
© 2015 GeoVision, Inc. All rights reserved. Under the copyright laws, this manual may not be copied, in whole or in part, without the written consent of GeoVision.
Every effort has been made to ensure that the information in this manual is accurate. GeoVision, Inc. makes no expressed or implied warranty of any kind and assumes no responsibility for errors or omissions. No liability is assumed for incidental or consequential damages arising from the use of the information or products contained herein. Features and specifications are subject to change without notice.
GeoVision, Inc. 9F, No. 246, Sec. 1, Neihu Rd., Neihu District, Taipei, Taiwan Tel: +886-2-8797-8377 Fax: +886-2-8797-8335 http://www.geovision.com.tw
Trademarks used in this manual: GeoVision, the GeoVision logo and GV series products are trademarks of GeoVision, Inc. Windows and Windows XP are registered trademarks of Microsoft Corporation.
May 2015

Contents
1. Introduction.........................................................................................................1
1.1 Minimum System Requirements ..............................................................................1
1.2 Supported GV-IP Devices and Software ..................................................................2
1.3 Options .....................................................................................................................2
Windows Version.......................................................................................................3
2. Getting Started ....................................................................................................4
2.1 Installing the GV-Edge Recording Manager .............................................................4
2.2 Adding Hosts ............................................................................................................5
2.3 Overview ..................................................................................................................8
2.3.1 Main Window ............................................................................................................ 8
2.3.2 Toolbar ...................................................................................................................... 9
3. Configuring the NAS.........................................................................................10
3.1 Recording to NAS...................................................................................................10
3.2 Changing the NAS Storage ....................................................................................13
3.3 Deleting the NAS Storage for Recording................................................................13
4. Enabling Host Monitoring ................................................................................14
5. Playback ............................................................................................................15
Mac Version .............................................................................................................18
6. Getting Started ..................................................................................................19
6.1 Installing the GV-Edge Recording Manager ...........................................................19
6.2 Adding Hosts ..........................................................................................................20
6.3 Overview ................................................................................................................23
6.3.1 Main Window .......................................................................................................... 23
6.3.2 Toolbar .................................................................................................................... 24
7. Configuring the NAS.........................................................................................25
8. Enabling Host Monitoring ................................................................................29
i
9. Playback ............................................................................................................31


1. Introduction
Welcome to the GV-Edge Recording Manager Quick Start Guide. In the following sections,
you will learn about the basic installations and configurations. For more details, see GV-Edge
Recording Manager User’s Manual.
1.1 Minimum System Requirements
Install GV-Edge Recording Manger to a computer that meets the minimum system
requirements.
Windows Version
OS Supported 32-bit
64-bit
Windows 7 / 8 / 8.1 / Server 2008 R2 /
Server 2012 R2
32 channels (Dual Streams) Core i3-4130, 3.4 GHz CPU
64 channels (Dual Streams) Core i5-4670, 3.4 GHz
32 channels (Dual Streams) 2 x 1 GB Memory
64 channels (Dual Streams) 2 x 2 GB
Graphic Card AGP or PCI-Express, 800 x 600 (1280 x
1024 recommended), 32-bit color
Software License (Windows Version)
Free License 32 channels
Maximum License 64 channels
Increment for Each License N/A
Optional Combinations N/A
Dongle Type Internal or external
Note: It is recommended that you use the internal GV-USB Dongle to have the Hardware
Watching function which restarts the PC when Windows crashes or freezes.
Mac Version
OS Supported OS X 10.9 or later
Mac PC 32 channels (Dual Streams) Mac mini (Core i5-3210M, 8 GB RAM)
1

2
1.2 Supported GV-IP Devices and Software
GV-IP Devices Supported Version
GV-IP Camera V3.00 or later
GV-SD220 GV-IP Speed Dome
GV-SD220-S V1.04 or later
GV-Target Camera V1.02 or later
GV-VS11 V1.03 or later
GV-VS12 V1.07 or later GV-Video Server
GV-VS14 V1.01 or later
GV-SNVR0400F V1.10 or later GV-NVR System
GV-SNVR1600 V1.10 or later
GV-Software Supported Version
GV-Recording Server V1.2.4.0 or later
GV-System (GV-DVR / NVR) V8.5.9.0 or later for Windows version
GV-VMS V14.10 or later
Note:
1. Recording to GV-NAS Systems is only supported by GV-IPCamera, and GV-Target
Camera of the specified versions.
2. Files recorded to GV-NAS Systems are stored in the MPEG4 format and those recorded
to memory cards are stored in the AVI format.
IMPORTANT: Currently, the Mac version of GV-Edge Recording Manager does not support
GV-System (GV-DVR / NVR). It will support GV-System (GV-DVR / NVR) in the near future.
1.3 Options
GV-NAS System GV-NAS System is a Linux-based, network attached storage device
designed to store GV-IP Camera and GV-Target Camera recordings.

Windows Version
3

2. Getting Started
2.1 Installing the GV-Edge Recording Manager
Follow the steps below to install GV-Edge Recording Manager from the GeoVision Website.
1. Go to the Software Download and Upgrading page of GeoVision Website:
http://www.geovision.com.tw/english/5_8_VMS.asp
2. Select Video Management Software tab, select GV-Edge Recording Manager from the
drop-down list and click the Download icon of GV-Edge Recording
Manager (Windows).
4

Getting Started
2
2.2 Adding Hosts
Note: To connect to GV-System / GV-VMS hosts, make sure Control Center Service and
Remote ViewLog Service functions are enabled to allow remote access of GV-Edge
Recording Manager.
1. Execute the GV-Edge Recording Manager program.
2. Upon first startup, GV-Edge Recording Manager automatically searches for the GV-IP
Devices and the servers installed with GeoVision software that are under the same LAN.
3. When the search is finished, you are prompted to select hosts. Click OK to proceed.
4. Select a desired host by checking the box . This dialog box appears.
5
5. Type the ID and password of the device and click OK.

6. Repeat steps 4 and 5 to select more hosts. The selected hosts are indicated with a green
plus sign.
7. Click the Add Selected Hosts button. When the hosts are added to the Host List, you are
prompted with a message.
6
8. Click OK and click Next Step. You are prompted to display the added hosts to live view.

Getting Started
2
9. To display all the hosts, click Yes. To display only a selection of the hosts, click No and
then drag and drop the cameras from the Host List to live view grid for immediate display.
7
Note:
1. For more ways of adding hosts, see 2.2 Adding Hosts in GV-Edge Recording Manager
User’s Manual.
2. If a router or firewall is installed, ensure the following communication ports required by the
Host Search function are open:
TCP/IP ports 5201 (for searching GV-System / GV-VMS) and 5202 (for searching
GV-IP Devices)
Multicast port 5200
3. If antivirus software is installed, the Host Search function may be interfered and will not
detect the available hosts. In this case, turn off the antivirus software and try again.
4. To add GV-System / GV-VMS hosts, make sure that Control Center Service and Remote
ViewLog Service are enabled ahead to allow remote access from GV-Edge Recording
Manager. (Network button > Control Center Server > Start Default Service)
[GV-System]
[GV-VMS]

2.3 Overview
2.3.1 Main Window
By default, there are three areas on the main window.
1 3
2
No. Name Description
1 Toolbar Contains buttons to quickly access system settings, functions
and main screen windows.
2 Host List Contains the hosts added to the GV-Edge Recording Manager.
3 Live View Window Displays live views from hosts.
8
For more details, see 1.2.2 The Toolbar, 1.2.3 The Host List and 4.1 The Live View Window
respectively in GV-Edge Recording Manager User’s Manual.

Getting Started
9
2
2.3.2 Toolbar
1 2 3 4 5 6
No. Name Description
1 Configure Contains system settings. For details, see Chapter 7 System
Configuration in GV-Edge Recording Manager User’s Manual.
2 Batch Update Wizard Contains the settings with which users can modify the IP
address, device name, enable/disable recording to NAS and
view storage information of multiple GV-IP Devices at the
same time. For details, see Chapter 3 Batch Management in
GV-Edge Recording Manager User’s Manual.
3 Search Host Searches the GV-IP Devices and the servers installed with
GeoVision software under the same LAN with the GV-Edge
Recording Manager. For details, see 2.2.1 Automatically
Adding Multiple Hosts in GV-Edge Recording Manager User’s
Manual.
4 Host List Opens and closes the Host List on the main window.
5 Remote Playback Opens and closes the Remote Playback window on the main
window. For details, see 5. Playback in the Quick Start Guide.
6 Live View Opens and closes the Live View Window. For details, see 4.1
The Live View Window in GV-Edge Recording Manager
User’s Manual.

3. Configuring the NAS
You can set GV-IP Cameras and GV-Target Cameras to record to NAS (Network-Attached
Storage) devices.
IMPORTANT:
1. For the NAS application, it is required to use GV-IP Cameras (firmware V3.0 or later) and
GV-Target Cameras (firmware V1.02 or later).
2. For performance and compatibility, it is highly recommended to use GV-NAS Systems for
recording.
3. Make sure the computer installed with GV-Edge Recording Manager is under the same
LAN with the NAS devices.
3.1 Recording to NAS
1. On the main screen, click the Batch Update Wizard button from the toolbar and
select NAS Setup. The cameras that support NAS devices appear in the NAS Setup
window.
10
2. Select the cameras for NAS management and click Start. The NAS Setup window
appears.

Configuring the NAS
3
3. Click the Search for network host button to detect the NAS installed under the LAN.
The detected network hosts are listed.
4. Select a NAS from the list and click the Search the host’s network storage button to
detect its shared folder(s).This dialog box appears.
5. Type the administrator username and password of the NAS device that allows for highest
level of access. The default username and password for a GV-NAS System are both
admin. The server’s folders are detected and shown.
11
6. Expand the sever to show its folders

7. Assign storage paths for GV-IP Cameras.
A
BB
C
A. Select at least one camera.
B. Select a NAS folder and click the Select this storage path for the device button
to assign this storage path. The storage path appears in the Storage Path column
immediately.
C. Type the ID and password of an established account of the NAS server. For example,
for a GV-NAS System, type the default username Cam01 and default password
12345678.
8. Click the Save button to store the settings.
Note:
1. Be sure that you assign each camera to record to a different user account in GV-NAS
System to avoid disrupting the recycling process. For details, see GV-NAS System User’s
Manual.
2. For GV-NAS2008 / 4008, the default user name is Cam01 up to Cam08 for each of the 8
user accounts; for GV-NAS2016 / 4016, the default user name is Cam01 up to Cam16 for
each of the 16 user accounts. The default passwords are all 12345678. For details, see
GV-NAS System Quick Start Guide and User’s Manual.
12

Configuring the NAS
13
3
3.2 Changing the NAS Storage
From the NAS Setup window (step 7 in 3.1 Recording to NAS), select a camera, select a new
NAS folder and click . The new storage path is immediately assigned. Alternatively type
the storage path, ID and password of a NAS folder. Click Save to apply the settings.
3.3 Deleting the NAS Storage for Recording
From the NAS Setup window (step 7 in 3.1 Recording to NAS), select a camera and click the
Delete the selected storage path button. The storage is deleted. Click the Save
button to store the settings.

4. Enabling Host Monitoring
You can remotely enable the monitoring function on host using GV-Edge Recording Manager.
Note: This function is only available for GV-IP Devices. For the supported firmware versions,
see 1.2 Supported GV-IP Devices and Software in the Quick Start Guide.
From the Live View Window, right-click a live view channel and select Monitor.
The monitoring and recording status is indicated on each channel:
Channel Color Monitoring & Recording Status
Not under monitoring
Under monitoring but not being recorded
Under monitoring and is being recorded
14
For more details on the Live View Window, see Chapter 4 Live View in GV-Edge Recording
Manager User’s Manual.

5. Playback
Follow the steps below to play back host event recordings on GV-Edge Recording Manager.
Note: For a GV-System / GV-VMS host, make sure Remote ViewLog Service (under Control
Center Service) is enabled ahead to allow GV-Edge Recording Manager to remotely access
the host for playback.
1. To play back at a pre-defined duration, follow the steps below. This feature is only
supported by GV-System, GV-VMS and GV-Recording Server hosts.
A. Right-click a camera from the Host List and select Live View. A Single Live View
Window appears.
15
B. From the Single Live View Window, click the Instant Play button and select 10
Sec, 30 Sec, 1 Min or 5 Min for GV-System / GV-VMS and 5 Min for GV-Recording
Server.

2. To play back by event, use one of the following methods.
Right-click the host from the Host List or live view and select Remote Playback (NAS)
to play the recordings saved on a NAS system or Remote Playback (SD Card) to
play the recordings saved on SD card.
Click the Remote Playback button on the main window and drag a camera from
the Host List to the Video Event List of the Remote Playback window.
16
Playback
17
5
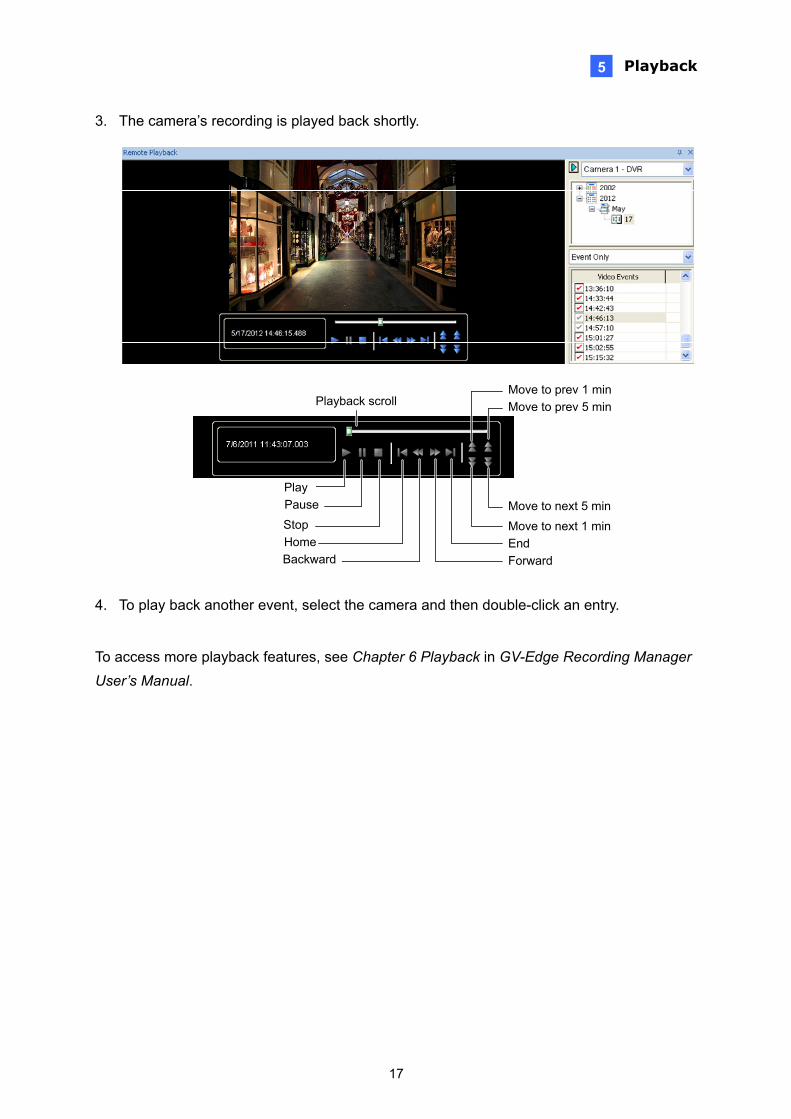
3. The camera’s recording is played back shortly.
Playback scroll
Play
Pause
Stop
Forward
Home
BackwardEnd
Move to prev 5 min
Move to next 1 min
Move to next 5 min
Move to prev 1 min
4. To play back another event, select the camera and then double-click an entry.
To access more playback features, see Chapter 6 Playback in GV-Edge Recording Manager
User’s Manual.

Mac Version
18

6. Getting Started
6.1 Installing the GV-Edge Recording Manager
Follow the steps below to install GV-Edge Recording Manager from the GeoVision Website.
1. Go to the Software Download and Upgrading page of GeoVision Website:
http://www.geovision.com.tw/english/5_8_VMS.asp
2. Select Video Management Software tab, select GV-Edge Recording Manager from the
drop-down list and click the Download icon of GV-Edge Recording
Manager (Mac).
3. Open the downloaded folder, drag and drop the Edge Recording Manager.dmg file to
your computer.
19

6.2 Adding Hosts
Note: To connect to GV-VMS hosts, make sure the Webcam Server function is enabled to
allow remote access of GV-Edge Recording Manager.
1. Execute the GV-Edge Recording Manager program.
2. Upon first startup, you are prompted to search GV-IP Devices and servers installed with
GeoVision software that are under the same LAN.
20
3. Click Start to search. The found devices and servers are listed.

Getting Started 6
4. To add multiple hosts:
A. Select hosts from the Add column or click Select All to add all the hosts. To add a
selection of hosts, click the device on the Add column.
B. Type the username and Password and click Apply All to log in the selected hosts
using this set of username and password. To use different sets of username and
password, type the Username and Password for each camera. Click Next.
C. The selected hosts are shown.
21

D. To remove unwanted hosts, click Back to return to the previous step to unselect them.
To add these hosts to Camera List, click Apply. They are immediately added.
5. You can display live view using any of the following method:
Double-click a host
Drag and drop a host to the live view
Select a host on the Camera List and click
Note:
1. For more ways of adding hosts, see 9.7 Adding Hosts in GV-Edge Recording Manager
User’s Manual.
2. If a router or firewall is installed, ensure the following communication ports required by the
Host Search function are open:
TCP/IP ports 5201 (for searching GV-VMS and 5202 (for searching GV-IP Devices)
Multicast port 5200
3. If antivirus software is installed, the Host Search function may be interfered and will not
detect the available hosts. In this case, turn off the antivirus software and try again.
4. To add GV-VMS hosts, make sure that Webcam Server with Mobile function is enabled
ahead to allow remote access from GV-Edge Recording Manager. (Network button >
WebCam Server > Mobile tab).
22

Getting Started 6
6.3 Overview
6.3.1 Main Window
By default, there are three areas on the main window.
1 2 3
No. Name Description
1 Camera List Contains the hosts added to the GV-Edge Recording Manager.
2 Live View Window Displays live views from hosts.
3 Toolbar Contains buttons to quickly access system settings, functions
and main screen windows. For details, see 6.3.2 Toolbar in the
Quick Start Guide.
23
For more details, see 8.2 The Camera List and 11.1 The Live View Window respectively in
GV-Edge Recording Manager User’s Manual.

24
6.3.2 Toolbar
1 2 3 4 5
No. Name Description
1 Controller Click to extend the Live View Window to full screen.
2 Event List Displays events with event type, device name and detection
time. For details, see 11.5 Event List in GV-Edge Recording
Manager User’s Manual.
3 Remote Playback Click to access the recording calendar which notes dates in
which recordings are done. For details, see 9. Playback in the
Quick Start Guide.
4 Setup Click to access the Camera List for host management. For
details, see 8.2 The Camera List in GV-Edge Recording
Manager User’s Manual.
5 Layout Click to switch the live view division. You can choose among 1,
4, 9, 16 and 36 channels.

7. Configuring the NAS
You can set GV-IP Cameras and GV-Target Cameras to record to NAS (Network-attached
Storage).
IMPORTANT:
1. For the NAS application, it is required to use GV-IP Cameras (firmware V3.0 or later) and
GV-Target Cameras (firmware V1.02 or later).
2. For system performance and compatibility, it is highly recommended to use GV-NAS
Systems for recording.
3. Make sure the computer installed with GV-Edge Recording Manager is under the same
LAN with the NAS.
4. By default, all the username and password in the NAS application are admin. To use a
different set of username and password, type in the Username and Password fields.
1. On the top of main screen, click Tools and then click Utilities. The Utilities window
appears.
25
2. Click to show the Storage Setup page.

3. Type the username and password of the cameras you wish to search and click to
browse. In this example, we search for cameras with the username and password admin.
This dialog box appears.
26
4. Select a camera and click to browse for NAS servers under the same LAN.

Configuring the NAS 7
5. To assign the storage path, follow the steps below.
BC
A
B
A. Select a camera from the top list.
B. Select a NAS server from the bottom list and type the administrator username and
password of the NAS server. For GV-NAS Systems, the default username and
password are both admin.
C. Optionally click on the folder name to change the storage folder.
27
6. Click to assign this path to the camera. The storage path appears immediately in
the SMB Path column.

28
7. Type the username and password of an established account in the NAS server. For
example, the default username and password for a GV-NAS System is Cam01 and
1234578.
Cam01
8. To assign a different recording path for another GV-IP Camera, follow steps 6 and 7.
9. Click Apply to save the settings.

8. Enabling Host Monitoring
You can remotely enable the monitoring function on host using GV-Edge Recording Manager.
Note: This function is only available for GV-IP Devices. For details, see 1.2 Supported GV-IP
Devices and Software in the Quick Start Guide.
Enable Monitoring for a Single Channel
Right-click a live view from the Live View Window, and then select Monitoring. Select the
same option again to disable.
The monitoring and recording status is indicated by the color of device name on the Live View
Window:
Channel Color Monitoring & Recording Status
Not under monitoring
Under monitoring but not being recorded
Under monitoring and is being recorded
29

30
Enable Monitoring for All Channels
From the top of the main screen, select Tools and then select Start All Monitoring. To
disable monitoring, select Tools again and then select Stop All Monitoring.
For details on the Live View Window, see Chapter 11 Live View in GV-Edge Recording
Manager User’s Manual.

9. Playback
You can remotely play back host recordings on GV-Edge Recording Manager. Follow the
steps below to playback:
Note: For a GV-VMS host, make sure Remote Viewlog Service (under Control Center
Service) is enabled ahead to allow GV-Edge Recording Manager to remotely access the host
for playback.
1. Click the Playback button on the main window. The Playback page appears.
2. Select a device from the left. A calendar appears below.
3. Click to select a date for playback. Recordings of the selected date are listed (if any).
On AVI Player: The current date is highlighted yellow and the selected date blue.
On MPEG4 Player: The current date is highlighted blue, the selected date blue and
dates with recordings are circled red.
31
4. Click an entry and click . The recording is immediately played back.
[AVI Player] Click an entry to play back.
12
4
3

Enabling Host Monitoring
32
9
[MPEG4 Player]
Files saved on GV-NAS Systems are played back by the MPEG4 player.
1
2
3
4
The MPEG4 player contains a control panel and a timeline.
Play/PauseStop Backward
HomeForward
EndVolume
Playback scroll Playback speed
Time line
This file is being played back
Each recording entry is represented by a blue block. Click to play back.
Use the mouse scroll to change the displayed hours of the timeline.
Hold and drag the hour numeral to move to different parts of the timeline.


