

Getting started with Managana
creating for web and mobile devices
Written and compiled by Lucas Junqueira and Marilia Bergamo
4th Edition: August 2013 (Managana 1.6.0)
With information from
http://www.managana.org
http://www.ciclope.art.br/ciclopeen
Including material written by
Álvaro Andrade Garcia
This work is licensed under the Creative Commons
Attibution-Noncommercial-Share Alike 3.0 License
To view a copy of this license, visit:
http://creativecommons.org/licenses/by-nc-sa/3.0/
Or send a letter to:
Creative Commons
171 Second Street, Suite 300
San Francisco, California, 94105, USA

CONTENTS
1 INTRODUCTION.................................................................................41.1 About Managana......................................................................................41.2 Why use Managana..................................................................................41.3 Environment...........................................................................................5
2 INSTALLATION...................................................................................82.1 Installing Managana.................................................................................82.2 Creating a database for Managana.............................................................92.3 Managana configuration..........................................................................102.4 Installing Managana on your local web server............................................132.5 The Managana launcher..........................................................................13
3 MANAGANA INTERFACE...................................................................153.1 Web viewer...........................................................................................153.2 App viewer............................................................................................183.3 Editor...................................................................................................18
4 STARTING YOUR FIRST MANAGANA COMMUNITY............................224.1 Configuring the community general information.........................................224.2 Who has whom?....................................................................................234.3 Upload image files..................................................................................244.4 Creating the portrait home stream............................................................254.5 Adding a banner to portrait home stream..................................................264.6 Adding texts to portrait home stream content............................................344.7 Organizing your playlists and publishing your stream..................................38
5 AUXILIARY STREAMS.......................................................................405.1 Portfolio stream.....................................................................................405.2 Interview stream....................................................................................42
6 SETTING COMMUNITY NAVIGATION................................................476.1 Home navigation....................................................................................476.2 Portfolio navigation................................................................................486.3 Interview Navigation..............................................................................50
7 CREATING LANDSCAPE HOME STREAM............................................52
8 CREATING AUXILIARY LANSDCAPE STREAMS..................................578.1 Setting interview to landscape.................................................................578.2 Setting portfolio to landscape..................................................................588.3 Setting aspect ratio................................................................................59
9 CONFIGURING YOUR VIEWER..........................................................61
10 GENERATING AN APPLICATION.....................................................6410.1 The Managana App Wizard.....................................................................6410.2 Creating an application..........................................................................66
APPENDIX I........................................................................................72

1 INTRODUCTION
1.1 About Managana
Managana is a free cross-platform software for digital publication based on
imagination as interface. Created by the Ciclope Atelier, it allows the creation
and maintenance of communities that share interactive content on the web,
tablets, smartphones and exhibits. Each community has interactive streams
composed of clusters of audiovisual, graphics, text and external feeds.
Managana mixes and sequences playlists that can be created, displayed, and
animated at the software itself.
Managana is made for the era of cloud computing, mobile devices and the
panopticon: the Internet 3. The software, 100% free, published under the
LGPL license version 3 of the Free Software Foundation, mixes and sequences
media streams and their interaction with the main digital world platforms. It
evolved from the software called Imagination Site, made by Ciclope Atelier,
developed since 2002, having gone through five versions. The 6.0 software
version was entirely re-written using free tools and baptized as Managana.
With roots in Sanskrit, the name Managana, composed of mana and gana, and
present in the anthem of India, means “peoples minds”. The first verse of the
anthem “Jana Gana Mana adhināyaka” is officially translated into English as:
“Thou art the ruler of the minds of all people”.
You can check a small presentation video about Managana features at the
software site: http://www.managana.org/versions/
1.2 Why use Managana
Managana will help you to develop any kind of audiovisual content for cross-
platform environments without any knowledge on programming. In spite of
this, Managana is not only for non-programmers. If you know a little of
programming you also can make use of the scripts available for the software or
implement your own. A note for hard programmers: Managana is also an open-

source software that you can modify under the LGPL version 3 to develop tools
for your own customers.
Contents generated by Managana run on projections, televisions, computer
monitors, notebooks, tablets and smartphones, in various conditions and
operating systems like Windows, Linux, MacOS, Android and iOS.
It works with immediate update online via a graphical editor and through the
integration of Twitter, Facebook, WordPress and RSS feeds. Managana not only
imports content from places as also shares information on G+, Facebook and
Twitter. Interactions with mouse, touchscreen, remote controls using tablets
and smartphones, joysticks, Microsoft Kinect and various sensors are in its
design.
Managana allows editing online via web. The content editing module allows
dynamic editing, in draft, pending, and published. Access and modification
management through administrators, editors, authors and communities is also
implemented. Easy to translate, made in an open format and file structure, it
allows third parties to include new features.
1.3 Environment
Managana is not a stand-alone software to install on your desktop computer, it
depends on a web server, which is a computer application which helps to
deliver content that can be accessed through the Internet. A web server
application can be both set on your personal computer (called a local web
server) or made available to you by a web provider. We will see more about it
at the chapter about installation.
Now you need to know how Managana works. It features two basic major
environments: the editor and the viewer. Respectively, the editor is where you
will create the content, while the viewer is where your users will interact with
it. While the editor needs to be executed from a web server, the viewer can
also be used as stand-alone applications for desktop and mobile devices.

Managana editor will interact with a web server application to generate DIS
folders (Digital Imagination Sets) which represents a community. A community
is then a group of files such as xml, jpeg, mp4, mp3 and so on that is
understood by Managana very much like “projects” at other creation softwares.
As said before, you don't need to understand those file formats, the only thing
you need to know is that, as a group, they form a Managana community, which
can be edited and viewed by Managana.
A Managana community is intended to be open by Managana viewer. Also, the
DIS format is open so developers may also provide alternative software
implementations to load it.
A Managana community can also be transformed into mobile applications. In
order to do só, Ciclope developed the stand-alone software Managana App

Creator. You can add a DIS folder (a Managana community) to the software to
generate the app. There are two ways to navigate communities as applications.
The first option is to create a stand alone app, with only one community
transformed into an application. The second is to create the app as a viewer for
your communities hosted on a web server.
The generated apps can be submitted to Apple AppStore, Google Play and
many other app stores.

2 INSTALLATION
This chapter will show you the process for installing Managana and setting it
up. Managana is available in easily-downloadable format from its website at
http://www.managana.org/downloads. This Getting Started document was
written using version 1.5.0. Please check on Managana website for later
versions.
There are two ways to install Managana: using a web server provider
(Internet) or creating a local web server on your personal computer (check
section 2.4 for details about it). We also provide an easy-to use windows-only
“launcher” package with everything set and ready to run, even from flash
drives.
Besides the server requirements, you'll need the Adobe Flash Player
(https://www.adobe.com/go/EN_US-H-GET-FLASH) installed at your system
for the editor. Managana require at least the version 11.1 of the player. For
Linux users, the best choice is to use the Chormium web browser.
P.S. If you need to run the viewer on older Flash player versions,
like the ones found on some SmartTVs, Managana 1.4.0 can be a
choice since it runs on Flash player version 10.1.
The Managana web player runs using a dual approach: it first looks for the
Adobe Flash Player (version 11.1 or higher) and uses it if found. On systems
that do not support the Flash Player, like mobile devices, Managana tries to use
the HTML5 canvas for rendering. Some Managana features are not available for
the HTML5 version. Check the “Getting started with Managana: creating for
HTML5” document for more information.
2.1 Installing Managana
To install Managana on a web server you need to have an account on some
third part provider (for Internet services) or install a local web server. Many
third web providers differ from country to country. Therefore the most
important thing is that it should allow you to create web applications with PHP
and a MySQL database.
P.S. If you are using a Windows computer you may want to check
out the Managana “launcher” package since it doesn't require any
installation. Go to section 2.5 to learn about it.
First you will need to upload files to your web server provider or copy them to
your local host. Download Managana-#-#-#.zip file and decompress its
content. Then upload the “managana” folder (or its content) to the www or
htdocs folder of your web server provider.
P.S. To install Managana you need to have previous knowledge
about how to create an empty database using phpmyadmin or
any other tool made available to you by your provider.
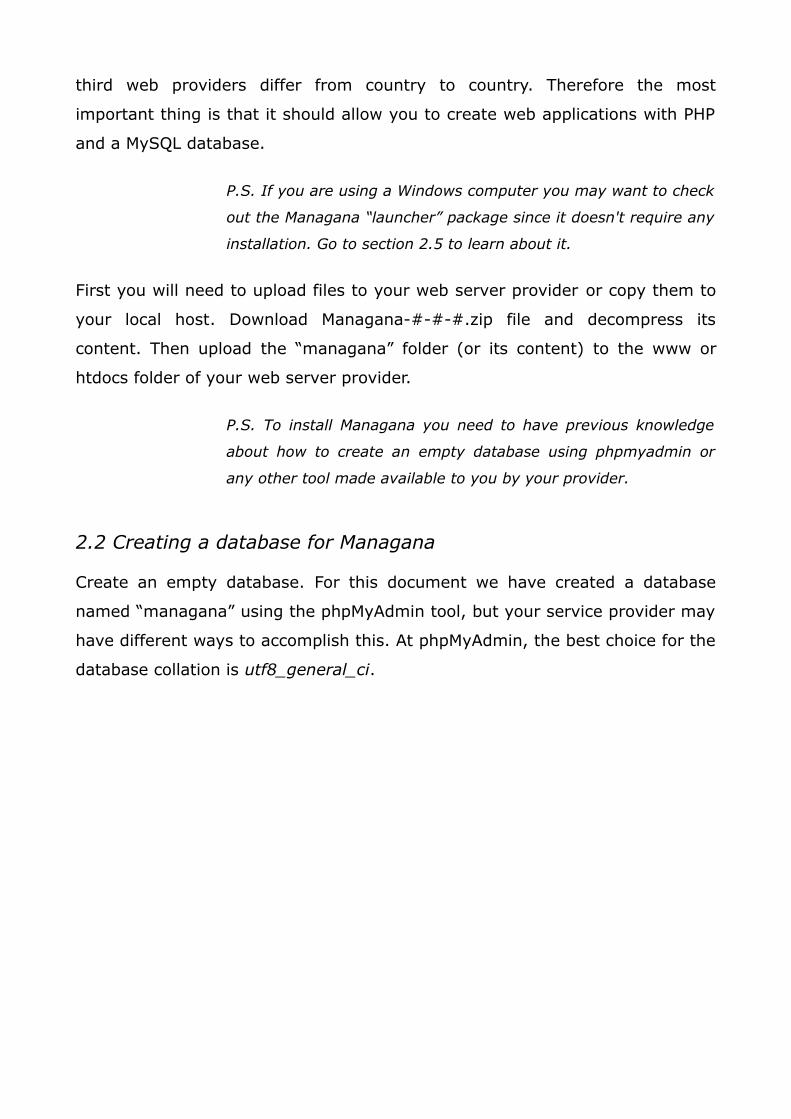
2.2 Creating a database for Managana
Create an empty database. For this document we have created a database
named “managana” using the phpMyAdmin tool, but your service provider may
have different ways to accomplish this. At phpMyAdmin, the best choice for the
database collation is utf8_general_ci.
P.S. Managana is best installed on a dedicated database, but you
may also install it on a shared one. If you do so, make sure no
other tables on the database have names starting with “dis”.
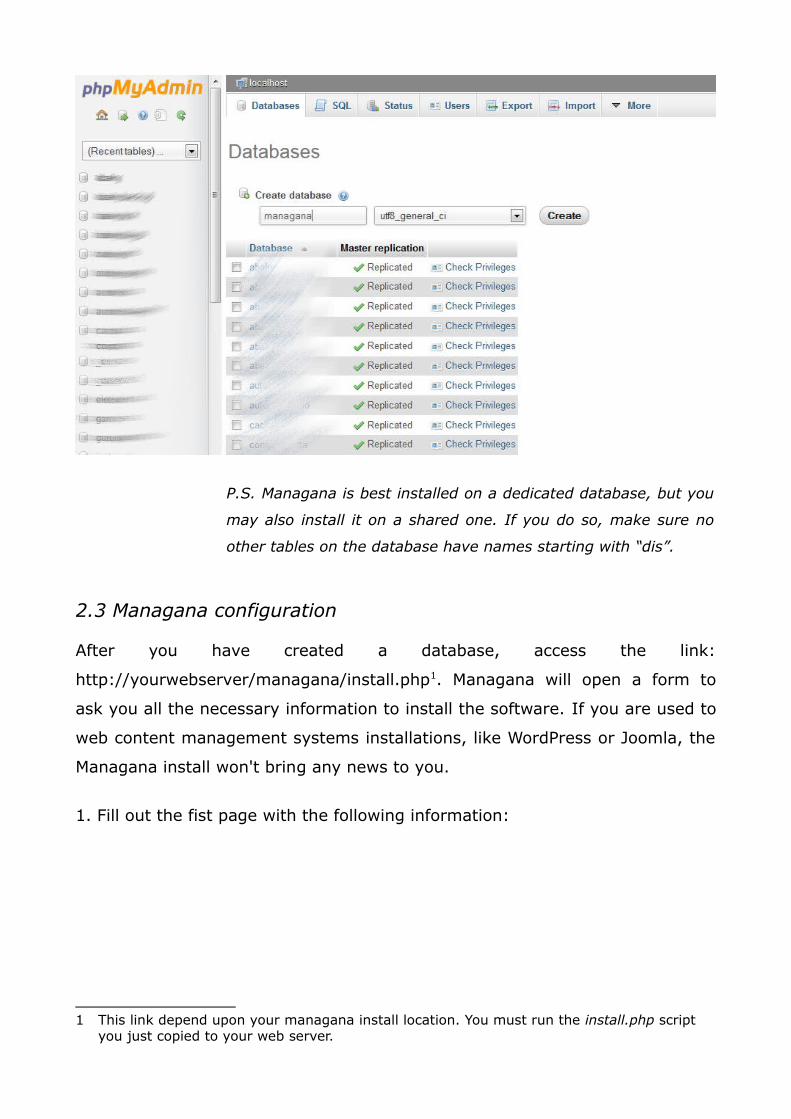
2.3 Managana configuration
After you have created a database, access the link:
http://yourwebserver/managana/install.php1. Managana will open a form to
ask you all the necessary information to install the software. If you are used to
web content management systems installations, like WordPress or Joomla, the
Managana install won't bring any news to you.
1. Fill out the fist page with the following information:
1 This link depend upon your managana install location. You must run the install.php script you just copied to your web server.
P.S. Your web server provider will provide you the information
about the database server address, user and password. Use the
name of the database you just created.
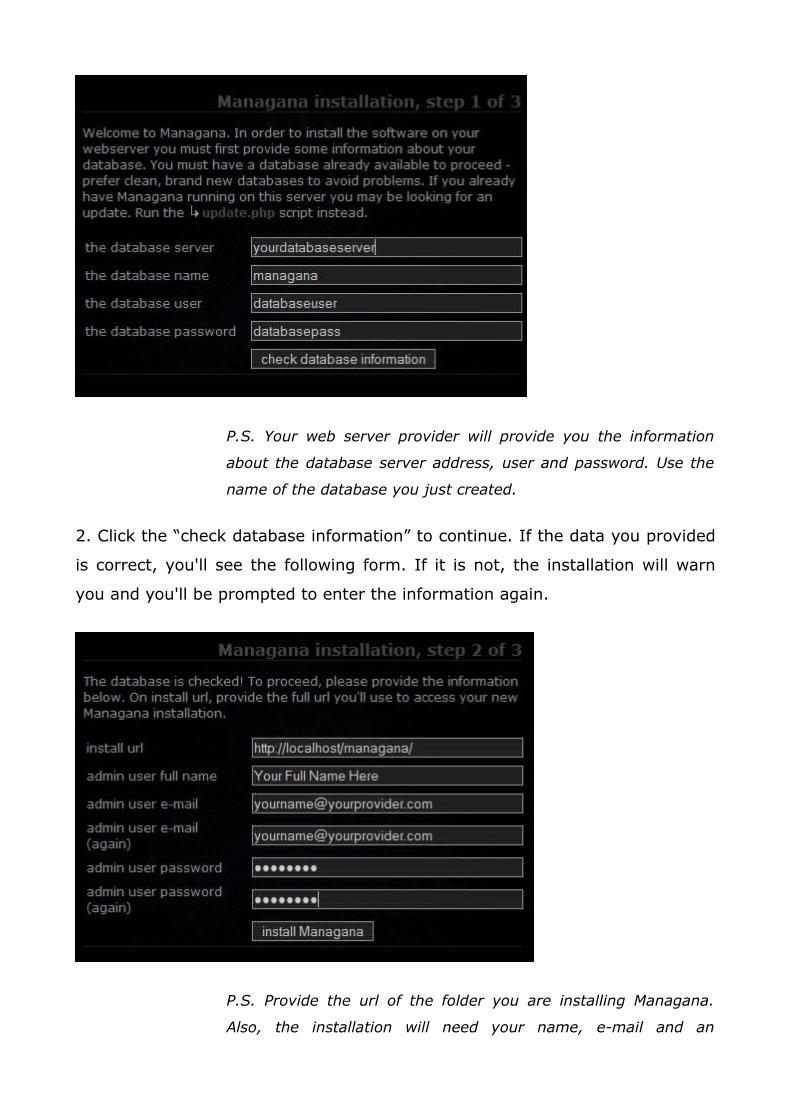
2. Click the “check database information” to continue. If the data you provided
is correct, you'll see the following form. If it is not, the installation will warn
you and you'll be prompted to enter the information again.
P.S. Provide the url of the folder you are installing Managana.
Also, the installation will need your name, e-mail and an

administrator password.
3. Click the “install Managana” button and you'll be presented all the
information you provided for review.
4. If everything is ok, click the “complete Managana installation” button to
finish the process and see the confirmation screen:
Take note of the editor and the reader URLs. You'll use them to create and
access your content.

2.4 Installing Managana on your local web server
Before installing Managana, please check the minimum requirements. You
must have a local web server that allows you to create web applications with
PHP and a MySQL database. Apache is the server of choice for most people,
but its installation and configuration may confuse initial users. On such cases,
we can suggest a list of easy-to-setup, all-inone softwares that will create a
compatible environment with Apache, PHP and MySQL:
OS recommended all-in-one packages
Linux XAMP - http://www.apachefriends.org/en/xampp.html
Windows WAMP - http://www.wampserver.com/en/XAMP - http://www.apachefriends.org/en/xampp.html
MacOS MAMP - http://www.mamp.info/en/index.htmlXAMP - http://www.apachefriends.org/en/xampp.html
Once you have installed the package at your computer, you will have a valid
local web server. Usually you access it using http://localhost/ - check your
package help information for further details. Also, the common setups set the
database server at localhost using root as the user and no password.
Remember that some of these local web servers do not automatically start
when you login into your system.
In order to install Managana at a local web server, look for the www or htdocs
folder of your package. Copy the managana folder into it as you would do for
an Internet web service (uploading).
2.5 The Managana launcher
If you are using a Windows system computer, you may find easier to use our
“launcher” package since no installation or server setup is required. Download
it from the www.managana.org site and unpack it to your computer – you can
use it even from a flash drive. Once copied, look for the “Managana.exe” file
and run it. After a quick automatic setup you'll see the following window:
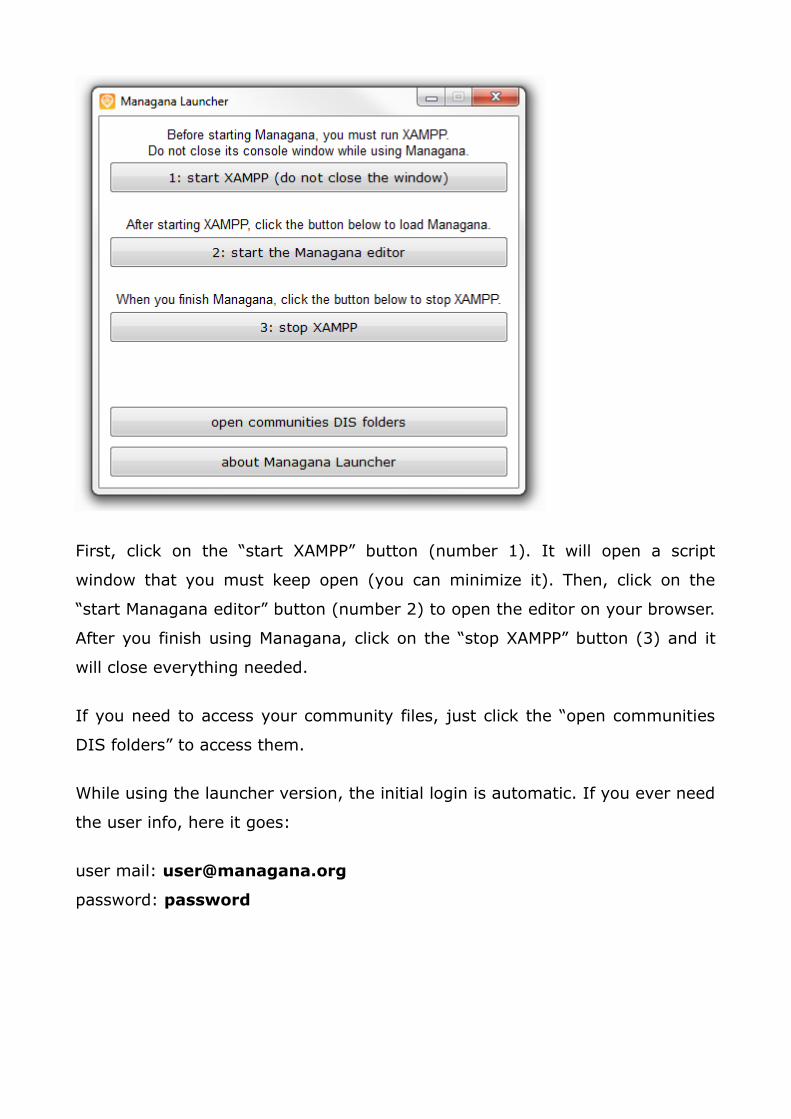
First, click on the “start XAMPP” button (number 1). It will open a script
window that you must keep open (you can minimize it). Then, click on the
“start Managana editor” button (number 2) to open the editor on your browser.
After you finish using Managana, click on the “stop XAMPP” button (3) and it
will close everything needed.
If you need to access your community files, just click the “open communities
DIS folders” to access them.
While using the launcher version, the initial login is automatic. If you ever need
the user info, here it goes:
user mail: [email protected]
password: password

3 MANAGANA INTERFACE
3.1 Web viewer
The web viewer interface (at the reader access url), is where you readers will
see your content. It has a menu bar with two icons: the Managana symbol on
the right and a timer on the left.
The right timer shows the current stream time and, if set, the total stream
time as well. This timer also acts as a play/pause button.
The left button shows the Managana logo by default and is used to show some
other playback options.
P.S. At the viewer configuration window (found on Managana
editor) you can select your own, custom icon to replace the
default one – prefer a 120×120 pixels transparent PNG file. You
can also set the viewer background color.
Click the Managana logo to access the player menu.

The upper bar buttons are, in order:
1. home: return to the current community home stream
2. full screen: show Managana in full screen (keyboard interactions are not
possible while on full screen mode)
3. sound: mute/unmute Managana
4. plus: show advanced viewer options
When the plus button is clicked, you'll see the advanced options menu:

At the advanced options menu you'll find:
share current stream on Facebook (if allowed by content creator)
share current stream on Twitter (if allowed by content creator)
share current stream on Google+ (if allowed by content creator)
search content (if allowed by content creator)
show/hide clock button
show/hide zoom buttons
show/hide notes and bookmarks button
show/hide voting options on streams
show/hide comments button
show/hide ratings button
show/hide logged user name close to logo button
allow/disallow remote control interactions
The advanced options window also displays a login button. Your users will be
able to rate or comment your content as long as they are logged in. They can
only log in if you create users for them with the editor interface, or by OpenID.
P.S. OpenID won't work on local web server and “launcher”
installations.
P.S.2 The HTML5 player version does not provide all these
functionalities/buttons.
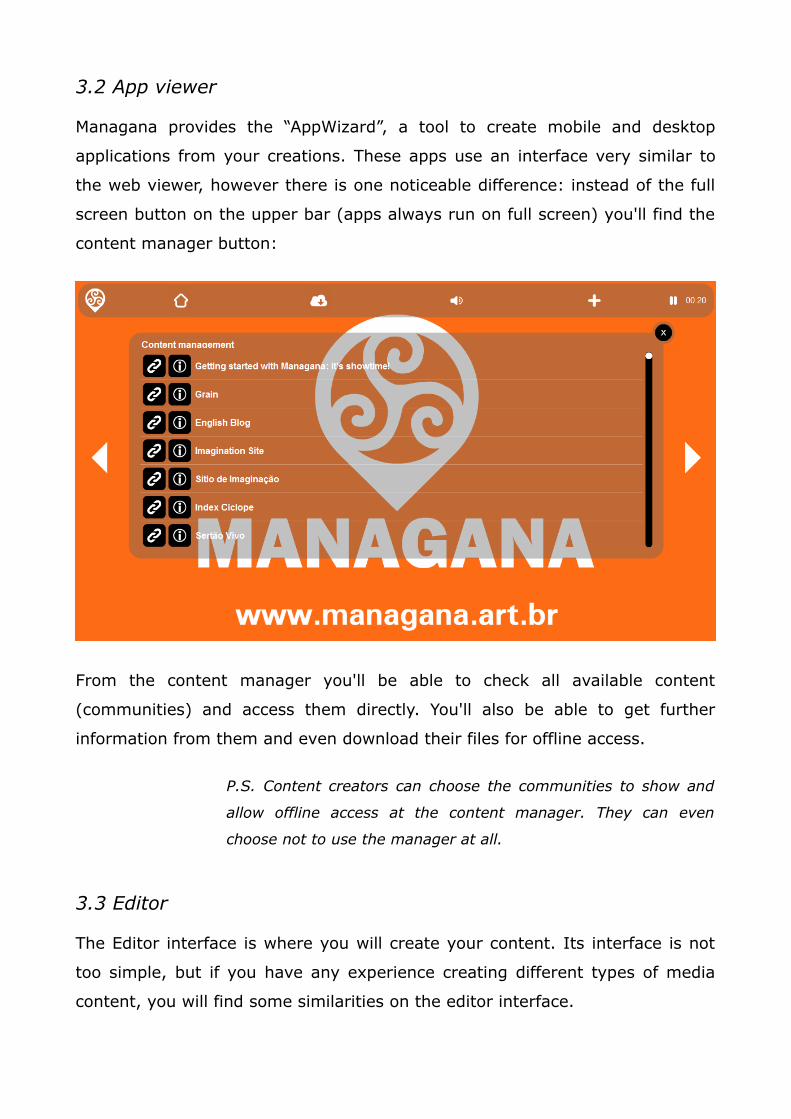
3.2 App viewer
Managana provides the “AppWizard”, a tool to create mobile and desktop
applications from your creations. These apps use an interface very similar to
the web viewer, however there is one noticeable difference: instead of the full
screen button on the upper bar (apps always run on full screen) you'll find the
content manager button:
From the content manager you'll be able to check all available content
(communities) and access them directly. You'll also be able to get further
information from them and even download their files for offline access.
P.S. Content creators can choose the communities to show and
allow offline access at the content manager. They can even
choose not to use the manager at all.
3.3 Editor
The Editor interface is where you will create your content. Its interface is not
too simple, but if you have any experience creating different types of media
content, you will find some similarities on the editor interface.

At the moment you start Managana editor, a loading page will be displayed for
you. It can be either very fast or very slow depending on your web server
provider.
When editor is loaded, you will have access to the editor interface, start
logging in to be able to create communities or edit a pre-existing one.
1. Put your email and password to access the interface (the very same ones
you registered on installation).

2. Click “login” to access the interface.
3. The interface is ready to be accessed.
P.S. If you have been responsible for installing Managana, your
user is probably a “super” user. It means that your are able to
create other users with different levels of access to edit
information. You may now have realized one of the most powerful
things about Managana: it creates digital content for many
traditional web environments and mobile operational systems,
but it is not only you who can do it. An entire community of
people also can and that´s why the projects of Managana are
called “communities”.
P.S.2 If you are using the “launcher” version of Managana, this
initial login is automatic. If you ever need the initial user
information, here it is – email: [email protected]; password:
password.
4 STARTING YOUR FIRST MANAGANA COMMUNITY
In this chapter we will learn how to create a Managana community, but first
download the files you will need to complete this task at
http://www.managana.org/files/gettingStartedFiles.zip. Once you have
downloaded the file, unzip it whenever you want on your desktop computer.
As a tutorial we will create a community to run on mobile devices. This little
community is based on some online content found over the Internet about
fashion illustration.
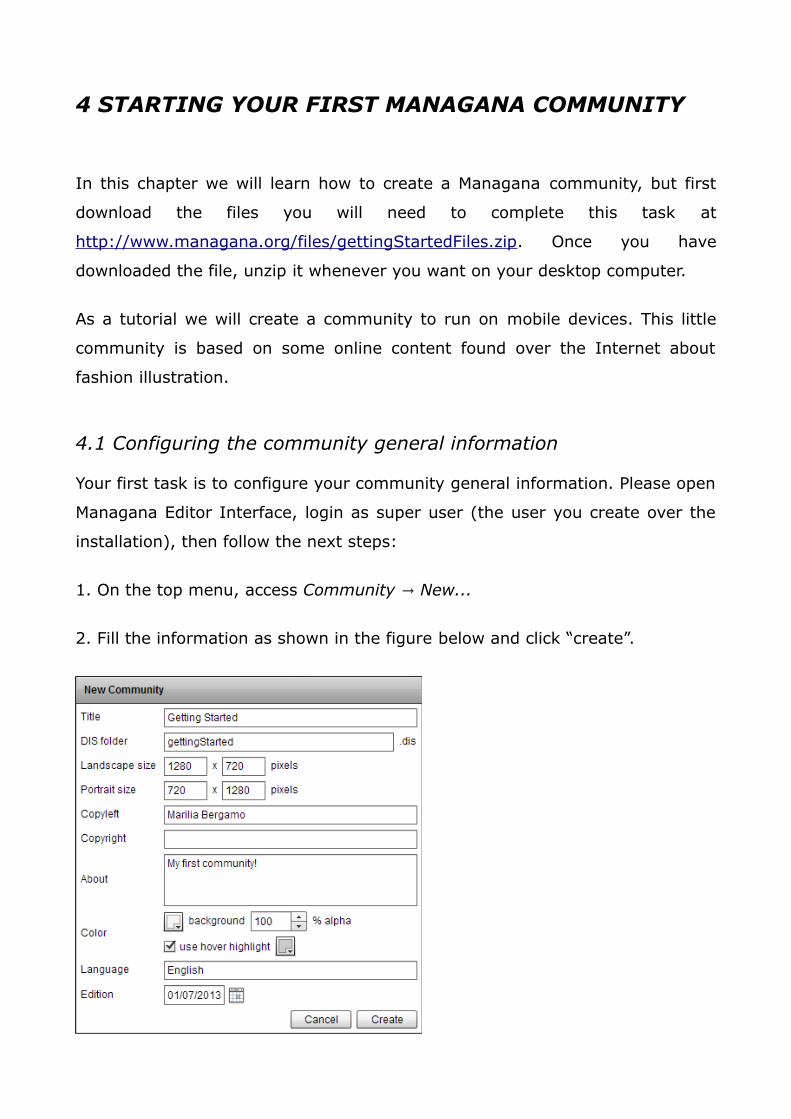
4.1 Configuring the community general information
Your first task is to configure your community general information. Please open
Managana Editor Interface, login as super user (the user you create over the
installation), then follow the next steps:
1. On the top menu, access Community → New...
2. Fill the information as shown in the figure below and click “create”.

P.S. A note about the resolution: because Managana was created
to adapt the content to various resolutions, its default size is
1280×720 pixels, but if your project requires other sizes you can
change it as you wish. Just remember that small resolutions may
look very strange on big screens. The final result usually looks
better across different devices if it follows the 16×9 proportion.
P.S.2 At Managana you can set two different resolutions, one for
landscape and one for portrait modes. While accessing your
content on web browsers, users will always see the landscape
version of your creations. While on mobile devices, you can set
different content for each proportion, as we'll see further at this
document. If you want to create just a single version of your
content, even for tablets and cell phones, leave both portrait and
landscape resolutions the same at the community properties
window.
4.2 Who has whom?
Before you continue creating your first community you should try to
understand Managana organization logic. Those are simple definitions:
1. A community is the general content you will create.
2. A stream is like an animated page you put your content on.
3. A playlist is a group of files (elements of media like images, videos, audio
and texts) that you organize according to your wish. The most common
analogy to it is actually a separated library of files.
4. An instance is an element of a playlist inside a stream.
5. So, to sum it all up:
• communities have playlists → playlists have elements of media (like
images, videos, audio and texts);

• communities have streams → streams have instances.
4.3 Upload image files
You can upload images to Managana communities any time you want during
the creative processes, but here we will do it all at once.
1. Access the Community → File manager... menu.
P.S. The file manager is a new feature of the Managana 1.5.0
version. Until version 1.4.0 you had to upload one image at a
time.
2. The File Manager window will show up. It shows all media files available to
you (personal files) and to everyone in the community (community files).
P.S. Based on information from your web server (local or over the
Internet), Managana determines the maximum file size you are
allowed to upload. To change this limit you will need to contact
your web server service provider or check your local server
configuration.

3. Select “community files”, and then “pictures”.
4. Find where you unzip the images downloaded from
http://www.managana.org/files/gettingStartedFiles.zip and upload all files. The
file manager allows you to upload all of them at once.
5. Close the window after the upload is completed.
4.4 Creating the portrait home stream
We are creating a content to be seen on mobile devices, so it probably will
need different layouts for landscape and portrait.
1. Change the Managana editor aspect mode:
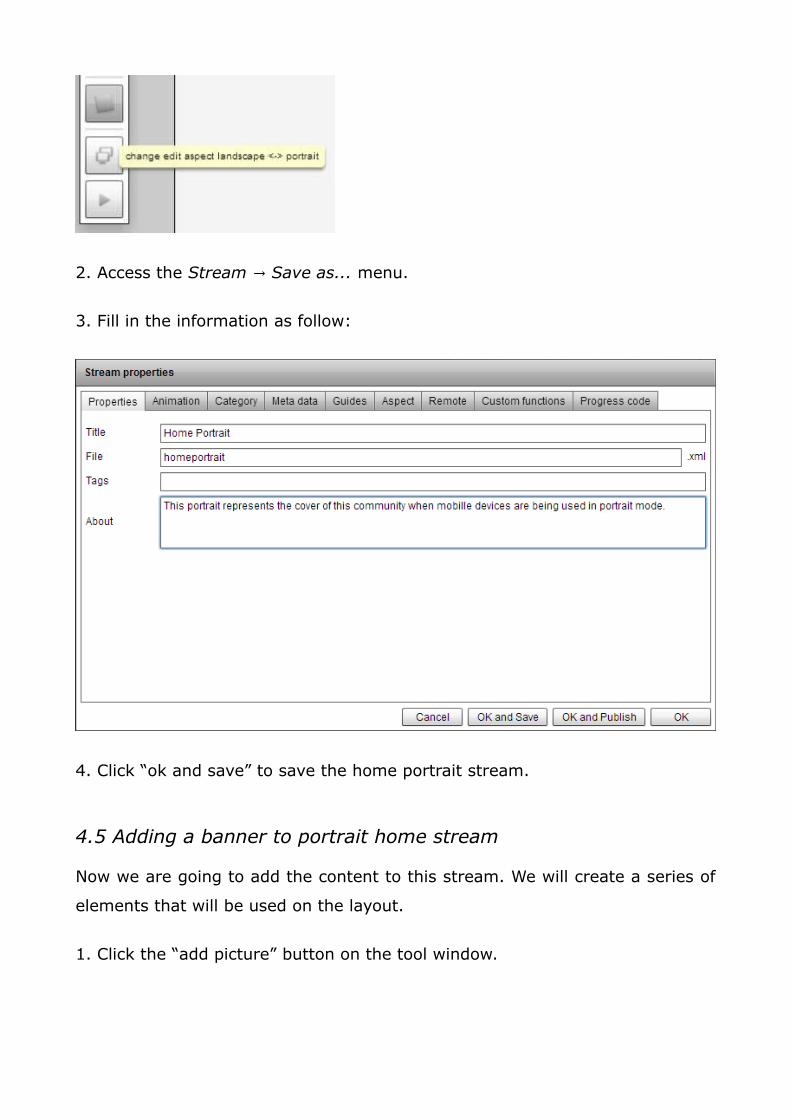
2. Access the Stream → Save as... menu.
3. Fill in the information as follow:
4. Click “ok and save” to save the home portrait stream.
4.5 Adding a banner to portrait home stream
Now we are going to add the content to this stream. We will create a series of
elements that will be used on the layout.
1. Click the “add picture” button on the tool window.

2. Select the image “home01.png”, fill in the element name as “home1” and
click the “add” button.
P.S. You can provide the element name as in step 2 for
organization purposes. If you do not want to do that, Managana
picks a name based on the file name.
3. All elements on Managana will be placed on the size of 160x90 pixels on the
top of the stream area.
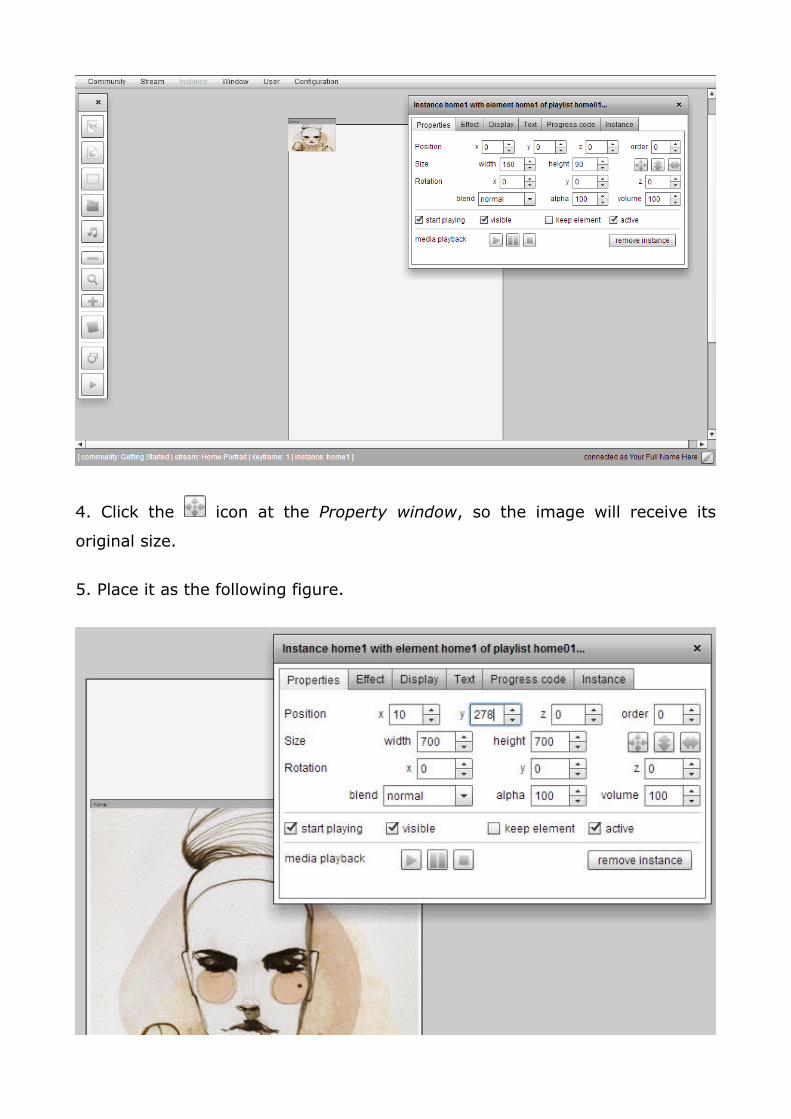
4. Click the icon at the Property window, so the image will receive its
original size.
5. Place it as the following figure.

P.S. Note on the property window that the order of this element
is “0”. Managana use this value to organize the layers of
elements.
Before we continue on this tutorial, we will put all the images used on home on
the same playlist. So let´s start defining this playlist.
6. Access the Window → Community playlists menu.
A dialogue window will be shown. It will present information about playlists
within this community, but the first tab will only present the playlists of this
specific stream.

7. Click on the playlist that starts with the name home01.png... and change its
name to “homeBanner” then click the button “update”.
Now we are going to add more images to this playlist, and create an animated
banner for our home.
8. Click on “add picture” button inside of the playlist window.
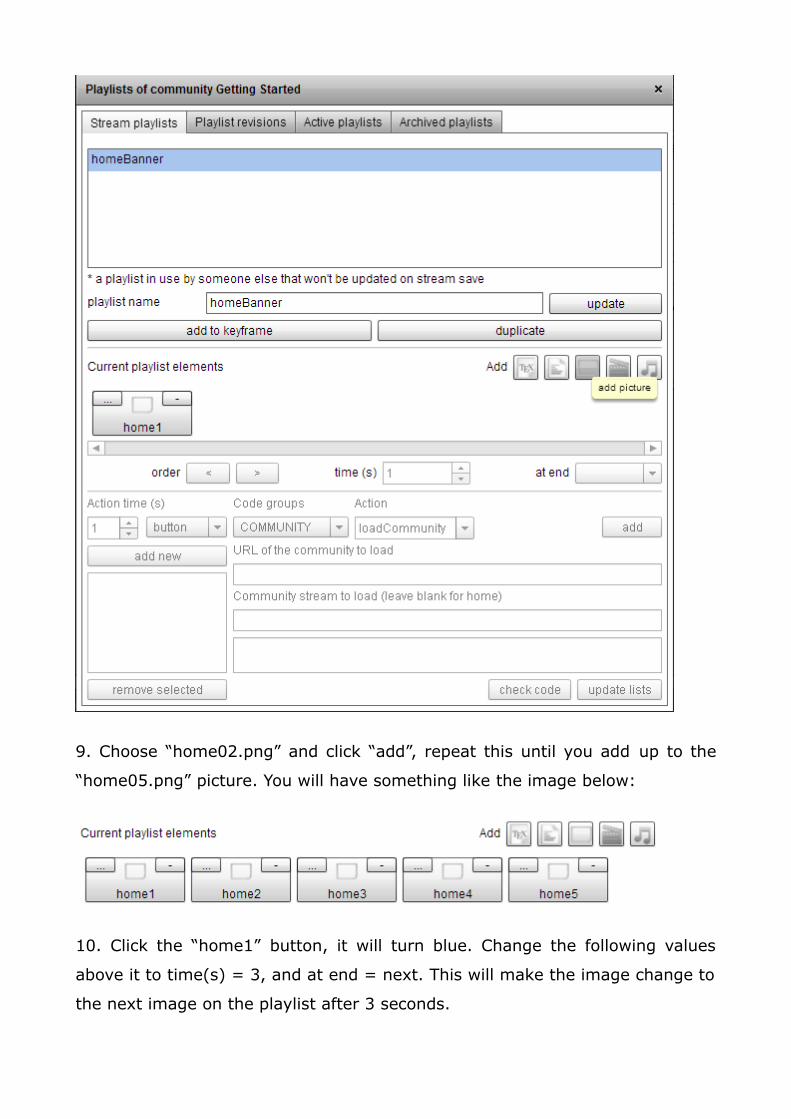
9. Choose “home02.png” and click “add”, repeat this until you add up to the
“home05.png” picture. You will have something like the image below:
10. Click the “home1” button, it will turn blue. Change the following values
above it to time(s) = 3, and at end = next. This will make the image change to
the next image on the playlist after 3 seconds.

11. Repeat the last action to all home images at the playlist including the last
one. Choosing “next” as an action to the last element on the playlist will make
it go back to the first one.
12. Close the playlists window.
13. Click the “view stream on internal player” button on the tool bar
14. Click the “portrait” button to see your banner working.

P.S. This preview window was created to be mainly used as a
constant validation area. The tool bar also has another preview
button, the “view published stream on web player” - it will open
another browser tab and show you the most recent published
version or your stream (more about published streams further at
this document).
We will now put a decorative image over the banner. This image is previously
transparent, and will be placed over the banner.
15. Click the “add picture” button on the tool bar.
16. Now select “decorative.png”, give it a name, and let it be an image on a
new playlist.
17. When the image is placed on the stream, set it to original size, clicking the
icon at the properties window, as done before.
18. At the properties window, change the alpha value to 40.
19. Click the preview button again to check your work.
20. Now, save your stream. Access the Stream → Save menu.
P.S. It is very important to always save your work on Managana,
as it is a web software, and will, therefore, be constantly
dependent on Internet connection.
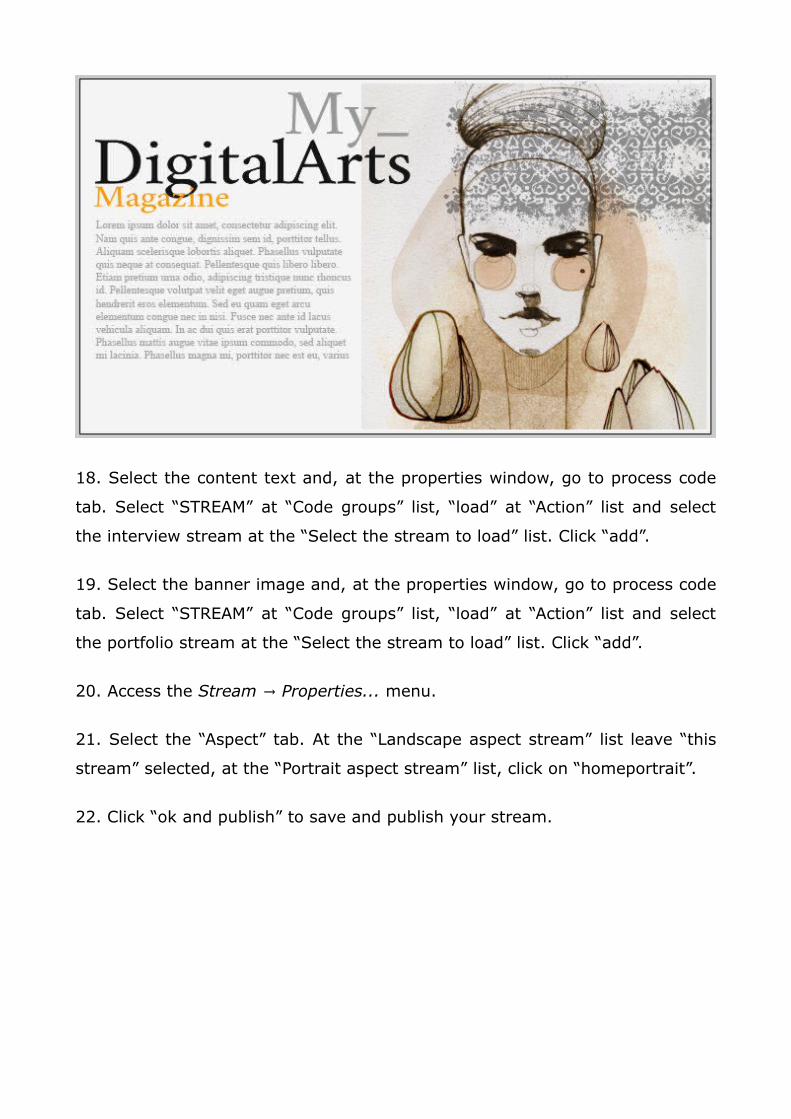
4.6 Adding texts to portrait home stream content
Now we will add text to our home stream.
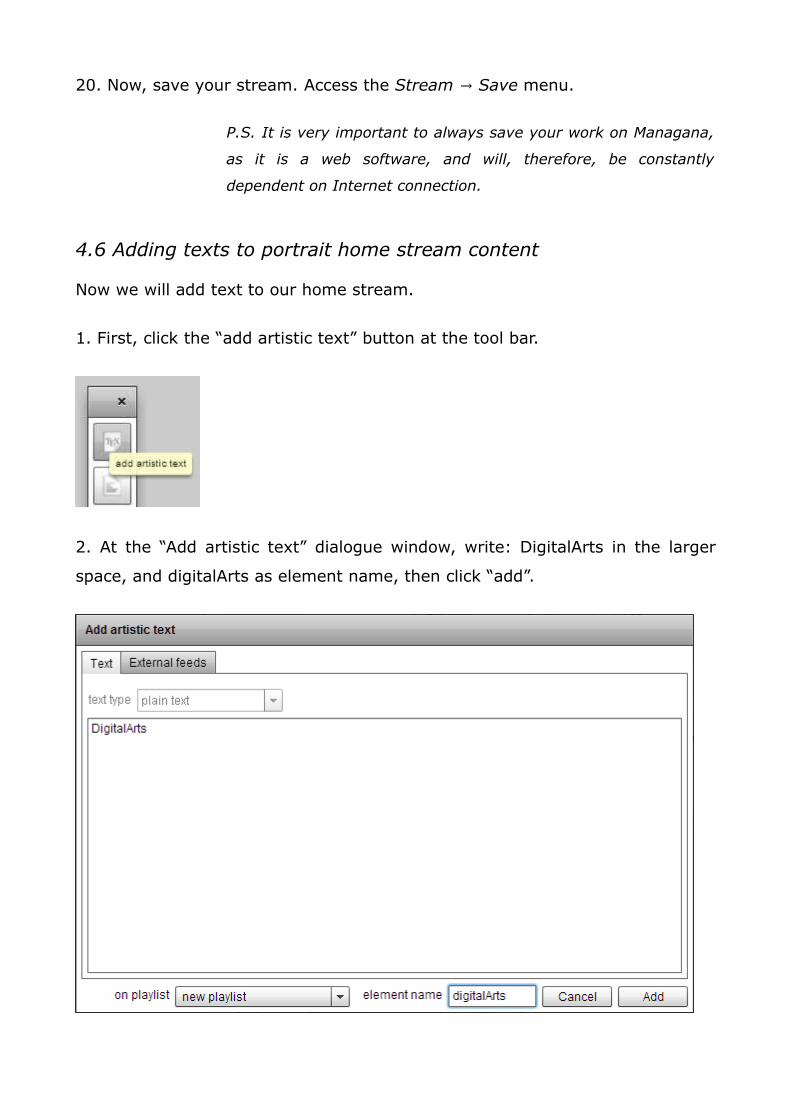
1. First, click the “add artistic text” button at the tool bar.
2. At the “Add artistic text” dialogue window, write: DigitalArts in the larger
space, and digitalArts as element name, then click “add”.

3. Repeat the procedure, creating the following texts: “My_” and “Magazine”.
When finished, you will have three text instances at your stream.
Let´s change the properties of them:
4. Select the “DigitalArts” text and click on the “Text” tab of the properties
window. Select the font face “Crimson”. Then, go back to “Properties” tab and
change the size to width 700 and height 217.
P.S. Managana comes bundled with some nice looking open fonts
that fulfill most users needs. To learn more about these open
fonts, please check the Open Font Library site at
http://openfontlibrary.org/
5. Select the “Magazine” text and click on the “Text” tab. Select the font face
“Crimson”, then change its color to “FF9900”. Go back to “Properties” tab and
change the size to width 300 and height 100.
6. Now, select “My_” text and click on the “Text” tab. Select the font face
“Crimson”, then change its color to “999999”. Go back to “Properties” tab and
change the size to width 300 and height 200.
7. Then, change the position of the text clicking and dragging each one until
they get more or less as the above image shows.

8. Save your stream (Stream → Save menu).
Now let's put a different type of text called paragraph text. It is different from
the artistic text because the later won't accept any information about font size,
while the former will.
P.S. Artistic text is meant for distortions: you can set the width
and height at the properties window and the text will fill the area
you set. Paragraph text, however, use the size setting as a
bounding area for its content. You can set the size of the
paragraph text characters by changing the font size at the “Text”
tab of the properties window.
9. Click the “add paragraph text” button at tool bar.
10. Then add a text to the text area. Some Lorem ipsum for convenience:
Lorem ipsum dolor sit amet, consectetur adipiscing elit. Nullam
vehicula ac leo ut pharetra. Nunc rhoncus suscipit volutpat. In
hac habitasse platea dictumst. Phasellus sed erat vehicula,

molestie enim ac, hendrerit massa. Curabitur tristique consequat
nulla nec vulputate. Ut eu est lectus. Cras nec nisl vitae purus
pretium suscipit. Mauris vestibulum neque a accumsan sagittis.
Proin faucibus nibh nec lorem gravida dapibus.
11. Click the “add” button.
12. When the instance shows at the stream area, click on the “Text” tab os the
properties window. Select the font face “Crimson”, use 30 as font size, and
change the color to “999999”. Go back to “Properties” tab and change the size
to width 684 and height 300.
13. Place it below the banner.

14. Save your stream.
4.7 Organizing your playlists and publishing your stream
Before we go on with this document, let's stop to organize our playlists and
then publish our home portrait stream. This is important so you will have
coherent names for all your information on the community.
1. Access the Window → Community playlists menu.
P.S. If nothing is presented on the “stream playlists” you have
probably closed Managana and have not opened your home
portrait stream yet. To do so, access the Stream → Open... menu
and select the home portrait you have been working on.
2. You will see that all elements we have placed after the banner have strange
names automatically given by the software. Rename them as you wish.

Now let's publish this stream. Publishing is a very important step. Unpublished
streams won't be shared or seen by visitors of your content. They will also not
be available for linking to other streams in your community. So, once you're
through with it, publish it!
3. Access the Stream Save and Publish→ menu.
5 AUXILIARY STREAMS
Let's create other streams for our first community. The second stream we will
create is a portfolio page that will show all the images created by the artist
whose images were placed on the banner inside our home portrait stream. The
third stream will be a page with the interview made by the journalist we have
mentioned at the home content text.
5.1 Portfolio stream
The portfolio stream will be created with pictures and a kind of navigation
menu. We will not make this navigation menu work yet, but we will place all
the imagery now.
1. Access the Stream → New... menu. If the home portrait stream is still open,
Managana will ask you if you want to overwrite the present stream. MAKE
SURE YOU HAVE SAVED home portrait stream, then click ok.
2. Access the Stream → Save menu, name the stream as “portfolio” and click
“ok and save”.
3. Click the “add picture” button of the tool bar.
4. Click on “photo01.png”, give it an element name, then click “add”.
5. The image will be placed at the top of the stream area. Select it and at the
properties window, set its width to 720 and its height to 1280. Make sure it is
at position X and Y equals to 0, so the image will fill the entire stream area.
6. Access the Window → Community playlists menu.
7. Rename the playlist as “portfolio”.
8. Add other pictures of “photo” to this playlist like you did before to banner
home. At this time, do not set any action to any element. We will do it later

when setting the community navigation.
9. Close this window.
10. Click the “add picture” button again and select “buttonback.png”.
11. When the image is placed at the stream area, click the icon at the
properties window.
12. Repeat adding the pictures “buttoncontent.png”, “buttonhome.png” and
“buttonnext.png”, always clicking the icon to bring the images to their
original sizes.
13. Select the “buttonnext” instance you placed on the stream.
14. Set position x to 433 and position y to 27.
15. Select “buttonhome” instance and set position x to 370 and y to 27.
16. Select “buttoncontent” instance and set position x to 310 and y to 27.
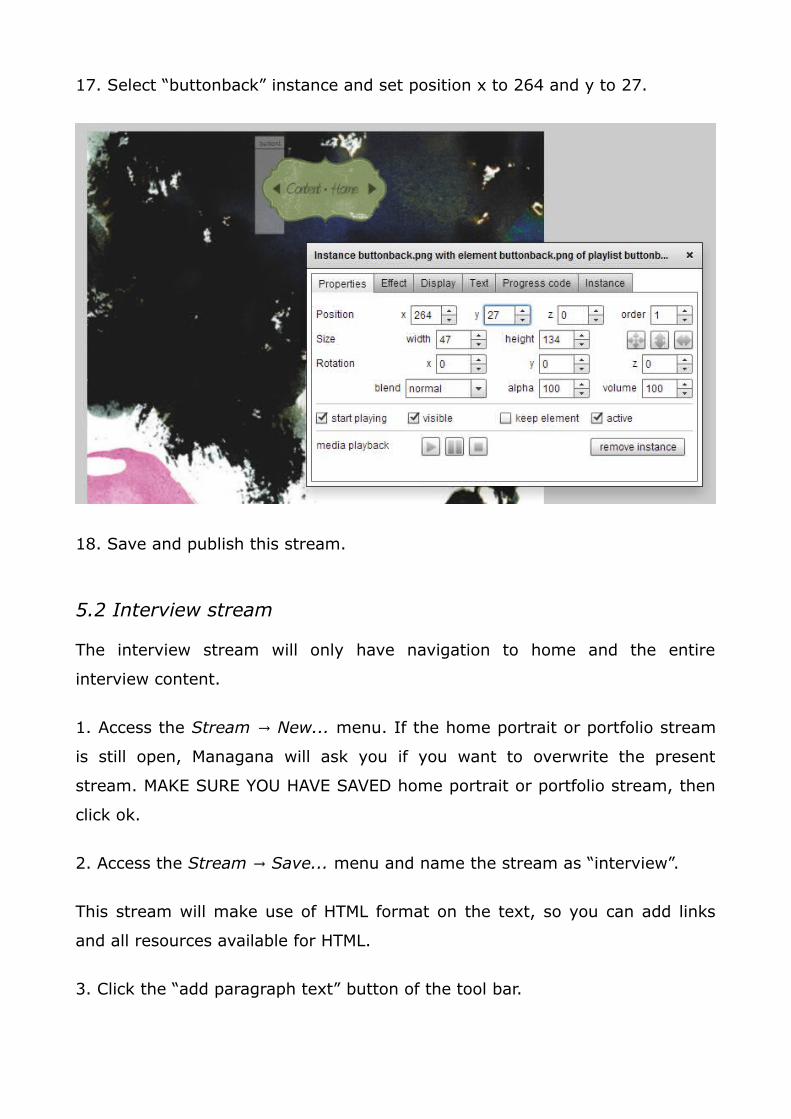
17. Select “buttonback” instance and set position x to 264 and y to 27.
18. Save and publish this stream.
5.2 Interview stream
The interview stream will only have navigation to home and the entire
interview content.
1. Access the Stream → New... menu. If the home portrait or portfolio stream
is still open, Managana will ask you if you want to overwrite the present
stream. MAKE SURE YOU HAVE SAVED home portrait or portfolio stream, then
click ok.
2. Access the Stream → Save... menu and name the stream as “interview”.
This stream will make use of HTML format on the text, so you can add links
and all resources available for HTML.
3. Click the “add paragraph text” button of the tool bar.
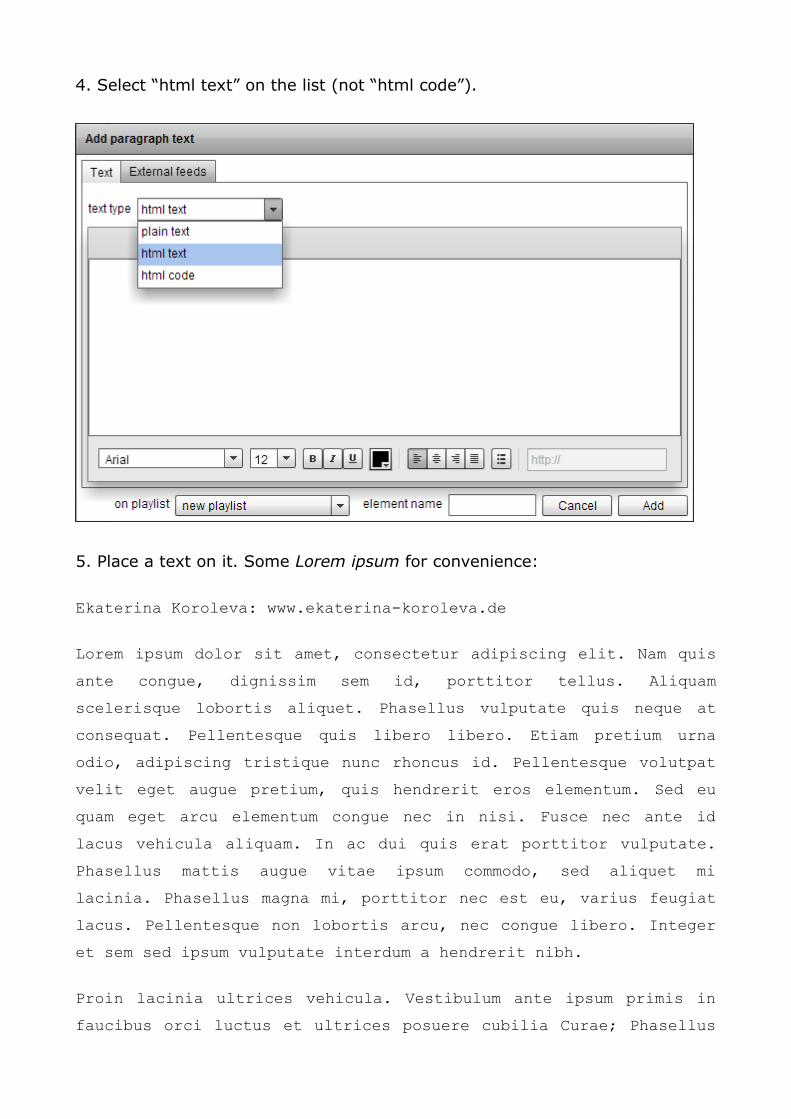
4. Select “html text” on the list (not “html code”).
5. Place a text on it. Some Lorem ipsum for convenience:
Ekaterina Koroleva: www.ekaterina-koroleva.de
Lorem ipsum dolor sit amet, consectetur adipiscing elit. Nam quis
ante congue, dignissim sem id, porttitor tellus. Aliquam
scelerisque lobortis aliquet. Phasellus vulputate quis neque at
consequat. Pellentesque quis libero libero. Etiam pretium urna
odio, adipiscing tristique nunc rhoncus id. Pellentesque volutpat
velit eget augue pretium, quis hendrerit eros elementum. Sed eu
quam eget arcu elementum congue nec in nisi. Fusce nec ante id
lacus vehicula aliquam. In ac dui quis erat porttitor vulputate.
Phasellus mattis augue vitae ipsum commodo, sed aliquet mi
lacinia. Phasellus magna mi, porttitor nec est eu, varius feugiat
lacus. Pellentesque non lobortis arcu, nec congue libero. Integer
et sem sed ipsum vulputate interdum a hendrerit nibh.
Proin lacinia ultrices vehicula. Vestibulum ante ipsum primis in
faucibus orci luctus et ultrices posuere cubilia Curae; Phasellus

at semper neque. Sed a ultrices ligula, vel gravida ipsum.
Vestibulum nulla odio, pulvinar et leo et, interdum consectetur
leo. Aliquam vehicula nibh id cursus porta. Sed consectetur
suscipit accumsan. Maecenas velit erat, lacinia id arcu ac,
feugiat rutrum diam. Suspendisse potenti. Sed malesuada, odio ac
luctus fermentum, turpis elit sagittis nulla, nec iaculis lacus
justo ut leo. Aliquam volutpat magna nulla, vel consectetur dolor
facilisis in. Proin varius venenatis turpis eget iaculis. Sed
commodo hendrerit velit, non egestas lectus ultricies ac. Vivamus
eu nisl sed ipsum pellentesque consequat ut non libero. Nam sit
amet fermentum metus.
Sed posuere, sapien sit amet posuere congue, mi nunc malesuada
neque, non auctor arcu tellus ut enim. Curabitur ac erat sapien.
Praesent vel enim dignissim, varius magna et, iaculis tortor.
Curabitur facilisis lorem quis nunc vulputate, vel tincidunt nibh
rutrum. Morbi vitae justo neque. Morbi vitae venenatis nulla.
Donec consectetur eget nisi sodales dignissim. Etiam a risus
blandit, vulputate est id, porta orci. Etiam dolor metus,
venenatis nec risus vitae, blandit convallis arcu. Nulla elementum
aliquam congue. Suspendisse lobortis augue eget elit molestie, id
vulputate dolor sodales. In pretium velit eget felis consectetur,
eget gravida sapien gravida. Suspendisse sit amet aliquet justo,
id tincidunt sem.
Pellentesque in ante ac est tincidunt sodales. Proin ornare odio
massa, quis ultricies nisl euismod eu. In vitae gravida nisi, a
egestas lacus. Etiam a mollis est, nec gravida mauris. Duis
pulvinar convallis tempor. Aliquam accumsan est a diam volutpat
sollicitudin. Sed gravida tellus id lectus interdum, vitae
pharetra tortor condimentum. Vivamus nisl ipsum, eleifend a
laoreet at, lacinia eget quam. Curabitur in felis vitae sapien
feugiat tempus a quis nulla. Sed et metus vitae turpis ornare
luctus non sit amet purus.
Ut sed libero ante. Aliquam quis tempus nisi, in lacinia magna.

Nullam lobortis enim ut adipiscing lacinia. In sagittis tincidunt
orci, sed ornare velit pulvinar vitae. Sed pretium ligula sit amet
turpis dictum rutrum ut sed sapien. Donec quam quam, laoreet nec
nulla a, scelerisque porttitor quam. Nulla in iaculis nisl. Sed
molestie, ligula at scelerisque faucibus, felis eros hendrerit
urna, sit amet varius mi magna non ante. Aliquam facilisis arcu id
sapien porta bibendum.
Mauris iaculis mi nulla, eu vestibulum enim tempus in. Cum sociis
natoque penatibus et magnis dis parturient montes, nascetur
ridiculus mus. Maecenas eros nulla, eleifend cursus laoreet nec,
tempor eget quam. In hac habitasse platea dictumst. Quisque
pharetra enim eget turpis consequat scelerisque id sit amet
lectus. Ut eget mollis nisl, et ultricies mi. Sed eget orci
suscipit, facilisis arcu in, interdum velit. Nullam fermentum
blandit odio, sodales tempor urna tincidunt eu. Sed non pretium
justo, eu bibendum odio.
6. Select all the text and justify the paragraphs.
7. Select the artist website, and fill the right text area with the link:
http://www.ekaterina-koroleva.de

8. Click “add”.
9. When the paragraph text is placed on the stream, select it.
10. At the “Properties” tab set the width to 700, height to 1000, position x to 8
and position y to 210.
11. Now let's put the home link image. Select “add picture” on tool bar
12. Select “buttonHomeContent.png” and click “add”.
13. Select the image on the stream and then click on the icon at the
properties window.
14. Set the position x to 264 and position y to 27.
15. Save and publish this stream.
P.S. Please organize your playlist names on playlist window of
both streams interview and portfolio, as you did for home stream.

6 SETTING COMMUNITY NAVIGATION
Now it is time to make some interactions. We will start from home portrait
stream.
6.1 Home navigation
1. Access the Stream → Open... menu and select the “homePortrait” stream.
2. Select the image banner.
3. At the properties window, select the “Progress code” tab.
4. Select the word “STREAM” at the “Code groups” list.
5. Select the word “load” at the “Action” list.
6. Select the portfolio stream at the “Select the stream to load” list.
7. Click “add”.
8. A list of the actions will appear on the text area, as seen at the picture
below. Leave it as it is.

9. Select the paragraph text on the stream.
10. Again, at the properties window “Progress code” tab, select “STREAM” at
the “Code groups” list, select “load” at the “Action” list and the interview
stream at the “Select the stream to load” list, then click “add”.
11. Save and publish your stream.
6.2 Portfolio navigation
1. Access the Stream → Open... menu and select the portfolio stream.
2. Select the back button on the stream.
3. At the properties window, “Progress code” tab, select “INSTANCE” at the
“Code groups” list, select “photo1” at “Instances” list and “previous” at “Action”
list. Click “add”.

4. Select the next button on the stream.
5. At the properties window, “Progress code” tab, select “INSTANCE” at the
“Code groups” list, select “photo1” at “Instances” list and “next” at “Action”
list. Click “add”.
6. Select the content button on the stream.
7. At the properties window, “Progress code” tab, select “STREAM” at “Code
groups” list, load at “Action” list and select the interview stream at the “Select
the stream to load” list. Click “add”.
8. Select the home button on the stream.
9. At the properties window, “Progress code” tab, select “STREAM” at “Code
groups” list, load at “Action” list and select the home portrait stream at the
“Select the stream to load” list. Click “add”.
10. Save and publish this stream.
6.3 Interview Navigation
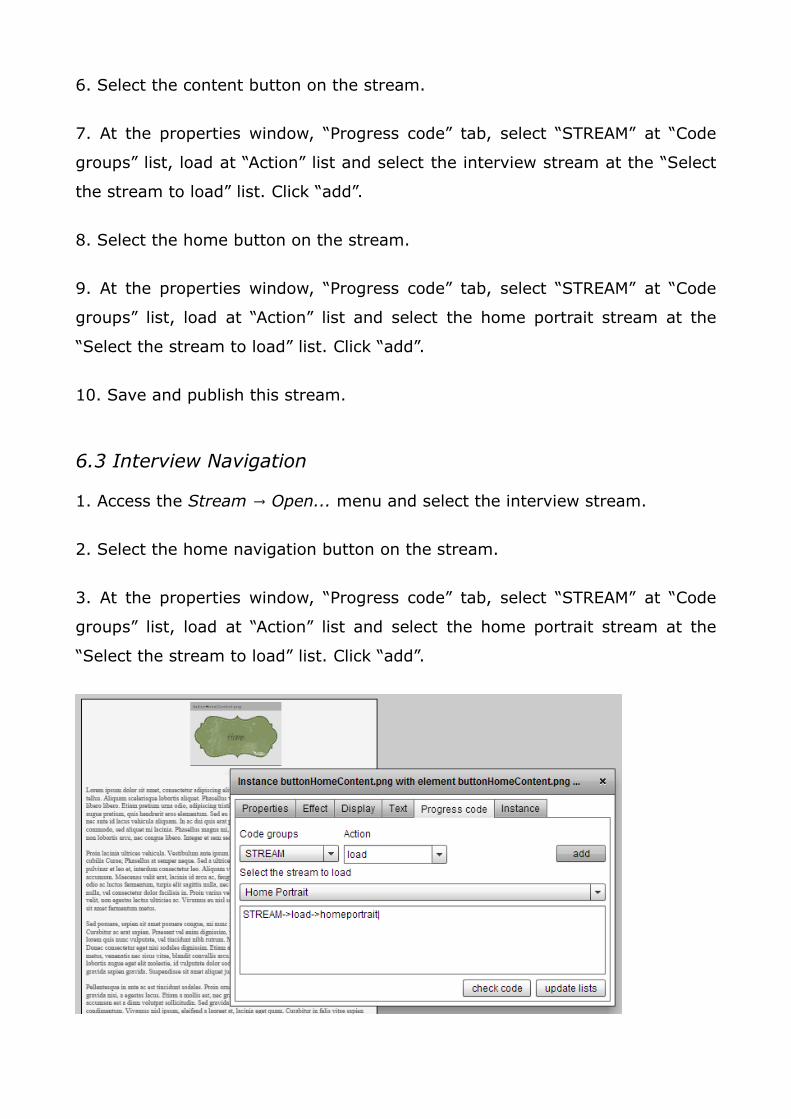
1. Access the Stream → Open... menu and select the interview stream.
2. Select the home navigation button on the stream.
3. At the properties window, “Progress code” tab, select “STREAM” at “Code
groups” list, load at “Action” list and select the home portrait stream at the
“Select the stream to load” list. Click “add”.

4. Save and publish this stream.
5. Click on preview window to check your interaction.

7 CREATING LANDSCAPE HOME STREAM
One of the interesting things about creating content for tablets is the change
from portrait to landscape screen visualization, which is done when users
change their devices position. But if the application is not ready to show
different layouts for each view, this functionality may be irrelevant.
This chapter introduces you to configuring different layouts to this community
home stream. We are assuming that you have gone through all the previous
chapters and already have your own Getting Started community. If so, open
this community on Managana editor interface.
P.S. You may choose not to have different layouts for portrait and
landscape visualizations. At this case, just set the same size for
both of them at the community properties window. If you do so,
Managana will adjust your entire content to fill the rotated area
without distorting it.
1. Access the Stream → New... menu.
2. Access the Stream → Save menu and save this stream as “homeLandscape”.
3. Press “ok and save”.
4. If your Managana editor interface is showing the stream as portrait, change
its visualization to landscape by clicking on “change edit aspect landscape <->
portrait” at the tool bar.
Now we are going to do something very useful on Managana editor. We will
reuse a previous playlist to create a different stream.
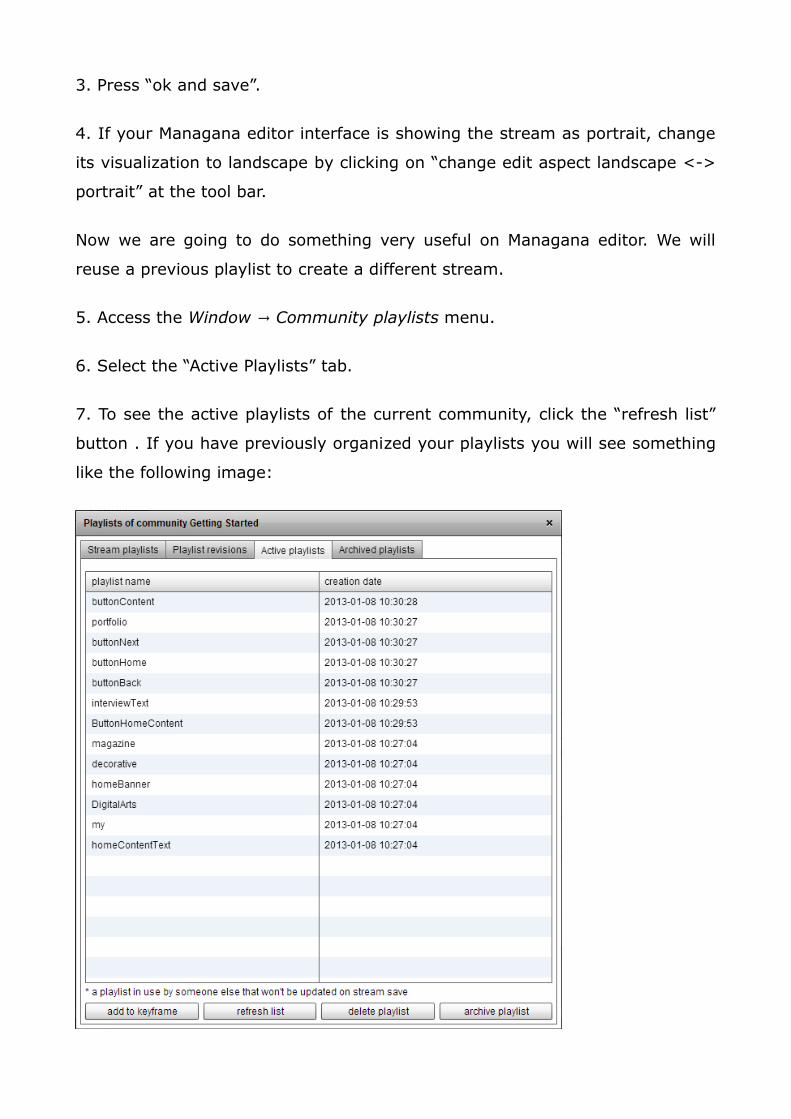
5. Access the Window → Community playlists menu.
6. Select the “Active Playlists” tab.
7. To see the active playlists of the current community, click the “refresh list”
button . If you have previously organized your playlists you will see something
like the following image:

8. Select “homeBanner” on the list and click “add to keyframe”.
9. Repeat this action to all other home elements (“my”, “DigitalArts”,
“magazine”, “decorative” and “homeContentText”).
10. Close the playlists window.
Now, let's configure each intance properties as we did for the portrait home
stream.
11. Select the “homeBanner” instance and then click the icon at the
properties window, so the image will receive its original size. Place it on the
conner of the stream.
12. Select the decorative image, place it on the same conner and put its alpha
to 40.
13. Select the “DigitalArts” text and click the “Text” tab. Select the font face
“Crimson”, then go back to “Properties” tab and change the size to width 700
and height 217.
14. Select the “Magazine” text and click the “Text” tab. Select the font face
“Crimson”, then change the color to “FF9900”. Go back to the “Properties” tab
and change the size to width 300 and height 98.
15. Select “My_” text and click the “Text” tab. Select the font face “Crimson”,
then change the color to “999999”. Go back to the “Properties” tab and change
the size to width 300 and height 205.
16. Select the home content text and place it on the left conner with width of
500, height of 300. Click the “Text” tab, select the font face “Crimson”, font
size 26, then change the color to “999999”.
17. Now, change the position of the text clicking and dragging each one until
they get more or less as the following image shows:
18. Select the content text and, at the properties window, go to process code
tab. Select “STREAM” at “Code groups” list, “load” at “Action” list and select
the interview stream at the “Select the stream to load” list. Click “add”.
19. Select the banner image and, at the properties window, go to process code
tab. Select “STREAM” at “Code groups” list, “load” at “Action” list and select
the portfolio stream at the “Select the stream to load” list. Click “add”.
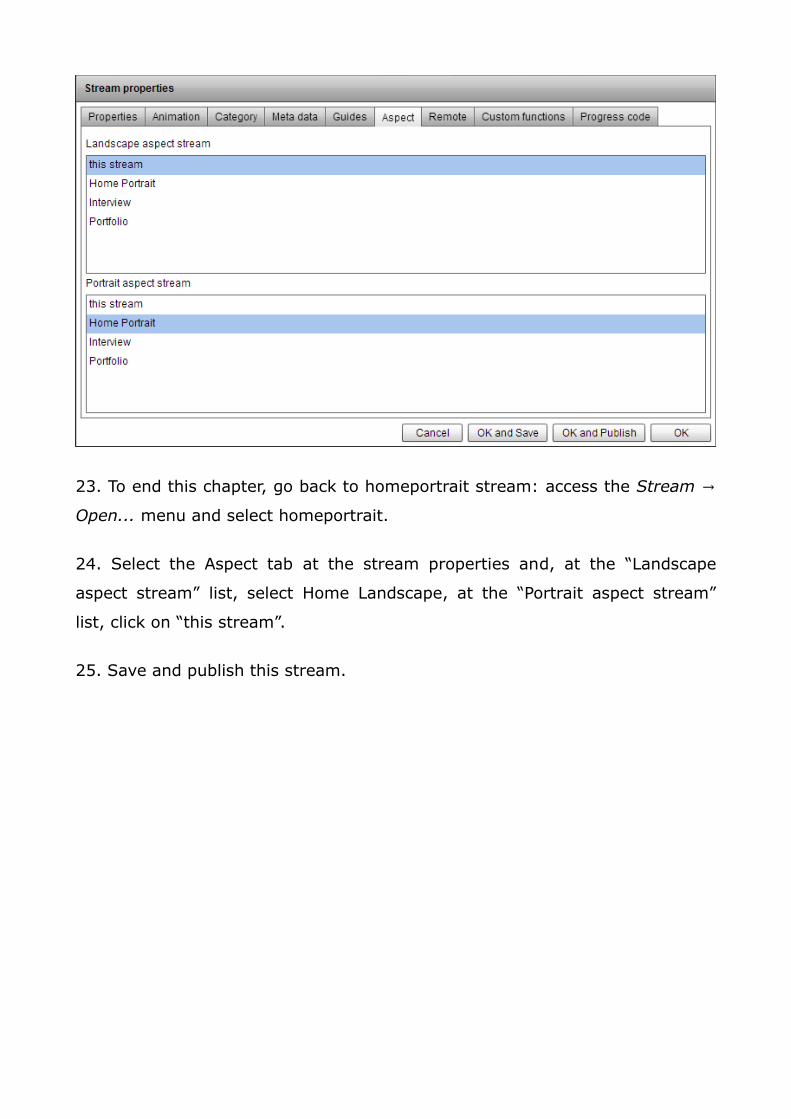
20. Access the Stream → Properties... menu.
21. Select the “Aspect” tab. At the “Landscape aspect stream” list leave “this
stream” selected, at the “Portrait aspect stream” list, click on “homeportrait”.
22. Click “ok and publish” to save and publish your stream.
23. To end this chapter, go back to homeportrait stream: access the Stream →
Open... menu and select homeportrait.
24. Select the Aspect tab at the stream properties and, at the “Landscape
aspect stream” list, select Home Landscape, at the “Portrait aspect stream”
list, click on “this stream”.
25. Save and publish this stream.
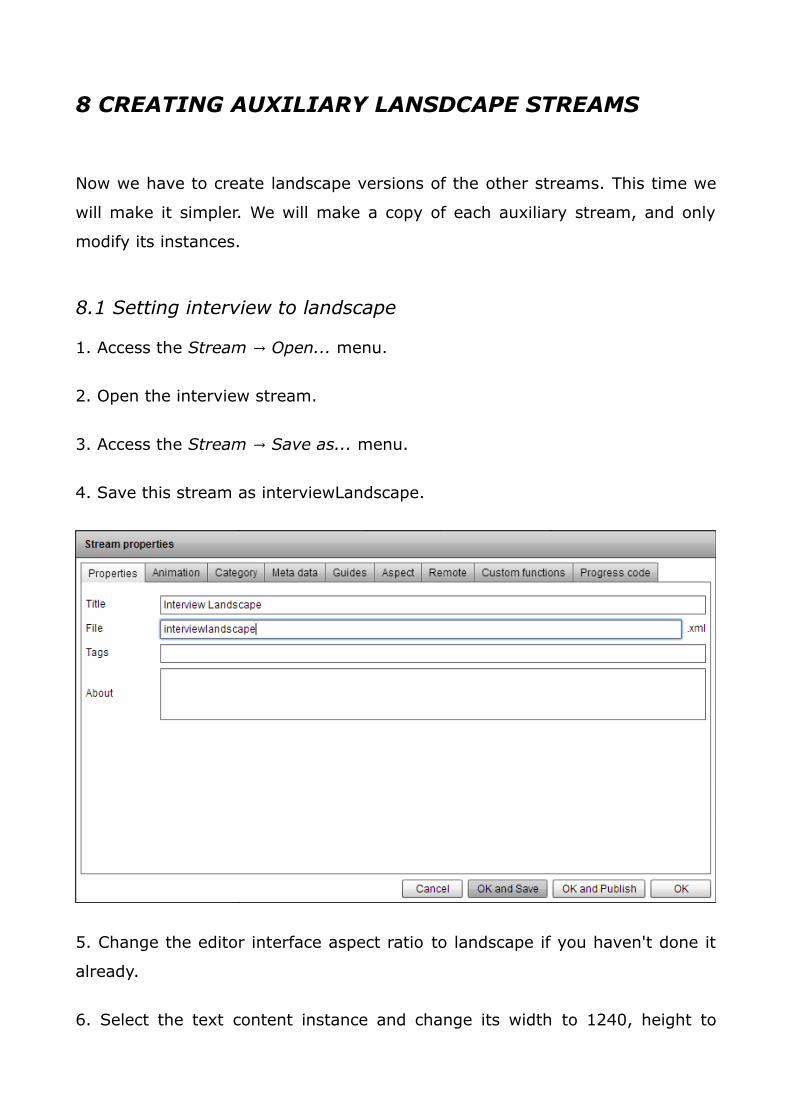
8 CREATING AUXILIARY LANSDCAPE STREAMS
Now we have to create landscape versions of the other streams. This time we
will make it simpler. We will make a copy of each auxiliary stream, and only
modify its instances.
8.1 Setting interview to landscape
1. Access the Stream → Open... menu.
2. Open the interview stream.
3. Access the Stream → Save as... menu.
4. Save this stream as interviewLandscape.
5. Change the editor interface aspect ratio to landscape if you haven't done it
already.
6. Select the text content instance and change its width to 1240, height to

600, x position to 22 and y position to 70.
7. Select the home button instance and change its width to 164, height to 99,
x position to 1099 and y position to 0.
8. Save and publish this stream.
8.2 Setting portfolio to landscape
1. Access the Stream → Open... menu.
2. Open the portfolio stream.
3. Access the Stream → Save as... menu.
4. Save this stream as portfolioLandscape.
5. Select the image instance and change its width to 394, height to 720, x
position to 450 and y position to 0.
6. Leave the buttons where they were.

7. Save and publish this stream.
8.3 Setting aspect ratio
1. Open the landscape portrait stream.
2. Open the stream properties window,access the “Aspect” tab and configure
landscape/portrait streams as the image below:

3. Save and publish this stream.
4. Open the landscape portfolio stream.
5. Open the stream properties window, access the “Aspect” tab and configure
landscape/portrait streams as the image below:
6. Save and publish this stream.
You now must open the original, portrait versions of these two streams
(interview and portfolio). After that, check the stream properties and set the
appropriate landscape view for each one at the aspect tab. Remember to save
and publish them after doing any changes.
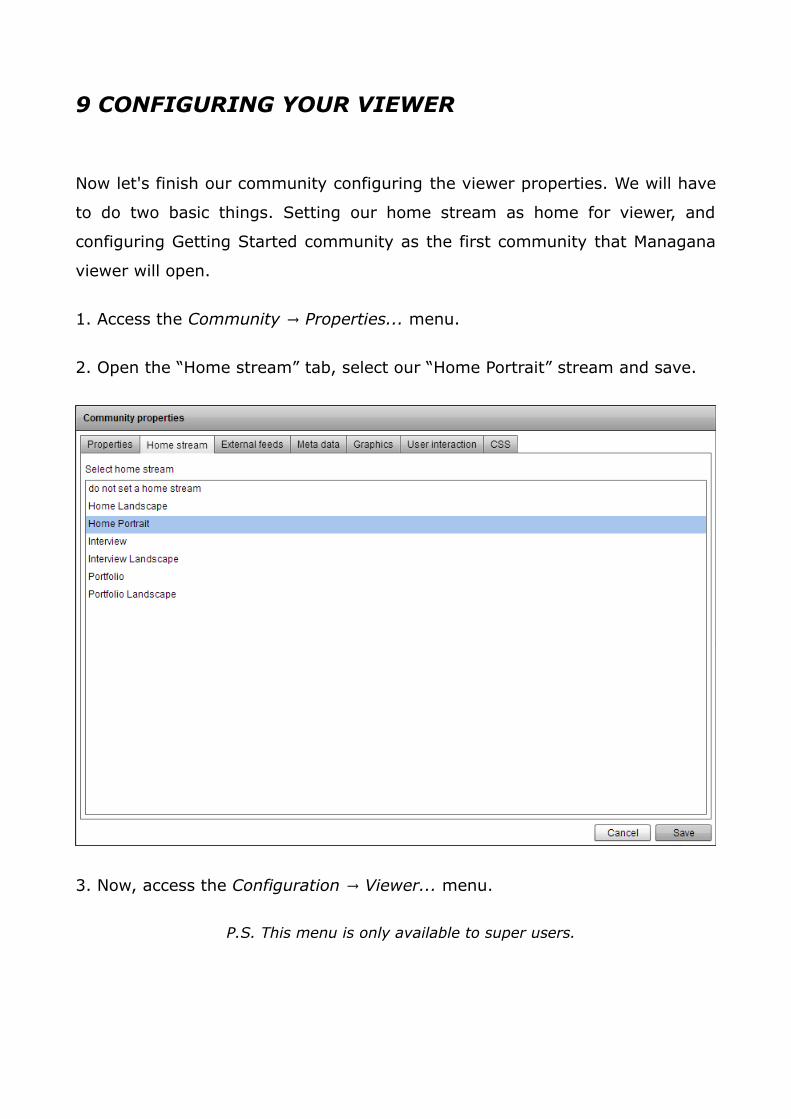
9 CONFIGURING YOUR VIEWER
Now let's finish our community configuring the viewer properties. We will have
to do two basic things. Setting our home stream as home for viewer, and
configuring Getting Started community as the first community that Managana
viewer will open.
1. Access the Community → Properties... menu.
2. Open the “Home stream” tab, select our “Home Portrait” stream and save.
3. Now, access the Configuration → Viewer... menu.
P.S. This menu is only available to super users.
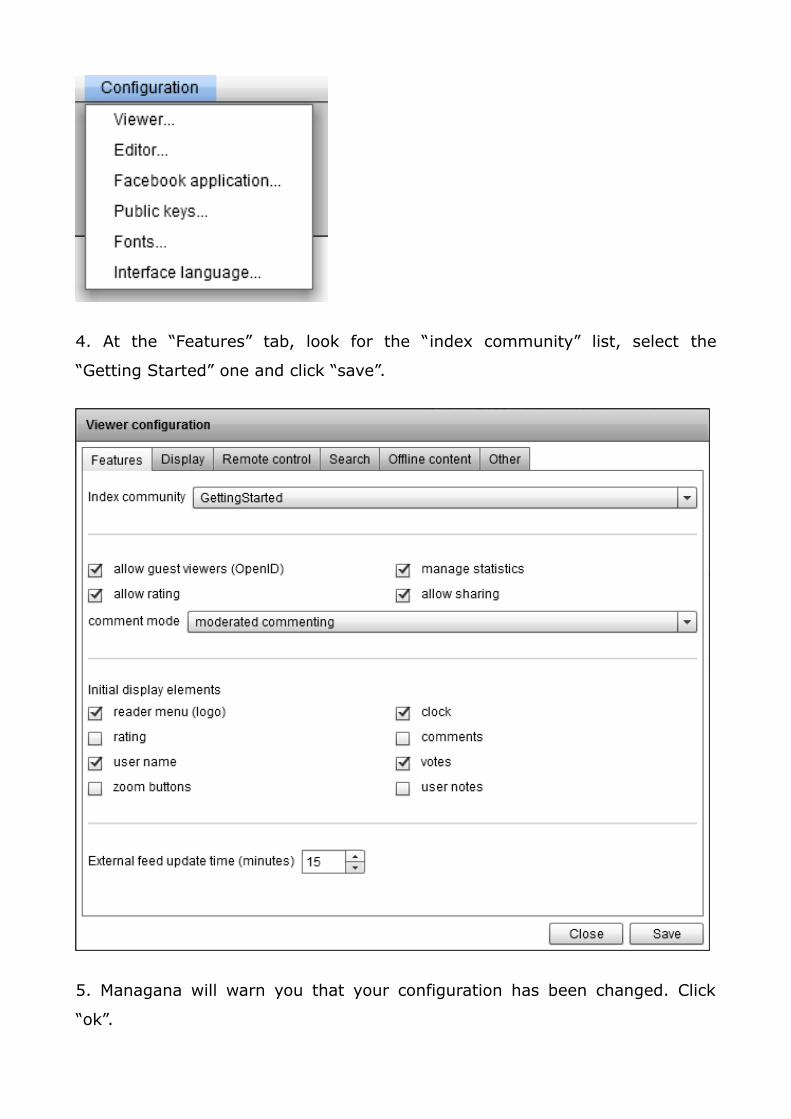
4. At the “Features” tab, look for the “index community” list, select the
“Getting Started” one and click “save”.
5. Managana will warn you that your configuration has been changed. Click
“ok”.

To see your final community, open your reader access url (such as
http://localhost/managana).
If your content is intended to be viewed on the web, you're now done. Just
provide the reader URL to your users and they will be able to access your
creation. This, of course, will only work if you installed Managana on a true
web server (not a local server or the “launcher”).
While on the web, only the landscape version of your streams are displayed –
the portrait ones are exclusive for the mobile devices.

10 GENERATING AN APPLICATION
Managana content can be packaged into applications for various systems,
including mobile ones: Android, iOS (iPhone/iPad), Windows and OSX (Mac).
This content can be packaged together with you app for offline access or it can
be accessed using a web connection.
When the content is accessed from the web you are even able to update it at
any time. Also, if you allow to, users can download it after the app is installed
using the “content manager” for offline access.
P.S. Some app stores, like the Google Play, limit the application
file size. This size considers only the apk file itself, not content
downloaded after it is installed.
P.S.2 Some cool Managana features like commenting, rating and
sharing will only work for content over the Internet.
To create an application you will need to download the Managana AppWizard, a
Windows-only software. The AppWizard also capable of creating mobile remote
controllers connected to your Managana-based website (an advanced feature
not covered by this document).
Download the Managana AppWizard at Managana website:
http://www.managana.org/downloads/
10.1 The Managana App Wizard
After you've downloaded it, you have to install it on a Windows computer.
1. Go to the folder you've downloaded the file and double-click it to install.
Managana App Wizard will start the install process, Windows may alert you
that this is not a recognized program, and some antivirus software may also
tell you the same. Ignore it! Also, the AppWizard requires the Adobe AIR
runtime to work. You'll be prompted to download it during the installation if
you haven't already done so.
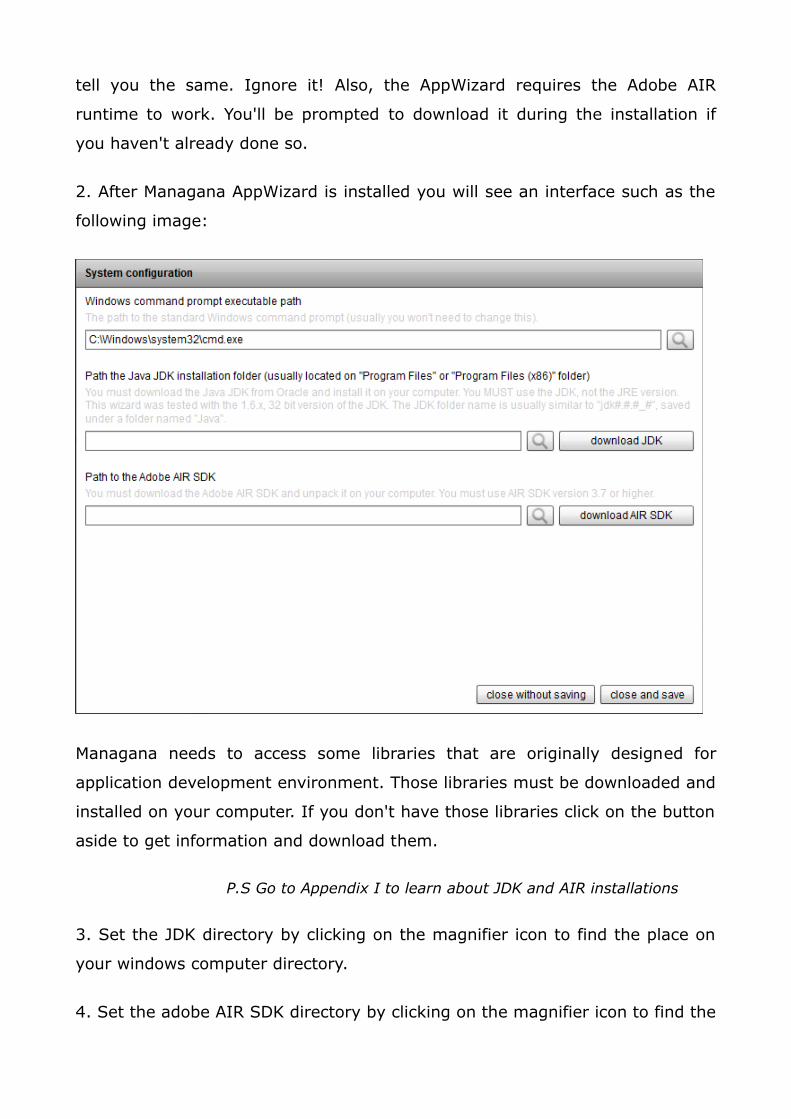
2. After Managana AppWizard is installed you will see an interface such as the
following image:
Managana needs to access some libraries that are originally designed for
application development environment. Those libraries must be downloaded and
installed on your computer. If you don't have those libraries click on the button
aside to get information and download them.
P.S Go to Appendix I to learn about JDK and AIR installations
3. Set the JDK directory by clicking on the magnifier icon to find the place on
your windows computer directory.
4. Set the adobe AIR SDK directory by clicking on the magnifier icon to find the

place on your windows computer directory.
5. Click on “close and save”.
You will see the Managana App Wizard program interface, as presented on the
image bellow. If you change the JDK or AIR SDK directory in the future just
click the “configuration” button to go back to the directories setting again.
10.2 Creating an application
The first thing you need to do is create an app project, which is the main
information to built your application. For our first app, let's create an app with
all content already packaged.
1. Click the “manage app projects” button.
2. Enter the requested app information: its title (the name shown on listings or

with the app icon) and the app id.
P.S. The app id must be unique if you intend to distribute it on
app stores like the Google Play or the Apple Appstore. Usually
this id is given by your reversed website addres plus the app
name like “org.managana.player”.
3. Choose the application type: the player to show your content or the remote
control. Here we will only cover the creation of a player app. If you want to
learn more about remote controllers, check the Getting started with
Managana: it's showtime! document.
4. Click on “create app project”. You'll see the following window with further
app details to provide.
P.S. You can re-open a created app at any time by clicking the
“manage app projects” and selecting it from the list.

5. You can scroll down and provide as much information as you want and save
it. Here are some tips:
• The server url is only valid if the app can access it from the Internet (no
local installations). For the getting started example no server url is
required.
• The index community id must be provided since it tells the app the
content to load at first. For the getting started example we must provide
“gettingStarted” - it's the DIS folder name without the ending “.dis”.
• The other display options tell the app what to show as it's default
interface. Since there will be no web connection for advanced features
and no video for time counting, let's uncheck them all.
6. After saving the configuration click the “offline communities” button. You'll
see the following window:
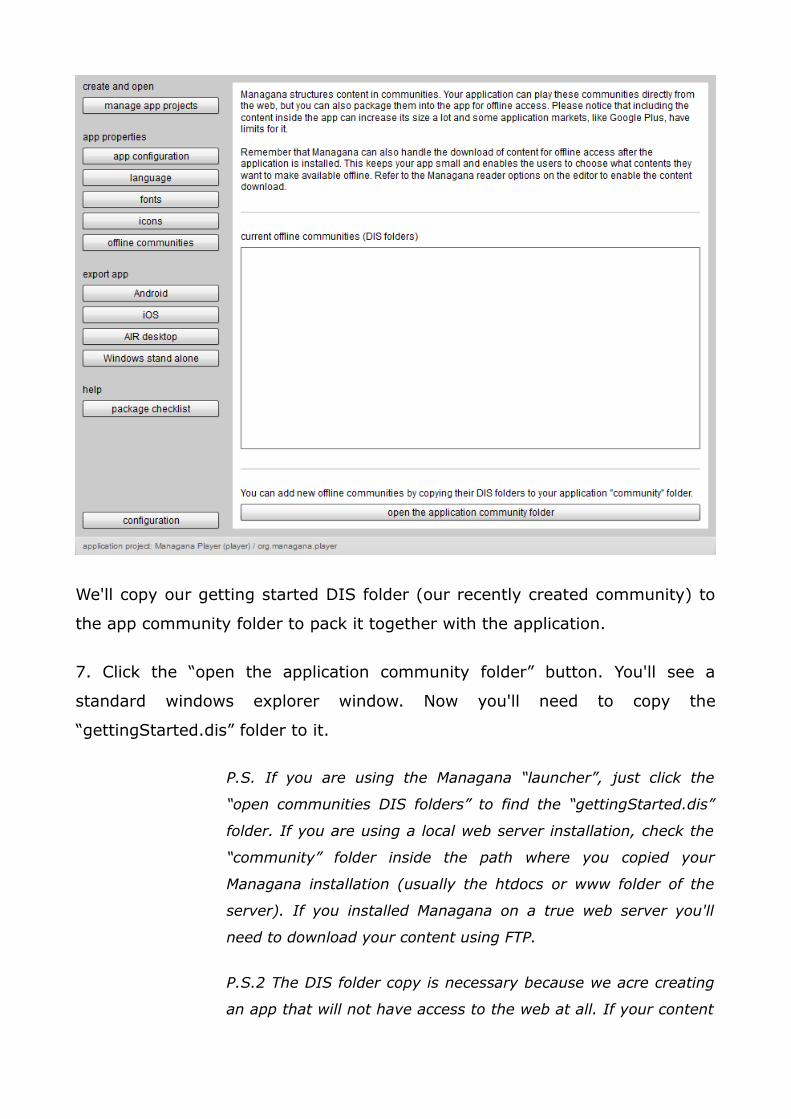
We'll copy our getting started DIS folder (our recently created community) to
the app community folder to pack it together with the application.
7. Click the “open the application community folder” button. You'll see a
standard windows explorer window. Now you'll need to copy the
“gettingStarted.dis” folder to it.
P.S. If you are using the Managana “launcher”, just click the
“open communities DIS folders” to find the “gettingStarted.dis”
folder. If you are using a local web server installation, check the
“community” folder inside the path where you copied your
Managana installation (usually the htdocs or www folder of the
server). If you installed Managana on a true web server you'll
need to download your content using FTP.
P.S.2 The DIS folder copy is necessary because we acre creating
an app that will not have access to the web at all. If your content

will be accessed over the web (providing a valid server url), this
is not required.
P.S.3 There are also some other possible configurations like the
interface language, the extra fonts used and the app icons. Let's
keep the default ones for now. You can go back to them later to
learn more about customizing your application.
8. Now, everything is set to create your application. Let's start with Android.
Click the “Android” button.
P.S. Every application needs a certificate file. For most of them
you can create your own, self-signed one. Check the AppWizard
text about the certificate and create one to sign your first Android
app.
9. Provide your certificate password and click the “create Android application”
button. The AppWizard will start the process (it may take some time). After

everything is done you just need to click the “open packaged apps folder” and
look for a file with en “.apk” ending: that's your first Android app.
P.S. This apk file is ready for both testing on actual devices and
sending to app markets like the Google Play or the Amazon
Appstore. If you intend to use it on your own Android device,
remember to check its configurations to allow app installation
from unknown sources (other than Google Play).
10. In order to create installable apps that run on Windows and OSX (Mac),
Managana relies on the Adobe AIR – your users will need to install it just like
you did to run the AppWizard itself (the AIR runtime, not the full AIR SDK).
The proccess of creating the applications – presented as “.air” files – is very
similar to the one used for Android. Click the “AIR desktop” button” to learn
more about it.
P.S. The “.air” files are just like standard installers that run if
Adobe AIR is found on the computer.
11. Another possible application kind the AppWizard can create is the Windows
stand alone one. These apps do not need any other software on the system
(they won't need Adobe AIR) and are not installed – they run from an all-in-
one folder, even from flash drives. The creation process is very similar to the
Android one: click the “Windows stand alone” button to check it out.
12. The last app kind is the one for iOS devices like the iPad, the iPhone and
the iPod touch. The process is similar to the ones before, but the certificates
can only be provided by Apple itself. Click the “iOS” button to learn about how
to get them and create your apps.
APPENDIX I
Setting up an environment to create mobile applications may look very
frightening when you go to the necessary download pages. There are so many
information that anyone can get very lost. Let us help you then.
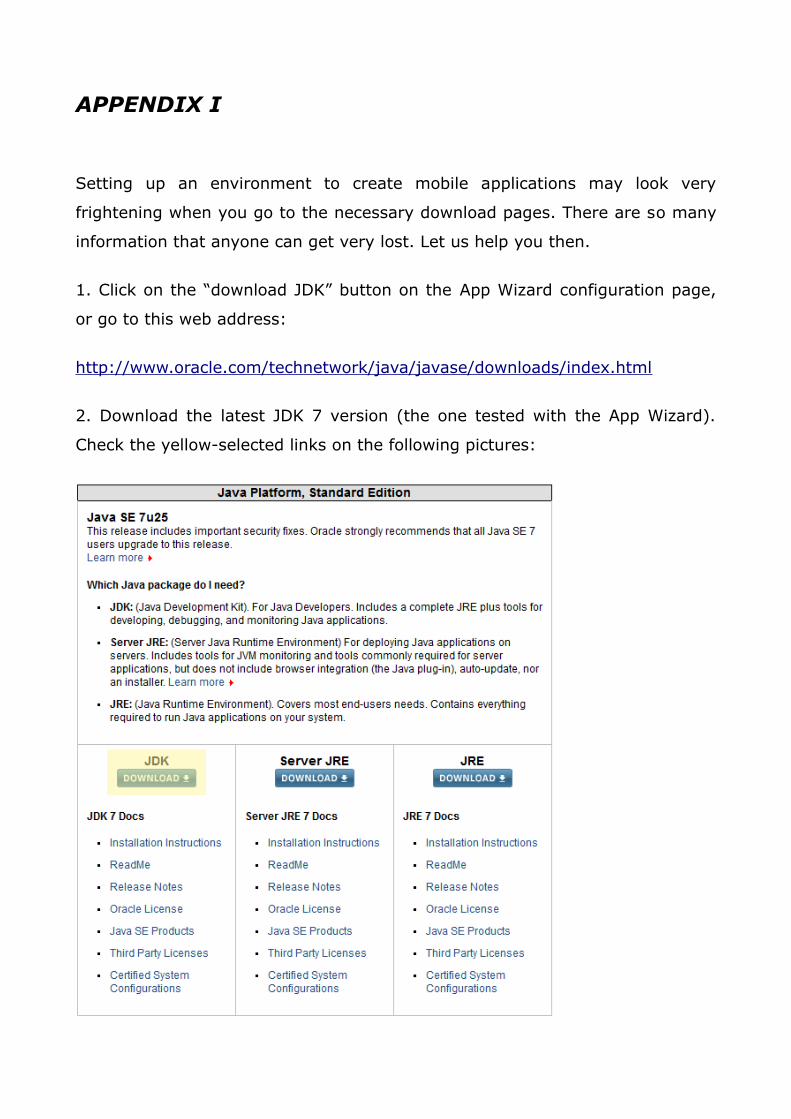
1. Click on the “download JDK” button on the App Wizard configuration page,
or go to this web address:
http://www.oracle.com/technetwork/java/javase/downloads/index.html
2. Download the latest JDK 7 version (the one tested with the App Wizard).
Check the yellow-selected links on the following pictures:

3. You must download the Windows 32 version (usually listed ad “windows
x86”) even if you are using a Windows 64 bits computer. You'll need the JDK,
not the JRE.
4. After installing, it will probably be placed at “C:\Program
Files\Java\jdk1.7.0_##”. On App Wizard configuration, find this path.
P.S. If you're using a Windows 64 bits it will probably be located
here: “C:\Program Files (x86)\Java\jdk1.7.0_##”.
Now, let's download AIR SDK, and unpack its folder.
1. Click on the “download AIR SDK” button on the configuration page, or go to
this web address:
http://www.adobe.com/devnet/air/air-sdk-download.html

2. Download the Windows version. Managana AppWizard was tested with the
3.8 version.
3. Unpack the content of the folder. For example, you can create a folder called
on AdobeAir on the C:\ root of your computer. Int this case your path will be
C:\AdobeAir. Just tell Managana App Wizard where the unpack folder is, and
you will be fine.


