GE Fanuc Automation
CIMPLICITY® Monitoring and Control Products
CIMPLICITY HMI
Basic Control EngineEvent Editor and BCEUI Operation Manual
GFK-1282D November 1998
GFL-002
Warning notices are used in this publication to emphasize that hazardous voltages, currents, temperatures, or otherconditions that could cause personal injury exist in the equipment or may be associated with its use.
In situations where inattention could cause either personal injury or damage to equipment, a Warning notice is used.
Caution notices are used where equipment might be damaged if care is not taken.
Note
Notes merely call attention to information that is especially significant to understanding and operating the equipment.
This document is based on information available at the time of publication. While efforts have been made to be accurate,the information contained herein does not purport to cover all details or variations in hardware or software, not to providefor every possible contingency in connection with installation, operation, or maintenance. Features may be describedherein which are not present in all hardware and software systems. GE Fanuc Automation assumes no obligation ofnotice to holders of this document with respect to changes subsequently made.
GE Fanuc Automation makes no representation of warranty, expressed, implied, or statutory with respect to, and assumesno responsibility for the accuracy, completeness, sufficiency, or usefulness of the information contained herein. Nowarranties of merchantability or fitness for purpose shall apply.
CIMPLICITY is a registered trademark of GE Fanuc Automation North America, Inc.Windows is a registered trademark and NT is a trademark of Microsoft Corporation
This manual was produced using Doc-To-Help®, by WexTech Systems, Inc.
Copyright 1996-1997 GE Fanuc Automation North America, Inc.All rights reserved

GFK-1282 iii
Preface
Content of this ManualChapter 1. Introduction. Describes CIMPLICITY HMI functionality andintroduces the Event Editor.
Chapter 2. Event Editor Concepts. Discusses the concepts of events and actionsand how they are combined by the Event Editor.
Chapter 3. Using the Event Editor. Documents the features of the Event Editor.
Chapter 4. Using the BCEUI (Event Viewer). Documents the features of theBasic Control Engine User Interface (BCEUI). This interface lets you view andcontrol script execution.
Appendix A. Configuring the EM_LOG Table. Shows you how to configure theEM_LOG table in the Database Logger. This will enable you to log Events andActions.
Appendix B. Performance Optimization. Documents the global parameter andpoint configuration files that you can modify to improve run-time performance.
Appendix C. Developing C Language Procedures. Shows you how to developprocedures that use the Event Manager Envelope Process. This appendix is providedfor users transitioning from the Event Manager API provided with Version 1.0 of theCIMPLICITY HMI for Windows NT and Windows 95. Starting with Version 2.0,you should use the Program Editor and the Basic Control Engine language to developprocedures.

Related PublicationsFor more information, refer to these publications:
CIMPLICITY HMI for Windows NT and Windows 98/95 Base System User’sManual (GFK-1180). This book describes all the basic features of theCIMPLICITY HMI for Windows NT and Windows 95 product.
CIMPLICITY HMI for Windows NT and Windows 98/95 Basic Control EngineLanguage Reference Manual (GFK-1283). This book documents all the BasicControl Engine language features available to the Program Editor for theCIMPLICITY HMI for Windows NT and Windows 95 base system.
CIMPLICITY HMI for Windows NT and Windows 98/95 Basic Control EngineProgram Editor Operation Manual (GFK-1305). This book describes the ProgramEditor that you can use to produce scripts that can be executed as actions by theEvent Manager.
GFK-1282 v
Contents
Introduction 1-1CIMPLICITY HMI Functionality .......................................................................................... 1-1
Event Management Concepts 2-1Event Management Defined ................................................................................................... 2-1Configured Events.................................................................................................................. 2-1Configured Actions ................................................................................................................ 2-2Actions Versus Events............................................................................................................ 2-2Event Manager Startup and Shutdown Scripts ....................................................................... 2-3
Using the Event Editor 3-1Getting Started ....................................................................................................................... 3-1
Event Editor Menus ................................................................................................. 3-2Event Editor Window Pop-up Menus ...................................................................... 3-4Event Editor Toolbar ............................................................................................... 3-5Event Editor Shortcut Keys...................................................................................... 3-5
Event Editor Properties .......................................................................................................... 3-6Sample Configurations............................................................................................. 3-7
Creating an Event ................................................................................................................... 3-8Alarm Acknowledged Events................................................................................... 3-9Alarm Deleted Events ............................................................................................ 3-10Alarm Generated Events ........................................................................................ 3-11Alarm Reset Events................................................................................................ 3-12Point Change Events .............................................................................................. 3-13Point Equals Events ............................................................................................... 3-14Point Transition High Events ................................................................................. 3-15Point Transition Low Events.................................................................................. 3-16Point Unavailable Events ....................................................................................... 3-17Point Update Events............................................................................................... 3-18Run Once ............................................................................................................... 3-19Timed Events ......................................................................................................... 3-19Event Advanced Tab.............................................................................................. 3-20
Associating Actions with an Event....................................................................................... 3-22Creating an Action ............................................................................................................... 3-23
Alarm Look-Up Actions ........................................................................................ 3-25Log Only Actions................................................................................................... 3-26Point Alarm Acknowledge Actions........................................................................ 3-27Point Alarm Disable Actions ................................................................................. 3-28Point Alarm Enable Actions................................................................................... 3-28Recipe Upload/Download ...................................................................................... 3-29Run Script Actions ................................................................................................. 3-30Set Point Actions.................................................................................................... 3-31
CIMPLICITY HMI Event Editor Operation Manual GFK-1282vi
Source Transition Set Actions................................................................................ 3-32Transition Set Actions............................................................................................ 3-33Call Envelope Function Actions............................................................................. 3-34
Copying an Event ................................................................................................................. 3-35Copying an Action................................................................................................................ 3-35Configuring Event Display Attributes .................................................................................. 3-36Configuring Action Display Attributes................................................................................. 3-37
Using the BCEUI (Event Viewer) 4-1About the BCEUI ................................................................................................................... 4-1Getting Started........................................................................................................................ 4-1
BCEUI Menus.......................................................................................................... 4-3BCEUI Window Pop-up Menu ................................................................................ 4-4BCEUI Toolbar........................................................................................................ 4-4BCEUI Shortcut Keys .............................................................................................. 4-4
Using the BCEUI Viewer ....................................................................................................... 4-5Selecting Events ....................................................................................................... 4-5Using the Event List................................................................................................. 4-7Controlling Scripts ................................................................................................. 4-10
Appendix A - Creating the Event Manager Log Table A-1Creating The EM_LOG Table............................................................................................... A-1
Appendix B - Performance Optimization B-1About Performance Optimization.......................................................................................... B-1Global Parameters ................................................................................................................. B-1
Setting the Maximum Number of Threads .............................................................. B-2Setting the Thread Timeout..................................................................................... B-2
Basic Control Engine Point Cache File ................................................................................. B-3
Appendix C - Developing User Applications With EM_EP C-1Enabling The Event Manager Envelope Process....................................................................C-1Adding a Procedure to the Event Manager Envelope Process................................................C-2Setting The Environment........................................................................................................C-2Files To Edit...........................................................................................................................C-3
emep_ext_app.h .......................................................................................................C-3emep_addr_ap.h .......................................................................................................C-3emep_usrfunc.c ........................................................................................................C-4
Rebuilding The Executable Files............................................................................................C-6Restrictions On User-Defined Functions ................................................................................C-7Example EM_EP Function .....................................................................................................C-8
action.idt ..................................................................................................................C-8User Functions - File emep_usrfunc.c......................................................................C-8External Declarations - File emep_ext_app.h ..........................................................C-9Initialization - File emep_addr_ap.h ........................................................................C-9
Index i
GFK-1282 1-1
Introduction
CIMPLICITY HMI FunctionalityCIMPLICITY HMI for Windows NT and Windows 98/95 software’s Base Systemfunctionality - Point Management, Alarm Management, Data Logging facilities, plusa full-functioned User Interface - lets CIMPLICITY HMI software users collect datafor reporting and visualize data via lists, graphic status displays, and alarms.Standard data communications ability makes CIMPLICITY HMI software a tool thatcan provide services such as the following:
• Downtime reporting
• Production reporting
• Records of production counts at work stations
• Graphic monitoring of automatic data point values
• Fault reporting via direct point values and alarms
CIMPLICITY HMI software’s flexible system architecture and modular designallows for easy add-on of functionality.
The Event Editor is included in the Basic Control Engine product option for GEFanuc’s CIMPLICITY HMI for Windows NT and Windows 98/95. It is fullyintegrated with CIMPLICITY HMI software’s Base System functionality, enhancingits already powerful monitoring capability in a full range of computer integratedmanufacturing environments.
The Event Editor lets you define actions to take in response to events that occur in aprocess. One event may invoke multiple actions, or one action may be invoked bymany events. An event can be defined as a changing point or alarm state, or even atime of day. Based on an event, you can perform the following actions:
• Set point values
• Acknowledge or clear alarms
• Create log file entries
• Invoke specific user-defined actions
• Invoke Basic Control Engine scripts to execute user-defined logic
At run-time, the Basic Control Engine monitors for events and executes theconfigured actions. The Basic Control Engine is based on a multi-threaded designwhich allows the system to invoke and execute multiple Basic Control Engine scriptsconcurrently.

GFK-1282 2-1
Event Management Concepts
Event Management DefinedYou use the Event Editor to define events and to take actions in response to thoseevents when they occur. The following may all be defined as events:
• A point’s status changes
• An alarm’s status changes
• A specific time of day occurs
• A specified time interval occurs
In response to events, you may define actions to set point values, manage alarms,create log file entries, and invoke specific user-defined actions.
Configured EventsYou can define the following types of events with the Event Editor:
Alarm State Changes These events are triggered when the Alarm Managerreports that the state of an alarm changes.
Point Changes These events are triggered when the Point Managerreports that the state or value of a point has changed.
Timed Events These events are triggered when a specific time of dayor time interval occurs.
2-2 CIMPLICITY HMI Event Editor Operation Manual GFK-1282
Configured ActionsAn event may invoke several actions, and an action may be invoked as a result ofmore than one events. You can define any of the following actions to be invoked in aspecific order when an event occurs:
Log Event Send a message to the Event Log that the event tookplace.
Acknowledge Alarms Acknowledge an alarm with a specified ID.
Enable/DisableAlarming for a Point
Send a message to the Point Manager to enable ordisable alarming for a device or global point.
RecipeUpload/Download
Upload or download a recipe.
Run a Script Run a Basic Control Engine script.
Set a Point Value Perform a setpoint operation to update the value of adevice point or global point.
Source TransitionSet Point
Perform a setpoint operation to update the value of adevice point or global point to the value of a sourcepoint.
Transition Set Point Perform a setpoint operation to update the value of adevice point or global point to the value of the pointdefined for the event.
Call an EnvelopeFunction
Run an envelope procedure.
Actions Versus EventsAny action can be invoked by any event. Below are a few of the ways actions andevents may be combined, with some comments about each.
Point Actions Basedon Point Events
You can use this type of event-action to passinformation between points.
Point Actions Basedon Alarm Events
You can use this type of event-action to allow aphysical indication of an alarm, such as activating alight on a control panel.
Events WhoseActions Call A User-Defined Routine orScript
You can use this type of event-action to define customfunctions that are invoked in response to configuredsystem events.

GFK-1282 Event Management Concepts 2-3
Event Manager Startup and Shutdown ScriptsThe Basic Control Engine calls a startup script when the Event Manager starts up anda termination script when it shuts down. These scripts are initially null (that is, theydo not do anything). You can use these scripts to perform initialization andtermination tasks, such as restoring and saving the value of a global variable. Thetwo scripts are:
• EM_INIT.BCL
• EM_TERM.BCL
You will find copies of these scripts in your project’s \scripts directory.

GFK-1282 3-1
Using the Event Editor
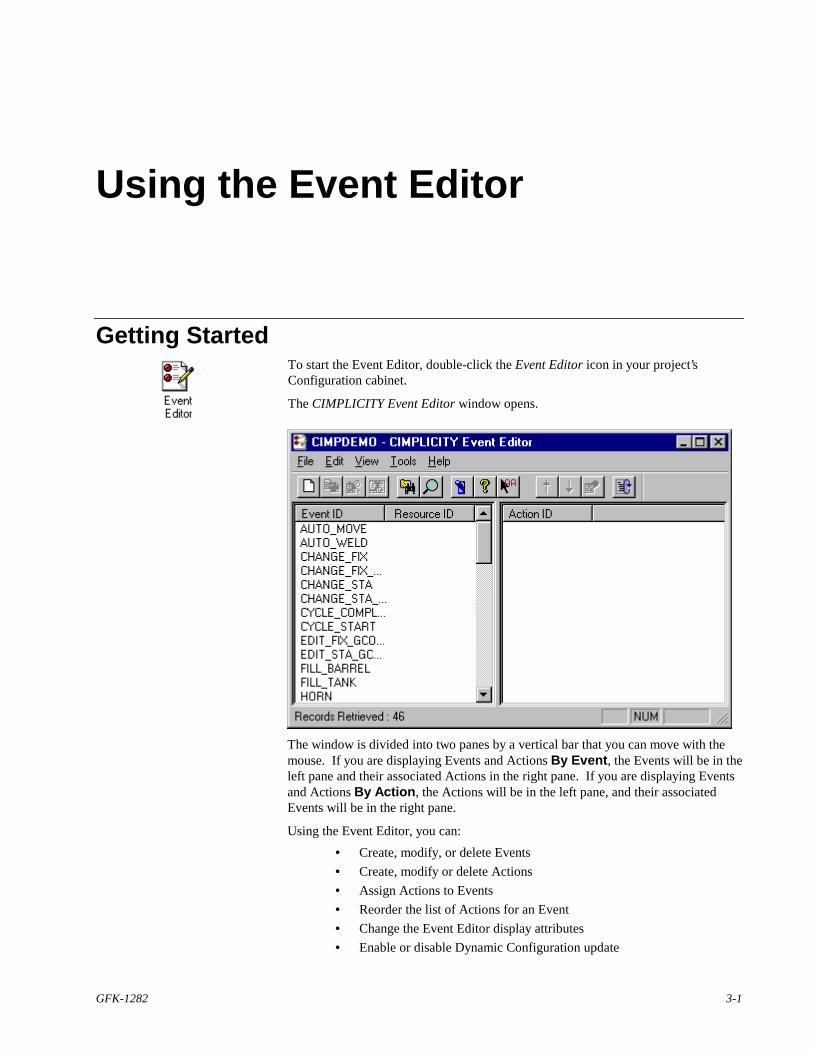
Getting StartedTo start the Event Editor, double-click the Event Editor icon in your project’sConfiguration cabinet.
The CIMPLICITY Event Editor window opens.
The window is divided into two panes by a vertical bar that you can move with themouse. If you are displaying Events and Actions By Event, the Events will be in theleft pane and their associated Actions in the right pane. If you are displaying Eventsand Actions By Action, the Actions will be in the left pane, and their associatedEvents will be in the right pane.
Using the Event Editor, you can:
• Create, modify, or delete Events
• Create, modify or delete Actions
• Assign Actions to Events
• Reorder the list of Actions for an Event
• Change the Event Editor display attributes
• Enable or disable Dynamic Configuration update
3-2 CIMPLICITY HMI Event Editor Operation Manual GFK-1282
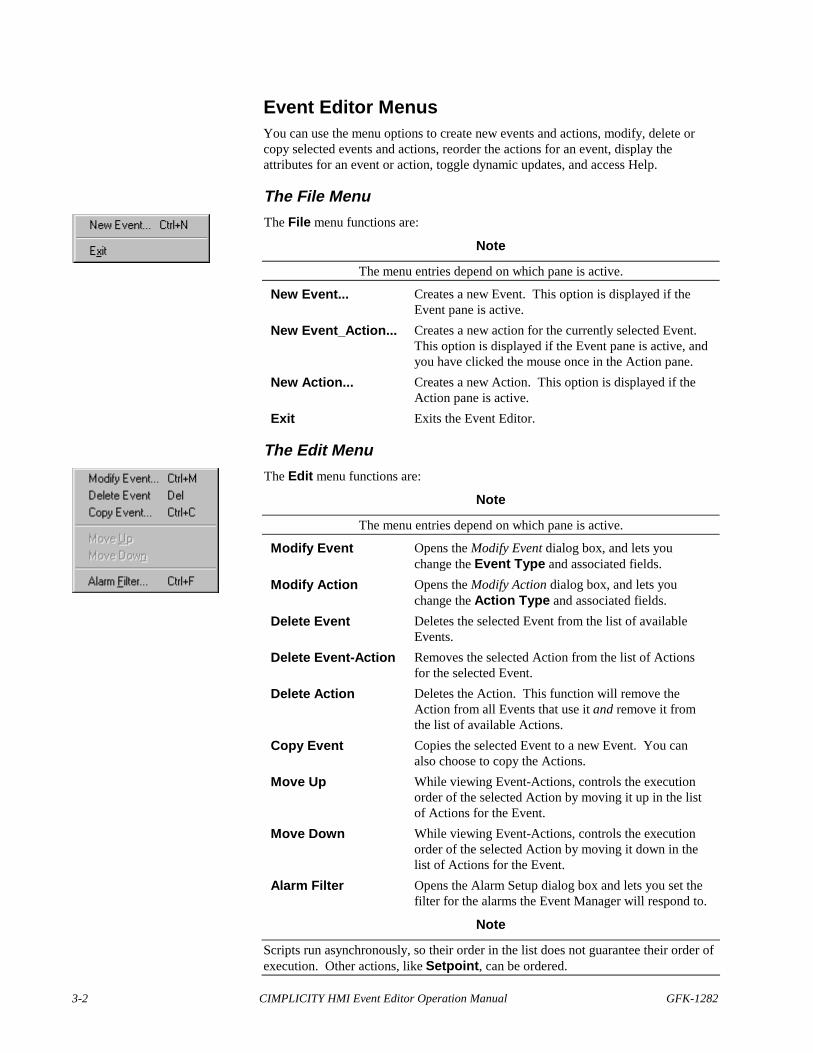
Event Editor MenusYou can use the menu options to create new events and actions, modify, delete orcopy selected events and actions, reorder the actions for an event, display theattributes for an event or action, toggle dynamic updates, and access Help.
The File Menu
The File menu functions are:
Note
The menu entries depend on which pane is active.
New Event... Creates a new Event. This option is displayed if theEvent pane is active.
New Event_Action... Creates a new action for the currently selected Event.This option is displayed if the Event pane is active, andyou have clicked the mouse once in the Action pane.
New Action... Creates a new Action. This option is displayed if theAction pane is active.
Exit Exits the Event Editor.
The Edit Menu
The Edit menu functions are:
Note
The menu entries depend on which pane is active.
Modify Event Opens the Modify Event dialog box, and lets youchange the Event Type and associated fields.
Modify Action Opens the Modify Action dialog box, and lets youchange the Action Type and associated fields.
Delete Event Deletes the selected Event from the list of availableEvents.
Delete Event-Action Removes the selected Action from the list of Actionsfor the selected Event.
Delete Action Deletes the Action. This function will remove theAction from all Events that use it and remove it fromthe list of available Actions.
Copy Event Copies the selected Event to a new Event. You canalso choose to copy the Actions.
Move Up While viewing Event-Actions, controls the executionorder of the selected Action by moving it up in the listof Actions for the Event.
Move Down While viewing Event-Actions, controls the executionorder of the selected Action by moving it down in thelist of Actions for the Event.
Alarm Filter Opens the Alarm Setup dialog box and lets you set thefilter for the alarms the Event Manager will respond to.
Note
Scripts run asynchronously, so their order in the list does not guarantee their order ofexecution. Other actions, like Setpoint, can be ordered.
GFK-1282 Using the Event Editor 3-3
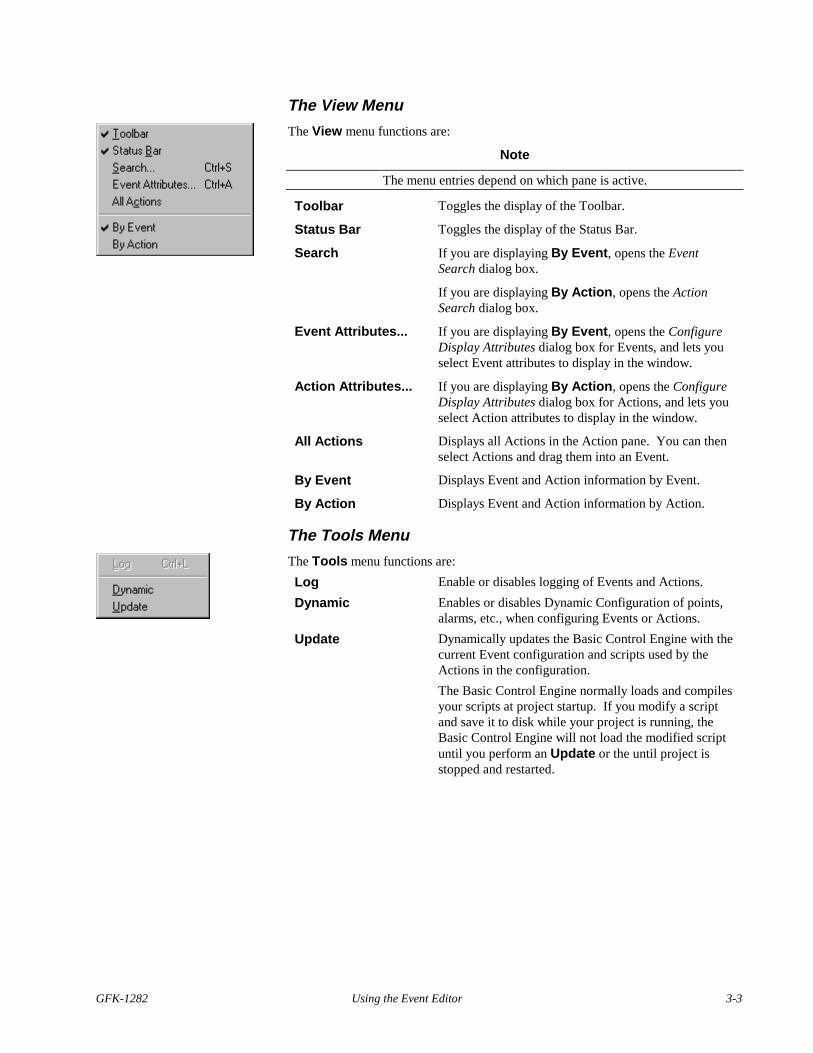
The View Menu
The View menu functions are:
Note
The menu entries depend on which pane is active.
Toolbar Toggles the display of the Toolbar.
Status Bar Toggles the display of the Status Bar.
Search If you are displaying By Event, opens the EventSearch dialog box.
If you are displaying By Action, opens the ActionSearch dialog box.
Event Attributes... If you are displaying By Event, opens the ConfigureDisplay Attributes dialog box for Events, and lets youselect Event attributes to display in the window.
Action Attributes... If you are displaying By Action, opens the ConfigureDisplay Attributes dialog box for Actions, and lets youselect Action attributes to display in the window.
All Actions Displays all Actions in the Action pane. You can thenselect Actions and drag them into an Event.
By Event Displays Event and Action information by Event.
By Action Displays Event and Action information by Action.
The Tools Menu
The Tools menu functions are:
Log Enable or disables logging of Events and Actions.
Dynamic Enables or disables Dynamic Configuration of points,alarms, etc., when configuring Events or Actions.
Update Dynamically updates the Basic Control Engine with thecurrent Event configuration and scripts used by theActions in the configuration.
The Basic Control Engine normally loads and compilesyour scripts at project startup. If you modify a scriptand save it to disk while your project is running, theBasic Control Engine will not load the modified scriptuntil you perform an Update or the until project isstopped and restarted.
3-4 CIMPLICITY HMI Event Editor Operation Manual GFK-1282
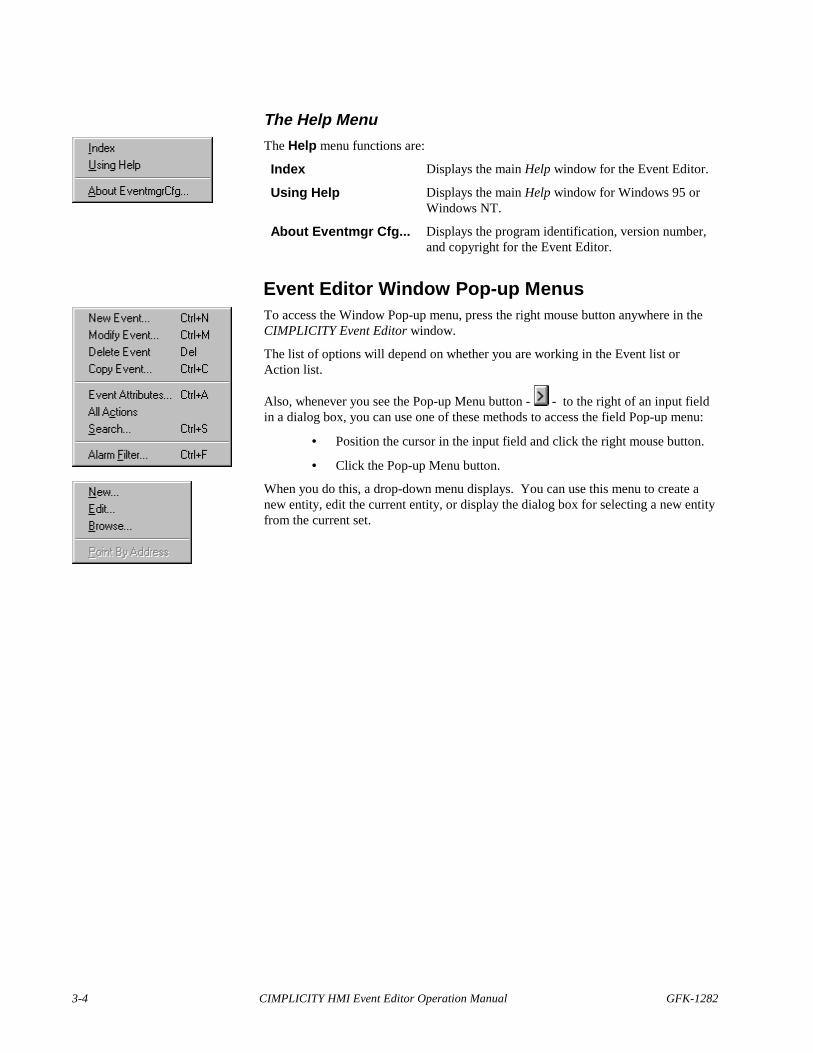
The Help Menu
The Help menu functions are:
Index Displays the main Help window for the Event Editor.
Using Help Displays the main Help window for Windows 95 orWindows NT.
About Eventmgr Cfg... Displays the program identification, version number,and copyright for the Event Editor.
Event Editor Window Pop-up MenusTo access the Window Pop-up menu, press the right mouse button anywhere in theCIMPLICITY Event Editor window.
The list of options will depend on whether you are working in the Event list orAction list.
Also, whenever you see the Pop-up Menu button - - to the right of an input fieldin a dialog box, you can use one of these methods to access the field Pop-up menu:
• Position the cursor in the input field and click the right mouse button.
• Click the Pop-up Menu button.
When you do this, a drop-down menu displays. You can use this menu to create anew entity, edit the current entity, or display the dialog box for selecting a new entityfrom the current set.
GFK-1282 Using the Event Editor 3-5
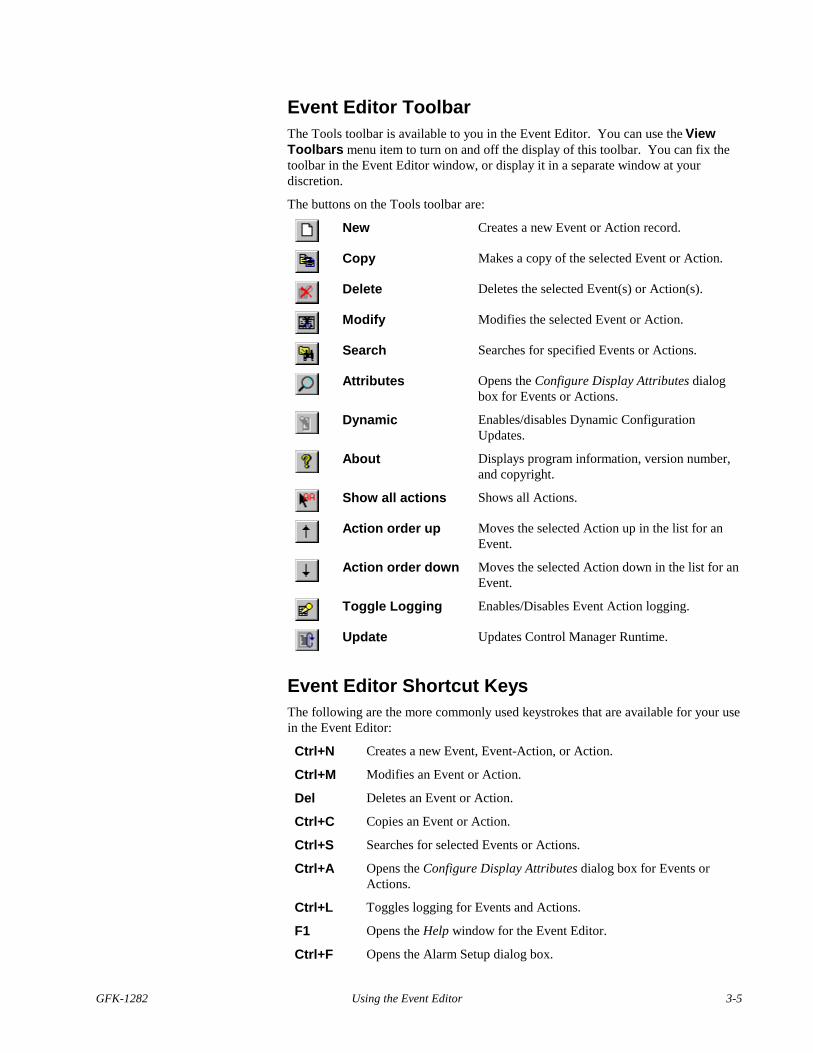
Event Editor ToolbarThe Tools toolbar is available to you in the Event Editor. You can use the ViewToolbars menu item to turn on and off the display of this toolbar. You can fix thetoolbar in the Event Editor window, or display it in a separate window at yourdiscretion.
The buttons on the Tools toolbar are:
New Creates a new Event or Action record.
Copy Makes a copy of the selected Event or Action.
Delete Deletes the selected Event(s) or Action(s).
Modify Modifies the selected Event or Action.
Search Searches for specified Events or Actions.
Attributes Opens the Configure Display Attributes dialogbox for Events or Actions.
Dynamic Enables/disables Dynamic ConfigurationUpdates.
About Displays program information, version number,and copyright.
Show all actions Shows all Actions.
Action order up Moves the selected Action up in the list for anEvent.
Action order down Moves the selected Action down in the list for anEvent.
Toggle Logging Enables/Disables Event Action logging.
Update Updates Control Manager Runtime.
Event Editor Shortcut KeysThe following are the more commonly used keystrokes that are available for your usein the Event Editor:
Ctrl+N Creates a new Event, Event-Action, or Action.
Ctrl+M Modifies an Event or Action.
Del Deletes an Event or Action.
Ctrl+C Copies an Event or Action.
Ctrl+S Searches for selected Events or Actions.
Ctrl+A Opens the Configure Display Attributes dialog box for Events orActions.
Ctrl+L Toggles logging for Events and Actions.
F1 Opens the Help window for the Event Editor.
Ctrl+F Opens the Alarm Setup dialog box.
3-6 CIMPLICITY HMI Event Editor Operation Manual GFK-1282
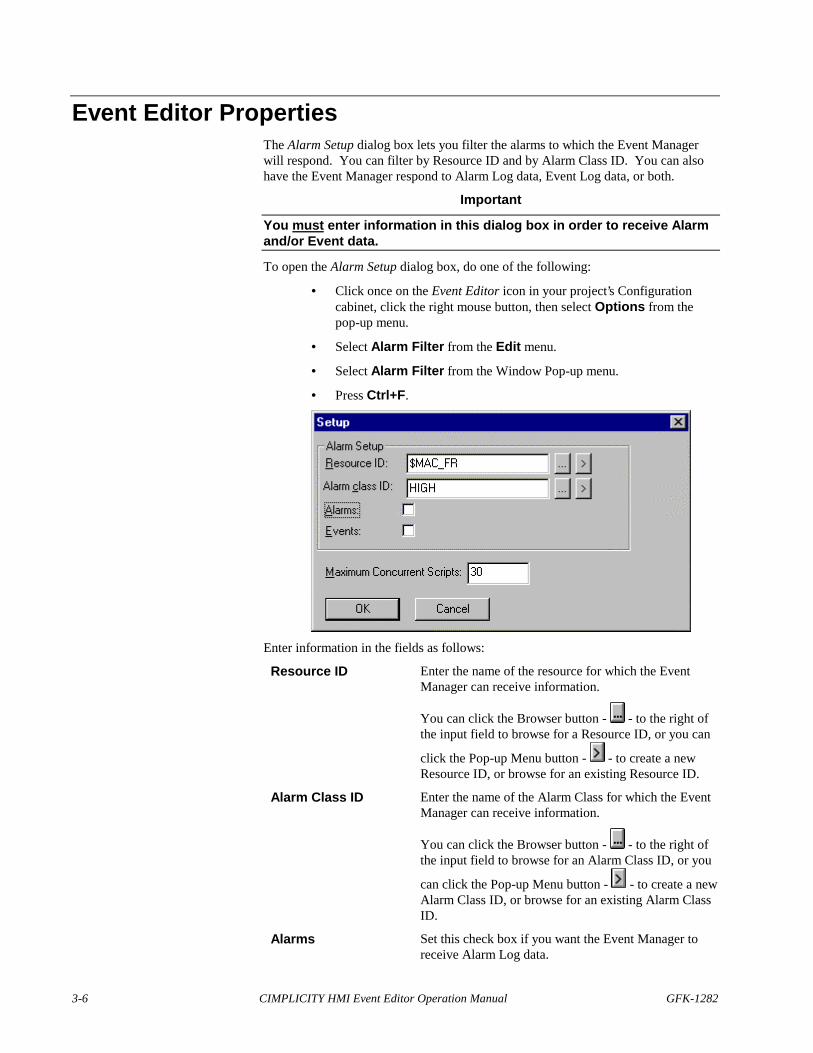
Event Editor PropertiesThe Alarm Setup dialog box lets you filter the alarms to which the Event Managerwill respond. You can filter by Resource ID and by Alarm Class ID. You can alsohave the Event Manager respond to Alarm Log data, Event Log data, or both.
Important
You must enter information in this dialog box in order to receive Alarmand/or Event data.
To open the Alarm Setup dialog box, do one of the following:
• Click once on the Event Editor icon in your project’s Configurationcabinet, click the right mouse button, then select Options from thepop-up menu.
• Select Alarm Filter from the Edit menu.
• Select Alarm Filter from the Window Pop-up menu.
• Press Ctrl+F.
Enter information in the fields as follows:
Resource ID Enter the name of the resource for which the EventManager can receive information.
You can click the Browser button - - to the right ofthe input field to browse for a Resource ID, or you can
click the Pop-up Menu button - - to create a newResource ID, or browse for an existing Resource ID.
Alarm Class ID Enter the name of the Alarm Class for which the EventManager can receive information.
You can click the Browser button - - to the right ofthe input field to browse for an Alarm Class ID, or you
can click the Pop-up Menu button - - to create a newAlarm Class ID, or browse for an existing Alarm ClassID.
Alarms Set this check box if you want the Event Manager toreceive Alarm Log data.

GFK-1282 Using the Event Editor 3-7
Clear the check box if you do not want the EventManager to receive any Alarm Log data.
Events Set this check box if you want the Event Manager toreceive Event Log data.
Clear the check box if you do not want the EventManager to receive any Event Log data.
MaximumConcurrent Scripts
Specifies the maximum number of scripts that canexecute concurrently within the Event Manager. Whenthis limit is exceeded an $EM_MAX_SCRIPTS alarmwill be generated. Additional a “Too many executingthreads, action ignored” message will appear in thestatus log.
Sample ConfigurationsHere are some examples of how you can filter information for the Event Manager.
If you want the Event Manager to receive all alarms and events:
1. Leave the Resource ID and Alarm Class ID fields blank.
2. Set the Alarms and Event check boxes.
If you want the Event Manager to only receive Event Log data for system resources:
1. Enter "$SYSTEM" in the Resource ID field.
2. Leave the Alarm Class ID field blank.
3. Leave the Alarms check box blank.
4. Set the Events check box.
If you want the Event Manager to receive alarms and events for all resources, by thealarms will be restricted to the "HIGH" class from "$SYSTEM" resources:
1. Enter "$SYSTEM" in the Resource ID field.
2. Enter "HIGH" in the Alarm Class ID field.
3. Set the Alarms and Events check boxes.
3-8 CIMPLICITY HMI Event Editor Operation Manual GFK-1282
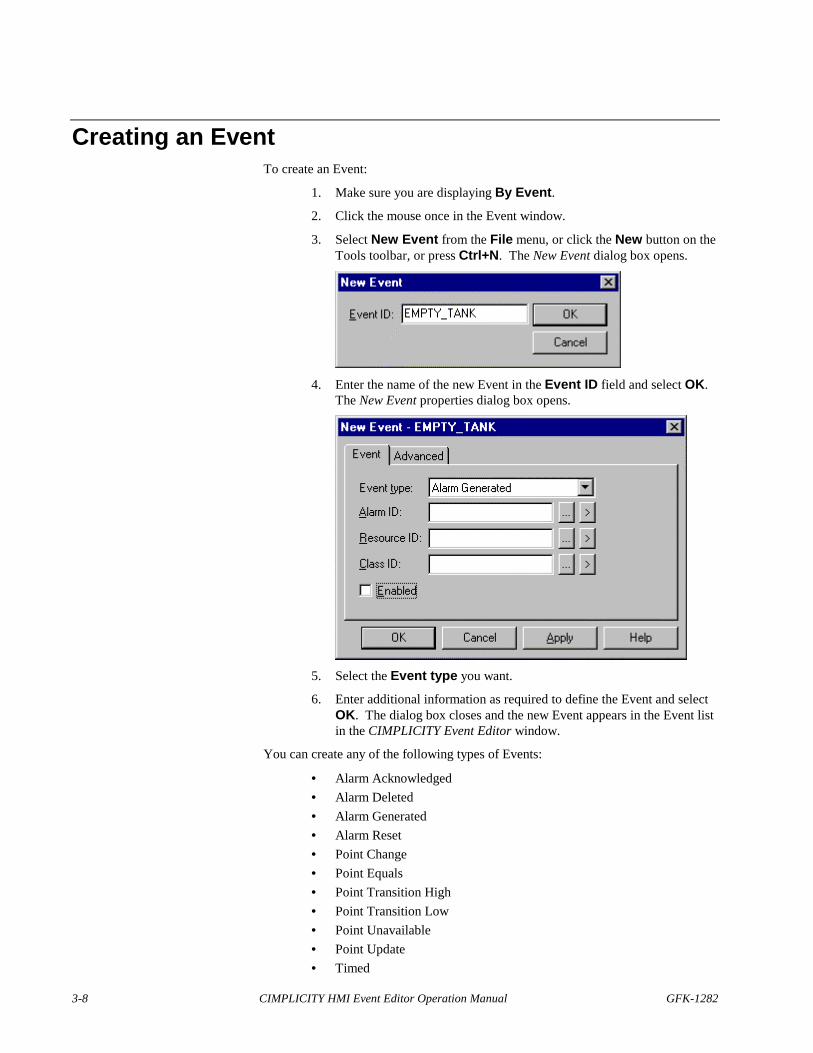
Creating an EventTo create an Event:
1. Make sure you are displaying By Event.
2. Click the mouse once in the Event window.
3. Select New Event from the File menu, or click the New button on theTools toolbar, or press Ctrl+N. The New Event dialog box opens.
4. Enter the name of the new Event in the Event ID field and select OK.The New Event properties dialog box opens.
5. Select the Event type you want.
6. Enter additional information as required to define the Event and selectOK. The dialog box closes and the new Event appears in the Event listin the CIMPLICITY Event Editor window.
You can create any of the following types of Events:
• Alarm Acknowledged
• Alarm Deleted
• Alarm Generated
• Alarm Reset
• Point Change
• Point Equals
• Point Transition High
• Point Transition Low
• Point Unavailable
• Point Update
• Timed

GFK-1282 Using the Event Editor 3-9
Alarm Acknowledged EventsAlarms can be acknowledgedmanually by operators, orautomatically via software.
An Alarm Acknowledged Event occurs when the alarm identified in the Alarm IDfield for the Event is acknowledged.
To create this Event, enter the following information in the New Event dialog box:
Alarm ID Enter the ID of the alarm or wildcard pattern that will trigger thisevent when it is acknowledged.
You can click the Browser button - - to the right of the inputfield to browse for an Alarm ID, or you can click the Pop-up Menu
button - - to create a new Alarm ID, or browse for an existingAlarm ID.
Resource Leave this field blank if you want the Event to be generatedwhenever the alarm is acknowledged.
Enter a Resource ID in this field if you want the Event to begenerated only when the alarm is acknowledged for that resource.
You can click the Browser button - - to the right of the inputfield to browse for a Resource ID, or you can click the Pop-up
Menu button - - to create a new Resource ID, or browse for anexisting Resource ID.
Class ID Select the alarm classification that will evaluate this event. To createa new classification, select New from the right mouse menu or theClass ID popup menu..
Enabled If you want the Event to be enabled, set this check box.
To disable the Event, clear the check box.
3-10 CIMPLICITY HMI Event Editor Operation Manual GFK-1282
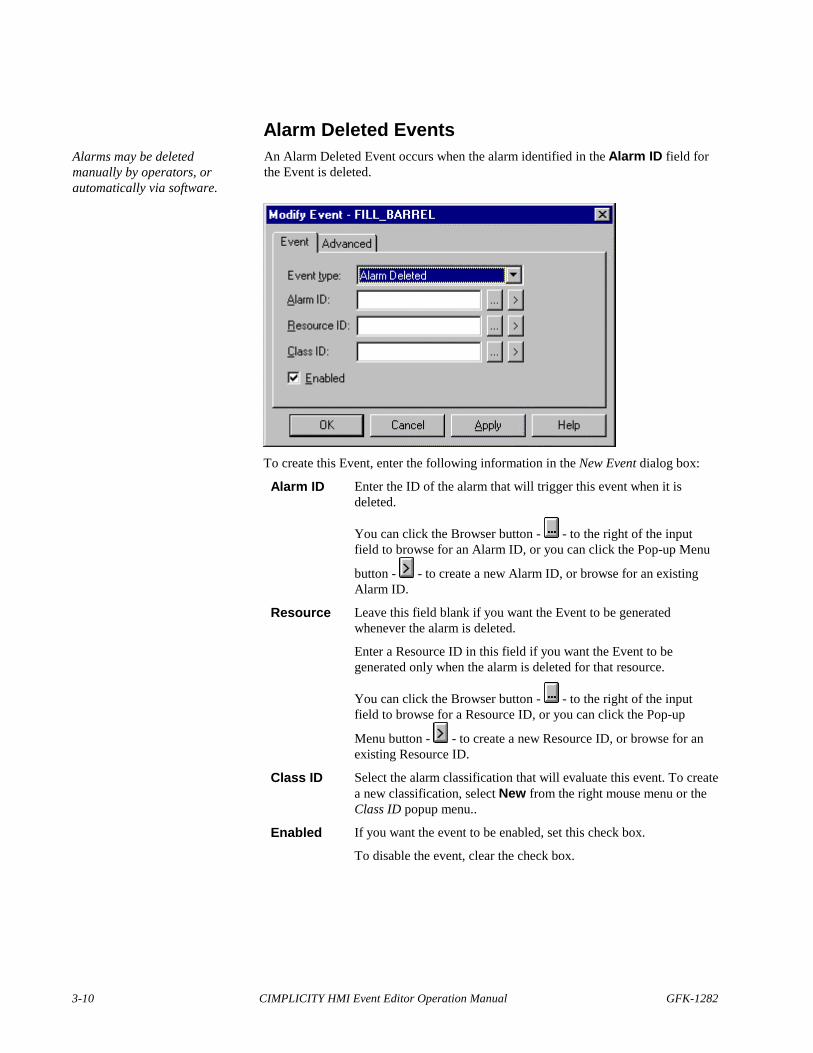
Alarm Deleted EventsAlarms may be deletedmanually by operators, orautomatically via software.
An Alarm Deleted Event occurs when the alarm identified in the Alarm ID field forthe Event is deleted.
To create this Event, enter the following information in the New Event dialog box:
Alarm ID Enter the ID of the alarm that will trigger this event when it isdeleted.
You can click the Browser button - - to the right of the inputfield to browse for an Alarm ID, or you can click the Pop-up Menu
button - - to create a new Alarm ID, or browse for an existingAlarm ID.
Resource Leave this field blank if you want the Event to be generatedwhenever the alarm is deleted.
Enter a Resource ID in this field if you want the Event to begenerated only when the alarm is deleted for that resource.
You can click the Browser button - - to the right of the inputfield to browse for a Resource ID, or you can click the Pop-up
Menu button - - to create a new Resource ID, or browse for anexisting Resource ID.
Class ID Select the alarm classification that will evaluate this event. To createa new classification, select New from the right mouse menu or theClass ID popup menu..
Enabled If you want the event to be enabled, set this check box.
To disable the event, clear the check box.

GFK-1282 Using the Event Editor 3-11
Alarm Generated EventsAn Alarm Generated Event occurs when the alarm identified in the Alarm ID fieldfor the Event is generated.
To create this Event, enter the following information in the New Event dialog box:
Alarm ID Enter the ID of the alarm or wildcard pattern that will trigger thisevent when it is generated.
You can click the Browser button - - to the right of the inputfield to browse for an Alarm ID, or you can click the Pop-up Menu
button - - to create a new Alarm ID, or browse for an existingAlarm ID.
Resource Leave this field blank if you want the Event to be generatedwhenever the alarm is generated.
Enter a Resource ID in this field if you want the Event to begenerated only when the alarm is generated for that resource.
You can click the Browser button - - to the right of the inputfield to browse for a Resource ID, or you can click the Pop-up
Menu button - - to create a new Resource ID, or browse for anexisting Resource ID.
Class ID Select the alarm classification that will evaluate this event. To createa new classification, select New from the right mouse menu or theClass ID popup menu..
Enabled If you want the event to be enabled, set this check box.
To disable the event, clear the check box.
Note: All alarm events allow wildcards for pattern matching. Valid wildcards are *and ?. In the above example , the event "Alarm" will occur whenever a HIGH Classalarm occurs.

3-12 CIMPLICITY HMI Event Editor Operation Manual GFK-1282
Alarm Reset EventsAlarms can be reset manuallyby operators, orautomatically via software.
An Alarm Reset Event occurs when the alarm identified in the Alarm ID field for theEvent is reset.
To create this Event, enter the following information in the New Event dialog box:
Alarm ID Enter the ID of the alarm or wildcard pattern that will trigger thisevent when it is reset.
You can click the Browser button - - to the right of the inputfield to browse for an Alarm ID, or you can click the Pop-up Menu
button - - to create a new Alarm ID, or browse for an existingAlarm ID.
Resource Leave this field blank if you want the Event to be generatedwhenever the alarm is reset.
Enter a Resource ID in this field if you want the Event to begenerated only when the alarm is reset for that resource.
You can click the Browser button - - to the right of the inputfield to browse for a Resource ID, or you can click the Pop-up
Menu button - - to create a new Resource ID, or browse for anexisting Resource ID.
Class ID Select the alarm classification that will evaluate this event. To createa new classification, select New from the right mouse menu or theClass ID popup menu..
Enabled If you want the event to be enabled, set this check box.
To disable the event, clear the check box.
GFK-1282 Using the Event Editor 3-13
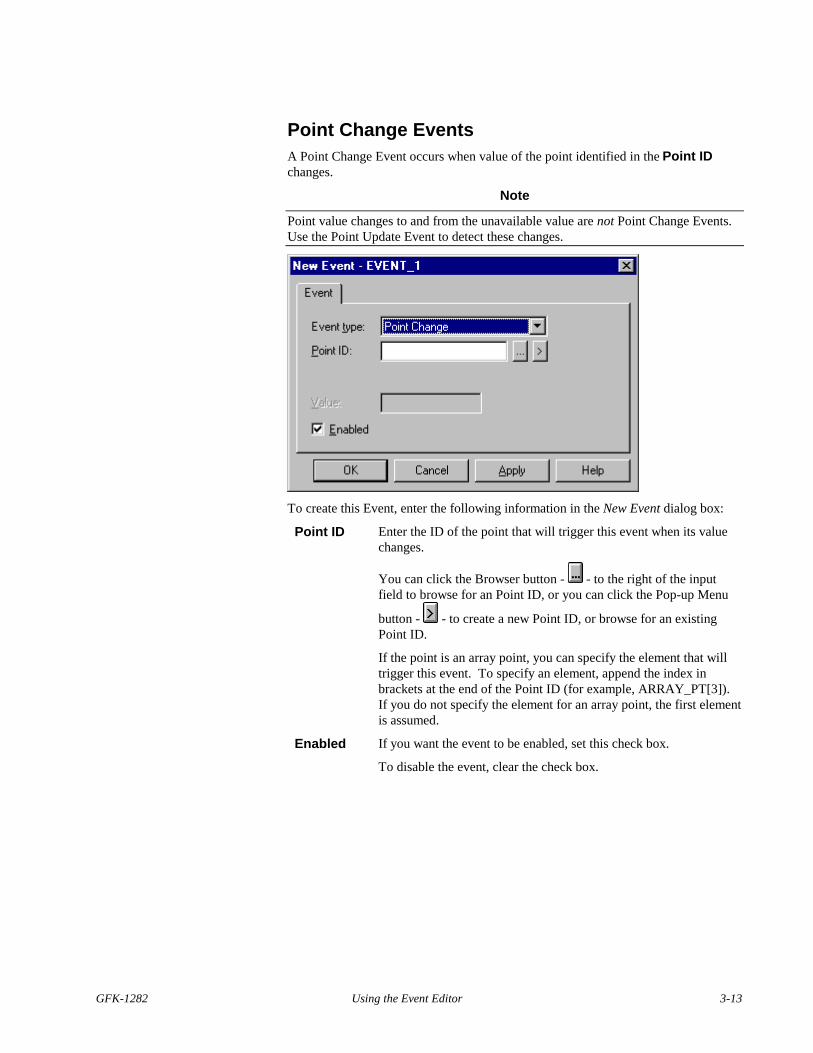
Point Change EventsA Point Change Event occurs when value of the point identified in the Point IDchanges.
Note
Point value changes to and from the unavailable value are not Point Change Events.Use the Point Update Event to detect these changes.
To create this Event, enter the following information in the New Event dialog box:
Point ID Enter the ID of the point that will trigger this event when its valuechanges.
You can click the Browser button - - to the right of the inputfield to browse for an Point ID, or you can click the Pop-up Menu
button - - to create a new Point ID, or browse for an existingPoint ID.
If the point is an array point, you can specify the element that willtrigger this event. To specify an element, append the index inbrackets at the end of the Point ID (for example, ARRAY_PT[3]).If you do not specify the element for an array point, the first elementis assumed.
Enabled If you want the event to be enabled, set this check box.
To disable the event, clear the check box.
3-14 CIMPLICITY HMI Event Editor Operation Manual GFK-1282
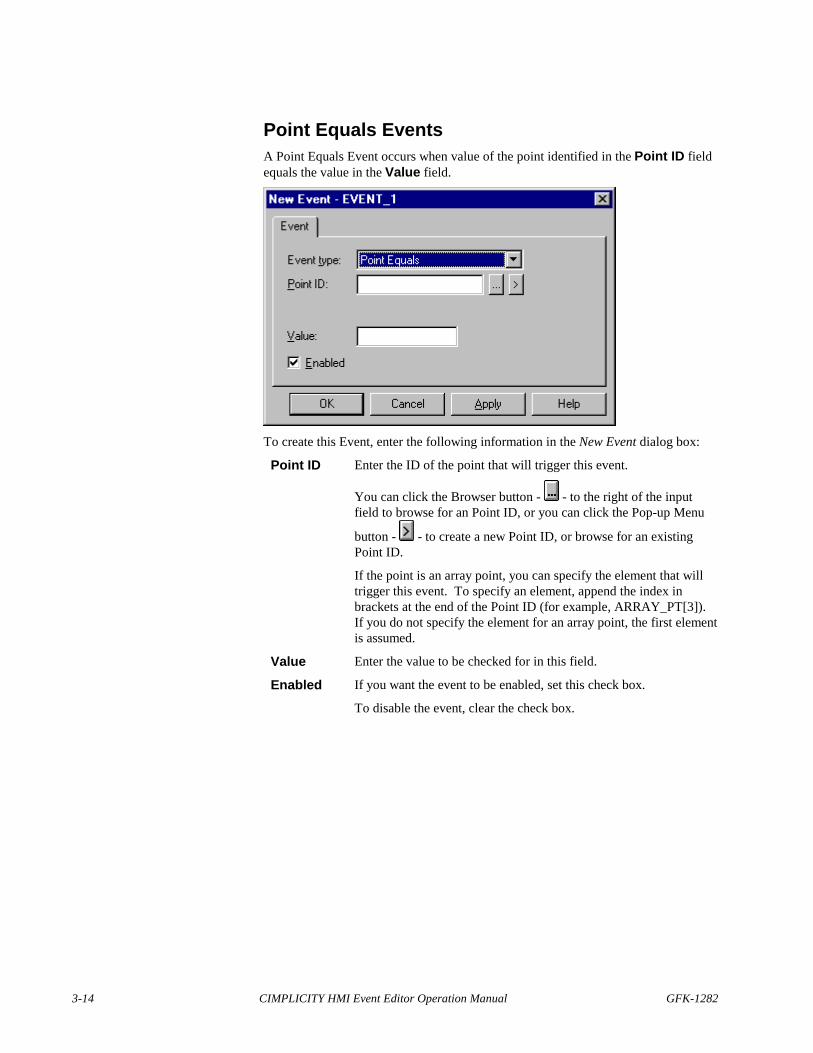
Point Equals EventsA Point Equals Event occurs when value of the point identified in the Point ID fieldequals the value in the Value field.
To create this Event, enter the following information in the New Event dialog box:
Point ID Enter the ID of the point that will trigger this event.
You can click the Browser button - - to the right of the inputfield to browse for an Point ID, or you can click the Pop-up Menu
button - - to create a new Point ID, or browse for an existingPoint ID.
If the point is an array point, you can specify the element that willtrigger this event. To specify an element, append the index inbrackets at the end of the Point ID (for example, ARRAY_PT[3]).If you do not specify the element for an array point, the first elementis assumed.
Value Enter the value to be checked for in this field.
Enabled If you want the event to be enabled, set this check box.
To disable the event, clear the check box.
GFK-1282 Using the Event Editor 3-15
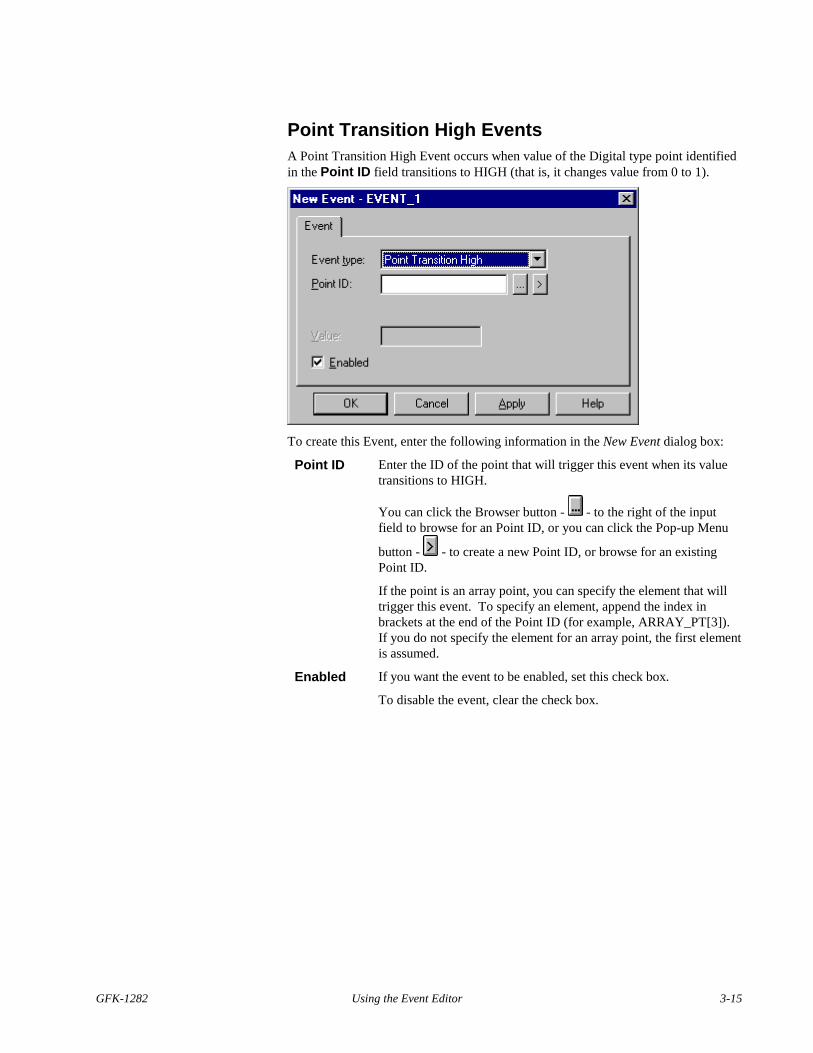
Point Transition High EventsA Point Transition High Event occurs when value of the Digital type point identifiedin the Point ID field transitions to HIGH (that is, it changes value from 0 to 1).
To create this Event, enter the following information in the New Event dialog box:
Point ID Enter the ID of the point that will trigger this event when its valuetransitions to HIGH.
You can click the Browser button - - to the right of the inputfield to browse for an Point ID, or you can click the Pop-up Menu
button - - to create a new Point ID, or browse for an existingPoint ID.
If the point is an array point, you can specify the element that willtrigger this event. To specify an element, append the index inbrackets at the end of the Point ID (for example, ARRAY_PT[3]).If you do not specify the element for an array point, the first elementis assumed.
Enabled If you want the event to be enabled, set this check box.
To disable the event, clear the check box.
3-16 CIMPLICITY HMI Event Editor Operation Manual GFK-1282
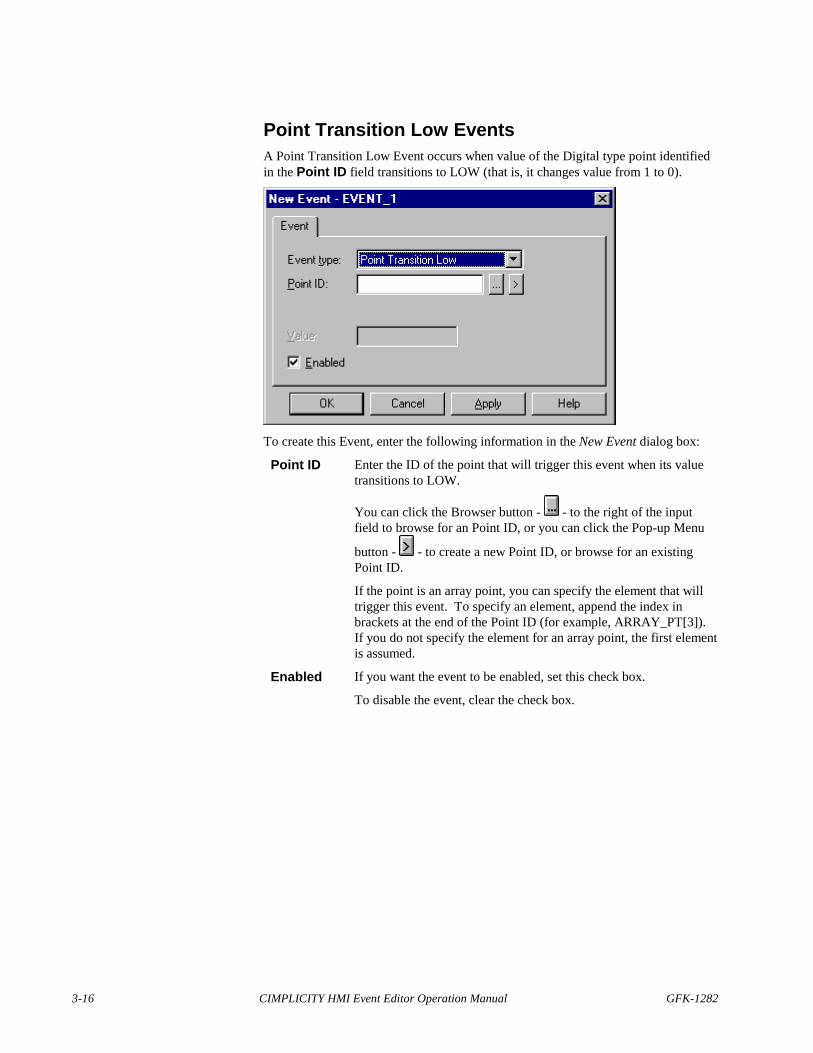
Point Transition Low EventsA Point Transition Low Event occurs when value of the Digital type point identifiedin the Point ID field transitions to LOW (that is, it changes value from 1 to 0).
To create this Event, enter the following information in the New Event dialog box:
Point ID Enter the ID of the point that will trigger this event when its valuetransitions to LOW.
You can click the Browser button - - to the right of the inputfield to browse for an Point ID, or you can click the Pop-up Menu
button - - to create a new Point ID, or browse for an existingPoint ID.
If the point is an array point, you can specify the element that willtrigger this event. To specify an element, append the index inbrackets at the end of the Point ID (for example, ARRAY_PT[3]).If you do not specify the element for an array point, the first elementis assumed.
Enabled If you want the event to be enabled, set this check box.
To disable the event, clear the check box.
GFK-1282 Using the Event Editor 3-17
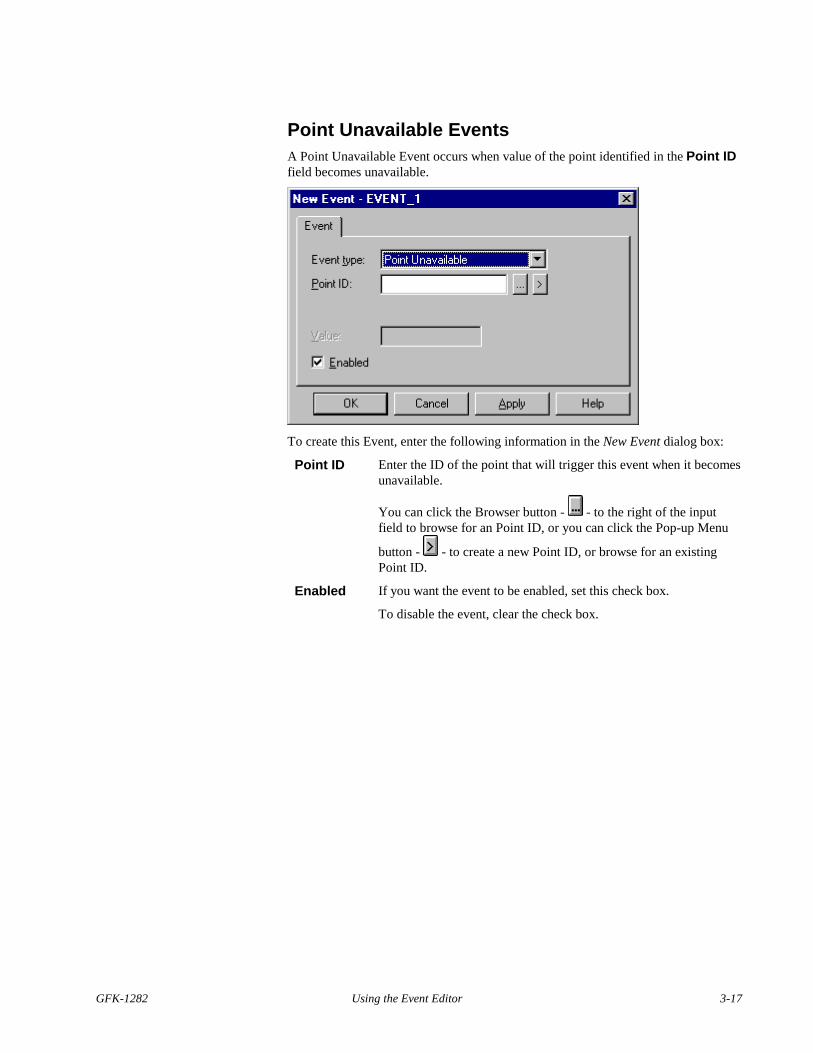
Point Unavailable EventsA Point Unavailable Event occurs when value of the point identified in the Point IDfield becomes unavailable.
To create this Event, enter the following information in the New Event dialog box:
Point ID Enter the ID of the point that will trigger this event when it becomesunavailable.
You can click the Browser button - - to the right of the inputfield to browse for an Point ID, or you can click the Pop-up Menu
button - - to create a new Point ID, or browse for an existingPoint ID.
Enabled If you want the event to be enabled, set this check box.
To disable the event, clear the check box.
3-18 CIMPLICITY HMI Event Editor Operation Manual GFK-1282
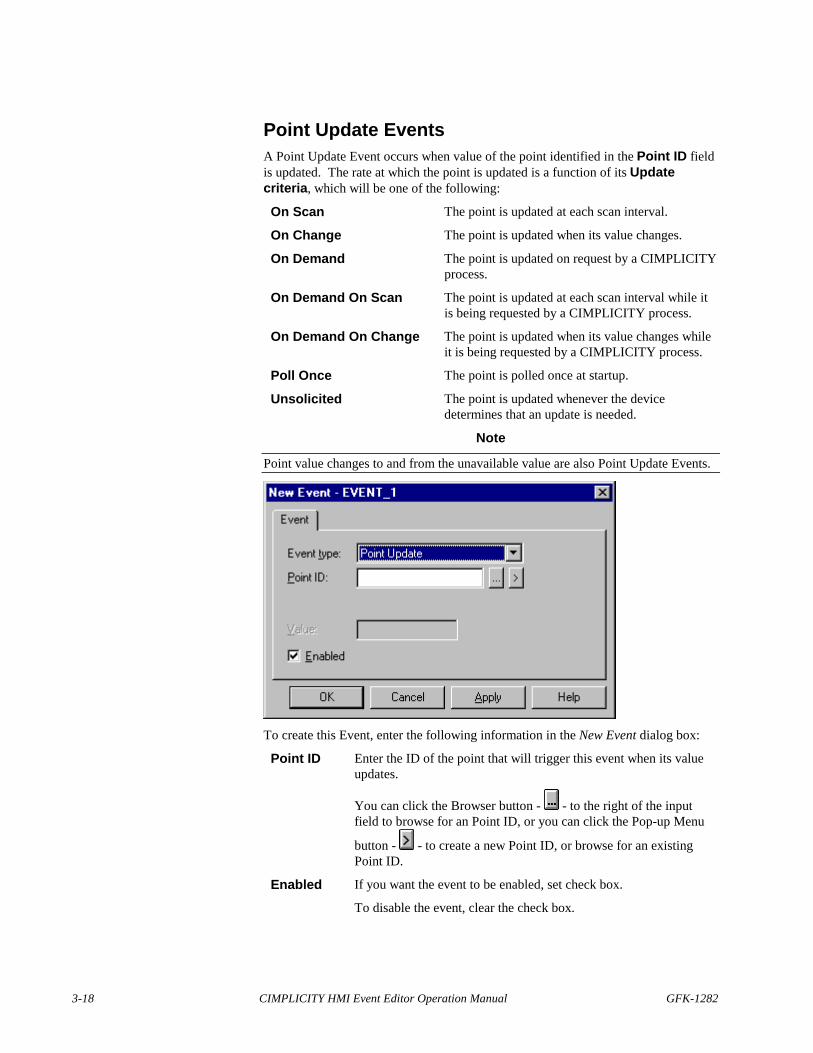
Point Update EventsA Point Update Event occurs when value of the point identified in the Point ID fieldis updated. The rate at which the point is updated is a function of its Updatecriteria, which will be one of the following:
On Scan The point is updated at each scan interval.
On Change The point is updated when its value changes.
On Demand The point is updated on request by a CIMPLICITYprocess.
On Demand On Scan The point is updated at each scan interval while itis being requested by a CIMPLICITY process.
On Demand On Change The point is updated when its value changes whileit is being requested by a CIMPLICITY process.
Poll Once The point is polled once at startup.
Unsolicited The point is updated whenever the devicedetermines that an update is needed.
Note
Point value changes to and from the unavailable value are also Point Update Events.
To create this Event, enter the following information in the New Event dialog box:
Point ID Enter the ID of the point that will trigger this event when its valueupdates.
You can click the Browser button - - to the right of the inputfield to browse for an Point ID, or you can click the Pop-up Menu
button - - to create a new Point ID, or browse for an existingPoint ID.
Enabled If you want the event to be enabled, set check box.
To disable the event, clear the check box.
GFK-1282 Using the Event Editor 3-19
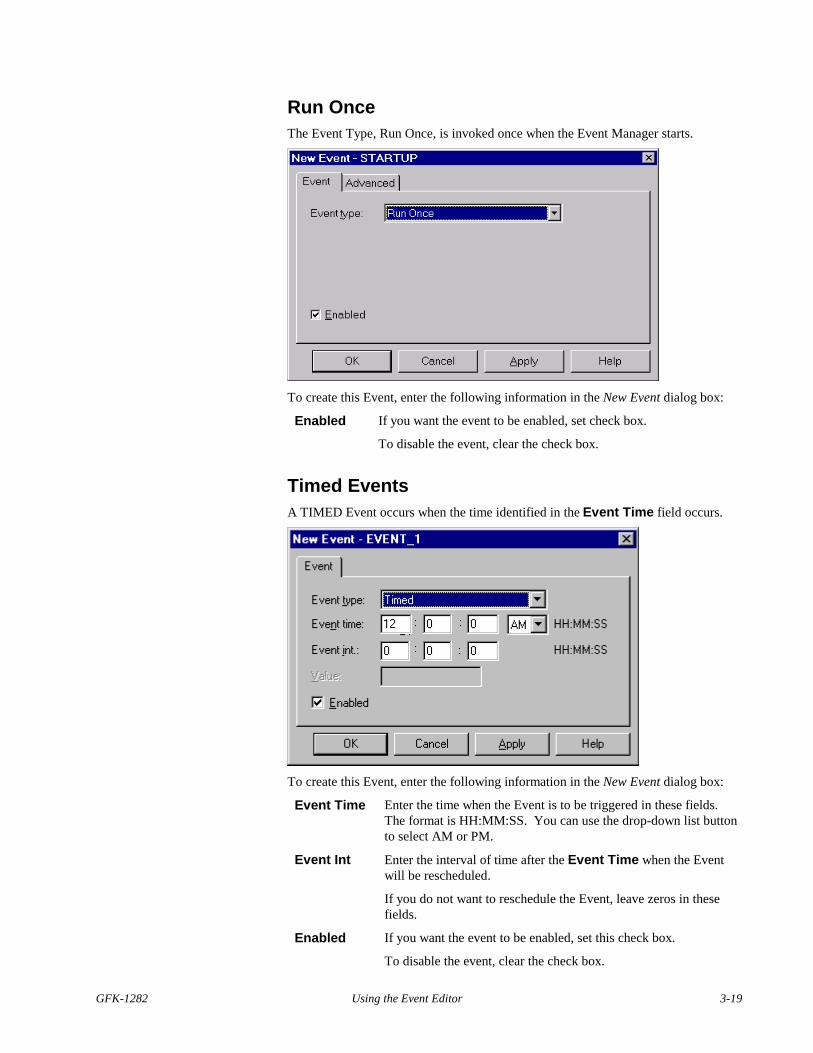
Run OnceThe Event Type, Run Once, is invoked once when the Event Manager starts.
To create this Event, enter the following information in the New Event dialog box:
Enabled If you want the event to be enabled, set check box.
To disable the event, clear the check box.
Timed EventsA TIMED Event occurs when the time identified in the Event Time field occurs.
To create this Event, enter the following information in the New Event dialog box:
Event Time Enter the time when the Event is to be triggered in these fields.The format is HH:MM:SS. You can use the drop-down list buttonto select AM or PM.
Event Int Enter the interval of time after the Event Time when the Eventwill be rescheduled.
If you do not want to reschedule the Event, leave zeros in thesefields.
Enabled If you want the event to be enabled, set this check box.
To disable the event, clear the check box.
3-20 CIMPLICITY HMI Event Editor Operation Manual GFK-1282
Timed Event Example
If you have an Event that you want to be scheduled every 15 minutes on the quarterhour, you can do the following:
1. Enter 00:15:00 AM in the Event Time field
2. Enter 01:00:00 in the Event Int field.
So the event is scheduled at 00:15:00 AM, 01:15:00 AM, 02:15:00 AM, etc.
If you have an Event that you want to be scheduled every 15 minutes, you can do thefollowing:
1. Enter 00:00:00 in the Event Time field.
2. Enter 00:15:00 in the Event Int field.
So the event is scheduled at 00:15:00 AM, 00:30:00 AM, 00:45:00 AM, etc.
If you have an Event that you want to be scheduled at 2:30 AM everyday, you can dothe following:
1. Enter 00:02:30 AM in the Event Time field.
2. Enter 00:00:00 in the Event Int field.
So the event is scheduled at 2:30 AM everyday.
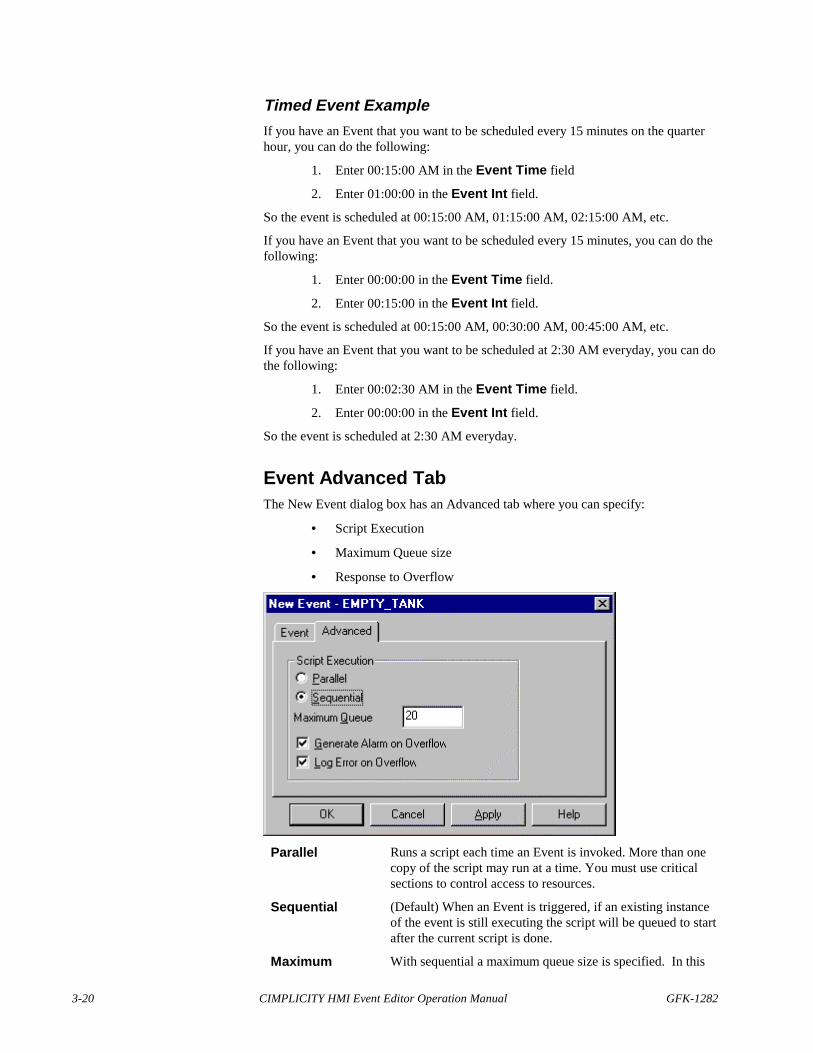
Event Advanced TabThe New Event dialog box has an Advanced tab where you can specify:
• Script Execution
• Maximum Queue size
• Response to Overflow
Parallel Runs a script each time an Event is invoked. More than onecopy of the script may run at a time. You must use criticalsections to control access to resources.
Sequential (Default) When an Event is triggered, if an existing instanceof the event is still executing the script will be queued to startafter the current script is done.
Maximum With sequential a maximum queue size is specified. In this

GFK-1282 Using the Event Editor 3-21
Queue case when more the 20 events are queued, the oldest will bediscarded.
Generate Alarmon Overflow
(Default) If the sequential queue overflows, check this box togenerate an $EM_QUEUE alarm when the queue overflows.
NoteIf your event is an alarm event, generating an alarm maycause your event to trigger again and generate another alarm.This will cause a circular cycle of alarms.
Log Error onOverflow
(Default) If the sequential queue overflows, check this box togenerate an message in the status log.
3-22 CIMPLICITY HMI Event Editor Operation Manual GFK-1282
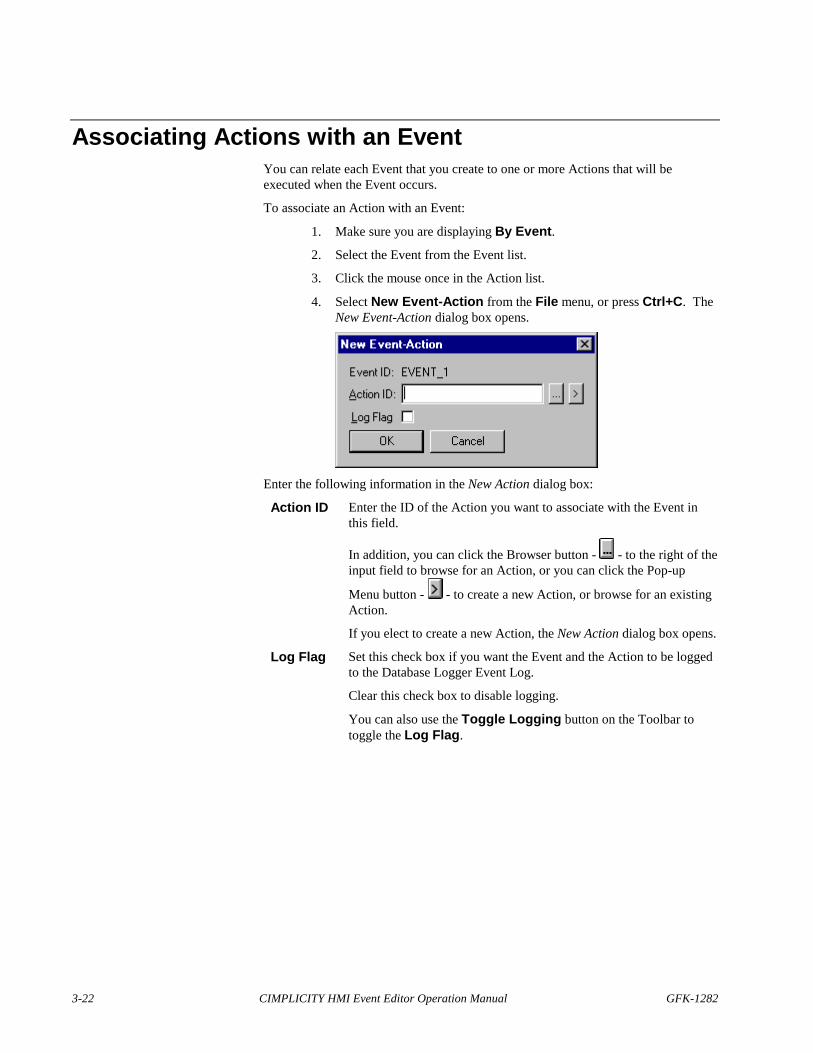
Associating Actions with an EventYou can relate each Event that you create to one or more Actions that will beexecuted when the Event occurs.
To associate an Action with an Event:
1. Make sure you are displaying By Event.
2. Select the Event from the Event list.
3. Click the mouse once in the Action list.
4. Select New Event-Action from the File menu, or press Ctrl+C. TheNew Event-Action dialog box opens.
Enter the following information in the New Action dialog box:
Action ID Enter the ID of the Action you want to associate with the Event inthis field.
In addition, you can click the Browser button - - to the right of theinput field to browse for an Action, or you can click the Pop-up
Menu button - - to create a new Action, or browse for an existingAction.
If you elect to create a new Action, the New Action dialog box opens.
Log Flag Set this check box if you want the Event and the Action to be loggedto the Database Logger Event Log.
Clear this check box to disable logging.
You can also use the Toggle Logging button on the Toolbar totoggle the Log Flag.
GFK-1282 Using the Event Editor 3-23
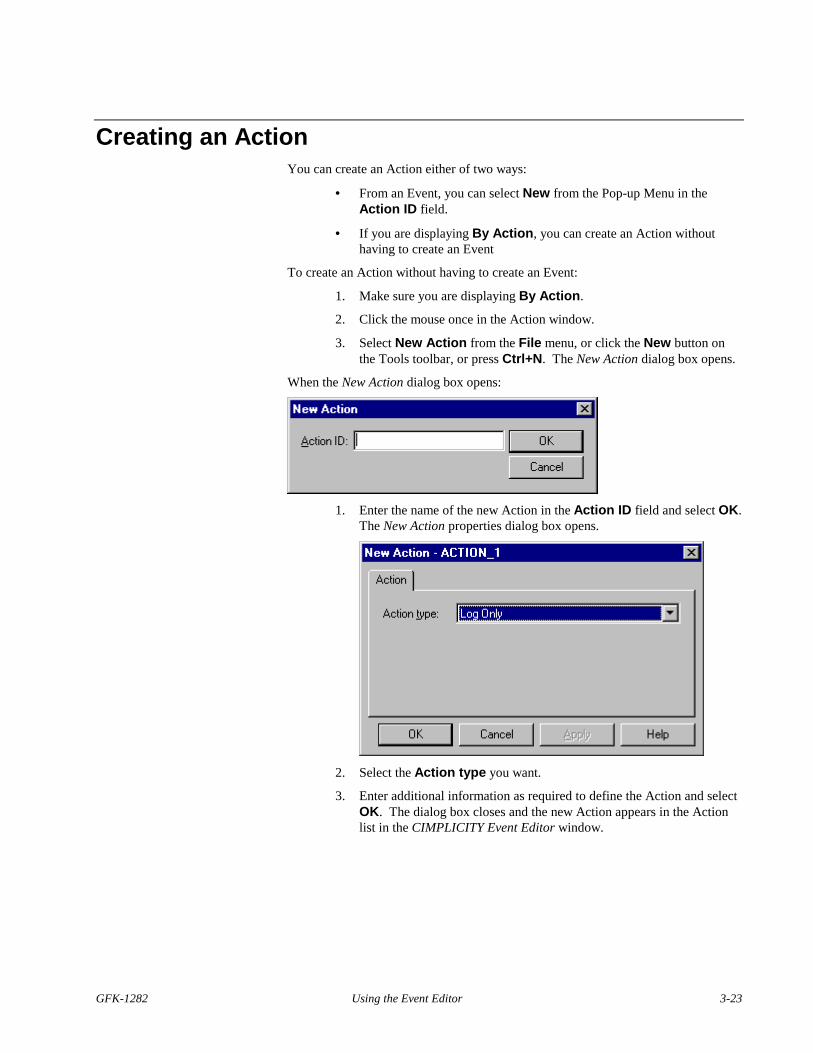
Creating an ActionYou can create an Action either of two ways:
• From an Event, you can select New from the Pop-up Menu in theAction ID field.
• If you are displaying By Action, you can create an Action withouthaving to create an Event
To create an Action without having to create an Event:
1. Make sure you are displaying By Action.
2. Click the mouse once in the Action window.
3. Select New Action from the File menu, or click the New button onthe Tools toolbar, or press Ctrl+N. The New Action dialog box opens.
When the New Action dialog box opens:
1. Enter the name of the new Action in the Action ID field and select OK.The New Action properties dialog box opens.
2. Select the Action type you want.
3. Enter additional information as required to define the Action and selectOK. The dialog box closes and the new Action appears in the Actionlist in the CIMPLICITY Event Editor window.

3-24 CIMPLICITY HMI Event Editor Operation Manual GFK-1282
You can create any of the following types of Actions:
• Alarm Look-Up
• Log Only
• Point Alarm Acknowledge
• Point Alarm Disable
• Point Alarm Enable
• Recipe Upload/Download
• Run Script
• Set Point
• Source Transition Set
• Transition Set
• Call Envelope Function
GFK-1282 Using the Event Editor 3-25
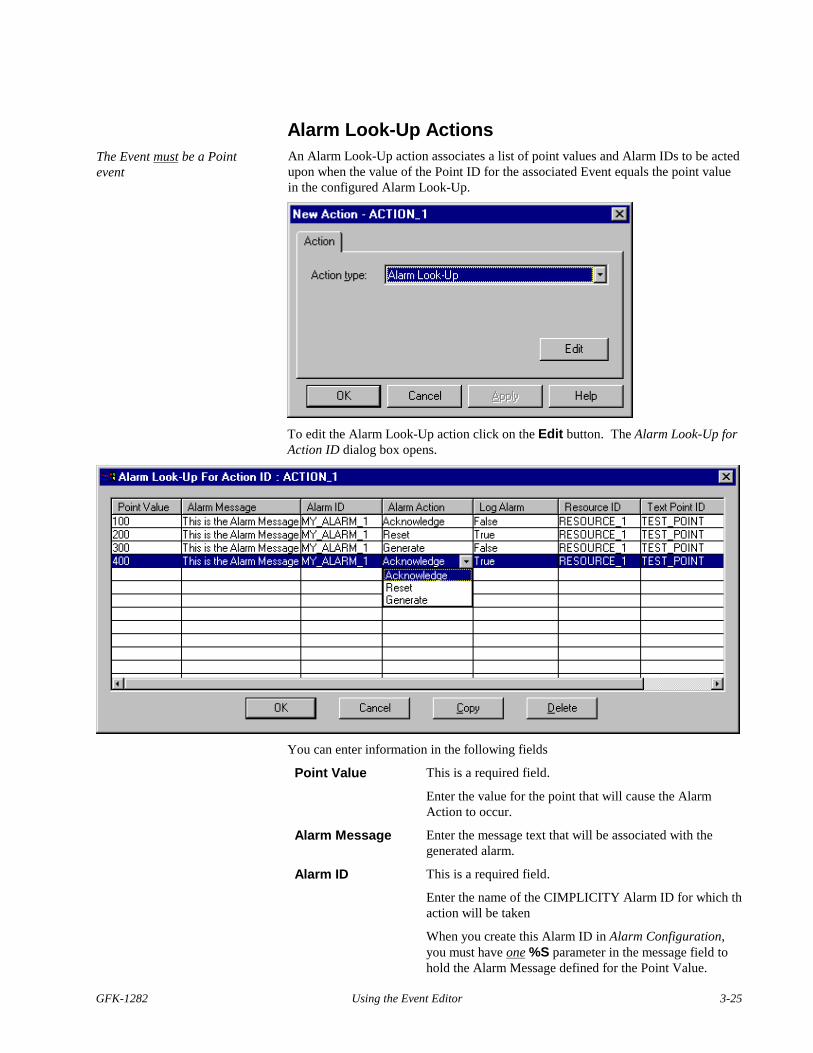
Alarm Look-Up ActionsThe Event must be a Pointevent
An Alarm Look-Up action associates a list of point values and Alarm IDs to be actedupon when the value of the Point ID for the associated Event equals the point valuein the configured Alarm Look-Up.
To edit the Alarm Look-Up action click on the Edit button. The Alarm Look-Up forAction ID dialog box opens.
You can enter information in the following fields
Point Value This is a required field.
Enter the value for the point that will cause the AlarmAction to occur.
Alarm Message Enter the message text that will be associated with thegenerated alarm.
Alarm ID This is a required field.
Enter the name of the CIMPLICITY Alarm ID for which thaction will be taken
When you create this Alarm ID in Alarm Configuration,you must have one %S parameter in the message field tohold the Alarm Message defined for the Point Value.
3-26 CIMPLICITY HMI Event Editor Operation Manual GFK-1282
Alarm Action Enter the action to be taken for the alarm. You can clickthe drop-down list button to the right of the input field andselect the action from the list of available actions.
Log Alarm Enter True if you want to log this event in the Event Log.
Enter False if you do not want to log this event.
Resource ID Enter an optional Resource ID to be associated with thegiven alarm.
If you leave this field blank, $SYSTEM is used.
Text Point ID Enter the Point ID for a text point in this field.
If you enter a text Point ID in this field, the point’s value isset to the alarm message when the alarm action occurs.
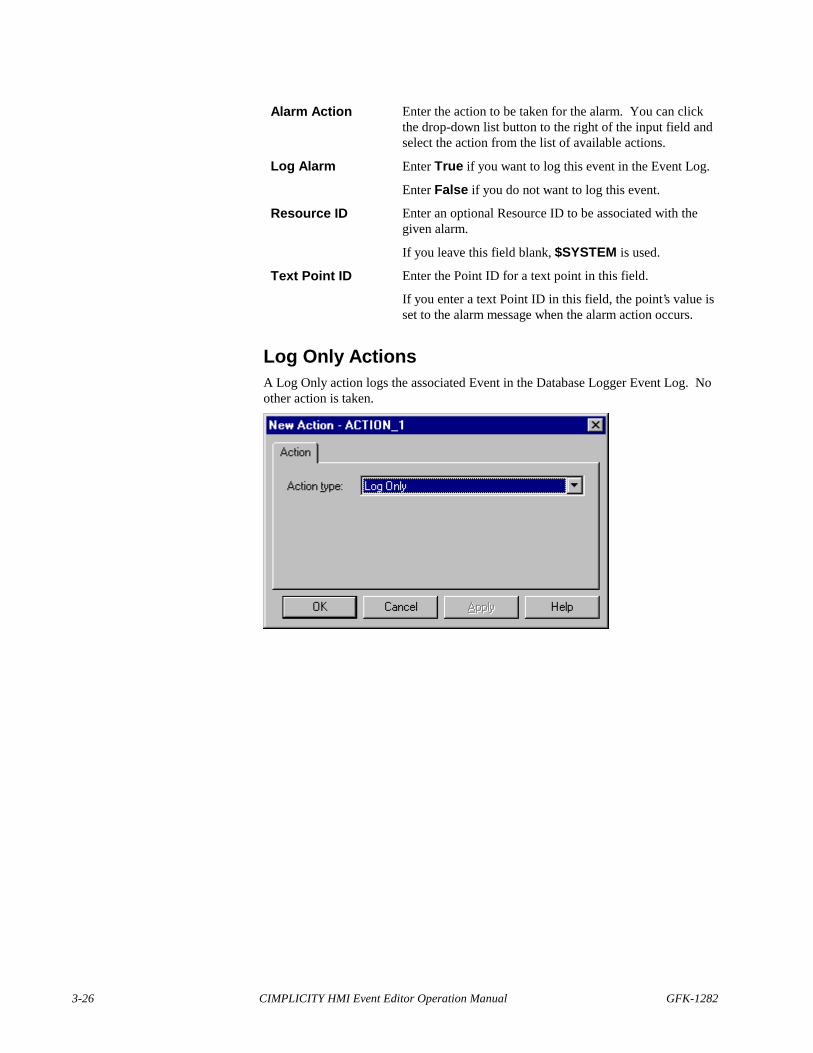
Log Only ActionsA Log Only action logs the associated Event in the Database Logger Event Log. Noother action is taken.
GFK-1282 Using the Event Editor 3-27
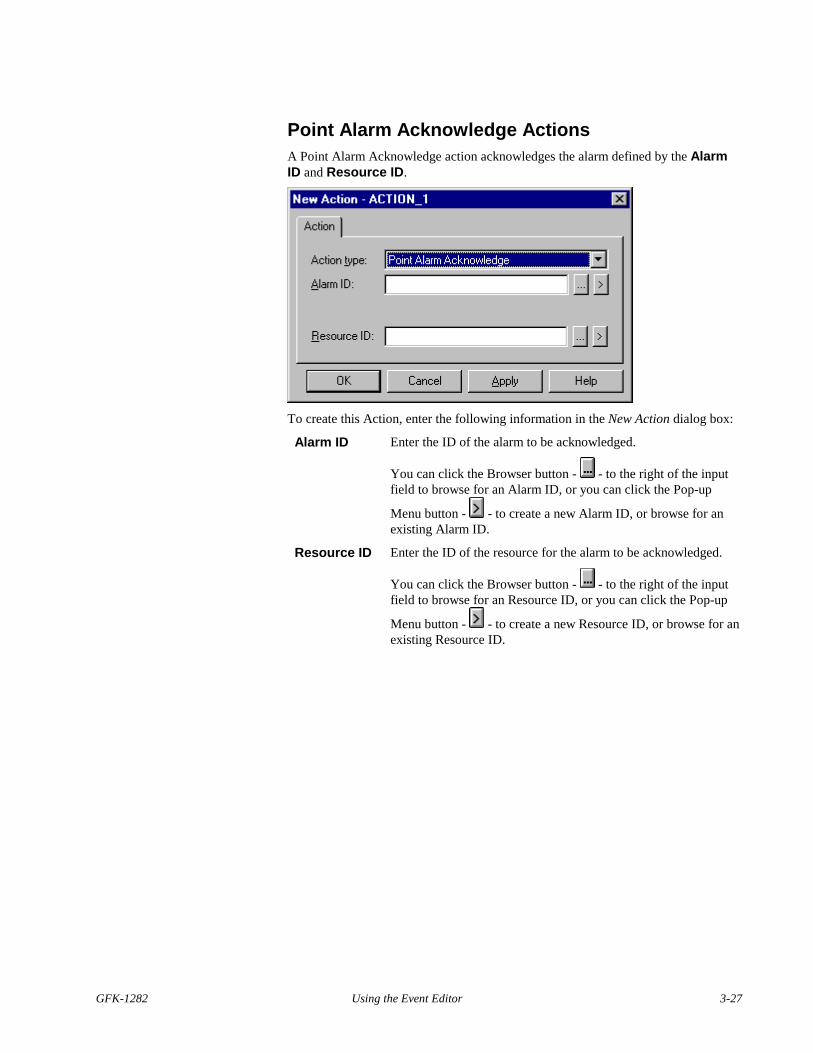
Point Alarm Acknowledge ActionsA Point Alarm Acknowledge action acknowledges the alarm defined by the AlarmID and Resource ID.
To create this Action, enter the following information in the New Action dialog box:
Alarm ID Enter the ID of the alarm to be acknowledged.
You can click the Browser button - - to the right of the inputfield to browse for an Alarm ID, or you can click the Pop-up
Menu button - - to create a new Alarm ID, or browse for anexisting Alarm ID.
Resource ID Enter the ID of the resource for the alarm to be acknowledged.
You can click the Browser button - - to the right of the inputfield to browse for an Resource ID, or you can click the Pop-up
Menu button - - to create a new Resource ID, or browse for anexisting Resource ID.
3-28 CIMPLICITY HMI Event Editor Operation Manual GFK-1282
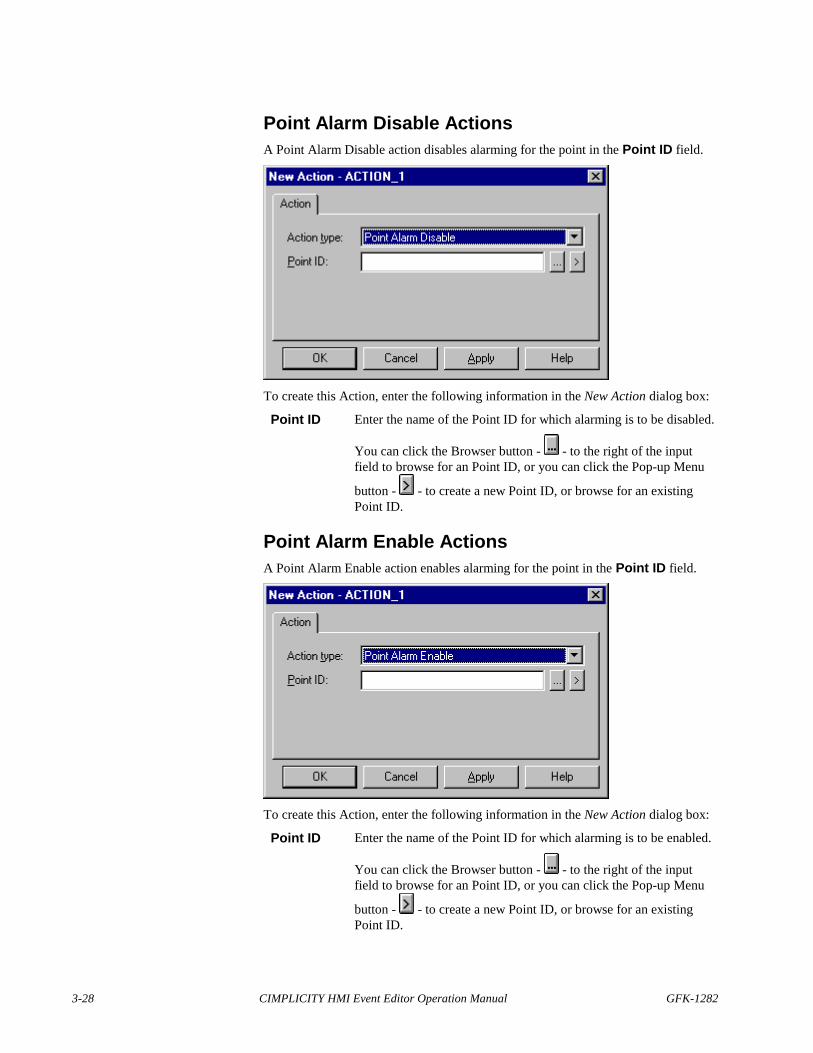
Point Alarm Disable ActionsA Point Alarm Disable action disables alarming for the point in the Point ID field.
To create this Action, enter the following information in the New Action dialog box:
Point ID Enter the name of the Point ID for which alarming is to be disabled.
You can click the Browser button - - to the right of the inputfield to browse for an Point ID, or you can click the Pop-up Menu
button - - to create a new Point ID, or browse for an existingPoint ID.
Point Alarm Enable ActionsA Point Alarm Enable action enables alarming for the point in the Point ID field.
To create this Action, enter the following information in the New Action dialog box:
Point ID Enter the name of the Point ID for which alarming is to be enabled.
You can click the Browser button - - to the right of the inputfield to browse for an Point ID, or you can click the Pop-up Menu
button - - to create a new Point ID, or browse for an existingPoint ID.
GFK-1282 Using the Event Editor 3-29
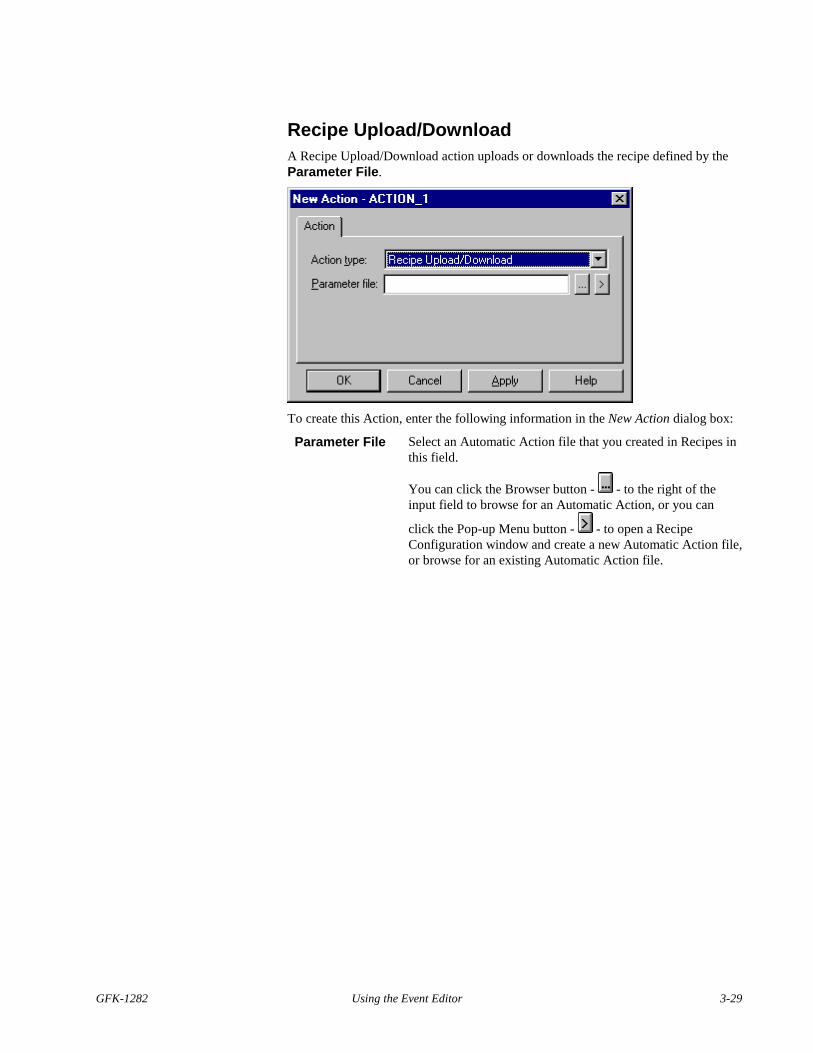
Recipe Upload/DownloadA Recipe Upload/Download action uploads or downloads the recipe defined by theParameter File.
To create this Action, enter the following information in the New Action dialog box:
Parameter File Select an Automatic Action file that you created in Recipes inthis field.
You can click the Browser button - - to the right of theinput field to browse for an Automatic Action, or you can
click the Pop-up Menu button - - to open a RecipeConfiguration window and create a new Automatic Action file,or browse for an existing Automatic Action file.
3-30 CIMPLICITY HMI Event Editor Operation Manual GFK-1282
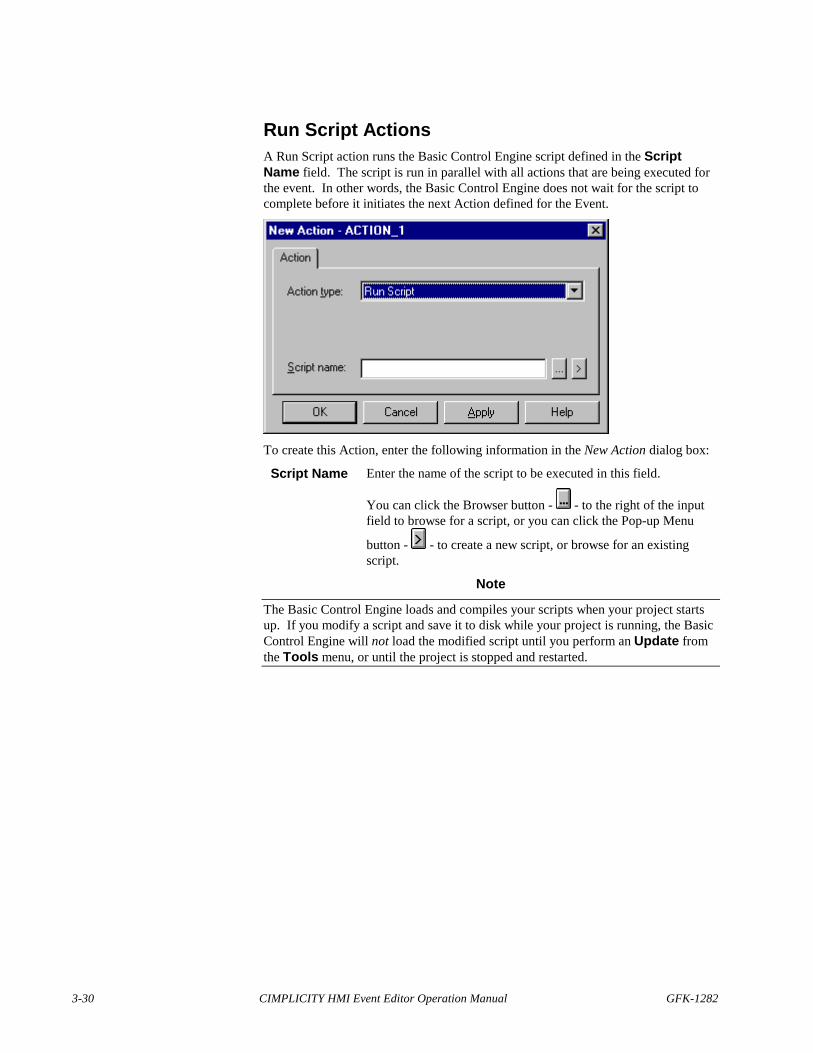
Run Script ActionsA Run Script action runs the Basic Control Engine script defined in the ScriptName field. The script is run in parallel with all actions that are being executed forthe event. In other words, the Basic Control Engine does not wait for the script tocomplete before it initiates the next Action defined for the Event.
To create this Action, enter the following information in the New Action dialog box:
Script Name Enter the name of the script to be executed in this field.
You can click the Browser button - - to the right of the inputfield to browse for a script, or you can click the Pop-up Menu
button - - to create a new script, or browse for an existingscript.
Note
The Basic Control Engine loads and compiles your scripts when your project startsup. If you modify a script and save it to disk while your project is running, the BasicControl Engine will not load the modified script until you perform an Update fromthe Tools menu, or until the project is stopped and restarted.
GFK-1282 Using the Event Editor 3-31
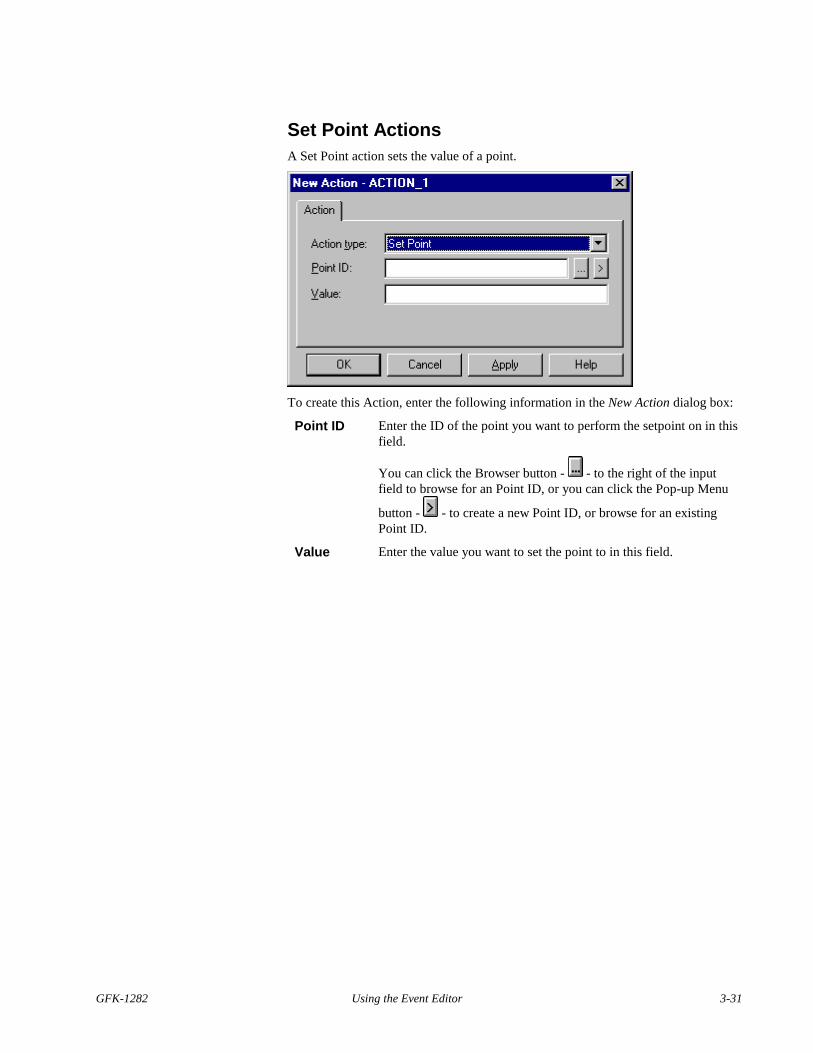
Set Point ActionsA Set Point action sets the value of a point.
To create this Action, enter the following information in the New Action dialog box:
Point ID Enter the ID of the point you want to perform the setpoint on in thisfield.
You can click the Browser button - - to the right of the inputfield to browse for an Point ID, or you can click the Pop-up Menu
button - - to create a new Point ID, or browse for an existingPoint ID.
Value Enter the value you want to set the point to in this field.
3-32 CIMPLICITY HMI Event Editor Operation Manual GFK-1282
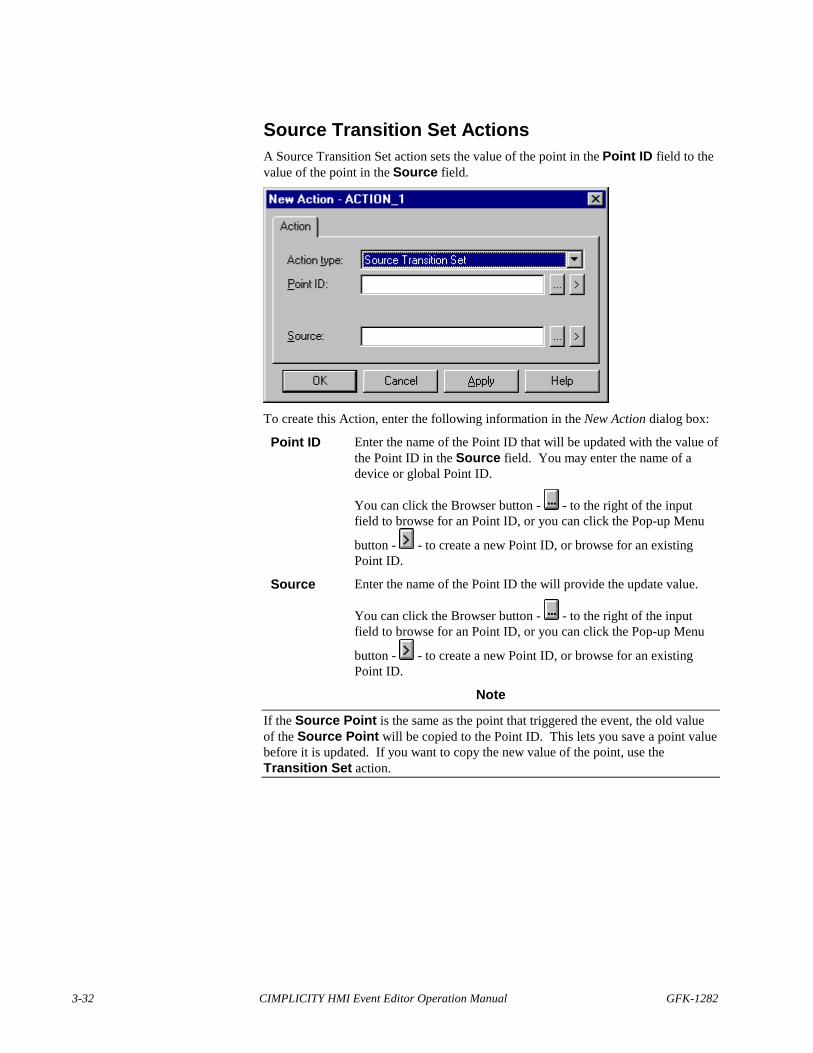
Source Transition Set ActionsA Source Transition Set action sets the value of the point in the Point ID field to thevalue of the point in the Source field.
To create this Action, enter the following information in the New Action dialog box:
Point ID Enter the name of the Point ID that will be updated with the value ofthe Point ID in the Source field. You may enter the name of adevice or global Point ID.
You can click the Browser button - - to the right of the inputfield to browse for an Point ID, or you can click the Pop-up Menu
button - - to create a new Point ID, or browse for an existingPoint ID.
Source Enter the name of the Point ID the will provide the update value.
You can click the Browser button - - to the right of the inputfield to browse for an Point ID, or you can click the Pop-up Menu
button - - to create a new Point ID, or browse for an existingPoint ID.
Note
If the Source Point is the same as the point that triggered the event, the old valueof the Source Point will be copied to the Point ID. This lets you save a point valuebefore it is updated. If you want to copy the new value of the point, use theTransition Set action.
GFK-1282 Using the Event Editor 3-33
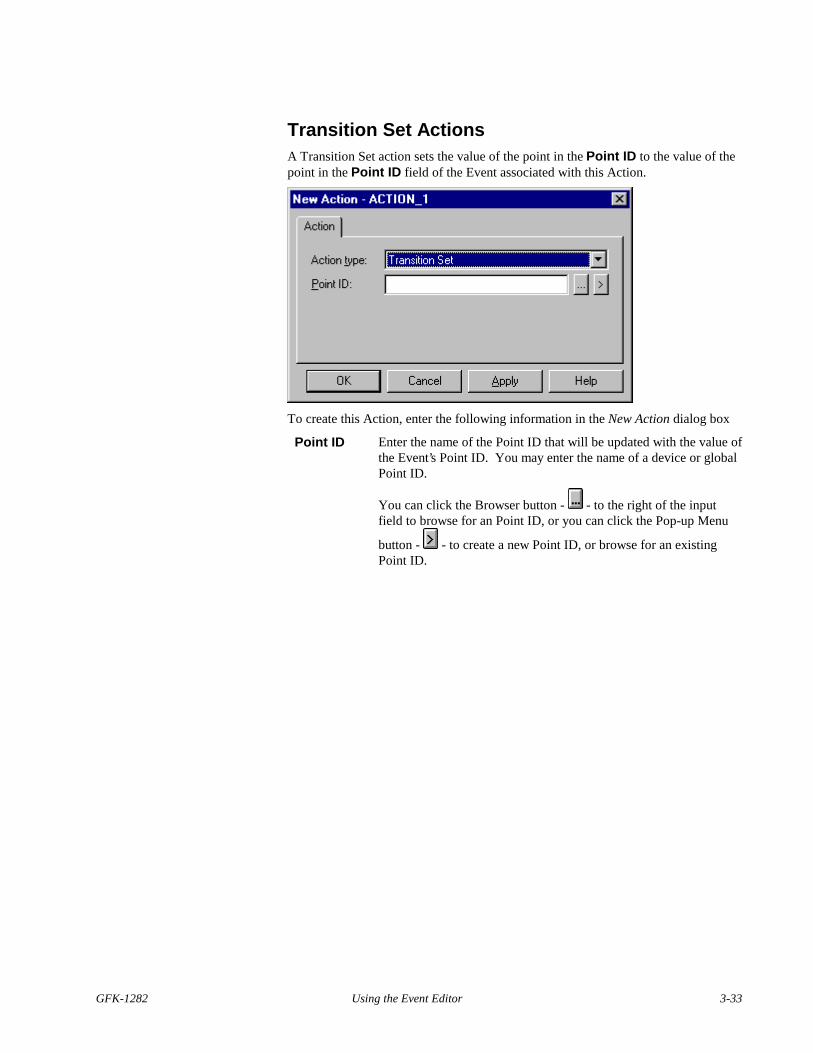
Transition Set ActionsA Transition Set action sets the value of the point in the Point ID to the value of thepoint in the Point ID field of the Event associated with this Action.
To create this Action, enter the following information in the New Action dialog box
Point ID Enter the name of the Point ID that will be updated with the value ofthe Event’s Point ID. You may enter the name of a device or globalPoint ID.
You can click the Browser button - - to the right of the inputfield to browse for an Point ID, or you can click the Pop-up Menu
button - - to create a new Point ID, or browse for an existingPoint ID.
3-34 CIMPLICITY HMI Event Editor Operation Manual GFK-1282
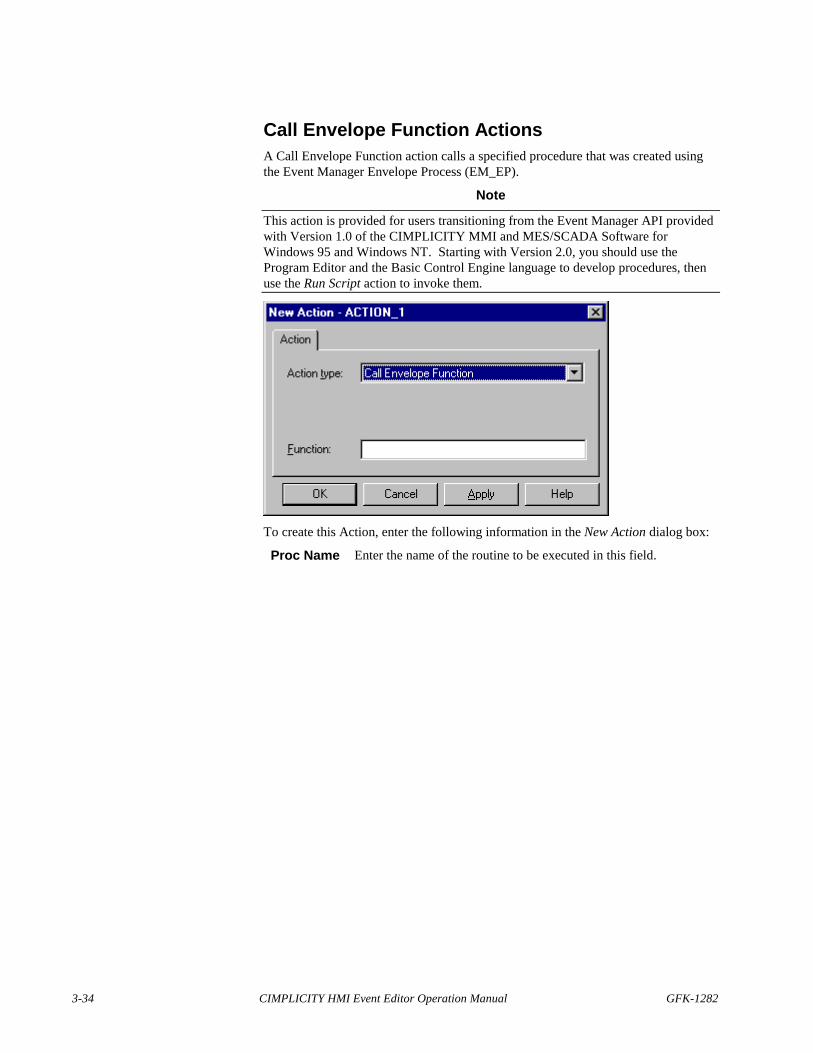
Call Envelope Function ActionsA Call Envelope Function action calls a specified procedure that was created usingthe Event Manager Envelope Process (EM_EP).
Note
This action is provided for users transitioning from the Event Manager API providedwith Version 1.0 of the CIMPLICITY MMI and MES/SCADA Software forWindows 95 and Windows NT. Starting with Version 2.0, you should use theProgram Editor and the Basic Control Engine language to develop procedures, thenuse the Run Script action to invoke them.
To create this Action, enter the following information in the New Action dialog box:
Proc Name Enter the name of the routine to be executed in this field.
GFK-1282 Using the Event Editor 3-35
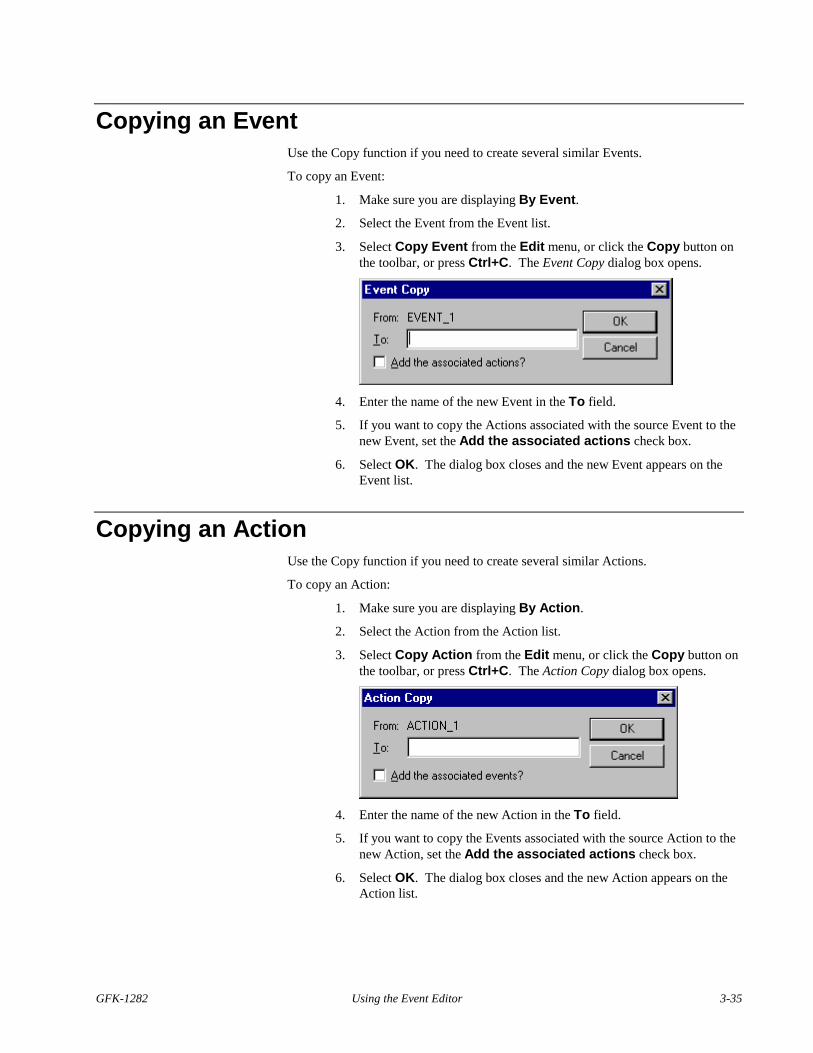
Copying an EventUse the Copy function if you need to create several similar Events.
To copy an Event:
1. Make sure you are displaying By Event.
2. Select the Event from the Event list.
3. Select Copy Event from the Edit menu, or click the Copy button onthe toolbar, or press Ctrl+C. The Event Copy dialog box opens.
4. Enter the name of the new Event in the To field.
5. If you want to copy the Actions associated with the source Event to thenew Event, set the Add the associated actions check box.
6. Select OK. The dialog box closes and the new Event appears on theEvent list.
Copying an ActionUse the Copy function if you need to create several similar Actions.
To copy an Action:
1. Make sure you are displaying By Action.
2. Select the Action from the Action list.
3. Select Copy Action from the Edit menu, or click the Copy button onthe toolbar, or press Ctrl+C. The Action Copy dialog box opens.
4. Enter the name of the new Action in the To field.
5. If you want to copy the Events associated with the source Action to thenew Action, set the Add the associated actions check box.
6. Select OK. The dialog box closes and the new Action appears on theAction list.
3-36 CIMPLICITY HMI Event Editor Operation Manual GFK-1282
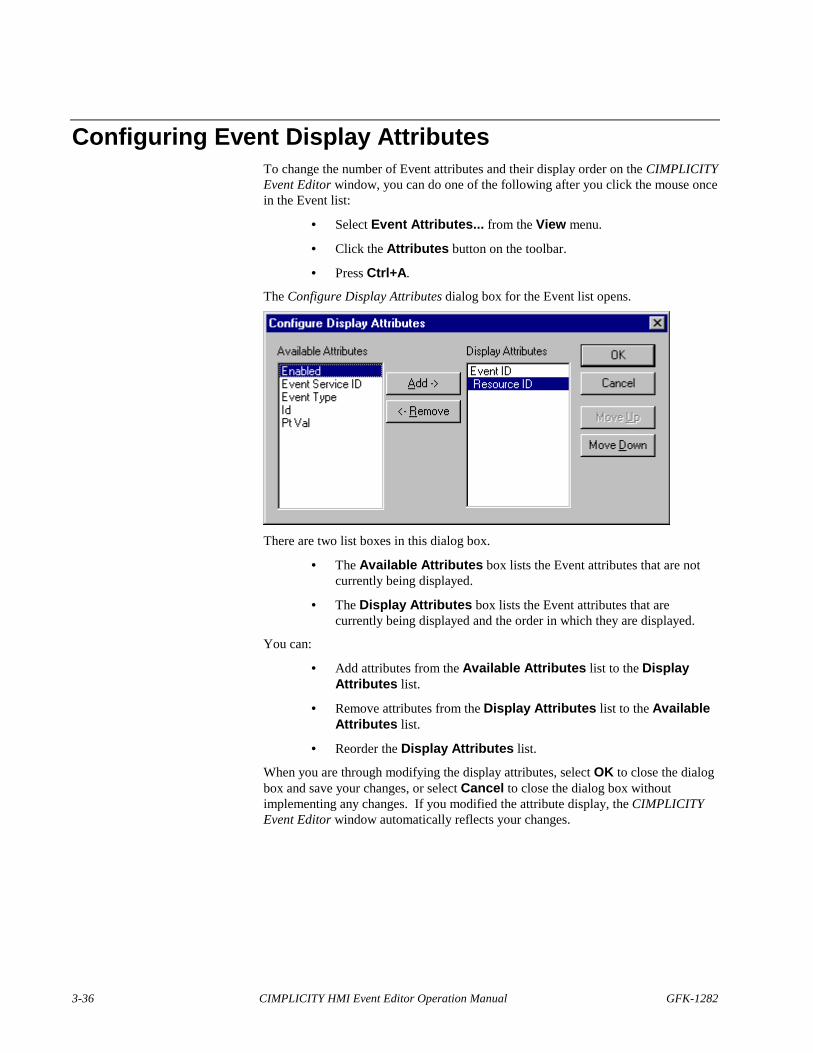
Configuring Event Display AttributesTo change the number of Event attributes and their display order on the CIMPLICITYEvent Editor window, you can do one of the following after you click the mouse oncein the Event list:
• Select Event Attributes... from the View menu.
• Click the Attributes button on the toolbar.
• Press Ctrl+A.
The Configure Display Attributes dialog box for the Event list opens.
There are two list boxes in this dialog box.
• The Available Attributes box lists the Event attributes that are notcurrently being displayed.
• The Display Attributes box lists the Event attributes that arecurrently being displayed and the order in which they are displayed.
You can:
• Add attributes from the Available Attributes list to the DisplayAttributes list.
• Remove attributes from the Display Attributes list to the AvailableAttributes list.
• Reorder the Display Attributes list.
When you are through modifying the display attributes, select OK to close the dialogbox and save your changes, or select Cancel to close the dialog box withoutimplementing any changes. If you modified the attribute display, the CIMPLICITYEvent Editor window automatically reflects your changes.
GFK-1282 Using the Event Editor 3-37
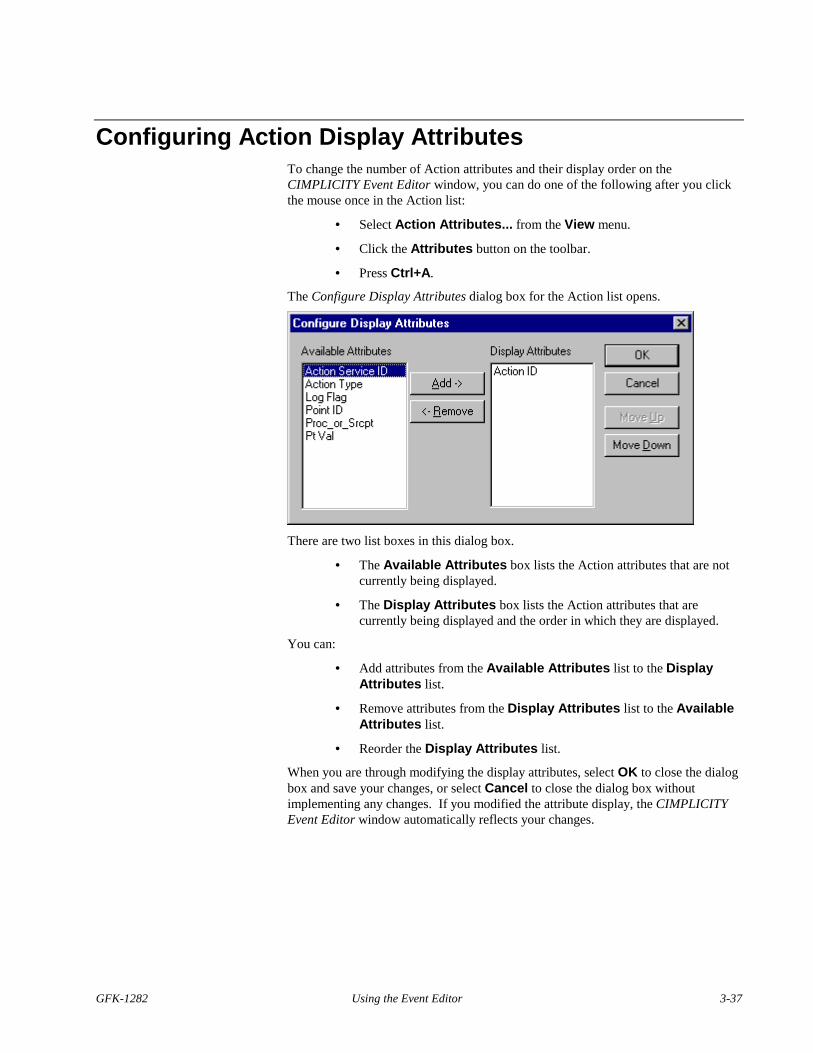
Configuring Action Display AttributesTo change the number of Action attributes and their display order on theCIMPLICITY Event Editor window, you can do one of the following after you clickthe mouse once in the Action list:
• Select Action Attributes... from the View menu.
• Click the Attributes button on the toolbar.
• Press Ctrl+A.
The Configure Display Attributes dialog box for the Action list opens.
There are two list boxes in this dialog box.
• The Available Attributes box lists the Action attributes that are notcurrently being displayed.
• The Display Attributes box lists the Action attributes that arecurrently being displayed and the order in which they are displayed.
You can:
• Add attributes from the Available Attributes list to the DisplayAttributes list.
• Remove attributes from the Display Attributes list to the AvailableAttributes list.
• Reorder the Display Attributes list.
When you are through modifying the display attributes, select OK to close the dialogbox and save your changes, or select Cancel to close the dialog box withoutimplementing any changes. If you modified the attribute display, the CIMPLICITYEvent Editor window automatically reflects your changes.

GFK-1282 A-1
Appendix A - Creating the EventManager Log Table
Creating The EM_LOG TableIn order for you to log Events and Actions for the Event Manager, you must have theDatabase Logger option licensed and enabled for your project. Once you have donethis:
1. From your Project Cabinet, select Database Logger.
2. In the CIMPLICITY Logging Configuration window, from the Filemenu, select New Table.
3. In the New Table dialog box, enter "EM_LOG" in the TableIdentifier field, click the Application Table radio button, and clickOK.
4. In the Table Properties dialog box, select the Maintenance Events andMaintenance Actions you want for this file.
5. Exit the Database Logger option
6. To create the EM_LOG table, you must stop and restart yourCIMPLICITY project.


GFK-1282 B-1
Appendix B - PerformanceOptimization
About Performance OptimizationYou can do the following to optimize the performance of the Event Manager:
• Make entries in the Global Parameters file to change the maximumnumber of scripts that can run simultaneously, or specify how long anidle thread should remain active.
• Make entries in the Basic Control Engine points file to cache frequentlyused points.
Global ParametersCIMPLICITY HMI run-time software reads configuration data from index-sequential(ISAM) files. You cannot directly edit these files. The IDTPOP and SCPOP areincluded with your CIMPLICITY HMI software to enable you to convert an ISAMfile to an ASCII text file that can be edited, and to convert an ASCII text file back toits ISAM format.
To edit the Global Parameters file, do the following:
1. From your project’s Tools menu, select the Command Promptoption. An MS-DOS Command Prompt window opens.
2. In the Command Prompt window, type:
cd %SITE_ROOT%\master
to set up your environment and pathname correctly.
3. Type:
idtpop glb_parms
to create an ASCII version of the global parameters file.
4. Type:
notepad glb_parms.idt
to open a Notepad and edit the file.
B-2 CIMPLICITY HMI Event Editor Operation Manual GFK-1282
5. When you are through changing the file, exit the Notepad and save theupdated file.
6. Type:
scpop glb_parms
to convert the file back to ISAM format.
To have the changes take effect:
1. Stop your project.
2. Select Configuration Update from the Project menu.
3. Restart your project.
Setting the Maximum Number of ThreadsThe maximum number of scripts that are able to run simultaneously is set to a defaultof 25. To change this value, enter the following line in glb_parms.idt:
CE_MAX_THREADS|1|<num>
where <num> is the maximum number of threads you want to run simultaneously.
Setting the Thread TimeoutWhen a script terminates, its operating system thread remains active for a certainperiod of time so that it can be used by the next script which needs to be run. Thisprovides a faster response, since creating a thread is a relatively time-consumingprocess. Conversely, having too many active threads that remain idle uses up systemresources.
The default timeout is 900 seconds (15 minutes). To change this value, enter thefollowing line in glb_parms.idt:
CE_THREAD_TIMOUT|1|<num>
where <num> is the number of seconds an operating system thread is to remain activeafter the script terminates.

GFK-1282 Appendix B - Performance Optimization B-3
Basic Control Engine Point Cache FileEach time a script uses a point, it must retrieve the point’s definition. You can usethe bce_points.cfg file to pre-load point definitions into the Basic Control Enginefor the Event Manager, providing a performance boost.
The bce_points.cfg file is an ASCII file that needs to be located in your project’sData directory. To create the file:
1. From your project’s Tools menu, select the Command Promptoption. An MS-DOS Command Prompt window opens.
2. In the Command Prompt window, type cd %SITE_ROOT%\data to setup your environment and pathname correctly.
3. Type notepad bce_points.cfg to open a Notepad and create oredit your file.
4. Enter the Point IDs that you want to cache, one per line in the file.
5. When you are through, exit the Notepad and save the file.
To have the caching take effect, stop and restart your project.

GFK-1282 C-1
Appendix C - Developing UserApplications With EM_EP
Enabling The Event Manager Envelope ProcessThe Event Manager Envelope Process (EM_EP) is not normally enabled in a project.To enable EM_EP in a project, do the following:
1. From the Project menu, select Settings. The Project Propertiesdialog box opens.
2. In the Project Properties dialog box, clear the check box for the BasicControl Engine.
3. Select OK to close the dialog and have your change processed.
4. From the Tools menu, select Command Prompt. The CommandPrompt window opens.
5. In the Command Prompt window, set your directory toCIMPLICITY\bsm_data.
6. Type notepad IC646TEM100.RP. The Notepad window opens.
7. In the Notepad window, remove the asterisk at the start of the line thatbegins with "*ANY|EM_EP|BSM_ROOT:[exe]emep.exe".
8. Exit the Notepad and save the updated file.
9. Exit the Command Prompt window.
10. From the Project menu, select Settings. The Project Propertiesdialog box opens.
11. In the Project Properties dialog box, set the check box for the BasicControl Engine.
12. Select OK to close the dialog and have your change processed.
Both the EM_EP and EM_RP processes will start the next time you start the project.
Note
To disable EM_EP, follow the steps above, except in step 7, insert an asterisk (*) at thestart of the line that begins with "*ANY|EM_EP|BSM_ROOT:[exe]emep.exe".

C-2 CIMPLICITY HMI Event Editor Operation Manual GFK-1282
Adding a Procedure to the Event Manager EnvelopeProcess
The envelope process can be configured to call any user-defined procedure that iscallable from a C language interface. To do this:
1. Edit two include files.
2. Add the routine to the source file.
3. Rebuild the envelope process.
The files, found in %BSM_ROOT%\api\include\inc_path and/or%BSM_ROOT%\api\em_api are described below.
Important
A new release of CIMPLICITY HMI software may overwrite files in theabove directories. Always preserve a copy of any modified files in anon-CIMPLICITY software directory.
Setting The EnvironmentDo the following to set your environment variables correctly and move to%BSM_ROOT%:
1. Open the CIMPLICITY HMI Configuration Cabinet for your project.
2. Select Command Prompt... from the Tools menu. This opens anMS-DOS Command Prompt window in your project with the correctenvironment and definitions for %BSM_ROOT% and %SITE_ROOT%.
3. Type
cd /d %BSM_ROOT%
to set your disk and pathname to the root directory for %BSM_ROOT%.
GFK-1282 Appendix C - Developing User Applications With EM_EP C-3
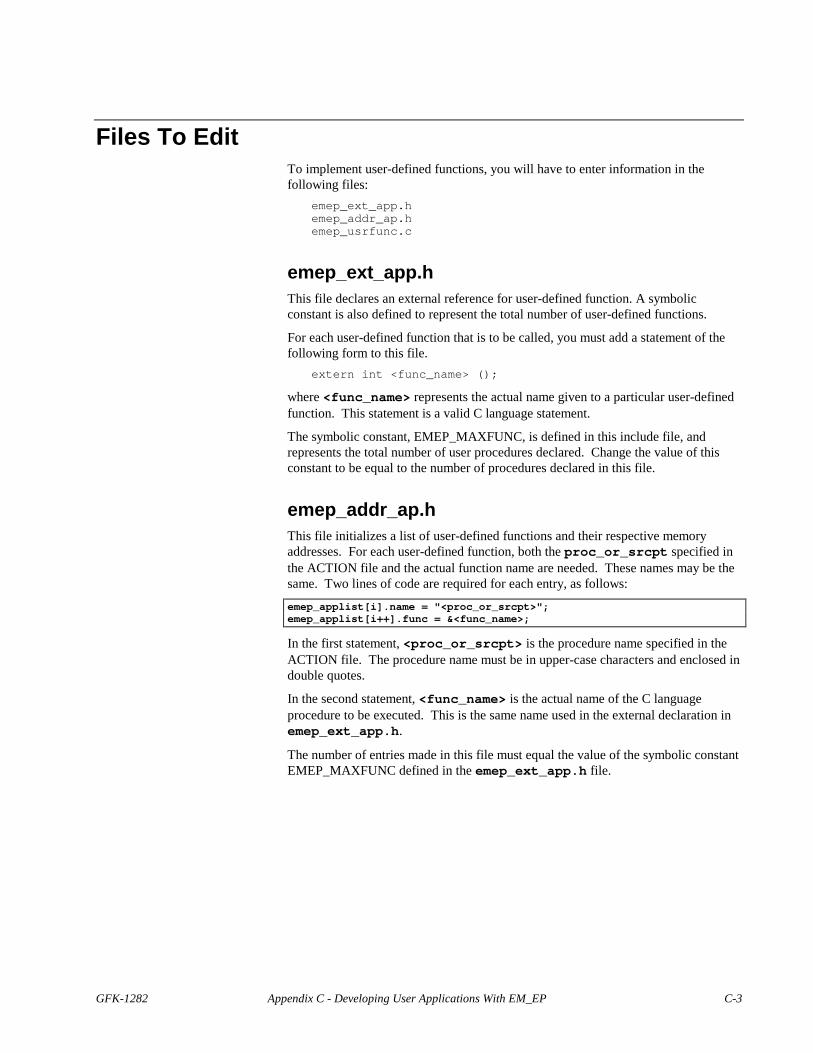
Files To EditTo implement user-defined functions, you will have to enter information in thefollowing files:
emep_ext_app.hemep_addr_ap.hemep_usrfunc.c
emep_ext_app.hThis file declares an external reference for user-defined function. A symbolicconstant is also defined to represent the total number of user-defined functions.
For each user-defined function that is to be called, you must add a statement of thefollowing form to this file.
extern int <func_name> ();
where <func_name> represents the actual name given to a particular user-definedfunction. This statement is a valid C language statement.
The symbolic constant, EMEP_MAXFUNC, is defined in this include file, andrepresents the total number of user procedures declared. Change the value of thisconstant to be equal to the number of procedures declared in this file.
emep_addr_ap.hThis file initializes a list of user-defined functions and their respective memoryaddresses. For each user-defined function, both the proc_or_srcpt specified inthe ACTION file and the actual function name are needed. These names may be thesame. Two lines of code are required for each entry, as follows:
emep_applist[i].name = "<proc_or_srcpt>";emep_applist[i++].func = &<func_name>;
In the first statement, <proc_or_srcpt> is the procedure name specified in theACTION file. The procedure name must be in upper-case characters and enclosed indouble quotes.
In the second statement, <func_name> is the actual name of the C languageprocedure to be executed. This is the same name used in the external declaration inemep_ext_app.h.
The number of entries made in this file must equal the value of the symbolic constantEMEP_MAXFUNC defined in the emep_ext_app.h file.
C-4 CIMPLICITY HMI Event Editor Operation Manual GFK-1282
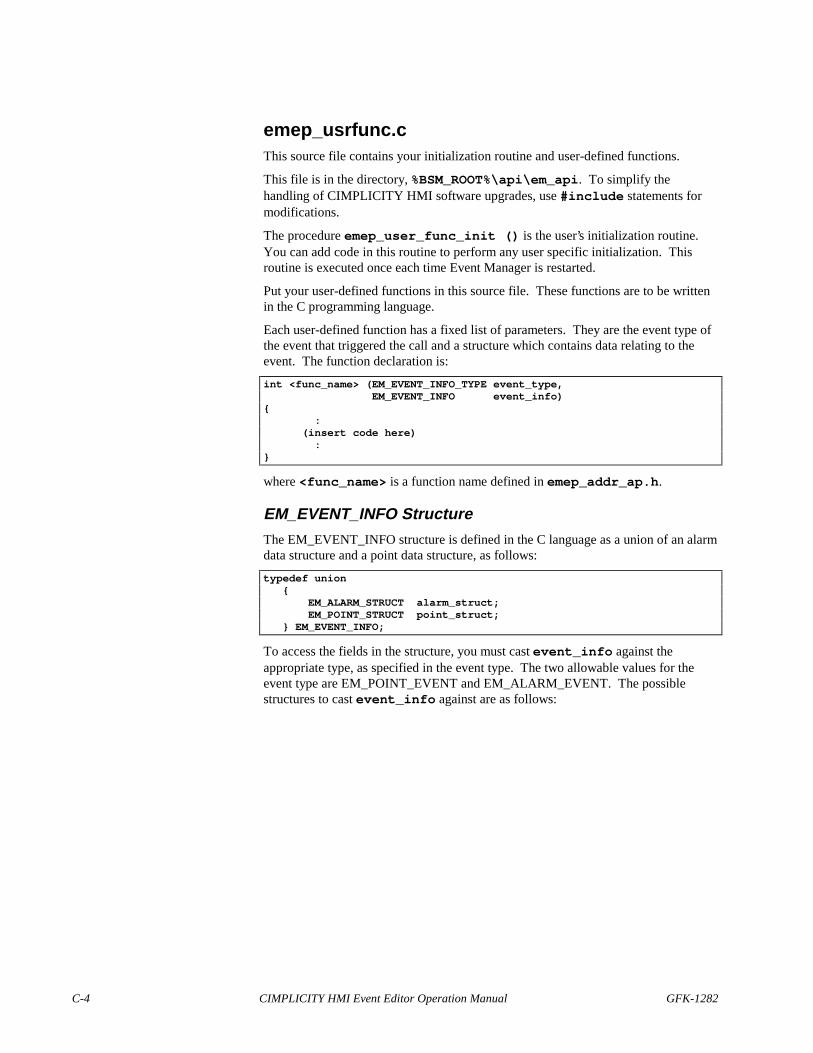
emep_usrfunc.cThis source file contains your initialization routine and user-defined functions.
This file is in the directory, %BSM_ROOT%\api\em_api. To simplify thehandling of CIMPLICITY HMI software upgrades, use #include statements formodifications.
The procedure emep_user_func_init () is the user’s initialization routine.You can add code in this routine to perform any user specific initialization. Thisroutine is executed once each time Event Manager is restarted.
Put your user-defined functions in this source file. These functions are to be writtenin the C programming language.
Each user-defined function has a fixed list of parameters. They are the event type ofthe event that triggered the call and a structure which contains data relating to theevent. The function declaration is:
int <func_name> (EM_EVENT_INFO_TYPE event_type, EM_EVENT_INFO event_info){ : (insert code here) :}
where <func_name> is a function name defined in emep_addr_ap.h.
EM_EVENT_INFO Structure
The EM_EVENT_INFO structure is defined in the C language as a union of an alarmdata structure and a point data structure, as follows:
typedef union { EM_ALARM_STRUCT alarm_struct; EM_POINT_STRUCT point_struct; } EM_EVENT_INFO;
To access the fields in the structure, you must cast event_info against theappropriate type, as specified in the event type. The two allowable values for theevent type are EM_POINT_EVENT and EM_ALARM_EVENT. The possiblestructures to cast event_info against are as follows:
GFK-1282 Appendix C - Developing User Applications With EM_EP C-5
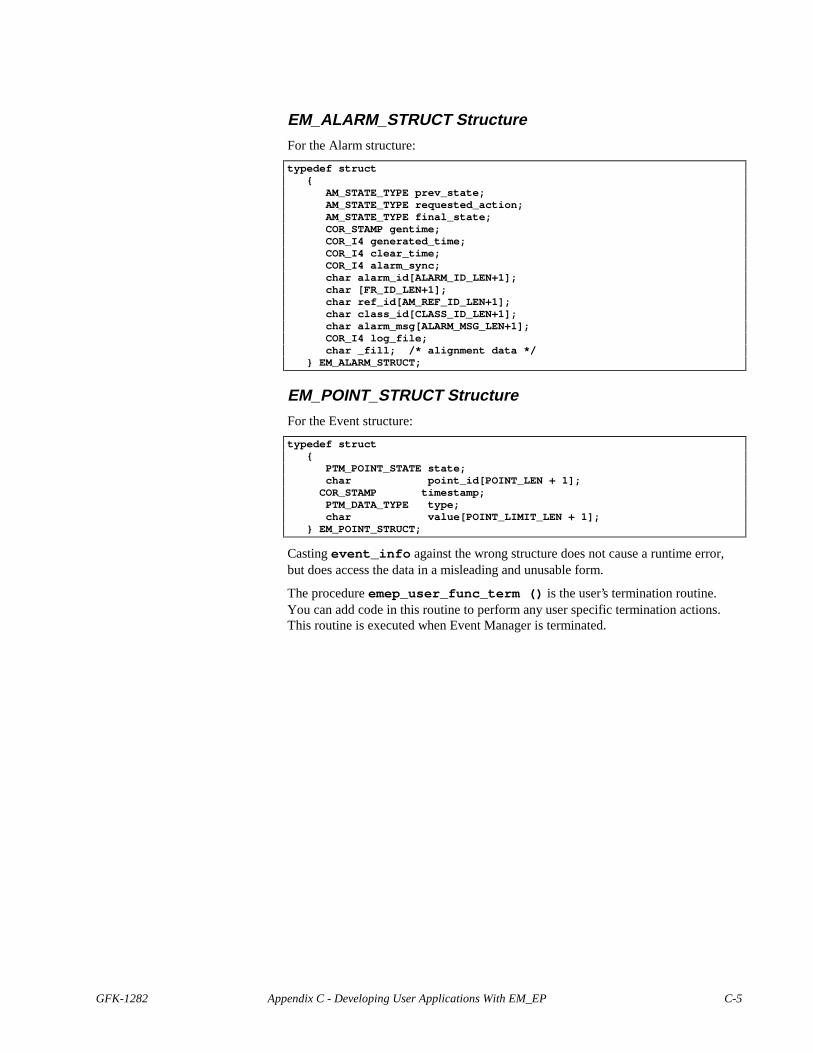
EM_ALARM_STRUCT Structure
For the Alarm structure:
typedef struct { AM_STATE_TYPE prev_state; AM_STATE_TYPE requested_action; AM_STATE_TYPE final_state; COR_STAMP gentime; COR_I4 generated_time; COR_I4 clear_time; COR_I4 alarm_sync; char alarm_id[ALARM_ID_LEN+1]; char [FR_ID_LEN+1]; char ref_id[AM_REF_ID_LEN+1]; char class_id[CLASS_ID_LEN+1]; char alarm_msg[ALARM_MSG_LEN+1]; COR_I4 log_file; char _fill; /* alignment data */ } EM_ALARM_STRUCT;
EM_POINT_STRUCT Structure
For the Event structure:
typedef struct { PTM_POINT_STATE state; char point_id[POINT_LEN + 1]; COR_STAMP timestamp; PTM_DATA_TYPE type; char value[POINT_LIMIT_LEN + 1]; } EM_POINT_STRUCT;
Casting event_info against the wrong structure does not cause a runtime error,but does access the data in a misleading and unusable form.
The procedure emep_user_func_term () is the user’s termination routine.You can add code in this routine to perform any user specific termination actions.This routine is executed when Event Manager is terminated.
C-6 CIMPLICITY HMI Event Editor Operation Manual GFK-1282
Rebuilding The Executable FilesAlong with your custom application programs, the following two CIMPLICITY HMIsoftware files have to be compiled, using the C compiler, to include any changes:
emep_user.cemep_usrfunc.c
emep_user.c includes the two header files discussed above, and is not edited.
emep_usrfunc.c is the module to which you have added initialization code andyour user-defined functions.
Your application files must have the file type .c to be compiled.
The files must be linked following compilation. A group of command files areprovided to perform the compilation and link via the steps described below.
Note
These steps assume you have placed your user-written routine intoemep_userfunc.c as instructed earlier.
1. A Microsoft Visual C makefile is provided to build the executable.Type the following command to rebuild the program:
nmake
2. Prepare to test the program by terminating the existing EMEP process.If you use the standard site configuration, enter the following command:
pm_driver <node_id> TERM EM_EP
3. Exercise your program as follows (assuming you have used standardsite configuration):
set PRCNAM=EM_EPemep
4. Move your program, when you are satisfied with it, to the directorywhere master copies of executables are stored:
copy emep.exe %BSM_ROOT%\exe
5. Activate your new program as follows (or simply restart all yourCIMPLICITY HMI projects):
pm_driver <node_id> ACT EM_EP
GFK-1282 Appendix C - Developing User Applications With EM_EP C-7
Restrictions On User-Defined FunctionsUser-defined functions should be developed with the following constraints:
1. A user-defined function should never attempt to read or write to aterminal, unless the terminal is explicitly opened by the user-definedfunctions.
2. On CIMPLICITY HMI, the process has no access to the screen.
3. User-defined functions are invoked by the Event Manager ResidentProcess (EM_RP) in response to some event and are executed in theEvent Manager Envelope Process (EM_EP). EM_RP invokes the user-defined functions by sending messages to the EM_EP.
The first time a user-defined function is invoked, the EM_EP executes that functionas soon as it receives the message. Incoming messages are not read while theEM_EP is executing a user-defined function; therefore, if several functions areinvoked in a short time span, they are executed sequentially.
Up to 10 messages will be buffered by the system while user-defined functions areexecuting. If more than 10 user-defined functions are invoked in a very short period,it is possible that messages sent to the EM_EP may be lost. If this happens, an errorwill be placed in your project’s Status log file. To check for error messages, selectStatus Viewer in your CIMPLICITY HMI menu, then select your project’s log file.
C-8 CIMPLICITY HMI Event Editor Operation Manual GFK-1282
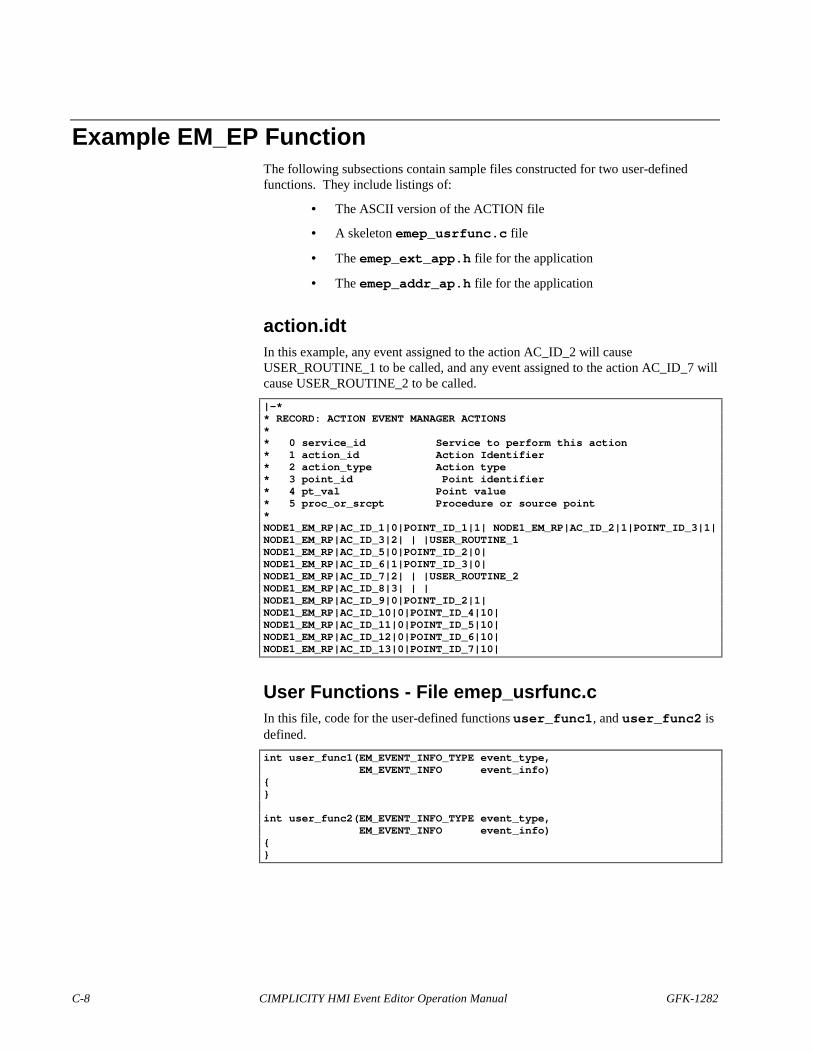
Example EM_EP FunctionThe following subsections contain sample files constructed for two user-definedfunctions. They include listings of:
• The ASCII version of the ACTION file
• A skeleton emep_usrfunc.c file
• The emep_ext_app.h file for the application
• The emep_addr_ap.h file for the application
action.idtIn this example, any event assigned to the action AC_ID_2 will causeUSER_ROUTINE_1 to be called, and any event assigned to the action AC_ID_7 willcause USER_ROUTINE_2 to be called.
|-** RECORD: ACTION EVENT MANAGER ACTIONS** 0 service_id Service to perform this action* 1 action_id Action Identifier* 2 action_type Action type* 3 point_id Point identifier* 4 pt_val Point value* 5 proc_or_srcpt Procedure or source point*NODE1_EM_RP|AC_ID_1|0|POINT_ID_1|1| NODE1_EM_RP|AC_ID_2|1|POINT_ID_3|1|NODE1_EM_RP|AC_ID_3|2| | |USER_ROUTINE_1NODE1_EM_RP|AC_ID_5|0|POINT_ID_2|0|NODE1_EM_RP|AC_ID_6|1|POINT_ID_3|0|NODE1_EM_RP|AC_ID_7|2| | |USER_ROUTINE_2NODE1_EM_RP|AC_ID_8|3| | |NODE1_EM_RP|AC_ID_9|0|POINT_ID_2|1|NODE1_EM_RP|AC_ID_10|0|POINT_ID_4|10|NODE1_EM_RP|AC_ID_11|0|POINT_ID_5|10|NODE1_EM_RP|AC_ID_12|0|POINT_ID_6|10|NODE1_EM_RP|AC_ID_13|0|POINT_ID_7|10|
User Functions - File emep_usrfunc.cIn this file, code for the user-defined functions user_func1, and user_func2 isdefined.
int user_func1(EM_EVENT_INFO_TYPE event_type, EM_EVENT_INFO event_info){}
int user_func2(EM_EVENT_INFO_TYPE event_type, EM_EVENT_INFO event_info){}

GFK-1282 Appendix C - Developing User Applications With EM_EP C-9
External Declarations - File emep_ext_app.hIn this file, external declarations for the two user-defined functions are entered.
/* ------------------------------- *//* Define Number of User Functions *//* ------------------------------- */#define EMEP_MAXFUNC 2
/* ------------------------------- *//* Declare User Functions *//* ------------------------------- */extern int user_func1();extern int user_func2();
Initialization - File emep_addr_ap.hIn this file, procedure names defined in the Action file are assigned to user-definedfunctions in emep_usrfunc.c.
/*---------------------------------------------*//* Specify function name and its location here *//*---------------------------------------------*/
{int i = 0;
/*---------------------------------------------*//* TEMPLATEemep_applist[i].name = "<procedure name>";emep_applist[i++].func = &<procedure name>;*//*---------------------------------------------*/
/*---------------------------------------------*//* Start User Modification *//*---------------------------------------------*/emep_applist[i].name = "USER_ROUTINE_1";emep_applist[i++].func = user_func1;emep_applist[i].name = "USER_ROUTINE_2";emep_applist[i++].func = user_func_2;/*---------------------------------------------*//* End User Modification *//*---------------------------------------------*/
}

GFK-1282 i
Index
A
AboutBCEUI 4-1
Action Display AttributesConfiguring 3-37
action.idtSample file for EM_EP C-8
ActionsAlarm Look-up 3-25Associating Events With 3-22Call Envelope Function 3-34Copying 3-35Creating 3-23Log Only 3-26Point Alarm Acknowledge 3-27Point Alarm Disable 3-28Point Alarm Enable 3-28Recipe Upload/Download 3-29Run Script 3-30Set Point 3-31Source Transition Set 3-32Transition Set 3-33
Actions vs. Events 2-2Adding a Procedure to the Event Manager Envelope
Process C-2Adding events to the view
BCEUI 4-8Adding more events to the list
BCEUI 4-8Alarm Acknowledged Events 3-9Alarm Deleted Events 3-10Alarm Generated Events 3-11Alarm Look-up Actions 3-25Alarm Reset Events 3-12Associating Actions with an Event 3-22Auto Browse
Toggling for BCEUI 4-6
B
BCEUIAbout 4-1Adding events to the view 4-8Adding more events to the list 4-8Connecting to a project 4-6Controlling scripts 4-10Events menu 4-3File menu 4-3Getting started 4-1Help menu 4-3Menus 4-3Pausing scripts 4-10Removing events from the view 4-8Running scripts 4-11Scripts 4-3Selecting events 4-5, 4-6Setting maximum number of completed events 4-8Shortcut keys 4-4Stopping scripts 4-11Toggling Auto Browse 4-6Toolbar 4-4Triggering events 4-9Using the BCEUI Viewer 4-5Using the event list 4-7View menu 4-3Window pop-up menu 4-4
C
Call Envelope Function Actions 3-34CE_MAX_THREADS B-2CE_THREAD_TIMOUT B-2CIMPLICITY HMI Functionality
Event Editor 1-1Configuration Action Display Attributes 3-37Configured Actions 2-2Configured Events 2-1Configuring Event Display Attributes 3-36Connecting to a project
BCEUI 4-6Controlling scripts
BCEUI 4-10Copying an Action 3-35Copying an Event 3-35Creating Actions 3-23Creating an Event 3-8Creating the EM_LOG Table A-1
D
Database LoggerCreating the EM_LOG Table A-1
Developing User Application With EM_EP C-1

CIMPLICITY HMI Event Editor Operation Manual GFK-1282ii
E
EM_ALARM_STRUCT Structure C-5EM_EP
Adding a procedure to C-2Example Function C-8Files to edit C-3Rebuilding the executable files C-6Restrictions on user-defined functions C-7Sample action.idt file C-8Sample emep_addr_ap.h file C-9Sample emep_ext_app.h file C-9Sample emep_usrfunc.c file C-8Setting the environment C-2
EM_EVENT_INFO Structure C-4EM_LOG Table
Creating A-1EM_POINT_STRUCT Structure C-5emep_addr_ap.h C-3
Sample file C-9emep_ext_app.h C-3
Sample file C-9emep_usrfunc.c C-4
Sample file C-8Event Display Attributes
Configuring 3-36Event Editor
CIMPLICITY HMI Functionality 1-1Getting Started 3-1Introduction 1-1Menus 3-2Properties 3-6Properties, Sample Configurations 3-7Shortcut Keys 3-5Toolbar 3-5Using 3-1
Event Editor MenusEdit Menu 3-2File Menu 3-2Help Menu 3-4Tools Menu 3-3View Menu 3-3Window Pop-up Menus 3-4
Event ManagementDefinition 2-1
Event Management Concepts 2-1Event Manager
Caching Points B-3Global Parameters B-1Global Parameters, CE_MAX_THREADS B-2Global Parameters, CE_THREAD_TIMOUT B-2Performance Optimization B-1Shutdown Script 2-3Startup Script 2-3
Event Manager Envelope Process See EM_EP
EventsAlarm Acknowledged 3-9Alarm Deleted 3-10Alarm Generated 3-11Alarm Reset 3-12Associating Actions With 3-22Copying 3-35Creating 3-8Point Change 3-13Point Equals 3-14Point Transition High 3-15Point Transition Low 3-16Point Unavailable 3-17Point Update 3-18Timed 3-19Timed, Example 3-20
Events menuBCEUI 4-3
Example EM_EP Function C-8
F
File menuBCEUI 4-3
Files to EditEM_EP C-3
G
Getting startedBCEUI 4-1
Getting StartedEvent Editor 3-1
Global ParametersEvent Manager B-1
H
Help menuBCEUI 4-3
I
IntroductionEvent Editor 1-1
L
Log Only Actions 3-26
M
Maximum number of completed eventsBCEUI 4-8
Menus

GFK-1282 Index iii
BCEUI 4-3Event Editor 3-2
P
Pausing scriptsBCEUI 4-10
Point Alarm Acknowledge Actions 3-27Point Alarm Disable Actions 3-28Point Alarm Enable Actions 3-28Point Caching
Event Manager B-3Point Change Events 3-13Point Equals Events 3-14Point Transition High Events 3-15Point Transition Low Events 3-16Point Unavailable Events 3-17Point Update Events 3-18Properties
Event Editor 3-6Event Editor, Sample Configurations for 3-7
R
Rebuilding EM_EP Executable Files C-6Recipe Upload/Download 3-29Removing events from the view
BCEUI 4-8Restrictions on EM_EP User Defined Functions C-7Run Script Actions 3-30Running scripts
BCEUI 4-11
S
Scripts menuBCEUI 4-3
Selecting eventsBCEUI 4-5, 4-6
Set Point Actions 3-31Setting the EM_EP Environment C-2Shortcut keys
BCEUI 4-4Shortcut Keys
Event Editor 3-5Source Transition Set Actions 3-32Stopping scripts
BCEUI 4-11
T
Timed Events 3-19Example 3-20
ToolbarBCEUI 4-4
Event Editor 3-5Transition Set Actions 3-33Triggering events
BCEUI 4-9
U
Using the Event Editor 3-1Using the event list
BCEUI 4-7Using the Viewer
BCEUI 4-5
V
View menuBCEUI 4-3
W
Window pop-up menuBCEUI 4-4


