
GT – PROLOG/QL
GT-PROLOGWORKBENCHUSER GUIDE
Issue 1.0December 1993

2
CONTENTS
CHAPTER 1 INTRODUCTION...................................................................................................................1
1.1 WELCOME............................................................................................................................................................ 1
1.2 GT-Prolog OVERVIEW ......................................................................................................................................... 1
1.3 HOW TO USE THIS MANUAL.............................................................................................................................. 1
CHAPTER 2 GETTING STARTED.............................................................................................................3
2.1 INTRODUCTION................................................................................................................................................... 3
2.2 INSTALLATION..................................................................................................................................................... 3
2.3 IMPLEMENTATION FEATURES.......................................................................................................................... 3
CHAPTER 3 STARTUP .............................................................................................................................6
3.1 INTRODUCTION................................................................................................................................................... 6
3.2 PRELUDE ............................................................................................................................................................. 6
3.3 STARTUP.............................................................................................................................................................. 6
3.4 WORKBENCH_BIPS ............................................................................................................................................ 8
CHAPTER 4 ...............................................................................................................................................10
4.1 INTRODUCTION.................................................................................................................................................10
4.2 TV DISPLAY VERSUS VDU...............................................................................................................................10
4.3 MENUS ...............................................................................................................................................................10
4.4 DIALOGUES .......................................................................................................................................................11
CHAPTER 5 ...............................................................................................................................................12
5.1 INTRODUCTION.................................................................................................................................................12
5.2 FILE CONVENTIONS .........................................................................................................................................12
5.3 WORKBENCH MENU.........................................................................................................................................12
5.4 DATABASE MENU .............................................................................................................................................13
5.5 BREAK MENU ....................................................................................................................................................14
5.6 ERROR MENU....................................................................................................................................................14
CHAPTER 6 ...............................................................................................................................................16
6.1 INTRODUCTION.................................................................................................................................................16
6.2 THE '8-QUEENS' PROBLEM..............................................................................................................................16
6.3 CREATING THE SOURCE FILE ........................................................................................................................18
6.4 RUNNING THE PROGRAM................................................................................................................................20
6.5 USING THE DEBUGGER...................................................................................................................................22
6.6 EXITING FROM PROLOG..................................................................................................................................22

3
CHAPTER 7 ...............................................................................................................................................23
7.1 INTRODUCTION..................................................................................................................................................23
7.2 BREAK HANDLER...............................................................................................................................................23
7.3 STANDARD ERROR HANDLING........................................................................................................................23
7.4 ERROR VALUES .................................................................................................................................................24
7.5 RESOURCE ERRORS ........................................................................................................................................24
7.6 WORKBENCH ERROR MANAGEMENT ............................................................................................................25
CHAPTER 8 ...............................................................................................................................................26
8.1 INTRODUCTION................................................................................................................................................26
8.2 GENERAL FEATURES......................................................................................................................................26
8.3 STARTUP..............................................................................................................................................................26
8.4 IMMEDIATE COMMANDS..............................................................................................................................27
8.5 COMMAND LINE ................................................................................................................................................28
8.6 QUICK KEY COMMANDS ..................................................................................................................................28
8.7 WORKBENCH INTERFACE...............................................................................................................................29
CHAPTER 9 ...............................................................................................................................................30
9.1 INTRODUCTION.................................................................................................................................................30
9.2 CONTROL FLOW MODEL .................................................................................................................................30
9.3 SPYPOINT MECHANISMS.................................................................................................................................31
9.4 DEBUG OUTPUT................................................................................................................................................33
9.5 DEBUGGING TACTICS........................................................................................................................................33
Introduction
1
CHAPTER 1
INTRODUCTION
1.1WELCOME
Welcome to GT-Prolog/QL, the complete Prolog programming environment for the Sinclair QL. This manual
describes how to create, edit, compile, run and debug Prolog programs using the features of the GT-Prolog
Workbench. A companion Reference Manual provides details of how to gain access to the facilities of QDOS
and specifies technical aspects of the Prolog features which are supported.
This manual is not intended to teach you the Prolog language itself although it does contain some examples
which illustrate particular features of the GT-Prolog system. New users, who are unfamiliar with the
language, should refer to any of the numerous textbooks now available which describe the Edinburgh
syntax.
1.2GT-Prolog OVERVIEW
GT-Prolog is a new implementation of the powerful logic programming language Prolog which is widely used
in industry and academia for research and development of systems exploiting knowledge-based techniques
and artificial intelligence. GT-Prolog has been designed specifically to exploit the capabilities of the Sinclair
QL and QDOS while providing compatibility with implementations on larger and more powerful workstations,
thus allowing for the straightforward incorporation of existing code and the use of widely available training
material.
GT-Prolog provides a full implementation of the Edinburgh syntax adopted as the basis of international
standardisation efforts and supports a complete range of Prolog data types. Development facilities are based
on the use of window oriented techniques with a fully incremental compiler and interactive debugger allowing
rapid prototyping and development of applications.
GT-Prolog features fast execution speed and low memory overheads as the by-products of a highly
optimised Prolog virtual machine which is efficiently realised through careful use of the MC68000 instruction
set. The virtual machine provides a range of sophisticated speed-up and space-saving techniques, including
automatic tail-recursion optimisation, type indexing and value hashing on first arguments to all calls plus
automatic garbage collection of code and data spaces.
1.3HOW TO USE THIS MANUAL
This manual provides an introduction to the features of the GT-Prolog implementation and, in particular, to
the facilities of the interactive workbench environment.
Chapter 2 describes the contents of the delivery media and outlines some features of GT-Prolog which may
be significant if you are porting existing code.
Chapter 3 describes the steps necessary to execute GT-Prolog and to configure its memory usage.
Chapter 4 illustrates the main features of the user interface exploited by the GT-Prolog Workbench.
Chapter 5 describes the main functions of the GT-Prolog Workbench and the way in which these are
invoked.
Chapter 6 provides a brief tutorial on programming in GT-Prolog illustrating the use of the main components
of the development environment to create, compile and am a small example program.

Introduction
2
Chapter 7 describes the mechanisms provided to configure the management of break events and error
conditions.
Chapter 8 describes the facilities of die integrated text editor and the ways in which source files can be
created, modified and compiled.
Chapter 9 describes die symbolic debugging facilities which allow controlled execution of a program to detect
the occurrence of errors and to track down the corresponding bugs.

Getting Started
3
CHAPTER 2
GETTING STARTED
2.1 INTRODUCTION
This chapter briefly describes the contents of the delivery media and outlines some features of GT-Prolog
which may be significant if you are porting existing code.
2.2 INSTALLATION
GT-Prolog is supplied as a series of files on microdrive or diskette. Having read the licence agreement and
opened the media pack your first action should be to make at least one working copy of each cartridge or
diskette. The originals should then be stored in a safe place.
The main files are as follows:
README_TXT This contains details of any last minute changes or additions to the
software, documentation or example programs.
PRL The runtime library
BOOT The boot file to install PRL.
GTProlog The main executable file.
Workbench_BIPS The bootstrap file containing the GT-Prolog Workbench Built-In
Predicate library.
Queens A source file containing the code used by the tutorial in Chapter 6.
2.3 IMPLEMENTATION FEATURES
GT-Prolog is a full implementation of Prolog conforming to the general conventions established for the
Edinburgh dialect. However, you will find that there are small differences of interpretation and style amongst
all Prolog systems and between the precise dialects employed in the multiplicity of textbooks which are
available. Therefore, if you are importing source code from another Prolog implementation, or using a
particular textbook for example programs, and you find that the program does not behave as expected, then
it is possible that you have encountered one of the features highlighted in this section.

Getting Started
4
2.3.1 Data Types
GT-Prolog supports the usual range of Prolog data types as defined in Edinburgh dialect implementations
with the following special features.
A separate string type is provided which is lexically defined as a sequence of characters enclosed in double
quotes (") and which is represented as a packed array of characters (byte array). This may cause conflicts if
the program expects the Prolog reader to return a string as a list of integer values.
A separate character type is provided which is lexically represented as a dollar ($) followed by the character
value. In some other implementations the low-level input routines return an integer when reading the next
character. GT-Prolog returns a value of type character. This may cause problems if a value comparison is
made with an integer value using the =/2 operator since the differing types will always cause failure.
However, using an arithmetic comparison implicitly converts the arguments to a common type. Thus $a=:=97
succeeds.
The null list value [] is not an atom. Rather it is the only value of the null list class. This may result in an
unexpected failure if atom(X) is called when X is instantiated to []. Similarly ='[]' will always fail since the first
argument is a null value and the second is an atom.
2.3.2 Syntax
Many Prolog implementations use the presence of a space character between an atom and a following left
parenthesis to distinguish whether the atom is an operator or the identifier of a functor. The GT-Prolog
parser is not sensitive to the presence or absence of a space and will always treat an unquoted atom as an
operator if an appropriate definition is in force. This may lead to a syntax error or, in the extreme case, to
unexpected runtime behaviour. GT-Prolog never treats a quoted atom as an operator so any ambiguity can
easily be resolved.
Lists are always represented using square brackets e.g. [Ain The dot notation for lists A.B is not supported.
Similarly the parser will always treat a graphical symbol comprising a single dot character as a clause
terminator rather than as an operator.
2.3.3 Database modifications
Many older Prolog implementations support an 'immediate update' approach to controlling updates to the
database whereby asserting a new clause causes it to become visible to any current goals on backtracking.
Similarly retracting a clause deletes it from the database immediately. These operations can have
catastrophic effects if misused and, generally, mitigate against the successful porting of code to other Prolog
systems since implementation of these features is by no means standardised. However, while exploitation of
these implementation specific facilities has long been considered as deplorable practice it is just possible that
porting existing code may result in apparently different behaviour from that previously observed.
GT-Prolog adopts a 'logical update' approach which effectively takes a snapshot of the database for a
particular goal when it is first invoked and prevents any subsequent modifications from altering its behaviour.
Of course, any subsequent new invocation of the same procedure will react to the modifications as expected.
This approach has clearly defined deterministic semantics and should not cause any difficulties to well-
structured existing code.
2.3.4 Metacalling

Getting Started
5
There are still differences of opinion between implementations as to the interpretation of invoking a variable
goal when the variable is instantiated to cut (!). Some Prolog systems avoid the distinction by implicitly
wrapping all occurrences of an inline variable goal within call/1. For example p(X):-X. is automatically
converted into p(X):-call(X). which prevents any impact from cuts within X on backtracking to further clauses
for p/1.
GT-Prolog has adopted the approach of maintaining the distinction and may result in differing results for
existing code. If necessary the consistent interpretation can be enforced by modifying the Prolog source
code.

Getting Started
6
CHAPTER 3
STARTUP
3.1 INTRODUCTION
This chapter describes the sequence of steps necessary to load and configure GT-Prolog.
3.2 PRELUDE
Before starting GT-Prolog the user should ensure that the PRL file has been installed. This can be done
using the BOOT file provided.
3.3 STARTUP
GT-Prolog is normally initiated from a toolkit with an initiating message specifying the bootstrap file as follows:
exec GTProlog;flp2_Workbench_BIPS
If no file is specified, or GT-Prolog is initiated from QDOS (using exec), then the user is prompted later for
the file name. Note that the executable filename does not have a hyphen (-).
On initiation GT-Prolog's first action is to display a banner page containing copyright and version information
which the user is required to acknowledge.
Figure 3.1 : Initiation Screen
On successfully opening the bootstrap file GT-Prolog displays the predefined configuration parameters which
determine the size of the various memory areas used by the GT-Prolog runtime system. The default values
are configured for a QL with 512k added memory (640k total) but can be adjusted to exploit additional memory
or to alter the proportions for each purpose. If extra memory is available then increasing the heap, code and

Getting Started
7
data amounts can reduce the frequency of garbage collection. When GT-Prolog is running the current usages
can be determined using the Built-In Procedure core/0.
Altering a parameter is performed by typing in the new value followed by ENTER. Typing ENTER alone uses
the default value.
GT-Prolog then allocates memory as specified and loads the content of the bootstrap file. If an error is
encountered during loading then it is reported as a negative number if detected by QDOS.
Figure 3.2 : Configuration Parameters

Getting Started
8
3.4 WORKBENCH_BIPS
Loading Workbench_BIPS initiates the standard GT-Prolog interactive development environment. This
exploits the QL standard screen and file handling mechanisms to provide a multi-window, menu based
interactive user interface.
The environment exploits six distinct screen areas which are tiled onto the main screen.
user The main interactive shell window
display Used for menus and summary listings
message Used for error and debugging messages and dialogues
break Used to interrupt execution
edit The main editor display area
gc Garbage collector activity indicator
By default only the first four areas are visible on startup and edit overlays with user and display. However,
all the windows are fully accessible to user programs and the configuration can be dynamically adjusted at
will.
As usual CTRL-C can be used to switch between windows enabled by this and other programs.
The break window is used to provide an execution interrupt mechanism (similar to CTRL-Space for BASIC)
and is always enabled for input but all characters other than ESC are ignored. Typing ESC within break
invokes a continuable software interrupt mechanism within the GT-Prolog runtime system whose action is
also user configurable. Note that the break window can be used by the standard Prolog library I/0 procedures
but only for output.
The gc window displays a single letter whenever a garbage collector is active. H indicates heap (clause and
code), S indicates stack (data and trail) and T indicates that the logical database timestamps are being
reallocated. Each garbage collector is implicitly invoked whenever the corresponding resources are
exhausted so that frequent repetition of a particular letter may indicate that too small an area was allocated
at bootstrap time.
After initiation, visible windows are cleared and the environment top-level menu is displayed.

Getting Started
9
Figure 3.3 : Workbench Window Layout
User Interface
10
CHAPTER 4
USER INTERFACE
4.1 INTRODUCTION
This chapter describes the main facilities and conventions of the GT-Prolog Workbench user interface and
the way in which these exploit the screen management and console input/output facilities of QDOS. The
default working mode is to use a series of menus and dialogues to initiate functions as described below.
However, it is also possible to drive the Workbench using the command line facilities of the Query Shell (see
Chapter 5).
4.2 TV DISPLAY VERSUS VDU
GT-Prolog is not sensitive to the distinctions between TV and VDU display modes except within the editor
(see Chapter 8). While use of high resolution mode (4-colour) will enable more information to be displayed
within a single window, there is no particular disadvantage to using the Workbench in low resolution mode if
desired.
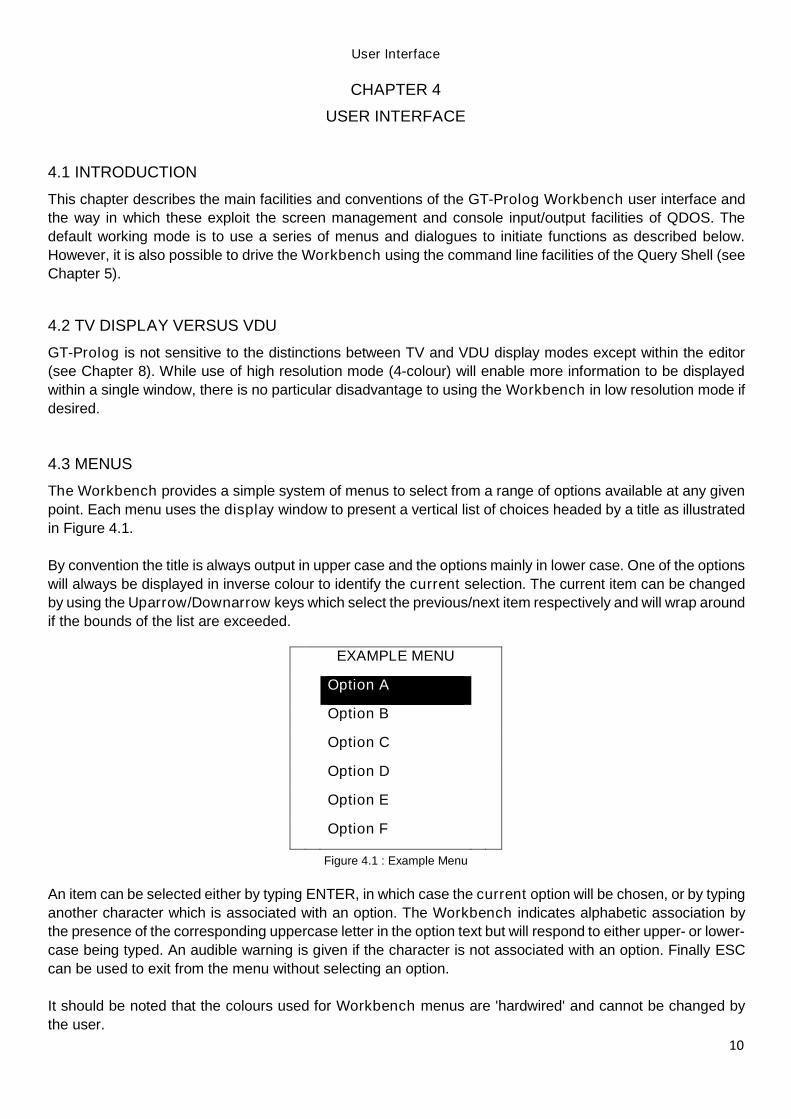
4.3 MENUS
The Workbench provides a simple system of menus to select from a range of options available at any given
point. Each menu uses the display window to present a vertical list of choices headed by a title as illustrated
in Figure 4.1.
By convention the title is always output in upper case and the options mainly in lower case. One of the options
will always be displayed in inverse colour to identify the current selection. The current item can be changed
by using the Uparrow/Downarrow keys which select the previous/next item respectively and will wrap around
if the bounds of the list are exceeded.
EXAMPLE MENU
Option A
Option B
Option C
Option D
Option E
Option F
Figure 4.1 : Example Menu
An item can be selected either by typing ENTER, in which case the current option will be chosen, or by typing
another character which is associated with an option. The Workbench indicates alphabetic association by
the presence of the corresponding uppercase letter in the option text but will respond to either upper- or lower-
case being typed. An audible warning is given if the character is not associated with an option. Finally ESC
can be used to exit from the menu without selecting an option.
It should be noted that the colours used for Workbench menus are 'hardwired' and cannot be changed by
the user.

User Interface
11
4.4 DIALOGUES
Some menu selections require additional information to be input e.g. if the command requires a filename to
be specified. In this case the message window is used to display a prompt for the input of some text. The
prompt is often followed by some default value which may be amended using the QDOS line editing facilities.
Typing ENTER will cause the dialogue to be completed and the text to be processed. The dialogue will be
aborted if the text input by the user contains the copyright character © (SHIFT-ESC).

Workbench Functions
12
CHAPTER 5
Workbench Functions
5.1 INTRODUCTION
This chapter describes the main functions provided by the GT-Prolog Workbench and the way in which
these are invoked via the user interface.
5.2 FILE CONVENTIONS
5.2.1 Directories and Devices
GT-Prolog makes no assumptions about the legality of device names, the use of directory structures or the
presence or absence of a Toolkit running with QDOS. By default, therefore, the user is expected to provide
the full name for any file to be processed by a Workbench command.
5.2.2 File Types
GT-Prolog similarly forces no particular file naming conventions to be adopted to indicate Prolog source
code, object code or data and the user is free to select a convenient personal choice which avoids conflict
with any other programs.
5.3 WORKBENCH MENU
The top level WORKBENCH menu is illustrated in Figure 5.1. It provides access to the facilities described in
the following sections.
Figure 5.1 : WORKBENCH Top Level Menu
5.3.1 Query
The query option invokes the Query Shell which is described in detail in Section 5.7.
5.3.2 Edit
Invoking the editor first enters a dialogue to select the file which is to be processed using the name of the
most recently edited file (if any) as default. The facilities of the editor are described in more detail in Chapter 8.
5.3.3 Database
This option invokes the DATABASE submenu to provide access to a set of functions for consulting or
compiling source files or loading object files. See Section 5.4
Workbench Functions
13
5.3.4 Restart
This option causes all command levels to be abandoned and the WORKBENCH menu to be re-entered at
the outermost level.
5.3.5 Exit
This option causes the current invocation of GT-Prolog to be terminated.
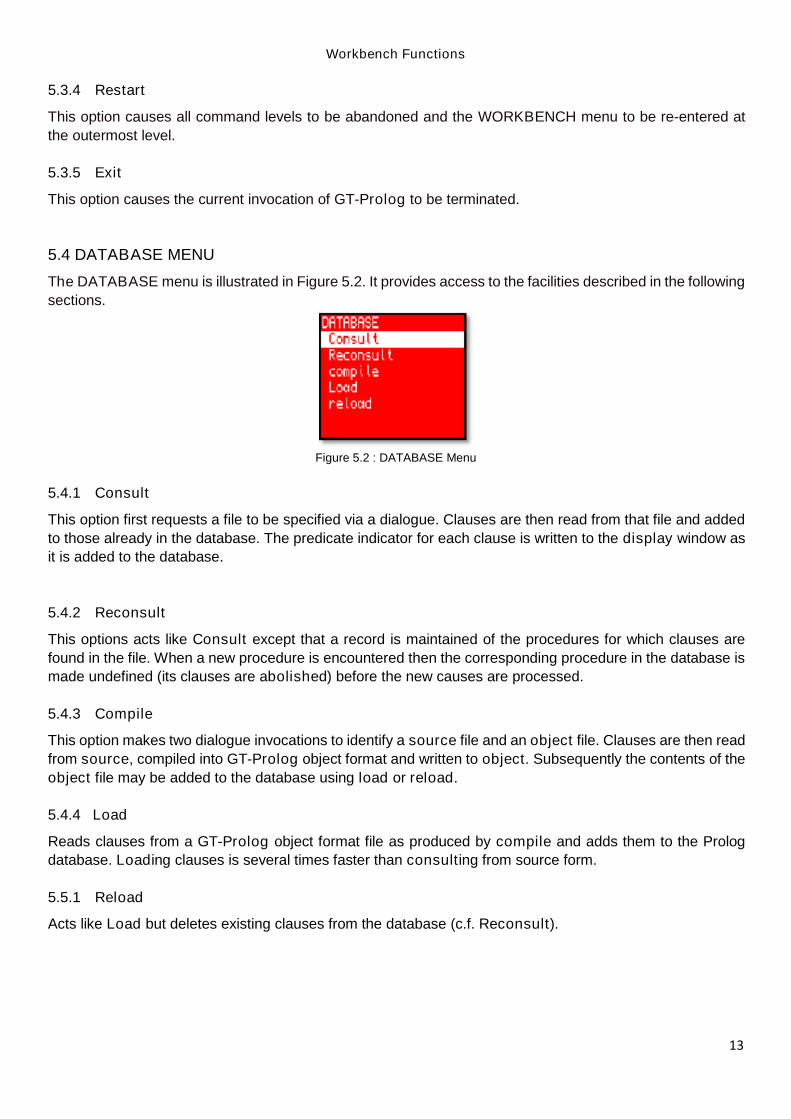
5.4 DATABASE MENU
The DATABASE menu is illustrated in Figure 5.2. It provides access to the facilities described in the following
sections.
Figure 5.2 : DATABASE Menu
5.4.1 Consult
This option first requests a file to be specified via a dialogue. Clauses are then read from that file and added
to those already in the database. The predicate indicator for each clause is written to the display window as
it is added to the database.
5.4.2 Reconsult
This options acts like Consult except that a record is maintained of the procedures for which clauses are
found in the file. When a new procedure is encountered then the corresponding procedure in the database is
made undefined (its clauses are abolished) before the new causes are processed.
5.4.3 Compile
This option makes two dialogue invocations to identify a source file and an object file. Clauses are then read
from source, compiled into GT-Prolog object format and written to object. Subsequently the contents of the
object file may be added to the database using load or reload.
5.4.4 Load
Reads clauses from a GT-Prolog object format file as produced by compile and adds them to the Prolog
database. Loading clauses is several times faster than consulting from source form.
5.5.1 Reload
Acts like Load but deletes existing clauses from the database (c.f. Reconsult).

Workbench Functions
14
5.5 BREAK MENU
This menu is invoked as the default action of interrupting execution of a Prolog program by typing ESC within
the break window. Apart from the title its format and content is identical to the WORKBENCH menu. Note
that selecting the Edit option will cause an exception if this attempts a recursive invocation.
In many cases ESCaping from this menu will allow the interrupted program to continue execution. However,
this may not be successful if the files in use by that program have been affected by actions during the break
(repositioning, closing etc).
5.6 ERROR MENU
The ERROR menu is illustrated in Figure 5.3 and is invoked as the default action of an exception being
detected within a Built-In Procedure (BIP). It follows the display of an error message within the message
window. The options available are described in the following sections.
5.6.1 Fail
This option causes execution to continue as if the BIP had failed.
5.6.2 Succeed
In this case execution continues as if the BIP had succeeded. However, as the actions of the BIP have not
been completed (e.g. instantiation of output arguments) this often causes further exceptions to be detected.
Figure 5.3 : Error Menu
5.6.3 Throw
The exception detected is propagated back to the next exception handler in scope.
5.6.4 Break
Invokes the BREAK menu allowing, for instance, a nested invocation of the query shell to be used for
interrogating the state of the Prolog database.
5.6.5 Restart
This option causes all command levels to be abandoned and the WORKBENCH menu to be re-entered at
the outermost level.

Workbench Functions
15
5.è QUERY SHELL
The query shell provides an interactive interface allowing the user to enter a query comprising one or more
Prolog goals which will be executed using the facts and rules contained within the Prolog database. It can
also be used as a command line interface to the Workbench if this style of working is preferred.
The query shell runs within the user window and starts each interaction by displaying the query prompt
(default ?-). The user is then expected to type in his query terminated by a full stop (.) The usual QDOS line
editing functions are available to correct any mistakes and the process is terminated by ENTER. If the query
text contains the copyright character © (SHIFT-ESC) then the query shell is terminated without any
processing of the text. Note that the maximum length of the query is determined by the 1/0 stream buffer size
defined during the startup process. Providing the query is syntactically correct then it will be executed.
On achieving a solution each variable within the query is displayed together with its current instantiation. Any
uninstantiated variables are identified by displaying names of the form A, ..., Z, A1, ... etc. to achieve a
consistent renaming. The user is then asked whether a further solution should be sought and a y/n response
is requested. If ESC is typed at this point then the query shell is terminated.
If the user responds negatively to the further solutions interaction or no solution is found then a message is
displayed and a new interaction cycle is started.
The query shell may be entered recursively via the BREAK and ERROR menus as described above.

Tutorial
16
CHAPTER 6
TUTORIAL
6.1 INTRODUCTION
This chapter describes the development of a small program written in Prolog as a way of illustrating the use
of both the language and the facilities of the Workbench.
6.2 THE '8-QUEENS' PROBLEM
The 8-Queens problem is a famous chess brain-teaser and is also a classic application in Prolog since it
exploits many of the basic programming techniques such as searching and backtracking. The problem itself
is simply stated as "How do you place eight queens on an empty chessboard so that no queen is attacked
by any other queen". One possible configuration is shown in Figure 6.1.
8 Q
7 Q
6 Q
5 Q
4 Q
3 Q
2 Q
1 Q
1 2 3 4 5 6 7 8
Figure 6.1 : Sample solution to the 8-Queens Problem
There are numerous methods to formulate a solution for the problem which are covered at length in the
various textbooks. In this case we adopt a fairly simple approach which still executes with reasonable
efficiency.
Our first task is to decide on a representation of the board layout and, since we will need to know the position
of each piece, a natural approach is to use a list of coordinate pairs (X,Y). For the configuration in Figure 6.1
this would give the final position:
[ (1,8), (2,2), (3,4), (4,1), (5,7), (6,5), (7,3), (8,6) ]
We can tackle the overall problem by adopting an inductive approach to the safe placement of the N'th queen.
Assuming that we have already placed N-1 queens successfully then the N'th queen must be placed such
that:
1. it is in a different column from any of the existing queens
2. it is in a different row from any of the existing queens
3. it is on a different diagonal from any existing queen.
The limiting case is that where there are no queens already placed then the position is trivially safe.

Tutorial
17
Before considering how to code this in Prolog we should note that (without loss of generality) we can improve
the efficiency of the method by requiring that queens are placed in ascending column positions. Thus the final
position must be of the form:
[ (1,Y1), (2,Y2), (3,Y3), (4,Y4), (5,Y5), (6,Y6), (7,Y7), (8,Y8) ]
We encode our Prolog solution using three procedures place/1, which places a list of pieces,
unthreatened/2, which checks that a new piece does not conflict with any previously placed pieces and
safe/2 which checks that two pieces are mutually safe. The code is as follows:
place([]):-!. % the trivial case
place([(X,Y)I Others]):- % the inductive case
place(Others),
member(Y, [1,2,3,4,5,6,7,8]),
unthreatened((X,Y), Others).
unthreatened(_,[]):-!. %the trivial case
unthreatened(Position, (Head,Tail):-
safe(Position, Head),
unthreatened(Position,Tail).
safe((X1,Y), (X2,Y)):-!, fail. %unsafe if Y values are the %same
safe((X1,Y1), (X2,Y2)):- %unsafe if same leading
X1-X2=:=Y1-Y2, %diagonal
!,fail.
safe((X1,Y1), (X2,Y2)):- %unsafe if same trailing
X1-X2=:=Y2-Y1, %diagonal
!,fail.
safe(_,_). %otherwise ok
The member/2 procedure is provided by GT-Prolog as a library BIP, but its definition is also given here for
convenience:
member(X, [XI_]). %X is the head of the list or
member(X, [_|T]):- %X is a member of the
member(X,T). %remainder
Finally we need a way to structure the final solution and to start the process off:
board([(1,Y1), (2,Y2), (3,Y3), (4,Y4), (5,Y5), (6,Y6), (7,Y7), (8,Y8)]).
queens(Solution):-
board(Solution),
place(Solution).

Tutorial
18
6.3 CREATING THE SOURCE FILE
Normally you will need to create a source file containing the Prolog text by typing the code into a suitable
editor (either the one included in the GT-Prolog Workbench or your own favourite external editor). In this
case we have simplified the process by including the text in the file queens on the distribution media. The
rest of this section assumes that you are using the GT-Prolog editor.
You can invoke the editor either from the WORKBENCH menu, in which case a dialogue is used to specify
the filename, or directly from the Query Shell in which case a command of the following form is needed:
?- edit(flp2_queens).
Having loaded the Prolog text we can use the facilities described in Chapter 8 to browse the code and, if
desired, to modify the source. Note that it is always good practice to save the text after modification and
before commencing any other operation.
Figure 6.3 : Editing Queens source file
We can now consult the text by typing ALT+C (press C while holding down the ALT key). This will cause
the Prolog compiler to read clauses from the edit text and assert them into the Prolog database. Note that the
predicate indicator for each clause is listed in the display window so that you can see the compilation
progress. Assuming you have not made any invalid changes to the code then the compilation will terminate
and return you to the editor.
If the compiler does detect an error then an exception is displayed in the message window and the compilation
is halted. In this case the editor is reentered with the cursor placed on the line where the error was detected.
Note that the actual error may be in one of the previous lines of the same clause. Having identified and
corrected the fault using the editor (and saved the file) we can try the compiler again. However, in this case
we already have a partially compiled program within the database and we do not want merely to assert the
clauses since this will cause duplication of the clauses which were successfully processed on the first attempt.
Rather we want to replace the partial program by a completely new version and we can do this by
reconsulting the text using ALT+R.

Tutorial
19
Figure 6.4 : The Compilation progress

Tutorial
20
6.4 RUNNING THE PROGRAM
Having successfully created and compiled our program we now want to try to run it and to do this we need to
invoke the Query Shell. If we type ESC within the editor then the BREAK menu will be presented from which
we can select the query option.
Before running the program we can first check on the compilation by a query as follows (the ?- prompt is
supplied by the shell):
?- listing.
This will decompile the program and list it to the current output stream, in this case user. Note that the variable
names in the clauses have been consistently replaced by system generated aliases.
Figure 6.5 : Decompile the program
We can then run a suitable test by entering a query
?- queens(S).
to which the shell will respond:
S : [ (1,4), (2,2), (3,7), (4,3), (5,6), (6,8), (7,5), (8,1) ]
More (y/n) ?
Responding y (either upper -or lower- case) will cause a further solution to be sought which will be displayed.
Typing n will cause the shell to request input of the next query.
If there is no solution the shell will respond:
No (more) solutions

Tutorial
21
Figure 6.6 : Running the test
Responding y (either upper -or lower- case) will cause a further solution to be sought which will be displayed.
Typing n will cause the shell to request input of the next query.
If there is no solution the shell will respond:
No (more) solutions

Tutorial
22
6.5 USING THE DEBUGGER
As well as use for bug hunting the debugger also has a valuable role to play as a general mechanism for
investigating the actions of a program. We can use it in this case by firstly establishing a spypoint on the
queens procedure by a query of the form:
?- spy(queens/1).
If we then invoke queens/1 as before then debugger will respond with a message:
1 CALL: queens(A)
We can continue to use the remaining features of the debugger as described in Chapter 9. It may be especially
instructive for novice Prolog programmers to single step through the program to get a feel of exactly how
Prolog operates. Note that the restart option will cause a return to the outermost WORKBENCH level and
that a query
?- nospy.
will delete all spypoints.
6.6 EXITING FROM PROLOG
When we have completed our efforts we can leave GT-Prolog either by choosing the exit option in the
WORKBENCH or BREAK menus or by entering the query
?- halt.

Break / Error handler
23
CHAPTER 7
BREAK/ERROR HANDLER
7.1 INTRODUCTION
GT-Prolog is designed specifically for the development and execution of interactive applications. It is,
therefore, essential that a completed program is able to detect and recover from any error condition in a
secure and controlled fashion without incurring significant space and performance overheads. Conversely,
during development, the requirement is more oriented towards enhancing the speed of the production process
by providing a greater level of detail on error conditions plus the ability to interrupt execution and interrogate
the program state at will.
This chapter describes the mechanisms provided by GT-Prolog which supply the required functionality while
reconciling the conflicting space and time overheads.
7.2 BREAK HANDLER
The GT-Prolog break mechanism is invoked by the user selecting the break window and typing ESC. This
causes an interrupt to the runtime system which saves the current state of execution, interrogates the setting
of the break flag and invokes the predicate identified.
By default the value of the break flag is break_handler/0 which initiates a new copy of the top level menu.
This permits the execution to be restarted, halted or a new invocation of the query shell to be entered. In the
latter case successive queries to determine or modify the system state can be input as desired until terminated
by ESC. The suspended execution can be resumed by ESCaping from the menu.
The user has complete freedom to program the break action dynamically by defining a suitable predicate and
resetting the break flag accordingly. This can occur at multiple points during the execution of the program.
Alternatively the entire break mechanism can be disabled by closing the break window using close/1.
However, it should be noted that the break mechanism cannot be re-enabled subsequently under program
control.
7.3 STANDARD ERROR HANDLING
Error handling in GT-Prolog exploits the special control predicates catch/3 and throw/1. The predicate
catch(G,E,R) establishes an exception trap point and then calls G. If G, or any of its subgoals, invokes
throw(F), either directly or as a result of an error, then a copy of F is preserved and control is returned
immediately to the trap point which is removed. The return is analogous to backtracking to a choice point in
that any variable instantiations resulting from G are undone.
If the copy of F unifies with E then the goal R is called as a recovery action. Any exception arising from R is
propagated to the next outer trap point which is in scope. If the unification fails then the exception is
propagated immediately.
Trap points may be nested arbitrarily and are removed by cuts in the same way as choice points. Within
catch(G,E,R) the goal G is invoked using call/1 so that the effect of any cut is limited to G, similarly for R.

Break / Error handler
24
7.4 ERROR VALUES
An exception value may be any valid Prolog term. However GT-Prolog utilises a number of standard
exceptions to report error conditions for built-in predicates:
domain_error the value of an argument is outside the permitted range or is
not one of an allowed set of values.
existence_error an object on which the operation is to be performed does not
exist
instantiation_error an uninstantiated variable has been supplied as an argument
whose mode is specified as + (see Reference Manual Chapter
9).
permission_error the operation is not allowed on the specified object
representation_error the result of the operation cannot be represented
syntax_error(S) an attempt to parse a sequence of characters as a valid Prolog
term has failed for the reason given by S
system_error a system fault occurred during execution of the predicate
type_error the type of an argument is incorrect
The exceptions and corresponding causes for each built-in predicate are described in Chapter 9 of the
Reference Manual.
7.5 RESOURCE ERRORS
A further set of errors are detected if one of the storage areas used by GT-Prolog or QDOS becomes
exhausted. Although continuation of the current goal is impossible it may be possible to continue execution
of GT-Prolog itself after remedial action is taken. Alternatively reinvoke GT-Prolog with a larger allocation
for the affected area.
atom_space_fault the atom table is exhausted - not continuable.
channel_space_fault the QDOS channel table is full - close any unwanted streams in
this program or channels in any other program.
clause_space_fault the heap garbage collector is unable to free any more space in
the clause table. May be continuable if GT-Prolog is restarted.
Alternatively abolish any unwanted procedures.
code_space_fault the heap garbage collector is unable to free any more space in
the code area. May be continuable if GT-Prolog is restarted.
Alternatively abolish any unwanted procedures.
control_space_fault the control area has insufficient space to allocate a choice point
or continuation. Always continuable if GT-Prolog is restarted.
data_space_fault the stack garbage collector is unable to free any more space in
the data area. Always continuable if GT-Prolog is restarted.
drive_space_fault the device corresponding to the current output stream is full.
Deleting unwanted files may allow Prolog to continue.

Break / Error handler
25
functor_space_fault the functor table is exhausted - not continuable.
memory_space_fault QDOS is unable to find enough memory to allow a trap to
complete successfully.
name_space_fault the name table is exhausted - not continuable.
stream_space_fault the stream table is full - close any unwanted streams.
trail_space_fault the stack garbage collector is unable to free any more space in
the data area. Always continuable if GT-Prolog is restarted.
7.6 WORKBENCH ERROR MANAGEMENT
The standard error reporting mechanism provides a user written application program with a configurable
balance between the overheads of error detection and the granularity of the recovery mechanism. However,
when developing and debugging new code a much greater level of detail is often essential.
The GT-Prolog Workbench augments the basic error handling scheme by establishing a trap point for each
built-in predicate which reports any error condition using the goal error(E,G) where E is the exception and G
is the goal originally called. The predicate error/2 itself interrogates the system flag error to determine the
name of a predicate of arity 2 which is then invoked with the same arguments. By defining a suitable
procedure and resetting the error flag to its name the user can tailor reporting of any errors arising from a
built-in predicate. If the user defined predicate fails then the exception E is propagated as in the standard
scheme.
The default setting for the error flag is error_handler which will cause invocation of error_handler/2. This
predicate outputs to the message window in the format:
EXCEPTION <E> ARISING FROM <G>
and then invokes the ERROR menu allowing the user to select the circumstances for continuation.

UPDATE TEXT
26
CHAPTER 8
TEXT EDITOR
8.1 INTRODUCTION
The GT-Prolog Workbench includes a fully integrated text editor for the creation and maintenance of source
files. This chapter describes how to start up the editor, how to access, create or save a file, the commands
to insert, modify or move text, and the interface to the other facilities of the Workbench.
The editor is intended to provide those facilities generally needed to allow production and modification of
Prolog source files and other text files of moderate size. However, it is not intended to be a full word
processor. Moreover, as the editor is, itself, written in Prolog then use on very large files may hit memory
space limitations or encounter noticeable performance overheads.
8.2 GENERAL FEATURES
The GT-Prolog editor offers a screen-based set of text manipulation facilities using the edit display area.
The editor automatically adjusts to the current screen display mode and the colour and character size settings
for the edit window.
Text is treated as a sequence of lines (numbered from 1) with the edit window being adjusted as necessary
to keep the current text position (line number and character position) visible. Each line is implicitly terminated
with an invisible linefeed character.
Editor commands operate in one of the following modes:
immediate the action is directly related to a simple or compound key press
e.g. character insert/delete, cursor movement
command line extended command names, commands with parameters and
sequences of commands
quick key abbreviated command name using <ALT+Key> or function key
The command line facility uses a dialogue displayed in the message window to allow a sequence of
commands to be created, edited or replayed.
8.3 STARTUP
The editor is invoked either via the WORKBENCH or default BREAK menus or directly using edit/1. An
attempt to invoke the editor recursively results in an error.
If the file already exists then its contents are loaded, otherwise a new edit text is created. The current text
position is set to the start of the edit text.

UPDATE TEXT
27
8.4 IMMEDIATE COMMANDS
8.4.1 Character Insert
Unless reserved as a command name (see below) any combination of key presses which result in a single
character (including <SHIFT+Key> and <CTRL+Key>) will cause that character to be inserted at the current
cursor location
8.4.2 Linefeed <ENTER>/<CTRL+J>
If the cursor is at the start or end of a line then a new blank line is inserted. Otherwise the current line is split
at the cursor position.
8.4.3 Left Delete <CTRL+Leftarrow>
The character to the left of the cursor is deleted.
If the cursor was positioned at the start of a line then the line is concatenated with the previous line.
Any attempt to delete a character before the start of the edit text results in an audible warning.
8.4.4 Right Delete <CTRL+Rightarrow>
The character under the cursor is deleted.
If the cursor was positioned at the end of a line then the line is concatenated with the following line.
Any attempt to delete a character beyond the end of the edit text results in an audible warning.
8.4.5 Cursor Movement <Leftarrow> <Rightarrow> <Uparrow> <Downarrow>
The cursor is moved in the direction of the arrow key.
Movement beyond the start/end of a line causes wraparound to the previous/next line.
If an up/down movement would leave the cursor beyond the end of the new line then the cursor is repositioned
to the end.
An attempt to move the cursor beyond the start/end of the edit text results in an audible warning.
8.4.6 Redo Last Command <F2>
The last command input to the Command Line Processor is re-executed.
8.4.7 Enter Command Line <F3>
The Command Line Processor initiates a dialogue in the message window which allows the user to enter a
command sequence.
8.4.8 Refresh Display <F4>
The current attributes of the edit window are accessed and used in redisplaying the contents.
8.4.9 Edit Command <F5>
The last command input to the Command Line Processor is displayed for editing and subsequent execution.
UPDATE TEXT
28
8.5 COMMAND LINE
8.5.1 Syntax
Each command consists of a command letter followed by one or more parameters each of which is bracketed
by matching delimiter characters. Delimiters must be one of
# & . / * \ + - : < = > ? @ ^ ~
Multiple parameters are separated from each other by a single delimiter character.
A command line can comprise multiple commands separated by spaces.
8.5.2 Save (S)
The current edit text is written to the file identified by the parameter. The recorded file name is also set to the
parameter for use by subsequent saves.
8.5.3 Insert File (I)
The contents of the file identified by the parameter is inserted into the edit text immediately after the current
line.
8.5.4 Find (F)
The edit text is scanned for an occurrence of the parameter text starting at the character after the current
cursor location. Note that case is significant in determining a match. The cursor location is adjusted to point
at the first character of the matched sequence. An audible warning is given if no match is found.
8.5.5 Exchange (E)
The edit text is scanned for an occurrence of the first parameter starting at the current cursor location. If a
match is found then the text is replaced by the second parameter. Note that case is significant in determining
a match. The cursor location is adjusted to point at the first character of the replacement text. An audible
warning is given if no match is found.
8.6 QUICK KEY COMMANDS
8.6.1 Page Scrolling <ALT+Uparrow> <ALT+Downarrow>
The text cursor is moved in the direction of the arrow by one page full of information.
An attempt to move the cursor beyond the start/end of the edit text results in an audible warning.
8.6.2 Line Positioning <ALT+Leftarrow> <ALT+Rightarrow>
The text cursor is moved to the start/end of the current line.
8.6.3 Delete Line <CTRL+ALT+Leftarrow>
The current line is deleted.
An audible warning is sounded if the edit text is empty.
8.6.4 Delete Rest <CTRL+ALT+Rightarrow>
Characters under and to the right of the cursor on the current line are deleted.

UPDATE TEXT
29
8.6.5 Move to Top of File <ALT+T>
The text cursor is moved to the start of the edit text.
8.6.6 Move to Bottom of File <ALT+B>
The cursor is moved to the end of the edit text.
8.6.7 Save the File <ALT+S>
The edit text is saved to the file from which it was loaded or to which it was last saved.
8.6.8 Consult the File <ALT+C>
The edit text is consulted and each clause is added to the Prolog database. If a syntax error occurs then the
cursor is moved to the line where the error was detected. Note that the actual problem may be in an earlier
line of the same clause.
8.6.9 Reconsult the File <ALT+R>
The edit text is reconsulted and each clause is added to the Prolog database replacing any existing clauses
for the same predicate. If a syntax error occurs then the cursor is moved to the line where the error was
detected. Note that the actual problem may be in an earlier line of the same clause.
8.6.10 Quit <ALT+Q>
The current editing session is abandoned. If the edit text has been modified since loading or the last save
then the user is asked to confirm that the modifications should be jettisoned.
8.6.11 Exit <ALT+X>
The current editing session is terminated. If the edit text has been modified since loading or the last save
then the modified version is rewritten.
8.7 WORKBENCH INTERFACE
If ESC is typed during editing then a break state will be entered allowing queries etc. to be executed. Exiting
from the break state will allow editing to continue.
If the restart option is selected following a break or an error then the uses is given the option of saving the
file before the editor exits if the text has been modified since loading or the last save.

UPDATE TEXT
30
CHAPTER 9
DEBUGGING
9.1 INTRODUCTION
At some time during the development of a Prolog program you may discover that the observed behaviour
does not meet your expectations under some conditions. In many cases simple examination of the source
code will reveal the cause of the anomaly. However, in more complex cases, particularly those involving
dynamic modifications to the database, the task of bug hunting can benefit substantially from the ability to
track the execution path of the program at a more detailed level and to examine its state at appropriate points.
In conventional program development systems the debugging process usually involves a minimum overhead
of recompiling the source code to add debug print statement and/or to link in a symbolic debugging package.
Prolog systems, however, almost invariably allow symbolic debugging to be applied to the program in situ
and GT-Prolog provides a particularly powerful variant of this technique based on an enhanced version of
the ubiquitous Byrd Four Port Box Model.
9.2 CONTROL FLOW MODEL
The Box Model provides a simple framework for visualising the stages of execution of a Prolog procedure.
As shown in figure 9.1 there are four external ports to cope with the general case of a procedure which is
resatisfiable
CALL is entered when the procedure is first invoked but before any
selection of candidate clauses is made.
EXIT represents a successful solution of the goal which invoked the
procedure. In effect at least one clause has been found whose
head matches the call goal and whose body succeeds.
REDO is entered when a subsequent failure has caused backtracking
and an alternative solution to the procedure is being sought.
FAIL represents the case when no (further) solution to the calling goal
can be derived.
GT-Prolog augments the basic model with two further internal ports
NECK entered when a candidate clause of a user defined procedure
has been selected and any arguments of the calling goal have
been unified successfully with the clause head.
XCEP invoked when the procedure causes an exception value to be
thrown either explicitly or as the result of error processing.

UPDATE TEXT
31
The six debugging ports are exploited by two complementary mechanisms to allow the execution of a goal
to be controlled and its progression to be viewed
Spying allows the user to establish points at which execution of a goal
can be interrupted to allow the status of the program to be
interrogated in more detail.
Tracing permits the goal to be executed unchecked with informatory
messages generated at points of interest.
CALL NECK EXIT
XCEP
FAIL REDO
Figure 9.1 Box Model Ports
9.3 SPYPOINT MECHANISMS
The GT-Prolog Workbench Debugger allows interactive debugging of both complete and partial programs
through the use of spypoints. A spypoint can be set for any predicate (atom or functor) regardless of whether
it identifies a user defined procedure, a system defined Built-In Predicate or is undefined. However, spypoints
will not be established on any predicate which is a control construct.
The effect of setting a breakpoint on a predicate is to cause any attempt to execute a goal with the same
identifier and arity to be pre-empted by a call to the debugger.
Spypoints can be set using spy/1 executed directly as a goal. Similarly nospy/1 can be used to unset a
spypoint and nospy/0 to unset all spypoints. A listing of current spypoints can be obtained using spying/0.
When the debugger is enabled for a particular goal a message is output for each port encountered in the
format:
Number Port: Goal
where
Number is the goal invocation number. All messages for a particular call
instance have the same number.
Port indicates which port is being traversed.
Goal lists the goal including the instantiation of any variable
arguments
At each port the user is also given a number of options to control execution continuation via the DEBUG
menu shown in Figure 9.2.

UPDATE TEXT
32
Step for user defined predicates which are dynamic and not private
causes single stepping to the next subgoal of the current clause
and reenters the debugger regardless of whether the subgoal
has a spypoint set.
For BIPS, and static and/or private user defined predicates, acts
like Leap. This prevents the debugger from being used to
examine their internal structure.
Hop continues execution until the next port of the current goal is
reached. Any spypoints encountered in subgoals of the current
clause body are suppressed.
Leap continues execution until either a spypointed subgoal is
executed or the next port of the current goal is reached.
Trace continues execution with tracing enabled until either a
spypointed subgoal is executed or the next port of the current
goal is reached. A trace message will be generated for each
debug port encountered.
Notrace disables tracing.
Else causes a local failure which invokes backtracking to the most
recently established choice point.
Call restores the execution state to the CALL port of the current goal.
Note, however, that any side effects of subgoals are not undone.
Fail causes the current goal to fail completely.
Break causes the system break handler to be invoked. Typically this
re-enters the Query Shell allowing general queries to be used to
interrogate and/or modify the program state. The ESC
mechanism may subsequently be used to restore execution to
this point.
Restart abandons the current goal and returns to the system top level.
DEBUGStepHopLeapTraceNotraceElseCallFailBreakRestart
Figure 9.2: DEBUG Menu

UPDATE TEXT
33
9.4 DEBUG OUTPUT
Debugging messages are output to the stream identified by the Prolog flag debug_stream. By default this is
set to message so that all messages appear on the screen. However, where large volumes of output are
anticipated, it may be desirable to capture the information in a file or on hard copy in which case the flag
should be reset to a suitable value e.g.
?- open(bug_out,file("flp2_debug_out"),write),
set_flag(debug_stream,bug_out).
9.5 DEBUGGING TACTICS
In many cases the user will be able to identify a small number of predicates as being of significant interest in
resolving the problem. Thus a reasonable starting point is to set spypoints on these predicates and then
execute a suitable initial goal. The debugger will be entered at the CALL port of the first spied predicate which
is encountered.
It is unlikely that the first call on a spied predicate will reveal the cause immediately but repeated use of the
leap option can be used to advance execution in fairly large scale steps until a discrepancy is noted. At this
point a more finely grained approach can be adopted by setting more spypoints via the break option, through
the use of single stepping or by tracing. Note that the call option can be used to replay the current goal and
that repeated fails can be used to force backward stepping to an earlier goal.
It should be noted that the debugger itself is written in Prolog and will, therefore, consume memory resources.
This may lead to increased garbage collection activity and, ultimately, to exhaustion of control or data spaces
with corresponding exception processing being invoked.

UPDATE TEXT
34
README_TXT Last Update 3.3.94
Welcome to GT-Prolog.
This file contains information on last-minute updates to the GT-Prolog software and documentation together
with any known features or bugs.
If you have any comments or problems then please contact us at :
Grange Technology Limited
Rosebank, Stream Road,
Upton, Didcot,
Oxon. OX11 9JG
Tel/Fax: 0235-851818
DISTRIBUTION CONTENTS
Pentomino, a graphical demonstration program has been added to the distribution diskette. Instructions for
use and description of method are included in the file.
Queens_full is a fuller and more general version of the Queens program used in the tutorial. It includes a
graphical output of the board.
RELEASE HISTORY
GT-Prolog
1.0.0 The first external release
1.0.1 (Internal Only)
Fixes a problem with position/2 when at EOF which also causes an error in compile
Also fixes an obscure problem in which creation of a clause index can lose some clauses in the index
chain
1.0.2 Fixes a potential garbage collection fault
Workbench
1.0.0 The first external release
1.0.1 Fixes:
compile/2 calls undefined comp_process/1
ESC within ERROR/DEBUG menus gives instantiation_error
F2 within edit leaves message as current output stream
1.0.2 Minor adjustment of windows

UPDATE TEXT
35
ERRORS
GT-Prolog
1.0.2 There are no outstanding errors
Workbench
1.0.2 There are no outstanding errors
DOCUMENTATION
User Guide
There are no amendments
Reference Manual
Chapter 9 System Procedures p9-23
dmode(+M)
Sets the screen display mode according to the value of M:
high the screen is set to high resolution mode (4 colour)
low the screen is set to low resolution mode (8 colour)
ERRORS
instantiation_error M is not instantiated
type_error M is not an atom
domain_error M is not a valid mode


