Download - Hibiscus International #50

Hibiscus International 1
THE QUARTERLY MAGAZINE OF THE INTERNATIONAL HIBISCUS SOCIETY Vol.12 No1– Issue 50
A LAD
Y ‘S L
EGACY
POTS AREN’T SO SIMPLE AFTER ALL
SOTY 2011 WINNERS
A RAINBOW OF COLOURS

Hibiscus International 2
S P E C I A L
P O I N T S O F
I N T E R E S T :
Presidents Message
Page 1
Editors Report
Page 2
Jan. Feb. Mar. 2012
Hello fellow hibiscus enthusiasts,
Now that Spring has returned to the northern hemisphere
and the days are getting longer we can look forward to the
prospect of getting back into our gardens and into the fresh
warm air. Our southern brethren are now looking at cooler
weather and the onset of fall . Wherever you live, change is
definitely in the air.
Change is also ongoing with the transition from our old web-
site to our new one but not at the pace for which we might
have hoped. Certain areas have been moved over smoothly
with other areas still to come.
In the words of Mark Stephenson "The new IHS web site is
looking good. If it is populated with some more data and kept
alive and active, it is a great leap forward for the IHS".
We can see that almost all of the desired objectives that we
had set out in our working document plus some new ones can
be met and are within reach. A lot of work has been put into
the new website and it is beginning to show!
To add icing to the cake we have now found a possible white
knight professional database programmer who might rebuild
the TGHL professionally at no cost. This presents the possi-
bility that we could finish this project with a website that is
better than what we envisioned even in our wildest dreams!
How much more positive and exciting can it get!!!
Vol.12 No1– Issue 50
Grand Slam
2006 HOTY
Tahitian Princess
2003 HOTY
I N S I D E T H I S
I S S U E :
Inside Story
Seedling of the Year 2011
Page 4
Inside Story
Tribute to Nola Reynolds
Page 6
Inside Story
Nola’s Best of Show Win-
ners Page 7
Inside Story
Views of the Reynolds
Setup Page 8-10
Inside Story
The IHS Propagation Pro-
gram Page 11
Inside Story
Pictures of plants being
propagated Page 14
Inside Story
Growing Hibiscus In Pots
Pages 15—25
Hibiscus International 3
EDITORS REPORT
The IHS has reached a milestone—this is issue number 50 of Hibiscus International. Over the years
a great deal of important and useful information has appeared in the pages of this publication. All
past issues are available online and are at the fingertips of anyone who is interested.
In this issue we pay tribute to the late Nola Reynolds and the huge legacy that she left us in the form
of all her beautiful creations.. As well we give you a peek into Nola’s world through the pictures of
her yard and the hibiscus growing there,
We have also attempted to explain how our propagation station is the heart and driving force of our
HOTY program. This program is perhaps the least known and understood of the programs run by
the IHS.
The final article is a discussion of growing hibiscus in pots by Alan and Vera De La Torre which is
full of information that is important to all of us who are unable to grow them in ground.
ALL RIGHTS RESERVED
OFFICE BEARERS President– Kes Winwood : Vice-President : Ian Rabenda : Sec./Treasurer : Clay McGee:
Past President : Richard Johnson :
Board Members European : Nina Bjelovucic : Asian : Alan James de la Torre : Oceania : Charles Atiu
:
N. American : Sonny Stollings : S American : Elizabeth Jordan : Australia : Jim Purdie :
S. African : Gail Cahi
Editor : :
Web Master : Ian Rabenda :
Web Address— www.internationalhibiscussociety.org
E-mail Address— [email protected]
I.H.S. PATRON— DAVID FRANZMAN
If things have gone a little slow surely it is better to go slow and get a superior result
than to go fast and get a poor one?
This work is time consuming and much of it has fallen on the shoulders of a very few
people. Ian and his small team could make use of any help that might be forthcoming.
All that is required are a few basic computer skills and a little time to learn the ropes
With a few more helping hands, the work will progress at an even faster pace.

Hibiscus International 4
.
Seedling Of The Year
2011
2nd Place
Black Rainbow
Tot’s My Love
Black Rainbow was hybridized by Nola & Carlos Reynolds and it is perhaps fitting that it was
chosen the SOTY 2011 winner as the following feature article in this issue is a tribute to Nola Rey-
nolds and to her dedication to hibiscus.
When one looks over all her seedlings that have won Best of Show in the shows of the AmHS
I’m sure most of us have a number of her seedlings in our collections. It is also almost mind boggling
to contemplate what other beautiful cultivars she created that didn’t quite make to Best of Show
status on a particular day but may be just a beautiful and worthy of being in our collections.
With many hundreds of crosses yet to be seen, we can only wonder if “the best is yet to come”.

Hibiscus International 5
3rd Place
4th Place
5th Place
Classical Dancer
Catwalk
Tahitian Orange Glow
Hibiscus International 6
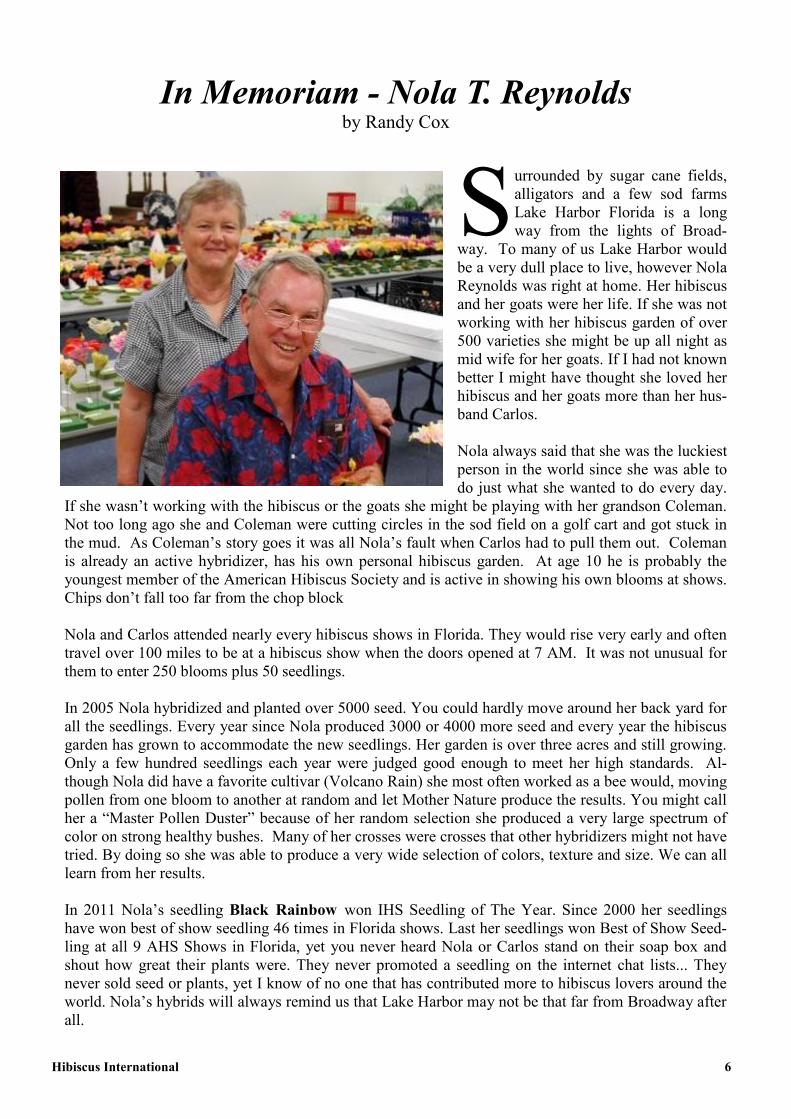
In Memoriam - Nola T. Reynolds by Randy Cox
S urrounded by sugar cane fields,
alligators and a few sod farms
Lake Harbor Florida is a long
way from the lights of Broad-
way. To many of us Lake Harbor would
be a very dull place to live, however Nola
Reynolds was right at home. Her hibiscus
and her goats were her life. If she was not
working with her hibiscus garden of over
500 varieties she might be up all night as
mid wife for her goats. If I had not known
better I might have thought she loved her
hibiscus and her goats more than her hus-
band Carlos.
Nola always said that she was the luckiest
person in the world since she was able to
do just what she wanted to do every day.
If she wasn’t working with the hibiscus or the goats she might be playing with her grandson Coleman.
Not too long ago she and Coleman were cutting circles in the sod field on a golf cart and got stuck in
the mud. As Coleman’s story goes it was all Nola’s fault when Carlos had to pull them out. Coleman
is already an active hybridizer, has his own personal hibiscus garden. At age 10 he is probably the
youngest member of the American Hibiscus Society and is active in showing his own blooms at shows.
Chips don’t fall too far from the chop block
Nola and Carlos attended nearly every hibiscus shows in Florida. They would rise very early and often
travel over 100 miles to be at a hibiscus show when the doors opened at 7 AM. It was not unusual for
them to enter 250 blooms plus 50 seedlings.
In 2005 Nola hybridized and planted over 5000 seed. You could hardly move around her back yard for
all the seedlings. Every year since Nola produced 3000 or 4000 more seed and every year the hibiscus
garden has grown to accommodate the new seedlings. Her garden is over three acres and still growing.
Only a few hundred seedlings each year were judged good enough to meet her high standards. Al-
though Nola did have a favorite cultivar (Volcano Rain) she most often worked as a bee would, moving
pollen from one bloom to another at random and let Mother Nature produce the results. You might call
her a “Master Pollen Duster” because of her random selection she produced a very large spectrum of
color on strong healthy bushes. Many of her crosses were crosses that other hybridizers might not have
tried. By doing so she was able to produce a very wide selection of colors, texture and size. We can all
learn from her results.
In 2011 Nola’s seedling Black Rainbow won IHS Seedling of The Year. Since 2000 her seedlings
have won best of show seedling 46 times in Florida shows. Last her seedlings won Best of Show Seed-
ling at all 9 AHS Shows in Florida, yet you never heard Nola or Carlos stand on their soap box and
shout how great their plants were. They never promoted a seedling on the internet chat lists... They
never sold seed or plants, yet I know of no one that has contributed more to hibiscus lovers around the
world. Nola’s hybrids will always remind us that Lake Harbor may not be that far from Broadway after
all.

Hibiscus International 7
Nola’s Best of Show
Seedling Winners

Hibiscus International 8
A view of the Reynolds backyardA view of the Reynolds backyard
2009 seedlings under evaluation2009 seedlings under evaluation

Hibiscus International 9
Rows of seedlings under evaluation

Hibiscus International 10
Carlos Reynolds and the 2008 seedlings patch

Hibiscus International 11
THE PROPAGATION STATION
THE HE RT OF THE HOTY PROGRAM
T he IHS HOTY program is designed to select quality seedlings at two levels of distinction, one considered the most
beautiful without consideration of other char-acteristics (to be known as the IHS Seedling Of The Year or IHS SOTY) and the other being the best of the most beautiful as demonstrated in trialing of the selected SOTY candidates over a three year period (to be known as the IHS Hi-biscus Of The Year or IHS HOTY). Moreover, it is designed to permit anyone who has qual-ity seedlings, either as the hybridizer or grower, to enter regardless of where in the world they might be.
The basic preselection mechanism is via the IHS SOTY selection in which the mem-bership selects what it considers to be the best in seedling candidates. The top 8-10, and in case of a tie vote rounded off to the next highest number, in each SOTY se-lection will be retained for final judging for a total of approximately 24-30 candi-dates. These candidates will be presented to the HPOJ (HOTY Panel of Judges) where a final selection of at least 15 will be selected to be entered into the Champi-onship Voting Round for the SOTY competition. This part of the preselection proc-ess will be based on the appearance of the bloom and the information provided by the hybridizer. The candidate with the highest vote average, as selected by the vot-ing membership and affiliates, will be declared the SOTY. The SOTY and nine run-ners up will all go into international trialing for three years. In the beginning of the IHS HOTY program, each hybridizer was asked to send the required wood for grafting to each of the trialing stations around the world where they would be grafted and grown for the next three years. This system soon proved to be fraught with difficulties ranging from the length of time in transit which often led to the wood rotting or not arriving at all. As well, the wood required for all the trialing stations at one time was a strain on the resources of the hybridizer. It quickly became apparent that another solution was necessary to solve these issues. It was Dick Johnson who suggested the current method that the IHS uses. He real-

Hibiscus International 12
ized that if each hybridizer only needed to send wood to a single location rather than multiple ones, less wood would be required. Also it was hoped that a single shipment would arrive in a timely fashion and in a healthy condition that would allow grafting. What was required was a climate that would facilitate the rapid growth of the grafted wood and so provide enough wood to be sent to the trialing stations when ready. Thus, the IHS Propagation station program was set out, which provides each trialing station with wood grown in the same climate. Each station thus re-ceives wood from healthy plants grown under the same conditions and of similar sizes which provides each trialing station with wood of equal quality allowing the trialing process to be as fair as possible. Carmelo Donato and Francesco Imbesi were already a trialing station (Sicily), which was in a suitable climate for a propagation program and they were per-suaded to set up this new method of propagating cultivars for the HOTY program. By following the above approach, we have added a year to the overall length of the evaluation process by adding a year to grow enough wood for all the trialing sta-tions as well as providing a safeguard stock of wood, should a shipment fail to ar-rive at any single trialing station.

Hibiscus International 13
Wood, generally four to six, 6” pieces of each of the selected SOTY winners will then be sent to the IHS propagation station within the first quarter of the year fol-lowing the announcement of the SOTY selection winners. The wood will be grafted and grown by the propagation station for 14 to 16 months, after which approxi-mately three or four 6” pieces of each candidate will be delivered to each of the IHS trialing stations in late Spring of the following year. In this manner it is hoped that all trialing stations will receive enough wood to get all candidates growing at the same time with a back up or two in case of losses dur-ing trialing. The propagation station will also have additional wood in the case of take failures. The trialing stations will evaluate the 10 SOTY candidates for an addi-tional three years. Although trialing stations may change, at the present we have four including two in Europe (Germany and Sicily), one in the US (Florida) and one in Brazil.

Hibiscus International 14
Hibiscus International 15
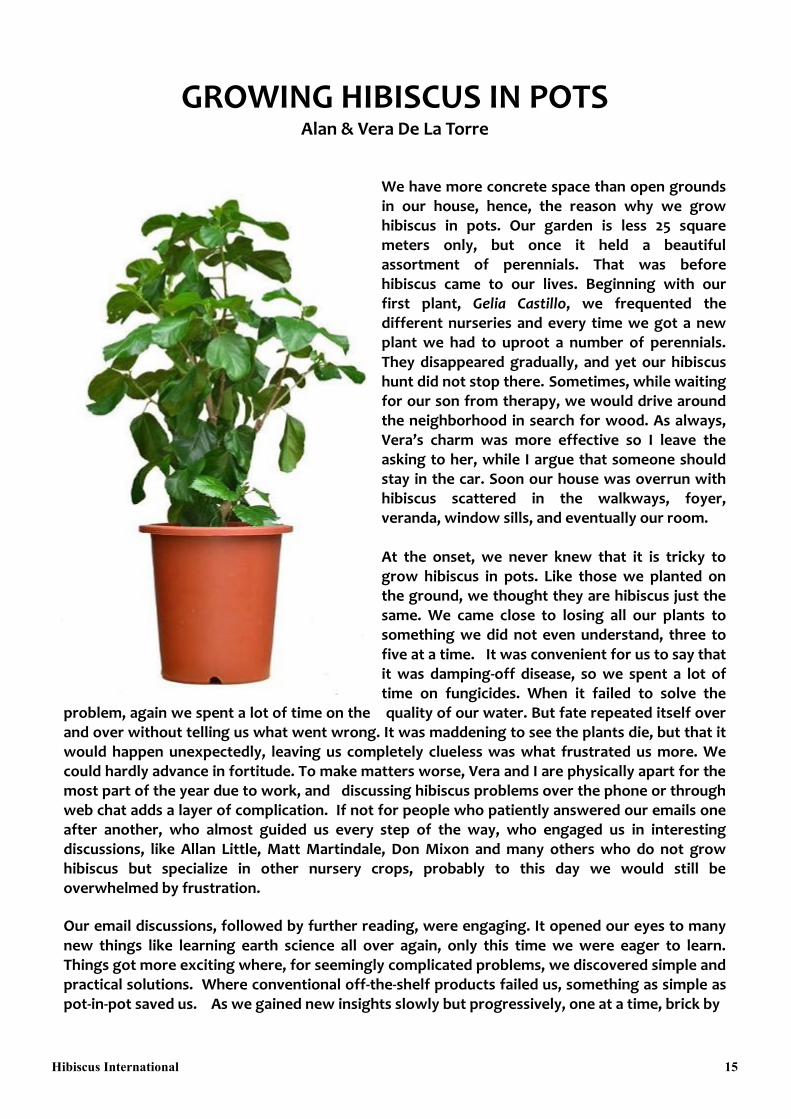
GROWING HIBISCUS IN POTS Alan & Vera De La Torre
We have more concrete space than open grounds in our house, hence, the reason why we grow hibiscus in pots. Our garden is less 25 square meters only, but once it held a beautiful assortment of perennials. That was before hibiscus came to our lives. Beginning with our first plant, Gelia Castillo, we frequented the different nurseries and every time we got a new plant we had to uproot a number of perennials. They disappeared gradually, and yet our hibiscus hunt did not stop there. Sometimes, while waiting for our son from therapy, we would drive around the neighborhood in search for wood. As always, Vera’s charm was more effective so I leave the asking to her, while I argue that someone should stay in the car. Soon our house was overrun with hibiscus scattered in the walkways, foyer, veranda, window sills, and eventually our room. At the onset, we never knew that it is tricky to grow hibiscus in pots. Like those we planted on the ground, we thought they are hibiscus just the same. We came close to losing all our plants to something we did not even understand, three to five at a time. It was convenient for us to say that it was damping-off disease, so we spent a lot of time on fungicides. When it failed to solve the
problem, again we spent a lot of time on the quality of our water. But fate repeated itself over and over without telling us what went wrong. It was maddening to see the plants die, but that it would happen unexpectedly, leaving us completely clueless was what frustrated us more. We could hardly advance in fortitude. To make matters worse, Vera and I are physically apart for the most part of the year due to work, and discussing hibiscus problems over the phone or through web chat adds a layer of complication. If not for people who patiently answered our emails one after another, who almost guided us every step of the way, who engaged us in interesting discussions, like Allan Little, Matt Martindale, Don Mixon and many others who do not grow hibiscus but specialize in other nursery crops, probably to this day we would still be overwhelmed by frustration.
Our email discussions, followed by further reading, were engaging. It opened our eyes to many new things like learning earth science all over again, only this time we were eager to learn. Things got more exciting where, for seemingly complicated problems, we discovered simple and practical solutions. Where conventional off-the-shelf products failed us, something as simple as pot-in-pot saved us. As we gained new insights slowly but progressively, one at a time, brick by

Hibiscus International 16
brick, we moved in the direction of looking for, in every challenging moment, a common sense explanation. As always we are thankful to the many people who helped us, whose account we have taken note of, and share it here in case someone may find it useful.
Potting Mix There is only one commercially prepared potting mix in the Philippines, which we have tried and the result was deplorable. We lost many seedlings to poor aeration. It was initially exciting to see the seedlings sprout from seed, then later it would be maddening to see them wilt and die. It took us such as long time to figure out that our potting mix is not porous enough, the perched water table (wet feet condition) is high, and too much water is retained. So we thought that if our potting mix has poor tilth and conducive to wet feet condition, the efficacy of fungicides is momentary, as soil-borne pathogens develop anew when the strength of fungicides dissipate. We decided to make our own potting mix recipe and put it to the test. We dropped perlite and vermiculite because local suppliers could not confirm that it is asbestos-free. As for pine bark fines, we had none, so Vera suggested the use of organic materials available to us. After making over 50 recipes, we found the best result in Recipe #36 and #38 for the following reasons: first, it allows the plant’s roots to anchor on and support plant growth; second, it has sufficient amount of empty spaces to allow water movement in the potting mix; and third, it stores nutrients. These three functions are termed as anchorage, porosity and nutrient sink. Anchorage and porosity are mutually exclusive—they oppose each other. If you improve porosity, the less compact the soil. If you improve anchorage, the less draining the soil. As for nutrient sink, we learned that it is not the natural absorbent capacity of organic matter but the porosity and capillary function of the potting mix that plays a significant role in nutrient deposit. Porosity also plays a key role in making nutrients available to plant’s roots through water movement in the potting mix. A good potting mix should, therefore, strike a balance between anchorage and porosity for effective nutrient sink.
In our tests, Recipe #22 had the highest total porosity at 81.82%; whereas, Recipe #36 and #38 both had 63.64% only. But with Recipe #22 the roots could hardly settle. It was too loose, water drained so fast, and the overall result was terrible. Recipe #20 had a total porosity of 72.73%, but it was largely water than air.
How to Measure Porosity A potting mix is made up of air, water and solid particles, where each one comprises a portion of the container volume. The space occupied by air and water are empty spaces (pores), without which it would be compact. We measure porosity in our garage using four things: (a) plastic pot, the size we use for growing matured plants; (b) water; (c) water pan; which you can find in your

Hibiscus International 17
laundry; and (d) measuring cup, which you can find in your kitchen. The Ministry of Agriculture, Fisheries and Food of Canada (1996) explains the procedures for measuring porosity.
1. Seal the drainage hole in the pot and fill it with water. Measure the volume of water and record it as ‘container volume.’
2. Empty and dry the pot and fill it with potting mix. Slowly saturate the potting mix by gradually pouring water onto the surface. Continue adding water over a period of time until the growing medium is completely saturated (i.e. the surface glistens). Record the total volume of water added as ‘total pore volume.’
3. Place the pot in the water pan and remove the seal from the pot’s drain holes. Allow all the free water to drain out (this make take several hours). Measure the amount of drained water and record it as ‘aeration pore volume.’
4. Compute total porosity, aeration porosity, and water holding porosity as follows:
Total Porosity (%) = x 100%
Aeration Porosity (%) = x 100%
Water-Holding Porosity (%) = Total Porosity – Aeration Porosity
According to J. S. Annan and R. K. White (September 1998) there are many ways to compute porosity and each one has its own limitations. But for our purpose, the method explained above is sufficient enough. The same method was used D. M. Jeyaseeli and S. P. Raj (2010) in their study of the porosity of coco peat.
What is Porosity? On its dry state, a potting mix is made up solid particles and empty spaces called ‘pores.’ The amount of pores defines the porosity of the potting mix. According to the Ministry of Agriculture, Fisheries and Food of Canada (1996), water occupies the small pores while air is present in large pores. So how much porosity is necessary to make a good potting mix? A total porosity of 60% to 65% is ideal. Less than 60% is a bit compact and at no time should it fall below 50%. Over 65% is loose and over 70% is too loose for a potted hibiscus that can grow over 3 feet tall, though it may still be good for other perennials. The ideal aeration porosity (large pores) is 20% to 25%, with water-holding porosity (small pores) of not more than 45%. If water-holding exceeds 45%, it takes a long time to dry out and the less frequent we can water and fertilize the plant. This is what we call wet-feet condition where roots are constantly sitting on wet feet.
Total Pore Volume
Container Volume
Aeration Pore Volume
Container Volume
Water
Potting Mix
Air
Adopted from the Ministry of Agriculture,
Fisheries and Food of Canada, July 1996

Hibiscus International 18
Below are excerpts from our porosity tests to illustrate the different results based on different ingredients.
What makes a well draining potting mix?
It may sound silly but at one time we actually thought of adding pebbles at the bottom of the pot to improve drainage. It turned out that other people have also thought of doing the same. While this is not true, D. M. Jeyaseeli et. al. (2010) reported an interesting topic on the peculiar relationship of the particle size of coco peat to aeration and water-holding porosity.
Large particles of coco peat improve drainage. But if it is very coarse, its water-holding decreases and the lateral movement of water and nutrients within the potting mix is restricted. On the con-trary, when the particles are fine to very fine, the potting mix is dense, restricts root growth, and encourages the development of soil-borne pathogens. Our type of coco peat has a total porosity of 63.6%, which is good. However, it is 55.6% water and only 8% air. This shows that we are using coco peat that has a lot of fine to very fine particles.
To improve aeration, we added large particles such as coco chips and pumice. Coco chips are our local equivalent of bark fines or the closest we can get to a bark fine, while pumice became abun-dant to us after the June 1991 volcanic eruption of Mount Pinatubo. We were particularly excited with the pumice because it had natural pores. However, the results were not encouraging. Small particles packed around large particles, clogging the pores, such that the improvement in poros-ity does not justify the cost. But when we employed rice hull into the recipe, we realized
INGREDIENTS Potting Mix Recipe (Pot Size = 7”, Container Volume = 2,750 ml.)
#01 #20 #22 #25 #26 #28 #32 #36 #38
Coco Peat 10 6 - - 6 6 - 2 2
Coco Fiber - - - - 6 - 6 4 4
Coco Chips 1 - - - - - - - -
Worm Casting 1 1 1 2 1 3 8 6 6
Pumice - - - - - - - - -
Perlite - - - - - - - - -
Carbonized Rice Hull 1 - - 1 1 3 2 4 3
Raw Rice Hull 1 - 9 2 4 6 - - -
Composted Rice Hull - - - - - - 2 2 3
Semi-crushed Raw Rice Hull - 6 - - - - - - -
Fine River Sand - 1 1 2 2 2 2 2 2
Coarse River Sand - - - - - - - - -
Fine White Sand 1 - - - - - - - -
Vermiculite - - - - - - - - -
Wood Charcoal - - - - - - - - -
Total Parts 15 14 11 7 20 20 20 20 20
Total Pore Volume (ml.) 1,400 2,000 2,250 1,750 2,000 1,750 1,750 1,750 1,750
Aeration Pore Volume (ml.) 205 500 1,600 280 975 550 575 550 525
Total Porosity 50.9% 72.7% 81.8% 63.6% 72.7% 63.6% 63.6% 63.6% 63.6%
Aeration Porosity 7.5% 18.2% 58.2% 10.2% 35.5% 20.0% 20.9% 20.0% 19.1%
Water-Holding 43.5% 54.5% 23.6% 53.5% 37.3% 43.6% 42.7% 43.6% 44.5%
PARTICLE SIZE (1000m = 1 millimeter)
Very Fine: <250m Fine: 250m to < 500m Medium: 500m to <1000m Coarse: 1000m to 2000m Very Coarse: >2000m

Hibiscus International 19
a significant increase in porosity. In terms of particle size, rice hull is smaller than coco chips and pumice. Unlike pumice, it has no natural pores. But what makes it so porous and well draining is its irregular shape (Al Fassezke, March 2005).
Perched Water Table (PWT) Al Fassezke (March 2005), who lives in Bay City, Michigan and spent over 20 years studying soil, noted that “there is, in every pot, what is called perched water table. This is water saturated at the bottom layer of the potting mix that will not drain. It can evaporate or can be used by the plant, but physical forces will not allow it to drain. This is the area of the pot where roots seldom penetrate and where root problems begin due to lack of aeration.” In hibiscus terms, PWT means wet feet. PWT is present in every pot regardless of how many drain holes there are in the pot, and regardless of how porous the potting mix is. It is also present in ground soil, except that it is too deep for the roots to reach. This explains why hibiscus planted on the ground suffers from wet feet to a lesser extent. But just the same, there is PWT in ground soil .
As to having a coarse layer at the bottom of the pot, Al Fassezke (March 2005) believes that it does not improve drainage. Instead, it elevates PWT close to root zone and reduces the space for roots to colonize. With Al’s permission, here is an excerpt of his account on “Water Movement in Soils,” which explains the development of PWT:
“There are two forces that cause water movement through soil—one is gravity, the other capillary action. Gravity needs little explanation, but for this writing I would like to note: Gravitational flow potential (GFP) is greater for water at the top of the pot than it is for water at the bottom of the pot. I'll return to that later. Capillarity is a function of the natural forces of adhesion and cohesion. Adhesion is water's tendency to stick to solid objects like soil particles and the sides of the pot. Cohesion is the tendency for water to stick to itself. Cohesion is why we often find water in droplet form - because cohesion is at times stronger than adhesion, water’s bond to itself can be stronger than the bond to the object it might be in contact with; in this condition it forms a drop. Capillary action is in evidence when we dip a paper towel in water. The water will soak into the towel and rise several inches above the surface of the water. It will not drain back into the source. It will stop rising when the GFP equals the capillary attraction of the fibers in the paper.”
PWT occurs when the capillary pull of the soil at some point will equal the GFP. When this happens, water will not drain—it is perched.
Pot-in-Pot We spent a lot of time addressing the issue of damping-off disease by testing different types of fungicides. Unfortunately, as our plants were constantly sitting on wet feet (PWT), soil-borne pathogens developed anew as soon as the strength of fungicide dissipates. We observed the effect of fungicide as momentary due to constant presence of wet feet.
Perched Water Table

Hibiscus International 20
The method we tested and found very useful in curbing PWT is called, “pot-in-pot.” As compared to money spent on fungicides, pot-in-pot is not only effective, it is also very cheap, and the result is remarkable. Pot-in-pot is as simple as placing an inner pot (the pot where the plant is growing) inside an outer pot (a much larger pot), with the inner pot buried 3-4 inches below the potting mix of the outer pot. Because the outer pot serves as an extension to the inner pot, this method tricks PWT to go down to the outer pot. Consequently, the outer pot is constantly wet, therefore, should be treated with a good fungicide. We do not want soil-borne pathogens to climb to the inner pot, though this has not happened to us even when using untreated medium. It is also important to have as much medium in the outer pot, enough to cover the drain holes, to ensure that the outer pot is absorbing the water from the inner pot.

Hibiscus International 21
In our experience using pot-in-pot, roots tend to grow fast. In no time, they occupy the entire pot and, when left unchecked, they even extend to the outer pot. Sometimes, we had to break the outer pot just to save the roots. Vera also noticed that pot-in-pot is effective in insulating the inner pot from the high temps of our concrete floors.
If the roots are not too many (right), we pull the roots back to the inner pot through the drain holes as gently as possible. We water the roots to remove excess potting mix, and examine whether the roots can still be pulled back through the drain holes. It is painstak-ing, but that’s the price we have pay if we leave it unchecked. If the amount of roots is too much, we break the pot to save the roots.
Hibiscus International 22
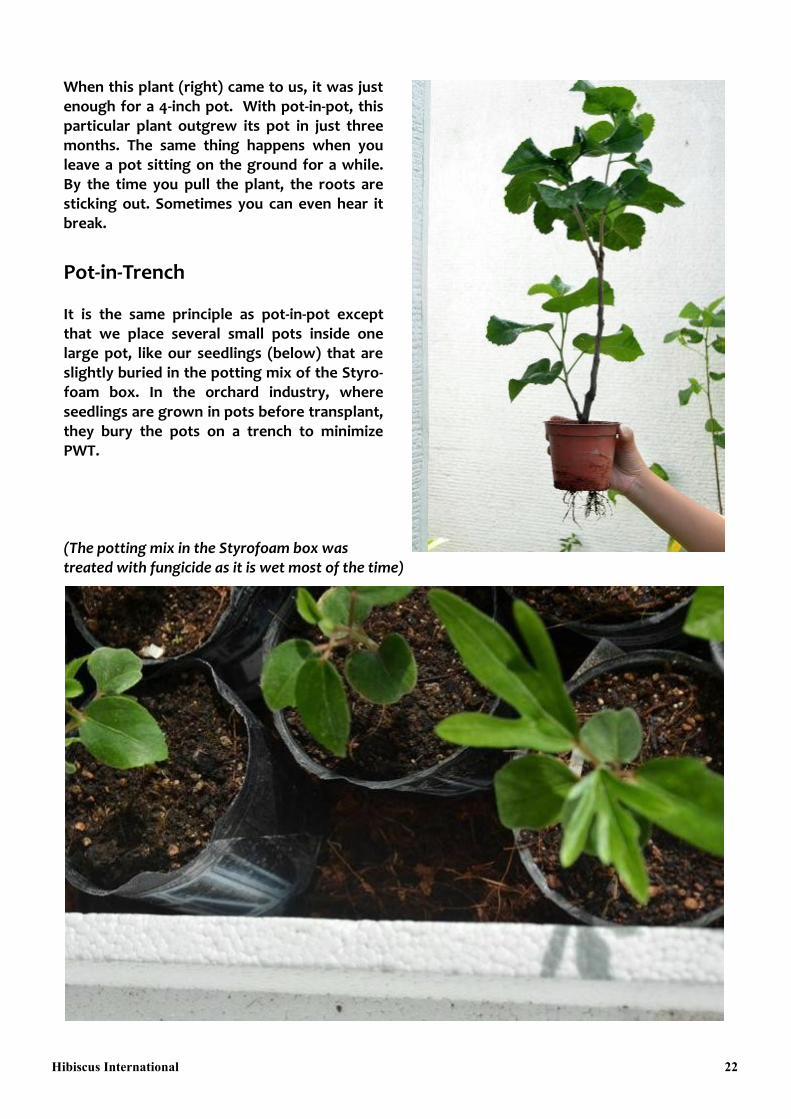
When this plant (right) came to us, it was just enough for a 4-inch pot. With pot-in-pot, this particular plant outgrew its pot in just three months. The same thing happens when you leave a pot sitting on the ground for a while. By the time you pull the plant, the roots are sticking out. Sometimes you can even hear it break.
Pot-in-Trench It is the same principle as pot-in-pot except that we place several small pots inside one large pot, like our seedlings (below) that are slightly buried in the potting mix of the Styro-foam box. In the orchard industry, where seedlings are grown in pots before transplant, they bury the pots on a trench to minimize PWT. (The potting mix in the Styrofoam box was treated with fungicide as it is wet most of the time)
Hibiscus International 23
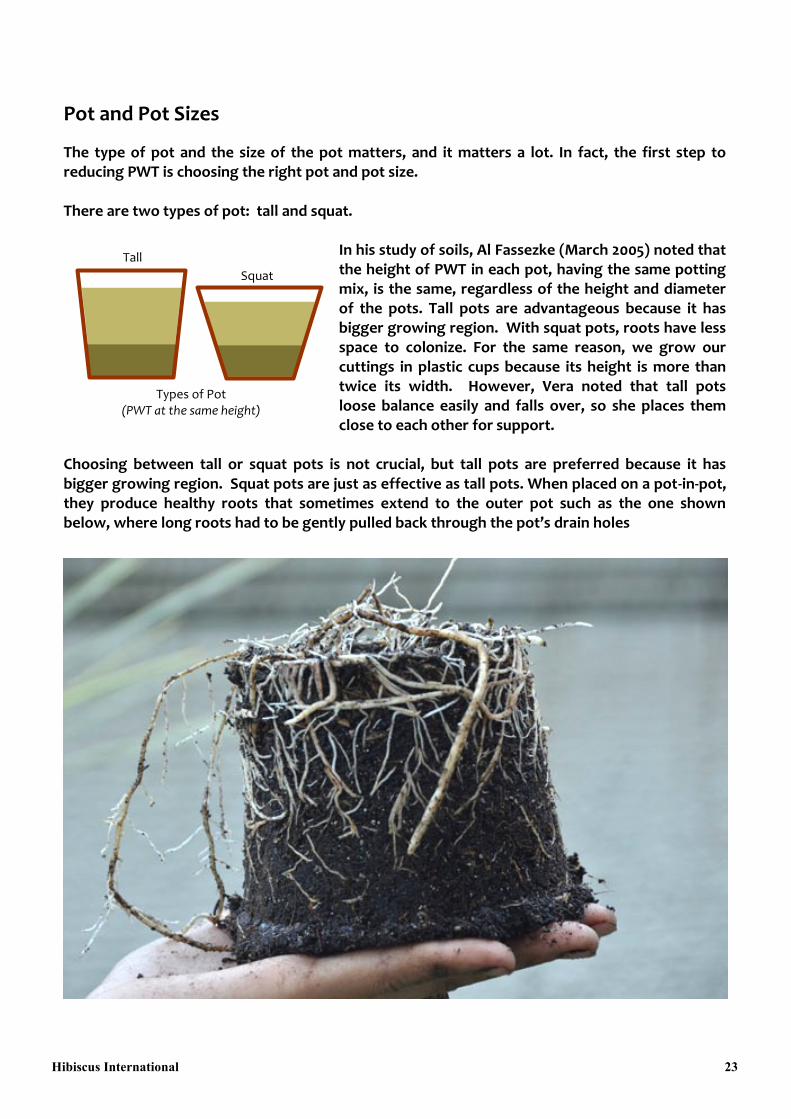
Pot and Pot Sizes
The type of pot and the size of the pot matters, and it matters a lot. In fact, the first step to reducing PWT is choosing the right pot and pot size. There are two types of pot: tall and squat.
In his study of soils, Al Fassezke (March 2005) noted that the height of PWT in each pot, having the same potting mix, is the same, regardless of the height and diameter of the pots. Tall pots are advantageous because it has bigger growing region. With squat pots, roots have less space to colonize. For the same reason, we grow our cuttings in plastic cups because its height is more than twice its width. However, Vera noted that tall pots loose balance easily and falls over, so she places them close to each other for support.
Choosing between tall or squat pots is not crucial, but tall pots are preferred because it has bigger growing region. Squat pots are just as effective as tall pots. When placed on a pot-in-pot, they produce healthy roots that sometimes extend to the outer pot such as the one shown below, where long roots had to be gently pulled back through the pot’s drain holes
Types of Pot (PWT at the same height)
Tall
Squat

Hibiscus International 24
What is crucial is the size of the pot. Planting hibiscus on an oversized pot was, in our case, a deadly mistake. The picture (right) is our first Magic Moments in 2009 that we planted on an oversized pot. It came to us on a 4-inch square pot, and after it grew a few inches, we got so excited. It was alleluia to have Magic Moments so we transplanted it on an eight-inch round pot, thinking that we should give it more room to grow, but since then the plant never grew. We were lucky to have saved this plant, because we lost all others in the same batch. It was in one of our conversations with Matt Martindale, though it was on the subject of when to repot, that we realized the connection between water retained in the pot (water-holding), and the ability of the plant’s roots to absorb water. Though we said earlier that it is important to keep water holding below 45%, this is true on condition that the plant is not in an oversized pot. If the pot size is eight inches and the rootball is only four inches, even if water retained is 35%, this may still be too much water—way more than what a four-inch rootball can absorb. A plant sitting on a wet feet will either succumb to damping-off disease or it may survive but will look under-nourish and stunted such as what we did to this almost fourteen-month old beauty. Therefore, it is important that the size of the pot should be just enough for the plant’s rootball, with a little extra room for growing up. Otherwise, what is the point of applying fungicide if, in the first place, the plant is constantly sitting on wet feet. On the contrary, if the pot size is just enough for the rootball, there is almost no need for pot-in-pot; or, if the plant is already on a pot-in-pot, it need not stay there for long if the rootball has grown up. Even when we know our kid is growing up, we should never buy him an oversized shirt. We should buy what fits him well with a little room for growing up.
When is the time to repot? When to repot the plants is not a matter of time, but whether the root ball is already too big for the present pot size. This is subjective though as plants can stay within the same pot for long periods of time. For example, given our limited space, in the last two years we restricted our plants to seven-inch tall pots (less than three-fourths of a gallon), but sustained them with water and daily feeding for over a year. It is also possible to prune the roots accompanied by pruning of the branches just enough for the roots to sustain in order to keep them in the present pot. The size of the plant vis-à-vis the size of the pot is also another factor to consider, as tall plants on a small pot will frequently fall over.

Hibiscus International 25
When to repot the plants is always a subjective discussion between Vera and me, proof that our learning curve is still on a wide turn. But over the years we acquired a few tips from the hard lessons learned, so our discussions are either academic or due to certain targets we want to achieve. As a general rule in our house, we do not repot unless the following conditions are true: (a) The root ball is already too big for the pot, that is, the roots occupy 60% or more of the
container volume, which we will easily know because the amount of water we give them is measured.
(b) As suggested by Matt Martindale, the potting mix dries out in less than a day which
means that the water holding is already less than the water needed by the root ball, or you can water them twice a day and keep them in the same pot.
(c) The size of the plant is already too big for the pot. Unlike soil that regenerates its fertility, texture and structure over time, soilless potting mix such as coco peat degenerates. Heterotrophs, for instance, will cause the gradual decomposition of soilless medium causing the potting mix to lose its texture and structure. It is hard to tell how long this process takes as it depends on a confluence of factors but, as a general rule, soilless medium should be changed at least once every three years.
References
The Ministry of Agriculture, Fisheries and Food of Canada (July 1996), “Importance of Aeration in
Container Media” (adopted with permission). Retrieved from www.al.gov.bc.ca/ornamentals/floriculture/aeration.pdf
Jason S. Annan and Richard K. White (September 1998), “Evaluation of Techniques for Measuring Air Filled Porosity in Composts of Municipal Biosolids and Wood Chips.” A Paper presented to the Composting in the Southeast – Proceedings of the 1998 Conference (Athens, Georgia). Retrieved from http://infohouse.p2ric.org/ref/12/11558.pdf
D. M. Jeyaseeli and S. P. Raj (2010), “Physical Characteristics of Coir Pith as a Function of its Particle Size to be used as Soilless Medium,” American-Eurasian Journal of Agricultural & Environmental Science, 8(4) : 431-437
Al Fassezke (March 2005), “Container Soils and Water in Containers”. Excerpts reprinted by permission of Al Fassezke. Retrieved from http://forums2.gardenweb.com/forums/load/contain/msg031557203792.html
Matt Martindale, Website: www.hibiscusplace.com, Email: [email protected]


