
INKSCAPE BASICS
Inkscape is a free, open-source vector graphics editor. It can be used to create or
edit vector graphics like illustrations, diagrams, line arts, charts, logos and more.
Inkscape uses Scalable Vector Graphics (SVG) file format when saving vector
graphics. A SVG (.svg) file can be used to cut shapes and designs with the Makery’s
Laser Cutter! For more information or to download Inkscape, visit inkscape.org.
Create, Make, and Build
125 S. Prospect Avenue, Elmhurst, IL 60126
(630) 279-8696 ● elmhurstpubliclibrary.org

GETTING STARTED
Preparing Document Size
Before you begin designing, you will want to size the file for your project.
Select File from the Application Menu. Then select Document Properties.
A window will pop open for document settings. Default options include
US Letter, US Legal, Ledger/Tabloid, and more. Use the Custom Size menu
to create a custom paper size and desired unit of measurement. Default
unit of measurement shown in the document ruler is millimeters (mm).
To change, select Inches (or other desired measurement) from the
Display Units dropped down menu. Exit from Document Properties
menu to finalize adjustments.
Create, Make, and Build
125 S. Prospect Avenue, Elmhurst, IL 60126
(630) 279-8696 ● elmhurstpubliclibrary.org
Ruler
Pallet
Page Border Around
the Canvas
Too
lbo
x
Tool Control Bar (changes per tool)
Co
mm
and
Bar
Layer Commands Context Sensitive Help
Zoom
Menu Bar
The Layout
Similar to Adobe Illustrator, Inkscape has a graphics interface. Nearly every tool and function is depicted with
an icon. If you are unfamiliar with the icon, simply hover your mouse over the icon and a label for the icon
should appear. Inkscape also has keyboard shortcuts for nearly every tool and function. For a complete
reference to the keyboard shortcuts, select Keys and Mouse Reference from the Help menu in the Menu Bar.
TEXT AND SHAPES
Create, Make, and Build
125 S. Prospect Avenue, Elmhurst, IL 60126
(630) 279-8696 ● elmhurstpubliclibrary.org
Activity 1: Inserting Text and Shapes
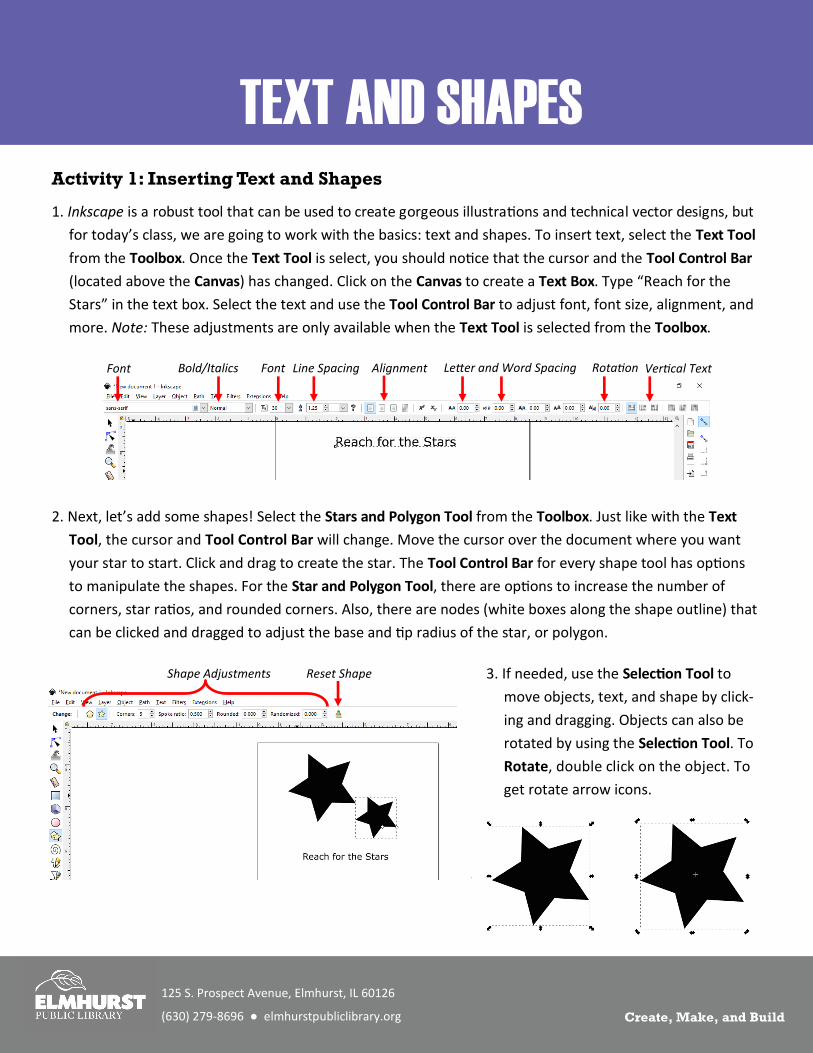
1. Inkscape is a robust tool that can be used to create gorgeous illustrations and technical vector designs, but
for today’s class, we are going to work with the basics: text and shapes. To insert text, select the Text Tool
from the Toolbox. Once the Text Tool is select, you should notice that the cursor and the Tool Control Bar
(located above the Canvas) has changed. Click on the Canvas to create a Text Box. Type “Reach for the
Stars” in the text box. Select the text and use the Tool Control Bar to adjust font, font size, alignment, and
more. Note: These adjustments are only available when the Text Tool is selected from the Toolbox.
Font Bold/Italics Font Line Spacing Letter and Word Spacing Rotation Vertical Text Alignment
2. Next, let’s add some shapes! Select the Stars and Polygon Tool from the Toolbox. Just like with the Text
Tool, the cursor and Tool Control Bar will change. Move the cursor over the document where you want
your star to start. Click and drag to create the star. The Tool Control Bar for every shape tool has options
to manipulate the shapes. For the Star and Polygon Tool, there are options to increase the number of
corners, star ratios, and rounded corners. Also, there are nodes (white boxes along the shape outline) that
can be clicked and dragged to adjust the base and tip radius of the star, or polygon.
Shape Adjustments Reset Shape 3. If needed, use the Selection Tool to
move objects, text, and shape by click-
ing and dragging. Objects can also be
rotated by using the Selection Tool. To
Rotate, double click on the object. To
get rotate arrow icons.

CHANGING OBJECT COLORS
Create, Make, and Build
125 S. Prospect Avenue, Elmhurst, IL 60126
(630) 279-8696 ● elmhurstpubliclibrary.org
4. Next, lets change the color of the stars. Select the first star, then double click the Fill and Stroke color
swatches in the bottom left. The Fill and Stroke menu will then open on the right. The Fill and Stroke Paint
tabs have options to chose colors a variety of ways, including by RGB, CYMK, a color Wheel, or even using
the Pallet at the bottom of the canvas. There is also an eyedropper tool to borrow colors from other imag-
es. Change the fill color of one of the stars using the Fill menu.
Pallet
No Fill, Flat Color, and
Gradient Options
5. Let’s change the second star so it only is
an outline with no fill. After selecting the
star, select the No Fill (indicated by an X)
option from the Fill tab. Then go to
Stroke Paint to change the color of the
star’s outline, if desired. Lastly, go to the
Stroke Style tab. Confirm that the solid
line is selected from the Dashes drop
down menu. Increase the Width to
1.000 mm.

SAVING AND EXPORTING
Create, Make, and Build
125 S. Prospect Avenue, Elmhurst, IL 60126
(630) 279-8696 ● elmhurstpubliclibrary.org
6. To save your Inkscape artwork, select File > Save (or Save
As… if you want to save a separate, updated version).
Inkscape will allow you to save your file in several different
file formats, the most popular being Scalable Vector
Graphics (.SVG) or Portable Document Format (.PDF).
7. If you want to turn your design into a transparent Portable
Network Graphics (.PNG), select File > Export PNG Image…
(Shift+Ctrl+E). There is an option to export the entire page,
just the area used for the drawing, or by selecting specific
objects of your design. Pixel size and DPI can also be
adjusted. Chose Export As… to give the .PNG file a name
and storage location. Select Export to finalize. Hint: Use
“Checkerboard Background” in Document Properties.
On Your Own Activity!
Use the Circle Tool and adjustments located in
the Circle Tool’s Tool Control Bar to recreate
Pacman! Hint: Hold Ctrl to prevent the circle
from turning into an oval.

BUTTERFLY EFFECT
Create, Make, and Build
125 S. Prospect Avenue, Elmhurst, IL 60126
(630) 279-8696 ● elmhurstpubliclibrary.org
Activity 2: A Butterfly
The Butterfly Effect is a method used to create half of your design and then duplicate
and mirror to create a complete, symmetrical design. A perfect example of this would
be to create butterfly wings, which will also provide practice for making lines and
curves.
1. To begin, use the Bezier Tool to create a shape like the one to the right.
2. Next, use the Edit Paths by Nodes tool to manipulate the straight lines into
curved lines. Click and drag the nodes (white or grey boxes) to adjust the
intersection of the paths. Click and drag the line segment to produce a
curve.
3. Next, create a Guideline to indicate the “spine”
of the butterfly or design. To make a Guideline,
click on the ruler on the far left and drag to-
wards the canvas.
4. Use the Rectangle Tool to create a rectangle
with No Fill. Verify the Snap to Guide function is
selected from the Command Bar. Move the
rectangle until it Snaps to the guideline.
5. Use the Selection Tool to select both objects by
clicking and holding Shift. Once selected, used the
Difference option located in the Path menu from
the Application Menu.

BUTTERFLY EFFECT
Create, Make, and Build
125 S. Prospect Avenue, Elmhurst, IL 60126
(630) 279-8696 ● elmhurstpubliclibrary.org
6. Next, create a duplicate of the wing by either Copying (Ctrl + C) and Pasting
(Ctrl + V), or by using the Duplicate (Ctrl + D) function.
7. Flip the duplicated wing horizontally by
pressed the H key. Snap the wings together
so they meet at the center.
8. Lastly, select both wings and use the Union function from the Path menu
in the Application Menu to merge the objects together and eliminate
the center line. Drag and remove guideline if desired.
Activity 3: Tracing Bitmaps
Bitmap images (example: .JPEG and .PNG) files can be imported and tracked into Inkscape. To Import, select
File from the Application Menu and then Import. Choose your file to import. To Trace, select Path from the
Application Menu, then select Trace Bitmap… A menu will appear to choose your tracing options. Click OK to
finalize. Inkscape will then create a series of traced paths and shapes on top of your original image. Move the
traced image to the side. Delete the original bitmap, if desired. Your traced image can now be manipulated
with tools such as the Edit Paths by Nodes.


