
AP-10CR1SEPSAP-12CR1SEPS
AP-14DR1SFJS2
AP-08CR1SEJSAP-10CR1SEJSAP-12CR1SEJS
For questions about features, operation/performance, parts or service, call: 1-877-465-3566Thank you very much for purchasing this Air Conditioner. Please read these use and installation instructionscarefully before installing and using this appliance,and keep this manual for future reference.
Para preguntas sobre las características, la operación/el funcionamiento, los componentes o el servicio del producto, llame: 1-877-465-3566Muchísimas gracias por la compra de este aire acondicionado. Que lea las instrucciones de uso e instalación detalladamente antes de su instalación y utilización del Producto y preserve este manual para la futura referencia.
INSTRUCCIONES DE USO E INSTALACIÓN
1
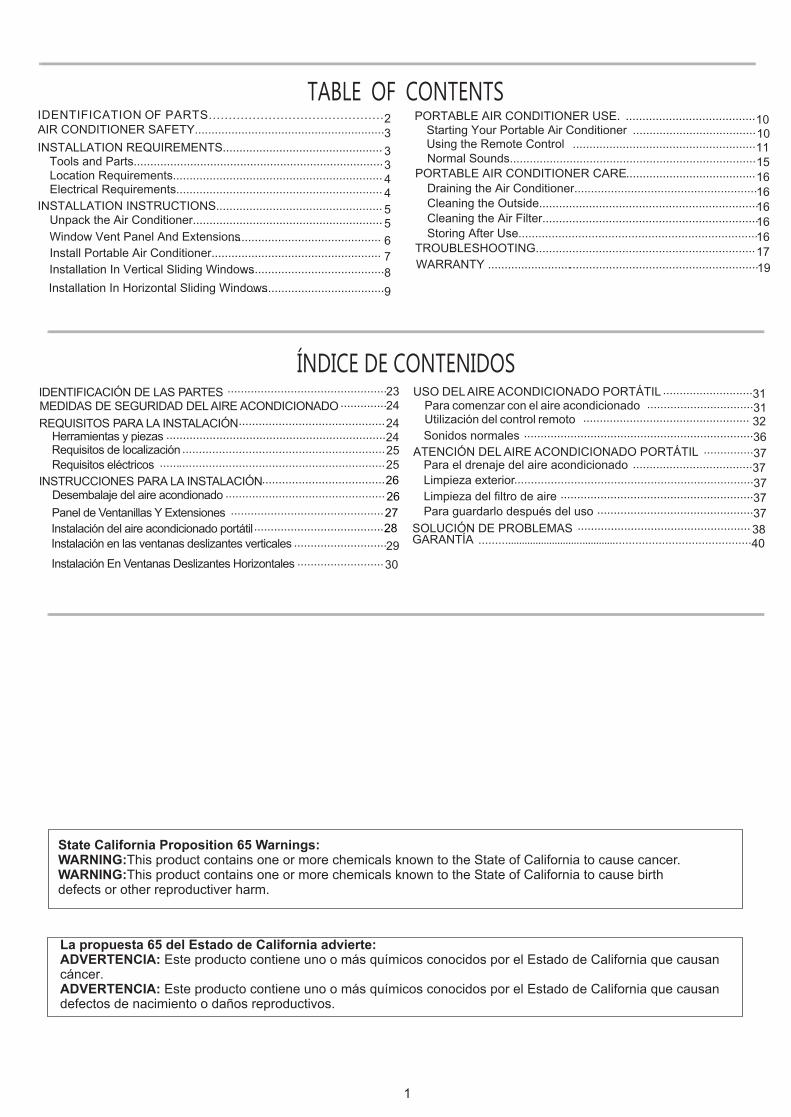
TABLE OF CONTENTSAIR CONDITIONER SAFETY.........................................................3INSTALLATION REQUIREMENTS................................................ 3
Tools and Parts...........................................................................3Location Requirements............................................................... 4Electrical Requirements.............................................................. 4
INSTALLATION INSTRUCTIONS.................................................. 5Unpack the Air Conditioner......................................................... 5
Install Portable Air Conditioner.................................................................................................76
...................................................................................
98
PORTABLE AIR CONDITIONER USE. .......................................10Starting Your Portable Air Conditioner .....................................10Using the Remote Control .......................................................11
IDENTIFICATION OF PARTS............................................2
Normal Sounds..........................................................................15
Draining the Air Conditioner.......................................................16
Cleaning the Air Filter.................................................................16Storing After Use........................................................................16
TROUBLESHOOTING..................................................................17
PORTABLE AIR CONDITIONER CARE..................................... 16..
1Cleaning the Outside.................................................................. 6
Window Vent Panel And Extensions
Installation In Vertical Sliding WindowsInstallation In Horizontal Sliding Windows
WARRANTY ..................................................................................19
State California Proposition 65 Warnings:WARNING:This product contains one or more chemicals known to the State of California to cause cancer.WARNING:This product contains one or more chemicals known to the State of California to cause birth defects or other reproductiver harm.
ÍNDICE DE CONTENIDOS..............
..............................................................................................................
............................................................................................................................
............................................................................................
.
.............................................................................
.
....................................................
30
.
...........................31................................31
.................................................. 32
................................................
.....................................................................36
....................................37
..........................................................37...............................................37
.................................................... 38.........................................................................................40
...............37
........................................................................37
IDENTIFICACIÓN DE LAS PARTESMEDIDAS DE SEGURIDAD DEL AIRE ACONDICIONADOREQUISITOS PARA LA INSTALACIÓN
INSTRUCCIONES PARA LA INSTALACIÓNDesembalaje del aire acondionadoPanel de Ventanillas Y ExtensionesInstalación del aire acondicionado portátilInstalación en las ventanas deslizantes verticalesInstalación En Ventanas Deslizantes Horizontales
USO DEL AIRE ACONDICIONADO PORTÁTILPara comenzar con el aire acondicionadoUtilización del control remotoSonidos normales
ATENCIÓN DEL AIRE ACONDICIONADO PORTÁTIL
Limpieza exterior Limpieza del filtro de aire Para guardarlo después del uso
Para el drenaje del aire acondicionado
SOLUCIÓN DE PROBLEMAS GARANTÍA
Herramientas y piezasRequisitos de localizaciónRequisitos eléctricos .....
29
2423
2424
2525
La propuesta 65 del Estado de California advierte:ADVERTENCIA: Este producto contiene uno o más químicos conocidos por el Estado de California que causan cáncer.ADVERTENCIA: Este producto contiene uno o más químicos conocidos por el Estado de California que causan defectos de nacimiento o daños reproductivos.
26262728
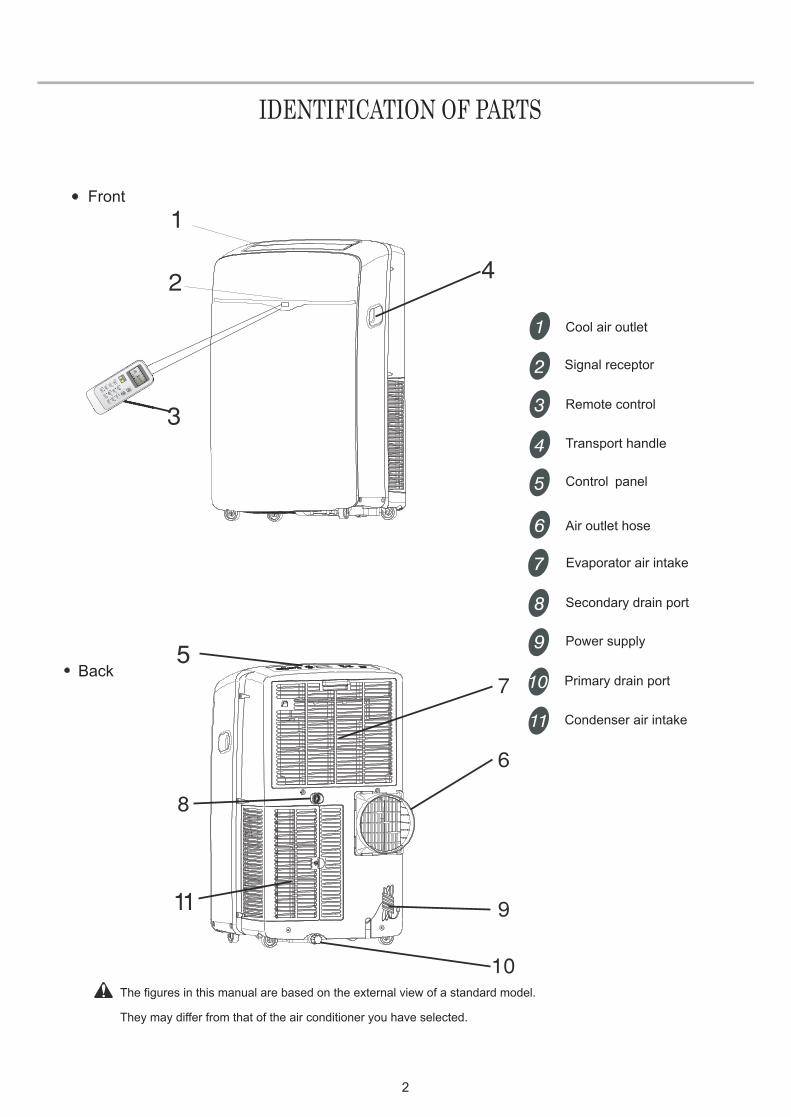
IDENTIFICATION OF PARTS
Control panel
Cool air outlet
Signal receptor
Remote control
Transport handle
Air outlet hose
Evaporator air intake
Secondary drain port
Power supply
Primary drain port
Front
Back
The figures in this manual are based on the external view of a standard model.
They may differ from that of the air conditioner you have selected.
Condenser air intake
ON
/OFF
MO
DE
FAN
SWIN
G
SLEEP
SUPER
SMART
IFEEL
DIM
MER
TIMER
ON
TIMER
OFF
CLO
CK
ON OFFON OFF
2

3
AIR CONDITIONER SAFETY
You can be injured if you don't immediately killed or seriously follow instructions.
You can be injured if you don't follow instructions.
All safety messages will tell you what the potential hazard is and tell you how to reduce the chance of injury.
We have provided many important safety messages in this manual and on your appliance. Always read and obey all safety messages.
This is the safety alert symbol.This symbol alerts you to potential hazards that can kill or hurt you and others.All safety messages will follow the safety alert symbol and either the word "DANGER" or "WARNING."These words mean:
DANGER
WARNING
IMPORTANT SAFETY INSTRUCTIONS
WARNING: To reduce the risk of fire, electrical shock or injury when using your air conditioner, follow these basic precautions:
SAVE THESE INSTRUCTIONS
Unplug air conditioner before servicing.Use two or more people to move and install air conditioner.
Plug into a grounded 3 prong outlet.Do not remove ground prong.Do not use an adapter.
Do not use an extension cord.
Your safety and the safety of others is very important.
DISPOSING OF THE UNIT
Please recycle or dispose of the packaging material for product in an environmentally responsible manner. Never store or ship the air conditioner upside down or sideways to avoid damage to the compressor .
The appliance is not intended for use by young children or infirm persons without supervision. Young children should be
supervised to ensure that they do not play with the appliance.
INSTALLATION REQUIREMENTSTools and Parts
Gather the required tools and parts before starting installation. Read and follow the instructions provided with any tools listed here.
Tools needed
Parts suppliedCheck that all parts are included in parts package.
■ Phillips screwdriver■ Pencil
■ Scissors
A.Foam sealB.Dummy couplingC.Flexible exhaust hose D.Window exhaust adapterE.1⁄₂ screws (2)F.Wood screws(4)G.Window-lock bracket(2)H.Outer slider section panel A
"
I. Inner slider section panel BJ.Outer slider section panel DK.Inner slider section panel CL.3⁄8"screws (2)M.Foam seal (2)N.Foam seal(2)
B
F G
A
CD
E
L
N
M
HJI
K
All air conditioners contain refrigerants, which under federal law must be removed prior to product disposal. If old products with refrigerants are being disposed of, check with your local disposal company for local requirements.Do not dispose of batteries in fire. Batteries may explore or leak.■
4
Location Requirements
Electrical Requirements
■ The portable air conditioner should be dedicated to a 115V, 60Hz, 15-amp fuse grounded 3 prong outlet.
■ The use of a time-delay fuse or time-delay circuit breaker isrequired.
■ All wiring must comply with local and the national electricalcodes and be installed by a qualified electrician. If you haveany questions, contact a qualified electrician.
Electrical Shock Hazard
Plug into a grounded 3 prong outlet.
Do not remove ground prong.
Do not use an adapter.
Do not use an extension cord.
Failure to follow these instructions can result in death,
WARNING
fire, or electrical shock.
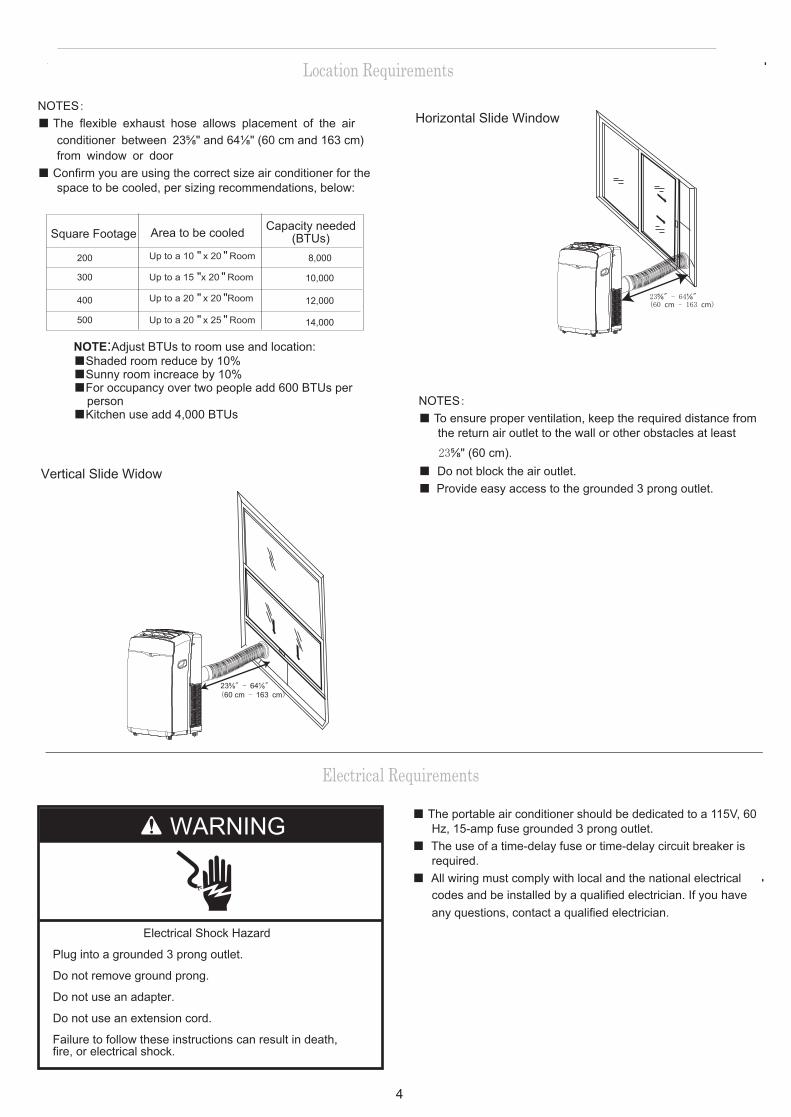
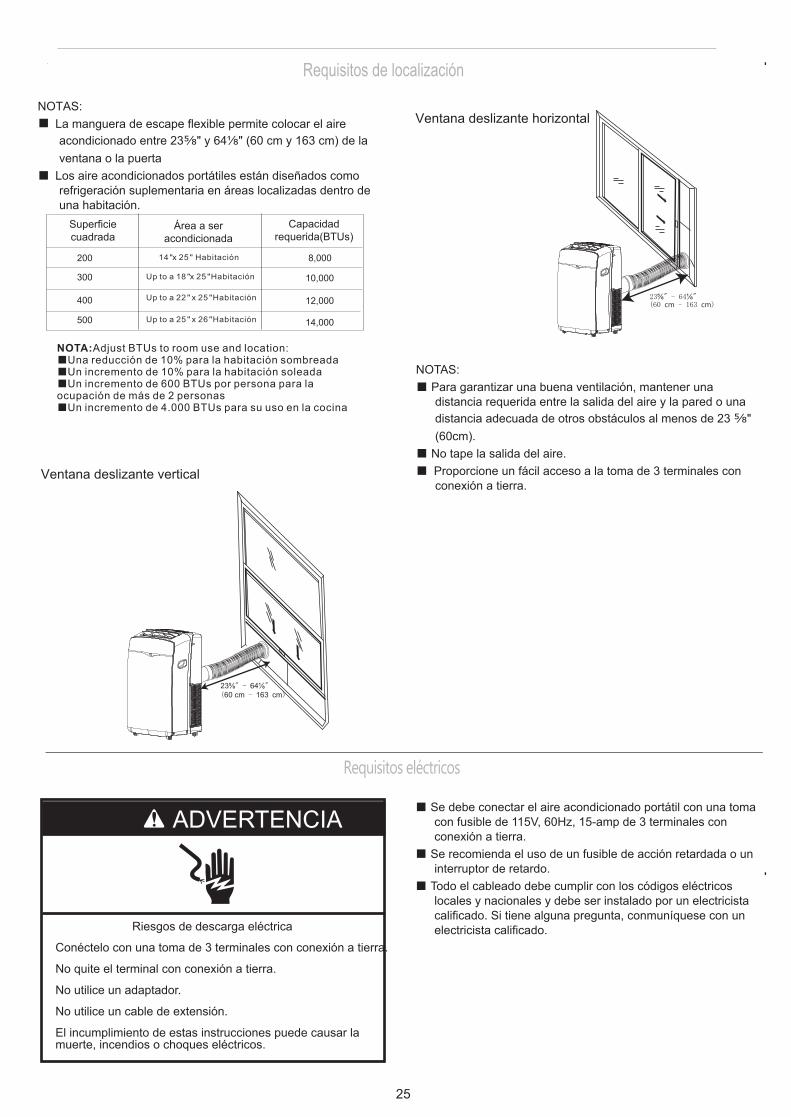
NOTES:■ The flexible exhaust hose allows placement of the air
conditioner between 23⁵⁄₈" and 64 " (60 cm and 163 cm) from window or door
■ Confirm you are using the correct size air conditioner for thespace to be cooled, per sizing recommendations, below:
¹⁄₈
Vertical Slide Widow
NOTES:■ To ensure proper ventilation, keep the required distance from
the return air outlet to the wall or other obstacles at least 23⁵⁄₈" (60 cm).■ Do not block the air outlet.■ Provide easy access to the grounded 3 prong outlet.
23⁵⁄₈" - 64¹⁄₈"(60 cm - 163 cm)
Horizontal Slide Window
23⁵⁄₈" - 64¹⁄₈"(60 cm - 163 cm)
Up to a 15 x 20 Room" "
Up to a 20 x 20 Room" "
Up to a 20 x 25 Room" "
Area to be cooled Capacity needed
8,000
12,000
10,000
14,000
NOTE:Adjust BTUs to room use and location:■Shaded room reduce by 10%■Sunny room increace by 10%■For occupancy over two people add 600 BTUs per
person■Kitchen use add 4,000 BTUs
(BTUs)Square Footage
200
300
400
500
Up to a 10 x 20 Room" "

5
Power Supply Cord
NOTE: Your air conditioners device may differ from the one shown.
To test your power supply cord: 1. Plug power supply cord into a grounded 3prong outlet.2. Press RESET (on some devices, a green light will turn on).3. Press TEST (listen for click; Reset button will trip, and on
some devices, a green light will turn off).4. Press and release RESET (listen for click; Reset button will
latch, and on some devices, a green light will turn on). Thepower supply cord is ready for operation.
NOTES:■ The Reset button must be pushed in for proper operation.■ The power supply cord must be replaced if it fails to trip when
the test button is pressed or fails to reset.■ Do not use the power supply cord as an off/on switch. The
power supply cord is designed as a protective device.■ A damaged power supply cord must be replaced with a new
power supply cord obtained from the product manufacturerand must not be repaired.
■ The power supply cord contains no user serviceable parts.Opening the tamper-resistant case voids all warranty andperformance claims.
INSTALLATION INSTRUCTIONS
Unpack the Air Conditioner
Remove packaging materials■ Remove and recycle packaging materials.
Remove tape and glue residue from surfaces before turning on the air conditioner. Rub a small amount of liquid dish soap over the adhesive with your fingers. Wipe with warm water and dry.
■ Do not use sharp instruments, rubbing alcohol, flammablefluids, or abrasive cleaners to remove tape or glue. These products can damage the surface of your air conditioner.
■
■
Handle the air conditioner gently.
Keep unit upright at least 2 hours prior to use.
A.Test buttonB.Reset button
TEST
RESET
AB
Electrical Shock Hazard
Plug into a grounded 3 prong outlet.
Do not remove ground prong.
Do not use an adapter.
Do not use an extension cord.
Failure to follow these instructions can result in death, fire, or electrical shock.
WARNING
WARNINGExcessive Weight Hazard
Use two or more people to move and install air conditioner.Failure to do so can result in back or other injury.
WARNING
This room air conditioner is equipped with a power supply cord required by UL. This power supply cord contains state-of-the-art electronics that sense leakage current. If the cord is crushed, the electronics detect leakage current and power will be disconnected in a fraction of a second.

Window Vent Panel And Extensions
The window installation kit allows you to install the air conditioner in most vertical-sliding windows 18'' to 50'' wide,orcasement-style windows from 18'' to 50'' high.
1.Please check your window length and choose thefit from the above table.
2.If your window length need more than 2 panels,afteradjust the length,please use a type L screw to fix them.
Screw L
6
7
Window Installation
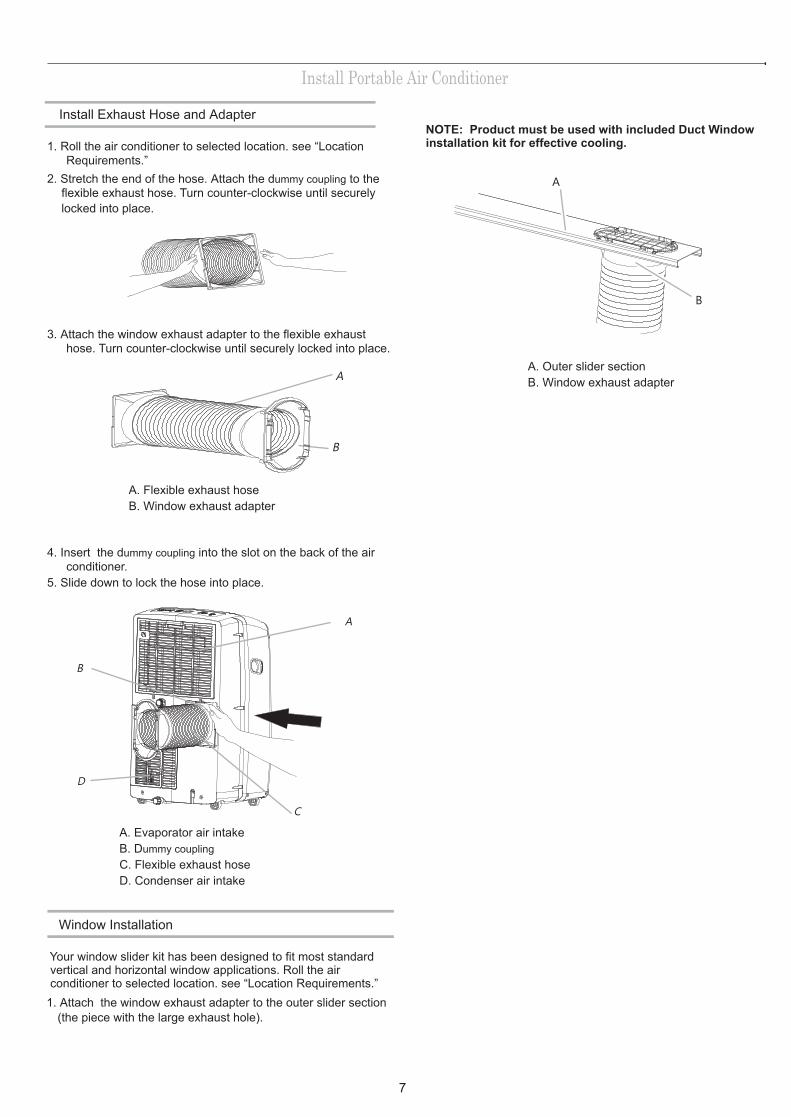
1. Roll the air conditioner to selected location. see “LocationRequirements.”
2. Stretch the end of the hose. Attach the dummy coupling to theflexible exhaust hose. Turn counter-clockwise until securely
Install Exhaust Hose and Adapter
3. Attach the window exhaust adapter to the flexible exhausthose. Turn counter-clockwise until securely locked into place.
Your window slider kit has been designed to fit most standard vertical and horizontal window applications. Roll the air conditioner to selected location. see “Location Requirements.”
1. Attach the window exhaust adapter to the outer slider section(the piece with the large exhaust hole).
A. Outer slider sectionB. Window exhaust adapter
4. Insert the dummy coupling into the slot on the back of the airconditioner.
5. Slide down to lock the hose into place.
A
B
Install Portable Air Conditioner
A. Evaporator air intakeB. Dummy couplingC. Flexible exhaust hoseD. Condenser air intake
A
C
B
D
A. Flexible exhaust hoseB. Window exhaust adapter
A
B
NOTE: Product must be used with included Duct Window installation kit for effective cooling.
locked into place.
8
Installation In Vertical Sliding Windows
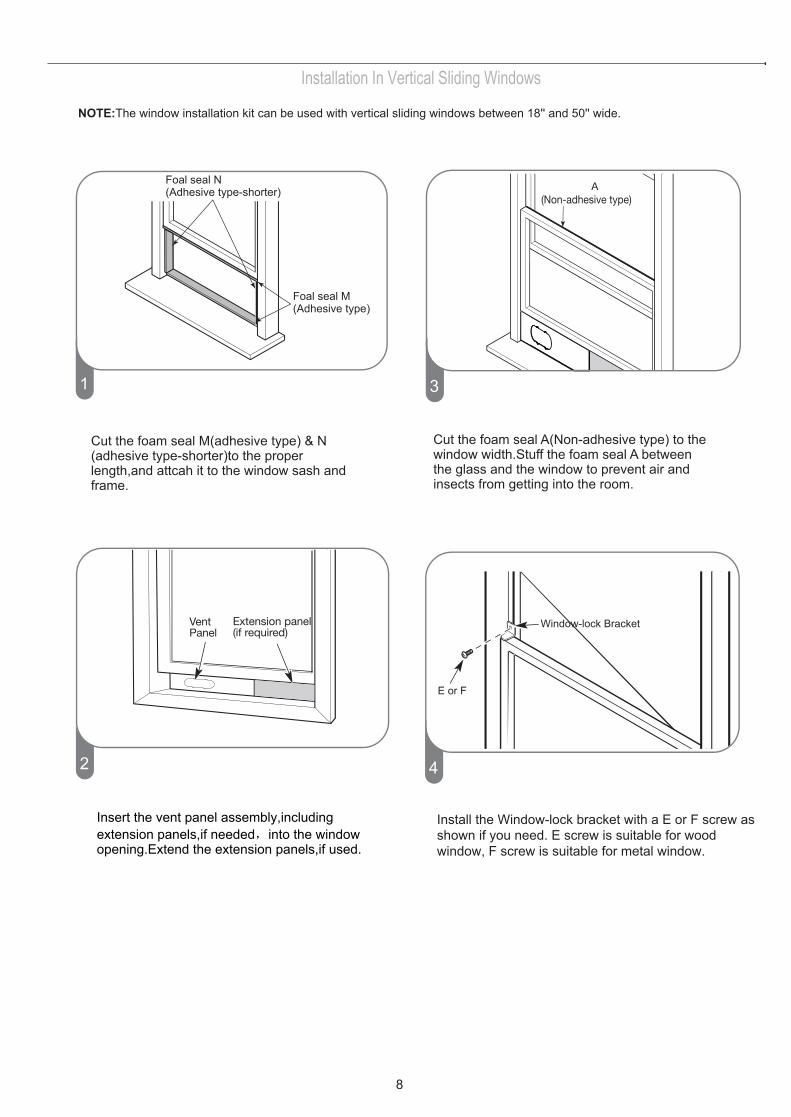
NOTE:The window installation kit can be used with vertical sliding windows between 18'' and 50'' wide.
Foal seal N(Adhesive type-shorter)
Foal seal M(Adhesive type)
A
E or F
Window-lock Bracket
Cut the foam seal M(adhesive type) & N(adhesive type-shorter)to the proper length,and attcah it to the window sash and frame.
Cut the foam seal A(Non-adhesive type) to thewindow width.Stuff the foam seal A between the glass and the window to prevent air and insects from getting into the room.
Install the Window-lock bracket with a E or F screw as shown if you need. E screw is suitable for wood window, F screw is suitable for metal window.
Insert the vent panel assembly,including extension panels,if needed,into the window opening.Extend the extension panels,if used.

Installation In Horizontal Sliding Windows
NOTE:The window installation kit can be used with vertical sliding windows between 18'' and 50'' wide.
Foal seal N(Adhesive type-shorter)
Foal seal M(Adhesive type)
A
E or F
9
Cut the foam seal M(adhesive type) & N (adhesive type-shorter)to the proper length,and attcah it to the window sash and frame.
Cut the foam seal A(Non-adhesive type) to the window width.Stuff the foam seal A between the glass and the window to prevent air and insects from getting into the room.
Install the Window-lock bracket with a E or F screw as shown if you need. E screw is suitable for wood window, F screw is suitable for metal window.
Insert the vent panel assembly,including extension panels,if needed,into the window opening.Extend the extension panels,if used.
10
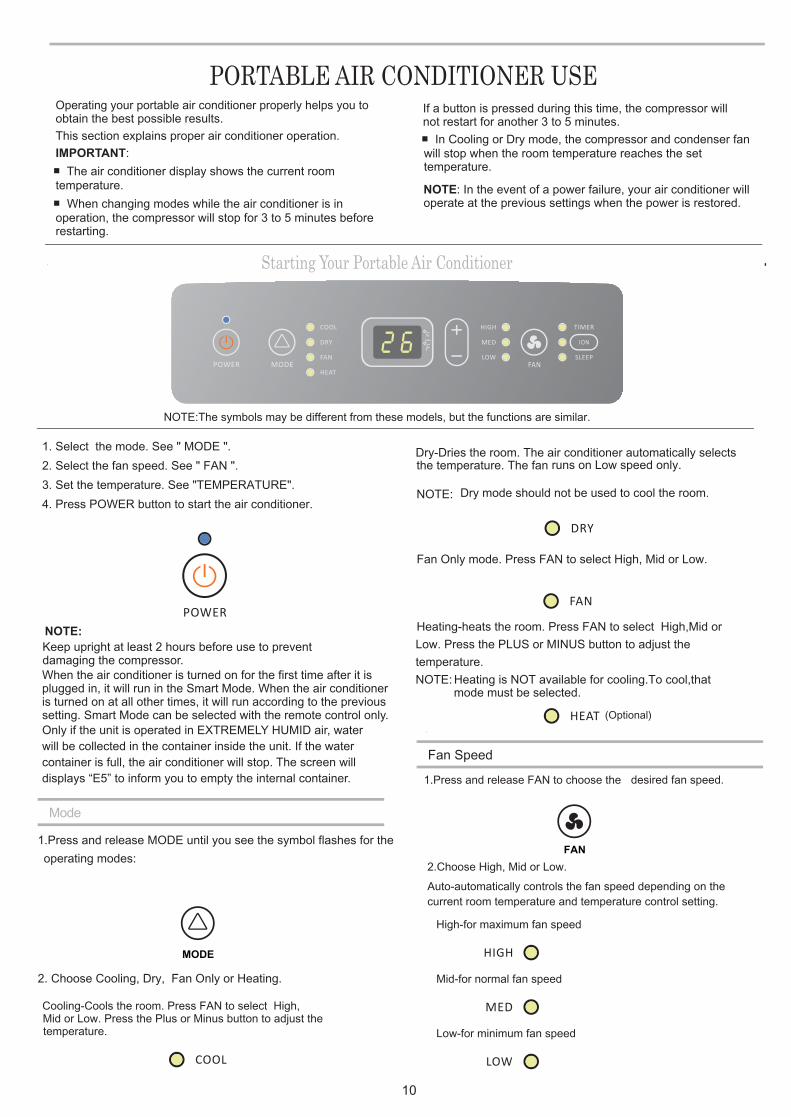
Starting Your Portable Air Conditioner
1. Select the mode. See " MODE ".2. Select the fan speed. See " FAN ".3. Set the temperature. See "TEMPERATURE".4. Press POWER button to start the air conditioner.
When the air conditioner is turned on for the first time after it is plugged in, it will run in the Smart Mode. When the air conditioner is turned on at all other times, it will run according to the previous setting. Smart Mode can be selected with the remote control only.Only if the unit is operated in EXTREMELY HUMID air, water will be collected in the container inside the unit. If the water container is full, the air conditioner will stop. The screen will displays “E5” to inform you to empty the internal container.
NOTE:
1.Press and release MODE until you see the symbol flashes for theoperating modes:
2. Choose Cooling, Dry, Fan Only or Heating.
Dry-Dries the room. The air conditioner automatically selects
Cooling-Cools the room. Press FAN to select High,Mid or Low. Press the Plus or Minus button to adjust thetemperature.
the temperature. The fan runs on Low speed only.
NOTE: Dry mode should not be used to cool the room.
Fan Only mode. Press FAN to select High, Mid or Low.
Heating-heats the room. Press FAN to select High,Mid or Low. Press the PLUS or MINUS button to adjust the temperature. NOTE: Heating is NOT available for cooling.To cool,that
Fan Speed
Mid-for normal fan speed
Low-for minimum fan speed
Auto-automatically controls the fan speed depending on the current room temperature and temperature control setting.
High-for maximum fan speed
1.Press and release FAN to choose the desired fan speed.
2.Choose High, Mid or Low.
NOTE:The symbols may be different from these models, but the functions are similar.
Keep upright at least 2 hours before use to prevent damaging the compressor.
mode must be selected.
(Optional)
PORTABLE AIR CONDITIONER USEOperating your portable air conditioner properly helps you to obtain the best possible results. This section explains proper air conditioner operation.IMPORTANT:
NOTE: In the event of a power failure, your air conditioner will operate at the previous settings when the power is restored.
The air conditioner display shows the current room temperature.
When changing modes while the air conditioner is in operation, the compressor will stop for 3 to 5 minutes before restarting.
■
■
If a button is pressed during this time, the compressor will not restart for another 3 to 5 minutes. In Cooling or Dry mode, the compressor and condenser fan
will stop when the room temperature reaches the set temperature.
■
MODE
FAN

11
1. Remove the battery cover along the arrowed direction.
2. Insert new batteries making sure that the (+) and (-) ofbattery are matched correctly.
3. Re-attach the cover by sliding it back into position.
NOTE:Use the included 2 standard AAA(1.5volt) batteries. Do not use rechargeable batteries. Replace batteries with new ones of the same type when the display becomes dim, or after 6 months.If you reload batteries after removing the old ones, previous settings will be lost.Do not recharge non-rechargeable batteries.Do not mix different types of batteries such as alkaline, carbon-zinc, or rechargeable batteries.Do not mix old and new batteries.Batteries are to be inserted with the correct polarity.Exhausted batteries are to be removed from the product.
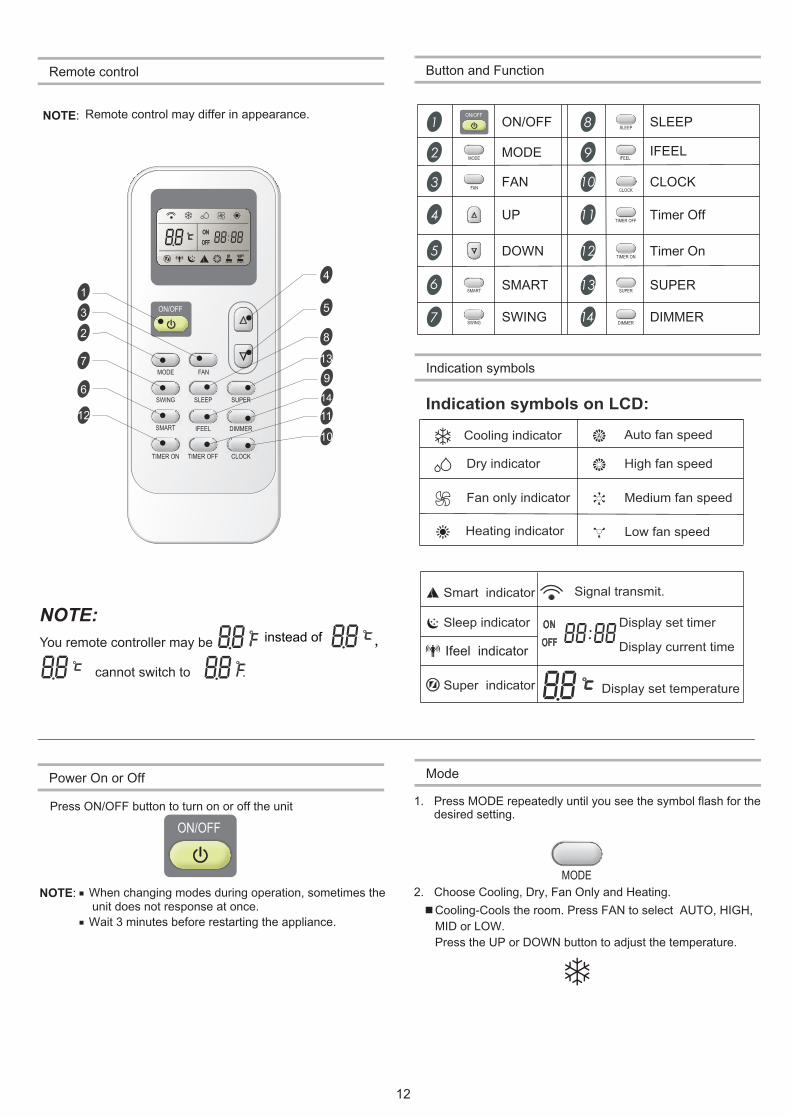
Using the Remote Control
Insert the Batteries
Storage tip
The clip on the back of the unit can be used to store the remotecontrol.
How to Use
To operate the room air conditioner, aim the remote controller to the signal receptor.The remote control will operate the air conditioner at a distance of up to 23’ (7m) whenpointing at signal receptor of the air conditioner.
Signal receptor
ON/OFF
MODE
FAN
SWING
SLEEP
SUPER
SMART
IFEE L
DIMMER
TIMER ON
TIMER OFF
CLOCK
ON OFF
ON OFF
Holder
NOTE:In the Cooling mode, the temperature can be set between 61°F and 86°F (16°C and 30°C).In Fan Only mode, the temperature cannot be set.
Press the PLUS button to raise the temperature. Press the PLUS button once to increase the set temperature by 1°F (1°C).
PLUSPress the MINUS button to lower the temperature. Press the MINUS button once to decrease the set temperature by 1°F (1°C).
Temperature
MINUS
To change the temperature display between °C and °F press both the Plus and Minus Adjust buttons at the same time.
ION (Optional)
Press the ION button to start or stop the Plasma Generator.
When the ION indicator light of the appliance flashes, Plasma Generator will turn on.
the
■
■
■
■
■
■
■
■
12
Indication symbols
Ifeel indicator
Remote control may differ in appearance.NOTE:
Remote control
10
1112
13
14
3
4
ON/OFF
MODE FAN
SWING SLEEP SUPER
SMART IFEEL DIMMER
TIMER ON TIMER OFF CLOCK
ON
OFF
ON
OFF
1
2
6
7
5
8
9
Button and Function
MODE
ON/OFF
SUPER
CLOCK
IFEEL
SLEEP
SWING
SMART
DOWN
UP
FAN
ON/OFF
MODE
FAN
SWING
SLEEP
SUPERSMART
DIMMER
Timer OnTIMER ON
Timer OffTIMER OFF
CLOCK
DIMMER
IFEEL
Power On or Off
Press ON/OFF button to turn on or off the unit
NOTE: When changing modes during operation, sometimes the
Wait 3 minutes before restarting the appliance.
■
■unit does not response at once.
ON/OFF
Mode
1. Press MODE repeatedly until you see the symbol flash for thedesired setting.
2. Choose Cooling, Dry, Fan Only and Heating.■Cooling-Cools the room. Press FAN
MID or LOW.Press the UP or DOWN button to adjust the temperature.
to select AUTO, HIGH,
MODE
NOTE:
You remote controller may be
cannot switch to .
instead of ,
13
Fan Only-Only the fan runs. Press FAN button to adjust fan speed.
NOTE: Auto fan speed cannot be selected in Fan Only mode.
SMART Mode
Press the SMART button,regardless If the unit is on or off, to set temperature and fan speed automatically based on the actual room temperature.
■
■Heating-Heats the room. Press FAN to select the fan speed.Press the up or down TEMP button to adjust the temperature.
Dry-Dries the room. The air conditioner automatically selects the temperature. The fan runs on Low speed only.NOTE: Dry mode should not be used to cool the room.
■
SMART
72°F 22°C ( )
79°F 26°C ( )79°F 26°C ( )
73-79°F 23-26°C ( )
70-73°F 21-23°C ( )
70°F 21°C ( )
23-26°C 73-79°F ( )
23°C 73°F ( ) or belowRoom temperature decrease 4 2 after operate for 3minutes
°F( )°C
Operation mode and temperature are determined by indoor temperature.
Temperature, airflow and direction are controlledautomatically in smart mode. However, a decrease or rise ofup to can be set with the remote controller if you still feel uncomfortable.
4°F 2°C ( )
NOTE:
With Heater models
Cooling only models
SUPER
SUPER button is used to start or stop fast cooling or heating.
1. Press SUPER button. The air conditioner automatically sets the fan speed to High and the temperature to 61°F 16°C ( ).
2. To turn off Super control, press any button on the remotecontrol or control panel except Timer On, Timer Off, Clock,Dimmer,Ifeel and Swing.
NOTE:
In the SUPER mode you can set airflow direction or timer.■
SMART mode is not available in SUPER mode.■
SUPER button is ineffective in SMART mode.■
SUPER
fast heating
ON
OFF
fast cooling
ON
OFF
Fast heating operates at auto fan speed,changing the set temperature automatically to 86°F 30°C ( ) .
FAN
SWING
Indoor fan speed alternates amongHigh, Medium and Low each time this button is pressed.
Button
Button Adjustment
■ High for maximum fan speed
Fan Speed
1. Press FAN button, Choose desired fan speed.
■ Auto-Automatically controls fan speed depending oncurrent room temperature and temperature controlsetting.
Auto fan speed cannot be selected in Fan Only mode.
■ Mid for normal fan speed
■ Low for minimum fan speed
NOTE:
Room temperature decrease 4 2 after operate for 3 minutes
°F( )°C
A decrease or rise of up to can be set with the remote controller if you still feel uncomfortable.
4°F (2°C)
26°C 79°F ( ) 26°C 79°F ( )
14
Temperature
■ Press the UP button to raise the temperature. Pressthe UP button once to increase the set temperatureby .1 (1 )°F °C
■ Press the DOWN button to lower the temperature.Press the DOWN button once to decrease the settemperature by .1°F(1°C)
NOTES:■ In the Cooling and Heating mode, the temperature can be
set between 61°F and 86°F(16°C and 30°C).■ In Fan Only mode,the temperature cannot be set.
UP
DOWN
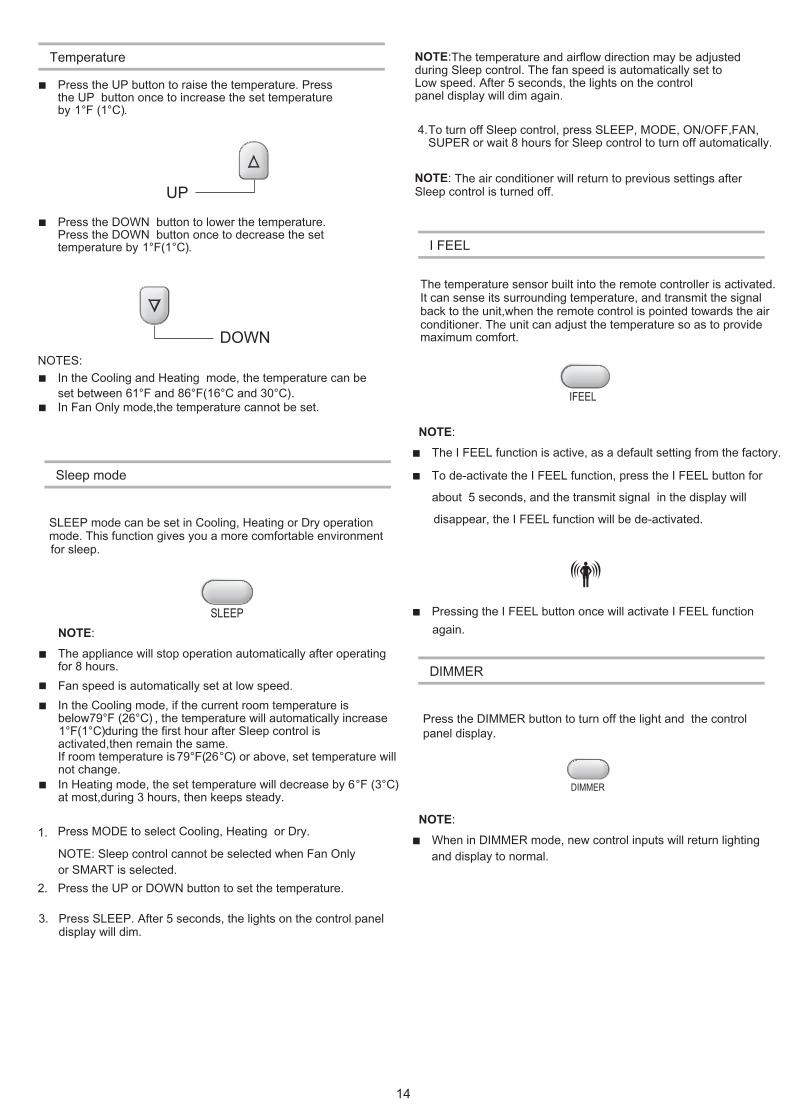
Sleep mode
SLEEP mode can be set in Cooling, Heating or Dry operationmode. This function gives you a more comfortable environmentfor sleep.
■ In Heating mode, the set temperature will decrease by 6at most,during 3 hours, then keeps steady.
°F (3°C)
1. Press MODE to select Cooling, Heating or Dry.
NOTE: Sleep control cannot be selected when Fan Onlyor SMART is selected.
2. Press the UP or DOWN button to set the temperature.
3. Press SLEEP. After 5 seconds, the lights on the control paneldisplay will dim.
■ The appliance will stop operation automatically after operatingfor 8 hours.
■ In the Cooling mode, if the current room temperature isbelow , the temperature will automatically increase
during the first hour after Sleep control is activated,then remain the same.If room temperature is 26 ) or above, set temperature will not change.
1°F(1°C)
79°F( °C
79°F (26°C)
■
SLEEP
Fan speed is automatically set at low speed.
NOTE:
The air conditioner will return to previous settings after Sleep control is turned off.
4.To turn off Sleep control, press SLEEP, MODE, ON/OFF,FAN,SUPER or wait 8 hours for Sleep control to turn off automatically.
The temperature and airflow direction may be adjusted during Sleep control. The fan speed is automatically set to Low speed. After 5 seconds, the lights on the control panel display will dim again.
NOTE:
NOTE:
I FEEL
about 5 seconds, and the transmit signal in the display will
disappear, the I FEEL function will be de-activated.
■ The I FEEL function is active, as a default setting from the factory.
■ To de-activate the I FEEL function, press the I FEEL button for
The temperature sensor built into the remote controller is activated. It can sense its surrounding temperature, and transmit the signal back to the unit,when the remote control is pointed towards the air conditioner. The unit can adjust the temperature so as to provide maximum comfort.
NOTE:
IFEEL
DIMMER
Press the DIMMER button to turn off the light and the control panel display.
■ When in DIMMER mode, new control inputs will return lightingNOTE:
DIMMER
■ Pressing the I FEEL button once will activate I FEEL function
and display to normal.
again.

15
The TIMER indicator on the appliance lights up.
3.When the desired time is displayed on the LCD, press theTIMER ON button to confirm it.
A “Beep” will be heard, and “ON” stops flashing.
TIMER ON/OFF
It is convenient to set the timer with TIMER ON/OFF buttons.
The TIMER ON button can be used to turn on the unit automatically at the time you set.
Using the TIMER
1. Press TIMER ON, Then "On 12:00" flashes on the LCD.
2.Press the UP or DOWN button to get your desired time of dayto turn on the appliance.
Press the UP or DOWN button once to increase ordecrease the time setting by 1minute.
Press and hold the UP or DOWN button for 2 seconds to increase or decrease the time setting by 10 minutes.
Press and hold the UP or DOWN button for a longer timeto increase or decrease the time setting by 1 hour.
■
■
■
TIMER ON
Increase
DecreaseON
The CLOCK must be set before using the TIMER function.NOTE:
Normal SoundsWhen your air conditioner is operating normally, you may hear sounds such as:■ Air movement from the fan.■ Clicks from the thermostat cycling.■ Vibrations or noise due to poor wall or window construction.■ A high-pitched hum or pulsating noise caused by the
high-efficiency compressor cycling on and off.
4.After your desired time is displayed for 5 seconds, the clock will display on the remote control display instead of the desired time.
SWING
Press SWING once to change vertical airflow direction. Press again to hold the airflow louver at desired direction.
NOTE: Airflow is automatically adjusted to a certain angle in accordance■
■
with the operation mode after turning on the unit.The direction of airflow can be also adjusted to your ownrequirement by pressing the SWING button.
■ Do not turn the vertical adjustment louvers manually, toprevent damage. Turn off the unit first and cut off thepower supply, then restore power again to reset the louver.
SWING
To cancel Timer OnPress TIMER ON button again, when a "beep" can be heard and the indicator disappears, the TIMER ON mode has been canceled.
It is similar to set TIMER OFF, you can makethe appliance unit switch off automatically at the time you set.
TIMER OFF
NOTE:
3. Press CLOCK button again once the real time is set.
2. Use the Up and Down buttons to set the correct time.
Clock function
1. You can set or adjust the real time by pressing CLOCK button.
CLOCK

3. Remove plug the primary drain .cover and
8. Plug in the air conditioner or reconnect power.
7. Reposition the air conditioner.
6. Reinstall the primary drain cover to the drain hole.
5. Reinstall the drain plug to the primary drain hole.
4. Drain water completely through . the drain hole
2. Move the air conditioner to a drain location or outside.
1. Unplug the air conditioner or disconnect power.
16
PORTABLE AIR CONDITIONER CAREDraining the Air Conditioner
NOTE: To avoid spilling water from the internal bucket, move the air conditioner slowly and keep it level.
A.Secondary drain plugB.Secondary drain coverC.Primary drain plug
WARNINGExcessive Weight Hazard
Use two or more people to move and install airconditioner.
Failure to do so can result in back or other injury.
A
BC
D
NOTE: If the air conditioner will be stored after use, see “Storing After Use”.
D.Primary drain cover
Cleaning the Air Filter
A. doorEvaporator air intake fliter panelB. doorCondenser air intake fliter panel
A
B
1. Press ON/OFF to turn off the air conditioner.2. Open the filter panel door on the back of the air conditioner
and remove.3. Remove the air filter from the filter panel door.
4. Use a vacuum cleaner to clean the filter. If the filter is verydirty, wash the filter in warm water with a mild detergent.NOTE: Do not wash the filter in the dishwasher or use anychemical cleaners.
4. Remove the tapping screw from the condenser air intake filterpanel door and remove.
5. Remove the air filter from the filter panel door.
Cleaning the Outside1. Press ON/OFF to turn off the air conditioner.2. Unplug the air conditioner or disconnect power.3. Remove the air filter and clean separately. See "cleaning the
Air Filter ”.4. Wipe the outside of the air conditioner with a soft, damp
cloth.5. Plug in the air conditioner or reconnect power.6. Press ON/OFF to start the air conditioner.
Storing After Use1. Drain the water completely. See "draining the Air
Conditioner “.2. Run the air conditioner set to Fan Only for approximately
12 hours to dry the air conditioner.3. Unplug the air conditioner.4. Remove the flexible exhaust hose and store with the air
conditioner in a clean, dry area. See “ installationInstructions “.
5. Remove the window kit and store with the air conditioner in aclean, dry area. See " Installation Instructions “.
6. Remove the filter and clean. See Cleaning the Air Filter.7. Clean the outside of the air conditioner. See " Cleaning the
Outside “.8. Reinstall the filter.9. Remove the batteries and store the remote control with the
air conditioner in a clean, dry area.
5. Air dry the filter completely before replacing to ensuremaximum efficiency.
6. Reattach the air filter to the filter panel door.7. Reinstall the filter panel door and tapping screw.8. Press ON/OFF to start the air conditioner.
turning off air conditioner beforetrying to restart the air conditioner.
17
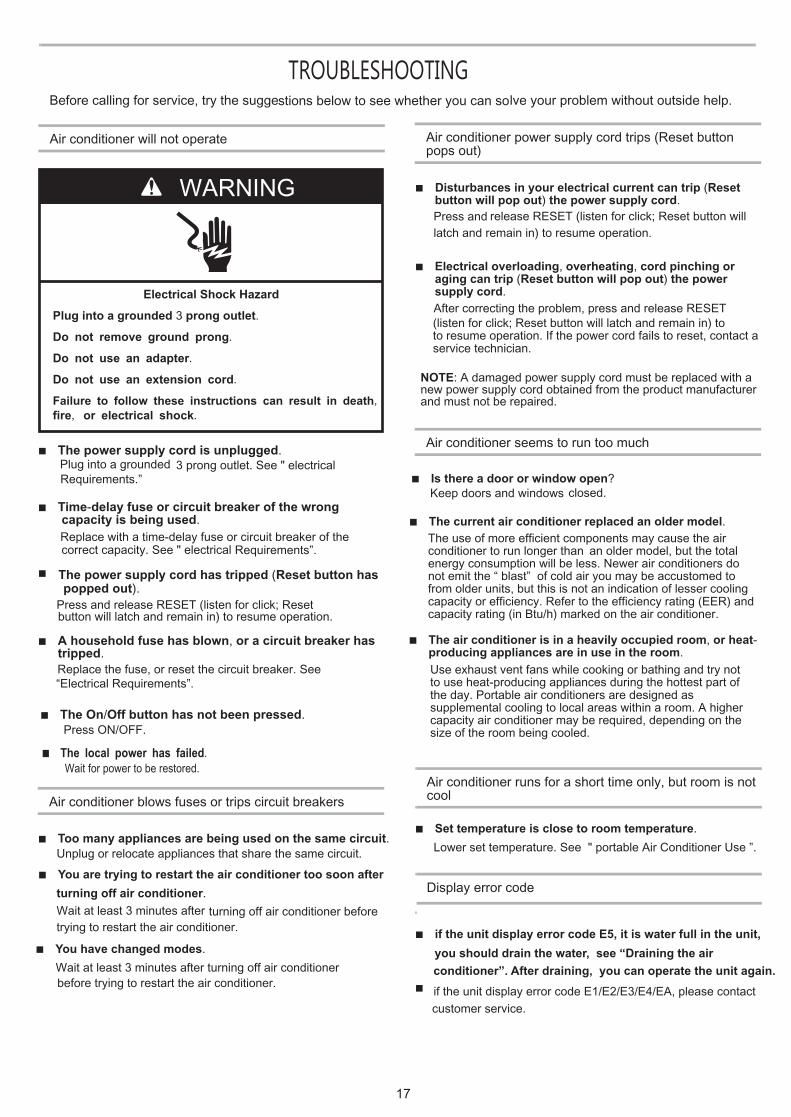
TROUBLESHOOTINGBefore calling for service, try the suggestions below to see whether you can solve your problem without outside help.
Air conditioner will not operate
■ The power supply cord is unplugged.Plug into a grounded 3 prong outlet. See " electrical
Electrical Shock Hazard
Plug into a grounded 3 prong outlet.
Do not remove ground prong.
Do not use an adapter.
Do not use an extension cord.
Failure to follow these instructions can result in death,fire, or electrical shock.
WARNING
WARNING
Requirements.”
■ Time-delay fuse or circuit breaker of the wrongcapacity is being used.Replace with a time-delay fuse or circuit breaker of thecorrect capacity. See " electrical Requirements”.
■ The power supply cord has tripped (Reset button haspopped out).
Press and release RESET (listen for click; Resetbutton will latch and remain in) to resume operation.
■ A household fuse has blown, or a circuit breaker hastripped.Replace the fuse, or reset the circuit breaker. See“Electrical Requirements”.
■ The On/Off button has not been pressed.Press ON/OFF.
■ The local power has failed. Wait for power to be restored.
Air conditioner blows fuses or trips circuit breakers
■ Too many appliances are being used on the same circuit.Unplug or relocate appliances that share the same circuit.
■ You are trying to restart the air conditioner too soon after
turning off air conditioner.Wait at least 3 minutes after
Air conditioner runs for a short time only, but room is not cool
■ Set temperature is close to room temperature.Lower set temperature. See " portable Air Conditioner Use ”.
■ The air conditioner is in a heavily occupied room, or heat-producing appliances are in use in the room.Use exhaust vent fans while cooking or bathing and try notto use heat-producing appliances during the hottest part ofthe day. Portable air conditioners are designed assupplemental cooling to local areas within a room. A highercapacity air conditioner may be required, depending on thesize of the room being cooled.
■ The current air conditioner replaced an older model.The use of more efficient components may cause the airconditioner to run longer than an older model, but the totalenergy consumption will be less. Newer air conditioners donot emit the “ blast” of cold air you may be accustomed tofrom older units, but this is not an indication of lesser coolingcapacity or efficiency. Refer to the efficiency rating (EER) andcapacity rating (in Btu/h) marked on the air conditioner.
NOTE: A damaged power supply cord must be replaced with a new power supply cord obtained from the product manufacturer and must not be repaired.
Air conditioner power supply cord trips (Reset button pops out)
■ Disturbances in your electrical current can trip (Resetbutton will pop out) the power supply cord.Press and release RESET (listen for click; Reset button willlatch and remain in) to resume operation.
■ Electrical overloading, overheating, cord pinching oraging can trip (Reset button will pop out) the powersupply cord.After correcting the problem, press and release RESET(listen for click; Reset button will latch and remain in) toto resume operation. If the power cord fails to reset, contact aservice technician.
Air conditioner seems to run too much
■ Is there a door or window open?Keep doors and windows closed.
■ You have changed modes.Wait at least 3 minutes after turning off air conditionerbefore trying to restart the air conditioner.
Display error code
■ if the unit display error code E5, it is water full in the unit,
if the unit display error code E1/E2/E3/E4/EA, please contact
you should drain the water, see “Draining the air
conditioner”. After draining, you can operate the unit again.
■
customer service.

Air conditioner runs, but does not cool
■ The filter is dirty or obstructed by debris.Clean the filter.
■ Air outlet is blocked.Clear air outlet.
■ Set temperature is too high.Lower set temperature.
18
Air conditioner cycles on and off too much
■ The air conditioner is not properly sized for your room.Check the cooling capabilities of your portable air
conditioner. Portable air conditioners are designed as supplemental cooling to local areas within a room.
■ The filter is dirty or obstructed by debris.Clean the filter.
■ There is excessive heat or moisture open containercooking, showers, etc.) in the room.
hottest part of the day.
Use a fan to exhaust heat or moisture from the room.Try not to use heat-producing appliances during the
■ The louvers are blocked.Install the air conditioner in a location where the louversare free from curtains, blinds, furniture, etc.
WARRANTY
19
Commercial and/or Rental use of this Product is not covered under this warranty.
WHAT IS NOT COVERED:
1. Any non-Hisense parts, including any third party provided accessories and/or add-on’s;
2. Service repairs to correct the installation of the Product, instruction on how to use the Product,
replacement of home fuses or resetting circuit breakers, replacing or correcting home wiring.
3. Service repairs related to use for other than normal, single family household use.
4. Damages of any kind resulting from accidents, alterations, misuse, abuse, fire, floods, acts of
God, improper usage, installation not in accordance with electrical or plumbing codes, or use of
products/accessories not approved by Hisense in writing.
5. Service repair outside of the United States, the Virgin Islands, Guam and Puerto Rico.
6. Service or support for units resulting from unauthorized modifications made to the Product.
7. Pickup and delivery. This product is designed for repair or replacement only.
8. Packaging for the product.
9. Damages caused by services performed by owner, service companies not authorized by
Hisense in writing, the use of parts other than genuine Hisense parts, or parts obtained from
entities other than Hisense authorized service companies.
TWO-YEAR LIMITED MANUFACTURER’S WARRANTY
This Warranty, provided by Hisense U.S.A. Corporation (hereinafter “Hisense”) covers Portable Air
Conditioners (hereinafter “Product”) in the United States of America, Puerto Rico, Guam and the U.S.
Virgin Islands only, excluding any third party provided accessories and/or add-on’s purchased
separately; This warranty shall apply solely when this Product is purchased, stored, transported,
handled, operated and maintained according to the Hisense provided instructions attached to or
furnished with the Product. Hisense will, in its sole determination, repair or refund units deemed
defective solely for materials or workmanship, at Hisense’s discretion, for a limited warranty period of:
FOR 8K BTU and 10K BTU Air Conditioners: Two (2) years for Parts and Labor, on Product from the date of purchase (requires
purchase receipt) for the original buyer only.
FOR 12K BTU and 14K BTU Air Conditioners:
Two (2) years for Parts and Labor, in-home, on Product from the date of purchase (requires
purchase receipt) for the original buyer only, and Three (3) years Parts on the compressor only*
from the date of purchase (requires proof of purchase) for the original buyer only. (*Does not include theevaporator, condenser, drier, connecting tubing – and all other parts, which are excluded from this warranty)
If you need assistance, first see the “Troubleshooting” section of your instruction manual; After checking
“Troubleshooting,” additional help can be found by calling:
Hisense-USA: 1-877-465-3566 (English & Spanish, Monday–Friday 9 a.m. to 6 p.m. EST)
batteries,bulbs etc;);This Warranty is invalid if the factory-applied serial number has been altered or
removed from the Product. Damage occurring to any Product returned for service that is caused by
environmental hazards, improper or unsecure packaging or shipping by the original consumer
purchaser is excluded from coverage under this Warranty. This Warranty is valid only in the United
States, the U.S. Virgin Islands, Guam, and Puerto Rico, and only applies to Products purchased and
serviced in those regions. Warranty will be voided if attempts of repair are performed by the consumer
or any third parties that are NOT authorized by Hisense in writing.
THERE ARE NO EXPRESS WARRANTIES OTHER THAN THOSE EXPRESSLY DESCRIBED
ABOVE, AND NO WARRANTIES WHETHER EXPRESS OR IMPLIED, INCLUDING, BUT NOT
LIMITED TO, ANY IMPLIED WARRANTIES OF MERCHANTABILITY OR FITNESS FOR A
PARTICULAR PURPOSE, SHALL APPLY AFTER THE EXPRESS WARRANTY PERIOD STATED
ABOVE,AND NO OTHER EXPRESS WARRANTY OR GUARANTY GIVEN BY ANY PERSON,
FIRM OR ENTITY WITH RESPECT TO THE PRODUCT SHALL BE BINDING ON HISENSE. THIS
WARRANTY IS THE SOLE AND EXCLUSIVE WARRANTY WITH RESPECT TO THE PRODUCT
AND HISENSE IS THE EXCLUSIVE WARRANTY PROVIDER FOR THE PRODUCT. REPAIR OR
REFUND, AT HISENSE’S SOLE DISCRETION, IS THE EXCLUSIVE REMEDY OF THE
CONSUMER. HISENSE SHALL NOT BE LIABLE FOR ANY INCIDENTAL OR CONSEQUENTIAL
DAMAGES CAUSED BY THE USE, MISUSE OR INABILITY TO USE THE
PRODUCT.NOTWITHSTANDING THE FOREGOING, CONSUMER’S RECOVERY AGAINST
HISENSE SHALL NOT EXCEED THE PURCHASE PRICE OF THE PRODUCT SOLD BY
HISENSE. THIS WARRANTY SHALL NOT EXTEND TO ANYONE OTHER THAN THE ORIGINAL
CONSUMER WHO PURCHASED THE PRODUCT AND IS NOT TRANSFERABLE UNDER ANY
CIRCUMSTANCES.PROOF OF PURCHASE SHALL BE REQUIRED FOR ALL WARRANTY
CLAIMS.
20
Exclusions and Limitations: This Warranty covers manufacturing defects in materials and
workmanship encountered in the normal, noncommercial use of the Product, and does not cover
consumer instruction, delivery, installation, set-up, adjustments, cosmetic damage or damage due to
acts of nature, accident, misuse, abuse, negligence, commercial use or modification of or to any part of
the Product. This Warranty applies to the original consumer only and does not cover Products sold to
consumers in used, “AS IS” or “WITH ALL PROBLEMS” condition, or consumables (e.g., fuses,
Obligations for service and parts under this warranty must be performed by Hisense or a Hisense
authorized service company. Product features or specification as described or il lustrated are subject to
change without notice.
DISCLAIMER OF IMPLIED WARRANTIES: LIMITATION OF REMEDIES

USER GUIDE SUPPORT PAGE
ASSISTANCE OR SERVICE
Before calling for assistance or service, please check the troubleshooting section of your user manual.
It may save you the cost of a service call. If you stil l need help, follow the instructions below. When
calling, please know the purchase date and the complete model and serial number of your appliance.
This information will help us to better respond to your request. If you need to order replacement parts,
we recommend that you use only factory-specified replacement parts. Factory-specified replacement
parts will fit right and work right because they are made with the same precision used to build every
new
The Hisense Call Center can provide assistance with:
■ Features and specifications on our appliances
■ Installation information
■ Use and maintenance procedures
■ Repair parts sales
■ Referrals to service companies.
■ Designated service technicians are trained to fulfill the product warranty and provide after-warranty
service, anywhere in the United States and US territories.
For further assistance
If you need further assistance, you can write with any questions or concerns to:
Hisense USA Corp.
Customer Service
PO Box 3289
Suwanee, GA 30024
USA
Please include a daytime phone number in your correspondence.
21
Keep this Warranty page and your sales receipts together for future reference. You must provide proof
of purchase for warranty service.
Write down the following information about your appliance to better help you obtain assistance or
service if you should ever need it. You will need to know your complete model and serial number. You
can find this information on the model and serial number label located on the Product.
Store name:________________________ Model number:______________________
Address:___________________________ Serial number:______________________
Phone number:______________________ Purchase date:______________________
www.hisense-usa.com/support/productReg.asp to register your product.
The Benefits of Product Registration:
Product Update
Proper registration will enable Hisense to contact you of safety notifications, updates, accessories, or
other product changes.
Proof of Ownership
In the case of an insurance loss such as fire, flood, or theft, your registration will serve as your proof of purchase.
Better Service
If you have any questions about your new Hisense product, your registration will help us assist you.
22
PRODUCT REGISTRATION
To better safeguard your product, please log on to

IDENTIFICACIÓN DE LAS PARTES
Parte delantera
Parte trasera
Las imágenes de este manual están basadas en la vista externa de un modelo estándar.
Quizás las del aire acondicionado seleccionado por usted no serán completamente iguales que éstas.
ON
/OFF
MO
DE
FAN
SWIN
G
SLEEP
SUPER
SMART
IFEEL
DIM
MER
TIMER
ON
TIMER
OFF
CLO
CK
ON OFFON OFF
23
Panel de control
Salida del aire frío
Receptor de señales
Control remoto
Manija de transporte
Manguera de salida del aire
Admisión de aire del vaporizador
Puerto de drenaje secundario
Fuente de alimentación
Puerto de drenaje primario
Admisión de aire del condensador

24
MEDIDAS DE SEGURIDAD DEL AIRE ACONDICIONADO
Herramientas necesarias■ Destornillador Phillips■ Lápiz
■ Tijeras
B
F G
A
CD
E
L
N
M
HJI
K
Este es un símbolo de advertencia de seguridad.Este símbolo le advierte que un posible peligro pueda matar o dañar a usted y a otros.Todos los mensajes de seguridad estarán seguidos del símbolo de alerta de seguridad y de la palabra "PELIGRO" o "ADVERTENCIA".Estas palabras significan que:
La seguridad de usted y otros es muy importante.Le hemos proporcionado muchos mensajes importantes de seguridad en este manual y en el aparato. Que Siempre lea y cumpla con todos los mensajes de segurdad.
Usted puede morir o salir gravemente herido si no sigue las instrucciones.
Todos los mensajes de seguridad le dirán cuál es el posible peligro, como evitar salir herido y qué puede suceder si no se obedecen las instrucciones.
PELIGRO
ADVERTENCIA Usted puede morir o ser gravemente herido si no sigue las
instrucciones.
INSTRUCCIONES DE SEGURIDAD IMPORTANTES
ADVERTENCIA: Para reducir el riesgo de incendios, descargas eléctricas o lesiones cuando utilice el aire acondicionado, siga estas
CONSERVE ESTAS INSTRUCCIONES
No utilice el cable de extensión.Desenchufe el aire acondicionado antes de hacer el
Conéctelo con una toma de 3 terminales con conexión a tierra.No quite el terminal con conexión a tierra.No utiliceel adaptador.
TRATAMIENTO DE LA UNIDADQue recicle o deshágase del material de embalaje del producto de manera ecológicamente responsable. Nunca guarde o translade el aire acondicionado con boca abajo o de lado para evitar daños en el compresor.
El aparato no está diseñado para que lo utilicen los niños o personas enfermas sin supervisión. Los niños pequeños deben
Todos los aire acondicionados contienen refrigerantes, los que por la Ley Federal deben ser removidos antes de desecharlos.ser supervisados para asegurarse de que no jueguen con el aparato.
Si los productos antiguos con refrigerantes están por deshacerse, consulte con la compañía local de eliminación de residuos de los requisitos locales.No tire las pilas al fuego. Las baterías pueden explorar o escape.
medidas básicas:
mantenimiento del mismo.Se necesitan dos o más personas para mover e instalar el aire acondicionado.
REQUISITOS PARA LA INSTALACIÓNHerramientas y piezas
Antes de iniciar la instalación, reúna las herramientas y piezas necesarias. Lea y siga las siguientes instrucciones de cualquiera de las herramientasaquí mencionadas.
Piezas suministradasVerifique que todas las piezas estén comprendidas en el paquete.
A. Sello de espuma B. Dummy couplingC. Manguera de escape flexible D. Adaptador para la ventana de escapeE.1⁄₂" tornillos (2)F. Tornillos para madera(4)G. Soporte para cierre de ventana(2)H. Sección deslizante exterior del panel A
I. Sección deslizante interna del panel BJ. Sección deslizante exterior del panel DK. Sección deslizante interna del panel CL. 3⁄8" tornillos(2)M.Sello de espuma(2)N. Sello de espuma(2)
■
25
Requisitos de localización
NOTAS:■
■
Ventana deslizante vertical
23⁵⁄₈" - 64¹⁄₈"(60 cm - 163 cm)
Ventana deslizante horizontal
23⁵⁄₈" - 64¹⁄₈"(60 cm - 163 cm)
8,000
12,000
10,000
14,000
Superficie cuadrada
200
300
400
500
La manguera de escape flexible permite colocar el aireacondicionado entre 23⁵⁄₈" y 64¹⁄₈" (60 cm y 163 cm) de la ventana o la puerta
Los aire acondicionados portátiles están diseñados comorefrigeración suplementaria en áreas localizadas dentro de una habitación.
Up to a 18 "x 25 "Habitación
Up to a 22 " x 25 "Habitación
Up to a 25 " x 26 "Habitación
14 "x 25 " Habitación
Área a ser acondicionada
Capacidad requerida(BTUs)
NOTA:Adjust BTUs to room use and location:■Una reducción de 10% para la habitación sombreada■Un incremento de 10% para la habitación soleada■Un incremento de 600 BTUs por persona para laocupación de más de 2 personas■Un incremento de 4.000 BTUs para su uso en la cocina
NOTAS:■ Para garantizar una buena ventilación, mantener una
distancia requerida entre la salida del aire y la pared o una distancia adecuada de otros obstáculos al menos de 23 ⁵⁄₈" (60cm).
■ No tape la salida del aire.■ Proporcione un fácil acceso a la toma de 3 terminales con
conexión a tierra.
Requisitos eléctricos
■ Se debe conectar el aire acondicionado portátil con una tomacon fusible de 115V, 60Hz, 15-amp de 3 terminales conconexión a tierra.
■ Se recomienda el uso de un fusible de acción retardada o uninterruptor de retardo.
■ Todo el cableado debe cumplir con los códigos eléctricoslocales y nacionales y debe ser instalado por un electricistacalificado. Si tiene alguna pregunta, conmuníquese con unelectricista calificado.Riesgos de descarga eléctrica
Conéctelo con una toma de 3 terminales con conexión a tierra.
No quite el terminal con conexión a tierra.
No utilice un adaptador.
ADVERTENCIA
No utilice un cable de extensión.
El incumplimiento de estas instrucciones puede causar la muerte, incendios o choques eléctricos.

26
Cable de alimentación
NOTA: Su aire acondicionado puede diferir del que se muestra aquí.
INSTRUCCIONES PARA LA INSTALACIÓNDesembalaje del aire acondionado
Quite todos los materiales del empaque■ Quite y deshágase de los materiales para reciclar.
Elimine los residuos de cinta o pegamento de la superficie antes de encender el aire acondicionado.Frote un poco de detergente líquido sobre el adhesivo con sus dedos. Limpie con agua tibia y séquelo.
■ Mantenga vertical el equipo al menos de 2 horas antes
A.Botón TESTB.Botón RESET
TEST
RESET
AB
ADVERTENCIA
Este aire acondicionado para habitaciones está equipado con un cable de alimentación requerido por UL. Este cableha usado la tecnología de la última generación que detecta fugas de corriente. Si el cable está aplastado, esta tecnología detectará la fuga de corriente y se desconectará la alimentación en una fracción de segundo.
Riesgos de descarga eléctrica
Conecte con una toma de 3 terminales con conexión a tierra.
No quite el terminal con conexión a tierra.
No utilice un adaptador.
No utilice un cable de extensión.
El incumplimiento de estas instrucciones puede causar la muerte, incendios o choques eléctricos.
ADVERTENCIA
Para probar el cable de alimentación:1.Conecte el cable de alimentación con una toma de 3 terminales
2.Presione RESET (en algunos dispositivos se enciende una luz verde).3.Presione TEST (se escuchará un clic; el botón RESET
se activará y, en algunos dispositivos, se apaga la luz verde).4.Presione y suelte RESET (se escuchará un clic; el botón RESET
se suspenderá y, en algunos dispositivos, se enciende la luzverde). El cable de alimentación está listo para funcionar.
NOTAS:
■ El botón de RESET debe presionarse para un mejor
■ El cable de alimentación debe reemplazarse si no funciona biencuando se presiona el botón TEST o si su reinicio es fracasado.
■ No se debe utilizar el cable de alimentación como interruptor de
■ No repare el cable. El cable de alimentación malogrado debeser reemplazado por un nuevo proveniente del fabricante.
■ El cable de alimentación no contiene partes que puedan serreparadas por el usuario. El hecho de abrir la caja de prueba de alteraciones suspenderá la garantía de rendimiento y reclamos.
encendido/apagado. Este cable está diseñado como un dispositivo de protección.
con conexión a tierra.
funcionamiento.
de utilizarlo.■
■
No utilice instrumentos filosos, alcohol, líquidos inflamables olimpiadores abrasivos para quitar la cinta o el pegamento.Posiblemente, estos productos dañarán la superficie de suaire acondicionado.Maneje el aire acondicionado con cuidado.
Peligro: muy pesadoSe necesitan dos o más personas para mover e instalar el aire acondicionado.El incumplimiento de eso puede resultaren lesiones de espalda u otras.

Tornillo L
27
Panel de Ventanillas Y ExtensionesEl kit de instalación de ventanas les permite a ustedes a instalar el aire acondicionado en las ventanas deslizantes verticales con un ancho de entre 18'' y 50'',o en las ventanas de estilo de panel con una altura de entre 18'' y 50''.casement-style windows from 18'' to 50'' high.
Panel Longitud de la ventana
1. Que compruebe la longitud de su ventana y elija eltamaño adecuado en la tabla arriba.2. Si la longitud de su ventana necesita más de 2 paneles,hay que utilizar el tornillo de tipo Q para fijarlos después de ajustar la longitud.
Para una ventana abierta de 18”, utilice el panel de ventanillas de ventilación por sí misma
Para una ventana abierta de entre 27'' y 34'' , utilice el panel de ventanillas de ventilación (panel A) y un panel de extensión (Panel C).
Para una ventana abierta de entre 19'' y 26'', utilice el panel de ventanillas de ventilación (panel A) y un panel de extensión(Panel B).
Para una ventana abierta de entre 35'' y 50'', utilice el panel de ventanillas de ventilación y dos paneles de extensión (Panel C y Panel D).

28
Instalación de la ventana
Instale la manguera de escape y el adaptador
3. Adjunte el adaptador de la ventana de escape a la manguerade escape flexible. Gire en sentido antihorario hasta que seasegure de que el bloqueo esté en el lugar adecuado.
A.Equipo de ventana deslizadora B.Adaptador de ventana de escape
A
B
Instalación del aire acondicionado portátil
A.Admisión de aire del vaporizador B.Dummy couplingC.Manguera de escape flexibleD.Admisión de aire del condensador
A
C
B
D
A. Manguera de escape flexible B. Adaptador de ventana de escape
A
B
NOTA: El Producto debe ser usado en compañía del kit de instalación de la ventana de conducto para la refrigeración eficaz.
1. Mueva el aire acondicionado para su mejor ubicación. Véa"Requisitos de ubicación".
2. Estirar el extremo de la manguera. Adjuntar el acople a lamanguera de escape flexible. Girar en sentido antihorariohasta que quede bloqueada en el lugar.
4. Insierte el dummy coupling en la ranura de atrás del aiacondicionado.
5. Deslícelo hacia abajo para sujetar la manguera en su lug .
El equipo de la ventana deslizadora se diseñó para adaptarse a la mayoría de las ventanas verticales y horizontales estándares. Mueva el aire acondicionado para su mejor ubicación. Véase "Requisitos de ubicación".
1. Insierte el adaptador de ventana de escape en la ranura dequipo de la ventana deslizadora.
29
Instalación en las ventanas deslizantes verticales
NOTA:El kit de instalación de ventanas debe ser utilizado junto con las ventanas deslizantes verticales con un ancho de entre 18'' y 50''.
Sello de espuma N(type-shorter adhesivo)
Sello de espuma M (Tipo adhesivo)
E o F
Corte el sello de espuma M(Tipo adhesivo) & N(Tipo-más corto adhesivo ) a la longitud apropiada, y únalo al marco de la ventana.
Corte el sello de espuma A(Tipo no adhesivo) a la anchura de la ventana. Rellene el sello de espuma A entre el vidrio y la ventana para impedir la entrada de aire e insectos.
Instale el soporte de ventana-cierre con un tornillo de tipo E o F como se indica si usted lo necesita.El tornillo E es ideal para ventanas de madera. El tornillo F es ideal para ventanas de metal.
A(Tipo No-adhesivo)
Panel de ventilación
Panel de extensión(si es necesario)
Soporte de Ventana-cierre
Insierte el conjunto del panel de ventanillas, incluídos los paneles de extensión si es necesario en la ventana abierta. Extienda los paneles de extensión si es necesario.

Sello de espuma M (Tipo adhesivo)
E o F
30
Corte el sello de espuma M(Tipo adhesivo) & N(Tipo-más corto adhesivo ) a la longitud apropiada, y únalo al marco de la ventana.
Corte el sello de espuma A(Tipo no adhesivo) a la anchura de la ventana. Rellene el sello de espuma A entre el vidrio y la ventana para impedir la entrada de aire e insectos.
Instale el soporte de ventana-cierre con un tornillo de tipo E o F como se indica si usted lo necesita.El tornillo E es ideal para ventanas de madera. El tornillo F es ideal para ventanas de metal.
Instalación En Ventanas Deslizantes Horizontales
NOTA:El kit de instalación de ventanas debe ser utilizado junto con las ventanas deslizantes horizontales con un ancho de entre 18'' y 50''.
Sello de espuma N(type-shorter adhesivo)
A(Tipo No-adhesivo)
Panel de ventilación
Panel de extensión(si es necesario)
Soporte de seguridad
Insierte el conjunto del panel de ventanillas, incluídos los paneles de extensión si es necesario en la ventana abierta. Extienda los paneles de extensión si es necesario.
31
Para comenzar con el aire acondicionado
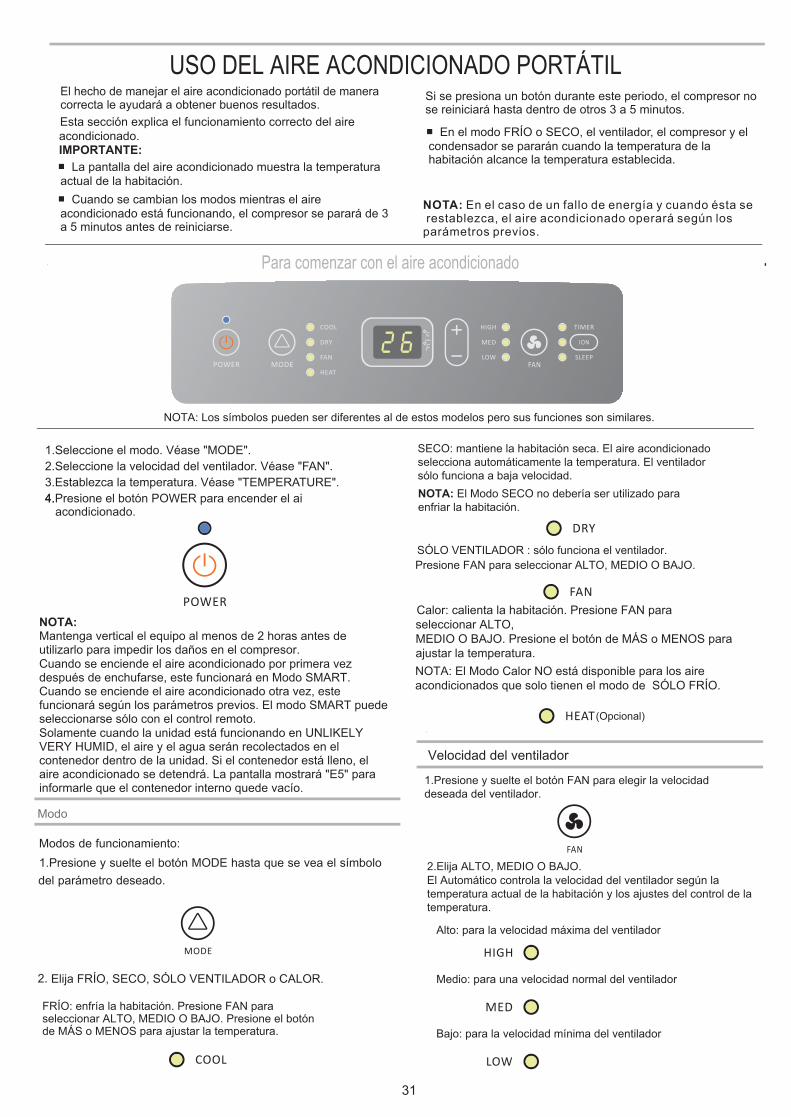
NOTA:Mantenga vertical el equipo al menos de 2 horas antes de utilizarlo para impedir los daños en el compresor.Cuando se enciende el aire acondicionado por primera vez después de enchufarse, este funcionará en Modo SMART. Cuando se enciende el aire acondicionado otra vez, este funcionará según los parámetros previos. El modo SMART puede seleccionarse sólo con el control remoto.Solamente cuando la unidad está funcionando en UNLIKELY VERY HUMID, el aire y el agua serán recolectados en el contenedor dentro de la unidad. Si el contenedor está lleno, el aire acondicionado se detendrá. La pantalla mostrará "E5" para informarle que el contenedor interno quede vacío.
2. Elija FRÍO, SECO, SÓLO VENTILADOR o CALOR.
SECO: mantiene la habitación seca. El aire acondicionado selecciona automáticamente la temperatura. El ventilador sólo funciona a baja velocidad.
FRÍO: enfría la habitación. Presione FAN para seleccionar ALTO, MEDIO O BAJO. Presione el botón de MÁS o MENOS para ajustar la temperatura.
NOTA: El Modo SECO no debería ser utilizado para enfriar la habitación.
SÓLO VENTILADOR : sólo funciona el ventilador. Presione FAN para seleccionar ALTO, MEDIO O BAJO.
Calor: calienta la habitación. Presione FAN para seleccionar ALTO, MEDIO O BAJO. Presione el botón de MÁS o MENOS para ajustar la temperatura.
Velocidad del ventilador
Medio: para una velocidad normal del ventilador
Bajo: para la velocidad mínima del ventilador
2.Elija ALTO, MEDIO O BAJO.El Automático controla la velocidad del ventilador según la temperatura actual de la habitación y los ajustes del control de la temperatura.
Alto: para la velocidad máxima del ventilador
1.Presione y suelte el botón FAN para elegir la velocidaddeseada del ventilador.
NOTA: Los símbolos pueden ser diferentes al de estos modelos pero sus funciones son similares.
NOTA: El Modo Calor NO está disponible para los aire acondicionados que solo tienen el modo de SÓLO FRÍO.
(Opcional)
USO DEL AIRE ACONDICIONADO PORTÁTILEl hecho de manejar el aire acondicionado portátil de manera correcta le ayudará a obtener buenos resultados.Esta sección explica el funcionamiento correcto del aire acondicionado.IMPORTANTE:
■ La pantalla del aire acondicionado muestra la temperaturaactual de la habitación. Cuando se cambian los modos mientras el aire
acondicionado está funcionando, el compresor se parará de 3 a 5 minutos antes de reiniciarse.
■
Si se presiona un botón durante este periodo, el compresor no se reiniciará hasta dentro de otros 3 a 5 minutos.
En el modo FRÍO o SECO, el ventilador, el compresor y el condensador se pararán cuando la temperatura de la habitación alcance la temperatura establecida.
■
NOTA: En el caso de un fallo de energía y cuando ésta se restablezca, el aire acondicionado operará según los parámetros previos.
1.Seleccione el modo. Véase "MODE".2.Seleccione la velocidad del ventilador. Véase "FAN".3.Establezca la temperatura. Véase "TEMPERATURE".4.4.Presione el botón POWER para encender el ai
acondicionado.
Modo
Modos de funcionamiento:1.Presione y suelte el botón MODE hasta que se vea el símbolodel parámetro deseado.
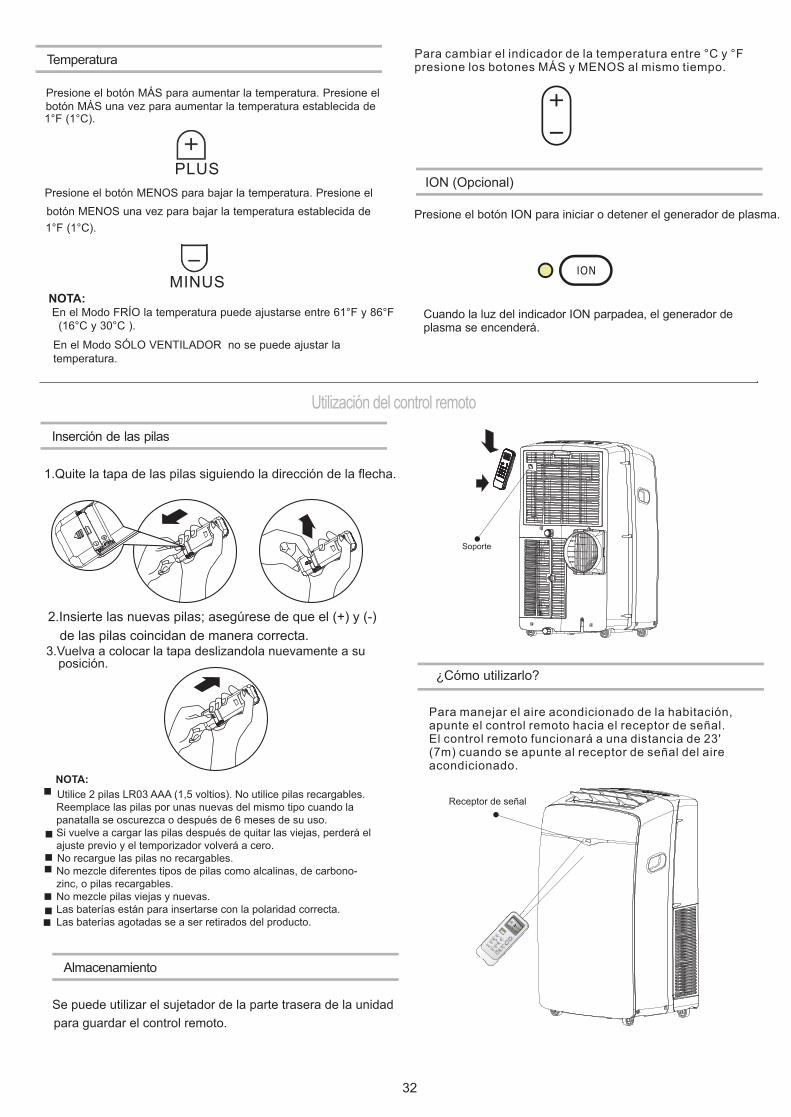
1.Quite la tapa de las pilas siguiendo la dirección de la flecha.
2.Insierte las nuevas pilas; asegúrese de que el (+) y (-)de las pilas coincidan de manera correcta.
3.Vuelva a colocar la tapa deslizandola nuevamente a su
NOTA:
Utilice 2 pilas LR03 AAA (1,5 voltios). No utilice pilas recargables. Reemplace las pilas por unas nuevas del mismo tipo cuando la panatalla se oscurezca o después de 6 meses de su uso.Si vuelve a cargar las pilas después de quitar las viejas, perderá el ajuste previo y el temporizador volverá a cero.No recargue las pilas no recargables.No mezcle diferentes tipos de pilas como alcalinas, de carbono-zinc, o pilas recargables.No mezcle pilas viejas y nuevas.Las baterías están para insertarse con la polaridad correcta.Las baterías agotadas se a ser retirados del producto.
Utilización del control remoto
Inserción de las pilas
Almacenamiento
Se puede utilizar el sujetador de la parte trasera de la unidad para guardar el control remoto.
¿Cómo utilizarlo?
Soporte
NOTA:En el Modo FRÍO la temperatura puede ajustarse entre 61°F y 86°F (16°C y 30°C ).En el Modo SÓLO VENTILADOR no se puede ajustar la
Presione el botón MÁS para aumentar la temperatura. Presione el botón MÁS una vez para aumentar la temperatura establecida de
Presione el botón MENOS para bajar la temperatura. Presione el
1°F (1°C).botón MENOS una vez para bajar la temperatura establecida de
Temperatura
PLUS
MINUS
ION (Opcional)
Presione el botón ION para iniciar o detener el generador de plasma.
Cuando la luz del indicador ION parpadea, el generador de plasma se encenderá.
1°F (1°C).
temperatura.
Para cambiar el indicador de la temperatura entre °C y °F presione los botones MÁS y MENOS al mismo tiempo.
posición.
Para manejar el aire acondicionado de la habitación, apunte el control remoto hacia el receptor de señal.El control remoto funcionará a una distancia de 23' (7m) cuando se apunte al receptor de señal del aire acondicionado.
32
Receptor de señal
ON/OFF
MODE
FAN
SWING
SLP
SUPER
SMART
IFEE L
DIMMER
TIMER ON
TIME
E
R
E
OFF
CLOCK
O OOO
FFNN
FF
■
■
■
■
■
■
■

Símbolos de indicación
Indicador ifeel
El control remoto puede diferir en apariencia. NOTA:
Control remoto.
10
1112
13
14
3
4
ON/OFF
MODE FAN
SWING SLEEP SUPER
SMART IFEEL DIMMER
TIMER ON TIMER OFF CLOCK
ON
OFF
ON
OFF
1
2
6
7
5
8
9
Botones y función
MODO
ENCENDIDO/
SÚPER
RELOJ
IFEEL
SUEÑO
COLUMPIO
INTELIGENTE
ABAJO
UP
VENTILADOR
ON/OFF
MODE
FAN
SWING
SLEEP
SUPERSMART
DIMMER
TEMPORIZADOR TIMER ON
TEMPORIZADOR TIMER OFF
CLOCK
ATENUADOR
IFEEL
Encendido o Apagado
Presione el botón ON/OFF para encender o apagar la unidad
NOTA: Posiblemente el equipo no responderá de inmediato
Espere 3 minutos antes de reiniciar el electrodoméstico.
■
■
cuando sus modos sean modificados durante su
ON/OFF
Modo
Presione el botón MODE varias veces hasta que se vea que el símbolo del parámetro deseado parpadee.
Elija FRÍO, SECO, SÓLO VENTILADOR y CALOR.■FRÍO: enfría la habitación. Presione FAN para seleccionar,
AUTO, ALTO, MEDIO O BAJO.Presione el botón UP o DOWN para ajustar la temperatura.
MODE
NOTE:
Su control remoto puede ser de en lugar de
Símbolos de indicación en la pantalla LCD:
y no puede cambiarse a .
Indicador de enfriamiento
Indicador de seco
Indicador de sólo ventilador
Indicador de calentamiento
Indicador inteligenteIndicador de sueño
Indicador de súper
Velocidad automática de ventiladorVelocidad alta de ventiladorVelocidad mediana del ventilador
Velocidad baja del ventilador
Mostrar el tiempo actual
Transmisión de señal
Mostrar el temporizador ajustado
Mostrar la temperatura ajustada
APAGADO
ENCENDIDO
APAGADO
funcionamiento.
33
1.
2.
SÓLO VENTILADOR : sólo funciona el ventilador. Presione el botón FAN para ajustar la velocidad del ventilador.
NOTA: La velocidad automática del ventilador no se puede seleccionar en el Modo SÓLO VENTILADOR .
Modo SMART
■
■CALOR: calienta la habitación. Presione el botón FAN paraseleccionar la velocidad del ventilador. Presione el botón TEMP hacia arriba o abajo para ajustar la temperatura.
SECO: mantiene la habitación seca. El aire acondicionado selecciona automáticamente la temperatura. El ventilador sólo funciona a baja velocidad. NOTA: El Modo SECO no debería ser utilizado para enfriar la
■
SMART
72°F 22°C ( )
79°F 26°C ( )79°F 26°C ( )
73-79°F 23-26°C ( )
70-73°F 21-23°C ( )
70°F 21°C ( )
23-26°C 73-79°F ( )
23°C 73°F ( ) La temperatura de la habitación disminuye 4°F (2°C) después de funcionar por 3 minutos
El modo de funcionamiento y la temperatura son determinados por la
La temperatura, el flujo de aire y la dirección se controlan automáticamente en el modo SMART. Sin embargo, se puede establecer una dismunición o aumento de 4°F (2°C) en el control remoto si usted todavia no se siente cómodo.
NOTA:
Con modelos de CALOR
Modelos Sólo FRÍO
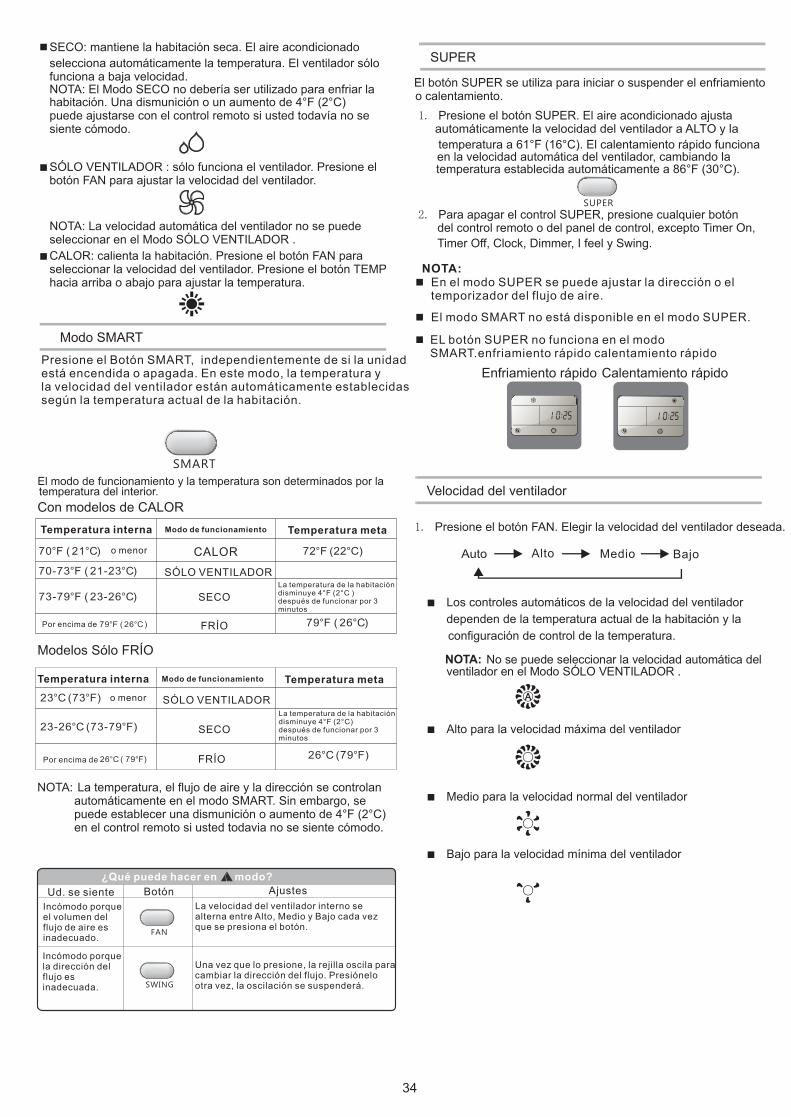
SUPER
El botón SUPER se utiliza para iniciar o suspender el enfriamiento
1. Presione el botón SUPER. El aire acondicionado ajustaautomáticamente la velocidad del ventilador a ALTO y la
2. Para apagar el control SUPER, presione cualquier botón
NOTA:En el modo SUPER se puede ajustar la dirección o el temporizador del flujo de aire.
■
El modo SMART no está disponible en el modo SUPER.■
EL botón SUPER no funciona en el modoSMART.enfriamiento rápido calentamiento rápido
■
SUPER
Calentamiento rápido
ON
OFF
Enfriamiento rápido
ON
OFF
temperatura a 61°F (16°C). El calentamiento rápido funciona
FAN
SWING
Button
■ Alto para la velocidad máxima del ventilador
Velocidad del ventilador
1. Presione el botón FAN. Elegir la velocidad del ventilador deseada.
■ Los controles automáticos de la velocidad del ventiladordependen de la temperatura actual de la habitación y laconfiguración de control de la temperatura.
No se puede seleccionar la velocidad automática del ventilador en el Modo SÓLO VENTILADOR .
■ Medio para la velocidad normal del ventilador
■ Bajo para la velocidad mínima del ventilador
NOTA:
La temperatura de la habitación disminuye 4°F (2°C ) después de funcionar por 3 minutos
habitación. Una dismunición o un aumento de 4°F (2°C) puede ajustarse con el control remoto si usted todavía no se siente cómodo.
26°C 79°F ( ) 26°C 79°F ( )
Presione el Botón SMART, independientemente de si la unidad está encendida o apagada. En este modo, la temperatura y la velocidad del ventilador están automáticamente establecidas según la temperatura actual de la habitación.
temperatura del interior.
Temperatura interna Modo de funcionamiento Temperatura meta
Temperatura interna Modo de funcionamiento Temperatura meta
o menor
o menor
Por encima de
Por encima de
FRÍO
SECO
SÓLO VENTILADOR
SÓLO VENTILADOR
CALOR
FRÍO
SECO
¿Qué puede hacer en modo?
Ud. se siente Botón AjustesIncómodo porque el volumen del flujo de aire es inadecuado.
Incómodo porque la dirección del flujo es inadecuada.
La velocidad del ventilador interno se alterna entre Alto, Medio y Bajo cada vez que se presiona el botón.
Una vez que lo presione, la rejilla oscila para cambiar la dirección del flujo. Presiónelo otra vez, la oscilación se suspenderá.
o calentamiento.
en la velocidad automática del ventilador, cambiando latemperatura establecida automáticamente a 86°F (30°C).
del control remoto o del panel de control, excepto Timer On, Timer Off, Clock, Dimmer, I feel y Swing.
Alto Medio Bajo
34
Temperatura
■ Presione el botón UP para aumentar la temperatura. Presioneel botón UP una vez para aumentar la temperatura establecidade 1°F (1°C).
■ Presione el botón DOWN para disminuir la temperatura.Presione el botón DOWN una vez para disminuir la temperaturaestablecida de 1°F (1°C).
NOTAS:■ La temperatura se puede ajustar entre los 61 (°F y 86°F 16°C y
30°C) en el Modo FRÍO o CALOR.■ La temperatura no se puede establecer En el Modo
SÓLO VENTILADOR .
UP
DOWN
Modo SLEEP
En el modo FRÍO, CALOR o SECO se puede establecer el Modo SLEEP. Esta función le brindará un espacio más confortable a la hora de dormir.
■ En el modo CALOR, la temperatura disminuirá por 6°F (3°C)como máximo por 3 horas, luego se mantendráestable.
1. Presione MODE para seleccionar FRÍO, CALOR o SECO.
NOTA: El control SLEEP no se puede seleccionar cuando losModos SÓLO VENTILADOR o SMART son seleccionados.
2. Presione el botón UP o DOWN para ajustar la temperatura.
3. Presione SLEEP. Luego de 5 segundos, las luces en la pantalladel panel de control se atenuarán.
■ El electrodoméstico dejará de funcionar automáticamente luegode haber funcionado por 8 horas.
■ En el modo FRÍO, si la temperatura actual de la habitación esmenor a 79°F(26°C ), la temperatura aumentará automáticamente 1°F (1°C) durante la primer hora después de que el control de espera esté activado, luego se mantiene igual.Si la temperatura de la habitación es de 79°F(26°C) o más, la temperatura no cambiará.
■
SLEEP
La velocidad del ventilador se ajusta automáticamente a una velocidad baja.
NOTA:
El aire acondicionado volverá a la configuración previa después de que control SLEEP se apague.
4.Para apagar el control de SLEEP, presione SLEEP, MODE, ON/OFF, FAN, SUPER o espere 8 horas para que el control se apague automáticamente.
NOTA: La temperatura y la dirección del flujo de aire se pueden ajustar durante el control SLEEP. La velocidad del ventilador se ajusta automáticamente a una velocidad baja. Luego de 5 segundos, las luces en la pantalla del panel de control se atenuarán nuevamente.
NOTA:
I FEEL
El sensor de la temperatura en el control remoto está activado. Éste puede percibir la temperatura del medio y transmitir la señal a la unidad,cuando el mando a distancia apunta hacia el acondicionador de aire.La unidad puede ajustar la temperatura para brindarle un máximo confort.
Si Presiona el botón I FEEL durante 5 segundos, la
transmisión de la señal en la pantalla desaparecerá, la función
I FEEL será descartada.
■ La configuración predeterminada I FEEL está activada.
■
NOTA:
IFEEL
DIMMER
Presione el botón DIMMER para apagar la luz y la pantalla de la unidad.
■ Cuando la luz esté apagada, la señal encenderá la luz
NOTA:
DIMMER
■ Presione el botón I FEEL una vez y se activará nuevamente.
nuevamente.
35
TEMPORIZADOR ON/OFF
It is convenient to set the timer with TIMER ON/OFF buttons.
El botón TIMER ON puede ser utilizado para encender la unidad automáticamente a la hora que usted haya elegido.
Para TIMER ON
1.Presione TIMER ON, luego "ON 12:00" aparecerá en la pantalla
2.Presione el botón UP o DOWN para obtener la hora deseadacuando debe iniciarse el equipo.
Presione el botón UP o DOWN una vez para aumentar o disminuir el tiempo ± 1 minuto.
Presione y mantenga el botón UP o DOWN por 2 segundos para aumentar o disminuir el tiempo ± 10 minutos.
Presione y mantenga el botón UP o DOWN por más tiempo para aumentar o disminuir el tiempo en ± 1 hora .
■
■
■
TIMER ON
Aumento
DisminuciónON
NOTA:El CLOCK debe ser establecido antes de usar la función de
Sonidos normalesCuando el aire acondicionado está funcionando de manera normal, usted puede escuchar sonidos como:■ El movimiento del aire desde el ventilador.■ Los clicks del ciclo del termostato.■ Vibraciones o sonidos debido a la mala construcción de la pared
■ Un zumbido agudo o un ruido pulsante causado por el compresormoderno de alta eficiencia cuando el ciclo se inicia o termina.
4. Luego de que el tiempo deseado haya aparecido por 5 segundos, el reloj se mostrará en la pantalla de LCD del control remoto en lugar del tiempo deseado.
SWING
NOTA:
El flujo de aire se ajusta automáticamente al ángulo según el■
■
modo de funcionamiento después de encender la unidad.La dirección del flujo de aire también puede ajustarse a sus necesidades si presiona el botón SWING.
■ Para evitar daños, no se debe girar manualmente laspersianas de ajuste vertical. Primero se debe apagar launidad y cortar el suministro de energía. Luego, restaurar laenergía para reiniciar las persianas.
SWING
Para cancelar el TIMER ONPresione el botón TIMER ON nuevamente, y escuchará un "bip" y el indicador desaparecerá.El modo TIMER ON ya se ha cancelado.
Semejante al ajuste de TIMER OFF, usted puede hacer que el electrodoméstico se modifique automáticamente a la hora que usted
TIMER OFF
NOTA:
3.Presione el botón CLOCK nuevamente para establecer la hora.
2. Utilice los botones UP y DOWN para seleccionar el tiempo correcto.
Función de reloj
1. Usted puede ajustar la hora presionando el botón CLOCK.
CLOCK
de LCD.
3. Cuando la hora deseada se muestre en el LCD, presione el botón TIMER ON para confirmarla. Escuchará un "bip",y el "ON" dejará de parpadear. El indicador TIMER aparecerá en el electrodoméstico.
estableció.
Presione SWING una vez para cambiar la dirección vertical del flujo de aire. Presione nuevamente para parar la oscilación del flujo de aire en la dirección deseada.
o la ventana.
TIMER.
36

ATENCIÓN DEL AIRE ACONDICIONADO PORTÁTILPara el drenaje del aire acondicionado
A. Tapón de drenaje secundarioB. Tapa de drenaje secundaria C. Tapón de drenaje primario
ADVERTENCIAPeligro: muy pesado
Se necesita dos o más personas para mover e instalar elaire acondicionado.El incumplimiento de eso puede resultar en lesiones de
A
BC
D
D. Tapa de drenaje principal
Limpieza del filtro de aire
A.A.Puerta del panel del filtro de la admisión de aire del evaporador B.A.Puerta del panel del filtro de la admisión de aire del condensador
A
B
Limpieza exterior
Para guardarlo después del uso
espalda u otras.
1.Desenchufe el aire acondionado o desconecte laalimentación.2.Mueva el aire acondicionado para drenarlo en el lugar dedrenaje o afuera. NOTA: Para evitar que se derrame el agua del balde, mueva el aire acondicionado lentamente y manténgalo horizontal.3.Quite el tapón y la tapa de drenaje principal.4.Drene completamente el agua a través del agujero dedrenaje.NOTA: Si se guarda el aire acondicionado luego del uso, véase "Para guardarlo después del uso".5.Vuelva a colocar el tapón de drenaje primario en el agujerode drenaje.6.Vuelva a colocar la tapa de drenaje primaria en el agujerode drenaje.7.Recoloque el aire acondionado.8.Enchufe el aire acondionado o reconecte la alimentación.
1.Presione ON/OFF para apagar el aire acondicionado.2.Desenchufe el aire acondionado o desconecte laalimentación.3.Quite el filtro de aire y límpielo parte por parte. Véase"Limpieza del filtro de aire".4.Limpie la parte externa del aire acondicionado con un pañosuave y húmedo.5.Enchufe el aire acondionado o reconecte la energía.6.Presione ON/OFF para encender el aire acondicionado.
1.Presione ON/OFF para apagar el aire acondicionado.2.Abra la puerta del panel del filtro en la parte trasera del aireacondicionado y quítela.3.Quite el filtro de aire de la puerta del panel del filtro.4.Quite el tornillo de la puerta del panel del filtro de admisiónde aire del condensador para quitar la puerta.5.Quite el filtro de aire de la puerta del panel del filtro.4.Utilice una aspiradora para limpiar el filtro. Si el filtro estámuy sucio, lave el filtro con agua tibia y detergente.NOTA: No laveel filtro en el lavavajillas y no use ningún químico de limpieza.5.Seque el filtro por completo antes de colocarlo para sumáxima eficiencia.6.Vuelva a conectar el filtro de aire a la puerta del panel delfiltro.7.Vuelva a instalar la puerta del panel del filtro y atorníllela.8.Presione ON/OFF para encender el aire acondicionado.
1.Drene toda el agua. Véase "Drenaje del aire acondionado".2.Encienda el aire acondicionado y seleccione SÓLOVENTILADOR por apróximadamente 12 horas para secar el aire acondicionado.3.Desenchufe el aire acondionado.4.Quite la manguera de escape flexible y guárdela junto con elaire acondicionado en un área limpia y seca. Véase "Instrucciones para la instalación".5.Quite el equipo de la ventana y guárdelo junto con el aireacondicionado en un área limpia y seca. Véase "Instrucciones para la instalación".6.Quite el filtro de aire y límpielo. Véase "Limpieza del filtrode aire".7.Limpie la parte externa del aire acondicionado. Véase"Limpieza de la parte exterior".8.Vuelva a colocar el filtro.9.Quite las pilas y guarde el control remoto junto con el aireacondicionado en un área limpia y seca.
37

acondicionado, antes de reiniciarlo.
SOLUCIÓN DE PROBLEMASAntes de llamar al servicio técnico, pruebe las sugerencias que se mencionan a continuación para ver si puede resolver el
El aire acondicionado no funciona
■ El cable de alimentación está desenchufado.Conecte a una toma de 3 terminales con conexión a tierra.Véase "Requisitos eléctricos".
■ Se está utilizando un fusible de acción retardada o undisyuntor con la capacidad errónea.
Reemplace el fusible o disyuntor por uno con la capacidadcorrecta. Véase "Requisitos eléctricos".
■ El cable de almentación se ha disparado (el botónRESET se ha saltado).
Presione y suelte RESET (se escuchará un "clic"; el botónRESET se detendrá y permancerá así) para reanudar el
■ El fusible de la casa se fundió o el disyuntor saltó.
Reemplace el fusible o restablecer el disyuntor. Véase"Requisitos eléctricos".
■ No se presionó el botón ON/OFF.Presione ON/OFF.
■ Laalimentación local falló.Espere a que la alimentación vuelva a restablecerse.
Explotaron los fusibles o saltaron los disyuntores del aire
■ Muchos electrodomésticos utilizan el mismo circuito.Desenchufe o reubique los electrodomésticos que comparten
■ Usted está reiniciando el aire acondicionado en una
fracción de segundo después de haber apagado el equipo.
Espere al menos 3 minutos después de apagar el aire
El aire acondicionado sólo funciona por un período corto de tiempo pero la habitación no se encuentra fresca.
■ Establezca la temperatura que sea similar a la de la habitación.
Baje el ajuste de temperatura. Véase "Uso del aire
■ El aire acondiconado se encuentra en una habitación muypoblada o allí hay electrodomésticos en uso que emiten calor.
■ El aire acondicionado actual reemplazó a un modelo viejo.
El uso de componentes más eficientes puede provocar que el aireacondicionado funcione mucho más que un modelo anterior peroel consumo de energía total es menor. Los aire acondicionadosmás nuevos no emiten la "ráfaga" de aire frío a la emitida por otrosmodelos antiguos que usted ya está acostumbrado . Pero esto nonecesariamente indica una capacidad o eficiencia de enfriamientomenor. Consulte el índice de eficiencia (EER, por sus siglas en
NOTA: No se debe arreglar el cable. El cable de alimentación dañado debe ser reemplazado por uno nuevo, ofrecido por elfabricante.
Cable de alimentación del aire acondicionado (el botón RESET salta)
■ Las alteraciones en la corriente eléctrica pueden alterar(el botón RESET salta) el cable de alimentación.
Presione y suelte RESET (se escuchará un "clic"; el botónRESET se detendrá y permancerá así) para reanudar el
■ La sobrecarga eléctrica, el calentamiento, enganche delcable o el tiempo pueden alterar (el botón RESET saltado)el cable de alimentación.
Luego de corregir el problema, presione y suelte RESET (seescuchará un "clic"; el botón RESET se detendrá y permanceráasí) para reanudar el funcionamiento. Si el cable de alimentaciónfalla cuando se reinicia, llame a la asistencia técnica.
Parece que el aire acondicionado funciona demasiado
■ ¿Hay algunas puertas o ventanas abiertas?Mantenga las puertas y ventanas cerradas.
■ Usted ha cambiado de modo.
Espere al menos 3 minutos después de apagar el aireacondicionado y antes de reiniciarlo.
Visualización del código de error
■ Si la unidad muestra el código de error E5, la unidad está
Si la unidad muestra el código de error E1/E2/E3/E4/EA,
llena de agua. Debería drenar el agua, véase "Drenaje del
aire acondicionado". Después del drenaje, puede poner el
■
contacte al servicio al cliente.
Riesgos de descarga eléctrica
Conecte con una toma de 3 terminales con conexión a tierra.
No quite el terminal con conexión a tierra.
No utilice un adaptador.
No utilice un cable de extensión.
El incumplimiento de estas instrucciones puede causar la muerte, incendios o choques eléctricos.
ADVERTENCIA
problema sin ayuda externa.
funcionamiento.
acondicionado
el mismo circuito.
funcionamiento.
inglés) y el índice de capacidad (en Btu/h) indicado en el aire
Utilice los ventiladores de la ventilación de escape cuandouno está cocinando o bañándose e intente no utilizarelectrodomésticos que emitan calor durante el tiempo máscaluroso del día. Los aire acondicionados portátiles estándiseñados como refiregeración suplementaria para áreaslocalizadas dentro de una habitación. Se necesita unacapacidad de aire superior del aire acondicionado segúnel tamaño de la habitación.
acondicionado.
acondicionado portátil".
equipo en funcionamiento nuevamente.
38

El aire acondicionado funciona pero no enfría
■ El filtro está sucio u obstruido por residuos.Limpie el filtro.
■ La salida del aire está bloqueada.Despeje la salida del aire.
■ La temperatura establecida es demasiado alta.Baje la temperatura.
El ciclo de encendido y apagado del aire acondicionado
■ El aire acondicionado no está medido correctamente para
Verifique las capacidades de enfriamiento del aire
Los aire acondicionados portátiles están diseñados como refiregeración suplementaria para áreas localizadas dentro
■ El filtro está sucio u obstruido por residuos.
Limpie el filtro.■ Hay excesivo calentamiento o humedad (debido a la
cocina, duchas, etc.) en la habitación.
Utilice un ventilador para que el calor y la humedad de lahabitación desaparezcan. Trate de no utilizarelectrodomésticos que emitan calor durante el tiempo máscaluroso del día.
■ Las rejillas están bloqueadas.
Instale el aire acondicionado en un lugar donde las rejillasestén libres de cortinas, persianas, muebles, etc.
es excesivamente largo
su habitación.
acondicionado portátil.
de una habitación.
39
40
GARANTÍA
1. Todas las piezas no de Hisense, incluyendo los accesorios proporcionados porterceros y/o suplementos.
2. Servicio de reparaciones para corregir la instalación del Producto, instrucción de métodode uso del Producto, reemplazo de fusibles de casa o restablecimiento de interruptoresautomáticos, reemplazo o corrección de cableado de casa.
3. Servicio de reparaciones relacionado con el uso del producto para propósito distinto aluso doméstico normal y en sola familia.
4. Daños en cualquier tiempo como resultado de accidentes, alteraciones, usoindebido, abuso, incendio, inundaciones, actos de Dios, instalación incorrecta,instalación no de acuerdo con los códigos eléctricos o de plomería, o el uso de losproductos/accesorios no aprobados por Hisense por escrito.
5. Servicio de reparaciones fuera de EE.UU, las Islas Vírgenes, Guam y Puerto Rico.
Esta garantía, brindada por Hisense U.S.A. Corporation (en adelante "Hisense") cubre el Aire
Acondicionado Portátil (en adelante "Producto") en Estados Unidos, Puerto Rico, Guam y las Islas
Vírgenes de EE.UU., excluyendo cualquier accesorio y/o complementos de terceros comprados por
separado. Esta garantía deberá aplicar solamente cuando el Producto se compre, almacene,
transporte, maneje, opere y mantenga según las instrucciones adjuntas o suministradas en el
Producto brindadas por Hisense. Hisense, a su criterio exclusivo, reparará o dará un reembolso
considerando los defectos únicamente por materiales o mano de obra, a criterio de Hisense, para el
período limitado de la garantía de:
PARA AIRES ACONDICIONADOS DE 8K BTU Y 10K BTU:
Dos(2) años por Piezas y Mano de Obra del Producto desde la fecha de compra (se requiere
el recibo de la compra), solo para el comprador original.
PARA AIRES ACONDICIONADOS DE 12K BTU Y 14K BTU:
Dos(2) años por Piezas y Mano de Obra, a domicilio, del Producto desde la fecha de compra
(se requiere el recibo de compra), solo para el comprador original; y tres (3) años por Piezas
del compresor* desde la fecha de compra (se requiere prueba de la compra), solo para el
comprador original.(*No incluye el evaporador, condensador, secador, tubo de conexión y otras partes, que están excluidas en esta garantía).
GARANTÍA DEL FABRICANTE LIMITADA DE DOS AÑO
El uso comercial o el arriendo de este Producto no están cubiertos por esta garantía.QUÉ NO CUBRE:

41
Las obligaciones para servicios y piezas bajo esta garantía deberán ser ejecutadas por Hisense o una empresa de servicio autorizada por Hisense. Las características o especificaciones del producto como se describen o ilustran están sujetas a cambios sin previo aviso.
RENUNCIA DE GARANTÍAS IMPLÍCITAS: LIMITACIÓN DE REMEDIOS
Exclusiones y limitaciones: Esta Garantía cubre los defectos manufactureros del material oel arte de producción encontrados en el uso normal y no comercial del Producto, y no cubrela instrucción del consumidor, la entrega, la instalación, el establecimiento, los ajustes, el daño cosmético o el daño causado por actos de naturaleza, accidente, uso indebido, abuso, negligencia, uso comercial o modificación de o a cualquier pieza del Producto. Esta Garantía sólo se aplica al consumidor original y no cubre los Productos vendidos a los consumidores en uso, en condición de “TAL CUAL” o “CON TODOS LOS DEFECTOS” , o los consumibles (p.ej., fusibles, baterías, bombillas, etc.). Esta Garantía será inválida si el número de serie aplicado por la fábrica ha sido alterado o retirado desde el Producto. El daño producido a cualquier Producto devuelto para servicio que es causado por los peligros ambientales, embalaje o envío inadecuado o inseguro por el comprador o consumidor original está excluido desde la cobertura de esta Garantía. Esta Garantía sólo es válida en EE.UU, las Islas Vírgenes de EE.UU, Guam y Puerto Rico, y sólo se aplica a los Productos comprados y servidos en estas regiones. La Garantía será anulada si el consumidor o cualquier tercera parte NO autorizada por Hisense por escrito intenta reparar el Producto.
NO HAY GARANTÍAS EXPRESAS DISTINTAS DE LAS EXPRESAMENTE DESCRITAS
ANTERIORMENTE, Y NO GARANTÍA, YA SEA EXPRESA O IMPLÍCITA, INCLUYENDO, PERO SIN
LIMITARSE A, CUALQUIER GARANTÍA IMPLÍCITA DE COMERCIABILIDAD O APTITUD PARA
UN PROPÓSITO PARTICULAR, SE APLICARÁ DESPUÉS DEL PERÍODO DE GARANTÍA
EXPRESA DICHO ANTERIORMENTE, Y NINGUNA OTRA GARANTÍA EXPRESA O GARANTÍA
DADA POR CUALQUIER PERSONA, EMPRESA O ENTIDAD CON RESPECTO AL PRODUCTO
SERÁ OBLIGATORIA PARA HISENSE. ESTA GARANTÍA ES LA ÚNICA Y EXCLUSIVA
GARANTÍA CON RESPECTO AL PRODUCTO Y HISENSE ES EL PROVEEDOR EXCLUSIVO DE
GARANTÍA PARA EL PRODUCTO. REPARACIÓN O EL REEMBOLSO, A LA SOLA DISCRECIÓN
6. Servicio o soporte para las unidades como resultado de las modificaciones noautorizadas hechas al Producto.
7. Recogida y entrega. Este producto está diseñado para su reparación o reemplazosolamente.
8. Embalaje para el producto.9. Daños causados por servicios ejecutados por el dueño, las empresas de servicio no
autorizadas por Hisense por escrito, el uso de las piezas distintas a las piezas genuinasde Hisense, o las piezas obtenidas desde las entidades distintas a las empresas deservicio autorizadas por Hisense.

42
Si necesita asistencia, véase la sección “Solución de Problemas” primero para su manual de instrucciones. Después de verificar “Solución de Problemas”, podrá solicitar la ayuda adicional cuando llame a :
Hisense-USA: 1-877-465-3566 (Inglés & Español, lunes–viernes 9 a.m. a 6 p.m. EST)
Guarde esta página de Garantía y los recibos de ventas juntos para la referencia futura. Hay que proporcionar el comprobante de compra para el servicio de garantía.
Escriba la información siguiente de su aparato para la asistencia o el servicio cuando necesario. Necesitará saber el modelo completo y número de serie. Puede encontrar esta información en la etiqueta de modelo y número de serie ubicada en el Producto.
Nombre de tienda:______________________Número de modelo:_____________________________
Dirección:_____________________________Número de serie:________________________________
Número telefónico:______________________Fecha de compra:_______________________________
PÁGINA DE APOYO DE GUÍA DE USUARIO
ASISTENCIA O SERVICIO
Antes de llamar para asistencia o servicio, por favor verifique la sección de solución de problemas de su manual de usuario. Eso puede ahorrar su costo de llamada de servicio. Si todavía necesita ayudas, siga las instrucciones siguientes. Antes de llamarnos, por favor recuerde la fecha de compra y el modelo completo y el número de serie de su aparato. Esta información nos ayudará a responder mejor a su solicitud. Si necesita pedir las piezas de repuesto, le recomendamos que utilice solamente las piezas de repuesto especificadas por la fábrica. Las piezas de repuesto especificadas por la fábrica se adaptarán bien y funcionarán bien debido a que ellas son hechas con la misma precisión utilizada para fabricar cada uno y todos los aparatos nuevos.
El Centro de Llamada de Hisense puede proporcionar las asistencias de:
■ Características y especificaciones de nuestros aparatos
■ Información de instalación
DE HISENSE, ES EL RECURSO EXCLUSIVO DEL CONSUMIDOR. HISENSE NO SERÁ
RESPONSABLE DE NINGÚN DAÑO INCIDENTAL O CONSECUENTE CAUSADO POR EL USO,
MAL USO O INCAPACIDAD DE USO DEL PRODUCTO. A PESAR DE LO ANTERIOR, LA
RECUPERACIÓN DE LOS CONSUMIDORES CONTRA HISENSE NO EXCEDERÁ EL PRECIO DE
COMPRA DEL PRODUCTO VENDIDO POR HISENSE. ESTA GARANTÍA NO SE EXTIENDE A
CUALQUIER PERSONA QUE NO SEA EL CONSUMIDOR ORIGINAL QUE COMPRÓ EL
PRODUCTO Y NO ES TRANSFERIBLE BAJO NINGUNA CIRCUNSTANCIA. El COMPROBANTE
DE COMPRA ES REQUERIDO POR TODAS LAS RECLAMACIONES DE GARANTÍA.
43
Para la asistencia futura
Si necesita ayuda adicional, puede escribir sus cuestiones o preocupaciones a: Hisense USA Corp. Servicio al Cliente PO Box 3289 Suwanee, GA 30024 EE.UU Por favor, incluya un número de teléfono de día en su correspondencia.
REGISTRO DEL PRODUCTO Para proteger mejor su producto, por favor inicie sesión en
www.hisense-usa.com/support/productReg.asp para registrar su producto
Beneficios de Registro del Producto:
Actualización del Producto
El registro adecuado permitirá que Hisense se ponga en contacto con usted para las notificaciones de seguridad, actualizaciones, accesorios u otras modificaciones del Producto.
Comprobante de Posesión
En caso de cualquier pérdida causada por accidentes tales como el incendio, inundación o robo, su registro servirá como su comprobante de compra.
Mejor Servicio
Si tiene cualquier cuestión sobre su nuevo producto de Hisense, su registro nos ayudará a atenderle mejor.
■ Procedimientos de uso y mantenimiento
■ Ventas de piezas de reparación
■ Referencias de empresas de servicios
■ Los técnicos de servicio designados son capacitados para cumplir con el servicio de garantía de producto y proporcionar servicio después del período de garantía en cualquier lugar dentro de EE.UU y territorios de EE.UU


