Download - Laundry Print Manual

Operators ManualThermal Printing SystemRev: LP-Thermal 2008
26 Carham Road, Hoylake, Wirral, England0151 632 3464
www.wader.co.uk

Laundryprint Operators Manual
Please Read First
Your new Laundryprint system will come with a Ribbon already installed.Ensure that you only use the special Wader Thermal fast ribbon, this product has been laundry wash tested.
The phrase “Form” in this manual refers to a Label layout.
Extracts contained in this booklet have come from the OEM enclosed on CD within this system package. All logos and trademarks are property of the respective owners.
Notes on the two CD’s enclosed with your system . These discs have been included with your system for reference only.*On the CD’s you will find the two PDF manuals for your printer and Keyboard, these are handy as they include “How To” movies e.g. Installing a ribbon, tape etc. There is also software on these disc’s that can be used to program the printer, design & print labels via a personal computer, we urge caution when using these programs as a incorrect label layout sent via PC will have a global effect on all stored label formats and you may find that when you then try to use the stand alone keyboard and printer the labels do not print out correctly. (Your warranty with Wader Labelling Systems may also be void)
When using the Laundryprint in standalone setup (As supplied by Wader Labelling Systems) i.e. just keyboard and printer these discs are not required for actual label printing.
2

Laundryprint Operators Manual
Starting To Print a Label
Once the Laundryprint has been connected to the power supply and you have checked that a ribbon and tape are installed correctly (see pages 5 & 6) you can now begin to print a label.Stored within the printer are numerous standard label layouts that you can access, enter text & then print. At the end of this manual are detail of the layouts stored within the Laundryprint system and will give you an idea of how the printed label will look sizes, fonts etc (see example 1).
If you have specified a custom designed layout these will be stored in the printer as well (samples and the form name will be enclosed).
Example 1
When you switch on the screen of the Keyboard will display as below…
For label printing we are only concerned with the first two options the F2 & FORM KEY.
F2 by pressing this key the printer will list all the stored label formats
FORM KEY.Press this key and the display will ask you to enter the name of the Form/ Label you wish to print.
To load the Example 1 label above simply type W6 and press the ENTER key.
3
W6
Please Note:
Form (Label) names are case sensitive. Upper case lettering is the default
Ribbon & TapeInstalled?

Laundryprint Operators Manual
It will now ask you for the text in the label to be printed i.e.
The screen displays the prompt “Line 1” and you will notice that the cursor is flashing under the text waiting for you to enter you label text.
For this example we want the first line of the label to say “Another Hospital” so just simply type that in and press the ENTER key. (See below).
Now the screen prompts you for the second line of the label
For this example enter “WARD 30” followed by the ENTER key.
Repeat this procedure for all the lines available to that particular layout you have selected.When all the label lines are complete the screen will prompt you for the quantity to be printed.
ENTER you quantity to be printed and press ENTER
The labels should now be printed and cut.
4
Line 1_
Line 1ANOTHER HOSPITAL _
Line 2_
Line 2WARD 30 _
Number of label sets1_

Laundryprint Operators Manual
Once the labels have been printed the screen displays the first line of the label again with the previous text you have entered, in this example it is …
** If you do not wish to print any more labels using this current design or for any other reason press EXIT or ESC to go back to the main menu and select a new form.
Let’s say you want to keep this line just press ENTER.
Now the second line of the label will be displayed i.e.
WARD 30
You want this line to be Ward 28 this time so simply type in
WARD 28 press ENTER.
Carry on this procedure until the label data is complete. (Just like you did when you first entered the label)
Put the quantity in and press ENTER, as before and the printer starts printing again.
** To select a different label layout press the ESC or EXIT key to go to the main menu where you can retrieve a different form / label.
Note: Some of the larger size 5 type fonts are upper case characters only.
5
Line 1ANOTHER HOSPITAL _
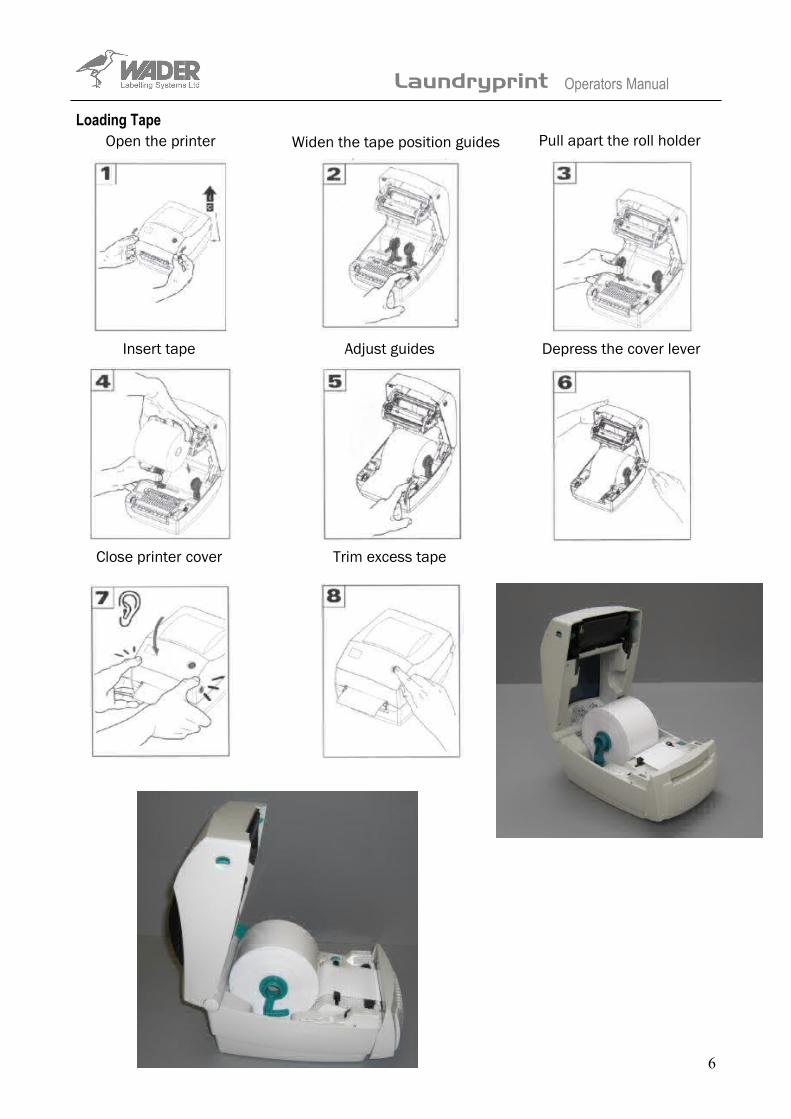
Open the printer Widen the tape position guides Pull apart the roll holder
Insert tape Adjust guides Depress the cover lever
Close printer cover Trim excess tape
Laundryprint Operators Manual
Loading Tape
6

Laundryprint Operators Manual
Ribbon Installation
7

Laundryprint Operators Manual
Adding a new ribbon
If the ribbon runs out in the middle of a print job, the indicator lights RED and the printer waits for you to add a new ribbon.
Keep the power on as you change the ribbon. Open the top cover, and then cut the used ribbon so that you can remove the core. Load the new ribbon roll. (see ribbon installation tips) Close the printer cover. Press the Feed button to restart the printer.
Replacing a Partially used transfer ribbon.
Cut the ribbon from the take –up roll. Remove the take-up roll and discard the used ribbon. Remove the supply roll and tape the end of any fresh ribbon to prevent it from unwrapping, When reinstalling a partially used supply roll, tape the cut end onto the empty take up roll.
Problem Solving
8

Laundryprint Operators Manual
Label Retainer.This item is fitted to stop smaller size labels getting pulled back into the printer.
To fit the label retainer strip….• Ensure that the area you are sticking the retainer is clean & free from dust etc.• Peel the self adhesive backing off• Align the lower edge of the self adhesive tape to the upper edge of the cutter tape exit. (See picture).• The clear plastic flap should bend outward to the front of the printer / Cutter (see picture).
9
Lower edge of self adhesive tape aligned to upper cutter exit.
Label exit direction
Retainer Flap bends outward in the same direction as the label is exiting the printer

Laundryprint Operators Manual
10
W1
Form Names Of Standard Installed Label Layouts 80mm Wide. Please Note depending when your system was delivered label designs may differ.
W2
W6W5
W4W3
W7
W11
W8
W9 W10
W12
W13 W14

Laundryprint Operators Manual
11
W15
W19
W18
W16
W17
W20


