Bruce Lambert 3-2007 [email protected] www.fighterkitecentral.com
MAKING YOUR FIRST FIGHTER KITE
‘GOODDOG’
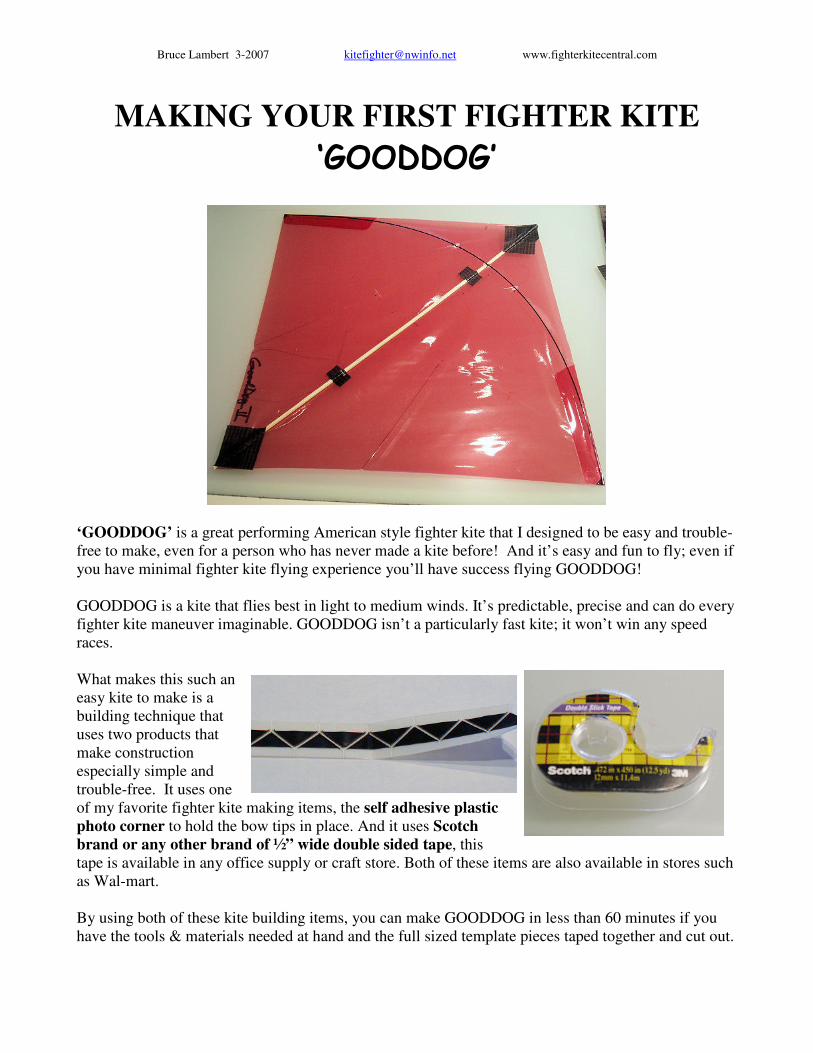
‘GOODDOG’ is a great performing American style fighter kite that I designed to be easy and trouble-
free to make, even for a person who has never made a kite before! And it’s easy and fun to fly; even if
you have minimal fighter kite flying experience you’ll have success flying GOODDOG!
GOODDOG is a kite that flies best in light to medium winds. It’s predictable, precise and can do every
fighter kite maneuver imaginable. GOODDOG isn’t a particularly fast kite; it won’t win any speed
races.
What makes this such an
easy kite to make is a
building technique that
uses two products that
make construction
especially simple and
trouble-free. It uses one
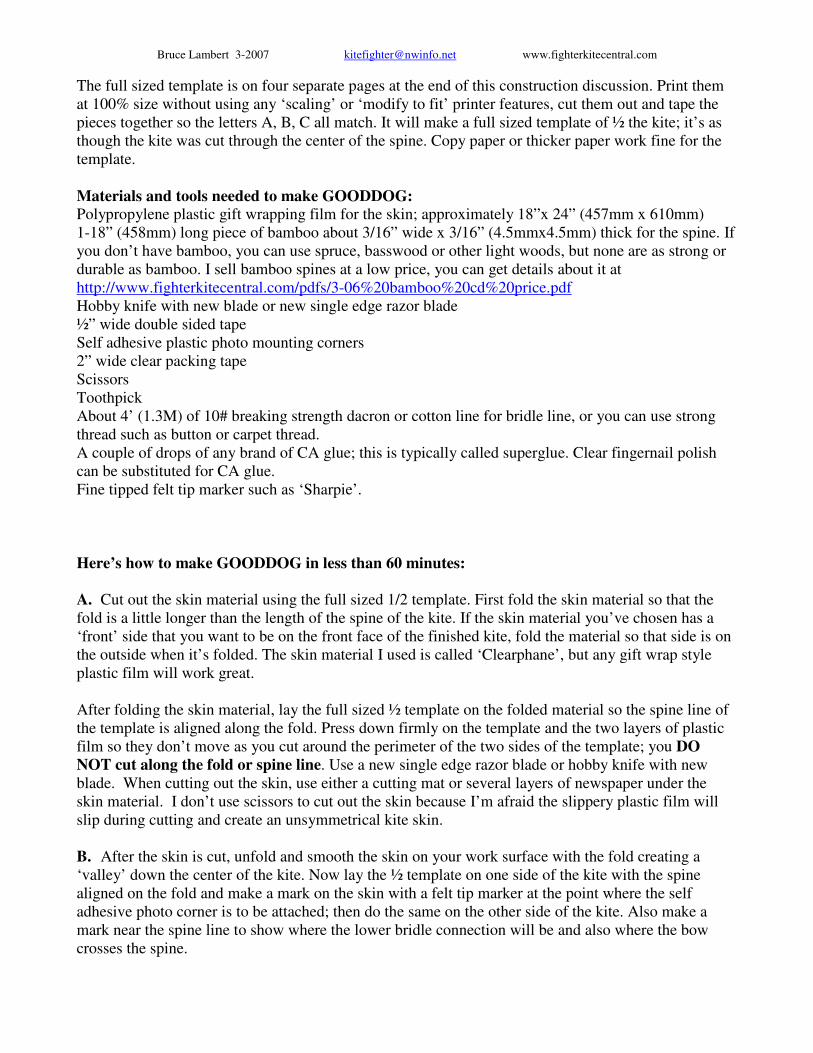
of my favorite fighter kite making items, the self adhesive plastic
photo corner to hold the bow tips in place. And it uses Scotch
brand or any other brand of ½” wide double sided tape, this
tape is available in any office supply or craft store. Both of these items are also available in stores such
as Wal-mart.
By using both of these kite building items, you can make GOODDOG in less than 60 minutes if you
have the tools & materials needed at hand and the full sized template pieces taped together and cut out.
Bruce Lambert 3-2007 [email protected] www.fighterkitecentral.com
The full sized template is on four separate pages at the end of this construction discussion. Print them
at 100% size without using any ‘scaling’ or ‘modify to fit’ printer features, cut them out and tape the
pieces together so the letters A, B, C all match. It will make a full sized template of ½ the kite; it’s as
though the kite was cut through the center of the spine. Copy paper or thicker paper work fine for the
template.
Materials and tools needed to make GOODDOG:
Polypropylene plastic gift wrapping film for the skin; approximately 18”x 24” (457mm x 610mm)
1-18” (458mm) long piece of bamboo about 3/16” wide x 3/16” (4.5mmx4.5mm) thick for the spine. If
you don’t have bamboo, you can use spruce, basswood or other light woods, but none are as strong or
durable as bamboo. I sell bamboo spines at a low price, you can get details about it at
http://www.fighterkitecentral.com/pdfs/3-06%20bamboo%20cd%20price.pdf
Hobby knife with new blade or new single edge razor blade
½” wide double sided tape
Self adhesive plastic photo mounting corners
2” wide clear packing tape
Scissors
Toothpick
About 4’ (1.3M) of 10# breaking strength dacron or cotton line for bridle line, or you can use strong
thread such as button or carpet thread.
A couple of drops of any brand of CA glue; this is typically called superglue. Clear fingernail polish
can be substituted for CA glue.
Fine tipped felt tip marker such as ‘Sharpie’.
Here’s how to make GOODDOG in less than 60 minutes:
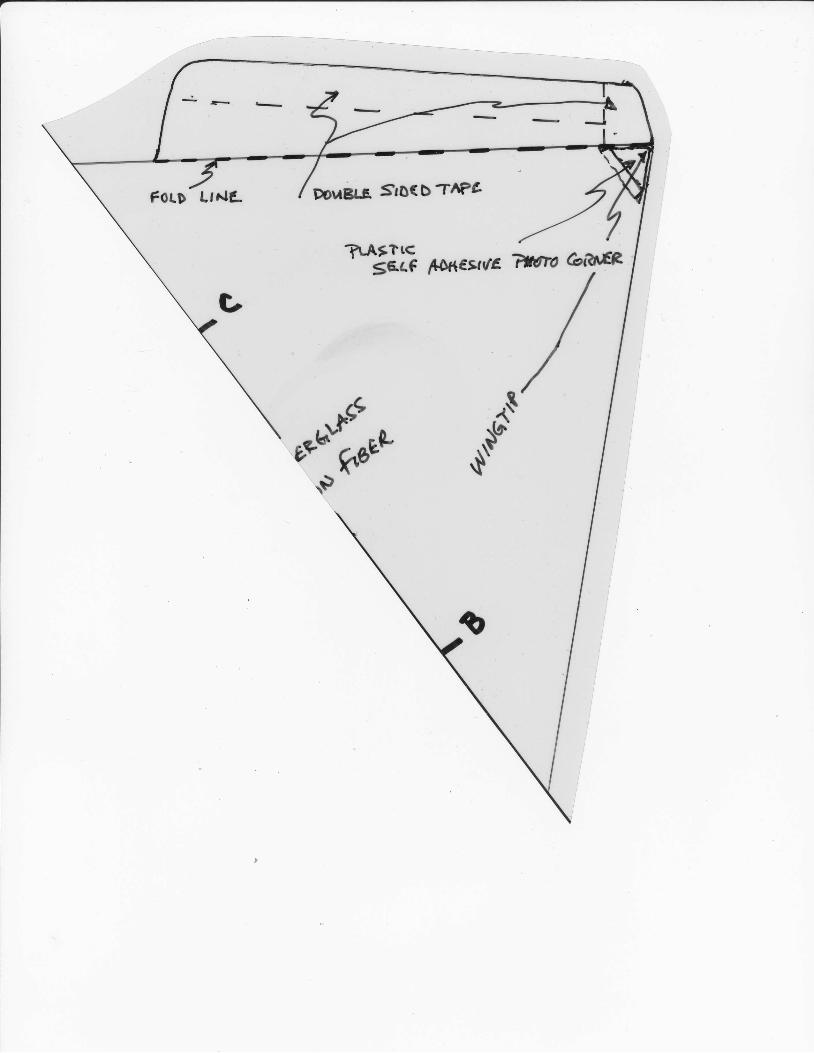
A. Cut out the skin material using the full sized 1/2 template. First fold the skin material so that the
fold is a little longer than the length of the spine of the kite. If the skin material you’ve chosen has a
‘front’ side that you want to be on the front face of the finished kite, fold the material so that side is on
the outside when it’s folded. The skin material I used is called ‘Clearphane’, but any gift wrap style
plastic film will work great.
After folding the skin material, lay the full sized ½ template on the folded material so the spine line of
the template is aligned along the fold. Press down firmly on the template and the two layers of plastic
film so they don’t move as you cut around the perimeter of the two sides of the template; you DO
NOT cut along the fold or spine line. Use a new single edge razor blade or hobby knife with new
blade. When cutting out the skin, use either a cutting mat or several layers of newspaper under the
skin material. I don’t use scissors to cut out the skin because I’m afraid the slippery plastic film will
slip during cutting and create an unsymmetrical kite skin.
B. After the skin is cut, unfold and smooth the skin on your work surface with the fold creating a
‘valley’ down the center of the kite. Now lay the ½ template on one side of the kite with the spine
aligned on the fold and make a mark on the skin with a felt tip marker at the point where the self
adhesive photo corner is to be attached; then do the same on the other side of the kite. Also make a
mark near the spine line to show where the lower bridle connection will be and also where the bow
crosses the spine.
Bruce Lambert 3-2007 [email protected] www.fighterkitecentral.com
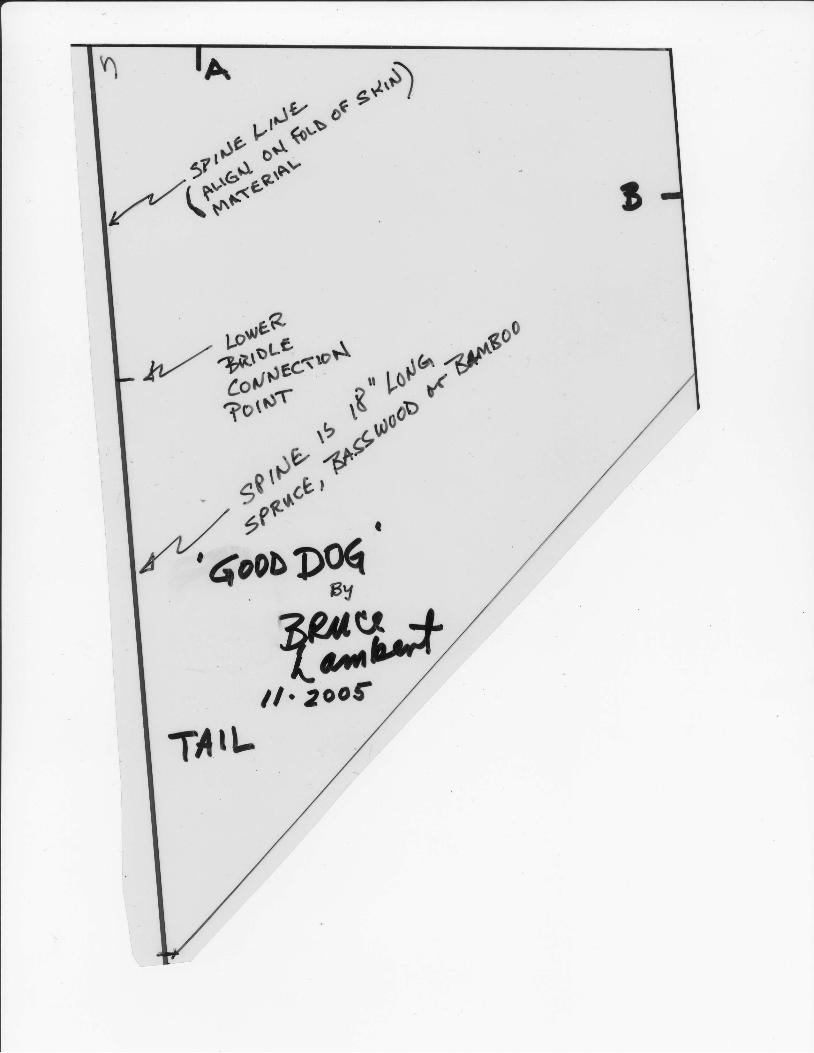
C. Cut a bamboo spine to length; 18” long. The bamboo I used is one of the bamboo spines I sell. I
did nothing to it but to cut it to length and straightened it a little. I tried to make the bamboo spine as
straight as possible before installing into the kite.
Sight down the spine’s length to determine if or where it needs to be straightened, then with your
hands, warm that area and bend it so it is straighter. The spine I installed in this kite wasn’t perfectly
straight when I installed it and the kite flies great anyway.
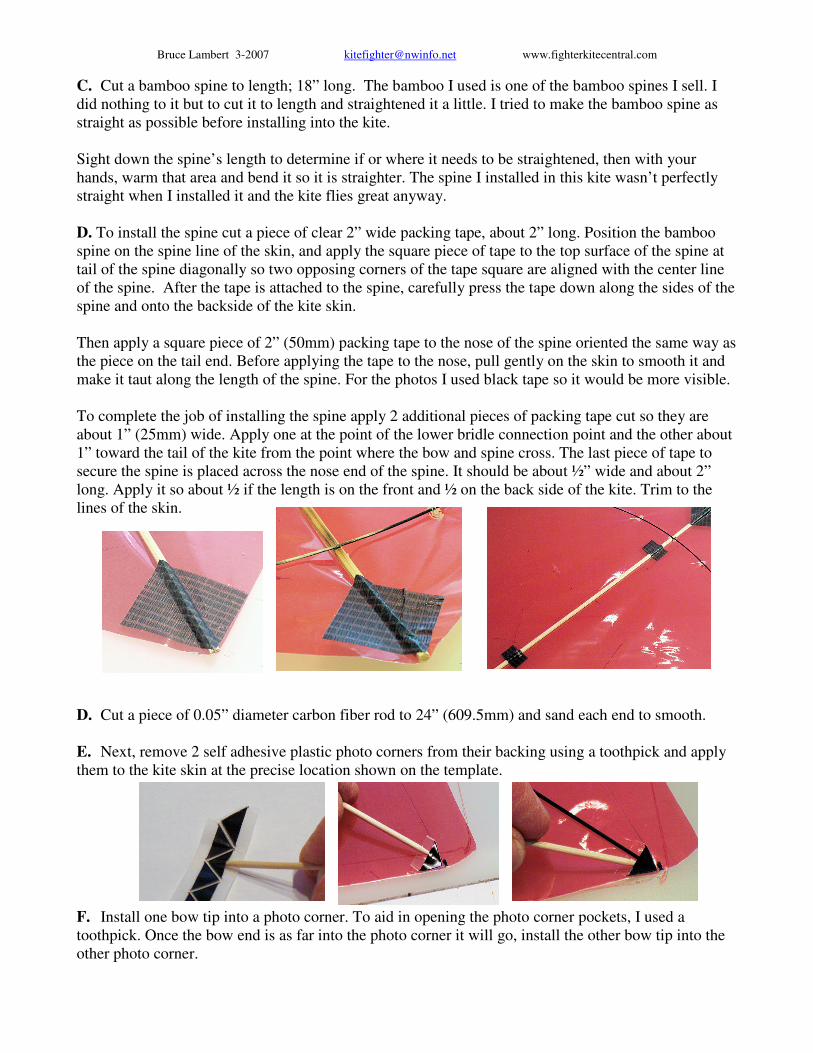
D. To install the spine cut a piece of clear 2” wide packing tape, about 2” long. Position the bamboo
spine on the spine line of the skin, and apply the square piece of tape to the top surface of the spine at
tail of the spine diagonally so two opposing corners of the tape square are aligned with the center line
of the spine. After the tape is attached to the spine, carefully press the tape down along the sides of the
spine and onto the backside of the kite skin.
Then apply a square piece of 2” (50mm) packing tape to the nose of the spine oriented the same way as
the piece on the tail end. Before applying the tape to the nose, pull gently on the skin to smooth it and
make it taut along the length of the spine. For the photos I used black tape so it would be more visible.
To complete the job of installing the spine apply 2 additional pieces of packing tape cut so they are
about 1” (25mm) wide. Apply one at the point of the lower bridle connection point and the other about
1” toward the tail of the kite from the point where the bow and spine cross. The last piece of tape to
secure the spine is placed across the nose end of the spine. It should be about ½” wide and about 2”
long. Apply it so about ½ if the length is on the front and ½ on the back side of the kite. Trim to the
lines of the skin.
D. Cut a piece of 0.05” diameter carbon fiber rod to 24” (609.5mm) and sand each end to smooth.
E. Next, remove 2 self adhesive plastic photo corners from their backing using a toothpick and apply
them to the kite skin at the precise location shown on the template.
F. Install one bow tip into a photo corner. To aid in opening the photo corner pockets, I used a
toothpick. Once the bow end is as far into the photo corner it will go, install the other bow tip into the
other photo corner.
Bruce Lambert 3-2007 [email protected] www.fighterkitecentral.com
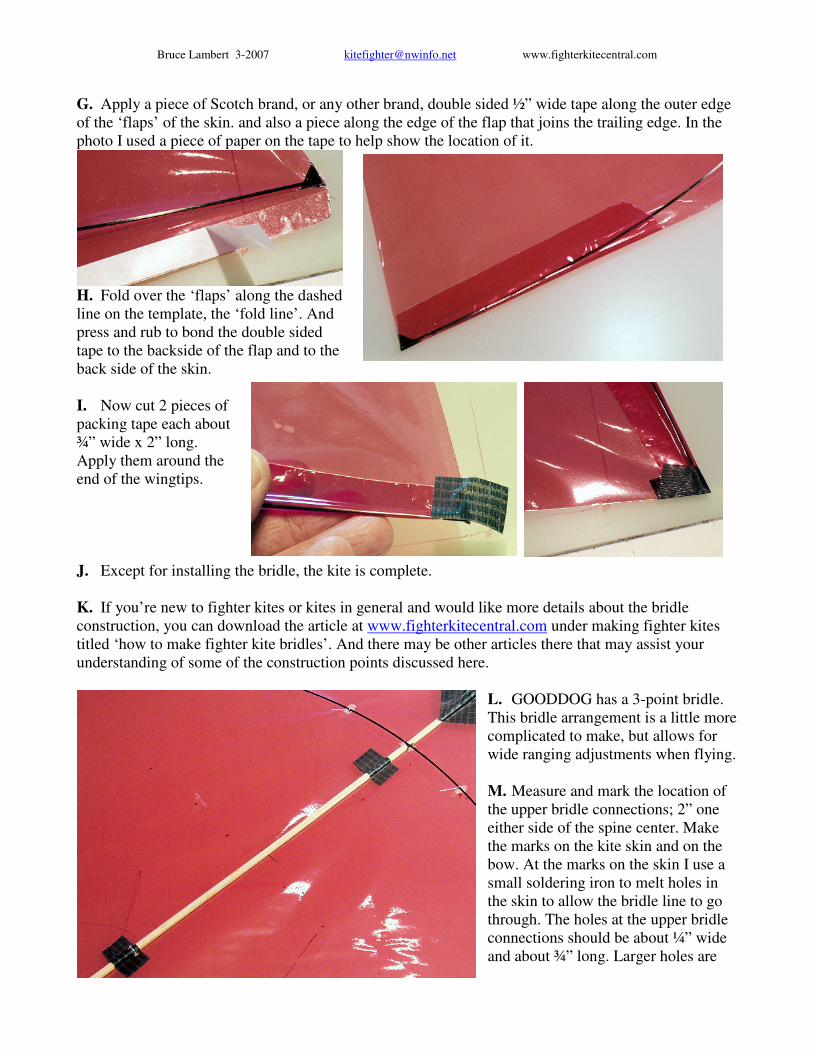
G. Apply a piece of Scotch brand, or any other brand, double sided ½” wide tape along the outer edge
of the ‘flaps’ of the skin. and also a piece along the edge of the flap that joins the trailing edge. In the
photo I used a piece of paper on the tape to help show the location of it.
H. Fold over the ‘flaps’ along the dashed
line on the template, the ‘fold line’. And
press and rub to bond the double sided
tape to the backside of the flap and to the
back side of the skin.
I. Now cut 2 pieces of
packing tape each about
¾” wide x 2” long.
Apply them around the
end of the wingtips.
J. Except for installing the bridle, the kite is complete.
K. If you’re new to fighter kites or kites in general and would like more details about the bridle
construction, you can download the article at www.fighterkitecentral.com under making fighter kites
titled ‘how to make fighter kite bridles’. And there may be other articles there that may assist your
understanding of some of the construction points discussed here.
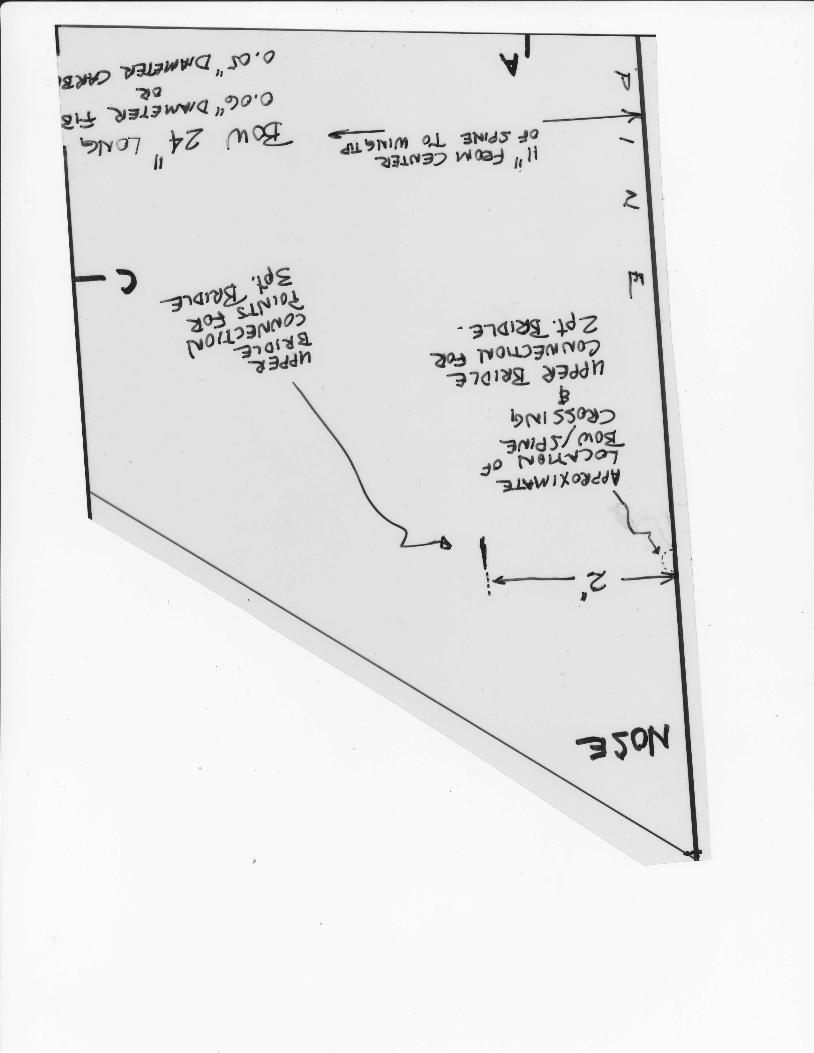
L. GOODDOG has a 3-point bridle.
This bridle arrangement is a little more
complicated to make, but allows for
wide ranging adjustments when flying.
M. Measure and mark the location of
the upper bridle connections; 2” one
either side of the spine center. Make
the marks on the kite skin and on the
bow. At the marks on the skin I use a
small soldering iron to melt holes in
the skin to allow the bridle line to go
through. The holes at the upper bridle
connections should be about ¼” wide
and about ¾” long. Larger holes are
Bruce Lambert 3-2007 [email protected] www.fighterkitecentral.com
also fine. And when you’ve got the soldering iron hot, melt a small hole on either side of the spine at
the lower bridle connection point where you earlier made a mark; you will be melting through the tape
and kite skin. I make the hole reasonably large so the bridle doesn’t get snagged on the skin during
flight. And also for the 3-point bridle I melted a hole on either side of the spine at the lower bridle
connection point as indicated on the template.
(ALTERNATE) If you don’t have a soldering iron or wood burning iron available, you can place a
piece of tape about 1” wide x 2” long on the back side of the skin and under the bow at these marks.
Then thread a needle with your bridle line to allow you to pierce the kite skin plus the tape with the
needle to get the bridle line from the front of the kite to the back. Do the same on the lower bridle
connection point.
N. First install the upper bridle yoke. Cut a piece of bridle line about 14” long, poke one end from the
front of the kite through the kite skin, around the bow and back out the hole to the front of the kite. Tie
a double half hitch or any knot that will securely hold. Now do the same thing with the other end of the
line at the other upper bridle connection point. At this point you should have a loop or yoke of line on
the front side of the kite with each end going through the skin and tied to the bow. Now slide the knots
on the bow to the marks on the bow and put a drop of CA, superglue, on the bow and line at each of
the upper bridle yoke connection points. Let the glue dry and then trim off the tail ends of the line so
there is about 1/4” or so remaining.
O. Now cut a piece of bridle line about 30” long for the
lower bridle line. Fold over about 6” of the line at one end
and tie an overhand knot to form a loop about 2-1/2” long
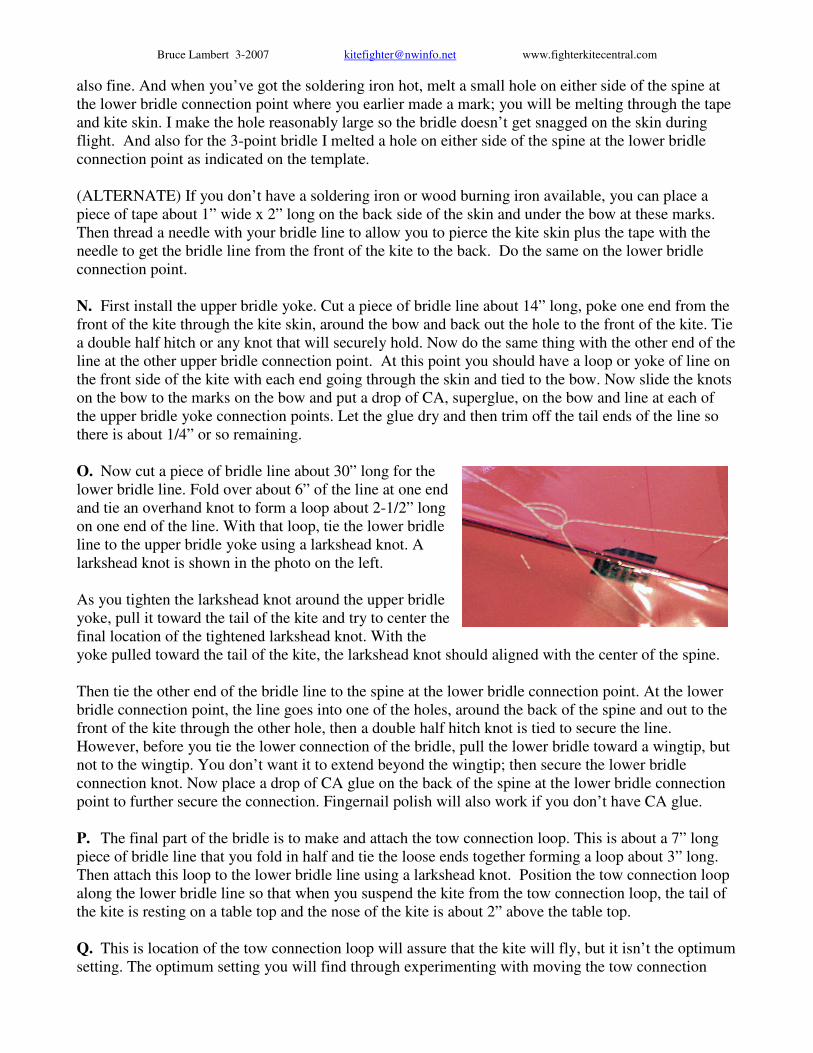
on one end of the line. With that loop, tie the lower bridle
line to the upper bridle yoke using a larkshead knot. A
larkshead knot is shown in the photo on the left.
As you tighten the larkshead knot around the upper bridle
yoke, pull it toward the tail of the kite and try to center the
final location of the tightened larkshead knot. With the
yoke pulled toward the tail of the kite, the larkshead knot should aligned with the center of the spine.
Then tie the other end of the bridle line to the spine at the lower bridle connection point. At the lower
bridle connection point, the line goes into one of the holes, around the back of the spine and out to the
front of the kite through the other hole, then a double half hitch knot is tied to secure the line.
However, before you tie the lower connection of the bridle, pull the lower bridle toward a wingtip, but
not to the wingtip. You don’t want it to extend beyond the wingtip; then secure the lower bridle
connection knot. Now place a drop of CA glue on the back of the spine at the lower bridle connection
point to further secure the connection. Fingernail polish will also work if you don’t have CA glue.
P. The final part of the bridle is to make and attach the tow connection loop. This is about a 7” long
piece of bridle line that you fold in half and tie the loose ends together forming a loop about 3” long.
Then attach this loop to the lower bridle line using a larkshead knot. Position the tow connection loop
along the lower bridle line so that when you suspend the kite from the tow connection loop, the tail of
the kite is resting on a table top and the nose of the kite is about 2” above the table top.
Q. This is location of the tow connection loop will assure that the kite will fly, but it isn’t the optimum
setting. The optimum setting you will find through experimenting with moving the tow connection
Bruce Lambert 3-2007 [email protected] www.fighterkitecentral.com
loop up or down a little at a time and test flying the kite after each change. Then decide which of the
positions makes the kite fly best for you.
R. IMPORTANT LAST STEP Before flying the GOODDOG, put a slight bend in the spine. The
bend should start about 6” from the nose of the kite and should continue to the nose. The amount of
bend isn’t very critical, but it must have some bend or the kite will not behave like a fighter kite that
you’d enjoy flying. The way I put the bend in the spine is to put the front face of the kite against my
stomach and press gently but firmly with my fingers on the back of the spine starting at about 6”
toward the tail from the nose of the kite; and then at about 5” from the nose; and then at about 4” from
the nose, etc. I press hard enough so the spine pushes into my stomach about ½” or so. The
combination of heat from my body and the pressure of my fingers on the back of the spine are enough
to create the needed rocker shaped bend.
Your new GOODDOG is now ready to fly and enjoy!
ADJUSTING YOUR GOODDOG TO FLY STRAIGHT
Adjusting a fighter kite to fly straight that has a 3-point bridle, like the GOODDOG has is easy. All it
takes is a little experimenting while you are out flying.
Here’s what to do:
If the kite always veers or spins to the right, for example, it means you need to move the larkshead
knot on the upper bridle yoke to the left. Move it only the smallest amount and fly the kite to notice the
change. Continue with this adjustment until the kite is flying straight.
If the kite is always veering or turning to the left, move the larkshead knot to the right a small amount.
BigGrins,
Bruce
www.fighterkitecentral.com
q rA sjQ
,Jv - o(Vt Z^Vv
I - \ ? - - J ' -
I E'.I*r :.""
,wTirL
E
t/ ,#t"s'*"-;olfoii,*r 1b lr*"
-
'rrlr$?
'syv? %nn:":^'':
Eh! >tiJ hNQ,'9o'o
i in"r uYZ $& Iil-'lgn*'l.Hi;,l
l -a l n -
Lv t?
arr4.r?P,irr0{s,B aitnZ)r,,tOE"'irt$=iTun
'er<rrU[L')iaz"Brl,'fft[:tr'
ItlCrt 55,0D)
,r=$€#fr=r*w,Ior/dv
I'r-3
?trot'f


