
Microsoft Word: Steps To Success (The Bare Essentials)
Workbook byJoyce Kirst2005

Microsoft Word: Step to Success (The Bare Essentials)
Page Contents___________________________ 1 Starting Word 2 Save 3 Exit 5 Toolbars, Alignment, Line Spacing 6 Open 7 Print 8 Close a File without Exiting 9 New File
10 Select Text 11 View/Zoom 12 Fonts and Format Painter 14 Undo 15 Cancel 16 Spell Check 17 Line Spacing & Alignment 19 Margins 20 Cut, Copy, Paste 22 Thesaurus 23 Show/Hide Codes & Word Count 24 Find & Replace Text 25 Pictures 27 Bullet & Number Lists 28 Tables 29 Page Numbers (Headers/Footers) 30 Columns 31 Help! 32 Organizing Files 34
E-Mail a File
36-37 Glossary

Microsoft Word: Steps to Success (The Bare Essentials)
Introduction This workbook presents a brief overview of Microsoft Word’s most basic functions. As you will see, most commands can be completed in a number of ways: l Clicking your mouse on an icon (picture) l Using the keyboard l Choosing an action from a pull-down menu l Sometimes right-clicking on the screen
I designed the book with YOU in mind. For example, if you prefer not to use a mouse, keyboard commands are included. If you have trouble reading standard-sized print, you’ll notice that larger print was used throughout the text. The book is available in alternate formats upon request . And if you need step -by -step directions, this book is for you! When you come to class I will show you many bonus commands, short-cuts, and tricks to make your work even easier in Word. In the meantime, happy computing!
- Joyce Kirst

+ Underlined letter activates pull-down menu.
Starting Word Keyboard
Begin typing here
1
Pull-Down Menu
Mouse Click an icon to perform an action
To Start Word: 1. Press CTRL + ALT + Delete 2. Click in the User Name box (ALT + U). Type your
Login Name, press TAB. 3. Type your personal password, press Enter. 4. Click the WORD Icon in the Task Bar or
Double click WORD Icon on the Desktop or Click START>Programs>MS Office>Word or Use the Keyboard: Press CTRL + ESC>P>Right arrow, then arrow down to MS Office>Right arrow, then arrow down to Word
5. Begin Typing
To move to next sectionof dialog boxKeyboard

KeyboardSave
Pull-Down MenusMouse
+
Usually Choose Save.Use Save As to change
A file’s name or location.
To Save and Continue:1. Click File , 2. Choose A Drive: Click Down Arrow by SAVE IN box, then on A: in list. Or type A: before your title.3. In the FILE NAME box, type a TITLE (Word will add “.doc”)4. Click SAVE or Press ENTER.
NOTE: You may save as often as you wish.
or Press ALT + F Click Save or Press S.or Click Save Icon or Press Ctrl + S.
Choose 3½Floppy (A:) Drive
Type a Titleor Filename
2

KeyboardSave & Exit
Pull-Down MenusMouse
+
3

Save & Exit (cont.)
To Save and Exit:1. Click File , 2. Word will ask if you want to save your document.3. Click YES, or Press Y, or ENTER to save.4. Choose A Drive: Click Down Arrow by SAVE IN box, then on A: in list.5. In the FILE NAME box, type a TITLE (Word will add “.doc”) To use the file in Windows 3.1, limit title to 8 letters.6. Click OK or Press ENTER.
or Press ALT + F Click Exit or Press X.or Click X in Upper Right Corner or Press ALT F4.
4

Ne
wOp
en
Sa
veP
rin
t Pre
vie
wSp
ell
Cu
tCo
py P
ast
e
Fo
rma
tP
ain
ter U
nd
oR
ed
o
Tab
les/
He
lpIn
sert
Tab
le
Co
lum
ns
Sh
ow
/H
ide
Zo
om
Fo
nt N
am
eS
ize
Bo
ld
Ita
licU
nd
erlin
e
Alig
n L
eft
Ce
nte
r Rig
ht
Ju
stify LLLiiinnn
eee S
pa
cin
g
Nu
mb
er
Lis
t
Bu
llet L
ist
Hig
hlig
ht
Fo
nt C
olo
rToolbarsS
TA
ND
AR
D T
OO
LB
AR
FO
RM
AT
TIN
G T
OO
LB
AR
NO
TE
: A
ll a
ctiv
itie
s p
erf
orm
ed
by c
lickin
g ico
ns o
n a
to
olb
ar
can
als
o b
e c
om
ple
ted
usin
g th
e k
eyb
oa
rd, fo
r e
xa
mp
le:
Alig
nm
en
t S
ho
rtcu
tsL
ine
Sp
ac
ing
Sh
ort
cu
tsC
ente
r
Ctrl +
ELe
ft
C
trl +
LRig
ht
Ctrl +
RJu
stify
(Fu
ll)
Ctrl +
J
Sing
le S
pa
ce
Ctrl +
1D
oub
le S
pa
ce
C
trl +
21
and
½ S
pa
ce
Ctrl +
5
5

KeyboardOpen
Pull-Down MenuMouse
+
6
To Open an Existing File:1. Click File, then Open or click the Open Icon (CTRL + O).2. In the Look In box (Alt + i), Click the down arrow, then click on the drive where the file is located. (Press down arrow, then arrow up or down to drive).3. If necessary, double click a folder to find your file. (Press Enter to open a folder)4. Click on the file to open (arrow to file). 5. Click OPEN (press Enter)

KeyboardPrint
Pull-Down MenuMouse
+
Printing a Document:1. Click on File, then Print, or click the Print Icon (Ctrl + P).2. Select the Page Range (usually ALL).3. Select the Number of Copies (usually 1).4. Click OK or press Enter.
Note: In BC labs, you must use your GADES card To pay for printing (10 cents per page)
7Use Print Preview determine number of pages

Keyboard
MousePull-Down Menu
Close
Close
Closing a Document without Closing Word:1. Click on File, then Close (ALT+F, C).2. A dialog box asks whether you want to save changes. .3. Click Yes (Y or Enter) to save.4. If you have not yet saved the document, the Save As dialog box appears.5. In the “Save In” box (Alt + I), click down arrow, click A: (Use down arrow on keyboard, press Enter on A:)6. Press TAB or click in “File Name” box.7. Type a name for your document 8. Click SAVE (ALT + S or Enter).
8
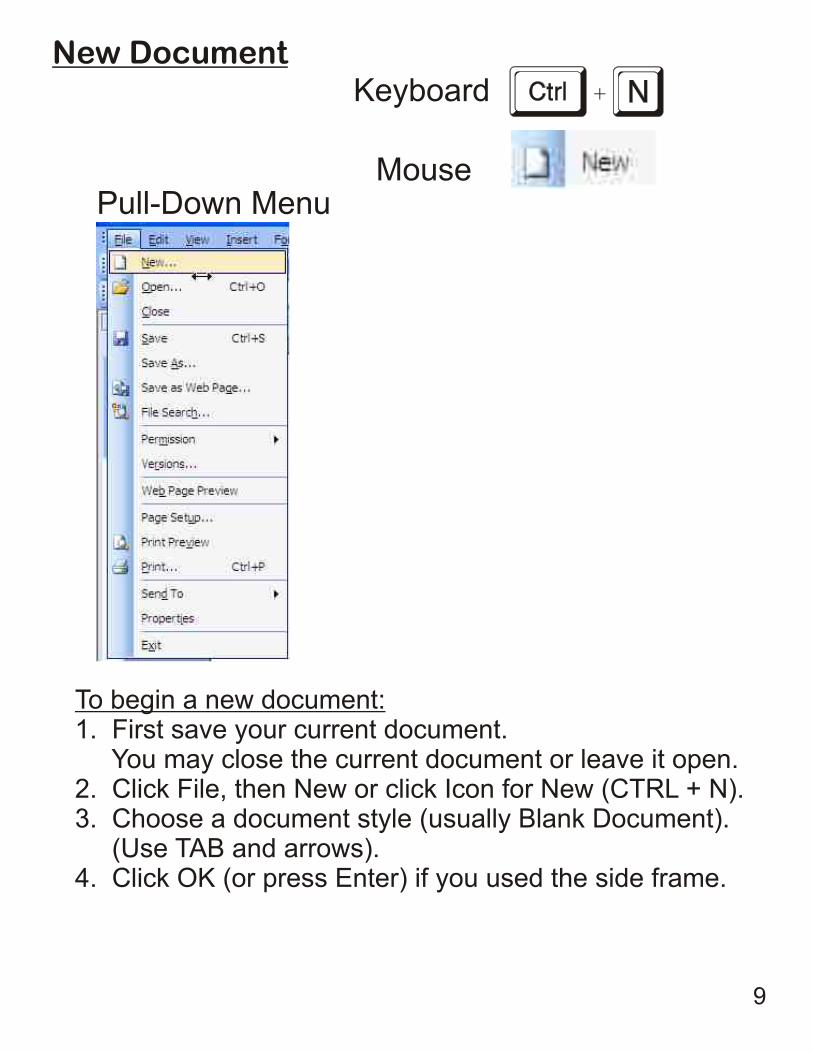
KeyboardNew Document
Pull-Down MenuMouse
+
To begin a new document:1. First save your current document. You may close the current document or leave it open.2. Click File, then New or click Icon for New (CTRL + N).3. Choose a document style (usually Blank Document). (Use TAB and arrows).4. Click OK (or press Enter) if you used the side frame.
9

SHORTCUTS FOR SELECTING TEXT
To Select: Do This:
A Word Double-click it, or place cursor before or after the word, then hold Shift + arrow right or left over the word.
A Line Click in the left margin by the line, or place cursor at the beginning of the line, then hold Shift + END.
Many lines Drag mouse down lines or left margin, or hold Shift while arrowing down or over lines.
A Paragraph Triple-click it, or double-click left margin by the paragraph, or place cursor at the beginning of the paragraph, then hold CTRL + Shift + Down Arrow.
Some Text Click at beginning of text, hold Shift, then click at the end of the text to be selected, or place cursor at the beginning of the text to be selected, then Shift + arrows
From Cursor to End - CTRL + Shift + End
A Document CTRL + click left margin, or triple-click left margin, or choose EDIT, SELECT ALL, or press CTRL + A.
Selecting Text
10

KeyboardView/Zoom
Pull-Down MenuMouse
+
Changing the View (Zooming in and out):1. Click on View then Zoom, or click on the arrow beside the viewing percent identified on the standard toolbar (ALT+V, Z).2. Click on a desired zoom level (in dialog box use arrows to move among options, press Enter or click OK).3. Or type a zoom percentage into the percent box.Note: Zoom will not affect printout size.
11

Pull-Down Menu
KeyboardFont Changes
+
Mouse
12
Keyboard
Format/Font

Font Changes (Cont.)
Changing Font Size and Style:1. Select Text to be changed or set font before typing.2. Click on Format, then Font (ALT+O, F) or Right-click on text, then click on Font.3. Click in or tab to boxes to change Font, Style, Size, Underlining, Color, etc.4. Notice how your text will look in the Preview box.5. Click OK or press Enter when finished.6. QUICK METHOD: Select text, then Click font name, size, or style icons
Bonus:
13
Format Painter1. Place your cursor in the text that has the formatting you want to copy.2. Click Format Painter Icon (Ctrl + Shift + C), then select the text where you want to apply the formatting (Ctrl + Shift + V).
Tip: To copy the target formatting to several locations, double-click Format Painter. Click the icon again or press ESC when you’re finished.
Copies the format from a selected object or text and applies it to the object or text you click.

Keyboard +
Mouse
Undo
Pull-Down Menu
The Undo Command:1. To undo a typing or editing action, click the undo button or click Edit, then Undo (Ctrl + Z).2. To undo more than one action, click the down arrow to the right of the undo button. Click the action(s) in the list to undo. (Ctrl + Z repeatedly)3. To redo an action after undoing it, click the redo button or click Edit, then Redo. (Ctrl + Y) 4. To redo more than one action, click the down arrow to the right of the redo button. Select the number of actions to redo by clicking on the items in the list.
14

Keyboard
Mouse(When available)
Cancel
The Cancel Command:1. In a dialog box where the Cancel button is available, click the Cancel button to close the dialog box without implementing any actions.2. The ESC (escape) key also closes dialog boxes without implementing changes.
Note: If you already clicked OK or Enter, you might be able to undo the action with the Undo Command (see page 14).
15
Cancel

KeyboardSpell Check
MousePull-Down Menu
Spell Checking:1. Click Tools, then Spelling (ALT+T, S) or press F7 2. You’ll see a word in red which may be misspelled3. If it’s correct (i.e.: A proper noun), click ignore (ALT+I). 4. If it’s misspelled, click on a correction in the suggestions box or press tab, then arrow to a correction or correct your error by retyping the word in the top box.5. Click Change (ALT+C)6. When finished, click OK or press Enter.7. Quick Method: Right-click (Shift + F10) on misspelled word, then click or arrow to a correction in the fly-out menu.
16

Keyboard
Pull-Down Menus
MouseRight Click,Then Click onParagraph...
Spacing & Alignment SpacingSingle
Double
1½
Mouse
For step-by-step directions, see page 18.17

Keyboard
Spacing & Alignment (Cont.) Alignment
Mouse
Line Spacing and Alignment:1. Spacing & Alignment may be changed before or after typing text.2. Put cursor in text to be changed.3. Click Format, (ALT+O), or Right-click.4. Click Paragraph or (P).5. Click in box for Alignment or Line Spacing or tab to it.6. Type the first letter of the word you want (eg. L for Left), then press Enter, or click the option.7. Click OK or press Enter.8. If you prefer, use keyboard shortcuts or icon buttons.9. To reveal Formatting, press Shift + F1
Left
Right
Center
Justify
18

MarginsKeyboard
Mouse Click & Drag Ruler’s Margins
+
Pull-Down Menu
Changing Margins:1. Click on File (ALT+F), then Page Setup (U)2. 3. 4. Note: The “Apply to:” box identifies if margins will apply to whole document or from this point forward. 5. Also click Layout Tab (ALT + L). Make sure section start is “Continuous”, not “New Page”.
Type a number for each margin area or use dialsClick from cell to cell or press tab or arrowsClick OK or Press Enter
19

KeyboardCut, Copy & Paste Text
Copy
Paste
Cut
Mouse
Pull-Down Menu
20
Right Mouse Click

Cut or Copy and Paste Text: Step-by-Step1. Select text you want to cut or copy. (See Selecting Text on page 10). 2. Once text is selected, you can: a. Drag it to a new location with your mouse, or
b. Choose EDIT, then CUT or COPY, (ALT+E, T for Cut or C for Copy). Click or arrow to a new location, then choose EDIT, PASTE (ALT+E, P for Paste), or
c. Press CTRL + X for CUT or press CUT Icon. Press CTRL + C for COPY or press COPY Icon. After text is cut or copied into the computer’s memory, click or arrow to a new location where you want the text, then press CTRL + V for PASTE or click PASTE Icon, or
d. RIGHT CLICK and choose CUT or COPY, then PASTE.
NOTE: Once something has been copied or cut into the computer’s memory, you may paste the it multiple times without having to copy or cut it again.
Cut, Copy & Paste Text (cont.)
21

KeyboardThesaurus
Pull-Down Menu
+
Using the Thesaurus1. Move cursor to the target word, choose TOOLS LANGUAGE, THESAURUS (Shift + F7).2. Your target word is in the Search for box, and you see meaning in the Bold with corresponding synonyms below.3. 4.
5. 6. T
Some words even have Antonyms.To find more synonyms, click a word (Tab, then arrow, then
press Enter).To go back to a previous word, click the Back icon (Tab, arrow)o use a new word, click the down arrow to its right, then
choose Insert (Shift + F10 or Right Click Button, I).Note: To switch between active frames in Word, press F6.
22

Keyboard
Mouse
Show/Hide & Word Count+
23
Word Count:
1. For the total number of words in your document and other statistics, click Tools (ALT + T), then Word Count (W).
2. To see the number of words in a portion of your document, select text, the click Tools (Alt + T), Word Count (W).
3. To close the information box, click CLOSE or press ESC.
Show/Hide:
While you view or edit a document, you can displaycharacters - such as tab, spaces, and carriage returns –that don’t appear on the printed page. That way you can easily see if you added an extra space betweenwords, typed spaces instead of a tab, etc.
1. Click the Show/Hide Icon2. To hide the non-printing characters again, click the Show/Hide Icon again.

KeyboardFind & Replace Text
Pull-Down Menu
+
+
24
Finding Text:1. Click on Edit, then Find (CTRL + F).2. Type a word or phrase to find.3. Click Find Next button (ALT + F).4. To find additional instances of the word or phrase, continue to click the Find Next button (ALT + F).Finding & Replacing Text:1. Click on Edit, then Replace (CTRL + H).2. Type a word or phrase to find. Press TAB. Type a replacement in Replace With box.3. Click Replace button (ALT + R).Extra Features:Click the More button (ALT + M). Use check boxes, Format (ALT + O) or Special (ALT + E) buttons if desired.

Keyboard
To Insert a Picture:1. Click on Insert (ALT+), Picture (P), Clip Art (C)I2. On the Clip Art frame, click Organize Clips (F6 to switch between frames, Tab and arrow within frame).3. Click NOW (Alt + N) so Word categorizes clip art.4. Click the + in front of “Office Collections” (Right arrow)5. Clilck on any category (or click + to expand a category). Keyboard -- TAB and Arrows to navigate6. To paste a picture into your document, either drag it or Right click on the picture (Shift + F10), choose COPY (arrow to copy, then press Enter), click in your document (ALT + TAB) and click Paste icon (Alt + V)
Pictures
Pull-Down Menu
Mouse
+
25

To Resize a Picture:1. Insert a picture from the clip art gallery or from a file.2. Click on the picture and see the “handles” appear on all 4 corners and the center of the top and sides.3. Move your cursor over the picture near the corners until the pointer turns into a double arrow.4. Click and drag toward the center to shrink the picture, or away to enlarge it. The picture remains proportional.
Note: If your drag a center handle, the picture will change sizes disproportionately. To restore the picture to its original size, click the last icon (Restore) on the Picture Toolbar.
Pictures (Cont.)Mouse
26
To Move a Picture:1. Insert a picture from the clip art gallery or from a file.2. Right-click the picture, then left click “Format Picture” (or choose the “Format Picture” Icon from the Picture Toolbar).3. Click the “Layout” tab.4. Select “In Front of Text”.5. Click the “Advanced” button.6. On the “Picture Position” tab, deselect the Option: “Move object with text”.7. Click “OK” twice or press Enter twice.8. Click on the picture and drag it anywhere on the page.

KeyboardBullets and Numbering
Pull-Down Menu Mouse
+ 0149
Bullet and Number Lists:1. Click on the icon for Bullets or Numbering before or after typing text. (ALT+0149 for bullets, begin with a 1 for a numbered list.)2. Type text for the first item in the list.3. Press Enter. Word will create another bullet or the next number in the sequence.4. Continue to type, then press Enter for each item. Note: If any items are longer than one line, Word will align them correctly with the previous text.
27
Type a number
5. To start a new line without adding another bullet or number, press SHIFT+Enter.6. After the last item in the list, press Enter, then press backspace or re-click the icon to stop the list.7. To select other bullet or number styles, click Format, then Bullets (ALT + O, N).
Note: Use Format>Paragraph>Line Spacing After to change the amount of space between each item in a list.

KeyboardTables
Pull-Down MenuMouse
+
28
Tables:1. Click Table, Insert, Table (ALT + A, I) or Insert Table Icon.2. Type the number of Columns, press TAB, number of rows, or use dials. Or d
3. Or draw a table: Table, Draw Table (ALT + A, B) or click Tables & Borders Icon. Drag mouse to draw.4. Click from cell to cell or press tab or arrows.5. In a table, press Enter within a cell to enlarge it.6. Drag cell borders to resize them.7. Right-click or use Table menu for more options.
rag mouse over desired number of rows/columns on Insert Table Icon.

Keyboard
Page Numbers (Headers/Footers)
Pull-Down MenuMouse
+
(If available)
Page Numbers (and Header/Footer Info):1. Click on Insert, Page Numbers (ALT + I, U) or Page Numbering Icon if available. Or click View, Header and Footer (Alt+V, H).2. Click or TAB to select Position, Alignment, and whether you want page numbering on the first page.3. Click OK or press Enter.4. To add other Header or Footer information (Titles, Date, etc.), double click on dimmed page number or Click View, Header and Footer (ALT + V, H). A dotted box will appear showing the header or footer.5. Type text (use normal font, size, and alignment tools) or choose from preset options. Click Close (ALT + C).
29

KeyboardColumns
Pull-Down MenuMouse
+
Creating Columns:1. Select text for columns or set columns before typing.2. Click Format, Columns (ALT + O, C) or Columns icon.3. Click or type number of columns. Click OK or Enter.4. In the dialog box you may choose to apply columns to whole document, selected text, or this point forward (Alt + A, then arrow up or down, Enter).5. Dialog box allows you to identify column widths and spacing, and if you want a line between columns.
30

HELP!
Keyboard
Pull-Down MenuMouse
Help - Most dialog boxes have a HELP Icon next to the Exit Icon (F1) - Click the Help icon ? On the Standard Toolbar (F1) - Choose Help, Microsoft Office Word Help. (F1)
Type a word or phrase in the “Search for:” box, Click green arrow to go to that topic. (Enter) - For a list of help topics, click or TAB to Table of Contents.- For the Help Assistant, click Help, Show the Office Assistant (Alt + H, O). Click on the Assistant, then type a question, click Search (Alt + S).
The Help frame will open at the right (F6 switches between frames).
31

Keyboard
Organizing Files (With Windows Explorer)
Pull-Down Menu Mouse
+
(If available)
32

Organizing Files:1. Launch Windows Explorer from START, PROGRAMS, ACCESSORIES, Windows Explorer (CTRL + ESC, P, Right Arrow, then Down Arrow to Explorer), or click the Windows Explorer Icon if available.
2. Click on 3½ Floppy (A:) or use Up or Down Arrows to navigate to your disk. Click in the Right Frame or press TAB to switch to the Right Frame (Shift + Tab returns). You may choose any file in the list by clicking on it or arrowing to it.
3. Double click or press Enter to open any files in right window. This shows the contents of the file. Close the file and return to Windows Explorer.
4. In the folders list (left frame) click on + sign or press right arrow to expand the folder and see sub-folders.
5. Click on FILE (Alt + F) or Right Click (Shift + F10) for a menu of available actions such as delete (D), or rename (M).
6. Follow the directions on screen.
7. To Close Windows Explorer, click the Red X or File, Close (Alt + F, C).
Organizing Files (With Windows Explorer) Cont.
33

34

Sending E-Mail and Attachments
5. Type the Email address of the person you are sending the message to in the To: Box ([email protected]). Press tab.
6. In the Subject Box type a topic. (e.g., Research Project)
7. To attach a File with your E-mail, click on the Attach Files button.
8. Click on Browse Box. Click the down arrow next to Look In, and find the disk or folder for your document (A:)
9. Select your document in the list, and click Open button.
10. Click the Attach button.
11. Click the Compose button to return to the message box.
12. Click in the Message Box area and type your message. Remember to sign your name.
13. Click the Check Spelling button.
14. Scroll to the bottom of the screen and click the Send button. The screen will read Your message has been sent.
15. Click the Continue button. Close the Internet window. Close all windows and log off computer.
35

Glossary Page Topic Keyboard 17-18 Alignment CTRL + L, R, E, J 12-13 Bold CTRL + B
27 Bullets ALT + 0149 15 Cancel ESC
12-13 Changing Fonts ALT + O, F 19 Changing Margins ALT + F, U 11 Changing the View ALT + V, Z 8 Close a File ALT + F, C
12-13 Colored Text Alt + O, F 30 Columns ALT + O, C
20-21 Copy Text CTRL + C 16 Correct Spelling F7
20-21 Cut, Copy, Paste CTRL + X, C, V 20-21 Cut Text CTRL + X
32 Deleting Files Explorer, Delete key 17-18 Double Space CTRL + 2
33 E-Mailing a File Internet 15 Escape, Cancel ESC 2-3 Exit Alt + F, X 24 Find & Replace Text CTRL + F or H
12-13 Fonts ALT + O, F 29 Footers ALT + V, H 13 Format Painter Ctrl + Shift + C or V 26 Graphics ALT + I, P 29 Headers/Footers ALT + V, H 31 Help F1
25-26 Inserting a Picture ALT + I 28 Inserting a Table ALT + A, I
12-13 Italics CTRL + I 17-18 Justify CTRL + J
36

Glossary Page Topic Keyboard 17-18 Line Spacing CTRL + 1, 2, 5
19 Margins ALT + F, U 20-21 Moving Text CTRL + X, V
9 New Document CTRL + N 27 Number Lists 1, 2, 3 6 Open CTRL + O
32 Organizing Files CTRL + Esc, Explorer 29 Page Numbers ALT + I, U 19 Page Setup ALT + F, U
20-21 Paste CTRL + V 25 Pictures ALT + I 7 Print CTRL + P
14 Redo CTRL + Y 32 Renaming Files CTRL + Esc, Explorer 24 Replacing Text CTRL + H 2-3 Save and Exit ALT + F4 10 Selecting Text Shift + Arrows 23 Show/Hide ALT + T, O
17-18 Spacing CTRL + 1, 2, 5 16 Spell Check F7 1 Starting Word CTRL + ESC
28 Tables ALT + A, I 22 Thesaurus SHIFT + F7 5 Toolbars ALT + V, T
12-13 Underline CTRL + U 14 Undo CTRL + Z 11 View ALT + V, Z 23 Word Count ALT + T, W 11 Zoom ALT + V, Z
37


