
71-8079-25012/08
®featuring and
‘Mikado’ 2-8-2Steam Locomotive & Tender
Owner’s Manual
SYSTEM

2
• HightorquePittmanmotor• CommandreverseunitforusewiththeLionelTrainMasterCommandmodelrailroadcontrol
system• Fan-drivensmokegeneratorthatproducesclean,safeandrealisticsmoke• Die-castElectroCoupler(rearoftender)• WirelessTether• OdysseySystemSpeedControl• RailSoundsdigitalsoundsystem• BrilliantHeadlightandMarkerLights• CrewTalk(inCommand)• TowerCom(inCommand)• Tire-Traction• Directionallighting• FireBoxGlow
Youownoneofthemostsophisticatedmodeltrainseverbuilt—theLionelTrainMasterCommandandOdysseySystem-equippedMikado.Fromitshand-appliedscaledetailstothe
advancedtechnologyfoundinside,yourlocomotiveisreadyfordutyonyourmodelrailroadlayout.Experiencethesuperiorityoftoday’sLionel.
Congratulations!
ThefollowingLionelmarksmaybeusedthroughoutthisinstructionmanualandareprotectedunderlaw.Allrightsreserved.
Lionel®, TrainMaster®, Odyssey®, RailSounds®, CrewTalk™, TowerCom™, DynaChuff™, StationSounds™, Pullmor®, ElectroCoupler™, Magne-Traction®, CAB-1® Remote Controller, PowerMaster®, Lionel ZW®, ZW®, PowerHouse®, TMCC®, Lionelville™, Lockon®, Wireless Tether™, LionMaster®, FatBoy™, American Flyer®, TrainSounds™, PowerMax™, LEGACY™, PowerMax™ Plus, Odyssey II™, LEGACY RailSounds™
The name FasTrack® is used with permission from Pitsco, Inc.

3
Table of contents
Transformer operationsRunningyoursteamlocomotivewithaLioneltransformer 4OdysseySystem 5OdysseySystemconventional(transformer)operation 5Lockingyourlocomotiveintoasingleoperationalstate 6Usingyourtender-mountedElectroCouplerinthenon-Commandenvironment 7Yourlocomotive’sRailSoundssystem—thebasics 8Experiencingtherangeofyourlocomotive’sRailSoundssystem 9NotesonRailSounds 9InstallingtheLionelSoundActivationButton 10
TrainMaster Command operationsYourlocomotiveintheTrainMasterCommandenvironment 11RunningyourlocomotiveintheTrainMasterCommandenvironment 12CAB-1commandsforyourlocomotive 12RailSoundsintheCommandenvironment 13CAB-1numerickeypadcommandsforyourlocomotive 14Tuningyourlocomotiveperformance 15Yourlocomotive’sOdysseySystemintheCommandControlenvironment 15AssigningyourlocomotiveanewID# 16ReprogrammingtheCommandreverseunitboardtorestorefeatures 17Maintainingyourlocomotive’shandrailantenna 17
Maintaining and servicing your locomotiveLubricatingyourlocomotive 18Replacingyourlocomotive’slamps 19Replacingyourtender'slamp 20Tire-Traction 21Addingfluidtothesmokegenerator 21Installingthe‘O’gaugefrontcoupler 22Notes 23LionelLimitedWarrantyPolicy&Service 24

Transformer operations
4
Running your locomotive with a Lionel transformer
Place your locomotive on Lionel or Lionel-compatible O-42 or larger track.
•With track power OFF, connectthedrawbarbetweenlocomotiveandtender.That’sallyouhavetodowithLionel’sWirelessTether,aninfraredcommunicationsystemthateliminatestheplugsandwiresofthepast.
NOTE:Yourlocomotiveisdesignedtooperateonminimum0-42diametertrack.
2
3
Power up your locomotive with your transformer.• Your locomotive is designed to operate on 8-18 volts alternating
current. VirtuallyallLionelandLionel-compatiblealternating-currenttransformersaresuitable;werecommendtheTrainMasterCommandmodelrailroadcontrolsystem.
• Do not power your locomotive with direct current (DC).Damagetosensitiveelectroniccomponentsmayoccur.
• When you first power up your track, the locomotive will wait between three and eight seconds asit“listens”fordigitallanguagefromtheTrainMasterCommandBase(availableseparately).Whenit’sdeterminedthatit’sonaconventional(non-Command)railroad,thelocomotiveheadlightwillilluminateandRailSoundswillstartup.Atthispoint,thelocomotiveisinneutral.(Thisoccurswhenplacingthelocomotiveonyourrailroadforthefirsttime.Thereafter,itstartsinforwardaftereverythree-secondpowerinterrupt.)
Note!
Move ‘em out!• Get your locomotive moving. PresstheDIRbuttononyourCAB-1remote
orLioneltransformer.ThissequencestheCommandreverseunittothenextoperatingstate.
• Adjust track voltage untilyourlocomotivemovesatyourdesiredspeed.
1
Figure1.Drawbarconnection

5
Transformer operations
TheOdysseySystemisautomaticallyoperationalwhenyouoperateyourlocomotiveinconventional(non-CommandControl)mode,aslongastheOdysseyswitchisintheON
position(seeFigure2onpage6).Thismeansthatyourlocomotivewillmaintainaconstantspeed,compensatingforgrades,loads,andturns.Simplyuseyourtransformer’sthrottletoadjustthespeedofyourlocomotive.Ifyouwouldliketodeactivatethespeedcontrolfeature,slidetheOdysseyswitchtotheOFFpositionwhilethelocomotiveisnotinmotion.
Inconventionaloperation,thelightsinboththeengineandtenderareconnecteddirectlytotrackpower.Donotexceed14-16voltsforextendedperiods.Doingsowillreducethelifeofyourlamps.
Becauseofthewaythatspeedcontroloperatesinconventionalmode,youwillnoticeaslightdelaybetweenadjustingyourtransformerthrottleandthechangeinthespeedofyourlocomotive.Ifyoudesireinstantaneousresponsetothrottlechanges,turnofftheOdysseySystem.
Odyssey System conventional (transformer) operation
The Odyssey System
TheOdysseySystemisa“cruisecontrol”foryourlocomotive.Oncethespeedisset(seebelow),yourlocomotivewillmaintainaconstantspeed,nomatterwhatloadsthe
locomotivepullsorwhatgradesyouhaveonyourlayout.Thisdigitally-controlledsystemalsoallowsforextremelyslowmovementthatwillamazeany“scale”enthusiast.
Caution!
Note!

6
Transformer operations
ToselectasingleoperationalstateforyourLionellocomotive(example:forwardonly),youcandeactivatetheCommandreverseunit'ssequencingfunctionwiththeProgram/Runswitch,
locatedontherighthandside,undertheboilercasting.Getyourlocomotivemovinginthedesireddirection,thenslowitdownwithoutstopping.Setthe
Program/RunswitchtoPROG.Thelocomotiveisnow“locked”intoyourchosendirection.Whenyounolongerwantsingle-directionoperation,justslidetheProgram/Runswitchbackto
RUN.
Locking your locomotive into a single operational state
REAR OF LOCOMOTIVE
OFFON
SMOKE
PROGRUN
OFF
OD
Y
Figure2.Switchlocations
Smoke Unit Switch (see page 21 for details)
Program/Run Switch

Transformer operations
7
Using your locomotive tender’s ElectroCoupler in the non-Command environment
Touseyourlocomotivetender’sElectroCouplerinthenon-Commandenvironment,youmustfirstcoupleapieceofrollingstockequippedwithLionelmagneticcouplersdirectly
toyourlocomotivetender’srearElectroCoupler.ThemagneticcouplerontherollingstockwillthenreacttothemagneticfieldgeneratedbyaLionelremote-controltracksection(availableseparately).Placeyourrollingstock’scoupler“triggerdisc”overthecentralcoilofaremote-controltracksectionandpress“uncouple”onthecontroller.Themagneticfieldpullsthediscdownward,andthecoupleropens.
Yourlocomotivetender’sElectroCouplerwillNOTopenmanuallyorbyusingaremote-controltracksection.
Note!
Remote-control track section
Figure3.Magneticcoupleroperation

8
Note!
Note!
Note!
Note!
Your locomotive’s RailSounds system—the basics
L ionelRailSoundsisthemostrealisticmodelrailroadsoundsystemintheworld.Yourlocomotivefeaturesdigitalsamplesfromreal-lifesteamlocomotivesfortheultimate in
realism.Beginbyinstallinga9-voltalkaline batteryinthetender.Thisensuresinterruption-free
operationofRailSounds.Thebatteryclipislocatedinthetender.Toremovethesixtenderbodymountingscrews,refertothediagramonpage9forlocationofmountingscrews.
Whenyoufirstapplytrackpower,thelocomotive’sRailSoundssystemproducessoundsofthelocomotiveatrest.Asthelocomotivemoves,chuffingbegins,increasingwiththelocomotive’sspeed.
Tosilencethesteamchuffingsound(whistle/bellareunaffected),slidetheRailSoundsswitch,locatedontheundersideofthetender(seepage9forlocation),totheOFFpositionbefore powering up the locomotive.ThewhistleisactivatedbyusingtheleverorbuttononyourtransformerorCAB-1.Thevolumecontrolknobtoraiseorlowerthelevelofsoundislocatedontheundersideofthetendernearthefronttruck(seepage9).
9-volt alkaline battery
Please remove protective cover from battery clip
AlthoughRailSoundsispoweredbytrackvoltage,the battery is required foruninterruptedoperationandshutdownsequences.Useonlyalkalinebatteries.
Discontinuelocomotivepowerfor 10 seconds beforechangingtheRailSoundson/offswitchposition.
IfRailSounds“dropsout”duringtrackpowerinterrupts(directionchange),replacethebattery.
Figure4.Installingthebatteryinthelocomotive
Transformer operations
Battery holder
Battery harness
9
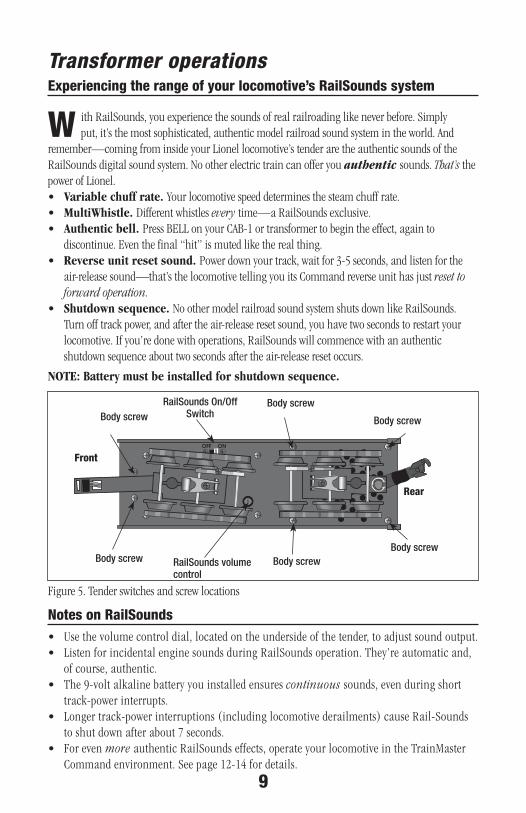
W ithRailSounds,youexperiencethesoundsofrealrailroadinglikeneverbefore.Simplyput,it’sthemostsophisticated,authenticmodelrailroadsoundsystemintheworld.And
remember—comingfrominsideyourLionellocomotive’stenderaretheauthenticsoundsoftheRailSoundsdigitalsoundsystem.Nootherelectrictraincanofferyouauthentic sounds.That’sthepowerofLionel.• Variable chuff rate. Yourlocomotivespeeddeterminesthesteamchuffrate.• MultiWhistle. Differentwhistlesevery time—aRailSoundsexclusive.• Authentic bell. PressBELLonyourCAB-1ortransformertobegintheeffect,againto
discontinue.Eventhefinal“hit”ismutedliketherealthing.• Reverse unit reset sound. Powerdownyourtrack,waitfor3-5seconds,andlistenforthe
air-releasesound—that’sthelocomotivetellingyouitsCommandreverseunithasjustreset to forward operation.
• Shutdown sequence. NoothermodelrailroadsoundsystemshutsdownlikeRailSounds.Turnofftrackpower,andaftertheair-releaseresetsound,youhavetwosecondstorestartyourlocomotive.Ifyou’redonewithoperations,RailSoundswillcommencewithanauthenticshutdownsequenceabouttwosecondsaftertheair-releaseresetoccurs.
NOTE: Battery must be installed for shutdown sequence.
Experiencing the range of your locomotive’s RailSounds system
Notes on RailSounds• Usethevolumecontroldial,locatedontheundersideofthetender,toadjustsoundoutput.• ListenforincidentalenginesoundsduringRailSoundsoperation.They’reautomaticand,
ofcourse,authentic.• The9-voltalkalinebatteryyouinstalledensurescontinuous sounds,evenduringshort
track-powerinterrupts.• Longertrack-powerinterruptions(includinglocomotivederailments)causeRail-Sounds
toshutdownafterabout7seconds.• Forevenmore authenticRailSoundseffects,operateyourlocomotiveintheTrainMaster
Commandenvironment.Seepage12-14fordetails.
Transformer operations
Body screw
Rear
Front
RailSounds On/Off Switch
RailSounds volume control
Body screw
Body screwBody screw Body screw
Body screw
Figure5.Tenderswitchesandscrewlocations

Installing the Lionel Sound Activation Button
1 2
1 2
ForACtransformerswithahorn/whistlebutton
ForACtransformerslackingahorn/whistlebutton
Attach to ground terminal
Attach to power terminal
Existing wireBlack wire
Red wire
Lionel no. 610-5906-001Sound Activation Button for activating the bell
To your transformer
Lionel no. 610-5906-001Sound Activation Button for whistle
Lionel no. 610-5906-001Sound Activation Button for bell
Black wire Red wire
Red wire
Attach to ground terminal
Attach to power terminal
To your transformer
Theno.610-5906-001buttonworkswithanyLionelACtransformerexceptno.6-4690TypeMW.TransformersmadebyothermanufacturersmaynotbecompatiblewithRailSounds.
Note!
T ooperatethebellandwhistlesoundswhenoperatingyourlocomotivewithconventionaltransformers,you’llneedtoinstalltheLionelno.610-5906-001SoundActivationButton
(availableseparately).Connectthebutton(s)asshownbelow.
10
Note! AlltrackpowermustfeedthroughtheSoundActivationButton.Donotbypassbutton.
Existing wire
Transformer operations
11
Your locomotive in the TrainMaster Command environment
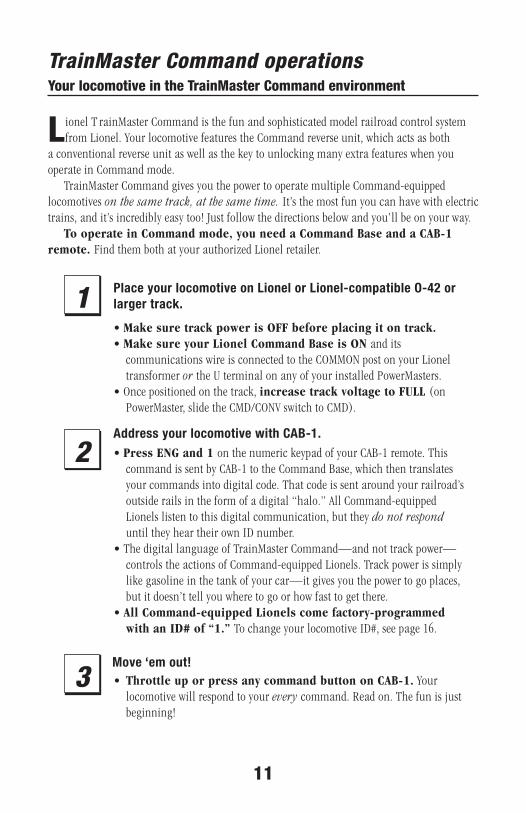
L ionelT rainMasterCommandisthefunandsophisticatedmodelrailroadcontrolsystemfromLionel.YourlocomotivefeaturestheCommandreverseunit,whichactsasboth
aconventionalreverseunitaswellasthekeytounlockingmanyextrafeatureswhenyouoperateinCommandmode.
TrainMasterCommandgivesyouthepowertooperatemultipleCommand-equippedlocomotiveson the same track, at the same time. It’sthemostfunyoucanhavewithelectrictrains,andit’sincrediblyeasytoo!Justfollowthedirectionsbelowandyou’llbeonyourway.
To operate in Command mode, you need a Command Base and a CAB-1 remote. FindthembothatyourauthorizedLionelretailer.
Place your locomotive on Lionel or Lionel-compatible O-42 or larger track.
•Make sure track power is OFF before placing it on track.•Make sure your Lionel Command Base is ON andits
communicationswireisconnectedtotheCOMMONpostonyourLioneltransformeror theUterminalonanyofyourinstalledPowerMasters.
•Oncepositionedonthetrack,increase track voltage to FULL (onPowerMaster,slidetheCMD/CONVswitchtoCMD).
Address your locomotive with CAB-1.•Press ENG and 1 onthenumerickeypadofyourCAB-1remote.This
commandissentbyCAB-1totheCommandBase,whichthentranslatesyourcommandsintodigitalcode.Thatcodeissentaroundyourrailroad’soutsiderailsintheformofadigital“halo.”AllCommand-equippedLionelslistentothisdigitalcommunication,buttheydo not respond untiltheyheartheirownIDnumber.
•ThedigitallanguageofTrainMasterCommand—andnottrackpower—controlstheactionsofCommand-equippedLionels.Trackpowerissimplylikegasolineinthetankofyourcar—itgivesyouthepowertogoplaces,butitdoesn’ttellyouwheretogoorhowfasttogetthere.
•All Command-equipped Lionels come factory-programmed with an ID# of “1.” TochangeyourlocomotiveID#,seepage16.
Move ‘em out!• Throttle up or press any command button on CAB-1.Your
locomotivewillrespondtoyourevery command.Readon.Thefunisjustbeginning!
1
2
3
TrainMaster Command operations

Tenderrearcouplerreleases.Coupler release sounds.
12
PressAUX2toturnyourlocomotive’sheadlightonand
off.
PressWSTL/HRNtoactivatethelocomotive’swhistle,releaseto
discontinue.Multi-Whistle steam whistle sound.
PressDIR—theloco-motivedeceleratestoacompletestop;turn
thethrottleup,andthelocomotivemovesintheoppositedirection.Thereisnoneutral.Steam air-release sound.
PressBELLoncetoactivatethebell,againtodiscontinue.
Traditional bell sound.
PressHALTtoshutdownallPowerMasterelectricaloutput
onyourrailroad.StopsallCommand-equippedLionelsinoperation.
TurntheTHROTTLEtotherighttoaccelerate,
lefttodecelerate.Speed-dependent variable steam chuffing. DynaChuff dynamic
chuffing effect.
CAB-1 commands for your locomotive
PressandholdBOOSTforextrapower.ReleaseBOOSTand
returntothelocomotive’spreviousspeed.Labored chuff.
PressandholdBRAKEtoslowdownorstop.ReleaseBRAKEand
returntothepreviousspeed.Squealing brake sounds.
Locomotive RailSounds effects in bold italic.
HALT
HALT
Running your locomotive in the TrainMaster Command environment
Y ourCommand-equippedlocomotivecomesfactory-
programmedwithanID#of“1.”Togetyourlocomotiveintoaction,setPowerMasterstoCMDorsetallpowersuppliesonfull.PressENGand“1”onCAB-1.Turnthethrottleorpressanycommandbutton;RailSoundsstartsup.YourlocomotiveisreadyforCommandoperations.
Address Locomotive #1
PowerMasters set to CMD or traditional power supplies ON FULL
Press ENG
Press 1 (the ID#)
Throttle up/press any command button
Example
TrainMaster Command operations
13
RailSounds in the Command environment
Y ourlocomotiveRailSoundssystemgivesyouevenmore intheTrainMasterCommandenvironment.
•DynaChuff .Realsteamlocomotivechuffingdependsonthelocomotive’sload.DynaChuffsimulatesbothlaboredandrelaxedchuffingsounds.Highballdownthemainlineandhearthelaboredchuffingofalocomotivebattlinginertia.Reduceyourthrottlesetting,andchuffingrelaxestoamoresedatesound,asthoughtheloadplacedonthelocomotivehasdecreased.ExperienceDynaChuffonsteepgrades,atyardcrawls,andatspeed.Another RailSoundsexclusive.•Bonus sounds likesquealingbrakeswiththeCAB-1BRAKEcommand.•Incidental sounds you controlwithCAB-1numerickeypadcommands,likesteamlet-offandsteamreleaseeffects.
TrainMaster Command operations

14
W henyoupressAUX1onCAB-1,youturnthenumerickeypadinto10commandbuttons.Thekeypad“staysopen”andgivesyouaccessto
extracommandfeaturesuntilyoupressanytop-rowbutton(SW,ACC,RTE,TR,orENG).
Locomotive RailSounds effects in bold italic.
CAB-1 numeric keypad commands for your locomotive
0StopsandresetsthelocomotivetoFORWARD.Headlight flickers.
1RaisesthevolumeofRailSounds.Sound volume increases.
2CrewTalkisthesoundofwalkie-talkiecommunication.
3StartsupRailSounds.Start-up sequence commences. Steam blowoff sound.
4LowersthevolumeofRailSounds.Sound volume decreases.
5ActivatestheRailSoundssteamshutdownsequence.Justliketherealthing,your loco-motive must be idle for shutdown to occur. Steam shutdown commences.
Remember,thewhistleandbellwillnotsounduntilyourestart RailSounds.CrewTalk sounds.
6Steam release sound.
7TowerComisanaudibleannouncementthatincludesthatengine’sroadnumberand/orname.There is a four second delay in this function.
8Turnsoffthesmokegenerator.CrewTalk sounds.
9Turnsonthesmokegenerator.
Note! AUX1-9onlyworksifthesmokeunitswitchisintheONposition.
TrainMaster Command operations

15
TrainMaster Command operationsTuning your locomotive performance
MOMenTuMSimulatethelaboredperformanceofalocomotivepullingaheavyloadwithmomentum.
PressL,M,orH(locatedunderCAB-1’sremovablepanel)forlight,mediumorheavymomentum.TheCommandreverseunitremembersthesettinguntilyouchangeit.Fordelayedresponse,useH.Forquickresponse,chooseL.
bOOSTing and bRaKingUsetheBOOSTandBRAKEcommandbuttonsforincrementalcontrolofspeedand a
superiormethodforhandlinggrades,stops-and-starts,andmore.Plus,usingBRAKEintheCommandenvironmentgivesyouabonusRailSoundseffect—theultra-realisticsoundofsquealingbrakes.
STaLLMakeyourlocomotivefeelmoreresponsivebysettinga“stall”voltage.Getyour
locomotivemoving,thenpressSET;thelocomotivewillstop.Theheadlightwillflash,indicatingit’sintheSETmode.Turnthethrottleclockwisetogettheenginemoving,thendecreasespeeduntilthelocomotivejuststops.ThenpressSETagain;theCommandreverseunitremembersthestallsettinguntilyouchangeit.Toclearstall,pressSETtwice,holdingitforonesecondeachtime.
HIGH VOLTAGE SETTINGPressENG,thelocomotiveID#,thenpressSET;theheadlightwillflash.Getyour
locomotivemovingtothemaximumspeedyouwantittorun,thenpressBOOST.Usethistokeepyourlocomotivefromaccidentallybeingderailedathighspeed.
Toclearsetting,pressENG,theID#,thenimmediatelypressBOOST.
SOund quaLiTyToachieveyourpreferredRailSoundsmastervolumelevel,usethevolumecontroldial
locatedonthebottomofthetender(seepage9).Turnthedialleftorrighttoadjustthevolumetoyourliking.
Forquickremote-controlofvolumebelow themastersetting—likemuting—usetheCAB-1numerickeypad’svolumecontrol.PressingAUX1and4onthekeypadlowersoverallRailSoundsoutput.
ThesesettingswillbelostwhenyouassignanewengineIDnumber.Note!
Note!
SpeedcontrolinCommandmodeisautomatic.Simplyadjustthespeedtothedesiredlevel,andtheOdysseySystemwillmaintainitovergrades,etc.
Your locomotive’s Odyssey System in the Command Control environment

16
Assign a new ID# to your Command-equipped locomotive
Set the locomotive Program/Run Switch to PROGRAM (see page 5 for location)Command Base ON
Place the locomotive on track
PowerMasters set to CMD or traditional power supplies on full
Turn track power on (PowerMasters):
Press BOOST
Program the locomotive with a new ID#:
Press ENG
Press a number you choose (the ID#)
Press SET
Set Program/Run Switch to RUN (see page 5 for location)
Your locomotive remembers its ID# forever; change it any time with these steps.
Example AsyourfleetofCommand-equippedLionelsgrows,give
yourlocomotiveitsownID#.Choosefromanybetween1and99.Slidethelocomotive’sPROGRAM/RUNswitchtoPROGRAM.(Seepage6forlocation.)Plug-intheCommandBaseandplacethelocomotiveontrack.Then,powerup.
UsingCAB-1,pressENG,thelocomotiveID#,thenpresstheSETbuttonlocatedunderCAB-1’sremovablepanel.Seethelocomotive’sheadlightflash;that’syoursignalthattheprogramminghasbeenaccepted.NowslidetheswitchtoRUN.
Werecommendthatyouchooseaneasy-to-rememberID#foryourlocomotives.Somepossibilitiesarepartofthelocomotiveroadnumber,yourage,oranytwo-digitnumberthatisnotusedbyanotherlocomotive.Ifyoulike,writethenumberonasmallpieceoftapeandputthisonthebottomoftheframetoaidinremembering.
Assigning your locomotive a new ID#
TrainMaster Command operations

TrainMaster Command operations
17
Reprogramming Command reverse unit board to restore features
STep 1:MoveswitchonlocomotivefromRUNtoPROGRAM.
STep 2:Plug-inCommandBase.
STep 3:Placelocomotiveontrack,thenturnonpowertotrack.
STep 4:Press“ENG”theninputlocomotive’sID#.Press“SET”.
STep 5:Press“ENG,”thentheID#,“AUX1”,thenpressthe number 740.
STep 6: Turnoffpowertotrackandwaittenseconds.
STep 7:Removelocomotivefromtrack,moveswitchfromPROGRAMtoRUN.
STep 8:Placelocomotivebackontrack,turnpowerontotrack.
STep 9:Press“ENG”andID#,thenoperateasnormal.
Duetotheinevitablederailments,static,andthenatureofelectricity,itispossiblethatyourCommandreverseunitcouldsomedayloseitssetupprogram.Thesymptomsofthis
conditionwouldbeunresponsivenessinCommandmode.Thiscanbeeasilyremediedby“reprogramming”usingthefollowingsteps.
Maintaining your locomotive’s handrail antenna
Y ourlocomotivehandrailsaremorethanjustmodelgrabirons—they’retheCommandreverseunit'santennaforreceivingCommandBasedigitalcommunications.Please
handle the locomotive carefully to avoid handrail damage. Toensureoptimumreception,bothhandrailsareinsulatedfromthedie-castshell.IfyourlocomotiveexperiencesdifficultyreceivingBasecommunications,checkthehandrailendsinthecabandpilotforthepresenceofinsulatingmaterial.Ensurethateachinsulatorispresentandenjoysaproperfit.Finally,preventthehandrailsfromtouchinganypartofthedie-castlocomotivecab.

18
H elpyourLionellocomotiveleadalongandproductivelifeonyourrailroadbymaintainingitproperly.
WerecommendyoupurchaseaLionelLubricationandMaintenanceKit(partno.6-62927),availablefromyourLioneldealer.Twobasicrulestokeepinmind:never over-lubricate(asmallamountwilldo),andavoidgettinggreaseoroilonthelocomotivewheels,contactrollers,or-yourtrack.
You’llknowyourlocomotiverequireslubricationwhenvisualinspectionrevealsdrynessonthepartsindicatedintheillustration.Removeaccumulateddirtanddustbeforelubricating,andalwayslubricateanylocomotiveemergingfromprolongedstorage.Also,lightly lubricatethelocomotivesiderods,driverods,linkage,frontandreartruckpivotpoints,andtenderwheelbearingsaftereach25hoursofoperation.
Lubricating your locomotive
Maintaining and servicing your Locomotive
OFF
ON
SM
OK
E
PR
OG
RU
N
OFFODY
Grease
Grease
Oil both sides of the locomotive
Oil both sides of the locomotive
Oil rods and pivot points on both sides of the locomotive
Oil rods and pivot points on both sides of the locomotive
Cab Screws
Cab Screw
Figure6.Lubricatingpoints

Yourlocomotiveisilluminatedbytwolamps.Oneislocatedinthenoseofthelocomotiveilluminatingtheheadlight.
Turnthelocomotiveoverontoasoftsurfaceandremovethethreescrewsasshownonpage18.Toreplacetheheadlight,removethelampfromtheheadlighthousing.UnplugtheconnectorandreplacewithLionelPartNo.620-8029-300.ToreplacetheFireboxLight,carefullyremovetheexpiredbulbfromthemountingandreplacewiththecorrectlistedbulb.Reassemblethecabtotheframeandsecuretogetherwiththethreepreviouslyremovedscrews,makingsurethatnowiresbecomepinchedbetweenthecabandframe.
19
Replacing your locomotive’s lamps
Maintaining and servicing your locomotive
Headlight 620-8029-300
Firebox 610-8082-019
Figure7.Replacingthelocomotivelamps

20
Yourlocomotive’stenderisilluminatedbyonelamp,locatedattherearofthetender.Removethetenderbodybyunscrewingthesixscrewslocatedontheundersideofthe
tender(seepage9forscrewlocations).Carefullyliftthetenderbodyfromtheframe,takingcarewiththelampwiringassembly
whichisstillattachedtothetenderbody.Grasptheleadsandpullthelampoutofthehousing.UnplugtheconnectorandreplacewithLionelpartno.620-8029-300.AlllampsareavailablefromyourAuthorizedLionelServiceCenterordirectfromLionelService.SeetheLionelServicesectiononpage24formoreinformation.
Reassembleinreverseorder.Whilereassemblingthetender,makesureallwiresareinsidethebodybeforethescrewsaretightened.
Replacing your tender’s lamps
Maintaining and servicing your locomotive
Figure8.Replacingyourtender'slamps

21
Adding fluid to your locomotive smoke generator
Yourlocomotiveisequippedwithasmokegeneratorthatproducessafe,clean,whitesmokeduringoperation.
ThesmokegeneratorrequirestheperiodicadditionofLionelsmokefluidinordertofunction.Piercethefluidtube’sendwithapin,thenadd4to8dropsoffluiddirectlyintothesmokestack.Smokeproductionwillcommencemomentarily,fasterifyourunyourlocomotiveatspeed.Whensmokeproductionwanes,addmorefluid(4to8drops).
Always keepasmallamountofsmokefluidinthelocomotivesmokegenerator;thegenerator’selementcanbecomedamagedifoperatedwithoutfluid.Smokeproductionisgreaterathighervoltagesandwhenthelocomotiveispullingaheavyloadorlongconsist.
Note! Always keep smoke fluid in your locomotive smoke generator. If not, turn it off when smoke is not desired using the switch shown on page 6 or the AUX1-8 command if you are running in Command mode.
Maintaining and servicing your locomotive
YourlocomotiveisequippedwithTire-Traction.Thismeansthattwoofthedrivewheelsarefittedwithrubbertractiontirestoenhancetractiveeffortsoyourlocomotivecanpull
manycarsatonce.Lionelhasprovidedextratractiontirestoreplacetheinstalledtractiontiresiftheywear
out.Simplyunscrewthedriverodnutfromthewheelusinga3/16”nutdriver,slipofftheoldtractiontireandremoveitfromunderthedriverod.Placethenewtractiontireonthewheelinthereverseorderofthisstepandre-tightenthedriverodnut.You’renowreadytopullthatlongfreightbacktotheyard.
Tire-Traction™

22
Maintaining and servicing your locomotive
An‘O’gaugecoupler(non-operating)isincludedwithyourlocomotiveforthosewhomaywishto“double-head”theirtrainswithasecondMikadooranotherlocomotive.
Simplyloosenthescrewthatholdsthefrontcoupler.Straightenthewirelinkthatattachestothecouplerliftbarwithneedle-nosepliersandremovethescalecoupler.Replacethescalecouplerheadwiththe‘O’gaugecouplerheadandretightenthescrew.
Installation of ‘O’ Gauge Coupler Head
Figure9.Installingthe‘O’gaugecoupler

23
Notes
Lionel Limited Warranty Policy & Service
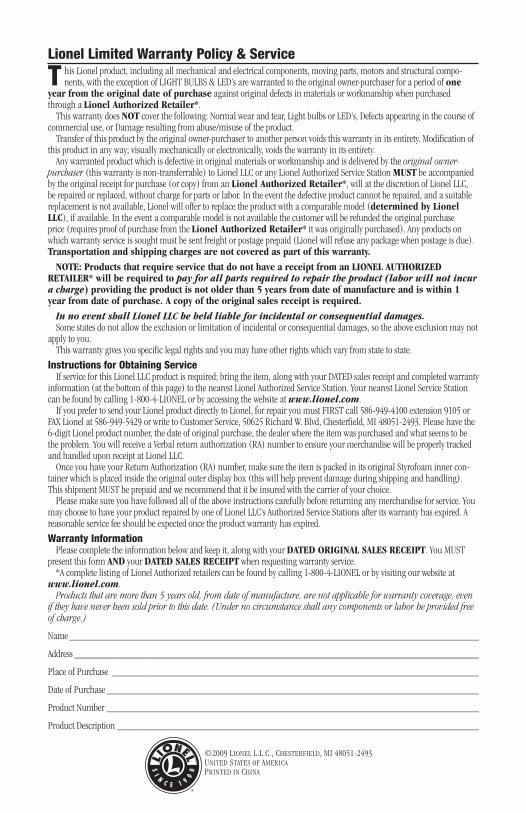
T hisLionelproduct,includingallmechanicalandelectricalcomponents,movingparts,motorsandstructuralcompo-nents,withtheexceptionofLIGHTBULBS&LED’sarewarrantedtotheoriginalowner-purchaserforaperiodofone
year from the original date of purchaseagainstoriginaldefectsinmaterialsorworkmanshipwhenpurchasedthroughaLionel Authorized Retailer*.
ThiswarrantydoesNOTcoverthefollowing:Normalwearandtear,LightbulbsorLED’s,Defectsappearinginthecourseofcommercialuse,orDamageresultingfromabuse/misuseoftheproduct.
Transferofthisproductbytheoriginalowner-purchasertoanotherpersonvoidsthiswarrantyinitsentirety.Modificationofthisproductinanyway;visuallymechanicallyorelectronically,voidsthewarrantyinitsentirety.
Anywarrantedproductwhichisdefectiveinoriginalmaterialsorworkmanshipandisdeliveredbytheoriginal owner-purchaser(thiswarrantyisnon-transferrable)toLionelLLCoranyLionelAuthorizedServiceStationMUSTbeaccompaniedbytheoriginalreceiptforpurchase(orcopy)fromanLionel Authorized Retailer*,willatthediscretionofLionelLLC,berepairedorreplaced,withoutchargeforpartsorlabor.Intheeventthedefectiveproductcannotberepaired,andasuitablereplacementisnotavailable,Lionelwilloffertoreplacetheproductwithacomparablemodel(determined by Lionel LLC),ifavailable.Intheeventacomparablemodelisnotavailablethecustomerwillberefundedtheoriginalpurchaseprice(requiresproofofpurchasefromtheLionel Authorized Retailer*itwasoriginallypurchased).Anyproductsonwhichwarrantyserviceissoughtmustbesentfreightorpostageprepaid(Lionelwillrefuseanypackagewhenpostageisdue).Transportation and shipping charges are not covered as part of this warranty.
NOTE: Products that require service that do not have a receipt from an LIONEL AUTHORIZED RETAILER* will be required to pay for all parts required to repair the product (labor will not incur a charge) providing the product is not older than 5 years from date of manufacture and is within 1 year from date of purchase. A copy of the original sales receipt is required.
In no event shall Lionel LLC be held liable for incidental or consequential damages. Somestatesdonotallowtheexclusionorlimitationofincidentalorconsequentialdamages,sotheaboveexclusionmaynot
applytoyou.Thiswarrantygivesyouspecificlegalrightsandyoumayhaveotherrightswhichvaryfromstatetostate.
Instructions for Obtaining ServiceIfserviceforthisLionelLLCproductisrequired;bringtheitem,alongwithyourDATEDsalesreceiptandcompletedwarranty
information(atthebottomofthispage)tothenearestLionelAuthorizedServiceStation.YournearestLionelServiceStationcanbefoundbycalling1-800-4-LIONELorbyaccessingthewebsiteatwww.lionel.com.
IfyouprefertosendyourLionelproductdirectlytoLionel,forrepairyoumustFIRSTcall586-949-4100extension9105orFAXLionelat586-949-5429orwritetoCustomerService,50625RichardW.Blvd,Chesterfield,MI48051-2493.Pleasehavethe6-digitLionelproductnumber,thedateoforiginalpurchase,thedealerwheretheitemwaspurchasedandwhatseemstobetheproblem.YouwillreceiveaVerbalreturnauthorization(RA)numbertoensureyourmerchandisewillbeproperlytrackedandhandleduponreceiptatLionelLLC.
OnceyouhaveyourReturnAuthorization(RA)number,makesuretheitemispackedinitsoriginalStyrofoaminnercon-tainerwhichisplacedinsidetheoriginalouterdisplaybox(thiswillhelppreventdamageduringshippingandhandling).ThisshipmentMUSTbeprepaidandwerecommendthatitbeinsuredwiththecarrierofyourchoice.
Pleasemakesureyouhavefollowedalloftheaboveinstructionscarefullybeforereturninganymerchandiseforservice.YoumaychoosetohaveyourproductrepairedbyoneofLionelLLC’sAuthorizedServiceStationsafteritswarrantyhasexpired.Areasonableservicefeeshouldbeexpectedoncetheproductwarrantyhasexpired.
Warranty InformationPleasecompletetheinformationbelowandkeepit,alongwithyourDATED ORIGINAL SALES RECEIPT.YouMUST
presentthisformANDyourDATED SALES RECEIPTwhenrequestingwarrantyservice.*AcompletelistingofLionelAuthorizedretailerscanbefoundbycalling1-800-4-LIONELorbyvisitingourwebsiteat
www.lionel.com.Products that are more than 5 years old, from date of manufacture, are not applicable for warranty coverage, even
if they have never been sold prior to this date. (Under no circumstance shall any components or labor be provided free of charge.)
Name�����������������������������������������������������������������������������
Address����������������������������������������������������������������������������
PlaceofPurchase ���������������������������������������������������������������������
DateofPurchase����������������������������������������������������������������������
ProductNumber����������������������������������������������������������������������
ProductDescription��������������������������������������������������������������������
©2009LIONELL.L.C.,CHESTERFIELD,MI48051-2493UNITEDSTATESOFAMERICAPRINTEDINCHINA


