Oracle® Manufacturing Execution System for DiscreteManufacturingUser's GuideRelease 12.1Part No. E13057-04
August 2010
Oracle Manufacturing Execution System for Discrete Manufacturing User's Guide, Release 12.1
Part No. E13057-04
Copyright © 2010, Oracle and/or its affiliates. All rights reserved.
Primary Author: Susan Saperstein
Oracle is a registered trademark of Oracle Corporation and/or its affiliates. Other names may be trademarks of their respective owners.
This software and related documentation are provided under a license agreement containing restrictions on use and disclosure and are protected by intellectual property laws. Except as expressly permitted in your license agreement or allowed by law, you may not use, copy, reproduce, translate, broadcast, modify, license, transmit, distribute, exhibit, perform, publish or display any part, in any form, or by any means. Reverse engineering, disassembly, or decompilation of this software, unless required by law for interoperability, is prohibited.
The information contained herein is subject to change without notice and is not warranted to be error-free. If you find any errors, please report them to us in writing.
If this software or related documentation is delivered to the U.S. Government or anyone licensing it on behalf of the U.S. Government, the following notice is applicable:
U.S. GOVERNMENT RIGHTSPrograms, software, databases, and related documentation and technical data delivered to U.S. Government customers are "commercial computer software" or "commercial technical data" pursuant to the applicable Federal Acquisition Regulation and agency-specific supplemental regulations. As such, the use, duplication, disclosure, modification, and adaptation shall be subject to the restrictions and license terms set forth in the applicable Government contract, and, to the extent applicable by the terms of the Government contract, the additional rights set forth in FAR 52.227-19, Commercial Computer Software License (December 2007). Oracle USA, Inc., 500 Oracle Parkway, Redwood City, CA 94065.
This software is developed for general use in a variety of information management applications. It is not developed or intended for use in any inherently dangerous applications, including applications which may create a risk of personal injury. If you use this software in dangerous applications, then you shall be responsible to take all appropriate fail-safe, backup, redundancy and other measures to ensure the safe use of this software. Oracle Corporation and its affiliates disclaim any liability for any damages caused by use of thissoftware in dangerous applications.
This software and documentation may provide access to or information on content, products and services from third parties. Oracle Corporation and its affiliates are not responsible for and expressly disclaim all warranties of any kind with respect to third party content, products and services. Oracle Corporation and its affiliates will not be responsible for any loss, costs, or damages incurred due to your access to or use of third party content, products or services.
iii
Contents
Send Us Your Comments
Preface
1 Overview Oracle MES for Discrete ManufacturingOverview of Oracle MES for Discrete Manufacturing.............................................................1-1
Distributed MES for Discrete Manufacturing...................................................................... 1-4
2 MES Administrator MES Administrator................................................................................................................... 2-1
3 MES WorkstationOverview of the MES Workstation........................................................................................... 3-1Workstation Startup and Initialization Modes........................................................................ 3-4Viewing Dispatch Lists............................................................................................................. 3-6Viewing Work Content........................................................................................................... 3-11Job Operation Actions............................................................................................................. 3-13
Updating Job Notes............................................................................................................3-16Job Component Transactions............................................................................................. 3-16
Moving and Completing Assemblies..................................................................................... 3-18Overview of Serialized Manufacturing Transactions............................................................ 3-33Searching for Serialized Jobs and Performing Express Moves..............................................3-34Creating Move Transactions for Serialized Jobs.................................................................... 3-37Viewing Job Information........................................................................................................ 3-40Reporting Exceptions.............................................................................................................. 3-48Returning Assemblies............................................................................................................. 3-49
iv
Shop Floor Time Entry............................................................................................................ 3-53
4 MES Supervisor WorkbenchOverview of the MES Supervisor Workbench......................................................................... 4-1Dashboard................................................................................................................................. 4-2Monitoring Shop Floor Progress............................................................................................. 4-16Viewing and Resolving Exceptions........................................................................................ 4-23Assigning Alternate Resources............................................................................................... 4-29Rescheduling Operations........................................................................................................ 4-29Changing Shopfloor Statuses................................................................................................. 4-31Job Operations and the Dispatch List..................................................................................... 4-32Expedite and Undo Expedite................................................................................................... 4-33
5 Global ActionsGlobal Actions........................................................................................................................... 5-1Printing the Discrete Job Routing Sheet...................................................................................5-2Report Resource Usage.............................................................................................................. 5-3Searching for Jobs..................................................................................................................... 5-4
A Navigator PathsMES for Discrete Navigator Paths............................................................................................ A-1
B MES for Discrete Manufacturing WorkflowWIP Exception Notification Workflow.................................................................................... B-1
C MES Client ExtensionsOverview of MES Client Extensions........................................................................................ C-1
Ready Status........................................................................................................................ C-1Transaction Validation........................................................................................................ C-3Component Shortage Calculation....................................................................................... C-6
Integration with Time and Attendance Systems..................................................................... C-8
Index
v
Send Us Your Comments
Oracle Manufacturing Execution System for Discrete Manufacturing User's Guide, Release 12.1Part No. E13057-04
Oracle welcomes customers' comments and suggestions on the quality and usefulness of this document. Your feedback is important, and helps us to best meet your needs as a user of our products. For example:
• Are the implementation steps correct and complete? • Did you understand the context of the procedures? • Did you find any errors in the information? • Does the structure of the information help you with your tasks? • Do you need different information or graphics? If so, where, and in what format? • Are the examples correct? Do you need more examples?
If you find any errors or have any other suggestions for improvement, then please tell us your name, the name of the company who has licensed our products, the title and part number of the documentation andthe chapter, section, and page number (if available).
Note: Before sending us your comments, you might like to check that you have the latest version of the document and if any concerns are already addressed. To do this, access the new Oracle E-Business Suite Release Online Documentation CD available on My Oracle Support and www.oracle.com. It contains the most current Documentation Library plus all documents revised or released recently.
Send your comments to us using the electronic mail address: [email protected]
Please give your name, address, electronic mail address, and telephone number (optional).
If you need assistance with Oracle software, then please contact your support representative or Oracle Support Services.
If you require training or instruction in using Oracle software, then please contact your Oracle local officeand inquire about our Oracle University offerings. A list of Oracle offices is available on our Web site at www.oracle.com.


vii
Preface
Intended AudienceWelcome to Release 12.1 of the Oracle Manufacturing Execution System for Discrete Manufacturing User's Guide.
Oracle Manufacturing applications users
See Related Information Sources on page ix for more Oracle E-Business Suite product information.
Deaf/Hard of Hearing Access to Oracle Support ServicesTo reach Oracle Support Services, use a telecommunications relay service (TRS) to call Oracle Support at 1.800.223.1711. An Oracle Support Services engineer will handle technical issues and provide customer support according to the Oracle service request process. Information about TRS is available at http://www.fcc.gov/cgb/consumerfacts/trs.html, and a list of phone numbers is available at http://www.fcc.gov/cgb/dro/trsphonebk.html.
Documentation AccessibilityOur goal is to make Oracle products, services, and supporting documentation accessibleto all users, including users that are disabled. To that end, our documentation includes features that make information available to users of assistive technology. This documentation is available in HTML format, and contains markup to facilitate access bythe disabled community. Accessibility standards will continue to evolve over time, and Oracle is actively engaged with other market-leading technology vendors to address technical obstacles so that our documentation can be accessible to all of our customers. For more information, visit the Oracle Accessibility Program Web site at http://www.oracle.com/accessibility/.
viii
Accessibility of Code Examples in DocumentationScreen readers may not always correctly read the code examples in this document. The conventions for writing code require that closing braces should appear on an otherwise empty line; however, some screen readers may not always read a line of text that consists solely of a bracket or brace.
Accessibility of Links to External Web Sites in DocumentationThis documentation may contain links to Web sites of other companies or organizationsthat Oracle does not own or control. Oracle neither evaluates nor makes any representations regarding the accessibility of these Web sites.
Structure1 Overview Oracle MES for Discrete ManufacturingThis chapter describes the features of the Oracle MES for Discrete Manufacturing, a manufacturing execution system used for discrete shop floor transactions.
2 MES Administrator This chapter describes the features of the MES Administrator role, including parameter descriptions.
3 MES WorkstationThis chapter describes the features of the MES Workstation and the Operator role, including the ability to view the work dispatch list and perform transactions.
4 MES Supervisor WorkbenchThis chapter describes the features of the MES Supervisor Workbench, including the ability to monitor shop floor progress on the Dashboard and to avoid potential problems through actions taken on the Supervisor Workstation.
5 Global ActionsThis chapter describes global action views and tasks displayed in the MES Supervisor Workbench and the MES Workstation.
A Navigator PathsThis appendix lists navigation paths for pages in the Oracle MES for Discrete Manufacturing application.
B MES for Discrete Manufacturing WorkflowThis appendix describes the features of the WIP Exception Notification Workflow.
C MES Client ExtensionsThis appendix describes the APIs integrated into Oracle MES for Discrete Manufacturing.
ix
Related Information Sources
Integration RepositoryThe Oracle Integration Repository is a compilation of information about the service endpoints exposed by the Oracle E-Business Suite of applications. It provides a complete catalog of Oracle E-Business Suite's business service interfaces. The tool lets users easily discover and deploy the appropriate business service interface for integration with any system, application, or business partner.
The Oracle Integration Repository is shipped as part of the E-Business Suite. As your instance is patched, the repository is automatically updated with content appropriate for the precise revisions of interfaces in your environment.
Oracle Bills of Material User's GuideThis guide describes how to create various bills of materials to maximize efficiency, improve quality and lower cost for the most sophisticated manufacturing environments. By detailing integrated product structures and processes, flexible product and process definition, and configuration management, this guide enables you to manage product details within and across multiple manufacturing sites.
Oracle Cost Management User's GuideThis guide describes how to use Oracle Cost Management in either a standard costing or average costing organization. Cost Management can be used to cost inventory, receiving, order entry, and work in process transactions. It can also be used to collect transaction costs for transfer to Oracle Projects. Cost Management supports multiple cost elements and multiple sub–elements. It also provides comprehensive valuation andvariance reporting
Oracle General Ledger User's GuideThis guide explains how to plan and define your chart of accounts, accounting period types and accounting calendar, functional currency, and set of books. It also describes how to define journal entry sources and categories so you can create journal entries for your general ledger. If you use multiple currencies, use this manual when you define additional rate types, and enter daily rates.
Oracle HRMS User's GuideThis manual explains how to enter your employees. It also explains how to set up organizations and site locations. Even if you do not install Oracle HRMS, you can set upyour employees, site locations, and organization using Oracle HRMS windows.
x
Oracle Inventory User's GuideThis guide describes how to define items and item information, perform receiving and inventory transactions, maintain cost control, plan items, perform cycle counting and physical inventories, and set up Oracle Inventory.
Oracle Order Management User's Guide This guide describes how to enter sales orders and returns, copy existing sales orders, schedule orders, release orders, confirm shipments, create price lists and discounts for orders, run processes, and create reports.
Oracle Work in Process User's GuideThis guide describes how Oracle Work in Process provides a complete production management system. Specifically this guide describes how discrete, repetitive, assemble-to-order, project, flow, and mixed manufacturing environments are supported.
Do Not Use Database Tools to Modify Oracle E-Business Suite DataOracle STRONGLY RECOMMENDS that you never use SQL*Plus, Oracle Data Browser, database triggers, or any other tool to modify Oracle E-Business Suite data unless otherwise instructed.
Oracle provides powerful tools you can use to create, store, change, retrieve, and maintain information in an Oracle database. But if you use Oracle tools such as SQL*Plus to modify Oracle E-Business Suite data, you risk destroying the integrity of your data and you lose the ability to audit changes to your data.
Because Oracle E-Business Suite tables are interrelated, any change you make using an Oracle E-Business Suite form can update many tables at once. But when you modify Oracle E-Business Suite data using anything other than Oracle E-Business Suite, you may change a row in one table without making corresponding changes in related tables.If your tables get out of synchronization with each other, you risk retrieving erroneous information and you risk unpredictable results throughout Oracle E-Business Suite.
When you use Oracle E-Business Suite to modify your data, Oracle E-Business Suite automatically checks that your changes are valid. Oracle E-Business Suite also keeps track of who changes information. If you enter information into database tables using database tools, you may store invalid information. You also lose the ability to track whohas changed your information because SQL*Plus and other database tools do not keep arecord of changes.
Overview Oracle MES for Discrete Manufacturing 1-1
1Overview Oracle MES for Discrete
Manufacturing
This chapter describes the features of the Oracle MES for Discrete Manufacturing, a manufacturing execution system used for discrete shop floor transactions.
This chapter covers the following topics:
• Overview of Oracle MES for Discrete Manufacturing
Overview of Oracle MES for Discrete ManufacturingOracle MES for Discrete Manufacturing, is comprised of the MES workstation and the MES Supervisor Workbench that can be used by shop floor operators and supervisors.
The MES Workstation for the operator provides a single interface to perform multiple shop floor functions, without navigating to a number of transaction windows. Shop floor operators can view the jobs assigned to specific work centers, view requirements and instructions for performing work. The Manufacturing Execution System can be configured for actions, display, security, and transactions for the operator and supervisor roles.
You can personalize application pages without modifying any underlying code. All personalizations are added on top of the base product, and do not overwrite the existing interface. Personalizations are reflected immediately on the page. The links for personalization display on your pages. See: Personalizing Your Pages and Portlets, Oracle Application Framework Personalization Guide, and Creating Admin Level Personalizations, Oracle Application Framework Personalization Guide
MES Workstation
• Configurable dispatch list driven execution
• Configurable work content and sequential display of instructions
• Clock In/Clock/Out and Shift In/Shift Out for time capture
1-2 Oracle Manufacturing Execution System for Discrete Manufacturing User's Guide
• Enhanced shop floor transaction reporting
• Integration with Oracle Quality
• Streamlined material transactions with lot and serial entry
• Shop floor exception reporting
• Document printing including labels and job traveler
MES Supervisor Workbench
• Exceptions summary view with drill down capabilities
• Exception impact assessment and resolution
• Anticipated capacity or resource shortages for bottleneck resources
• View of the current state of the shop floor
• Capabilities to expedite jobs and reorder dispatch lists
• Reporting resource usages
• View of job transaction history
• Access to job and resource workbenches
• Access to manufacturing management DBI
MES Administrator
• Role for setting and configuring parameters
• Parameters that control the user interface layout, content, system behavior and security
• Ability to configure parameters at several levels - site, role, organization, department
Dispatch Lists
Dispatch lists, a listing of all job operations in the queue for work, are the workstation starting point. You have the flexibility to view dispatch lists for one particular resource or resource instance, across multiple resources or departments, or an entire organization. Viewing options and content are customized by the parameter settings in the Administrator mode. This includes the criteria for current or scheduled work, and the order presented on the list. See: Viewing Dispatch Lists, page 3-6
Electronic Signatures
Overview Oracle MES for Discrete Manufacturing 1-3
The Oracle E-Records application supports Federal Food and Drug Administration's (FDA) code regulation 21 CFR Part 11. This regulation supports the creation of electronic records to monitor activities by regulated industries such as food, pharmaceuticals, and medical devices. These industries are subject to audit, retention ofrecords, and capture of legally binding signatures. Oracle MES for Discrete Manufacturing captures data and provides traceability for the operator or supervisor for move, completion, and material transactions. See: Electronic Signature Support, page 3-2
Exception Reporting
Exceptions are reported and displayed for occurrences preventing work on a job operation. Examples include material shortages, labor shortage, machine downtime, or quality problems. When you are notified about exceptions, you can view other job operations affected and take action in the resolution (such as utilizing an alternate resource). See: Viewing and Resolving Exceptions, page 4-23
Label Printing
Label printing is available from various pages while performing work on the shop floor.You can print labels for job related information and serial numbers for specific jobs See: Job Operation Actions, page 3-13
Labor Reporting
Labor reporting captures both the actual and scheduled time an employee works on a job operation. Four labor performance data elements are tracked including actual attendance, direct labor, scheduled available, and earned hours. You can have one or several employees working on a job operation. Shop floor labor resources are tracked using employee badge numbers and resource instances. Clock In flags the job operation as started, and records the start time for resource usage calculation. Clock In and Clock Out indicate the status of a specific operation and is displayed in the dispatch list. Shift In and Shift Out enables the recording of actual attendance hours entered.
Labor Skills Validation
Labor skills validation enables you to set up skilled employees to work on job operations to perform manufacturing activities. When the operator Clocks In for job operations—qualifications are checked. This helps you meet International Organization for Standardization (ISO) 9000 quality and regulatory standard. Labor skills validation is integrated with other Oracle applications including:
• Oracle Human Resources Management Systems to set employees at the appropriateskill levels.
• Oracle Bills of Material to specify skills required for operations and routings.
• Oracle Work in Process to define skills required for job operations.
• Oracle E-Records to display the details of skills validated during move transactions.
See: Moving and Completing Assemblies, page 3-18, and Operator Skills Validation,
1-4 Oracle Manufacturing Execution System for Discrete Manufacturing User's Guide
page 2-20
Resource Consumption
Resource consumption reporting is supported through direct entry of all hours worked on a task—Clock In and Clock Out. The system captures the machine or person performing the work.
Serialized Manufacturing
Functionality is provided for creating both jobs with serial controlled components, and preassigned assembly serialized jobs. Lot and serial numbers can be manually assigned during operation and work order completion. A serialized job is a discrete job that has predefined, associated assembly serial numbers. After the serialization start operation, the progress on the shop floor is tracked using the assembly serial numbers. The Search Serial Numbers page can be set as the initial starting page. You have the ability to enforce sequential moves for the operation up to the next count point operation. See: Overview of Serialized Manufacturing Transactions, page 3-33
Related TopicsMES Administrator, page 2-1
Overview of the MES Workbench, page 3-1
Overview of the MES Supervisor Workbench, page 4-1
Distributed MES for Discrete ManufacturingOracle MES for Discrete Manufacturing can be deployed in an integrated mode in Enterprise Resource Planning (ERP), or in a distributed mode separate from the ERP instance. The distributed instance supports:
• 24-hour plant level manufacturing operations independent of ERP.
• Event driven manufacturing management.
• Control of manufacturing processes across multiple plants and applications.
• Ability to use MES functionality without upgrading the ERP system.
Oracle provides an implementation approach to deploy the Oracle MES in multiple instances, separately for plants and corporate levels. Operators carry out the manufacturing transactions through these plant level instances. Each group of plants or locations requiring manufacturing independent of the central ERP needs a separate instance of the application. Transactions can be synchronized between the central Oracle ERP and distributed MES instances using the Oracle Fusion Middleware and Oracle Data Integrator (ODI).
For more information, see: Distributed Oracle Manufacturing Execution System, Note Number 1051812.1 located at My Oracle Support (support.oracle.com).
MES Administrator 2-1
2MES Administrator
This chapter describes the features of the MES Administrator role, including parameter descriptions.
This chapter covers the following topics:
• MES Administrator
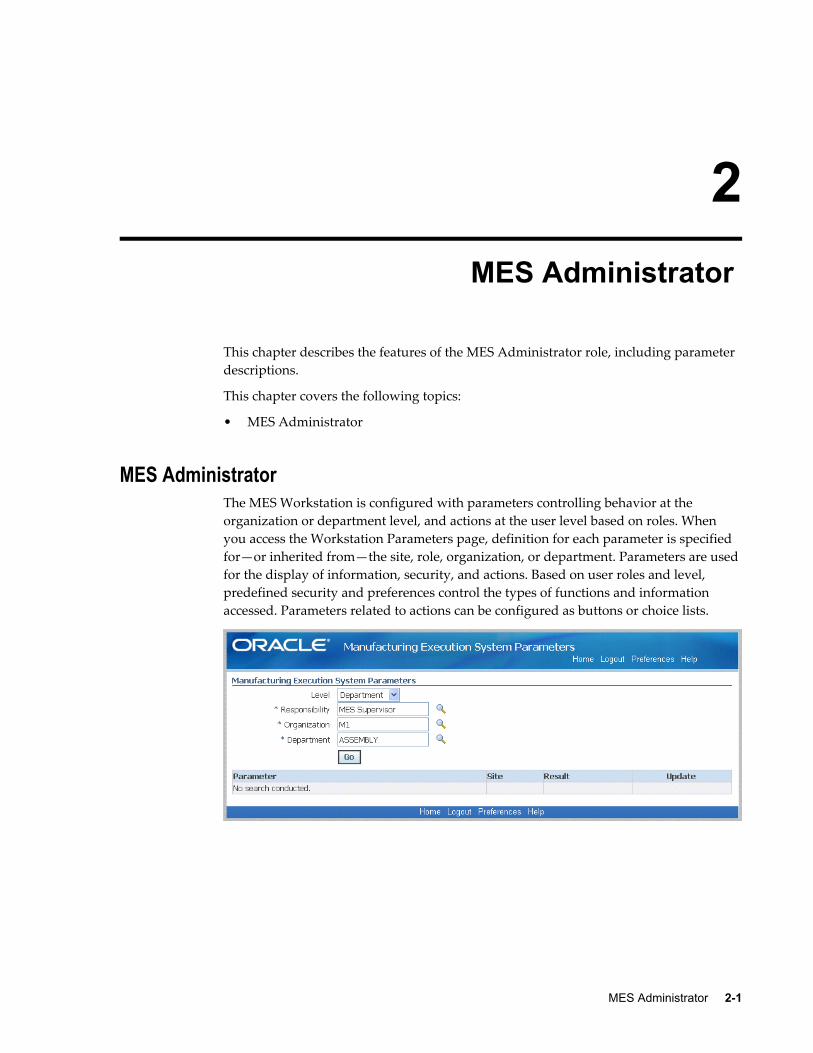
MES AdministratorThe MES Workstation is configured with parameters controlling behavior at the organization or department level, and actions at the user level based on roles. When you access the Workstation Parameters page, definition for each parameter is specified for—or inherited from—the site, role, organization, or department. Parameters are used for the display of information, security, and actions. Based on user roles and level, predefined security and preferences control the types of functions and information accessed. Parameters related to actions can be configured as buttons or choice lists.
2-2 Oracle Manufacturing Execution System for Discrete Manufacturing User's Guide
Manufacturing Execution Workstation Parameters
To view or update Manufacturing Execution Workstation parameters:1. Navigate to the Manufacturing Execution Workstation Parameters page.
2. Select a parameter level.
Your choices are Site, Role, Organization, or Department.
Depending on the level selected, other level specific values are required. For example:
• Site: No other related fields
• Role: Responsibility, that is, MES Operator or MES Supervisor
• Organization: Role and Organization fields
• Department: Role, Organization, and Department fields
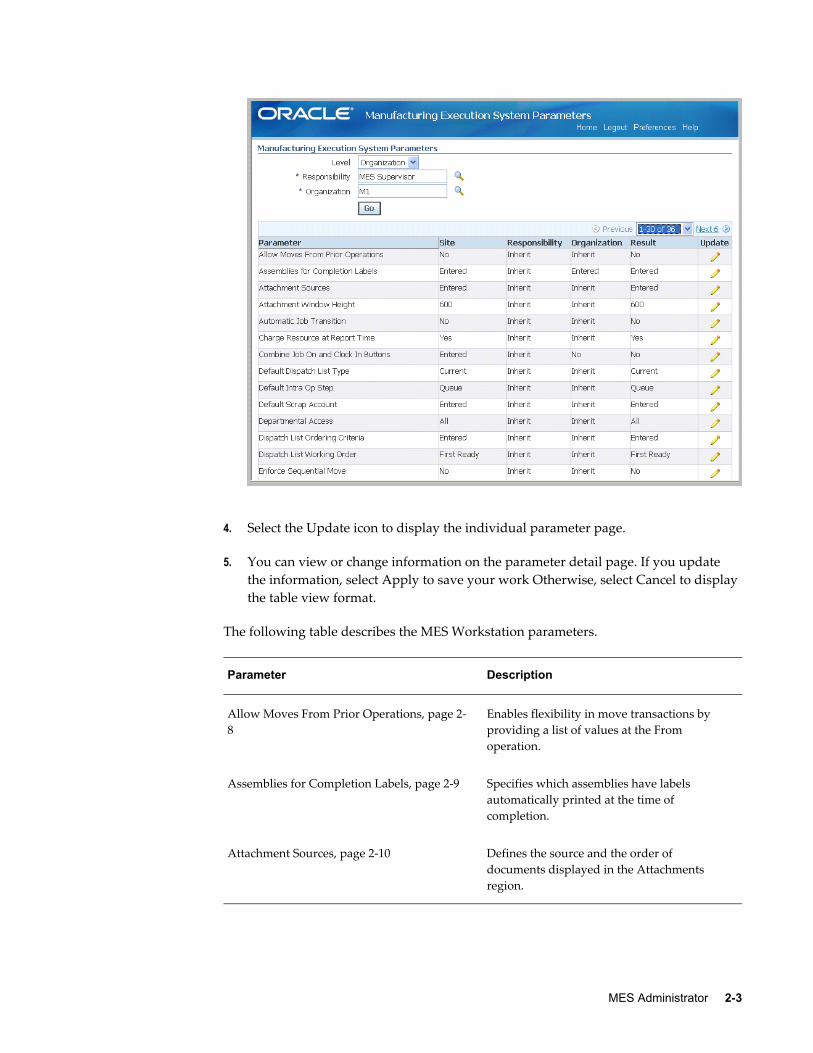
3. Select Go to display the Workstation Parameters page.
The page displays a table format view of the list of parameters, and the values at thelevel you selected. There are several display options:
• Parameters using only one value from a list of values, display the selected value—or Inherited if they are derived from the higher level.
• Parameters using multiple values from a list of values display Entered—or Inherited if they are derived from the higher level.
MES Administrator 2-3
4. Select the Update icon to display the individual parameter page.
5. You can view or change information on the parameter detail page. If you update the information, select Apply to save your work Otherwise, select Cancel to display the table view format.
The following table describes the MES Workstation parameters.
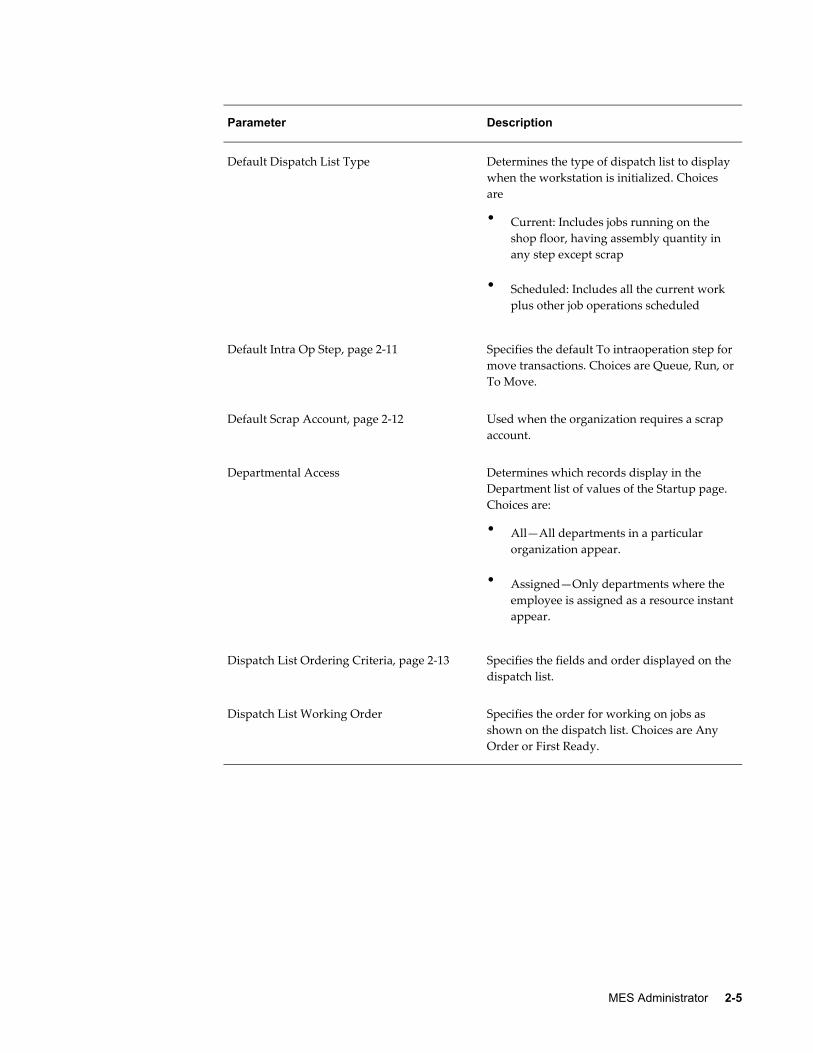
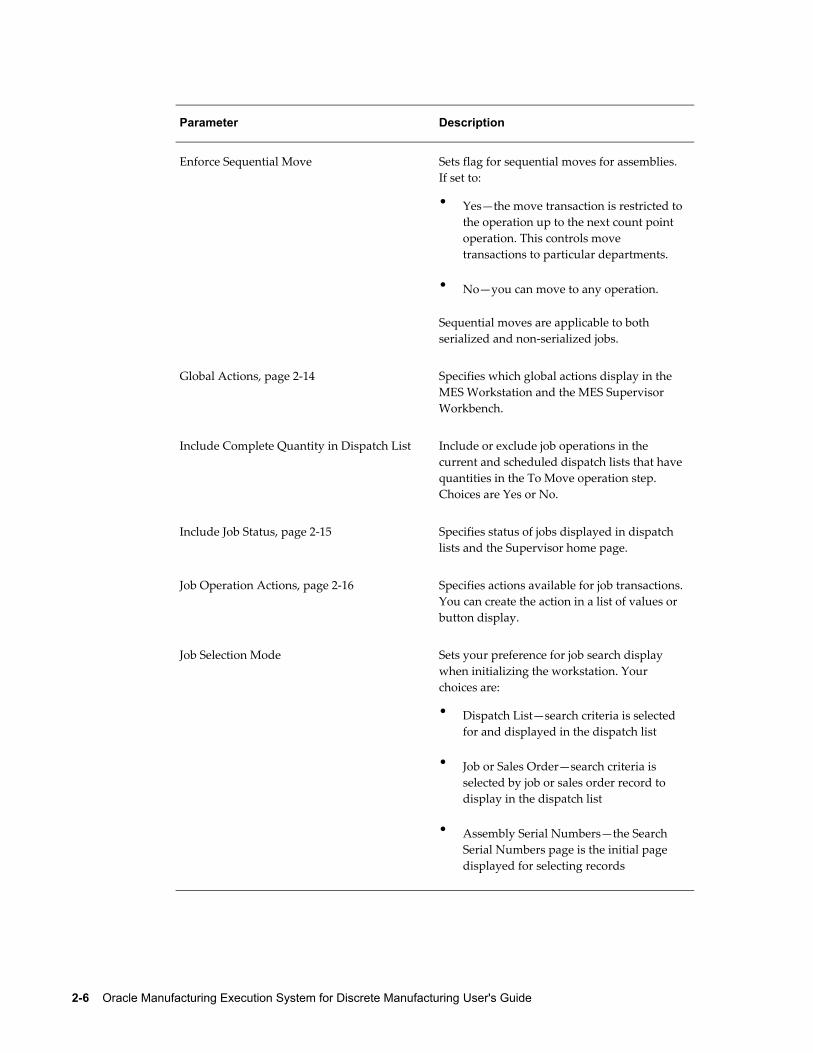
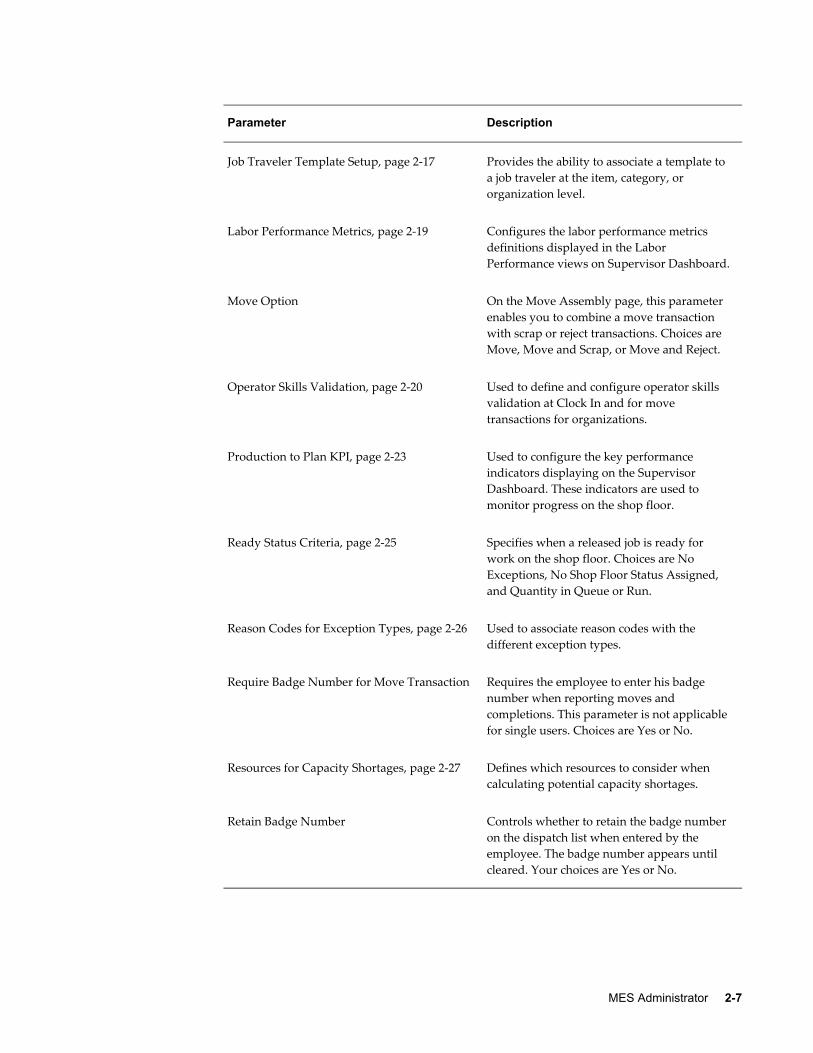
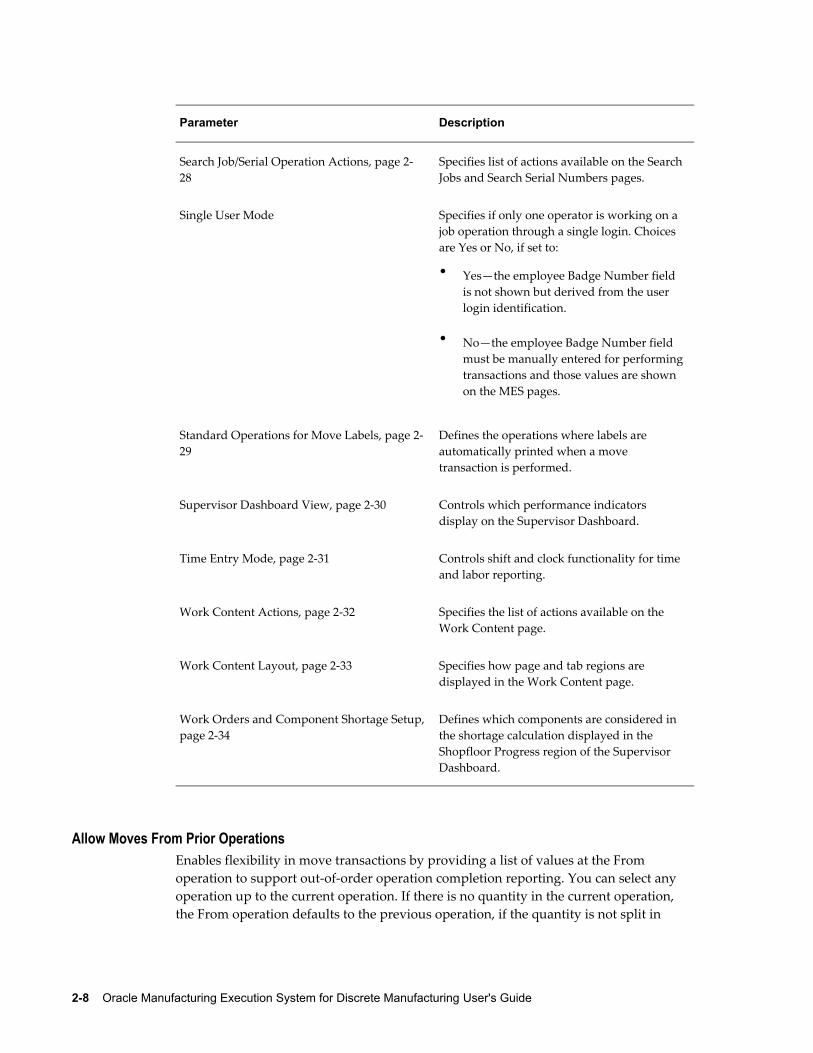
Parameter Description
Allow Moves From Prior Operations, page 2-8
Enables flexibility in move transactions by providing a list of values at the From operation.
Assemblies for Completion Labels, page 2-9 Specifies which assemblies have labels automatically printed at the time of completion.
Attachment Sources, page 2-10 Defines the source and the order of documents displayed in the Attachments region.
2-4 Oracle Manufacturing Execution System for Discrete Manufacturing User's Guide
Parameter Description
Attachment Window Height Sets the view size of attachments on the Work Content and Attachment pages. The width is always full screen. Choices are 100, 400, 600, or 800 pixels.
Automatic Job Transition Controls the presentation of jobs on the Work Content page. Choices are:
• Yes: Upon completion of one job operation, the next available job operationis automatically selected, if the entire quantity in the job operation is completed.
• No: System returns to the work content page of the current operation, even after the entire quantity in the job operation is completed.
Charge Resource at Report Time Indicates if resource transactions are created from reported times— through clock actions. Choices are Yes or No.
Combine Job On and Clock In Buttons Enables you to combine the actions of Job On and Clock In, and Job Off and Clock Out time entry. The combination is used for environments where only one employee is working on a job. Choices are:
• Yes: Job On and Clock In are the same action, therefore the Job On button does not appear on the page.
• No: Job On is a separate action of Clock In, and required when multiple employees are working on a single job operation. Both buttons appear on the page.
Note: This parameter is disabled if the Time Entry Mode parameter is set to Disable.
MES Administrator 2-5
Parameter Description
Default Dispatch List Type Determines the type of dispatch list to display when the workstation is initialized. Choices are
• Current: Includes jobs running on the shop floor, having assembly quantity in any step except scrap
• Scheduled: Includes all the current work plus other job operations scheduled
Default Intra Op Step, page 2-11 Specifies the default To intraoperation step formove transactions. Choices are Queue, Run, orTo Move.
Default Scrap Account, page 2-12 Used when the organization requires a scrap account.
Departmental Access Determines which records display in the Department list of values of the Startup page. Choices are:
• All—All departments in a particular organization appear.
• Assigned—Only departments where the employee is assigned as a resource instantappear.
Dispatch List Ordering Criteria, page 2-13 Specifies the fields and order displayed on thedispatch list.
Dispatch List Working Order Specifies the order for working on jobs as shown on the dispatch list. Choices are Any Order or First Ready.
2-6 Oracle Manufacturing Execution System for Discrete Manufacturing User's Guide
Parameter Description
Enforce Sequential Move Sets flag for sequential moves for assemblies. If set to:
• Yes—the move transaction is restricted to the operation up to the next count point operation. This controls move transactions to particular departments.
• No—you can move to any operation.
Sequential moves are applicable to both serialized and non-serialized jobs.
Global Actions, page 2-14 Specifies which global actions display in the MES Workstation and the MES Supervisor Workbench.
Include Complete Quantity in Dispatch List Include or exclude job operations in the current and scheduled dispatch lists that have quantities in the To Move operation step. Choices are Yes or No.
Include Job Status, page 2-15 Specifies status of jobs displayed in dispatch lists and the Supervisor home page.
Job Operation Actions, page 2-16 Specifies actions available for job transactions. You can create the action in a list of values or button display.
Job Selection Mode Sets your preference for job search display when initializing the workstation. Your choices are:
• Dispatch List—search criteria is selected for and displayed in the dispatch list
• Job or Sales Order—search criteria is selected by job or sales order record to display in the dispatch list
• Assembly Serial Numbers—the Search Serial Numbers page is the initial page displayed for selecting records
MES Administrator 2-7
Parameter Description
Job Traveler Template Setup, page 2-17 Provides the ability to associate a template to a job traveler at the item, category, or organization level.
Labor Performance Metrics, page 2-19 Configures the labor performance metrics definitions displayed in the Labor Performance views on Supervisor Dashboard.
Move Option On the Move Assembly page, this parameter enables you to combine a move transaction with scrap or reject transactions. Choices are Move, Move and Scrap, or Move and Reject.
Operator Skills Validation, page 2-20 Used to define and configure operator skills validation at Clock In and for move transactions for organizations.
Production to Plan KPI, page 2-23 Used to configure the key performance indicators displaying on the Supervisor Dashboard. These indicators are used to monitor progress on the shop floor.
Ready Status Criteria, page 2-25 Specifies when a released job is ready for work on the shop floor. Choices are No Exceptions, No Shop Floor Status Assigned, and Quantity in Queue or Run.
Reason Codes for Exception Types, page 2-26 Used to associate reason codes with the different exception types.
Require Badge Number for Move Transaction Requires the employee to enter his badge number when reporting moves and completions. This parameter is not applicable for single users. Choices are Yes or No.
Resources for Capacity Shortages, page 2-27 Defines which resources to consider when calculating potential capacity shortages.
Retain Badge Number Controls whether to retain the badge number on the dispatch list when entered by the employee. The badge number appears until cleared. Your choices are Yes or No.
2-8 Oracle Manufacturing Execution System for Discrete Manufacturing User's Guide
Parameter Description
Search Job/Serial Operation Actions, page 2-28
Specifies list of actions available on the Search Jobs and Search Serial Numbers pages.
Single User Mode Specifies if only one operator is working on a job operation through a single login. Choices are Yes or No, if set to:
• Yes—the employee Badge Number field is not shown but derived from the user login identification.
• No—the employee Badge Number field must be manually entered for performing transactions and those values are shown on the MES pages.
Standard Operations for Move Labels, page 2-29
Defines the operations where labels are automatically printed when a move transaction is performed.
Supervisor Dashboard View, page 2-30 Controls which performance indicators display on the Supervisor Dashboard.
Time Entry Mode, page 2-31 Controls shift and clock functionality for time and labor reporting.
Work Content Actions, page 2-32 Specifies the list of actions available on the Work Content page.
Work Content Layout, page 2-33 Specifies how page and tab regions are displayed in the Work Content page.
Work Orders and Component Shortage Setup,page 2-34
Defines which components are considered in the shortage calculation displayed in the Shopfloor Progress region of the Supervisor Dashboard.
Allow Moves From Prior OperationsEnables flexibility in move transactions by providing a list of values at the From operation to support out-of-order operation completion reporting. You can select any operation up to the current operation. If there is no quantity in the current operation, the From operation defaults to the previous operation, if the quantity is not split in
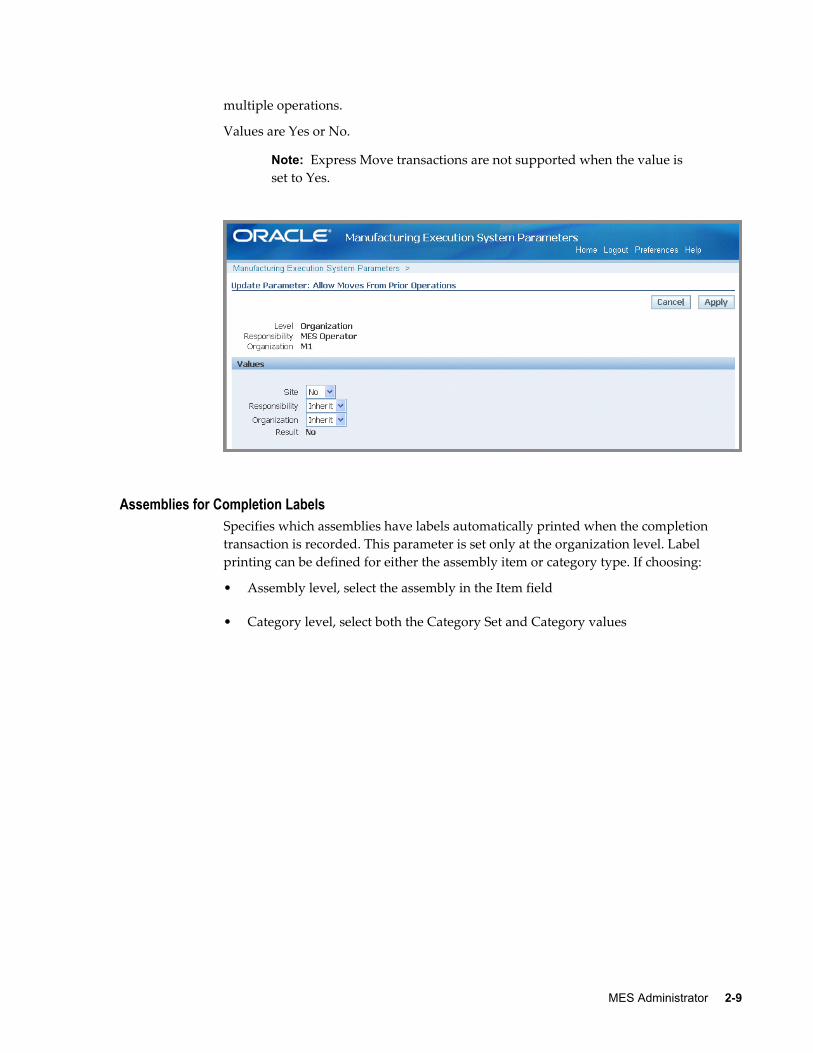
MES Administrator 2-9
multiple operations.
Values are Yes or No.
Note: Express Move transactions are not supported when the value is set to Yes.
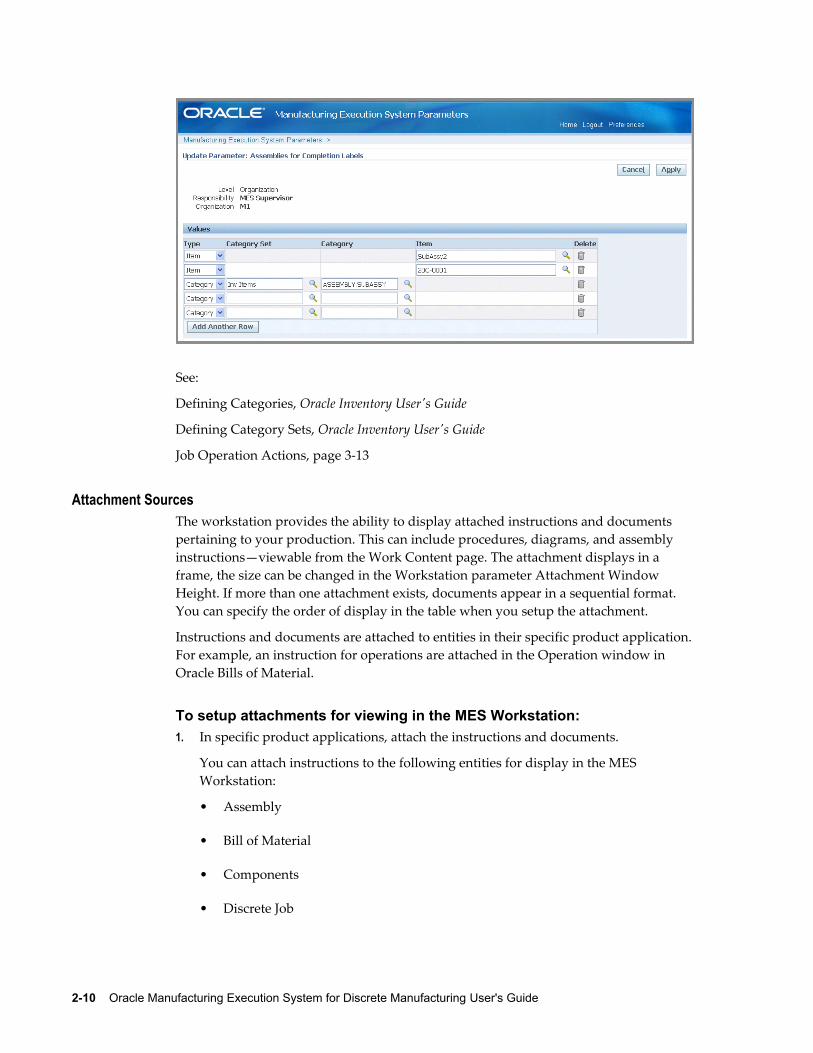
Assemblies for Completion LabelsSpecifies which assemblies have labels automatically printed when the completion transaction is recorded. This parameter is set only at the organization level. Label printing can be defined for either the assembly item or category type. If choosing:
• Assembly level, select the assembly in the Item field
• Category level, select both the Category Set and Category values
2-10 Oracle Manufacturing Execution System for Discrete Manufacturing User's Guide
See:
Defining Categories, Oracle Inventory User's Guide
Defining Category Sets, Oracle Inventory User's Guide
Job Operation Actions, page 3-13
Attachment SourcesThe workstation provides the ability to display attached instructions and documents pertaining to your production. This can include procedures, diagrams, and assembly instructions—viewable from the Work Content page. The attachment displays in a frame, the size can be changed in the Workstation parameter Attachment Window Height. If more than one attachment exists, documents appear in a sequential format. You can specify the order of display in the table when you setup the attachment.
Instructions and documents are attached to entities in their specific product application.For example, an instruction for operations are attached in the Operation window in Oracle Bills of Material.
To setup attachments for viewing in the MES Workstation:1. In specific product applications, attach the instructions and documents.
You can attach instructions to the following entities for display in the MES Workstation:
• Assembly
• Bill of Material
• Components
• Discrete Job
MES Administrator 2-11
• Operation
• Routing (operation)
• Sales Order Header
• Sales Order Line
2. Set the frame for viewing in the workstation parameter Attachment Window Height.
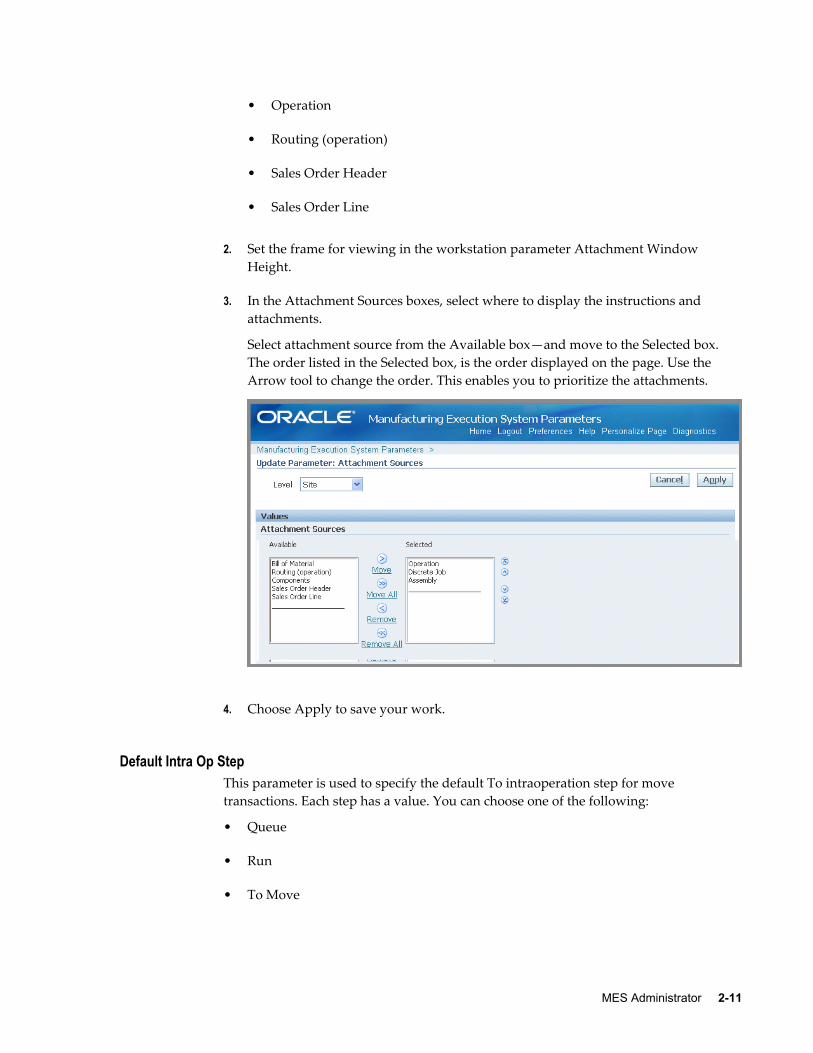
3. In the Attachment Sources boxes, select where to display the instructions and attachments.
Select attachment source from the Available box—and move to the Selected box. The order listed in the Selected box, is the order displayed on the page. Use the Arrow tool to change the order. This enables you to prioritize the attachments.
4. Choose Apply to save your work.
Default Intra Op StepThis parameter is used to specify the default To intraoperation step for move transactions. Each step has a value. You can choose one of the following:
• Queue
• Run
• To Move
2-12 Oracle Manufacturing Execution System for Discrete Manufacturing User's Guide
Note: Values of Reject and Scrap are not available as default move transactions.
The default logic for Intraoperation steps in the MES Workstation progresses in the following way:
• When the default step is greater than the From operation step, the To operation is used as the From operation default.
For example, for Operation 10 Queue moves, if the default step is set to Run—the To operation is defaulted to Operation 10, and the To step default is Run.
• When the default step is less than or equal to the From step, the To operation is defaulted to the next count point operation.
For example, for Operation 10 Queue moves, if the default step is set to Queue—theTo operation is defaulted to Operation 20, and the To step default is Queue.
• When the From operation is the last operation in the routing, and the default step is less than or equal to the From step—the To step default is To Move.
For example, for Operation 20 Queue moves, if this is the last operation and the default step is set to Queue—the To operation is defaulted to Operation 20, and To step default is To Move.
• When moving from To Move of the last operation—the To step is defaulted but not the To operation, because there are a number of possibilities for the backward moves.
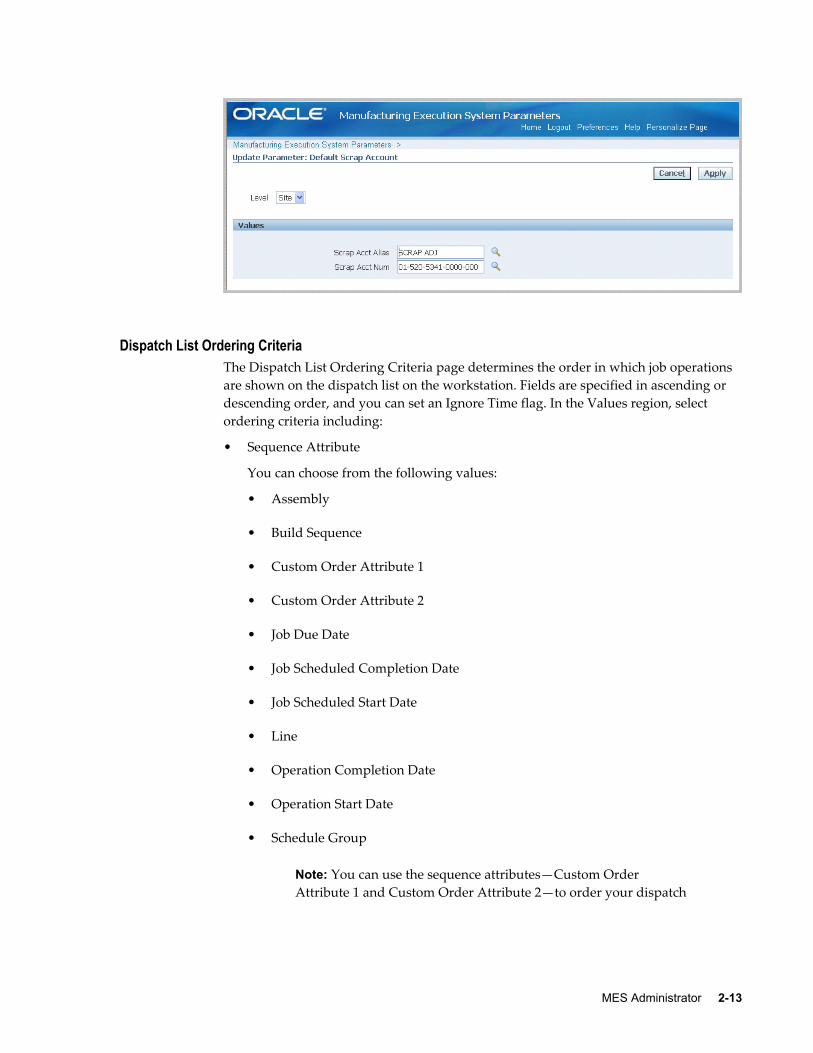
Default Scrap AccountThis parameter is used when the organization requires a scrap account, and there is a value in the Quantity to Scrap field for move transactions. Select a value in the Scrap Account field. Or select an alias value in the Scrap Account Alias field, the account number appears in the Scrap Account field.
MES Administrator 2-13
Dispatch List Ordering CriteriaThe Dispatch List Ordering Criteria page determines the order in which job operations are shown on the dispatch list on the workstation. Fields are specified in ascending or descending order, and you can set an Ignore Time flag. In the Values region, select ordering criteria including:
• Sequence Attribute
You can choose from the following values:
• Assembly
• Build Sequence
• Custom Order Attribute 1
• Custom Order Attribute 2
• Job Due Date
• Job Scheduled Completion Date
• Job Scheduled Start Date
• Line
• Operation Completion Date
• Operation Start Date
• Schedule Group
Note: You can use the sequence attributes—Custom Order Attribute 1 and Custom Order Attribute 2—to order your dispatch
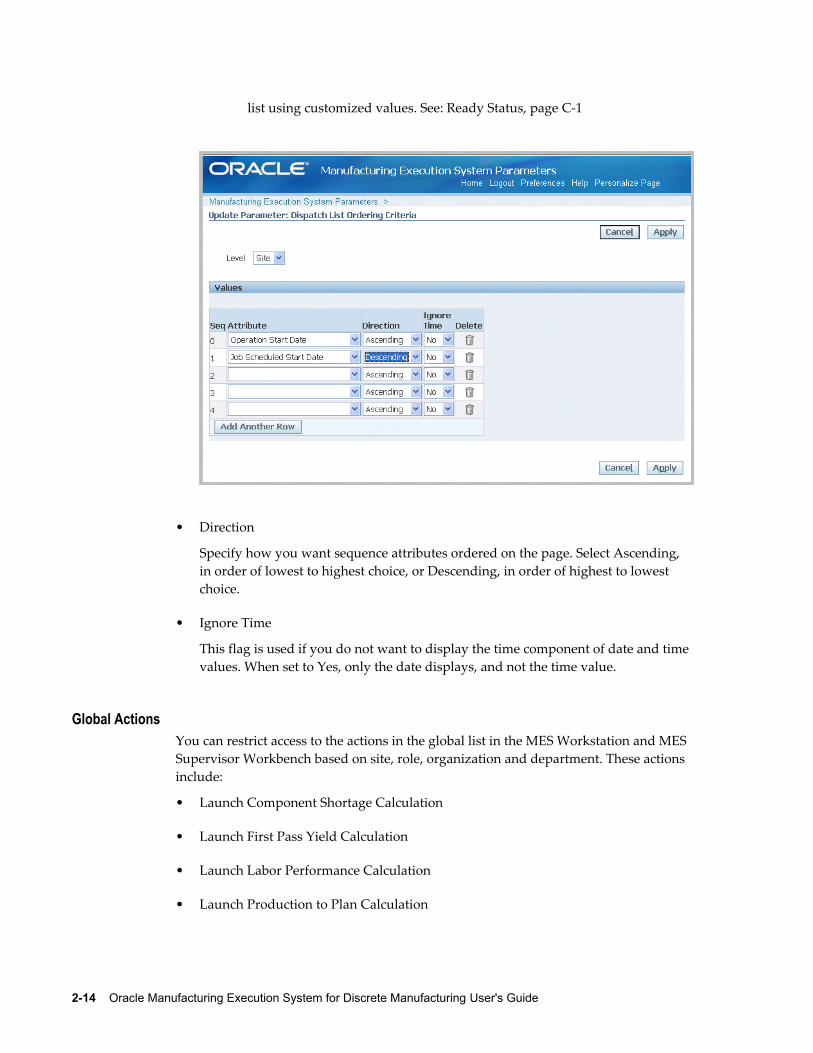
2-14 Oracle Manufacturing Execution System for Discrete Manufacturing User's Guide
list using customized values. See: Ready Status, page C-1
• Direction
Specify how you want sequence attributes ordered on the page. Select Ascending, in order of lowest to highest choice, or Descending, in order of highest to lowest choice.
• Ignore Time
This flag is used if you do not want to display the time component of date and time values. When set to Yes, only the date displays, and not the time value.
Global ActionsYou can restrict access to the actions in the global list in the MES Workstation and MES Supervisor Workbench based on site, role, organization and department. These actions include:
• Launch Component Shortage Calculation
• Launch First Pass Yield Calculation
• Launch Labor Performance Calculation
• Launch Production to Plan Calculation
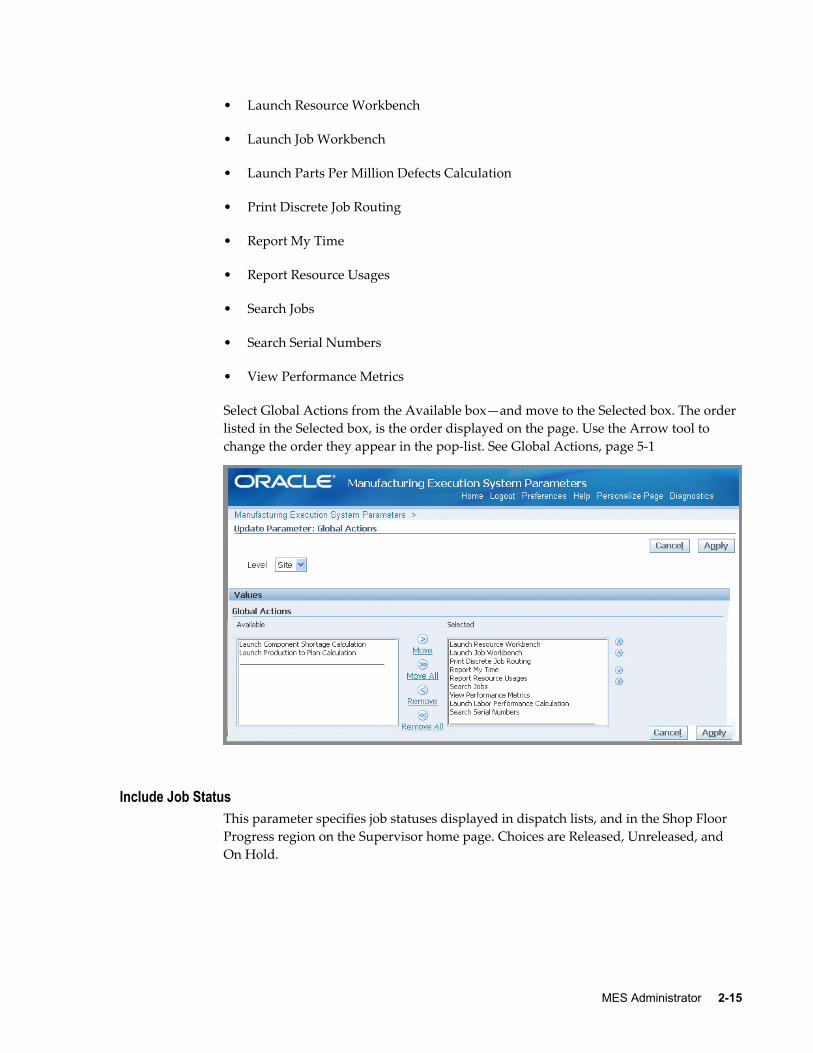
MES Administrator 2-15
• Launch Resource Workbench
• Launch Job Workbench
• Launch Parts Per Million Defects Calculation
• Print Discrete Job Routing
• Report My Time
• Report Resource Usages
• Search Jobs
• Search Serial Numbers
• View Performance Metrics
Select Global Actions from the Available box—and move to the Selected box. The order listed in the Selected box, is the order displayed on the page. Use the Arrow tool to change the order they appear in the pop-list. See Global Actions, page 5-1
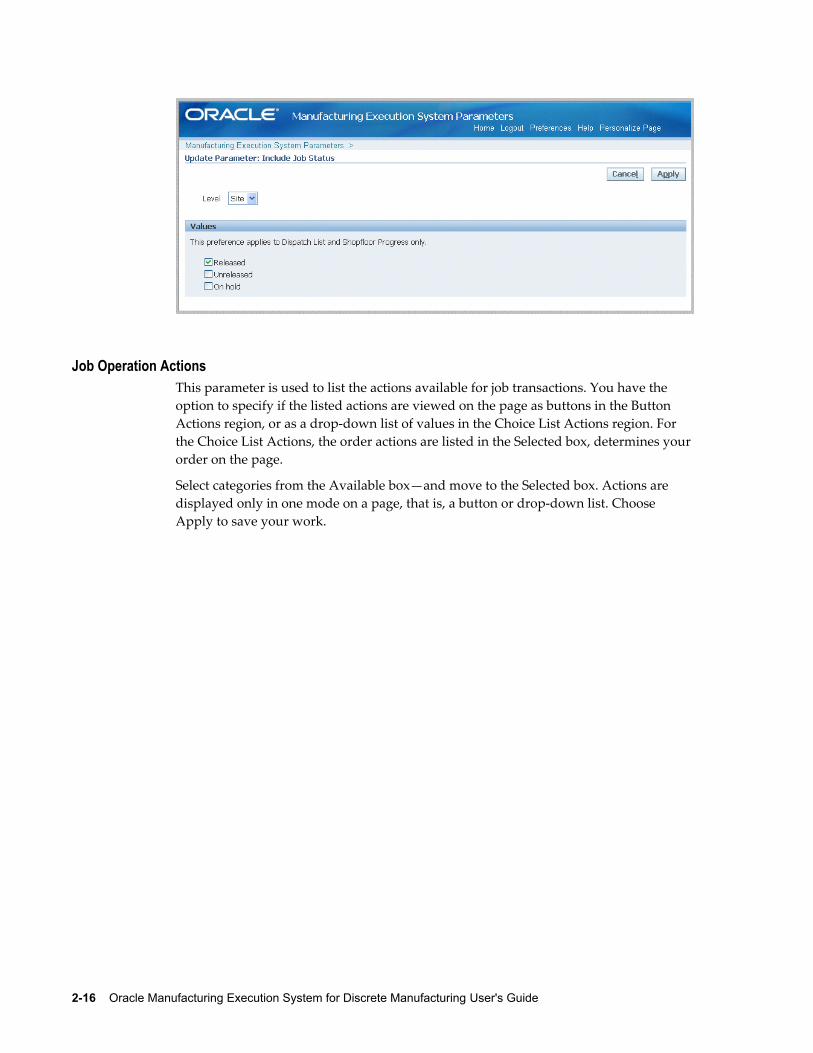
Include Job StatusThis parameter specifies job statuses displayed in dispatch lists, and in the Shop Floor Progress region on the Supervisor home page. Choices are Released, Unreleased, and On Hold.
2-16 Oracle Manufacturing Execution System for Discrete Manufacturing User's Guide
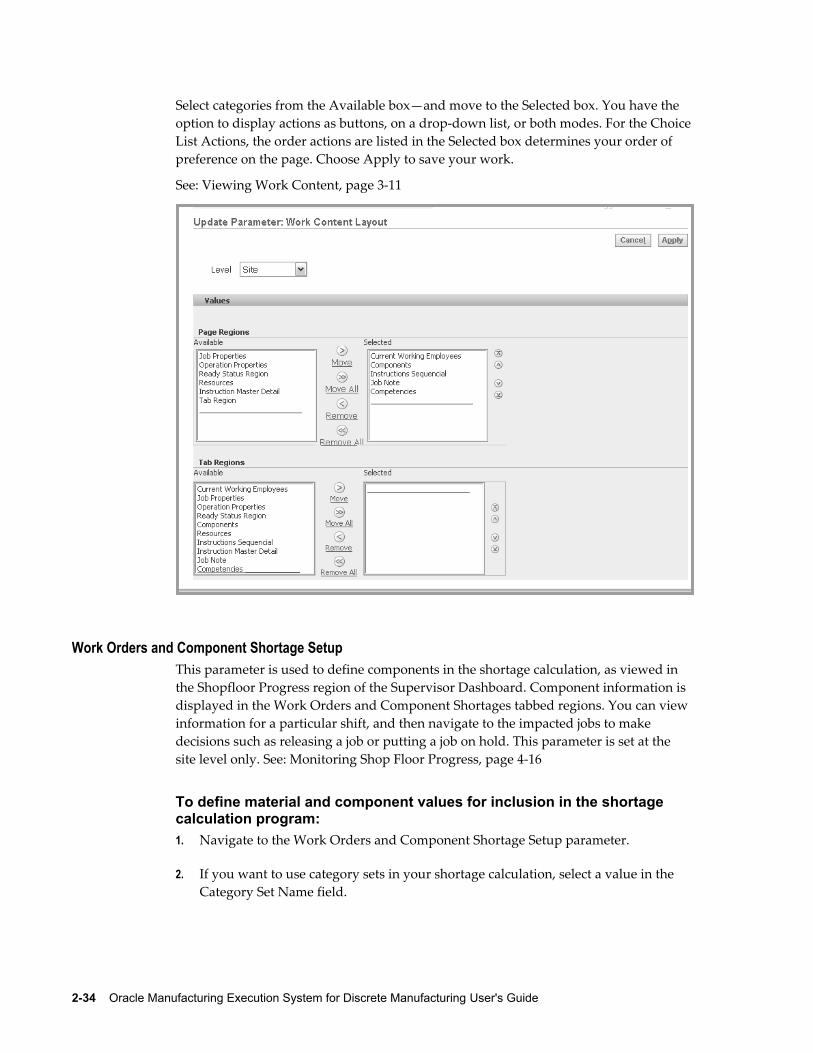
Job Operation ActionsThis parameter is used to list the actions available for job transactions. You have the option to specify if the listed actions are viewed on the page as buttons in the Button Actions region, or as a drop-down list of values in the Choice List Actions region. For the Choice List Actions, the order actions are listed in the Selected box, determines yourorder on the page.
Select categories from the Available box—and move to the Selected box. Actions are displayed only in one mode on a page, that is, a button or drop-down list. Choose Apply to save your work.

MES Administrator 2-17
The available Job Operation Actions include: Assign Alternate Resources, Clock In, Clock Out, Complete Assembly, Expedite, Job On, Job Off, Move Assembly, Move and Complete, Print Label, Reject Assembly, Report Exception, Report Time, Reschedule Operation, Return Assembly, Return and Move, Return From Scrap, Return From Reject, Separator1, Separator2, Separator3, Scrap Assembly, Transact Components, View Exceptions, View Job Detail, View Job Transactions, Undo Clock In, Undo Expedite, Update Note, View Operation Transactions, View Related Jobs, View and Print Job Traveler, and View Work Content.
See: Job Operation Actions, page 3-13
Job Traveler Template Setup The Job Traveler Template Setup parameter provides the ability to associate a template to a job traveler. You can view and print a job traveler from the Dispatch List, Search Jobs, Work Content, and Shopfloor Progress pages. This parameter enables you to configure a template for job travelers at several different levels including item, category,or organization level—and also enables you to include separate PDF files as appendices to the traveler document. It is set at the site level only.
To setup a job traveler template:1. Navigate to the Job Traveler Template Setup page.
2. Enable the Include PDF attachments in Job Traveler if you want to include separate PDF document file attachments.
2-18 Oracle Manufacturing Execution System for Discrete Manufacturing User's Guide
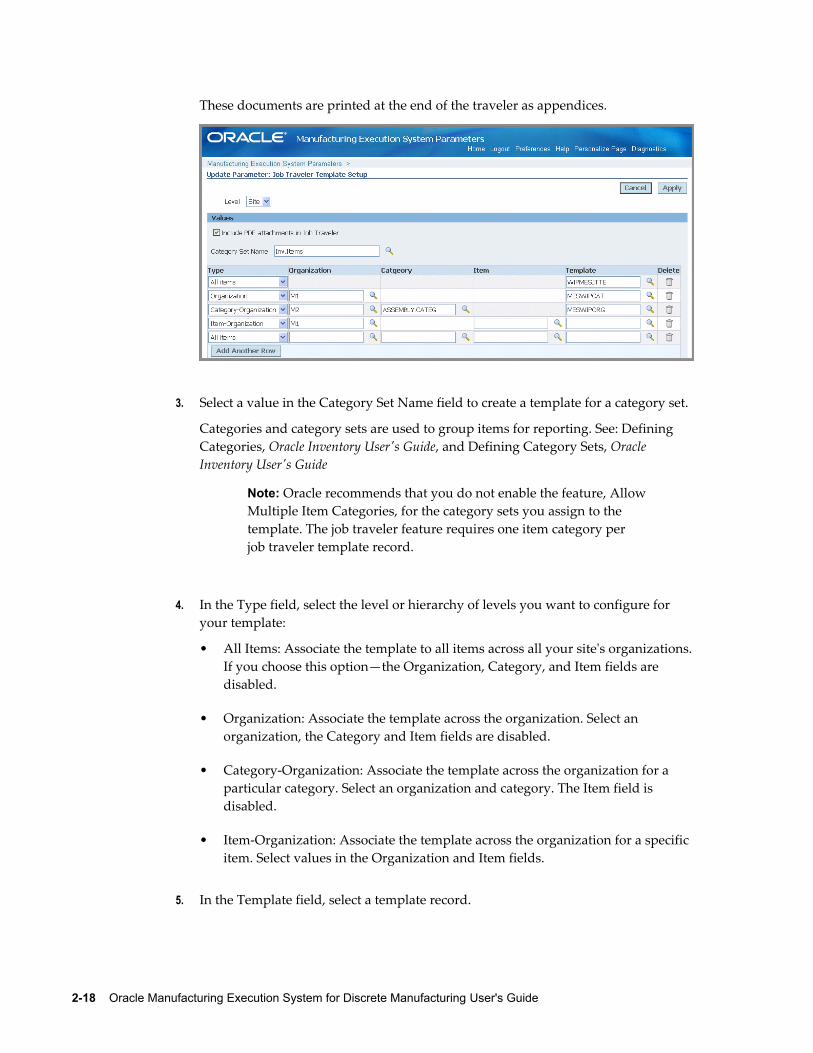
These documents are printed at the end of the traveler as appendices.
3. Select a value in the Category Set Name field to create a template for a category set.
Categories and category sets are used to group items for reporting. See: Defining Categories, Oracle Inventory User's Guide, and Defining Category Sets, Oracle Inventory User's Guide
Note: Oracle recommends that you do not enable the feature, AllowMultiple Item Categories, for the category sets you assign to the template. The job traveler feature requires one item category per job traveler template record.
4. In the Type field, select the level or hierarchy of levels you want to configure for your template:
• All Items: Associate the template to all items across all your site's organizations.If you choose this option—the Organization, Category, and Item fields are disabled.
• Organization: Associate the template across the organization. Select an organization, the Category and Item fields are disabled.
• Category-Organization: Associate the template across the organization for a particular category. Select an organization and category. The Item field is disabled.
• Item-Organization: Associate the template across the organization for a specific item. Select values in the Organization and Item fields.
5. In the Template field, select a template record.
MES Administrator 2-19
A default template is provided, WIPMESJTTE. You can attach custom templates created using Oracle XML Publisher.
6. Select Apply to save your work.
See: Job Operation Actions, page 3-13
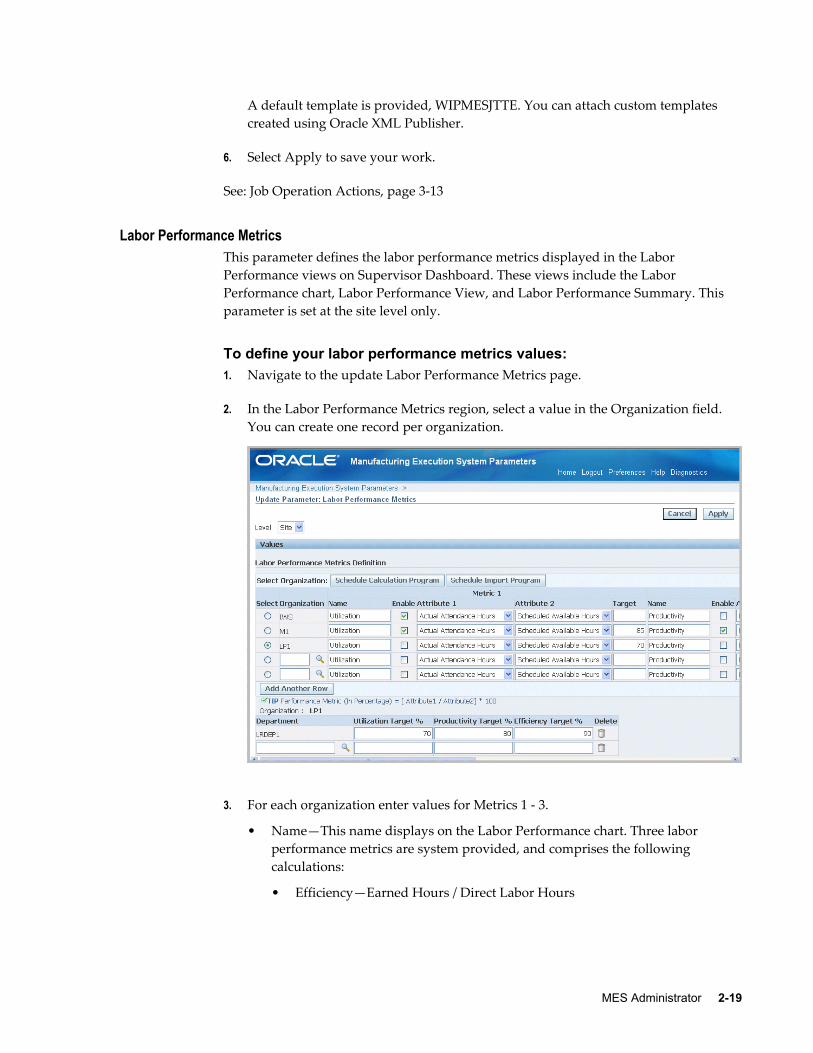
Labor Performance MetricsThis parameter defines the labor performance metrics displayed in the Labor Performance views on Supervisor Dashboard. These views include the Labor Performance chart, Labor Performance View, and Labor Performance Summary. This parameter is set at the site level only.
To define your labor performance metrics values:1. Navigate to the update Labor Performance Metrics page.
2. In the Labor Performance Metrics region, select a value in the Organization field. You can create one record per organization.
3. For each organization enter values for Metrics 1 - 3.
• Name—This name displays on the Labor Performance chart. Three labor performance metrics are system provided, and comprises the following calculations:
• Efficiency—Earned Hours / Direct Labor Hours
2-20 Oracle Manufacturing Execution System for Discrete Manufacturing User's Guide
• Productivity—Direct Labor Hours / Actual Attendance Hours
• Utilization—Actual Attendance Hours / Scheduled Available Hours
You can customize the metric name to meet your site's specifications. For example, you can rename the a specific metric to something more specific to your site.
• Attribute 1, Attribute 2—Choices are Actual Attendance Hours, Direct Labor Hours, Earned Hours, and Scheduled Available Hours.
• Target—Enter a percentage value for the goal of this metric.
4. You have the option to define metrics, but choose not to use them in the calculations. Check the Enable box for the metrics you want defined in your calculation.
Note: Metrics must be enabled to be considered in the calculation program.
5. You can also set a target for the metrics at department level. Specify the target for each department.
If no value is entered here, the calculation program uses the organization level value.
If you have customized the name of the metric, that customization displays here.
6. Select Apply to save your work.
7. Select an organization row, and choose Schedule Calculation Program to launch theLabor Performance Metrics concurrent request program. The Schedule Request: Schedule page appears where you can select runtime details for this request. The program considers the parameter values to calculate values for each organization. This information is displayed on the Labor Performance chart. You can also access the concurrent request through the Global Actions box.
8. Select Schedule Import Program to use time and attendance data from another system.
See: Labor Performance View, page 4-8
Operator Skills ValidationThe Operator Skills Validation parameter defines and configures organizations to checkfor the skill requirements during Clock In and move transactions. Use this parameter to specify the organizations that require competencies and qualifications are confirmed
MES Administrator 2-21
before enabling move transactions. This feature is setup in several Oracle Applications, see: Labor Skills Validation Setup, page 2-22
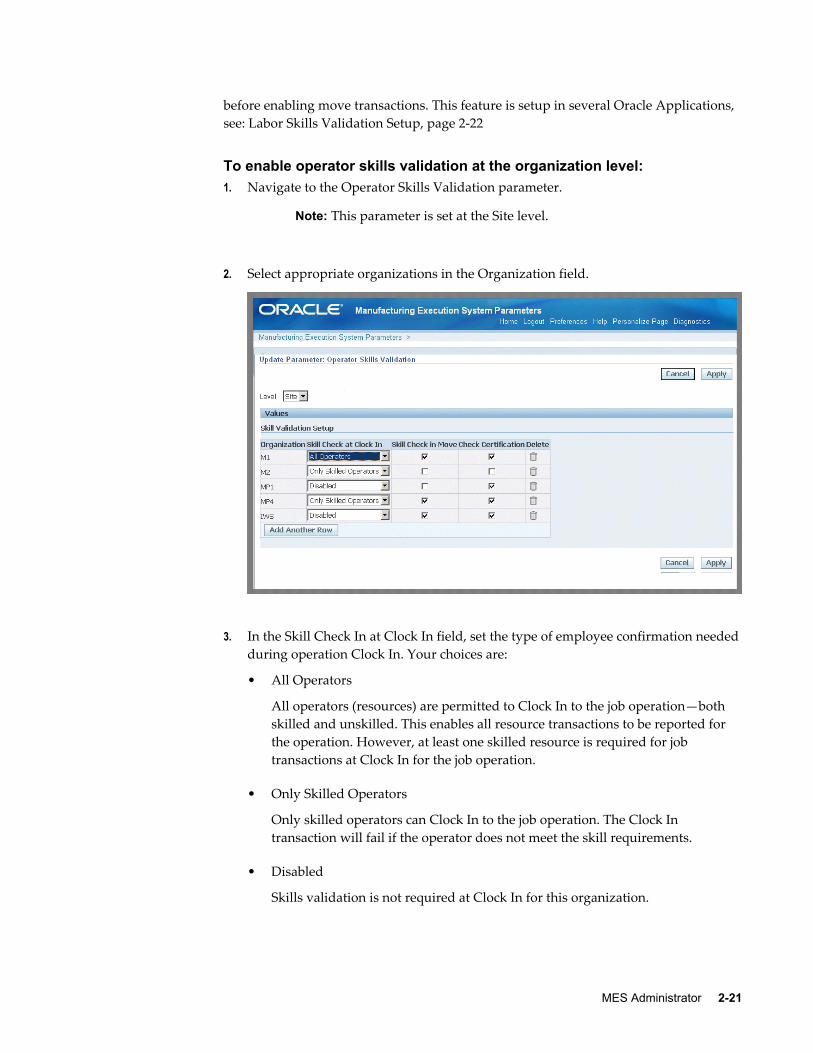
To enable operator skills validation at the organization level:1. Navigate to the Operator Skills Validation parameter.
Note: This parameter is set at the Site level.
2. Select appropriate organizations in the Organization field.
3. In the Skill Check In at Clock In field, set the type of employee confirmation neededduring operation Clock In. Your choices are:
• All Operators
All operators (resources) are permitted to Clock In to the job operation—both skilled and unskilled. This enables all resource transactions to be reported for the operation. However, at least one skilled resource is required for job transactions at Clock In for the job operation.
• Only Skilled Operators
Only skilled operators can Clock In to the job operation. The Clock In transaction will fail if the operator does not meet the skill requirements.
• Disabled
Skills validation is not required at Clock In for this organization.
2-22 Oracle Manufacturing Execution System for Discrete Manufacturing User's Guide
4. Enable or disable the Skill Check in Move check box. This specifies if the skill check is required for move transactions.
If this value is enabled, the operator performing the move transaction is required to have all the specified competencies at the appropriate skill levels, qualifications, and certifications to perform the job operation. If the move is across multiple operations, the skill check is effective for each performed operation where the skill check is enabled.
5. Enable or disable the Check Certification check box. This specifies if certification is required for move transactions.
6. Select Apply to save your work.
Labor Skills Validation SetupLabor skills validation is used to certify the qualifications and required competencies for operators performing assigned manufacturing activities. This helps you meet International Organization for Standardization (ISO) 9000 standards, preventing potential errors during job transactions. Regulatory requirements for specific industries may mandate companies to execute and document employee competencies.
The setup for labor skills validation is integrated with other Oracle applications including Human Resources Management Systems, Bills of Material, Work in Process, and E-Records.
1. Human Resources Management Systems
• Setup required competencies including certifications and skill levels.
• Setup qualifications.
• Associate competencies and qualifications to employees.
For procedures on setting up Human Resources Management Systems functionality, see:
• Competencies Overview, Oracle HRMS Workforce Sourcing, Deployment, and Talent Management Guide
• Competency Requirements, Oracle HRMS Workforce Sourcing, Deployment, and Talent Management Guide
• Defining Competencies, Oracle HRMS Workforce Sourcing, Deployment, and TalentManagement Guide
• Creating a Competency Profile, Oracle HRMS Workforce Sourcing, Deployment, and Talent Management Guide
MES Administrator 2-23
• Qualification Types, Oracle HRMS Workforce Sourcing, Deployment, and Talent Management Guide
2. Bills of Material
• Define competencies for standard operations.
• Define competencies for routing operations.
For procedures on setting up Bills of Material functionality, see:
• Creating a Standard Operation, Oracle Bills of Material User's Guide
• Creating a Routing, Oracle Bills of Material User's Guide
3. Work in Process
Define competencies for the operations on jobs, see: Adding and Updating Operations, Oracle Work in Process User's Guide.
4. E-Records
Setup e-records for capturing the competencies validated during move transactions,, see:
• Evidence Store, Oracle E-Records Implementation Guide
• Implementing E-Records, Oracle E-Records Implementation Guide
5. MES for Discrete Manufacturing
Configure Operator Skills Validation parameter.
Production to Plan KPIThis parameter defines the key performance indicators on the Production to Plan graph on the Supervisor Dashboard. Supervisors use this graph to review shop floor progress and then take appropriate actions. The parameter is set at the site level only.
The page displays a table containing values used for the scheduling calculation method per organization record. You select a specific organization and launch the Production toPlan Calculation concurrent request.
To set Production to Plan key performance indicators:1. Navigate to the Production to Plan KPI parameter page.
2. Select an Organization. You can create only one record per organization.
3. Select a calculation method, your choices are:
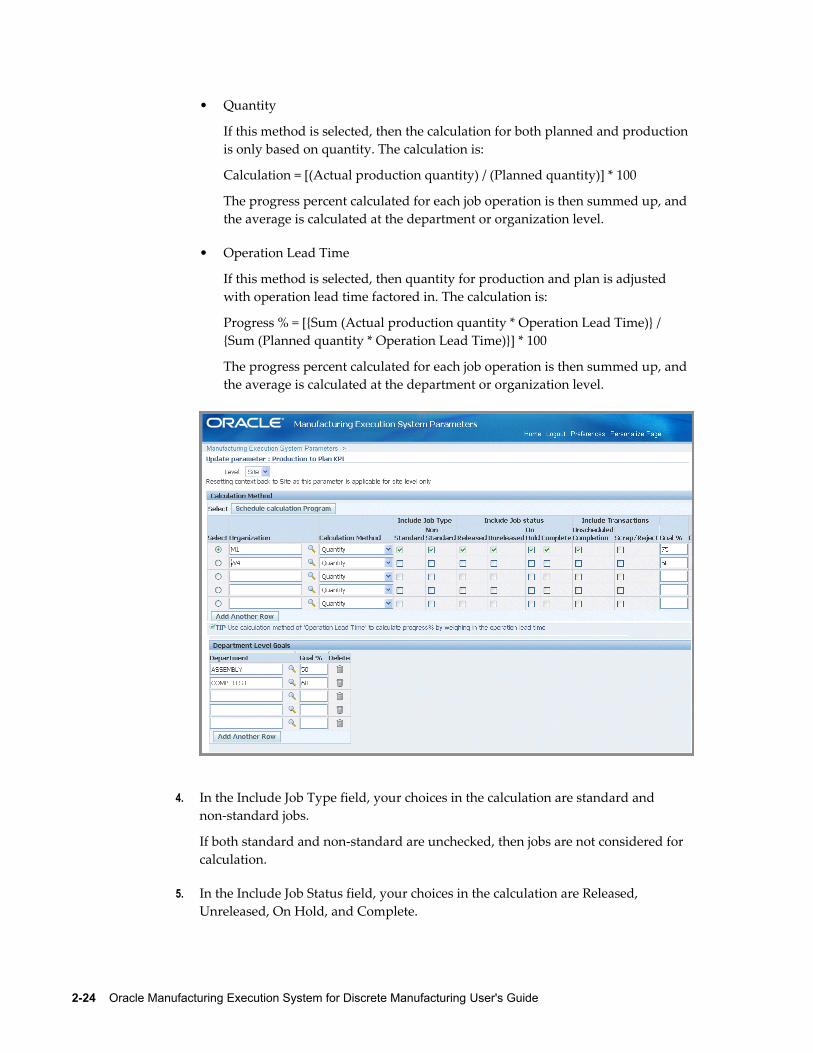
2-24 Oracle Manufacturing Execution System for Discrete Manufacturing User's Guide
• Quantity
If this method is selected, then the calculation for both planned and production is only based on quantity. The calculation is:
Calculation = [(Actual production quantity) / (Planned quantity)] * 100
The progress percent calculated for each job operation is then summed up, and the average is calculated at the department or organization level.
• Operation Lead Time
If this method is selected, then quantity for production and plan is adjusted with operation lead time factored in. The calculation is:
Progress % = [{Sum (Actual production quantity * Operation Lead Time)} / {Sum (Planned quantity * Operation Lead Time)}] * 100
The progress percent calculated for each job operation is then summed up, and the average is calculated at the department or organization level.
4. In the Include Job Type field, your choices in the calculation are standard and non-standard jobs.
If both standard and non-standard are unchecked, then jobs are not considered for calculation.
5. In the Include Job Status field, your choices in the calculation are Released, Unreleased, On Hold, and Complete.
MES Administrator 2-25
If no status is selected, then jobs are not considered for calculation.
6. In the Include Transactions field, your choices in the calculation are Unscheduled Completion and Scrap/Reject.
Transactions on job operations which are not performed on the scheduled day and shift are considered as unscheduled completions. Scheduled day and shift is calculated based on the job operation completion time.
7. Enter a Goal % at the organization level for the production to plan. This value is user-defined.
8. In the Department Level Goals region, you can specify the objective of the percentage of parts completed for each department. Select a Department and enter avalue in the Goal % field at the department level.
If no value is entered here, the calculation program uses the organization level value.
9. Select Apply to save your work.
10. Select an organization row, and choose Schedule Calculation Program to launch theProduction to Plan Calculation concurrent request program.
The Schedule Request: Schedule page appears where you can select runtime details for this request. The program considers the parameter values to calculate values for each job operation rolled up to the department and organization. This information is displayed on the Production to Plan graph.
You can also access the concurrent request through the Global Actions box.
See: Production to Plan, page 4-6
Ready Status CriteriaThis parameter specifies the criteria used to indicate if a released job is ready for work on the shop floor. When a job meets the conditions for work, the Ready check mark is automatically updated on the Dispatch List and Work Content page. Criteria includes:
• No Exceptions
• No Shop Floor Status Assigned
• Quantity in Queue or Run
Information on ready status details displays in the Status region of the Work Content page if set in the parameter Work Content Layout, page 2-33
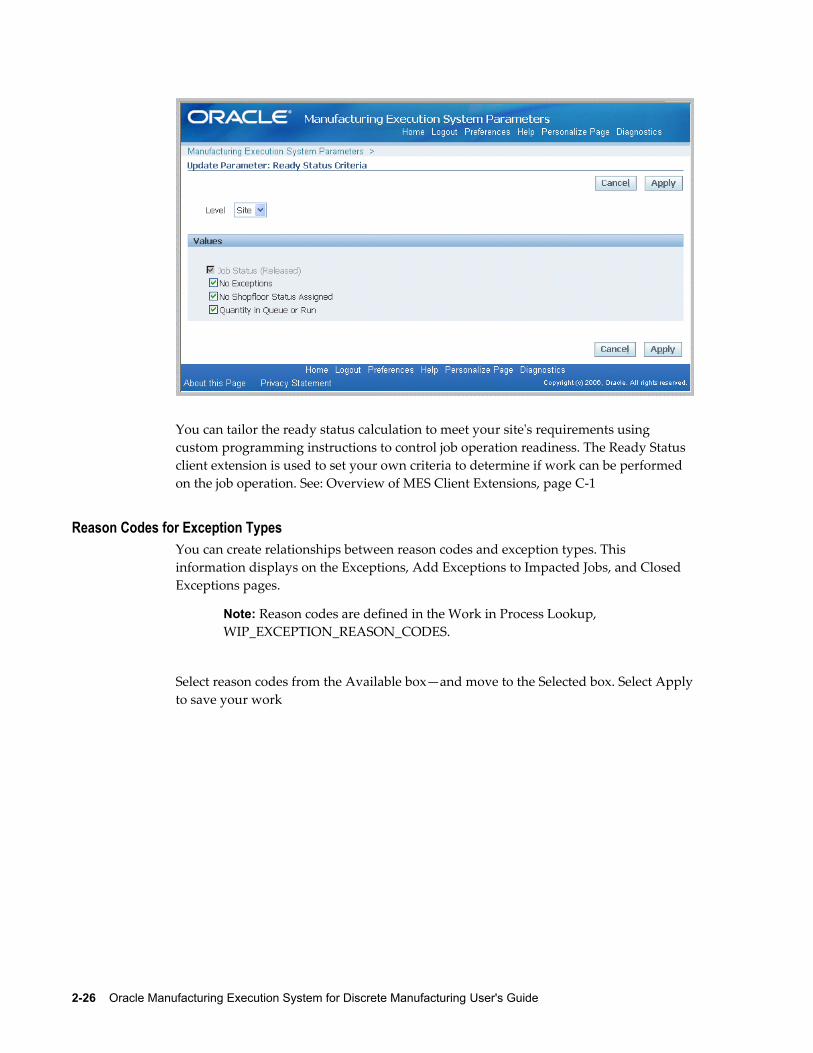
2-26 Oracle Manufacturing Execution System for Discrete Manufacturing User's Guide
You can tailor the ready status calculation to meet your site's requirements using custom programming instructions to control job operation readiness. The Ready Status client extension is used to set your own criteria to determine if work can be performed on the job operation. See: Overview of MES Client Extensions, page C-1
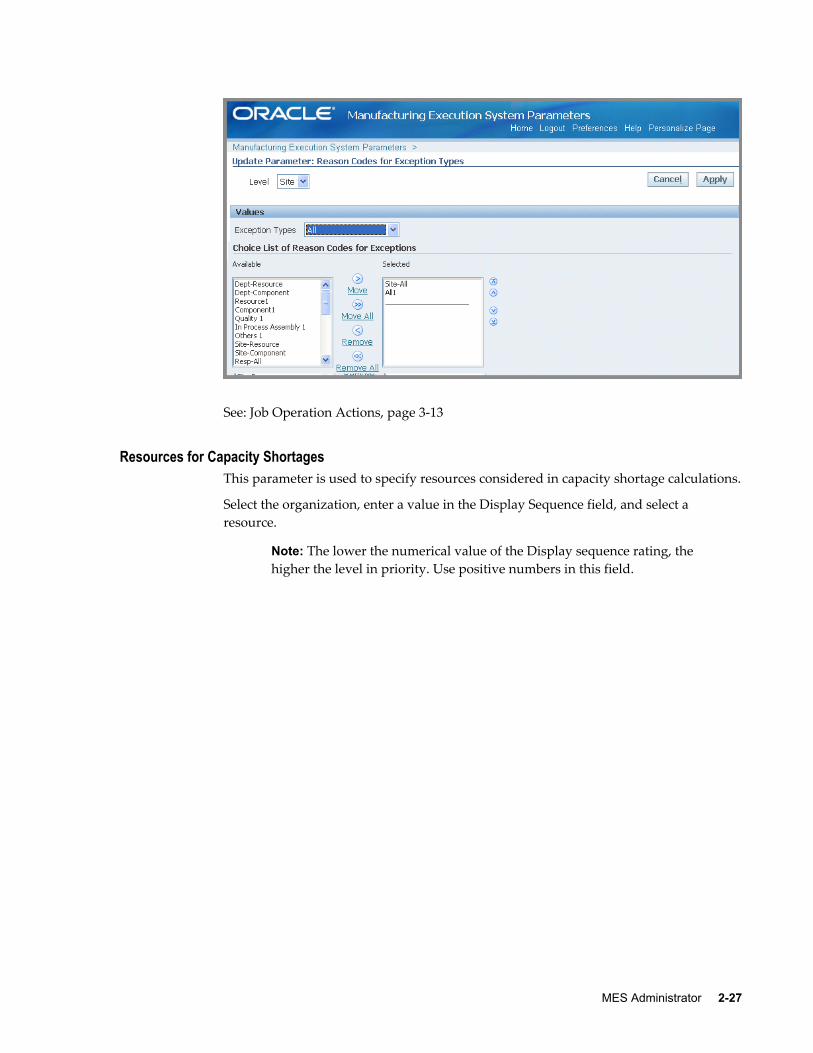
Reason Codes for Exception TypesYou can create relationships between reason codes and exception types. This information displays on the Exceptions, Add Exceptions to Impacted Jobs, and Closed Exceptions pages.
Note: Reason codes are defined in the Work in Process Lookup, WIP_EXCEPTION_REASON_CODES.
Select reason codes from the Available box—and move to the Selected box. Select Applyto save your work
MES Administrator 2-27
See: Job Operation Actions, page 3-13
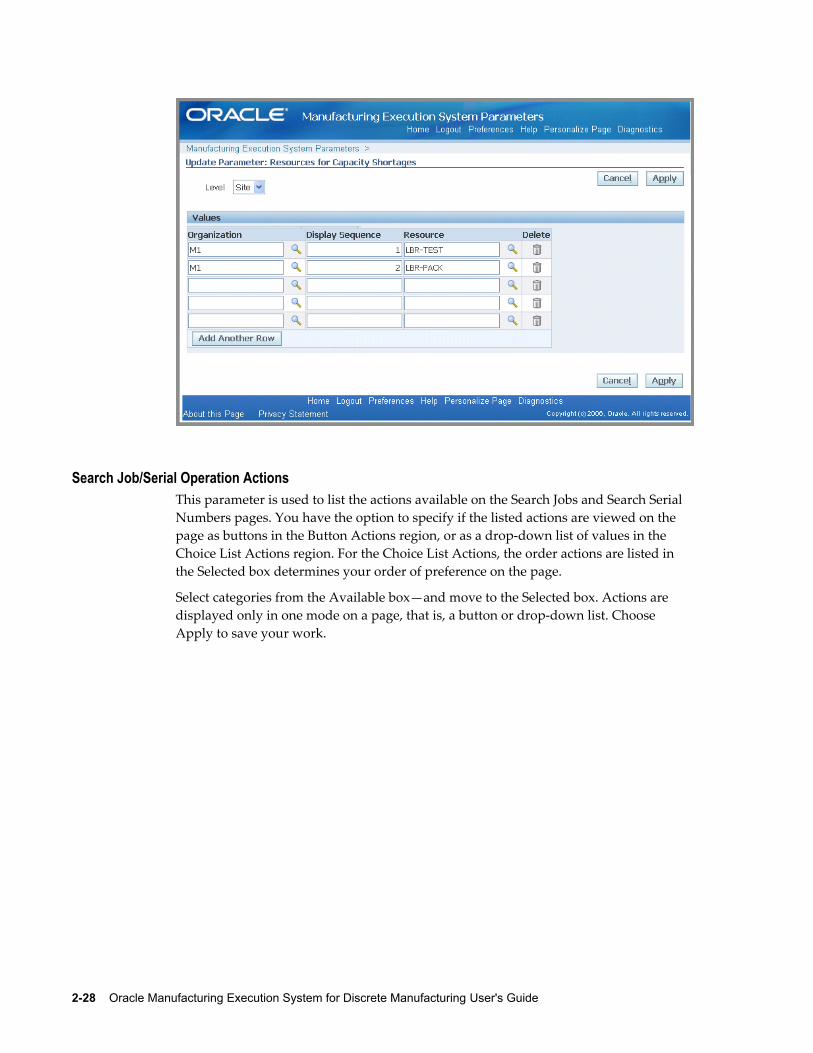
Resources for Capacity ShortagesThis parameter is used to specify resources considered in capacity shortage calculations.
Select the organization, enter a value in the Display Sequence field, and select a resource.
Note: The lower the numerical value of the Display sequence rating, thehigher the level in priority. Use positive numbers in this field.
2-28 Oracle Manufacturing Execution System for Discrete Manufacturing User's Guide
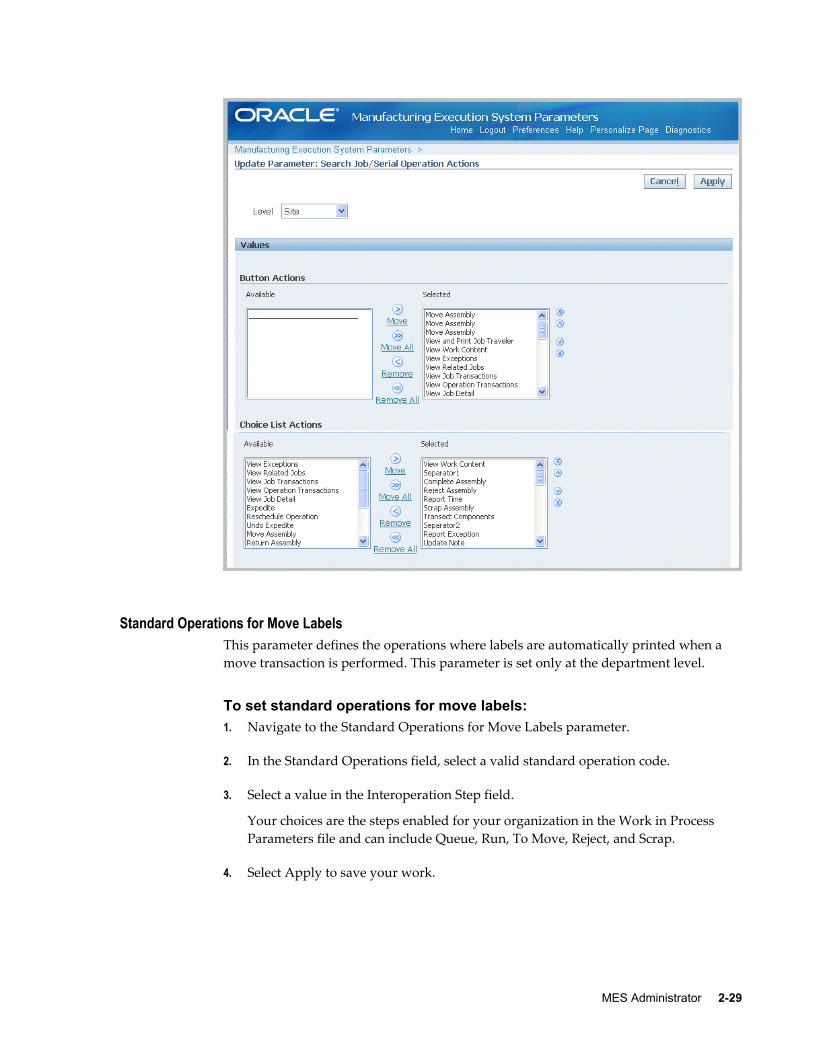
Search Job/Serial Operation ActionsThis parameter is used to list the actions available on the Search Jobs and Search Serial Numbers pages. You have the option to specify if the listed actions are viewed on the page as buttons in the Button Actions region, or as a drop-down list of values in the Choice List Actions region. For the Choice List Actions, the order actions are listed in the Selected box determines your order of preference on the page.
Select categories from the Available box—and move to the Selected box. Actions are displayed only in one mode on a page, that is, a button or drop-down list. Choose Apply to save your work.
MES Administrator 2-29
Standard Operations for Move LabelsThis parameter defines the operations where labels are automatically printed when a move transaction is performed. This parameter is set only at the department level.
To set standard operations for move labels:1. Navigate to the Standard Operations for Move Labels parameter.
2. In the Standard Operations field, select a valid standard operation code.
3. Select a value in the Interoperation Step field.
Your choices are the steps enabled for your organization in the Work in Process Parameters file and can include Queue, Run, To Move, Reject, and Scrap.
4. Select Apply to save your work.
2-30 Oracle Manufacturing Execution System for Discrete Manufacturing User's Guide
See: Job Operation Actions, page 2-16
Supervisor Dashboard ViewThis parameter sets the display on the Supervisor Dashboard for performance indicators. Enable the appropriate check boxes for the following views to display:
• Exceptions Summary
• Production to Plan KPI
• Labor Metrics
• First Pass Yield
• Parts Per Million Defects
See: Dashboard, page 4-2
MES Administrator 2-31
Time Entry ModeThis parameter is used to distinguish between the time entry records entered through the Startup page, Dispatch List, and transaction pages. It enables the shift and clock button displays used in time and attendance calculations, and labor reporting.
Choices for Shift In and Shift Out configuration are:
• Disable—Shift In and Shift Out do not display
• Enable—Shift In and Shift Out display on both the Dispatch List and Startup page
• Enable Only In Dispatch List
• Enable Only In Startup Page
Choices for Clock In and Clock Out configuration are Enable or Disable. If enabled, the choices for when the resource is charged are:
• No Review—charged automatically
• Review during Time Entry—charged at time entry
• Review during Time Entry and Move—charged during move transaction
2-32 Oracle Manufacturing Execution System for Discrete Manufacturing User's Guide
Work Content ActionsThis parameter is used to list the actions available on the Work Content page. You have the option to specify if the listed actions are viewed on the page as buttons in the ButtonActions region, or as a drop-down list of values in the Choice List Actions region. For the Choice List Actions, the order actions are listed in the Selected box determines your order of preference on the page.
The available Work Content Actions include: Assign Alternate Resources, Clock In, Clock Out, Complete Assembly, Dispatch Instances, Expedite, Job On, Job Off, Move Assembly, Move and Complete, Print Label, Reject Assembly, Report Exception, ReportTime, Reschedule Operation, Return Assembly, Return and Move, Return From Scrap, Return From Reject, Separator1, Separator2, Separator3, Scrap Assembly, Transact Components, View Exceptions, View Job Detail, View Job Transactions, Undo Clock In, Undo Expedite, Update Note, View Operation Transactions, View Related Jobs, View and Print Job Traveler, and View Work Content.
Select categories from the Available box—and move to the Selected box. You have the option to display actions as buttons, on a drop-down list, or both modes. Choose Apply to save your work.
See: Viewing Work Content, page 3-11
MES Administrator 2-33
Work Content LayoutThe Work Content Layout parameter is used to determine how to display page regions and tab regions on the Work Content page. Work Content Layout includes the following:
• Competencies
• Components
• Current Working Employees
• Instruction Master Detail
• Sequential Instructions
• Job Note
• Job Properties
• Operation Properties
• Ready Status Region
• Resources
2-34 Oracle Manufacturing Execution System for Discrete Manufacturing User's Guide
Select categories from the Available box—and move to the Selected box. You have the option to display actions as buttons, on a drop-down list, or both modes. For the ChoiceList Actions, the order actions are listed in the Selected box determines your order of preference on the page. Choose Apply to save your work.
See: Viewing Work Content, page 3-11
Work Orders and Component Shortage SetupThis parameter is used to define components in the shortage calculation, as viewed in the Shopfloor Progress region of the Supervisor Dashboard. Component information is displayed in the Work Orders and Component Shortages tabbed regions. You can view information for a particular shift, and then navigate to the impacted jobs to make decisions such as releasing a job or putting a job on hold. This parameter is set at the site level only. See: Monitoring Shop Floor Progress, page 4-16
To define material and component values for inclusion in the shortage calculation program:1. Navigate to the Work Orders and Component Shortage Setup parameter.
2. If you want to use category sets in your shortage calculation, select a value in the Category Set Name field.
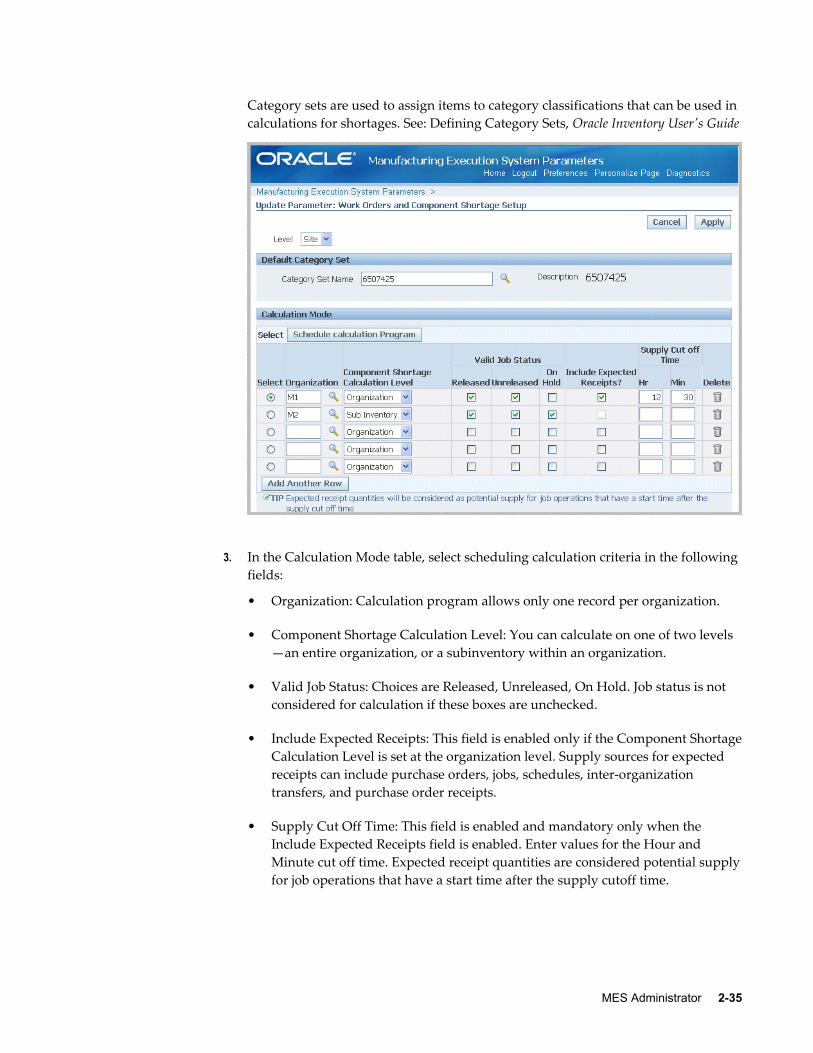
MES Administrator 2-35
Category sets are used to assign items to category classifications that can be used in calculations for shortages. See: Defining Category Sets, Oracle Inventory User's Guide
3. In the Calculation Mode table, select scheduling calculation criteria in the following fields:
• Organization: Calculation program allows only one record per organization.
• Component Shortage Calculation Level: You can calculate on one of two levels—an entire organization, or a subinventory within an organization.
• Valid Job Status: Choices are Released, Unreleased, On Hold. Job status is not considered for calculation if these boxes are unchecked.
• Include Expected Receipts: This field is enabled only if the Component ShortageCalculation Level is set at the organization level. Supply sources for expected receipts can include purchase orders, jobs, schedules, inter-organization transfers, and purchase order receipts.
• Supply Cut Off Time: This field is enabled and mandatory only when the Include Expected Receipts field is enabled. Enter values for the Hour and Minute cut off time. Expected receipt quantities are considered potential supplyfor job operations that have a start time after the supply cutoff time.
2-36 Oracle Manufacturing Execution System for Discrete Manufacturing User's Guide
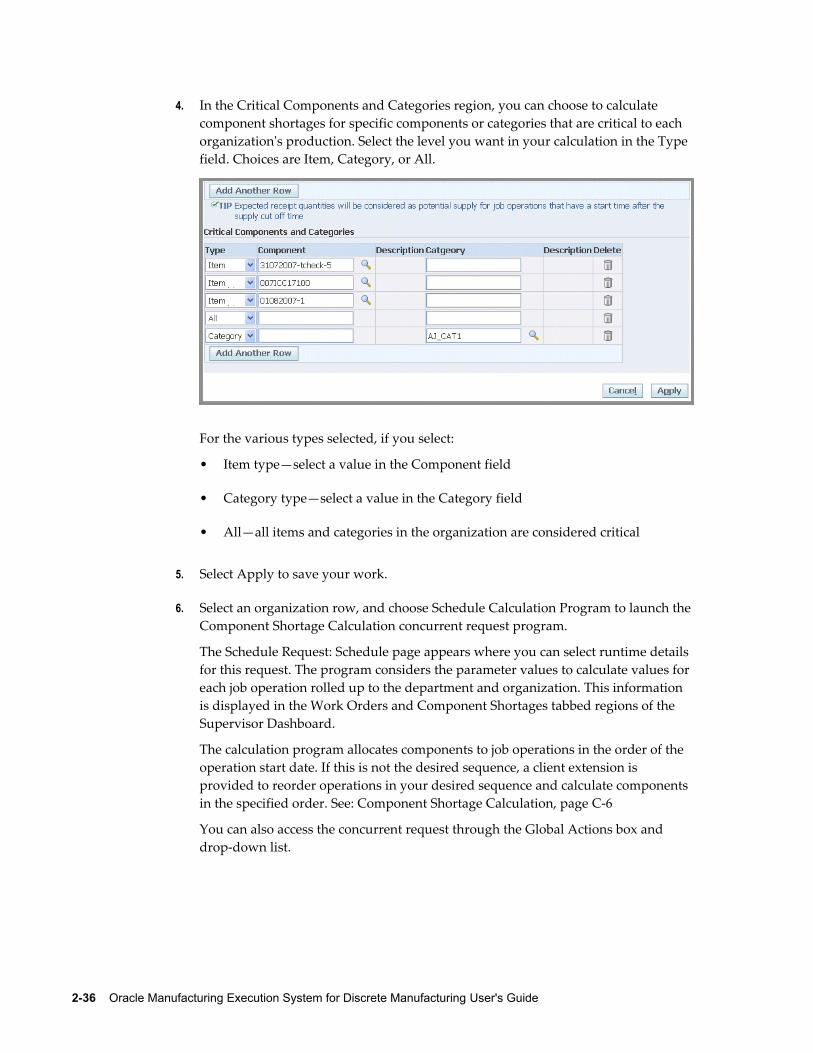
4. In the Critical Components and Categories region, you can choose to calculate component shortages for specific components or categories that are critical to each organization's production. Select the level you want in your calculation in the Type field. Choices are Item, Category, or All.
For the various types selected, if you select:
• Item type—select a value in the Component field
• Category type—select a value in the Category field
• All—all items and categories in the organization are considered critical
5. Select Apply to save your work.
6. Select an organization row, and choose Schedule Calculation Program to launch theComponent Shortage Calculation concurrent request program.
The Schedule Request: Schedule page appears where you can select runtime details for this request. The program considers the parameter values to calculate values for each job operation rolled up to the department and organization. This information is displayed in the Work Orders and Component Shortages tabbed regions of the Supervisor Dashboard.
The calculation program allocates components to job operations in the order of the operation start date. If this is not the desired sequence, a client extension is provided to reorder operations in your desired sequence and calculate components in the specified order. See: Component Shortage Calculation, page C-6
You can also access the concurrent request through the Global Actions box and drop-down list.

MES Workstation 3-1
3MES Workstation
This chapter describes the features of the MES Workstation and the Operator role, including the ability to view the work dispatch list and perform transactions.
This chapter covers the following topics:
• Overview of the MES Workstation
• Workstation Startup and Initialization Modes
• Viewing Dispatch Lists
• Viewing Work Content
• Job Operation Actions
• Moving and Completing Assemblies
• Overview of Serialized Manufacturing Transactions
• Searching for Serialized Jobs and Performing Express Moves
• Creating Move Transactions for Serialized Jobs
• Viewing Job Information
• Reporting Exceptions
• Returning Assemblies
• Shop Floor Time Entry
Overview of the MES WorkstationThe MES Workstation for the operator includes one tabbed region that provides Manufacturing Execution System (MES) capabilities on top of Oracle Work in Process. Itprovides the ability to view the work dispatch list, and then navigate to a number of transaction windows.
MES Operator responsibilities include:• Viewing dispatch lists for jobs in the work queue
3-2 Oracle Manufacturing Execution System for Discrete Manufacturing User's Guide
• Viewing job components and instructions
• Performing work in process transactions including move, completion, and assemblyscrap
• Recording quality results and material transactions
• Reporting exceptions if unable to perform job transactions
• Reporting time and labor information
• Ability to assign lot and serial numbers during operation and work order completion
• Functionality for serialized jobs to search and perform transactions by serial number record
• Ability to create electronic signatures for audit capability
Electronic Signature SupportMES for Discrete Manufacturing supports Federal Food and Drug Administration's (FDA) code regulation 21 CFR Part 11 through the Oracle E-Records application. This provides traceability for move, completion, and material transactions. In these transactions the operator or supervisor can first certify or acknowledge instructions to successfully process the transaction:
• If a signature is required for a transaction, a signature page displays
• Transaction pages display a check box, enabling you to indicate if instructions were acknowledged
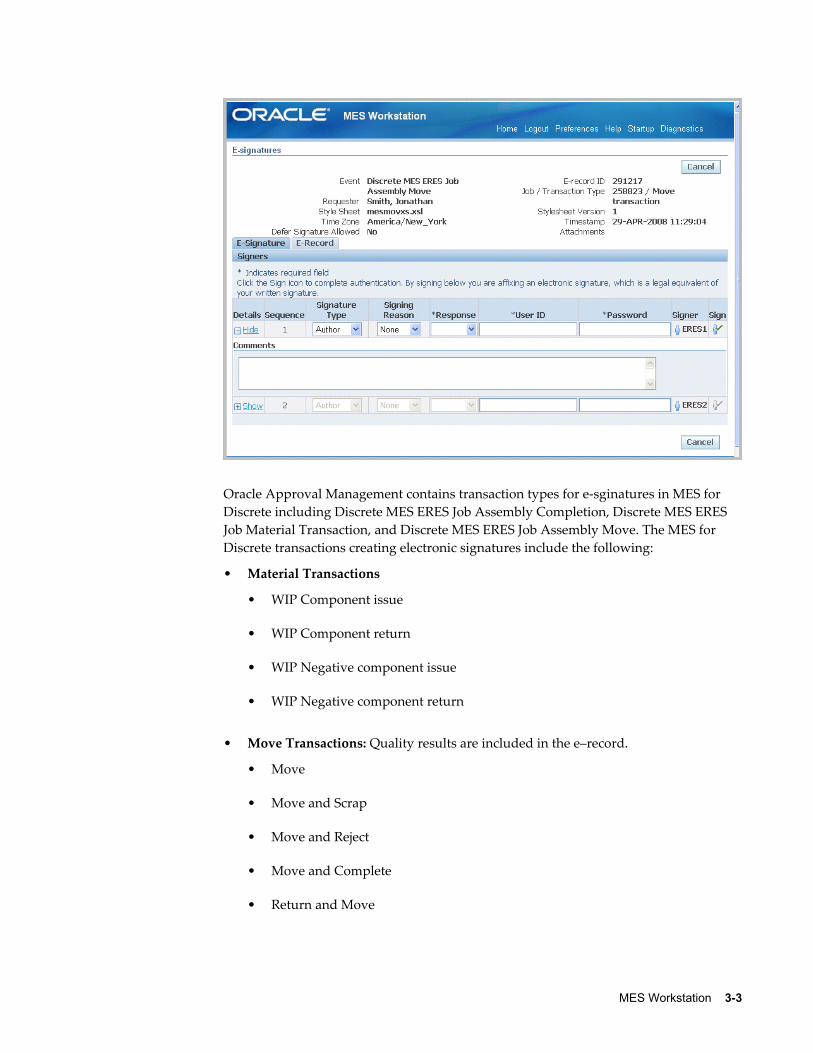
MES Workstation 3-3
Oracle Approval Management contains transaction types for e-sginatures in MES for Discrete including Discrete MES ERES Job Assembly Completion, Discrete MES ERES Job Material Transaction, and Discrete MES ERES Job Assembly Move. The MES for Discrete transactions creating electronic signatures include the following:
• Material Transactions
• WIP Component issue
• WIP Component return
• WIP Negative component issue
• WIP Negative component return
• Move Transactions: Quality results are included in the e–record.
• Move
• Move and Scrap
• Move and Reject
• Move and Complete
• Return and Move

3-4 Oracle Manufacturing Execution System for Discrete Manufacturing User's Guide
• Completion Transactions: Quality results are included in the e–record.
• Assembly completion
• Assembly return
Setup
The e-records and e-signatures (ERES) framework uses Oracle Workflow business events and Oracle XML Gateway. Oracle Workflow is required to initiate the e-signatures (EDRPSIGF) workflow for sending notifications. The Workflow Business Event system is used to define an e-signature event and associate synchronous e-signature subscription to the event.
If e-signature capability is setup, combination transactions generate records depending on parameter configurations. If the Move Option parameter is enabled, two records are generated in e-signatures for combination transactions.
The Oracle E–Records Implementation Guide and the Oracle E–Records Developer's Guide contains setup information. See:
• Evidence Store, Oracle E-Records Implementation Guide
• Implementing E-Records, Oracle E-Records Implementation Guide
• Oracle Manufacturing: Implementing Oracle E-Records in Discrete Manufacturing Guide
• Oracle Approvals Management Implementation Guide
Workstation Startup and Initialization ModesThe details displayed on both the MES Workstation and the MES Supervisor Workbench are determined by the specifics of your login information. The Startup page is used to enter your information to view the entire organization and a particular department; you can also specify a resource, employee, or machine. You can set parameters and integrate other Oracle Application functions for different login and Workbench initialization modes.
Job Selection Modes
The Job Selection Mode parameter is used to set a job search page when initializing the workstation. Each page type returns records within the login parameter values entered. Choices include:
• Dispatch Lists to display job operation records according to your configuration including operation schedule times, job type, working order, and a number of otherparameter settings. See: Viewing Dispatch Lists, page 3-6
• Search page enabling search by job number or sales order number for records. See:
MES Workstation 3-5
Searching for Jobs, page 5-4
• Search Serial Numbers page enabling search according to serialized job records. See: Searching for Serialized Jobs and Performing Express Moves, page 3-34
Assigned Resources
In Oracle Bills of Material, departments are assigned to each operation, and available employee labor resources instances are assigned to departments. For a specific login:
• If the employee is assigned to one organization, department, and resource instance combination—the search mode page appears automatically for that login parametercombination. The employee can perform transactions only within those parameters,and values cannot be changed.
• If the employee has several assigned organizations, departments, or resources associated to his login—the information can be changed to the assigned values.
See: Defining a Resource, Oracle Bills of Material User's Guide, and Assigning Resources to a Department, Oracle Bills of Material User's Guide
Departmental Access
The Departmental Access parameter determines which records display, in the list of values, in the Department parameter of the Startup page. If the parameter is set to:
• All—All departments in a particular organization appear.
• Assigned—Only departments where the employee is assigned as a resource instance appear.
Save Startup Parameters
Your job selection mode page displays automatically when you save startup parametersfrom a prior login. Enable the Save Startup Parameters check box to save parameters forfuture logins. This reduces navigation for repeated combinations of organization, department, and resource. To change saved login information, access the Startup page again by selecting Startup in the MES Workstation.
To log on to the MES Workstation:1. Navigate to the Startup page.
2. If Shift In and Shift Out is configured on the page, you can enable or disable employee time and labor reporting. These flags are configured in the Time Entry Mode parameter, page 2-31.
• Shift In enables the recording of actual attendance hours entered
• Shift Out stops actual attendance hours
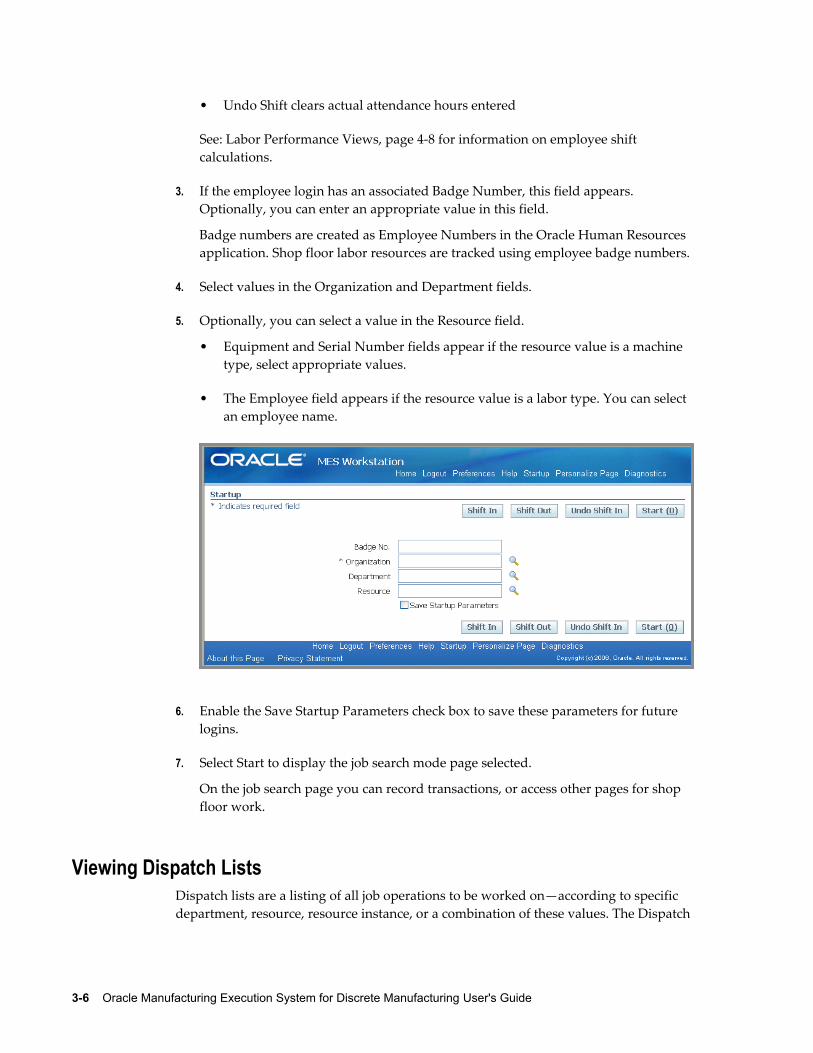
3-6 Oracle Manufacturing Execution System for Discrete Manufacturing User's Guide
• Undo Shift clears actual attendance hours entered
See: Labor Performance Views, page 4-8 for information on employee shift calculations.
3. If the employee login has an associated Badge Number, this field appears. Optionally, you can enter an appropriate value in this field.
Badge numbers are created as Employee Numbers in the Oracle Human Resources application. Shop floor labor resources are tracked using employee badge numbers.
4. Select values in the Organization and Department fields.
5. Optionally, you can select a value in the Resource field.
• Equipment and Serial Number fields appear if the resource value is a machine type, select appropriate values.
• The Employee field appears if the resource value is a labor type. You can select an employee name.
6. Enable the Save Startup Parameters check box to save these parameters for future logins.
7. Select Start to display the job search mode page selected.
On the job search page you can record transactions, or access other pages for shop floor work.
Viewing Dispatch ListsDispatch lists are a listing of all job operations to be worked on—according to specific department, resource, resource instance, or a combination of these values. The Dispatch
MES Workstation 3-7
List enables you to perform express move transactions and access other pages for performing and viewing transactions. This list is based on operation schedule times within the specified time range. This includes:
• Current: Job operations with assembly quantities in all steps except Scrap and Reject.
• Scheduled: Job operations with assembly quantities in all steps except Scrap and Reject, plus all other job operations having schedule times within time range.
• Upstream: Job operations that have quantities in Queue, Run and To Move steps in their immediate preceding count point operation within the time range.
The display is modifiable—providing filtering, ordering, and grouping. Several parameters are used to control information displayed on the dispatch list. See: MES Administrator, page 2-1
• Default Dispatch List Type determines the job type initially displayed on the list when the workstation opens. Choices are to display current work on the shop floor, or current work and any scheduled job operations.
• Dispatch List Ordering Criteria specifies the attribute fields shown on the list. See: Dispatch List Ordering Criteria, page 2-13
• Dispatch List Working Order determines the order of jobs displayed on the list—that is, any order or first ready.
• Include Complete Quantity in Dispatch List provides the ability to include job operations with quantities in the To Move step.
• Include Job Status specifies the status types of jobs displayed. See: Include Job Status, page 2-15
The list is formatted in a table view, columns in the list display information about each job. This includes scheduled start and end times, assembly name, customer, job readiness, and component and resource availability. If the Dispatch list Ordering Criteria parameter is not set, and The Dispatch List Working Order parameters is set to Any Order— you can sort the dispatch list on the columns by clicking on the column header. You can print a hardcopy version of the document by choosing Printable Page, and reorder the records on the list. See: Reordering Job Operations on the Dispatch List, page 4-32. In addition, you can hide or show columns on the dispatch list, by using the personalization capability.
Ready StatusThe Ready column on Dispatch List page indicates if the job operation is ready for work. Use the Ready Status Criteria parameter to define your qualifications for readiness. This includes if a job is released, has no exceptions, status is not assigned,
3-8 Oracle Manufacturing Execution System for Discrete Manufacturing User's Guide
and a quantity is in Queue or Run. When a job meets the criteria set, a check mark appears in this column. See: Ready Status Criteria, page 2-25
The design of this setting leaves the decision to the supervisor to determine whether or not the job operation is ready for work. If the supervisor decides the job is not ready, a job hold or exception can be issued.
Resource and component shortages as displayed on the Shopfloor Progress region of the Dashboard are not used in calculating the Ready Status definition. If you want to modify this design function, you can create a customized interface in the Ready Status client extension to enable custom logic to determine specific readiness definitions. See: Overview of MES Client Extensions, page C-1
To view and update Dispatch List information:1. Navigate to the Dispatch List.
The default dispatch list appears, displaying default details determined by the specifics of login values, along with a region to select filtering criteria.
2. If Shift In and Shift Out is configured on the page, you can enable or disable employee time and labor reporting. These flags are configured in the Time Entry Mode, page 2-31 parameter.
• Shift In enables the recording of actual attendance hours entered
• Shift Out stops actual attendance hours
• Undo Shift clears actual attendance hours entered
See: Labor Performance Views, page 4-8 for information on employee shift calculations.
3. Optionally, you can select filter information in the View Options region. Select filtering criteria from the following fields:
• Department
• Resource
• Instance
• Dispatch List type
• From Date and time
• To Date and time
4. You can select additional filter criteria in the More Options region.
MES Workstation 3-9
The following fields are available: Customer, Sales Order, Assembly, Line, ScheduleGroup, Build Sequence, Status, Project Number, Task Number, Setup, Due Date From, Due Date To, and Component.
5. Select Go to display the dispatch list with the filtering results.
The setup and layout of the dispatch list is configured in the Manufacturing Execution System Parameters page. The header displays available actions. These actions can be configured as both buttons or choice lists.

3-10 Oracle Manufacturing Execution System for Discrete Manufacturing User's Guide
The Dispatch List Ordering Criteria parameter determines the fields displayed on the dispatch list. See: Dispatch List Ordering Criteria, page 2-13. Fields that appear can include:
• Assembly
• Customer
• Exceptions
• Dispatch list type
• Job's ready status
• Expedited status
• Employees working on the job
• Shift
• Start Date
6. Select the Job Operation you want to work on to display the Work Content page, see Viewing Work Content, page 3-11
7. If you are using clock functionality, select the Clock or Job actions to record the timeworked on a job operation.
• The display for this action depends on your parameter configuration.
MES Workstation 3-11
• You can also set clock actions in the Action column for the specific job. When you select the Clock and Worker icon, the job is clocked on and the icon displays a red colored box with a cross out indicating the job is locked.
• The operator name displays in the Name column. To end this action, select the icon again, and the lock display disappears.
See: Clock In and Clock Out, page 3-54
8. Select actions available on this page:
• You can create job operation transactions. See: Job Operation Actions, page 3-13 and Global Actions, page 5-1
• You can perform express move transactions on this page. This enables you to move the quantity in one action, and create move transactions for a number of job operations performed in one action. See: Moving and Completing Assemblies, page 3-18
Viewing Work ContentThe Work Content page displays the information needed to perform work on an operation. It includes component and resource requirements, work instructions, attachments and other job property information. You can navigate to action pages and view employees currently working. Clocked in time of the employees currently working displays.
The actions available and the page layout are determined by parameter settings. See: Work Content Actions, page 2-32, and Work Content Layout, page 2-33
To view and update work content:1. Navigate to the Work Content page.
The Job Properties region displays information about the job including job number, description, assembly information, status, and schedule and completion dates.
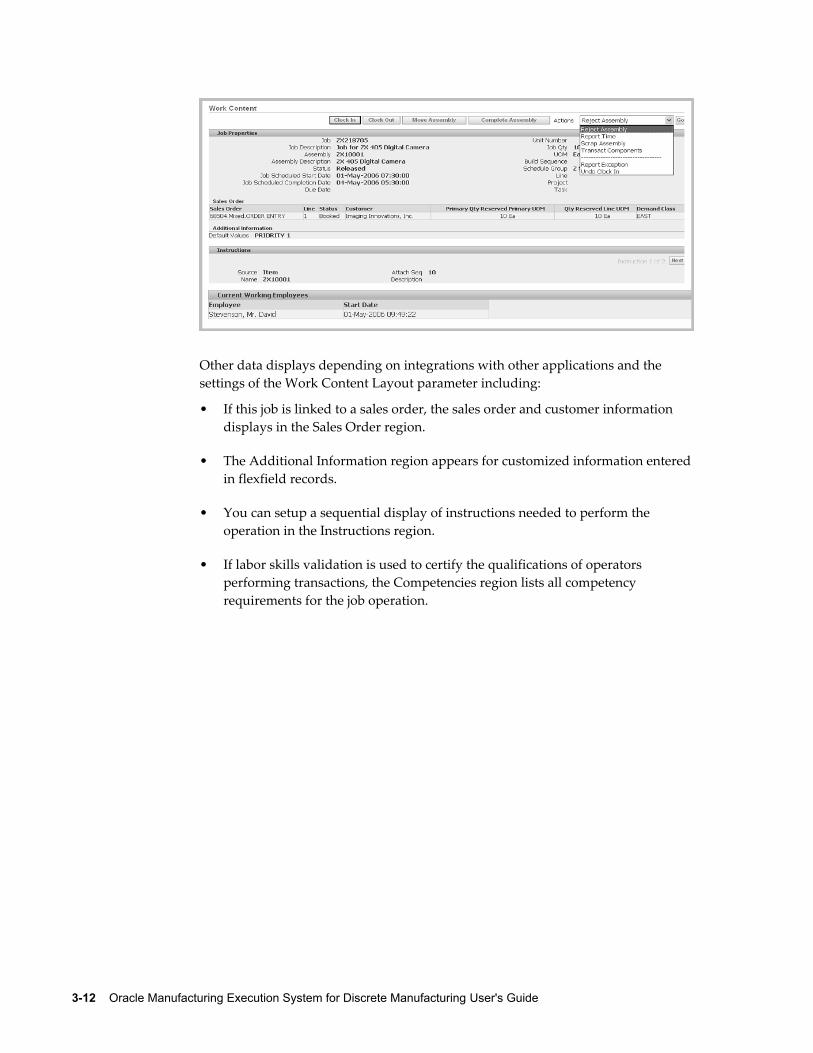
3-12 Oracle Manufacturing Execution System for Discrete Manufacturing User's Guide
Other data displays depending on integrations with other applications and the settings of the Work Content Layout parameter including:
• If this job is linked to a sales order, the sales order and customer information displays in the Sales Order region.
• The Additional Information region appears for customized information enteredin flexfield records.
• You can setup a sequential display of instructions needed to perform the operation in the Instructions region.
• If labor skills validation is used to certify the qualifications of operators performing transactions, the Competencies region lists all competency requirements for the job operation.
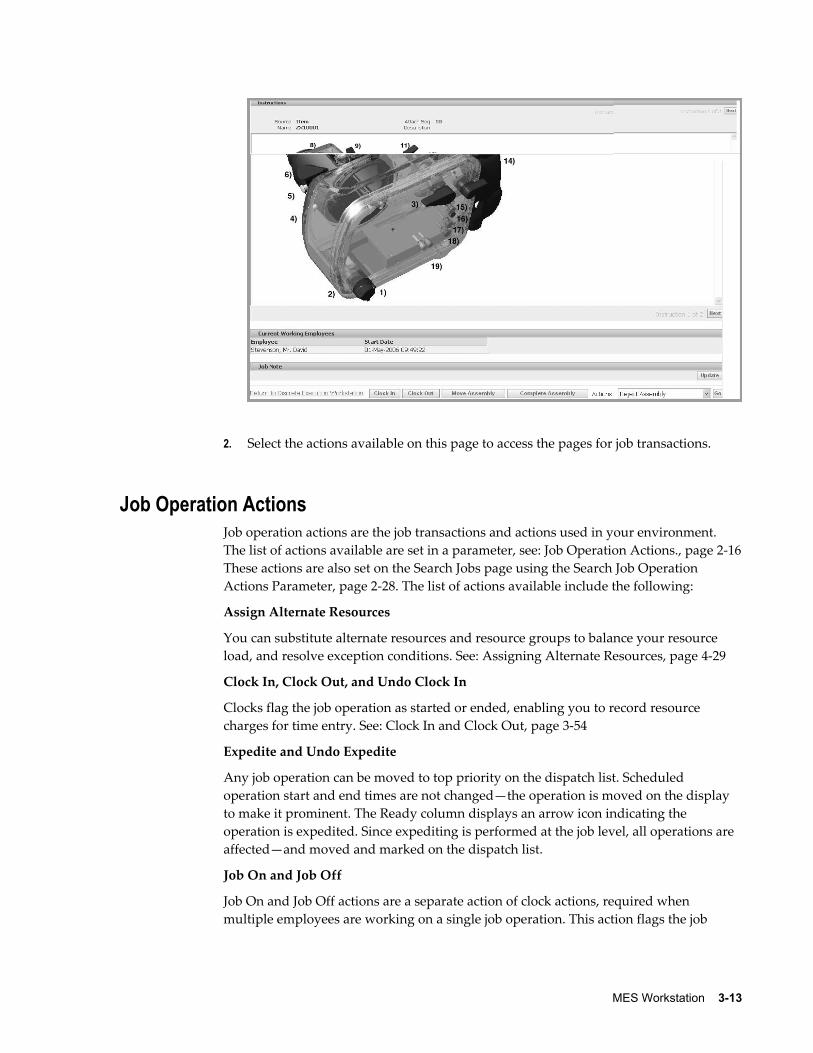
MES Workstation 3-13
2. Select the actions available on this page to access the pages for job transactions.
Job Operation ActionsJob operation actions are the job transactions and actions used in your environment. The list of actions available are set in a parameter, see: Job Operation Actions., page 2-16These actions are also set on the Search Jobs page using the Search Job Operation Actions Parameter, page 2-28. The list of actions available include the following:
Assign Alternate Resources
You can substitute alternate resources and resource groups to balance your resource load, and resolve exception conditions. See: Assigning Alternate Resources, page 4-29
Clock In, Clock Out, and Undo Clock In
Clocks flag the job operation as started or ended, enabling you to record resource charges for time entry. See: Clock In and Clock Out, page 3-54
Expedite and Undo Expedite
Any job operation can be moved to top priority on the dispatch list. Scheduled operation start and end times are not changed—the operation is moved on the display to make it prominent. The Ready column displays an arrow icon indicating the operation is expedited. Since expediting is performed at the job level, all operations are affected—and moved and marked on the dispatch list.
Job On and Job Off
Job On and Job Off actions are a separate action of clock actions, required when multiple employees are working on a single job operation. This action flags the job
3-14 Oracle Manufacturing Execution System for Discrete Manufacturing User's Guide
operation as picked and ready, enabling the recording of resource charges for time entry. See: Clock In and Clock Out, page 3-54
Move Assembly, Move and Complete, Express Move, and Complete Assembly
You can move assemblies within an operation, from one operation to another, backward and forward within the routing, and onto completion of the job. You also have the ability to create express moves—enabling simultaneous completion and scrap, or completion and reject, for the entire quantity in one action. See: Moving and Completing Assemblies, page 3-18
Print Label
Label printing ability is provided while performing work on the shop floor from various pages. The Print Label action is defined in the Job Operation Actions and Work Content Actions parameters. You can print labels for:
• Job related information
• Serialized numbers in specific jobs
• Move and completion transactions
• Multiple labels for a range of jobs—one label for the entire job quantity, and individual labels are printed for each serial number in the job
Two parameters are used to specify at what point in the transaction labels are printed:
• Assemblies for Completion Labels, page 2-9 specifies which assemblies or categories have labels printed at completion.
• Standard Operations for Move Labels, page 2-29 defines the operations where labelsare automatically printed when a move transaction is performed.
See: Labeling Overview, Oracle Warehouse Management User's Guide, and Label Printing Integration Kit, Oracle Warehouse Management Implementation Guide
Reject Assembly and Scrap Assembly
You can reject and disposition assemblies on the production floor that do not meet standards. The Reject and Scrap process isolates problem assemblies by moving the assemblies into a scrap or reject intraoperation step. If these assemblies are reworked, they can be returned to their routing operation, see: Rejecting and Scrapping Assemblies, page 3-29
Reschedule Operation and Undo Reschedule Operation
You can reschedule operations to balance the work load. See: Rescheduling Operations, page 4-29
Return Assembly, Return and Move, Return From Scrap, and Return From Reject
You can return assemblies to production from the supply subinventory, or reworked parts that were originally scrapped or rejected. See: Returning Assemblies, page 3-49
MES Workstation 3-15
Separator1, Separator2, Separator3
Separators are not actions, they are used to group actions together.
Transact Components
You can create component transactions for a job. See: Job Component Transactions, page 3-16
View Exceptions and Report Exception
Exceptions are reported when work is stopped on the production line. When notified about exceptions, you can view other job operations affected and take action. See: Viewing and Resolving Exceptions, page 4-23
Viewing Job Information
Detailed information about job and operation transactions is available in the following pages: View Job Detail, View Job Transactions, View Operation Transactions, View Related Jobs, and View Work Content. See: Viewing Job Information, page 3-40 and Viewing Work Content, page 3-11
View and Print Job Traveler
You can view and print a job traveler in the Dispatch List, Work Content, Search Jobs, and Shopfloor Progress pages. The traveler displays as a PDF file in a separate window.
The job traveler can contain associated attachments such as instructions for the job in the body of the traveler, or at the end as an appendix. You can:
• Configure the job traveler template at several levels including category set, item, category, or organization level. See: Job Traveler Template Setup, page 2-17
• Customize the traveler, including enabling bar code scans, if Oracle XML Publisher is installed.
• Attach files types such as images, short text, long text, and PDF.
Note: All attachments display on the traveler, however you can customize the template if you want to delete certain sections using Oracle XML Publisher.
• Print the job traveler in batch mode. For example, you can print the job traveler for all the jobs for a shift before starting a shift. In the Shopfloor Progress region of the Dashboard page, you can select multiple jobs that are scheduled to start in a shift—and select View Job Traveler.
See: Attaching Files to Jobs, Schedules, and Operations, Oracle Work in Process User's Guide
Update Note
Notes created during job transactions can be updated on the Update Note page. See:
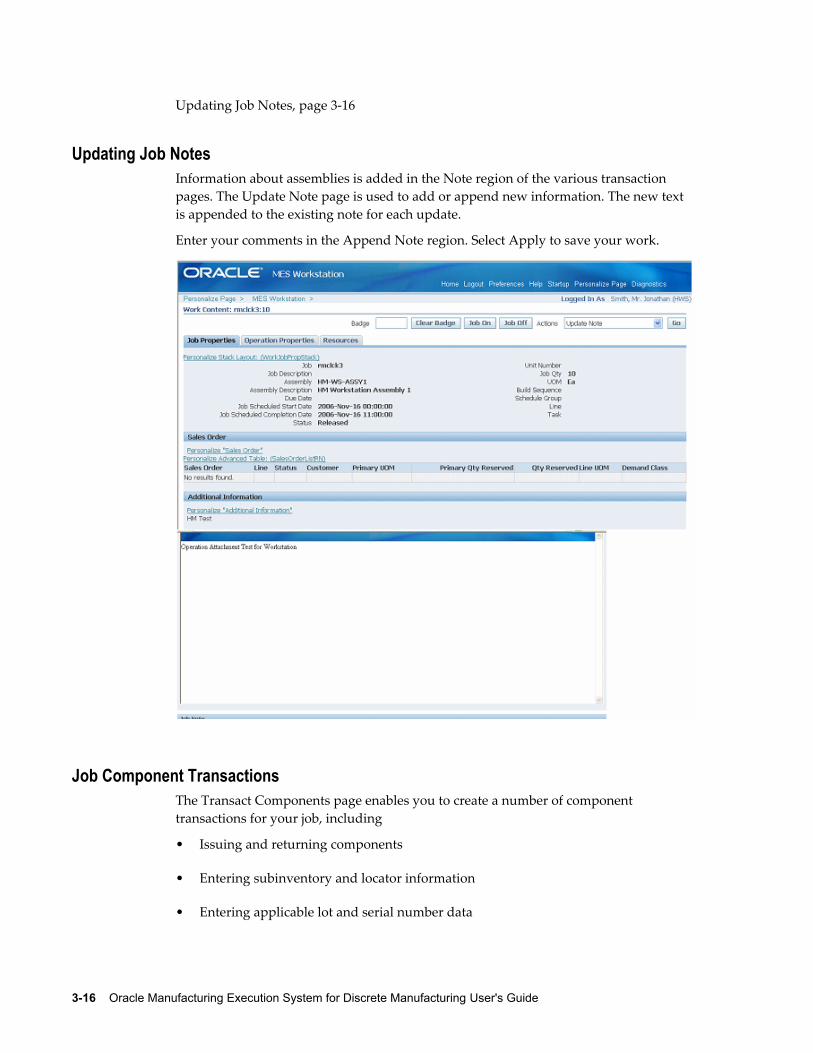
3-16 Oracle Manufacturing Execution System for Discrete Manufacturing User's Guide
Updating Job Notes, page 3-16
Updating Job NotesInformation about assemblies is added in the Note region of the various transaction pages. The Update Note page is used to add or append new information. The new text is appended to the existing note for each update.
Enter your comments in the Append Note region. Select Apply to save your work.
Job Component TransactionsThe Transact Components page enables you to create a number of component transactions for your job, including
• Issuing and returning components
• Entering subinventory and locator information
• Entering applicable lot and serial number data
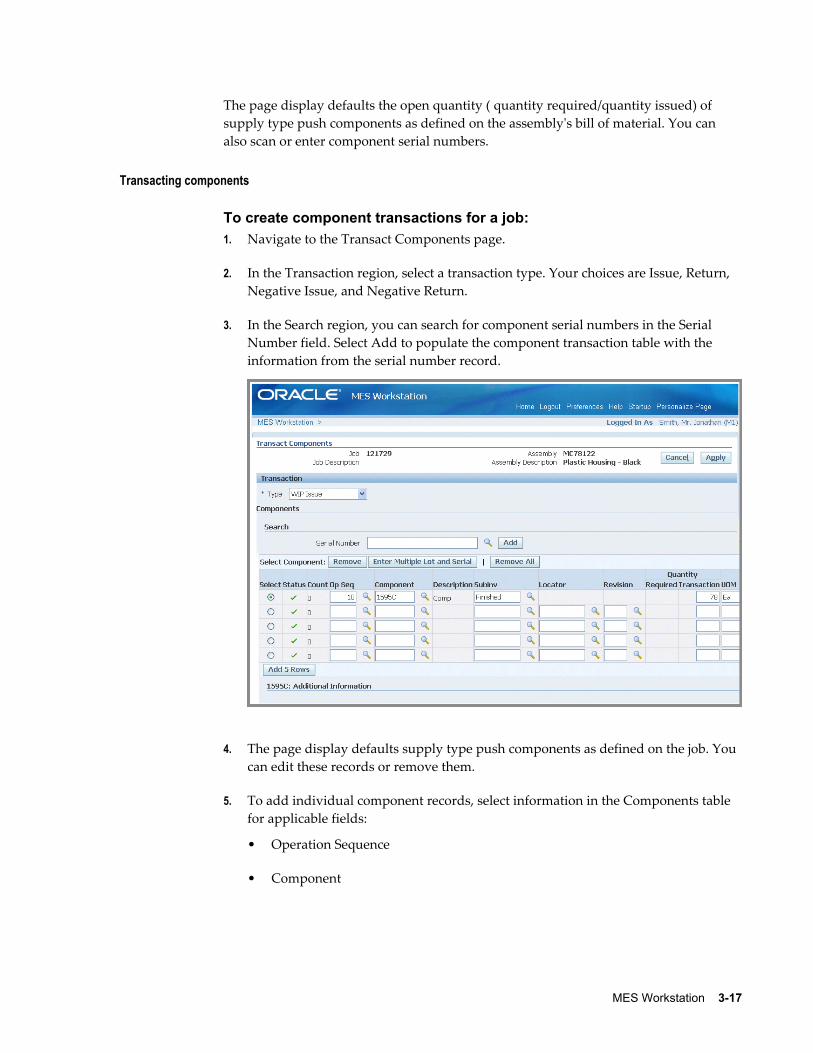
MES Workstation 3-17
The page display defaults the open quantity ( quantity required/quantity issued) of supply type push components as defined on the assembly's bill of material. You can also scan or enter component serial numbers.
Transacting components
To create component transactions for a job:1. Navigate to the Transact Components page.
2. In the Transaction region, select a transaction type. Your choices are Issue, Return, Negative Issue, and Negative Return.
3. In the Search region, you can search for component serial numbers in the Serial Number field. Select Add to populate the component transaction table with the information from the serial number record.
4. The page display defaults supply type push components as defined on the job. You can edit these records or remove them.
5. To add individual component records, select information in the Components table for applicable fields:
• Operation Sequence
• Component
3-18 Oracle Manufacturing Execution System for Discrete Manufacturing User's Guide
• Subinventory
• Locator
• Revision
• Transaction Quantity
• Unit of Measure
6. You can enter information for components under both lot and serial number control.
This page enables you to access the Serial Detail or Lot Detail pages, and generate lot and serial numbers, and assign lot and serial numbers.
• For individual components, in the Serial region of this table, select from applicable generated lot serial numbers in the From, To, and Parent fields. You can also select values in the Reason and Reference fields.
• If serial numbers have not been generated, select Enter Multiple Lot and Serial to access the Add Lot and Serial page in Oracle Inventory.
7. Select Apply to save your work.
Related TopicsOverview of Serialized Manufacturing Transactions, page 3-33
Lot Control, Oracle Inventory User's Guide
Setting Up Lot Control, Oracle Inventory User's Guide
Maintaining Item Lot Information, Oracle Inventory User's Guide
Setting Up Serial Number Control, Oracle Inventory User's Guide
Assigning Serial Numbers, Oracle Inventory User's Guide
Moving and Completing AssembliesAssemblies can be moved from one operation and intraoperation step to another, and backward and forward within the routing.
• When assemblies are completed at an operation, the system automatically backflushes operation pull components and charges resources.
• You have the ability to combine transactions such as move and scrap, and move and reject. This enables you to complete the transaction in a single step. This option is set in the Move Option parameter. See: MES Administrator, page 2-1
MES Workstation 3-19
• You can setup custom flexfield information to meet your site's needs.
• Applicable quality plans display for entering collection data.
• Lot and serial number information can be assigned during move and completion transactions.
• You can insert custom programming instructions to control job operation readiness and transaction movements according to your site's specifications. See: Overview ofMES Client Extensions, page C-1
• You can confirm instructions, and also capture move related transactions in e-records if using electronic signature functionality.
See: Move Transactions Process Diagram, Oracle Work in Process User's Guide
Express MovesExpress moves enable you to move the quantity in one action, defaulting all required values. It also provides a way to move several job operations in one transaction. For express move options:
• The setting of the Default Intra Op Step parameter determines the intraoperation step of the next operation where the assembles are moved. See: Default Intra Op Step, page 2-11
• The Enforce Sequential Move parameter is used to determine the next operation where the assembles are moved.
• The assembly quantity in the current operation cannot be in more than one intraoperation step of Queue, Run, or To Move.
• Completion and scrap transactions require a default scrap account defined if the organization requires a scrap account. This is set in the Default Scrap Account parameter. See: Default Scrap Account, page 2-12
• Mandatory quality collection plans are not applicable for express moves.
• Functionality is supported for preassigned assembly serial number jobs if the qualifying criteria is met, see: Overview of Serialized Manufacturing Transactions, page 3-33
• Express moves for partial quantities is dependent on the method the Search Serial Numbers page is accessed. If the page is accessed from the Dispatch List Serialized icon, you cannot move partial quantities of serialized jobs. If the page is accessed directly from startup or from global actions, you can perform express moves for anyquantity at the operation.
3-20 Oracle Manufacturing Execution System for Discrete Manufacturing User's Guide
To perform express moves on job operations:1. Navigate to the Dispatch List page.
2. Select the job operation record you want to complete. You can select multiple records.
3. In the Express Move Quantity columns, enter a value in the Complete field.
4. If there is a quantity to scrap, enter a value in the Scrap field.
5. Select Express Move to complete your transaction.
Labor Skills ValidationLabor skills validation is used to certify the qualifications and required competencies needed to perform assigned manufacturing activities. This help you meet International Organization for Standardization (ISO) 9000 requirements, preventing potential errors and issues during job transactions. Regulatory requirements for specific industries may mandate companies to execute and document employee competencies. The labor skills validation process includes:
• When the operator Clocks In for job operation move transactions—such as move, scrap, reject, and return—levels of qualifications are checked.
• The View Content and Job Details pages contain Competencies regions listing all competency requirements for the job operation.
• E-records can be setup to capture the competencies validated for move transactions.
The setup for labor skills validation is integrated with other Oracle applications including Human Resources Management Systems, Bills of Material, Work in Process, and E-Records. This includes:
• Defining competencies and qualifications, and associating to employees at the appropriate skill levels.
• Defining competencies for standard operations and routing operations.
• Defining competencies for job operations.
• Configuring the Operator Skills Validation parameter for specific organizations.
See: Operator Skills Validation, page 2-20
Quality Display ModesThere are several methods for entering collection plan data in the Quality Plans region
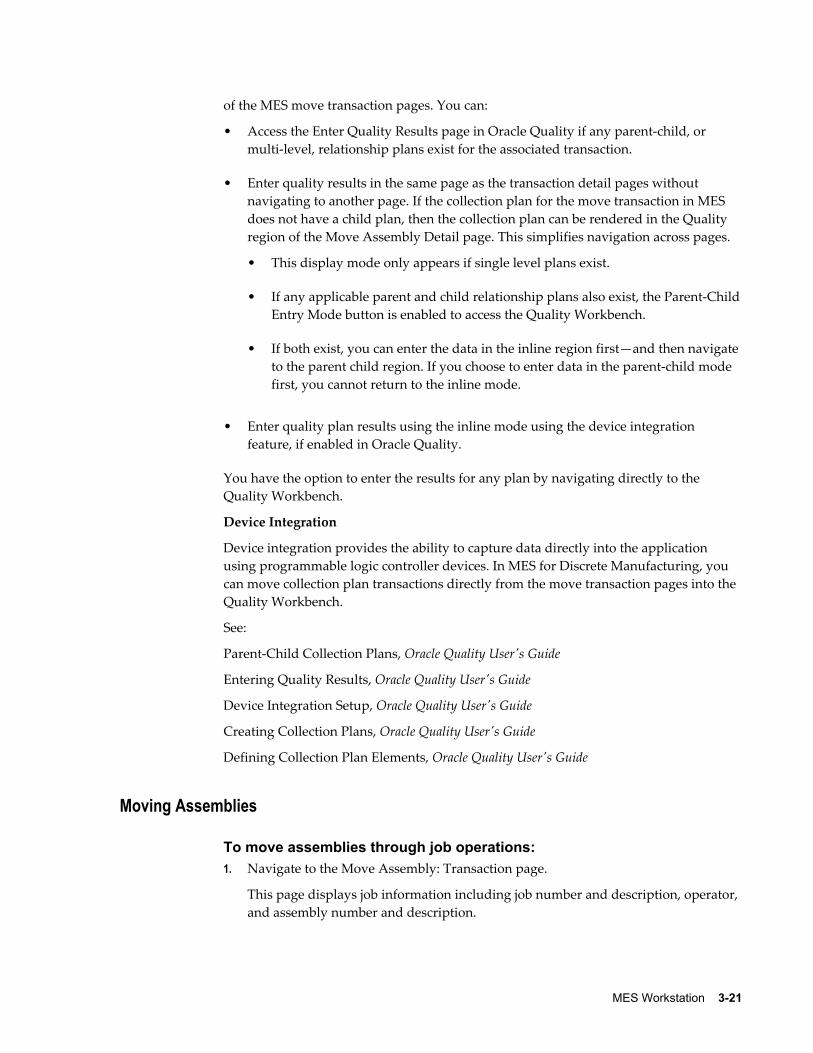
MES Workstation 3-21
of the MES move transaction pages. You can:
• Access the Enter Quality Results page in Oracle Quality if any parent-child, or multi-level, relationship plans exist for the associated transaction.
• Enter quality results in the same page as the transaction detail pages without navigating to another page. If the collection plan for the move transaction in MES does not have a child plan, then the collection plan can be rendered in the Quality region of the Move Assembly Detail page. This simplifies navigation across pages.
• This display mode only appears if single level plans exist.
• If any applicable parent and child relationship plans also exist, the Parent-ChildEntry Mode button is enabled to access the Quality Workbench.
• If both exist, you can enter the data in the inline region first—and then navigate to the parent child region. If you choose to enter data in the parent-child mode first, you cannot return to the inline mode.
• Enter quality plan results using the inline mode using the device integration feature, if enabled in Oracle Quality.
You have the option to enter the results for any plan by navigating directly to the Quality Workbench.
Device Integration
Device integration provides the ability to capture data directly into the application using programmable logic controller devices. In MES for Discrete Manufacturing, you can move collection plan transactions directly from the move transaction pages into the Quality Workbench.
See:
Parent-Child Collection Plans, Oracle Quality User's Guide
Entering Quality Results, Oracle Quality User's Guide
Device Integration Setup, Oracle Quality User's Guide
Creating Collection Plans, Oracle Quality User's Guide
Defining Collection Plan Elements, Oracle Quality User's Guide
Moving Assemblies
To move assemblies through job operations:1. Navigate to the Move Assembly: Transaction page.
This page displays job information including job number and description, operator, and assembly number and description.
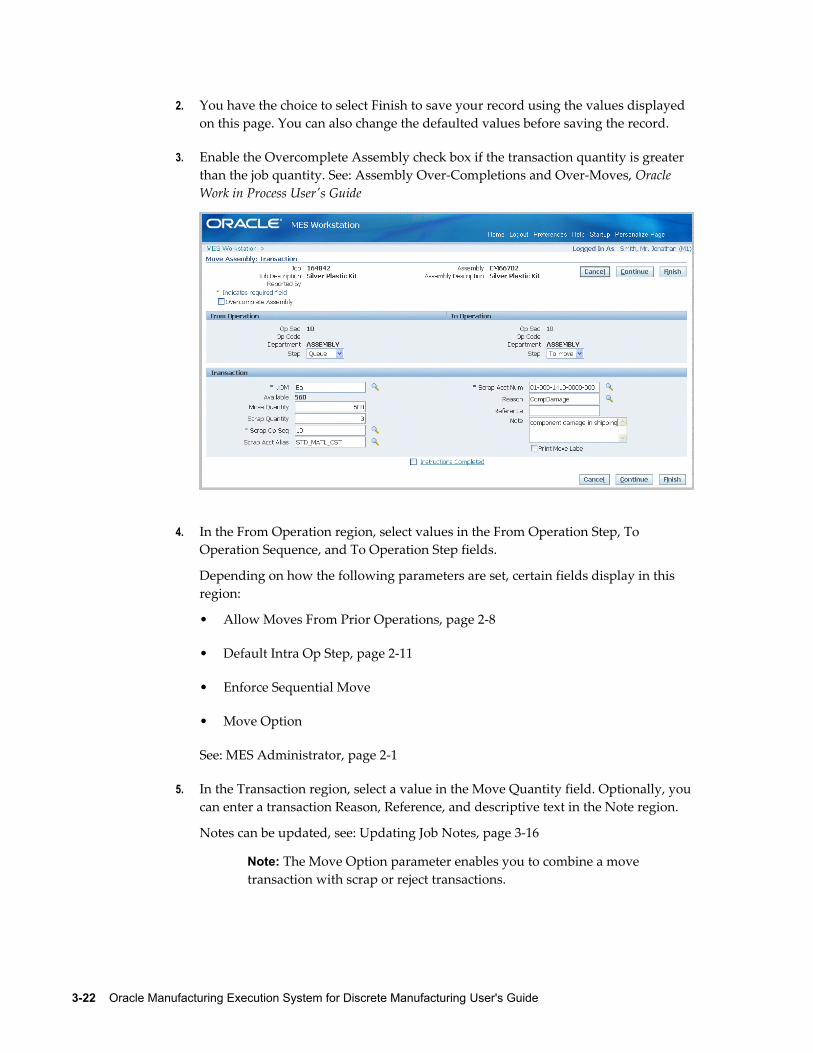
3-22 Oracle Manufacturing Execution System for Discrete Manufacturing User's Guide
2. You have the choice to select Finish to save your record using the values displayed on this page. You can also change the defaulted values before saving the record.
3. Enable the Overcomplete Assembly check box if the transaction quantity is greater than the job quantity. See: Assembly Over-Completions and Over-Moves, Oracle Work in Process User's Guide
4. In the From Operation region, select values in the From Operation Step, To Operation Sequence, and To Operation Step fields.
Depending on how the following parameters are set, certain fields display in this region:
• Allow Moves From Prior Operations, page 2-8
• Default Intra Op Step, page 2-11
• Enforce Sequential Move
• Move Option
See: MES Administrator, page 2-1
5. In the Transaction region, select a value in the Move Quantity field. Optionally, youcan enter a transaction Reason, Reference, and descriptive text in the Note region.
Notes can be updated, see: Updating Job Notes, page 3-16
Note: The Move Option parameter enables you to combine a move transaction with scrap or reject transactions.

MES Workstation 3-23
6. If you have a quantity to scrap, enter a value in the Scrap Quantity field.
7. When a value is entered in the Scrap Quantity field, the fields for Scrap Operation Sequence, Scrap Account Alias, and Scrap Account Number display.Enter the applicable values in these fields.
8. If a customized descriptive flexfield is used in your environment, the Additional Information region displays. Enter your information in this region. If you are not using customized information, this region does not appear.
9. Select Finish to complete your move transaction, or select Continue to enter information about manual resources and quality plans.
• If you select Finish, the transaction is saved.
• If you select Continue, the Move Assembly: Detail page displays.
On the Move Assembly: Detail page, the specifics of the data entered on the Move Assembly: Transaction page display in the Transaction Detail region.
10. In the Manual Resources region, you have the option to add machine resources by selecting Retrieve Non-Labor Resources—or individually adding records.
• When you select Retrieve Non-Labor Resources, applicable machine resources populate the fields for Resource, Instance, and Start Time and End Time. You can edit or delete these records.
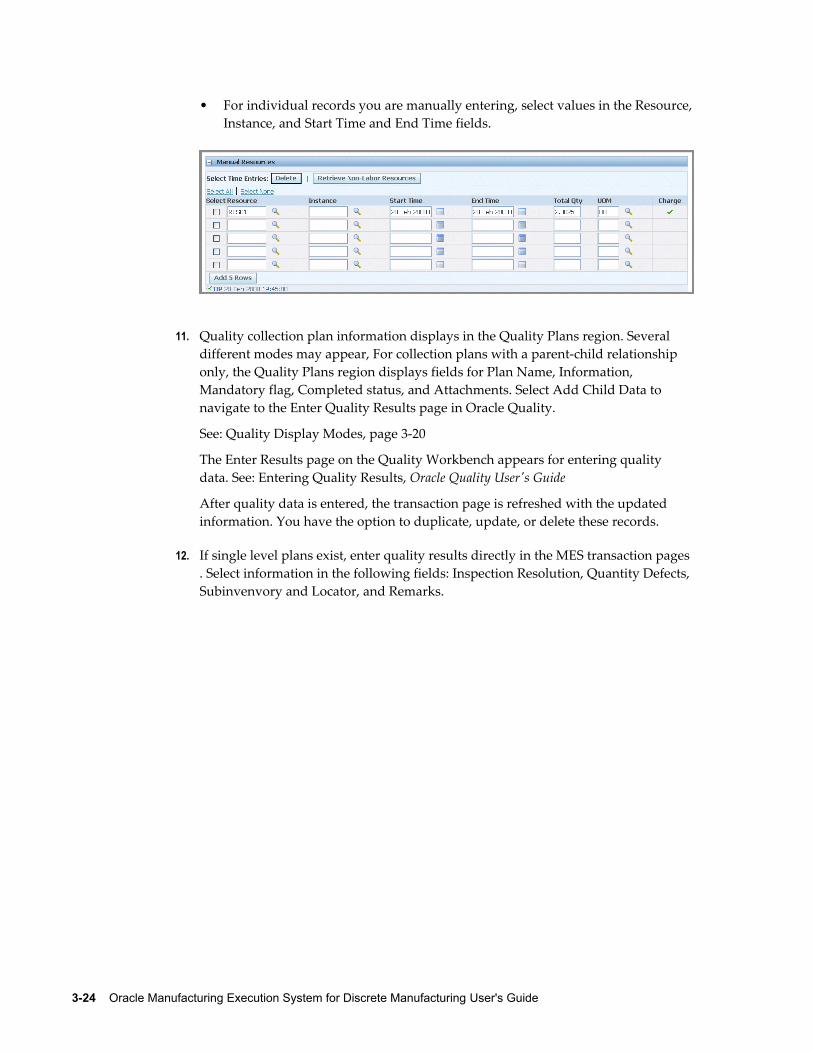
3-24 Oracle Manufacturing Execution System for Discrete Manufacturing User's Guide
• For individual records you are manually entering, select values in the Resource,Instance, and Start Time and End Time fields.
11. Quality collection plan information displays in the Quality Plans region. Several different modes may appear, For collection plans with a parent-child relationship only, the Quality Plans region displays fields for Plan Name, Information, Mandatory flag, Completed status, and Attachments. Select Add Child Data to navigate to the Enter Quality Results page in Oracle Quality.
See: Quality Display Modes, page 3-20
The Enter Results page on the Quality Workbench appears for entering quality data. See: Entering Quality Results, Oracle Quality User's Guide
After quality data is entered, the transaction page is refreshed with the updated information. You have the option to duplicate, update, or delete these records.
12. If single level plans exist, enter quality results directly in the MES transaction pages . Select information in the following fields: Inspection Resolution, Quantity Defects, Subinvenvory and Locator, and Remarks.
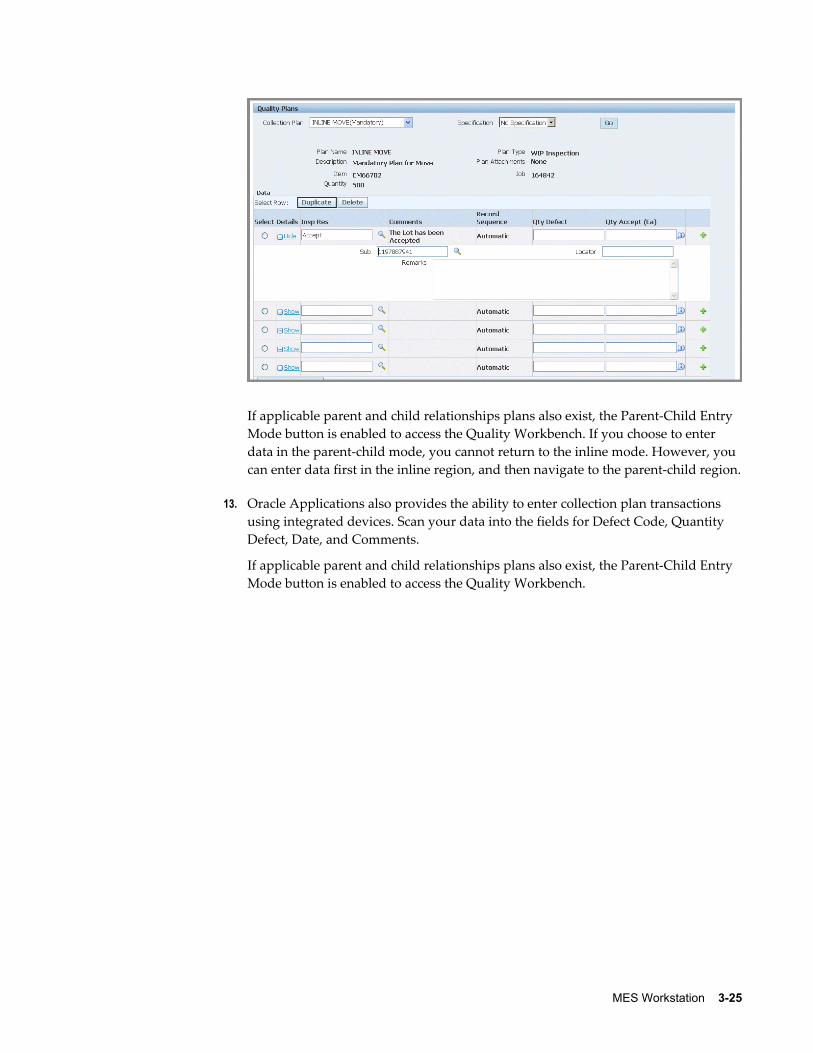
MES Workstation 3-25
If applicable parent and child relationships plans also exist, the Parent-Child Entry Mode button is enabled to access the Quality Workbench. If you choose to enter data in the parent-child mode, you cannot return to the inline mode. However, you can enter data first in the inline region, and then navigate to the parent-child region.
13. Oracle Applications also provides the ability to enter collection plan transactions using integrated devices. Scan your data into the fields for Defect Code, Quantity Defect, Date, and Comments.
If applicable parent and child relationships plans also exist, the Parent-Child Entry Mode button is enabled to access the Quality Workbench.
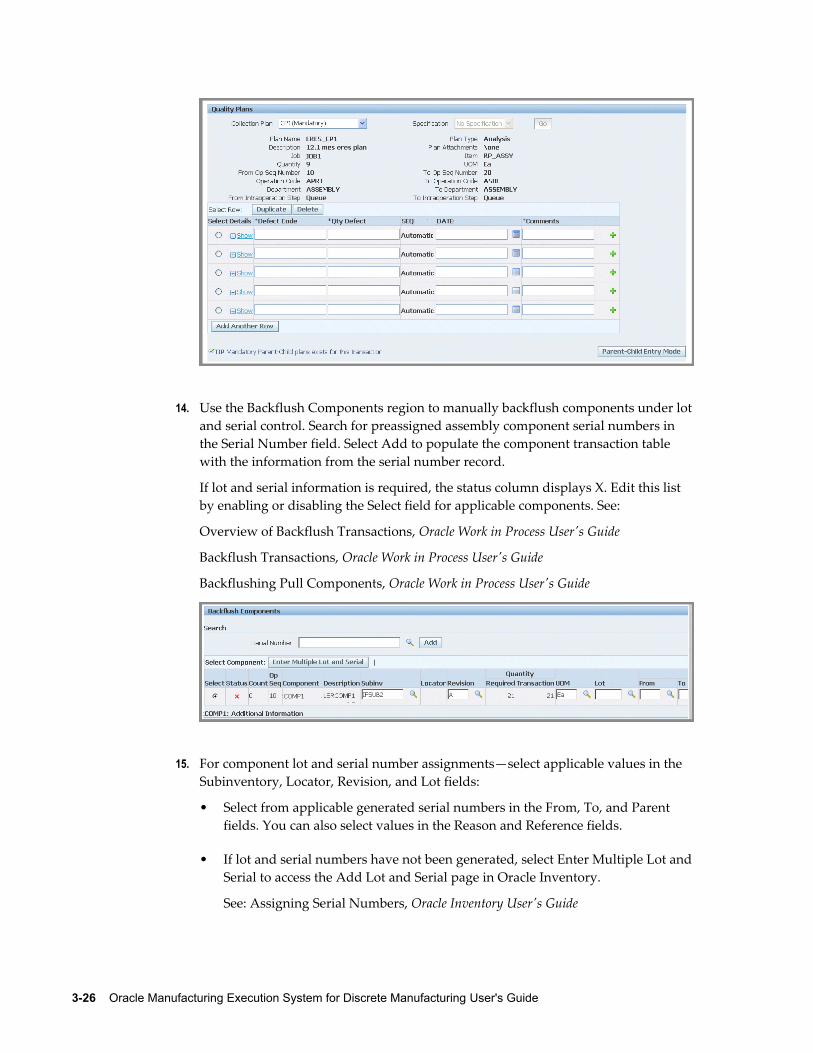
3-26 Oracle Manufacturing Execution System for Discrete Manufacturing User's Guide
14. Use the Backflush Components region to manually backflush components under lotand serial control. Search for preassigned assembly component serial numbers in the Serial Number field. Select Add to populate the component transaction table with the information from the serial number record.
If lot and serial information is required, the status column displays X. Edit this list by enabling or disabling the Select field for applicable components. See:
Overview of Backflush Transactions, Oracle Work in Process User's Guide
Backflush Transactions, Oracle Work in Process User's Guide
Backflushing Pull Components, Oracle Work in Process User's Guide
15. For component lot and serial number assignments—select applicable values in the Subinventory, Locator, Revision, and Lot fields:
• Select from applicable generated serial numbers in the From, To, and Parent fields. You can also select values in the Reason and Reference fields.
• If lot and serial numbers have not been generated, select Enter Multiple Lot andSerial to access the Add Lot and Serial page in Oracle Inventory.
See: Assigning Serial Numbers, Oracle Inventory User's Guide
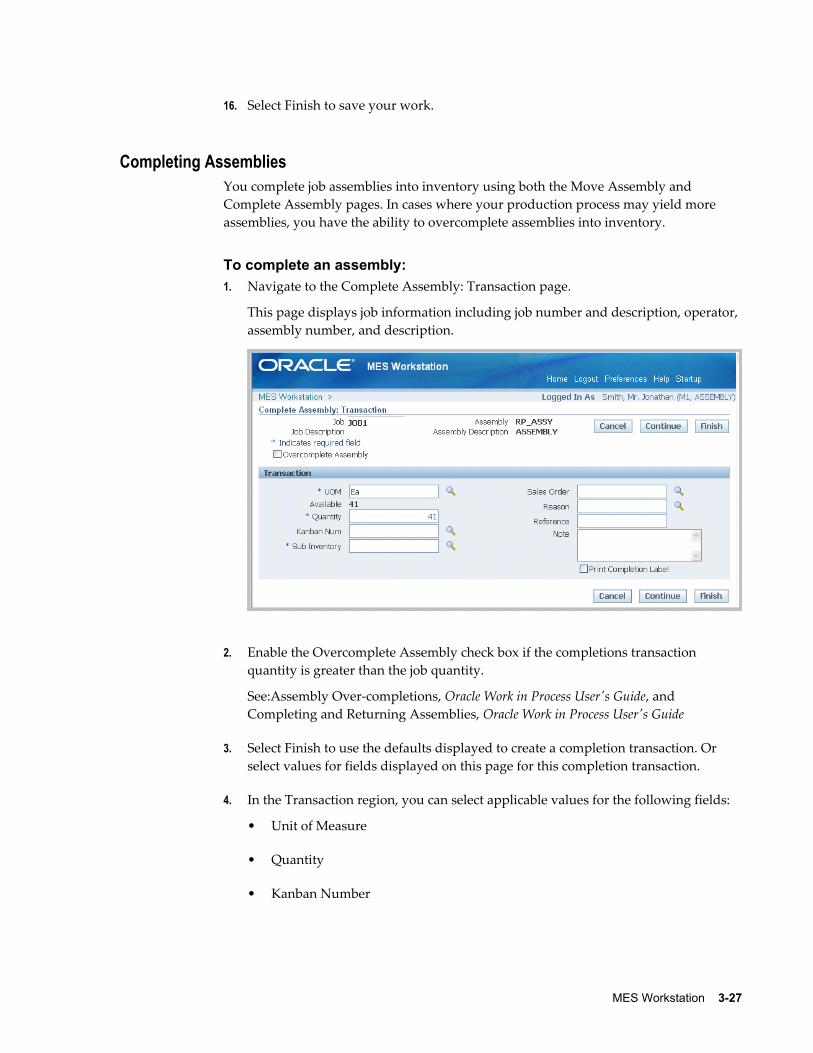
MES Workstation 3-27
16. Select Finish to save your work.
Completing AssembliesYou complete job assemblies into inventory using both the Move Assembly and Complete Assembly pages. In cases where your production process may yield more assemblies, you have the ability to overcomplete assemblies into inventory.
To complete an assembly:1. Navigate to the Complete Assembly: Transaction page.
This page displays job information including job number and description, operator, assembly number, and description.
2. Enable the Overcomplete Assembly check box if the completions transaction quantity is greater than the job quantity.
See:Assembly Over-completions, Oracle Work in Process User's Guide, and Completing and Returning Assemblies, Oracle Work in Process User's Guide
3. Select Finish to use the defaults displayed to create a completion transaction. Or select values for fields displayed on this page for this completion transaction.
4. In the Transaction region, you can select applicable values for the following fields:
• Unit of Measure
• Quantity
• Kanban Number
3-28 Oracle Manufacturing Execution System for Discrete Manufacturing User's Guide
• Subinventory
• Sales Order
• Reason
• Reference
• Note
Notes can be updated, see: Updating Job Notes, page 3-16
5. If a customized descriptive flexfield is used in your environment, the Additional Information region displays. Enter your information in this region. If you are not using customized information, this region does not appear.
6. Select Finish to complete this transaction, or select Continue to enter information forquality plans, component backflush, and lot and serial assignments.
• If you select Finish, the transaction is saved.
• If you select Continue, the Complete Assembly: Detail page displays.
7. In the Manual Resources region, you have the option to add machine resources by selecting Retrieve Non-Labor Resources—or individually adding records.
• When you select Retrieve Non-Labor Resources, applicable machine resources populate the fields for Resource, Instance, and Start Time and End Time. You can edit or delete these records.
• For individual records you are manually entering, select values in the Resource,Instance, and Start Time and End Time fields.
8. Quality collection plan information displays in the Quality Plans region. Several different modes may appear, For collection plans with a parent-child relationship only, the Quality Plans region displays fields for Plan Name, Information, Mandatory flag, Completed status, and Attachments. Select Add Child Data to navigate to the Enter Quality Results page in Oracle Quality.
See: Quality Display Modes, page 3-20
The Enter Results page on the Quality Workbench appears for entering quality data. See: Entering Quality Results, Oracle Quality User's Guide
After quality data is entered, the transaction page is refreshed with the updated information. You have the option to duplicate, update, or delete these records.
9. If single level plans exist, enter quality results directly in the MES transaction pages . Select information in the following fields: Inspection Resolution, Quantity Defects,
MES Workstation 3-29
Subinvenvory and Locator, and Remarks.
If applicable parent and child relationships plans also exist, the Parent-Child Entry Mode button is enabled to access the Quality Workbench. If you choose to enter data in the parent-child mode, you cannot return to the inline mode. However, you can enter data first in the inline region, and then navigate to the parent-child region.
10. Oracle Applications also provides the ability to enter collection plan transactions using integrated devices. Scan your data into the fields for Defect Code, Quantity Defect, Date, and Comments.
If applicable parent and child relationships plans also exist, the Parent-Child Entry Mode button is enabled to access the Quality Workbench.
11. Use the Backflush Components region to manually backflush components under lotand serial control. Search for preassigned assembly serial numbers in the Serial Number field. Select Add to populate the component transaction table with the information from the serial number record.
If lot and serial information is required, the status column displays X. Edit this list by enabling or disabling the Select field for applicable components. See:
Overview of Backflush Transactions, Oracle Work in Process User's Guide
Backflush Transactions, Oracle Work in Process User's Guide
Backflushing Pull Components, Oracle Work in Process User's Guide
12. For component lot and serial number assignments—select applicable values in the Subinventory, Locator, Revision, and Lot fields:
• Select from applicable generated serial numbers in the From, To, and Parent fields. You can also select values in the Reason and Reference fields.
• If lot and serial numbers have not been generated, select Enter Multiple Lot andSerial to access the Add Lot and Serial page in Oracle Inventory.
See: Assigning Serial Numbers, Oracle Inventory User's Guide
13. Select Finish to save your work.
Rejecting and Scrapping AssembliesYou can reject or scrap, and then disposition assemblies that do not meet standards. Thereject and scrap process isolates problem assemblies. When it is possible to rework defective assemblies, they can be returned to their routing operation.
• Rejected assemblies are considered complete and resources consumed. Assemblies in the Reject intraoperation step of an operation may be waiting to be reworked or scrapped. You can move assemblies from the Reject step to any other intraoperation
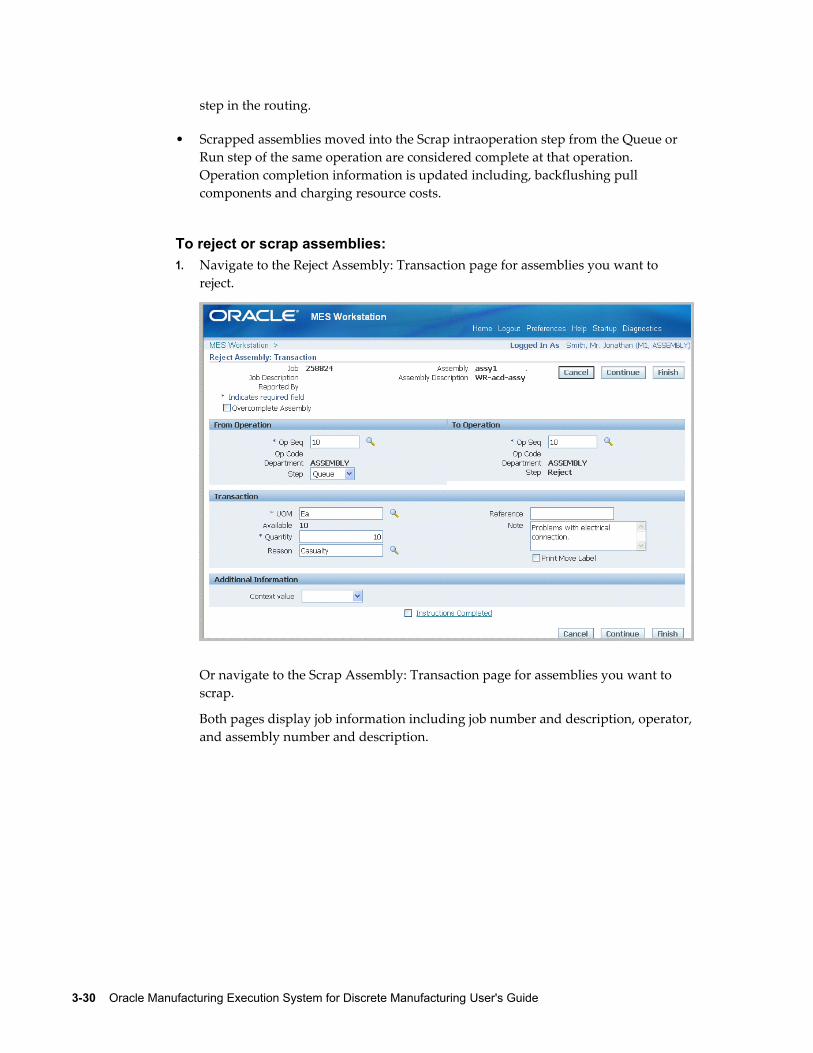
3-30 Oracle Manufacturing Execution System for Discrete Manufacturing User's Guide
step in the routing.
• Scrapped assemblies moved into the Scrap intraoperation step from the Queue or Run step of the same operation are considered complete at that operation. Operation completion information is updated including, backflushing pull components and charging resource costs.
To reject or scrap assemblies:1. Navigate to the Reject Assembly: Transaction page for assemblies you want to
reject.
Or navigate to the Scrap Assembly: Transaction page for assemblies you want to scrap.
Both pages display job information including job number and description, operator,and assembly number and description.
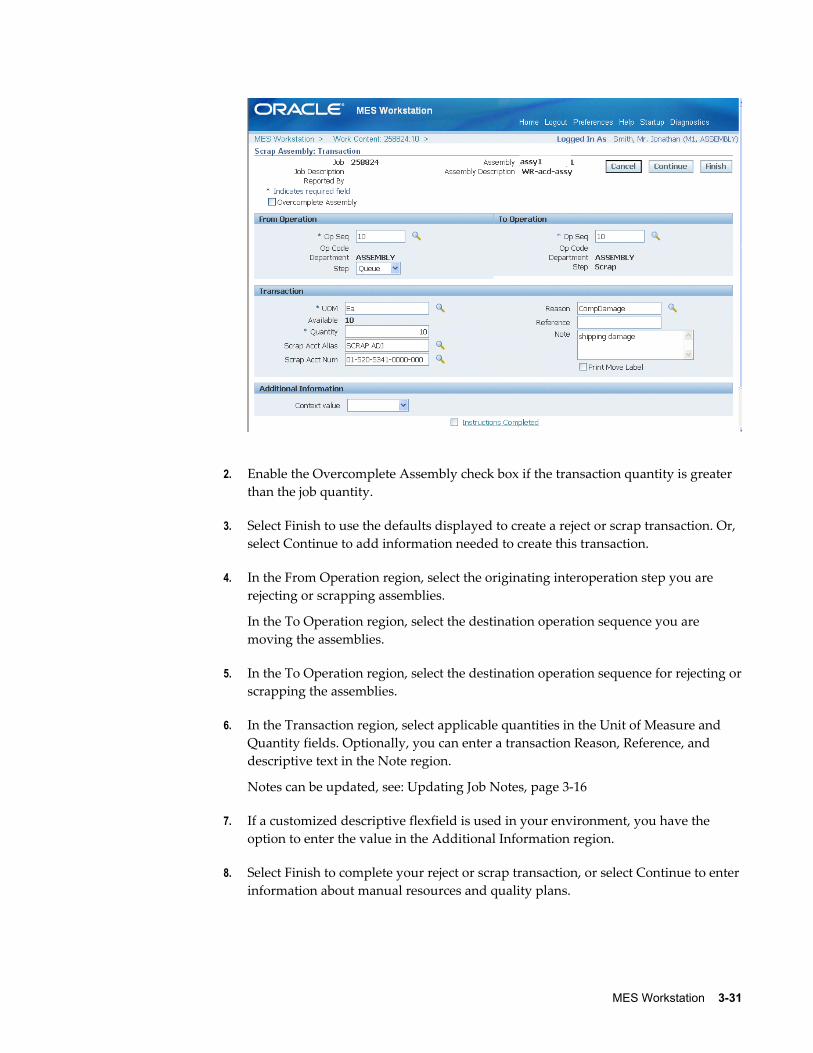
MES Workstation 3-31
2. Enable the Overcomplete Assembly check box if the transaction quantity is greater than the job quantity.
3. Select Finish to use the defaults displayed to create a reject or scrap transaction. Or, select Continue to add information needed to create this transaction.
4. In the From Operation region, select the originating interoperation step you are rejecting or scrapping assemblies.
In the To Operation region, select the destination operation sequence you are moving the assemblies.
5. In the To Operation region, select the destination operation sequence for rejecting orscrapping the assemblies.
6. In the Transaction region, select applicable quantities in the Unit of Measure and Quantity fields. Optionally, you can enter a transaction Reason, Reference, and descriptive text in the Note region.
Notes can be updated, see: Updating Job Notes, page 3-16
7. If a customized descriptive flexfield is used in your environment, you have the option to enter the value in the Additional Information region.
8. Select Finish to complete your reject or scrap transaction, or select Continue to enterinformation about manual resources and quality plans.
3-32 Oracle Manufacturing Execution System for Discrete Manufacturing User's Guide
• If you select Finish, the transaction is saved.
• If you select Continue, the Detail page displays.
9. On the Detail page, in the Manual Resources region, you have the option to add machine resources by selecting Retrieve Non-Labor Resources.
For any applicable machine resources, this region populates the fields for OperationSequence, Resource, Instance, Start Time.
10. Quality collection plan information displays in the Quality Plans region. Several different modes may appear, For collection plans with a parent-child relationship only, the Quality Plans region displays fields for Plan Name, Information, Mandatory flag, Completed status, and Attachments. Select Add Child Data to navigate to the Enter Quality Results page in Oracle Quality.
See: Quality Display Modes, page 3-20
The Enter Results page on the Quality Workbench appears for entering quality data. See: Entering Quality Results, Oracle Quality User's Guide
After quality data is entered, the transaction page is refreshed with the updated information. You have the option to duplicate, update, or delete these records.
11. If single level plans exist, enter quality results directly in the MES transaction pages . Select information in the following fields: Inspection Resolution, Quantity Defects, Subinvenvory and Locator, and Remarks.
If applicable parent and child relationships plans also exist, the Parent-Child Entry Mode button is enabled to access the Quality Workbench. If you choose to enter data in the parent-child mode, you cannot return to the inline mode. However, you can enter data first in the inline region, and then navigate to the parent-child region.
12. Oracle Applications also provides the ability to enter collection plan transactions using integrated devices. Scan your data into the fields for Defect Code, Quantity Defect, Date, and Comments.
If applicable parent and child relationships plans also exist, the Parent-Child Entry Mode button is enabled to access the Quality Workbench.
13. Use the Backflush Components region to manually backflush components under lotand serial control. Search for preassigned assembly serial numbers in the Serial Number field. Select Add to populate the component transaction table with the information from the serial number record.
If lot and serial information is required, the status column displays X. Edit this list by enabling or disabling the Select field for applicable components. See:
Overview of Backflush Transactions, Oracle Work in Process User's Guide
Backflush Transactions, Oracle Work in Process User's Guide
MES Workstation 3-33
Backflushing Pull Components, Oracle Work in Process User's Guide
14. For component lot and serial number assignments—select applicable values in the Subinventory, Locator, Revision, and Lot fields:
• Select from applicable generated serial numbers in the From, To, and Parent fields. You can also select values in the Reason and Reference fields.
• If lot and serial numbers have not been generated, select Enter Multiple Lot andSerial to access the Add Lot and Serial page in Oracle Inventory.
See: Assigning Serial Numbers, Oracle Inventory User's Guide
15. Select Finish to save your work.
Related TopicsRescheduling Operations, page 4-29
Returning Assemblies, page 3-49
Generating Serial Numbers, Oracle Inventory User's Guide
Lot Control, Oracle Inventory User's Guide
Setting Up Lot Control, Oracle Inventory User's Guide
Maintaining Item Lot Information, Oracle Inventory User's Guide
Setting Up Serial Number Control, Oracle Inventory User's Guide
Assigning Serial Numbers, Oracle Inventory User's Guide
Overview of Serialized Manufacturing TransactionsOracle MES provides preassigned assembly serial numbers enabling the creation of serialized jobs. You have the ability to perform operation and assembly completion by job serial number record. And the progress of the job can be tracked after the serialization start operation using the assembly serial number . In serialized manufacturing you can:
• Query jobs and perform transactions by serial number. The Job Selection Mode parameter is used to set your search preferences by serial number when initializing the workstation. Use selection mode Assembly Serial Numbers to use the Search Serial Numbers page as the initial page display for entering search criteria.
• Use a mobile device to scan jobs by serial number for transactions.
• Perform express moves for serialized assemblies. This action moves all the serial number records in a job operation.
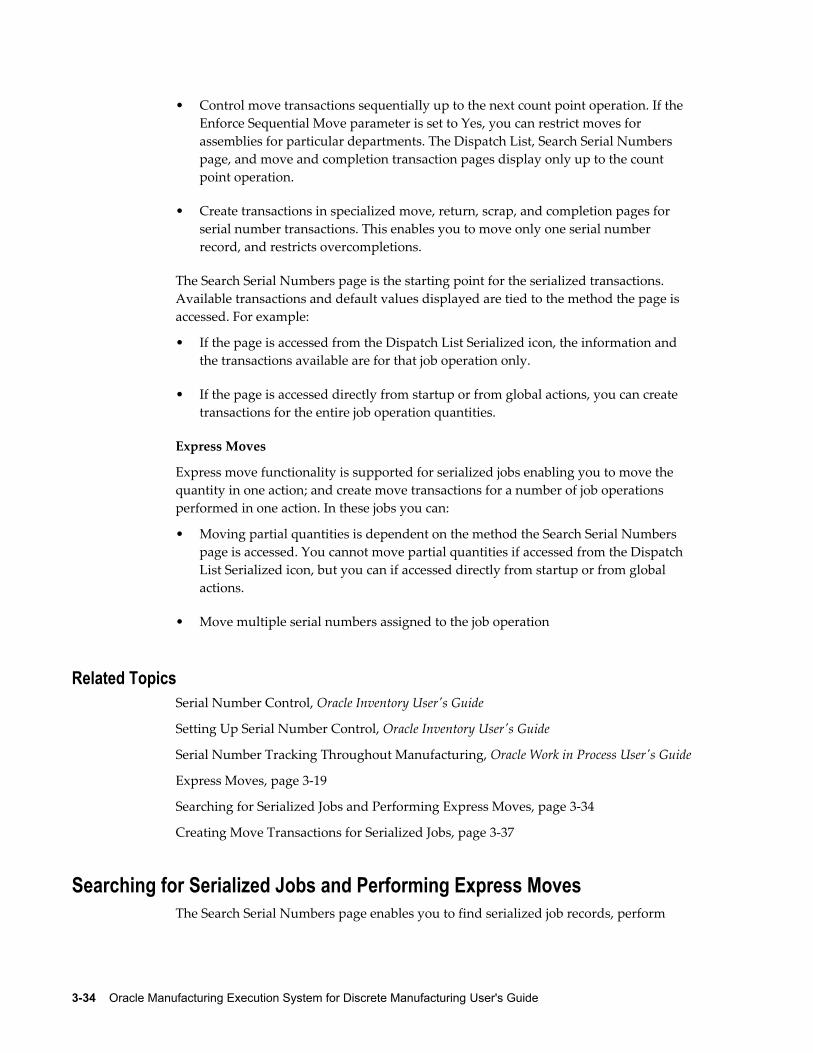
3-34 Oracle Manufacturing Execution System for Discrete Manufacturing User's Guide
• Control move transactions sequentially up to the next count point operation. If the Enforce Sequential Move parameter is set to Yes, you can restrict moves for assemblies for particular departments. The Dispatch List, Search Serial Numbers page, and move and completion transaction pages display only up to the count point operation.
• Create transactions in specialized move, return, scrap, and completion pages for serial number transactions. This enables you to move only one serial number record, and restricts overcompletions.
The Search Serial Numbers page is the starting point for the serialized transactions. Available transactions and default values displayed are tied to the method the page is accessed. For example:
• If the page is accessed from the Dispatch List Serialized icon, the information and the transactions available are for that job operation only.
• If the page is accessed directly from startup or from global actions, you can create transactions for the entire job operation quantities.
Express Moves
Express move functionality is supported for serialized jobs enabling you to move the quantity in one action; and create move transactions for a number of job operations performed in one action. In these jobs you can:
• Moving partial quantities is dependent on the method the Search Serial Numbers page is accessed. You cannot move partial quantities if accessed from the Dispatch List Serialized icon, but you can if accessed directly from startup or from global actions.
• Move multiple serial numbers assigned to the job operation
Related TopicsSerial Number Control, Oracle Inventory User's Guide
Setting Up Serial Number Control, Oracle Inventory User's Guide
Serial Number Tracking Throughout Manufacturing, Oracle Work in Process User's Guide
Express Moves, page 3-19
Searching for Serialized Jobs and Performing Express Moves, page 3-34
Creating Move Transactions for Serialized Jobs, page 3-37
Searching for Serialized Jobs and Performing Express MovesThe Search Serial Numbers page enables you to find serialized job records, perform
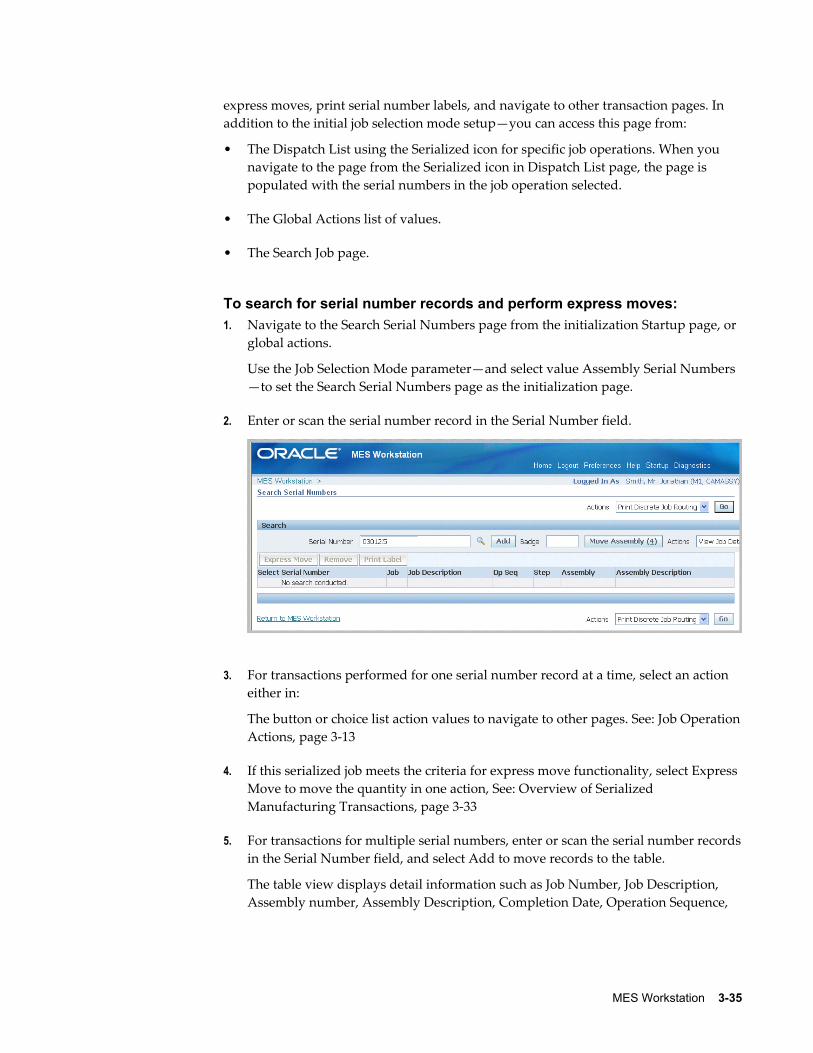
MES Workstation 3-35
express moves, print serial number labels, and navigate to other transaction pages. In addition to the initial job selection mode setup—you can access this page from:
• The Dispatch List using the Serialized icon for specific job operations. When you navigate to the page from the Serialized icon in Dispatch List page, the page is populated with the serial numbers in the job operation selected.
• The Global Actions list of values.
• The Search Job page.
To search for serial number records and perform express moves:1. Navigate to the Search Serial Numbers page from the initialization Startup page, or
global actions.
Use the Job Selection Mode parameter—and select value Assembly Serial Numbers—to set the Search Serial Numbers page as the initialization page.
2. Enter or scan the serial number record in the Serial Number field.
3. For transactions performed for one serial number record at a time, select an action either in:
The button or choice list action values to navigate to other pages. See: Job OperationActions, page 3-13
4. If this serialized job meets the criteria for express move functionality, select Express Move to move the quantity in one action, See: Overview of Serialized Manufacturing Transactions, page 3-33
5. For transactions for multiple serial numbers, enter or scan the serial number recordsin the Serial Number field, and select Add to move records to the table.
The table view displays detail information such as Job Number, Job Description, Assembly number, Assembly Description, Completion Date, Operation Sequence,
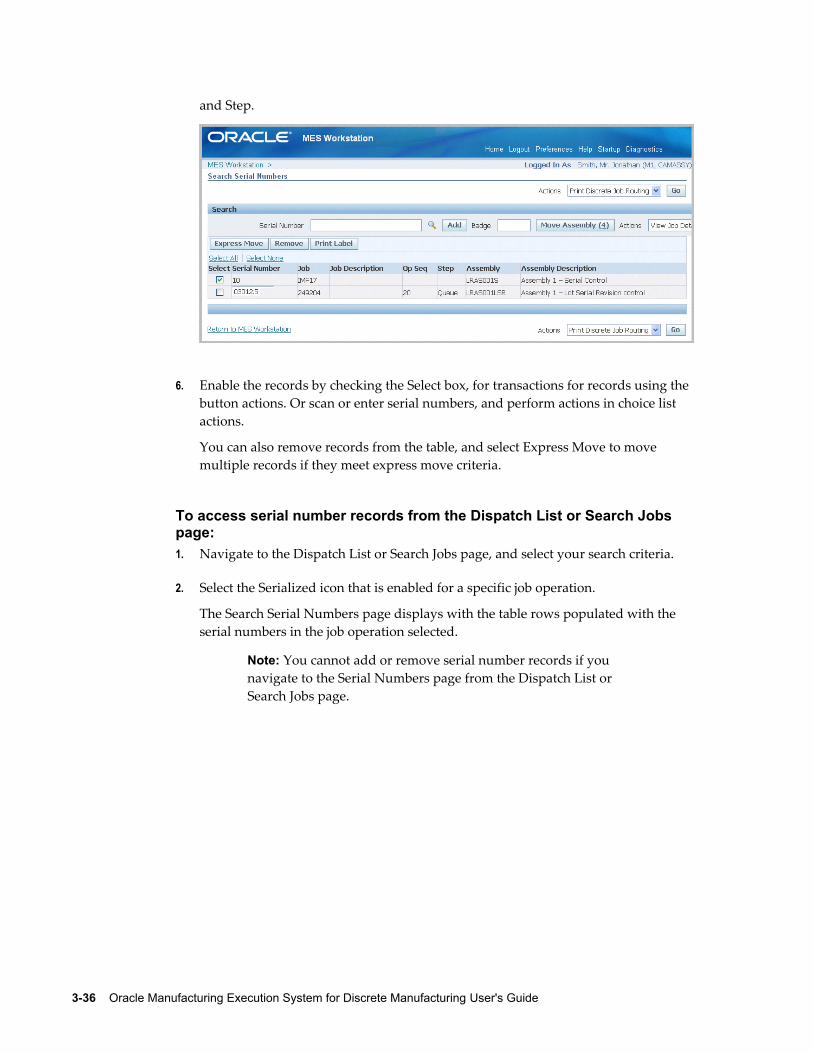
3-36 Oracle Manufacturing Execution System for Discrete Manufacturing User's Guide
and Step.
6. Enable the records by checking the Select box, for transactions for records using the button actions. Or scan or enter serial numbers, and perform actions in choice list actions.
You can also remove records from the table, and select Express Move to move multiple records if they meet express move criteria.
To access serial number records from the Dispatch List or Search Jobs page:1. Navigate to the Dispatch List or Search Jobs page, and select your search criteria.
2. Select the Serialized icon that is enabled for a specific job operation.
The Search Serial Numbers page displays with the table rows populated with the serial numbers in the job operation selected.
Note: You cannot add or remove serial number records if you navigate to the Serial Numbers page from the Dispatch List or Search Jobs page.
MES Workstation 3-37
3. Enable the records by checking the Select box, and then choose an action in the button or choice list action values, or global actions.
You can also remove records from the table, and select Express Move to move multiple records if they meet express move criteria.
Note: You cannot remove serial number records if you navigate to the Serial Numbers page from the Dispatch List or Search Jobs page.
Related TopicsCreating Move Transactions for Serialized Jobs, page 3-37
Creating Move Transactions for Serialized JobsSerialized transaction pages are invoked when you select a move task from the Search Serial Numbers page. This includes Complete Assembly, Move Assembly, Return Assembly, Return From Scrap, Return From Reject, Reject Assembly, Move and Complete, Return and Move, and Scrap Assembly transaction pages. The serialized transaction page is a one page flow, unlike the assembly transaction and detail pages for non-serialized moves. The following rules are set for these pages:
• You move only one serial number record. Therefore, the Move Quantity field does not appear on the transaction page.
• If the Enforce Sequential Move parameter is set to Yes, the To Operation value displays only the operation up to the count point operation. Moves across the countpoint operation are disabled.
• For backward moves, the assembly cannot be moved back before the serialization
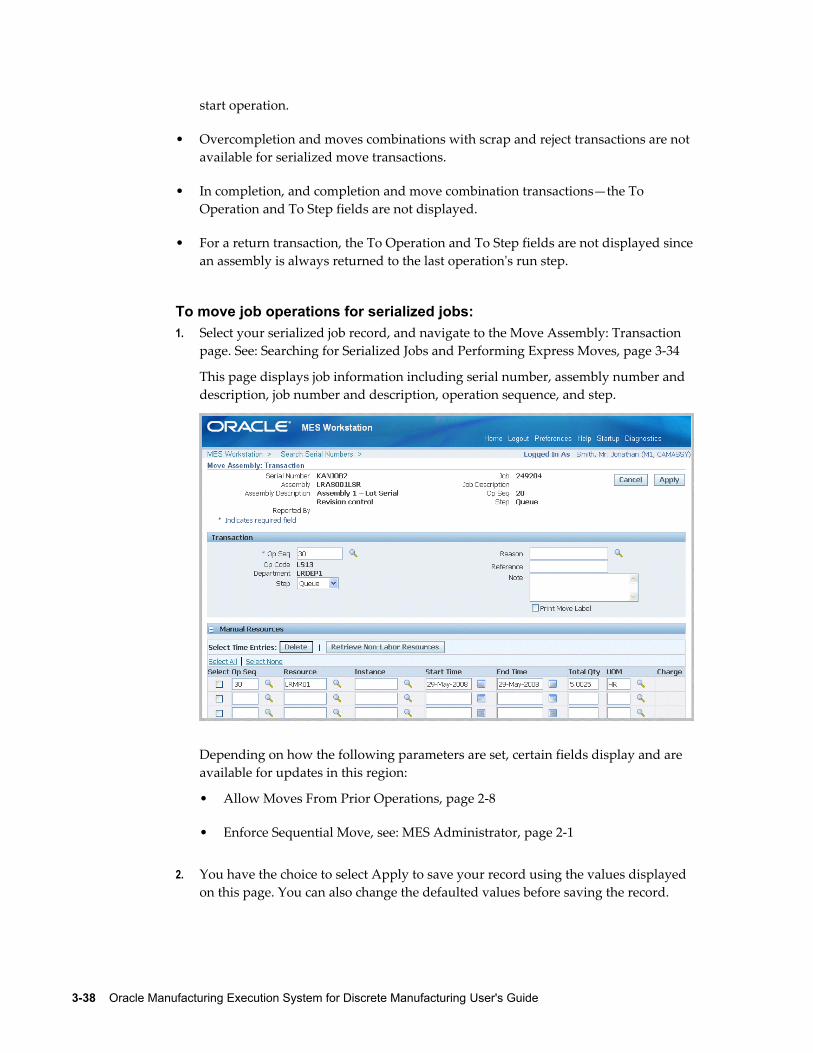
3-38 Oracle Manufacturing Execution System for Discrete Manufacturing User's Guide
start operation.
• Overcompletion and moves combinations with scrap and reject transactions are not available for serialized move transactions.
• In completion, and completion and move combination transactions—the To Operation and To Step fields are not displayed.
• For a return transaction, the To Operation and To Step fields are not displayed sincean assembly is always returned to the last operation's run step.
To move job operations for serialized jobs:1. Select your serialized job record, and navigate to the Move Assembly: Transaction
page. See: Searching for Serialized Jobs and Performing Express Moves, page 3-34
This page displays job information including serial number, assembly number and description, job number and description, operation sequence, and step.
Depending on how the following parameters are set, certain fields display and are available for updates in this region:
• Allow Moves From Prior Operations, page 2-8
• Enforce Sequential Move, see: MES Administrator, page 2-1
2. You have the choice to select Apply to save your record using the values displayed on this page. You can also change the defaulted values before saving the record.
MES Workstation 3-39
3. In the Transaction region, select values in the Step, Reason, Reference, and descriptive text in the Note region field.
Updating Job Notes, page 3-16
4. If a customized descriptive flexfield is used in your environment, the Additional Information region displays. Enter your information in this region. If you are not using customized information, this region does not appear.
5. In the Manual Resources region, you have the option to add machine resources by selecting Retrieve Non-Labor Resources—or individually adding records.
• When you select Retrieve Non-Labor Resources, applicable machine resources populate the fields for Resource, Instance, and Start Time and End Time. You can edit or delete these records.
• For individual records you are manually entering, select values in the Resource,Instance, and Start Time and End Time fields.
6. Quality collection plan information displays in the Quality Plans region. Several different modes may appear, For collection plans with a parent-child relationship only, the Quality Plans region displays fields for Plan Name, Information, Mandatory flag, Completed status, and Attachments. Select Add Child Data to navigate to the Enter Quality Results page in Oracle Quality.
See: Quality Display Modes, page 3-20
The Enter Results page on the Quality Workbench appears for entering quality data. See: Entering Quality Results, Oracle Quality User's Guide
After quality data is entered, the transaction page is refreshed with the updated information. You have the option to duplicate, update, or delete these records.
7. If single level plans exist, enter quality results directly in the MES transaction pages . Select information in the following fields: Inspection Resolution, Quantity Defects, Subinvenvory and Locator, and Remarks.
If applicable parent and child relationships plans also exist, the Parent-Child Entry Mode button is enabled to access the Quality Workbench. If you choose to enter data in the parent-child mode, you cannot return to the inline mode. However, you can enter data first in the inline region, and then navigate to the parent-child region.
8. Oracle Applications also provides the ability to enter collection plan transactions using integrated devices. Scan your data into the fields for Defect Code, Quantity Defect, Date, and Comments.
If applicable parent and child relationships plans also exist, the Parent-Child Entry Mode button is enabled to access the Quality Workbench.
9. Use the Backflush Components region to manually backflush components under lot
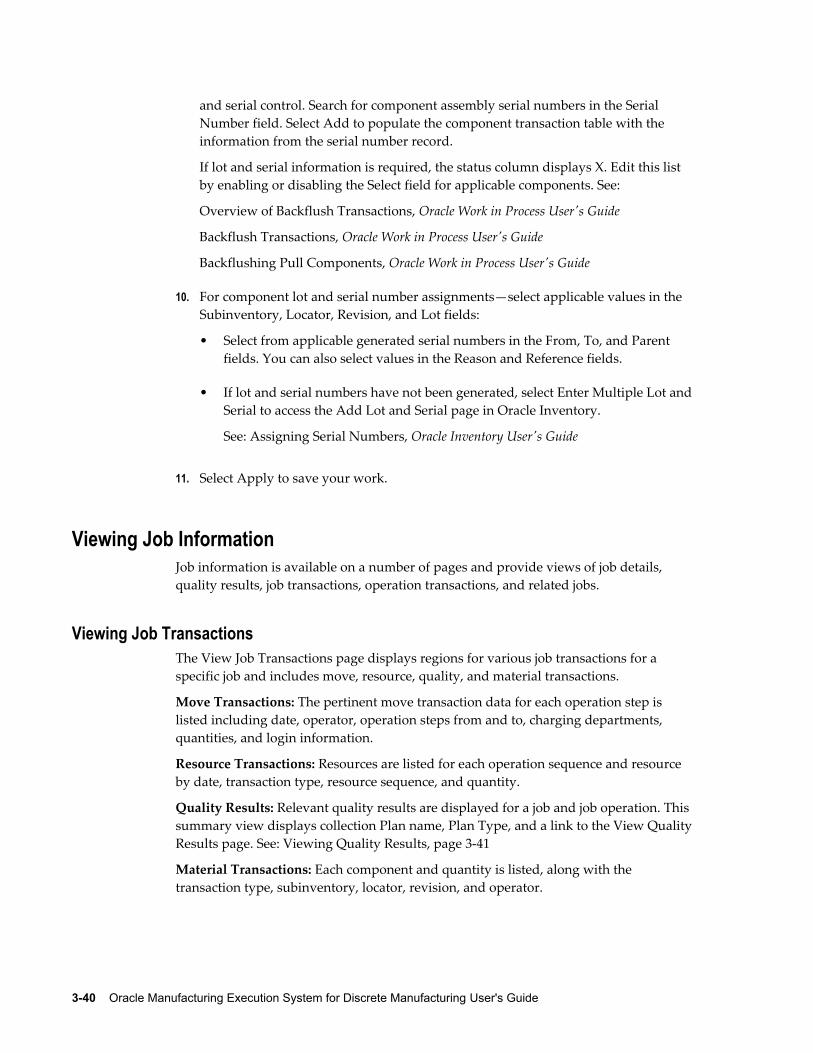
3-40 Oracle Manufacturing Execution System for Discrete Manufacturing User's Guide
and serial control. Search for component assembly serial numbers in the Serial Number field. Select Add to populate the component transaction table with the information from the serial number record.
If lot and serial information is required, the status column displays X. Edit this list by enabling or disabling the Select field for applicable components. See:
Overview of Backflush Transactions, Oracle Work in Process User's Guide
Backflush Transactions, Oracle Work in Process User's Guide
Backflushing Pull Components, Oracle Work in Process User's Guide
10. For component lot and serial number assignments—select applicable values in the Subinventory, Locator, Revision, and Lot fields:
• Select from applicable generated serial numbers in the From, To, and Parent fields. You can also select values in the Reason and Reference fields.
• If lot and serial numbers have not been generated, select Enter Multiple Lot andSerial to access the Add Lot and Serial page in Oracle Inventory.
See: Assigning Serial Numbers, Oracle Inventory User's Guide
11. Select Apply to save your work.
Viewing Job InformationJob information is available on a number of pages and provide views of job details, quality results, job transactions, operation transactions, and related jobs.
Viewing Job TransactionsThe View Job Transactions page displays regions for various job transactions for a specific job and includes move, resource, quality, and material transactions.
Move Transactions: The pertinent move transaction data for each operation step is listed including date, operator, operation steps from and to, charging departments, quantities, and login information.
Resource Transactions: Resources are listed for each operation sequence and resource by date, transaction type, resource sequence, and quantity.
Quality Results: Relevant quality results are displayed for a job and job operation. This summary view displays collection Plan name, Plan Type, and a link to the View QualityResults page. See: Viewing Quality Results, page 3-41
Material Transactions: Each component and quantity is listed, along with the transaction type, subinventory, locator, revision, and operator.
MES Workstation 3-41
Viewing Quality ResultsThe View Quality Results page enables you to see the results entered for your quality plan for a particular job and job operation. You can navigate to this page from the View Job Transactions, Job Details, and View Operation Transactions pages.
In the Quality Plan summary region, details display for any other information about theplan and applicable attachment files.
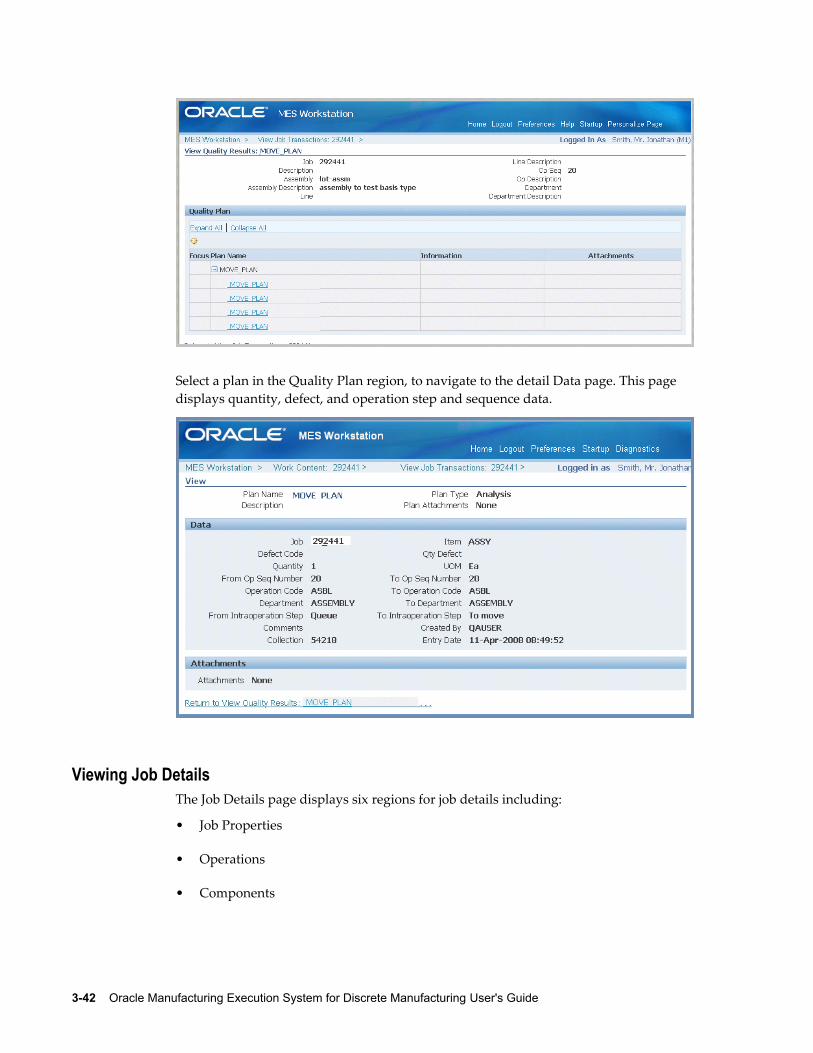
3-42 Oracle Manufacturing Execution System for Discrete Manufacturing User's Guide
Select a plan in the Quality Plan region, to navigate to the detail Data page. This page displays quantity, defect, and operation step and sequence data.
Viewing Job DetailsThe Job Details page displays six regions for job details including:
• Job Properties
• Operations
• Components
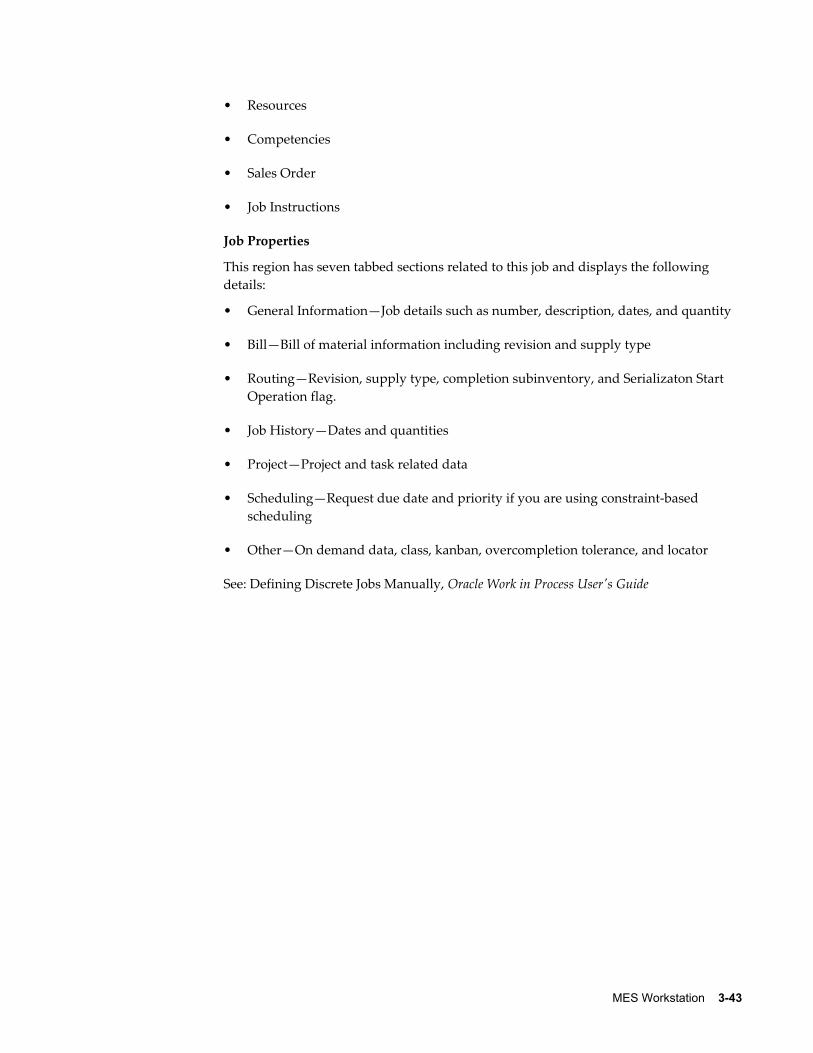
MES Workstation 3-43
• Resources
• Competencies
• Sales Order
• Job Instructions
Job Properties
This region has seven tabbed sections related to this job and displays the following details:
• General Information—Job details such as number, description, dates, and quantity
• Bill—Bill of material information including revision and supply type
• Routing—Revision, supply type, completion subinventory, and Serializaton Start Operation flag.
• Job History—Dates and quantities
• Project—Project and task related data
• Scheduling—Request due date and priority if you are using constraint-based scheduling
• Other—On demand data, class, kanban, overcompletion tolerance, and locator
See: Defining Discrete Jobs Manually, Oracle Work in Process User's Guide
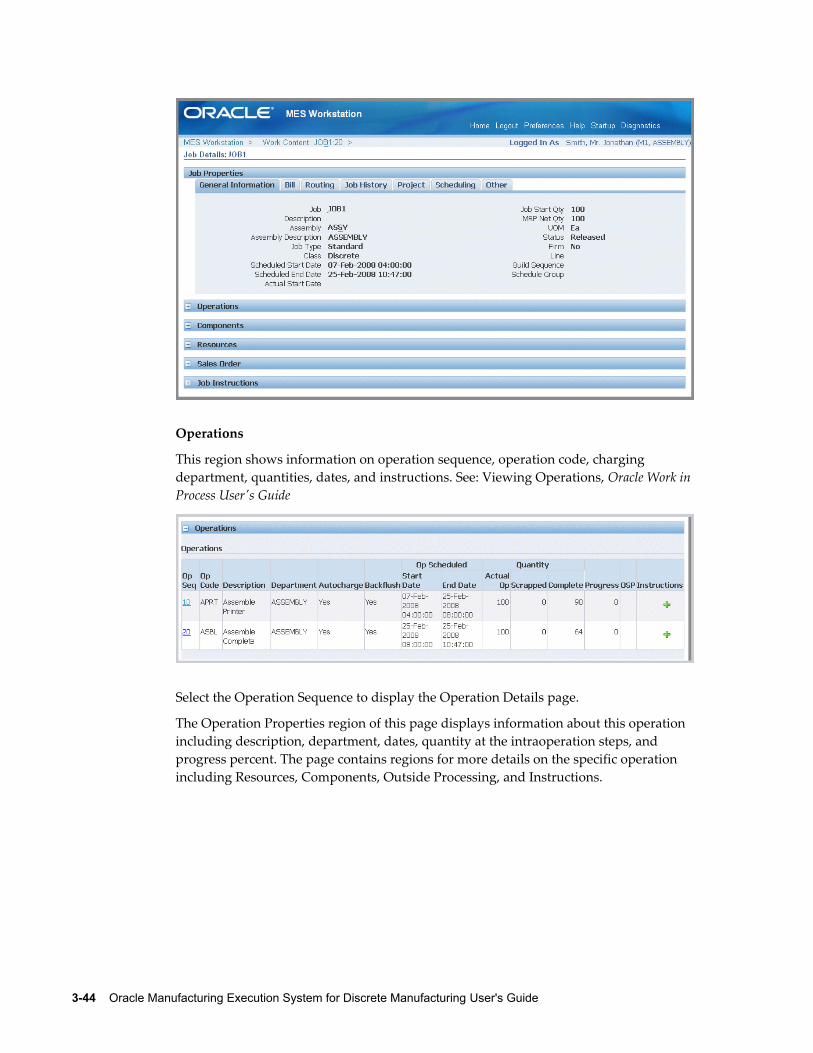
3-44 Oracle Manufacturing Execution System for Discrete Manufacturing User's Guide
Operations
This region shows information on operation sequence, operation code, charging department, quantities, dates, and instructions. See: Viewing Operations, Oracle Work in Process User's Guide
Select the Operation Sequence to display the Operation Details page.
The Operation Properties region of this page displays information about this operation including description, department, dates, quantity at the intraoperation steps, and progress percent. The page contains regions for more details on the specific operation including Resources, Components, Outside Processing, and Instructions.
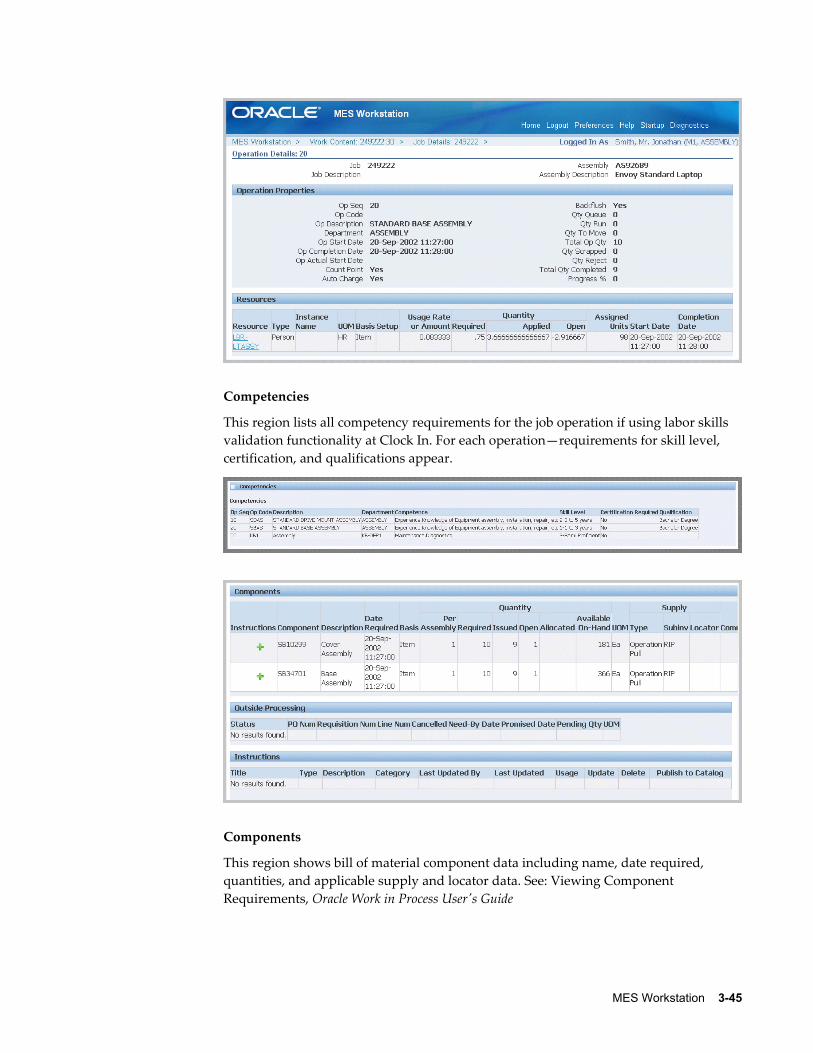
MES Workstation 3-45
Competencies
This region lists all competency requirements for the job operation if using labor skills validation functionality at Clock In. For each operation—requirements for skill level, certification, and qualifications appear.
Components
This region shows bill of material component data including name, date required, quantities, and applicable supply and locator data. See: Viewing Component Requirements, Oracle Work in Process User's Guide
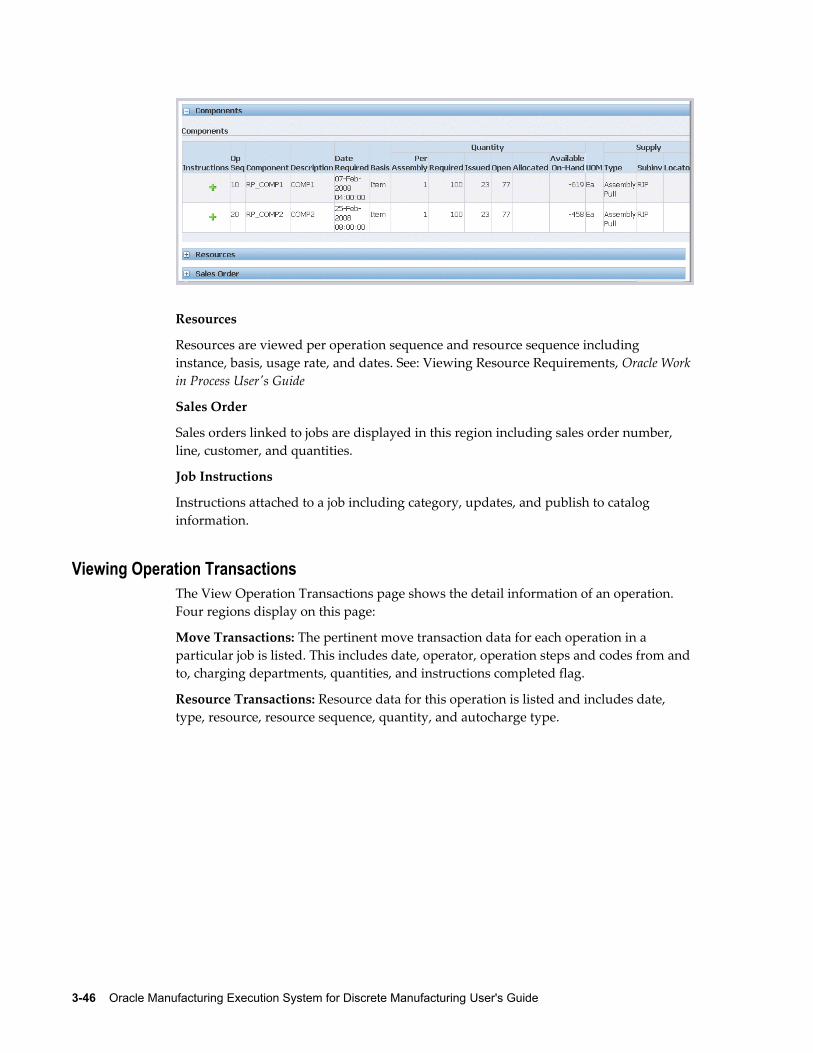
3-46 Oracle Manufacturing Execution System for Discrete Manufacturing User's Guide
Resources
Resources are viewed per operation sequence and resource sequence including instance, basis, usage rate, and dates. See: Viewing Resource Requirements, Oracle Work in Process User's Guide
Sales Order
Sales orders linked to jobs are displayed in this region including sales order number, line, customer, and quantities.
Job Instructions
Instructions attached to a job including category, updates, and publish to catalog information.
Viewing Operation TransactionsThe View Operation Transactions page shows the detail information of an operation. Four regions display on this page:
Move Transactions: The pertinent move transaction data for each operation in a particular job is listed. This includes date, operator, operation steps and codes from and to, charging departments, quantities, and instructions completed flag.
Resource Transactions: Resource data for this operation is listed and includes date, type, resource, resource sequence, quantity, and autocharge type.
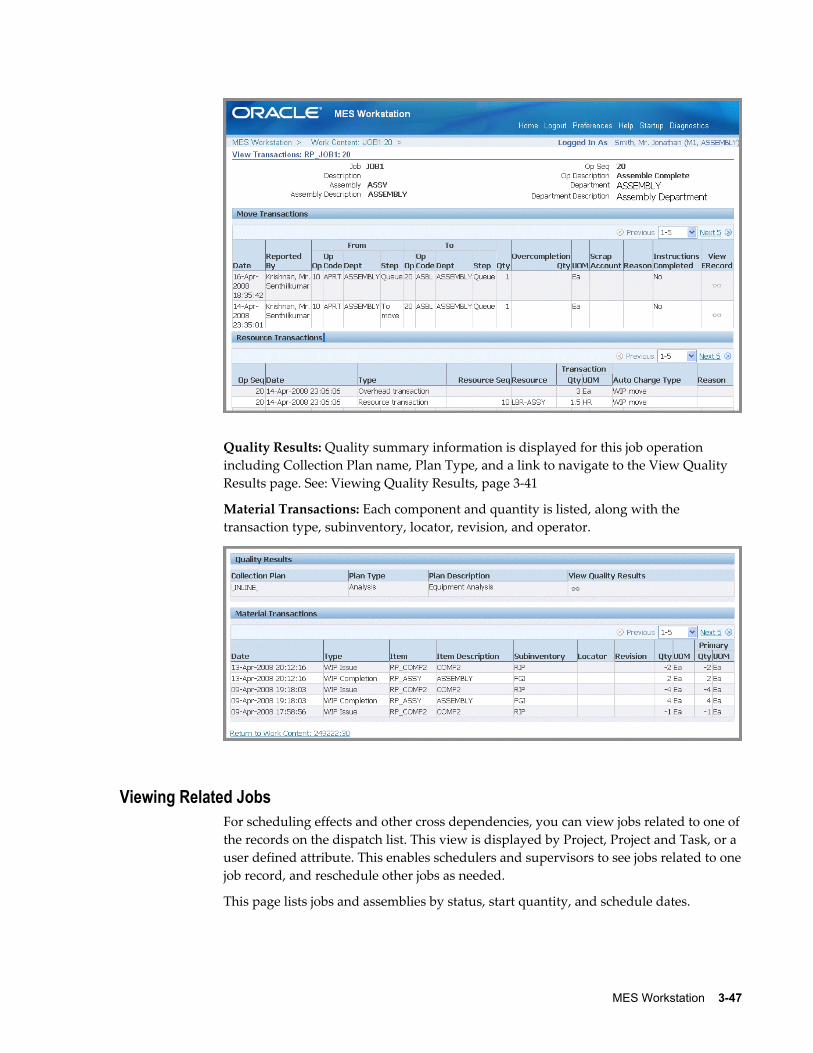
MES Workstation 3-47
Quality Results: Quality summary information is displayed for this job operation including Collection Plan name, Plan Type, and a link to navigate to the View Quality Results page. See: Viewing Quality Results, page 3-41
Material Transactions: Each component and quantity is listed, along with the transaction type, subinventory, locator, revision, and operator.
Viewing Related JobsFor scheduling effects and other cross dependencies, you can view jobs related to one ofthe records on the dispatch list. This view is displayed by Project, Project and Task, or a user defined attribute. This enables schedulers and supervisors to see jobs related to onejob record, and reschedule other jobs as needed.
This page lists jobs and assemblies by status, start quantity, and schedule dates.
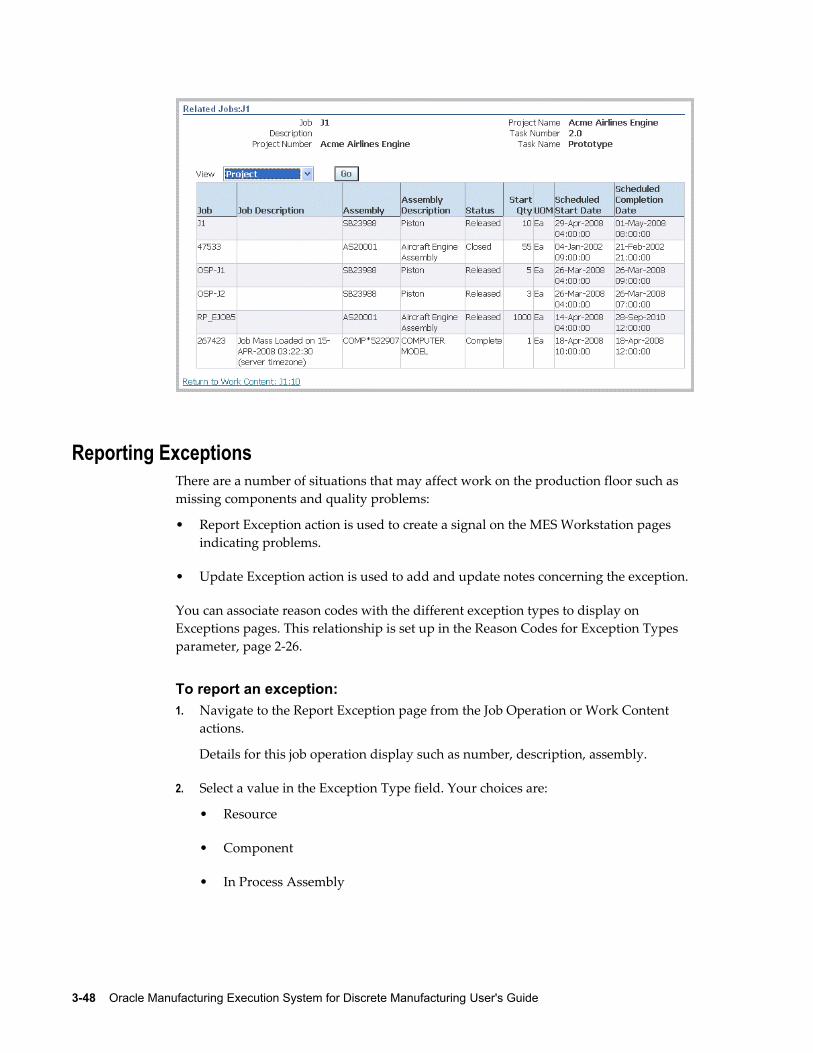
3-48 Oracle Manufacturing Execution System for Discrete Manufacturing User's Guide
Reporting ExceptionsThere are a number of situations that may affect work on the production floor such as missing components and quality problems:
• Report Exception action is used to create a signal on the MES Workstation pages indicating problems.
• Update Exception action is used to add and update notes concerning the exception.
You can associate reason codes with the different exception types to display on Exceptions pages. This relationship is set up in the Reason Codes for Exception Types parameter, page 2-26.
To report an exception:1. Navigate to the Report Exception page from the Job Operation or Work Content
actions.
Details for this job operation display such as number, description, assembly.
2. Select a value in the Exception Type field. Your choices are:
• Resource
• Component
• In Process Assembly
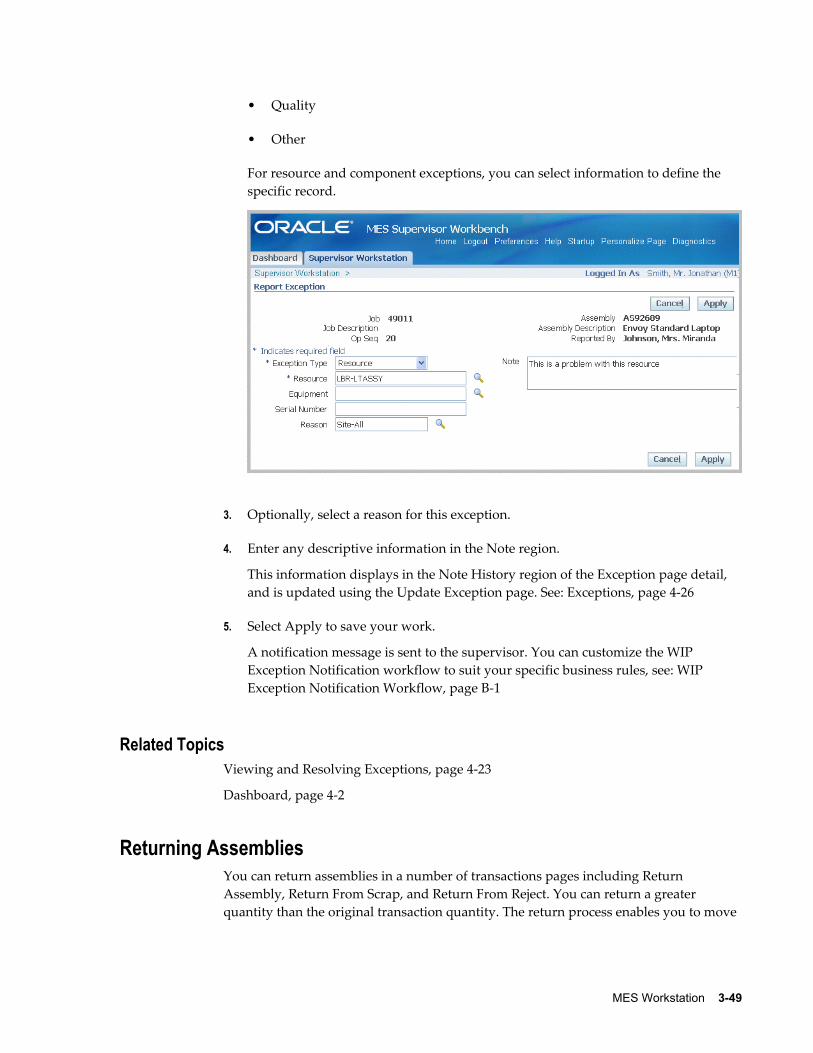
MES Workstation 3-49
• Quality
• Other
For resource and component exceptions, you can select information to define the specific record.
3. Optionally, select a reason for this exception.
4. Enter any descriptive information in the Note region.
This information displays in the Note History region of the Exception page detail, and is updated using the Update Exception page. See: Exceptions, page 4-26
5. Select Apply to save your work.
A notification message is sent to the supervisor. You can customize the WIP Exception Notification workflow to suit your specific business rules, see: WIP Exception Notification Workflow, page B-1
Related TopicsViewing and Resolving Exceptions, page 4-23
Dashboard, page 4-2
Returning AssembliesYou can return assemblies in a number of transactions pages including Return Assembly, Return From Scrap, and Return From Reject. You can return a greater quantity than the original transaction quantity. The return process enables you to move
3-50 Oracle Manufacturing Execution System for Discrete Manufacturing User's Guide
assemblies either back to the stockroom. Or move assemblies taken out of production back to the original production job, and proceed through the remainder of the routing.
To return assemblies:1. Navigate to the Return Assembly page.
The page displays job information including job number and description, operator, and assembly number and description.
2. Select Finish to use the defaults displayed to create a return transaction. Or select values for fields displayed on this page.
3. In the Transaction region, enter values in the Quantity and Subinventory fields. Youhave the option to change the unit of measure.
4. You can select applicable information in the Sales Order, Reason, and Reference fields—and descriptive text in the Note region.
5. The Lots and Serials region displays for assemblies under lot or serial number control, or both. Select Lot Details or Serial Details to access lot or serial detail pages. See: Lot Control, Oracle Inventory User's Guide, and Setting Up Serial NumberControl, Oracle Inventory User's Guide
• For lot controlled assemblies, select applicable values in the Lot, Parent Lot, andQuantity fields.
• For serial controlled assemblies, select applicable values in the Serial From and To, and Quantity fields.
• If the assembly is under both lot and serial control, select values in the Lot, Parent Lot, Serial From and To, and Quantity fields.
MES Workstation 3-51
6. Select Finish to complete your return transaction, or select Continue to enter information for quality plans and component backflushing.
• If you select Finish, the transaction is saved.
• If you select Continue, the Return Assembly Detail page displays.
7. On the Return Assembly: Detail page, collection plan information displays in the Quality Plans region. This region displays fields for Plan Name, Information, Mandatory flag, and Completed status. Select the plan you want to update by choosing Add Child Data.
The Enter Results page on the Quality Workbench appears for entering quality data. See: Entering Quality Results, Oracle Quality User's Guide
After quality data is entered, the transaction page is refreshed with the updated information. You have the option to duplicate, update, or delete these records.
8. The Backflush Components region displays components under lot and serial controlrequiring backflushing. If lot and serial information is required, the status column displays X. Edit this list by enabling or disabling the Select field for applicable components:
• Select applicable lot values in the Subinventory, Locator, Revision, and Lot fields.
• Select applicable generated serial numbers in the From, To, and Parent fields. You can also select values in the Reason and Reference fields.
9. Select Finish to save your work.
To return assemblies from scrap or reject:1. Navigate to the appropriate page. Choices are Return From Scrap or Return From
Reject.
The page displays job information fields including Job number, Job Description, Assembly number, Assembly Description, and Reported By.
2. For reject returns, you have the option to return a quantity greater than the job quantity by enabling the Overcomplete Assembly check box.
Note: This function is not available for Return From Scrap transactions.
3. Select Finish to use the defaults displayed to create a return transaction. Or select values for fields displayed on this page.

3-52 Oracle Manufacturing Execution System for Discrete Manufacturing User's Guide
4. In the From Operation and to Operation region, select values in the following fields:
• From Operation Sequence
• To Operation Sequence
• To Step
5. In the Transaction region, select a quantity value.
• If this is a return from scrap transaction, you can enter information in the Scrap Account Alias and Scrap Account Number fields.
• Optionally, you can enter a transaction Reason, Reference, and descriptive text in the Note region.
6. If a customized descriptive flexfield is used in your environment, the Additional Information region displays. Enter your information in this region. If you are not using customized information, this region does not appear.
7. Select Finish to complete your return transaction, or select Continue to enter information about manual resources, quality plans, or component backflushing.
• If you select Finish, the transaction is saved.
• If you select Continue, the detail page displays.
8. On the detail page, in the Manual Resources region, you have the option to add machine resources by selecting Retrieve Non-Labor Resources.
MES Workstation 3-53
For applicable machine resources, this region populates the fields for Operation Sequence, Resource, Instance, and Start Time.
Enter values in the End Time and Total Quantity fields. You have the option to change the unit of measure.
9. You can collect quality results in the Quality Plans region. This region provides information on Plan Name, Information, whether data collection is mandatory, and Completed status. Select the plan you want to update by choosing Add Child Data.
This Enter Results page on the Quality Workbench appears for entering quality data. See: Entering Quality Results, Oracle Quality User's Guide
After quality data is entered, the transaction page is refreshed with the updated information. You have the option to duplicate, update, or delete these records.
10. The Backflush Components region displays components under lot and serial controlrequiring backflushing. If lot and serial information is required, the status column displays X. Edit this list by enabling or disabling the Select field for applicable components:
• Select applicable lot values in the Subinventory, Locator, Revision, and Lot fields.
• Select applicable generated serial numbers in the From, To, and Parent fields. You can also select values in the Reason and Reference fields.
11. Select Finish to save your work.
Shop Floor Time EntryShop floor time entry captures resource times using Job On and Job Off, Clock In and Clock Out, and time entry page functionality. Employee and job time is tracked by user login identification and employee badge number. Several parameters control time entrybehavior:
• Charge Resource at Report Time specifies if resource transactions are created at thetime the job operation transaction time is reported.
• Time Entry Mode enables Clock In and Clock Out, and Shift In and Shift Out functionality.
• Combine Job On and Clock In Buttons enables you to combine the actions of Job On and Off, and Clock In and Out time entry.
• Job Operation Actions, and Work Content Actions set the display of actions for Job On, Job Off, Clock In, Clock Out, and Undo Clock In on the MES Workstation and MES Supervisor Workbench.
3-54 Oracle Manufacturing Execution System for Discrete Manufacturing User's Guide
See: MES Administrator, page 2-1
Clock In and Clock OutWhen an operator performs a Job On action, that job is assigned to that employee. ClockIn signifies that an operator is working on the job operation, and Clock Out signals that work has stopped.
• For environments where one employee, the single user mode, is working on a job—the tracking is performed by user login identification. For multiple employees, the identification is derived from the employee badge number.
• You can also set clock actions in the Ready Action column on the dispatch list for a specific job. When you select the clock and worker icon, the job operation is clocked in. The icon displays a red colored box with a cross out, signifying that the operation is locked.
• The Undo Clock In action removes the clock action you performed.
Performing Job On and Clock In Actions
Job On is an action used when multiple employees are working on a single job operation. Job On means that a job has been picked, it is ready for work, enabling the recording of charges for time entry. It is used to indicate that a particular job has been taken up for work but does not necessarily indicate actual work start. When an operatorperforms a Job On action, that job is assigned to that employee and the name is displayed in the dispatch list.
An operator Clocks In to record actual times for starting work on a specific job operation, and Clocks Out to signal that work has stopped. As an operator, you can pick and Job On to multiple jobs—but will most likely Clock In to one job at a time.
• When you Clock Off, the job is still associated with your operator name. If you are no longer performing work on a job operation, you must select Job Off to remove your name as associated with the operation.
• In production floor environments where work on specific job operations are assigned to only one employee, you can combine the Job On and Clock In actions using the Combine Job On and Clock In Buttons parameter. If the actions are combined, Job On and Job Off tasks do not appear on the page. When multiple employees are working on specific job operations, this parameter is set to No.
Using Badge NumbersBadge numbers in MES are used for the operator to report labor resource time, and for the supervisor to track that time. Badges are either scanned on the transaction pages, or manual entered. In the Oracle Human Resources application, every employee is given a unique identifier. Badge number values are created as Employee Numbers in the Oracle
MES Workstation 3-55
HRMS. See: Entering a New Person, Oracle Human Resources Management Systems Workforce Sourcing, Deployment, and Talent Management Guide (Global)
Several parameters used for setting badge numbers:
• Single User Mode: If enabled, indicates that only one operator is reported for the job transaction, rather than multiple operators. For single users, the employee Badge number field is not shown on the transaction pages.
• Require Badge Number for Move Transaction: If enabled, operators are required to enter their badge numbers when reporting moves and completions. This parameter is not applicable for the single user mode.
• Retain Badge Number: Controls whether to retain the employee badge number on the dispatch list after it is entered. If enabled, the badge number is active for transactions until it is cleared.
When using badge numbers as identifiers, you can set specific employees to work as resources on job operations. You can also setup labor skills validation to certify that the required qualifications for performing an operation are met by the employee.
• When setting employees as person type resources, any employee who is a resource instance in the organization in any of the departments can move the job:
• In the Department window, assign resources to the department, and resource instances to the resources.
• The Resources window is used to associate specific employees as Person type resources. Person resource instances are assigned by selecting the Employee Number value created in Oracle HRMS. This value is used as the Badge value in MES. See: Assigning Resources to a Department, Oracle Bills of Material User'sGuide
• When labor skills validation is set up, required qualifications for performing an operation are certified when the operator Clocks In. If badge numbers are required for move transactions in the environment, after the operator enters the number, andClocks In to a job operation, the skill levels are checked. This feature is set up in several applications. See: Moving and Completing Assemblies, page 3-18
Reporting Time PagesReport Time pages provide a manual method of reporting, reviewing and charging resources if time is not reported during the move transaction. The entries are used in calculating labor resources:
• The Report My Time page is used for reporting resource time for job operations on a number of different jobs.
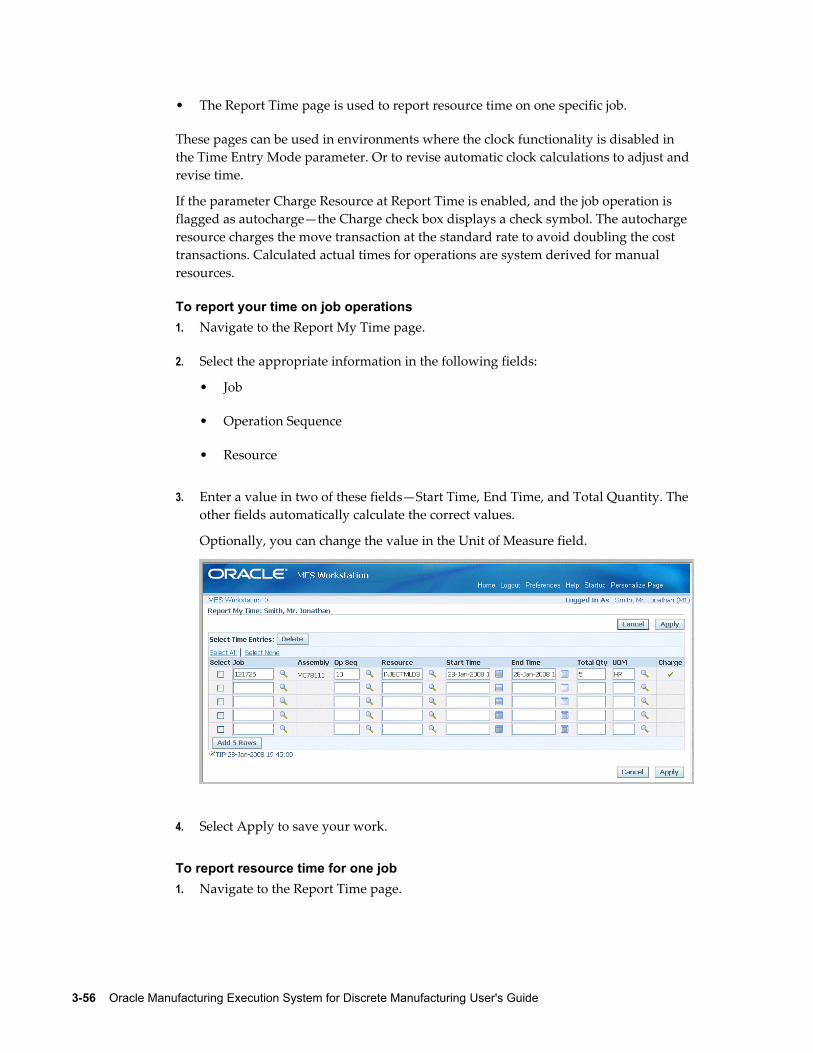
3-56 Oracle Manufacturing Execution System for Discrete Manufacturing User's Guide
• The Report Time page is used to report resource time on one specific job.
These pages can be used in environments where the clock functionality is disabled in the Time Entry Mode parameter. Or to revise automatic clock calculations to adjust and revise time.
If the parameter Charge Resource at Report Time is enabled, and the job operation is flagged as autocharge—the Charge check box displays a check symbol. The autocharge resource charges the move transaction at the standard rate to avoid doubling the cost transactions. Calculated actual times for operations are system derived for manual resources.
To report your time on job operations1. Navigate to the Report My Time page.
2. Select the appropriate information in the following fields:
• Job
• Operation Sequence
• Resource
3. Enter a value in two of these fields—Start Time, End Time, and Total Quantity. The other fields automatically calculate the correct values.
Optionally, you can change the value in the Unit of Measure field.
4. Select Apply to save your work.
To report resource time for one job1. Navigate to the Report Time page.
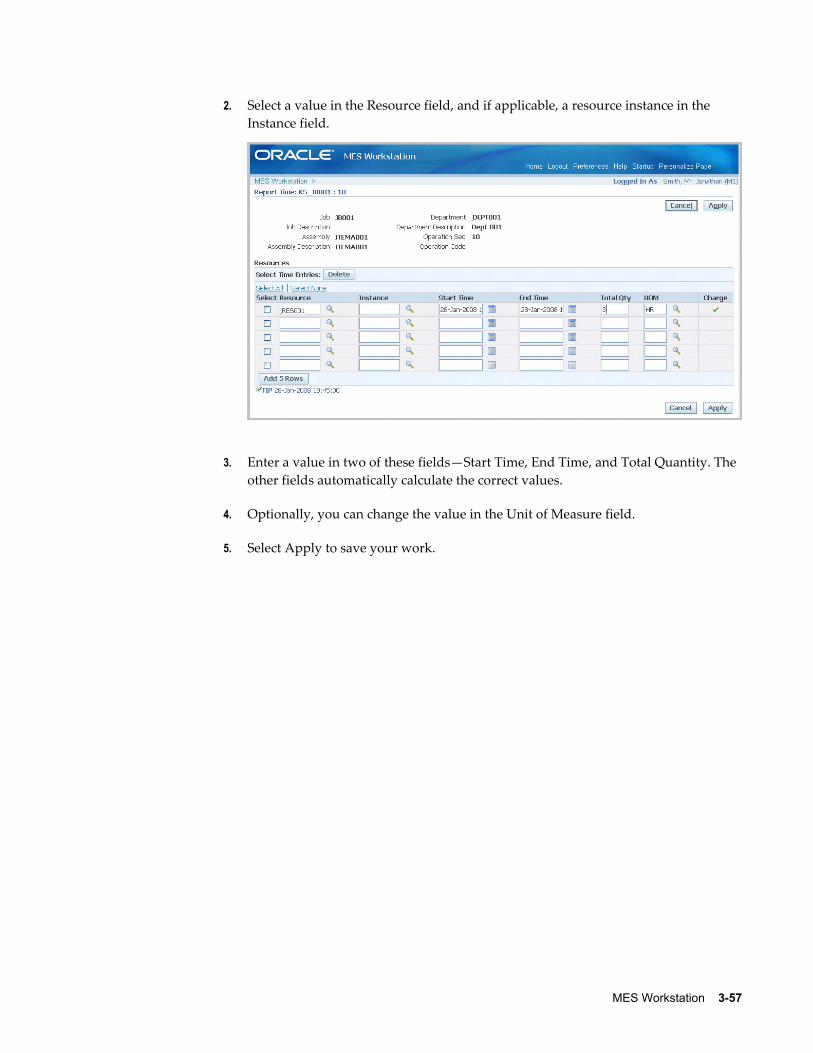
MES Workstation 3-57
2. Select a value in the Resource field, and if applicable, a resource instance in the Instance field.
3. Enter a value in two of these fields—Start Time, End Time, and Total Quantity. The other fields automatically calculate the correct values.
4. Optionally, you can change the value in the Unit of Measure field.
5. Select Apply to save your work.

MES Supervisor Workbench 4-1
4MES Supervisor Workbench
This chapter describes the features of the MES Supervisor Workbench, including the ability to monitor shop floor progress on the Dashboard and to avoid potential problems through actions taken on the Supervisor Workstation.
This chapter covers the following topics:
• Overview of the MES Supervisor Workbench
• Dashboard
• Monitoring Shop Floor Progress
• Viewing and Resolving Exceptions
• Assigning Alternate Resources
• Rescheduling Operations
• Changing Shopfloor Statuses
• Job Operations and the Dispatch List
• Expedite and Undo Expedite
Overview of the MES Supervisor WorkbenchThe MES Supervisor Workbench is the starting point for supervisors to view shop floor progress and potential problems. This includes shop floor status, performance, and exceptions to shop floor work flow. The MES Supervisor responsibility includes two tabbed regions: the Dashboard and the Supervisor Workstation. The program opens in the Dashboard view and displays graphs and links to detailed information on exceptions, performance, and labor. The Supervisor Workstation tab displays the dispatch list. From both of these tabs you can navigate to global actions for more information.
The details displayed in the Supervisor Workbench are determined by the specifics of the login information. You can view the entire organization; or specify a particular department, resource, employee, or machine.
4-2 Oracle Manufacturing Execution System for Discrete Manufacturing User's Guide
MES Supervisor Workbench StartupThe Startup page is used to enter specific parameters for organization, department; and resource. You can set different login and workbench initialization modes. For example, you can:
• Save startup parameters from a prior login to reduce navigation for repeated parameter combinations.
• Set different job search pages.
• Configure organization, department, and resource access.
See: Workstation Startup and Initialization Modes, page 3-4
To access the MES Supervisor Workbench:1. Navigate to Startup page and select the specifics for a particular organization,
department, resource, employee, or machine.
The Organization field is required; select values in the other fields depending on how much detailed information you want to view.
2. Select Start to display the Dashboard page.
From here you can view performance indicators, shop floor progress, or select the Supervisor Workstation tab to navigate to transaction pages.
3. Select a task from the Actions box to access available global actions. Choose Go to navigate to the appropriate page.
Available global actions are specified in the Global Actions parameter. These views and tasks include other workbenches and reports. See: Global Actions, page 2-14
4. Select the MES Workstation tabbed region to display the dispatch list. See: Viewing Dispatch Lists, page 3-6
DashboardThe Dashboard displays performance graphs, links to detailed information, and a Shopfloor Progress region. The graphs on the Dashboard are configured using several parameters including:
• Labor Performance Metrics, page 2-19
• Production to Plan KPI, page 2-23
• Supervisor Dashboard View, page 2-30
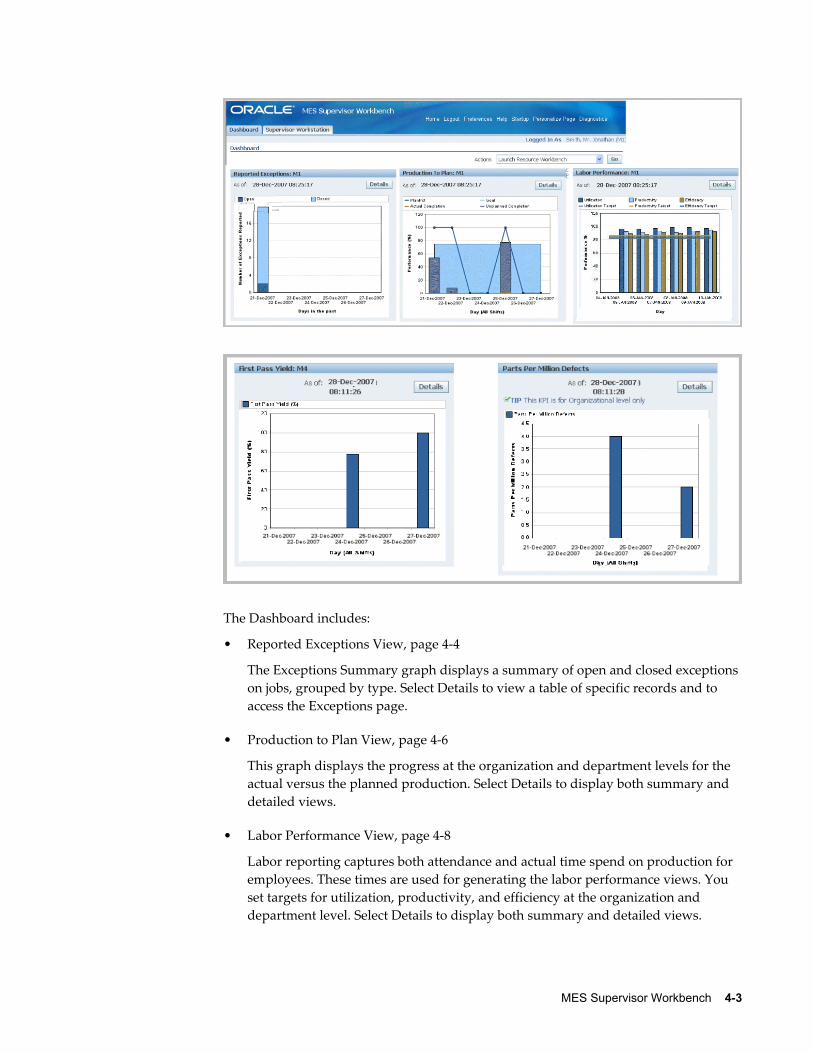
MES Supervisor Workbench 4-3
The Dashboard includes:
• Reported Exceptions View, page 4-4
The Exceptions Summary graph displays a summary of open and closed exceptions on jobs, grouped by type. Select Details to view a table of specific records and to access the Exceptions page.
• Production to Plan View, page 4-6
This graph displays the progress at the organization and department levels for the actual versus the planned production. Select Details to display both summary and detailed views.
• Labor Performance View, page 4-8
Labor reporting captures both attendance and actual time spend on production for employees. These times are used for generating the labor performance views. You set targets for utilization, productivity, and efficiency at the organization and department level. Select Details to display both summary and detailed views.
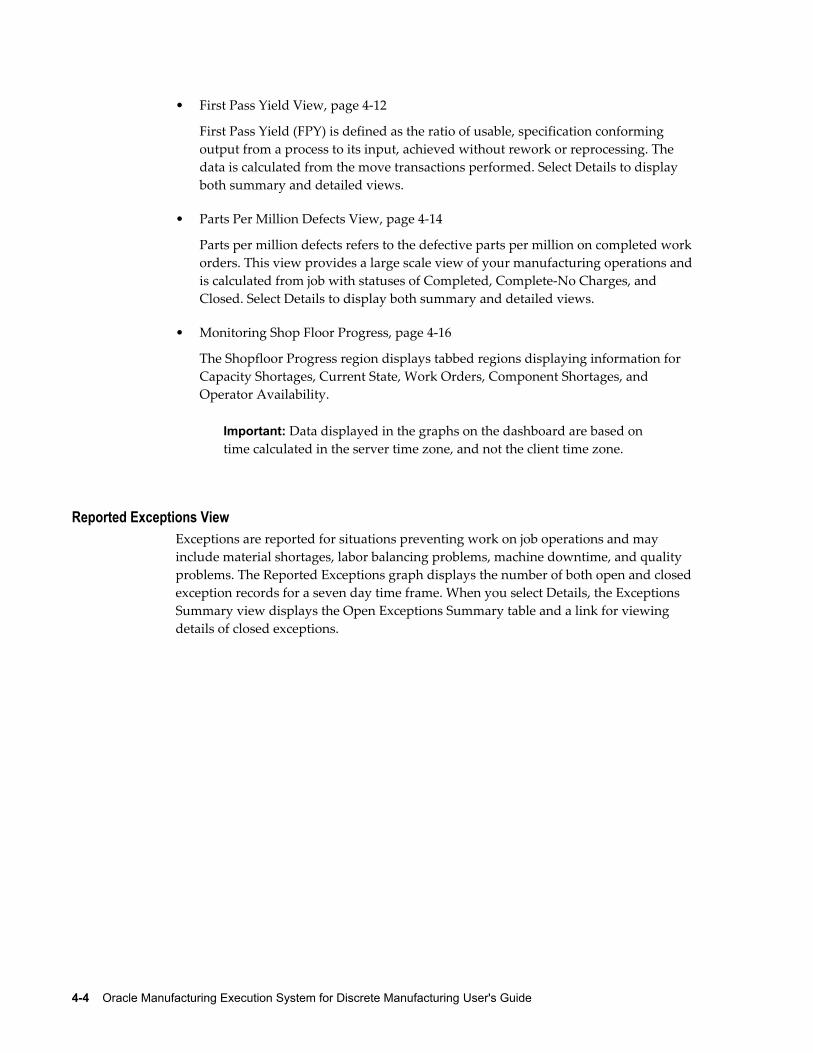
4-4 Oracle Manufacturing Execution System for Discrete Manufacturing User's Guide
• First Pass Yield View, page 4-12
First Pass Yield (FPY) is defined as the ratio of usable, specification conforming output from a process to its input, achieved without rework or reprocessing. The data is calculated from the move transactions performed. Select Details to display both summary and detailed views.
• Parts Per Million Defects View, page 4-14
Parts per million defects refers to the defective parts per million on completed workorders. This view provides a large scale view of your manufacturing operations andis calculated from job with statuses of Completed, Complete-No Charges, and Closed. Select Details to display both summary and detailed views.
• Monitoring Shop Floor Progress, page 4-16
The Shopfloor Progress region displays tabbed regions displaying information for Capacity Shortages, Current State, Work Orders, Component Shortages, and Operator Availability.
Important: Data displayed in the graphs on the dashboard are based on time calculated in the server time zone, and not the client time zone.
Reported Exceptions ViewExceptions are reported for situations preventing work on job operations and may include material shortages, labor balancing problems, machine downtime, and quality problems. The Reported Exceptions graph displays the number of both open and closedexception records for a seven day time frame. When you select Details, the Exceptions Summary view displays the Open Exceptions Summary table and a link for viewing details of closed exceptions.
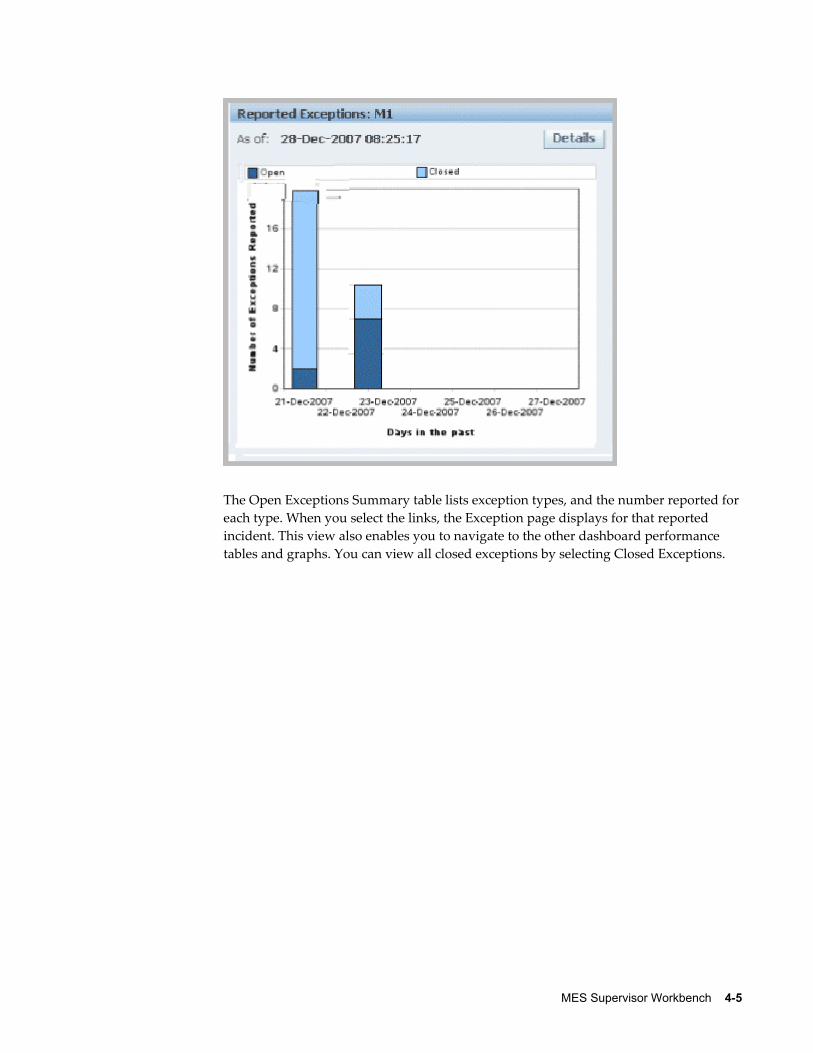
MES Supervisor Workbench 4-5
The Open Exceptions Summary table lists exception types, and the number reported foreach type. When you select the links, the Exception page displays for that reported incident. This view also enables you to navigate to the other dashboard performance tables and graphs. You can view all closed exceptions by selecting Closed Exceptions.
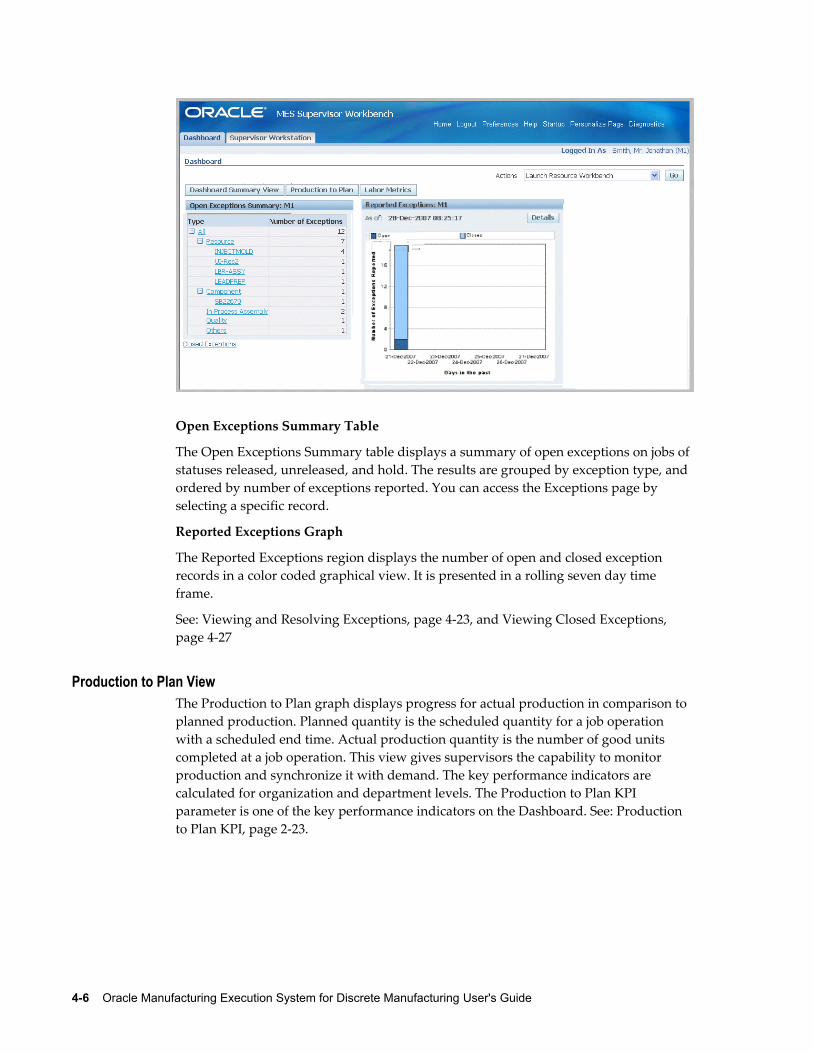
4-6 Oracle Manufacturing Execution System for Discrete Manufacturing User's Guide
Open Exceptions Summary Table
The Open Exceptions Summary table displays a summary of open exceptions on jobs of statuses released, unreleased, and hold. The results are grouped by exception type, and ordered by number of exceptions reported. You can access the Exceptions page by selecting a specific record.
Reported Exceptions Graph
The Reported Exceptions region displays the number of open and closed exception records in a color coded graphical view. It is presented in a rolling seven day time frame.
See: Viewing and Resolving Exceptions, page 4-23, and Viewing Closed Exceptions, page 4-27
Production to Plan ViewThe Production to Plan graph displays progress for actual production in comparison to planned production. Planned quantity is the scheduled quantity for a job operation with a scheduled end time. Actual production quantity is the number of good units completed at a job operation. This view gives supervisors the capability to monitor production and synchronize it with demand. The key performance indicators are calculated for organization and department levels. The Production to Plan KPI parameter is one of the key performance indicators on the Dashboard. See: Production to Plan KPI, page 2-23.
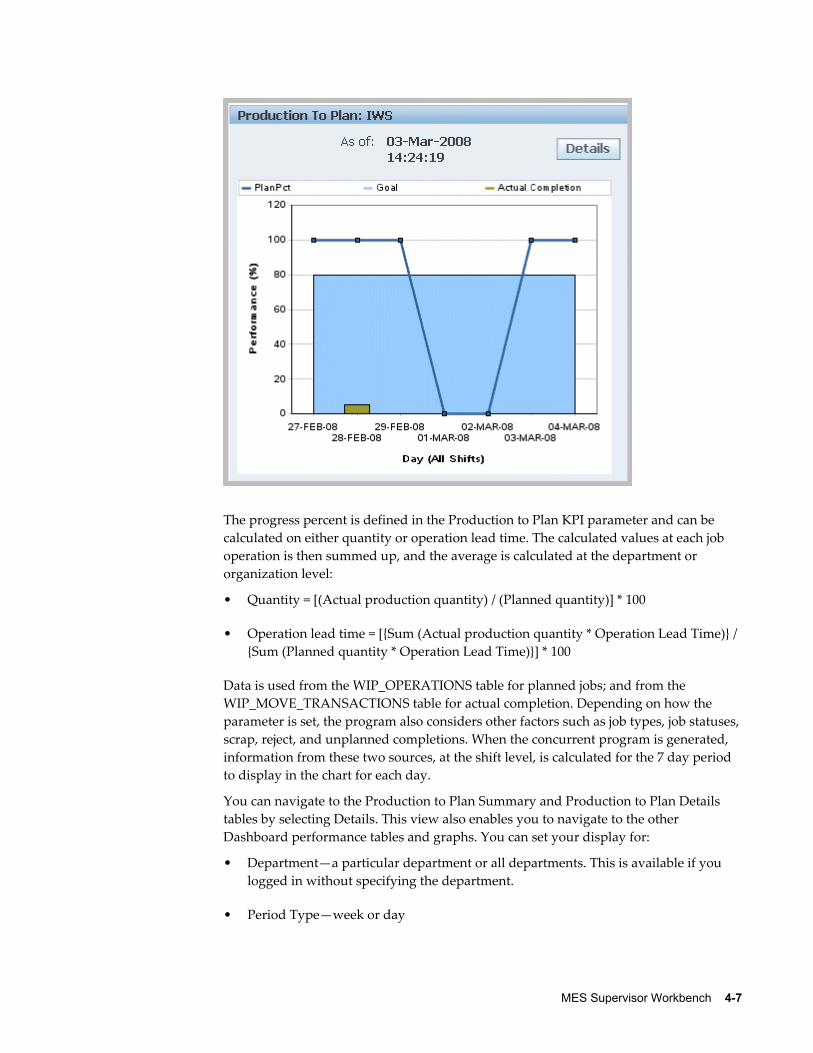
MES Supervisor Workbench 4-7
The progress percent is defined in the Production to Plan KPI parameter and can be calculated on either quantity or operation lead time. The calculated values at each job operation is then summed up, and the average is calculated at the department or organization level:
• Quantity = [(Actual production quantity) / (Planned quantity)] * 100
• Operation lead time = [{Sum (Actual production quantity * Operation Lead Time)} / {Sum (Planned quantity * Operation Lead Time)}] * 100
Data is used from the WIP_OPERATIONS table for planned jobs; and from the WIP_MOVE_TRANSACTIONS table for actual completion. Depending on how the parameter is set, the program also considers other factors such as job types, job statuses,scrap, reject, and unplanned completions. When the concurrent program is generated, information from these two sources, at the shift level, is calculated for the 7 day period to display in the chart for each day.
You can navigate to the Production to Plan Summary and Production to Plan Details tables by selecting Details. This view also enables you to navigate to the other Dashboard performance tables and graphs. You can set your display for:
• Department—a particular department or all departments. This is available if you logged in without specifying the department.
• Period Type—week or day
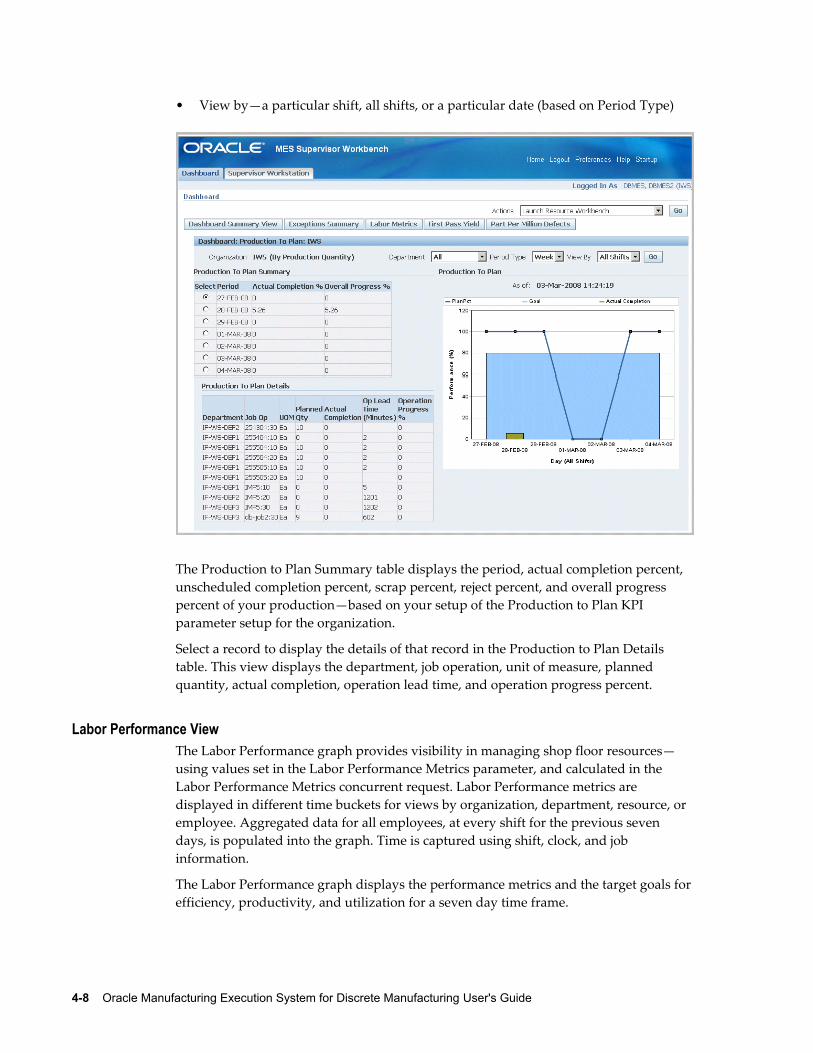
4-8 Oracle Manufacturing Execution System for Discrete Manufacturing User's Guide
• View by—a particular shift, all shifts, or a particular date (based on Period Type)
The Production to Plan Summary table displays the period, actual completion percent, unscheduled completion percent, scrap percent, reject percent, and overall progress percent of your production—based on your setup of the Production to Plan KPI parameter setup for the organization.
Select a record to display the details of that record in the Production to Plan Details table. This view displays the department, job operation, unit of measure, planned quantity, actual completion, operation lead time, and operation progress percent.
Labor Performance ViewThe Labor Performance graph provides visibility in managing shop floor resources—using values set in the Labor Performance Metrics parameter, and calculated in the Labor Performance Metrics concurrent request. Labor Performance metrics are displayed in different time buckets for views by organization, department, resource, or employee. Aggregated data for all employees, at every shift for the previous seven days, is populated into the graph. Time is captured using shift, clock, and job information.
The Labor Performance graph displays the performance metrics and the target goals forefficiency, productivity, and utilization for a seven day time frame.
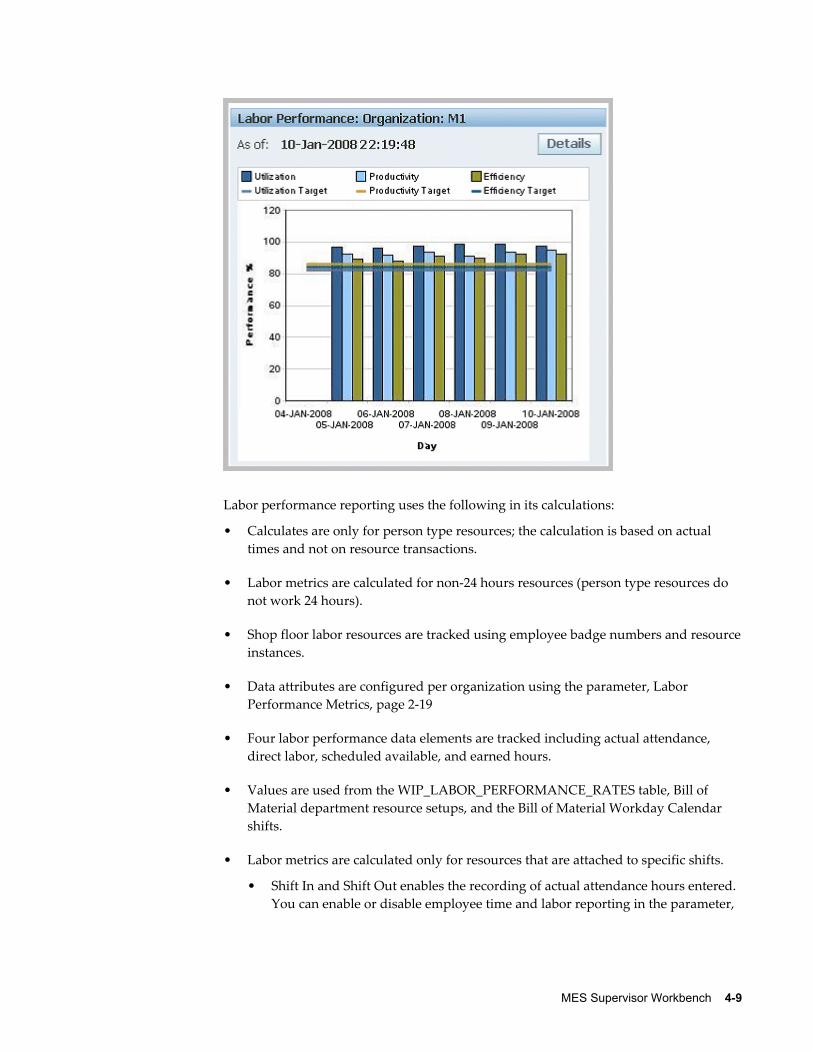
MES Supervisor Workbench 4-9
Labor performance reporting uses the following in its calculations:
• Calculates are only for person type resources; the calculation is based on actual times and not on resource transactions.
• Labor metrics are calculated for non-24 hours resources (person type resources do not work 24 hours).
• Shop floor labor resources are tracked using employee badge numbers and resourceinstances.
• Data attributes are configured per organization using the parameter, Labor Performance Metrics, page 2-19
• Four labor performance data elements are tracked including actual attendance, direct labor, scheduled available, and earned hours.
• Values are used from the WIP_LABOR_PERFORMANCE_RATES table, Bill of Material department resource setups, and the Bill of Material Workday Calendar shifts.
• Labor metrics are calculated only for resources that are attached to specific shifts.
• Shift In and Shift Out enables the recording of actual attendance hours entered. You can enable or disable employee time and labor reporting in the parameter,
4-10 Oracle Manufacturing Execution System for Discrete Manufacturing User's Guide
Time Entry Mode, page 2-31
• Actual attendance hours is not computed for the current shift until the shift ends.
• For overlapping shifts, actual hours are credited to the shift with the earliest start date.
• Clock In flags the job operation as started, and records the start time for resource usage calculation. See: Clock In and Clock Out, page 3-54
• Actual Attendance Hours—the number of hours an employee reports for work in a given period of time. For example, if an employee reports to work at 8:00 am and leaves at 5:00 pm; the total number of actual attendance hours is 9 hours.
• Scheduled Available Hours—the number of hours an employee is scheduled to be available for work in a given period of time (excluding holidays, sick days, and vacation).
• Direct Labor Hours—the total number of hours an employee reports on job operations in a given period of time.
• Earned Hours—the total number of hours designated to produce a specific quantityof units, according to the standard routing definition. For example, if an employee reports 10 units completed in a certain operation and the standard usage rate defined on the routing is 1 hour per unit; then the employee earned 10 hours.
Note: Earned hours are not be calculated for lot based resources as they cannot be attributed to a particular unit of an assembly level.
Note: Direct labor hours are used for earned hours in reporting for an employee who does not have a standard usage rate.
Using Third Party Time and Attendance Systems
MES for Discrete Manufacturing can be integrated with third party time and attendancesystems to collect actual time. The WIP_TIME_ENTRY_INTERFACE table is used to enter records for Direct Labor Hours and Actual Attendance Hours. The Import Actual Times concurrent program moves the records from this table and imports them into the MES system. The Labor Performance Metrics Calculation is then generated to view labor metrics with the imported data. See: Integration with Time and Attendance Systems, page C-8
Labor Performance View and Labor Performance Summary
In the Labor Performance Graph, select Details to navigate to both the Labor
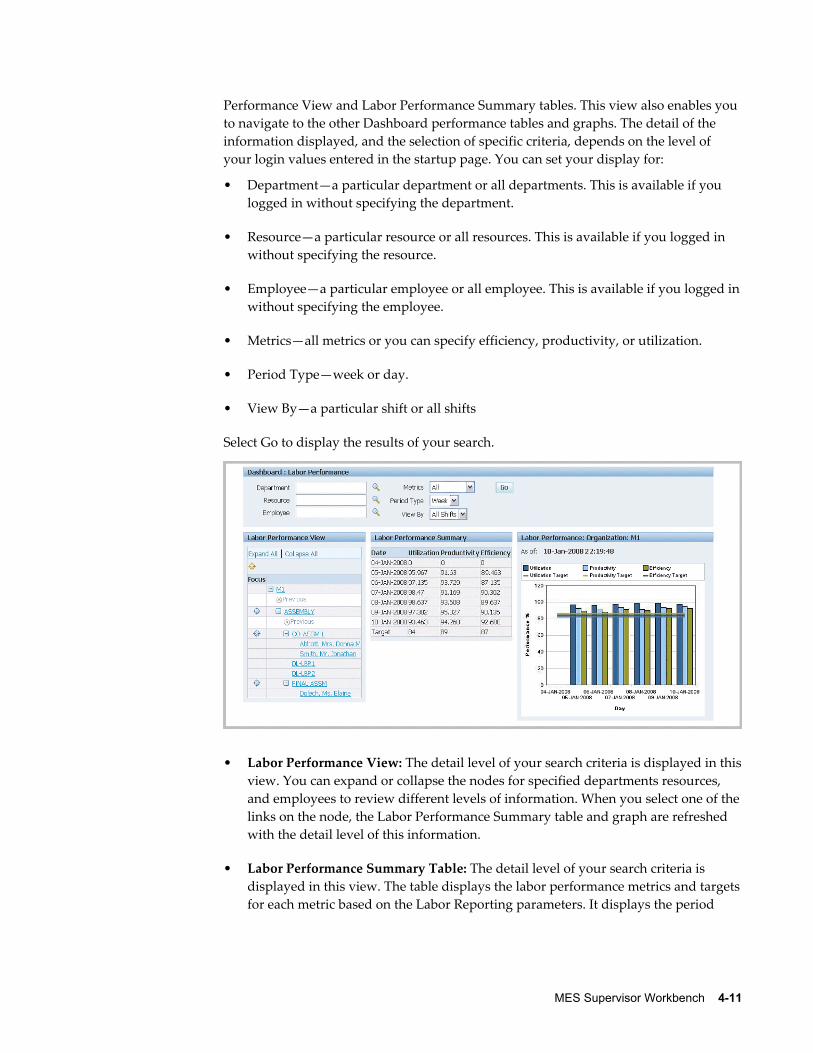
MES Supervisor Workbench 4-11
Performance View and Labor Performance Summary tables. This view also enables you to navigate to the other Dashboard performance tables and graphs. The detail of the information displayed, and the selection of specific criteria, depends on the level of your login values entered in the startup page. You can set your display for:
• Department—a particular department or all departments. This is available if you logged in without specifying the department.
• Resource—a particular resource or all resources. This is available if you logged in without specifying the resource.
• Employee—a particular employee or all employee. This is available if you logged inwithout specifying the employee.
• Metrics—all metrics or you can specify efficiency, productivity, or utilization.
• Period Type—week or day.
• View By—a particular shift or all shifts
Select Go to display the results of your search.
• Labor Performance View: The detail level of your search criteria is displayed in thisview. You can expand or collapse the nodes for specified departments resources, and employees to review different levels of information. When you select one of thelinks on the node, the Labor Performance Summary table and graph are refreshed with the detail level of this information.
• Labor Performance Summary Table: The detail level of your search criteria is displayed in this view. The table displays the labor performance metrics and targetsfor each metric based on the Labor Reporting parameters. It displays the period
4-12 Oracle Manufacturing Execution System for Discrete Manufacturing User's Guide
(day or week) and shift set in the search criteria.
First Pass Yield ViewThe First Pass Yield graph displays the ratio of usable parts to the material used for its processing—achieved without rework or reprocessing. This metric provides supervisorsa view of manufacturing operations at the macro level for decision making. The view is enabled using the Supervisor Dashboard View parameter, and generated through the First Pass Yield Calculation program accessed in the global actions. See: Supervisor Dashboard View, page 2-30
The First Pass Yield concurrent program uses the following considerations in its calculation:
• Only operations performed are considered.
• Net scrap or reject quantities are the final quantities moved to the Scrap or Reject intraoperation step—not the sum of quantities moved in and out of these steps.
• Partially completed assembles not meeting quality requirements are consideredmoved to the Scrap or Reject intraoperation.
• Reject transactions are reversed by moving parts out of the Reject step.
• Either or both the Count Point and Autocharge fields on job operations must be enabled. See: Count Point and Autocharge Fields, Oracle Bills of Material User's Guide
The first pass yield percentages displaying on the chart are for the previous seven days from the current date.

MES Supervisor Workbench 4-13
Select Details to view First Pass Yield Summary and Details. This view also enables you to navigate to the other Dashboard performance tables and graphs. The data displayed in the summary and detail regions depends on your display parameters. You can set your display for:
• Department—a particular department or all departments. This is available if you logged in without specifying the department.
• Period Type—week or day
• View by—a particular shift, all shifts, or a particular date (based on Period Type)
In the First Pass Yield Summary Region, select view and date values to filter your display for the Scrap Percent, Reject Percent, First Pass Yield Percent values.
• Select View—by Department or Assembly. This is available if you logged in without specifying the department.
If you select Assembly, Assembly name and Assembly Description display. If you select Department, Department Code and Department Name display.
• Select Date—a particular date or all dates in the previous seven day period.
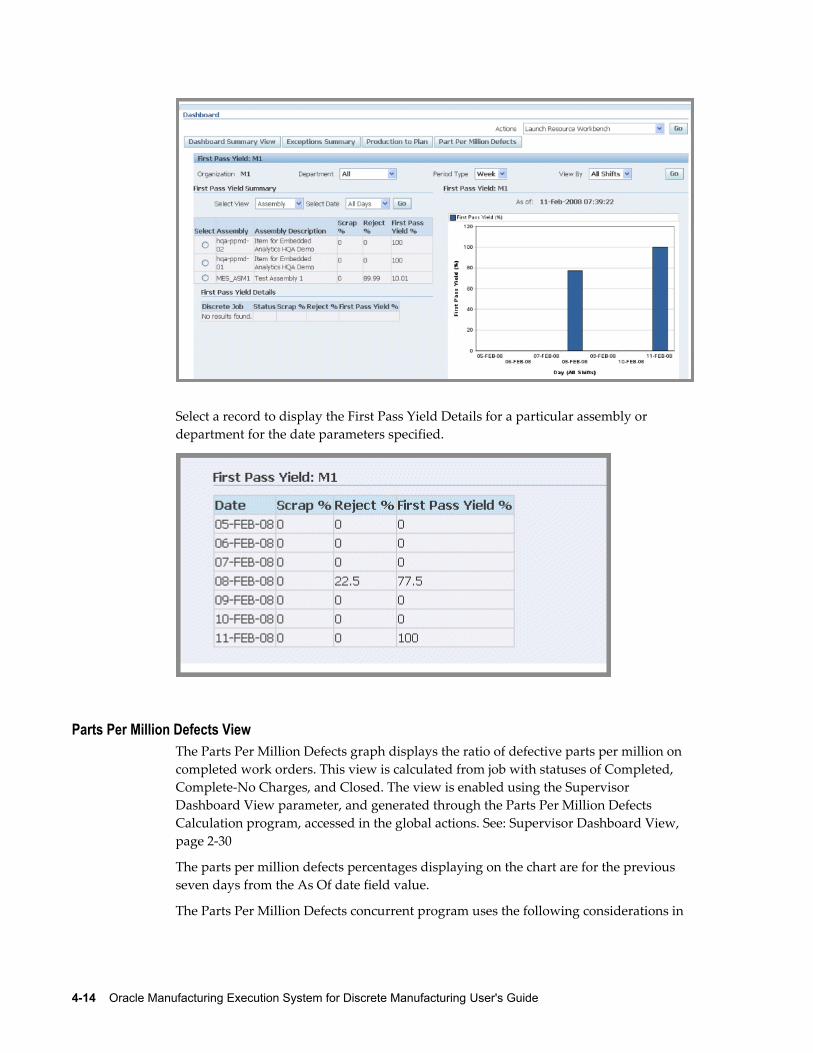
4-14 Oracle Manufacturing Execution System for Discrete Manufacturing User's Guide
Select a record to display the First Pass Yield Details for a particular assembly or department for the date parameters specified.
Parts Per Million Defects ViewThe Parts Per Million Defects graph displays the ratio of defective parts per million on completed work orders. This view is calculated from job with statuses of Completed, Complete-No Charges, and Closed. The view is enabled using the Supervisor Dashboard View parameter, and generated through the Parts Per Million Defects Calculation program, accessed in the global actions. See: Supervisor Dashboard View, page 2-30
The parts per million defects percentages displaying on the chart are for the previous seven days from the As Of date field value.
The Parts Per Million Defects concurrent program uses the following considerations in
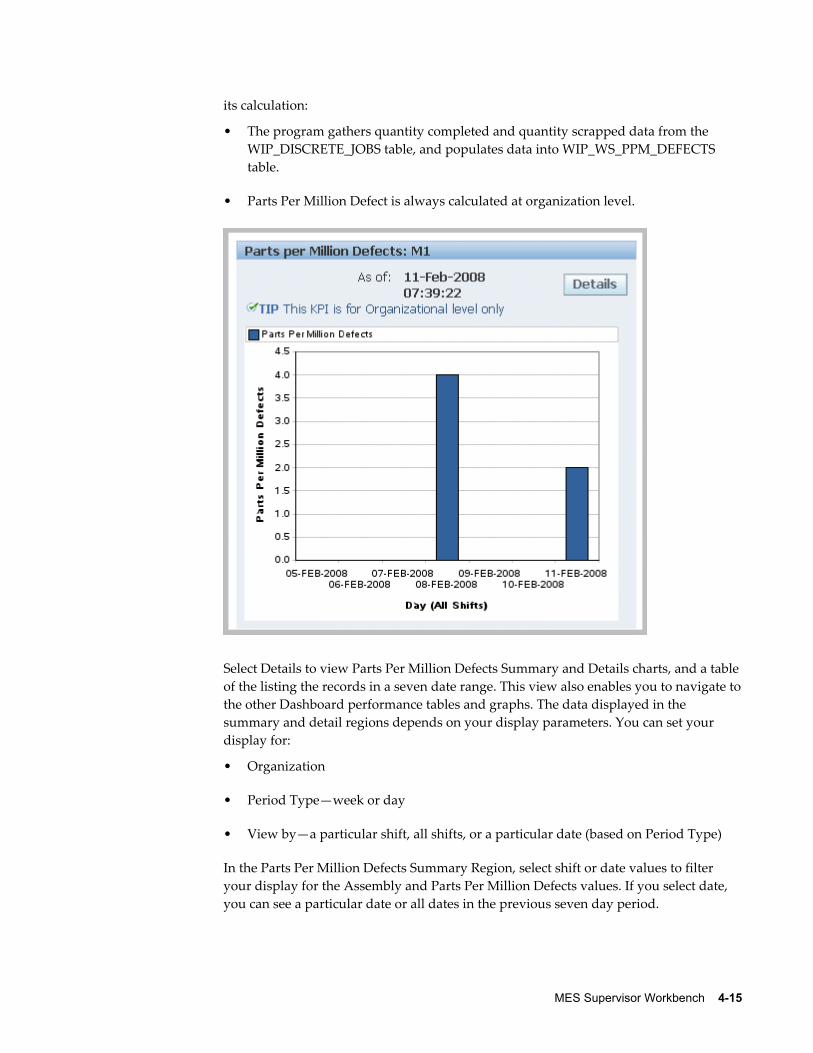
MES Supervisor Workbench 4-15
its calculation:
• The program gathers quantity completed and quantity scrapped data from the WIP_DISCRETE_JOBS table, and populates data into WIP_WS_PPM_DEFECTS table.
• Parts Per Million Defect is always calculated at organization level.
Select Details to view Parts Per Million Defects Summary and Details charts, and a tableof the listing the records in a seven date range. This view also enables you to navigate tothe other Dashboard performance tables and graphs. The data displayed in the summary and detail regions depends on your display parameters. You can set your display for:
• Organization
• Period Type—week or day
• View by—a particular shift, all shifts, or a particular date (based on Period Type)
In the Parts Per Million Defects Summary Region, select shift or date values to filter your display for the Assembly and Parts Per Million Defects values. If you select date, you can see a particular date or all dates in the previous seven day period.
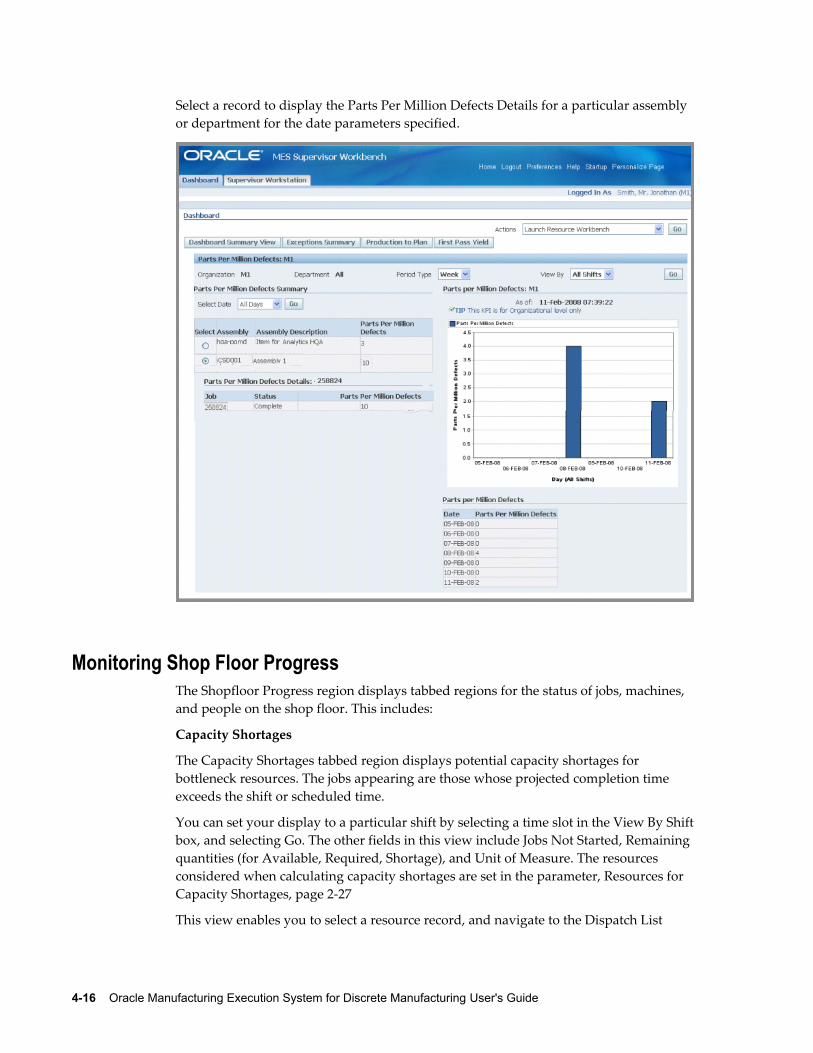
4-16 Oracle Manufacturing Execution System for Discrete Manufacturing User's Guide
Select a record to display the Parts Per Million Defects Details for a particular assembly or department for the date parameters specified.
Monitoring Shop Floor ProgressThe Shopfloor Progress region displays tabbed regions for the status of jobs, machines, and people on the shop floor. This includes:
Capacity Shortages
The Capacity Shortages tabbed region displays potential capacity shortages for bottleneck resources. The jobs appearing are those whose projected completion time exceeds the shift or scheduled time.
You can set your display to a particular shift by selecting a time slot in the View By Shiftbox, and selecting Go. The other fields in this view include Jobs Not Started, Remaining quantities (for Available, Required, Shortage), and Unit of Measure. The resources considered when calculating capacity shortages are set in the parameter, Resources for Capacity Shortages, page 2-27
This view enables you to select a resource record, and navigate to the Dispatch List
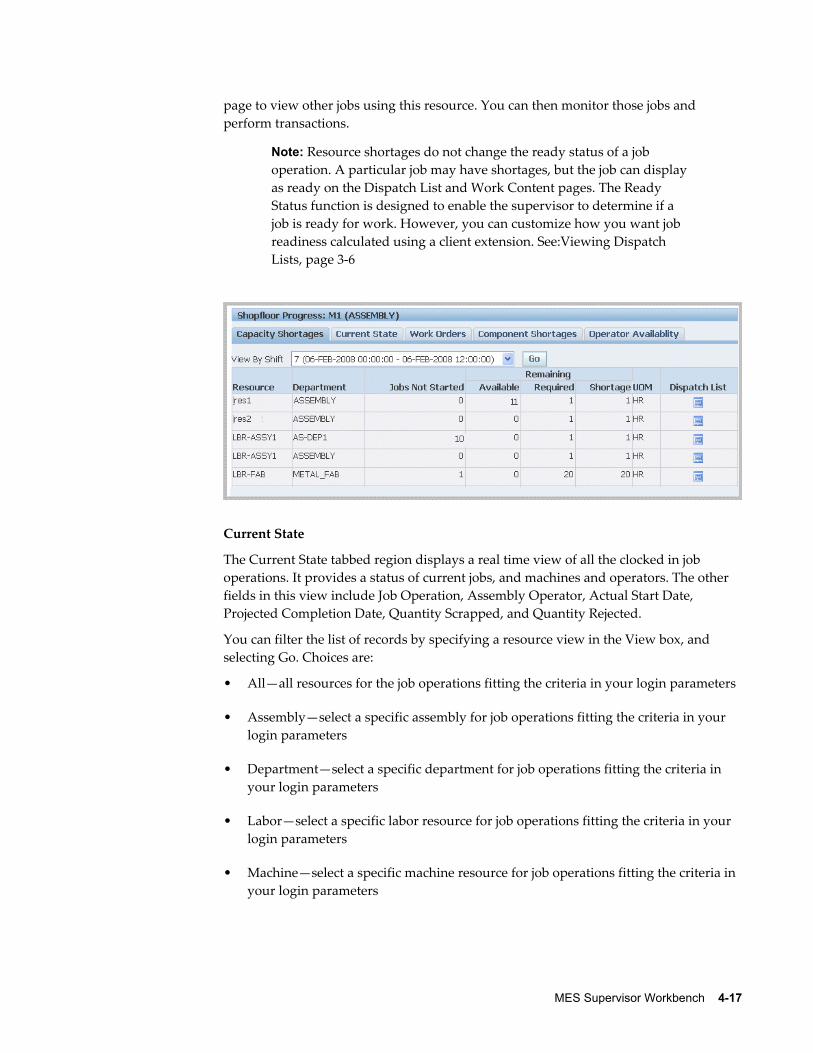
MES Supervisor Workbench 4-17
page to view other jobs using this resource. You can then monitor those jobs and perform transactions.
Note: Resource shortages do not change the ready status of a job operation. A particular job may have shortages, but the job can display as ready on the Dispatch List and Work Content pages. The Ready Status function is designed to enable the supervisor to determine if a job is ready for work. However, you can customize how you want job readiness calculated using a client extension. See:Viewing Dispatch Lists, page 3-6
Current State
The Current State tabbed region displays a real time view of all the clocked in job operations. It provides a status of current jobs, and machines and operators. The other fields in this view include Job Operation, Assembly Operator, Actual Start Date, Projected Completion Date, Quantity Scrapped, and Quantity Rejected.
You can filter the list of records by specifying a resource view in the View box, and selecting Go. Choices are:
• All—all resources for the job operations fitting the criteria in your login parameters
• Assembly—select a specific assembly for job operations fitting the criteria in your login parameters
• Department—select a specific department for job operations fitting the criteria in your login parameters
• Labor—select a specific labor resource for job operations fitting the criteria in your login parameters
• Machine—select a specific machine resource for job operations fitting the criteria in your login parameters
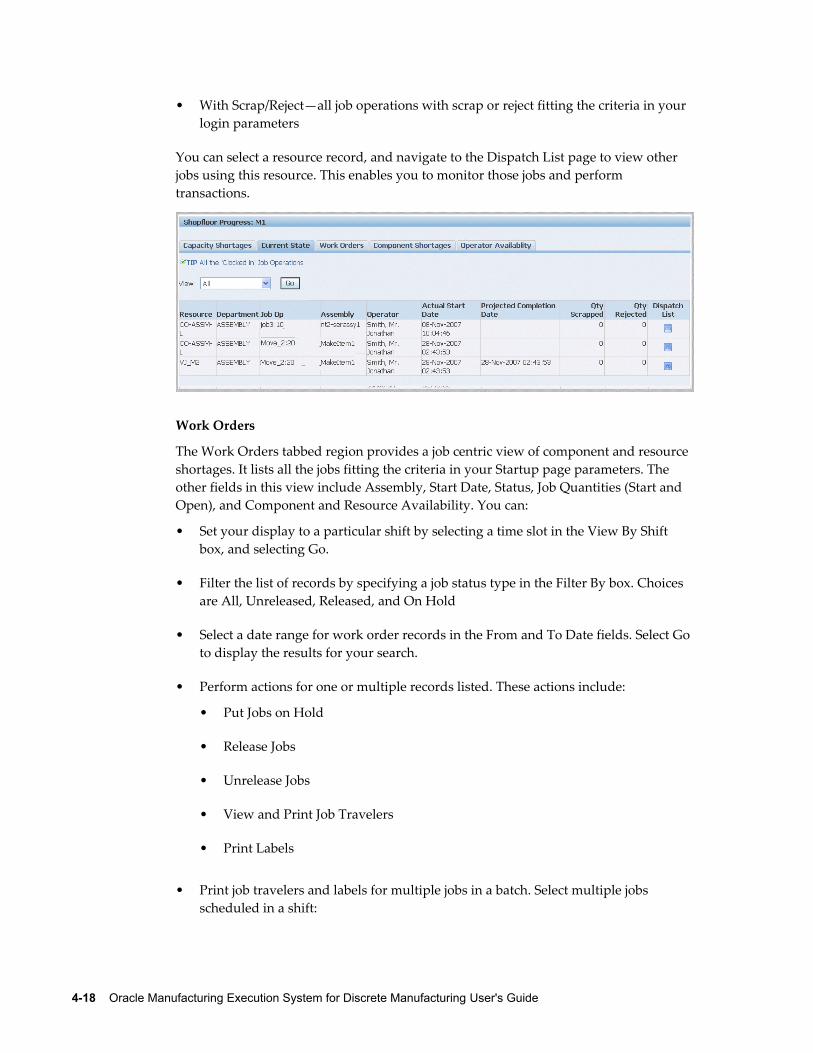
4-18 Oracle Manufacturing Execution System for Discrete Manufacturing User's Guide
• With Scrap/Reject—all job operations with scrap or reject fitting the criteria in your login parameters
You can select a resource record, and navigate to the Dispatch List page to view other jobs using this resource. This enables you to monitor those jobs and perform transactions.
Work Orders
The Work Orders tabbed region provides a job centric view of component and resource shortages. It lists all the jobs fitting the criteria in your Startup page parameters. The other fields in this view include Assembly, Start Date, Status, Job Quantities (Start and Open), and Component and Resource Availability. You can:
• Set your display to a particular shift by selecting a time slot in the View By Shift box, and selecting Go.
• Filter the list of records by specifying a job status type in the Filter By box. Choices are All, Unreleased, Released, and On Hold
• Select a date range for work order records in the From and To Date fields. Select Go to display the results for your search.
• Perform actions for one or multiple records listed. These actions include:
• Put Jobs on Hold
• Release Jobs
• Unrelease Jobs
• View and Print Job Travelers
• Print Labels
• Print job travelers and labels for multiple jobs in a batch. Select multiple jobs scheduled in a shift:
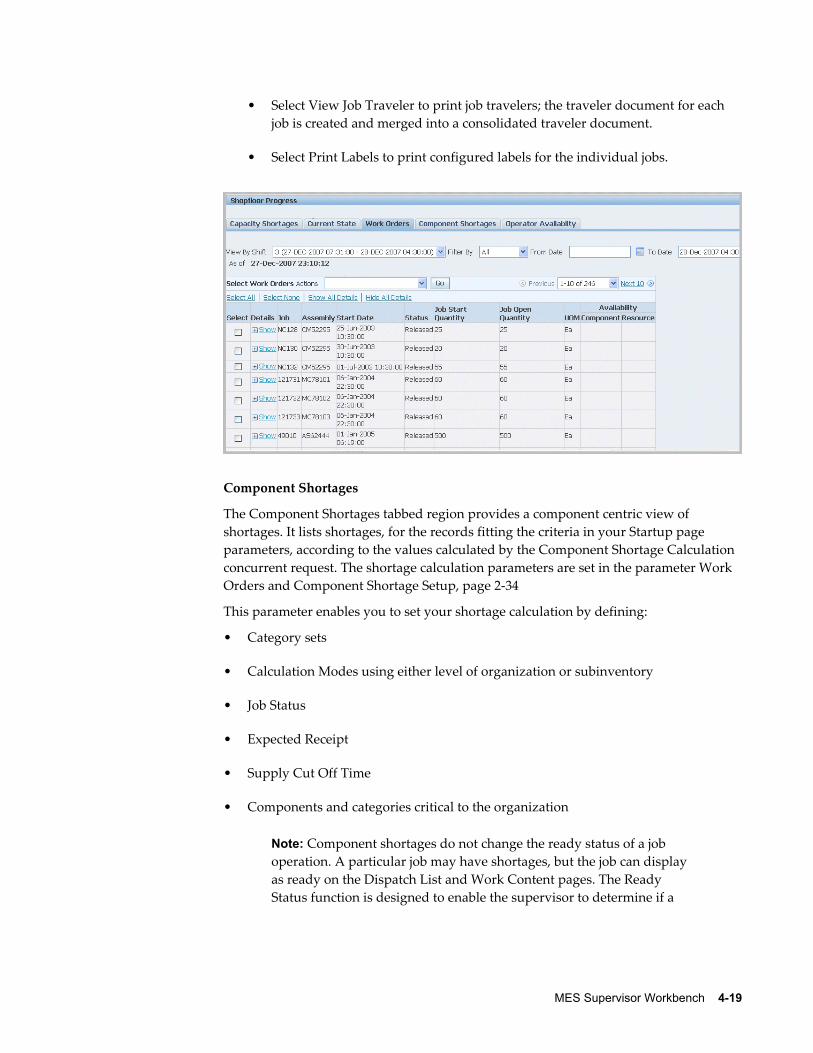
MES Supervisor Workbench 4-19
• Select View Job Traveler to print job travelers; the traveler document for each job is created and merged into a consolidated traveler document.
• Select Print Labels to print configured labels for the individual jobs.
Component Shortages
The Component Shortages tabbed region provides a component centric view of shortages. It lists shortages, for the records fitting the criteria in your Startup page parameters, according to the values calculated by the Component Shortage Calculation concurrent request. The shortage calculation parameters are set in the parameter Work Orders and Component Shortage Setup, page 2-34
This parameter enables you to set your shortage calculation by defining:
• Category sets
• Calculation Modes using either level of organization or subinventory
• Job Status
• Expected Receipt
• Supply Cut Off Time
• Components and categories critical to the organization
Note: Component shortages do not change the ready status of a job operation. A particular job may have shortages, but the job can display as ready on the Dispatch List and Work Content pages. The Ready Status function is designed to enable the supervisor to determine if a
4-20 Oracle Manufacturing Execution System for Discrete Manufacturing User's Guide
job is ready for work. However, you can customize how you want job readiness calculated using a client extension. See:Viewing Dispatch Lists, page 3-6
Note: The calculation program allocates components to job operations in the order of the operation start date. If this is not the desired sequence, a client extension is provided to reorder operations in your desired sequence and calculate components in the specified order. See: Component Shortage Calculation, page C-6
The information displayed is generated from the Component Shortage Calculation concurrent request program. You can:
• Set your display to a particular shift by selecting a time slot in the View By Shift box, and selecting Go.
• View shortages in a table view with the following information:
• Component and Subinventory
• Quantities—On Hand, Projected Available, Required, Shortage
• Select the Focus icon to separate a record n this list to view.
• Select a component record and navigate to the Impacted Jobs page to view all the other jobs using this component. See: Viewing Impacted Jobs, page 4-22
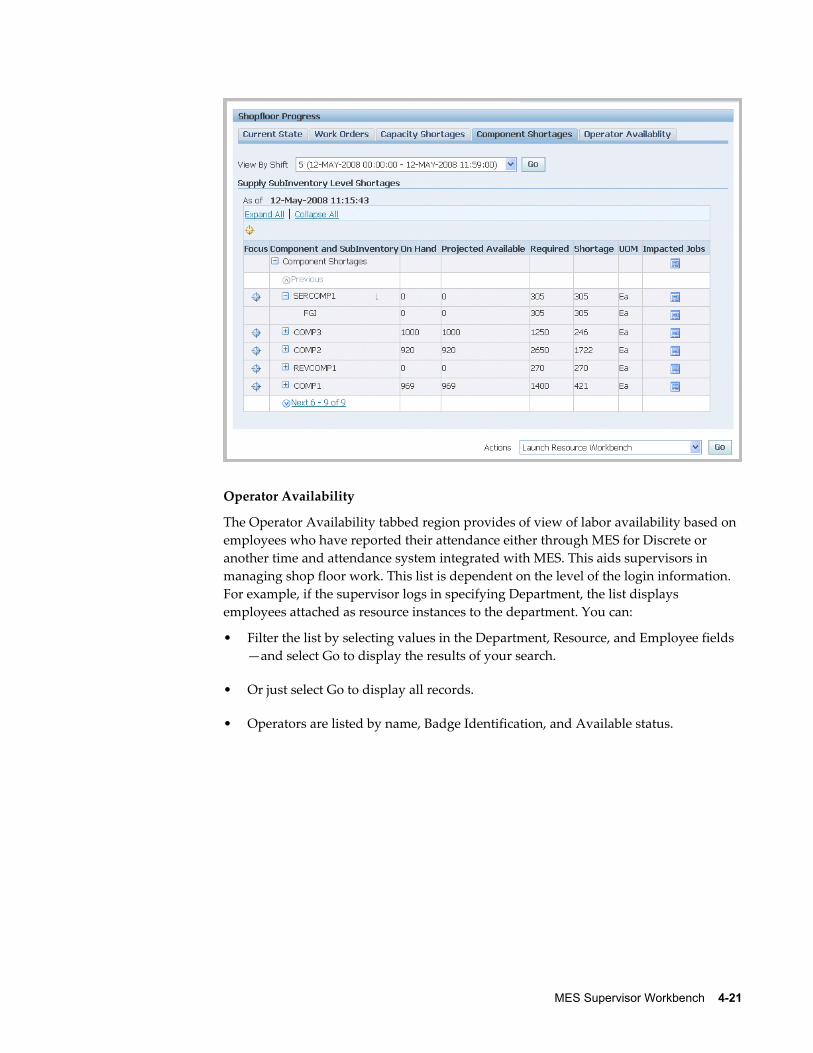
MES Supervisor Workbench 4-21
Operator Availability
The Operator Availability tabbed region provides of view of labor availability based on employees who have reported their attendance either through MES for Discrete or another time and attendance system integrated with MES. This aids supervisors in managing shop floor work. This list is dependent on the level of the login information. For example, if the supervisor logs in specifying Department, the list displays employees attached as resource instances to the department. You can:
• Filter the list by selecting values in the Department, Resource, and Employee fields—and select Go to display the results of your search.
• Or just select Go to display all records.
• Operators are listed by name, Badge Identification, and Available status.
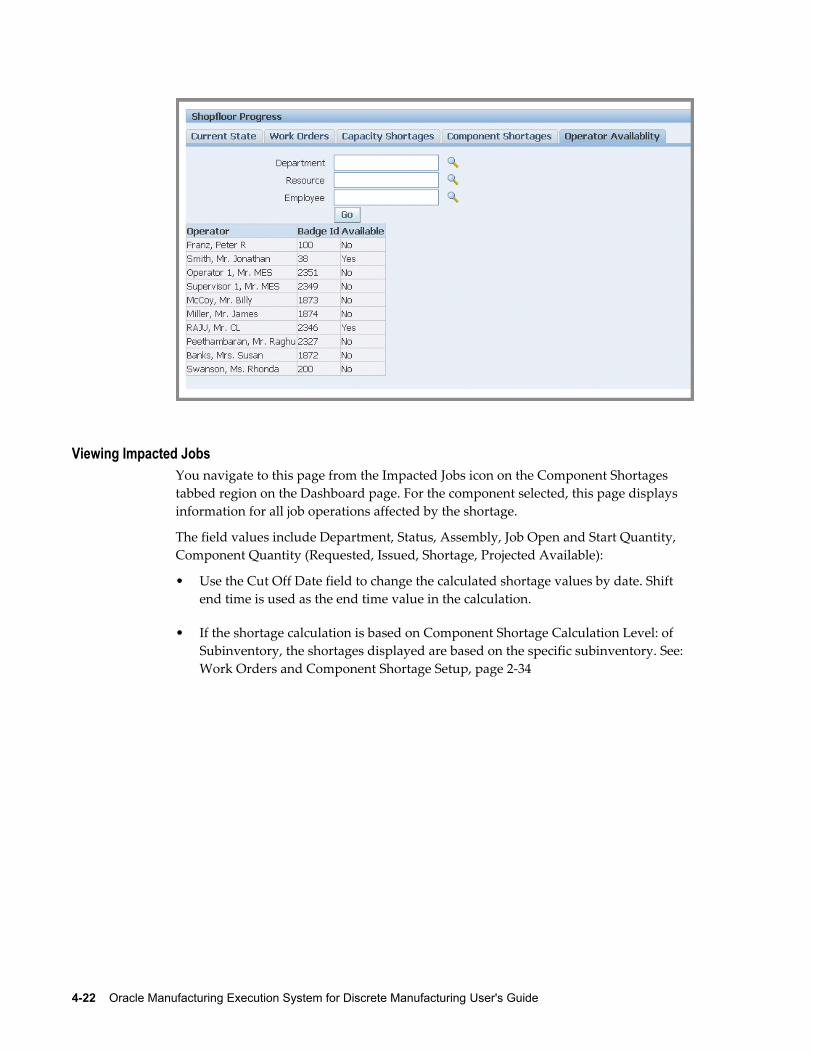
4-22 Oracle Manufacturing Execution System for Discrete Manufacturing User's Guide
Viewing Impacted JobsYou navigate to this page from the Impacted Jobs icon on the Component Shortages tabbed region on the Dashboard page. For the component selected, this page displays information for all job operations affected by the shortage.
The field values include Department, Status, Assembly, Job Open and Start Quantity, Component Quantity (Requested, Issued, Shortage, Projected Available):
• Use the Cut Off Date field to change the calculated shortage values by date. Shift end time is used as the end time value in the calculation.
• If the shortage calculation is based on Component Shortage Calculation Level: of Subinventory, the shortages displayed are based on the specific subinventory. See: Work Orders and Component Shortage Setup, page 2-34
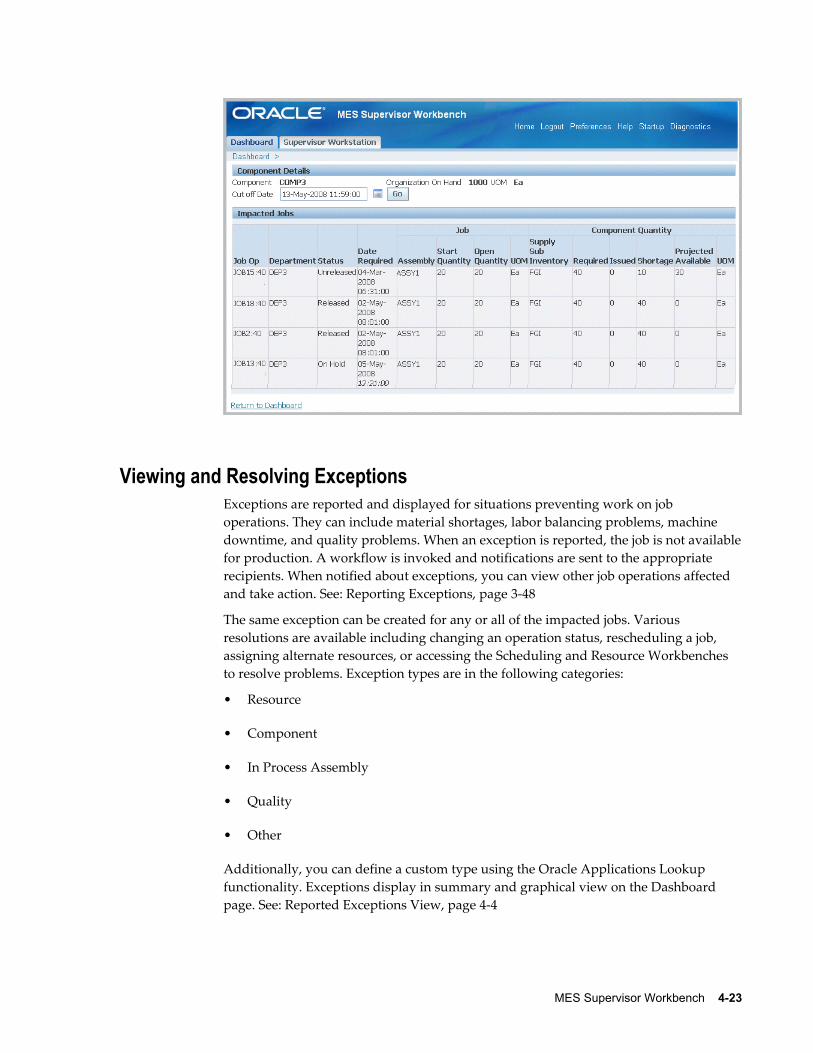
MES Supervisor Workbench 4-23
Viewing and Resolving ExceptionsExceptions are reported and displayed for situations preventing work on job operations. They can include material shortages, labor balancing problems, machine downtime, and quality problems. When an exception is reported, the job is not availablefor production. A workflow is invoked and notifications are sent to the appropriate recipients. When notified about exceptions, you can view other job operations affected and take action. See: Reporting Exceptions, page 3-48
The same exception can be created for any or all of the impacted jobs. Various resolutions are available including changing an operation status, rescheduling a job, assigning alternate resources, or accessing the Scheduling and Resource Workbenches to resolve problems. Exception types are in the following categories:
• Resource
• Component
• In Process Assembly
• Quality
• Other
Additionally, you can define a custom type using the Oracle Applications Lookup functionality. Exceptions display in summary and graphical view on the Dashboard page. See: Reported Exceptions View, page 4-4
4-24 Oracle Manufacturing Execution System for Discrete Manufacturing User's Guide
Viewing an Exception RecordThe Exception page appears when you select an exception record. This page can be accessed from:
• Exception Summary Region of the Supervisor Dashboard: Display and content is dependant on the exception type selected. If All is selected, all open exceptions display on the page:
• Dispatch List: Displays only exceptions reported against that particular job operation.
• Work Content page: Displays only exceptions reported against that particular job operation.
The page is divided between a summary and a detail region. The summary region displays assembly, operator, dates, number of exceptions, and other values according tothe exception type. Actions are available according to the exception type.
To view and resolve exceptions to production work:1. Navigate to the Exceptions page.
The exception type displays in a region on the page. If you have selected All from the Supervisor Home page, all of the exception types display in separate regions on the page.
2. Select Add Exceptions to Impacted Jobs to add exceptions to other jobs affected by this production problem.
Note: This option is not available for In Process Assembly type exceptions.
3. If this is a resource or component type exception, you can select Launch the Resource Workbench, or Launch the Job Workbench for rescheduling.
See: Using the Job Workbench, Oracle Work in Process User's Guide, and Using the Resource Workbench, Oracle Work in Process User's Guide

MES Supervisor Workbench 4-25
4. In the detail region of the page, you can select Show for a particular record to display details including assembly and description, department and description, quantity, and scheduled start and completion dates. There is a region for Note History for descriptive information added in the Update Exceptions note page.
5. You can choose a record and select an action to resolve the production problem.
For example, for the following exception types, you can:
• Resource: Assign Alternate Resources, Assign Shopfloor Statuses, Put Jobs on Hold, Reschedule Jobs
• Component: Assign Shopfloor Statuses, Put Jobs on Hold, Reschedule Jobs
• In Process Assembly: Reschedule Jobs
• Quality, Other, and User Defined: Assign Alternate Resources, Assign Shopfloor Statuses, Put Jobs on Hold, Reschedule Jobs
6. If this exception has been corrected, select Resolve to close this record, and delete it from this page.
If you access the Exception page from either the Dispatch List or Work Content page, this action is not available.
7. You have the option to add informational text by selecting Update. This displays the Update Exceptions page. See: Updating Exception Notes, page 4-27
If you access the Exception page from either the Dispatch List or Work Content page, this action is not available.
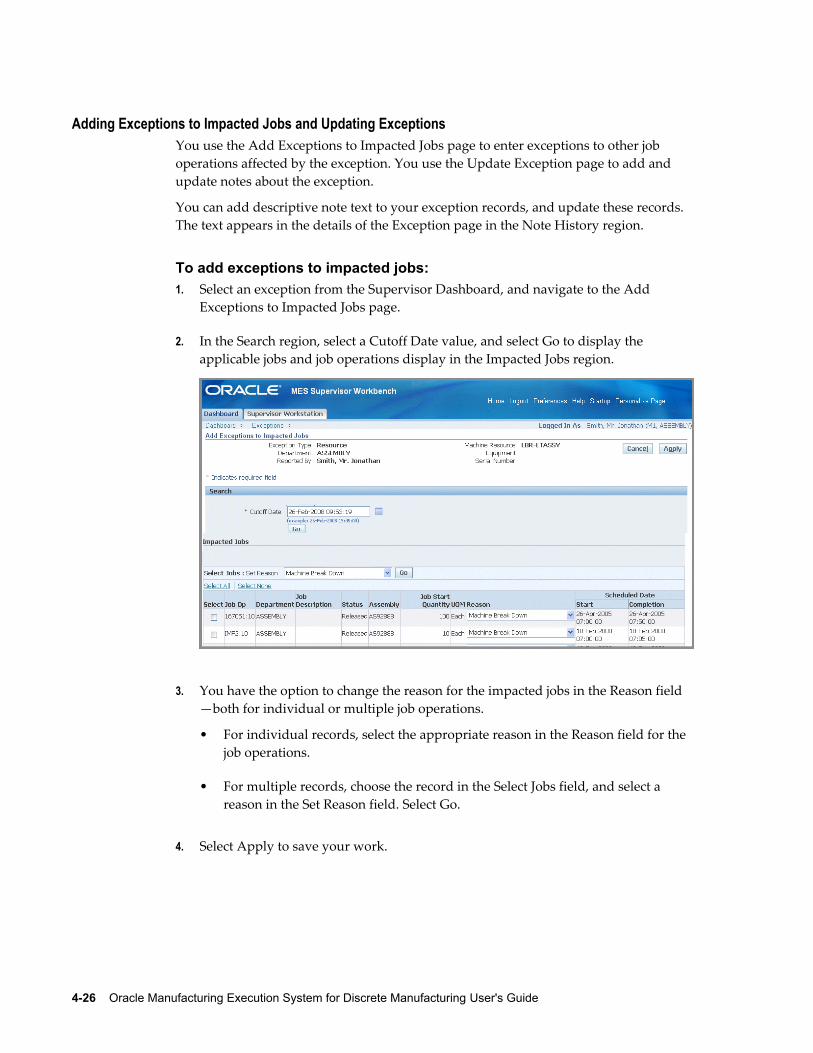
4-26 Oracle Manufacturing Execution System for Discrete Manufacturing User's Guide
Adding Exceptions to Impacted Jobs and Updating ExceptionsYou use the Add Exceptions to Impacted Jobs page to enter exceptions to other job operations affected by the exception. You use the Update Exception page to add and update notes about the exception.
You can add descriptive note text to your exception records, and update these records. The text appears in the details of the Exception page in the Note History region.
To add exceptions to impacted jobs:1. Select an exception from the Supervisor Dashboard, and navigate to the Add
Exceptions to Impacted Jobs page.
2. In the Search region, select a Cutoff Date value, and select Go to display the applicable jobs and job operations display in the Impacted Jobs region.
3. You have the option to change the reason for the impacted jobs in the Reason field—both for individual or multiple job operations.
• For individual records, select the appropriate reason in the Reason field for the job operations.
• For multiple records, choose the record in the Select Jobs field, and select a reason in the Set Reason field. Select Go.
4. Select Apply to save your work.
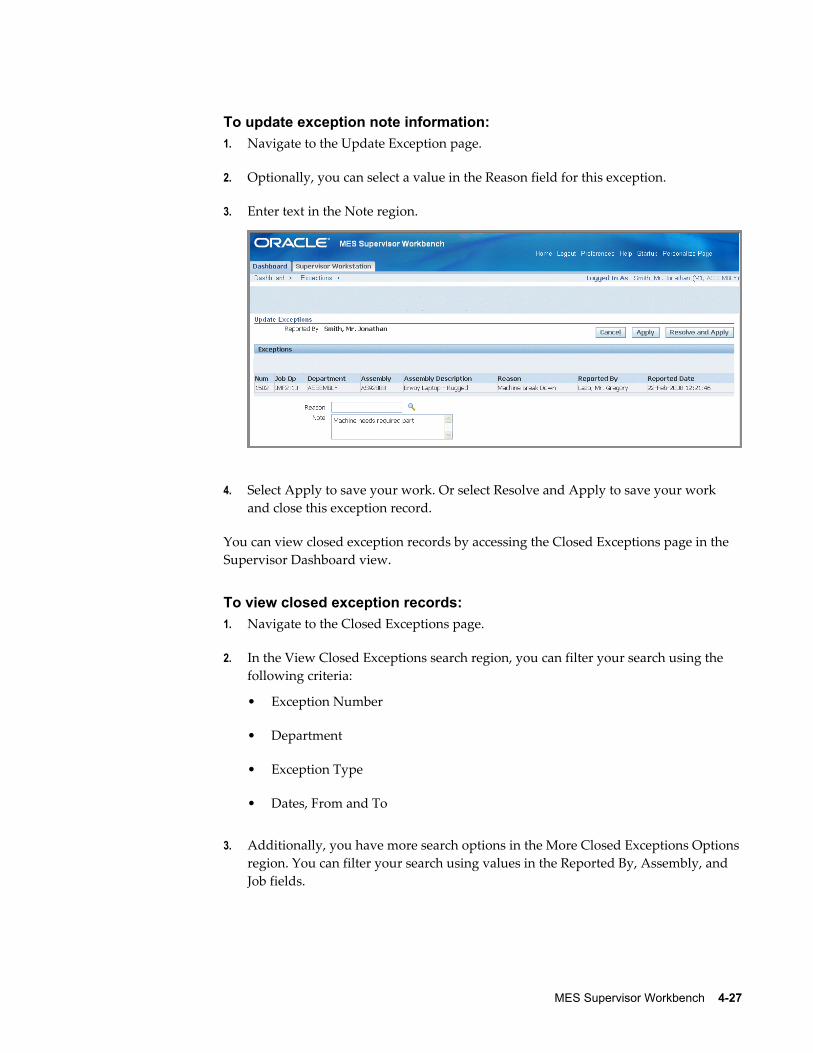
MES Supervisor Workbench 4-27
To update exception note information:1. Navigate to the Update Exception page.
2. Optionally, you can select a value in the Reason field for this exception.
3. Enter text in the Note region.
4. Select Apply to save your work. Or select Resolve and Apply to save your work and close this exception record.
You can view closed exception records by accessing the Closed Exceptions page in the Supervisor Dashboard view.
To view closed exception records:1. Navigate to the Closed Exceptions page.
2. In the View Closed Exceptions search region, you can filter your search using the following criteria:
• Exception Number
• Department
• Exception Type
• Dates, From and To
3. Additionally, you have more search options in the More Closed Exceptions Optionsregion. You can filter your search using values in the Reported By, Assembly, and Job fields.
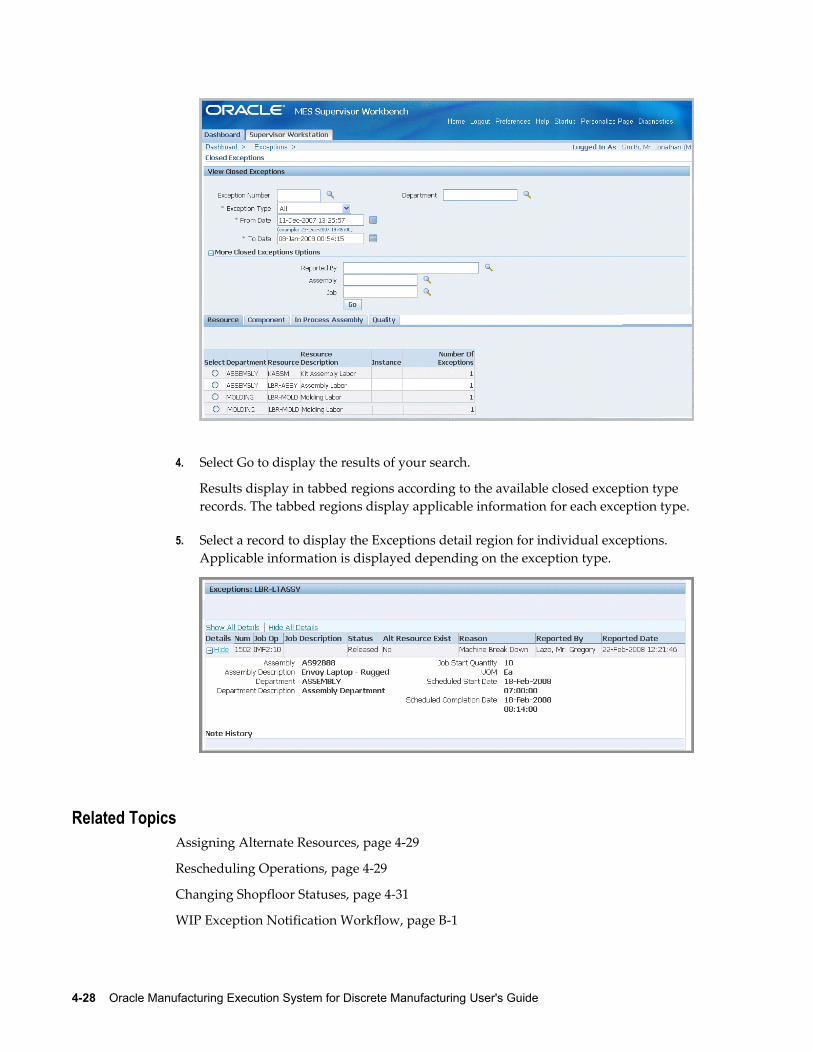
4-28 Oracle Manufacturing Execution System for Discrete Manufacturing User's Guide
4. Select Go to display the results of your search.
Results display in tabbed regions according to the available closed exception type records. The tabbed regions display applicable information for each exception type.
5. Select a record to display the Exceptions detail region for individual exceptions. Applicable information is displayed depending on the exception type.
Related TopicsAssigning Alternate Resources, page 4-29
Rescheduling Operations, page 4-29
Changing Shopfloor Statuses, page 4-31
WIP Exception Notification Workflow, page B-1
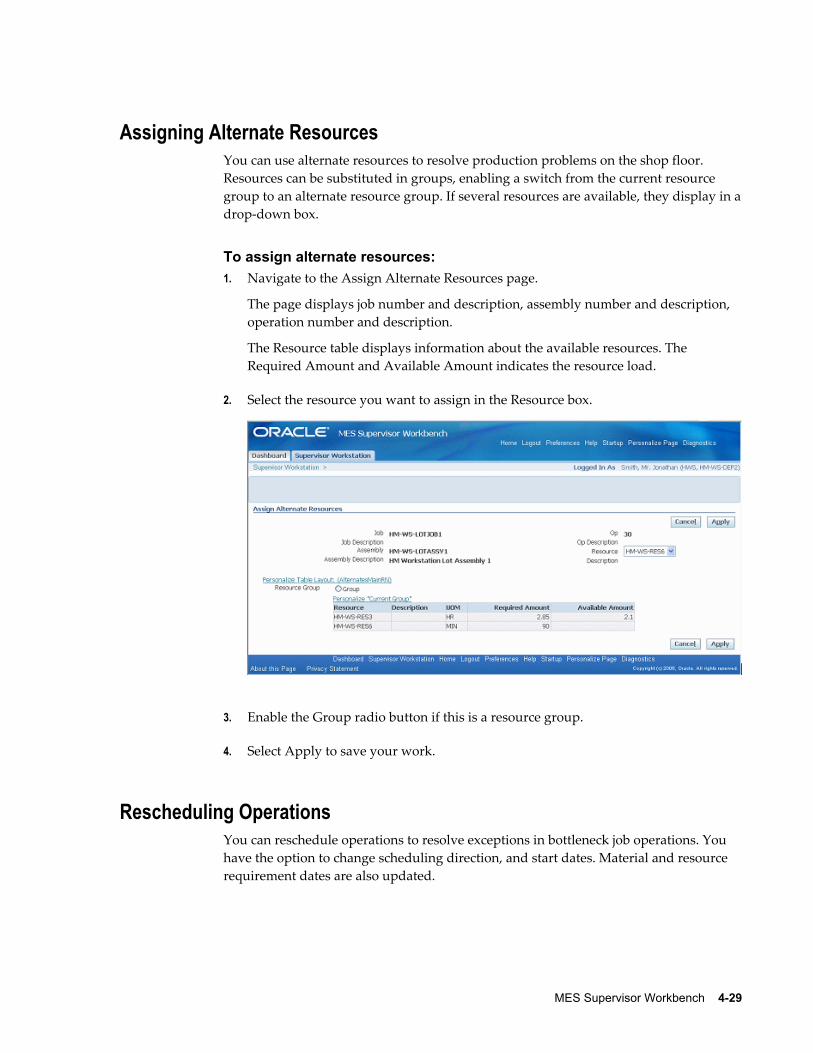
MES Supervisor Workbench 4-29
Assigning Alternate ResourcesYou can use alternate resources to resolve production problems on the shop floor. Resources can be substituted in groups, enabling a switch from the current resource group to an alternate resource group. If several resources are available, they display in adrop-down box.
To assign alternate resources:1. Navigate to the Assign Alternate Resources page.
The page displays job number and description, assembly number and description, operation number and description.
The Resource table displays information about the available resources. The Required Amount and Available Amount indicates the resource load.
2. Select the resource you want to assign in the Resource box.
3. Enable the Group radio button if this is a resource group.
4. Select Apply to save your work.
Rescheduling OperationsYou can reschedule operations to resolve exceptions in bottleneck job operations. You have the option to change scheduling direction, and start dates. Material and resource requirement dates are also updated.
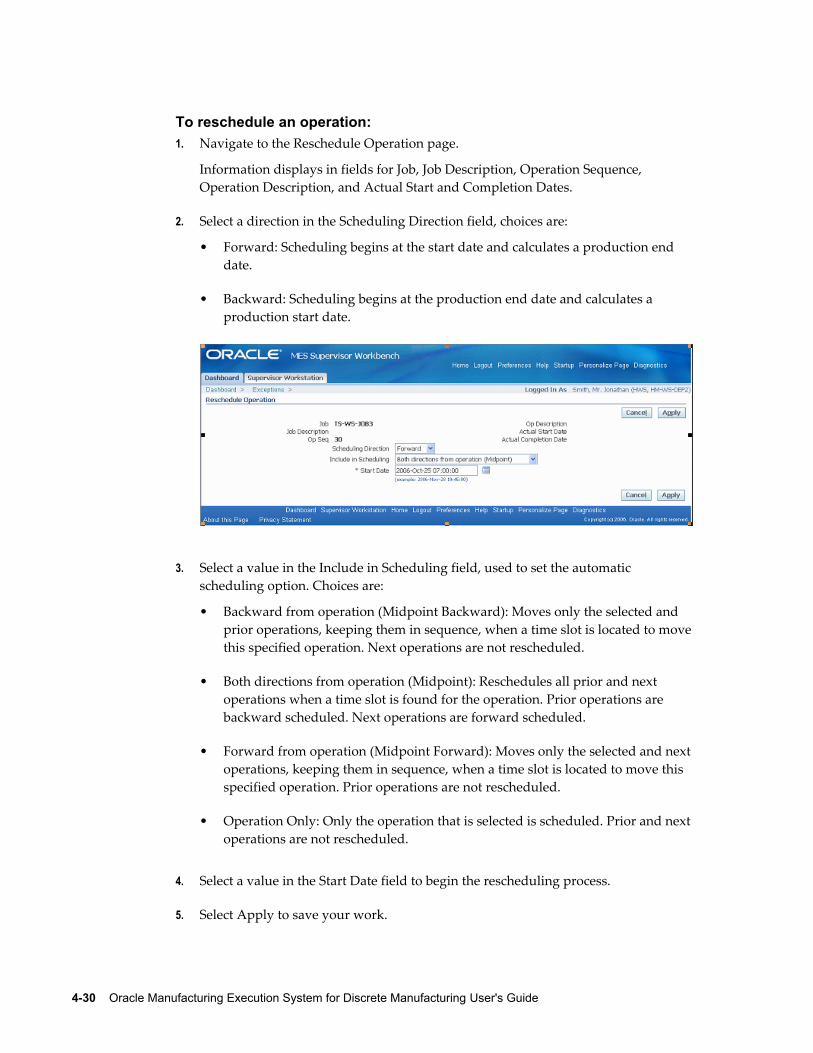
4-30 Oracle Manufacturing Execution System for Discrete Manufacturing User's Guide
To reschedule an operation:1. Navigate to the Reschedule Operation page.
Information displays in fields for Job, Job Description, Operation Sequence, Operation Description, and Actual Start and Completion Dates.
2. Select a direction in the Scheduling Direction field, choices are:
• Forward: Scheduling begins at the start date and calculates a production end date.
• Backward: Scheduling begins at the production end date and calculates a production start date.
3. Select a value in the Include in Scheduling field, used to set the automatic scheduling option. Choices are:
• Backward from operation (Midpoint Backward): Moves only the selected and prior operations, keeping them in sequence, when a time slot is located to movethis specified operation. Next operations are not rescheduled.
• Both directions from operation (Midpoint): Reschedules all prior and next operations when a time slot is found for the operation. Prior operations are backward scheduled. Next operations are forward scheduled.
• Forward from operation (Midpoint Forward): Moves only the selected and nextoperations, keeping them in sequence, when a time slot is located to move this specified operation. Prior operations are not rescheduled.
• Operation Only: Only the operation that is selected is scheduled. Prior and next operations are not rescheduled.
4. Select a value in the Start Date field to begin the rescheduling process.
5. Select Apply to save your work.
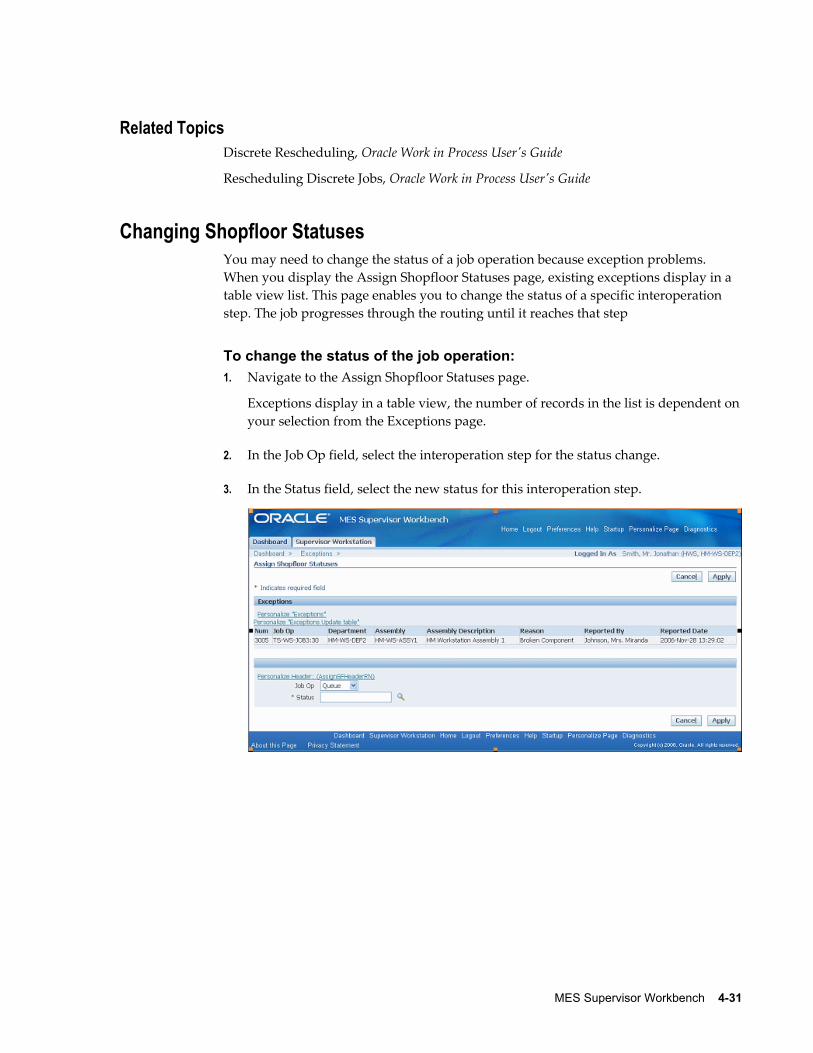
MES Supervisor Workbench 4-31
Related TopicsDiscrete Rescheduling, Oracle Work in Process User's Guide
Rescheduling Discrete Jobs, Oracle Work in Process User's Guide
Changing Shopfloor StatusesYou may need to change the status of a job operation because exception problems. When you display the Assign Shopfloor Statuses page, existing exceptions display in a table view list. This page enables you to change the status of a specific interoperation step. The job progresses through the routing until it reaches that step
To change the status of the job operation:1. Navigate to the Assign Shopfloor Statuses page.
Exceptions display in a table view, the number of records in the list is dependent onyour selection from the Exceptions page.
2. In the Job Op field, select the interoperation step for the status change.
3. In the Status field, select the new status for this interoperation step.
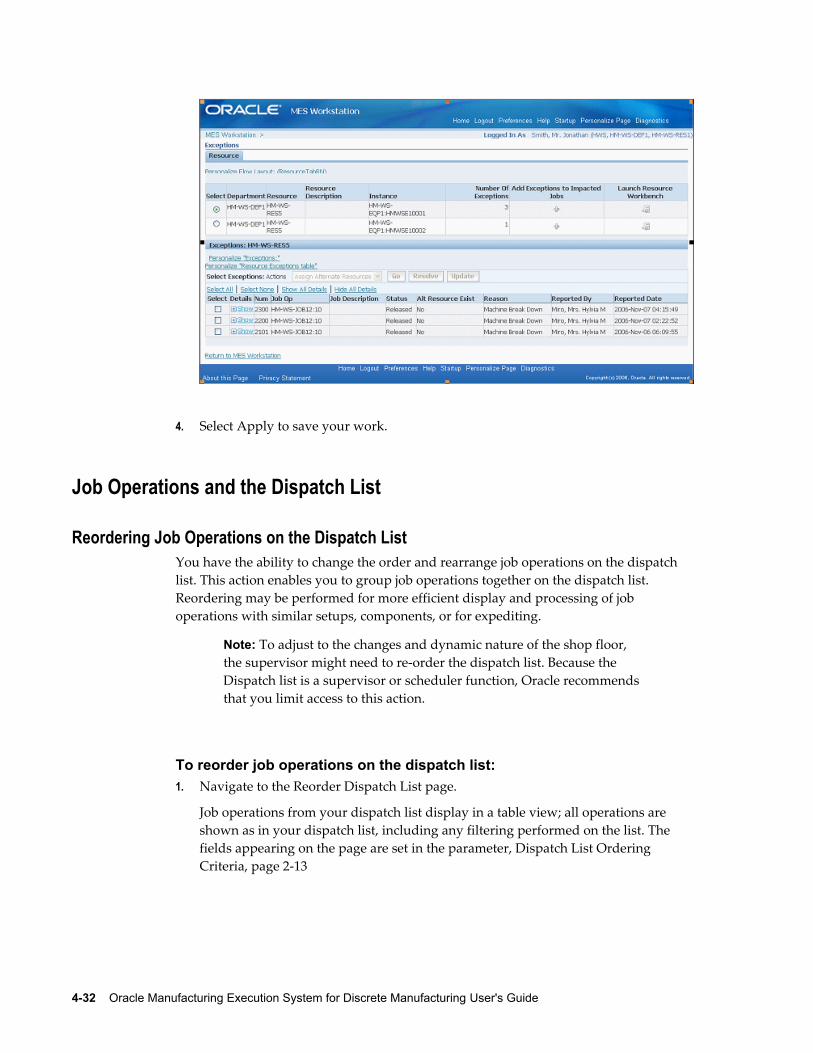
4-32 Oracle Manufacturing Execution System for Discrete Manufacturing User's Guide
4. Select Apply to save your work.
Job Operations and the Dispatch List
Reordering Job Operations on the Dispatch ListYou have the ability to change the order and rearrange job operations on the dispatch list. This action enables you to group job operations together on the dispatch list. Reordering may be performed for more efficient display and processing of job operations with similar setups, components, or for expediting.
Note: To adjust to the changes and dynamic nature of the shop floor, the supervisor might need to re-order the dispatch list. Because the Dispatch list is a supervisor or scheduler function, Oracle recommends that you limit access to this action.
To reorder job operations on the dispatch list:1. Navigate to the Reorder Dispatch List page.
Job operations from your dispatch list display in a table view; all operations are shown as in your dispatch list, including any filtering performed on the list. The fields appearing on the page are set in the parameter, Dispatch List Ordering Criteria, page 2-13
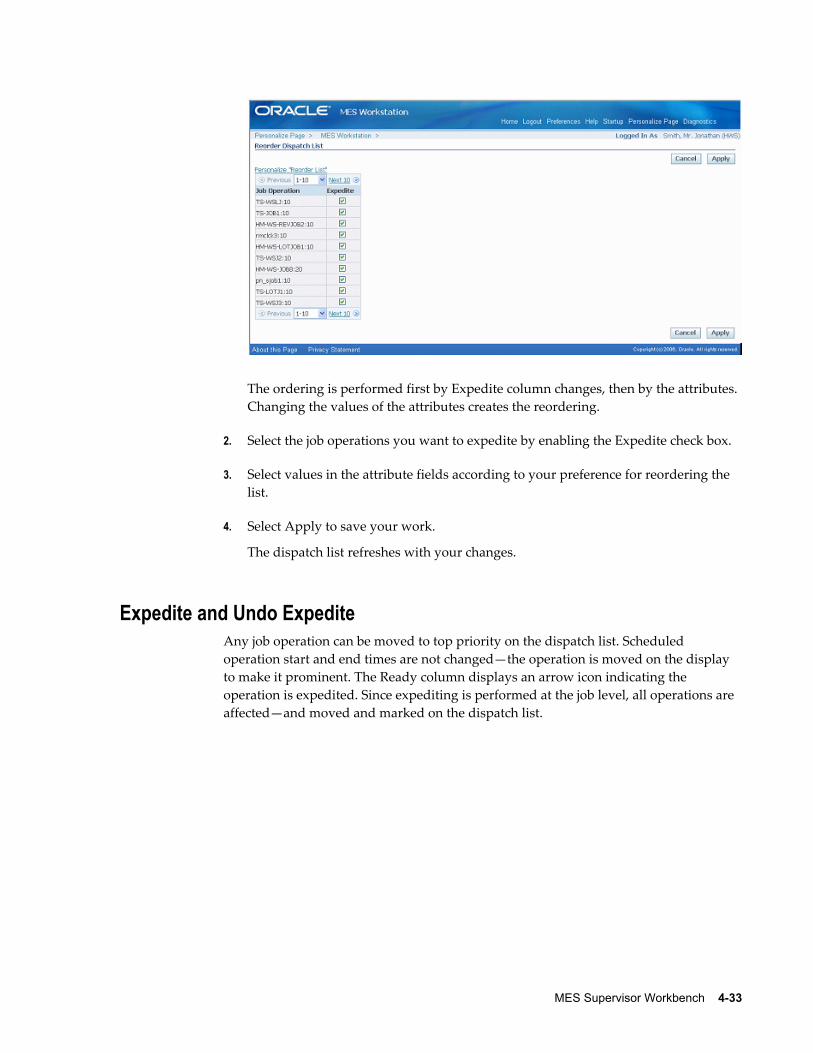
MES Supervisor Workbench 4-33
The ordering is performed first by Expedite column changes, then by the attributes. Changing the values of the attributes creates the reordering.
2. Select the job operations you want to expedite by enabling the Expedite check box.
3. Select values in the attribute fields according to your preference for reordering the list.
4. Select Apply to save your work.
The dispatch list refreshes with your changes.
Expedite and Undo ExpediteAny job operation can be moved to top priority on the dispatch list. Scheduled operation start and end times are not changed—the operation is moved on the display to make it prominent. The Ready column displays an arrow icon indicating the operation is expedited. Since expediting is performed at the job level, all operations are affected—and moved and marked on the dispatch list.

Global Actions 5-1
5Global Actions
This chapter describes global action views and tasks displayed in the MES Supervisor Workbench and the MES Workstation.
This chapter covers the following topics:
• Global Actions
• Printing the Discrete Job Routing Sheet
• Report Resource Usage
• Searching for Jobs
Global ActionsGlobal actions are views and tasks based on site, role, organization and department. Global action display is set using the Global Actions parameter, see: Global Actions, page 2-14. These actions can include:
• Launch Component Shortage Calculation, page 2-34
• Launch First Pass Yield Calculation, page 4-12
• Launch Job Workbench, see: Using the Job Workbench, Oracle Work in Process User'sGuide
• Launch Labor Performance Calculation, page 2-19
• Launch Parts Per Million Defects Calculation, page 4-14
• Launch Production to Plan Calculation, page 4-6
• Launch Resource Workbench, see: Using the Resource Workbench, Oracle Work in Process User's Guide
• Print Discrete Job Routing, page 5-2
5-2 Oracle Manufacturing Execution System for Discrete Manufacturing User's Guide
• Report My Time, page 3-55 accesses the Report My Time page which provides a manual method of reporting, reviewing and charging resources for calculating labor resources.
• Report Resource Usage, page 5-3
• View Performance Metrics accesses Oracle Daily Business Intelligence for Supply Chain—a measurement tool for delivery performance and cycle times. See: Manufacturing Management Dashboard, Oracle Daily Business Intelligence User Guide
• Search Jobs, page 5-4
• Search Serial Numbers, page 3-34
Printing the Discrete Job Routing SheetYou can print the Discrete Job Routing Sheet to list information about the job, operations, customer, routing steps, requirements, resources. Report sorting can be by job, schedule group, and build sequence. You can set a simple or advanced schedule to automatically submit this report.
The pages for this concurrent program display a chronology of steps, or a process train, showing where you are in the process. The train displays Parameters, Schedule, Layout,Notifications, Printing, and Review.
To print the Discrete Job Routing Sheet:1. Select the Print Discrete Job Routing action to navigate to the Discrete Job Routing
Sheet program.
The Schedule Request Parameters page appears. The step train displays the steps to complete with the Parameter step highlighted.
2. Enter the appropriate report submission information in the following fields:
• Jobs From and To: Select a beginning and an ending job to restrict the report to a range of jobs.
• Schedule Start Dates To and From: Select a beginning and an ending date to restrict the report to a range of scheduled start dates.
• Schedule Group From and To: Select a beginning and an ending schedule group to restrict the report to a range of schedule groups.

Global Actions 5-3
3. Choose one of the following Sort By options:
• Job
• Schedule Group, Build Sequence—sort by the schedule group, then by build sequence within the schedule group
4. Select Next to display the other pages, and select the details appropriate for your report. The process train highlights each step as you proceed. This includes:
• Schedule
• Layout
• Notifications
• Printing
• Review
5. Select Submit to generate the report.
Report Resource UsageThe Report Resource Usage page enables you to change and charge resources and resource instances. You can also change resource charges to other units of measure. If the entry is time based, the system uses the Charge Resource at Report Time parameter. Otherwise, the resource charge occurs when you save your record.
The start time comes from all sources including clock actions, time card entry, and resource usage charging at both resource and instance levels. In each situation when the
5-4 Oracle Manufacturing Execution System for Discrete Manufacturing User's Guide
time is modified, the actual resource start and completion time is recalculated. Operation actual time and job actual time only use resources with a scheduled flag set to Yes.
If the parameter Charge Resource at Report Time is enabled, and the job operation is flagged as autocharge—the Charge check box displays a check symbol.
To report resource usage:1. Navigate to the Report Resource Usage page.
2. Select the appropriate information in the following fields:
• Job
• Operation Sequence
• Resource
• Instance
3. Enter a value in two of these fields—Start Time, End Time, and Total Quantity. The other field will automatically calculate the correct value.
4. Optionally, you can change the value in the Unit of Measure field.
5. Select Apply to save your work.
Searching for JobsThe Search Jobs page enables you to search for a specific job for performing transactionson that job. Actions available are set on the Search Job Operation Actions parameter.

Global Actions 5-5
You can set this page as your Startup page in the Job Selection Mode parameter. See: Search Job Operation Actions, page 2-28
To search for jobs1. Navigate to the Search Jobs page.
2. In the Search region, select a value in the Attribute field.
You have the option to search by Job Number or Sales Order number. If you select asales order, you can also select an Order Line.
3. Select Go to display the results of your search.
The job information displays including Type, Status, Assembly, Assembly Description, Job Quantity Start and Completed, Unit of Measure, Start Date, Completion Date, Customer, and Sales Order.
The status of the job operations display in the Job Operations region including Ready Status, Operation Start and Completion Dates, Operation Quantities in the interoperation steps, and any exceptions logged.
Specific transactions can be performed depending on how you set up the Search JobOperation Actions parameter.

Navigator Paths A-1
ANavigator Paths
This appendix lists navigation paths for pages in the Oracle MES for Discrete Manufacturing application.
This appendix covers the following topics:
• MES for Discrete Navigator Paths
MES for Discrete Navigator Paths
Page Name Navigation Path
Assemblies for Completion Labels, page 2-9 MES Administrator > Assemblies for Completion Labels > [Edit]
Assign Alternate Resources, page 4-29 Dispatch List > [Assign Alternate Resources] >[Go]
Work Content > [Assign Alternate Resources] > [Go]
Closed Exceptions Dashboard > Reported Exceptions > [Details] >[Closed Exceptions]
Complete Assembly: Transaction, page 3-18 Dispatch List > [Complete Assembly] > [Go]
Work Content > [Complete Assembly] > [Go]
Dashboard, page 4-1 MES Supervisor Workbench > Startup > Dashboard
A-2 Oracle Manufacturing Execution System for Discrete Manufacturing User's Guide
Page Name Navigation Path
Dispatch Lists, page 3-6 MES Workstation > Startup > Start > View Options [Go]
MES Supervisor Workbench: > Startup > Start > MES Supervisor Workbench > [Go]
Enforce Sequential Move, page 2-1 MES Administrator > Enforce Sequential Move > [Edit]
Job Traveler Template Setup, page 2-17 MES Administrator > Job Traveler Template Setup > [Edit]
Labor Performance Metrics, page 2-19 MES Administrator > Labor Performance Metrics > [Edit]
Manufacturing Execution Workstation Parameters, page 2-1
MES Administrator > Select a parameter level > Go
Move Assembly: Detail, page 3-18 Dispatch List > [Move Assembly] > [Continue]
Work Content > [Move Assembly] > [Continue]
Move Assembly: Transaction, page 3-18 Dispatch List > [Move Assembly]
Work Content > [Move Assembly]
Operator Skills Validation, page 2-20 MES Administrator > Operator Skills Validation> [Edit]
Parameters, page 2-1 MES Administrator > Select a parameter level > Go > Update
Production to Plan KPI, page 2-23 MES Administrator > Production to Plan KPI >[Edit]
Reason Codes for Exception Types, page 2-26 MES Administrator > Reason Codes for Exception Types > [Edit]
Reschedule Operation, page 4-29 Dispatch List > [Reschedule Operation] > [Go]
Work Content > [Reschedule Operation] > [Go]
Navigator Paths A-3
Page Name Navigation Path
Report Exceptions, page 4-26 Dispatch List > [Report Exception] > [Go]
Work Content > [Report Exception] > [Go]
Report Time, page 3-53 Dispatch List > [Report Time] > [Go]
Work Content > [Report Time] > [Go]
Search Job/Serial Operation Actions, page 2-28 MES Administrator > Search Job/Serial Operation Actions > [Edit]
Search Serial Numbers, page 3-34 Dispatch List > [Search Serial Numbers] > [Go]
Work Content > [Search Serial Numbers] > [Go]
Job Selection Mode parameter > [Edit] > [Assembly Serial Numbers]
Standard Operations for Move Labels, page 2-29
MES Administrator > Standard Operations forMove Labels > [Edit]
Startup (MES Workstation), page 3-1
Startup (MES Supervisor Workbench), page 4-1
MES Workstation
MES Supervisor Workbench
Supervisor Dashboard View, page 2-30 MES Administrator > Supervisor Dashboard View > [Edit]
Transact Components, page 3-16 Dispatch List > [Transact Components] > [Go]
Work Content > [Transact Components] > [Go]
Update Job Note, page 3-16 Dispatch List > [Update Note] > [Go]
Work Content > [Update Note] > [Go]
View Job Detail, page 3-40 Dispatch List > [View Job Detail] > [Go]
Work Content > [View Job Detail] > [Go]
View Job Transactions, page 3-40 Dispatch List > [View Job Transactions] > [Go]
Work Content > [View Job Transactions] > [Go]
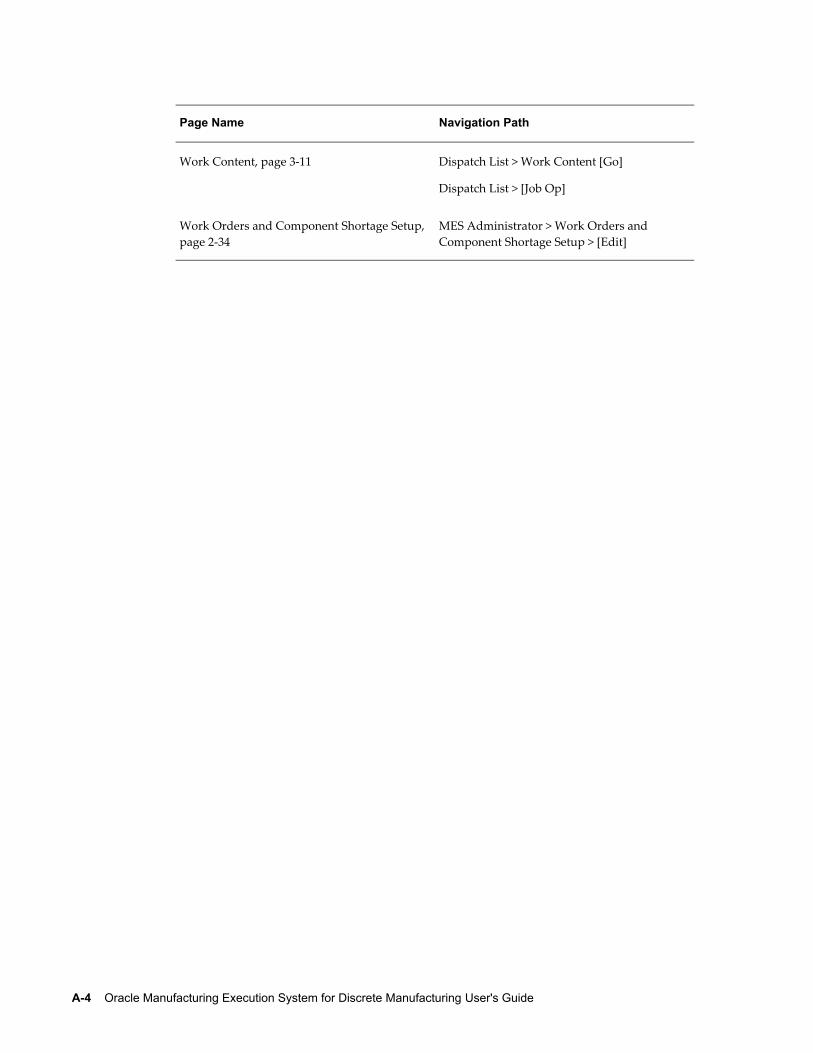
A-4 Oracle Manufacturing Execution System for Discrete Manufacturing User's Guide
Page Name Navigation Path
Work Content, page 3-11 Dispatch List > Work Content [Go]
Dispatch List > [Job Op]
Work Orders and Component Shortage Setup,page 2-34
MES Administrator > Work Orders and Component Shortage Setup > [Edit]
MES for Discrete Manufacturing Workflow B-1
BMES for Discrete Manufacturing Workflow
This appendix describes the features of the WIP Exception Notification Workflow.
This appendix covers the following topics:
• WIP Exception Notification Workflow
WIP Exception Notification WorkflowThe WIP Exception Notification Workflow is used to notify appropriate people of production exceptions on the shop floor. Exceptions are conditions and problems preventing work on job operations. These conditions are reported while performing work, and the workflow is activated at this time. This reporting mechanism enables the exception to be tracked, monitored, and resolved. See: Reporting Exceptions, page 3-48 and Exceptions, page 4-26
Customizing the WIP Exception Notification Workflow ProcessOracle Workflow Builder is used to customize workflows.
To display the process in Oracle Workflow Builder:1. Navigate to Oracle Workflow Builder at your site
2. Select database or file to connect to the source containing the item type associated toyour process definition:
• The display name of the workflow is WIP Exception Notification Workflow
• The name of its workflow definition file is wipexpwk.wft
3. Expand the WIP Exception Notification branch within the data source.
4. Expand the Processes branch, then choose the WIP Exception Notification branch activity to display the diagram.
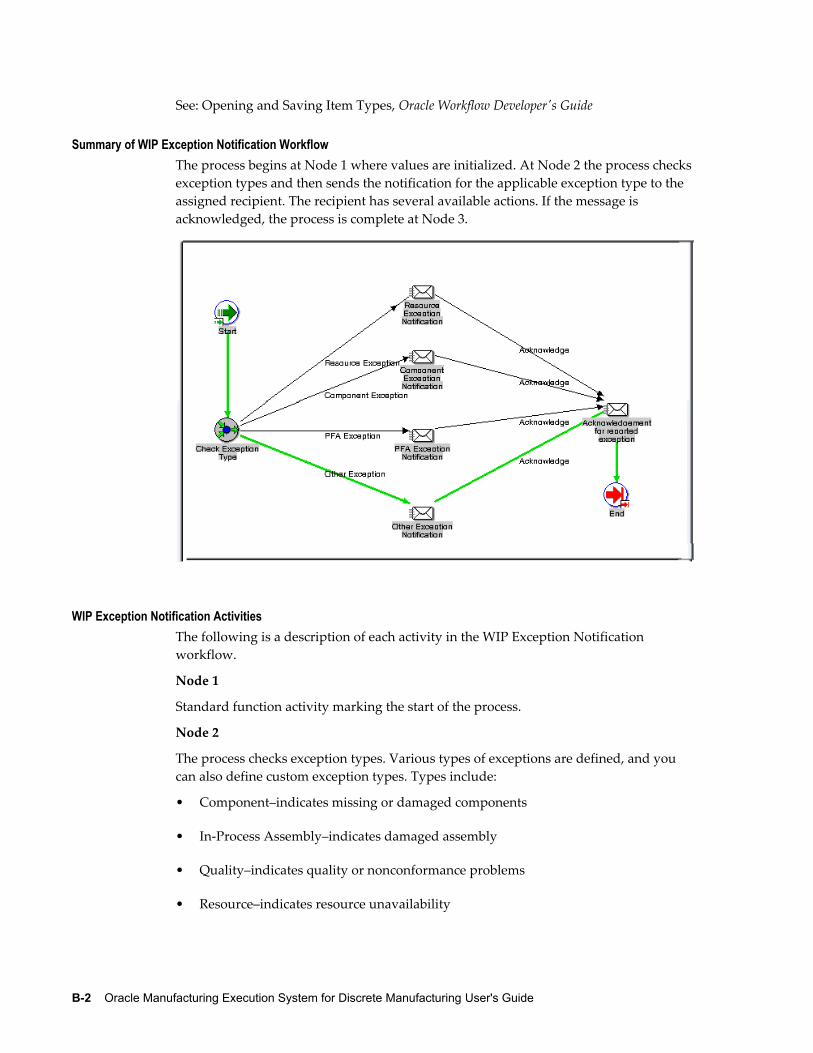
B-2 Oracle Manufacturing Execution System for Discrete Manufacturing User's Guide
See: Opening and Saving Item Types, Oracle Workflow Developer's Guide
Summary of WIP Exception Notification WorkflowThe process begins at Node 1 where values are initialized. At Node 2 the process checksexception types and then sends the notification for the applicable exception type to the assigned recipient. The recipient has several available actions. If the message is acknowledged, the process is complete at Node 3.
WIP Exception Notification ActivitiesThe following is a description of each activity in the WIP Exception Notification workflow.
Node 1
Standard function activity marking the start of the process.
Node 2
The process checks exception types. Various types of exceptions are defined, and you can also define custom exception types. Types include:
• Component–indicates missing or damaged components
• In-Process Assembly–indicates damaged assembly
• Quality–indicates quality or nonconformance problems
• Resource–indicates resource unavailability
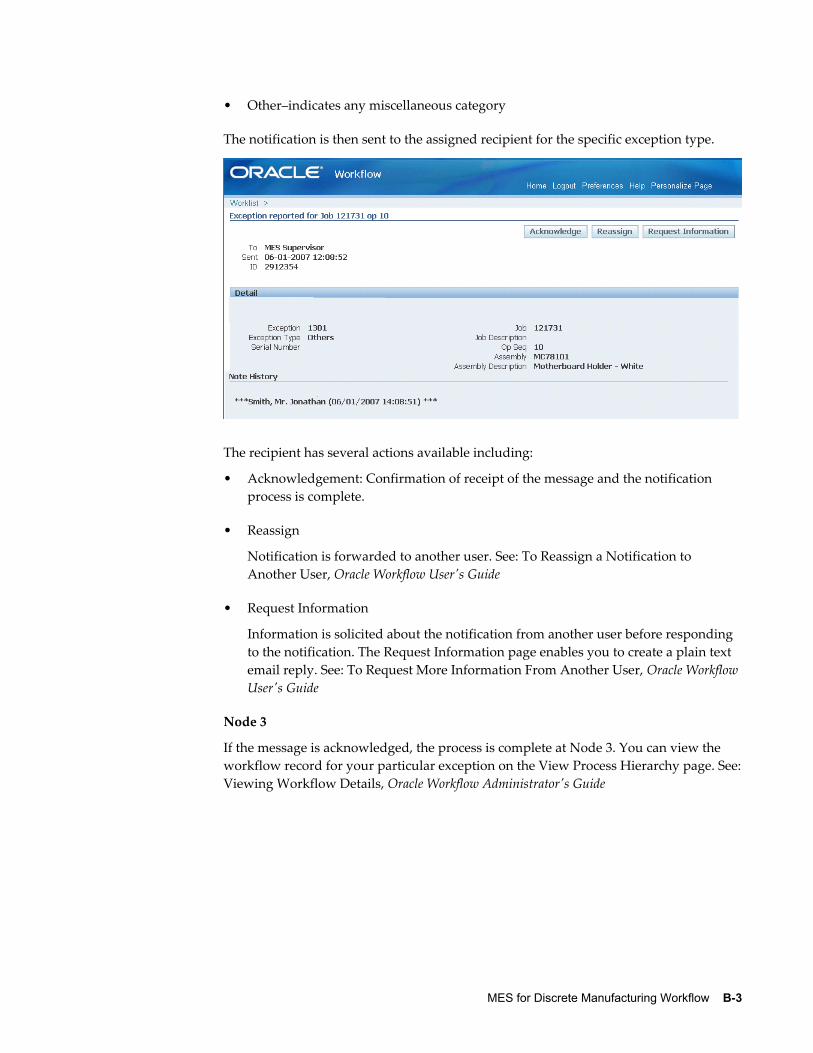
MES for Discrete Manufacturing Workflow B-3
• Other–indicates any miscellaneous category
The notification is then sent to the assigned recipient for the specific exception type.
The recipient has several actions available including:
• Acknowledgement: Confirmation of receipt of the message and the notification process is complete.
• Reassign
Notification is forwarded to another user. See: To Reassign a Notification to Another User, Oracle Workflow User's Guide
• Request Information
Information is solicited about the notification from another user before responding to the notification. The Request Information page enables you to create a plain text email reply. See: To Request More Information From Another User, Oracle Workflow User's Guide
Node 3
If the message is acknowledged, the process is complete at Node 3. You can view the workflow record for your particular exception on the View Process Hierarchy page. See:Viewing Workflow Details, Oracle Workflow Administrator's Guide
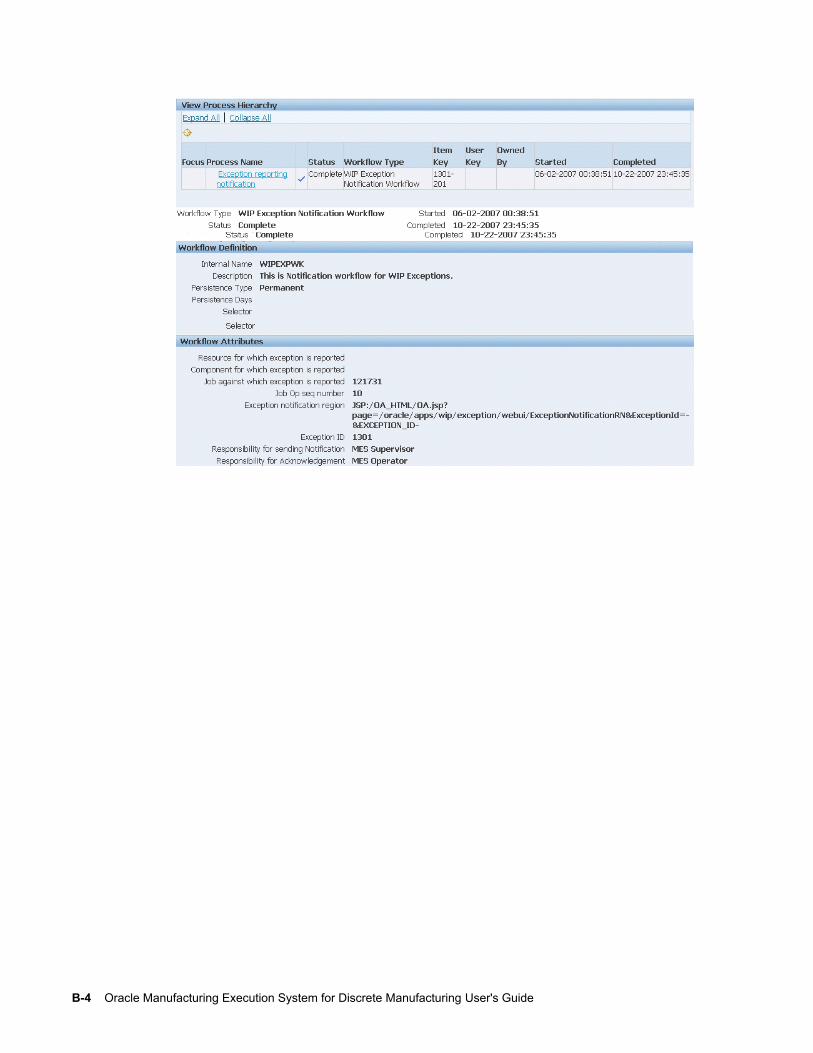
B-4 Oracle Manufacturing Execution System for Discrete Manufacturing User's Guide
MES Client Extensions C-1
CMES Client Extensions
This appendix describes the APIs integrated into Oracle MES for Discrete Manufacturing.
This appendix covers the following topics:
• Overview of MES Client Extensions
• Integration with Time and Attendance Systems
Overview of MES Client ExtensionsOracle MES for Discrete Manufacturing provides custom programming instructions to control job operation readiness, transaction movements, and reordering features. Three client extensions are provided:
• Ready Status
Based on your predefined setup criteria, triggering points are identified where the client extension will return a Yes or No status to execute actions for move transactions.
• Transaction Validation
Enables custom logic to determine if transactions are processed or stopped.
• Component Shortage Calculation
Enables reordering the sequence component shortages are displayed in the Shopfloor Progress region.
Ready StatusIn the Dispatch List, the Ready Status icon for each job operation is set in the Ready Status Criteria parameter. The options are No Exceptions, No Shop Floor Status Assigned, and Quantity in Queue or Run. When a job operation meets the conditions, the Ready check mark is automatically updated and displayed as Ready. This client

C-2 Oracle Manufacturing Execution System for Discrete Manufacturing User's Guide
extension enables custom logic to determine if a job operation is ready with your specific definitions. In addition to the Ready Status icon visual indicator in the Dispatch List, the Ready Status client extension's value displays on the Work Content page. The program returns one of two different values, Yes or No:
• If the job operation is ready for transactions, the program returns a Yes value, and the Ready Status visual indicator is enabled.
• If the client extension returns a No value, the Ready Status icon is disabled.
A PL/SQL package, WIP_WS_HOOKS_UTI, contains the custom programming instructions invoked.
Note: When the job operation is not ready prior to implementation of the client extension, the program does not effect the ready status of the job, displaying a Not Ready status.
When the job operation is ready prior to implementation of the client extension, if the program returns a Yes value—the job status in the Dispatch List is ready with the Ready status visual indicator enabled. If the client extension return a No value, the job status in the Dispatch Listis not ready.
Ready Status Function—get_custom_ready_status
Parameter IN/OUT Type Description
wip_entity_id IN NUMBER WIP entity identification of the job
operation_seq_num IN NUMBER Operation sequence number
serial_number IN VARCHAR2 Serial number of assembly
attribute1 IN VARCHAR2 Reserved for future use
attribute2 IN VARCHAR2 Reserved for future use
attribute3 IN VARCHAR2 Reserved for future use
MES Client Extensions C-3
Parameter IN/OUT Type Description
return_value OUT VARCHAR2 Value is Yes or No indicating whether the job operation passes the Ready Status program
Custom Ordering AttributesYou can use the sequence attributes, Custom Order Attribute 1 and Custom Order Attribute 2, in the Dispatch List Ordering Criteria parameter to customize your dispatchlist order.
To create customized values for the Dispatch List Ordering Criteria parameter:1. In the wipwsctb.pls file, add Custom Order Attribute values:
• wip_ws_customer.get_orderby_attribute_1()
• wip_ws_customer.get_orderby_attribute_2()
2. Navigate to the Dispatch List Ordering Criteria parameter page.
3. In the Sequence Attribute field, select the applicable Custom Order Attributes.
4. Select your other values for the parameter, see: Dispatch List Ordering Criteria, page 2-13
5. Save your work.
Transaction ValidationThis client extension enables custom logic to determine if move, scrap, reject, and completion transactions are processed or stopped. The program returns one of several values. If the value returned is:
• Yes, the transaction page proceeds as normal.
• No, the transaction page is aborted displaying an error message.
• Warning, you are redirected to a dialog page. You can cancel the dialog page, and return to the transaction page. Or select Continue and process the transaction.
• Informational, the transaction proceeds as normal. The custom message is
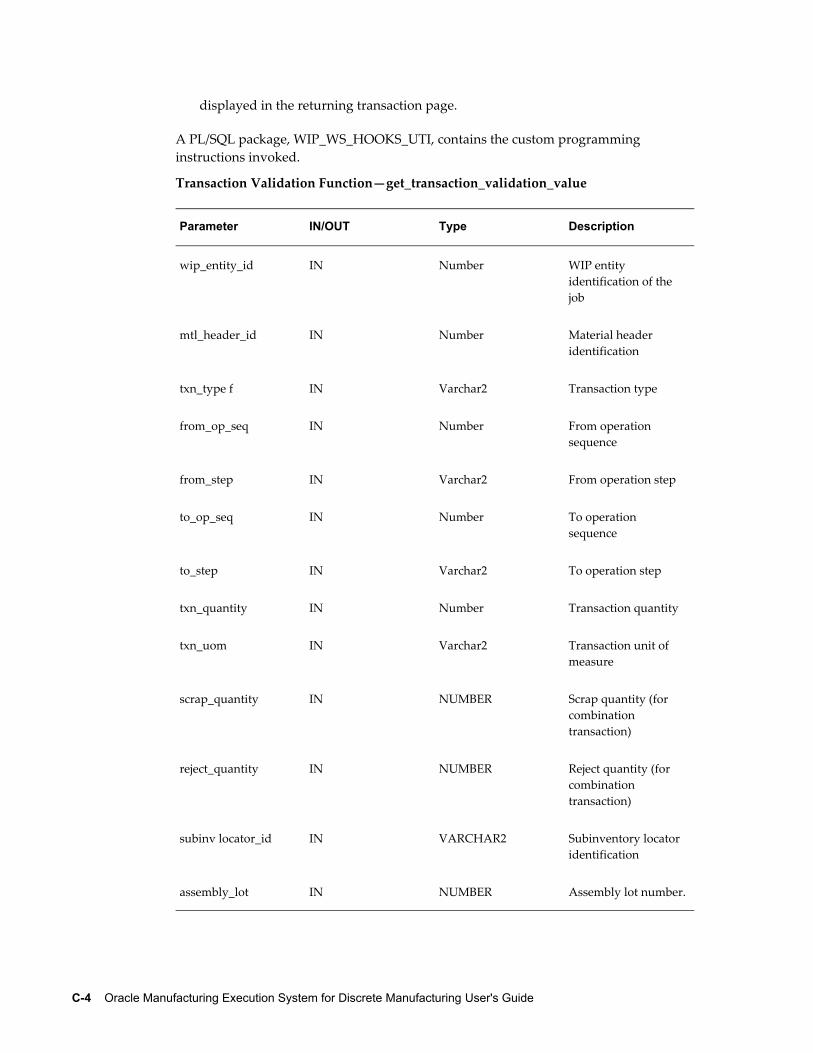
C-4 Oracle Manufacturing Execution System for Discrete Manufacturing User's Guide
displayed in the returning transaction page.
A PL/SQL package, WIP_WS_HOOKS_UTI, contains the custom programming instructions invoked.
Transaction Validation Function—get_transaction_validation_value
Parameter IN/OUT Type Description
wip_entity_id IN Number WIP entity identification of the job
mtl_header_id IN Number Material header identification
txn_type f IN Varchar2 Transaction type
from_op_seq IN Number From operation sequence
from_step IN Varchar2 From operation step
to_op_seq IN Number To operation sequence
to_step IN Varchar2 To operation step
txn_quantity IN Number Transaction quantity
txn_uom IN Varchar2 Transaction unit of measure
scrap_quantity IN NUMBER Scrap quantity (for combination transaction)
reject_quantity IN NUMBER Reject quantity (for combination transaction)
subinv locator_id IN VARCHAR2 Subinventory locator identification
assembly_lot IN NUMBER Assembly lot number.
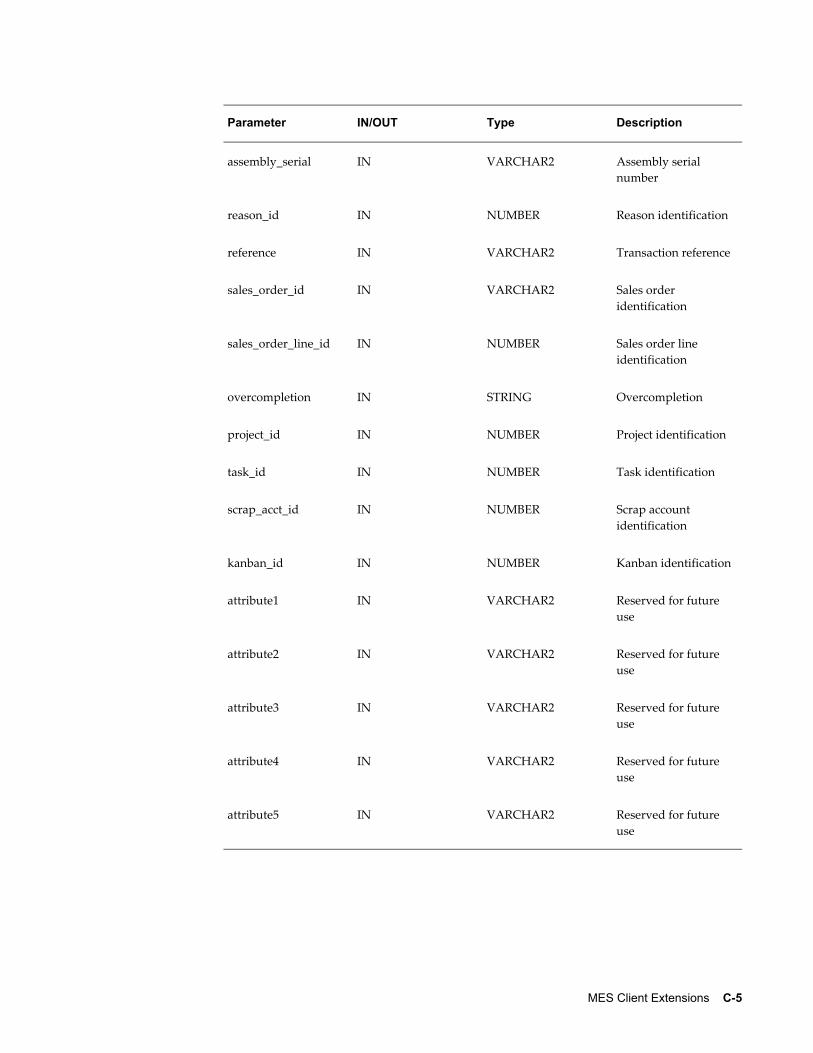
MES Client Extensions C-5
Parameter IN/OUT Type Description
assembly_serial IN VARCHAR2 Assembly serial number
reason_id IN NUMBER Reason identification
reference IN VARCHAR2 Transaction reference
sales_order_id IN VARCHAR2 Sales order identification
sales_order_line_id IN NUMBER Sales order line identification
overcompletion IN STRING Overcompletion
project_id IN NUMBER Project identification
task_id IN NUMBER Task identification
scrap_acct_id IN NUMBER Scrap account identification
kanban_id IN NUMBER Kanban identification
attribute1 IN VARCHAR2 Reserved for future use
attribute2 IN VARCHAR2 Reserved for future use
attribute3 IN VARCHAR2 Reserved for future use
attribute4 IN VARCHAR2 Reserved for future use
attribute5 IN VARCHAR2 Reserved for future use
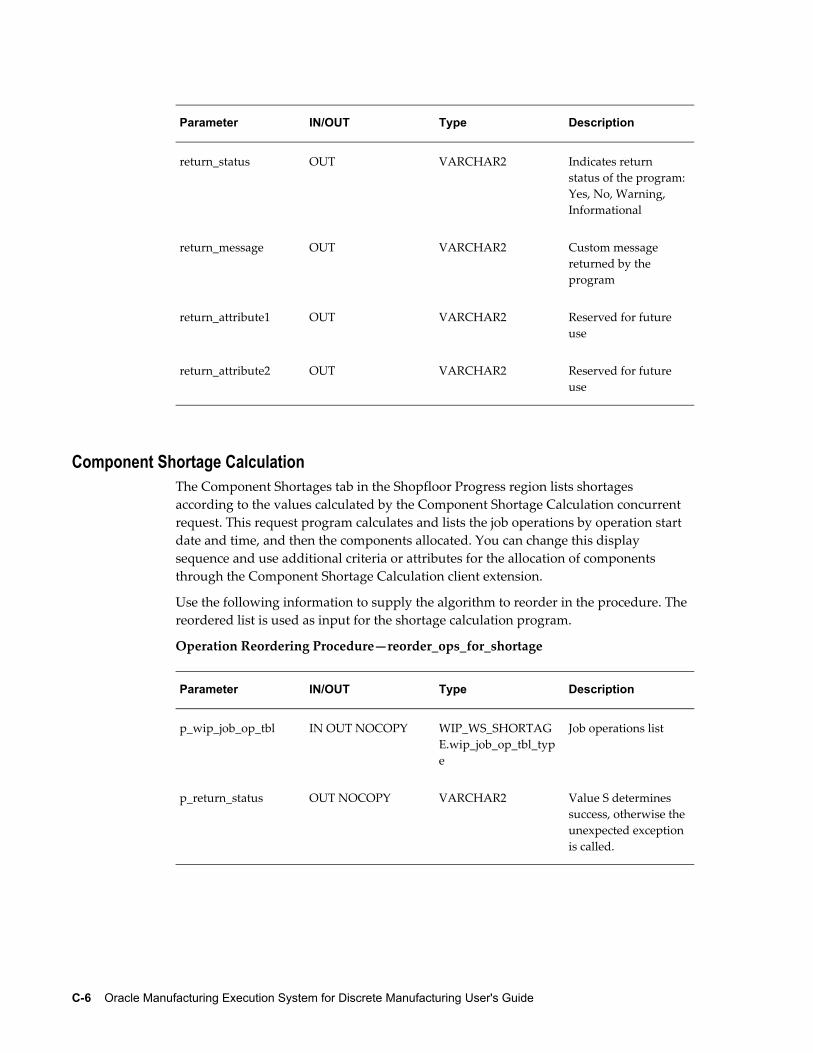
C-6 Oracle Manufacturing Execution System for Discrete Manufacturing User's Guide
Parameter IN/OUT Type Description
return_status OUT VARCHAR2 Indicates return status of the program:Yes, No, Warning, Informational
return_message OUT VARCHAR2 Custom message returned by the program
return_attribute1 OUT VARCHAR2 Reserved for future use
return_attribute2 OUT VARCHAR2 Reserved for future use
Component Shortage CalculationThe Component Shortages tab in the Shopfloor Progress region lists shortages according to the values calculated by the Component Shortage Calculation concurrent request. This request program calculates and lists the job operations by operation start date and time, and then the components allocated. You can change this display sequence and use additional criteria or attributes for the allocation of components through the Component Shortage Calculation client extension.
Use the following information to supply the algorithm to reorder in the procedure. The reordered list is used as input for the shortage calculation program.
Operation Reordering Procedure—reorder_ops_for_shortage
Parameter IN/OUT Type Description
p_wip_job_op_tbl IN OUT NOCOPY WIP_WS_SHORTAGE.wip_job_op_tbl_type
Job operations list
p_return_status OUT NOCOPY VARCHAR2 Value S determines success, otherwise theunexpected exceptionis called.
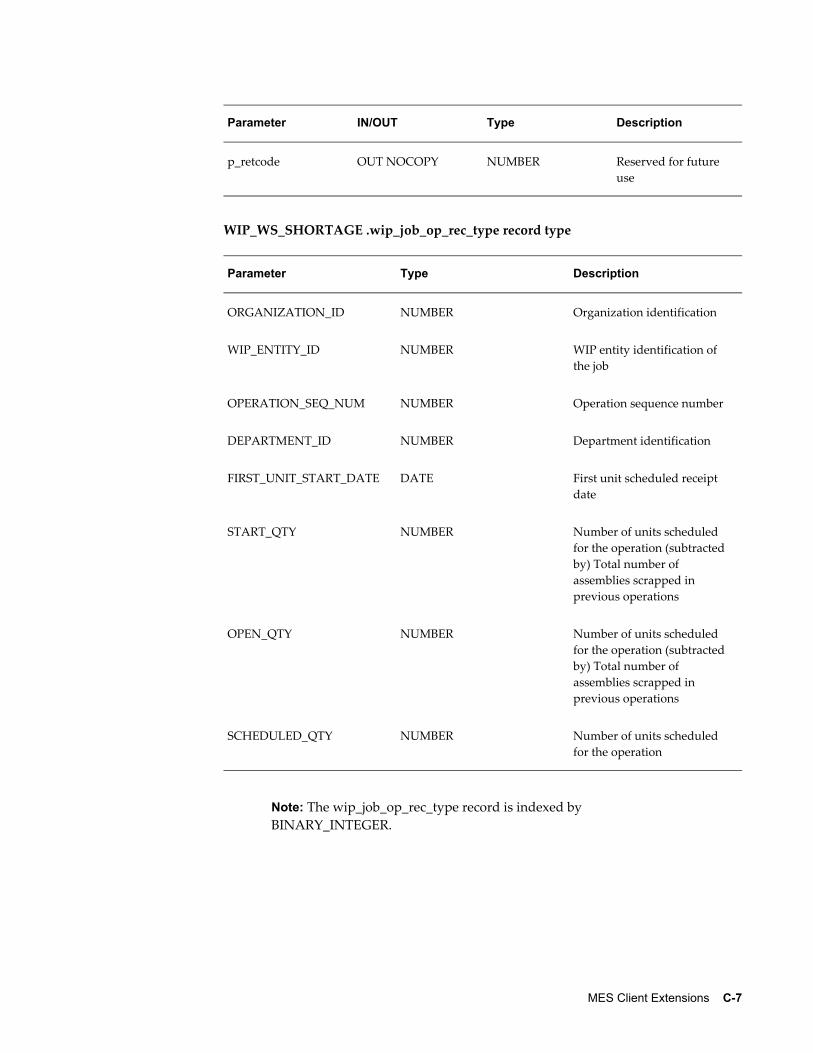
MES Client Extensions C-7
Parameter IN/OUT Type Description
p_retcode OUT NOCOPY NUMBER Reserved for future use
WIP_WS_SHORTAGE .wip_job_op_rec_type record type
Parameter Type Description
ORGANIZATION_ID NUMBER Organization identification
WIP_ENTITY_ID NUMBER WIP entity identification of the job
OPERATION_SEQ_NUM NUMBER Operation sequence number
DEPARTMENT_ID NUMBER Department identification
FIRST_UNIT_START_DATE DATE First unit scheduled receipt date
START_QTY NUMBER Number of units scheduled for the operation (subtracted by) Total number of assemblies scrapped in previous operations
OPEN_QTY NUMBER Number of units scheduled for the operation (subtracted by) Total number of assemblies scrapped in previous operations
SCHEDULED_QTY NUMBER Number of units scheduled for the operation
Note: The wip_job_op_rec_type record is indexed by BINARY_INTEGER.
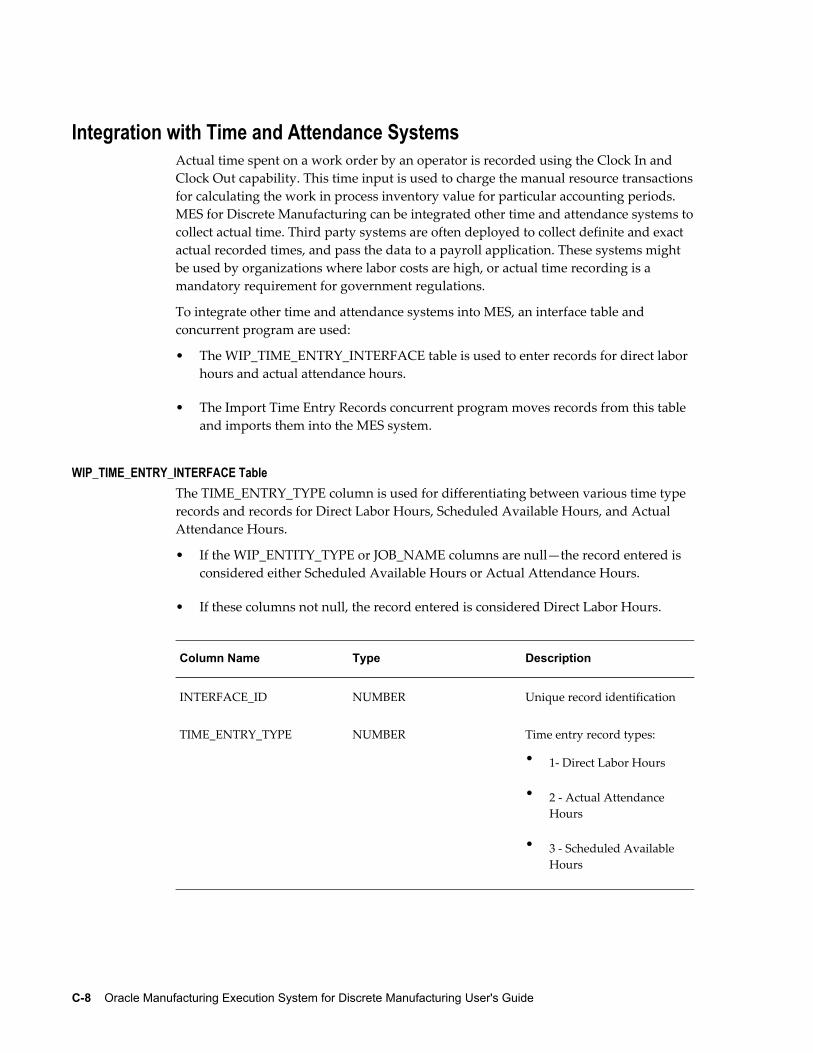
C-8 Oracle Manufacturing Execution System for Discrete Manufacturing User's Guide
Integration with Time and Attendance SystemsActual time spent on a work order by an operator is recorded using the Clock In and Clock Out capability. This time input is used to charge the manual resource transactionsfor calculating the work in process inventory value for particular accounting periods. MES for Discrete Manufacturing can be integrated other time and attendance systems tocollect actual time. Third party systems are often deployed to collect definite and exact actual recorded times, and pass the data to a payroll application. These systems might be used by organizations where labor costs are high, or actual time recording is a mandatory requirement for government regulations.
To integrate other time and attendance systems into MES, an interface table and concurrent program are used:
• The WIP_TIME_ENTRY_INTERFACE table is used to enter records for direct labor hours and actual attendance hours.
• The Import Time Entry Records concurrent program moves records from this table and imports them into the MES system.
WIP_TIME_ENTRY_INTERFACE TableThe TIME_ENTRY_TYPE column is used for differentiating between various time type records and records for Direct Labor Hours, Scheduled Available Hours, and Actual Attendance Hours.
• If the WIP_ENTITY_TYPE or JOB_NAME columns are null—the record entered is considered either Scheduled Available Hours or Actual Attendance Hours.
• If these columns not null, the record entered is considered Direct Labor Hours.
Column Name Type Description
INTERFACE_ID NUMBER Unique record identification
TIME_ENTRY_TYPE NUMBER Time entry record types:
• 1- Direct Labor Hours
• 2 - Actual Attendance Hours
• 3 - Scheduled Available Hours
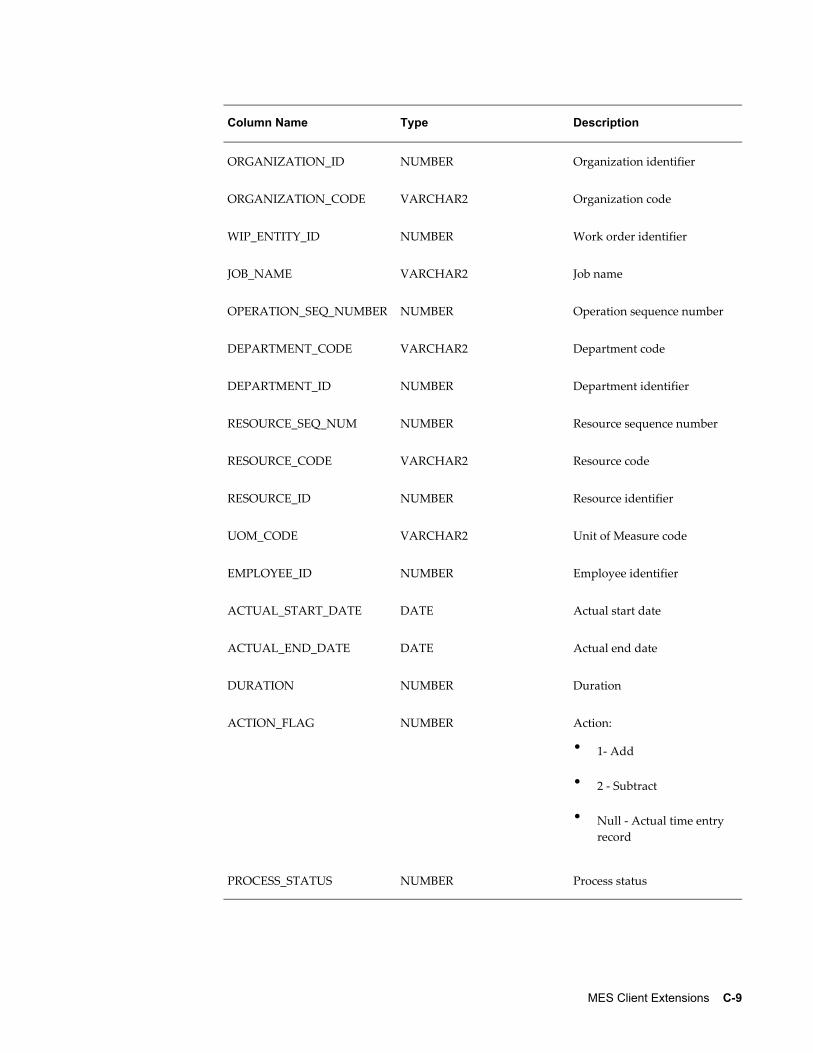
MES Client Extensions C-9
Column Name Type Description
ORGANIZATION_ID NUMBER Organization identifier
ORGANIZATION_CODE VARCHAR2 Organization code
WIP_ENTITY_ID NUMBER Work order identifier
JOB_NAME VARCHAR2 Job name
OPERATION_SEQ_NUMBER NUMBER Operation sequence number
DEPARTMENT_CODE VARCHAR2 Department code
DEPARTMENT_ID NUMBER Department identifier
RESOURCE_SEQ_NUM NUMBER Resource sequence number
RESOURCE_CODE VARCHAR2 Resource code
RESOURCE_ID NUMBER Resource identifier
UOM_CODE VARCHAR2 Unit of Measure code
EMPLOYEE_ID NUMBER Employee identifier
ACTUAL_START_DATE DATE Actual start date
ACTUAL_END_DATE DATE Actual end date
DURATION NUMBER Duration
ACTION_FLAG NUMBER Action:
• 1- Add
• 2 - Subtract
• Null - Actual time entry record
PROCESS_STATUS NUMBER Process status
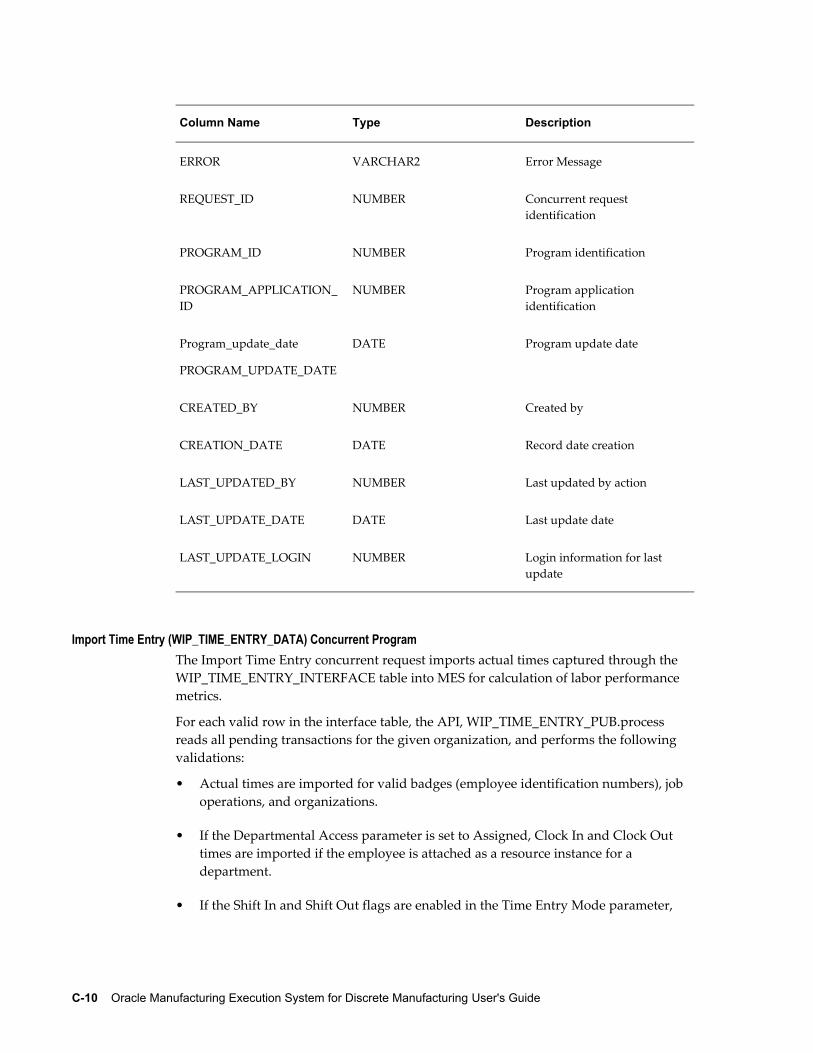
C-10 Oracle Manufacturing Execution System for Discrete Manufacturing User's Guide
Column Name Type Description
ERROR VARCHAR2 Error Message
REQUEST_ID NUMBER Concurrent request identification
PROGRAM_ID NUMBER Program identification
PROGRAM_APPLICATION_ID
NUMBER Program application identification
Program_update_date
PROGRAM_UPDATE_DATE
DATE Program update date
CREATED_BY NUMBER Created by
CREATION_DATE DATE Record date creation
LAST_UPDATED_BY NUMBER Last updated by action
LAST_UPDATE_DATE DATE Last update date
LAST_UPDATE_LOGIN NUMBER Login information for last update
Import Time Entry (WIP_TIME_ENTRY_DATA) Concurrent ProgramThe Import Time Entry concurrent request imports actual times captured through the WIP_TIME_ENTRY_INTERFACE table into MES for calculation of labor performance metrics.
For each valid row in the interface table, the API, WIP_TIME_ENTRY_PUB.process reads all pending transactions for the given organization, and performs the following validations:
• Actual times are imported for valid badges (employee identification numbers), job operations, and organizations.
• If the Departmental Access parameter is set to Assigned, Clock In and Clock Out times are imported if the employee is attached as a resource instance for a department.
• If the Shift In and Shift Out flags are enabled in the Time Entry Mode parameter,

MES Client Extensions C-11
captured attendance hour records are not imported.
• If Clock In and Clock Out flags are enabled in the Time Entry Mode parameter, labor hours are not imported.


Index-1
Index
AAlternate resources, 4-29
BBadge numbers, 3-54
setting up parameters, 3-54
CClient extensions
Component Shortage Calculation, C-6ready status, C-1transaction validation, C-3
Clock In and Clock Out, 3-54Completing job operations and assemblies, 3-18, 3-27Component Shortage Calculation client extension, C-6
DDashboard, 4-1, 4-2
first pass yield view, 4-12labor performance view, 4-8production to plan view, 4-6reported exceptions view, 4-4
Device integration, 3-21Discrete Job Routing Sheet, 5-2Dispatch lists, 3-6
reordering records, 4-32setting parameters, 3-7viewing and updating, 3-8
Distributed MES for Discrete Manufacturing, 1-4
EElectronic signature support, 3-2Exception Notification Workflow, B-1Exceptions
adding to impacted jobs, 4-26reporting, 3-48updating, 4-26viewing and resolving exceptions, 4-23viewing closed exceptions, 4-27workflow, B-1
Express moves, 3-19, 3-34
FFirst pass yield view, 4-12
GGlobal actions, 5-1
IInitialization modes, 3-4
JJob component transactions, 3-16Job On and Clock In actions, 3-54Job operation actions, 3-13
LLabor Performance view, 4-8Labor skills validation, 1-3, 3-20
Index-2
parameter, 2-20setup, 2-22
MManufacturing Execution Workstation
overview, 1-1MES Administrator, 2-1MES initialization modes, 3-4MES Supervisor Workbench, 4-1Monitoring shop floor progress, 4-16Moving and completing job operations and assemblies, 3-18, 3-21
express moves, 3-19Moving and completing job operations and assemblies,
serialized moves, 3-37
NNavigator paths, A-1
OOperations
reordering on the dispatch list, 4-32rescheduling, 4-29
Operator role, 3-1Overview
Manufacturing Execution Workstation, 1-1
PParameters
Allow Moves From Prior Operations, 2-8Assemblies for Completion Labels, 2-9Attachment Sources, 2-10Default Intraoperation Step, 2-11Default Scrap Account, 2-12Dispatch List Ordering Criteria, 2-13Global Actions, 2-14Include Job Status, 2-15Job Operation Actions, 2-16Job Traveler Template Setup, 2-17Labor Performance Metrics, 2-19Operator Skills Validation, 2-20Production to Plan KPI, 2-23Ready Status Criteria, 2-25Reason Codes for Exception Types, 2-26
Resources for Capacity Shortages, 2-27Search Job/Serial Operation Actions, 2-28Standard Operations for Move Labels, 2-29Supervisor Dashboard View, 2-30Work Content Actions, 2-32Work Content Layout, 2-33Work Orders and Component Shortage Setup,2-34
Printing labels, 3-14Production to Plan view, 4-6
QQuality device integration, 3-21Quality display options, 3-20
RReady status
overview, 3-7Ready status client extension, C-1Rejecting assemblies, 3-29Reported Exceptions view, 4-4Reporting resource usage, 5-3Rescheduling operations, 4-29Returning assemblies, 3-49
SScrapping assemblies, 3-29Search Jobs page, 5-4Search Serial Numbers page, 3-34Serialized manufacturing, 3-33Serial numbers
creating move transactions, 3-37express moves, 3-19, 3-34overview of serialized manufacturing, 3-33searching for, 3-34
Shopfloor Progress region, 4-16Shopfloor statuses, 4-31Startup page
MES Workstation, 3-4Supervisor Workbench, 4-2
Supervisor Dashboard, 4-2Supervisor Workstation, 4-1
TTime and attendance systems
Index-3
integration with, 4-10, C-8Time entry, 3-53
setup parameters, 3-53Transact components, 3-16Transaction validation client extension, C-3
UUpdate Note page, 3-16
VViewing and resolving exceptions, 4-23Viewing job information, 3-40
WWork Content page, 3-11Workflow
WIP Exception Notification Workflow, B-1


