
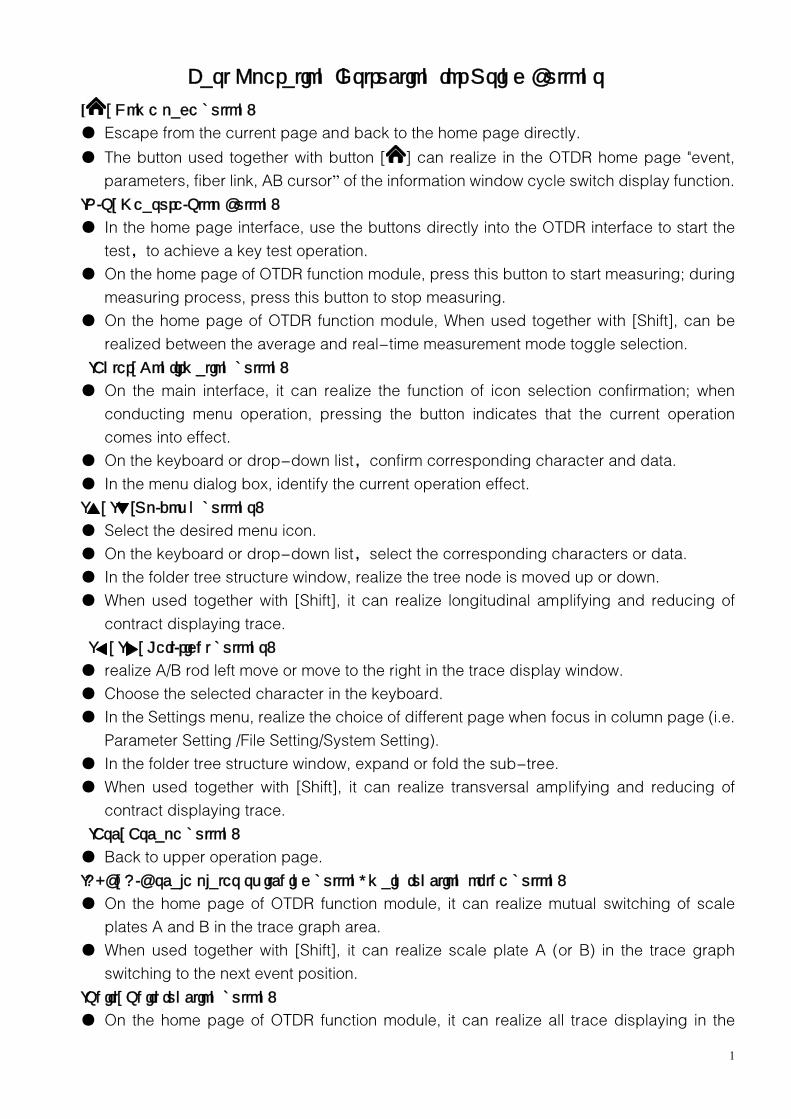
Optical Time Domain Reflectometer
USER MANUAL
ORIENTEK TR600 OTDR
1
Fast Operation Instruction for Using Buttons
[ ] Home page button: ● Escape from the current page and back to the home page directly.
● The button used together with button [ ] can realize in the OTDR home page "event,
parameters, fiber link, AB cursor” of the information window cycle switch display function.
[R/S] Measure/Stop Button:
● In the home page interface, use the buttons directly into the OTDR interface to start the
test,to achieve a key test operation.
● On the home page of OTDR function module, press this button to start measuring; during
measuring process, press this button to stop measuring.
● On the home page of OTDR function module, When used together with [Shift], can be
realized between the average and real-time measurement mode toggle selection.
[Enter] Confirmation button:
● On the main interface, it can realize the function of icon selection confirmation; when
conducting menu operation, pressing the button indicates that the current operation
comes into effect.
● On the keyboard or drop-down list,confirm corresponding character and data.
● In the menu dialog box, identify the current operation effect.
[ ] [ ]Up/down buttons:
● Select the desired menu icon.
● On the keyboard or drop-down list,select the corresponding characters or data.
● In the folder tree structure window, realize the tree node is moved up or down.
● When used together with [Shift], it can realize longitudinal amplifying and reducing of
contract displaying trace.
[ ] [ ] Left/right buttons:
● realize A/B rod left move or move to the right in the trace display window.
● Choose the selected character in the keyboard.
● In the Settings menu, realize the choice of different page when focus in column page (i.e.
Parameter Setting /File Setting/System Setting).
● In the folder tree structure window, expand or fold the sub-tree.
● When used together with [Shift], it can realize transversal amplifying and reducing of
contract displaying trace.
[Esc] Escape button:
● Back to upper operation page.
[A-B] A/B scale plates switching button, main function of the button:
● On the home page of OTDR function module, it can realize mutual switching of scale
plates A and B in the trace graph area.
● When used together with [Shift], it can realize scale plate A (or B) in the trace graph
switching to the next event position.
[Shift] Shift function button:
● On the home page of OTDR function module, it can realize all trace displaying in the

2
trace graph area.
● In the menu dialog box, it serves as a Tab switching key role, that is, the function switch
under each menu in the dialog box.
● On the home page of OTDR function module, the button used together with button [ ]
can realize in the OTDR home page "event, parameters, fiber link, AB cursor” of the
information window cycle switch display function.
● On the home page of OTDR function module, the button used together with buttons [▲]
[▼] can realize combination functions of longitudinal amplifying and reducing of trace.
● On the home page of OTDR function module, the button used together with buttons [ ]
[ ] can realize combination functions of transversal amplifying and reducing of trace.
● On the home page of OTDR function module, the button used together with button [ ]
can realize the fast switching options between the average and real-time measurement
mode.
● On the home page of OTDR function module, the button used together with button [A-B]
can realize scale plate A (or B) in the trace graph switching to the next event position.
● When using the shift key combination function, please press the [Shift] button, then press
the combination of keys, function realization, first release the key combination, then
release the [Shift] key.
[ ] Button for power supply:
● Turn on and turn off the power of instrument. Need to press and hold for 2-3 seconds
until the power light reaction can let go.

3
Contents 1 Copyright Information .....................................................................................................................................................5 2 Safety Information ...........................................................................................................................................................6 3 Appearance Diagram of OTDR Product ......................................................................................................................8 3.1 Introduction to Electrical Interface of Instrument .............................................................................................9 3.2 Instruction of Optical Interface of Instrument ...................................................................................................9 3.3 Instruction of Buttons on the Instrument.........................................................................................................10
4 Introduction to Home Page of OTDR .........................................................................................................................12 5 Introduction to Operation of VFL.................................................................................................................................13 6 Introduction to OTDR....................................................................................................................................................14 6.1 Measuring Purpose of OTDR...........................................................................................................................14 6.1.1 Measuring Contents of OTDR ..............................................................................................................14 6.1.2 OTDR Curve Analysis ............................................................................................................................14
6.2 Basic Principle of OTDR ...................................................................................................................................14 6.3 Instruction of Events Categories......................................................................................................................15 6.3.1 Initial Event ..............................................................................................................................................15 6.3.2 End Event ................................................................................................................................................15 6.3.3 Reflection Event......................................................................................................................................15 6.3.4 Non-reflection Event..............................................................................................................................16 6.3.5 Event Inspection .....................................................................................................................................16
7 Introduction to Operation of OTDR.............................................................................................................................17 7.1 Instruction of Home Page Screen of OTDR...................................................................................................17 7.1.1 Instruction of Trace graph Area on the Main Interface of OTDR .....................................................18 7.1.2 Instruction of Trace Operation Button Area on the Main Interface of OTDR .................................18 7.1.3 Instruction of Info Window Area of the Main Interface of OTDR......................................................19 7.1.4 Instruction of Status Bar Area on the Main Interface of OTDR........................................................21
7.2 Instruction of Menu Button “Set” of OTDR ....................................................................................................22 7.2.1 Parameter Setting...................................................................................................................................22 7.2.2 File Setting...............................................................................................................................................24 7.2.3 System Setting ........................................................................................................................................25
7.3 Instruction of Menu Button“Measurement”/“Stop”of OTDR .......................................................................26 7.4 Instruction of Menu Button“Saving”of OTDR ................................................................................................27 7.5 Instruction of Menu Button“Open”of OTDR...................................................................................................29 7.6 Instruction of Menu Button“File Management”of OTDR..............................................................................30 7.7 Instruction of Menu Button“Multi- traces Analysis”of OTDR ......................................................................31
7.7.1 Instruction of Button“Multi-traces Setting”.........................................................................................31 7.7.2 Instruction of Button“Trace 1/2/3/4” ....................................................................................................32 7.7.3 Instruction of Button“Remove” .............................................................................................................32 7.7.4 Instruction of Button“Esc” .....................................................................................................................32 7.7.5 Instruction of Button“Help”....................................................................................................................32 7.7.6 Instruction of Button“Home Page”.......................................................................................................32
7.8 Instruction of Menu Button “Trace Locking” of OTDR .................................................................................33 7.9 Instruction of Menu Button“Help”of OTDR ....................................................................................................34 7.10 Instruction of Menu Button“Home Page”of OTDR .....................................................................................34
8 Instruction of PC Terminal Software of OTDR ..........................................................................................................35 8.1 Installation of PC Terminal Software of OTDR ..............................................................................................35

4
8.1.1 Requirements to the Installation Environment....................................................................................35 8.1.2 Software Installation Steps....................................................................................................................35 8.1.3 Screen Resolution Ration Setting ........................................................................................................35
8.2 Instruction of Interface of PC Terminal Software of OTDR..........................................................................36 8.3 Instruction of Menu Bar Window of PC Terminal Software of OTDR.........................................................37 8.3.1 Instruction of Menu“File” .......................................................................................................................37 8.3.2 Instruction of Menu “Editing” ................................................................................................................44 8.3.3 Instruction of Menu“View”.....................................................................................................................45 8.3.4 Instruction of Menu“Help” .....................................................................................................................46
8.4 Instruction of PC Terminal Software Toolbar Window of OTDR .................................................................46 8.5 Instruction of PC Terminal Software Traces Window of OTDR ..................................................................47 8.5.1 Displaying Area of“Trace graph”..........................................................................................................47 8.5.2 Displaying Area of“List of Multi-traces Displaying File” ...................................................................48 8.5.3 Displaying Area of“Measurement Parameter” ...................................................................................48 8.5.4 Displaying Area of“Measurement Result” ..........................................................................................48
8.6 Instruction of Event List Window of PC Terminal Software of OTDR ........................................................49 8.7 Instruction of the Whole Waveform Window of PC Terminal Software of OTDR .....................................49 8.8 Instruction of the Status Bar Window of PC Terminal Software of OTDR.................................................49
9 OTDR Products Maintenance and Service ...............................................................................................................50 9.1 Operation Note of OTDR Product ...................................................................................................................50 9.2 Cleaning the Connector of Optical Interface ..................................................................................................50 9.3 Maintenance and Changing of Battery ...........................................................................................................51 9.4 Calibration of OTDR Products .........................................................................................................................51 9.5 Service and Guarantee .....................................................................................................................................52 9.5.1 General Information................................................................................................................................52 9.5.2 Responsibilities .......................................................................................................................................52 9.5.3 Disclaimer ................................................................................................................................................52 9.5.4 Maintenance ............................................................................................................................................53
9.6 Transportation ....................................................................................................................................................53 10 Common Failure Diagnosis of OTDR product ........................................................................................................54 Appendix Technical Parameters of OTDR....................................................................................................................56

5
1 Copyright Information
Copyright © 2013 belongs to us. Without agreement and written permission in advance of
us, any content in the manual couldn’t be copied, saved in retrieval system or spread by any
way, including electronic or mechanical photocopying, recording or any other method.
Guarantee
Any change of the information in the manual won’t be notified. We won’t guarantee
anything about the material, including, but not limited to hint guarantee for marketability and
adaptability of dedicated target. For these accidental or secondary losses caused by errors
contained, supplying to use the material, or the practicability of the edition materials, We won’t undertake any responsibility.
Measurement unit
The measurement unit used by the manual complies with SI standard and conventions.
6
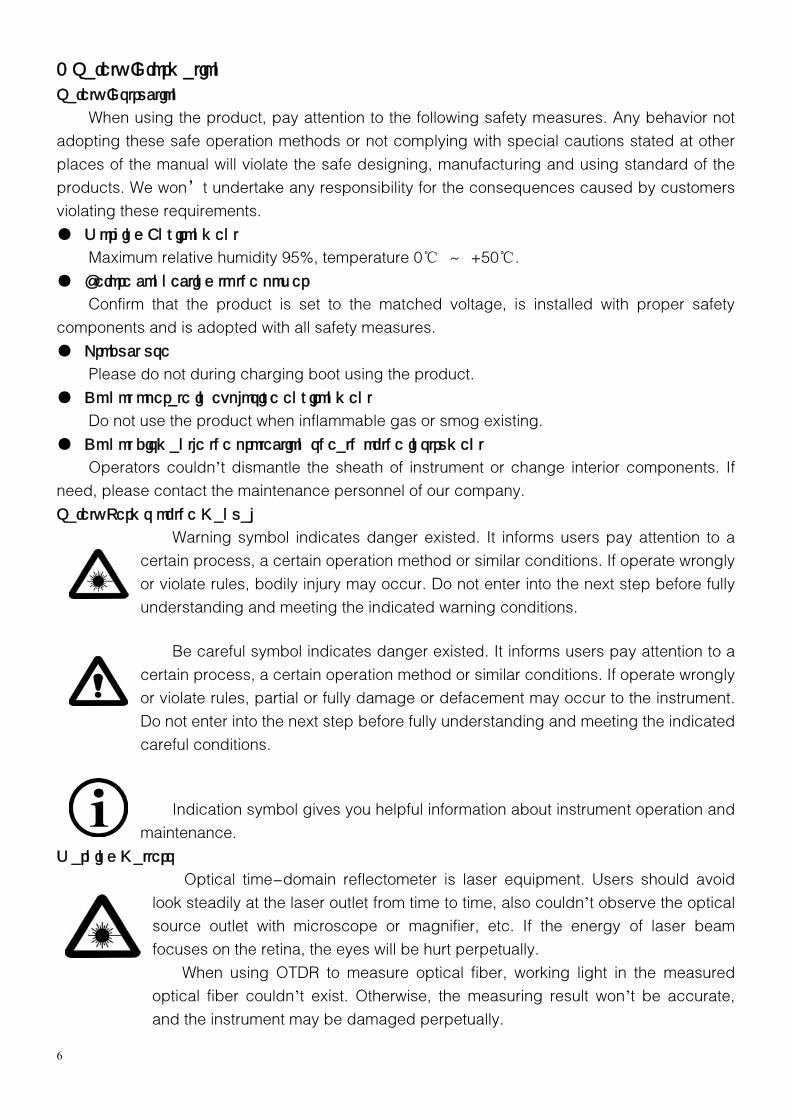
2 Safety Information Safety Instruction
When using the product, pay attention to the following safety measures. Any behavior not
adopting these safe operation methods or not complying with special cautions stated at other
places of the manual will violate the safe designing, manufacturing and using standard of the
products. We won’t undertake any responsibility for the consequences caused by customers
violating these requirements.
● Working Environment
Maximum relative humidity 95%, temperature 0℃ ~ +50℃.
● Before connecting to the power
Confirm that the product is set to the matched voltage, is installed with proper safety
components and is adopted with all safety measures.
● Product use
Please do not during charging boot using the product. ● Do not operate in explosive environment
Do not use the product when inflammable gas or smog existing.
● Do not dismantle the protection sheath of the instrument
Operators couldn’t dismantle the sheath of instrument or change interior components. If
need, please contact the maintenance personnel of our company.
Safety Terms of the Manual
Warning symbol indicates danger existed. It informs users pay attention to a
certain process, a certain operation method or similar conditions. If operate wrongly
or violate rules, bodily injury may occur. Do not enter into the next step before fully
understanding and meeting the indicated warning conditions.
Be careful symbol indicates danger existed. It informs users pay attention to a
certain process, a certain operation method or similar conditions. If operate wrongly
or violate rules, partial or fully damage or defacement may occur to the instrument.
Do not enter into the next step before fully understanding and meeting the indicated
careful conditions.
Indication symbol gives you helpful information about instrument operation and
maintenance.
Warning Matters
Optical time-domain reflectometer is laser equipment. Users should avoid
look steadily at the laser outlet from time to time, also couldn’t observe the optical
source outlet with microscope or magnifier, etc. If the energy of laser beam
focuses on the retina, the eyes will be hurt perpetually.
When using OTDR to measure optical fiber, working light in the measured
optical fiber couldn’t exist. Otherwise, the measuring result won’t be accurate,
and the instrument may be damaged perpetually.

7
Cautions
Battery: the battery of our company’s optical time-domain reflectometer
adopts rechargeable lithium battery. When using the instrument after a long term
lying aside, charge the battery firstly. If the instrument is laid aside for more than 1
month, charge the battery in time to maintain the electricity in the battery. Do no
charge the battery over 8 hours. Do not take out the battery randomly. Do not
make the battery approach to fire and heat-flash. Do not open or damage the
battery. Do not touch the electrolyte of the battery, otherwise the eye, skin and
clothes will be injured and corroded.
Outside power supply: All OTDR series can use outside power supply. Requirements of
power supply: DC12V/3A, polarity: .
Avoid laser radiation: during measuring processing of optical fiber system, avoid looking at
the open optical fiber, optical fiber interface, optical fiber tie point and other optical source, etc;
otherwise, the eyes may come into contact with the transferred laser and be hurt.
When the optical time-domain reflectometer working, do not look at the laser outlet
directly;
After using, cover the dust cap onto the optical outlet of the optical time-domain
reflectometer;
Do not directly look at the disconnected terminal of the being tested optical fiber. If
possible, make the disconnected terminal of fiber optical point to a non-reflective
object.

8
3 Appearance Diagram of OTDR Product
Fig. 3-1 Appearance Diagram of OTDR

9
3.1 Introduction to Electrical Interface of Instrument
● DC12V/3A Power supply interface
Requirement to power supply interface: input DC12V/3A, polarity: .
● USB、SD Data Interfaces
The instrument is matched with USB and SD card interfaces. SD card interface is matched
with a 4G SD card. The SD card is the default data saving medium of the instrument’s trace files.
To plug U disk (≤8G) into the USB interface can transfer the trace data saved in the instrument
into the U disk, and then save the data into the computer from the U disk to conduct subsequent
analysis; or take out the SD card from the instrument and plug into the computer to conduct
subsequent analysis. The data in the U disk can be read only if plug in the U disk when the
instrument is on.
● Charge Indicator
When charging the battery, the indicator is turned on to be green; when charging finished,
the indicator will turn off automatically.
● LAN Ethernet Interface
Several models have such interface.
● Audio Interface
Several models have such interface.
3.2 Instruction of Optical Interface of Instrument
● Optical Interface of OTDR
The optical interface is the measurement interface of OTDR. It adopts FC/UPC optical
connector (SC/ST are replaceable).
● VLS Optical Interface
The optical interface is the measurement interface of VFL. It adopts FC/UPC optical
connector (SC/ST are replaceable).
Invisible laser radiation
Do not look at the optical interface directly or look over the optical interface
through optical instrument.
The optical interfaces of OTDR and VFL output laser. Users should always
avoid look at the laser outlet directly. Not mention to observe the optical outlets
with microscope or magnifier. If the energy of laser beam focuses on the retina,
the eyes will be hurt perpetually.

10
3.3 Instruction of Buttons on the Instrument
[ ] Home page button: ● Escape from the current page and back to the home page directly.
● The button used together with button [ ] can realize in the OTDR home page "event,
parameters, fiber link, AB cursor” of the information window cycle switch display function.
[R/S] Measure/Stop Button:
● In the home page interface, use the buttons directly into the OTDR interface to start the
test,to achieve a key test operation.
● On the home page of OTDR function module, press this button to start measuring; during
measuring process, press this button to stop measuring.
● On the home page of OTDR function module, When used together with [Shift], can be
realized between the average and real-time measurement mode toggle selection.
[Enter] Confirmation button:
● On the main interface, it can realize the function of icon selection confirmation; when
conducting menu operation, pressing the button indicates that the current operation
comes into effect.
● On the keyboard or drop-down list,confirm corresponding character and data.
● In the menu dialog box, identify the current operation effect.
[ ] [ ]Up/down buttons:
● Select the desired menu icon.
● On the keyboard or drop-down list,select the corresponding characters or data.
● In the folder tree structure window, realize the tree node is moved up or down.
● When used together with [Shift], it can realize longitudinal amplifying and reducing of
contract displaying trace.
[ ] [ ] Left/right buttons:
● realize A/B rod left move or move to the right in the trace display window.
● Choose the selected character in the keyboard.
● In the Settings menu, realize the choice of different page when focus in column page (i.e.
Parameter Setting /File Setting/System Setting).
● In the folder tree structure window, expand or fold the sub-tree.
● When used together with [Shift], it can realize transversal amplifying and reducing of
contract displaying trace.
[Esc] Escape button:
● Back to upper operation page.
[A-B] A/B scale plates switching button, main function of the button:
● On the home page of OTDR function module, it can realize mutual switching of scale
plates A and B in the trace graph area.
● When used together with [Shift], it can realize scale plate A (or B) in the trace graph
switching to the next event position.
[Shift] Shift function button:
● On the home page of OTDR function module, it can realize all trace displaying in the

11
trace graph area.
● In the menu dialog box, it serves as a Tab switching key role, that is, the function switch
under each menu in the dialog box.
● On the home page of OTDR function module, the button used together with button [ ]
can realize in the OTDR home page "event, parameters, fiber link, AB cursor” of the
information window cycle switch display function.
● On the home page of OTDR function module, the button used together with buttons [▲]
[▼] can realize combination functions of longitudinal amplifying and reducing of trace.
● On the home page of OTDR function module, the button used together with buttons [ ]
[ ] can realize combination functions of transversal amplifying and reducing of trace.
● On the home page of OTDR function module, the button used together with button [ ]
can realize the fast switching options between the average and real-time measurement
mode.
● On the home page of OTDR function module, the button used together with button [A-B]
can realize scale plate A (or B) in the trace graph switching to the next event position.
● When using the shift key combination function, please press the [Shift] button, then press
the combination of keys, function realization, first release the key combination, then
release the [Shift] key.
[ ] Button for power supply:
● Turn on and turn off the power of instrument. Need to press and hold for 2-3 seconds
until the power light reaction can let go.

12
4 Introduction to Home Page of OTDR
The home page (home) of OTDR provides two module functions - OTDR (optical
time-domain reflectometer) and VFL (visual fault location). Directly clicking OTDR or VFL can
enter into the operation page of their functional modules. As shown in the following figure.
4-1. Operation Interface Diagram of Home Page of OTDR
4-2. Operation Interface Diagram of Home Page of VFL

13
5 Introduction to Operation of VFL Click VFL functional module on the home page to enter VFL main operation interface
directly.
Fig. 5-1 Main Operation Interface Diagram of VFL
VFL provides two kinds of using status--“bright permanently”, “twinkling”. Clicking the
button “bright permanently”, the VFL will enter turn-on status of permanent lightening; clicking
the button “twinkling”, the VFL will enter turn-on status of 2Hz twinkling; clicking the button
“OFF”, the VFL will turn off immediately.
When clicking the button “auto turn-off”, the dialog box of auto turn-off setting is ejected.
Operator can conduct corresponding setting on the dialog box. Auto turn-off function provides
options of “OFF, after 5 min, after 10 min, after 30 min, after 1 hour, after 2 hours”. The default
setting is “10 min”, i.e., turns off after 10 min. No matter it is under which kind of auto turn-off
status, when clicking the button “OFF”, the “light permanently” or “twinkling” status of
VFL will be turned off.
Fig.5-2. Operation Interface Diagram of Auto Shutdown of VFL
On VFL interface, after turning on the VFL function, under turn-on status, users can enter
into OTDR interface through home page interface to conduct OTDR measurement; meanwhile, it
will provide a status window on the status bar to show the ON or OFF status.

14
6 Introduction to OTDR 6.1 Measuring Purpose of OTDR
OTDR displays the power of the returned signal related to distance. The information can be
used to confirm the transmission quality of a fiber optic link.
6.1.1 Measuring Contents of OTDR
● Position (distance) of event, result or fractured position of fiber optic link;
● Attenuation coefficient of optical fiber in the optical fiber link;
● Loss of a single event (for example, a optical connector or bending), or total losses from
end to end on the fiber optic link;
● Reflection amplitude (or reflection level) of an event, such as connector
6.1.2 OTDR Curve Analysis
OTDR analyzes the curve automatically. Location of the curve:
● Reflection event generated from connection and mechanical connector;
● Non-reflection event (usually be fusion splice);
● Optical fiber bundling: through scanning the first loss event that larger than the bundling
threshold, OTDR detects the bundling of optical fiber;
● Events list: Category of events, loss, reflection, and distance are listed through
calculation.
6.2 Basic Principle of OTDR
Optical Time Domain Reflectometer is the full name of OTDR. OTDR is accurate
optoelectronic integrated instrument made according to back scattering that generated from
Rayleigh scattering and Fresnel reflection when lights are transmitted in the optical fiber. It is
widely used in the maintenance, construction and monitoring of cable line. It can measure the
optical fiber length, transmission attenuation of optical fiber, attenuation of splice, and failure
location, etc.
When the pulse being transmitted downwards along with the optical fiber, and some small
changes (such as changes of refractivity and discontinuity) in the material make the lights
scatter to different directions, Rayleigh scattering occurs. Partial lights are scattered back along
with the direction that opposite to pulse, therefore, it is called Rayleigh back scattering. Back
scattering light shows attenuation details that related to the length. Information related to length
is gained through time (i.e.: origin of domain of Optical Time Domain Reflectometer). These
back scattering signal indicates the attenuation (loss/distance) degree caused by optical fiber.
The curve formed is a downwards curve, which reflects the transmission characteristics of the
optical fiber.
When lights transmitted downwards along with the optical fiber encountering sudden
change of material density, Fresnel reflection occurs. Material density change may occur at the
connection or fracture parts where air gap existed. This phenomenon is used by OTDR to
accurately confirm the position of discontinuity point along with the length of optical fiber.
Compared to Rayleigh scattering, Fresnel reflection will reflect quite a lot of lights. The power of
Fresnel reflection is tens of thousands times of that of back scattering. The reflection strength is
ascertained according to the change degree of refractivity.

15
Distance calculation formula of OTDR: Distance = (c/n) × (t/2)
Among which: c= speed of light in vacuum (2.998 x 10⁸ m/s)
t = Time delay between transmitted pulse and received pulse
n = refractivity of optical fiber during testing process (nominated by manufacturer)
When displaying the whole trace, each point on the trace graph represents the average
value of several sampling points. The value of each sampling point can be found by reducing or
magnifying the trace.
Fig. 6-1. OTDR Principle Diagram
6.3 Instruction of Events Categories
Events on optical fiber indicate these abnormal points that brought loss or sudden change
of reflection power beyond normal scattering of optical fiber material, including various kinds of
connection and bending, loss of flaw or fracture on the optical fiber link.
Event points displayed on the screen is the abnormal points in the optical fiber that led to
deviation of trace, which are classified with special symbols on the trace.
Events include “reflection event” and “non-reflection event”.
6.3.1 Initial Event
“Initial event” on the OTDR trace is the event that marks the starting point of optical fiber.
Under default conditions, “initial event” is located at the first event (usually be the first
connector of OTDR) of the tested optical fiber. The event belongs to reflection event.
6.3.2 End Event
“End event” on the OTDR trace is the event that marks the terminal of optical fiber. Under
default conditions, “end event” is located at the last event of the tested optical fiber. The event
is called optical fiber terminal event (usually be the end or fracture point of the tested optical
fiber), which usually belongs to reflection event.
6.3.3 Reflection Event
When optical pulse energy is reflected (such as on the connector), reflection event occurs.
On the trace, reflection event is shown as peak signal, as shown in Fig.6-2.

16
Fig.6-2 Reflection Event
6.3.4 Non-reflection Event
Non-reflection event brings loss on the whole transmission link of optical fiber, but no light
reflection. On the curve, non-reflection event is shown as drop of optical power, as shown in
Fig.6-3.
Fig.6-3 Non-reflection Event
6.3.5 Event Inspection
OTDR sends optical pulse into the optical fiber that waited for inspection, then, begins to
accept the returned optical signal immediately, and calculate the distance of “event” in the
optical fiber. The further the event is, the longer the time for returning back to OTDR will be. The
distance can be calculated according to the time when receiving the event.
Through inspecting the curve of the reflected signal, the optical transmission characteristics
of optical fiber, connector and joint can be confirmed.

17
7 Introduction to Operation of OTDR 7.1 Instruction of Home Page Screen of OTDR
The trace displayed on the screen that measured by OTDR is shown in Fig.7-1.
Fig.7-1. Interface Diagram Displayed on the Screen of OTDR

18
7.1.1 Instruction of Trace graph Area on the Main Interface of OTDR
The window displays the trace gained from the first measurement.
Definition of trace: After the first measurement, reflection power diagram is displayed as
distance function. The diagram is called trace.
Trace of OTDR displays the measurement result by graphic mode on the screen. The
vertical axis represents the power, while the lateral axis represents the distance. The event point
is marked with red symbol.
Fig.7-2 Schematic Diagram of Trace Area
Fig.7-3 Schematic Diagram of Marks of Event Point
7.1.2 Instruction of Trace Operation Button Area on the Main Interface of OTDR
“Longitudinal amplifying” indicates longitudinally amplifying the measured trace with the
intersection of the chosen sign post and the trace as center.
“Longitudinal reducing” indicates longitudinally reducing the measured trace with the
intersection of the chosen sign post and the trace as center.
“Transversal amplifying” indicates transversally amplifying the measured trace with the
intersection of the chosen sign post and the trace as center.
“ Transversal reducing ” indicates transversally reducing the measured trace with the
intersection of the chosen sign post and the trace as center.
“Whole trace” indicates displaying the whole measured trace.
“Lock/Unlock of AB” indicates Lock/Unlock of relative position of scale plates A and B.
“Switching of trace” indicates mutual switching between or among two or more measured
traces.
“Move upwards” indicates upward movement of measured trace.

19
“Move downwards” indicates downward movement of measured trace.
“Longitudinal reset” indicates longitudinal reset of measured trace.
● When measuring, except for the stop icon, functions of the other icons in
the icon tool bar for trace operation are forbidden.
7.1.3 Instruction of Info Window Area of the Main Interface of OTDR
Contents of info window include measurement parameter, event list, scale plate A/B, and
analyzed parameter, etc.
Measurement parameter includes laser wavelength, distance scope, pulse width,
refractivity, back scattering coefficient, reflection threshold, bundling threshold, non-reflection
threshold, and duration of measurement. The definition and setting are shown in “set” menu.
When looking over these parameters, click the icon “parameter” through the touch screen,
and then the parameter information can be found in the info window. Contents of parameters are
shown in Fig.7-4:
Fig.7-4 Info Window of Measured Parameter
Optical fiber link information includes file name, measurement date, measurement time, link
length, link loss, link attenuation coefficient, and quantity of event. Definition and setting of file
name, duration of measurement, and measurement date are shown in “set” menu. When
looking over information of optical fiber link, click the icon “fiber link” through the touch screen,
then the information of optical fiber link can be found in the info window. Contents of information
of optical fiber link are shown in Fig.7-5:
Fig.7-5 Info Window of Optical Fiber Link
Information of scale plate includes position of point A (or B), plug-in loss of point A (or B),
back scattering coefficient of point A (or B), accumulate loss of point A (or B), distance of A B
section, loss between two points of AB section, attenuation coefficient between two points of AB
section, and LSA attenuation coefficient of AB section. Sign post is used to mark and analyze a
single event, curve section and distance. The information of sign post shows distance, loss and
attenuation coefficient between sign posts. When changing any sign post, the record value will
also be changed along with it. When looking over information of scale plate, click the icon “AB
cursor” through the touch screen, then the information of scale plate can be found in the info

20
window. Contents of information of scale plate are shown in Fig.7-6:
Fig.7-6 Info Window of Scale Plate
Data displayed in the event list include: serial number, category, position, plug-in loss,
attenuation coefficient, echo loss, and accumulate loss. “Serial number” indicates the
information of the nth event that currently displayed on the trace graph; “Category” indicates
the event category of the event point; “Position” indicates the distance from the initial point of
the optical fiber to the event point; “Plug-in loss” indicates the quantity of plug-in loss of the
event; “Attenuation coefficient” indicates the attenuation characteristics of the optical fiber
from the last event point to the current event point; “Echo loss” reflect the reflection value of
the event point; “Accumulate loss” indicates the loss value of optical fiber from the initial point
to the current event point. Contents of information of event list are shown in Fig.7-7. The event
point data and event section data are separately displayed in the event list. Serial number of
event only numbers the event points. Event category displays the following information by
picture: initial event, optical fiber section, reflection event, non-reflection event, and end event.
Corresponding pictures of event category are shown in Fig.7-8. When looking over information
of event list, click the icon “event” through the touch screen, then the information of event list
can be found in the info window.
Fig.7-7 Info window of Event List
Fig.7-8 Icon Picture of Event Category

21
7.1.4 Instruction of Status Bar Area on the Main Interface of OTDR
Fig.7-9 Schematic Diagram of Status Bar Information
Status bar of OTDR separately provides status display of 5 categories of function: display
of connection status, display of measurement model status, display of measuring progress
status bar, display of VFL status, display of power status.
Display of connection status: inspect the connection status of optical connector of OTDR.
Before beginning measurement, and after inspecting the communication light, OTDR will
automatically inspect the connector of instrument and the connection condition of the optical
fiber that waiting to be measured. The connection status includes two levels, good and bad. It
will prompt user after inspection, however, it won’t influence the measurement.
Display of measurement model status: measurement model includes average
measurement and real-time measurement. Under the models of average measurement and
real-time measurement, it will provide user functions of measurement starting and stopping,
and will prompt measurement status in the status bar of the measurement model.
Display of measuring progress status bar: when clicking the icon button “measurement”,
OTDR begins measurement, and the measuring progress status bar shows measurement
conducting; when measurement finished or clicking the icon button “stop”, the measuring
progress status bar shows measurement completed.
Display of VFL status: when starting using VFL function, the VFL status bar shows VFL ON;
when closing VFL function, VFL status bar shows VFL OFF.
Display of power status: OTDR instrument needs to display the using conditions of the
current battery on the status bar of the main interface. The status of battery includes charging
status and discharging status. When the battery is in discharging status, the current quantity of
electricity in the battery will be marked by five grades, separately are: full of electricity, greater
quantity of electricity remains, half electricity remains, insufficient electricity, and electricity run
out. When the battery is in charging status, the current quantity of electricity in the battery will be
marked by two grades: separately are: charging, full of electricity.

22
7.2 Instruction of Menu Button “Set” of OTDR
“Set” menu shows three dialog boxes: file setting, parameter setting, and system setting.
The data when starting up the instrument are the setting data of the former operation, as default.
menu dialog box “Set” is shown in Fig7-10:
Fig. 7-10 Interface Diagram of Menu“Set”
7.2.1 Parameter Setting
Fig.7-11 Interface Diagram of Menu“Parameter Setting”
laser wavelength, Distance scope, pulse width, duration of measurement, measurement
model, refractivity, non-reflection threshold, and bundling threshold that provided by parameter
setting are optional. Length unit, back scattering coefficient, and reflection threshold are
designated.
Laser wavelength: selected by user, it provides several options, wave length of multimode

23
fiber: 850nm, 1300nm; wave length of single mode fiber: 1310nm, 1550nm; wavelength of single
mode fiber of PON network: 1490nm, 1625nm. According to the differences of models, users
can simultaneously select 3 wavelengths at most to measure. This kind of measurement model
is called “multi wavelength measurement model”. Under “multi wavelength measurement
model”, measurement of multi wavelength output from the same optical interface will be
automatically and successively completed. Users can set analysis and file saving with different
wavelength. In addition, multi wavelength measurement is valid only under the average
measurement mode. Multi wavelength measurement is forbidden under the real-time
measurement mode.
Distance scope: selected by user, options include “auto, 300m, 1Km, 5Km, 10Km, 30Km,
60Km, 100Km, and 180Km”.
Pulse width: selected by user, options include “auto, 5ns, 10ns, 20ns, 40ns, 80ns, 160ns,
320ns, 640ns, 1.28µs, 2.56µs, 5.12µs, 10.24µs, and 20.48µs”
Duration of measurement: selected by user, options include “5s, 10s, 15s, 30s, 1min, 2min,
and 3min”. If the current measurement model is real-time measurement, the selected duration
of measurement won’t play role in the measurement.
Measurement model: selected by user, options include “average measurement and
real-time measurement”. When selecting real-time measurement mode, the selected duration
of measurement won’t play role in the measurement.
Length unit: meter. No option or user setting is provided in OTDR instrument.
Refractivity: set by user, input scope: 1.0000~1.9999, default value is set to be: 1.4685
Back scattering coefficient: it is to provide OTDR with a relative back scattering electrical
level for the given optical fiber. Back scattering coefficient is set before delivery. Usually,
technicians won’t change the parameter. If the back scattering coefficient is changed, it will
influence the reflection value and optical return loss that reported by instrument. No option or
user setting is provided in OTDR instrument.
Reflection threshold: No option or user setting is provided in OTDR instrument.
Non-reflection threshold: set by user, input scope: 0.01~2.99, the default value is: auto.
When the manual setting value is 0.00, it will transfer to auto value.
Bundling threshold: it is used as the threshold value for looking over event point when the
instrument treating data, i.e.: event points that lower than the set value of bundling threshold will
be removed, while the event points that higher than the set value of bundling threshold will be
displayed. For options set by user, input scope is: 1~19.99dB, the default value is: 5.00dB.
Default setting recovery: distance scope is “auto”; pulse width is “auto”; duration of
measurement is “10 sec”; laser wavelength is ‘1550nm’, measurement model is “average
model”; length unit is “meter”; refractivity is “1.4685”; back scattering coefficient is “auto”;
reflection threshold is “auto”; non-reflection threshold is “auto”; bundling threshold is
“5.00dB”.

24
7.2.2 File Setting
Fig. 7-12 Interface Diagram of Menu“File Setting”
File setting menu provides information of trace dialog box of “measuring location, SN of
optical fiber, terminal position of optical fiber, category of optical fiber, operator, and note”.
Operator can fill in the corresponding character information according to the condition of
project.
Auto saving: It provides two options- ON and OFF. When the auto saving status is “ON”,
the file will be automatically named and set to “ON” status. The auto naming category is
optional. Automatic storage file is the presence of SD card under the root directory, when the
OTDR is not inserted the SD card after the measurement will pop up warning window prompts.
Auto naming: It provides two options- ON and OFF. When the auto naming status is “ON”,
the auto naming category is optional. When the auto naming status is “OFF”, the auto naming
function is off.
Default setting recovery: auto saving status is “OFF”; auto naming status is “ON”; Serial
number is “001”; file format is “.sor”; auto naming category is “wave length + date + serial
number”; the note is blank.

25
7.2.3 System Setting
Fig.7-13 Interface Diagram of Menu“System Setting”
Date: selected by user, select the date, month and year separately. The factory setting is
the date manufactured.
Time: selected by user, select the hour, minute and second separately. The factory setting
is the current time.
Auto shutdown: selected by user, options include “OFF, 5min, 10min, 20min, 30min, and 1
hour”. The default value is OFF.
Thumbnail: selected by user, options include “ON and OFF”, the default value is OFF.
Optical warning in optical fiber: selected by user, options include “ON and OFF”, the
default value is ON.
Bundling threshold line: selected by user, options include “ON and OFF”, the default value
is OFF. Bundling threshold line is marked with red dotted line.
Screen brightness adjustment:selected by user, options include “dark, darker, lighter and
bright”, the default value is darker.
Backlight duration:selected by user, options include“10S、15S、20S、30S、50S、60S、
120S、180S”,the default value is 10S,in the case of without performing any operation after 10S,
enters the screen saving mode.
System upgrading: after selecting and confirming the option, the core module software of
the instrument can be upgraded.
Default value recovery: language is “Chinese”; the date and time are the factory settings;
auto shutdown is “OFF”; optical warning in optical fiber is “ON”; thumbnail is “OFF”; bundling
threshold line is “OFF”.

26
7.3 Instruction of Menu Button“Measurement”/“Stop”of OTDR
After entering interface of OTDR, click the button icon “measurement”. Firstly, it will inspect
whether there is light in the optical fiber, then, it will inspect the connection status of instrument
and the connector of optical fiber that waiting to measure. After the above two inspections
finishing, it begins OTDR measurement. The measurement model should correspond to the
measurement model option in the “parameter setting”. The inspection for checking whether
there is light in the optical fiber is to inspect the communication light in the optical fiber line, if
there is light, on consideration of protecting the instrument and communication equipment, the
measurement should be terminated and warning prompt should be given. Prompt mode:
warning dialog box ejects. The accuracy of the data measured by OTDR instrument is closely
related to the connection status of the connector of the optical fiber that waiting to measure. The
inspection to the connection status includes two grades: Good and Bad. Prompt will be given in
the status bar of OTDR after inspection; however, it won’t influence the measurement of OTDR.
During OTDR measurement process, click the button icon“stop”. The OTDR measurement
will stop immediately.
When operating the buttons, the instrument provides fast operation modes of two
measurement models. Through the" measurement / stop" button +" shift" button combination
operation, can be realized between the average and real-time measurement mode toggle
selection; In selecting the corresponding measurement mode, then through the " measurement
/ stop" button, can be realized in the corresponding measurement mode measurement.

27
Fig.7-14 Interface Diagram of“Measurement”/“Stop”Menu
7.4 Instruction of Menu Button“Saving”of OTDR
After entering interface of OTDR, click the button icon “saving”. Saving dialog box will
eject, and the data information of the current trace will be saved. The saving format can be set
in the “file setting” under the “set” menu. The instrument provides Bellcore data format
(*.sor).
When saving the trace from multi wavelength measurement, if the status in “file setting” is
auto saving, the multi wavelength measurement will automatically save the trace files according
to the setting rules of “auto naming”, and the quantity of files saved is the same as the quantity
of wavelength measured simultaneously. If the “file setting” is saving, after finishing multi
wavelength measurement, click the menu icon “saving” to save the trace files. When saving,
it will circularly prompt whether save the corresponding trace information. The prompting times
are the same as the quantity of the wave length that measured.
If the “auto naming” in the “file setting” is ON, the saved trace file will be automatically
named according to setting in the “auto naming category”. The suffixal serial number will be
automatically increased according to saving times. The file name is composed of characters
and figures. The default saving medium of the instrument is SD card. The manually saving route
will be the former saving route.
In the key mode of operation, through the "SHIFT" button to achieve circular switching
function for each window, through the "<, >" button to achieve the path choice of the folded or

28
unfolded subfolders function, through the "∨, ∧, enter" button on the folder options and
confirming function.
Fig.7-15 Interface Diagram of Menu“Saving”

29
7.5 Instruction of Menu Button“Open”of OTDR
After entering interface of OTDR, click the button icon “open”. Page dialog box “open”
will eject.
In the key mode of operation, through the "SHIFT" button to achieve circular switching
function for each window, through the "<, >" button to achieve the path choice of the folded or
unfolded subfolders function, through the "∨, ∧, enter" button on the folder options and
confirming function.
Fig.7-16 Interface Diagram of Menu“Open”
30
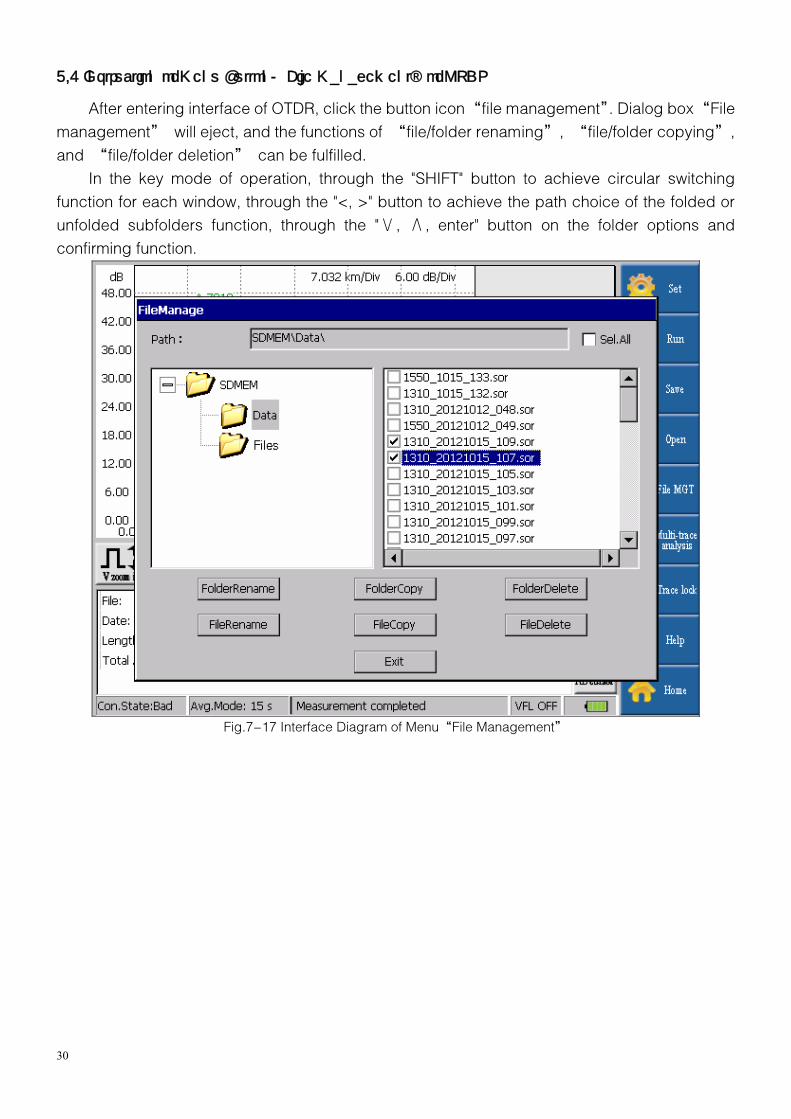
7.6 Instruction of Menu Button“File Management”of OTDR
After entering interface of OTDR, click the button icon “file management”. Dialog box “File
management” will eject, and the functions of “file/folder renaming”, “file/folder copying”,
and “file/folder deletion” can be fulfilled.
In the key mode of operation, through the "SHIFT" button to achieve circular switching
function for each window, through the "<, >" button to achieve the path choice of the folded or
unfolded subfolders function, through the "∨, ∧, enter" button on the folder options and
confirming function.
Fig.7-17 Interface Diagram of Menu“File Management”

31
7.7 Instruction of Menu Button“Multi- traces Analysis”of OTDR
After entering interface of OTDR, click the button icon “multi-traces analysis” to enter icon
dialog box of lower menu of “multi-traces analysis” to realize difference contrast function of
multi traces, i.e. 4 traces (non current measured and displayed trace) at most can be
simultaneously displayed in the same trace window.
Fig. 7-18 Interface Diagram of Menu“Multi-traces Analysis”
7.7.1 Instruction of Button“Multi-traces Setting”
Click the button icon“multi-traces setting” in the multi-waveform analysis, dialog box
“multi-traces setting” will eject. By clicking the icon “browse” to realize the function
displaying several traces (4 traces can be displayed at most) in the trace graph area;
furthermore, these traces can choose the files under any folder. The opened traces are
distinguished through different colors. Color setting interface for users aren’t provided. For the
opened traces, the one with smallest serial number is the current trace. The current trace is blue,
while the other traces are grey.

32
Fig.7-19 Interface Diagram of Menu“Multi-traces Setting”
7.7.2 Instruction of Button“Trace 1/2/3/4”
Button icons in the trace operation area are valid to all opened traces simultaneously.
Current trace can be switched through the trace switching button or through clicking “trace 1”
(or “trace 2”, “trace 3”, “trace 4”) directly. The data in the info window is that of the current
trace.
7.7.3 Instruction of Button“Remove”
The current trace can be removed. The trace can be removed from the displayed window
through trace remove operation. The remove operation is only valid for the current trace. After
remove the current trace, the next smallest SN trace will be adjusted to be the current trace
automatically.
7.7.4 Instruction of Button“Esc”
The button“Esc”provides operation back to OTDR home page. Once clicking the button,
any operation under multi-traces analysis will be cancelled and the setting won’t be saved.
7.7.5 Instruction of Button“Help”
The button“help”provides operation instruction under multi-waveform analysis.
7.7.6 Instruction of Button“Home Page”
When clicking the button“home page”, it will directly back to the home page interface of
the instrument.
33
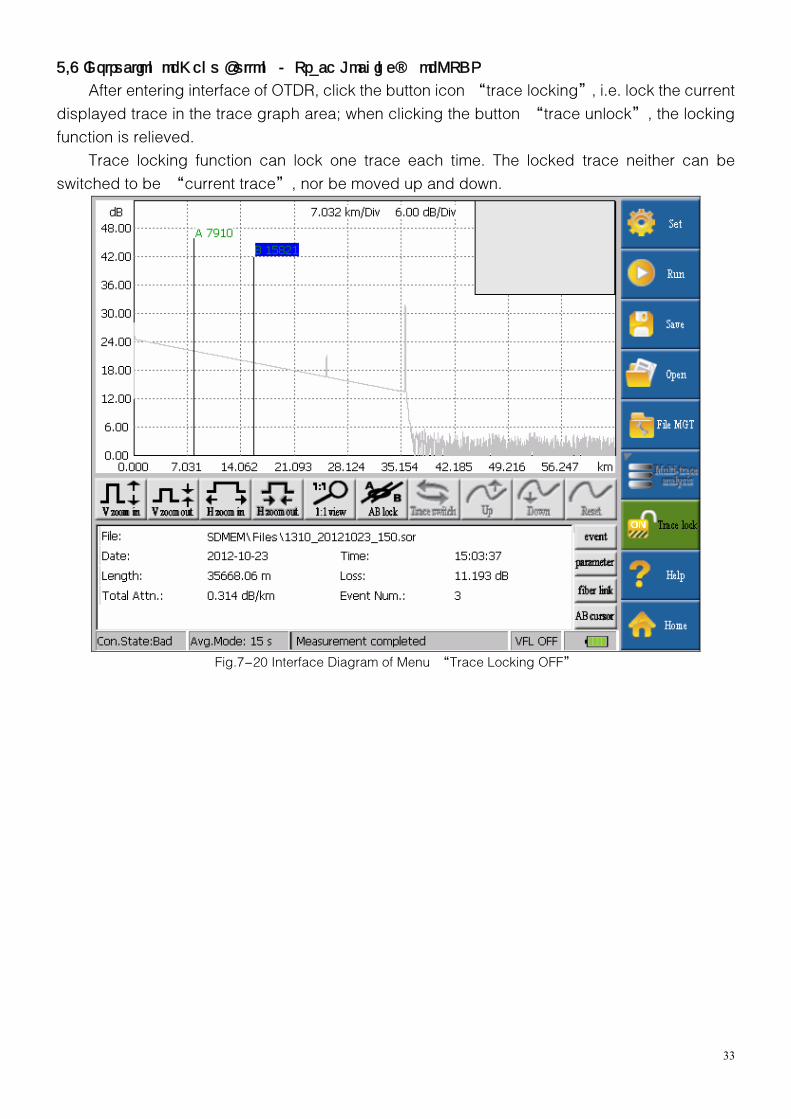
7.8 Instruction of Menu Button “Trace Locking” of OTDR
After entering interface of OTDR, click the button icon “trace locking”, i.e. lock the current
displayed trace in the trace graph area; when clicking the button “trace unlock”, the locking
function is relieved.
Trace locking function can lock one trace each time. The locked trace neither can be
switched to be “current trace”, nor be moved up and down.
Fig.7-20 Interface Diagram of Menu “Trace Locking OFF”

34
Fig.7-21 Interface Diagram of Menu “Trace Locking ON”
7.9 Instruction of Menu Button“Help”of OTDR
After clicking the button “help”, the table of contents will eject. Contents looked over can
be selected according the table of contents.
7.10 Instruction of Menu Button“Home Page”of OTDR
Click the button “home page” to go back to the home page interface of the instrument.

35
8 Instruction of PC Terminal Software of OTDR The name of PC terminal software corresponding to OTDR is OTDR Traces Manager. The
software is dedicated software for OTDR that developed by us. The trace files generated from
measurement of OTDR can be opened through the software. It can provide user with convenient
data management function. These functions include: maintenance, browse, saving, copying
and printing of the tested data.
8.1 Installation of PC Terminal Software of OTDR
8.1.1 Requirements to the Installation Environment
The system configuration of the required installation environment of OTDR Traces Manager
is as follows:
Pentium 3 or Pentium 4 or private computer with similar configuration;
Microsoft Windows98/2000/XP/7 operation system;
Available space of hardware is larger than 40M;
CD-ROM larger than 8 speed.
8.1.2 Software Installation Steps
The installation steps are as follows:
Start up Windows operation system;
Escape other running application program;
Plug the attached disk into the CD driver; select and enter the folder of curve
processing software - “OTDR Traces Manager”;
Dblclick the OTDR Traces Manager.EXE to enter the installation program;
Install according to the prompt of installation guide unit completed.
8.1.3 Screen Resolution Ration Setting
For 4:3 screens, we recommend setting it to be 1024*768; for 16:9 screens, we recommend
setting it to be 1360*768.

36
8.2 Instruction of Interface of PC Terminal Software of OTDR
Main interface of PC terminal software of OTDR is composed of the following several parts:
menu bar window, toolbar window, waveform window (including trace graph, multi-waveform
displaying file list, measurement parameter, measurement result), event list window, the whole
waveform window, as well as the status bar at the bottom of the window.
Fig.8-1 Main Interface Diagram of PC Terminal Software of OTDR

37
8.3 Instruction of Menu Bar Window of PC Terminal Software of OTDR
Menu bar window of PC terminal software of OTDR Traces Manager includes 5 menu
options: file, editing, view, help, and language.
Fig.8-2. Interface Diagram of Menu Bar Window of PC Terminal Software of OTDR
8.3.1 Instruction of Menu“File”
The menu“File”is shown as Fig.8-3. Functions can be realized in the menu“file”include:
open/close trace file, save/save as the current curve, save all curves, print the option, print, print
preview, batch modifying, batch print/ multi traces print on single page/ display and print multi
traces, escape the application software.
Fig.8-3 Interface Diagram of Menu“File”
1) “Open/close/close all files”
“Open dialog box”will eject after selecting the function“Open”, as shown in Fig.8-4.
Users can choose at most 8 trace files in a same folder through“Ctrl + mouse”; the selected file
will be in the“list of multi-waveform displayed file”. The opened trace file can be closed by
selecting“close file”or“close all files”in the menu“file”.

38
Fig.8-4. Interface Diagram of Dialog Box“Open”
2) “Save the current curve, save all curves, save the current curve as”:
When selecting “save the current modified curve”, “save all modified curve”; and “save
the current curve as another file”, the dialog box shown in Fig.8-5 will eject.
Fig.8-5 Interface Diagram of Dialog Box“Saving”

39
3) “Print option/print/print preview”:
“Print option, print, and print preview”are corresponding to print mode“single trace in
single page”. Setting items in “print option” include: “trace information, trace graph (including
mesh, sign post, bundling threshold line, event point marks, thumbnail), parameter information,
optical fiber link, and event list”. Its default value option is “trace information”, “sign post”
in “trace graph”, “parameter information”, and “event list”. The format of dialog box is as
shown in Fig.8-6.
Fig.8-6 Interface Diagram of Dialog Box“Print Option”

40
4) “Batch Modifying”
“Batch modifying” only allows batch modifying of information in trace file under the same
file folder, as shown in Fig.8-7.
Fig.8-7 Interface Diagram of Dialog Box“Batch Modifying”

41
5) “Batch print/ multi traces print on single page/ display and print multi traces”:
“Batch print/ multi traces print on single page/ display and print multi traces” only allows
print mode of trace file under the same folder.
(a) “Batch print”
The print mode only allows print format of single trace in single page of trace file under the
same folder, and the print format of the selected trace file are the same.
Fig.8-8 Interface Diagram of Dialog Box“Batch Print”

42
(b) “Multi traces print on single page”
The print mode only allows multi traces print on single page of trace file under the same
folder. When conducting “ Multi traces print on single page ” , print page setting “ 2
waveform/page, 4 waveform/page, 6 waveform/page, or 8 waveform/page” needs to be
selected firstly. Each page setting corresponds to different formats. In addition, under the print
mode, the first selected trace file (i.e. the uppermost one) is defined as the master file. The trace
information on each page of the printed file should conform to that of the master file.
Fig.8-9 Interface Diagram of Dialog Box“Multi Traces Print on Single Page”

43
(c) “Display and print multi traces”
The print mode only allows print of trace files less than 3 under the same folder. Select files
according to the order 1, 2 and 3. When printing, trace files will display the corresponding figure
and wave length information. In addition, under the print mode, the first selected trace file (i.e.
the uppermost one) is defined as the master file. The trace information on each page of the
printed file should conform to that of the master file.
Fig.8-10 Interface Diagram of Dialog Box“Display and Print Multi Traces”

44
8.3.2 Instruction of Menu “Editing”
The menu“editing”is as shown in Fig.8-11. Functions can be realized in the menu
“editing”include: trace information editing, event increasing, event modifying, and event
deleting. Through “trace information editing”, one can realize trace information modifying of the
trace file; through “event increasing, event modifying, and event deleting”, one can realize
modifying of event list information.
Fig.8-11 Interface Diagram of Menu“Editing”

45
8.3.3 Instruction of Menu“View”
The menu“view”is as shown in Fig.8-12. Functions can be realized in the menu“view”
include: displaying/concealing of toolbar window, displaying/concealing of status bar window,
window rearranging, displaying/concealing of relevant tool buttons for trace operation
(including transversal/longitudinal amplifying/reducing, whole trace displaying),
displaying/concealing of relevant tool buttons for AB scale plate (AB line locking/switching),
displaying/concealing of relevant tool buttons for multi trace operation (including traces
switching, longitudinal upwards/downwards, longitudinal resetting), displaying/concealing of
optical fiber section information in the event list, distance unit setting, and style setting of
background of the trace graph area.
Fig.8-12 Interface Diagram of Menu“View”

46
8.3.4 Instruction of Menu“Help”
The menu“help”is as shown in Fig.8-13. Functions can be realized in the menu “help”
include: user guidance (i.e. product instruction), edition information.
Fig.8-13 Interface Diagram of Menu“Help”
8.4 Instruction of PC Terminal Software Toolbar Window of OTDR
Fig.8-14 Interface Diagram of“Toolbar”Window
The toolbar window is under the menu bar window. The purpose of toolbar window is to
make the main functions under the menu “file” realize fast operation; when moving the mouse
onto the icons on the toolbar window, they will display the functional characters of the icons;
displaying/concealing of toolbar window can be switched through clicking “toolbar” option in
the menu “view”.

47
8.5 Instruction of PC Terminal Software Traces Window of OTDR
Waveform window is divided into 4 displaying areas: trace graph, list of multi-waveform
displaying file, measurement parameter, and measurement result, as shown in Fig.8-15.
Fig.8-15 Interface Diagram of Traces Window
8.5.1 Displaying Area of“Trace graph”
Select “open” function to realize displaying of trace file in the trace graph area, as shown
in Fig.8-16. The lateral axis represents the distance (unit: m), while the vertical axis represents
the back scattering power (Unit: dB). The 11 icon buttons in the right of trace graph area
represent the operation icon buttons of trace. When move the mouse onto these icons, they will
display the functional characters of the icons. Meanwhile, these 11 icon buttons conform to that
of the instrument terminal. Moving from left to right of AB lines scale plate in the trace graph can
be realized by sliding the mouse.
Fig.8-16 Schematic Diagram of the Displaying Area of“Trace Graph”

48
8.5.2 Displaying Area of“List of Multi-traces Displaying File”
After selecting“open”function, the opened trace file is displayed in the “list of multi- traces
displaying file”. 8 trace files can be displayed at most. Through the button“multi- traces
displaying”, these 8 trace files can be singly or wholly displayed in the trace graph area. In
addition, these 8 trace files are displayed by different colors in the trace graph area. In the area,
through the right key of mouse, functions of trace information opening, closing and editing of a
single file can be realized. “List of multi- traces displaying file”is as shown in Fig.8-17.
Fig.8-17 Schematic Diagram of the Displaying Area of“List of Multi-trace Displaying File”
8.5.3 Displaying Area of“Measurement Parameter”
Displaying area of“measurement parameter”is as shown in Fig. 8-18.
Fig.8-18 Schematic Diagram of the Displaying Area of“Measurement Parameter”
8.5.4 Displaying Area of“Measurement Result”
Displaying area of“measurement result” is as shown in Fig. 8-19.
Fig.8-19 Schematic Diagram of the Displaying Area of“Measurement Result”

49
8.6 Instruction of Event List Window of PC Terminal Software of OTDR
The data information displayed in the window “event list” conforms to that of the
instrument terminal. Instructions of each column in the event list are as follows:
Serial Number: indicating the sequence that the event point appears on the optical fiber
link;
Event category: including beginning, ending, reflection event, and non-reflection event;
Position: indicating the distance from the connector of OTDR instrument and the optical
fiber tested to the event point;
Plug-in loss: indicating dB quantity of an event longitudinally dropped;
Attenuation coefficient: indicating the attenuation dB value of each kilometer of optical fiber
between the event and the former event on the optical fiber link;
Back scattering coefficient: indicating the reflection quantity of the reflection event;
Accumulate loss: indicating the attenuation dB value of the optical fiber from the connector
of OTDR instrument and the optical fiber tested to the event;
Note: note the modified event. The option won’t provide print display.
Fig.8-20 Interface Diagram of“Event List” Window
8.7 Instruction of the Whole Waveform Window of PC Terminal Software of OTDR
The“whole waveform” window displays the thumbnail of the measured trace, as shown in
Fig.8-21.
Fig.8-21 Interface Diagram of the“Whole Waveform”Window
8.8 Instruction of the Status Bar Window of PC Terminal Software of OTDR
“Status bar” window is at the bottom of the main interface of PC terminal software, and
displays the currently selected menu or operation prompts of the toolbar, as shown in Fig.8-22.
The status bar is the outline of the current menu operation or the functions of toolbar. Through
the information in the status bar, users can simply comprehend the current operation.
Fig.8-22 Interface Diagram of“Status Bar”Window

50
9 OTDR Products Maintenance and Service 9.1 Operation Note of OTDR Product
Always clean the connector of the optical interface before using.
Avoid the equipment being contaminated by dust.
Please clean the shell and the front panel with slightly wet cotton cloth.
Store the equipment in clean and dry places under room temperature and keep it away from
sunlight.
When using, control the humidity at a lower level and avoid significant temperature
changes.
Avoid unnecessary knocking and vibration.
If any fluid sprays onto the surface or penetrates into the equipment, please turn off the
power until the equipment dries completely.
Warning:
If the operation and maintenance process of control, adjustment and
implementation doesn’t comply with the following nominated operation regulations,
it may lead to dangerous radiation.
9.2 Cleaning the Connector of Optical Interface
Cleaning the connector of the optical interface periodically is helpful for keeping the best
measurement performance of the instrument. The optical fiber interface of the instrument must
keep cleaning. The optical interface needs to be wiped periodically with dedicated alcohol.
After using, cover the dust cap, meanwhile; keep the cleanness of the dust cap. In addition,
clean the connector of flange periodically. There is no need to dismantle the equipment when
cleaning.
Please comply with the following safety rules when cleaning:
a) When cleaning the equipment, make sure turning off the instrument. If inspect
the surface of the connector when the equipment is working, the eyes will be
injured forever.
b) When cleaning any optical interface, laser source is prohibited.
c) Avoid lightning stroke. Before cleaning, disconnect the power of the instrument.
Use dry or slightly wet soft cloth to clean the external of the equipment case. Do
no clean the inside of the equipment case.
d) Do not install components onto the optical equipment or randomly adjust the
optical equipment.
e) Please ask qualified and professional maintenance personnel that approved by
our company to repair the equipment.
Cleaning operation steps:
1) Take down the connector of the optical interface from the instrument. The base and pin
of the connector will be revealed.
2) Wet a 2.5 mm cleaning rod with a drop of isopropyl alcohol (if use to much alcohol,
vestige may be left).
3) Gently plug the cleaning rod into the optical interface adapter until it stretches out from

51
the other end (rotating clockwise is good for cleaning).
4) Gently rotate the cleaning rod for a circle, and keep rotating it when drawing it out.
5) Use a dry cleaning rod to do the action in step 3 and 4. Note: do not touch the soft end of
the cleaning rod.
6) Clean the pin in the port of connector according to the following steps:
Drip a drop of isopropyl alcohol onto the nonlinting cloth, Gently wipe
the connector and the pin.
Key prompt:
If use too much isopropyl alcohol or let it evaporate randomly (about 10 min),
residual may be left. Avoid the bottleneck touching the cloth to make the surface
dry rapidly.
Gently wipe the same surface with a dry nonlinting cloth to ensure the
connector and the pin completely drying.
User can use a portable optical fiber microscope or detector to inspect
the surface of the optical connector.
7) Install the connector of optical interface back to the instrument (push and rotate it
clockwise).
8) Discard the cleaning rod and cloth after using once.
9.3 Maintenance and Changing of Battery
OTDR series optical time-domain reflectometer adopts inlaid rechargeable lithium battery.
Maintaining battery should pay attention to the follows:
● You’d better store the instrument (including battery) under room temperature
(15℃ to 30℃), and place it at dry place to keep its best performance.
● If the instrument is left unused for a long term (leave unused for more than 1
month), you’d better charge the battery once a month.
● Do not charge the battery too long (exceeding 8 hours), otherwise the battery
may be damaged;
● Battery changing operation steps are as follows:
a) Take down the cover of battery storage;
b) Firstly, move the rechargeable battery away, then, draw out the battery
connector from the plug hole of the rechargeable battery.
9.4 Calibration of OTDR Products
We calibrates the product according to ISO/IEC 17025 standard. The standard regulates
that the calibration file can exclude the recommended calibration interval, unless otherwise
achieved agreement with customer.
The effectiveness of regulations depends on the operation conditions. For example, the
effectiveness of calibration can be prolonged or shortened according to the using intensity,
environmental conditions and equipment maintenance. Please confirm the proper equipment
calibration interval according to the demands of accuracy.
Under the condition of normal using, We recommends recalibrating the equipment every
three years. Equipment calibration work needs to be conducted in manufacturer’s factory.

52
9.5 Service and Guarantee
9.5.1 General Information
We promises to maintain the defects of OTDR caused by material or technology within one
year since the original delivery date. We meanwhile promises that the equipment complies with
the applicable regulations under normal using status.
Within the guarantee period, We has right to maintain or change any products with
problems, this regulation also suitable for checking or adjusting the products waiting for
maintenance, or re-checking or re-adjusting the products wrongly calibrated before. Beyond
the guarantee period, if the equipment needs to repair in the manufacturer’s place, We will
charge a certain maintenance fee.
This guarantee declaration will replace the former clearly stated, implicated, and legal
guarantee declarations, including, but not limited to implicated guarantee declaration about
goods marketability and adaptability regarding special usage. Under any conditions, We
won’t undertake the responsibilities for damages caused by special troubles or accidents.
Key prompt:
Any the following situation happens, guarantee is invalid:
Equipment damage caused from maintenance or treatment by unauthorized
personnel or non our technicians.
Anti dismounting labels are torn up.
Serial number of the equipment is modified, erased or worn.
Equipment damage caused by improper using, negligence or accident.
9.5.2 Responsibilities
We won’t be responsible for using damage, or performance failure of the other equipment
connected to the product, or operation failure of any related system of the product.
We won’t be responsible for the damage caused by improper using, or damage caused by
modifying the equipment, attachment or software without authorization.
9.5.3 Disclaimer
We has right to change the design or structure of any product, and has no duty to change
the sold product according to requirement of any user. Various attachments, including but not
limited to fuse, indicator, battery and general joint used by our products aren’t included in the
guarantee scope.
If any of the following conditions occurs, the guarantee will become invalid: improper using
or installation, normal wearing or fracture, accident, violations, negligence, firing, water logging,
lightening or other nature accident, reasons beyond the product or other reasons beyond our
control.
Key prompt:
We will charge fees for changing damaged optical connectors caused by
improper use or harmful cleaning.

53
9.5.4 Maintenance
If you need to maintain our products, please call our service hotline: 4008-240-648, our
personnel will help you determine if your equipment needs technology service, maintenance or
calibration.
If your product needs maintenance, please attach the failure phenomenon report and
repairing address along with the product when mailing back to the manufacturer. Please use
original packaging material to pack the equipment when mailing.
If possible, please back up your data before sending the equipment.
After repairing, we will send out the equipment attached with a maintenance report. If the
equipment is beyond the guarantee scope, user should pay the expense stated on the
maintenance report. If the equipment is within the guarantee scope, we will pay the back freight.
To accelerate problem treatment process, please clearly list the product name, serial
number (refer to ex-factory label on the back cover of battery storage of OTDR product), and
statement of problems.
9.6 Transportation
When transporting the equipment, the temperature must be maintained in a regulated
scope. Equipment may be damaged during the transportation process because of improper
operation.
We suggest complying with the following procedures, so as to reduce the damaging possibility:
When transporting, pack the equipment with original packaging material.
Avoid over high humidity or over large temperature changing.
Avoid direct sunlight.
Avoid knocking and vibration.

54
10 Common Failure Diagnosis of OTDR product
Common problems Problem 1: Blank screen or cannot start up.
Possible reason: Electricity is used up.
Solving method: Charge the battery. Use AD-DC adapter to connect the equipment with
external power supply.
Problem 2: Button can’t work properly.
Possible reason: The button is damaged.
Solving method: change the button board
Problem 3: data saving aren’t allowed.
Possible reason: SD card is used up.
Solving method: Export the curve to empty the memory.
Optical fiber connection problem Improper optical fiber connection may lead to trace measurement failure, instructions are as
follows:
Problem 4: if the measured trace is as shown in Fig. 10-1:
Fig.10-1
Possible reasons:
①Using improper optical fiber jumper
joint
② The connector isn’t clean
③ The connector is ageing
Solving method:
① change the optical fiber
jumper
② Clean the connector
③ Change the connector

55
Problem 5: if the measured trace is as shown in Fig. 10-2:
Fig. 10-2
Possible reasons:
① Improper connection
②Inclined connector para-position
③ Misaligned dowel pin
Solving method:
① Reconnect
② Change the connector
Testing setting problem Problem 6: The trace curve is too short, and the measurement time is too long.
Possible reason: The set testing distance is too long.
Solving method: Set proper length scope according to the actual length of optical fiber or the
length that found by the automatic measurement model.
Problem 7: Only partial trace is displayed, which causes test failed.
Possible reason: The set testing distance is too short.
Solving method: The testing distance should be set larger than or equals to the actual length of
optical fiber
Problem 8: partial events are measured
Possible reason: Too big pulse width
Solving method: 1. Choose a smaller range of pulse width.
2. Increase testing time.
Problem 9: The trace is too noisy.
Possible reason: The pulse width is too small, and the scanning time isn’t enough.
Solving method: 1. Increase the testing time.
2. Increase the pulse width properly.

56
Appendix Technical Parameters of OTDR
Technical Specifications1
Wavelength (nm) 850/1300 1310/1550 1310/1490/1550 1625
Dynamic range (dB)2 21/23 32/30 38/36 32/30/30 344 365
Pulse width (ns) 20、40、80、160、
320、640、1280 5、10、20、40、80、160、320、640、1280、2560、5120、10240、20480
Event blind zone (m)3 15m 2m
Attenuation blind zone (m)3 25m 14m
Displaying screen 5.6’ touch screen 640*480
Linearity (dB/dB) ±0.05 dB/ dB
Loss threshold (dB) 0.05
Loss resolution ratio (dB) 0.01
Sampling resolution ratio
(m) 0.125 to 8
Sampling point 32K
Distance uncertainty (m) ±(1 m + 5×10⁻⁵× distance + sampling interval)
Distance scope (km) 0.3 to180
Typical real-time
refreshing duration (s) 0.2
Memory capacity of trace SD Card (4G), > 10000 pieces
Duration of measurement 5sec, 10sec, 15sec, 30sec, 1min, 2min, and 3min are selectable
General specification Interface category
Dimension (H×W×D) 150×235×66 Optical interface FC/UPC (PC, and APC
are selectable)
Weight 1.5kg Data interface USB interface, SD card
interface
Running temperature -10℃ to 50℃ Temperature
Memory temperature -40℃ to 70℃ Visible failure orientation VFL
Relative humidity 0% to 95% (non condensation) Wavelength 650nm
Power supply Lithium battery; continuing working
duration ≥ 8 hours Output power (dBm) ≥-3
Warranty period 12 months Maximum testing distance 3km
Remarks: 1. The technical specification describes the ensured performance of the instrument when using typical PC model
connector to measure. Without considering the uncertainty caused by optical fiber refractivity.
2. Dynamic range is the data measured under the condition of the maximum pulse width and 3 minutes of
average time. Dynamic range is the data measured under the condition of 100km/20480ns/3min.
3. Measuring conditions of blind zone: reflection event is within 10Km, reflection strength < -45dB. Measured by
the minimum pulse width.
4. Dynamic range measured when there is filter.
5. Dynamic range measured when there is no filter.

57
Contact Information:
Nanjing Orientek Optical Communication Limited
Add: RedSun Building, North Bridge,Road, Nanjing, China
Call us: +86 25 8687 0598
Fax us: +86 25 8687 0599
e-mail: [email protected] [email protected]
Website: www.OrientekFiber.com www.njorientek.com


