
Quasi-Resonant Controllers with Integrated Power MOSFET
STR-X6700 Series Application Note
STR-X6700-ANE Rev.2.0 SANKEN ELECTRIC CO., LTD. 1 Dec. 13, 2016 http://www.sanken-ele.co.jp/en/ © SANKEN ELECTRIC CO., LTD. 2010
Description
The STR-X6700 series are power ICs for switching
power supplies, incorporating a power MOSFET and a
quasi-resonant controller IC.
Including an auto standby function in the controller,
the product achieves the low standby power by the
automatic switching between the quasi-resonant
operation in normal operation, the bottom-skip operation
under medium to light load conditions and the burst-
oscillation under light load conditions.
The products are supplied in a seven-pin fully-molded
TO3P style package, and achieve high cost-performance
power supply systems with few external components.
Features
● Current Mode Quasi-Resonant Control
● Multi-mode Control
The optimum operation depending on load conditions
is changed automatically and is achieved high
efficiency operation across the full range of loads.
Operation Mode
Normal load -------------------------------- Quasi-resonant
Medium to light load -------------------- One bottom-skip
Light load -----------------------------------------------------
Iintermittent operation by UVLO or burst oscillation
● Built in PWM Oscillator (To reduce the products
stress in startup and short cuecuit mode, the IC
opetares in PWM (about 22 kHz) until the quasi-
resonant operation is established)
● Soft-start Function
● Step-drive Function
● Limmiting the Maximum On-time
● Adjustable OCP Operation Point for Input Voltage
● Protections
Overcurrent Protection (OCP): Pulse-by-Pulse
Overload Protection (OLP): Latched Shutdown
Overvoltage Protection (OVP): Latched Shutdown
Typical Application
Packages
TO3P-7L
Not to scale
Selection Guide
Part Number Medium to Light
load Operation Light Load Operation
STR-X67xxB — Iintermittent
operation by UVLO
STR-X67xx One bottom-skip Auto burst
STR-X6729
STR-X67xxN
STR-X67xxM One bottom-skip
Iintermittent
operation by UVLO
STR-X67xxF — Auto burst
● Specifications
Part Number VDSS
(min.)
RDS(ON)
(max.)
POUT (Open frame)(1)
230VAC 85 to
265VAC
STR-X6729 450 V 0.189 Ω 280 W(2) 360 W(3)
STR-X6737 STR-X6737M
500 V 0.36 Ω 220 W(2) 290 W(3)
STR-X6759N STR-X6759B STR-X6759F
650 V
0.385 Ω 210 W(2) 280 W(3)
STR-X6757 STR-X6757N
0.62 Ω 320 W 210 W
STR-X6750B STR-X6750F
0.62 Ω 320 W 210 W
STR-X6756 0.73 Ω 300 W 180 W
STR-X6769 STR-X6769B 800 V
0.66 Ω 310 W 200 W
STR-X6768N 1.0 Ω 200 W 130 W (1) The output power is actual continues power that is measured at 50 °C ambient. The peak output power can be 120 to 140 % of the
value stated here. Core size, ON Duty, and thermal design affect the
output power. It may be less than the value stated here.(2) 100VAC(3) 210VAC
Applications
● White Goods
● Office Automation Equipment
● Industrial Equipment
余白上 35mm
5
+B
GND
S1
S2
LowB
GND
ErrAmp
StandbyON/OFF
Reg Standby VOUT
Reg: リニアレギュレーターなど
P
D
ROCP
R4
C4
D
S
VCC
OCP/BD
FBSS/OLPGND
1 4
6
732
R3
D2
D3
R6
C6
PC1 D1 R2
C2
R1
C1
VAC
CV
D4
C3
C5
R5
5
+B
GND
S1
S2
LowB
GND
ErrAmp
StandbyON/OFF
Reg Standby VOUT
Reg: リニアレギュレーターなど
P
D
ROCP
R4
C4
D
S
VCC
OCP/BD
FBSS/OLPGND
1 4
6
732
R3
D2
D3
R6
C6
PC1 D1 R2
C2
R1
C1
VAC
CV
D4
C3
C5
R5
Z1
Not Reco
mmended
for N
ew D
esign
s
STR-X6700 Series
STR-X6700-ANE Rev.2.0 SANKEN ELECTRIC CO., LTD. 2 Dec. 13, 2016 http://www.sanken-ele.co.jp/en/ © SANKEN ELECTRIC CO., LTD. 2010
Contents
Description ------------------------------------------------------------------------------------------------------ 1
Contents --------------------------------------------------------------------------------------------------------- 2
1. Operational Description --------------------------------------------------------------------------------- 3 1.1. Startup Operation ----------------------------------------------------------------------------------- 3 1.2. Constant Output Voltage Control ---------------------------------------------------------------- 4 1.3. Soft Start Function ---------------------------------------------------------------------------------- 5 1.4. Quasi-Resonant Operation ------------------------------------------------------------------------ 5 1.5. Bottom Skip Quasi-resonant Operation -------------------------------------------------------- 7 1.6. Standby Modes --------------------------------------------------------------------------------------- 9
1.6.1. UVLO Intermittent Oscillation Operation ----------------------------------------------- 9 1.6.2. Automatic Burst Oscillation Operation ------------------------------------------------- 11
1.7. Step-drive Function ------------------------------------------------------------------------------- 11 1.8. Maximum On-Time Limitation Function ---------------------------------------------------- 11 1.9. Latch Circuit --------------------------------------------------------------------------------------- 11 1.10. Overvoltage Protection (OVP) ------------------------------------------------------------------ 12 1.11. Overload Protection (OLP) ---------------------------------------------------------------------- 12 1.12. Overcurrnt Protection (OCP) ------------------------------------------------------------------- 14
2. Design Notes ---------------------------------------------------------------------------------------------- 15 2.1. External Components ---------------------------------------------------------------------------- 15 2.2. Transformer Design ------------------------------------------------------------------------------ 16 2.3. PCB Trace Layout and Component Placement --------------------------------------------- 18
Important Notes ---------------------------------------------------------------------------------------------- 19
Not Reco
mmended
for N
ew D
esign
s

STR-X6700 Series
STR-X6700-ANE Rev.2.0 SANKEN ELECTRIC CO., LTD. 3 Dec. 13, 2016 http://www.sanken-ele.co.jp/en/ © SANKEN ELECTRIC CO., LTD. 2010
1. Operational Description
Unless otherwise specified, the electrical
characteristics values of STR-X6756 are used in this
section.
1.1. Startup Operation
Figure 1-1 shows the VCC pin peripheral circuit.
The startup circuit detects the VCC pin voltage, and
makes the control IC start and stop operation. At startup,
C2 is charged through a startup resistor R1. When the
VCC pin voltage reaches to VCC(ON) = 18.2 V (typ.), the
IC starts operation.
The R1 value needs to be set for more than the hold
current of the latch circuit (ICC(H) = 140 μA max.) in the
minimum AC input condition.
If the value of R1is too high, thestartup time (C2
charge time) becomes long. Thus, R1 should be set to
consider with C2 value.
In general SMPS specification, the value of C2 and
R2 are set as follows:
C2 is 4.7 μF to 47 μF,
R2 is 47 kΩ to 150 kΩ for 100VAC or universal AC
input, and 82 kΩ to 330 kΩ for 230VAC input.
R2
D
PC1
Vcc
1
D
4
3
D1
R1
C2
STR-X6700
GND
Figure 1-1. VCC Pin Peripheral Circuit
Figure 1-2 shows the relationship between the VCC
pin current and the VCC pin voltage.
When the VCC pin voltage reaches to VCC(ON) = 18.2
V (typ.), the IC starts operation and the circuit current is
increases. When the VCC pin voltage decreases to
VCC(OFF) = 9.7 V (typ.), the UVLO circuit operates to
stop the control circuit, and the IC returns to its initial
state.
After the control circuit starts its operation, the
rectifying and smoothing voltage of the auxiliary
winding, D, is supplied to the VCC pin.
In the specification of input and output voltage
variation of power supply, the number of turns of the
auxiliary winding should be set so that the VCC pin
voltage becomes within following range.
The voltage of the auxiliary winding is recommended
about 18 V.
Circuit current, ICC
VCC(OFF) VCC(ON)VCC pin voltage
StartStop
Figure 1-2. VCC Pin Current versus Voltage
IC starts operation VCC Pin
Voltage
VCC(ON)
VCC(OFF)
Startup failure
Time
Increase with rising of
output voltage
Startup success
Target operating
voltage
Figure 1-3. VCC Pin Voltage instartup
Figure 1-3 shows the startup voltage waveform of the
VCC pin.
The auxiliary winding voltage does not immediately
increase up to the set voltage after the control circuit
starts its operation. That is why the VCC pin voltage
starts dropping. The Operation-Stop voltage, VCC(OFF), is
set as low as 10.6 V (max.), the auxiliary winding
voltage reaches a stabilized voltage before it drops to
VCC(OFF), and the control circuit continues its operation.
If the VCC pin voltage decrease to VCC(OFF), the
startup failure is cased as shown in Figure 1-3. In the
case, increase the value of C2 and check the startup time
in actual operation.
In actual power supply circuits, there are cases in
which the VCC pin voltage fluctuates in proportion to
the output current, IOUT (see Figure 1-4), and the
Overvoltage Protection function (OVP) on the VCC pin
Not Reco
mmended
for N
ew D
esign
s
STR-X6700 Series
STR-X6700-ANE Rev.2.0 SANKEN ELECTRIC CO., LTD. 4 Dec. 13, 2016 http://www.sanken-ele.co.jp/en/ © SANKEN ELECTRIC CO., LTD. 2010
may be activated. This happens because C2 is charged to
a peak voltage on the auxiliary winding D, which is
caused by the transient surge voltage coupled from the
primary winding when the power MOSFET turns off.
For alleviating C2 peak charging, it is effective to add
some value R2, of several tenths of ohms to several
ohms, in series with D1 (see Figure 1-5).
The optimal value of R2 should be determined using a
transformer matching what will be used in the actual
application, because the variation of the auxiliary
winding voltage is affected by the transformer structural
design.
Furthermore, the variation ratio of the VCC pin
voltage becomes worse due to a loose coupling between
primary and secondary windings of the transformer (the
coupling between the auxiliary winding and the
stabilized output winding for the constant voltage
control). Therefore, when designing a transformer, the
winding position of the auxiliary winding needs to be
studied carefully.
Without R2
With R2
VCC Pin Voltage
Output Current, IOUT
Figure 1-4. Variation of VCC pin Voltage and Output
Current
R2
D
D1
C2
Vcc
4
3
GND
Figure 1-5. VCC Peripheral Circuit
1.2. Constant Output Voltage Control
Figure 1-6 shows the constant output voltage control
circuit, Figure 1-7 shows the waveforms of constant
output voltage control mode at no quasi-resonant control
signal.
The IC achieves the constant voltage control of the
power supply output by using the current-mode control
method, which enhances the response speed and
provides the stable operation.
Figure 1-6. Constant Output Voltage Control Circuit
Figure 1-7. Constant-voltage control at fixed
oscillation frequency (quasiresonant signal not
available)
As shown in Figure 1-6, the peak value of the power
MOSFET drain current is changed by comparing the FB
pin voltage with the internal VOCPM.
A control signal from an error amplifier (FB current)
is fed into the FB pin through the optocoupler, PC1.
The input FB current is transformed into feedback
voltage, VFB, by the internal resistor (SW1 is turned on
during normal status).
Drein current, ID, is detected as negative signal by
detection current, ROCP. This signal is devided by the
D1 R2
D
ROCP
+
FB
-
+
+
-
OCPVOCPM
VFB
VCC
OSC
D
S OCP/BD
FB
ID
Reg&IconstBURST
-+
SW1
D2
R3
PC1C2
R4
C4
R5
1 4
6
52
RB1
RB2
IFB
GND
3
D1 R2
D
ROCP
+
FB
-
+
-
+
+
-
+
-
OCPVOCPM
VFB
VCC
OSC
D
S OCP/BD
FB
ID
Reg&IconstBURST
-+-+
SW1
D2
R3
PC1C2
R4
C4
R5
1 4
6
52
RB1
RB2
IFB
GND
3
Added
7
Not Reco
mmended
for N
ew D
esign
s

STR-X6700 Series
STR-X6700-ANE Rev.2.0 SANKEN ELECTRIC CO., LTD. 5 Dec. 13, 2016 http://www.sanken-ele.co.jp/en/ © SANKEN ELECTRIC CO., LTD. 2010
internal resistor (RB1 and RB2) to make VOCPM.
VFB and VOCPMFB input to the FB comparator, and the
current mode that controls drain peak current is
controlled by it.
In the period of overload in Figure 1-7, VOCPM
decreases. When VOCPM decreases to VCOPBD(LIM) = −0.94
V (typ.), the overcurrent protection is activated, and
limits the drain current.
In the period from normal load to light load in Figure
1-73, the drain current decreases because the FB current
increases and VFB rises.
When VFB exceeds the FB pin threshold voltage
VFB(OFF) = 1.45 V(typ.) at light load, the IC operates in
burst oscillation so as not to raise the secondary-side
output voltage.
The Zener diode, D2, has VZ = 5.6 to 6.2 V, and is
connected in series with the optocoupler for the
countermeasure against the overvoltage of FB pin. The
FB pin voltage must not rise over 9 V in the dynamic
load fluctuation and the standby operation that is the
intermittent operation by UVLO.
R3 value is about 1 kΩ.
About R5 value setting, see Section 1.12.
1.3. Soft Start Function
Figure 1-8 shows an example of the waveform pattern
at soft start operation.
At the power supply startup, the soft start operation
charging current, ISSOLP(SS) = −550 μA(typ.), flows and
charges C3 of SS/OLP pin to the soft start operation stop
voltage, VSSOLP(SS) = 1.2 V(typ.). This period is the soft
start period. By comparing the oscillation waveforms of
the SS/OLP pin and that of the internal control, the soft-
start widening of the on-width is activated, resulting in
the reduction of the stress of voltage and current of the
power MOSFET and the secondary diode.
In addition, the soft-start is operated every time in the
burst oscillation. Gradual increase of drain current
suppresses audible noise from the transformer.
Table 1-1. Soft Start Reference Time
(Calculated value: Charging current −550 μA (typ.))
Capacitance of CSS Soft Start Time
0.47 μF 1.0 ms
1 μF 2.2 ms
2.2 μF 4.8 ms
3.3 μF 7.2 ms
4.7 μF 10.3 ms
Figure 1-8. Soft Start Operation
1.4. Quasi-Resonant Operation
The quasi-resonant operation reduces the switching
loss and noise, and achieves the high-efficiency and
low-noise power supply. The IC operates in quasi-
resonance at one-bottom-skip operation.
Figure 1-9 shows the flyback type circuit. The
meaning of symbols in Figure 1-9 are shown in Table
1-2.
Flyback circuit is the method to supply the energy
stored in the transformer when the power MOSFET
turns off.
In flyback, the power MOSFET remains off after
turning off and releasing the energy to the secondary
side. At this time, the VDS freely oscillates in the
frequency determined by LP and CV.
The quasi-resonant operation turns on the power
MOSFET at the bottom of VDS voltage waveform in the
free oscillation period. (bottom-on operation)
Figure 1-10 shows the VDS voltage waveform at the
ideal bottom-on operation.
When the delay time between the start of VDS voltage
waveform of free oscillation and the turning off the
power MOSFET is tONDLY, the tONDLY at the ideal bottom-
on operation is in the half-cycle of the free oscillation,
and calculated by the following equation.
VPONDLY CLt ≒
(1)
通常動作時起動時
パワーMOSFET
波形
ISS/OLP波形
ソフトスタート期間
OCP制限
VSSOLP(SS)
VSS/OLP波形
ISSOLP(SS)
ISSOLP(OLP)
ISSOLP(NOR)
通常動作時起動時
パワーMOSFET
波形
ISS/OLP波形
ソフトスタート期間
OCP制限
VSSOLP(SS)
VSS/OLP波形
ISSOLP(SS)
ISSOLP(OLP)
ISSOLP(NOR)
Waveform
Waveform ISS/OLP
Soft start period
Startup Normal operation
Limited by OCP Power MOSFET Waveform
Not Reco
mmended
for N
ew D
esign
s

STR-X6700 Series
STR-X6700-ANE Rev.2.0 SANKEN ELECTRIC CO., LTD. 6 Dec. 13, 2016 http://www.sanken-ele.co.jp/en/ © SANKEN ELECTRIC CO., LTD. 2010
T1
S
VIN
NP NS
LP
CV
VFLY
IDIOFF
VO
C51
VF
C1
D51
P
U1
Figure 1-9. Basic Flyback Converter Circuit
Table 1-2. Meaning of Symbols (Figure 1-9)
Symbol Meaning
VIN Input voltage
VFLY Flyback voltage, FO
S
PFLY VV
N
NV
VDS The voltage between drain and source of
the power MOSFET
NP The number of turns in the primary side
NS The number of turns in the secondary side
VO Output voltage
VF The forward voltage drop of secondary
rectifier diode
ID Drain current of the power MOSFET
IOFF The current that flows through the
secondary rectifier diode when the power
MOSFET is in off state.
CV Voltage resonant capacitor
LP Primary inductance
Figure 1-10. Ideal Bottom-on Operation Waveform
Bottom point
Ef
EIN
IOFF
ID
tON
VDS
Half cycle of free oscillation tONDLY
VONDLY CLpt ≒
GND
GND
GND
GND
GND
Auxiliary
winding voltage
OCP/BD pin voltage VOCP(TH1)
VOCP(TH2)
ボトムポイント
IOFF
VDS
Not Reco
mmended
for N
ew D
esign
s

STR-X6700 Series
STR-X6700-ANE Rev.2.0 SANKEN ELECTRIC CO., LTD. 7 Dec. 13, 2016 http://www.sanken-ele.co.jp/en/ © SANKEN ELECTRIC CO., LTD. 2010
Figure 1-11. Quasi-resonance and Delay Circuit
The delay circuit is configured by the auxiliary
winding D, and D3, D4, C6, and R6 between OCP/BD
pin in Figure 1-11.
When the OCP/BD pin voltage exceeds the quasi-
resonant operation threshold voltage 2, VOCP(TH2) = 0.8 V
(typ.), by the auxiliary winding after the power
MOSFET turns off, the power MOSFET remains off
until the OCP/BD pin voltage decreases to the quasi-
resonant operation threshold voltage1, VOCPBD(TH1) = 0.4
V (typ.).
When the transformer energy release is finished, the
auxiliary winding voltage starts to decrease and the C6
voltage is discharged through R5. When the OCP/BD
pin voltage decreases to the quasi-resonant operation
threshold voltage, VOCPBD(TH1) = 0.4 V (typ.), or less, the
power MOSFET turns on. This discharge period is the
delay time. The delay time needs to be set by adjusting
C6, monitoring the operating waveform, so that the
power MOSFET turns on when the VDS of the power
MOSFET hits the lowest point. The malfunction of
quasi-resonant operation is prevented by the voltage
difference between VOCPBD(TH1) and VOCP(TH2).
At the power supply startup or at low bias winding
voltage due to a winding short, if the OCP/BD pin
voltage after turning on is not VOCPBD(TH2) = 0.8 V (typ.)
or higher, the PWM operation of fixed oscillation
frequency, 22 kHz (typ.), is activated with the internal
oscillator, and the stress of voltage and current of the
power MOSFET and the secondary diode is reduced.
In setting R6, the OCP/BD pin voltage needs to be the
absolute maximum rating applied voltage of 5 V (max.)
or less. In a normal condition, it should be
approximately 1.5 V. The resistance of ROCP is small
enough to be ruled out. When the auxiliary winding
voltage is 18 V, the R6 that the OCP/BD pin voltage is
1.5 V is to be about 1 kΩ to 3.3 kΩ. The delay time
depends on the C6 capacitance. When the delay time is
2.2 μs, the R5 and C6 are temporarily set at 1.5 kΩ and
1000 pF, respectively. The constant is adjusted so that
the waveform of OCP/BD pin voltage is the bottom-on,
monitoring the OCP/BD pin voltage in actual operation.
For the setting of R5 and C5, see Section 1.12
Overcurrent Protection (OCP).
When the constant is adjusted, if the turn-on timing
does not match the bottom of VDS, the turn-on should be
set earlier than the bottom point as shown in Figure 1-12
so that the operation becomes stable.
Figure 1-12. Bottom-on Setting
1.5. Bottom-skip Quasi-resonant
Operation
In addition to the quasi-resonant operation in the
previous section, the IC incorporates a bottom-skip
mode in order to suppress the increase of oscillating
frequency during a light-to-medium load. The bottom-
skip quasi-resonant operation is incorporated in the
STR-X67xx, STR-X6729, STR-X67xxN and the STR-
X67xxM.
Bottom-skip quasi-resonance is operated as follows:
Secondary load status is monitored by the OCP/BD
pin voltage that is similar to the waveform of drain
current, ID. The load status is compared to the internal
BSD comparator. The operation is shifted to quasi-
resonant operation at heavey load, and shifted to bottom-
skip quasi-resonant operation at ligh-to-medium load.
R5 D4
P
D
D
S
VCC
OCP/BD
ROCP
CV
C5
C6
D3
R6
C1
R1
C2
D1 R2
1 4
2 7
GND
3
R5 D4
P
D
D
S
VCC
OCP/BD
ROCP
CV
C5
C6
D3
R6
C1
R1
C2
D1 R2
1 4
2 7
GND
3
Turn-on is set earlier than
the bottom if it does
not match the
bottom point
Ideal Bottom-on
Not Reco
mmended
for N
ew D
esign
s

STR-X6700 Series
STR-X6700-ANE Rev.2.0 SANKEN ELECTRIC CO., LTD. 8 Dec. 13, 2016 http://www.sanken-ele.co.jp/en/ © SANKEN ELECTRIC CO., LTD. 2010
Figure 1-13 shows the timing of shift from quasi-
resonant to bottom-skip quasi-resonant.
Figure 1-13. Quasi-resonant to Bottom-skip Operation Timing
In the following descriptions of mode shift operation,
the OCP/BD pin gate falling voltage of the power
MOSFET is VOCP.
● Quasi-resonant operation⇒bottom-skip mode
Quasi-resonance is operated under the following
condition:
|VOCP| > |VOCPBD(BS2)|
When the load becomes lighter, the ID becomes smaller.
As a result, when VOCP is higher than VOCPBD(BS2), the
operation is shifted to bottom-skip mode, and the
threshold is automatically changed to VOCPBD(BS1) . The
falling edges (OCP/BD pin voltage is less than
VOCPBD(TH1) due to the free oscillation of VDS) of quasi-
resonant signal is counted in the IC, and the one-cycle
free oscillation is skipped, resulting in the reduction of
the switching loss.
● Bottom-skip mode⇒quasi-resonant operation
Bottom-skip mode is operated under the following
conditio:
|VOCP| < |VOCPBD(BS1)|
When the load becomes lighter, the ID becomes larger.
As a result, when VOCP is higher than VOCPBD(BS1), the
operation is shifted to quasi-resonant operation, and the
threshold is automatically changed to VOCPBD(BS2).
As shown in Figure 1-14, in the process of load
current increase or the load current decrease, hysteresis
is set to make the switching waveform stable around the
shift threshold, resuluting in a stable operation mode
shift.
One bottom-skip
Quasi-resonant
VOCP(BS2)
VOCP(BS1)
VOCP(H)
Load current
Figure 1-14. Hysteresis at Operation Mode Shift
OCP/BD
ボトムスキップQR動作QR動作
ID
VDS
検出レベル
パワーMOSFET ゲート(IC内部)
ボトム検出信号(IC内部)
動作切換え信号(IC内部)
ヒステリシス
VOCPBD(LIM)
VOCPBD(TH2)
VOCPBD(TH1)
VOCPBD(BS1)
VOCPBD(BS2) VOCP
GND
GND
GND
GND
GND
GND
OCP/BD
ボトムスキップQR動作QR動作
ID
VDS
検出レベル
パワーMOSFET ゲート(IC内部)
ボトム検出信号(IC内部)
動作切換え信号(IC内部)
ヒステリシス
VOCPBD(LIM)
VOCPBD(TH2)
VOCPBD(TH1)
VOCPBD(BS1)
VOCPBD(BS2) VOCP
GND
GND
GND
GND
GND
GND
Quasi-resonant Bottom-skip Quasi-resonant
Detection level
Power MOSFET gate
(Power IC internal)
Bottom detect signal
(Power IC internal)
((Power IC internal)
State signal
Hysteresis
Not Reco
mmended
for N
ew D
esign
s

STR-X6700 Series
STR-X6700-ANE Rev.2.0 SANKEN ELECTRIC CO., LTD. 9 Dec. 13, 2016 http://www.sanken-ele.co.jp/en/ © SANKEN ELECTRIC CO., LTD. 2010
1.6. Standby Modes
The STR-X6700 series have two types of standby
modes. See the product lineup for the relationship
between products and stanby modes.
1.6.1. UVLO Intermittent Oscillation
Operation
The switch is provided to the detection circuit of the
secondary output so that the circuit is switched to
control the auxiliary winding voltage to be VCC(OFF) or
lower. This decreases the output voltage at standby of
remote control, and switches to the UVLO intermittent
oscillation operation to reduce the power consumption.
Figure 1-15 shows the secondary circuit example in
UVLO intermittent oscillation. When the standby signal
is input to the secondary side, and the switch, SW, turns
on, the auxiliary winding voltage decreases according to
the decrease of the output voltage. The IC stops
operation when the VCC pin voltage is the operation –
stop voltage, VCC(OFF) = 9.7 V (typ.), or lower. Then, C2
is charged through the startup resistor, R1, and the VCC
pin voltage increases again. When the VCC pin voltage
reaches the operation-start voltage, VCC(ON)= 18.2V
(typ.), the IC starts operation again. However, the VCC
pin voltage switches to the UVLO intermittent
oscillation operation that repeats between VCC(ON) and
VCC(OFF) since the auxiliary winding voltage is VCC(OFF)
or lower. Therefore, the energy is supplied to the
secondary side only for a short switching period that the
VCC pin decreases to VCC(OFF) from VCC(ON).
Figure 1-16 shows the timing chart at operation shift.
When the UVLO intermittent oscillation frequency is
in a human audible range (20 Hz to 20 kHz), the audible
noise of transformer may occur.
As a measure against the audible noise, the switching
current can be suppressed by decreasing the startup
resistor, R1, and shortening the intermittent oscillation
frequency, however, the R1 loss increases. Therefore,
in order to increase the intermittent frequency and
suppress the switching current, the STR-X6700 series
incorporates the function that decreases the difference
between VCC(OFF) and the operation-start power voltage
to about 1/5 of the difference in normal operation by
decreasing the operation-start voltage to the operation-
start voltage at standby, VCC(S) = 11.1V (typ.), when the
FB pin voltage reashes the stanby opearation threshold
voltage, VFB(S) = 1.1 V, or higher.
Because the oscillation stops during the period of shift
to UVLO intermittent operation from normal operation,
the output voltage continues to decrease. Therefore, the
load should be set to keep the voltage higher than the
required voltage by the secondary output volage.
Because the oscillation stops during the period of shift
to normal operation from standby operation, the output
voltage continues to decrease until the VCC pin voltage
reaches VCC(ON) = 18.2 V (typ.). Therefore, the load
should be set to keep the voltage higher than the
required voltage by the secondary output volage until the
normal oscillation starts.
The sequence of load shift is necessary in the device
during the operation shift period.
Taking the operational mechanisum into consideration,
the standby operation by UVLO intermittent oscillation
is in a minute load region of about several decades of
mW to 0.2 W at maximum.
When the output ripple voltage or the voltage
fluctuation except the stabilized output lines is too high,
or the audible noise of transformer occurs, it is required
to consider increasing the capacitance of output
smoothing capacitor.
For the audible noise of transformer, please contanct
transformer manufacturers as there are measures such as
ferrite core adhesion and varnish impregnation.
Though the minimum on-time, tON(MIN), is set in the IC,
the products that operate by UVLO intermittent
oscillation at light load release the limit of the minimum
on-time, tON(MIN), at quasi-resonant operation to operate
to zero. When the oscillation frequency at light load
increases and the switching loss increases, please pay
attention to temperature rise.
Not Reco
mmended
for N
ew D
esign
s

STR-X6700 Series
STR-X6700-ANE Rev.2.0 SANKEN ELECTRIC CO., LTD. 10 Dec. 13, 2016 http://www.sanken-ele.co.jp/en/ © SANKEN ELECTRIC CO., LTD. 2010
Figure 1-15. Secondary Circuit Example of UVLO Intermittent Oscillation
Figure 1-16. Timing Chart at Operation Shift
VCC
+B
GND
S1P
D
S2
LowB
GND
ErrAmp
スタンバイ出力
Reg
Err Amp: エラーアンプReg:リニアレギュレーターなど
SW
R1
D1 R2
C2
VCC
+B
GND
S1P
D
S2
LowB
GND
ErrAmp
スタンバイ出力
Reg
Err Amp: エラーアンプReg:リニアレギュレーターなど
SW
R1
D1 R2
C2
通常動作
FB端子電圧
通常動作 スタンバイ動作
パワーMOSFET波形
2次側出力電圧
VCC端子電圧
V FB(S)
V CC(S)
V CC(ON)
V CC(OFF)
スタンバイ時の動作開始電圧
スタンバイ信号ON スタンバイ信号OFF
V FB(OFF)
通常動作
FB端子電圧
通常動作 スタンバイ動作
パワーMOSFET波形
2次側出力電圧
VCC端子電圧
V FB(S)
V CC(S)
V CC(ON)
V CC(OFF)
スタンバイ時の動作開始電圧
スタンバイ信号ONスタンバイ信号ON スタンバイ信号OFFスタンバイ信号OFF
V FB(OFF)
VCC pin voltage
Error Amp
Liner
regulator Standby
output
Secondary output voltage
FB pin voltage
VCC pin voltage
Power MOSFET waveform
Operation start voltage at VCC(S) standby
Standby signal OFF Standby signal ON
Normal operation Normal operation Standby operation Not Reco
mmended
for N
ew D
esign
s
STR-X6700 Series
STR-X6700-ANE Rev.2.0 SANKEN ELECTRIC CO., LTD. 11 Dec. 13, 2016 http://www.sanken-ele.co.jp/en/ © SANKEN ELECTRIC CO., LTD. 2010
1.6.2. Automatic Burst Oscillation
Operation
The minimum on-itme, tON(MIN), is set internally.
When the load becomes lighter and the time width of
drain current, ID reaches , tON(MIN), the feedback current
increases to increase the FB pin voltage. When the FB
pin voltage reaches the FB pin threshold voltage,
VFB(OFF) = 1.45 V, the oscillation operation stops. When
the FB pin voltage decreases, the oscillation operation is
automatically started (automatic burst oscillation
operation). This reduces the swtching loss and improves
the effeciency at standy.
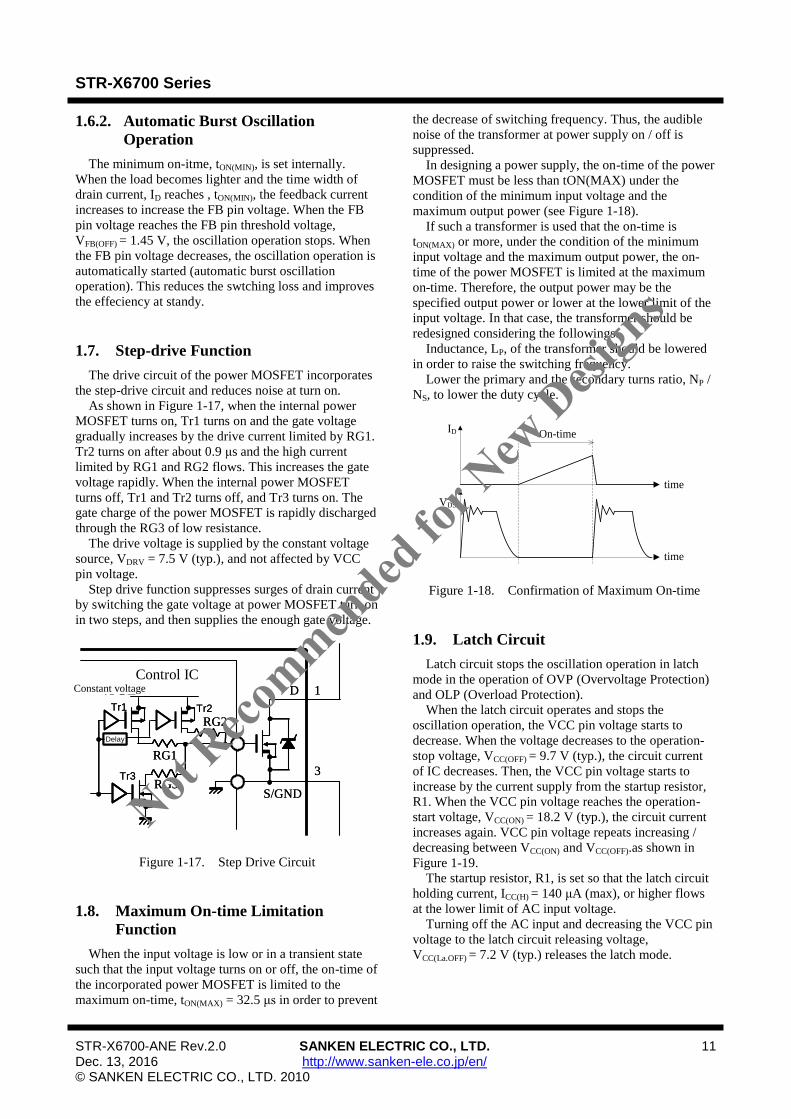
1.7. Step-drive Function
The drive circuit of the power MOSFET incorporates
the step-drive circuit and reduces noise at turn on.
As shown in Figure 1-17, when the internal power
MOSFET turns on, Tr1 turns on and the gate voltage
gradually increases by the drive current limited by RG1.
Tr2 turns on after about 0.9 μs and the high current
limited by RG1 and RG2 flows. This increases the gate
voltage rapidly. When the internal power MOSFET
turns off, Tr1 and Tr2 turns off, and Tr3 turns on. The
gate charge of the power MOSFET is rapidly discharged
through the RG3 of low resistance.
The drive voltage is supplied by the constant voltage
source, VDRV = 7.5 V (typ.), and not affected by VCC
pin voltage.
Step drive function suppresses surges of drain current
by switching the gate voltage at power MOSFET turn on
in two steps, and then supplies the enough gate voltage.
Figure 1-17. Step Drive Circuit
1.8. Maximum On-time Limitation
Function
When the input voltage is low or in a transient state
such that the input voltage turns on or off, the on-time of
the incorporated power MOSFET is limited to the
maximum on-time, tON(MAX) = 32.5 μs in order to prevent
the decrease of switching frequency. Thus, the audible
noise of the transformer at power supply on / off is
suppressed.
In designing a power supply, the on-time of the power
MOSFET must be less than tON(MAX) under the
condition of the minimum input voltage and the
maximum output power (see Figure 1-18).
If such a transformer is used that the on-time is
tON(MAX) or more, under the condition of the minimum
input voltage and the maximum output power, the on-
time of the power MOSFET is limited at the maximum
on-time. Therefore, the output power may be the
specified output power or lower at the lower limit of the
input voltage. In that case, the transformer should be
redesigned considering the followings:
Inductance, LP, of the transformer should be lowered
in order to raise the switching frequency.
Lower the primary and the secondary turns ratio, NP /
NS, to lower the duty cycle.
VDS
ID On-time
time
time
Figure 1-18. Confirmation of Maximum On-time
1.9. Latch Circuit
Latch circuit stops the oscillation operation in latch
mode in the operation of OVP (Overvoltage Protection)
and OLP (Overload Protection).
When the latch circuit operates and stops the
oscillation operation, the VCC pin voltage starts to
decrease. When the voltage decreases to the operation-
stop voltage, VCC(OFF) = 9.7 V (typ.), the circuit current
of IC decreases. Then, the VCC pin voltage starts to
increase by the current supply from the startup resistor,
R1. When the VCC pin voltage reaches the operation-
start voltage, VCC(ON) = 18.2 V (typ.), the circuit current
increases again. VCC pin voltage repeats increasing /
decreasing between VCC(ON) and VCC(OFF).as shown in
Figure 1-19.
The startup resistor, R1, is set so that the latch circuit
holding current, ICC(H) = 140 μA (max), or higher flows
at the lower limit of AC input voltage.
Turning off the AC input and decreasing the VCC pin
voltage to the latch circuit releasing voltage,
VCC(La.OFF) = 7.2 V (typ.) releases the latch mode.
RG2
制御IC
RG1
RG3
D
S/GND
定電圧
Delay
1
3
Tr1 Tr2
Tr3
RG2
制御IC
RG1
RG3
D
S/GND
定電圧
Delay
1
3
Tr1 Tr2
Tr3
Control IC
Constant voltage
Not Reco
mmended
for N
ew D
esign
s

STR-X6700 Series
STR-X6700-ANE Rev.2.0 SANKEN ELECTRIC CO., LTD. 12 Dec. 13, 2016 http://www.sanken-ele.co.jp/en/ © SANKEN ELECTRIC CO., LTD. 2010
(TYP)
(TYP)18.2V
9.7V
Vcc
Smalll circuit current
Large circuit current
Time
Figure 1-19. VCC Pin Voltage Waveform at Latch
Mode
1.10. Overvoltage Protection (OVP)
When a voltage between VCC pin and GND pin
increases to VCC(OVP) = 27.7 V or higher, the
Overvoltage Protection (OVP) is activated, and the IC
stops switching operation at the latched mode.
When the VCC pin voltage is provided by using
auxiliary winding of transformer, the overvoltage
conditions such as output voltage detection circuit open
can be detected because the VCC pin voltage is
proportional to the output voltage. The approximate
value of the output voltage, VOUT(OVP), in OVP is
calculated by Equation (2).
)NORMAL(CC
)NORMAL(OUT
OUT(OVP)V
VV 27.7 V (2)
where,
VOUT(NORMAL): Output voltage in normal operation
VCC(NORMAL): VCC pin voltage in normal operation
1.11. Overload Protection (OLP)
When the peak drain current of ID is limited by
Overcurrent Protection operation for a certain time
(delay time, tDLY), the IC stops switching operation in
the latched mode. This reduces the stress applied on
components such as power MOSFETs and secondary
diodes.
Figure 1-20 shows the secondary output
characteristics in OCP operation.
VOUT
IOUT
High AC input
Output current
Low AC input
Output voltage
Figure 1-20. Output Overload Characteristics
Figure 1-21 shows the peripheral circuit of FB pin and
SS/OLP pin, and Figure 1-22 shows the timing chart in
OLP operation.
When the peak drain current of ID is limited by the
Overcurrent Protection (OCP) operation, the output
voltage, VOUT, decreases and the feedback current, IFB,
from the secondary optocoupler becomes zero. When the
OCP operates, the C3 is charged by ISSOLP(OLP) = −11 μA
(typ.) that flows from the SS/OLP pin, and the SS/OLP
pin voltage starts to increase. When the SS/OLP pin
voltage reaches VSSOLP(OLP) = 4.9 V (typ.), the IC stops
switching operation in the latched mode.
The approximate delay time, tDLY, is calculated by
Equation(3).
(3)
where,
ΔV is the charging voltage of C3 of about 4.9 V
ISSOLP(OLP) has the characteristic of voltage dependence
of the SS/OLP pin. When the SS/OLP pin voltage
increases, ISSOLP(OLP) decreases. Therefore, the delay time
should be considered in the actual operation because
Equation (3) and the measured value do not match.
At the power supply startup, the time delay, tDLY,
needs to be set longer than the output rise time. When it
is short, the OLP operates earlier, resulting in a startup
failure.
When theVCC voltage decreases to VCC(OFF) or lower
before the C3 voltage reahes 4.9 V by the balance
between the volatge decrease rate of C2 of VCC pin and
thevoltage increase rate of C3 , the IC does not turn off
in latched mode and intermittently oscillates. Therefore,
please pay attention to the delay time setting.
Not Reco
mmended
for N
ew D
esign
s

STR-X6700 Series
STR-X6700-ANE Rev.2.0 SANKEN ELECTRIC CO., LTD. 13 Dec. 13, 2016 http://www.sanken-ele.co.jp/en/ © SANKEN ELECTRIC CO., LTD. 2010
Figure 1-21. Peripheral Circuit of FB Pin and SS/OLP
Pin
Table 1-1 Reference: OLP Delay Time
(calculated value in Equation (3) when ΔV = 4.9 V,
ISSOLP(OLP) = −11 μA)
Capacitance of C3 tDLY
0.47 μF 209 ms
1 μF 445 ms
2.2 μF 980 ms
3.3 μF 1470 ms
4.7 μ 2094 ms
Figure 1-22. Timing Chart in Overload
D
D1 R2
C2
R3
ROCP
D2
C4C3
R4
R5
IFBD
S
VCC
OCP/BD
FB
SS/OLP
1 4
6
2 7 5
PC1
GND
3
D
D1 R2
C2
R3
ROCP
D2
C4C3
R4
R5
IFBD
S
VCC
OCP/BD
FB
SS/OLP
1 4
6
2 7 5
PC1
GND
3
Charged by I SSOLP(OLP)
Feedback current, I FB
Power MOSFET waveform
V CC(OFF)
V CC(ON)
2 V OUT
V SSOLP(OLP)
V CC pin voltage
2 次側出力電流 I OUT
SS/OLP pin voltage
Overload Switching stops
Soft start
Limited by OCP
I
I FB
V CC(OFF)
V CC(ON)
2 V OUT
V SSOLP(OLP)
V CC
2 I OUT
SS/OLP
Secondary output current,
Secondary output voltage,
At startup Normal operation
Not Reco
mmended
for N
ew D
esign
s
STR-X6700 Series
STR-X6700-ANE Rev.2.0 SANKEN ELECTRIC CO., LTD. 14 Dec. 13, 2016 http://www.sanken-ele.co.jp/en/ © SANKEN ELECTRIC CO., LTD. 2010
When the OLP is operated by automatic restart with
the soft start activated, a resistor of around 47 kΩ or a
Zener diode of 2.7 V is connected to the SS/OLP pin to
prevent the SS/OLP pin from exceeding VSSOLP(OLP) = 4.9
V (typ.) as shown in Figure 1-23. Eliminating factors of
overload makes the OLP automatically restarts in
normal operation.
When the VCC pin voltage becomes VCC(OFF) or lower,
the internal reset circuit discharges the C3 voltage in
SS/OLP pin as shown in Figure 1-24. The reset circuit
does not operate in normal operation (in the operation of
internal constant voltage circuit)
Figure 1-23. OLP Operation by Automatic Restart
Figure 1-24. Reset Circuit
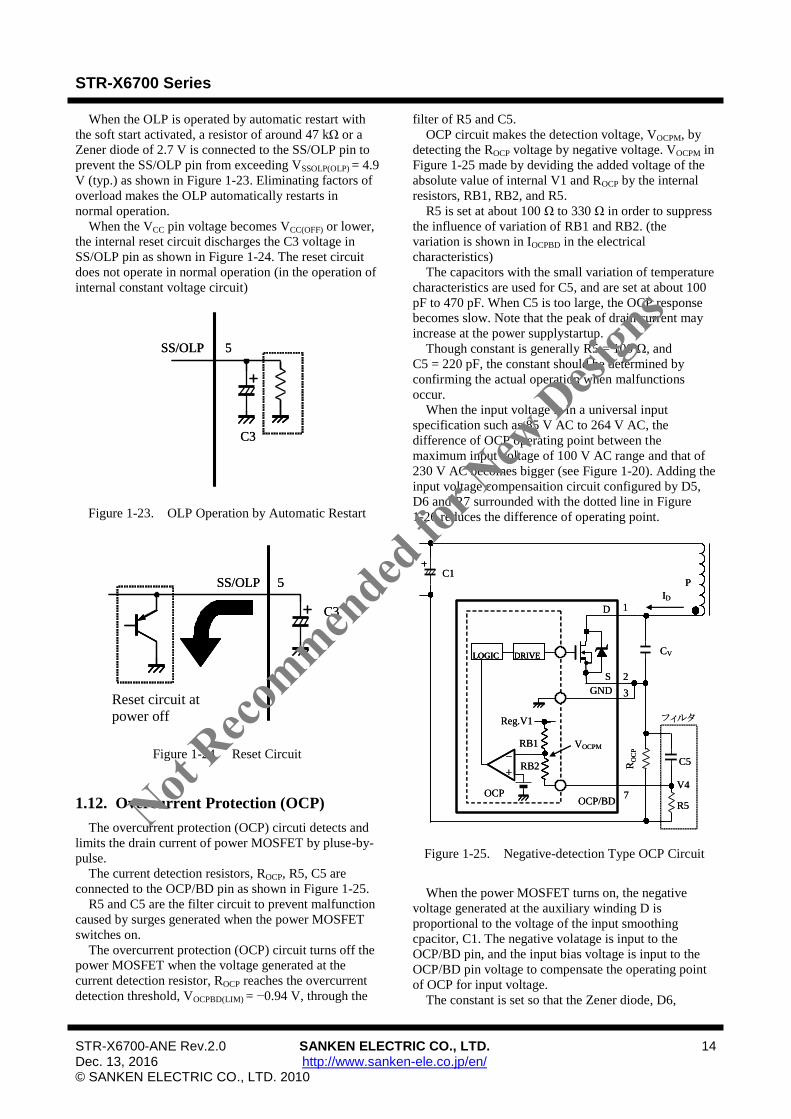
1.12. Overcurrent Protection (OCP)
The overcurrent protection (OCP) circuti detects and
limits the drain current of power MOSFET by pluse-by-
pulse.
The current detection resistors, ROCP, R5, C5 are
connected to the OCP/BD pin as shown in Figure 1-25.
R5 and C5 are the filter circuit to prevent malfunction
caused by surges generated when the power MOSFET
switches on.
The overcurrent protection (OCP) circuit turns off the
power MOSFET when the voltage generated at the
current detection resistor, ROCP reaches the overcurrent
detection threshold, VOCPBD(LIM) = −0.94 V, through the
filter of R5 and C5.
OCP circuit makes the detection voltage, VOCPM, by
detecting the ROCP voltage by negative voltage. VOCPM in
Figure 1-25 made by deviding the added voltage of the
absolute value of internal V1 and ROCP by the internal
resistors, RB1, RB2, and R5.
R5 is set at about 100 Ω to 330 Ω in order to suppress
the influence of variation of RB1 and RB2. (the
variation is shown in IOCPBD in the electrical
characteristics)
The capacitors with the small variation of temperature
characteristics are used for C5, and are set at about 100
pF to 470 pF. When C5 is too large, the OCP response
becomes slow. Note that the peak of drain current may
increase at the power supplystartup.
Though constant is generally R5 = 100 Ω, and
C5 = 220 pF, the constant should be determined by
confirming the actual operation when malfunctions
occur.
When the input voltage is in a universal input
specification such as 85 V AC to 264 V AC, the
difference of OCP operating point between the
maximum input voltage of 100 V AC range and that of
230 V AC becomes bigger (see Figure 1-20). Adding the
input voltage compensaition circuit configured by D5,
D6 and R7 surrounded with the dotted line in Figure
1-26 reduces the difference of operating point.
Figure 1-25. Negative-detection Type OCP Circuit
When the power MOSFET turns on, the negative
voltage generated at the auxiliary winding D is
proportional to the voltage of the input smoothing
cpacitor, C1. The negative volatage is input to the
OCP/BD pin, and the input bias voltage is input to the
OCP/BD pin voltage to compensate the operating point
of OCP for input voltage.
The constant is set so that the Zener diode, D6,
SS/OLP
C3
5SS/OLP
C3
5
C3
パワーオフ時リセット回路
SS/OLP 5
C3
パワーオフ時リセット回路
SS/OLP 5
D
S
OCP/BD
P
RO
CP
+
-
LOGIC DRIVE
フィルタ
R5
RB1
RB2
Reg.V1
OCP
C5
VOCPM
V4
CV
C1
ID
1
2
7
GND 3
D
S
OCP/BD
P
RO
CP
+
-
LOGICLOGIC DRIVEDRIVE
フィルタ
R5
RB1
RB2
Reg.V1
OCP
C5
VOCPM
V4
CV
C1
ID
1
2
7
GND 3Reset circuit at
power off
D
S
OCP/BD
P
RO
CP
+
-
LOGIC DRIVE
フィルタ
R5
RB1
RB2
Reg.V1
OCP
C5
VOCPM
V4
CV
C1
ID
1
2
7
GND 3
D
S
OCP/BD
P
RO
CP
+
-
LOGICLOGIC DRIVEDRIVE
フィルタ
R5
RB1
RB2
Reg.V1
OCP
C5
VOCPM
V4
CV
C1
ID
1
2
7
GND 3
Not Reco
mmended
for N
ew D
esign
s

STR-X6700 Series
STR-X6700-ANE Rev.2.0 SANKEN ELECTRIC CO., LTD. 15 Dec. 13, 2016 http://www.sanken-ele.co.jp/en/ © SANKEN ELECTRIC CO., LTD. 2010
switches non-conductive at the upper limit voltage of the
range of 100V AC, and switches conductive at the lower
limit voltage of the range of 230V AC.
When the negative voltage of the auxiliary winding D
is −18 V, the Zener voltage of D6 is about 16 V, and R7
is about 10 kΩ to 22 kΩ. The constant of D6 and R7 is
adjusted by confirming the actual operation.
P
D
C1
R1
Cv
D1
D3
R6
D6
D5
C6
R3
D2
R4
C4
R2
C2
C5
R5
C3
D4
R7
PC1
R OCP
D VCC
FB
1 4
6
7 5/SSOLPOCP
/BDGNDS2 3
Figure 1-26. Input Voltage Compensation Circuit of
OCP
2. Design Notes
2.1. External Components
Take care to use properly rated, including derating as
necessary and proper type of components.
● Input and Output Electrolytic Capacitor
Apply proper derating to ripple current, voltage, and
temperature rise. Use of high ripple current and low
impedance types, designed for switch mode power
supplies, is recommended.
● Current Detection Resistor, ROCP
A high frequency switching current flows to ROCP, and
may cause poor operation if a high inductance resistor is
used. Choose a low inductance and high surge-tolerant
type.
● Peripheral Circuit of Secondary Side Shunt
Regulator
Figure 2-1 shows the secondary side detection circuit
with the standard shunt regulator IC.
C8 is for phase compensation. The value of C8 is
recommended to be around 0.047 μF to 022 μF
respectively. They should be selected based on actual
operation in the application.
S
PC1
GND
R8
Z2
C8
D7
C7
VOUT
Figure 2-1. Peripheral Circuit of Secondary Side Shunt
Regulator
● FB Pin Peripheral Circuit
Figure 2-2 shows the FB pin peripheral circuit.
C4 is for high frequency noise reduction and phase
compensation.
The recommended value of C4 and R4 are 0.047 μF to
0.22 μF, and about 1 kΩ.
C4 and R4 should be connected close to these pins,
and are should be selected based on actual operation in
the application.
Figure 2-2. FB Pin Peripheral Circuit
● Transformer
Apply proper design margin to core temperature rise
by core loss and copper loss.
PC1
6
C3
D2
R4R6
ROCP
R5 D4
D
S
VCC
OCP/BD
CV
C5
C1
R1
1 4
3 7
P
D
C6
D3
C2
D1 R2
SS/OLP
5
FB
R3
C42
GND
PC1
6
C3
D2
R4R6
ROCP
R5 D4
D
S
VCC
OCP/BD
CV
C5
C1
R1
1 4
3 7
P
D
C6
D3
C2
D1 R2
SS/OLP
5
FB
R3
C42
GNDNot Reco
mmended
for N
ew D
esign
s

STR-X6700 Series
STR-X6700-ANE Rev.2.0 SANKEN ELECTRIC CO., LTD. 16 Dec. 13, 2016 http://www.sanken-ele.co.jp/en/ © SANKEN ELECTRIC CO., LTD. 2010
Because the switching currents contain high frequency
currents, the skin effect may become a consideration.
Choose a suitable wire gauge in consideration of the
RMS current and a current density of 4 to 6 A/mm2.
If measures to further reduce temperature are still
necessary, the following should be considered to
increase the total surface area of the wiring:
- Increase the number of wires in parallel.
- Use litz wires.
- Thicken the wire gauge.
In the following cases, the surge of VCC pin voltage
becomes high.
- The surge voltage of primary main winding, P, is high
(low output voltage and high output current power
supply designs)
- The winding structure of auxiliary winding, D, is
susceptible to the noise of winding P.
When the surge voltage of winding D is high, the
VCC pin voltage increases and the Overvoltage
Protection function (OVP) may be activated. In
transformer design, the following should be considered;
The coupling of the winding P and the secondary
output winding S should be maximized to reduce the
leakage inductance.
- The coupling of the winding D and the winding S
should be maximized.
- The coupling of the winding D and the winding P
should be minimized.
In the case of multi-output power supply, the coupling
of the secondary-side stabilized output winding, S1, and
the others (S2, S3…) should be maximized to improve
the line-regulation of those outputs.
Figure2-3 shows the winding structural examples of
two outputs.
- Winding structural example (a):
S1 is sandwiched between P1 and P2 to maximize the
coupling of them for surge reduction of P1 and P2.
D is placed far from P1 and P2 to minimize the
coupling to the primary for the surge reduction of D.
- Winding structural example (b)
P1 and P2 are placed close to S1 to maximize the
coupling of S1 for surge reduction of P1 and P2.
D and S2 are sandwiched by S1 to maximize the
coupling of D and S1, and that of S1 and S2. This
structure reduces the surge of D, and improves the
line-regulation of outputs.
Margin tape
Margin tape
Margin tape
Margin tape
P1 S1 P2 S2 D
P1 S1 D S2 S1 P2
Winding structural example (a)
Winding structural example (b)
Bobbin
Bobbin
Figure2-3. Winding Structural Examples
2.2. Transformer Design
The design of the transformer is fundamentally the
same as the power transformer of a Ringing Choke
Converter (RCC) system: a self-excitation type flyback
converter. However, because the duty cycle will change
due to the quasi-resonant operations delaying the turn-on,
the duty cycle needs to be compensated.
Figure 2-4 shows the quasi-resonant circuit.
T1
S
VIN
NP NS
LP
CV
VFLY
IDIOFF
VO
C51
VF
C1
D51
P
U1
Figure 2-4 Quasi-resonant Circuit
The flyback voltage, VFLY, is calculated as follows:
FO
S
PFLY VV
N
NV (4)
where,
NP: Primary side number of turns
NS: Secondary side number of turns
VO: Output voltage
VF: Forward voltage drop of D51
Not Reco
mmended
for N
ew D
esign
s

STR-X6700 Series
STR-X6700-ANE Rev.2.0 SANKEN ELECTRIC CO., LTD. 17 Dec. 13, 2016 http://www.sanken-ele.co.jp/en/ © SANKEN ELECTRIC CO., LTD. 2010
The on duty, DON, at the minimum AC input voltage
is calculated as follows:
FLY)MIN(IN
FLYON
VV
VD
(5)
where,
VIN(MIN): C1 voltage at the minimum AC input voltage
VFLY: Flyback voltage.
The inductance, LP' on the primary side, taking into
consideration the delay time, is calculated using
Equation (6).
2
VMINON)MIN(IN
1
MINO
2
ON)MIN(IN
P
CπfDVη
f2P
DV'L
(6)
where,
VIN(MIN) : C1 voltage at the minimum AC input
voltage
DON: On-duty at the minimum input voltage
PO: maximum output power
fMIN: minimum operation frequency
η1: transformer efficiency
CV: the voltage resonance capacitor connected
between the drain and source of the power MOSFET
Each parameter, such as the peak drain current, IDP,
is calculated by the following formulas:
VPONDLY C'Lπt (7)
ONDLYMINONON tf1D'D (8)
IN(MIN)2
OIN
V
1PI
η
(9)
'D
I2I
ON
INDP
(10)
valueAl
'LN P
P‐
(11)
FLY
FOPS
V
VVNN
(12)
where,
tONDLY: Delay time of quasi-resonant operation
IIN: Average input current
η2: conversion efficiency of the power supply
IDP: peak drain current
DON’: On-duty after compensation
VO: Secondary side output voltage
The minimum operation frequency, fMIN, can be
calculated by the Equation (14):
2
ON)MIN(INV
P
V
2
ON)MIN(IN
1
O
1
O
MINDVC2π
'L
CDV4π
η
2P
η
2P
f
(13)
Figure 2-5 shows the Example of NI-Limit versus
AL-Value characteristics.
Choose the ferrite core that does not saturate and
provides a design margin in consideration of
temperature effects and other variations to NI-Limit
versus AL-Value characteristics.
Al-value is calculated by using LP’ and NP. NI is
calculated by using Equation (14).
It is recommended that Al-value and NI provide the
design margin of 30 % or more for saturation curve of
core.
DPP INNI (AT) (14)
where,
NP: Primary side number of turns
IDP: Peak switching current
NI-
lim
it (
AT
)
Al-value (nH/T2)
Margin : about 30%
Saturation curve
NI
LP’/NP2
Figure 2-5. Example of NI-Limit versus AL-Value
characteristics
Not Reco
mmended
for N
ew D
esign
s
STR-X6700 Series
STR-X6700-ANE Rev.2.0 SANKEN ELECTRIC CO., LTD. 18 Dec. 13, 2016 http://www.sanken-ele.co.jp/en/ © SANKEN ELECTRIC CO., LTD. 2010
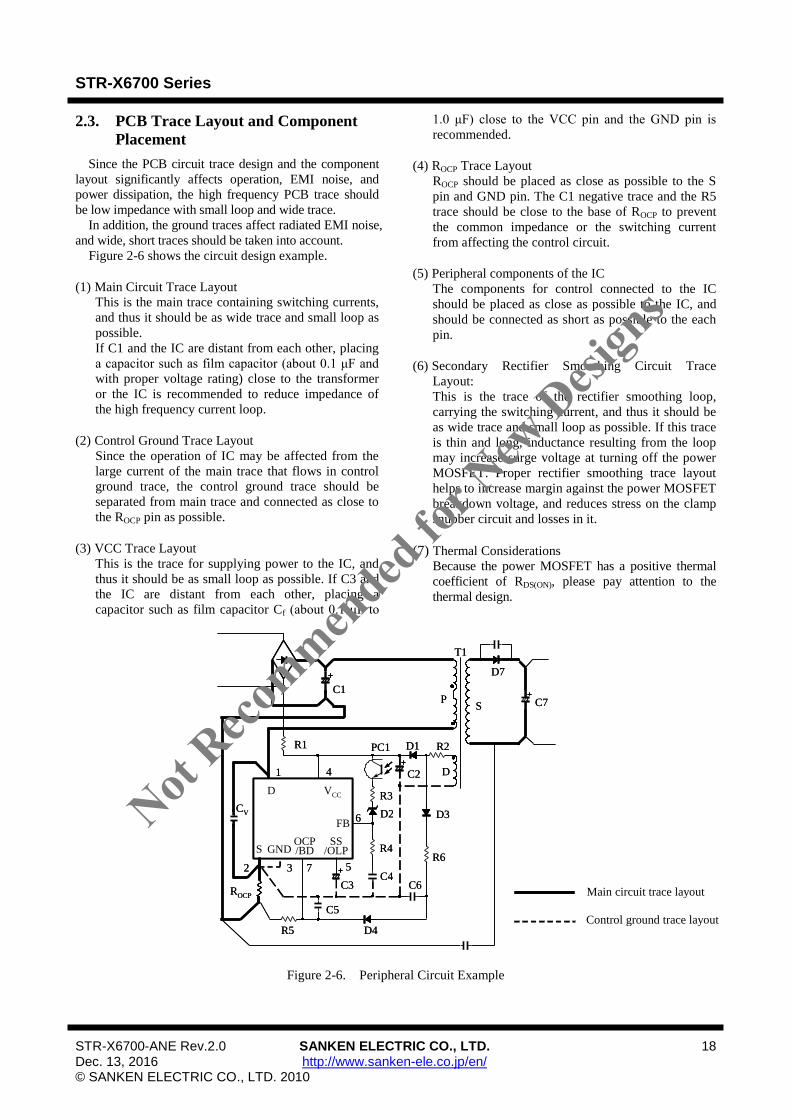
2.3. PCB Trace Layout and Component
Placement
Since the PCB circuit trace design and the component
layout significantly affects operation, EMI noise, and
power dissipation, the high frequency PCB trace should
be low impedance with small loop and wide trace.
In addition, the ground traces affect radiated EMI noise,
and wide, short traces should be taken into account.
Figure 2-6 shows the circuit design example.
(1) Main Circuit Trace Layout
This is the main trace containing switching currents,
and thus it should be as wide trace and small loop as
possible.
If C1 and the IC are distant from each other, placing
a capacitor such as film capacitor (about 0.1 μF and
with proper voltage rating) close to the transformer
or the IC is recommended to reduce impedance of
the high frequency current loop.
(2) Control Ground Trace Layout
Since the operation of IC may be affected from the
large current of the main trace that flows in control
ground trace, the control ground trace should be
separated from main trace and connected as close to
the ROCP pin as possible.
(3) VCC Trace Layout
This is the trace for supplying power to the IC, and
thus it should be as small loop as possible. If C3 and
the IC are distant from each other, placing a
capacitor such as film capacitor Cf (about 0.1 μF to
1.0 μF) close to the VCC pin and the GND pin is
recommended.
(4) ROCP Trace Layout
ROCP should be placed as close as possible to the S
pin and GND pin. The C1 negative trace and the R5
trace should be close to the base of ROCP to prevent
the common impedance or the switching current
from affecting the control circuit.
(5) Peripheral components of the IC
The components for control connected to the IC
should be placed as close as possible to the IC, and
should be connected as short as possible to the each
pin.
(6) Secondary Rectifier Smoothing Circuit Trace
Layout:
This is the trace of the rectifier smoothing loop,
carrying the switching current, and thus it should be
as wide trace and small loop as possible. If this trace
is thin and long, inductance resulting from the loop
may increase surge voltage at turning off the power
MOSFET. Proper rectifier smoothing trace layout
helps to increase margin against the power MOSFET
breakdown voltage, and reduces stress on the clamp
snubber circuit and losses in it.
(7) Thermal Considerations
Because the power MOSFET has a positive thermal
coefficient of RDS(ON), please pay attention to the
thermal design.
Figure 2-6. Peripheral Circuit Example
PC1
6
C3
D2
R4R6
ROCP
R5 D4
D
S
VCC
OCP/BD
CV
C5
C1
R1
1 4
3 7
P
D
C6
D3
C2
D1 R2
S
SS/OLP
5
FB
R3
C4
T1
D7
C7
2
GND
PC1
6
C3
D2
R4R6
ROCP
R5 D4
D
S
VCC
OCP/BD
CV
C5
C1
R1
1 4
3 7
P
D
C6
D3
C2
D1 R2
S
SS/OLP
5
FB
R3
C4
T1
D7
C7
2
GND
Main circuit trace layout
Control ground trace layout
Not Reco
mmended
for N
ew D
esign
s
STR-X6700 Series
STR-X6700-ANE Rev.2.0 SANKEN ELECTRIC CO., LTD. 19 Dec. 13, 2016 http://www.sanken-ele.co.jp/en/ © SANKEN ELECTRIC CO., LTD. 2010
Important Notes
● All data, illustrations, graphs, tables and any other information included in this document as to Sanken’s products listed herein (the
―Sanken Products‖) are current as of the date this document is issued. All contents in this document are subject to any change
without notice due to improvement of the Sanken Products, etc. Please make sure to confirm with a Sanken sales representative
that the contents set forth in this document reflect the latest revisions before use.
● The Sanken Products are intended for use as components of general purpose electronic equipment or apparatus (such as home
appliances, office equipment, telecommunication equipment, measuring equipment, etc.). Prior to use of the Sanken Products,
please put your signature, or affix your name and seal, on the specification documents of the Sanken Products and return them to
Sanken. When considering use of the Sanken Products for any applications that require higher reliability (such as transportation
equipment and its control systems, traffic signal control systems or equipment, disaster/crime alarm systems, various safety
devices, etc.), you must contact a Sanken sales representative to discuss the suitability of such use and put your signature, or affix
your name and seal, on the specification documents of the Sanken Products and return them to Sanken, prior to the use of the
Sanken Products. The Sanken Products are not intended for use in any applications that require extremely high reliability such as:
aerospace equipment; nuclear power control systems; and medical equipment or systems, whose failure or malfunction may result
in death or serious injury to people, i.e., medical devices in Class III or a higher class as defined by relevant laws of Japan
(collectively, the ―Specific Applications‖). Sanken assumes no liability or responsibility whatsoever for any and all damages and
losses that may be suffered by you, users or any third party, resulting from the use of the Sanken Products in the Specific
Applications or in manner not in compliance with the instructions set forth herein.
● In the event of using the Sanken Products by either (i) combining other products or materials therewith or (ii) physically,
chemically or otherwise processing or treating the same, you must duly consider all possible risks that may result from all such
uses in advance and proceed therewith at your own responsibility.
● Although Sanken is making efforts to enhance the quality and reliability of its products, it is impossible to completely avoid the
occurrence of any failure or defect in semiconductor products at a certain rate. You must take, at your own responsibility,
preventative measures including using a sufficient safety design and confirming safety of any equipment or systems in/for which
the Sanken Products are used, upon due consideration of a failure occurrence rate or derating, etc., in order not to cause any human
injury or death, fire accident or social harm which may result from any failure or malfunction of the Sanken Products. Please refer
to the relevant specification documents and Sanken’s official website in relation to derating.
● No anti-radioactive ray design has been adopted for the Sanken Products.
● No contents in this document can be transcribed or copied without Sanken’s prior written consent.
● The circuit constant, operation examples, circuit examples, pattern layout examples, design examples, recommended examples, all
information and evaluation results based thereon, etc., described in this document are presented for the sole purpose of reference of
use of the Sanken Products and Sanken assumes no responsibility whatsoever for any and all damages and losses that may be
suffered by you, users or any third party, or any possible infringement of any and all property rights including intellectual property
rights and any other rights of you, users or any third party, resulting from the foregoing.
● All technical information described in this document (the ―Technical Information‖) is presented for the sole purpose of reference
of use of the Sanken Products and no license, express, implied or otherwise, is granted hereby under any intellectual property
rights or any other rights of Sanken.
● Unless otherwise agreed in writing between Sanken and you, Sanken makes no warranty of any kind, whether express or implied,
including, without limitation, any warranty (i) as to the quality or performance of the Sanken Products (such as implied warranty
of merchantability, or implied warranty of fitness for a particular purpose or special environment), (ii) that any Sanken Product is
delivered free of claims of third parties by way of infringement or the like, (iii) that may arise from course of performance, course
of dealing or usage of trade, and (iv) as to any information contained in this document (including its accuracy, usefulness, or
reliability).
● In the event of using the Sanken Products, you must use the same after carefully examining all applicable environmental laws and
regulations that regulate the inclusion or use of any particular controlled substances, including, but not limited to, the EU RoHS
Directive, so as to be in strict compliance with such applicable laws and regulations.
● You must not use the Sanken Products or the Technical Information for the purpose of any military applications or use, including
but not limited to the development of weapons of mass destruction. In the event of exporting the Sanken Products or the Technical
Information, or providing them for non-residents, you must comply with all applicable export control laws and regulations in each
country including the U.S. Export Administration Regulations (EAR) and the Foreign Exchange and Foreign Trade Act of Japan,
and follow the procedures required by such applicable laws and regulations.
● Sanken assumes no responsibility for any troubles, which may occur during the transportation of the Sanken Products including
the falling thereof, out of Sanken’s distribution network.
● Although Sanken has prepared this document with its due care to pursue the accuracy thereof, Sanken does not warrant that it is
error free and Sanken assumes no liability whatsoever for any and all damages and losses which may be suffered by you resulting
from any possible errors or omissions in connection with the contents included herein.
● Please refer to the relevant specification documents in relation to particular precautions when using the Sanken Products, and refer
to our official website in relation to general instructions and directions for using the Sanken Products.
● All rights and title in and to any specific trademark or tradename belong to Sanken or such original right holder(s).
DSGN-CEZ-16002
Not Reco
mmended
for N
ew D
esign
s


