
This guide provides procedures for setting up and configuring the Extron RCP 2000 Remote Control Panel with ISS 506 Support.
IP SetupThe RCP 2000 is delivered with a factory default IP address of 192.168.254.253. If you want to change this address, or need to enter other information required for Ethernet or serial communication, follow these steps:
1. Press the Color/Tint, Cont/Bright, Size, and Center picture control buttons simultaneously and hold them until the Cut button lights (about 2 seconds). The RCP's MAC address is displayed on the LCD screen.
2. Press the Cut or Take button repeatedly to step through the IP Setup menu options to access the item to be changed.
3. If adjusting one of the four IP settings (RCP IP address, switcher IP address, subnet mask, or Gateway), press the Color/Tint, Cont/Bright, Size, or Center button to select an address block (octet) to change. The selected octet on the LCD screen blinks.
4. Rotate the H Adjust knob to change the selected value.
5. When finished, press the Detail button to save the configuration and exit IP Setup.
Press
DefaultCycle
CUT
Press
CUT
Step1
Step3
Step5
Press
CUT
Press Color/Tint, Cont/Bright, Size, and Center and hold for 2 sec.
Rotate the H knob to change the selected IP address segment, set the baud rate, or turn DHCP on and off.
Press each Picture Control button to select the next IP address segment.
Step2
Step4
A6-00-B700-0F-2B
Press the Detail button to save the configuration and exit IP Setup.
CENTERSIZECONTBRIGHT
COLORTINT
I 010.056P142.008
MAC address RCP’s IP address
S010.056I 003.212
Switcher’s IP
S255.255M255.000
Subnet mask Press
CUT
DHCPOff
CENTERSIZECONTBRIGHT
COLORTINT
Select1st octet
Select3rd octet
Select2nd octet
Select4th octet
H 000-255
G010.056M000.100
Gateway IP
RCP Baud9600
Press
CUT
Press
CUT
Press
CUT
Sw Baud9600
Press
CUT
H
9600-115,200
H
9600-115,200
Press the Cut button to cycle through the IP Setup menu options.
Press simultaneously.
DETAIL
68-1608-01 Rev. A08 08
RCP 2000 with ISS 506 Support Setup Guide
2 3 4 5 6 7 8
CUT
CONTBRIGHT
H
V
COLORTINT
WIPE DISSOLVE
TAKE2 3 4 5 6 7 8
PROGRAM
ADJUST
PICTURE CONTROLS
PREVIEW ION
LOGO 1/BLACK
LOGO 2/BLACK
LOGO 1/BLACK
LOGO 2/BLACK
SIZE CENTER DETAIL
AUTOIMAGE
Press and holdall four buttons.
The CUT button lights.
A6-00-B700-0F-2B
After 2 seconds, the display shows the MAC address.
01 = Dissolve (PIP only) 10 = S02 = Soft Right 11 = S03 = Soft Left 12 = S04 = Soft Up 13 = S05 = Soft Down 14 = 06 = Soft Center In 15 =07 = Soft Center Out 16 = 08 = Soft Curtain In 17 =09 = Soft Curtain Out
Wipe an
Step
1

RCP 2000 with ISS 506 Support • Setup Guide2
RCP 2000 with ISS 506 Support Setup Guide (cont'd)
RS-232 SetupTo configure an RS-232 connection to the switcher,
1. Plug the supplied 12' RS-232 cable into the RCP's rear panel To Switcher port and the switcher's RS-232/422 port.
2. Press and hold the Color/Tint, Cont/Bright, Size, and Center buttons simultaneously until the Cut button lights and the MAC address appears in the LCD window.
3. Press Cut two times, until the switcher IP address is displayed in the LCD window. The Color/Tint button flashes.
4. Set the switcher's IP address to 000.000.000.000 as follows:
a. Press one of the picture control buttons to access the desired octet of the switcher's IP address. Access the address blocks as follows:
Select 1st octet Select 2nd octet Select 3rd octet Select 4th octet
b. When the desired octet is blinking in the LCD window, rotate the H knob all the way to the left to set the address block to 000.
c. Repeat steps a and b as needed for each address block that needs to be set to 000.
5. If you need to change the switcher's baud rate, press Cut repeatedly until the Sw Baud screen appears.
Rotate the H knob to set the switcher's baud rate.
6. Press Detail to exit the setup menu.
Selecting Transition EffectsSelecting wipe, PIP, and title effects
To select a wipe, PIP, or title effect,
1. Press and hold the Wipe button.
2. While holding the Wipe button, press the Dissolve
button repeatedly to cycle through the Wipe, Pip, and Title menus.
For Title, press Wipe + Dissolve until Title Lvl is displayed on the LCD screen, then skip to step 4.
3. When the desired function (Wipe or Pip) is displayed in the LCD window, continue to hold down the Wipe button while turning the Adjust knob to select the number of the desired sub-effect (02 through 25 for Wipe; 01 through 25 for PIP). See the label in the upper-right corner of the RCP front panel for a list of available effects.
N You can not select a cut sub-effect while in Wipe or PIP mode. To perform a cut in these modes, select the desired preview input, then press the Cut button.
4. Release the Wipe button (it should remain lit), and rotate the Adjust knob to select the duration of the sub-effect (0.0 to 5.0 seconds) or the intensity level (Lvl) of the preview image that will become transparent in Title mode (000 to 255).
N If you want to control the duration of the wipe and PIP effects manually, move the T handle up or down at the desired rate.
5. Press the Take button to implement your effect on the selected preview input.
WIPE DISSOLVE
Pressand hold
Press to step through menu
+
WIPE
Hold
Rotate to select wipe
+ADJUST
Press Press
ADJUST
Press
02-25
ADJUST
01-25
DISSOLVE DISSOLVE
DISSOLVE
Wipe #030.5 Sec
Pip #030.5 Sec
Title Lvl 150
DefaultCycle
WIPE
Press and hold
ADJUST
0.0-5.0 Sec.
ADJUST
0.0-5.0 Sec.
ADJUST
0-255WIPE
WIPE
Release
WIPE
Release
Release
COLORTINT
Press
CONTBRIGHT
Press
SIZE
Press
CENTER
Press
S 000.000I 000.000
HRotate to set blinking octet to 000.
Sw Baud9600
H
9600-115,200

Selecting a cut (full screen program/preview swap)To select a full screen cut transition (immediate and seamless replacement of the program image with the preview image),
1. With the RCP in Wipe or Dissolve mode, select a preview input.
2. Press the Cut button. The selected preview image immediately becomes the program image.
Selecting a dissolveTo select a dissolve effect (the program image fades out while the preview image fades in),
1. Select a preview input.
2. Press the Dissolve button, which lights.
3. While the Dissolve button is lit, rotate the Adjust knob to select the duration in seconds (0.0 through 5.0) of the dissolve effect.
4. Press Take to execute the dissolve effect.
N If you want to control the duration of the dissolve manually, move the T-bar handle up or down at the desired rate.
Using Picture ControlsThe Picture Controls buttons, located near the top of the front panel, let you adjust settings on the preview output.
1. Select a Preview input.
2. Select a transition effect (wipe, PIP, title, or dissolve).
3. Press a picture control button.
4. Rotate the H and/or V adjustment knobs, located to the right of the buttons, to select the values, as shown below.
Color/Tint
COLORTINT
V
HPress
Adjust color
Adjust tint
Col Tint064 064
Contrast/ brightness
CONTBRIGHT
V
H
Press
Adjust contrast
Adjust brightness
Con Brt 064 064
Detail
DETAIL
V
HPress
Adjust sharpness
Detail064
or
Pip Det064
Image size
SIZE
V
HPress
Adjust width
Adjust height
Hsz 1024Vsz 0786
H W 0513V W 0386
Wipe, dissolve, and title modes
PIP mode
H I 0513V I 0386
Window size Image size
In PIP mode: Press the Size button again to toggle between window size and image size adjustment.
The Size button stays lit steadily during window size adjustment and blinks during image size adjustment.
Centering
CENTER
V
H
PressAdjust horizontalposition
Adjust vertical position
Hsh 2048Vsh 2048
H W 0640V W 0480
Wipe, dissolve, and title modes
PIP mode
H I 0640V I 0480
Window position Image position
In PIP mode: Press the Center button again to toggle between window position and image position.
The Center button stays lit during window position adjustment and blinks during image position adjustment.
RCP 2000 with ISS 506 Support Setup Guide (cont'd)
COLORTINT
CONTBRIGHT
SIZE CENTER DETAIL
PICTURE CONTROLSH
V
DISSOLVE
Press
Rotate to select dissolveduration.
+ADJUST
CUT
Press
RCP 2000 with ISS 506 Support • Setup Guide 3
N Picture controls affect only the current preview input.
N If the current PIP or Title preview input is active on the program output, no picture control adjustment is possible.
TAKE
Press
© 2008 Extron Electronics. All rights reserved.
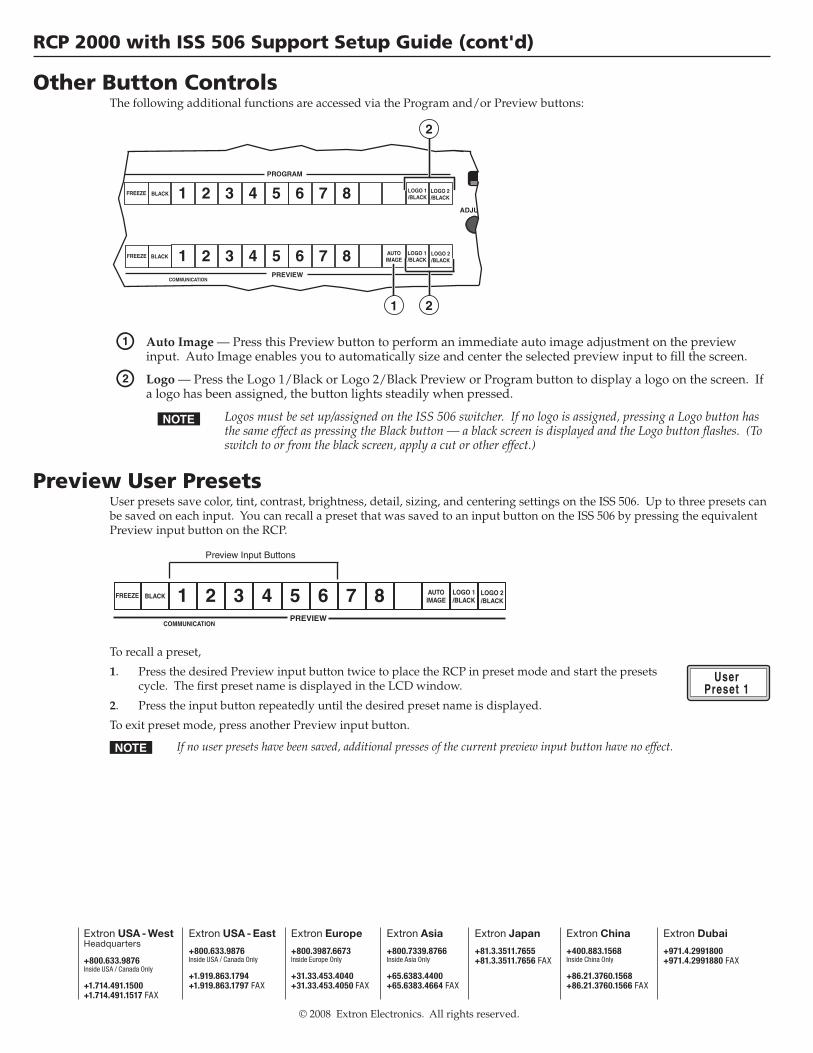
Other Button ControlsThe following additional functions are accessed via the Program and/or Preview buttons:
1 2 3 4 5 6 7 8
2 3 4 5 6 7 8
PROGRAM
ADJUS
PREVIEWCOMMUNICATION
LOGO 1/BLACK
LOGO 2/BLACK
LOGO 1/BLACK
LOGO 2/BLACK
AUTOIMAGE
1 2
2
FREEZE BLACK
FREEZE BLACK
1
a Auto Image — Press this Preview button to perform an immediate auto image adjustment on the preview input. Auto Image enables you to automatically size and center the selected preview input to fill the screen.
b Logo — Press the Logo 1/Black or Logo 2/Black Preview or Program button to display a logo on the screen. If a logo has been assigned, the button lights steadily when pressed.
N Logos must be set up/assigned on the ISS 506 switcher. If no logo is assigned, pressing a Logo button has the same effect as pressing the Black button — a black screen is displayed and the Logo button flashes. (To switch to or from the black screen, apply a cut or other effect.)
Preview User PresetsUser presets save color, tint, contrast, brightness, detail, sizing, and centering settings on the ISS 506. Up to three presets can be saved on each input. You can recall a preset that was saved to an input button on the ISS 506 by pressing the equivalent Preview input button on the RCP.
2 3 4 5 6 7 8PREVIEW
COMMUNICATION
LOGO 1/BLACK
LOGO 2/BLACK
AUTOIMAGE
FREEZE BLACK 1
Preview Input Buttons
To recall a preset,
1. Press the desired Preview input button twice to place the RCP in preset mode and start the presets cycle. The first preset name is displayed in the LCD window.
2. Press the input button repeatedly until the desired preset name is displayed.
To exit preset mode, press another Preview input button.
N If no user presets have been saved, additional presses of the current preview input button have no effect.
RCP 2000 with ISS 506 Support Setup Guide (cont'd)
UserPreset 1
Extron USA - West Headquarters
+800.633.9876Inside USA / Canada Only
+1.714.491.1500+1.714.491.1517 FAX
Extron USA - East
+800.633.9876Inside USA / Canada Only
+1.919.863.1794+1.919.863.1797 FAX
Extron Europe
+800.3987.6673Inside Europe Only
+31.33.453.4040+31.33.453.4050 FAX
Extron Asia
+800.7339.8766Inside Asia Only
+65.6383.4400+65.6383.4664 FAX
Extron Japan
+81.3.3511.7655+81.3.3511.7656 FAX
Extron China
+400.883.1568Inside China Only
+86.21.3760.1568+86.21.3760.1566 FAX
Extron Dubai
+971.4.2991800+971.4.2991880 FAX


