Grade 3
Science
Unit: 05
Lesson: 03
Suggested Duration: 9 days
Science Grade 03 Unit 05 Exemplar Lesson 03: Investigating Rocks and SoilScience Grade 03 Unit 05 Exemplar Lesson 03: Investigating Rocks and Soil
This lesson is one approach to teaching the State Standards associated with this unit. Districts are encouraged to
customize this lesson by supplementing with district-approved resources, materials, and activities to best meet the needs
of learners. The duration for this lesson is only a recommendation, and districts may modify the time frame to meet
students’ needs. To better understand how your district may be implementing CSCOPE lessons, please contact yourchild’s teacher. (For your convenience, please find linked the TEA Commissioner’s List of State Board of Education
Approved Instructional Resources and Midcycle State Adopted Instructional Materials.)
Lesson Synopsis
In this lesson, students explore properties and uses of rocks and minerals. They investigate how soil is formed from the
weathering of rock and decomposition of plant and animal remains.
TEKS
The Texas Essential Knowledge and Skills (TEKS) listed below are the standards adopted by the State Board of
Education, which are required by Texas law. Any standard that has a strike-through (e.g. sample phrase) indicates that
portion of the standard is taught in a previous or subsequent unit. The TEKS are available on the Texas Education
Agency website at http://www.tea.state.tx.us/index2.aspx?id=6148.
3.5 Matter and energy. The student knows that matter has measurable physical properties and
those properties determine how matter is classified, changed, and used. The student is
expected to:
3.5A Measure, test, and record physical properties of matter, including temperature, mass, magnetism, and the
ability to sink or float.
3.5D Explore and recognize that a mixture is created when two materials are combined such as gravel and sand and
metal and plastic paper clips.
3.7 Earth and space. The student knows that Earth consists of natural resources and its surface
is constantly changing. The student is expected to:
3.7A Explore and record how soils are formed by weathering of rock and the decomposition of
plant and animal remains.
3.7D Explore the characteristics of natural resources that make them useful in products and materials such as
clothing and furniture and how resources may be conserved.
Scientific Process TEKS
3.1 Scientific investigation and reasoning. The student conducts classroom and outdoor
investigations following school and home safety procedures and environmentally appropriate
practices. The student is expected to:
3.1A Demonstrate safe practices as described in the Texas Safety Standards during classroom and outdoor
investigations, including observing a schoolyard habitat.
3.1B Make informed choices in the use and conservation of natural resources by recycling or reusing materials
such as paper, aluminum cans, and plastics.
3.2 Scientific investigation and reasoning. The student uses scientific inquiry methods during
laboratory and outdoor investigations. The student is expected to:
3.2A Plan and implement descriptive investigations, including asking and answering
Last Updated 05/03/13 page 1 of 31
questions, making inferences, and selecting and using equipment or technology needed,
to solve a specific problem in the natural world.
3.2B Collect data by observing and measuring using the metric system and recognize
differences between observed and measured data.
3.2C Construct maps, graphic organizers, simple tables, charts, and bar graphs using tools and current technology
to organize, examine, and evaluate measured data.
3.2D Analyze and interpret patterns in data to construct reasonable explanations based on
evidence from investigations.
3.2F Communicate valid conclusions supported by data in writing, by drawing pictures, and
through verbal discussion.
3.3 Scientific investigation and reasoning. The student knows that information, critical thinking,
scientific problem solving, and the contributions of scientists are used in making decisions.
The student is expected to:
3.3A In all fields of science, analyze, evaluate, and critique scientific explanations by using
empirical evidence, logical reasoning, and experimental and observational testing,
including examining all sides of scientific evidence of those scientific explanations, so as
to encourage critical thinking by the student.
3.3C Represent the natural world using models such as volcanoes or Sun, Earth, and Moon system and identify their
limitations, including size, properties, and materials.
3.4 Scientific investigation and reasoning. The student knows how to use a variety of tools and
methods to conduct science inquiry. The student is expected to:
3.4A Collect, record, and analyze information using tools, including microscopes, cameras, computers, hand lenses,
metric rulers, Celsius thermometers, wind vanes, rain gauges, pan balances, graduated cylinders, beakers,
spring scales, hot plates, meter sticks, compasses, magnets, collecting nets, notebooks, sound recorders, and
Sun, Earth, and Moon system models timing devices, including clocks and stopwatches materials to support
observation of habitats of organisms such as terrariums and aquariums.
3.4B Use safety equipment as appropriate, including safety goggles and gloves.
GETTING READY FOR INSTRUCTION
Performance Indicators
Grade 03 Science Unit 05 PI 03
Create a storyboard that illustrates and describes how soil is formed by weathering of rock and the decomposition of plant and animal
remains.
Standard(s): 3.2F , 3.7A
ELPS ELPS.c.1C , ELPS.c.3J , ELPS.c.5G
Key Understandings
Soils are formed by the processes of weathering and decomposition.
— How is soil formed?— Why is soil important?The characteristics of natural resources determine their possible uses.
— How do the properties of a rock or mineral determine its possible use?Natural resources can be conserved in a variety of ways.
— What are some ways we can conserve natural resources?
Vocabulary of Instruction
Grade 3
Science
Unit: 05
Lesson: 03
Suggested Duration: 9 days
Last Updated 05/03/13 page 2 of 31
natural resources
organic/living, once living
inorganic/nonliving
minerals
fossil fuels
weathering
erosion
soil
humus
decomposer
Materials
apple (1 per class)
baby food jar filled with water (see Advanced preparation, 2 per class)
beaker (plastic, for holding the water, 1 per group)
book or story (about soil, including soil conservation, 1 per teacher)
calcium carbonate chalk (1 piece per group plus 1 piece for the demonstration)
chocolate chip cookie (1 per student)
clay “rock” (similar sized, see Advanced Preparation, 2 per class)craft stick (2 per group)
cup (clear plastic, about 6 ounces, 1 per group)
decomposition container (see Advance Preparation, 1 per class): 2 liter bottle (label removed, 1 per class), scoop
(1 per class), soil (moist, chemicalfree, about 8–10 cups per class), earthworms (6–8 per class), organic material(such as dry leaves, grass clippings, or pieces of banana peel, to start the investigation, about ½ cup per class)disposable gloves (as needed)
gloves (plastic or latex, 1 pair per student) – Optionalhand lens (1 per student)
holepunched slides of sand (see Advance Preparation,1 set per group): card stock (1”x3” piece, holepunched inthe middle, 3 per group), hole punch (1 per class), tape (clear, 1 roll per class), sand (coarse, medium, and fine
to create the sand slides and for the sediment jar, ½ cup of each per class), resealable plastic bags (to hold eachof the types of sand, 3 per class), jar with lid (about 8 ounces, to hold the three types of sand and water, 1 jar per
class), dish soap (for the sediment jar, 2–3 drops per class)jar (plastic, with lid, 1 per group)
KLEW chart (per class)
knife (teacher use only, for demonstration, 1 per class)
measuring cup (metric, 1 per group)
microscope (1–2 per class)newspaper (3–4 sheets per table group)paper (light and dark, 1 sheet of each per group)
paper (plain or folded newsprint for storyboard frames and captions, 3-4 sheets per student)
paper towel (1 sheet per student)
paper towel (to place soil on, 1 sheet per group)
rich soil sample (see Advance Preparation, 1 per group)
rocks (see Advance Preparation,1 of each per group)
safety goggles (1 pair per student)
samples or pictures of rocks (see Advance Preparation, 1 set of rocks, and 1 set of pictures per class)
signs for corners labeled: Air, Rocks/Soil, Water, Living Things (1 of each per class)
soil profile jar(s) (from previous activity)
spoon (plastic, 2 per group)
sticky note (1 per student)
strainer or sieve (1 per group) – Optionalsturdy toothpicks or straightened paperclips (1 per student)
vinegar (white, ½ cup per group)water (about 200 mL per group)
yarn (for attaching cards, about 24 inches per student)
Attachments
Grade 3
Science
Unit: 05
Lesson: 03
Suggested Duration: 9 days
Last Updated 05/03/13 page 3 of 31
All attachments associated with this lesson are referenced in the body of the lesson. Due to considerations for
grading or student assessment, attachments that are connected with Performance Indicators or serve as answer
keys are available in the district site and are not accessible on the public website.
Teacher Resource: PowerPoint: Third Rock from the Sun
Teacher Resource: PowerPoint: Rocks and Minerals: Properties and Uses
Optional Handout: Properties of Rocks and Minerals (see Advance Preparation, 1 per group)
Optional Handout: Uses of Rocks and Minerals (see Advance Preparation, 1 per group)
Optional Handout: Rocks and Minerals Photos (see Advance Preparation, 1 per group)
Teacher Resource: PowerPoint: Weathering: You Break Me Up!
Teacher Resource: Decomposition Container SAMPLE
Teacher Resource: Nature’s Recipe for Soil: Teacher Guide
Teacher Resource: Role Play Cards
Teacher Resource: Character Cards
Teacher Resource: Apple Model: Available Soil
Teacher Resource: Performance Indicator Instructions KEY
Resources
None Identified
Advance Preparation
1. Gather rock samples from rock and mineral suppliers, a local rock ranch, a landscaping supply, etc.) Samples of
granite, a sedimentary rock such as mudstone, sandstone, limestone, or conglomerate, should be included. Also
needed are samples or pictures of granite, obsidian, pumice, limestone, halite/rock salt, coal, talc, graphite, iron
ore or magnetite/hematite, marble, diamond, and copper ore (1 set of rock samples and 1 set of pictures per
class).
2. Copy the Optional Handouts: Rocks and Minerals Photos, Properties of Rocks and Minerals, and Uses of
Rocks and Minerals on sturdy paper. Cut them apart, and paper clip the sets together. One set per group is
needed.
3. Gather books about rocks, minerals, soil, and earthworms.
4. Download and preview the PowerPoint presentations, videos, and student interactive sites you plan to use.
5. Make natural resource signs for Rocks/Soil, Water, Air, Living Things, and post them in the four corners of the
classroom.
6. If you have students with food allergies, you may want to substitute “mock rocks” in the cookie mining activity.7. “Before” and “after” weathering items:
Make two similar clay “rocks”. You can use air dry clay, pottery clay, or unglazed pieces of brick for these rocks.Roll pieces of clay into a roundish shape, about 4 cm in diameter, and flatten to about 1 cm thickness. These will
crack when frozen and then placed in the microwave. Do not use modeling clay.
Fill one baby food jar to the brim with water, and put the lid on tightly. Wrap the water-filled jar in newspaper, and
place it in a plastic bag. Place the plastic bag in the freezer the day before the activity.
You can find 95% calcium carbonate chalk at an office supply store. Do not use ‘dustless’ chalk. Place 1–2 piecesof the chalk in a plastic bag, and put the bag in the freezer at least a day before the activity. Calcite, or limestone,
may be substituted for the calcium carbonate chalk, but you will want to ensure that it reacts with the vinegar.
8. Make hole-punched slides of sand (course, medium, fine, or silt if available). Cut tag board or a manila folder into
1”x3” rectangles. Punch a hole in the center, and place clear tape on the underside sticky side up. Dip into theplastic bag of sand. Sand will stick to the tape.
9. Prepare KLEW chart for soil.
Grade 3
Science
Unit: 05
Lesson: 03
Suggested Duration: 9 days
Last Updated 05/03/13 page 4 of 31
10. Collect samples of rich topsoil from different locations around the school, park, garden, etc. Try to locate or
obtain samples that include organic matter. Do not use packaged potting soil mix or peat.
11. Obtain red wiggler (Eisenia fetida) earthworms (from bait shops, pet stores, a local farmer’s compost pile, or ascience supplier).
12. Construct premade decomposition container. See the Teacher Resource: Decomposition Container.
13. Prepare attachment(s) as necessary.
Background Information
This lesson shifts the focus from those processes that make rapid changes to the Earth’s crust to those that slowly break down the crust
in the formation of soil. Along the way, students will explore important uses of rocks/minerals and soil and how these natural resources
can be conserved.
Students will examine changes due to slow processes, such as the formation of soil. This lesson begins with a brief introduction to the
process of weathering. Students observe how the forces of wind, water, ice, etc. help to break and grind rock down into smaller and
smaller particles which eventually become a part of soil.
INSTRUCTIONAL PROCEDURES
Instructional Procedures
ENGAGE/EXPLORE – Natural Resources
Notes for Teacher
NOTE: 1 Day = 50 minutes
Suggested Day 1
1. Direct students attention to the signs in the corners of the room:
Rocks/Soil, Water, Air, and Living Things (plants/animals). Explain
to students that these are called natural resources.
Ask
What does natural mean? (Natural means that it comes from
nature and is not man-made.)
What is a resource? (A resource is something that is valuable
to us because it can be used to meet our needs or satisfy our
wants.)
2. Record the word and its definition on a chart or the board: Natural
resources are materials in the environment that are useful to
people. They can be organic (living or once living) or inorganic
(nonliving).
3. Ask students to silently think about their answer to the following
question:
Of the four categories listed, which do you think is the
most important and why? (Students will be responding by
writing their answer on a sticky note.)
4. Give each student a sticky note. Instruct them to write the natural
resource that they believe is the most important on the sticky note
and then quickly move to that corner.
5. When students have assembled in the various corners, provide
one or two minutes for them to discuss their reasons with others in
that group. They should be prepared to share their group’s ideaswith the class.
Materials:
signs for corners labeled: Air,
Rocks/Soil, Water, Living Things (1 of
each per class)
sticky note (1 per student)
hand lens (1 per student)
rocks (see Advance Preparation,1 of
each per group)
paper (light and dark, 1 sheet of each
per group)
Attachments:
Teacher Resource: PowerPoint: Third
Rock From the Sun
Safety Notes:
Students are not to use the sense of taste. Students
should wash their hands after handling rocks.
Instructional Notes:
Instruct students to place their sticky notes on the
sign posted in the corner they chose. Before Day 2,
the teacher assembles the sticky notes into a bar
graph to compare the data. This will be a record that
Grade 3
Science
Unit: 05
Lesson: 03
Suggested Duration: 9 days
Last Updated 05/03/13 page 5 of 31
6. Rotate around the corners to allow each group to share their
ideas. Explain to students that they will have an opportunity to
learn more about some of these natural resources and their
importance.
7. Share the Teacher Resource: PowerPoint: Third Rock from the
Sun. Slide 1: Diagram of inner planets orbiting the Sun.
Ask:
Why is the Earth called the 'third rock from the Sun'?
Answers may vary. It is one of the four rocky planets and is
third in distance from the Sun.
Slides 2-17: Pictures of various landforms and rock formations.
For each slide, ask students to point out where the rock(s) is
(are).
Why can you see the rock in some of the pictures but not
in others? Answers may vary.
8. Emphasize that rock is the material that makes up the surface of
our Earth. It may have a thin covering of soil or sand or be hidden
by buildings, roads, or even an ocean; but, it is what makes up the
land beneath our feet.
Ask students to share their answer with a partner:
If you could go to any of these places to find your own
special rock, where would you go? Answers may vary.
9. Give each group a tray with rock samples, hand lenses, and a
sheet of paper (dark if the rocks are light and light if the rocks are
dark.) Instruct students to observe the sample of granite, first using
their senses and then their hand lenses. Instruct them to draw and
color a picture of the rock in their science notebooks and write
down at least 2–3 observations.
10. Draw their attention to the next special rock (a sedimentary rock
such as mudstone, sandstone, limestone, or conglomerate).
Ask:
How is this rock different from the first? Answers will vary,
but will likely point out differences in color or particle sizes.
11. Instruct students to observe the sample of sedimentary rock, first
using their senses and then their hand lenses. Instruct them to
draw and color a picture of the rock in their science notebooks and
write down at least 2–3 observations.
you can refer to later in the lesson or year.
It is helpful to have different sized samples of rocks.
Students may not realize that the same material may
range in size from pebble to boulder, etc.
Science Notebooks:
Students will draw and record observations about the
rock samples.
EXPLAIN – Uses of Rocks/Minerals Suggested Day 2
1. Reflect back on the four corners bar graph and the students’support, or lack of support, for the importance of rocks (and
soil). Explain to students that rocks and minerals have been an
important natural resource throughout time.
2. Use a collection of rock samples, artifacts, and/or pictures to
illustrate the properties, uses, and importance of rocks/minerals
throughout time. The Teacher Resource: PowerPoint: Rocks and
Materials:
samples or pictures of rocks (see
Advance Preparation, 1 set of rocks,
and 1 set of pictures per class)
Grade 3
Science
Unit: 05
Lesson: 03
Suggested Duration: 9 days
Last Updated 05/03/13 page 6 of 31
Minerals: Properties and Uses includes visuals and notes that
can be used to guide the explanation.
3. To begin the discussion,
Ask:
How do you think early man may have used rocks?
Answers may vary.
4. Show slide 2 of the Teacher Resource: PowerPoint: Rocks and
Minerals: Properties and Uses.
Ask:
How do the properties of a rock or mineral determine its
possible use?
Based on its appearance and properties, what do you
think the rock (granite) might be used for? Why? Accept
all answers.
5. The remaining slides introduce the properties and uses of a variety
of rocks and minerals. The explanation can be enhanced by
having real rock and mineral samples available for observation.
6. Alternate Explore/Explain Activity: Optional Handouts:
Properties of Rocks and Minerals, Uses of Rocks and
Minerals, and Rocks and Minerals Photos have been included
as a matching activity. Student groups could work together to
answer the key question (How do the properties of a rock or
mineral determine its possible uses?) by matching the rock with its
properties and possible uses. The Teacher Resource: PowerPoint:
Rocks and Minerals: Properties and Uses would provide a
follow-up or check for understanding. Once again, the activity
would be enhanced by having real rock and mineral samples
available for observation.
Attachments:
Teacher Resource: PowerPoint: Rocks
and Minerals: Properties and Uses
Optional Handout: Properties of
Rocks and Minerals (see Advance
Preparation, 1 per group)
Optional Handout: Uses of Rocks and
Minerals (see Advance Preparation, 1
per group)
Optional Handout: Rocks and
Minerals Photos (see Advance
Preparation, 1 per group)
Safety Notes:
(If using real rock samples)
Students are not to use the sense of taste. Students
should wash their hands after handling rocks.
ELABORATE – Conservation of Rocks/Minerals Suggested Day 2 (continued)
1. Say:
Mining is the way that rocks/minerals/metals/fuels are
taken out of the Earth so that they can be used by
people.
Many times, in the past and present, the land where
these resources were mined was destroyed or badly
damaged.
This affected the plants, animals, water, air, and the
people who lived in the area.
It is important to be careful about the ways that we take
these valuable resources from the Earth.
2. Distribute a cookie, toothpick or paperclip, and paper towel to each
student.
3. Explain to students that the cookie represents part of our rocky
Earth. It could be part of a mountain, a canyon, or any other rocky
landform.
Ask:
Materials:
chocolate chip cookie (1 per student)
sturdy toothpicks or straightened
paperclips (1 per student)
paper towel (1 sheet per student)
Safety Notes:
Be aware of any contact or food allergies children
may have when handling materials.
Caution students not to put anything in their mouths
without teacher permission.
Instructional Notes:
Grade 3
Science
Unit: 05
Lesson: 03
Suggested Duration: 9 days
Last Updated 05/03/13 page 7 of 31
How can you tell that the cookie (rock) is a mixture of
different minerals? It is made of different materials or
ingredients. The different parts are not the same.
4. Explain to students that the chocolate chips represent ore
deposits. The toothpick or paperclip is like a pick or piece of
equipment that is used for mining the ore deposits. Their job is to
see how much of the ore (chocolate chips) can be mined out of the
Earth’s crust (cookie) without destroying the land.
5. Say:
There are some constraints or limitations for this
investigation.
Once the cookie has been placed on the paper towel it
may not be picked up again.
The toothpick or paperclip is the only tool that may be
used to mine the ore.
You may only use the toothpick- no hands or other
implements.
You will have only five minutes to “mine” the cookie.
6. When the allotted time is up, instruct students to place the
toothpick or paperclip on the paper towel and their hands in their
lap.
Say:
We must be careful about how we use this ore because
once it is used up and gone it cannot be replaced.
7. Facilitate a discussion about how the model (cookie) does and
does not represent the real thing (mining on Earth). Include
questions such as:
how many pieces of ore (chips) did you mine from your land? (If
there is an unusually high quantity, you may ask the student how
they were able to get this amount. If their cookie is obliterated, then
you will want to talk about land reclamation, conservation of
resources, and environmental issues.)
8. Conclude by stating that it takes hundreds of millions of years to
form the rocks, minerals, metals, and fuels that we depend on for
our everyday needs.
Ask:
What are some ways we can conserve natural
resources? Reduce, reuse, and recycle
If you allow students to eat their chocolate chips (ore)
and pieces of cookie (rock), you can draw an analogy
to the use and conservation of these earth materials.
“If we use up all of the earth materials available to us
now, we will not have those resources available for
our use again. Unlike cookies, rocks and minerals
cannot be replaced.”
Science Notebooks:
This would be an appropriate time to add the words:
natural resources, minerals, and ore to the glossary
either in the science notebook or on the class word
wall.
EXPLORE/EXPLAIN – Weathering of Rock Suggested Day 3
1. Divide the class into groups of 3–4 students.
2. Explain to students that the real rock in the pictures they are aboutMaterials:
Grade 3
Science
Unit: 05
Lesson: 03
Suggested Duration: 9 days
Last Updated 05/03/13 page 8 of 31
to see has been broken down into smaller and smaller pieces with
the help of several forces. Use the Teacher Resource: PowerPoint:
Weathering: You Break Me Up! slides 2–4. As you show eachcorresponding picture,
Ask:
What force might have caused the rocks to fall down the
cliff or mountainside before breaking into smaller
pieces? (Gravity)
What force might have carved out this shape by grinding
it down with blowing sand? (Wind)
What force might have tumbled these rocks until the
edges were broken down and smooth? (Rushing water)
3. Explain to students that forces, such as wind, water, and gravity,
work hand in hand with other forces to break rock down into
smaller and smaller pieces. Students will investigate a few of those
forces.
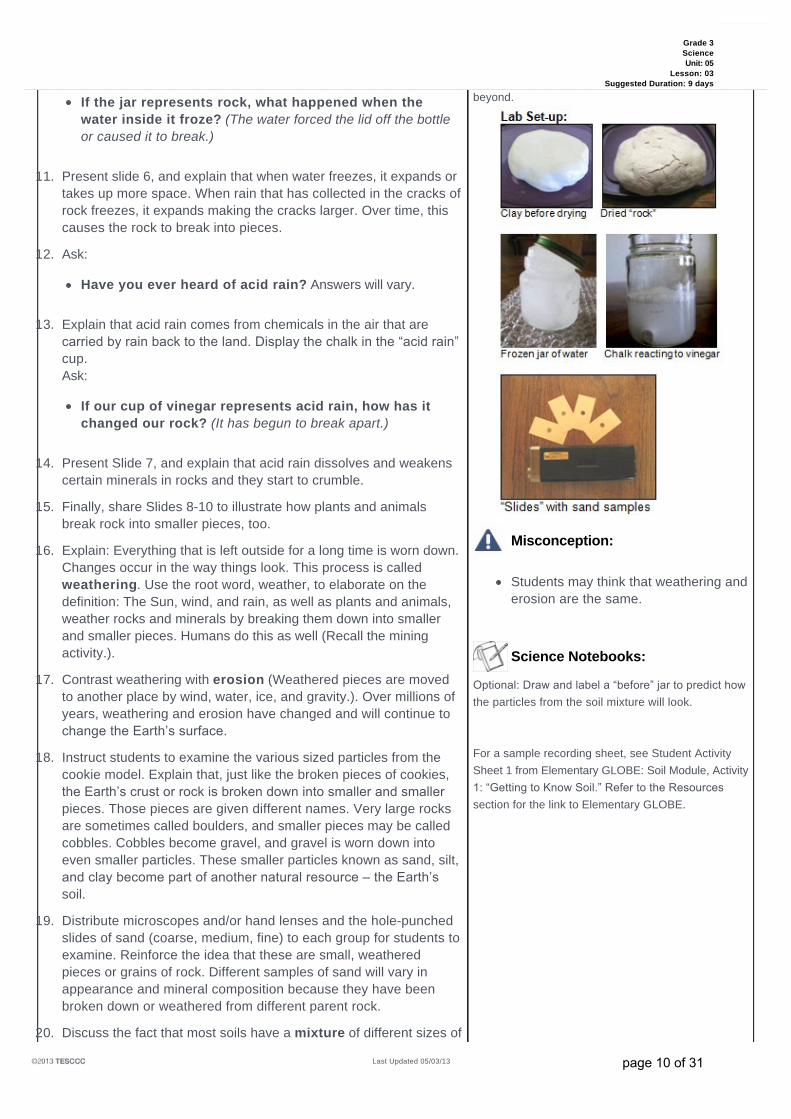
4. Display the “before” items: clay “rock”, baby food jar of water, andchalk.
5. Instruct students to predict what will happen if you subject each
one, respectively, to repeated heating and cooling
(freezing/thawing), freezing temperatures, and lemon juice or
vinegar.
6. Students should have the opportunity to record their predictions in
their science notebooks before they see the “after” items.
7. Bring out the “after” items.Ask:
What has happened to the clay “rock”? (The outer layer is
cracking.)
If the hard clay ball represents rock, what in the natural
world would be responsible for heating and cooling?
(The Sun’s energy)
8. Distribute a clear container of vinegar to each group. Instruct
students to leave the container of vinegar in the middle of the table
where all group members are able to observe it. Distribute a piece
of calcium carbonate chalk to each group. Instruct one student
from each group to place the chalk into the container of vinegar.
Students should spend about five minutes watching the reaction. A
labeled drawing should be made in the science notebook along
with any observational notes.
9. Present slide 5, and explain that some rocks will crack and break
apart due to extreme changes in temperature. The rocks
continually heat up in the Sun during the day and cool down when
the temperature drops at night. It takes many years of heating and
cooling for rock to break into smaller pieces this way.
10. Show the frozen jar of water.
Ask:
safety goggles (1 pair per student)
gloves (plastic or latex, 1 pair per
student) – Optionalclay “rock” (similar sized, see AdvancedPreparation, 2 per class)
baby food jar filled with water (see
Advanced preparation, 2 per class)
cup (clear plastic, about 6 ounces, 1
per group)
vinegar (white, ½ cup per group)calcium carbonate chalk (1 piece per
group plus 1 piece for the
demonstration)
microscopes and/or hand lenses (1 per
pair or group)
hole-punched slides of sand (see
Advance Preparation,1 set per group)
card stock (1”x3” piece, holepunched in the middle, 3 per
group)
hole punch (1 per class)
tape (clear, 1 roll per class)
sand (coarse, medium, and fine
to create the sand slides and for
the sediment jar, ½ cup of eachper class)
resealable plastic bags (to hold
each of the types of sand, 3 per
class)
jar with lid (about 8 ounces, to
hold the three types of sand and
water, 1 jar per class)
dish soap (for the sediment jar,
2–3 drops per class)
Attachments:
Teacher Resource: PowerPoint:
Weathering: You Break Me Up!
Safety Notes:
Wear goggles if dropping or grinding real or “mock
rocks”.
Wear goggles when handling vinegar.
Instructional Notes:
This is a brief introduction to weathering. Weathering
and erosion will be addressed further in Grade 4 and
Grade 3
Science
Unit: 05
Lesson: 03
Suggested Duration: 9 days
Last Updated 05/03/13 page 9 of 31
If the jar represents rock, what happened when the
water inside it froze? (The water forced the lid off the bottle
or caused it to break.)
11. Present slide 6, and explain that when water freezes, it expands or
takes up more space. When rain that has collected in the cracks of
rock freezes, it expands making the cracks larger. Over time, this
causes the rock to break into pieces.
12. Ask:
Have you ever heard of acid rain? Answers will vary.
13. Explain that acid rain comes from chemicals in the air that are
carried by rain back to the land. Display the chalk in the “acid rain”cup.
Ask:
If our cup of vinegar represents acid rain, how has it
changed our rock? (It has begun to break apart.)
14. Present Slide 7, and explain that acid rain dissolves and weakens
certain minerals in rocks and they start to crumble.
15. Finally, share Slides 8-10 to illustrate how plants and animals
break rock into smaller pieces, too.
16. Explain: Everything that is left outside for a long time is worn down.
Changes occur in the way things look. This process is called
weathering. Use the root word, weather, to elaborate on the
definition: The Sun, wind, and rain, as well as plants and animals,
weather rocks and minerals by breaking them down into smaller
and smaller pieces. Humans do this as well (Recall the mining
activity.).
17. Contrast weathering with erosion (Weathered pieces are moved
to another place by wind, water, ice, and gravity.). Over millions of
years, weathering and erosion have changed and will continue to
change the Earth’s surface.
18. Instruct students to examine the various sized particles from the
cookie model. Explain that, just like the broken pieces of cookies,
the Earth’s crust or rock is broken down into smaller and smallerpieces. Those pieces are given different names. Very large rocks
are sometimes called boulders, and smaller pieces may be called
cobbles. Cobbles become gravel, and gravel is worn down into
even smaller particles. These smaller particles known as sand, silt,
and clay become part of another natural resource – the Earth’ssoil.
19. Distribute microscopes and/or hand lenses and the hole-punched
slides of sand (coarse, medium, fine) to each group for students to
examine. Reinforce the idea that these are small, weathered
pieces or grains of rock. Different samples of sand will vary in
appearance and mineral composition because they have been
broken down or weathered from different parent rock.
20. Discuss the fact that most soils have a mixture of different sizes of
beyond.
Misconception:
Students may think that weathering and
erosion are the same.
Science Notebooks:
Optional: Draw and label a “before” jar to predict how
the particles from the soil mixture will look.
For a sample recording sheet, see Student Activity
Sheet 1 from Elementary GLOBE: Soil Module, Activity
1: “Getting to Know Soil.” Refer to the Resources
section for the link to Elementary GLOBE.
Grade 3
Science
Unit: 05
Lesson: 03
Suggested Duration: 9 days
Last Updated 05/03/13 page 10 of 31
weathered rock. Ask students to suggest how these different-sized
pieces of rock might be separated out from a natural sample of soil
(use sieves, sink/float in water).
21. Instruct students to discuss with a partner how they think the three
different-sized samples of weathered rock might behave when
mixed with water in a jar and allowed to settle, untouched,
overnight. Optional: Students can draw a “before” jar in theirscience notebooks.
22. Put ¼ to ½ cup of each of the three types of sand in a jar. Addwater and a drop of dish soap to the jar. Put the lid on the jar, and
shake well. Place it in an undisturbed location until the next day.
EXPLORE/EXPLAIN – Soil Ingredients Suggested Day 4
1. Let students see how the different sized samples of weathered
rock have separated and settled out. Reiterate that these small
particles of rock become part of another natural resource – soil.Optional: Students can draw an “after” jar in their sciencenotebooks. (Recycle the sand in the jar.)
2. Divide the class into groups of 3–4 students.
3. Use a KLEW chart to assess students’ prior knowledge of soil andits importance. Some initial probes might include:
What do you know about soil? Answers will vary.
What is the difference between soil and dirt? (Dirt is soil
that is out of place.)
If we want to study soil, where can we find it? (It is
covering the ground in most places.)
What’s in the soil? What’s under the soil? Answers will
vary.
Why does anyone really care about soil? Answers will vary.
4. Reflect back on the four corners activity and students’ support orlack of support for the importance of soil (and rocks).
5. Finally, use soil’s connection to food to introduce nature’s recipefor soil. Facilitate a discussion:
Have you ever made something from a recipe? What
ingredients were needed? Select one student to give an
example.
“Mother Nature” has her own recipe for cooking up soil.What ingredients do you think are needed for soil?
Answers will vary. Instruct students to record their ideas in their
science notebooks.
Let’s examine some soil and see if we can find out.
6. Cover the work areas with newspaper. Distribute disposable
gloves, a soil sample, a paper towel, and various tools, such as
hand lenses, spoons, craft sticks, and strainers/sieves, to each
group.
Materials:
safety goggles (1 pair per student)
KLEW chart (per class)
newspaper (3–4 sheets per tablegroup)
disposable gloves (as needed)
rich soil sample (see Advance
Preparation, 1 per group)
paper towel (to place soil on, 1 sheet
per group)
hand lens (2 per group)
microscope (1–2 per class)spoon (plastic, 2 per group)
craft stick (2 per group)
strainer or sieve (1 per group) –Optional
jar (plastic, with lid, 1 per group)
measuring cup (metric, 1 per group)
beaker (plastic, for holding the water, 1
per group)
water (about 200 mL per group)
Safety Notes:
Either provide disposable gloves when handling soil,
or instruct students to keep hands away from eyes
and mouth and wash hands thoroughly when
finished.
Students should be instructed to wear safety goggles
during this investigation.
Grade 3
Science
Unit: 05
Lesson: 03
Suggested Duration: 9 days
Last Updated 05/03/13 page 11 of 31
7. Emphasize that these samples are different from the weathered
rock samples they have previously observed. That is, this soil was
taken from a natural place, unlike the sand particles that were
separated out from a sample by a factory or lab.
8. Allow time for students to sort through their soil sample to find and
record the different “ingredients”. Students can put the things theyfind into piles on the paper towel and label the piles based on their
classification scheme. Microscopes may be useful in clarifying the
origin of some of the materials.
9. If students find any living things, such as earthworms or insects, let
them draw the organism and either return it to its natural
environment outside or place it in a temporary, supportive
environment in the classroom.
10. Return to the KLEW chart and science notebooks to record claims
and evidence about the components of soil. If students don’tsuggest water or moisture, lead them to the evidence (the moist
spot on the paper towel).
11. At this point, students may not have recorded evidence of air.
However, if samples have living organisms, students may infer that
water and air (needed by the organisms) exist in the soil. The next
activity should guide them to this conclusion. Give each group a
plastic jar with a lid, metric measuring cup, and beaker of water.
12. Instruct students to combine the separated soil ingredients, then
measure out (do not pack) and transfer soil into their plastic jar
(about 2/3 to 3/4 full. Measure the amount so the same amount of
water can be measured). Students should mark the level of soil
and predict where the level will be when they add an equal amount
of water. They may think that it will overflow.
13. Instruct students to observe what happens when the water is
poured into the sample. Students should see bubbles rising to the
top as evidence of air. The level will not rise as expected because
the water replaces the air trapped in the pores.
14. Instruct students to place the lid on the jar and shake it. They
should draw what they think the soil profile in the jar will look like
after it sits undisturbed overnight.
Instructional Notes:
Reinforce the idea that soil is a mixture, or
combination, of two or more ingredients that can
separated by some physical means.
Jars with different soil samples will enable students
to compare the differing components.
Misconceptions:
Students are often unaware of the
multitude of organisms that live in the
soil.
Students may not realize that water and
air are components of the soil.
Science Notebooks:
Students list their predictions about “ingredients” in
soil, the “ingredients” that they discover, and other
observations about soil.
Students should predict and draw/label how the soil
profile in the jar will look.
EXPLORE/EXPLAIN – Decomposers Suggested Day 5
1. Revisit the jar(s) of soil. Instruct students to draw and describe how
the jar of soil looks now. Discuss the various layers and why they
might have settled out that way (heavier/denser on bottom to
lighter/less dense on top).
2. Observe the material that has floated to the top. Elicit student
observations and inferences as to its composition. Optional: Use a
slotted spoon to skim off the top layer (humus) for closer
examination. Contrast this organic matter (living or once living
organisms like leaves, twigs, dead insects, etc.) with the inorganic
or nonliving matter (bits of rock).
Ask:
Materials:
KLEW chart (from previous activity)
soil profile jar(s) (from previous activity)
decomposition container (see Advance
Preparation, 1 per class)
2 liter bottle (label removed, 1
per class)
scoop (1 per class)
soil (moist, chemical-free, about
8–10 cups per class)
Grade 3
Science
Unit: 05
Lesson: 03
Suggested Duration: 9 days
Last Updated 05/03/13 page 12 of 31
Can you tell what type of plant or animal the organic
matter once was? (Be sure that responses include only living
or once living organisms and/or waste.)
What seems to be happening to the leaves, twigs, dead
insects, etc. that have fallen to the ground? (They seem to
be rotting or decaying.)
4. Bring out the pre-made Decomposition Container, scoop, and
moist soil. The instructions for constructing the Decomposition
Container can be found in the Teacher Resource:
Decomposition Container SAMPLE.
5. Say:
In this one scoop of soil, there are millions of tiny or
microscopic living organisms such as bacteria and fungi.
These microscopic organisms are part of nature’srecycling team. As they feed on dead plant and animal
matter, the nutrients that are inside the decaying plants
and animals are returned to the soil. This enriches the
soil with nutrients needed for new plants to grow.
6. Place soil into the decomposition container (about 2/3 full).
7. Introduce another member of nature’s recycling team – theearthworm.
Say:
Earthworms have a very important job, just like bacteria
and fungi. Their diet consists of soil and plant matter. As
they tunnel and eat their way through the soil, they leave
behind waste that is rich in recycled nutrients. Their
tunneling also loosens the soil and allows fresh air and
water to flow through it.
8. Add the earthworms to the decomposition container and gently
cover them with more moist soil.
9. Say/Ask:
Bacteria, fungi, earthworms, and certain other organisms
in the soil are called decomposers because they break
down dead plant and animal matter into smaller and
smaller parts. The rich dark decayed matter or humus
that is formed is a very important part of the soil.
What do you think would happen if there weren’t anydecomposers to break down the leaves, twigs, dead
plants, insects, animals, etc. that fall to the ground?
Answers may vary.
10. Add a few dry leaves, grass clippings, and/or pieces of banana
peel to the decomposition container. Tell students that over the
next few days (or weeks) they can observe how nature’s recyclersor decomposers do their job.
11. Return to the KLEW Chart for Learnings, Evidence, and
earthworms (6–8 per class)organic material (such as dry
leaves, grass clippings, or pieces
of banana peel, to start the
investigation, about ½ cup perclass)
Attachments:
Teacher Resource: Decomposition
Container SAMPLE
Safety Note:
Either provide disposable gloves when handling soil,
or instruct students to keep hands away from eyes
and mouth and wash hands thoroughly when
finished.
Instructional Notes:
Return soil to the environment. Compost can be
used for plant life cycles in Unit 07, if maintained
throughout the winter months.
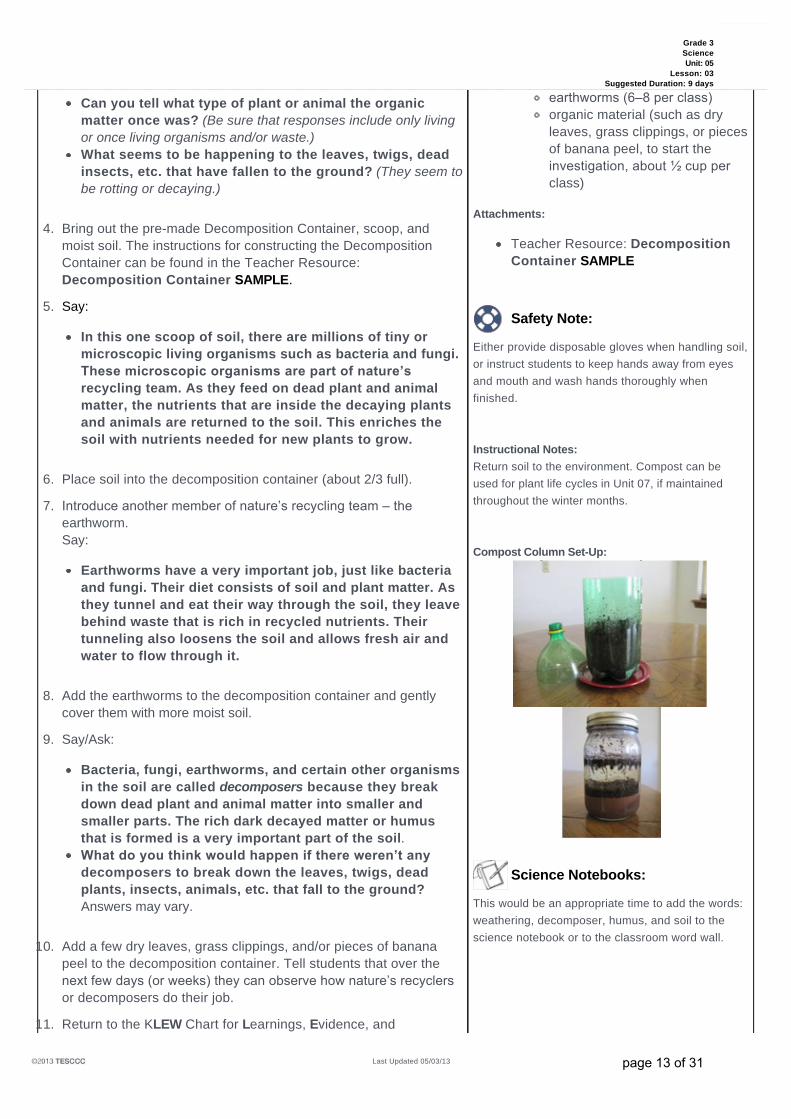
Compost Column Set-Up:
Science Notebooks:
This would be an appropriate time to add the words:
weathering, decomposer, humus, and soil to the
science notebook or to the classroom word wall.
Grade 3
Science
Unit: 05
Lesson: 03
Suggested Duration: 9 days
Last Updated 05/03/13 page 13 of 31
Wonderings.
Students should have the opportunity to share what they learned,
any claims and evidence, and discuss the concepts they are still
wondering about.
ELABORATION – Nature’s Recipe for Soil Suggested Days 6 and 7
1. Say:
Now that you have examined some of the ingredients in
soil, let’s investigate “Mother Nature’s” recipe and seehow she cooks up soil from scratch.
2. Introduce and prepare students for the role play, “Nature’s Recipefor Soil.” Refer to Teacher Resources: Nature’s Recipe for Soil:Teacher Guide, Role Play Cards, and Character Cards for
directions and materials.
3. Allow time for students to plan and practice their skit before
presenting it to the class.
4. As referenced in the Teacher Guide, students should be able to
clearly describe the answer to the question: “How is soil formed?”
5. After skit presentations, students should add a reflection in their
science notebooks to summarize what they have learned.
Materials:
yarn (for attaching cards, about 24
inches per student)
Attachments:
Teacher Resource: Nature’s Recipefor Soil: Teacher Guide
Teacher Resource: Role Play Cards
Teacher Resource: Character Cards
Instructional Notes:
Two days are allocated for skit preparation,
presentation, and discussion. If time permits, you
may want to introduce the Performance Indicator so
students can begin the task or think about how they
want to approach it.
ELABORATE – Conservation of Soil Suggested Day 8
1. Use the Teacher Resource: Apple Model: Available Soil to
illustrate the small amount of soil available for food, fiber, and
shelter.
2. Optional: Invite the local extension agent to give a short
presentation on soil conservation and preservation.
3. Reinforce the Key Understandings by sharing a book or story
about soil and soil conservation.
4. Facilitate a guided discussion about the importance of soil. Include
these guiding questions and important points about soil.
Why is soil important?
Soil is important for life because:
a) Soil is a part of the water cycle.
b) Soil is a part of the nutrient cycle.
c) Soil provides the water and nutrients for the plants and microorganisms
that live in it. If plants did not have nutrients, they would die.
d) Without plants, everything that breathes (including us) would run out of
oxygen and would die.
e) Without plants, there would be no food for animals (including us).
f) With no food, all animals would die.
g) Death is a natural process and part of all natural cycles. When plants
and animals die, they are decomposed by soil microorganisms.
h) As decomposition occurs, nutrients are released into the soil to support
the growth of new plants and microorganisms.
Materials:
KLEW chart (from previous activity)
apple (1 per class)
knife (teacher use only, for
demonstration, 1 per class)
book or story (about soil, including soil
conservation, 1 per teacher)
Attachments:
Teacher Resource: Apple Model:
Available Soil
Safety Note:
Knife is for teacher use only.
Grade 3
Science
Unit: 05
Lesson: 03
Suggested Duration: 9 days
Last Updated 05/03/13 page 14 of 31
What are some ways we can conserve soil? (Note:
Students may have limited experience with some of these
measures. An explanation may be needed for clarification.)
a) Use terrace farming/planting methods.
b) Reduce surfaces such as driveways and patios, paving stones, gravel, or
other materials, such as crushed granite, are good substitutes.
c) Plant windbreaks (trees or shrubs planted in a row to prevent topsoil
from blowing away).
d) Restore wetlands.
e) Apply mulch to plant beds.
f) Plant (native plants) as ground cover.
g) Use crop rotation.
h) Plant trees.
5. Return to the KLEW chart for final claims and evidence.
EVALUATE – Performance Indicator Suggested Day 9
Grade3 Science Unit05 PI03
Create a storyboard that illustrates and describes how soil is formed by
weathering of rock and the decomposition of plant and animal remains.
Standard(s): 3.2F , 3.7A
ELPS ELPS.c.1C , ELPS.c.3J , ELPS.c.5G
1. Refer to the Teacher Resource: Performance Indicator
Instructions KEY for information on administering the
assessment.
Materials:
paper (plain or folded newsprint for
storyboard frames and captions, 3-4
sheets per student)
Attachments:
Teacher Resource: Performance Indicator
Instructions KEY
Grade 3
Science
Unit: 05
Lesson: 03
Suggested Duration: 9 days
Last Updated 05/03/13 page 15 of 31

Grade 3 Science
Unit: 05 Lesson: 03
©2012, TESCCC 09/18/12 page 1 of 1
Properties of Rocks and Minerals
This rock burns. It is
dark in color, usually
brown or black.
This rock was formed
from broken up shells
and the bones of tiny sea
animals. It is most often
crushed up and mixed
with other materials.
This mineral is very soft
and has a greasy or
soapy feel. It ranges in
color from white to gray
and sometimes green.
This mineral is harder
than any other mineral.
When cut, it reflects
light, causing it to
sparkle.
This rock contains a
metal that attracts
magnets. The metal
must be separated from
the rock before it can
be used.
This rock is valued
because of its beauty. It
is strong, but can be
carved and polished.
This rock is very rough
and has many air holes.
It is so light that it will
float in water. Its rough
texture makes it useful
in many products.
This mineral is often
formed where sea water
has evaporated. It
dissolves in water and
looks like a clear or white
tiny cube under the
microscope.
This mineral is very soft
and will leave black
smudges on your
fingers if handled. It is
usually dark gray to
black in color.
This rock may be a mix of gray, white, red, pink, or black minerals. It is
very hard and does not wear down easily. It can be very beautiful
when polished.
This rock contains a
metal which can be
easily stretched,
molded, or shaped.
This rock is hard and glassy. Just like glass,
it chips to form very sharp edges.
Grade 3 Science
Unit: 05 Lesson: 03
©2012, TESCCC 09/18/12 page 1 of 1
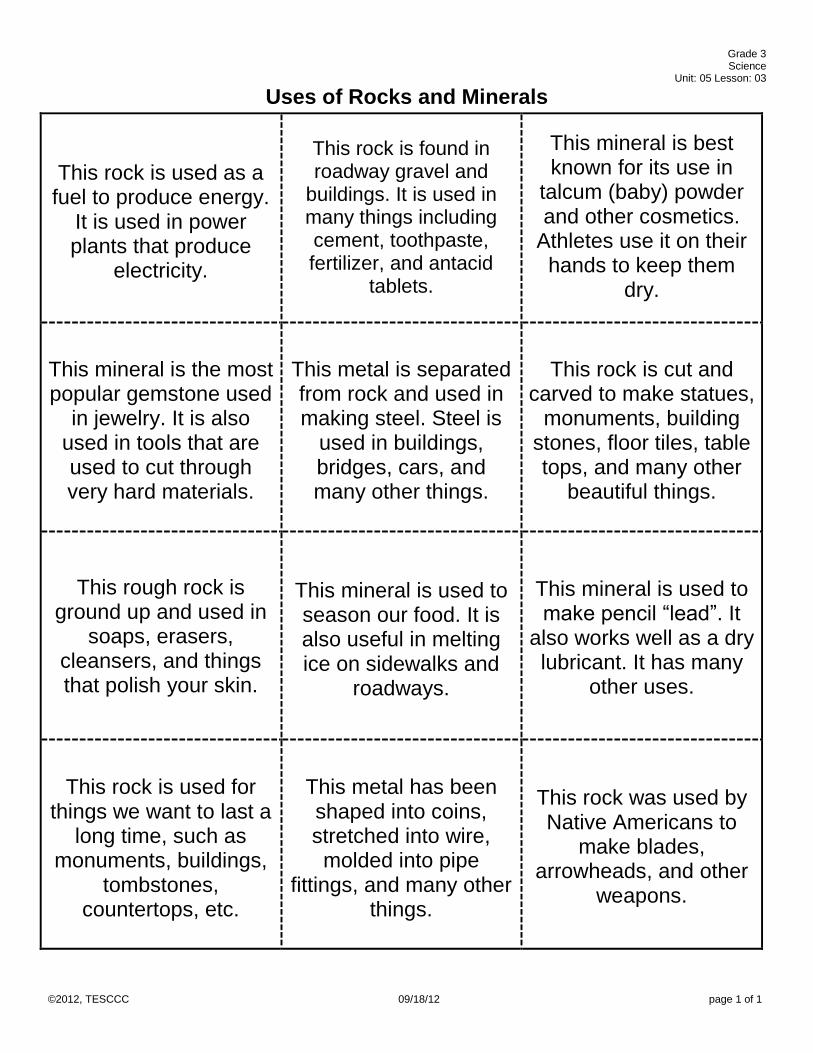
Uses of Rocks and Minerals
This rock is used as a fuel to produce energy.
It is used in power plants that produce
electricity.
This rock is found in roadway gravel and
buildings. It is used in many things including cement, toothpaste, fertilizer, and antacid
tablets.
This mineral is best known for its use in
talcum (baby) powder and other cosmetics.
Athletes use it on their hands to keep them
dry.
This mineral is the most popular gemstone used
in jewelry. It is also used in tools that are used to cut through very hard materials.
This metal is separated from rock and used in making steel. Steel is
used in buildings, bridges, cars, and many other things.
This rock is cut and carved to make statues,
monuments, building stones, floor tiles, table tops, and many other
beautiful things.
This rough rock is ground up and used in
soaps, erasers, cleansers, and things that polish your skin.
This mineral is used to season our food. It is also useful in melting ice on sidewalks and
roadways.
This mineral is used to make pencil “lead”. It
also works well as a dry lubricant. It has many
other uses.
This rock is used for things we want to last a
long time, such as monuments, buildings,
tombstones, countertops, etc.
This metal has been shaped into coins, stretched into wire, molded into pipe
fittings, and many other things.
This rock was used by Native Americans to
make blades, arrowheads, and other
weapons.
Grade 3 Science
Unit: 05 Lesson: 03
©2012, TESCCC 05/02/13 page 1 of 1
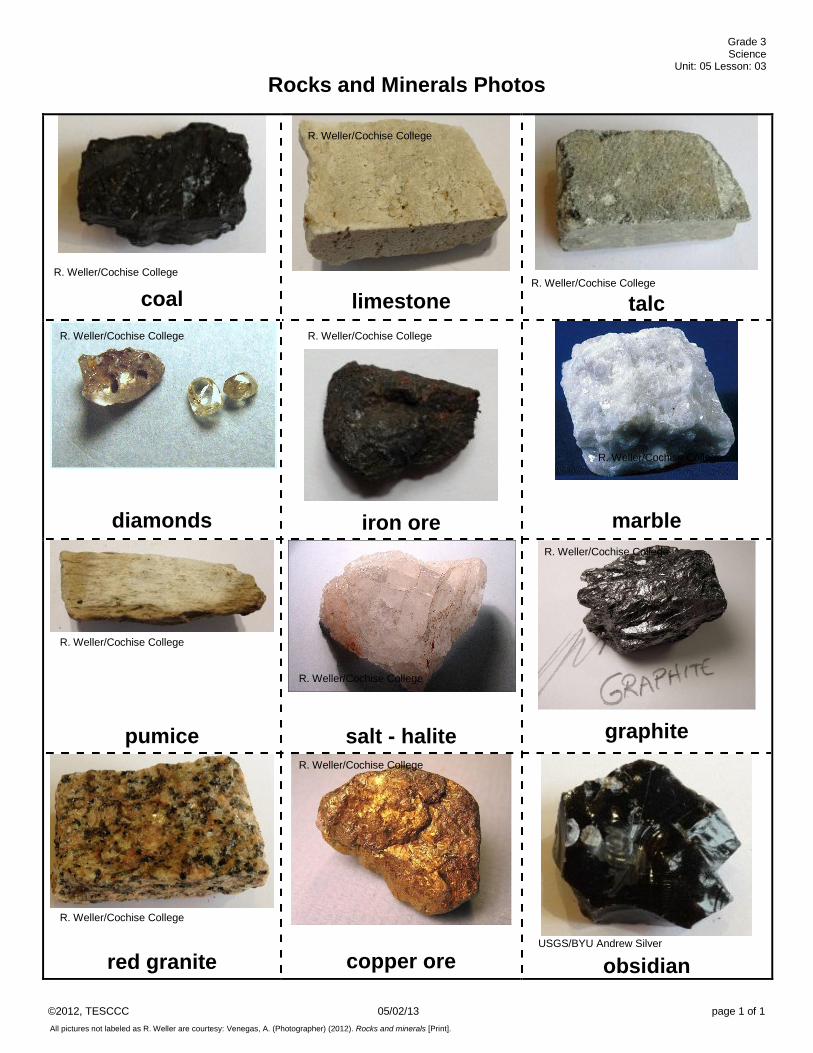
Rocks and Minerals Photos
coal
limestone
talc
diamonds
iron ore
marble
pumice
salt - halite
graphite
red granite
copper ore
obsidian
R. Weller/Cochise College
R. Weller/Cochise College
R. Weller/Cochise College
R. Weller/Cochise College R. Weller/Cochise College
R. Weller/Cochise College
R. Weller/Cochise College
R. Weller/Cochise College
R. Weller/Cochise College
R. Weller/Cochise College
R. Weller/Cochise College
USGS/BYU Andrew Silver
All pictures not labeled as R. Weller are courtesy: Venegas, A. (Photographer) (2012). Rocks and minerals [Print].

Grade 3 Science
Unit: 05 Lesson: 03
©2012, TESCCC 04/26/13 page 1 of 1
Decomposition Container SAMPLE (Also known as a compost column or worm bin)
2-liter bottles
blade, scissors
sharp tools
black & white newspaper
pesticide-free topsoil
water, mister
dead leaves, scraps
black paper, rubber bands
1. Remove label. Use a blade and then scissors to cut the top off the bottle. Make a lid by
cutting the base off a second bottle.
2. Punch small holes in the bottom and below the top of the bottle for drainage and air
holes.
3. Shred black and white newspaper (0.5 cm x 15 cm), and toss with water until moist, like a
damp (not soggy) sponge. Fluff the strips to separate them.
4. Add a handful of moist topsoil (not potting soil); toss it with the bedding.
5. Fill the container about 1/2 to 2/3 full of bedding, and you are ready for the class
demonstration (adding a scoop of soil and red wiggler worms).
6. Worms prefer darkness, so put on the lid and use black construction paper to encircle
and extend above the bottle. Hold paper in place loosely with tape or a rubber band.
Occasionally remove the lid for air flow.
7. Add small bits of organic material (dead leaves, crushed egg shells, etc.) for food.
Grade 3 Science
Unit: 05 Lesson: 03
©2012, TESCCC 04/26/13 page 1 of 2
Nature’s Recipe for Soil: Teacher Guide for Performance Indicator
Explore The Skits There are three skits: A) Help!...I’m Falling Apart, B) Nature’s Recycling Bin, and C) Recipe for Soil. Each skit should have Role Play Cards that describe the scenario, Character Cards (premade with string so they can be hung around the actor’s neck), and Soil Component Cards that can be used by the actors in the skit (Use index cards – print organic components in green, inorganic components in red, and soil in brown; you will likely need multiple copies of each component card.). The skits can be organized in many ways. This is a classroom management issue and needs to be individualized with each group of students. 1. Divide the class into groups. The groupings can be based on the number of role cards for each skit, but more than one student
could be assigned to some of the roles. Some groups might want a narrator to tell “the story” as it is acted out. Once again, grouping depends upon class size and dynamics.
2. Model the directions for the skit by reading a sample from the role play cards. Place a character card around your neck. Read the
directions for the role that you will model. Discuss how you would approach that reenactment of the scene. Likewise, explain that your role may either depend on or need to follow another enactment in the skit in order to make sense. Depending upon the age group of the class, you may have to actually act out the part. Some additional prompts you might use with students include: Decide how your group will act out its skit – read all of the cards first. What props will you gather or create? Where do you need to be when the skit begins? Will you move? Where? How will you behave? How will your character interact with the other characters?
3. Pass out the skit cards that are appropriate for your groupings. 4. Allow the students to have creative time for the skit planning and prop development. Prop development could involve as little as
paper or as much as objects from around the classroom or home. Monitor and assist as needed.
5. Allow students to practice their skits. Remind them to demonstrate scientific principles and safety. Encourage students to be creative in the development. Some skits can be mimed with one narrator or creatively demonstrated with actual objects. Green organic component cards, red inorganic component cards, and brown soil cards should be available for students to use to show the movement of matter through the soil formation processes.
Grade 3 Science
Unit: 05 Lesson: 03
©2012, TESCCC 04/26/13 page 2 of 2
Explain 1. Have students act out their skits, one group at a time. Tell students to watch for ways that their skit can connect to the one being
presented. You may want to walk back through the skit slowly to emphasize or elaborate on the important parts. Redirect any misconceptions. Another good way to reinforce the learning from the skit is to have the groups that are watching retell the story of the skit after it is finished.
2. Ask the students how the skits relate to one another. For example, the processes of weathering (Skit A) and decomposition (Skit B)
supply the ingredients for soil (Skit C). 3. Optional: Student groups could recreate the recipe for soil by drawing the processes presented in each skit on a large sheet of
butcher paper. Make sure they include all of the components you feel are appropriate for the age group. You may want to brainstorm with the class about things that should be included in the drawings. Record the ideas on the board for everyone to use as a guide. After their original drawing is finished, the students should present the drawing to the class in an informal or formal presentation.
4. There are many important concepts that go beyond the simple identification of soil components and formation of soil. Probe for
understanding by asking questions such as: What important ingredient do rocks (decomposers, water, etc.) contribute to the soil? Explain. Soils come in many different colors. What reason(s) would you give to explain this? How do the parts of the soil help plants to grow? Animals to live and grow? What would happen if there were no decomposers? It is often said that nature is the great recycler. How does that relate to soil?
5. Performance Indicator: Create a storyboard that illustrates and describes how soil is formed by weathering of rock and the
decomposition of plant and animal remains. (3.2F; 3.7A) Rubrics can be used to assess concepts as well as participation and contributions during the role play.
Grade 3 Science
Unit: 05 Lesson: 03
©2012, TESCCC 05/02/13 page 1 of 4
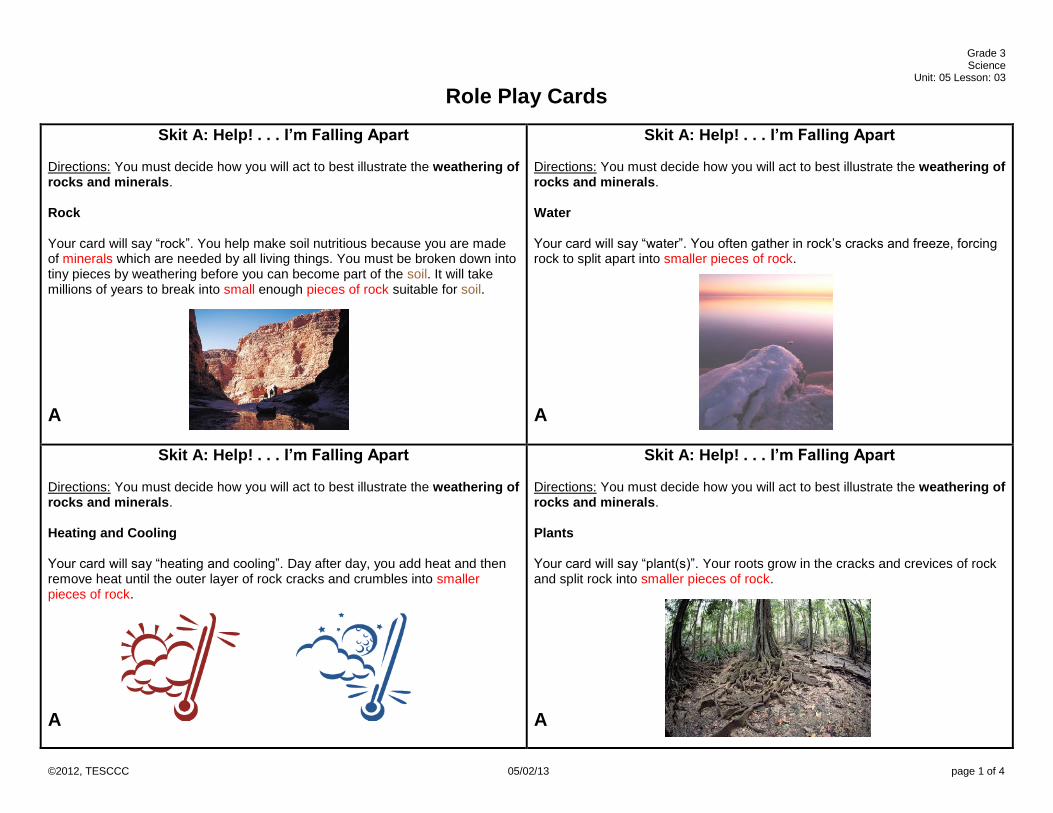
Role Play Cards
Skit A: Help! . . . I’m Falling Apart
Directions: You must decide how you will act to best illustrate the weathering of rocks and minerals. Rock Your card will say “rock”. You help make soil nutritious because you are made of minerals which are needed by all living things. You must be broken down into tiny pieces by weathering before you can become part of the soil. It will take millions of years to break into small enough pieces of rock suitable for soil.
A
Skit A: Help! . . . I’m Falling Apart
Directions: You must decide how you will act to best illustrate the weathering of rocks and minerals. Water Your card will say “water”. You often gather in rock’s cracks and freeze, forcing rock to split apart into smaller pieces of rock.
A
Skit A: Help! . . . I’m Falling Apart
Directions: You must decide how you will act to best illustrate the weathering of rocks and minerals. Heating and Cooling Your card will say “heating and cooling”. Day after day, you add heat and then remove heat until the outer layer of rock cracks and crumbles into smaller pieces of rock.
A
Skit A: Help! . . . I’m Falling Apart
Directions: You must decide how you will act to best illustrate the weathering of rocks and minerals. Plants Your card will say “plant(s)”. Your roots grow in the cracks and crevices of rock and split rock into smaller pieces of rock.
A
Grade 3 Science
Unit: 05 Lesson: 03
©2012, TESCCC 05/02/13 page 2 of 4
Skit A: Help! . . . I’m Falling Apart
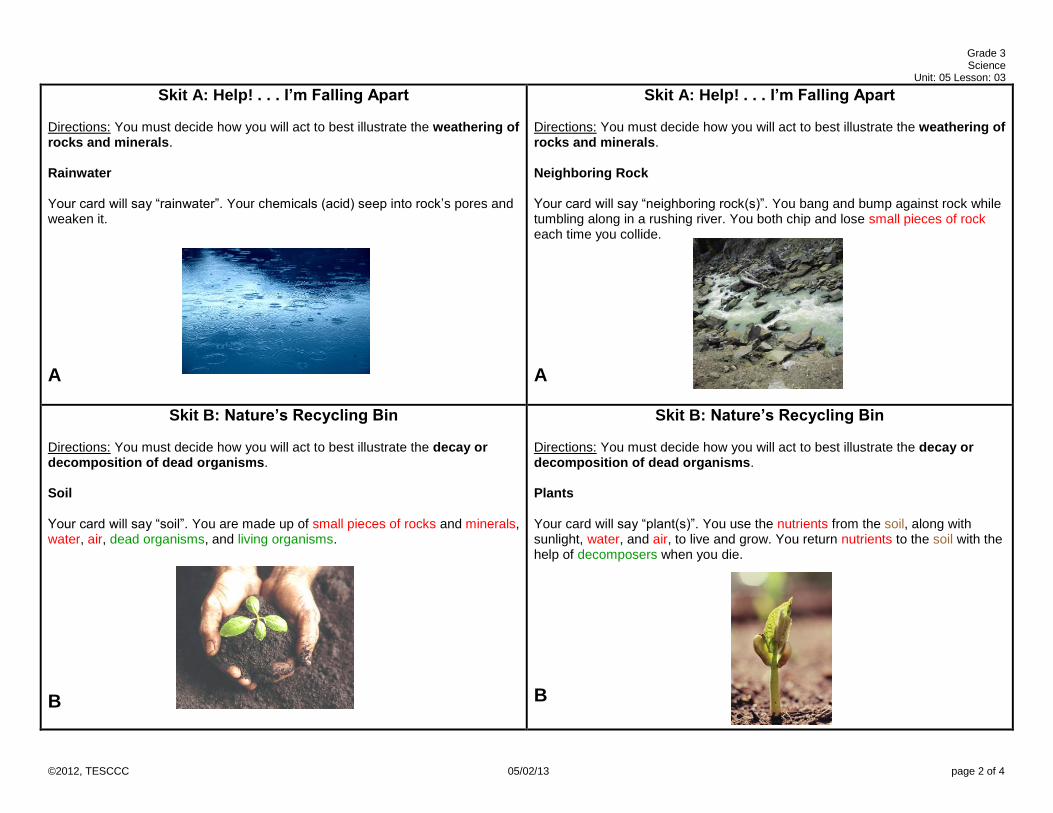
Directions: You must decide how you will act to best illustrate the weathering of rocks and minerals. Rainwater Your card will say “rainwater”. Your chemicals (acid) seep into rock’s pores and weaken it.
A
Skit A: Help! . . . I’m Falling Apart
Directions: You must decide how you will act to best illustrate the weathering of rocks and minerals. Neighboring Rock Your card will say “neighboring rock(s)”. You bang and bump against rock while tumbling along in a rushing river. You both chip and lose small pieces of rock each time you collide.
A
Skit B: Nature’s Recycling Bin
Directions: You must decide how you will act to best illustrate the decay or decomposition of dead organisms. Soil Your card will say “soil”. You are made up of small pieces of rocks and minerals, water, air, dead organisms, and living organisms.
B
Skit B: Nature’s Recycling Bin
Directions: You must decide how you will act to best illustrate the decay or decomposition of dead organisms. Plants Your card will say “plant(s)”. You use the nutrients from the soil, along with sunlight, water, and air, to live and grow. You return nutrients to the soil with the help of decomposers when you die.
B

Grade 3 Science
Unit: 05 Lesson: 03
©2012, TESCCC 05/02/13 page 3 of 4
Skit B: Nature’s Recycling Bin
Directions: You must decide how you will act to best illustrate the decay or decomposition of dead organisms. Animals Your card will say “animal(s)”. You take in nutrients when you eat plants or other animals. With the help of decomposers, you decay and return nutrients to the soil when you die.
B
Skit B: Nature’s Recycling Bin
Directions: You must decide how you will act to best illustrate the decay or decomposition of dead organisms. Decomposer/Bacteria Your card will say “decomposer/bacteria”. You are tiny living organisms that live in the soil. You get your energy by eating dead organisms. You return nutrients to the soil when you break down or decompose these dead plants and animals.
B
Skit B: Nature’s Recycling Bin
Directions: You must decide how you will act to best illustrate the decay or decomposition of dead organisms. Decomposer/Earthworms Your card will say “decomposer/earthworm(s)”. You recycle dead plants by eating them. Your waste/poop is very nutritious for growing plants.
B
Skit C: Recipe for Soil
Directions: You must decide how you will act to best illustrate mixing and blending the ingredients of soil. Small Pieces of Rock (Sand, Silt, Clay) Your card will say “sand/silt/clay”. You are the bits of weathered rock that help to support the roots of plants and provide minerals needed by living things.
C
Grade 3 Science
Unit: 05 Lesson: 03
©2012, TESCCC 05/02/13 page 4 of 4
Skit C: Recipe for Soil
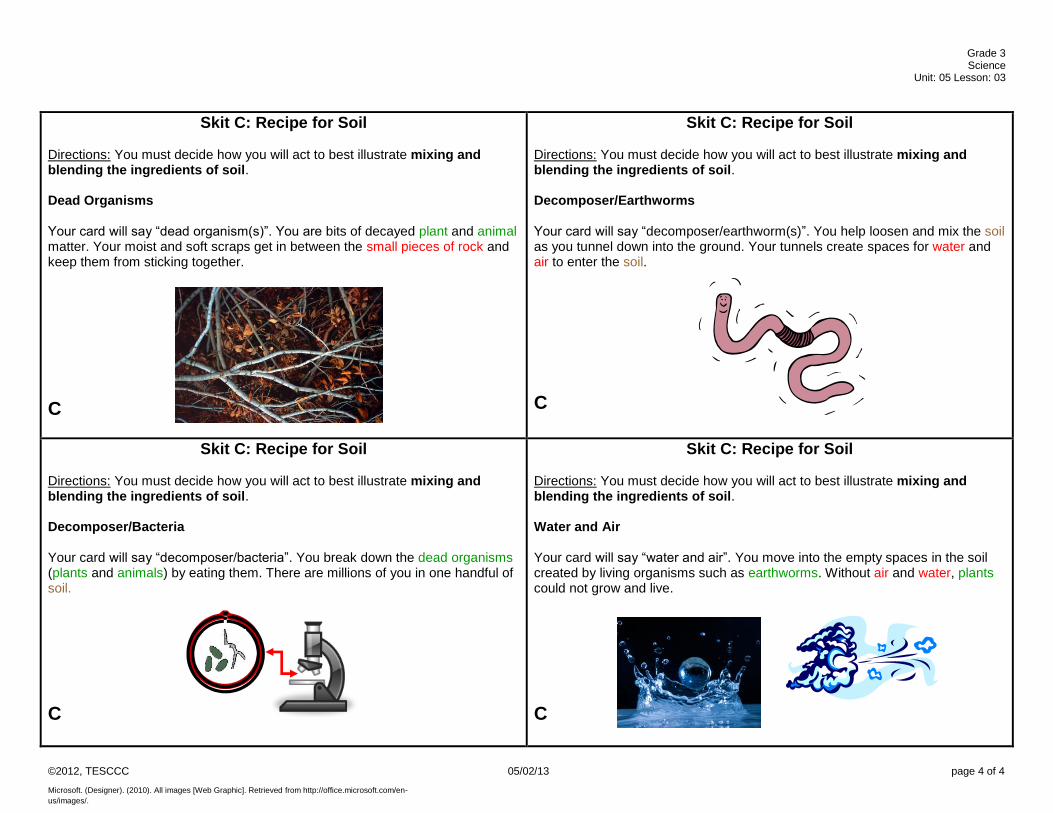
Directions: You must decide how you will act to best illustrate mixing and blending the ingredients of soil. Dead Organisms Your card will say “dead organism(s)”. You are bits of decayed plant and animal matter. Your moist and soft scraps get in between the small pieces of rock and keep them from sticking together.
C
Skit C: Recipe for Soil
Directions: You must decide how you will act to best illustrate mixing and blending the ingredients of soil. Decomposer/Earthworms Your card will say “decomposer/earthworm(s)”. You help loosen and mix the soil as you tunnel down into the ground. Your tunnels create spaces for water and air to enter the soil.
C
Skit C: Recipe for Soil
Directions: You must decide how you will act to best illustrate mixing and blending the ingredients of soil. Decomposer/Bacteria Your card will say “decomposer/bacteria”. You break down the dead organisms (plants and animals) by eating them. There are millions of you in one handful of soil.
C
Skit C: Recipe for Soil
Directions: You must decide how you will act to best illustrate mixing and blending the ingredients of soil. Water and Air Your card will say “water and air”. You move into the empty spaces in the soil created by living organisms such as earthworms. Without air and water, plants could not grow and live.
C
Microsoft. (Designer). (2010). All images [Web Graphic]. Retrieved from http://office.microsoft.com/en-
us/images/.
Grade 3 Science
Unit: 05 Lesson: 03
©2012, TESCCC 09/18/12 page 1 of 4
Character Cards
Rock
A
Heating & Cooling
A
Water
A
Plant
A
Grade 3 Science
Unit: 05 Lesson: 03
©2012, TESCCC 09/18/12 page 2 of 4
Rainwater
A
Neighboring Rock
A
Soil
B
Plant
B
Grade 3 Science
Unit: 05 Lesson: 03
©2012, TESCCC 09/18/12 page 3 of 4
Animal
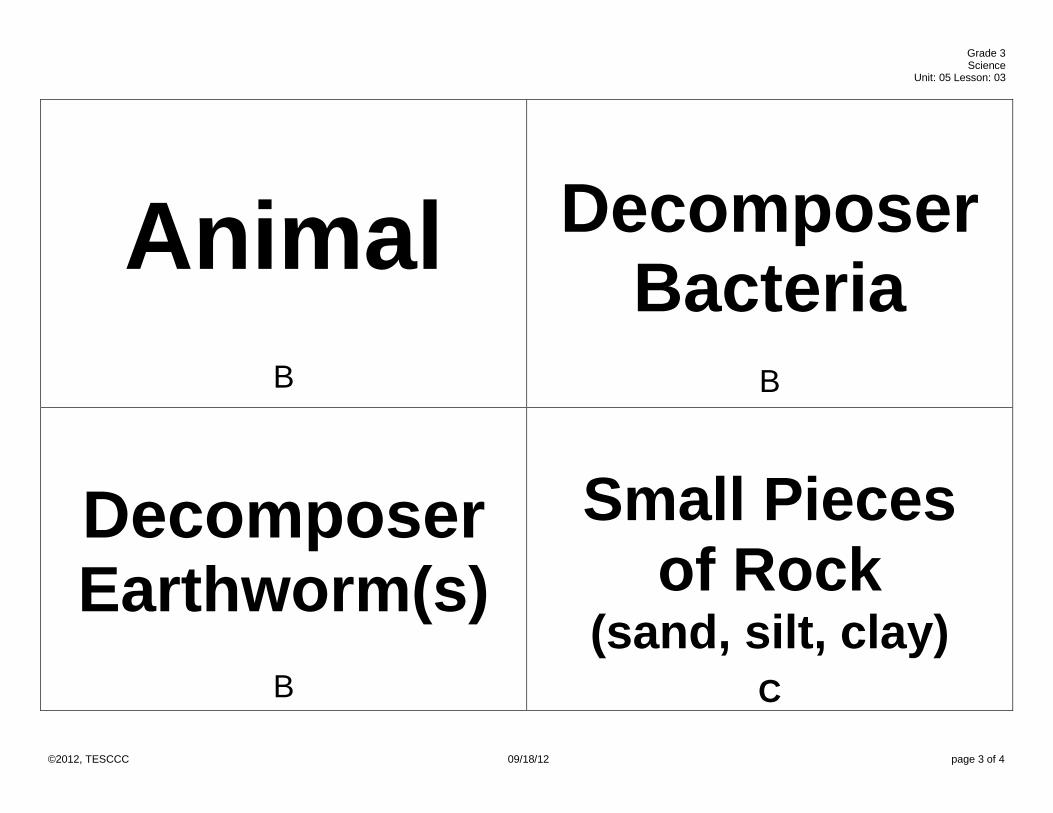
B
Decomposer Bacteria
B
Decomposer Earthworm(s)
B
Small Pieces of Rock
(sand, silt, clay)
C
Grade 3 Science
Unit: 05 Lesson: 03
©2012, TESCCC 09/18/12 page 4 of 4
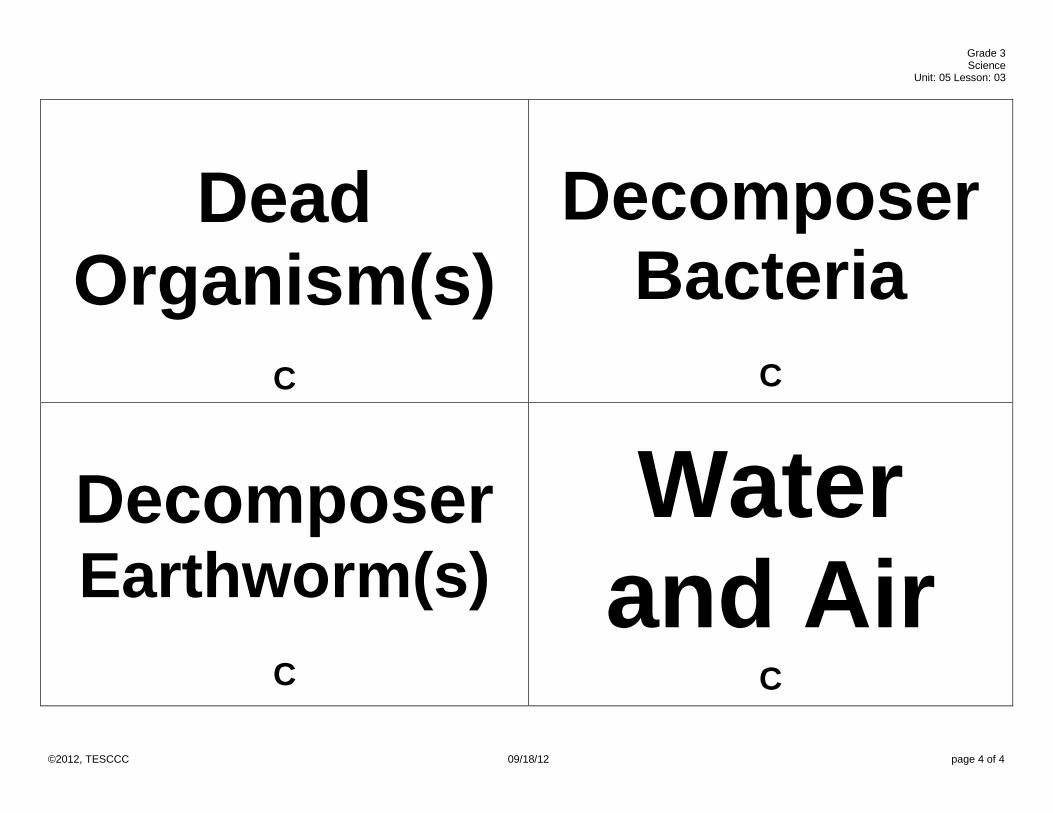
Dead Organism(s)
C
Decomposer Bacteria
C
Decomposer Earthworm(s)
C
Water and Air
C
Grade 3 Science
Unit: 05 Lesson: 03
©2012, TESCCC 04/26/13 page 1 of 1
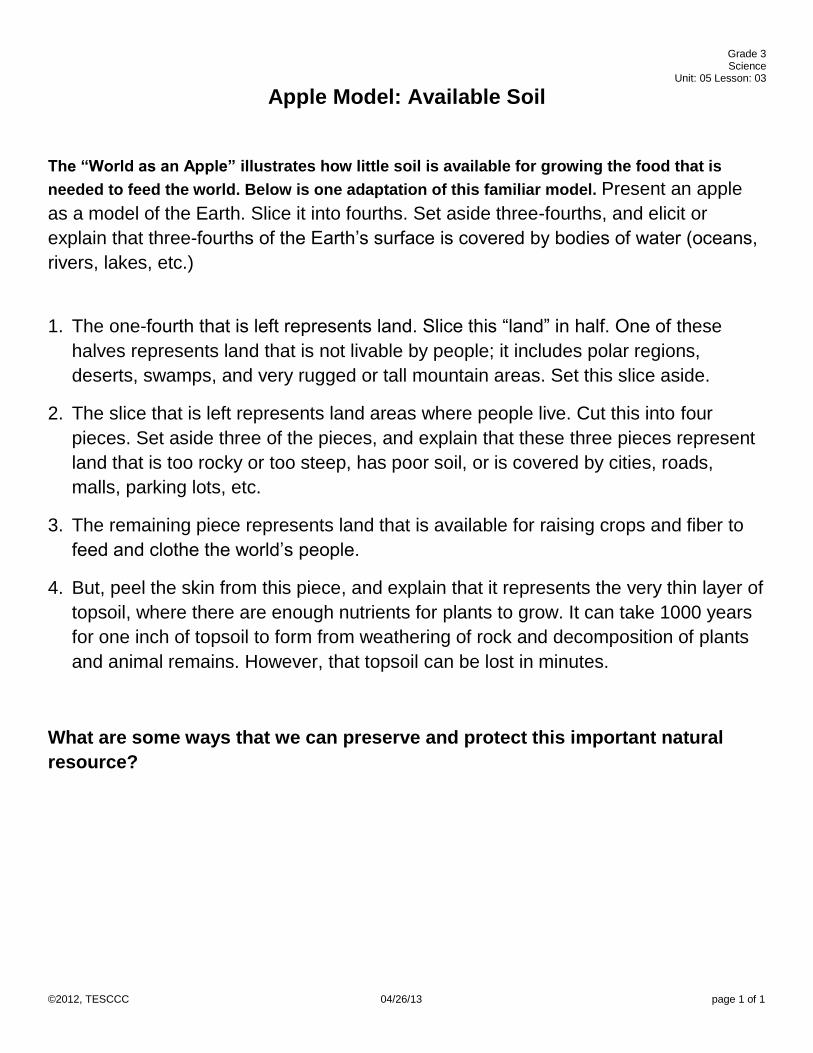
Apple Model: Available Soil
The “World as an Apple” illustrates how little soil is available for growing the food that is
needed to feed the world. Below is one adaptation of this familiar model. Present an apple
as a model of the Earth. Slice it into fourths. Set aside three-fourths, and elicit or
explain that three-fourths of the Earth’s surface is covered by bodies of water (oceans,
rivers, lakes, etc.)
1. The one-fourth that is left represents land. Slice this “land” in half. One of these
halves represents land that is not livable by people; it includes polar regions,
deserts, swamps, and very rugged or tall mountain areas. Set this slice aside.
2. The slice that is left represents land areas where people live. Cut this into four
pieces. Set aside three of the pieces, and explain that these three pieces represent
land that is too rocky or too steep, has poor soil, or is covered by cities, roads,
malls, parking lots, etc.
3. The remaining piece represents land that is available for raising crops and fiber to
feed and clothe the world’s people.
4. But, peel the skin from this piece, and explain that it represents the very thin layer of
topsoil, where there are enough nutrients for plants to grow. It can take 1000 years
for one inch of topsoil to form from weathering of rock and decomposition of plants
and animal remains. However, that topsoil can be lost in minutes.
What are some ways that we can preserve and protect this important natural
resource?
Grade 3 Science
Unit: 05 Lesson: 03
©2012, TESCCC 04/26/13 page 1 of 1
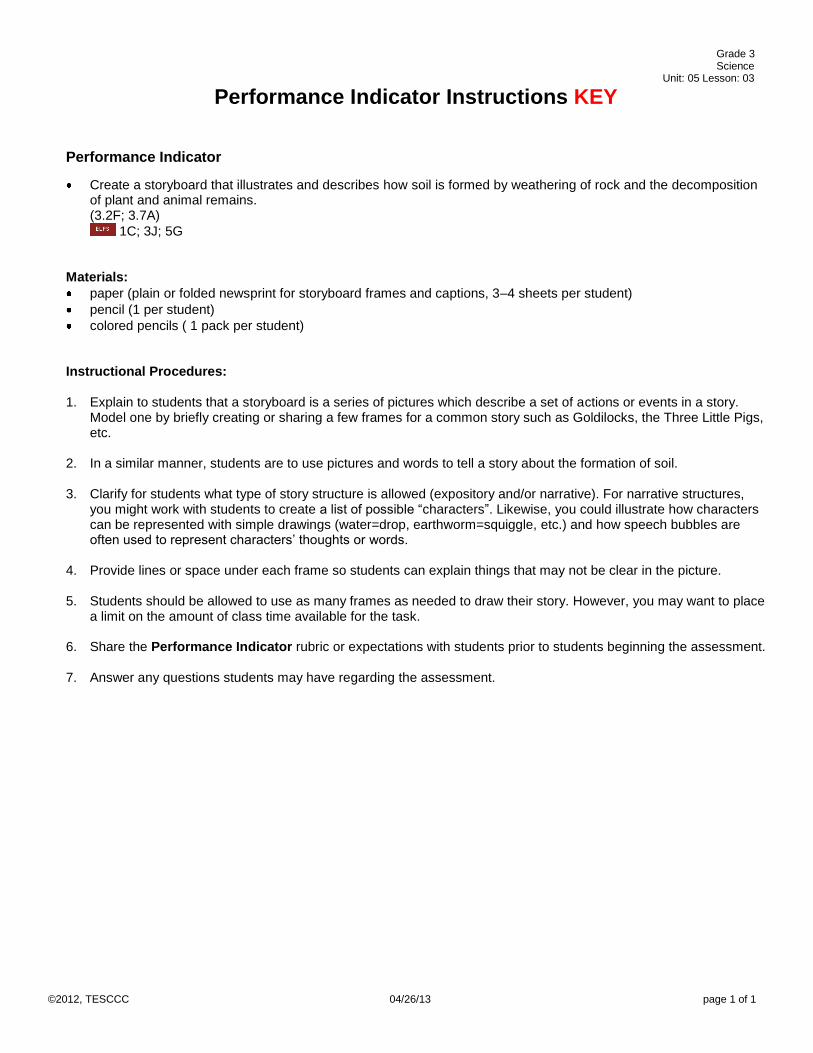
Performance Indicator Instructions KEY Performance Indicator
Create a storyboard that illustrates and describes how soil is formed by weathering of rock and the decomposition of plant and animal remains. (3.2F; 3.7A)
1C; 3J; 5G Materials: paper (plain or folded newsprint for storyboard frames and captions, 3–4 sheets per student) pencil (1 per student) colored pencils ( 1 pack per student)
Instructional Procedures: 1. Explain to students that a storyboard is a series of pictures which describe a set of actions or events in a story.
Model one by briefly creating or sharing a few frames for a common story such as Goldilocks, the Three Little Pigs, etc.
2. In a similar manner, students are to use pictures and words to tell a story about the formation of soil.
3. Clarify for students what type of story structure is allowed (expository and/or narrative). For narrative structures, you might work with students to create a list of possible “characters”. Likewise, you could illustrate how characters can be represented with simple drawings (water=drop, earthworm=squiggle, etc.) and how speech bubbles are often used to represent characters’ thoughts or words.
4. Provide lines or space under each frame so students can explain things that may not be clear in the picture.
5. Students should be allowed to use as many frames as needed to draw their story. However, you may want to place a limit on the amount of class time available for the task.
6. Share the Performance Indicator rubric or expectations with students prior to students beginning the assessment.
7. Answer any questions students may have regarding the assessment.


