Download - Securing web applications

5/201134
WEB DEVELOPMENT
Good software design dictates that security be ta-ken into account throughout the requirements--gathering process and the actual build. Unfortu-
nately, security considerations are often an afterthought in software design, again because developers are often so focused on functionality, performance and looks that security ends up taking a backseat. Even if you as a de-veloper give careful consideration to security in all your applications, you may end up “inheriting” an application with a weak security model.
Authentication and AuthorizationSecurity in web applications is a very broad topic. Let’s narrow it down by talking about two major security con-siderations - authentication and authorization. Authen-tication is about verifying that the user is who they say they are. For example I may enter my username and password to identify myself to an application. Depending on the circumstances, I may have to answer some per-sonal questions or I may be prompted to install a certifi-cate in my web browser’s store.
Once an application “knows” who the user is, it can move onto the authorization phase which is deciding whether to fulfill or deny a particular request (i.e. to ac-cess a resource, take a certain action, etc.) on behalf of that particular user. For example, user “pmorris” may be authorized to view resource “x” but may not be autho-rized to edit resource “x”.
Will it scale?In some cases a web application may handle authentica-tion and authorization very well but the solution may not
be scalable. For example, an application server may store session state for each user and expect the user to send a session cookie with each request. This is a very com-mon approach and honestly works well for most one-off applications. But what happens when one of our applica-tions needs to connect (on behalf of the user) to some service we’ve written. Let’s say the service runs on a se-cond server and also requires authentication? The ses-sion cookie means nothing to that second server so will we force the user to pass in credentials again? Or will the developer compromise and hard code some creden-tials in the application for making the call to the external service?
Or what if the developer simply wants to distribute a large application across multiple servers for perfor-mance but doesn’t want the user to have to log in more than once? Each of those servers would need to “know” about the user’s session.
HTTP AuthenticationUp until this point we have talked about users being pro-visioned a session and that session being tracked by so-me stateful server. But it should be noted that we could build our web applications such that their servers could be essentially stateless. In other words each request wo-uld be made in isolation. In such a case the user would have to be authenticated and authorized for each and every request. Some may frown upon such a design but a stateless design is inherently scalable. Take a look at how well the World Wide Web has scaled over the past 20
Securing Web Applications with OpenAMAs software developers, we seek to design software that gets people’s attention. Software that meets the needs of the user, performs well, and pleases the eye is sure to get users’ attention. The security model of an application, on the other hand, gets very little attention from the average user - that is until something goes wrong. One serious security breach could permanently blacklist an application or even a developer in the eyes of the users affected by that breach.
You’ll learn:• How OpenAM can secure web applications and how to
set up OpenAM in a development environment.
You should know:• Should have a clear understanding of how web appli-
cations work.• For the tutorial, some experience with Linux and the Li-
nux command line will be helpful.

en.sdjournal.org 35
Securing Web Applications with OpenAM
So where does that leave us then? Well we’re back to a stateful server maintaining sessions for all our users and we’re back to the problems with scalability that we mentioned earlier.
OpenAM as an Authentication and Authorization SolutionMeet OpenAM. (You see? I didn’t forget the title of this ar-ticle.) The “AM” stands for Access Management. OpenAM is a child project of OpenSSO (“SSO” for single-sign-on), an open source product formerly sponsored by Sun Mi-crosystems, now by Oracle. When Oracle bought out Sun they took back the latest release of OpenSSO (version 9.x) and now offer 8.x as the latest and greatest. A number of former Sun executives went on to head up a company called Forge Rock, which has taken version 9.x of OpenS-SO, named it OpenAM and started to maintain and build on it (up to 9.5.x now), pledging to follow its original pro-ject roadmap from when it was under the oversight of Sun.
I see OpenAM as a solution for building security into your distributed applications from the start, as well as a way to secure that pre-existing, not-so-secure applica-tion that you may have “inherited” as a hired developer (since we know you would never build an unsecure ap-plication yourself).
Authenticating with OpenAMSo OpenAM can be our stateful server for provisioning and tracking sessions for users. It can hook into an iden-
years. This is due in large measure to its stateless design. Most calls that happen over HTTP are in isolation altho-ugh it has to be admitted that most requests made over HTTP do not need to be authenticated or authorized.
HTTP as a protocol does include standards for authen-tication, namely Basic and Digest Authentication both of which allow for a stateless approach. So why don’t we see more applications using Basic or Digest Authentication? In the case of Basic authentication there are inherent se-curity weaknesses since credentials are passed over the wire in clear text. Digest Authentication is very secure however since it uses one-way hashing to obscure the credentials such that it’s impossible to extract them. It al-so includes policies for preventing the harvesting and re-playing of hashed credentials. So why don’t we see Digest Authentication more in web applications? Well for one thing it is not trivial to learn and implement the standard. But the overriding reason is that frankly HTTP authen-tication is just “not there yet.” A lot of it seems to have to do with the inconsistent and incomplete manner that web browsers have implemented the Digest Authentica-tion standard. The details on that are beyond the scope of this article, (Did you notice I haven’t mentioned Ope-nAM once yet?) so I encourage you to read these two articles if you want to learn those details:
http://www.artima.com/weblogs/viewpost.jsp?thre-ad=155252 and http://www.vsecurity.com/download/pa-pers/WeaningTheWebOffOfSessionCookies.pdf
Figure 1. OpenDJ Server Settings Figure 3. OpenDJ Directory Data
Figure 2. OpenDJ Topology Options Figure 4. OpenDJ Runtime Options

5/201136
WEB DEVELOPMENT
tity repository that already exists (i.e. Microsoft Active Directory) or you could set up its “sister” application, OpenDJ (formerly OpenDS) as the user store. OpenDJ is an open source LDAP directory service also sponso-red by Forge Rock. And apparently, at least some users just use a plain old relational database as the identity store. Using the identity repository to verify the identity of each user, OpenAM provisions a session and can set cookies that represent that session in the user’s browser. (I actually put together a proof of concept that elimina-tes the need for OpenAM to set cookies in the user’s browser.)
Authorizing with OpenAMOpenAM can be conFigured with fine-grained poli-cies that dictate which identity subjects (users and/or groups) have access to which resources and even which HTTP methods can be invoked by a particu-lar subject against a particular resource. So in other words OpenAM can be conFigured to allow user “pmorris” to GET the resource at http://www.exam-ple.com/resource but not POST to that same resource (that same URL).
Scale Applications Securely with OpenAMLet’s talk about why OpenAM scales so well. OpenAM is a Java-based application that runs within a servlet conta-iner (Apache Tomcat, Glassfish, JBoss, etc.). So OpenAM is itself a web application but it is not your web applica-tion. It partners with your web application. It has a sin-gle responsibility: to keep other applications secure. To illustrate: large office buildings with offices that handle very sensitive or secured resources often have a securi-ty team operating within the building. That team’s focus is to keep the building and everything in it secure. The other teams of people within the building don’t have to focus so much on security since there is already a team dedicated to that purpose operating within the building. The other teams are able to focus on what they do best (whatever that might be).
OpenAM as a framework operates as that security team in your infrastructure, keeping your applications secure so that your application code can focus more on things like functionality, usability and performance.
OpenAM exposes services (SOAP or REST) that can be invoked from your applications for authenticating
Figure 5. OpenAM General Figure 7. OpenAM Configuration Store
Figure 6. OpenAM Server Settings Figure 8. OpenAM User Store
en.sdjournal.org 37
Securing Web Applications with OpenAM
users, checking their authorization to make a certain request, and even interacting with your identity reposi-tory to add users, to get the groups a user belongs to, etc. For the proof of concept I spoke of earlier I set up very simple filters in front of a RESTful service to per-form authentication and authorization before allowing access to the service itself. Can you see how such an approach can scale to practically any size? As long as you have the session token representing the session, you can call OpenAM’s services from anywhere (even outside your own domain) to authenticate and autho-rize a request.
The OpenAM framework not only includes the central application itself but also a family of policy agents that can be deployed to remote application servers or web servers to “police” said servers and all the applications running on them. There are policy agents for J2EE servlet containers, and web servers (i.e. Apache and IIS). A policy agent is like a remote “security officer” that intercepts all requests coming in to the server (J2EE container, web server) and consults with the “chief security officer”, the OpenAM application itself, to determine if the request should be fulfilled or denied.
Take OpenAM for a Test DriveSo if you’re like me you like getting your hands on a technology so you can evaluate it yourself. Following is a step-by-step tutorial on how to set up OpenAM with OpenDJ as a user repository. All the prerequi-sites for our tutorial, from the OS (Ubuntu 10.04), to the servlet container (Apache Tomcat 7.0), to the two applications themselves, they’re all open source (i.e. free!) so you’ve got no reason not to jump right in! Let’s get started.
Set up UbuntuDownload Ubuntu 10.04 LTS from http://releases.ubuntu.com/lucid/ubuntu-10.04.2-desktop-i386.isoIf you’re setting up Ubuntu as a virtual machine be sure and up the RAM to at least 1024MB.Walk through the installation process normally.Once logged in go to System -> Administration -> Users and Groups and change the user you created to an Ad-ministrator.
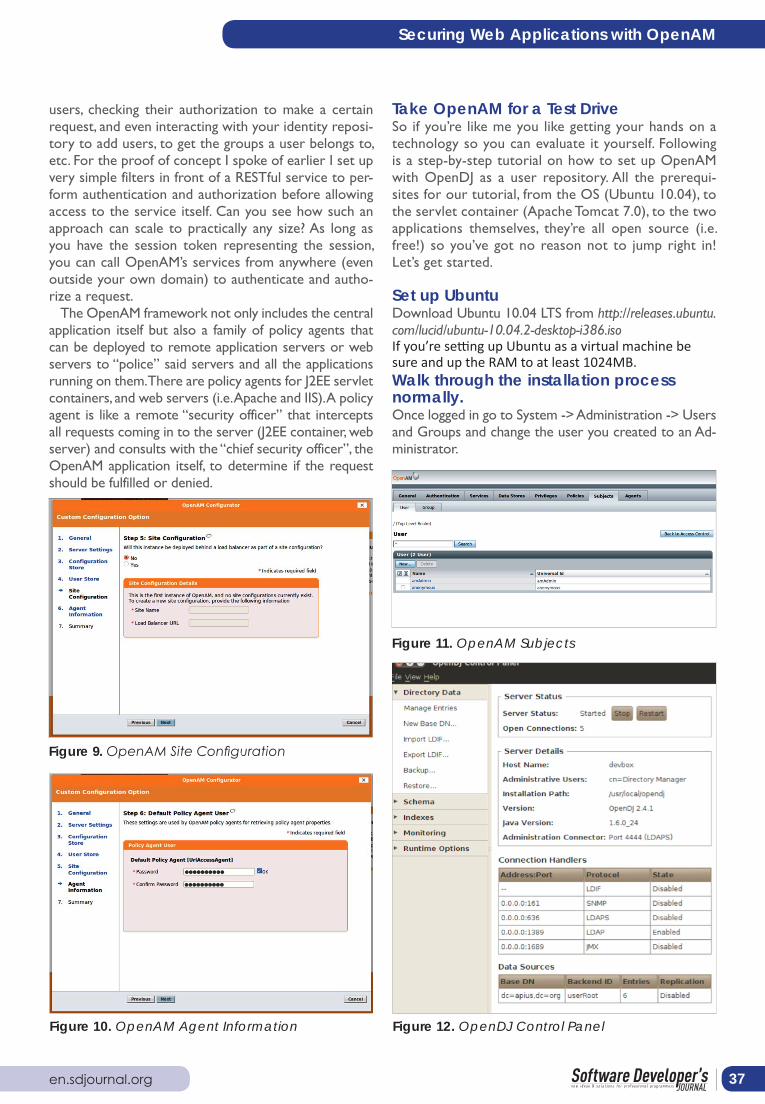
Figure 9. OpenAM Site Configuration
Figure 11. OpenAM Subjects
Figure 10. OpenAM Agent Information Figure 12. OpenDJ Control Panel

5/201138
WEB DEVELOPMENT
If running on VMware Fusion follow this documenta-tion to install VMware Tools: https://help.ubuntu.com/com-munity/VMware/ToolsReboot.
Install JavaWhile an OpenJDK package is available out-of the-box with
10.04, the Sun JDK is not, and that’s the one we want. So open a terminal window and run the following commands first:
sudo add-apt-repository „deb http://archive.
canonical.com/ lucid partner”
sudo apt-get update
Then install the Sun JDK:
sudo apt-get install sun-java6-jdk
Install TomcatWe need a fully qualified domain name (FQDN) when
we install OpenAM (i.e. localhost will not work for con-figuration) so we need to add an entry to the hosts file.
Run the following command to edit the file:
sudo nano /etc/hosts
I added this line:
127.0.0.1 devbox.apius.org
Be sure and exit (Command + x on the Mac), and save changes on the way out (“y” followed by Enter)
Download Apache Tomcat 7 by running wget with a current link address as in:
wget http://apache.ziply.com/tomcat/tomcat-7/v7.0.12/
bin/apache-tomcat-7.0.12.tar.gz
Untar it with this command:
tar xzvf apache-tomcat-7.0.12.tar.gz
I decided to move it to a more standardized folder lo-cation with:
mv apache-tomcat-7.0.12 /usr/local/tomcat7
Figure 13. OpenDJ Manage Entries
Figure 15. OpenAM New User
Figure 14. OpenDJ New User
en.sdjournal.org 39
Securing Web Applications with OpenAM
We need to set a couple of environment variables to ensure the Tomcat 7 instance uses the Sun JDK and that OpenAM will have sufficient memory to install and run. Run the following command:
sudo nano /usr/local/tomcat7/bin/setenv.sh
And add these two lines:
JAVA_HOME=/usr/lib/jvm/java-6-sun
export CATALINA_OPTS=“$CATALINA_OPTS -Xms128m
-Xmx1024m -XX:MaxPermSize=256m”
Next run:
sudo nano /usr/local/tomcat7/conf/tomcat-users.xml
I added what is in listing 1 so as to access the Tomcat management console.
Start Apache Tomcat with:
/usr/local/tomcat7/bin/startup.sh
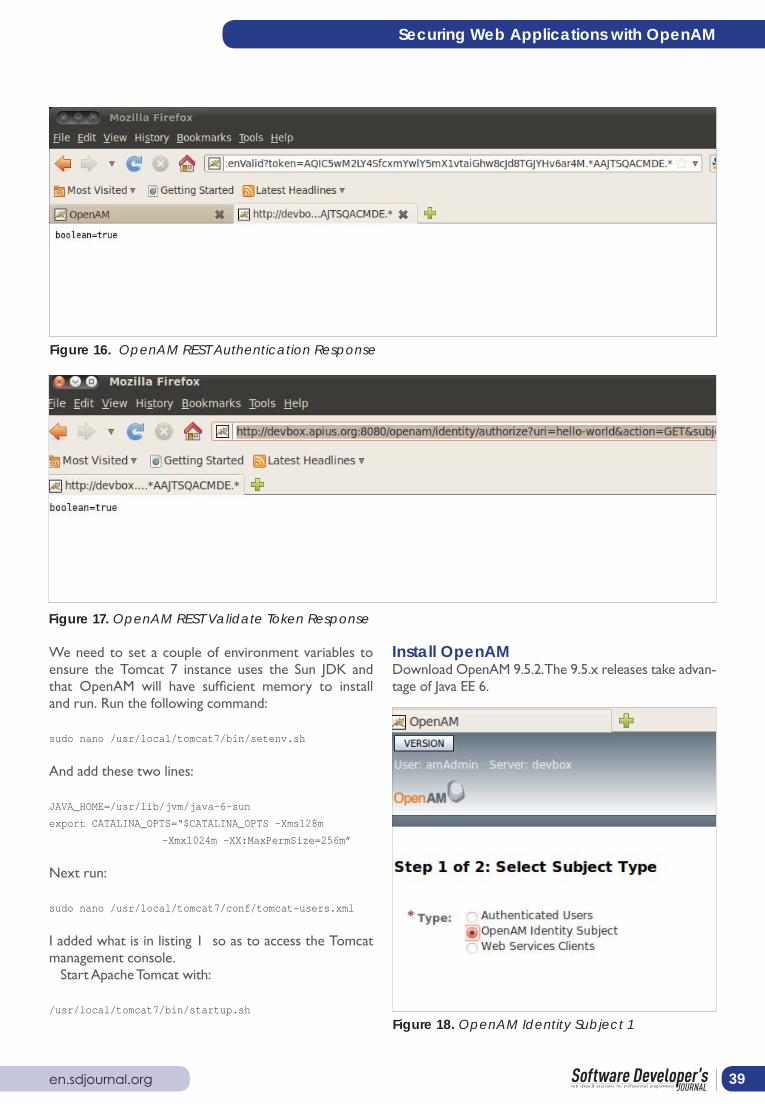
Install OpenAMDownload OpenAM 9.5.2. The 9.5.x releases take advan-tage of Java EE 6.
Figure 16. OpenAM REST Authentication Response
Figure 17. OpenAM REST Validate Token Response
Figure 18. OpenAM Identity Subject 1

5/201140
WEB DEVELOPMENT
wget http://www.forgerock.org/downloads/openam/
snapshot9.5/openam_s952.war
Moving the war to the webapps folder of the Tomcat installation will deploy it.
sudo mv openam_s952.war usr/local/tomcat7/webapps/
openam.war
Install OpenDJNow download OpenDJ using:
wget http://www.forgerock.org/downloads/opendj/2.4.1/
OpenDJ-2.4.1.zip
Extract it and move it into place using the following two commands:
unzip OpenDJ-2.4.1.zip
sudo mv OpenDJ-2.4.1 /usr/local/opendjThese commands should be run in order to conFigure
the installation and open the GUI interface for final con-figuration settings.
sudo /usr/local/opendj/bin/create-rc-script
--outputFile /etc/init.d/opendj
sudo update-rc.d opendj defaults
/etc/init.d/opendj start
cd /usr/local/opendj/
./setup
ConFigure OpenDJChoose a password for the Directory Manager (admin) account. (Figure 1 – OpenDJ Server Settings)
Select stand alone. (Figure 2 – OpenDJ Topology Options)
Just create a base DN using whatever domain you pre-fer. (Figure 3 – OpenDJ Directory Data)
Keep the defaults. (Figure 4 – OpenDJ Runtime Options)
Review the configuration settings and hit “Finish”. Once the installation is complete go ahead and launch the Con-trol Panel and log in to “Local Server” using the Directory Manager password you entered during setup. Go ahead and minimize the Control Panel and let’s conFigure OpenAM.
Figure 19. OpenAM Identity Subject 2
Figure 20. OpenAM URL Policy 1

en.sdjournal.org 41
Securing Web Applications with OpenAM
ConFigure OpenAM with OpenDJ as user storehttp://devbox.apius.org:8080/openam will open the web
configurator.Enter a password of at least 8 characters. (Figure 5 –
OpenAM General)Note the following use of that FQDN we added to our
hosts file earlier. (Figure 6 – OpenAM Server Settings)We’ll use OpenAM’s embedded optimized OpenDS
application to store configuration settings. (Figure 7 – OpenAM Configuration Store
Select OpenDS (the predecessor of OpenDJ) as the user store and make sure the Directory Name is cor-rect. It should automatically grab the first host name that the loopback address (127.0.0.1) resolves to. Enter the Directory Manager’s password that you set at installa-tion. (Figure 8 – OpenAM User Store)
This is a development environment so we won’t worry about load balancing. (Figure 9 – OpenAM Site Configu-ration)
Choose another password 8 characters or longer. (Fi-gure 10 – OpenAM Agent Information)
In the final screen, verify your configuration and press the Create Configuration button.
Add UserLog in to OpenAM using amadmin as a username and the password you entered in Step 1 of the setup.
We’re going to test the authentication interface using OpenAM’s REST services but first we’ll create a user ac-count. A user account can be created using one of the REST services or from the OpenAM console itself but to illustrate the relationship between OpenAM and the underlying user data store, OpenDJ, we’ll add the user from the OpenDJ control panel.
“Access Control” tab. -> “(Top Level Realm)” -> “Sub-jects” tab. I see two users, namely “amadmin” and “ano-nymous”. (Figure 11 – OpenAM Subjects)
Again, we could add a new user from here but let’s do it from OpenDJ.
If the Control Panel is still minimized go ahead and pull it up if it’s not running, run this command:
/usr/local/opendj/bin/control-panel
(Figure 12 – OpenDJ Control Panel)Select “Manage Entries” from the left menu.Right click on “people” and select “New User”. (Figure
13 – OpenDJ Manage Entries)Be sure and change the “Naming Attribute” to “uid”.
Click OK and look for the Entry Created message. (Figu-re 14 – OpenDJ New User)
Now go back to the OpenAM console and refresh the page. You should see the new user you created in the OpenDJ repository. (Figure 15 – OpenAM New User)
Test OpenAM Authentication ServiceLet’s run a quick and simple test using the REST au-
thentication service in OpenAM to create a session. En-ter the following into your web browser’s address bar. Adjust the URL and the parameter values based on your settings:
http://devbox.apius.org:8080/openam/identity/authenticate?username=pmorris&password=pmorrispmorris
This action requests OpenAM to create a session for the specified user and once created a token re-presenting that session is passed back to the caller.
Listing 1. Tomcat configuration<role rolename=”manager-gui”/>
<role rolename=”manager-script”/>
<role rolename=”manager-jmx”/>
<role rolename=”manager-status”/>
<user username=”admin” password=”admin”
roles=”manager-gui,manager-
script,manager-jmx,manager-
status”/>
Figure 21. OpenAM URL Policy 2 Figure 22. OpenAM URL Policy 3

5/201142
WEB DEVELOPMENT
(Figure 16 - OpenAM REST Authentication Respon-se)
One note though: What I did above I did only to expedite the tutorial. In reality this is a poor prac-tice. Why? Since I used a browser’s address bar to make this call we know that the HTTP method was a GET. Obviously this will work but in a real world implementation it’s a bad idea. For one thing, with a GET request the password parameter value will be written to server logs and for another this practice breaks RESTful constraints. HTTP as a standard sta-tes that GET should have no side effects. Creating a session is definitely a side effect (a desirable side effect but a side effect nonetheless). So in produc-tion it’s best practice to always coerce this call to a POST.
Now let’s test the authentication service using the token value as a parameter. Copy the token value from the response page and paste it into another call like so:
http://devbox.apius.org:8080/openam/identity/isTokenValid-?token=AQIC5wM2LY4SfcxmYwlY5mX1vtaiGhw8cJd8TGJYHv6ar4M.*AAJTSQACMDE.*
You should get back the following response. (Figure 17 - OpenAM REST Validate Token Response)
Test OpenAM Authorization ServiceNow let’s create a URL policy and test out the authori-zation feature. Go to the “Access Control” tab. -> “(Top Level Realm)” -> “Policies” tab. Click on “New Policy”. I’m calling mine “Hello World Policy”. We need to assign this policy to the user we created so scroll down and click on “New” in the “Subjects” section.
Let’s make this a specific subject, not just any authen-ticated user. Click “Next”. (Figure 18 - OpenAM Identity Subject)
Next, we’ll give the Identity Subject a name and in our case search for our user using the “User” filter and “Add” the user (in my case “pmorris”) to the Identity Subject and click “Finish” and “OK” in the next screen. (Figure 19 - OpenAM Identity Subject 2)
Keep in mind that we would probably not do this in real life – that is assign a single user to an Identity Sub-ject. More likely we would create a group, add pmorris to that group and then add the group to the Identity Subject. But again, to expedite the tutorial we’ll do it this way.
Figure 23. OpenAM REST Authorization Response

en.sdjournal.org 43
Securing Web Applications with OpenAM
You should be back out at the policy listing now. (Figu-re 20 - OpenAM URL Policy 1)
Under “Rules” click on “New” and make sure the set-ting is “URL Policy Agent”. Then click “Next”. (Figure 21 - OpenAM URL Policy 2)
Name the new URL Policy Agent and assign it to a particular URL. In our case “hello-world”. Don’t worry if that resource doesn’t actually exist on the server. Note that I am allowing the Hello World Identity Subject to GET the resource but not POST to it. Click “Finish”.
NOTE: By default, the OpenAM allows for control over GET and POST actions on resources, but does not offer options for the other HTTP methods like PUT and DELETE. Thanks to the http://blogs.sun.com/docte-ger/entry/enabling_put_and_delete_actions I was able to find and successfully modify the two files that provide the options for this configuration view within the Ope-nAM console, namely amWebAgent.xml and amWebA-gent.properties. Both are found under /WEB-INF/clas-ses of the OpenAM web application that we’re going to deploy. For each method you wish to add, simply create the desired AttributeSchema elements in the XML file with their nested tags and add the name-value pairs to the properties file. It’s simply a matter of repeating the pattern of the GET and POST actions that are already accounted for in each the files. (Figure 22 - OpenAM URL Policy 3)
We’ve now told OpenAM that this policy with its rule applies to the indicated Identity Subject.
Let’s get a fresh session token now. Once again follow the pattern below and copy the response token value to your clipboard:
http://devbox.apius.org:8080/openam/identity/authenticate?username=pmorris&password=pmorrispmorris
Let’s use the authorization service to check for access rights. Enter a URL following the pattern below aga-in adjusting the path and parameters to your configu-ration:
http://devbox.apius.org:8080/openam/identity/authorize?uri-=hello-world&action=GET&subjectid=AQIC5wM2LY4SfcwUIYd-YJ4_0ubuuGDJ6-_jzFrwrDrHhsg.*AAJTSQACMDE.*
The “uri” parameter is the resource for which we are checking user authorization, the “action” is the HTTP method, and the “subjectid” is the token value repre-senting pmorris’s active session. We set the policy to allow pmorris to GET this resource so we expect a “true” response when we inquire regarding authori-zation. (Figure 23 - OpenAM REST Authorization Re-sponse)
Now let’s try this same request but change the “ac-tion” parameter to POST as in:
http://devbox.apius.org:8080/openam/identity/authori-ze?uri=hello-world&action=POST&subjectid=AQIC5wM2LY4SfcwUIYd-YJ4_0ubuuGDJ6-_jzFrwrDrHhsg.*AAJTSQACM-DE.*
I won’t add another screen shot because the only chan-ge you see is that the response now reads “boole-an=false”, which is precisely what we expect based on the URL Policy Agent we conFigured earlier.
ConclusionOenAM is a mature application and, as such, feature-rich. There’s full support for OAuth, which is widely used in social networking sites. Identity federation is also an im-portant part of OpenAM services. Federation refers to storing an identity across multiple identity management sys-tems or multiple organizations so that disparate systems can establish a circle of trust for authenticating a user. In other words, if I log in at Company X’s web application ad am redirected to Company Y’s web application, Com-pany Y considers me authenticated to their application ba-sed on the trust relationship between the two systems. A framework for logging and monitoring is included to sa-tisfy stringent auditing requirements in some enterprises. As already mentioned for many small, one-off applications OpenAM would probably be overkill. But it’s a viable candi-date for distributed architectures and use cases of dispara-te applications needing to interface with one another and share a common authentication and authorization scheme.
OpenAM is open source so the only up-front commit-ment to adoption is time to get over the learning curve. I hope this article and the accompanying tutorial have given you a boost if you are interested in learning this technolo-gy. Although OpenAM and OpenDJ are open source, Forge Rock offers support for everything from proof of concept engagements to robust 24 hours a day by 7 days a week by 2 hour response time support contracts.
If you think OpenAM might end up in your toolbox, check out these additional resources for learning.
https://www.packtpub.com/glassish-security-with-java-ee/book Glassfish Security by Masou Kalali – Chapter 7, http://blogs.sun.com/doceger Doc Teger’s blog, https://wikis.forgerockorg/confluence/display/openam/OpenAM+Documentation Forge Rck’s site, https://www.packtpub.com/openam-snaphot-9-for-securing-your-web-applications/book New book abou Ope-nAM
PAUL MORRISPaul is a Java and ActionScript developer in the Chicago area. He colaborates with a di-stributed team of developers in the United States and Canada.Contact to the author ([email protected], http://paulmorris.drupalgardens.com/)


