
©2017 Charter Communications. All Rights Reserved. Not all products, pricing and services are available in all areas. Pricing and actual speeds may vary. Restrictions may apply. Subject to change without notice.
Last Update: 2017-06-14
About Spectrum Enterprise:
Spectrum Enterprise is a division of Charter Communications following a merger with Time Warner Cable and acquisition of Bright House Networks. Spectrum Enterprise is a national provider of scalable, fiber technology solutions. The Spectrum Enterprise portfolio includes networking and managed services solutions, including Internet access, Ethernet and Managed Network Services, Voice, TV and Cloud solutions. Our industry-leading team of experts works closely with clients to achieve greater business success.
About this document:
Spectrum Enterprise assures IP PBX compatibility by conducting interoperability testing to ensure any potential compatibility issues have been resolved prior to installation. Please review the IP PBX configuration instructions in this guide prior to your installation date.
Be advised that this document may contain references to Charter or Charter Business. All references to Charter should be read as Spectrum Enterprise.
Thank you,
Spectrum Enterprise
Spectrum Enterprise SIP Trunking Service Alcatel OmniPCX v13
IP PBX Configuration Guide

The information contained herein is confidential and should not be disclosed, copied, or duplicated in any manner without writtenpermission from Charter Communications™.
1
Alcatel OmniPCX v13 IP PBX Configuration Guide
1 Introduction
This document describes how to configure the Alcatel OmniPCX IP PBX to interoperate with the Charter network. It does not provide anyinformation how to provision, configure, or use the features of the IP PBX. Refer to the documentation provided with the IP PBX or contactthe vendor.
2 OXE Configuration
To begin the OXE Configuration, follow the step-by-step procedure.
Steps Action Result
1 Open OmniVista 8770 client management
2 Select from the left paneConfiguration
3 Navigate to is given for this example)nmc > Network > (Tekvizionoxe
4 Right click ENT Tekvizionoxe
5 Select Configure
6 Go to the next table
Trunk Network Configuration

The information contained herein is confidential and should not be disclosed, copied, or duplicated in any manner without writtenpermission from Charter Communications™.
2
2.1 Creating Trunk GroupTo create a trunk group, follow the step-by-step procedure
Steps Action Result
1 Under Tekvizionoxe:
2 Right Click and select Trunk Groups Create
3 Go to the next table
Trunk Group

The information contained herein is confidential and should not be disclosed, copied, or duplicated in any manner without writtenpermission from Charter Communications™.
3

The information contained herein is confidential and should not be disclosed, copied, or duplicated in any manner without writtenpermission from Charter Communications™.
4
Steps Action Result
1 At Trunk Group ID: enter the appropriate value 3 is an example
2 At Trunk Group Type: enter T2
3 At Trunk Group Name: enter the appropriate name SIP trunk is an example
4 At Node number: enter the appropriate value 1 is an example
5 At Q931 Signal variant: enter ISDN all countries
6 All the other values are set to default
7 Click Apply the changes
8 Procedure completed
Configuration
2.2 Creating SIP External Gateway
To create a SIP external gateway, follow the step-by-step procedure.
Steps Action Result
1 Navigate SIP > 1 >SIP Ext Gateway SIP External Gateway opens
2 Right click on and select SIP Ext Gateway Create
3 Go to the next table

The information contained herein is confidential and should not be disclosed, copied, or duplicated in any manner without writtenpermission from Charter Communications™.
5
SIP External Gateway
Steps Action Result
1 At SIP External Gateway ID: enter an appropriate value 2 is an example
2 At Gateway Name: enter an appropriate name SIP trunk is an example
3 At Remote domain: add appropriate IP address of Audio Codes SBC 10.70.50.15 is an example
4At SIP Port Number: enter 5060
5 At Transport type: enter UDP
6 At Belonging Domain: enter the appropriate Service Provider IP address
7 At Trunk group number: enter the created trunk group number 3 is Trunk Group number example
8 All the other values are set to default

The information contained herein is confidential and should not be disclosed, copied, or duplicated in any manner without writtenpermission from Charter Communications™.
6
9 Go to the next table
SIP Gateway Configuration
Steps Action Result
1 All the values are set to default
2 Click Apply the changes
3 Procedure completed
SIP Gateway Configuration

The information contained herein is confidential and should not be disclosed, copied, or duplicated in any manner without writtenpermission from Charter Communications™.
7
2.3 ARS Routing
To create ARS routing, follow the step-by-step procedure.
Steps Action Result
1 To Create Numbering Command Table ID:
Navigate to Translator > 1 > Automatic Route Selection > 1 > Numbering Command Table
2 Right click and select Automatic Route Selection Create
3 Go to the next table
Creating ARS Routing

The information contained herein is confidential and should not be disclosed, copied, or duplicated in any manner without writtenpermission from Charter Communications™.
8
Steps Action Result
1 At Table ID: enter an appropriate value 2 is an example
2 At Command: enter I
3 At enter Associated Ext SIP gateway: an appropriate value 2 is an example
4 Click Apply the changes
5 Go to the next table
ARS Table ID

The information contained herein is confidential and should not be disclosed, copied, or duplicated in any manner without writtenpermission from Charter Communications™.
9
Steps Action Result
1 To create ARS Route List
Navigate to Translator > 1 > Automatic Route Selection > 1 > Numbering Command Table > ARS RouteList
ARS Route Listopens
2 Right Click and select ARS Route List Create
3 Go to the next table
ARS Route List

The information contained herein is confidential and should not be disclosed, copied, or duplicated in any manner without writtenpermission from Charter Communications™.
10
Steps Action Result
1 At ARS Route list: enter 5
2 At Name, enter the appropriate name SIP trunk is an example
3 Click Apply the changes
4 Go to the next table
ARS Route List
Steps Action Result
1 To create an ARS Route
Navigate to Translator >1 > Automatic Route Selection > 1 > ARS Route List
ARS Route LIst opens
2 At Name, enter the appropriate name SIP trunk is an example
3 Click Apply the changes
4 Expand the and select the appropriate SIP trunk number ARS route List
5 At the ARS Route list: enter 5
6 At Name: enter the appropriate name SIP trunk is an example
7 At Trunk Group Source: enter Route
8 At Trunk Group: enter 3
9 At Numbering Command Tabl. ID: enter the appropriate value 2 is an example
10 At Quality: select from the drop-down menuSpeech
11 All the other values are set to default
12 Click Apply the changes
13 Procedure completed
ARS Route

The information contained herein is confidential and should not be disclosed, copied, or duplicated in any manner without writtenpermission from Charter Communications™.
11
2.4 Time-based Routing
To create time-based routing, follow the step-by-step procedure.
Steps Action Result
1 To create a Time-based Route List
Navigate to Translator >1 > Automatic Route Selection > 1 > ARS Route List
ARS Route List opens
2 Expand the and select ARS route List 5 SIP Trunk No
3 Right click on and select Time-based Route List Create
4 Go to the next table
Time-Based Routing

The information contained herein is confidential and should not be disclosed, copied, or duplicated in any manner without writtenpermission from Charter Communications™.
12
Steps Action Result
1 At Route Number: enter 1
2 At Waiting Cost Limit: enter -1
3At Stopping Cost Limit: enter -1
4 All the other values are set to default
5 Click Apply the changes
6 Procedure completed
Time Based Route List

The information contained herein is confidential and should not be disclosed, copied, or duplicated in any manner without writtenpermission from Charter Communications™.
13
2.5 External Numbering Plan
To create an external numbering plan, follow the step-by-step procedure.
Steps Action Result
1 Navigate to Translator >1 > External Numbering Plan > 1 > Numbering Discriminator Numbering Discriminator opens
2 Right click on and select Numbering Discriminator Create
3 At Stopping Cost Limit: enter -1
4 All the other values are set to default
5 Click Apply the changes
6 Go to the next table
External Numbering Plan

The information contained herein is confidential and should not be disclosed, copied, or duplicated in any manner without writtenpermission from Charter Communications™.
14
Steps Action Result
1 At Discriminator No. : enter appropriate value 6 is an example
2 At Name: enter SIP trunk
3 Click Apply the changes
4 Go to the next table
External Numbering Discriminator

The information contained herein is confidential and should not be disclosed, copied, or duplicated in any manner without writtenpermission from Charter Communications™.
15
Steps Action Result
1 Navigate to Translator >1 > External Numbering Plan > 1 > Numbering Discriminator Numbering Discriminator opens
2 Right click and select Discriminator Rule Create
3 Go to the next table
Numbering Discriminator
Steps Action Result
1 At Call Number: enter appropriate value 9 is an example
2 At Area Routing: enter 1
3 At ARS Route List Number. enter 5

The information contained herein is confidential and should not be disclosed, copied, or duplicated in any manner without writtenpermission from Charter Communications™.
16
4At Schedule Number: enter -1
5 At Number of Digits: enter the appropriate value 10 is an example
6 Click Apply the changes
7 Go to the next table
Call Number
Steps Action Result
1 To set Discriminator in Entity:Navigate to Entities > Entity (1 is used for this example) > Discriminator Selector
Discriminator Selector opens
2 At Discriminator 01 : enter 1
3 At Discriminator 06 : enter the appropriate value 6 is used for this example
4 All the other values are set to default
5 Click Apply the changes 1
6 Procedure completed
Instance
The information contained herein is confidential and should not be disclosed, copied, or duplicated in any manner without writtenpermission from Charter Communications™.
17
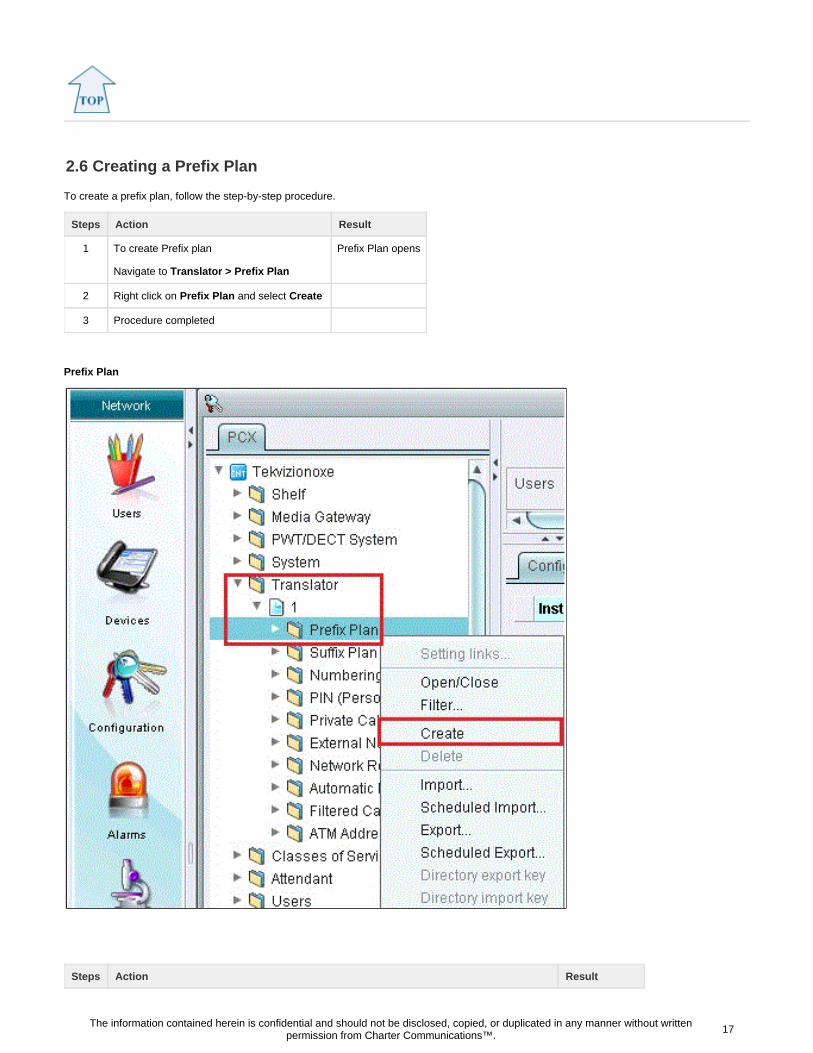
2.6 Creating a Prefix Plan
To create a prefix plan, follow the step-by-step procedure.
Steps Action Result
1 To create Prefix plan
Navigate to Translator > Prefix Plan
Prefix Plan opens
2 Right click on and select Prefix Plan Create
3 Procedure completed
Prefix Plan
Steps Action Result

The information contained herein is confidential and should not be disclosed, copied, or duplicated in any manner without writtenpermission from Charter Communications™.
18
1 At Number: enter the appropriate value 8 is an example
2 At Prefix Meaning: select from the drop-down menu + ARS Prof.Trg Grp Seiz.with overlap
3 At Discriminator No. : enter 6
4 Click Apply the changes
5 Procedure completed
Prefix Plan Number
2.7 Creating Users
To create users, follow the step-by-step procedure.
Steps Action Result
1 Navigate to Users > Create
2 At Directory Number: enter the appropriate value 1000 is an example
3 At Directory name: enter the appropriate name Sprint is an example
4 At Directory First name: enter the appropriate name user1 is an example
5At Set Type : enter the appropriate information IPTouch 4068 is an example
6 At Language ID: enter 1
7 At Can be Called/Dialed By Name: enter YES
8 All the other values are set to default
9 Click Apply for changes
10 Procedure completed
Users

The information contained herein is confidential and should not be disclosed, copied, or duplicated in any manner without writtenpermission from Charter Communications™.
19
3 AudioCodes Configuration
AudioCodes SBC is required for the Alcatel IP PBX.
3.1 AudioCodes Network Configuration
To add the network configuration, follow the step-by-step procedure.
Steps Action Result
1 Open Audio Codes SBC in the web browser Audio Codes SBC’s IP Address is an example
2 Select from the left paneConfiguration
3 Procedure completed
AudioCodes Configuration Tab

The information contained herein is confidential and should not be disclosed, copied, or duplicated in any manner without writtenpermission from Charter Communications™.
20
3.2 Proxy Sets Table Configuration
To add the proxy sets table configuration, follow the step-by-step procedure.
Steps Action Result
1 Navigate VoIP > Control Network > Proxy Sets Table Proxy Sets Table opens
2 Select “Configuration” from the left pane
3 At Set Proxy Set ID: select from the drop-down menu1
4 At : Enter the IP address provided by Charter to connect to Charter's network. Proxy Address
5 At Transport Type: select from the drop-down menuUDP
6 Click Submit
7 Go to the next table
Proxy Sets Table Configuration

The information contained herein is confidential and should not be disclosed, copied, or duplicated in any manner without writtenpermission from Charter Communications™.
21
Steps Action Result
1 At Set Proxy Set ID: Select from the drop down menu 2
2 At Proxy Address: Enter the IP address assigned to OmniPCX IP PBX. 10.70.50.6 is an example
3 At Transport Type: select from the drop down menuUDP
4 Click Submit
5 Procedure completed
Proxy Sets Table Configuration
3.3 SIP Definitions
To add SIP definitions, follow the step-by-step procedure.
Steps Action Result

The information contained herein is confidential and should not be disclosed, copied, or duplicated in any manner without writtenpermission from Charter Communications™.
22
1 Navigate VoIP > SIP Definitions > General Parameters General Parameters opens
2 At SIP Transport Type : UDP
3 At SIP UDP Local Port : 5060
4 At SIP TCP Local Port : 5060
5 At SIP TLS Local Port : 5061
6 At : SIP Destination Port 5060
7 All the other values are set to default
8 Click Submit
9 Procedure completed
General Parameters
3.4 IP Group Table
To configure the IP Group Table, follow the step-by-step procedure.
Steps Action Result
1 Navigate to VoIP > Control Network > IP Group Table IP Group Table opens
2 At Index: select the appropriate value from the drop-down menu 1 is an example
3 In Common Parameters:
At Type: select from the drop-down menuSERVER

The information contained herein is confidential and should not be disclosed, copied, or duplicated in any manner without writtenpermission from Charter Communications™.
23
4 At Description: select the appropriate value from the drop-down menu ITSP is an example
5 At Proxy Set ID: select 1 from the drop-down menu
6 At Media Realm: select from the drop-down menuMR0-WAN
7 At IP Profile ID: select the appropriate value from the drop-down menu 2 is an example. By default ‘0’ is assigned
8 All the other values are set to default
9 Click Submit
10 Go to the next table
IP Group Table WAN
Steps Action Result
1 At Index: select the appropriate value from the drop-down menu 2 is an example
2 In Common Parameters:
At Type: select from the drop-down listSERVER
3 At Description: select the appropriate value from the drop-down menu OXE is an example
4 At Profile Set ID: select 2
5 At Media Realm: select from the drop-down menuMR1-LAN
7 At IP Profile ID: select the appropriate value from the drop-down menu 1 is an example. By default ‘0’ is assigned
8 All the other values are set to default
9 Click Submit
10 Procedure completed

The information contained herein is confidential and should not be disclosed, copied, or duplicated in any manner without writtenpermission from Charter Communications™.
24
IP Group Table LAN
3.5 IP Profile Settings
To configure the IP profile setting, follow the step-by-step procedure.
Steps Action Result
1 Navigate to VoIP > Coders And Profile > IP Profile settings IP Profile Settings opens
2 At Playback Tone to IP: select from drop-down menuPlay
3 At Enable Early Media: select from drop-down menuEnable
4 All the other values are set to default
5 Click Submit
6 Procedure completed
The information contained herein is confidential and should not be disclosed, copied, or duplicated in any manner without writtenpermission from Charter Communications™.

The information contained herein is confidential and should not be disclosed, copied, or duplicated in any manner without writtenpermission from Charter Communications™.
25


