
RLLC
LLR
Threading Chartof 2-needle, 4-thread overlock sewing
MO-735 P.1
.
.
1Thread upper looper 2Thread lower looper
Needle positionand
needle thread path.
1 234
3~5 3~5 3~5 3~5 Thread tension
Stitch length2.5
Please thread innumerical order 1~4.
1. Switch the machine off. (power switch "O")2. Pull the release lever forward to activate the upper looper. (Page 44)3. Push the button to lower the upper knife arm. (Page 44)4. Lower the upper knife. (Page 12)5. Attach the knife guard. (Page 45)* For more details, please refer to instruction manual.
Threading preparations

4 3 2
RLLC
LLR
1
2
MO-735 P.2
Thread lower looper
Threading Chartof 2-needle, 3-thread super stretch
Upper looperconverter
Please thread innumerical order 2~4.
5~7 3~5 3~5 Thread tension
Stitch length2.5
.
.
Needle positionand
needle thread path.
1. Switch the machine off. (power switch "O")2. Pull the release lever forward to activate the upper looper. (Page 44)3. Push the button to lower the upper knife arm. (Page 44)4. Lower the upper knife. (Page 12)5. Attach the knife guard. (Page 45)* For more details, please refer to instruction manual.
Threading preparations

1
1 23
RLLC
LLR
2
Threading Chartof 1-needle, 3-thread overlock sewing(left needle)
Please thread innumerical order 1~4.
1. Switch the machine off. (power switch "O")2. Pull the release lever forward to activate the upper looper. (Page 44)3. Push the button to lower the upper knife arm. (Page 44)4. Lower the upper knife. (Page 12)5. Attach the knife guard. (Page 45)* For more details, please refer to instruction manual.
.
.
Threading preparations
Thread tension3~53~53~5
Stitch length2.5
Thread lower looperThread upper looper
MO-735 P.3
Needle positionand
needle thread path.

1 23
RLLC
LLR
1 2
Threading Chartof 1-needle, 3-thread overlock sewing(right needle)
Please thread innumerical order 1~3.
Thread lower looperThread upper looper
MO-735 P.4
Needle positionand
needle thread path.
3~5 3~5 3~5 Thread tension
Stitch length2.5
.
.
1. Switch the machine off. (power switch "O")2. Pull the release lever forward to activate the upper looper. (Page 44)3. Push the button to lower the upper knife arm. (Page 44)4. Lower the upper knife. (Page 12)5. Attach the knife guard. (Page 45)* For more details, please refer to instruction manual.
Threading preparations

1 23
RLLC
LLR
1 2
Threading Chartof 1-needle, 3-thread flatlock(left needle)
.
.Please thread innumerical order 1~3.
1~2 3~5 6 ~8 Thread tension
Stitch length2.5
Thread upper looperThread lower looper
MO-735 P.5
Needle positionand
needle thread path.
1. Switch the machine off. (power switch "O")2. Pull the release lever forward to activate the upper looper. (Page 44)3. Push the button to lower the upper knife arm. (Page 44)4. Lower the upper knife. (Page 12)5. Attach the knife guard. (Page 45)* For more details, please refer to instruction manual.
Threading preparations

1 23
RLLC
LLR
1 2
Threading Chartof 1-needle, 3-thread flatlock(right needle)
.
.
1~2 3~5 6 ~8 Thread tension
Stitch length2.5
Please thread innumerical order 1~3.
Needle positionand
needle thread path.
Thread upper looperThread lower looper
MO-735 P.6
1. Switch the machine off. (power switch "O")2. Pull the release lever forward to activate the upper looper. (Page 44)3. Push the button to lower the upper knife arm. (Page 44)4. Lower the upper knife. (Page 12)5. Attach the knife guard. (Page 45)* For more details, please refer to instruction manual.
Threading preparations

1 23
RLLC
LLR
1 2
Threading Chartof 1-needle, 3-thread narrow seam
Please thread innumerical order 1~3.
.
.
5~7 5~7 3~5 Thread tension
Stitch length1~1.8
Needle positionand
needle thread path.
Thread upper looperThread lower looper
MO-735 P.7
1. Switch the machine off. (power switch "O")2. Pull the release lever forward to activate the upper looper. (Page 44)3. Push the button to lower the upper knife arm. (Page 44)4. Lower the upper knife. (Page 12)5. Attach the knife guard. (Page 45)* For more details, please refer to instruction manual.
Threading preparations

1 23
RLLC
LLR
1 2
Threading Chartof 1-needle, 3-thread roll hem
Please thread innumerical order 1~3.
.
.
5~7 4~6 6~8 Thread tension
Stitch length1~1.8
Needle positionand
needle thread path.
Thread upper looperThread lower looper
MO-735 P.8
1. Switch the machine off. (power switch "O")2. Pull the release lever forward to activate the upper looper. (Page 44)3. Push the button to lower the upper knife arm. (Page 44)4. Lower the upper knife. (Page 12)5. Pull selection lever to the front marking on the stitch plate. (Page 21)6. Attach the knife guard. (See page 45)* For more details, please refer to instruction manual.
Threading preparations

3 2
RLLC
LLR
1
2
Threading Chartof 1-needle, 2-thread wrapped overlocksewing (left needle)
Please thread innumerical order 2~3.
.
.
5~7 3~5 Thread tension
Stitch length2.5
Needle positionand
needle thread path.
Thread lower looper
MO-735 P.9
Upper looperconverter
1. Switch the machine off. (power switch "O")2. Pull the release lever forward to activate the upper looper. (Page 44)3. Push the button to lower the upper knife arm. (Page 44)4. Lower the upper knife. (Page 12)5. Attach the knife guard. (Page 45)* For more details, please refer to instruction manual.
Threading preparations

3 2
RLLC
LLR
2
Threading Chartof 1-needle, 2-thread wrappedoverlock (right needle)
Please thread innumerical order 2~3.
.
.
Needle positionand
needle thread path.
5~7 3~5 Thread tension
Stitch length2.5
MO-735 P.10
Thread lower looper
1 Upper looperconverter
1. Switch the machine off. (power switch "O")2. Pull the release lever forward to activate the upper looper. (Page 44)3. Push the button to lower the upper knife arm. (Page 44)4. Lower the upper knife. (Page 12)5. Attach the knife guard. (Page 45)* For more details, please refer to instruction manual.
Threading preparations

3 2
RLLC
LLR
1
2
Threading Chartof 1-needle, 2-thread flatlock(left needle)
Please thread innumerical order 2~3.
.
.
Needle positionand
needle thread path.
1~2 4~6 Thread tension
Stitch length2.5
Thread lower looper
Upper looperconverter
MO-735 P.11
1. Switch the machine off. (power switch "O")2. Pull the release lever forward to activate the upper looper. (Page 44)3. Push the button to lower the upper knife arm. (Page 44)4. Lower the upper knife. (Page 12)5. Attach the knife guard. (Page 45)* For more details, please refer to instruction manual.
Threading preparations

3 2
RLLC
LLR
1
2
Threading Chartof 1-needle, 2-thread flatlock(right needle)
.
.Please thread innumerical order 2~3.
1~2 4~6 Thread tension
Stitch length2.5
Thread lower looper
Upper looperconverter
Needle positionand
needle thread path.
MO-735 P. 12
1. Switch the machine off. (power switch "O")2. Pull the release lever forward to activate the upper looper. (Page 44)3. Push the button to lower the upper knife arm. (Page 44)4. Lower the upper knife. (Page 12)5. Attach the knife guard. (Page 45)* For more details, please refer to instruction manual.
Threading preparations

3 2
RLLC
LLR
1
2
Threading Chartof 1-needle, 2-thread roll hem
numerical order 2~3.
Needle positionand
needle thread path.
5~7 4~6 Thread tension
Stitch length1~1.8
Thread lower looper
Upper looperconverter
MO-735 P.13
1. Switch the machine off. (power switch "O")2. Pull the release lever forward to activate the upper looper. (Page 44)3. Push the button to lower the upper knife arm. (Page 44)4. Lower the upper knife. (Page 12)5. Pull selection lever to the front marking on the stitch plate. (Page 21)6. Attach the knife guard. (See page 45)* For more details, please refer to instruction manual.
Threading preparations

3 2
RLLC
LLR
1
2
Threading Chartof 1-needle, 2-thread overlock(left needle)
.
.Please thread innumerical order 2~3.
1~2 4~6 Thread tension
Stitch length2.5
Needle positionand
needle thread path.
Thread lower looper
Upper looperconverter
MO-735 P.14
1. Switch the machine off. (power switch "O")2. Pull the release lever forward to activate the upper looper. (Page 44)3. Push the button to lower the upper knife arm. (Page 44)4. Lower the upper knife. (Page 12)5. Attach the knife guard. (Page 45)* For more details, please refer to instruction manual.
Threading preparations

3 2
RLLC
LLR
1
2
Threading Chartof 1-needle, 2-thread overlock(right needle)
.
.Please thread innumerical order 2~3.
1~2 4~6 Thread tension
Stitch length2.5
Thread lower looper
Upper looperconverter
Needle positionand
needle thread path.
MO-735 P.15
1. Switch the machine off. (power switch "O")2. Pull the release lever forward to activate the upper looper. (Page 44)3. Push the button to lower the upper knife arm. (Page 44)4. Lower the upper knife. (Page 12)5. Attach the knife guard. (Page 45)* For more details, please refer to instruction manual.
Threading preparations

1 1 2
LL RC
LLR
1
Threading Chart of Chain Stitch
MO-735 P.16
.
Please thread innumerical order 1~2.
Thread tension
Stitch length2.5
Needle positionand
needle thread path.
Thread chain looper
3~5
1. Switch the machine off. (power switch "O")2. Press release lever back to deactivate the upper looper. (Page 44)3. Raise the upper knife. (Page 12)4. Pull the lever and raise the upper knife arm. (Page 44)5. Attach the extension plate. (Page 45)* For more details, please refer to instruction manual.
Threading preparations
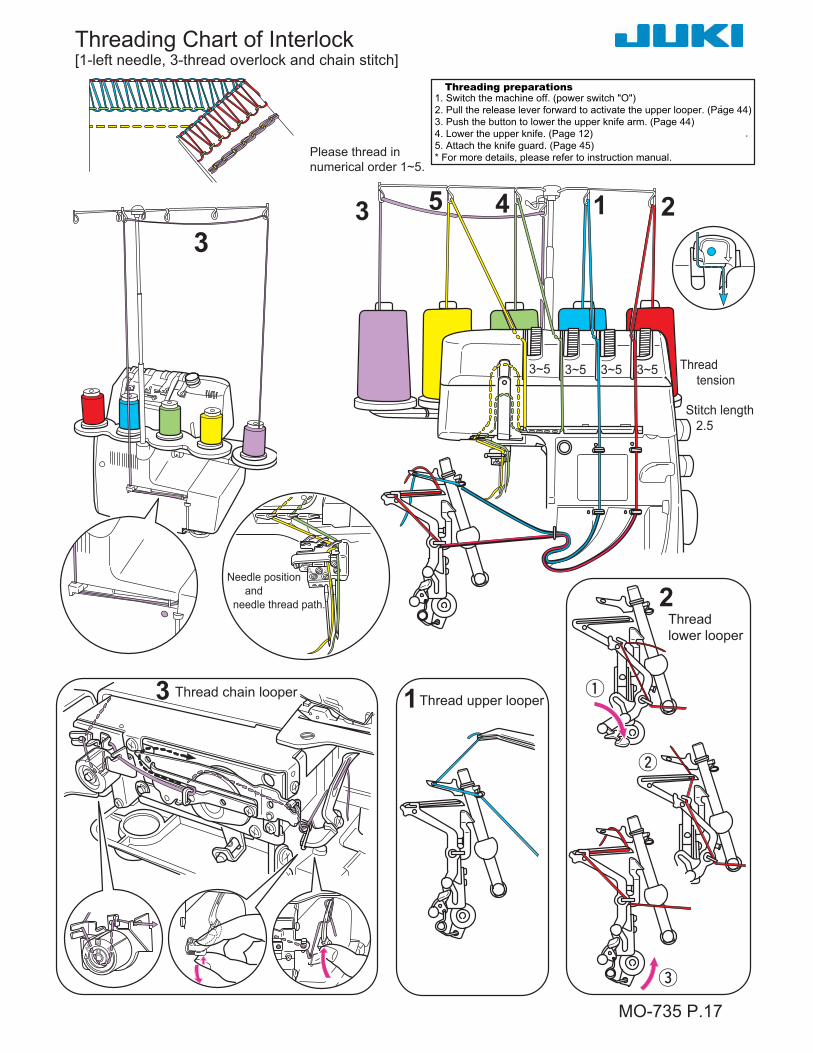
Threading Chart of Interlock[1-left needle, 3-thread overlock and chain stitch]
MO-735 P.17
2
3
3
LL RC
1 243 5
3~5 3~5 3~5 3~5
1
.
.
Please thread innumerical order 1~5.
Threadtension
Stitch length2.5
Needle positionand
needle thread path.
Thread upper looper
Threadlower looper
Thread chain looper
1. Switch the machine off. (power switch "O")2. Pull the release lever forward to activate the upper looper. (Page 44)3. Push the button to lower the upper knife arm. (Page 44)4. Lower the upper knife. (Page 12)5. Attach the knife guard. (Page 45)* For more details, please refer to instruction manual.
Threading preparations

3
3 5 4 1 2
LL
1
2
3
Threading Chart of Interlock[1-right needle, 3-thread overlock and chain stitch]
.
.Please thread innumerical order 1~5.
3~5 3~5 3~5 3~5 Threadtension
Stitch length2.5
Needle positionand
needle thread path.
Thread upper looper
Threadlower looper
MO-735 P.18
Thread chain looper
1. Switch the machine off. (power switch "O")2. Pull the release lever forward to activate the upper looper. (Page 44)3. Push the button to lower the upper knife arm. (Page 44)4. Lower the upper knife. (Page 12)5. Attach the knife guard. (Page 45)* For more details, please refer to instruction manual.
Threading preparations
3
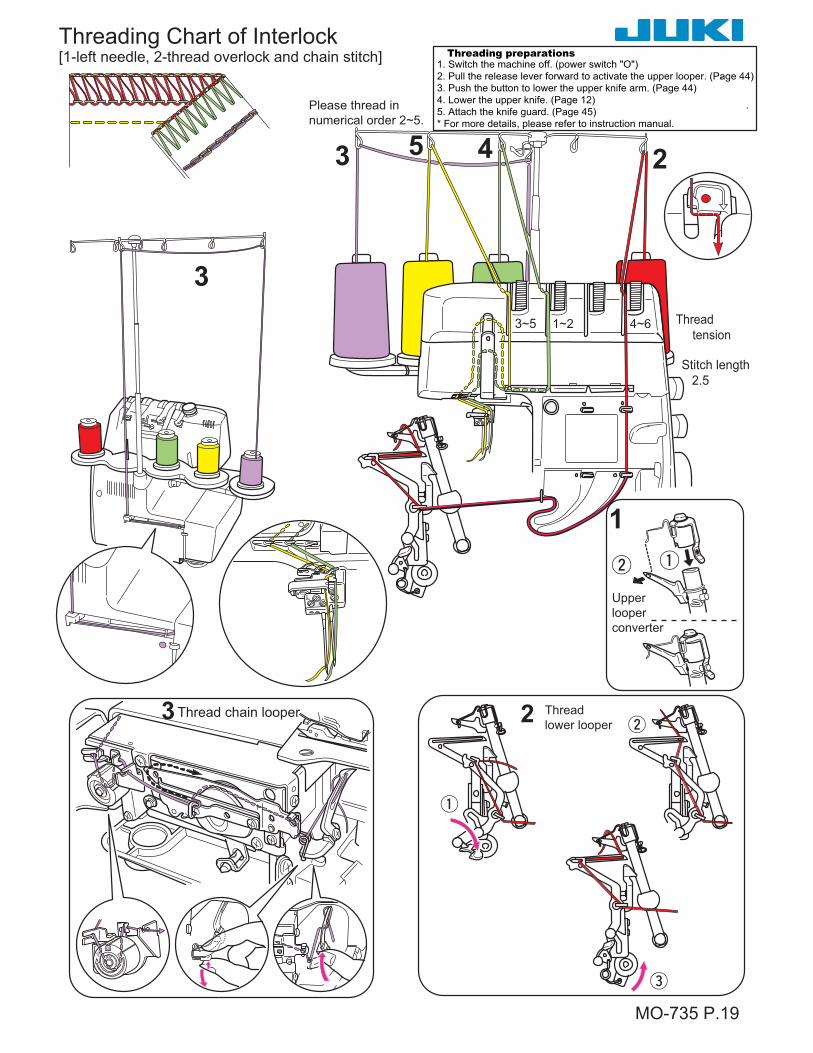
3 5 4 2
LLC
1
23 Threadlower looper
Threading Chart of Interlock[1-left needle, 2-thread overlock and chain stitch]
.
.Please thread innumerical order 2~5.
Upperlooperconverter
Thread chain looper
MO-735 P.19
3~5 1~2 4~6 Threadtension
Stitch length2.5
1. Switch the machine off. (power switch "O")2. Pull the release lever forward to activate the upper looper. (Page 44)3. Push the button to lower the upper knife arm. (Page 44)4. Lower the upper knife. (Page 12)5. Attach the knife guard. (Page 45)* For more details, please refer to instruction manual.
Threading preparations

3
3 5 4 2
1
23 Threadlower looper
Threading Chart of Interlock[1-right needle, 2-thread overlock and chain stitch]
.
.Please thread innumerical order 2~5.
Upperlooperconverter
Thread chain looper
MO-735 P.20
3~5 1~2 4~6 Threadtension
Stitch length2.5
LL RC
1. Switch the machine off. (power switch "O")2. Pull the release lever forward to activate the upper looper. (Page 44)3. Push the button to lower the upper knife arm. (Page 44)4. Lower the upper knife. (Page 12)5. Attach the knife guard. (Page 45)* For more details, please refer to instruction manual.
Threading preparations

1
1
Treading Chart3-needle, 4-thread cover stitch
MO-735 P.21
Thread chain looper
LL RC
LLR
1 4 3 2
4.5~63.5~5
.
Threadtension
Stitchlength3.0
Needle positionand
needle thread path.
Please thread innumerical order 1~4.
2~4
1. Switch the machine off. (power switch "O")2. Press release lever back to deactivate the upper looper. (Page 44)3. Raise the upper knife. (Page 12)4. Pull the lever and raise the upper knife arm. (Page 44)5. Attach the extension plate. (Page 45)* For more details, please refer to instruction manual.
Threading preparations

11 3 2
LL RC
LLR
1
Treading Chart2-needle, 3-thread cover stitch(wide L, R)
Please thread innumerical order 1~3.
.
Thread chain looper
Needle positionand
needle thread path.
MO-735 P.22
2~4 4.5~6Threadtension
Stitchlength3.0
1. Switch the machine off. (power switch "O")2. Press release lever back to deactivate the upper looper. (Page 44)3. Raise the upper knife. (Page 12)4. Pull the lever and raise the upper knife arm. (Page 44)5. Attach the extension plate. (Page 45)* For more details, please refer to instruction manual.
Threading preparations

1
1 3 2
RLLC
LLR
1
Treading Chart2-needle, 3-thread cover stitch(narrow L, C)
Please thread innumerical order 1~3.
.
Threadtension
Stitchlength3.0
2~4 3.5~5
Needle positionand
needle thread path.
Thread chain looper
MO-735 P.23
1. Switch the machine off. (power switch "O")2. Press release lever back to deactivate the upper looper. (Page 44)3. Raise the upper knife. (Page 12)4. Pull the lever and raise the upper knife arm. (Page 44)5. Attach the extension plate. (Page 45)* For more details, please refer to instruction manual.
Threading preparations

11 3 2
LL RC
LLR
1
Treading Chart2-needle, 3-thread cover stitch(narrow C, R)
Please thread innumerical order 1~3.
.
Threadtension
Stitchlength3.0
3.5~5 4.5~6
Needle positionand
needle thread path.
Thread chain looper
MO-735 P.24
1. Switch the machine off. (power switch "O")2. Press release lever back to deactivate the upper looper. (Page 44)3. Raise the upper knife. (Page 12)4. Pull the lever and raise the upper knife arm. (Page 44)5. Attach the extension plate. (Page 45)* For more details, please refer to instruction manual.
Threading preparations


