Download - Uncovering Zero-â€Days and advanced fuzzing

Uncovering Zero-‐Days and advanced fuzzing How to successfully get the tools to unlock UNIX and Windows Servers By Nikolaos Rangos (Kingcope) Year 2012 Slide 1 Welcome everybody to this awesome conference and to my talk that is about, as the title states, Uncovering Zero-‐Days and advanced fuzzing techniques. You will see several methods in this talk about how to get the tools to successfully unlock UNIX and Windows Servers, and more. If you have questions or comments please ask or comment right after the presentation.

Slide 2 The course of the presentation is displayed on the current slide on the screen. We will start with a short introduction about who I am – then I will introduce you to the topic of the current presentation and afterwards we are going to discuss the main topic which I entitled „0days and the rush for public vulnerabilities“ plus advanced fuzzing techniques. The reason I put „rush for public vulnerabilities“ into the title is that, as some of you might know, I did put much work into exploiting vulnerabilities that had been already publicy announced. As a side note: The discussion in this speech can be applied to any Operating System including the Windows series of Operating Systems – most of the details yet directly apply to UNIX systems like Linux, BSD or Solaris. The upcoming slide contains information about myself.
Slide 3 Whoami. Whoami is actually a command in both Windows and Linux and will display the current logged in user, just to mention that. My name is Nikolaos Rangos, and as some of you will know, the nickname I used throughout my time as a hacker is „Kingcope“. I live and work in Germany, in a village nearby Frankfurt, all my family is greek, so are both of my parents. As some of you might have noticed by reading my public vulnerbility advisories I feel connected to my greek roots. I have a strong passion, I like hacking software, be it discovering vulnerabilities, writing exploits, or finding out how the software I am facing is running. I started being active with hacking before the date displayed on the screen, I can remember though that I wrote my first real working exploit back in 2003. In the past I have been working as a penetration tester with a company based in Germany, nearby my village. Currently I do vulnerability research. Let’s proceed with the introduction of the topic today.
Slide 4 We can define vulnerabilities in several classes that have been developed over the course of time. Every class of vulnerabilities has its advantages and disadvantages. Remote Exploits can be defined as exploits that when run by the attacker gain access to a system silently and without user intervention. Scanners can be additionally programmed to support a remote exploit in means of discovering vulnerable servers. Sometimes remote exploits do not yield to the desired privileges on the remote system, so the class of local root exploits can be used to gain elevated privileges. Local root exploits can be used uniquely too, in a scenario where the attacker already has access to the system. A rather new form of vulnerabilities are the Client-‐Side vulnerabilties that when exploited can attack entities in organizations, companies, individual users, the Client-‐Side attacks normally require User-‐Intervention of the victim. In this talk I will especially illustrate how remote software flaws, remote vulnerabilities are discovered and exploited. Most parts of the discussion can be applied to local and client vulnerabilities.
Slide 5 Discovering vulnerabilities is Easy Programmers around the world constantly do mistakes and introduce flaws especially when new features or versions are implemented. An interested hacker therefore can be lucky in discovering vulnerabilities by looking into CVS Diffs or for example reversing updates. Every New Technology brings new possibilities for the attacker the reason for this is that New Technologies are immature and only get secure after several years of patching and crafting. Discovering flaws can be fun when you have the appropriate tools set up, like you will see in the upcoming slide about the environment that needs to be set up to be successful. There really is no secret (everyone cooks with water) -‐ Just needs passion, time, experience and good music.
Slide 6 Now to the environment that needs to be built up before auditing for vulnerabilities can begin. You will definitely need Virtual Machines. The reason is Virtual Machines can be easily installed and used nowadays. VMs are perfect for our purposes. Many operating systems, let’s say targets can be installed. The running VM’s can be used for adding offsets and values for different exploit targets too. I remember the time I was unaware of Virtual Machines. I wanted to exploit a Windows Flaw and had burned like ten or more CDs, every CD containing its own Windows version and Windows language. So I took the CDs one by one and installed it on real hardware. What a time overhead if you can have it so simple with Virtual Machines. You just install the software inside the VM and if the guest operating systems fails you won’t lose data (except the work thats inside the VM but thats a different story) One example setup is, as you will also see in the next slide, a Windows 7 Host with several Guests installed, like: Windows, Linux, FreeBSD, Solaris 86, and so on. As a side note: You can easily do kernel debugging by using pipes without using a real serial line on real hardware. So this is another advantage with Virtual Machines. There is a lot of software you can use today for this purpose. VMware Workstation, Oracle VirtualBox, QEMU and so on. I personally prefer VMware during my audits.

Slide 7 That is a screendump of a virtual machine running FreeBSD inside a Win7 Host installation, it illustrates quite pretty why VMs have many advantages. At the left pane you can see the Operating Systems that were installed and are available for booting. By the way FreeBSD runs very stable inside the VM. And the installation is quick. Another upside is that the harddisks of the VMs grow according to their usage, so you don’t need like 20Gig in the first place. The next slide will be about important tools that I personally prefer and recommend when doing audits.

Slide 8 The tools A big advantage is the ability to program, write code. So a good tool I included is a kind of programming language, the one you like most. Interpreted languages like Perl or Python can be used to easily fuzz software, develop and write the exploit itself. Another purpose of the high level programming languages have is writing own tools, take the example you want to observe processes, how they run etc. Some puzzles require native code and need to be programmed in a compiled language like C. Especially Local Exploits tend to be written in C, another example are RPC exploits. And of course it looks much more leet to code in C especially when the headers comments are larger than the actual exploit :D The following UNIX tools I present, most of you will have worked with them already, are important to investigate bugs. My experience shows me that especially tracers like strace for Linux, truss/ktrace and kdump on BSD and Solaris are nice to use because one can see whats happening. For example we shoot packets to a service, with these tracers we can exactly see whats happening when the packets arrive, by attaching to the running service process. Strace is a system call fuzzer like truss. The ktrace, kdump combination has nearly the same function, they use information coming directly from the kernel. Ltrace is nice utility too, it traces library calls in contrast to the other utilities that trace system calls. There are equivalent tools for Windows like the Process Monitor that is distributed by Microsoft, Process Monitor can be used to reveal bugs by looking at file system access of a process. This is the tool I discovered the Internet Information Server WEBDAV Authentication bypass with by looking closely at the file system when requesting with special UNICODE characters. (continued)

Of course debuggers are very important when doing an audit, gdb is fine and powerful on UNIX, WinDBG can debug both in Windows Userland and Kernel Space, OllyDbg is a debugger operating inside Windows in User Space only. The next screendump shows a tool example used during an audit.
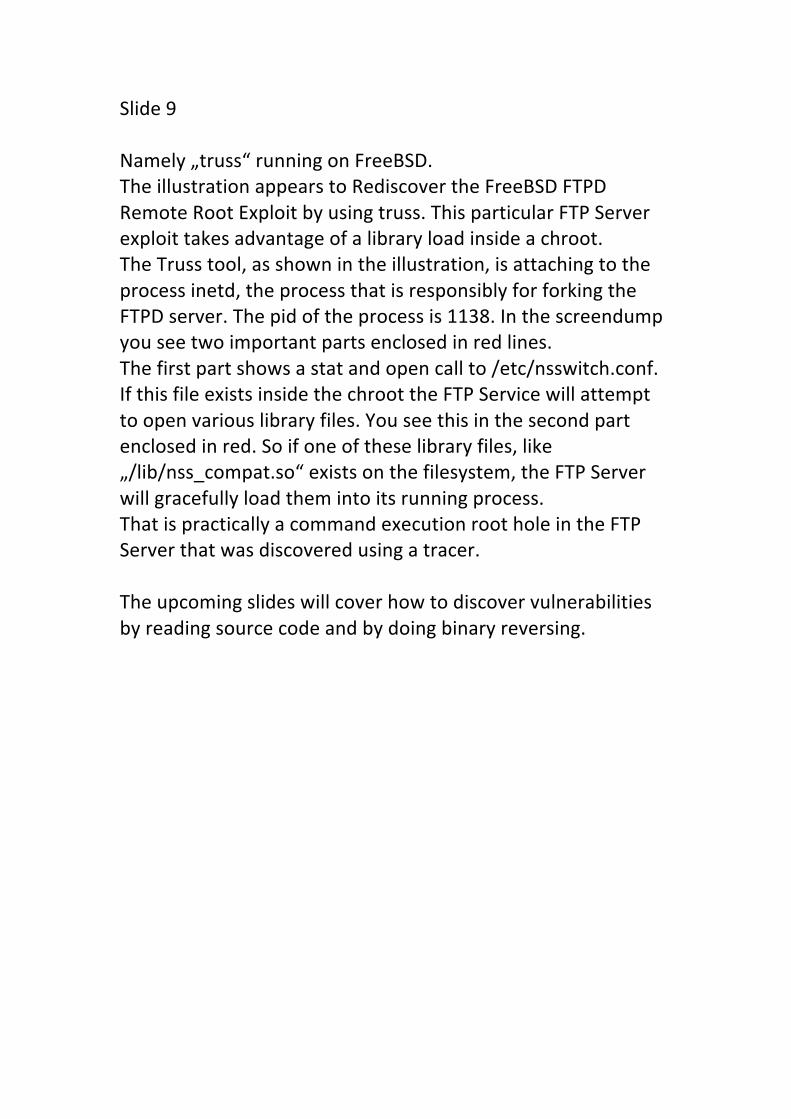
Slide 9 Namely „truss“ running on FreeBSD. The illustration appears to Rediscover the FreeBSD FTPD Remote Root Exploit by using truss. This particular FTP Server exploit takes advantage of a library load inside a chroot. The Truss tool, as shown in the illustration, is attaching to the process inetd, the process that is responsibly for forking the FTPD server. The pid of the process is 1138. In the screendump you see two important parts enclosed in red lines. The first part shows a stat and open call to /etc/nsswitch.conf. If this file exists inside the chroot the FTP Service will attempt to open various library files. You see this in the second part enclosed in red. So if one of these library files, like „/lib/nss_compat.so“ exists on the filesystem, the FTP Server will gracefully load them into its running process. That is practically a command execution root hole in the FTP Server that was discovered using a tracer. The upcoming slides will cover how to discover vulnerabilities by reading source code and by doing binary reversing.
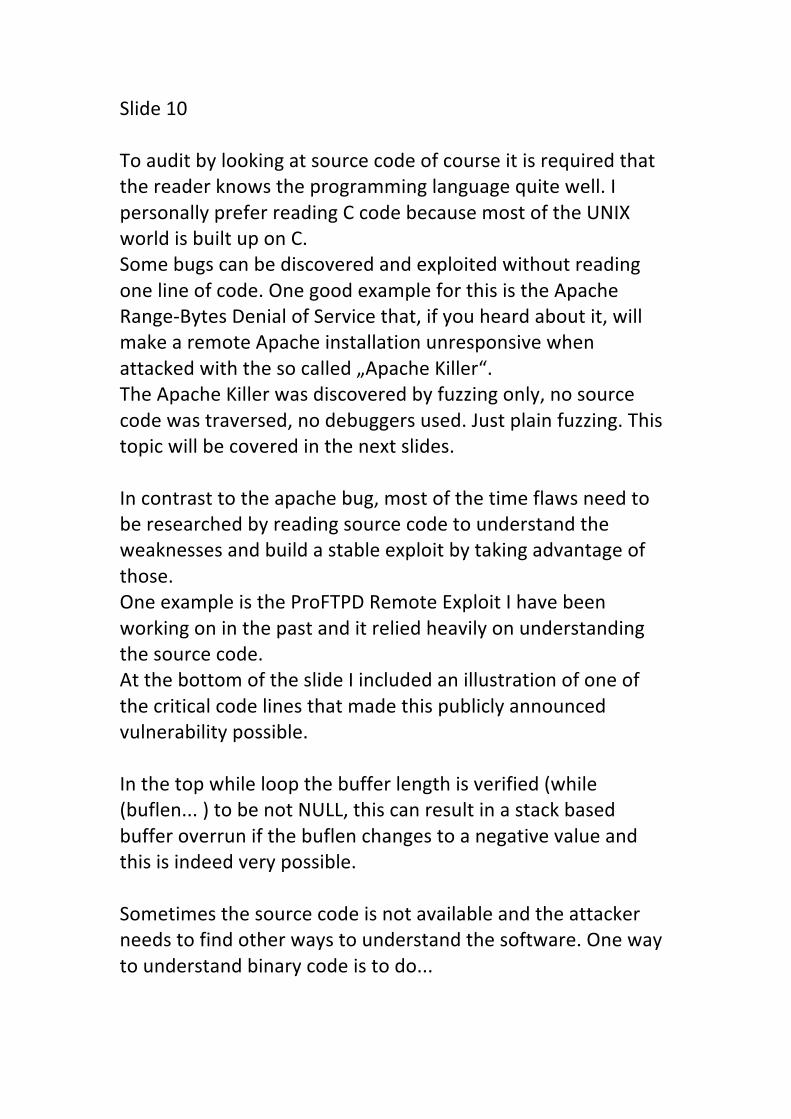
Slide 10 To audit by looking at source code of course it is required that the reader knows the programming language quite well. I personally prefer reading C code because most of the UNIX world is built up on C. Some bugs can be discovered and exploited without reading one line of code. One good example for this is the Apache Range-‐Bytes Denial of Service that, if you heard about it, will make a remote Apache installation unresponsive when attacked with the so called „Apache Killer“. The Apache Killer was discovered by fuzzing only, no source code was traversed, no debuggers used. Just plain fuzzing. This topic will be covered in the next slides. In contrast to the apache bug, most of the time flaws need to be researched by reading source code to understand the weaknesses and build a stable exploit by taking advantage of those. One example is the ProFTPD Remote Exploit I have been working on in the past and it relied heavily on understanding the source code. At the bottom of the slide I included an illustration of one of the critical code lines that made this publicly announced vulnerability possible. In the top while loop the buffer length is verified (while (buflen... ) to be not NULL, this can result in a stack based buffer overrun if the buflen changes to a negative value and this is indeed very possible. Sometimes the source code is not available and the attacker needs to find other ways to understand the software. One way to understand binary code is to do...
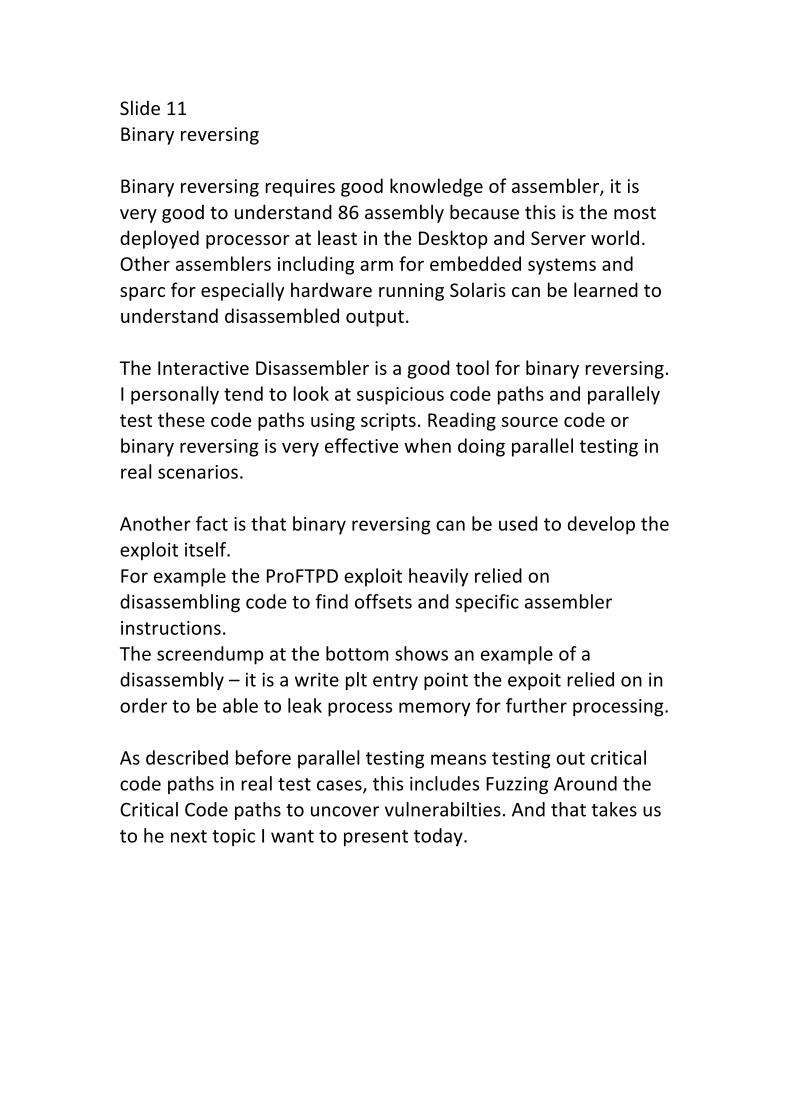
Slide 11 Binary reversing Binary reversing requires good knowledge of assembler, it is very good to understand 86 assembly because this is the most deployed processor at least in the Desktop and Server world. Other assemblers including arm for embedded systems and sparc for especially hardware running Solaris can be learned to understand disassembled output. The Interactive Disassembler is a good tool for binary reversing. I personally tend to look at suspicious code paths and parallely test these code paths using scripts. Reading source code or binary reversing is very effective when doing parallel testing in real scenarios. Another fact is that binary reversing can be used to develop the exploit itself. For example the ProFTPD exploit heavily relied on disassembling code to find offsets and specific assembler instructions. The screendump at the bottom shows an example of a disassembly – it is a write plt entry point the expoit relied on in order to be able to leak process memory for further processing. As described before parallel testing means testing out critical code paths in real test cases, this includes Fuzzing Around the Critical Code paths to uncover vulnerabilties. And that takes us to he next topic I want to present today.
Slide 12 Semi Automatic Fuzzing with perl/python The title is Semi Automatic Fuzzing because fuzzing is done partly by the programming language like perl and more important done by the knowledge of the programmer. This fuzzing technique can be especially effective for plain-‐text protocols because human beings simply understand plain-‐text protocols easier and therefore can fuzz more comfortable. Raw binary protocol fuzzing can be done this way, Sniffer dumps retrieved from for example the Wireshark Sniffer are required. One downside is that usually only the initial packets of the binary protocol can be covered, the reason for this is that binary protocols tend to be complex and a lot of packets are exchanged that are only visible in binary form for the programmer. As a hint I want to mention that libraries or modules of the programming language can be used for fuzzing „high level“. The advantage is that nearly if not all of the binary protocol is covered during the fuzzing session since the library or module has the code already in place and we have the ability to speak to the server side in a convienient manner. To make you understand why the knowledge of the programmer about the protocol is so important I will continue with a fuzzing template I used alot in the past and will describe the several parts of it.
Slide 13 This very basic fuzzing template written in perl is very effective when used properly. The script when run connects to the remote service (in this case isowarez.de on port 80 HTTP) sends the payload and reads the response. The crucial part is where I wrote „put fuzzing ideas here“. So the programmer takes his knowledge about the protocol to attack and codes possible packets that might make the service fail. The packets can include overly large strings, format string specifiers or packets adjusted to test a specific supicious code path revealed by using binary reversing or code auditing. The template can be extended to send several packets by repeating it. It can be extended in a way that packets are read after a response and following packets are sent and so on.
Slide 14 The template in the previous slide can be used for binary protocols by just replacing the payload with binary data. Each modification of the packet to send is run as a test case against the service. Each test case might have resulted in a flaw so the request is observed on the remote side using tracers like the ones described in the previous slides, strace, truss. Another tool to mention is „top“ which can be used to inspect Memory and CPU usage. For example a spike in Memory Usage after a request is sent can indicate a memory consumption or Denial of Service flaw. If during the fuzzing session we successfully found a bug and are sure about that, the vulnerability is researched and the exploit written by extending the basic template. The following example shows how the basic template was extended to a real exploit after verifying a vulnerability was found. In this case we will Re-‐Discover the Apache Remote Denial of Service and write parts of the Apache Killer.
Slide 15 The slide shows the very basic fuzzing template at the top. During the fuzzing session I decided to fuzz a specific HTTP header that is supported by default by the Apache Webserver, it’s name is Range-‐Bytes. So we enter the Range-‐Byte header in its simple form into the template and look if we can break Apache with it. The Range-‐Byte header in its simple form does not make the webserver fail so we add a overly long header with overlapping Ranges to the fuzz template and see if Apache behaves unexpected.

Slide 16 And indeed, the top tool shows a spike in memory usage, so we assume this might be a flaw in the handling of the Range-‐Bytes header. To prove the memory leak is real we hammer 50 requests parallely to the Apache Webserver using the Perl Module Parallel::Forkmanager. The result is Apache httpd becomes unresponsive and because of running out of swap space many processes get killed in the operating system, the system hangs. A different way of fuzzing software that especially involves binary protocols will now be discussed.
Slide 17 Nowadays nearly all critical open source programs in the UNIX world are written in C or C++. Shown from experience fuzzing by modifying C source on the fly can be very effective. Fuzzing by using C source can be comfortable and easy to do even with complex protocols. Now How can we fuzz using this technique? It’s simple. The target software is chosen and compiled. Let’s take the example of SAMBA on Linux, the smbd service is compiled and executed inside the testing environment so it can be audited. Now the client sources (like for example smbclient) are compiled and after the compilation of both parts the audit can begin. The client sources are modified during the fuzzing session step by step and after each modification each test case is compiled and run against the service.
Slide 18 Using this technique we can discover not only buffer overruns and alike but also logic bugs. If we want to discover logic bugs we need a strong understanding of the code-‐flow and the part of software we are currently auditing. The suspicious client code lines are changed in a way to provoke logic bugs on the server side. Finding the commonly known vulnerabilities like buffer overruns, memory corruptions, format string bugs and so on can be done rather blindly. To accomplish this we do the following: We look for the critical code in C source like the network layer code, command handling code, parsers. As a side note: if we cannot get results when doing fuzzing tests in the easier parts of the source it is important to dig deeper into the code, into the more complex layers of the software as these layers tend to be more vulnerable. Now we change the buffer contents and lengths one by one. Each modification of buffers in the client code is compiled and tested against the service. The next slide contains a screendump illustrating code changes in the smbclient to potentially provoke a buffer overrun.

Slide 19 There are a lot of places we can modify code in Samba. The screendump shows a very simple location of the client, it is the very front layer of smbclient. The „cmd_logon“ function, that does parts of the SMB session setup, is changed in a manner that the function will send a long password to the SMB Service. I put a buffer with the size 8096 filled with A’s into the source code. Then I duplicated the cli_session_setup command and commented one of the copies for later usage. In the other copy I changed the lines where the buffer and its buffer length is written. Now the code can be compiled and a long password will be sent to the smbd service. I have to note that sometimes the overly long buffer lengths are truncated inside the client itself because they are so long, so sometimes these size checks inside the client source need to be changed too so that the packet is sent with the correct overly long buffer size. Sometimes we have to adjust several buffer sizes because the buffers that hold the data can overflow in the client and we might get segmentation violations in the client itself prior to sending out the packet. Another note is that buffer overruns sometimes need to be in a specific range. It’s not enough to make the buffers as large as possible, sometimes smaller buffer sizes will trigger an overrun whereas longer buffer sizes will not. When we have successfully discovered a vulnerability we are going to exploit it and the several stages to do this are described in the next section.
Slide 20 Building Exploits Logic Bugs are nice to have since exploits for logic bugs can be more stable, effective and easier to develop. Buffer overruns and memory corruption can be as stable and effective as logic bugs, exploiting them is, shown from my personal experience, more time consuming. The goal ist to retrieve a remote shell, a command line so the attacker can intrude into the system and later into the network. A straightforward way to do this is, in the case of buffer overruns or memory corruptions is to... Patch memory to hit a good place to... Control the Instruction Pointer (in x86 it is called the EIP) Afterwards bypass protections like ASLR (Address Space Layout Randomization) and NX (the Non-‐Executable Bit, or Non-‐Exectuable mappings on amd64) Thereafter our payload can be executed to successfully execute a shell. I personally prefer reverse shells in my exploit codes because this makes it partly possible to evade firewall protections. Most of the work above is done using a debugger like gdb. At the time we have the exploit running quite stable it is time to add targets. (continued)
The next stage is to shape and adjust the exploit in the wild, in real world. A crucial stage in exploit writing nowadays is to bypass protections like ASLR, so we will have a look at how it is done in Linux, on a x86 platform, a bit closer.
Slide 21 Required for bypassing Address Space Layout randomization on Linux is the full control over the Instruction Pointer. For example gained through Stack or Heap Smashing or overwriting a Function Pointer. So assume we have full control over the Instruction Pointer. The address space is randomized, so where we jump to? Stack addresses, addresses of libraries, heaps of libraries are all randomized. The image (referred to as the TEXT segment a synonym for the CODE segment) is not randomized. That’s an obvious flaw in the ASLR implementation of Linux. As a side note: The default Linux ASLR implementation is weak by design, there are other methods which are more complete to protect systems, like PaX and Exec Shield patchsets or Position Independent Executables. Since Linux uses this weak ASLR implementation by default I refer to it here. What we do is we jump back into the TEXT segment because its base has a fixed and predictable address. At the time of this writing I personally verified that this flaw has not been patched at least not in a recent kernel from 2012 as the following image illustrates.
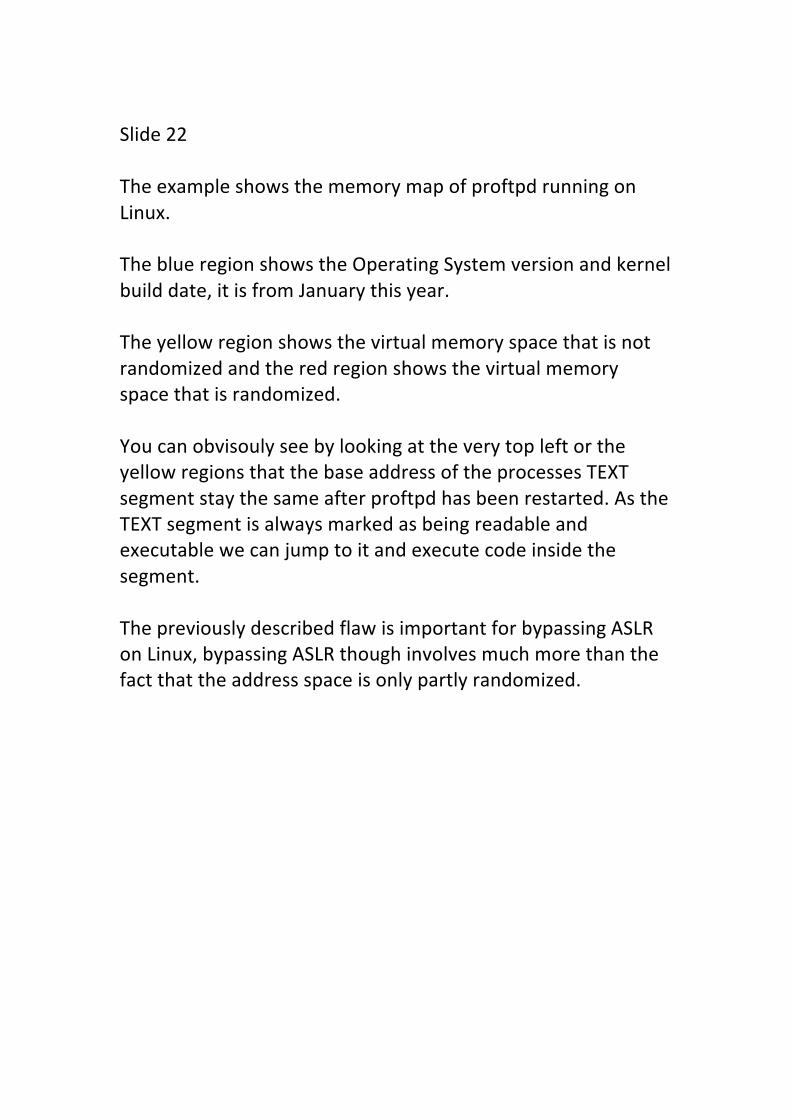
Slide 22 The example shows the memory map of proftpd running on Linux. The blue region shows the Operating System version and kernel build date, it is from January this year. The yellow region shows the virtual memory space that is not randomized and the red region shows the virtual memory space that is randomized. You can obvisouly see by looking at the very top left or the yellow regions that the base address of the processes TEXT segment stay the same after proftpd has been restarted. As the TEXT segment is always marked as being readable and executable we can jump to it and execute code inside the segment. The previously described flaw is important for bypassing ASLR on Linux, bypassing ASLR though involves much more than the fact that the address space is only partly randomized.

Slide 23 The goal is again to execute code, to get the shell running. The steps involved to gain a shell are the following: We lookup the mmap or mmap64 plt entry using IDA (this depends on what mmap is available in the process code if at all). From the plt entry we can indirectly jump to the randomized library function. We lookup the memcpy plt entry using IDA. We use mmap to map a fixed free memory region with read write and execute permission enabled so we can copy code into this memory region. Next we use memcpy to copy bytes from the TEXT segment to this newly created memory region, the purpose of the bytes being copied is to copy the shellcode to the new memory region. We jump to the copy routine that will copy the shellcode. The payload that retrieves the reverse shell is executed. To actually call the mmap and memcpy functions we need to use Return Oriented Programming. I am going to show you an image about the ASLR bypass technique and will explain it using the illustration now.

Slide 24 The image at the first glimpse looks complex. So I will explain how to successfully run the shellcode. At the left side we have the attacker and at the right we have the proftpd processes memory space. The gray part of the memory space is the not randomized memory and the red part is the randomized memory. We can only execute code inside the gray part. Executing code in the red part is only possible indirectly as we will see. So the attacker at number 1. connects to the remote FTP server, no login credentials are needed to execute code. The attacker uses ROP (the abbreviation for return oriented programming) to execute several functions inside the TEXT segment one by one. The first function we jump to is the mmap plt entry, plt entries allow us to jump to the randomized memory block and finally execute the library and system call. At number 2. mmap is called to create a read write and executable memory mapping at a fixed address. The newly created memory mapping is shown in this image at the bottom as dark yellow. We need to map this memory because we need a fixed, unrandomized place where we can write the shellcode to and we need a place that is executable to execute the shellcode. Once we have created the mapping we use ROP again at number 3. to be able to execute a new function. This function is memcpy at number 4. . Again we make use of the plt entry to reach the randomized library function in the red region. For the memcpy two parameters are needed, one is the memcpy function itself and the other one are the available mnemonics (assembly instructions) inside the TEXT segment. We copy, by using memcpy and ROP, special bytes one by one from the TEXT segment to the newly created memory mapping at the bottom, (continued)
these bytes are assembler instructions which once collected are used for later copying the shellcode and executing it. Once we have fully copied the bytes from the TEXT segment to the new mapping we jump to these bytes at number 5. The shellcode copier gets executed and will copy the shellcode from the STACK further down of the read write execute mapping. Finally we JUMP to the shellcode itself at number 6.. The shellcode is executed and sends back a shell to the attacker. The exploit that uses exactly this technique to bypass ASLR is publicy available under the name ProFTPD IAC Remote Root Exploit. This exploit uses a stack buffer overrun to execute code and the vulnerability for it was publicly announced by an anonymous individual in an advisory working with the ZDI the Zero Day Initiative. Because logic bugs can be fun too and are known to be effective we will discuss these now.
Slide 25 Since exploiting logic flaws strongly depends on the nature of the bug and can be complex I give the FreeBSD ftpd Remote Exploit ,which once was an 0day, as an example. The scenario is that we can load an arbritrary dynamically linked library into the process of the FTP server. We can do that because the logged in user is inside the chroot environment and we can write files to the disk using the FTP protocol. How do we exploit the flaw? We need a way to break the chroot and execute code. The easiest way in my opinion is to... Program a dynamic library that... Breaks the chroot by using the ptrace system call. Ptrace is a system call that allows to debug processes. So we attach to an existing FreeBSD process that runs as root using ptrace. Then we copy the shellcode into the root owned process again by using ptrace. The last step is to let the process continue at the shellcode position so the shellcode gets executed. The NX Bit on amd64 can, in this particular case, be bypassed easily because on FreeBSD theres a read write execute memory region in the FTP process, I even guess that is the case in all FreeBSD processes. So we write the shellcode into this region and let ptrace run the code inside this region. I will show you the procedure in a picture now.
Slide 26 In this picture, first there is the Attacker at the left and the Server running the FTP Service at the right. The attacker connects to the FTP server and logs in using the credentials. The FTP service runs inside a chroot environment, so the attacker uploads the dynamic library onto the file system and the library breaks out of the chroot by attaching to the root owned process using ptrace. The process is in a stopped state now. Process candidates to attach to are inetd, cron, syslogd, sendmail or any other known by name root owned process. The shellcode is injected into the running process. We let the process continue at the shellcode position and as shown in this example the attacker gets back a reverse rootshell. We have our desired rootshell, we now need to make the exploit as stable and powerful as possible. I will describe ideas about how to make this in the next section.

Slide 27 A way to make the exploit more powerful is by adding targets to it. The reason is simple, we want to support as many as possible vulnerable versions that are out there in the internet. Targets can be defined in two parts. The Supported operating system. The Supported software version on the operating system. We create the environment by installing as many possible virtual machines with the vulnerable operating systems and software versions. We need to get the offsets and possibly other values need to be examined.

Slide 28 As the first step we add code to the exploit for target integration and target selection. The following three examples of three different exploits will show what has to be added to the exploit to support more versions. The ProFTPD Exploit was designed to make it easy to add targets, the following values are needed: the write() offset can be found using IDA. The Align and Padding values are found using a perl script that was written for this purpose by observing the behaviour of the ProFTPD service. For the second exploit that attacks FreeBSD ftpd, only the dynamic libraries need to be compiled on each operating system version. The third example, a local root exploit for FreeBSD has to be adjusted for running both on x86 and amd64 architectures. So two shellcodes are added to the exploit and the buffer sizes adjusted for each architecture appropriately. Now that we are near the end of my presentation I will show you the last step that can be made to make the exploit even more effective.
Slide 29 The last step would be Testing, shaping and adjusting the exploit in the wild. Reason is exploits can run perfect in a testing environment. In real world they might not succeed in gaining a shell (this is not always the case as personal experience shows) So the exploit can be made stable by testing it in real networks. How to accomplish that? Search engines can be nice to use for finding running servers in the wild to test the exploit against Additionally Scanners can be developed to seek the internet for vulnerable servers. Once vulnerable servers are discovered the exploit can be tested against them. Now if no shell was gained we can try and mimic the discovered vulnerable OS and it’s vulnerable software version in a virtual machine. We now can adjust the exploit by addressing the failures in the exploit code to successfully root the box.
(End of the presentation) A big thank you to everybody who supported me along time. I am sure you know who you are <3 If you have Questions, Comments or Suggestions you are free to ask or tell me now.


