Troubleshooting/FAQW
arranty/Disccliamer
v
For Free Technical Support Call: 866-bullydog (866-285-5936)
®
See More at: bullydog.comDoc.# BD81021 v1.1.0
For a full listing of Diagnostic Trouble Codes go to: www.bullydog.com/DTC.php
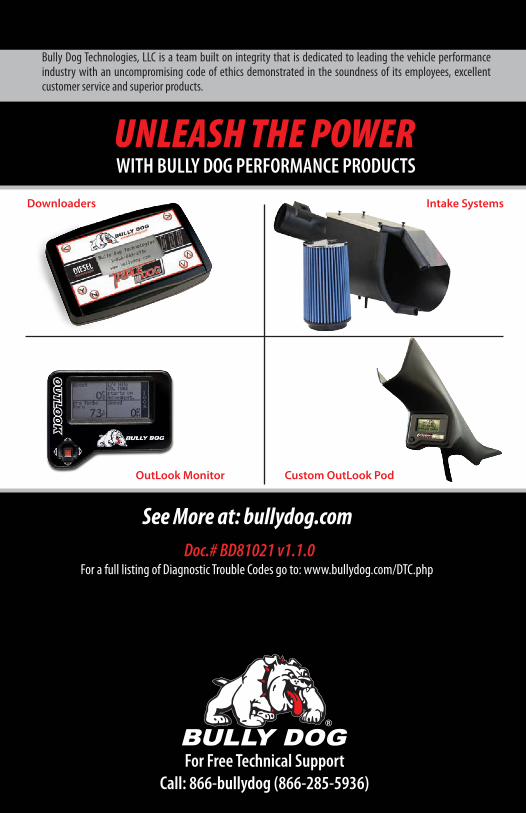
Intake Systems
OutLook Monitor Custom OutLook Pod
Downloaders
UNLEASH THE POWER WITH BULLY DOG PERFORMANCE PRODUCTS
Bully Dog Technologies, LLC is a team built on integrity that is dedicated to leading the vehicle performance industry with an uncompromising code of ethics demonstrated in the soundness of its employees, excellent customer service and superior products.
Troubleshooting/FAQW
arranty/Disccliamer
v
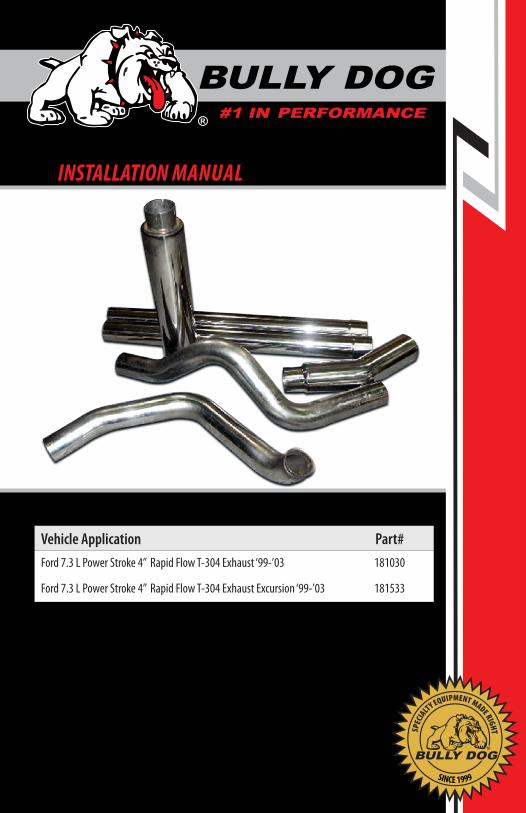
INSTALLATION MANuAL
Vehicle Application Part#Ford 7.3 L Power Stroke 4” Rapid Flow T-304 Exhaust ‘99-’03 181030
Ford 7.3 L Power Stroke 4” Rapid Flow T-304 Exhaust Excursion ‘99-’03 181533
Bill of Materials
Exhaust Removal
Exhaust InstallationTroubleshooting/FAQ
Warranty/Disccliam
er
TROUBLESHOOTING:If you have questions during the installation of this product, please visit www.bullydog.com/Product_Updates.php.The latest version of these instructions can be found at the same location. Please review the Troubleshooting section on page 9 before calling technical support to cover most common issues.Technical support is available by calling 866-bullydog (866-285-5936).
TABLE OF CONTENTSINTRODUCTIONS................................................................... PG.2
BILL.OF.MATERIALS............................................................... PG.3
EXHAUST.REMOVAL................................................................ PG.4
EXHAUST.INSTALLATION.................................................PAGES.5-8
......... ..............QUICK LOCATION OVERVIEW.................................................................PG 5
INSTALLATION STEPS......................................................................PGS 6-8
TROUBLESHOOTING............................................................... PG.9
WARRANTY.&.DISCLAIMER....................................................PG.10
1
Introduction
RAPID FLOW INSTALLATION

�
Bill of Materials
Exhaust Removal
Exhaust InstallationTroubleshooting/FAQ
Warranty/Disccliam
er
INTRODUCTIONThe Bully Dog Rapid Flow Exhaust Systems have been specially designed to allow the lowest mandrel bends in the industry. The lower mandrel bends allow increased air flow which reduces exhaust tem-peratures, burns more fuel in the combustion chamber adding additional horsepower and fuel econo-my. This instruction set covers both sets of the 4” Rapid T-304 Exhaust designed specifically for the 7.3L Power Stroke. The difference between the sets is one is for the 7.3L Ford pickup and the other is for the 7.3L Ford Excursion SUV.
2
IntroductionRAPID FLOW INSTALLATION
300 HP
400 HP
500 HP
600 HP
4” Exhaust Systems for
HP ApplicationsLess Than
450hp
5” Exhaust Systems for
HP ApplicationsBetween 450hp
and 550hp
6” Exhaust Systems for HP Applications
over 550hp
BULLy DOg’S RULE OF ThUmB FOR ExhAUST SIzES
Note: This instruction set and the Rapid Flow Exhaust systems included are made for the Ford with the 7.3L Power Stroke ‘99-’03

IntroductionExhaust Rem
ovalExhaust Installation
Troubleshooting/FAQW
arranty/Disccliamer
BILL.OF.MATERIALS
1. Down Pipe2. Straight Pipe (2 Pieces on 181030 only)
3. Muffler�. Front Piece Tail Pipe
5. Stainless Steel Tip6. Clamps (3 Pieces)
7. Hangers (� Peices)A. Second Piece Down Pipe
B. Straight PipeC. Rear of Muffler
D. Front Piece Tail Pipe
TOOLS.NEEDED
- 9/16” Wrench- Sawzall
- Silicone Spray Lubricant-7/16” Deep Socket
-Socket Wrench-Channel LocksBill of M
aterials
RAPID FLOW INSTALLATION
3
1.
3.
5.�.
2.
7.
6.
A. B. D.C.
IntroductionBill of M
aterialsExhaust Installation
Troubleshooting/FAQW
arranty/Disccliamer
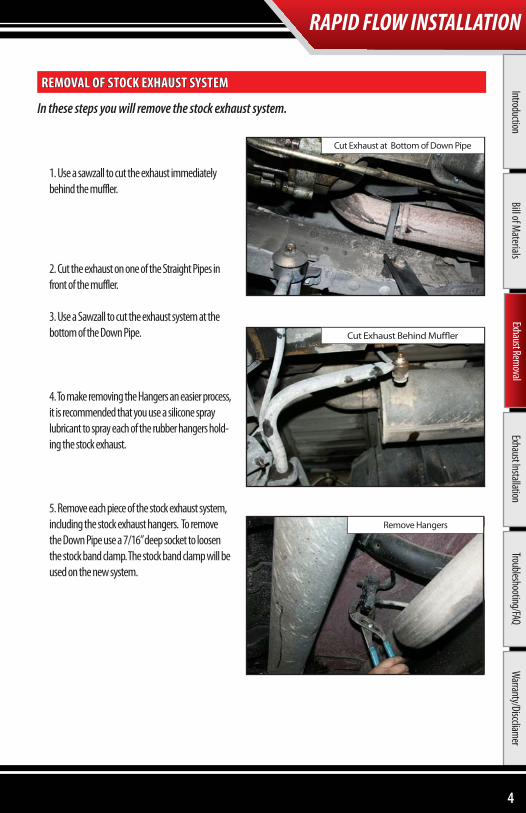
REMOVAL.OF.STOCk.EXHAUST.SYSTEM
In these steps you will remove the stock exhaust system.
1. Use a sawzall to cut the exhaust immediately behind the muffler.
2. Cut the exhaust on one of the Straight Pipes in front of the muffler.
3. Use a Sawzall to cut the exhaust system at the bottom of the Down Pipe.
4. To make removing the Hangers an easier process, it is recommended that you use a silicone spray lubricant to spray each of the rubber hangers hold-ing the stock exhaust.
5. Remove each piece of the stock exhaust system, including the stock exhaust hangers. To remove the Down Pipe use a 7/16” deep socket to loosen the stock band clamp. The stock band clamp will be used on the new system.
�
RAPID FLOW INSTALLATIONExhaust Rem
oval
Cut Exhaust at Bottom of Down Pipe
Cut Exhaust Behind Muffler
Remove Hangers
IntroductionBill of M
aterialsExhaust Rem
ovalTroubleshooting/FAQ
Warranty/Disccliam
er
5
Exhaust Installation
RAPID FLOW INSTALLATION
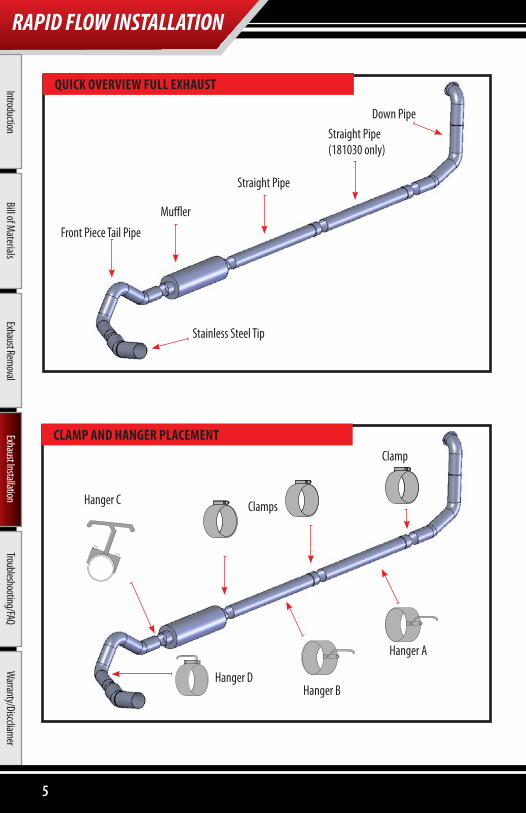
CLAMP.AND.HANGER.PLACEMENT.
QUICk.OVERVIEW.FULL.EXHAUST.
Down PipeStraight Pipe(181030 only)
Straight Pipe
Muffler
Clamp
Front Piece Tail Pipe
Stainless Steel Tip
Clamps
Hanger A
Hanger BHanger D
Hanger C
IntroductionBill of M
aterialsExhaust Rem
ovalTroubleshooting/FAQ
Warranty/Disccliam
er
6
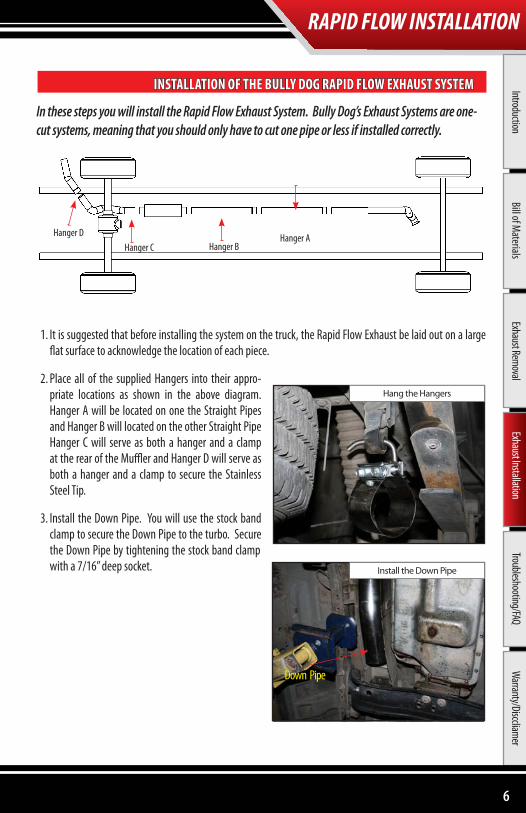
INSTALLATION.OF.THE.BULLY.DOG.RAPID.FLOW.EXHAUST.SYSTEM
In these steps you will install the Rapid Flow Exhaust System. Bully Dog’s Exhaust Systems are one-cut systems, meaning that you should only have to cut one pipe or less if installed correctly.
1. It is suggested that before installing the system on the truck, the Rapid Flow Exhaust be laid out on a large flat surface to acknowledge the location of each piece.
2. Place all of the supplied Hangers into their appro-priate locations as shown in the above diagram. Hanger A will be located on one the Straight Pipes and Hanger B will located on the other Straight Pipe Hanger C will serve as both a hanger and a clamp at the rear of the Muffler and Hanger D will serve as both a hanger and a clamp to secure the Stainless Steel Tip.
3. Install the Down Pipe. You will use the stock band clamp to secure the Down Pipe to the turbo. Secure the Down Pipe by tightening the stock band clamp with a 7/16” deep socket.
RAPID FLOW INSTALLATIONExhaust Installation
Hang the Hangers
Install the Down Pipe
Hanger AHanger BHanger C
Hanger D
Down Pipe
9
IntroductionBill of M
aterialsExhaust Rem
ovalTroubleshooting/FAQ
Warranty/Disccliam
er
7
4. Hang the Front Piece Tail Pipe from Hanger C and Hanger D.
5. Install the Stainless Steel Tip by tightening Hanger D. At this point do not tighten the band clamp completely until the entire exhaust is installed.
6. Install the Muffler by connecting it to the Front Piece Tail Pipe and then tightening Hanger C.
Note: At this point, you will skip installing the Straight Pipes and Muffler and continue to work towards the
Exhaust Installation
RAPID FLOW INSTALLATION
rear of the vehicle.
Install Front Piece Tail Pipe
Front Piece Tail Pipe
Install Front Piece Tail Pipe
Stainless Steel Tip
Front Piece Tail Pipe Tip
Install Front Piece Tail Pipe
Hanger C
Front Piece Tail Pipe Tip
IntroductionBill of M
aterialsExhaust Rem
ovalTroubleshooting/FAQ
Warranty/Disccliam
erRAPID FLOW INSTALLATION
8
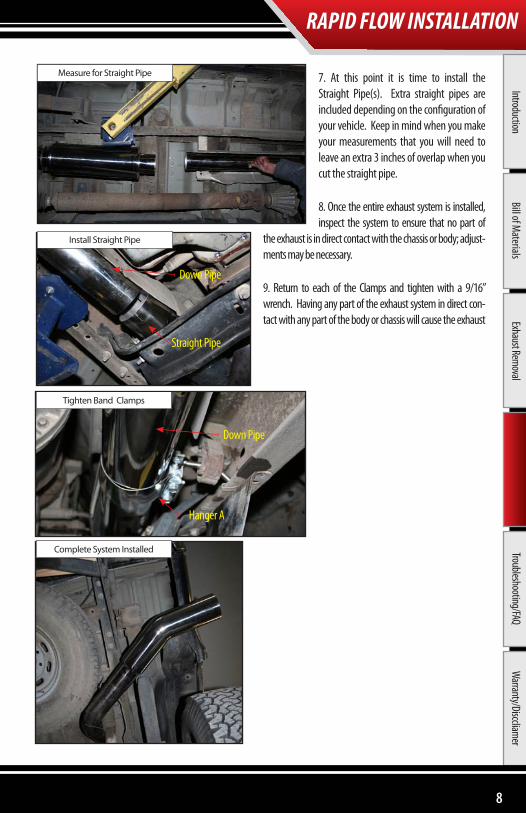
7. At this point it is time to install the Straight Pipe(s). Extra straight pipes are included depending on the configuration of your vehicle. Keep in mind when you make your measurements that you will need to leave an extra 3 inches of overlap when you cut the straight pipe.
8. Once the entire exhaust system is installed, inspect the system to ensure that no part of
the exhaust is in direct contact with the chassis or body; adjust-ments may be necessary.
9. Return to each of the Clamps and tighten with a 9/16” wrench. Having any part of the exhaust system in direct con-tact with any part of the body or chassis will cause the exhaust
Install Straight Pipe
Straight Pipe
Measure for Straight Pipe
Complete System Installed
Tighten Band Clamps
Down Pipe
Down Pipe
Hanger A
IntroductionBill of M
aterialsExhaust Rem
ovalExhaust Installation
Warranty/Disccliam
er
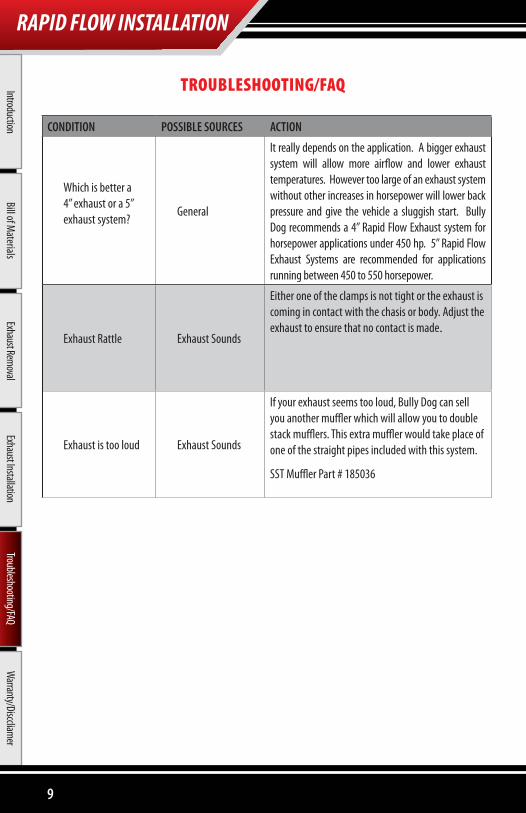
CONDITION POSSIBLE SOURCES ACTION
Which is better a 4” exhaust or a 5” exhaust system?
General
It really depends on the application. A bigger exhaust system will allow more airflow and lower exhaust temperatures. However too large of an exhaust system without other increases in horsepower will lower back pressure and give the vehicle a sluggish start. Bully Dog recommends a 4” Rapid Flow Exhaust system for horsepower applications under 450 hp. 5” Rapid Flow Exhaust Systems are recommended for applications running between 450 to 550 horsepower.
Exhaust Rattle Exhaust Sounds
Either one of the clamps is not tight or the exhaust is coming in contact with the chasis or body. Adjust the exhaust to ensure that no contact is made.
Exhaust is too loud Exhaust Sounds
If your exhaust seems too loud, Bully Dog can sell you another muffler which will allow you to double stack mufflers. This extra muffler would take place of one of the straight pipes included with this system.
SST Muffler Part # 185036
TROUBLEShOOTINg/FAQ
Troubleshooting/FAQ
RAPID FLOW INSTALLATION
9
IntroductionBill of M
aterialsExhaust Rem
ovalExhaust Installation
Troubleshooting/FAQ
WARRANTy & DISCLAImER.
REMEMBER, THIS IS A PERFORMANCE PRODUCT, USE AT YOUR OWN RISK.This product is not intended to be used to break the law.
Do not use this product until you have carefully read the following agreement. This agreement sets forth the terms and conditions for the use of this product. The installation of this product indicates that the buyer has read and understands this agreement and accepts the terms and conditions. Never exceed recommended vehicle or tire top speed ratings.
DISCLAIMER OF LIABILITYBully Dog Technologies, LLC. Its distributors, jobbers, and dealers (hereafter Seller) shall be in no way responsible for the product’s proper use and service. THE BUYER HERBY WAIVES ALL LIABILITY CLAIMS.
The Buyer acknowledges that he is not relying on the Sellers skill or judgment to select or furnish goods suitable for any particular purpose and that there are no liabilities which extend beyond the description on the face hereof, and the Buyers hereby waivers all remedies or liabilities expressed or implied, arising by law or otherwise, (including without any obligation of the Seller with respect fitness, merchantability and consequential damages) or whether or not occasioned by the Seller’s negligence.
The Seller disclaims any warranty and expressly disclaims any liability for personal injury or damages. The Buyer acknowledges and agrees that the disclaimer of any liability for personal injury is a material term for this agreement and the Buyer agrees to indemnify the Seller and to hold the Seller harmless from any claim related to the item of the equipment purchased. Under no circumstances will the Seller be liable for any damages or expenses by reason of use or sale of any such equipment.
The Seller assumes no liability regarding the improper installation or misapplication of its products. It is the installer’s responsibil-ity to check for proper installation and if in doubt contact the manufacturer.
The Buyer is solely responsible for all warranty issues from the manufacturer.
LIMITATION OF WARRANTYBULLY DOG TECHNOLOGIES, LLC. (Hereafter “Seller”) gives Limited Warranty as to description, quality, merchantability, and fitness for any particular purpose, productiveness, or any other matter of Seller’s product sold herewith. The Seller shall be in no way responsible for the products proper use and service and the Buyer hereby waives all rights other than those expressly written herein. This warranty shall not be extended, altered or varied except be a written instrument signed by Seller and Buyer.
The Warranty is Limited to one (1) year from the date of sale and limited solely to the parts contained within the products kit. All products that are in question of Warranty must be returned prepaid to the Seller and must be accompanied by a dated proof of purchase receipt. All Warranty claims are subject to approval by BULLY DOG TECHNOLOGIES, LLC.
Under no circumstances will the Seller be liable for any labor charged or travel time incurred in diagnosis for defects, removal, or reinstallation of this product or any other contingent expenses.
Under no circumstances will the Seller be liable for any damage or expenses incurred by reason of the use or sale of any such equip-ment.
IN THE EVENT THAT THE BUYER DOES NOT AGREE WITH THIS AGREEMENT: THE BUYER MAY PROMPTLY RETURN THIS PRODUCT, IN A NEW AND UNUSED CONDITION, WITH A DATED PROOF OF PURCHASE TO THE PLACE OF PURCHASE WITHIN TEN (10) DAYS FROM DATE OF PURCHASE FOR A FULL REFUND.
THE INSTALLATION OF THIS PRODUCT INDICATES THAT THE BUYER HAS READ AND UNDERSTANDS THIS AGREEMENT AND ACCEPTS ITS TERMS AND CONDITIONS.
CONDITION POSSIBLE SOURCES ACTION
Which is better a 4” exhaust or a 5” exhaust system?
General
It really depends on the application. A bigger exhaust system will allow more airflow and lower exhaust temperatures. However too large of an exhaust system without other increases in horsepower will lower back pressure and give the vehicle a sluggish start. Bully Dog recommends a 4” Rapid Flow Exhaust system for horsepower applications under 450 hp. 5” Rapid Flow Exhaust Systems are recommended for applications running between 450 to 550 horsepower.
Exhaust Rattle Exhaust Sounds
Either one of the clamps is not tight or the exhaust is coming in contact with the chasis or body. Adjust the exhaust to ensure that no contact is made.
Exhaust is too loud Exhaust Sounds
If your exhaust seems too loud, Bully Dog can sell you another muffler which will allow you to double stack mufflers. This extra muffler would take place of one of the straight pipes included with this system.
SST Muffler Part # 185036
Warranty/Disccliam
erRAPID FLOW INSTALLATION
10


