
U.S. Bankruptcy Court ePOC District of New Mexico Electronic Proof of Claim Program
Revised 12/1/2015 The Electronic Proof of Claim (ePOC) program permits proofs of claims and certain other types of documents to be filed directly from the court’s website. Submitting an ePOC document for entry in the claims register does not require a CM/ECF login. In addition, no claim form is needed for submitting an original or amended proof of claim – the data entered in the ePOC system will create and file an Official Form B 10 – Proof of Claim, although the filer must upload any supporting documents as PDF files. The following types of documents may be filed with the court using the ePOC program:
• Proof of Claim – Original or Amended • Withdrawal of a Claim • Rule 3002.1 Claim Supplements: Notice of Mortgage Payment Change Notice of Postpetition Fees, Expenses, and Charges Response to Notice of Final Cure Payment
(Note: Other types of documents, such as notice of a transfer of a claim or request for payment of an administrative expense, require a CM/ECF login for electronic filing. Creditors may apply for a CM/ECF Limited/Creditor User account at the court’s website: www.nmb.uscourts.gov.)
SIGNATURES
Submitting a document in the ePOC system in full compliance with the court’s procedures - including accurately entering the data requested, acknowledging the filer’s duty to redact protected personal identifiers, properly uploading documents as PDF files, and correctly entering a randomly generated verification code – shall serve as the submitting individual’s signature on the documents, with the same force and effect as if that individual had signed a paper copy of the document.
TECHNICAL REQUIREMENTS
Browser: The ePOC program requires use of Internet Explorer 8 or the latest version of Chrome and Firefox.
PDFs: When submitting an original or amended proof of claim, the ePOC program will create and file a completed, signed claim form, a copy of which may be printed or saved as part of the process. However, any supporting documents and attachments must be uploaded as PDF files. Documents other than proofs of claim also need to be prepared as PDFs in order to be uploaded and filed with the court. Each PDF file may be created by scanning or using software, and should not exceed 3.5 MB in size.

Page 2 of 14
FILE A PROOF OF CLAIM – ORIGINAL OR AMENDED
❶ From the court’s website, click Electronic Services, Claims E-Filing.
❷ Click ˃SUBMIT a Proof of Claim or Amend a Proof of Claim.
❸ The File Claim screen displays.
• Enter the case number. • Enter the name (or a portion of the name) of the creditor filing the claim.
If only a portion of the creditor’s name is entered, the program will pull all the creditors in the case that contain the entered letters.
• Select the party type filing the claim using the dropdown list. The selections are: Creditor (default) Creditor Attorney Debtor Debtor Attorney Trustee Note: Select Creditor Attorney if you are the creditor’s attorney and would like to record the creditor address and your address on the claim form and be added to the creditor list.
• Read the redaction notice and check the box to confirm compliance with Fed. R. Bankr. P. 9037.
• Click Next.
Page 3 of 14
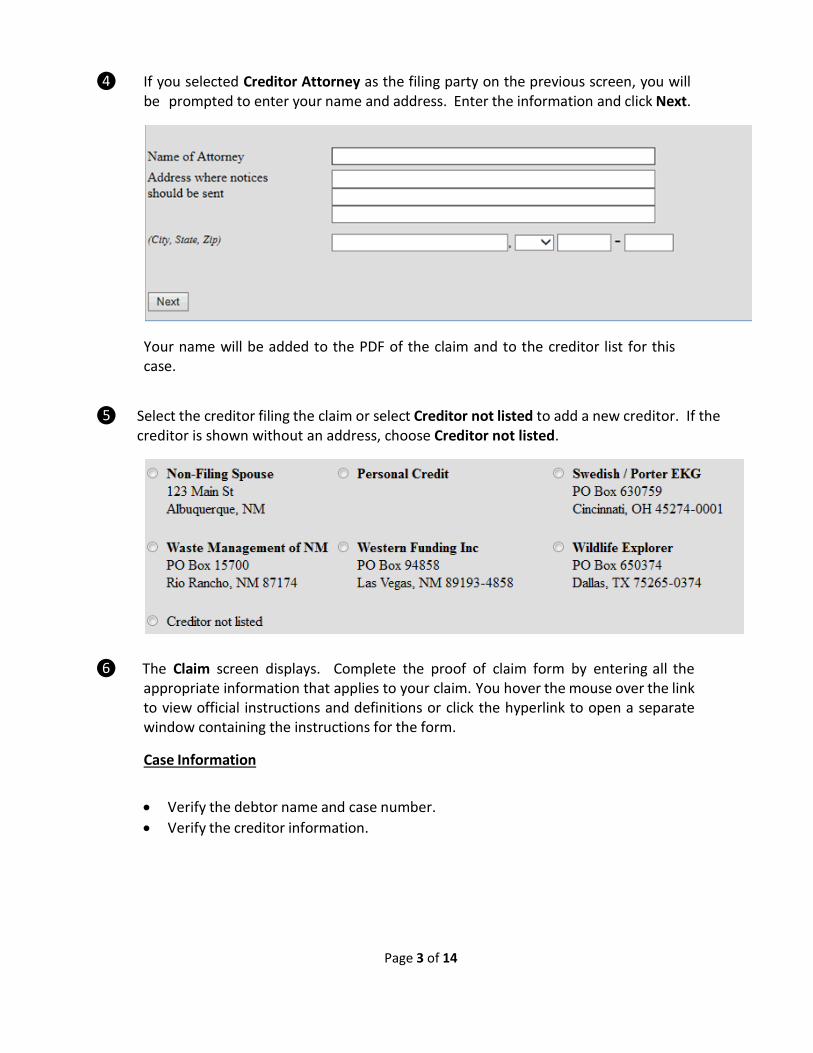
❹ If you selected Creditor Attorney as the filing party on the previous screen, you will be prompted to enter your name and address. Enter the information and click Next.
Your name will be added to the PDF of the claim and to the creditor list for this case.
❺ Select the creditor filing the claim or select Creditor not listed to add a new creditor. If the creditor is shown without an address, choose Creditor not listed.
❻ The Claim screen displays. Complete the proof of claim form by entering all the
appropriate information that applies to your claim. You hover the mouse over the link to view official instructions and definitions or click the hyperlink to open a separate window containing the instructions for the form.
Case Information • Verify the debtor name and case number. • Verify the creditor information.

Page 4 of 14
Part 1: Identify the Claim
1. Who is the current creditor? Enter the creditor’s telephone number and email address.
2. Has this claim been acquired from someone else? Yes □ No □
Notices and Payment Address
3. Where should notices and payments to the creditor be sent? Notice address has already been completed in Section 1.
CHECK if Payment Address If the payment address differs from the address where notices should be sent, and add the payment address information.

Page 5 of 14
Amended Claim
4. You must select the creditor who filed the claim to amend a claim Does this claim amend one already filed? Yes □ No □
A warning message displays advising that only the original claimant or transferee of the claim should amend a claim. Click OK to continue.
Click the Court Claim Number dropdown arrow to view a list of claims filed by the creditor. Select the claim number to be amended. The Filed on date will automatically populate based on the claim number selected. Be sure to select the correct claim number.
If you check the box to amend a claim and no claim number is shown in the dropdown box, there is not a claim associated with that creditor.
If you added a creditor in step 5, then you will not be given the opportunity to make a selection in the amended claim section.
Page 6 of 14
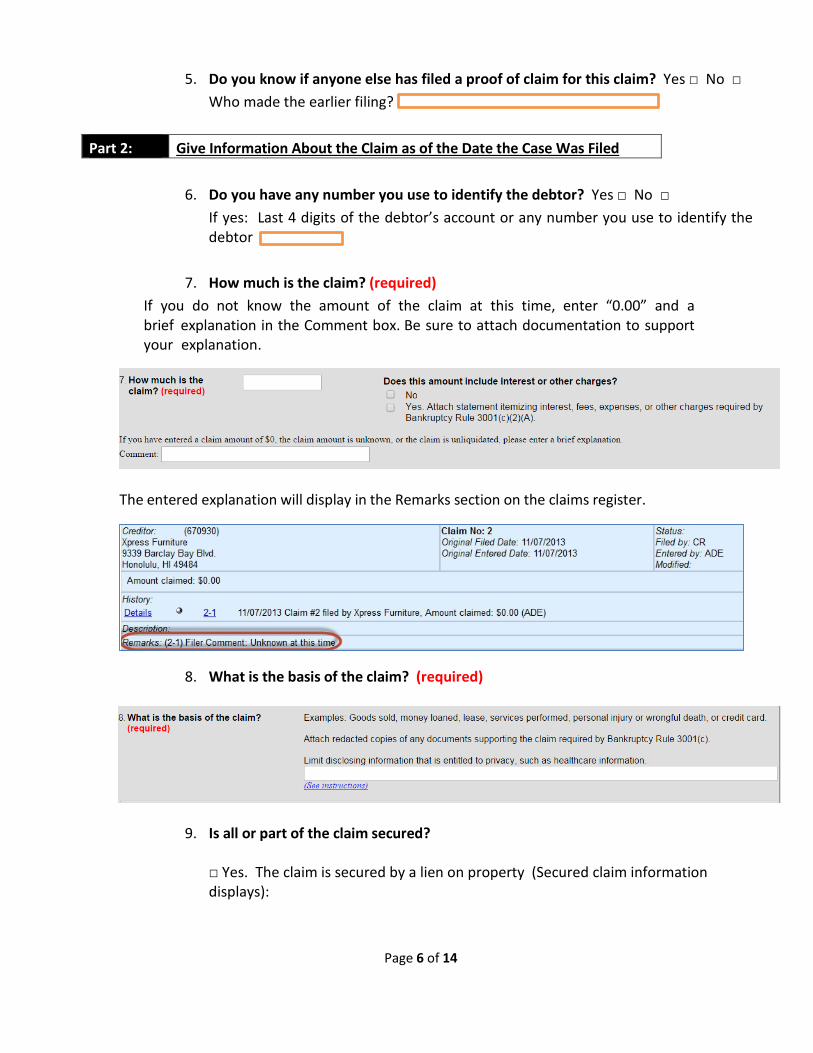
5. Do you know if anyone else has filed a proof of claim for this claim? Yes □ No □ Who made the earlier filing?
Part 2: Give Information About the Claim as of the Date the Case Was Filed
6. Do you have any number you use to identify the debtor? Yes □ No □
If yes: Last 4 digits of the debtor’s account or any number you use to identify the debtor
7. How much is the claim? (required)
If you do not know the amount of the claim at this time, enter “0.00” and a brief explanation in the Comment box. Be sure to attach documentation to support your explanation.
The entered explanation will display in the Remarks section on the claims register.
8. What is the basis of the claim? (required)
9. Is all or part of the claim secured?
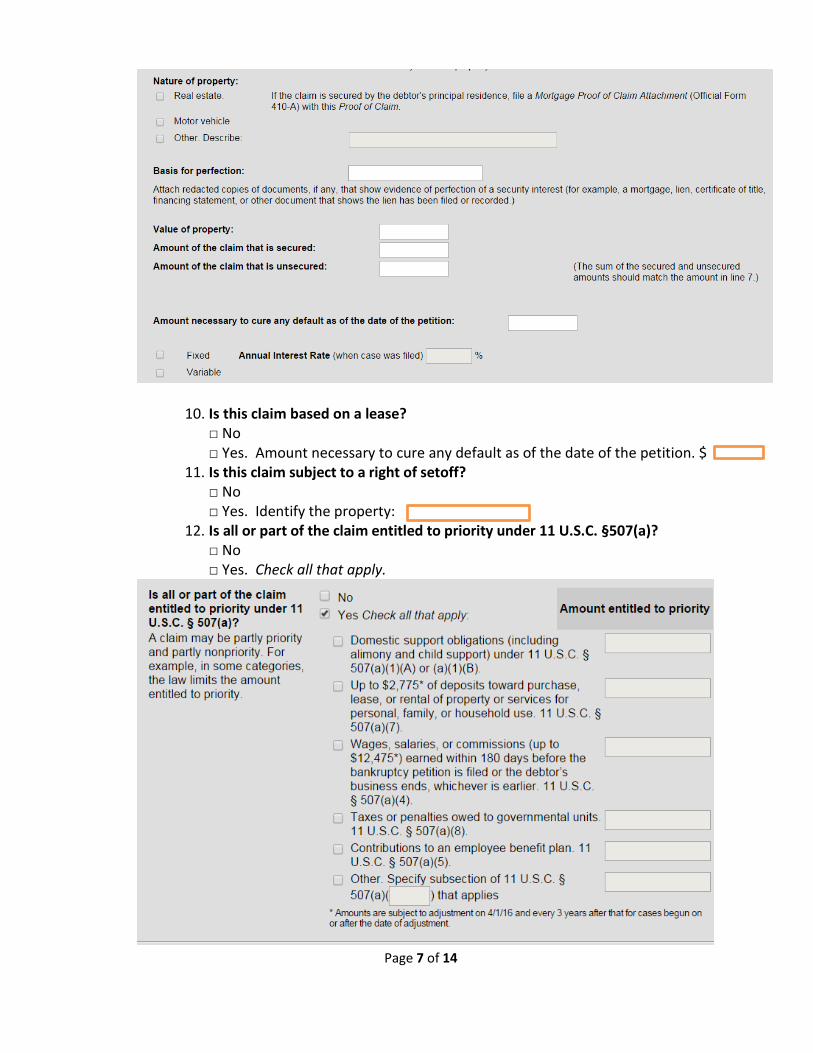
□ Yes. The claim is secured by a lien on property (Secured claim information displays):
Page 7 of 14
10. Is this claim based on a lease? □ No □ Yes. Amount necessary to cure any default as of the date of the petition. $
11. Is this claim subject to a right of setoff? □ No □ Yes. Identify the property:
12. Is all or part of the claim entitled to priority under 11 U.S.C. §507(a)? □ No □ Yes. Check all that apply.
Page 8 of 14
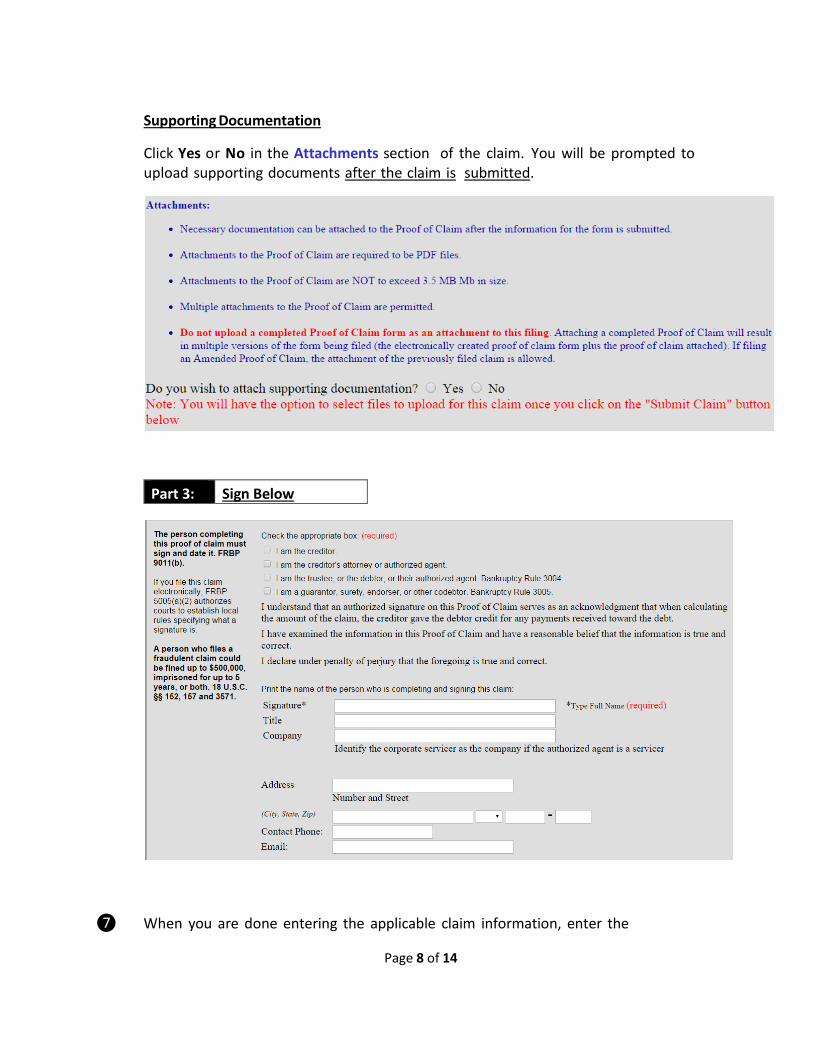
Supporting Documentation
Click Yes or No in the Attachments section of the claim. You will be prompted to upload supporting documents after the claim is submitted.
Part 3: Sign Below
❼ When you are done entering the applicable claim information, enter the
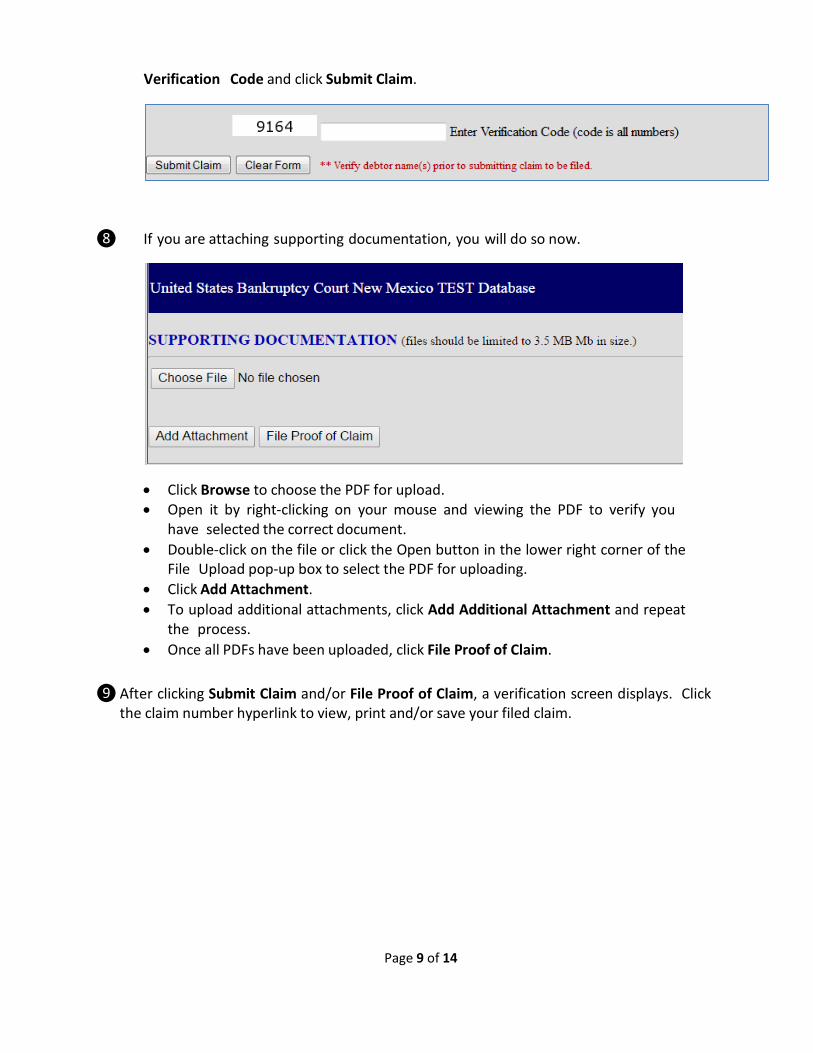
Page 9 of 14
Verification Code and click Submit Claim.
❽ If you are attaching supporting documentation, you will do so now.
• Click Browse to choose the PDF for upload. • Open it by right-clicking on your mouse and viewing the PDF to verify you
have selected the correct document. • Double-click on the file or click the Open button in the lower right corner of the
File Upload pop-up box to select the PDF for uploading. • Click Add Attachment. • To upload additional attachments, click Add Additional Attachment and repeat
the process. • Once all PDFs have been uploaded, click File Proof of Claim.
❾ After clicking Submit Claim and/or File Proof of Claim, a verification screen displays. Click
the claim number hyperlink to view, print and/or save your filed claim.

Page 10 of 14

Page 9 of 15
WITHDRAWAL OF A CLAIM
To withdraw a previously-filed claim, you must first create a document which withdraws the claim. The document should include the following information: filing party, case number, debtor name(s), claimant name, claim number and amount, and reason for the withdrawal. The document must also include the name of the individual authorizing the withdrawal. ❶ From the court’s website, click Electronic Services, Claims E-Filing.
❷ Click ˃Withdraw a Proof of Claim (PDF required).
❸ Read the explanation. Click Withdraw Claim to continue.
❹ The filing screen displays.
• Enter the case number.
Page 12 of 14
• Enter the name (or a portion of the name) of the creditor withdrawing its claim. If only a portion of the creditor’s name is entered, the program will pull only the claims in the case that contain the entered letters.
• Read the redaction notice and check the box to confirm compliance with Fed. R. Bankr. P. 9037.
• Click Next.
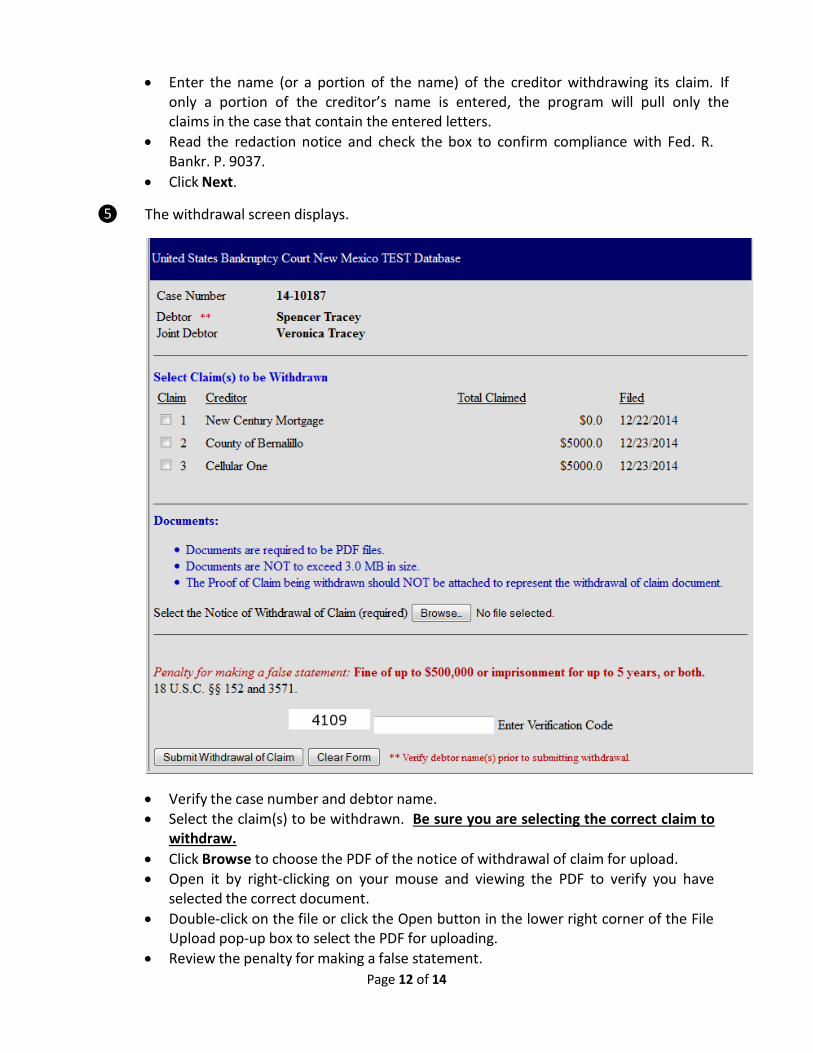
❺ The withdrawal screen displays.
• Verify the case number and debtor name. • Select the claim(s) to be withdrawn. Be sure you are selecting the correct claim to
withdraw. • Click Browse to choose the PDF of the notice of withdrawal of claim for upload. • Open it by right-clicking on your mouse and viewing the PDF to verify you have
selected the correct document. • Double-click on the file or click the Open button in the lower right corner of the File
Upload pop-up box to select the PDF for uploading. • Review the penalty for making a false statement.
Page 13 of 14
• Enter Verification Code. • Click Submit Withdrawal of Claim.
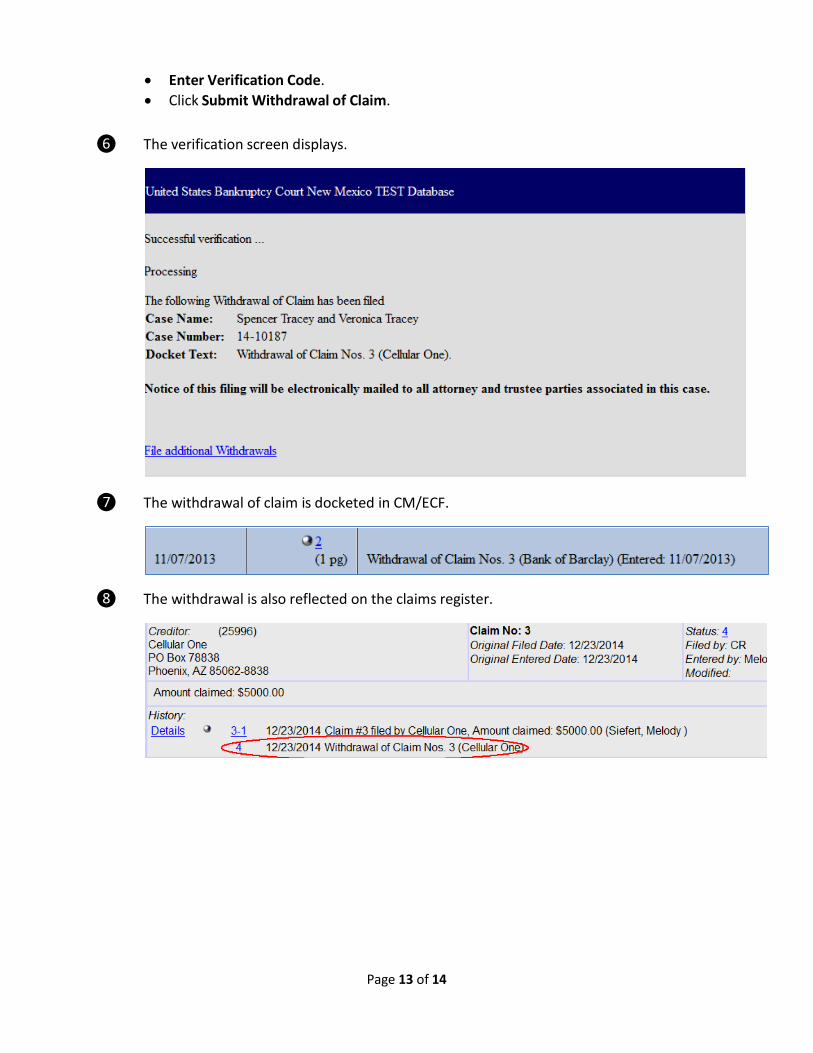
❻ The verification screen displays.
❼ The withdrawal of claim is docketed in CM/ECF.
❽ The withdrawal is also reflected on the claims register.
Page 14 of 14
RULE 3002.1 CLAIM SUPPLEMENTS
The ePOC program may also be used to file notices related to chapter 13 claims pursuant to Fed. R. Bankr. P. 3002.1: Notice of Mortgage Payment Change, Notice of Postpetition Fees, Expenses, and Charges and Responses to Notice of Final Cure Payment. ❶ From the court’s website, click Electronic Services, Claims E-Filing.
❷ Click ˃File a Claim Supplement (PDF required).
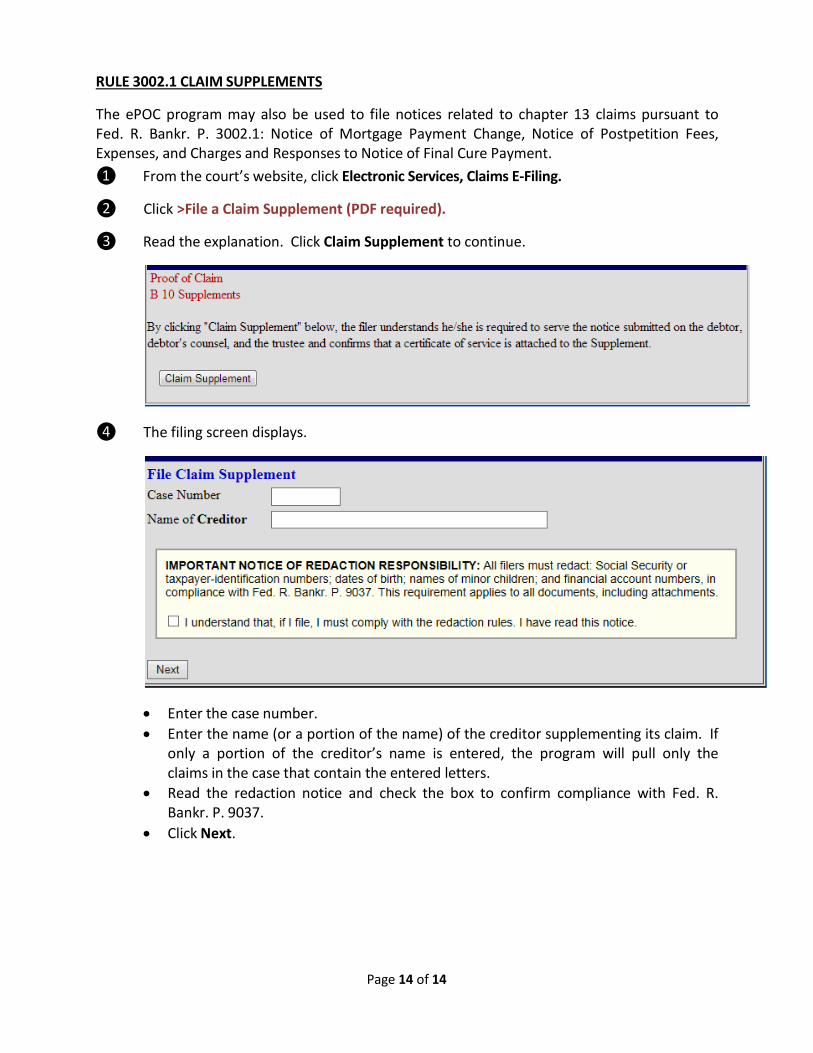
❸ Read the explanation. Click Claim Supplement to continue.
❹ The filing screen displays.
• Enter the case number. • Enter the name (or a portion of the name) of the creditor supplementing its claim. If
only a portion of the creditor’s name is entered, the program will pull only the claims in the case that contain the entered letters.
• Read the redaction notice and check the box to confirm compliance with Fed. R. Bankr. P. 9037.
• Click Next.
Page 15 of 14
❺ The supplemental screen displays.
Insert new image once ryan makes change
• Verify the case number and debtor name. • Select the claim to be supplemented. Be sure you are selecting the correct claim to
supplement. • If the claim has NOT been filed, check the box indicating that your claim is NOT listed
above and enter the Creditor Name. • Click Browse to choose the PDF of the supplemental document for upload. The
supplement and certificate of service must be attached as a single PDF. • Open it by right-clicking on your mouse and viewing the PDF to verify you have
selected the correct document. • Double-click on the file or click the Open button in the lower right corner of the File
Upload pop-up box to select the PDF for uploading. • Review the penalty for making a false statement. • Enter Verification Code. • Click Submit Supplement.
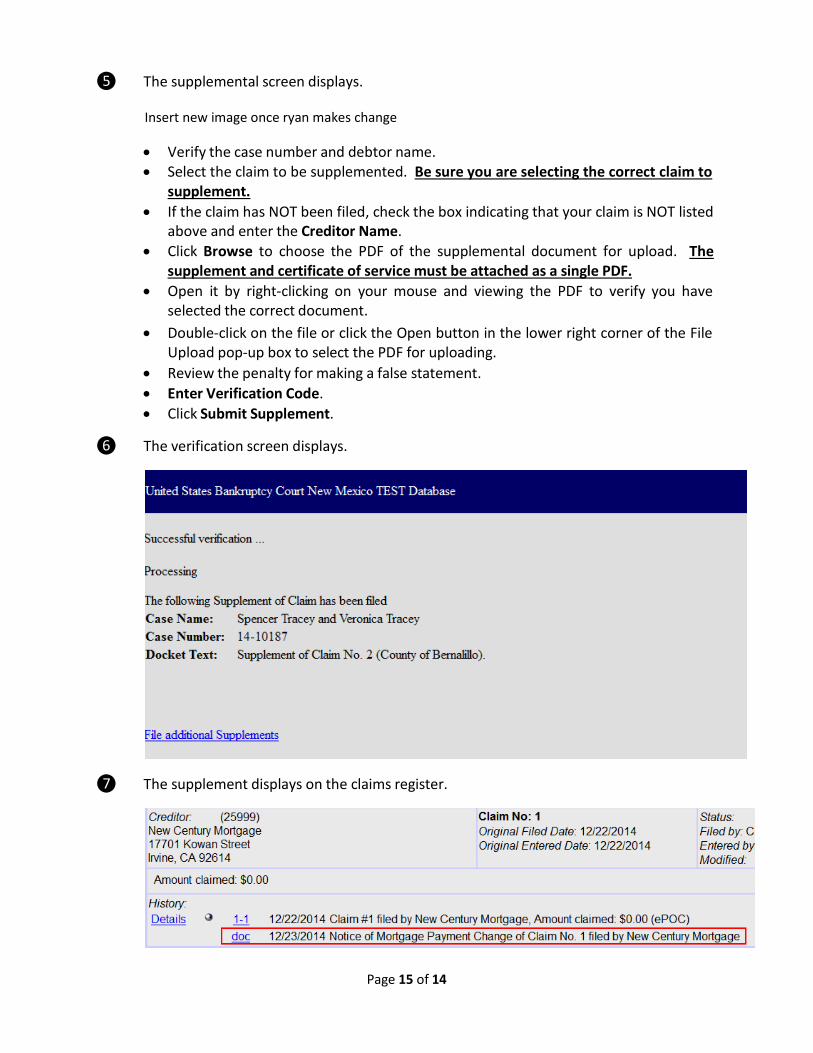
❻ The verification screen displays.
❼ The supplement displays on the claims register.

Page 16 of 14
❽ The claim supplement will also display on the docket sheet.


