- 1 -
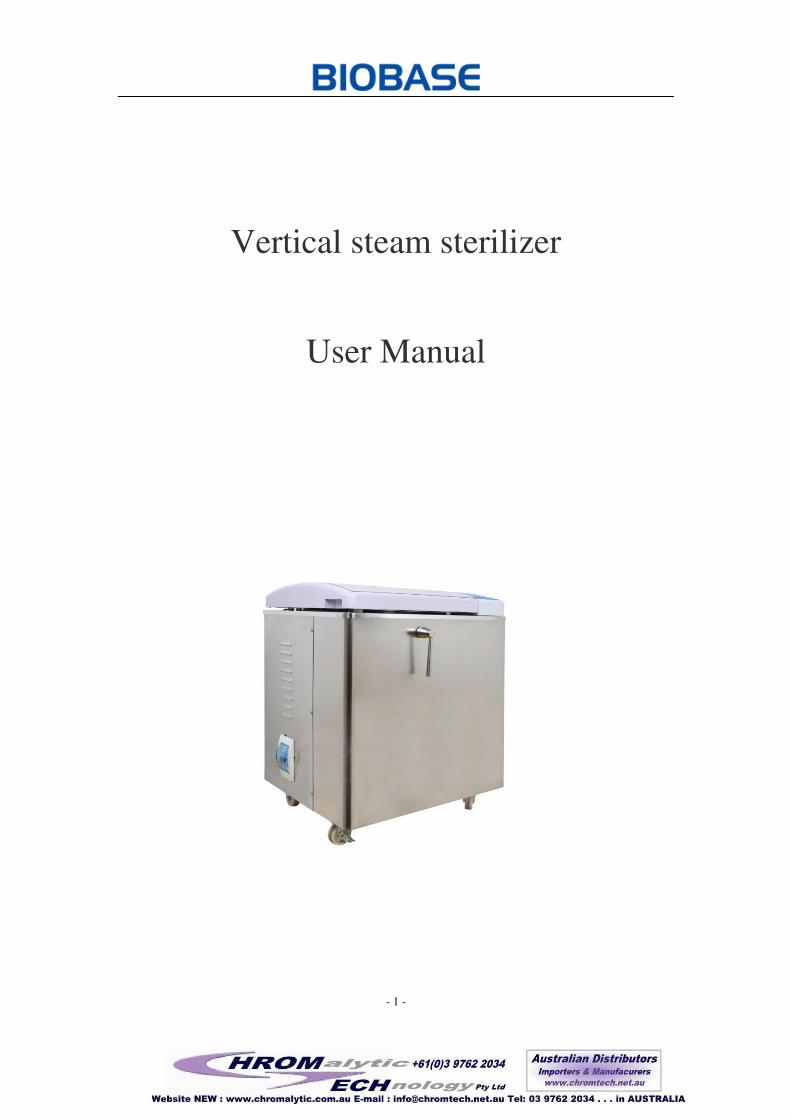
Vertical steam sterilizer
User Manual
- 2 -
Content
Preface ......................................................................................................... 3
1.Summarize ............................................................................................... 4
2.Basic introduction of the equipment ...................................................... 5
3. Installation and Adjustment .................................................................... 6
- 3 -
4.The preparatory works before sterilization .............................................. 7
5.Operation instructions ............................................................................ 8
6.Equipment maintenance ......................................................................... 14
Appendix I: Electrical Schematic Diagram .............................................. 17
Appendix II: PID Pipeline Schematics ..................................................... 18
- 4 -
Preface
1. Instructions
In strict accordance with this manual to install and operate the equipment, incorrect
installation and operation will endanger human life and property safety, and to
generate the guarantee of equipment performance of manufacturers invalid; In the
lifetime of the device, you should make manual intact ; Ensure all updates that you
receive can be saved in the manual; When changing equipment user or the use of the
site, please ensure that the operating manual must be transferred or transferred as
integral part of the equipment.
2. Safety sign
It indicates you should pay close attention, prompt the user and
maintenance personnel that operation failure, incomplete sterilization and other issues
may occur; minor personal injury or equipment damage may be caused.
It prompts the user and maintenance personnel that serious injury or
equipment damage may be caused.
This means that must be complied with, otherwise endanger their personal
safety.
Before carrying out any operation, maintenance, please read the manual carefully and

- 5 -
fully understand the contents of each chapter, particularly the ATTENTION content
with the above signs.
3. Manual custody::::
Manual must be carefully kept, in case of loss or damage, even minor damage should
be avoided. The operator is obliged to technically repair, complement manual content
which is lost, damaged or no longer applied, catalog and the relevant sections.
Any person, you can not tear or remove any content from the manual under any
circumstances. If you're having problems with the manual ,when its instruction does
not match the situation or not covering,.Please contact the manufacturer to upgrade.
Operation manual saving should keep ventilation and dry, avoiding moisture and heat.
Summarize
Product use scope:
Suitable for sterilization of high temperature, high pressure and humidity resistance
medical equipment, medical dressing kits, glassware, rubber, liquid and other items,
and it can also be used to sterilize laboratory media.
Specifications
Model BKQ-B30 BKQ-B50 BKQ-B75 BKQ-B100
Capacity 30L 50L 75L 100L
Chamber size(Φ*L) 385*412 mm 385*515 mm 385*715 mm 385*915 mm
Chamber material Polished SUS304 medical stainless steel
Max pressure 0.28MPa
Rated working pressure 0.165MPa
Max temperature 150℃
Working temp range 105~126℃
Dynamic pulse exhaust
time 0~9times
Power consumption 2.8KW 3KW 3.5KW 4.5KW
- 6 -
Power supply 220V, 50/60Hz
Outer size(W*D*H) 610*645*710mm 610*645*850mm 610*645*1000mm 610*645*1200mm
Net weight 68kg 75 kg 85 kg 100 kg
The service life of device is 6 years.
Attention
1. When receive the sterilizer, you should open the sterilizer box, check the equipment
for damage and the extent of damage。Before checking equipment, please pay
attention to its packing, retain the packaging material, and check the surface damage.
For example, panel scratches, door cover damage, etc.。Finally, please check the
packing list, and check the accessory is whether complete. If found problems, please
contact our service department.
2. Sterilizer should be operated strictly in accordance with the instructions described
in steps。If sterilization is not functioning properly, you could consult the fault
analysis table in the manual firstly to exclude problems by yourself. If not, you should
immediately provide feedback to our service department.If you can provide a detailed
failure description of sterilizer, models and the number of parts needed to be replaced,
our company deeply grateful for your support!
Basic introduction of the equipment
1、、、、Product Structure Introduction::::
- 7 -
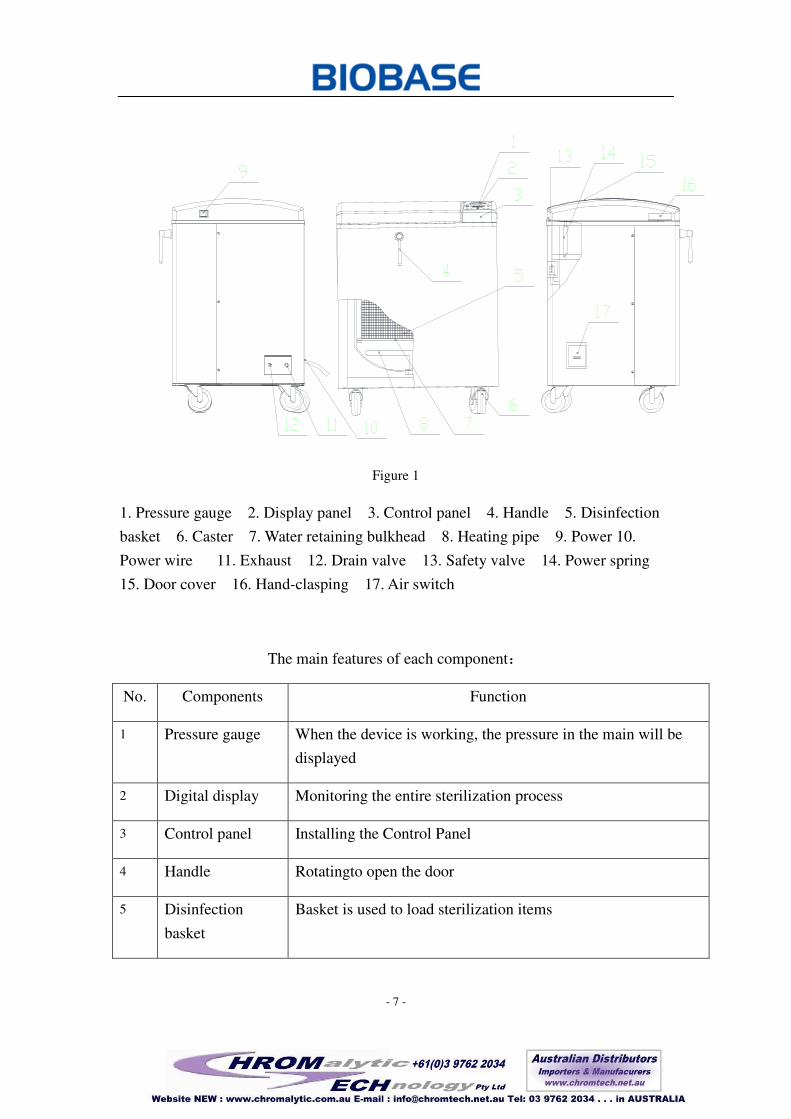
Figure 1
1. Pressure gauge 2. Display panel 3. Control panel 4. Handle 5. Disinfection
basket 6. Caster 7. Water retaining bulkhead 8. Heating pipe 9. Power 10.
Power wire 11. Exhaust 12. Drain valve 13. Safety valve 14. Power spring
15. Door cover 16. Hand-clasping 17. Air switch
The main features of each component:
No. Components Function
1 Pressure gauge When the device is working, the pressure in the main will be
displayed
2 Digital display Monitoring the entire sterilization process
3 Control panel Installing the Control Panel
4 Handle Rotatingto open the door
5 Disinfection
basket
Basket is used to load sterilization items
- 8 -
6 Caster Support equipment and make the equipment move on smooth
surface
7 Water retaining
bulkhead
Prevent items from splashing by water below.
8 Heating pipe Heating water to sterilize
9 Power Operateing power switch of the equipment
10 Power wire Wire connecting device and power supply (yellow wire is
ground wire)
11 Exhaust Exhaust of cold air and pressure steam
12 Drain valve discharging chamber waste water
13 Safety valve To ensure safety by predetermining pressure relief valve
14 Power spring For easy opening,
15 Door cover Cover door Components to insulate the heat and protect
operators
16 Hand-clasping Position of clutching door cover when opening the door.
17 Air switch The main power switch and leakage protection
Operating environment requirements
Sterilization should be placedin a clean, dry, dark, ventilated, small temperature
difference and indoor environment.
1. Indoor temperature 5℃-40℃.
2. The maximum relative humidity 85%.
3. Allowable voltage fluctuation range±10%.
4. No dust and pollution indoor.
- 9 -
Safety devices Introduction
BKQ-B Series vertical sterilizer has the following safety devices:
1. Automatic over-temperature protection device: More than programmed temperature,
the system automatically cut off the heating power, and display alarm information.
2. Door safety interlock:Safety device prevents the door from opening when there is
pressure in the sterilizer。
3. Dry alarm device:When the temperature of the sterilizer chamber is higher than the
thermostat set temperature, the thermostat operate, and the system will cut off the
heating power (display alarm information).
4. Automatic pressure relief safety valve: Exceeding the set pressure, the safety valve
opens to release the pressure.
5. Circuit safety device: AC circuit short protection。
Installation and Adjustment
Installation Steps:
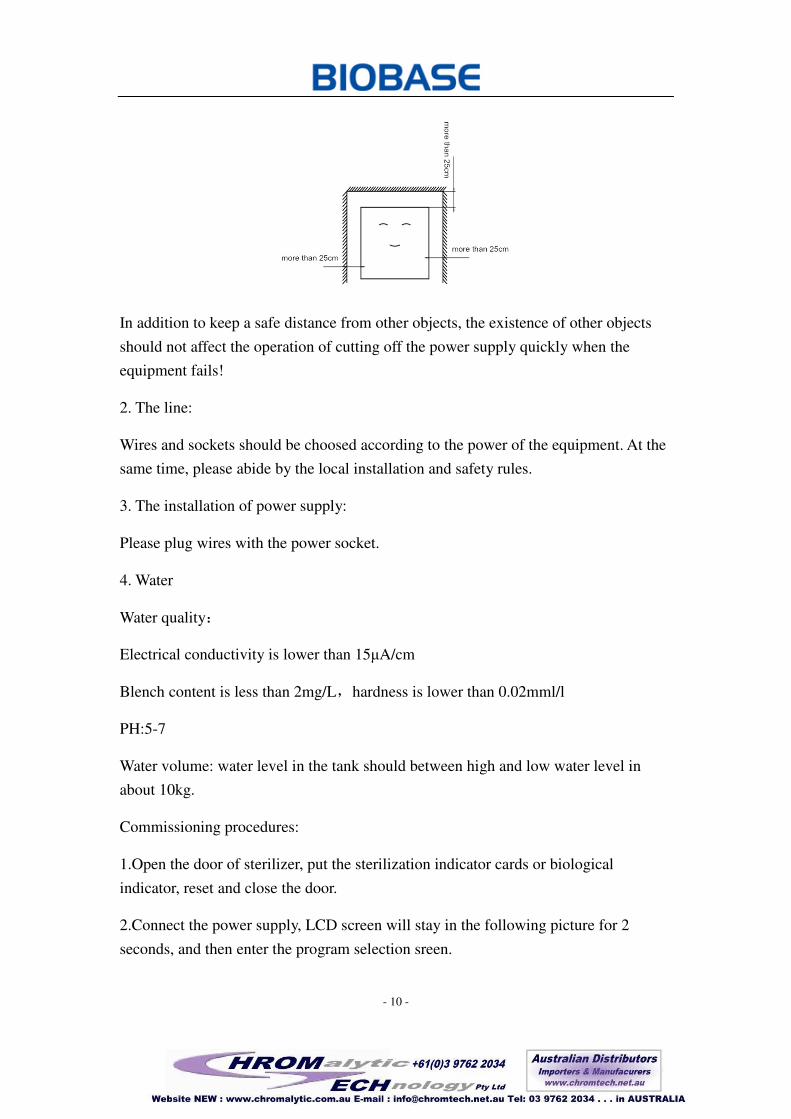
1.The placement of the sterilizer:
The BKQ-B series Vertical sterilizer is placed on a smooth, clean, spacious
ground,.Then adjust equipment machine feet, make it parallel to the ground, and
ensure stable and secure. To ensure good ventilation ,the distance between several
side behind the sterilizer and other objects is at least 250mm (Figure 2).
If the sterilizer close to the wall, it may lead to heat build-up inside to
cause the failure.
- 10 -
In addition to keep a safe distance from other objects, the existence of other objects
should not affect the operation of cutting off the power supply quickly when the
equipment fails!
2. The line:
Wires and sockets should be choosed according to the power of the equipment. At the
same time, please abide by the local installation and safety rules.
3. The installation of power supply:
Please plug wires with the power socket.
4. Water
Water quality:
Electrical conductivity is lower than 15µA/cm
Blench content is less than 2mg/L,hardness is lower than 0.02mml/l
PH:5-7
Water volume: water level in the tank should between high and low water level in
about 10kg.
Commissioning procedures:
1.Open the door of sterilizer, put the sterilization indicator cards or biological
indicator, reset and close the door.
2.Connect the power supply, LCD screen will stay in the following picture for 2
seconds, and then enter the program selection sreen.
- 11 -
The preparatory works before sterilization
Before putting the equipment in the sterilizer, please clean it first in order to avoid
damage to sterilizer and sterilized equipment itself caused by residue matters, such as
blood and other impurities. We set the cleaning solution for your reference:
1)Please clean the sterilizing instruments immediately after usage. You’d better clean
it by washing machine, cleaning agent and distilled water.
2)After cleaning, it is recommended that the rinse again to ensure its cleanliness.
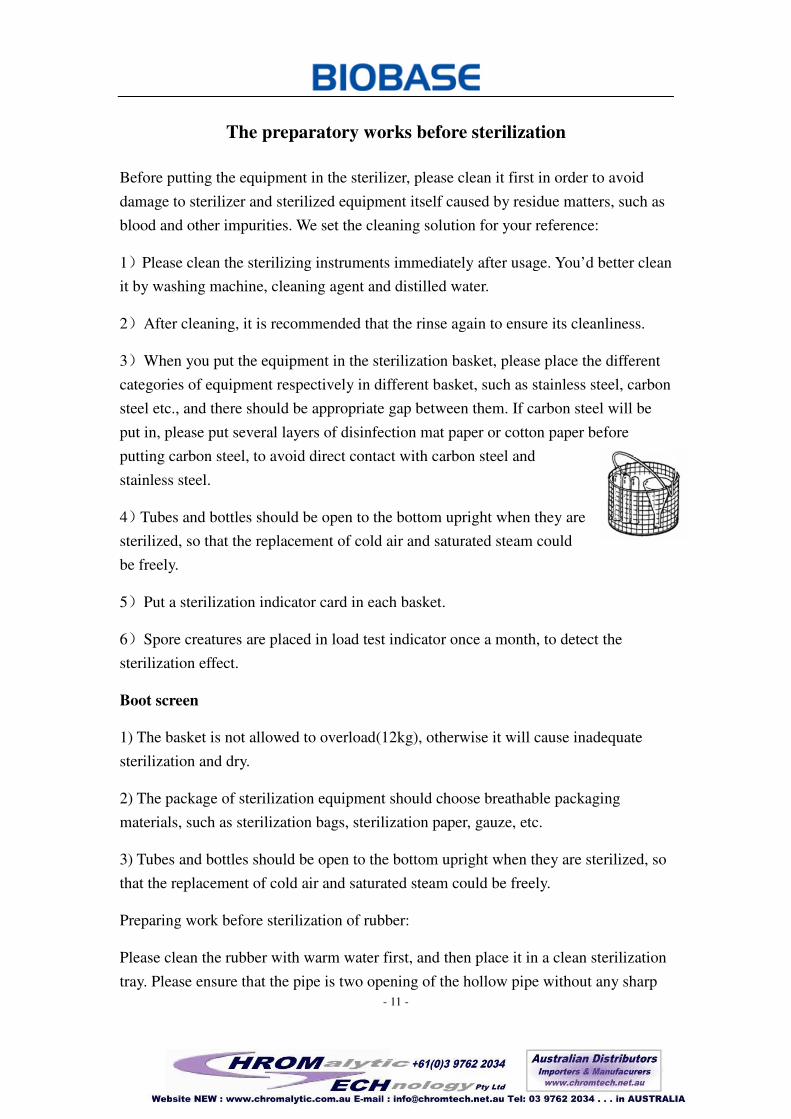
3)When you put the equipment in the sterilization basket, please place the different
categories of equipment respectively in different basket, such as stainless steel, carbon
steel etc., and there should be appropriate gap between them. If carbon steel will be
put in, please put several layers of disinfection mat paper or cotton paper before
putting carbon steel, to avoid direct contact with carbon steel and
stainless steel.
4)Tubes and bottles should be open to the bottom upright when they are
sterilized, so that the replacement of cold air and saturated steam could
be freely.
5)Put a sterilization indicator card in each basket.
6)Spore creatures are placed in load test indicator once a month, to detect the
sterilization effect.
Boot screen
1) The basket is not allowed to overload(12kg), otherwise it will cause inadequate
sterilization and dry.
2) The package of sterilization equipment should choose breathable packaging
materials, such as sterilization bags, sterilization paper, gauze, etc.
3) Tubes and bottles should be open to the bottom upright when they are sterilized, so
that the replacement of cold air and saturated steam could be freely.
Preparing work before sterilization of rubber:
Please clean the rubber with warm water first, and then place it in a clean sterilization
tray. Please ensure that the pipe is two opening of the hollow pipe without any sharp
- 12 -
bend, twist, kink, etc.
Preparing work before sterilization of dressing bag:
Put the dressing bag on the tray vertically, and avoid the contact with the inner wall of
the sterilizer.
Preparing work before sterilization of culture medium:
Heat-resistant glass bottles allowed only, and the loading capacity is no more than 2/3
of the volume, the bottle should be sealed in order to avoid medium spillover.
Operation Instructions
1、Operation instruction
There are 7 programs: 1.# bare instrument, 2# instrument bags, 3#rubber, 4# dressing,
5# liquid type, 6# solid type of custom, 7# liquid typr of custom.
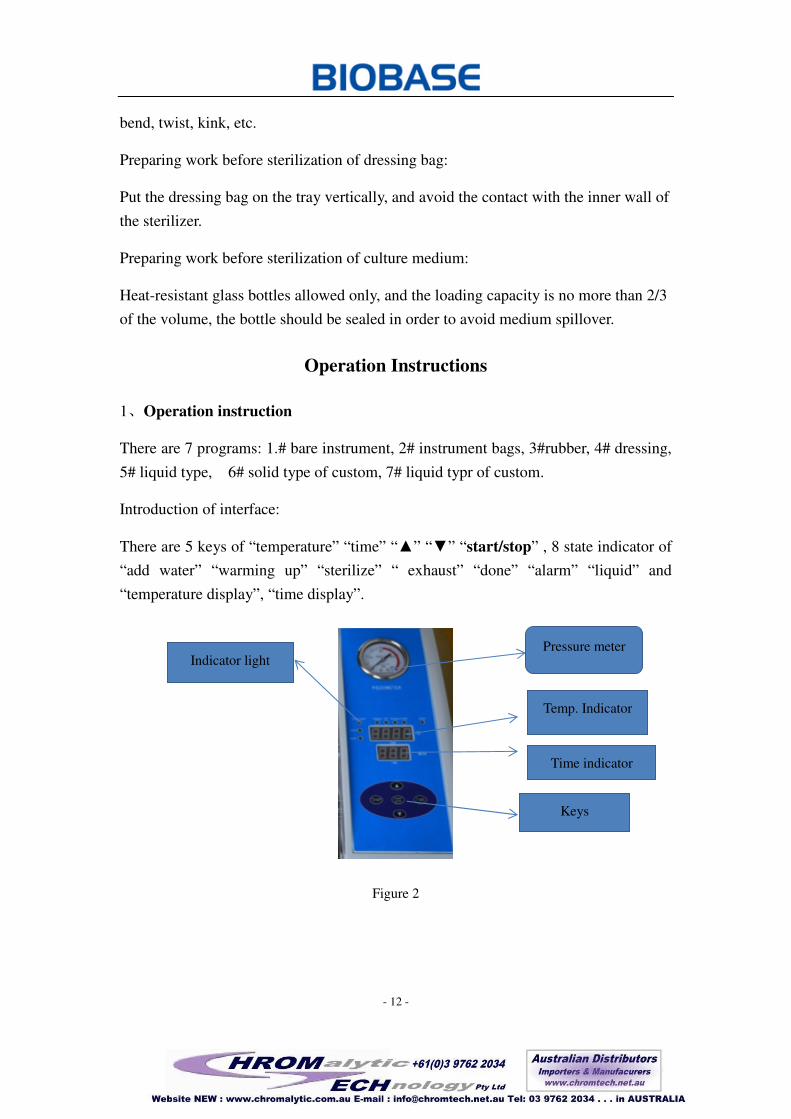
Introduction of interface:
There are 5 keys of “temperature” “time” “▲” “▼” “start/stop” , 8 state indicator of
“add water” “warming up” “sterilize” “ exhaust” “done” “alarm” “liquid” and
“temperature display”, “time display”.
Figure 2
Pressure meter
Temp. Indicator
Time indicator
Keys
Indicator light

- 13 -
Figure 3 Open state Figure 4 Closed state
The operation steps of opening the door:
1. Left hand hold the door cover buckle position 2. Left hand hold the buckle to lift the door
then press down firmly, meanwhile right hand cover.
moving the handle counterclockwise.
- 14 -
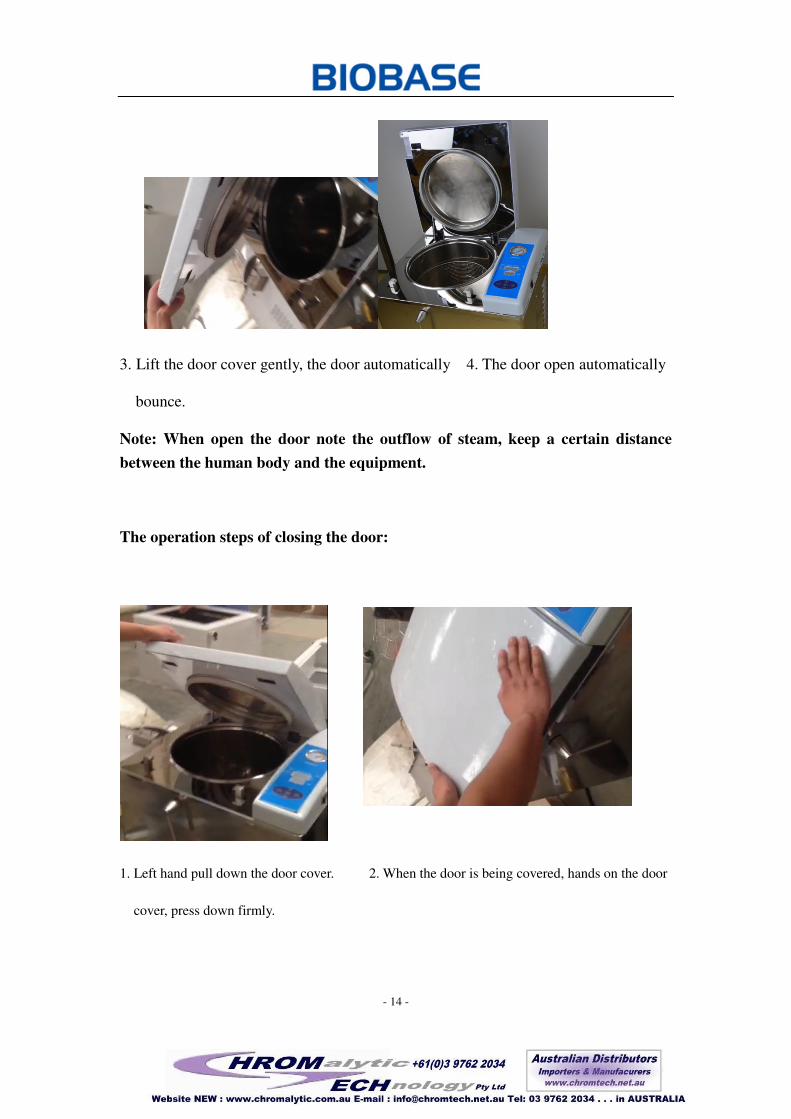
3. Lift the door cover gently, the door automatically 4. The door open automatically
bounce.
Note: When open the door note the outflow of steam, keep a certain distance
between the human body and the equipment.
The operation steps of closing the door:
1. Left hand pull down the door cover. 2. When the door is being covered, hands on the door
cover, press down firmly.
- 15 -
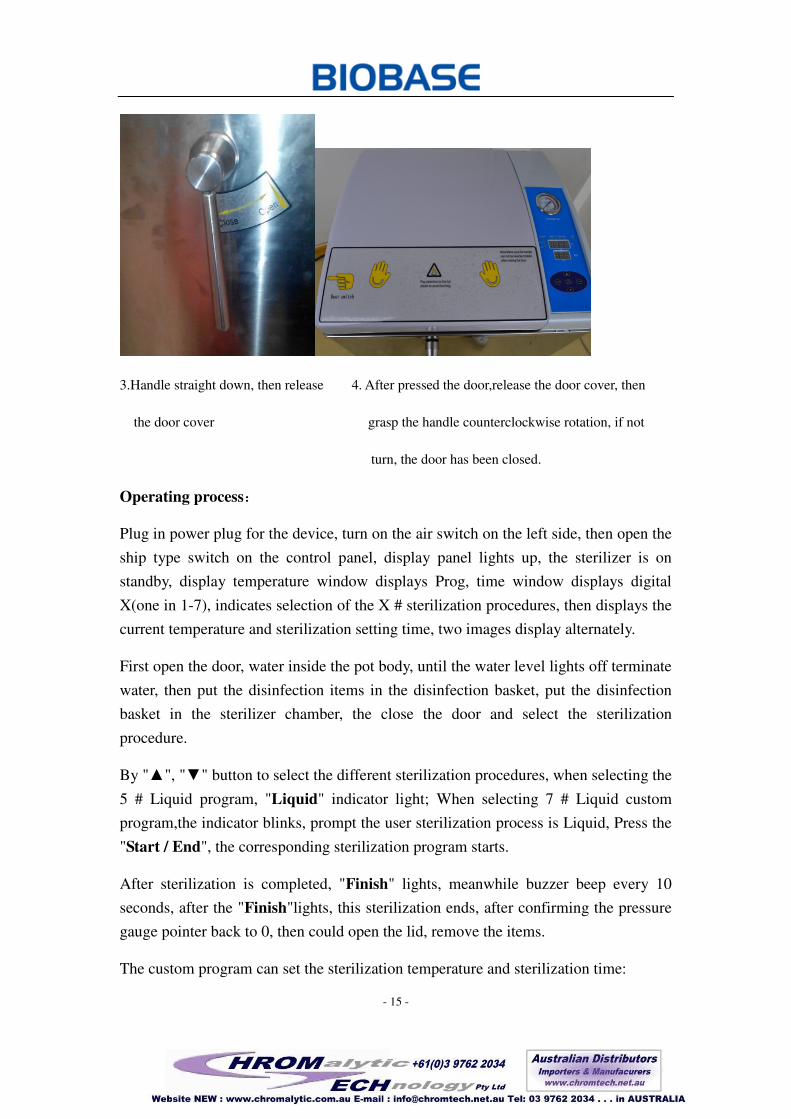
3.Handle straight down, then release 4. After pressed the door,release the door cover, then
the door cover grasp the handle counterclockwise rotation, if not
turn, the door has been closed.
Operating process:
Plug in power plug for the device, turn on the air switch on the left side, then open the
ship type switch on the control panel, display panel lights up, the sterilizer is on
standby, display temperature window displays Prog, time window displays digital
X(one in 1-7), indicates selection of the X # sterilization procedures, then displays the
current temperature and sterilization setting time, two images display alternately.
First open the door, water inside the pot body, until the water level lights off terminate
water, then put the disinfection items in the disinfection basket, put the disinfection
basket in the sterilizer chamber, the close the door and select the sterilization
procedure.
By "▲", "▼" button to select the different sterilization procedures, when selecting the
5 # Liquid program, "Liquid" indicator light; When selecting 7 # Liquid custom
program,the indicator blinks, prompt the user sterilization process is Liquid, Press the
"Start / End", the corresponding sterilization program starts.
After sterilization is completed, "Finish" lights, meanwhile buzzer beep every 10
seconds, after the "Finish"lights, this sterilization ends, after confirming the pressure
gauge pointer back to 0, then could open the lid, remove the items.
The custom program can set the sterilization temperature and sterilization time:
- 16 -
Sterilization temperature setting:
Press the "Temperature" button,temperature display window shows the set
temperature value and flicker, By "▲", "▼" to adjust the temperature value, press
again "temperature" button to preserve the setting temperature value.
Sterilization time setting:
Press the "Time" button, the time display window shows the set sterilization time and
flickers. Adjust the time value by pressing "▲", "▼", and then press "Time" button to
save the time value set.
Parameter setting:
Press "Start / End" and "Temperature" button at the same time for 5 seconds to enter
the menu
Displaying "iwti" indicates the time of adding water, in minutes; press "Start / End"
the value shows and flickers; turn up and down by pressing "▲", "▼"n, and then
press "Start / End" to confirm. Have to be 0
When "iwti" is displaying, press "▼" and then "EATE" would show up; press "▲"
then "tErF" would show up.
Displaying "EATE" indicates the temperature of the end of discharging cool air; press
the "Start / End" the value shows and flickers, turn up and down by pressing "▲", "
▼", and then press "Start /End" to confirm. The default setting is 100.0 ℃
When "EATE" is displaying, press "▼" and then "EATi" would show up; press "▲
"and then "iwti" would show up.
Displaying "EATi" indicates the time of discharging cool air, in minutes; press "Start
/ End" the value shows and flickers, turn up and down by pressing "▲", "▼", and
then press " Start / End " to confirm. The default setting is 30 minutes. (After the
time of discharging cool air ends, the temperature should not be lower than the set
ending temperature of cold air, otherwise it will report error. If the temperature inside
the pot is beyond 105 degrees, go directly to the next step)
When "EATi" is displaying, press "▼"and then "EWTi" would show up; press "▲
"and then "EATE" would show up.
Displaying "EWTi" indicates the drainage time, in seconds; press " Start / End " the
- 17 -
value shows and flickers; turn up and down by pressing "▲", "▼", and then press "
Start / End " to confirm. Only solid program is effective, the default setting is 240
seconds.
When "EWTi" is displaying, press "▼" and then "PULS" would show up; press "▲"
and then "EATi" would show up.
Displaying "PULS" indicates the frequency of sterilization pulsation, in seconds;
press " Start / End " the value shows and flickers; turn up and down by pressing "▲",
"▼", and then press " Start / End " to confirm. Only custom solid program is
effective, the default setting is 0.
When "PULS" is displaying, press "▼"and then "drti" would display, press "▲" and
then "EWTi" would show up.
Displaying "drti" indicates the drying time, in minutes; press " Start / End " the value
shows and flickers; turn up and down by pressing "▲", "▼", and then press " Start /
End " to confirm. Only custom solid program is effective, the default setting is 10.
When "drti" is displaying, press "▼" and then "tEFA" would show up; press "▲" and
then "ESTi" would show up.
Displaying "tEFA" indicates the temperature calibration factor, press " Start / End "
the value shows and flickers, turn up and down by pressing "▲", "▼", and then press
" Start / End " to confirm. Users are strictly forbidden to modify.
When "tEFA" is displaying, press "▼" and then "tErF" would display; press "▲" and
then "drti" would show up.
Displaying "tErF" indicates the temperature deviation, press " Start / End " the value
shows and flickers; turn up and down by pressing "▲", "▼", and then press " Start /
End " to confirm. Users are strictly forbidden to modify
When "tErF" is displaying, press "▼" and then "iwti" would show up; press "▲" and
then "tEFA" would show up; and the cycle repeats.
After the modification is complete, press "Start / End " and "Temperature" button at
the same time for 5 seconds to save the parameters and exit the menu.
Production debugging, temperature sensor calibration:
Measure low temperature (10-30) at first (could be replaced with analog temperature
probe) to record the actual temperature T1, display temperature D1
- 18 -
Then measure high temperature (100-130) (can be replaced with analog temperature
probe) to record the actual temperature T2, display temperature D2
The result of (T2-T1) / (D2-D1) multiplied parameter K displayed in tEFA menu is
the new parameters
After modifying the parameters in tEFA, and then modify the parameters in tErF
according to the difference of D3 and T2 displayed in the high-temperature sensor; if
the temperature displayed is low, make the value in tErF plus the difference; if the
temperature displayded is high, make the value in tErF minus the difference.
Note:
If you want to terminate the sterilization, end the sterilization process by pressing "
Start / End " button.
Error Indication:
Error code Fault Causes Problems Existed Solutions
Err 001 30 minutes after the
discharging of cool air the
temperature does not reach
the set point.
Heating pipes are
broken with air
leakage
Replace the heating
pipe or inspect
whether there is
leakage on the
pipeline
Err 002 Does not reach the set
temperature within the
time of cool air
discharging or pulsating
exhaust fails
Heating pipes are
broken, parameters
set are
unreasonable
Replace the heating
pipe or check
whether the set
parameters are
correct
Err 004 After reaching the set
temperature, the
temperature is not
stabilized within 10
minutes or the temperature
fluctuates excessively
during the sterilization
process
There is air leakage Check the pot
connector or the
pipe line whether
there is air leakage
Err 008 The sensor is not
connected or damaged; the
Sensor fails Replace the sensor
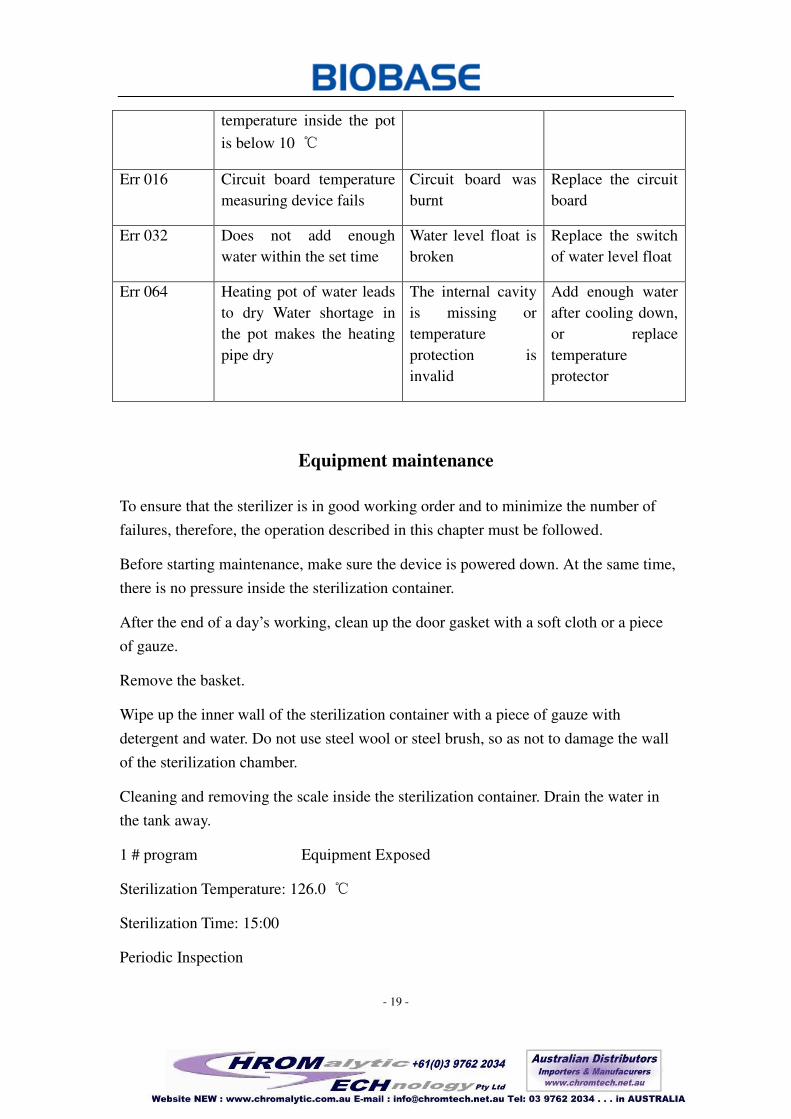
- 19 -
temperature inside the pot
is below 10 ℃
Err 016 Circuit board temperature
measuring device fails
Circuit board was
burnt
Replace the circuit
board
Err 032 Does not add enough
water within the set time
Water level float is
broken
Replace the switch
of water level float
Err 064 Heating pot of water leads
to dry Water shortage in
the pot makes the heating
pipe dry
The internal cavity
is missing or
temperature
protection is
invalid
Add enough water
after cooling down,
or replace
temperature
protector
Equipment maintenance
To ensure that the sterilizer is in good working order and to minimize the number of
failures, therefore, the operation described in this chapter must be followed.
Before starting maintenance, make sure the device is powered down. At the same time,
there is no pressure inside the sterilization container.
After the end of a day’s working, clean up the door gasket with a soft cloth or a piece
of gauze.
Remove the basket.
Wipe up the inner wall of the sterilization container with a piece of gauze with
detergent and water. Do not use steel wool or steel brush, so as not to damage the wall
of the sterilization chamber.
Cleaning and removing the scale inside the sterilization container. Drain the water in
the tank away.
1 # program Equipment Exposed
Sterilization Temperature: 126.0 ℃
Sterilization Time: 15:00
Periodic Inspection

- 20 -
Fastening the connector and testing on-off state once a year, and it should be done by
a qualified electrician.
As a result of extreme wear and tear, the door lock device must be inspected every
five years.
Instructions: This maintenance manual is provided for professionals. Unless you are a
professional, or when the equipment fails, be sure to consult the specification, repair
according to the instructions. Instructions have provided maintenance methods for the
professionals as many as possible.
Installation and Commissioning
1. Lifting and handling
(1) Cut off the power.
(2) Before moving the sterilizer, make sure it is disconnected from the power supply,
and no pressure in the sterilizer.
(3) Drain the water inside the sterilizer away. Lifting and handling should be carried
out by many people.
2.Failure Analysis Chart
Phenomenon Possible Reason Correction
Turn on the power switch,
but the power indicator
light is not bright.
1.The breaker is not closed
2.The main power switch is
broken down
1.Close the breaker
2.Change the main power
switch according to the
situation
Under the warming
situation, but the
temperature but pressure is
not rising or rising slowly
1.The control circuit of heater
is short or burn down
2.Pipe joint or safety valve is
leaking badly
1.Check and change damaged
device
2.Check and screw up pipe
joint, safety valve etc.
Under draining state, but Drain filter is blocking Clear the clutter on the filter

- 21 -
pressure is not rising or
rising slowly
valve core
3.Change water in the water tank
1)Move away the transparent silicone tube to drain, until all water is drained
2)Inject distilled water into the sterilization chamber, and stop injecting till the alarm
indicator light is not bright
4. The cleaning procedure of steam escape valve: (use the car recirculation device)
Picture 9 indicate the location of steam escape valve in the water tank
First cut down the power to make sure there is no pressure inside the sterilizer
1) Move away the water tank cover
2) Wash the steam escape valve hole by stretching before and after the steam escape
valve core
3) Change the steam escape valve if needed, but waiting the device cooling and
pressure down to 0MPa before change.
5. Check safety valve
It locates at the top left of the device.
To prevent the safety valve is in the lock status, let the steam pressure through it to
release every two months under normal use
1) Sterilize according to the manual
2) Produce 0.165MPa pressure inside the sterilizer
3) Use a screwdriver to push the safety valve handle to make it open about 2 seconds
4) Turn off the main switch, terminate the operation. Meanwhile, discharge the steam
inside the sterilizer container
5) Open it when the pressure down to 0MPa.
6. How to change safety valve
Notice: Only specialists can use those maintenance methods. Avoid electric shock
- 22 -
unless you are a professional. Must look up the manual when equipment
malfunctioned and repair it according to the manual. And the manual has been
provided the most professional maintenance methods.
1) It located at the front top left
2) Dismount the safety valve fixing screws, and remove the safety valve from the base
of it
3) Exchange it with a qualified safety valve. Test the sterilization procedure
7. Temperature controller
Locate inside the device and one sterilizer with one temperature controller. It can be
switched on and cut off the power to maintain a constant temperature in the heating
and sterilization phase. It usually be used as a temperature alarm.
It will automatically cut off the power of heater when the boiler temperature above
allowed range.
It will automatically switch on when the boiler temperature within allowed range.
8.How to rise working temperature of the temperature controller
Temperature controller is liquid expansion type, clockwise it to increase temperature
range.(Notice: Equipment has already regulated, customers do not need adjust)
9.To our distinguished customers.
10.Any products may have fault, please use the real-time monitoring equipment
operating the processing conditions. If abnormal occurred, please handle it according
to the manual, as yet unresolved, please promptly notify our service center to avoid
any losses.
11.After-sales service
12. 1.One year free warranty for the whole machine from the date of sale(Invoice
shall prevail),and services for life.
13. 2.Warranty card: When you need a normal consultation or repair, please bring
warranty card and purchase invoices to our local service center and please
safekeeping the warranty card .
- 23 -
AppendixI Electrical Schematic Diagram

- 24 -
- 25 -
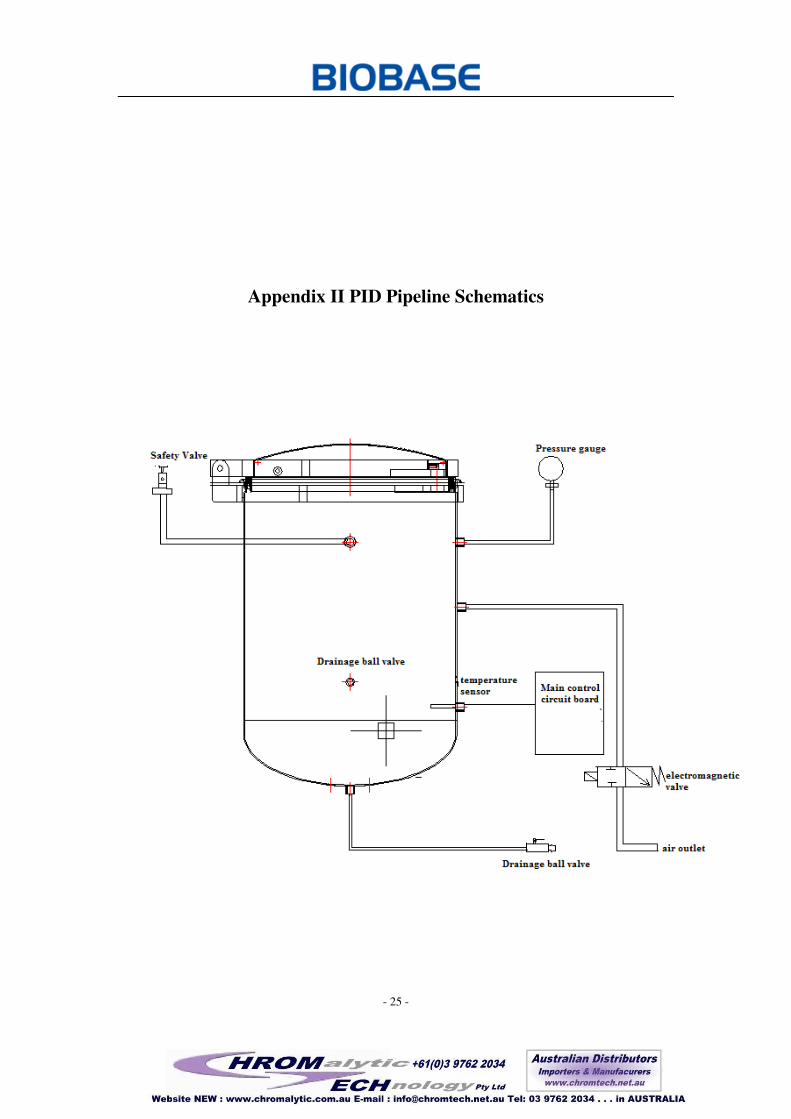
Appendix II PID Pipeline Schematics
- 26 -


