
1/11
Classification: Reference: Date:
BT21-008A NTB21-055A July 8, 2021
VOLUNTARY SAFETY RECALL CAMPAIGN 2013-2018 ALTIMA; HOOD LOCK ASSEMBLY
CAMPAIGN ID #: R21A6 APPLIED VEHICLES: 2013-2018 Altima (L33)
Check Service COMM or Dealer Business Systems (DBS) National Service History to confirm campaign eligibility.
INTRODUCTION Nissan is conducting this voluntary safety recall campaign on certain specific model year 2013-2018 Altima vehicles, to inspect and, if necessary, replace the hood lock assembly, replace the primary hood lock spring, and clean and lubricate the secondary hood lock. This service will be performed at no charge to the customer for parts or labor. IDENTIFICATION NUMBER Nissan has assigned identification number R21A6 to this campaign. This number must appear on all communication and documentation of any nature dealing with this campaign. DEALER RESPONSIBILITY It is the dealer’s responsibility to check Service COMM or Dealer Business Systems (DBS) National Service History for the campaign status on each vehicle falling within the range of this voluntary safety recall which for any reason enters the service department. This includes vehicles purchased from private parties or presented by transient (tourist) owners and vehicles in a dealer’s inventory. Federal law requires that new vehicles in dealer inventory which are the subject of a safety recall must be corrected prior to sale. Failure to do so can result in civil penalties by the National Highway Traffic Safety Administration. While federal law applies only to new vehicles, Nissan strongly encourages dealers to correct any used vehicles in their inventory before they are retailed. Nissan Bulletins are intended for use by qualified technicians, not 'do-it-yourselfers'. Qualified technicians are properly trained individuals who have the equipment, tools, safety instruction, and know-how to do a job properly and safely. NOTE: If you believe that a described condition may apply to a particular vehicle, DO NOT assume that it does. See your Nissan dealer to determine if this applies to your vehicle.
This bulletin has been amended. See AMENDMENT HISTORY on the last page. Discard all previous versions of this bulletin.
2/11 NTB21-055A
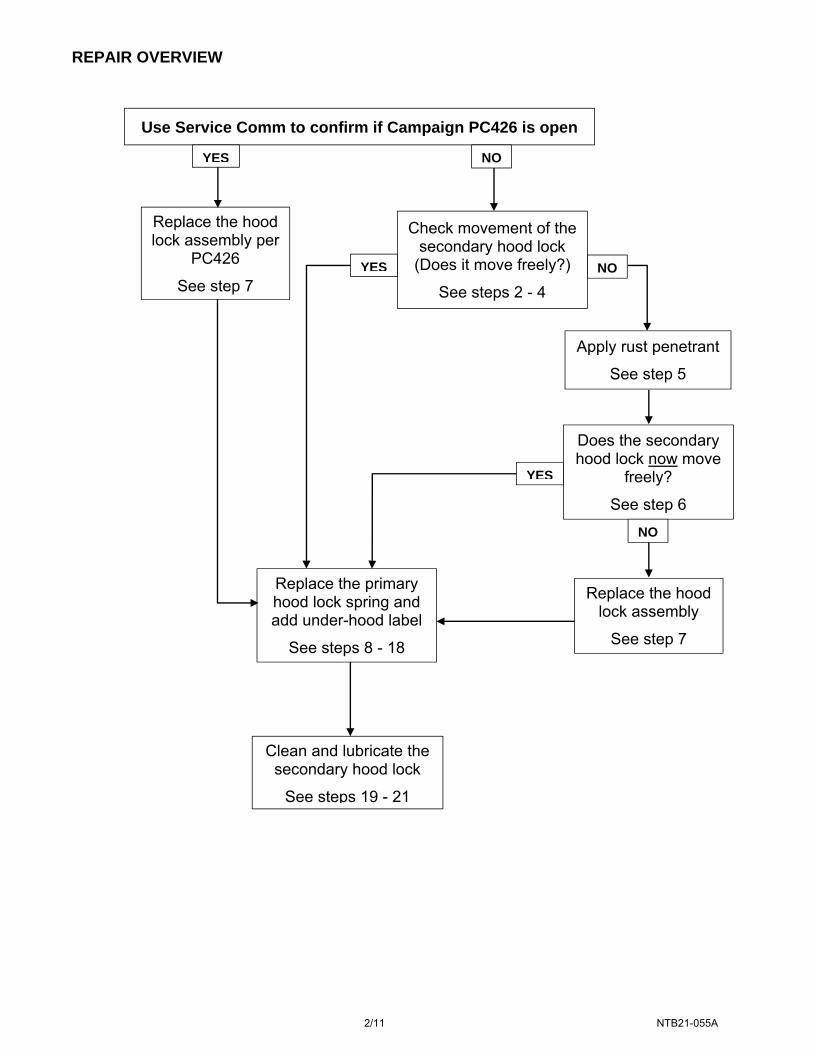
REPAIR OVERVIEW
Use Service Comm to confirm if Campaign PC426 is open
YES
NO
Check movement of the secondary hood lock
(Does it move freely?)
See steps 2 - 4
Apply rust penetrant
See step 5
Does the secondary hood lock now move
freely?
See step 6
YES
YES
NO
NO
Replace the hood lock assembly per
PC426
See step 7
Replace the primary hood lock spring and add under-hood label
See steps 8 - 18
Clean and lubricate the secondary hood lock
See steps 19 - 21
Replace the hood lock assembly
See step 7
3/11 NTB21-055A
SERVICE PROCEDURE 1. Using Service Comm, verify if PC426 is open on the VIN.
If PC426 is open, skip to step 7 on page 5 to replace the hood lock assembly.
If PC426 is not open, proceed to step 2 to check for the secondary hood lock movement.
Check Secondary Hood Lock Movement
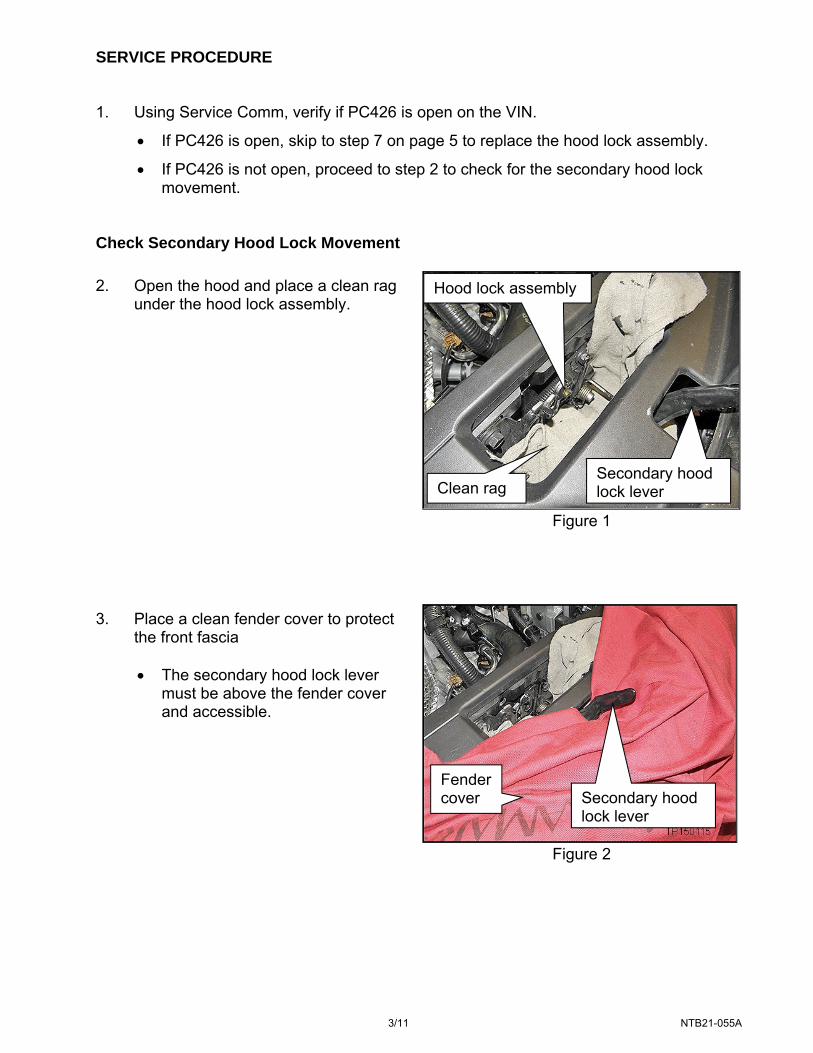
Figure 1
Figure 2
2. Open the hood and place a clean rag under the hood lock assembly.
3. Place a clean fender cover to protect the front fascia
The secondary hood lock lever
must be above the fender cover and accessible.
Clean rag Secondary hood lock lever
Fender cover Secondary hood
lock lever
Hood lock assembly

4/11 NTB21-055A
Figure 3
Figure 4
Figure 5
4. Move / cycle the secondary hood lock lever 5 times.
When the secondary hood lock lever is
released; does the lock move back to the fully closed position without sticking, as compared to a new lock?
Yes – skip to step 8 on page 5 to replace the primary hood lock spring.
No – proceed to step 5.
5. If the secondary lock did not move back to the fully closed position without sticking, apply aerosol rust penetrant to the secondary hood lock.
Use Nissan Rust Penetrant or equivalent.
Use a spray extension tube to help direct the application.
Apply to the pivot pin area and between the lock lever and the lock body.
6. Move / cycle the secondary hood lock lever 10-15 times.
When the secondary hood lock lever is
released; does the lock move back to the fully closed position without sticking, as compared to a new lock?
Yes – Remove fender cover and shop rag, and then skip to step 8 on page 5 to replace the primary hood lock spring.
No – Remove fender cover and shop rag, and then proceed to step 7 on page 5 to replace the hood lock assembly.
Secondary hood lock lever
Moves freely
Apply in this area
Moves freely
Secondary hood lock lever

5/11 NTB21-055A
Replace Hood Lock Assembly 7. Replace the hood lock assembly.
NOTE: Only replace the hood lock assembly if the secondary hood lock lever did not move freely after performing step 4 or step 6.
For hood lock assembly replacement, refer to the ESM section below.
o BODY EXTERIOR, DOORS, ROOF & VEHICLE SECURITY > DOOR & LOCK > REMOVAL AND INSTALLATION > HOOD > HOOD LOCK CONTROL > Removal and Installation
IMPORTANT: Replace the primary hood lock spring (steps 10 - 12) before fully installing the new hood lock assembly.
Replace the Primary Hood Lock Spring
Figure 6
Figure 7
8. Remove the radiator core support upper cover.
Remove the 10 clips that secure
the radiator core support upper cover (Figure 6).
9. If equipped with Remote Engine Start (RES), remove the air intake duct.
NOTE: If the vehicle is not equipped with RES, skip to step 10 on page 6.
Remove the 2 bolts securing the
air intake duct.

6/11 NTB21-055A
Figure 8
Figure 9
Figure 10
Disconnect the hood lock switch connector.
10. Position the hood lock as shown in Figure 9.
11. Remove the lower hood lock spring and discard, it will not be reused.
Pull the spring end shown in
Figure 10 out of the hood lock housing.
Remove the spring from the hood lock release lever.
Release lever
Hood lock housing
Remove this spring

7/11 NTB21-055A
Figure 11
13. Reinstall the hood lock assembly in reverse order of disassembly and hand tighten
the bolts. 14. Adjust the hood lock assembly by dropping the hood onto the lock assembly from an
approximate height of 200 mm (8 in) or by pressing down on the hood lightly using approximately 29 N-F (3.0 kg-f, 7 lb-f) of force.
Clearance A: 20±1 mm (0.8±0.04 in) Clearance B: 6.8 mm (0.27 in)
Figure 12
12. Install the new hood lock spring.
Place the new spring onto the release lever.
Pull the spring into place using a flat blade screwdriver.
Make sure the spring is seated correctly in the hole of the hood lock housing.
Release lever
Screwdriver Hood lock
housing hole
8/11 NTB21-055A
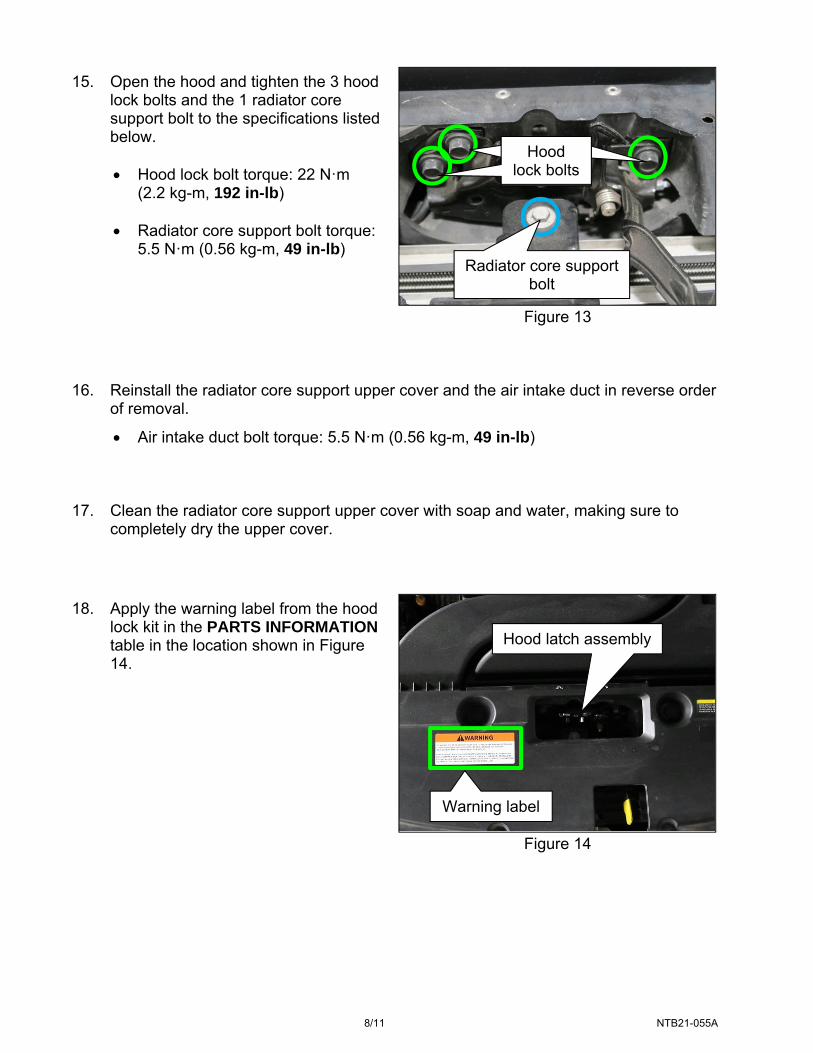
Figure 13
16. Reinstall the radiator core support upper cover and the air intake duct in reverse order
of removal.
Air intake duct bolt torque: 5.5 Nꞏm (0.56 kg-m, 49 in-lb) 17. Clean the radiator core support upper cover with soap and water, making sure to
completely dry the upper cover.
Figure 14
15. Open the hood and tighten the 3 hood lock bolts and the 1 radiator core support bolt to the specifications listed below.
Hood lock bolt torque: 22 Nꞏm
(2.2 kg-m, 192 in-lb)
Radiator core support bolt torque: 5.5 Nꞏm (0.56 kg-m, 49 in-lb)
18. Apply the warning label from the hood lock kit in the PARTS INFORMATION table in the location shown in Figure 14.
Hood latch assembly
Warning label
Hood lock bolts
Hood lock bolts
Hood lock bolts
Radiator core support bolt
9/11 NTB21-055A
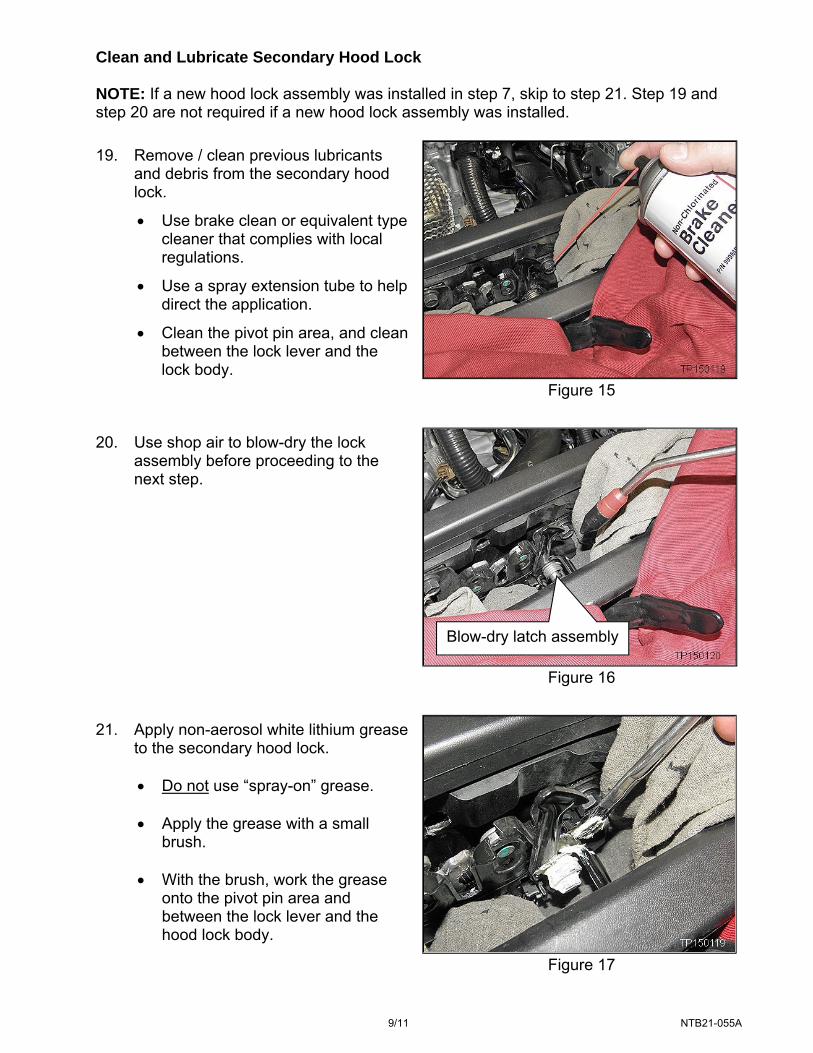
Clean and Lubricate Secondary Hood Lock NOTE: If a new hood lock assembly was installed in step 7, skip to step 21. Step 19 and step 20 are not required if a new hood lock assembly was installed.
Figure 15
Figure 16
Figure 17
19. Remove / clean previous lubricants and debris from the secondary hood lock.
Use brake clean or equivalent type cleaner that complies with local regulations.
Use a spray extension tube to help direct the application.
Clean the pivot pin area, and clean between the lock lever and the lock body.
20. Use shop air to blow-dry the lock assembly before proceeding to the next step.
21. Apply non-aerosol white lithium grease to the secondary hood lock.
Do not use “spray-on” grease. Apply the grease with a small
brush. With the brush, work the grease
onto the pivot pin area and between the lock lever and the hood lock body.
Blow-dry latch assembly
10/11 NTB21-055A
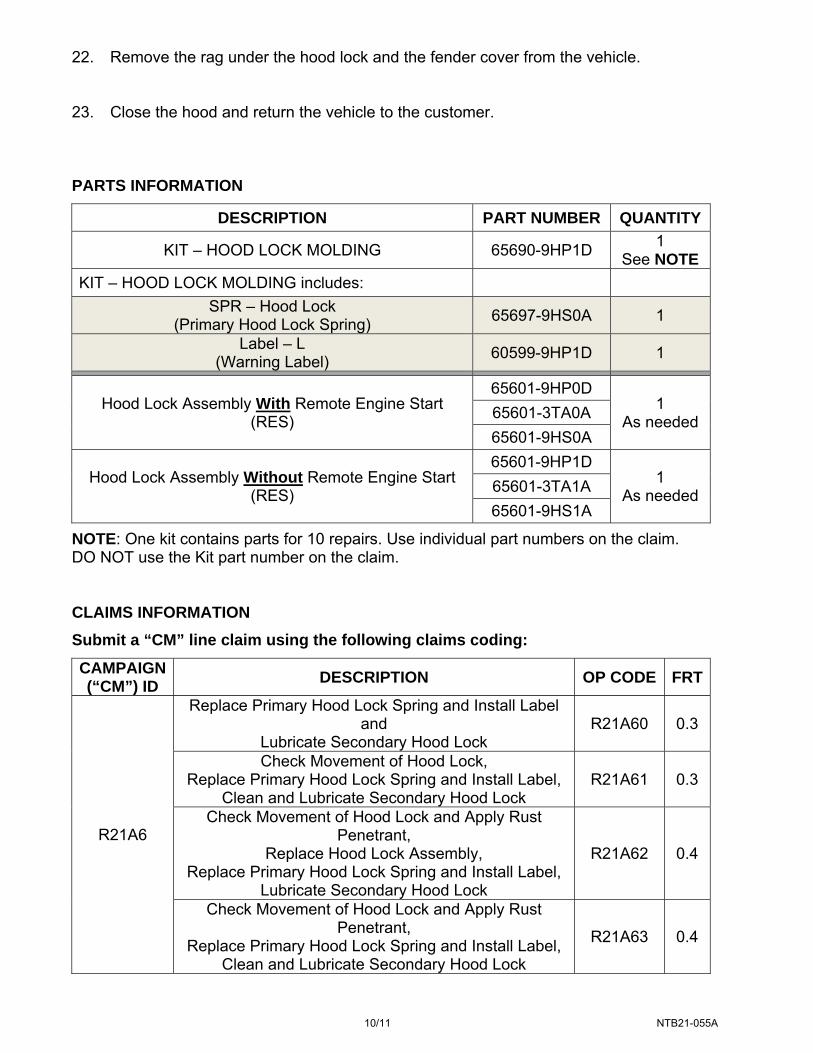
22. Remove the rag under the hood lock and the fender cover from the vehicle. 23. Close the hood and return the vehicle to the customer. PARTS INFORMATION
DESCRIPTION PART NUMBER QUANTITY
KIT – HOOD LOCK MOLDING 65690-9HP1D 1
See NOTE
KIT – HOOD LOCK MOLDING includes:
SPR – Hood Lock (Primary Hood Lock Spring)
65697-9HS0A 1
Label – L (Warning Label)
60599-9HP1D 1
Hood Lock Assembly With Remote Engine Start (RES)
65601-9HP0D 1
As needed 65601-3TA0A
65601-9HS0A
Hood Lock Assembly Without Remote Engine Start (RES)
65601-9HP1D 1
As needed 65601-3TA1A
65601-9HS1A
NOTE: One kit contains parts for 10 repairs. Use individual part numbers on the claim. DO NOT use the Kit part number on the claim. CLAIMS INFORMATION
Submit a “CM” line claim using the following claims coding:
CAMPAIGN (“CM”) ID
DESCRIPTION OP CODE FRT
R21A6
Replace Primary Hood Lock Spring and Install Label and
Lubricate Secondary Hood Lock R21A60 0.3
Check Movement of Hood Lock, Replace Primary Hood Lock Spring and Install Label,
Clean and Lubricate Secondary Hood Lock R21A61 0.3
Check Movement of Hood Lock and Apply Rust Penetrant,
Replace Hood Lock Assembly, Replace Primary Hood Lock Spring and Install Label,
Lubricate Secondary Hood Lock
R21A62 0.4
Check Movement of Hood Lock and Apply Rust Penetrant,
Replace Primary Hood Lock Spring and Install Label, Clean and Lubricate Secondary Hood Lock
R21A63 0.4
11/11 NTB21-055A
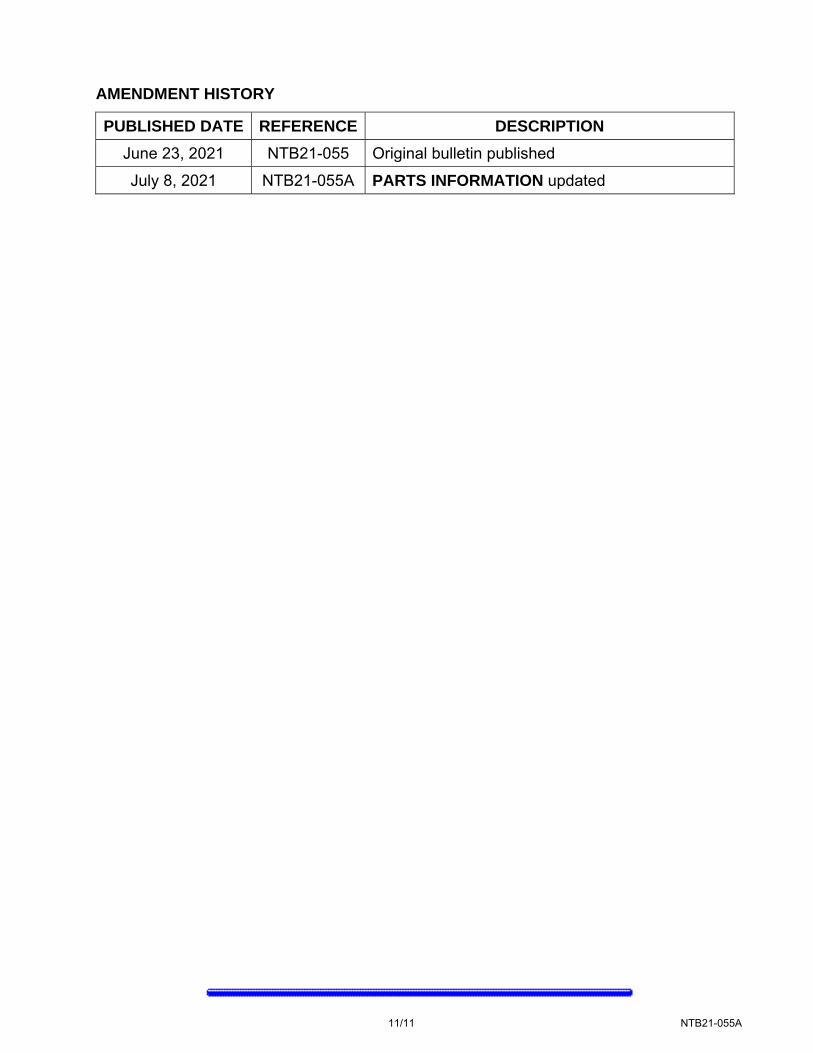
AMENDMENT HISTORY
PUBLISHED DATE REFERENCE DESCRIPTION
June 23, 2021 NTB21-055 Original bulletin published
July 8, 2021 NTB21-055A PARTS INFORMATION updated


