
RN SKILLS DAY STUDY PACKET 2018
REQUIRED READING
1. Policy #12048: Pressure Ulcer Risk Assessment, Prevention, Staging, and Treatment
2. Policy # 14355: Restraint and Seclusion
3. Policy # 12055: Tracheostomy Tubes-One-way Valve and Cap Assessment
Also see attached Referenced Document: Performance Criteria Plugging
4. Policy # 11945: Code Blue/White- Response & Interventions
5. Policy # 23384: Musculoskeletal Injury Prevention Program
6. Policy # 23614: Review Safe Patient Handling Guidelines

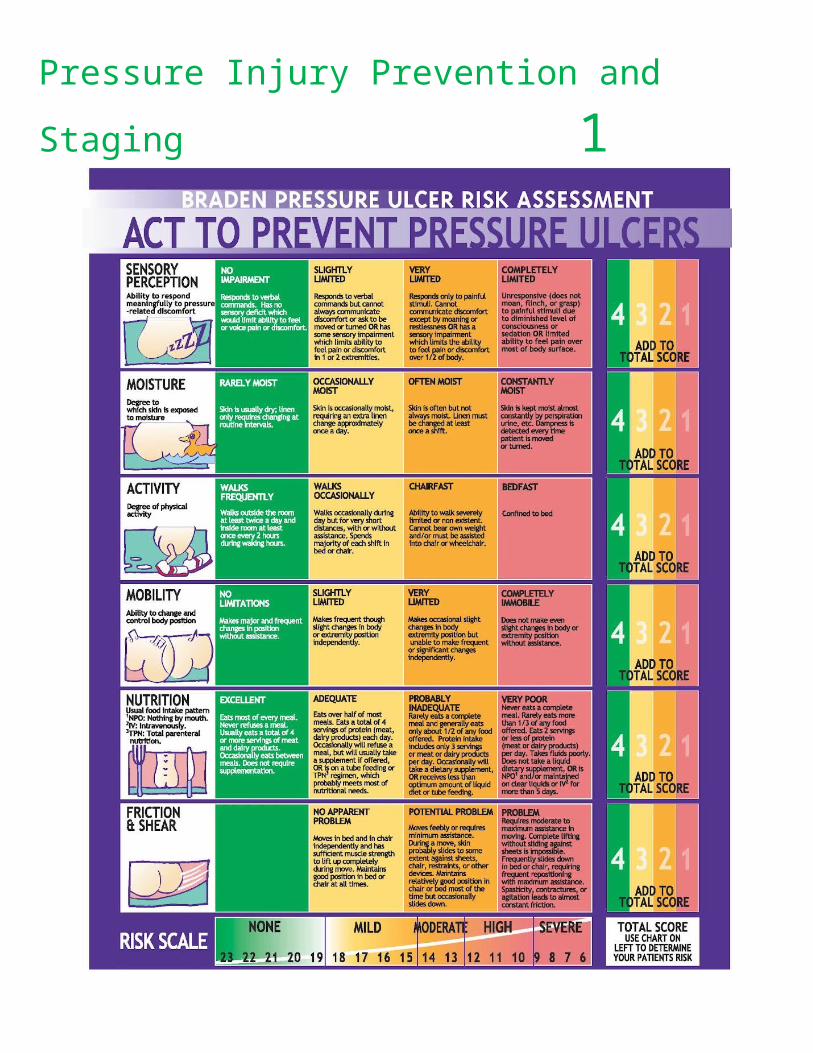
Pressure Injury Prevention and Staging 1There are 6 classic locations, but can be located over any bony prominence or under any medical device
• Sacral/coccygeal area (most common)
• Greater trochanter (most severe)
• Ischial tuberosity• Heel• Lateral malleolus• Elbows
*Pressure injuries can develop within 2-6 hours

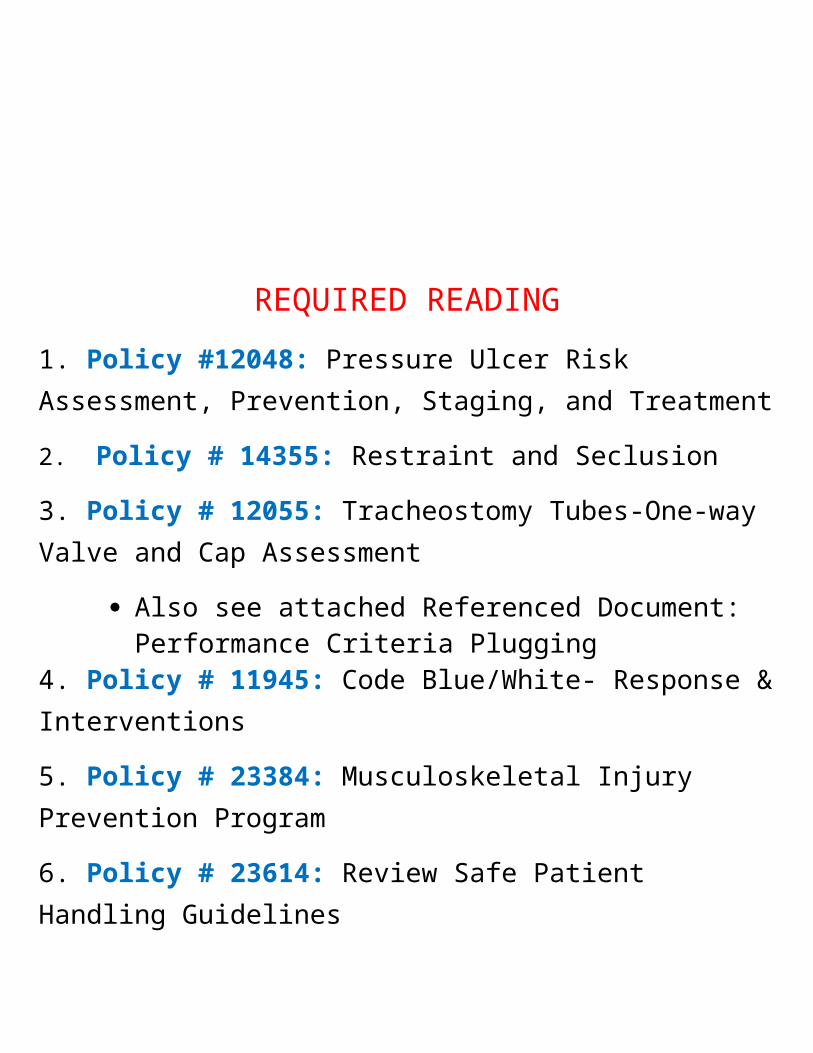
Pressure Injury Prevention and Staging 1PRESSURE INJURY RISK ASSESSMENT TOOL

Pressure Injury Prevention and Staging 1
HOW DO WE PREVENT PRESSURE INJURIES?
• Pressure Redistributions surfaces
– Specialty Beds– Mattresses and
Overlays– Cushions
• Offloading– Heel pressure relieving
boots• Repositioning
– Pillows– Wedges
• Prevention Dressing– Kerrafoam
Pressure Injury Prevention and Staging 1

Restraints 2A quick-release knot allows you to quickly release the knot using one hand if the patient is in distress or has an emergency. Follow the steps below to tie a quick-release knot.
Wrap the attachment strap once around the bed frame (not the side rail) leaving at least an 8″ tail.Fold the loose end in half to create a loop (as shown).
Cross the loop over the other end of the tie (as shown).
Insert the folded strap where the straps cross over each other. This step will feel like when you're tying your shoes.
Pull on the loop to tighten the strap
Please Review the following resources:1). Policy # 14355: Restraint and Seclusion
2). Watch videos located on the Education and Staff Development website
OR go to:
3). CMC Forum→ Virtual Library→ Nursing Resource Center Plus→ Restraints, Physical: Applying in Older Adults
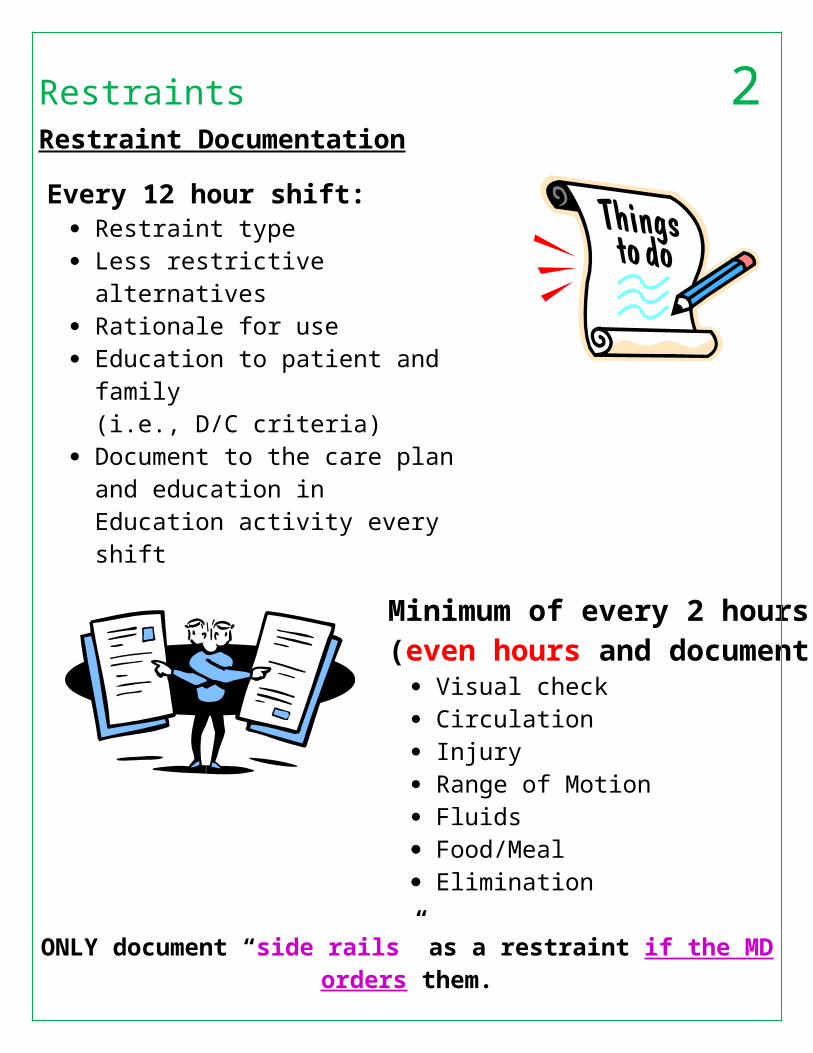
Restraints 2Restraint Documentation
Every 12 hour shift: Restraint type Less restrictive alternatives Rationale for use Education to patient and family
(i.e., D/C criteria) Document to the care plan and
education in Education activity every shift
Minimum of every 2 hours(even hours and document all):
Visual check Circulation Injury Range of Motion Fluids Food/Meal Elimination
ONLY document “side rails” as a restraint if the MD orders them. Review the restraints flow sheet as part of your Hand-Off
DC the order per protocol and resolve the care plan when restraints are discontinued

Chest Tube Care 3Please Review the following resources:1). Education and Staff Development website- Chest Tubes
2). CMC Forum→ Virtual Library→ Nursing Resource Center Plus→ Chest Tubes: Monitoring, Care, and Dressing Changes (pictures and videos included)
Purpose of Chest Tubes: a tube inserted into the pleural space of the lungs to remove air or fluid and to help the lung re-expand OR it is a tube placed in the mediastinum space to help drain blood or fluid from around the heart after cardiac surgery.
Mediastinal chest tubes are usually placed after cardiac surgery to help drain blood from the pericardial space (placed under the sternum) which prevents fluid from compressing the heart which can lead to cardiac tamponade.
Pleural space: a small space that surrounds the lungs that contains a small amount of serous fluid. This small space is surrounded by the parietal and visceral pleurae. These two layers glide over each other which creates a negative pressure. Therefore, if air or extra fluid enters into the pleural space the lungs are severely affected and can collapse.
Reasons for a chest tube:
Cardiovascular surgery Pneumothorax: air enters into the pleural space and causes the lung to collapse (trauma to the
chest or spontaneous) Pleural Effusion: fluid in the pleural space
o Types of Pleural Effusions:

Chest Tube Care 3 Hemothorax : blood enters in the pleural space and causes lung to collapse (trauma to
the chest, disease TB, blood clotting issue) Empyema (infection in the pleural space) Chylothorax (lymphatic fluid in pleural space),
Type of Chest Tubes Drainage Systems
Wet Suction (water seal suction) or Dry Suction
Wet: suction regulated by the height of water in the suction control chamber when connected to wall suction…some have stop-cocks to help regulate to amount of bubbling (you will hear bubbling while it’s working….water evaporates overtime so you will have to re-add it)…physician determines the suction level (usually -20cmH2O).
Dry Suction: This chest drainage system has no water column to control suction but uses a suction monitor bellow (looks like an orange accordion) that balances the wall suction and you can adjust water suction pressure using the rotary suction dial on the side of the system. It allows for higher suction pressure levels, has no bubbling sounds, and water does not evaporate from it as with other systems.
Nursing Management of a Chest Tube:
Drainage system itself: keep system below patient’s chest
Tubing: Keep it free from kinks and make sure it is draining freely (not clots or stagnate fluid) and that all connections are sealed
Drainage Collection Chamber: Monitor drainage (color, amount…..should drain no more than 100 cc/hr and record routinely)
Water Seal Chamber: performs an underwater seal on the tube to allow air to be removed from pleural space while preventing outside air from entering lungs
Water in the water seal chamber fluctuates as the patient breathes in and out. If the patient is breathing on their own the water will increase during inspiration and decrease during expiration (it will be the opposite if the patient is on positive pressure mechanical ventilation). There may be intermittent bubbling, which is expected as air is drained from the pleural space, especially for treatment of a pneumothorax. Remember that a pneumothorax is an AIR leak between the lung and chest wall….therefore air can escape into the water seal chamber causing intermittent bubbles. o What if it doesn’t fluctuate at all? The lung could have re-expanded or there is a kink
somewhere.o Excessive bubbling? There is an air leak somewhere.
Suction Control Chamber:
Dry: suction controlled by a dial on the side and is regulated by suction monitor bellow (orange accordion). There is no water column.
Chest Tube Care 3Wet: remember watch the amount of water because it evaporates over time and it should gently bubble due to the suction working.
*Water in the water seal and suction control can evaporate over time so watch the water and add as needed.
Patient Assessment: Note lung sounds, rate, any dyspnea? Worsening pneumothorax or hemothorax
Note skin around insertion site for any subcutaneous crepitus (crackling sensation felt on palpitation) that is due to carbon dioxide escaping into the tissues.
Keep patient moving by turning frequently, coughing, and deep breathing…helps move fluid and improve lung function
Mishaps with a Chest Tube and What to Do?
What to do if chest tube becomes dislodged? Cover the site with a sterile dressing, and tape on three sides (this allows air to escape and prevent tension pneumothorax) and notify physician immediately.
Milking or stripping tubing? Not recommended anymore because it creates too much negative pressure (always follow hospital policies)
Clamping tubing? Increase risk of patient developing a tension pneumothorax. Never do it without an order and follow hospital policies.
Chest tube NCLEX Review (2017). In RegisteredNurseRN.com. Retrieved from http://www.registerednursern.com/chest-tubes-nclex-review/

Tracheostomy Plugging and Suctioning 4Please review Policy # 12055 Tracheostomy Tubes-One-way Valve and Cap Assessment and review the attached referenced document: Performance Criteria Plugging. Watch Videos regarding Trach Plugging and Trach Suctioning found on the Education and Staff Development website under Trach Care.
Tracheostomy Plugging HighlightsHow does a one-way valve and a cap work?
a. OWV – Pt. breathes in through the trach and out through the upper airway.b. Cap – Pt. breathes in and out through the upper airway.
Evaluate secretion status (increased secretions may delay procedure)
Discuss O2 status – what type will be on pt. when valve in place
Describe type of trach in place
c. Cuffed – will have pilot balloond. Cuffless – no balloon on trach flange
Validate equipment at bedside:
e. Oxygen source, manual resuscitation Bag and Mask, inner-cannula (same size as tracheostomy tube), pulse oximeter, call light, suction equipment, suction device, extra trach same size as the one in place, obturator
Once airway clear, if cuffed trach, deflate pilot balloon COMPLETELY and ensure there is no air left in the balloon
Placing the One-Way Valve
1. Place valve on trach2. Observe for S/S of obstruction or distress3. Have pt. say, “Ahhhhh”4. O2 as ordered and pulse ox in place
Placing a Cap on the Trach
1. Ensure clear airway – suction if needed2. Ensure cleanliness of cap3. Remove inner-cannula from trach
a. Ensure 2nd inner-cannula at bedside for manual ventilation (can’t bag without it) 4. Place cap on trach5. Observe for S/S of obstruction or distress – 6. Have pt. say, “Ahhhh”7. O2 as ordered and pulse ox in place
ALERT – A CAP may only be placed on a trach tube that does NOT have a cuff. A cuffed trach that has a CAP placed with the cuff inflated will completely occlude the pt’s airway
Leaving the Patient

Tracheostomy Plugging and Suctioning 41. Once OWV or CAP are in place, reassess your patient for any S/S obstruction or distress2. Ensure monitoring/Equipment is at bedside3. O2 devices you would use if you needed to administer supplemental O2 – NC or FM4. Document your airway assessment Every 2 Hours
a. Q 2 H – remove OWV or CAP – remember you can’t hear secretions with valve in place.b. Have pt. cough or suction if secretions presentc. Assess breath sounds
Key Points to Remember
1. RN to perform airway check Q2 hours and document2. RCP to perform airway check Q4 hours and document
ANYONE CAN REMOVE A VALVE OR CAP IF A PATIENT IS IN DISTRESS!!!

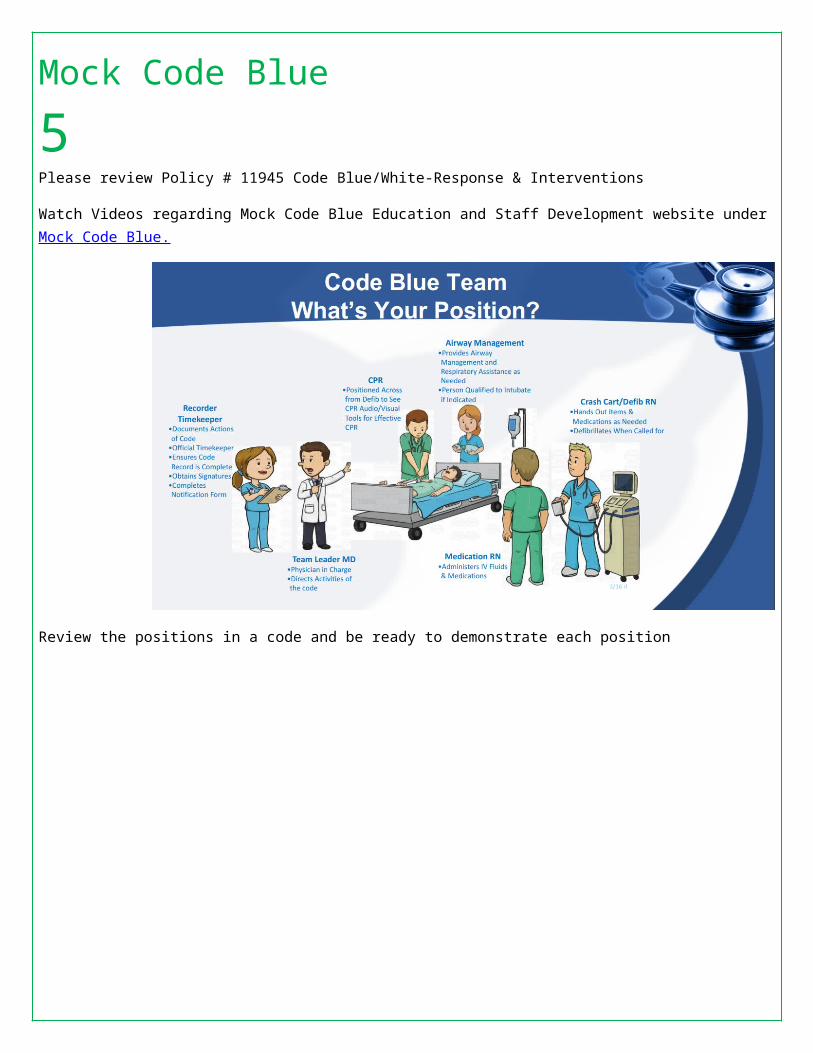
Mock Code Blue 5Please review Policy # 11945 Code Blue/White-Response & Interventions
Watch Videos regarding Mock Code Blue Education and Staff Development website under Mock Code Blue.
Review the positions in a code and be ready to demonstrate each position

Safe Patient Handling 6Safe Patient Handling Training
Basic Manual Transfer
Main Points of Emphasis:
Remember to let the patient do it They will need encouragement to do it themselves They will need time to do it themselves Not for patients who cannot bear weight Do not lift patient Only patients who can partially or fully bear weight. (BMAT - Level 3 and above)
Transferring a patient to a chair
Patient must first scoot forward Must lean forward (reach near arm across to chair) Caregiver is next to patient (not in front) Cue patient to lean forward and lift up own body, then pivot to chair Do not assist (guide) Do not lift (cue to lean forward) Give patient time
Learner is to demonstrate the above. Learner must cue appropriately and must not lift.
Skills Station - Mechanical Lift
Main Points of Emphasis:
Use a lift for any patient who cannot bear their own weight Full body sling lifts are for patients with no ability to bear weight, or who are unpredictable or uncooperative. BMAT
Level 1, 2 Use stand assist aid for patients with partial ability to bear weight, BMAT levels 2,3 Use full body sling lift for any patient who is on the floor and cannot get up themselves (with guidance) Refer to manufactures guidelines for techniques on specific equipment
Full Body Sling Lift:
Sling placemento Roll patient onto their sideo Roll patient onto their sideo Place sling under the patient’s back and buttocks - fully cover the shoulders and heado Roll patient to opposite side to ensure full coverage of sling and proper positioningo Slide your hands under the patient, smoothing out all wrinkleso Roll patient onto their backo If patient already seated, use behind the back method for placement
Position lift

Safe Patient Handling 6o Position the legs of the lift perpendicular to the patiento Set the lift’s adjustable base to its widest position to ensure optimal stabilityo Move the lift so that its arm is directly over the patiento Connect the straps to the side arms of the lift
Transfer Patiento Instruct the patient to place their arms across their chesto Press the “up” button to unweight patient from the bed/surfaceo Momentarily suspend the patient above the surface to ensure sling supporto Tilt the patient into a comfortable positiono Move the patient steadily until they are positioned above the transfer surfaceo Press the “down” button to lower the patient onto the transfer surfaceo Unhook the straps of the sling but leave sling in placeo Move the lift away from the patiento Monitor patient to ensure tolerance to new position
Skills Station - Patient Repositioning and Lateral Transfers with HoverMatt
Main Points of Emphasis: Remember to let the patient do it They will need encouragement to do it themselves They will need time to do it themselves Use sufficient Caregivers Use equipment when necessary
HoverMatt Use at least 2 caregivers (one on each side) Patient in horizontal position Use proper roll technique to place HoverMatt under patient. Attach safety straps Attach hose and snap in place Position transfer surfaces close as possible and lock brakes. Turn on pump Grasp handles and pull patient on an angle (feet or head first) until in desired position Turn off pump, remove HoverMatt using roll technique

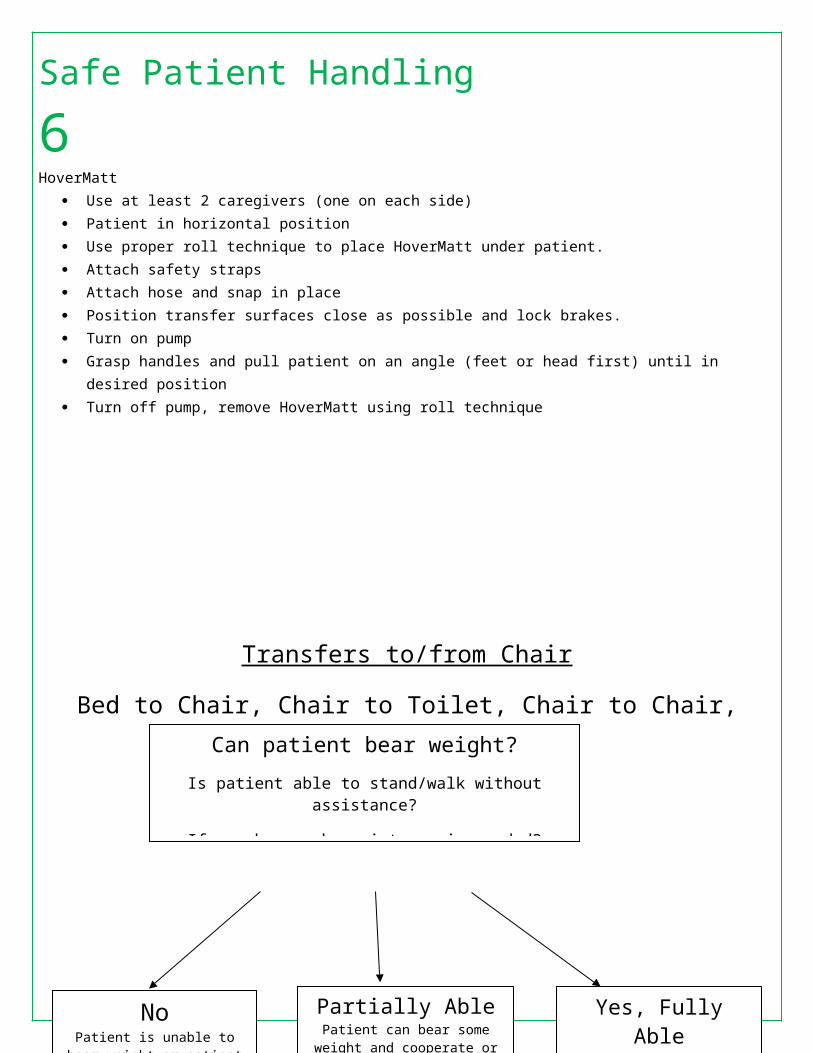
Safe Patient Handling 6Transfers to/from Chair
Bed to Chair, Chair to Toilet, Chair to Chair, Chair to Exam Table
Can patient bear weight?
Is patient able to stand/walk without assistance?
If no, how much assistance is needed?
NoPatient is unable to bear weight
or patient is unpredictable or uncooperative
Partially AblePatient can bear some weight and
cooperate or assist
Yes, Fully AblePatient performs task safely, without assistance. Patient requires no more help than standby, cueing, or coaching
Caregiver stand by for safety or assistance as neededStand-and-pivot technique
with or without gait/transfer belt or stand
assist lift
Use mechanical lift appropriate for patient’s weight per manufactures
guidelines
When equipment is used to assist with patient transfers, follow manufacturer’s guidelines for the number of caregivers required to operate equipment safely.
When no assistive devices are used, as a guideline, divide the patient’s weight in pounds by 50 or weight or in kilograms by 23 to determine the number of caregivers needed to move the patient.
If the patient is unpredictable or uncooperative add a caregiver. If the patient is cooperative and can bear greater than 50% of his
weight subtract a caregiver for every 50 pounds or 23 kilograms that represents.

Safe Patient Handling 6Patient Repositioning
Side-to-Side, Up in Bed
Can patient assist?
No Partially able
Yes, fully able
Use Draw sheet or Trendelenburg position (if tolerated) Number of staff needed to assist depends on how much weight is born by the patient and the assistive device.
Assistance not needed.
90 kg – 160 kg (200-350 lbs)
= 2 - 3 caregivers
Less than 90 kg (200 lbs)
= minimum 2 caregivers
Greater than 160 kg (350 lbs)
Minimum 3 caregivers and/or use full-body sling, with mechanical lift for patient repositioning tasks
REMEMBER: Maintain patient body alignment and secure all lines drains and artificial airways before during and after transfer.
Safe Patient Handling 6Lateral Transfer
To and From: Bed to Stretcher
Can patient assist with transfer?
No Yes, fully able to assist
Stand by for safety minimum of 2
caregivers
Use slide board or draw sheet
and minimum 2 caregivers
Slider board or draw sheet with minimum of 2 caregivers or mechanical lift or air assisted lift with a minimum of 2
Patient weight greater than
90 kg (200lbs)
Patient weight less than
90 kg (200lbs)
Partially able
Patient weight greater than
90 kg (200lbs)
Slider board or draw sheet with minimum of 3 caregivers or mechanical lift or air assisted lift with a minimum of 2
REMEMBER: Maintain patient body alignment and secure all lines drains and artificial airways before during and after transfer.

Safe Patient Handling 6
EQUIPMENT & ASSISTIVE DEVICE OPTIONS FOR MOBILITY INTERVENTIONS & FALL PREVENTIONMOBILITY LEVEL 1
B.M.A.T. – BEDSIDE MOBILITY ASSESSMENT TOOL FOR NURSESPRE-MOBILITY SCREEN MOBILITY LEVEL 0
Identify patients that are not stable enough for mobility outside of the bed. If patient has any of these conditions, they are not stable for mobility outside of the bed & DO NOT proceed with mobility assessment.
▪ Unstable spinal cord injury ▪ FIO2 > 60 or PEEP > 10▪ Unstable fractures ▪ Open chest or abdomen▪ Elevated ICP ▪ Sever agitation uncontrolled by meds▪ Active Bleeding ▪ Comfort care or impending withdrawal of care▪ SBP < 90 and/or MAP < 55▪ Dysrhythmia requiring new anti-dysrhythmia meds in last 6 hrs
▪ Vasoactive meds titrated up within the last 2-4 hrs in a non-ICU setting▪ MEWS 4 or greater in a non-ICU setting
PASS: Patient does not have any identified conditions preventing mobility. Passed Pre-Mobility Screen = Proceed with BMAT assessment.
FAIL: Patient has an unstable condition. Patient is MOBILITY LEVEL 0Suggested Activities for Level 0 ▪ Repositioning every 2 hrs at a minimum ▪ Consider CLRT ▪ Active/Passive ROM twice a shift Tools/Equipment ▪ Use total lift with sling and/or repositioning sheet and/or straps ▪ Use lateral transfer devices such as roll board, friction reducing (slide sheets/tube), or air assisted device ▪ Wedge or pillows to hold patient position
Consult with Physical Therapist when needed & appropriate.Assessment Level 1: Cognition / Trunk Strength / Seated Balance MOBILITY LEVEL 1
Sit & Shake: From a semi-reclined position, ask patient to sit upright & rotate* to a seated position at the side of the bed; may use bedrail. Note patient’s ability to maintain bedside position. Ask patient to reach out & grab your hand & shake making sure patient reaches across his/her midline. *If needed, use slider sheet/tube sheet to make it easier for patient to rotate to side of bed; then complete assessment.Note: If patient has ‘strict bed rest’ or bilateral ‘non-weight bearing’ restrictions, DO NOT proceed with the assessment.
PASS: Patient able to complete task. Passed Assessment Level 1 = Proceed with Assessment Level 2.
FAIL: Patient unable to complete task. Patient is MOBILITY LEVEL 1Suggested Activities for Level 1 ▪ Sitting position in bed – 20 min 3x day ▪ Out of bed in Stretcher Chair – 1 hr 2x day ▪ Repositioning every 2 hrs when in bed Progress activity daily in time/frequency as tolerated.Tools/Equipment ▪ Use total lift with sling and/or repositioning sheet and/or straps ▪ Stretcher Chair ▪ Use lateral transfer devices such as roll board, friction reducing (slide sheets/tube), or air assisted deviceConsult with Physical Therapist when needed & appropriate.
Assessment Level 2: Lower Extremity Strength / Stability MOBILITY LEVEL 2Stretch & Point: With patient in seated position at the side of the bed, have patient place both feet on the floor (or stool) with knees no higher than hips. DO NOT attempt to raise the knee if s/p hip replacement; follow hip precautions. Ask patient to stretch one leg & straighten the knee, then bend the ankle/flex & point the toes. If appropriate, repeat with the other leg. May test only one leg & proceed accordingly (e.g., stroke patient, patient with ankle in a cast).
PASS: Patient able to complete task. Passed Assessment Level 2 = Proceed with Assessment Level 3.
FAIL: Patient unable to complete task. Patient is MOBILITY LEVEL 2Suggested Activities for Level 2 ▪ Sit at side of bed for meals ▪ Sit in chair at bedside using a lift device or Stretcher Chair – 1-2 hrs 3x day Progress activity daily in time/frequency as tolerated.Tools/Equipment ▪ Use total lift for patient unable to weight-bear o at least one leg ▪ Stretcher Chair ▪ Use sit-to-stand lift for patient who can weight-bear on at least one leg Consult with Physical Therapist when needed & appropriate.
Assessment Level 3: Lower Extremity Strength for Standing MOBILITY LEVEL 3
Stand: Ask patient to elevate off the bed or chair (seated or standing) using an assistive device (cane, bedrail). Patient should be able to raise buttocks off bed & hold for a count of five. May repeat once. May test with weight-bearing on only one leg & proceed accordingly (e.g., stroke patient, patient with ankle in cast). If any assistive device (cane, walker, crutches) is needed, patient is MOBILITY LEVEL 3.
PASS: Patient able to complete task. Passed Assessment Level 3 = Proceed with Assessment Level 4.
FAIL: Patient unable to complete task. Patient is MOBILITY LEVEL 3Note: Patient passes Assessment Level 3 but requires assistive device to ambulate; standby & set-up assistance required for ambulation; patient is MOBILITY LEVEL 3.Suggested Activities for Level 3 ▪ Stand at bedside with assistive device ▪ Walk in place at bedside ▪ Ambulate with assistive devices ▪ Up to bedside chair minimum 3x day Progress activity daily in time/frequency as tolerated.Tools/Equipment
▪ Use non-powered raising/stand aid; default to powered sit-to-stand lift if no stand aid available▪ Use total lift with ambulation accessories ▪ Use assistive device (cane, walker, crutches)
May use gait belt to help steady & guide movement NOT to lift patient.Consult with Physical Therapist when needed & appropriate.
Assessment Level 4: Standing Balance / Gait MOBILITY LEVEL 3Walk: Ask patient to march in place at bedside. Then ask patient to advance step & return each foot. Note: There are ortho & neuro conditions that may render a patient unable to step backward; use your best clinical judgement.
FAIL: Patient unable to complete task or shows signs of unsteady gait. Patient is refereed back to MOBILITY LEVEL 3. Patient is MOBILITY LEVEL 3.
PASS: Patient able to complete task. Patient exhibits steady gait & good balance while marching & when stepping forwards & backwards. Patient can maneuver necessary turns for in-room mobility.
MOBILITY LEVEL 4Passed – No assistance needed to ambulate; use your best clinical judgment to determine need for supervision during ambulation.

Safe Patient Handling 6
MOBILITY LEVEL 1
HoverMatt - 1000 Pounds Arjo Lift
Liko Golvo Lift EZ Lift Liko Viking Lift
HoverMatt - 1000 Pounds Liko Golvo Lift EZ Lift Liko Viking Lift Stretcher Chair Arjo Lift
MOBILITY LEVEL 2
HoverMatt - 1000 Pounds Liko Golvo Lift EZ Lift Liko Viking Lift Stretcher Chair orBedside Chair
Arjo Lift
EZ Stand
MOBILITY LEVEL 3
ArjoHuntleigh Standing & Raising Aid
No equipment required.Staff may use any level 3 equipment for safety as needed.
Walker Canes Crutches Rollator
Central Line Maintenance 7
1. HAND HYGIENE !! Prior to accessing or manipulating the central line
2. Proper access techniquesIf Curos (port protectors) are not in use, scrub the hub for 10-15 seconds prior to accessing a line
3. Remove lines in a timely mannerIndications for continued use:
Hemodynamic monitoring and/or pacer insertion
Long term antibiotic or antiviral use Vasopressor or other caustic drug
Rapid or emergent fluid resuscitation Lack of venous access Hemodialysis Parenteral nutrition
CENTRAL LINE MAINTENANCECENTRAL LINE MAINTENANCE BUNDLEBUNDLE

Central Line Maintenance 74. Catheter care
Assess for signs and symptoms of infection every shift Secured properly Biopatch present and positioned correctlyDressing labeled and current Change dressing every 7 days and as neededFlushed and blood return noted every shiftIf no blood return, contact physician for order of Alteplase
5. IV tubing maintenance and careLabeled and current Curos on every port


