DRAFT DRAFT DRAFT
WebSphere Portal Server: Step By Step www.WebSphereMentor.com
UNDER REVIEW USE AT YOUR OWN RISK
Author: Rama Turaga Page 1 Courtesy to: Owen Cline
Chapter 4
WebSphere Portal Server V6: User Registry Transfer
to LDAP Server
Introduction
In Chapter 3 of this series you saw how the portal configuration data can be transferred
from the Cloudscape database to the DB2 database (Phase-1). But, you still need to
perform Phase-2 (migrating the user registry to an LDAP server) since the user registry is
still stored in the wmm schema in the Cloudscape database. In production environments,
this user registry is usually maintained in a production quality LDAP server like ITDS
(IBM Tivoli Directory Server).
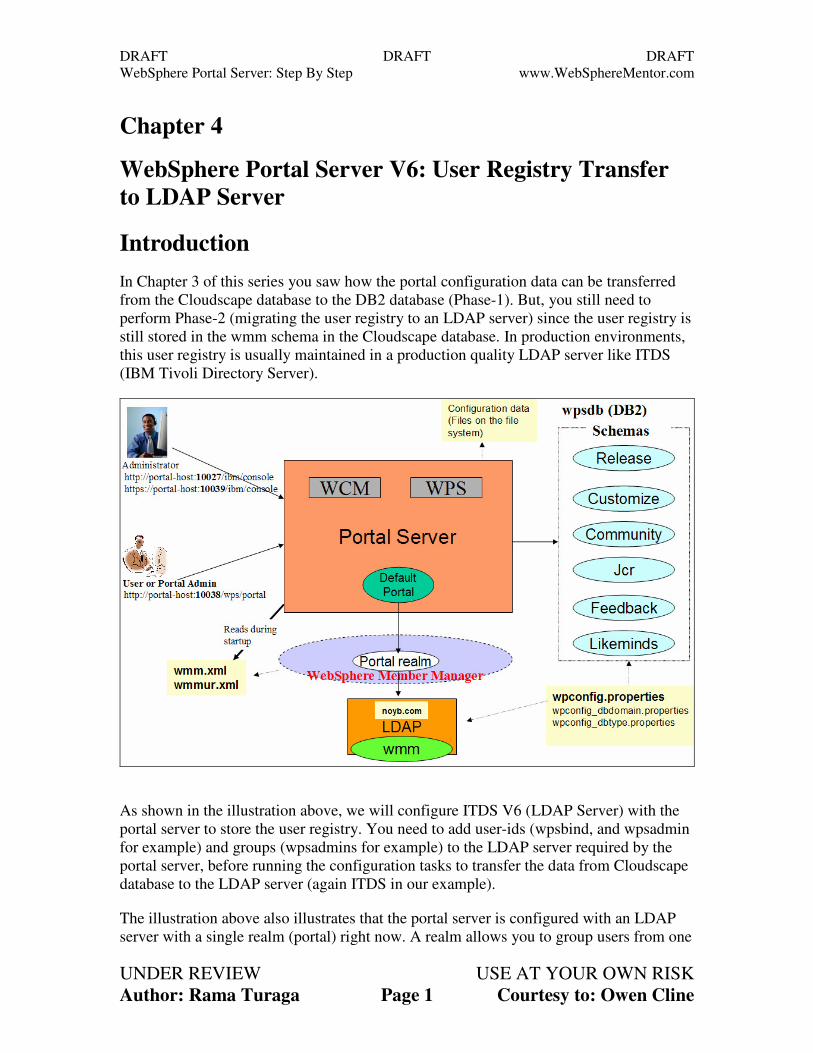
As shown in the illustration above, we will configure ITDS V6 (LDAP Server) with the
portal server to store the user registry. You need to add user-ids (wpsbind, and wpsadmin
for example) and groups (wpsadmins for example) to the LDAP server required by the
portal server, before running the configuration tasks to transfer the data from Cloudscape
database to the LDAP server (again ITDS in our example).
The illustration above also illustrates that the portal server is configured with an LDAP
server with a single realm (portal) right now. A realm allows you to group users from one
DRAFT DRAFT DRAFT
WebSphere Portal Server: Step By Step www.WebSphereMentor.com
UNDER REVIEW USE AT YOUR OWN RISK
Author: Rama Turaga Page 2 Courtesy to: Owen Cline
or more LDAP trees and from one or more LDAP servers. We have one LDAP tree
(noyb.com in our example) right now under the portal realm. When the portal server
starts up, the portal server looks for users under the noyb.com tree in the LDAP server
and authenticates users under that tree. Even though you are using a single LDAP tree
right now, it is a good idea to configure the portal server with realm support as you may
extend your portal configuration with multiple realms (or multiple LDAP trees under a
realm) later on.
When the portal server is configure with an LDAP Server with realm support, the portal
server will access the LDAP server through a component called the WebSphere Member
Manager (WMM). The WMM will act as an intermediary between the WebSphere
Application Server (remember portal server runs on WAS) and the users registries. In this
way, WMM will make user registries appear as a single logical entity to WAS even
though multiple user registries have been configured for use with the portal server.
You can also configure the portal server without realm support when you don’t anticipate
realm support in the future. In this configuration, your portal server is configured directly
with an LDAP tree and WAS will not use the WMM component since it will be
configured to directly access the LDAP server.
When you configure the portal server with the LDAP server, you will be working with
the wpconfig.properties file in the <WPV6-ROOT>\config directory. The user registry
migration task will update two XML based property files (wmm.xml and wmmur.xml
files under <WPV6-ROOT>\wmm directory) with the information about the LDAP
server and suffixes that the portal server will use to locate users and groups. After the
LDAP migration task is successful, the portal server will read these two wmm XML files
(wmm.xml and wmmur.xml) during its startup.
You will be configuring the portal server with an LDAP server with realm support in this
sample configuration.
Cloudscape to LDAP Server Migration (Phase-2)
Prepare your system
Step 1: Make sure that you followed the instructions provided under the same
section in Chapter-1 of this series, before you start with the migration task.
Disable Security
Before we migrate the user registry data in wmm from the Cloudscape database to the
ITDS Server, we need to disable security on the portal server. This can be achieved by
modifying the wpconfig.properties file and running a configuration task (disable-
security) using the WPSconfig.bat script.
DRAFT DRAFT DRAFT
WebSphere Portal Server: Step By Step www.WebSphereMentor.com
UNDER REVIEW USE AT YOUR OWN RISK
Author: Rama Turaga Page 3 Courtesy to: Owen Cline
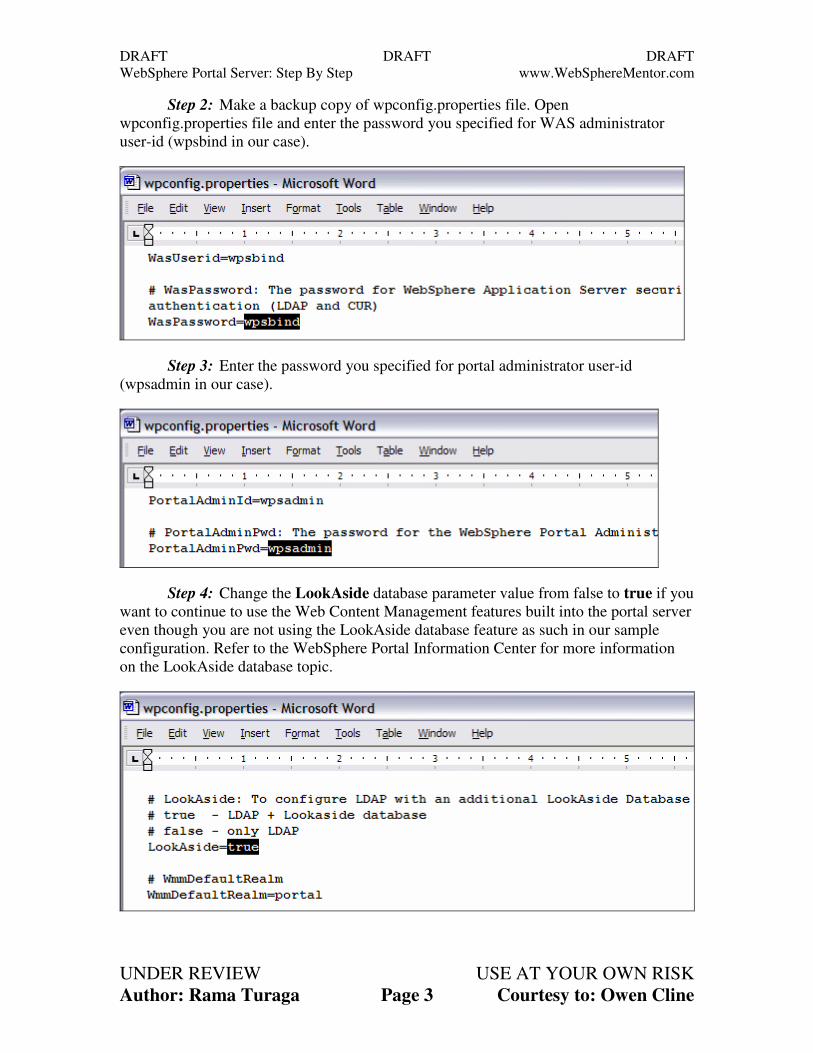
Step 2: Make a backup copy of wpconfig.properties file. Open
wpconfig.properties file and enter the password you specified for WAS administrator
user-id (wpsbind in our case).
Step 3: Enter the password you specified for portal administrator user-id
(wpsadmin in our case).
Step 4: Change the LookAside database parameter value from false to true if you
want to continue to use the Web Content Management features built into the portal server
even though you are not using the LookAside database feature as such in our sample
configuration. Refer to the WebSphere Portal Information Center for more information
on the LookAside database topic.
DRAFT DRAFT DRAFT
WebSphere Portal Server: Step By Step www.WebSphereMentor.com
UNDER REVIEW USE AT YOUR OWN RISK
Author: Rama Turaga Page 4 Courtesy to: Owen Cline
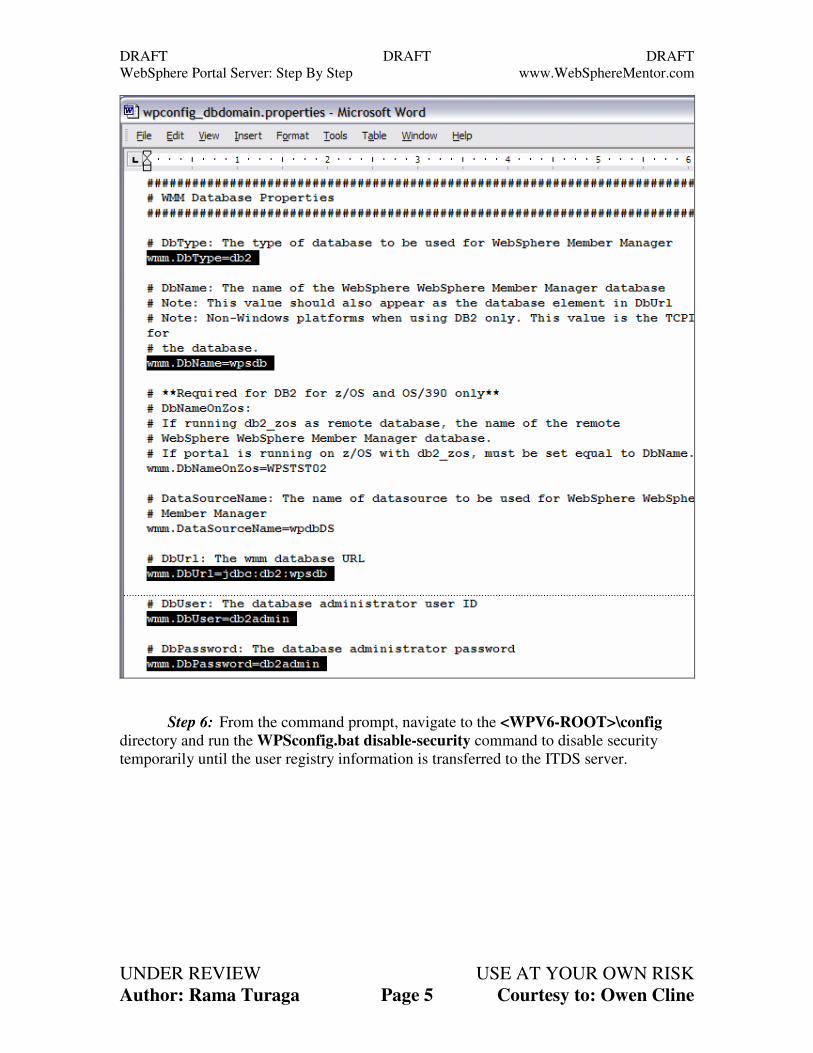
Step 5: Even though most production environments use the LDAP server to store
the user registry, some may use a production quality database (DB2 for example) instead
of an LDAP server. In such cases, you need to enter values for wmm.DbType, DbName,
DbUrl, DbUser and DbPassword etc. in the wpconfig.properties file to point to the DB2
server as shown in the screenshot below.
You need to provide values for wmm parameters in our case anyway because we
changed the LookAside value to true even though our user registry is going to be in
LDAP and not in DB2 server.
Open the wpconfig_dbdomain.properties file, navigate to the WMM datababase
properties section and change the following:
• wmm.DbType from cloudscape to DB2.
• wmme.DbName still stays the same as we named the database on DB2 also
as wpsdb, if you want to use a different name then you would change the
name here.
• wmm.DbUrl from jdbc:db2j:wpsdb;create=true to jdbc:db2:wpsdb to point
to the DB2 database.
• wmm.DbUser and DbPassword to db2admin/db2admin. If you used a
different name for the DB2 database administartor user then you would
enter that user name and password here.
DRAFT DRAFT DRAFT
WebSphere Portal Server: Step By Step www.WebSphereMentor.com
UNDER REVIEW USE AT YOUR OWN RISK
Author: Rama Turaga Page 5 Courtesy to: Owen Cline
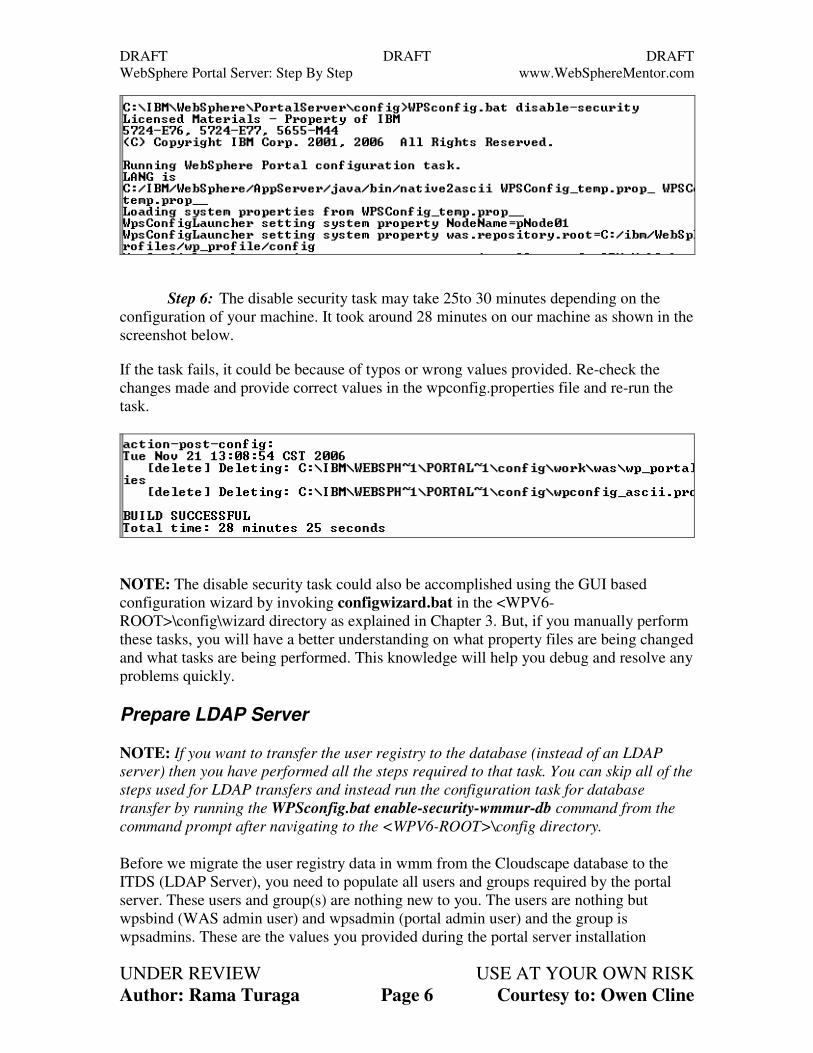
Step 6: From the command prompt, navigate to the <WPV6-ROOT>\config
directory and run the WPSconfig.bat disable-security command to disable security
temporarily until the user registry information is transferred to the ITDS server.
DRAFT DRAFT DRAFT
WebSphere Portal Server: Step By Step www.WebSphereMentor.com
UNDER REVIEW USE AT YOUR OWN RISK
Author: Rama Turaga Page 6 Courtesy to: Owen Cline
Step 6: The disable security task may take 25to 30 minutes depending on the
configuration of your machine. It took around 28 minutes on our machine as shown in the
screenshot below.
If the task fails, it could be because of typos or wrong values provided. Re-check the
changes made and provide correct values in the wpconfig.properties file and re-run the
task.
NOTE: The disable security task could also be accomplished using the GUI based
configuration wizard by invoking configwizard.bat in the <WPV6-
ROOT>\config\wizard directory as explained in Chapter 3. But, if you manually perform
these tasks, you will have a better understanding on what property files are being changed
and what tasks are being performed. This knowledge will help you debug and resolve any
problems quickly.
Prepare LDAP Server
NOTE: If you want to transfer the user registry to the database (instead of an LDAP
server) then you have performed all the steps required to that task. You can skip all of the
steps used for LDAP transfers and instead run the configuration task for database
transfer by running the WPSconfig.bat enable-security-wmmur-db command from the
command prompt after navigating to the <WPV6-ROOT>\config directory.
Before we migrate the user registry data in wmm from the Cloudscape database to the
ITDS (LDAP Server), you need to populate all users and groups required by the portal
server. These users and group(s) are nothing new to you. The users are nothing but
wpsbind (WAS admin user) and wpsadmin (portal admin user) and the group is
wpsadmins. These are the values you provided during the portal server installation
DRAFT DRAFT DRAFT
WebSphere Portal Server: Step By Step www.WebSphereMentor.com
UNDER REVIEW USE AT YOUR OWN RISK
Author: Rama Turaga Page 7 Courtesy to: Owen Cline
(except wpsadmins that was created implicitly) as administrators. Apart from these basic
users and groups, you should also create users and groups required by the Content
Management Server (WCM) that is built inside the portal server if you are using that
feature.
You either can create these users and groups manually from the ITDS V6 admin console
or import the LDIF file supplied in your portal images. The names of these LDIF files are
PortalUsers.ldif and ContentUsers.ldif. You need to customize these files for your
environment. Make a backup of these files before you modify them.
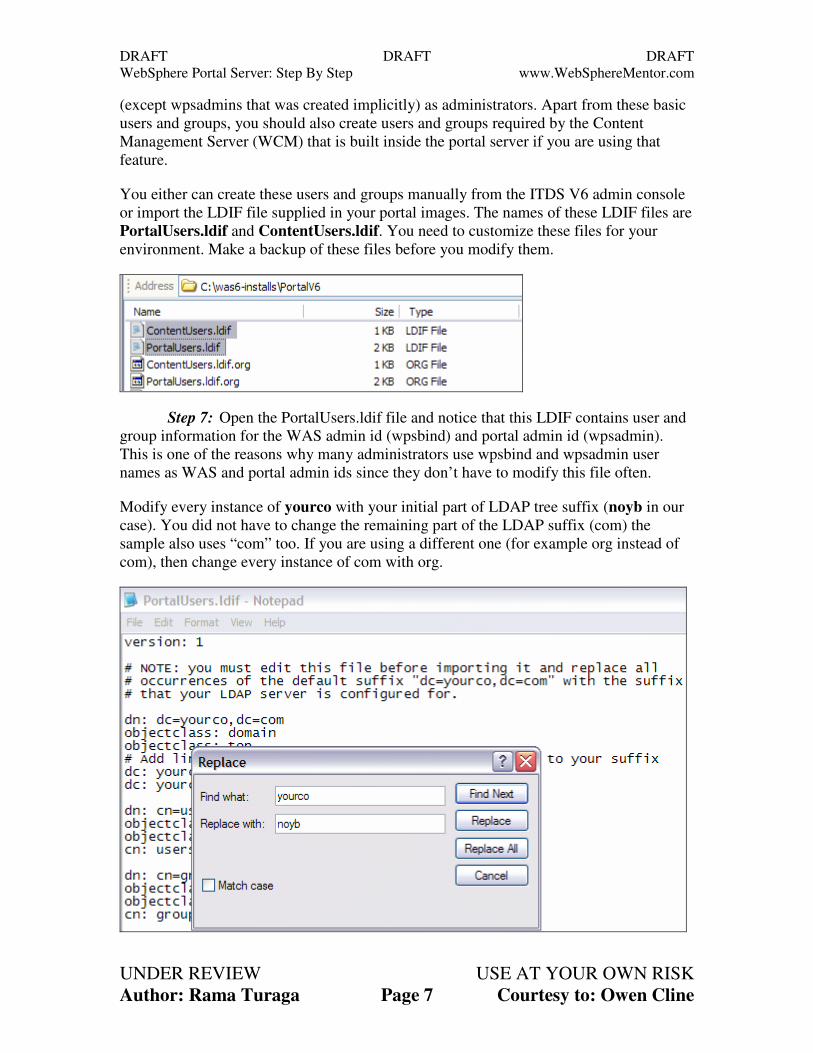
Step 7: Open the PortalUsers.ldif file and notice that this LDIF contains user and
group information for the WAS admin id (wpsbind) and portal admin id (wpsadmin).
This is one of the reasons why many administrators use wpsbind and wpsadmin user
names as WAS and portal admin ids since they don’t have to modify this file often.
Modify every instance of yourco with your initial part of LDAP tree suffix (noyb in our
case). You did not have to change the remaining part of the LDAP suffix (com) the
sample also uses “com” too. If you are using a different one (for example org instead of
com), then change every instance of com with org.
DRAFT DRAFT DRAFT
WebSphere Portal Server: Step By Step www.WebSphereMentor.com
UNDER REVIEW USE AT YOUR OWN RISK
Author: Rama Turaga Page 8 Courtesy to: Owen Cline
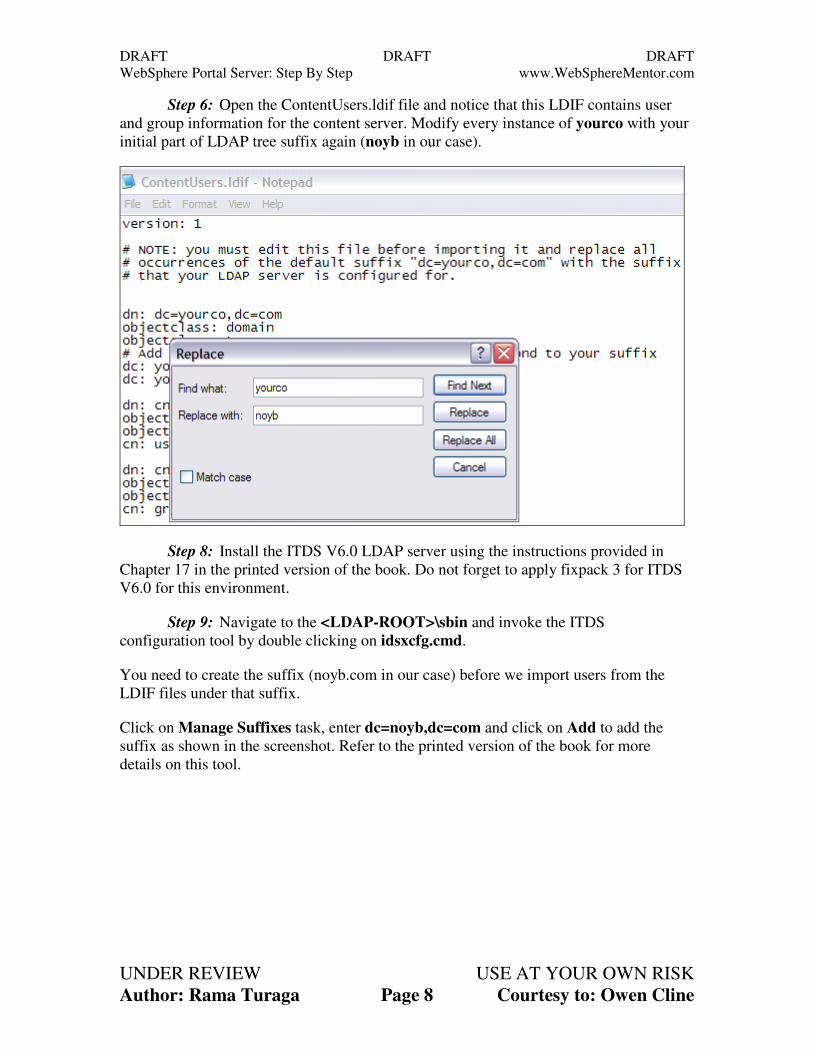
Step 6: Open the ContentUsers.ldif file and notice that this LDIF contains user
and group information for the content server. Modify every instance of yourco with your
initial part of LDAP tree suffix again (noyb in our case).
Step 8: Install the ITDS V6.0 LDAP server using the instructions provided in
Chapter 17 in the printed version of the book. Do not forget to apply fixpack 3 for ITDS
V6.0 for this environment.
Step 9: Navigate to the <LDAP-ROOT>\sbin and invoke the ITDS
configuration tool by double clicking on idsxcfg.cmd.
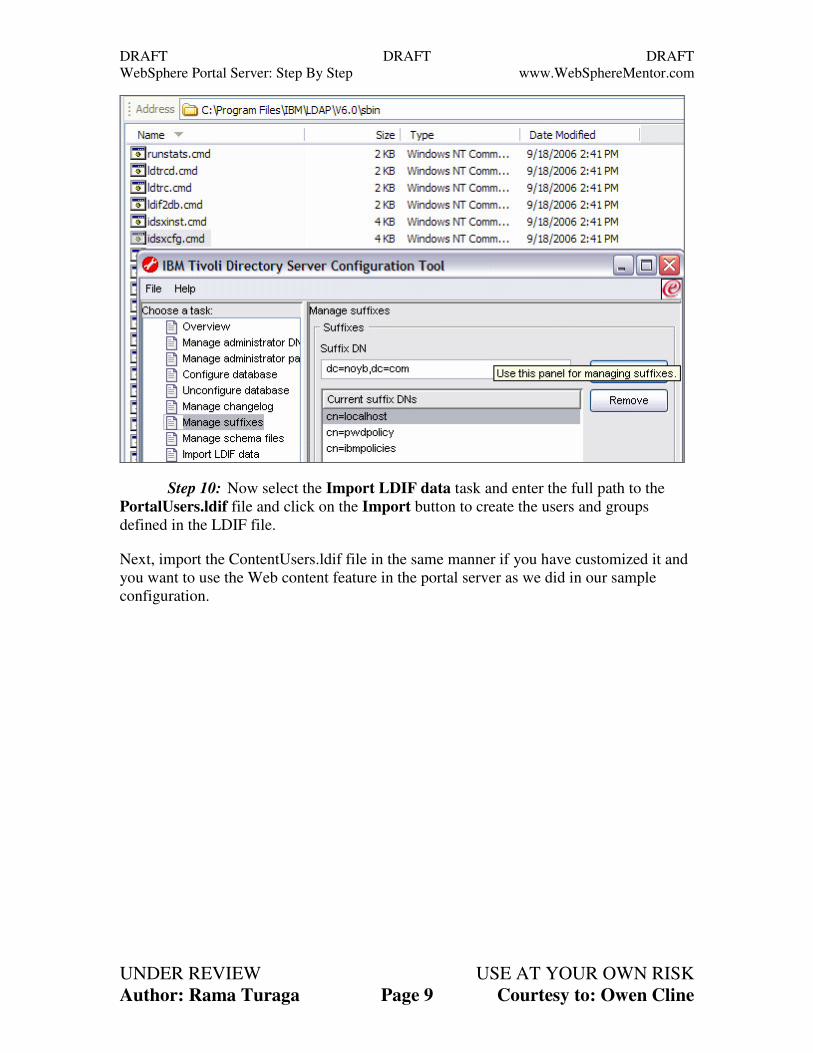
You need to create the suffix (noyb.com in our case) before we import users from the
LDIF files under that suffix.
Click on Manage Suffixes task, enter dc=noyb,dc=com and click on Add to add the
suffix as shown in the screenshot. Refer to the printed version of the book for more
details on this tool.
DRAFT DRAFT DRAFT
WebSphere Portal Server: Step By Step www.WebSphereMentor.com
UNDER REVIEW USE AT YOUR OWN RISK
Author: Rama Turaga Page 9 Courtesy to: Owen Cline
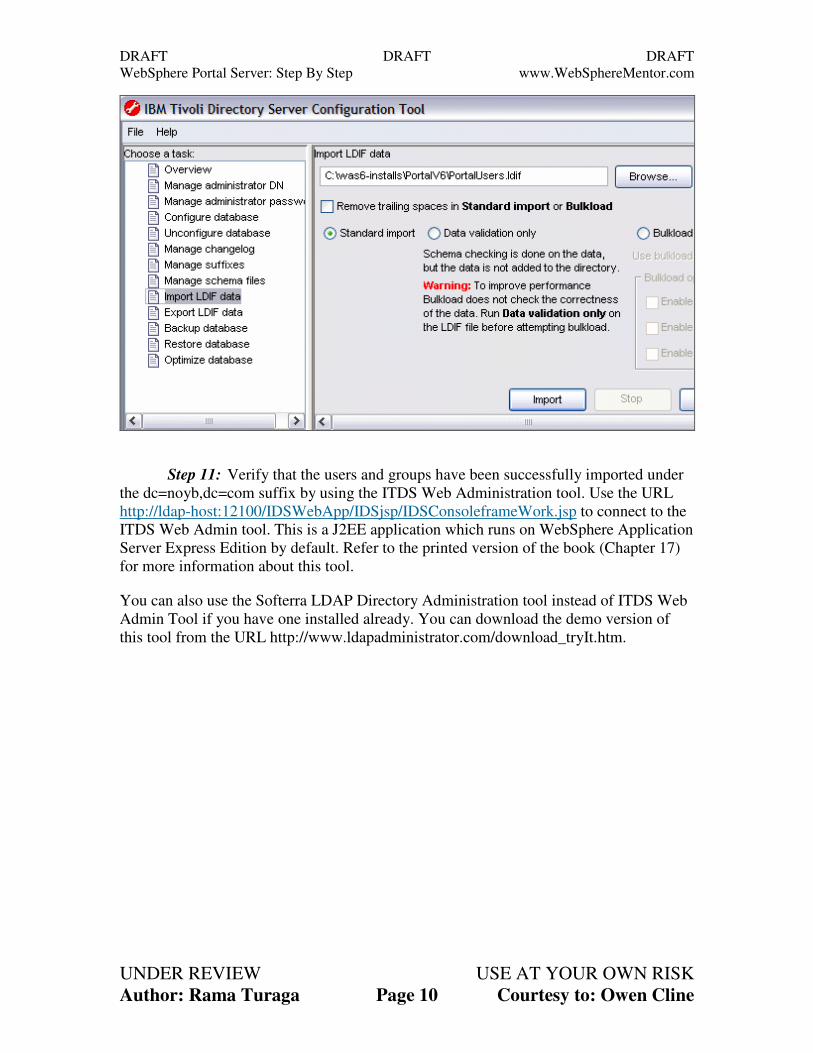
Step 10: Now select the Import LDIF data task and enter the full path to the
PortalUsers.ldif file and click on the Import button to create the users and groups
defined in the LDIF file.
Next, import the ContentUsers.ldif file in the same manner if you have customized it and
you want to use the Web content feature in the portal server as we did in our sample
configuration.
DRAFT DRAFT DRAFT
WebSphere Portal Server: Step By Step www.WebSphereMentor.com
UNDER REVIEW USE AT YOUR OWN RISK
Author: Rama Turaga Page 10 Courtesy to: Owen Cline
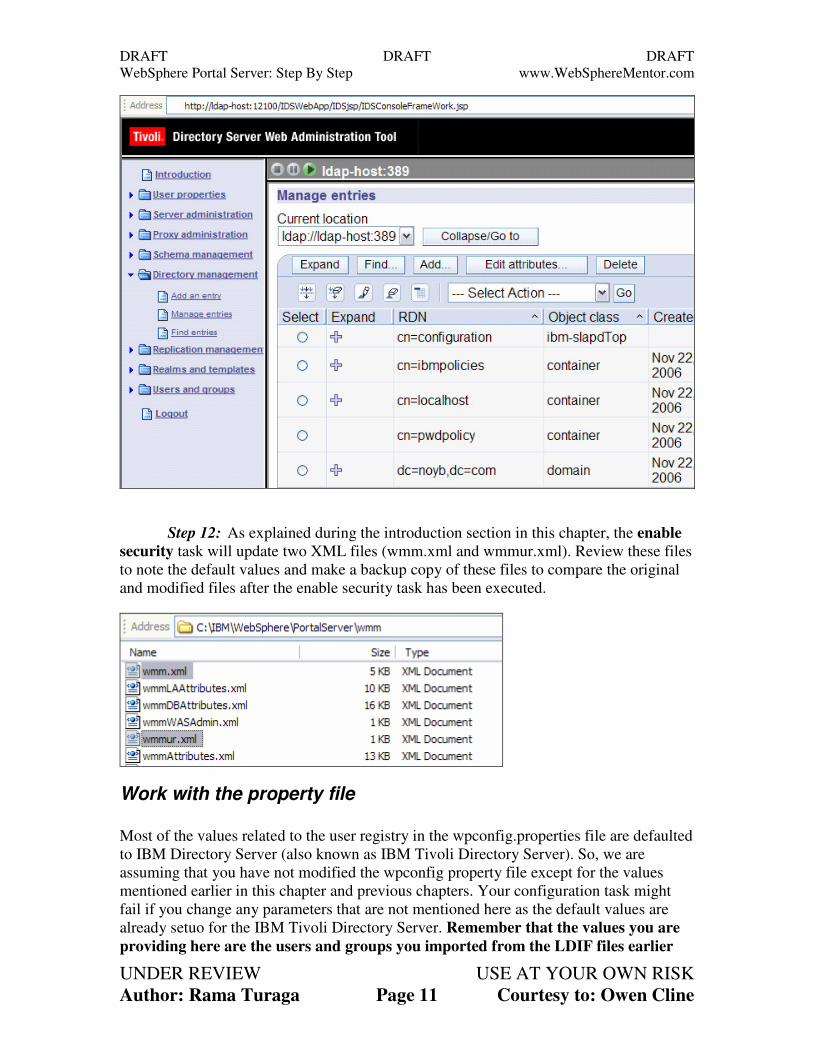
Step 11: Verify that the users and groups have been successfully imported under
the dc=noyb,dc=com suffix by using the ITDS Web Administration tool. Use the URL
http://ldap-host:12100/IDSWebApp/IDSjsp/IDSConsoleframeWork.jsp to connect to the
ITDS Web Admin tool. This is a J2EE application which runs on WebSphere Application
Server Express Edition by default. Refer to the printed version of the book (Chapter 17)
for more information about this tool.
You can also use the Softerra LDAP Directory Administration tool instead of ITDS Web
Admin Tool if you have one installed already. You can download the demo version of
this tool from the URL http://www.ldapadministrator.com/download_tryIt.htm.
DRAFT DRAFT DRAFT
WebSphere Portal Server: Step By Step www.WebSphereMentor.com
UNDER REVIEW USE AT YOUR OWN RISK
Author: Rama Turaga Page 11 Courtesy to: Owen Cline
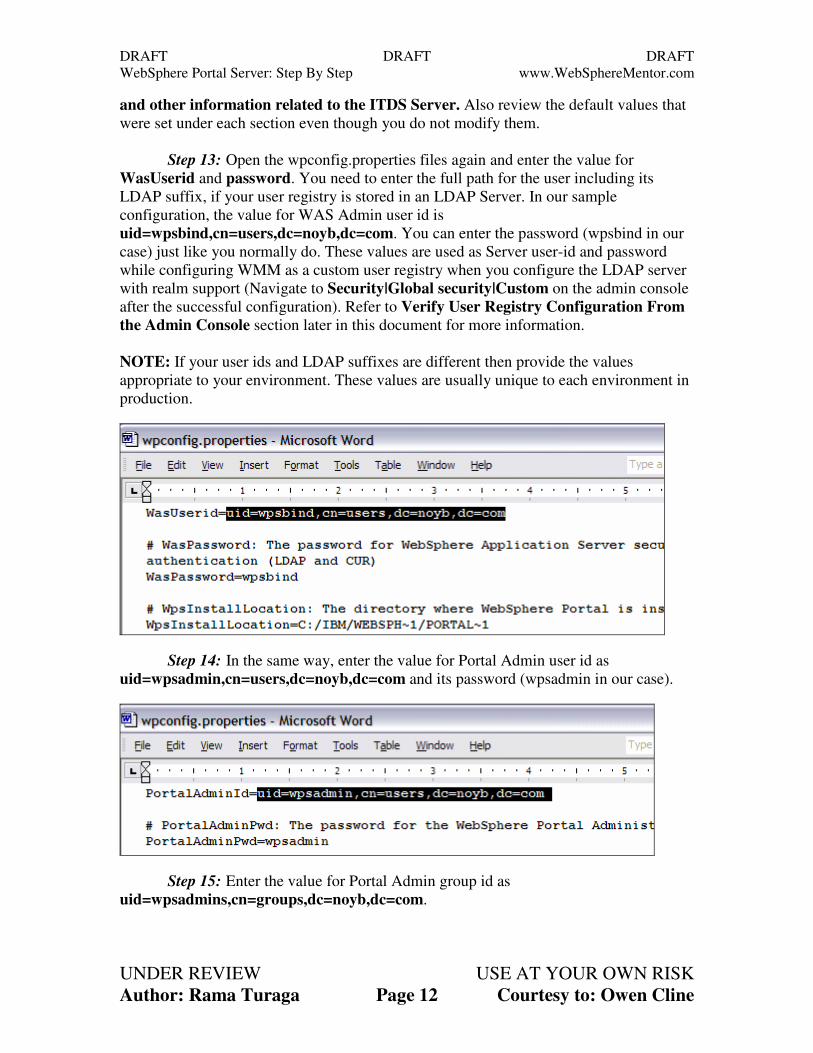
Step 12: As explained during the introduction section in this chapter, the enable
security task will update two XML files (wmm.xml and wmmur.xml). Review these files
to note the default values and make a backup copy of these files to compare the original
and modified files after the enable security task has been executed.
Work with the property file
Most of the values related to the user registry in the wpconfig.properties file are defaulted
to IBM Directory Server (also known as IBM Tivoli Directory Server). So, we are
assuming that you have not modified the wpconfig property file except for the values
mentioned earlier in this chapter and previous chapters. Your configuration task might
fail if you change any parameters that are not mentioned here as the default values are
already setuo for the IBM Tivoli Directory Server. Remember that the values you are
providing here are the users and groups you imported from the LDIF files earlier
DRAFT DRAFT DRAFT
WebSphere Portal Server: Step By Step www.WebSphereMentor.com
UNDER REVIEW USE AT YOUR OWN RISK
Author: Rama Turaga Page 12 Courtesy to: Owen Cline
and other information related to the ITDS Server. Also review the default values that
were set under each section even though you do not modify them.
Step 13: Open the wpconfig.properties files again and enter the value for
WasUserid and password. You need to enter the full path for the user including its
LDAP suffix, if your user registry is stored in an LDAP Server. In our sample
configuration, the value for WAS Admin user id is
uid=wpsbind,cn=users,dc=noyb,dc=com. You can enter the password (wpsbind in our
case) just like you normally do. These values are used as Server user-id and password
while configuring WMM as a custom user registry when you configure the LDAP server
with realm support (Navigate to Security|Global security|Custom on the admin console
after the successful configuration). Refer to Verify User Registry Configuration From
the Admin Console section later in this document for more information.
NOTE: If your user ids and LDAP suffixes are different then provide the values
appropriate to your environment. These values are usually unique to each environment in
production.
Step 14: In the same way, enter the value for Portal Admin user id as
uid=wpsadmin,cn=users,dc=noyb,dc=com and its password (wpsadmin in our case).
Step 15: Enter the value for Portal Admin group id as
uid=wpsadmins,cn=groups,dc=noyb,dc=com.

DRAFT DRAFT DRAFT
WebSphere Portal Server: Step By Step www.WebSphereMentor.com
UNDER REVIEW USE AT YOUR OWN RISK
Author: Rama Turaga Page 13 Courtesy to: Owen Cline
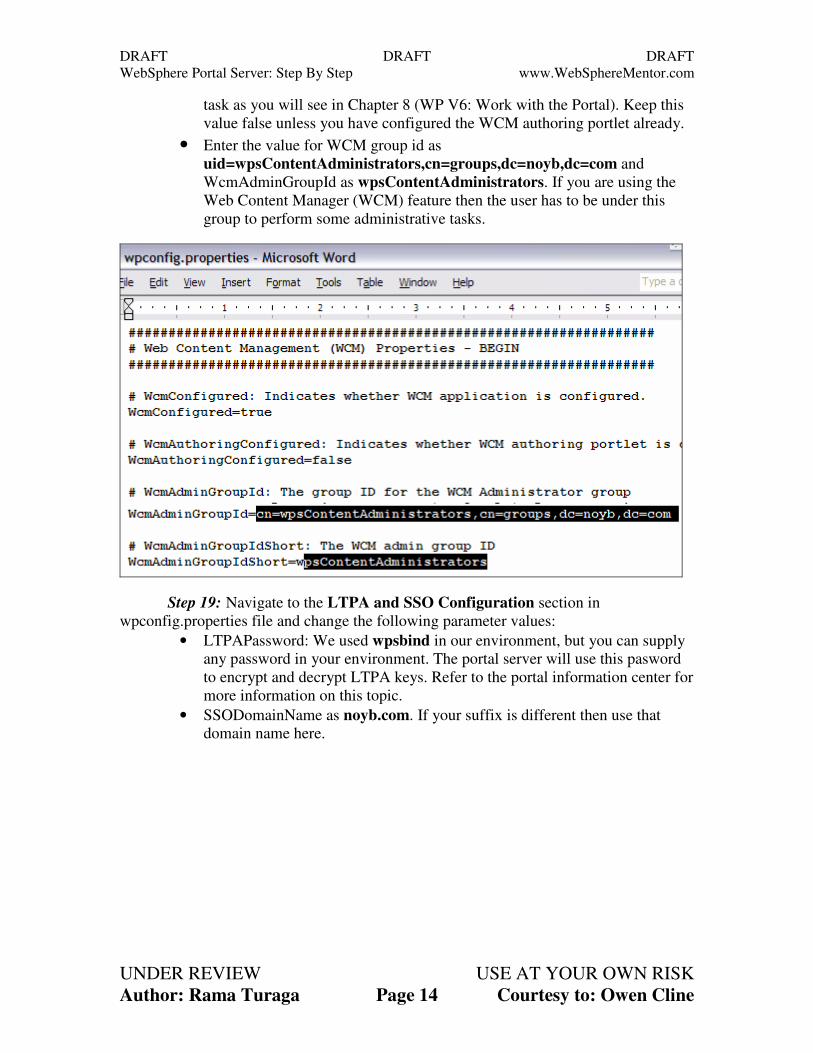
Step 16: Enter the value for the content administrators group as
uid=wpsContentAdministrators,cn=groups,dc=noyb,dc=com. If you are using the
portal document manager feature then the user has to be under this group to perform
some administrative tasks.
Step 17: Enter the value for the document reviewer group as
uid=wpsDocReviewer,cn=groups,dc=noyb,dc=com. If you are using the portal
document manager feature then the user has to be under this group to perform document
reviewing and approving tasks within the document workflow process.
Step 18: Now navigate to Web Content Management properties section in
wpconfig.properties file and change the following parameter values:
• Make sure that WcmConfigured is set to true, if you want to enable the
Web Content Management functionality in the portal server as we do in our
sample configuration. Change the value to false if you do not want to use
WCM features.
• If you have configured the WCM authoring portlet already then you would
change WcmAuthoringConfigured to true. So far, we have not configured
the WCM authoring portlet. You need to run the configure-wcm-authoring
DRAFT DRAFT DRAFT
WebSphere Portal Server: Step By Step www.WebSphereMentor.com
UNDER REVIEW USE AT YOUR OWN RISK
Author: Rama Turaga Page 14 Courtesy to: Owen Cline
task as you will see in Chapter 8 (WP V6: Work with the Portal). Keep this
value false unless you have configured the WCM authoring portlet already.
• Enter the value for WCM group id as
uid=wpsContentAdministrators,cn=groups,dc=noyb,dc=com and
WcmAdminGroupId as wpsContentAdministrators. If you are using the
Web Content Manager (WCM) feature then the user has to be under this
group to perform some administrative tasks.
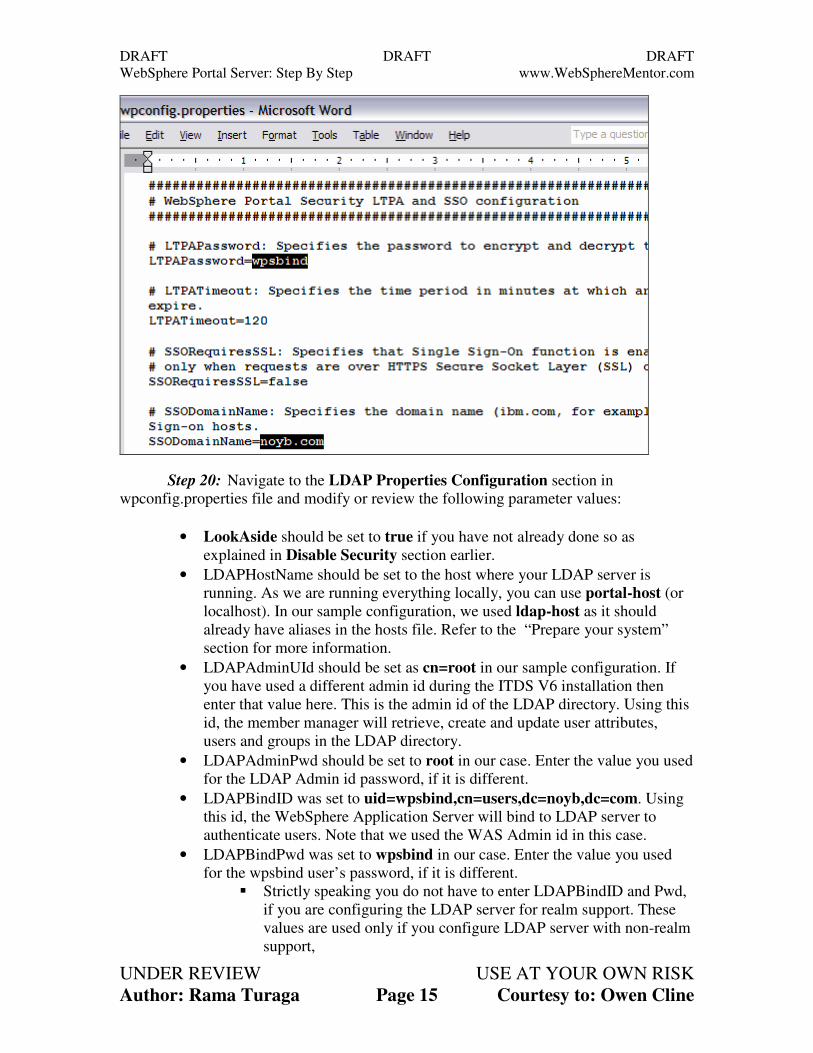
Step 19: Navigate to the LTPA and SSO Configuration section in
wpconfig.properties file and change the following parameter values:
• LTPAPassword: We used wpsbind in our environment, but you can supply
any password in your environment. The portal server will use this pasword
to encrypt and decrypt LTPA keys. Refer to the portal information center for
more information on this topic.
• SSODomainName as noyb.com. If your suffix is different then use that
domain name here.
DRAFT DRAFT DRAFT
WebSphere Portal Server: Step By Step www.WebSphereMentor.com
UNDER REVIEW USE AT YOUR OWN RISK
Author: Rama Turaga Page 15 Courtesy to: Owen Cline
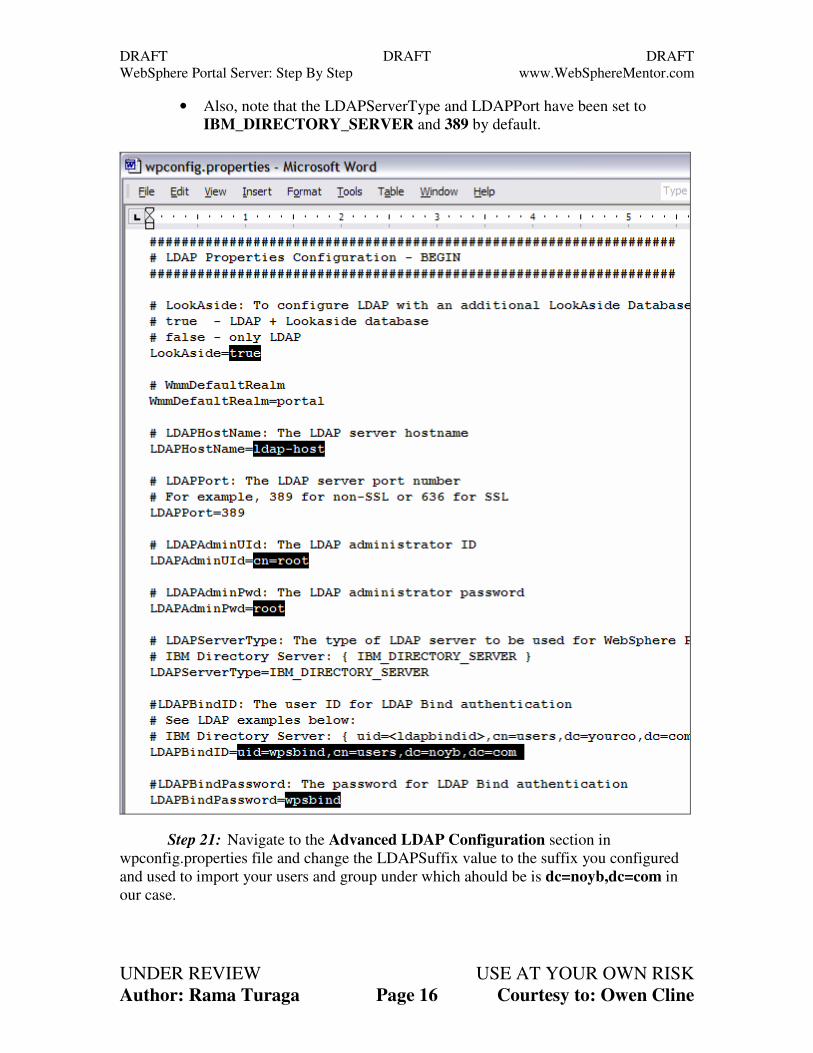
Step 20: Navigate to the LDAP Properties Configuration section in
wpconfig.properties file and modify or review the following parameter values:
• LookAside should be set to true if you have not already done so as
explained in Disable Security section earlier.
• LDAPHostName should be set to the host where your LDAP server is
running. As we are running everything locally, you can use portal-host (or
localhost). In our sample configuration, we used ldap-host as it should
already have aliases in the hosts file. Refer to the “Prepare your system”
section for more information.
• LDAPAdminUId should be set as cn=root in our sample configuration. If
you have used a different admin id during the ITDS V6 installation then
enter that value here. This is the admin id of the LDAP directory. Using this
id, the member manager will retrieve, create and update user attributes,
users and groups in the LDAP directory.
• LDAPAdminPwd should be set to root in our case. Enter the value you used
for the LDAP Admin id password, if it is different.
• LDAPBindID was set to uid=wpsbind,cn=users,dc=noyb,dc=com. Using
this id, the WebSphere Application Server will bind to LDAP server to
authenticate users. Note that we used the WAS Admin id in this case.
• LDAPBindPwd was set to wpsbind in our case. Enter the value you used
for the wpsbind user’s password, if it is different.
� Strictly speaking you do not have to enter LDAPBindID and Pwd,
if you are configuring the LDAP server for realm support. These
values are used only if you configure LDAP server with non-realm
support,
DRAFT DRAFT DRAFT
WebSphere Portal Server: Step By Step www.WebSphereMentor.com
UNDER REVIEW USE AT YOUR OWN RISK
Author: Rama Turaga Page 16 Courtesy to: Owen Cline
• Also, note that the LDAPServerType and LDAPPort have been set to
IBM_DIRECTORY_SERVER and 389 by default.
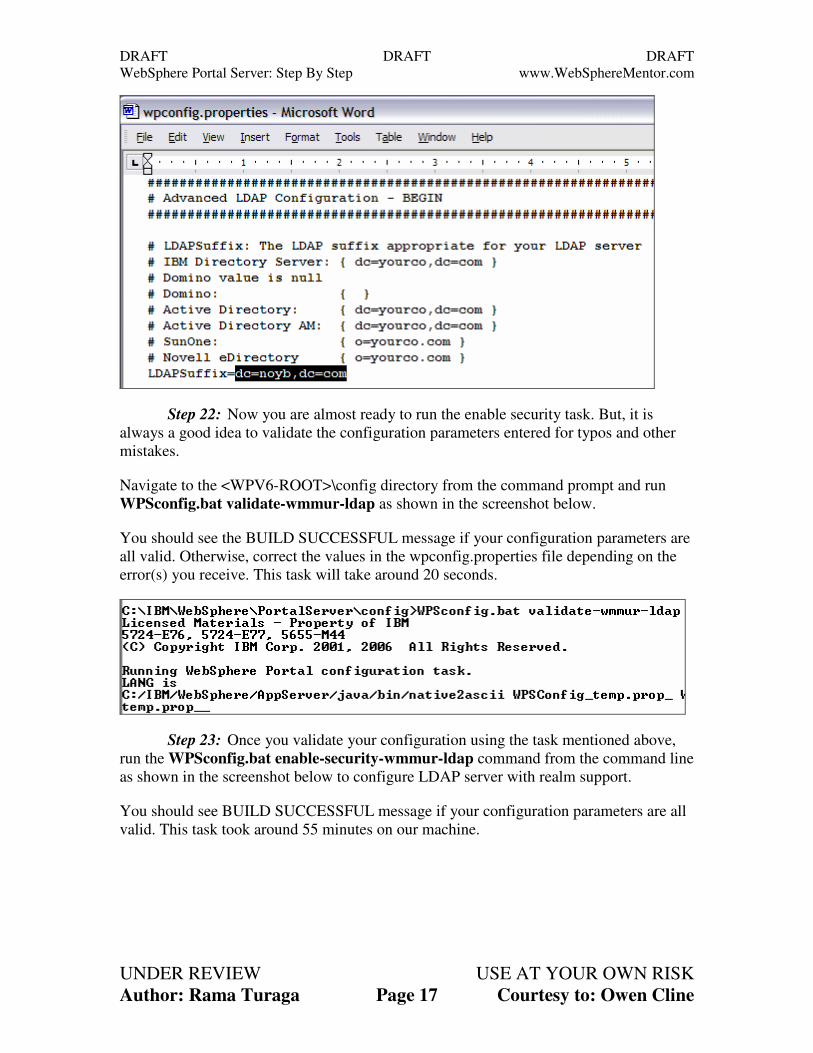
Step 21: Navigate to the Advanced LDAP Configuration section in
wpconfig.properties file and change the LDAPSuffix value to the suffix you configured
and used to import your users and group under which ahould be is dc=noyb,dc=com in
our case.
DRAFT DRAFT DRAFT
WebSphere Portal Server: Step By Step www.WebSphereMentor.com
UNDER REVIEW USE AT YOUR OWN RISK
Author: Rama Turaga Page 17 Courtesy to: Owen Cline
Step 22: Now you are almost ready to run the enable security task. But, it is
always a good idea to validate the configuration parameters entered for typos and other
mistakes.
Navigate to the <WPV6-ROOT>\config directory from the command prompt and run
WPSconfig.bat validate-wmmur-ldap as shown in the screenshot below.
You should see the BUILD SUCCESSFUL message if your configuration parameters are
all valid. Otherwise, correct the values in the wpconfig.properties file depending on the
error(s) you receive. This task will take around 20 seconds.
Step 23: Once you validate your configuration using the task mentioned above,
run the WPSconfig.bat enable-security-wmmur-ldap command from the command line
as shown in the screenshot below to configure LDAP server with realm support.
You should see BUILD SUCCESSFUL message if your configuration parameters are all
valid. This task took around 55 minutes on our machine.
DRAFT DRAFT DRAFT
WebSphere Portal Server: Step By Step www.WebSphereMentor.com
UNDER REVIEW USE AT YOUR OWN RISK
Author: Rama Turaga Page 18 Courtesy to: Owen Cline
• If your intention is to configure the LDAP Server without realm support
then you would need to run the WPSconfig enable-security-ldap command
instead.
Step 24: After completing the LDAP Server configuration with realm support
successfully, navigate to the <WPV6-ROOT>\wmm directory and backup the
wmm.xml and wmmur.xml files before reviewing them. The enable security task will
update these files with all or most of the configuration parameters we entered in the
wpconfig.properties file. As explained in the Introduction section, the portal server will
consult these files during the startup and runtime for all LDAP related parameters.
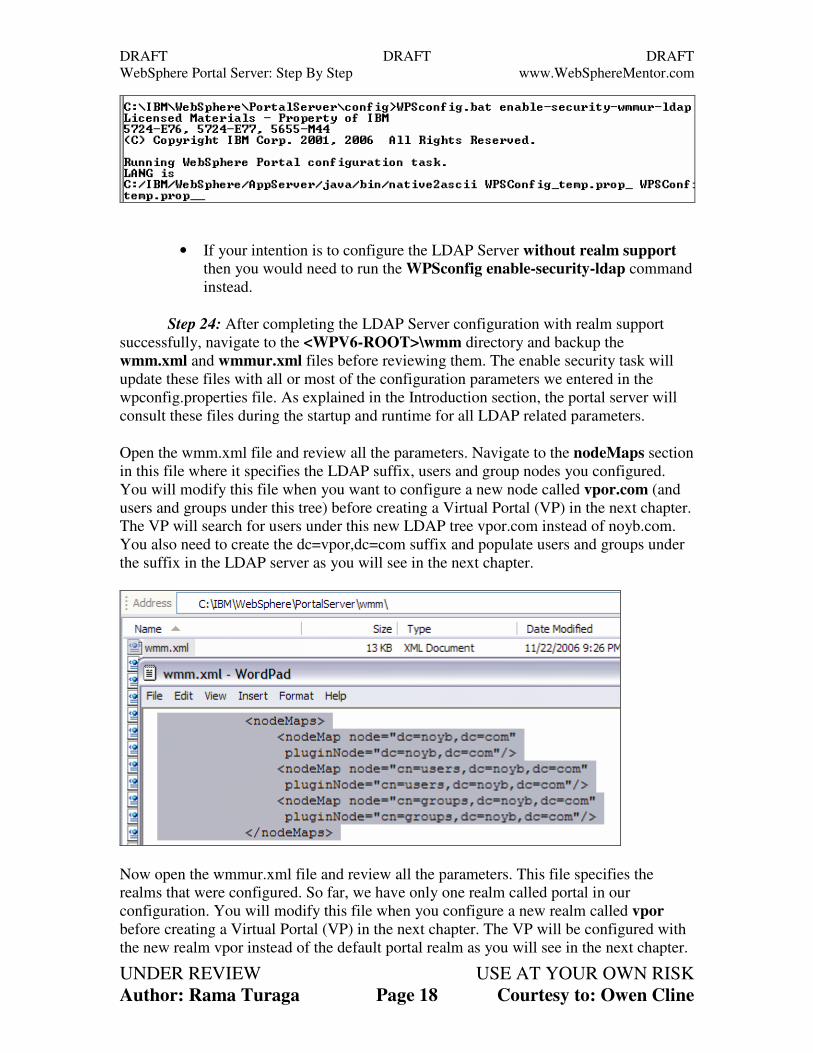
Open the wmm.xml file and review all the parameters. Navigate to the nodeMaps section
in this file where it specifies the LDAP suffix, users and group nodes you configured.
You will modify this file when you want to configure a new node called vpor.com (and
users and groups under this tree) before creating a Virtual Portal (VP) in the next chapter.
The VP will search for users under this new LDAP tree vpor.com instead of noyb.com.
You also need to create the dc=vpor,dc=com suffix and populate users and groups under
the suffix in the LDAP server as you will see in the next chapter.
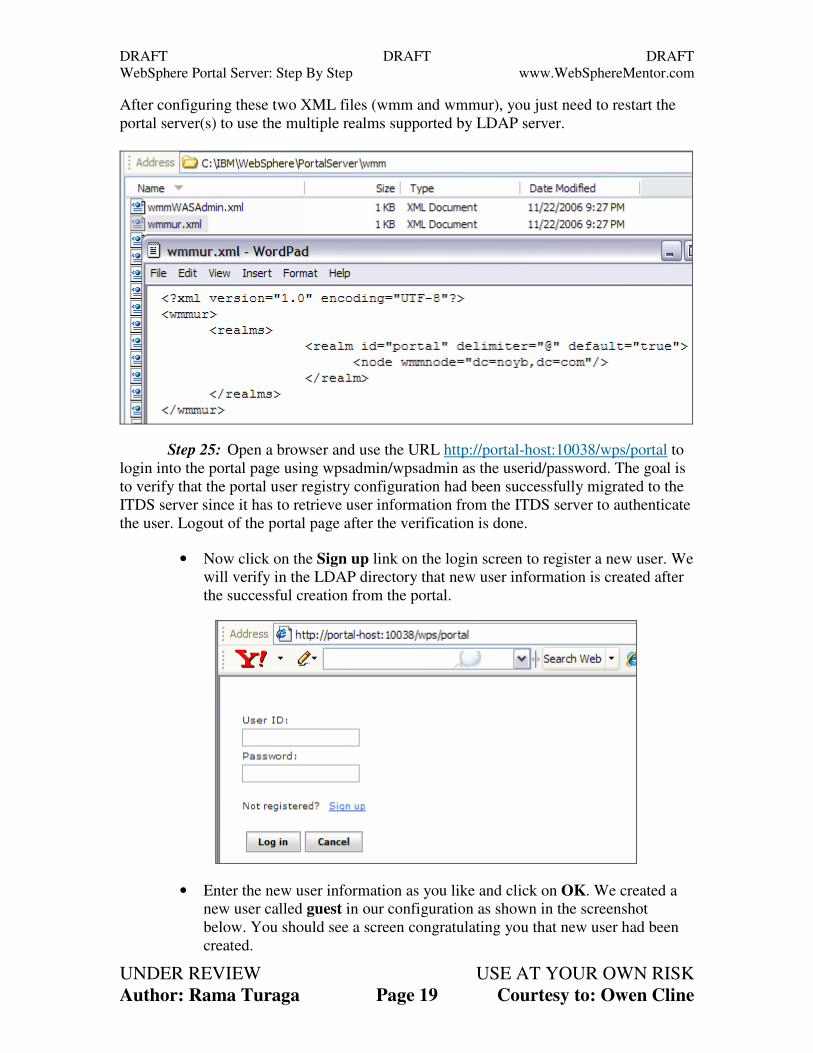
Now open the wmmur.xml file and review all the parameters. This file specifies the
realms that were configured. So far, we have only one realm called portal in our
configuration. You will modify this file when you configure a new realm called vpor
before creating a Virtual Portal (VP) in the next chapter. The VP will be configured with
the new realm vpor instead of the default portal realm as you will see in the next chapter.
DRAFT DRAFT DRAFT
WebSphere Portal Server: Step By Step www.WebSphereMentor.com
UNDER REVIEW USE AT YOUR OWN RISK
Author: Rama Turaga Page 19 Courtesy to: Owen Cline
After configuring these two XML files (wmm and wmmur), you just need to restart the
portal server(s) to use the multiple realms supported by LDAP server.
Step 25: Open a browser and use the URL http://portal-host:10038/wps/portal to
login into the portal page using wpsadmin/wpsadmin as the userid/password. The goal is
to verify that the portal user registry configuration had been successfully migrated to the
ITDS server since it has to retrieve user information from the ITDS server to authenticate
the user. Logout of the portal page after the verification is done.
• Now click on the Sign up link on the login screen to register a new user. We
will verify in the LDAP directory that new user information is created after
the successful creation from the portal.
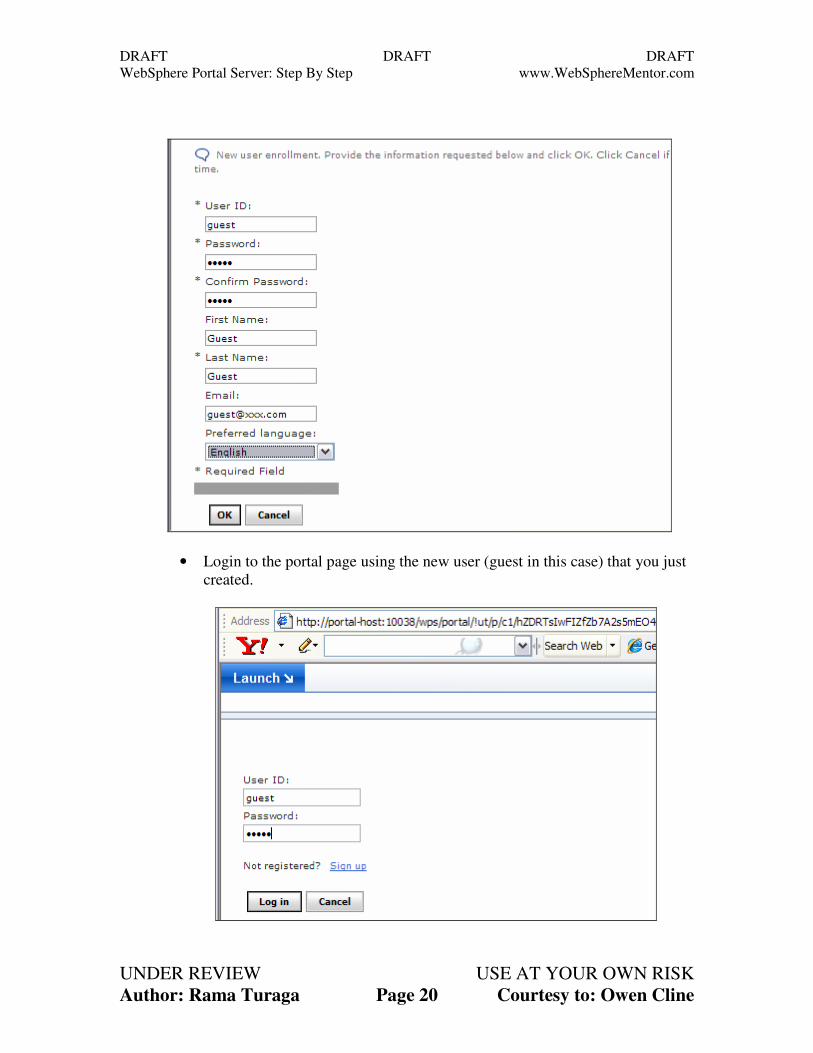
• Enter the new user information as you like and click on OK. We created a
new user called guest in our configuration as shown in the screenshot
below. You should see a screen congratulating you that new user had been
created.
DRAFT DRAFT DRAFT
WebSphere Portal Server: Step By Step www.WebSphereMentor.com
UNDER REVIEW USE AT YOUR OWN RISK
Author: Rama Turaga Page 20 Courtesy to: Owen Cline
• Login to the portal page using the new user (guest in this case) that you just
created.
DRAFT DRAFT DRAFT
WebSphere Portal Server: Step By Step www.WebSphereMentor.com
UNDER REVIEW USE AT YOUR OWN RISK
Author: Rama Turaga Page 21 Courtesy to: Owen Cline
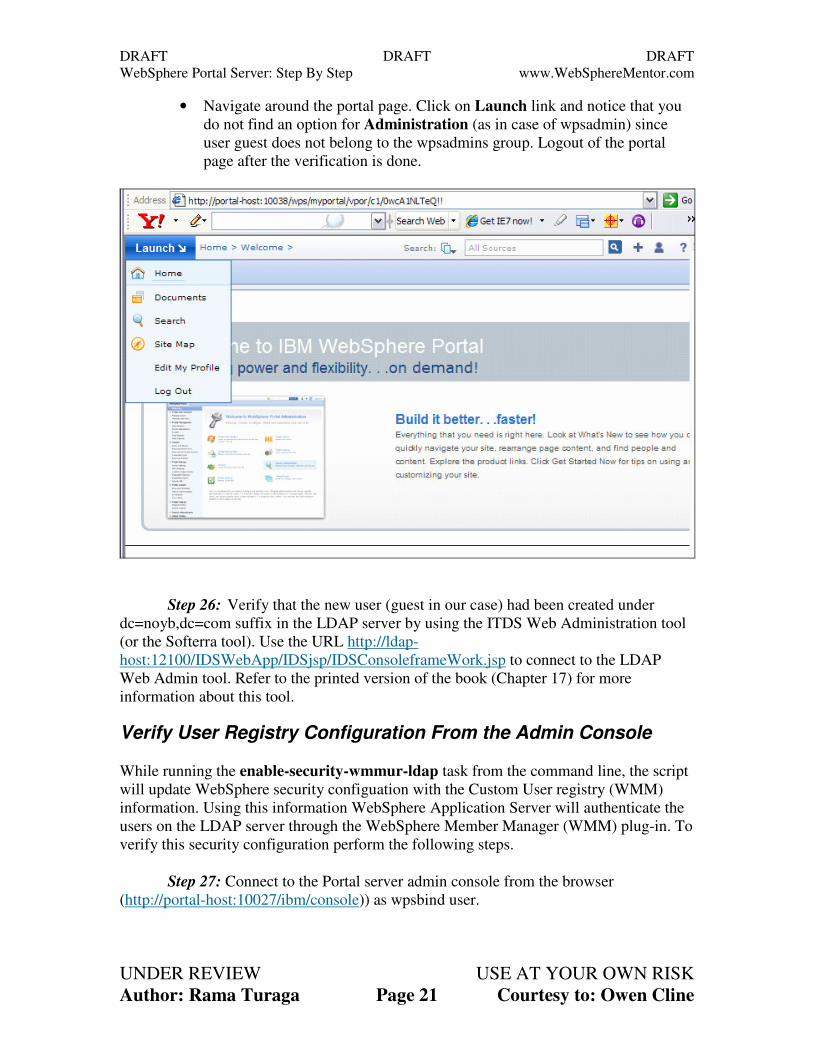
• Navigate around the portal page. Click on Launch link and notice that you
do not find an option for Administration (as in case of wpsadmin) since
user guest does not belong to the wpsadmins group. Logout of the portal
page after the verification is done.
Step 26: Verify that the new user (guest in our case) had been created under
dc=noyb,dc=com suffix in the LDAP server by using the ITDS Web Administration tool
(or the Softerra tool). Use the URL http://ldap-
host:12100/IDSWebApp/IDSjsp/IDSConsoleframeWork.jsp to connect to the LDAP
Web Admin tool. Refer to the printed version of the book (Chapter 17) for more
information about this tool.
Verify User Registry Configuration From the Admin Console
While running the enable-security-wmmur-ldap task from the command line, the script
will update WebSphere security configuation with the Custom User registry (WMM)
information. Using this information WebSphere Application Server will authenticate the
users on the LDAP server through the WebSphere Member Manager (WMM) plug-in. To
verify this security configuration perform the following steps.
Step 27: Connect to the Portal server admin console from the browser
(http://portal-host:10027/ibm/console)) as wpsbind user.
DRAFT DRAFT DRAFT
WebSphere Portal Server: Step By Step www.WebSphereMentor.com
UNDER REVIEW USE AT YOUR OWN RISK
Author: Rama Turaga Page 22 Courtesy to: Owen Cline
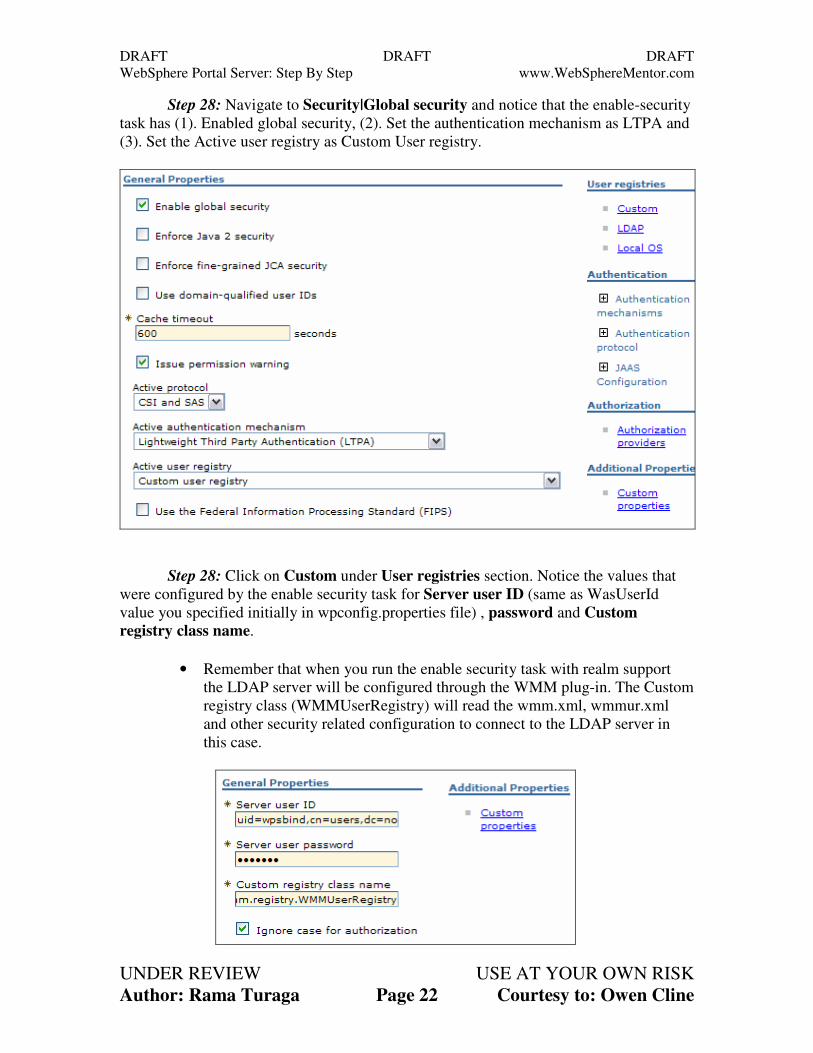
Step 28: Navigate to Security|Global security and notice that the enable-security
task has (1). Enabled global security, (2). Set the authentication mechanism as LTPA and
(3). Set the Active user registry as Custom User registry.
Step 28: Click on Custom under User registries section. Notice the values that
were configured by the enable security task for Server user ID (same as WasUserId
value you specified initially in wpconfig.properties file) , password and Custom
registry class name.
• Remember that when you run the enable security task with realm support
the LDAP server will be configured through the WMM plug-in. The Custom
registry class (WMMUserRegistry) will read the wmm.xml, wmmur.xml
and other security related configuration to connect to the LDAP server in
this case.
DRAFT DRAFT DRAFT
WebSphere Portal Server: Step By Step www.WebSphereMentor.com
UNDER REVIEW USE AT YOUR OWN RISK
Author: Rama Turaga Page 23 Courtesy to: Owen Cline
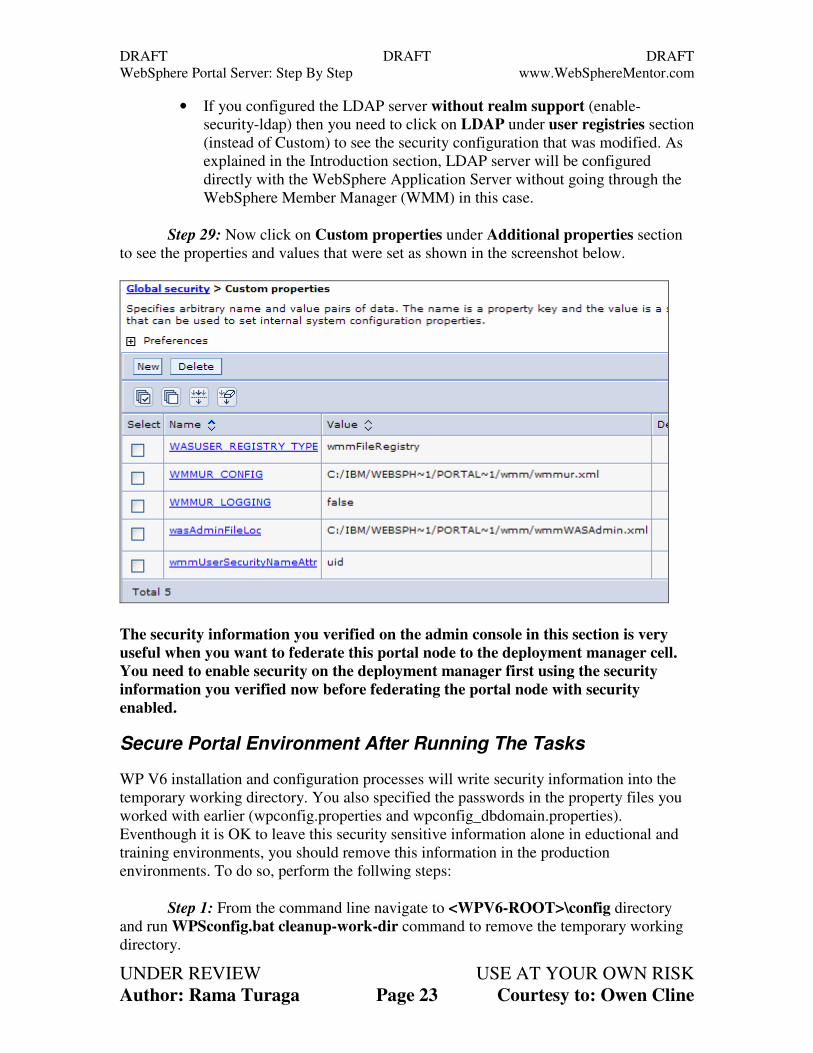
• If you configured the LDAP server without realm support (enable-
security-ldap) then you need to click on LDAP under user registries section
(instead of Custom) to see the security configuration that was modified. As
explained in the Introduction section, LDAP server will be configured
directly with the WebSphere Application Server without going through the
WebSphere Member Manager (WMM) in this case.
Step 29: Now click on Custom properties under Additional properties section
to see the properties and values that were set as shown in the screenshot below.
The security information you verified on the admin console in this section is very
useful when you want to federate this portal node to the deployment manager cell.
You need to enable security on the deployment manager first using the security
information you verified now before federating the portal node with security
enabled.
Secure Portal Environment After Running The Tasks
WP V6 installation and configuration processes will write security information into the
temporary working directory. You also specified the passwords in the property files you
worked with earlier (wpconfig.properties and wpconfig_dbdomain.properties).
Eventhough it is OK to leave this security sensitive information alone in eductional and
training environments, you should remove this information in the production
environments. To do so, perform the follwing steps:
Step 1: From the command line navigate to <WPV6-ROOT>\config directory
and run WPSconfig.bat cleanup-work-dir command to remove the temporary working
directory.
DRAFT DRAFT DRAFT
WebSphere Portal Server: Step By Step www.WebSphereMentor.com
UNDER REVIEW USE AT YOUR OWN RISK
Author: Rama Turaga Page 24 Courtesy to: Owen Cline
Step 2: Make sure both server1 and WebSphere_Portal servers are started.
Navigate to <WP-PROFILE-ROOT>\bin and check the server status using the
command serverStatus.bat -all. Use the command startServer.bat server1 and
startServer.bat WebSphere_Portal to start respective application server.
Step 3: From the command line navigate to <WPV6-ROOT>\config directory
and run WPSconfig.bat delete-passwords command to remove passwords from
wpconfig.properties and wpconfig_dbdomain.properties files.
NOTE: If you want to run a task in the future that requires password(s) again then you
can either specify password(s) in the properties files or enter them on the command line
while running the task. For example to specify portal admin password while running a
configuration task you would specify WPSconfig.bat task-name -
DportalAdminPwd=portal-admin-password command. This way passwords are not
stored in the properties files and you don’t haveto run delete-passwords tasks if you
specify passwords at the command line.


