MAN1114-01-EN
Indianapolis, USA | Cork, Ireland | Calgary, Canada | Bangalore, India | Oakleigh, Australia | Tianjin, China | Esteio, Brazil
Please visit our website for a complete listing and to learn more about certified Horner Automation products.This document is the property of Horner Automation Group, and is subject to change.
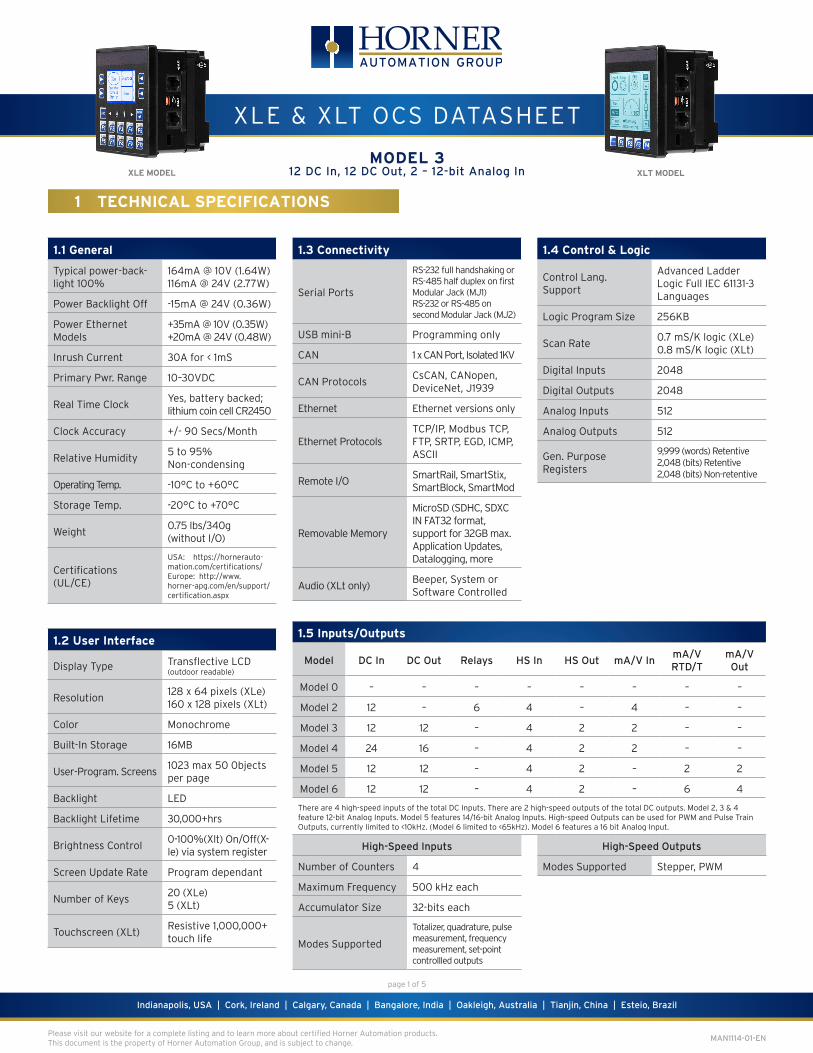
XLE & XLT OCS DATASHEET
page 1 of 5
High-Speed Inputs
Number of Counters 4
Maximum Frequency 500 kHz each
Accumulator Size 32-bits each
Modes Supported
Totalizer, quadrature, pulse measurement, frequency measurement, set-point controllled outputs
High-Speed Outputs
Modes Supported Stepper, PWM
1 TECHNICAL SPECIFICATIONS
MODEL 312 DC In, 12 DC Out, 2 – 12-bit Analog InXLE MODEL XLT MODEL
1.2 User Interface
Display Type Transflective LCD (outdoor readable)
Resolution128 x 64 pixels (XLe) 160 x 128 pixels (XLt)
Color Monochrome
Built-In Storage 16MB
User-Program. Screens1023 max 50 0bjects per page
Backlight LED
Backlight Lifetime 30,000+hrs
Brightness Control0-100%(Xlt) On/Off(X-le) via system register
Screen Update Rate Program dependant
Number of Keys20 (XLe)5 (XLt)
Touchscreen (XLt)Resistive 1,000,000+ touch life
1.4 Control & Logic
Control Lang. Support
Advanced Ladder Logic Full IEC 61131-3 Languages
Logic Program Size 256KB
Scan Rate0.7 mS/K logic (XLe) 0.8 mS/K logic (XLt)
Digital Inputs 2048
Digital Outputs 2048
Analog Inputs 512
Analog Outputs 512
Gen. Purpose Registers
9,999 (words) Retentive2,048 (bits) Retentive2,048 (bits) Non-retentive
1.3 Connectivity
Serial Ports
RS-232 full handshaking or RS-485 half duplex on first Modular Jack (MJ1) RS-232 or RS-485 on second Modular Jack (MJ2)
USB mini-B Programming only
CAN 1 x CAN Port, Isolated 1KV
CAN ProtocolsCsCAN, CANopen, DeviceNet, J1939
Ethernet Ethernet versions only
Ethernet ProtocolsTCP/IP, Modbus TCP, FTP, SRTP, EGD, ICMP, ASCII
Remote I/OSmartRail, SmartStix, SmartBlock, SmartMod
Removable Memory
MicroSD (SDHC, SDXC IN FAT32 format, support for 32GB max. Application Updates, Datalogging, more
Audio (XLt only)Beeper, System or Software Controlled
1.1 General
Typical power-back-light 100%
164mA @ 10V (1.64W) 116mA @ 24V (2.77W)
Power Backlight Off -15mA @ 24V (0.36W)
Power Ethernet Models
+35mA @ 10V (0.35W) +20mA @ 24V (0.48W)
Inrush Current 30A for < 1mS
Primary Pwr. Range 10–30VDC
Real Time ClockYes, battery backed;lithium coin cell CR2450
Clock Accuracy +/- 90 Secs/Month
Relative Humidity5 to 95% Non-condensing
Operating Temp. -10°C to +60°C
Storage Temp. -20°C to +70°C
Weight0.75 lbs/340g (without I/O)
Certifications (UL/CE)
USA: https://hornerauto-mation.com/certifications/ Europe: http://www.horner-apg.com/en/support/certification.aspx
1.5 Inputs/Outputs
Model DC In DC Out Relays HS In HS Out mA/V InmA/V RTD/T
mA/V Out
Model 0 – – – – – – – –
Model 2 12 – 6 4 – 4 – –
Model 3 12 12 – 4 2 2 – –
Model 4 24 16 – 4 2 2 – –
Model 5 12 12 – 4 2 – 2 2
Model 6 12 12 – 4 2 – 6 4
There are 4 high-speed inputs of the total DC Inputs. There are 2 high-speed outputs of the total DC outputs. Model 2, 3 & 4 feature 12-bit Analog Inputs. Model 5 features 14/16-bit Analog Inputs. High-speed Outputs can be used for PWM and Pulse Train Outputs, currently limited to <10kHz. (Model 6 limited to <65kHz). Model 6 features a 16 bit Analog Input.
MAN1114-01-EN
Indianapolis, USA | Cork, Ireland | Calgary, Canada | Bangalore, India | Oakleigh, Australia | Tianjin, China | Esteio, Brazil
Please visit our website for a complete listing and to learn more about certified Horner Automation products.This document is the property of Horner Automation Group, and is subject to change.
page 2 of 5
1.6 Digital DC Inputs
Inputs per Module12 Including 4 Configu-
rable HSC Inputs
Commons per Module 1
Input Voltage Range 12 VDC / 24 VDC
Absolute Max. Voltage 35 VDC Max.
Input Impedance 10 kΩ
Input Current:Upper Threshold Lower Threshold
Positive Logic:
0.8 mA 0.3 mA
Negative Logic:
-1.6 mA -2.1 mA
Max. Upper Threshold 8 VDC
Min. Lower Threshold 3 VDC
OFF to ON Response 1 mS
ON to OFF Response 1 mS
High Speed Counter Max Freq*
500 kHz
1.7 Digital DC Outputs
Outputs per Module12 Including 2 Config-urable PWM Outputs
Commons per Module 1
Output TypeSourcing / 10 kΩ Pull-
Down
Absolute Max. Voltage 28 VDC Max.
Output Protection Short Circuit
Max. Output Current/Point 0.5 A
Max. Total Current 4 A Continuous
Max. Output Supply Voltage
30 VDC
Min. Output Supply Voltage
10 VDC
Max. Voltage Drop at Rated Current
0.25 VDC
Max. Inrush Current 650 mA per Channel
Min. Load None
OFF to ON Response 1 mS
ON to OFF Response 1 mS
PWM Out 10 kHz
Output CharacteristicsCurrent Sourcing
(Pos. Logic)
*See I/O info below for detail regarding HSC and PWM
Wiring Details: Solid/Stranded wire – 12-24 awg (2.5-0.2mm2). Strip length – 0.28” (7mm).Torque rating: 4.5 – 7 lb-in (0.50 – 0.78 N-m).
technical specifications continued...
1.8 Analog Outputs
Number of Channels 2
Input Ranges Safe Input Range Input Impedance
(Clamped @ -0.5 VDC to 12 VDC)
0 - 10 VDC0 – 20 mA4 – 20 mA
-0.5 V to +12VCurrent Mode: 100ΩVoltage Mode: 500Ω
Nominal Resolution %AI full scale
Max. Over-Current
10 Bits32,000 counts
35 mA
Conversion SpeedAll channels converted once per ladder scan
Max. Error @25° C (excluding zero)
4-20 mA 1.00%0-20 mA 1.00%0-10 VDC 0.50%
Filtering160 Hz hash (noise) filter1-128 scan digital running
average filter
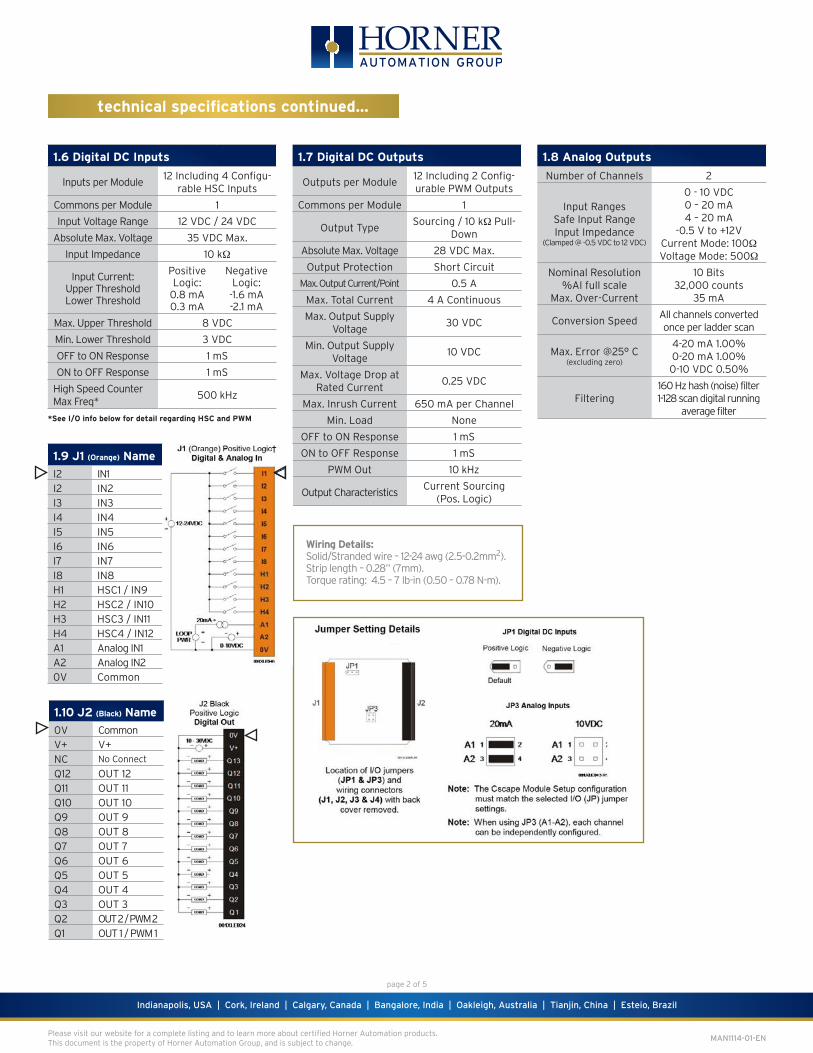
1.10 J2 (Black) Name
0V CommonV+ V+ NC No Connect
Q12 OUT 12Q11 OUT 11Q10 OUT 10Q9 OUT 9Q8 OUT 8Q7 OUT 7Q6 OUT 6Q5 OUT 5Q4 OUT 4Q3 OUT 3 Q2 OUT 2 / PWM 2Q1 OUT 1 / PWM 1
1.9 J1 (Orange) Name
I2 IN1I2 IN2I3 IN3I4 IN4I5 IN5I6 IN6I7 IN7I8 IN8H1 HSC1 / IN9H2 HSC2 / IN10H3 HSC3 / IN11H4 HSC4 / IN12A1 Analog IN1A2 Analog IN20V Common

MAN1114-01-EN
Indianapolis, USA | Cork, Ireland | Calgary, Canada | Bangalore, India | Oakleigh, Australia | Tianjin, China | Esteio, Brazil
Please visit our website for a complete listing and to learn more about certified Horner Automation products.This document is the property of Horner Automation Group, and is subject to change.
2 WIRING & CONNECTORS
2.1 - Port Connectors
communications continued on next page...page 3 of 5
DC Input / Frame
Solid/Stranded wire; 12-24 awg (2.5-0.2mm). Strip length – 0.28” (7mm).
Torque rating: 4.5 – 7 lb-in (0.50 – 0.78 N-m).
DC- is internally connected to I/O V-, but is isolated from CAN V-.
A Class 2 power supply must be used.
2.2 - Power Wiring
Primary Power Port Pins
PIN SIGNAL DESCRIPTION
1 Ground Frame Ground
2 DC- Input Power Supply Ground
3 DC+ Input Power Supply Voltage
3 COMMUNICATIONS
CAN Pin Assignments
PIN SIGNAL DESCRIPTION DIRECTION
1 V–CAN Ground
– Black–
2 CN LCAN Data Low – Blue
IN/OUT
3 SHLDShield Ground
– None–
4 CN HCAN Data
High – WhiteIN/OUT
5 V+ (NC)No Connect
– Red–
3.1 - CAN Communications
CAN Solid/Stranded wire; 12-24 awg (2.5-0.2mm). Strip length – 0.28” (7mm).Locking spring-clamp, two-terminators per conductor.Torque Rating: 4.5 lb-in (0.50 N-m). V+ pin is not internally connected, the SHLD pin is connected to Earth ground via a 1 MΩ resistor and 10 nF capacitor.
MJ1 PINS
PIN SIGNAL DIRECTION
8 TXD OUT
7 RXD IN
6 0V GROUND
5+5V at 60mA
OUT
4 RTS OUT
3 CTS IN
2 RX-/TX- IN/OUT
1 RX+/TX+ IN/OUT
3.2 - Serial Communications
MJ1: RS-232w/full handshaking or RS-485 half-duplex
RS-485 termination via switches; biasing via software
MJ2 PINS
PIN SIGNAL DIRECTION
8 232 TXD OUT
7 232 RXD IN
6 0 V Ground
5 +5V@60mA OUT
4 485 TX- OUT
3 485 TX+ OUT
2 485 RX- or RX/TX- IN or IN/OUT
1 485 RX+ or RX/TX+ IN or IN/OUT
MJ2 SERIAL PORT
MJ2: RS-232 or RS-485 half or full-duplex, software selectable
RS-485 termination via switches; biasing via software
8
115
2
3
6
9
4
10
7
1
12
13
1
612 12
12
1. Function Keys2. Touchscreen3. Navigation Keys4. USB Mini-B Port5. High Capacity microSD Slot6. RS232/RS485 Serial Ports (2)7. Wide-Range DC Power8. CAN Port9. Ethernet LAN Port (optional)10. Optional Built-In I/O11. Configuration Switches12. Mounting Clip Locations13. DIN Rail Clip14. Softkeys
14 14

MAN1114-01-EN
Indianapolis, USA | Cork, Ireland | Calgary, Canada | Bangalore, India | Oakleigh, Australia | Tianjin, China | Esteio, Brazil
Please visit our website for a complete listing and to learn more about certified Horner Automation products.This document is the property of Horner Automation Group, and is subject to change.
communications continued...
battery and safety warnings on next page...
4.1 - 5. Built-in I/O (Model 2, 3, 4, 5 & 6)
All XLe and XLt models (except model 0) feature built-in I/O. The I/O is mapped into OCS Register space, in three separate areas – Digital/Analog I/O, High-Speed Counter I/O, and High-speed Output I/O. Digital/Analog I/O location is fixed starting at 1, but the High- speed Counter and High-speed Output references may be mapped to any open register location. For more details on using the High-Speed Counter and High-Speed Outputs, see the XLe/XLt OCS User’s Manual (MAN0878).
4 BUILT-IN I/O
FIXED ADDRESS
DIGITAL/ANALOG I/O FUNCTION
MODEL 2 MODEL 3 MODEL 4 MODEL 5 MODEL 6
%I
Digital Inputs 1-12 1-12 1-24 1-12 1-12
Reserved 13-32 13-31 25-31 13-31 13-31
ESCP Alarm n/a 32 32 32 32
%QDigital Outputs 1-6 1-12 1-16 1-12 1-12
Reserved 7-24 13-24 17-24 13-24 13-24
%AIAnalog Inputs 1-4 1-2 1-2 1-2 1-4; 33-38
Reserved 5-12 3-12 3-12 3-12 n/a1-12
%AQAnalog Outputs n/a n/a n/a 9-12 9-12
Reserved n/a 1-8 1-8 1-8
Reserved areas maintain backward compatibility with other XL Series OCS models
5 INSTALLATION DIMENSIONS
3.78”(96mm)
3.78”(96mm)
2.26”(57.5mm)
3.5 - Ethernet Communications
Green LED indicates link – when illuminated, data communication is available.
Yellow LED indicates activity – when flashing, data is in transmission.
page 4 of 5
3.4 - Dip Switches
1.9 DIP SWITCHES
PIN NAME FUNCTION DEFAULT
1MJ1 RS-485 Termination
ON = Terminated
OFF
2MJ2 RS-485 Termination
ON = Terminated
OFF
3 Bootload Always Off OFF
1
2
3
The DIP switches are used to provide a built-in termination to both the MJ1 port and MJ2 port if needed. The termination for these ports should only be used if this device is located at either end of the multidrop/daisy-chained RS-485 network.
Panel Cut-Out3.62”
(92mm)
3.62”(92mm)
5.1. - Installation Procedure
The XLe/t utilizes a clip installation method to ensure a robust and watertight seal to the enclosure. Please follow the steps below for the proper installation and operation of the unit.
1. Carefully locate an appropriate place to mount the XLe/t. Be sure to leave enough room at the top of the unit for insertion and removal of the microSD™ card. 2. Carefully cut the host panel per the diagram on Page 1, creating a 92mm x 92mm +/-0.1mm opening into which the XLe/t may be installed. If the opening is too large, water may leak into the enclosure, potentially damaging the unit. If the opening is too small, the OCS may not fit through the hole without damage.3. Remove any burrs and or sharp edges and ensure the panel is not warped in the cutting process. 4. Remove all Removable Terminals from the XLe/t. Insert the XLe/t through the panel cutout (from the front). The gasket must be between the host panel and the XLe/t.5. Install and tighten the four mounting clips (provided in the box) until the gasket forms a tight seal (max torque 0.8 to 1.13Nm, 7-10 lb-in).6. Reinstall the XLe/t I/O Removable Terminal Blocks. Connect communications cables to the serial port, USB ports, Ethernet port, and CAN port as required.

MAN1114-01-EN
Indianapolis, USA | Cork, Ireland | Calgary, Canada | Bangalore, India | Oakleigh, Australia | Tianjin, China | Esteio, Brazil
Please visit our website for a complete listing and to learn more about certified Horner Automation products.This document is the property of Horner Automation Group, and is subject to change.
page 5 of 5
9 TECHNICAL SUPPORT
For assistance and manual updates, contact Technical Support at the following locations:
North America Europe(317) 916-4274 (+) 353-21-4321-266www.hornerautomation.com [email protected] [email protected]
8.1 - WARNINGS
1. To avoid the risk of electric shock or burns, always connect the safety (or earth) ground before making any other connections.2. To reduce the risk of fire, electrical shock, or physical injury, it is strongly recommended to fuse the voltage measurement inputs. Be sure to locate fuses as close to the source as possible.3. Replace fuse with the same type and rating to provide protection against risk of fire and shock hazards.4. In the event of repeated failure, do NOT replace the fuse again as repeated failure indicates a defective condition that will NOT clear by replacing the fuse.5. Only qualified electrical personnel familiar with the construction and operation of this equipment and the hazards involved should install, adjust, operate, or service this equipment. Read and understand this manual and other applicable manuals in their entirety before proceeding. Failure to observe this precaution could result in severe bodily injury or loss of life.
8.2 - FCC COMPLIANCE
This device complies with part 15 of the FCC Rules. Operation is subject to the following two conditions: 1. This device may not cause harmful interference 2. This device must accept any interference received, including interference that may cause undesired operation
8.3 - PRECAUTIONS
All applicable codes and standards need to be followed in the installation of this product. Adhere to the following safety precautions whenever any type of connection is made to the module: 1. Connect the safety (earth) ground on the power connector first before making any other connections. 2. When connecting to the electric circuits or pulse-initiating equipment, open their related breakers. 3. Do NOT make connection to live power lines. 4. Make connections to the module first; then connect to the circuit to be monitored. 5. Route power wires in a save manner in accordance with good practice and local codes. 6. Wear proper personal protective equipment including safety glasses and insulted gloves when making connections to power circuits. 7. Ensure hands, shoes, and floor are dry before making any connection to a power line. 8. Make sure the unit is turned OFF before making connection to terminals. 9. Make sure all circuits are de-energized before making connections. 10. Before each use, inspect all cables for breaks or cracks in the insulation. Replace immediately if defective. 11. Use copper conductors in Field Wiring only, 60/75˚ C.
8 SAFETY
6 BATTERY
The XLe/t uses a replaceable non-rechargeable 3V Lithium coin-cell battery (CR2450) to run the Real-Time Clock and to keep the retained register values. This battery is designed to maintain the clock and memory for 7-10 years. Please reference MAN0878 providing instructions on how to replace the battery.
10 PART NUMBER BUILDER
EXAMPLE PART NUMBERS
A common cause of Analog Input Tranzorb Failure on Analog Inputs Model 2, 3, 4, 5 & 6: If a 4- 20mA circuit is initially wired with loop power, but without a load, the Analog inputcould see 24Vdc. This is higher than the rating of the tranzorb. This can be solvedby NOT connecting loop power prior to load connection, or by installing a low-cost PTC in series between the load and Analog input.
NOTE†: Refers to Model 2 – orange (pg. 1,) Models 3 & 4 – J1 (pg. 2) and Model 5 – 20mA Analog In (pg. 3.)
7 ANALOG INPUT TRANZORB FAILURE
HE-X 1 0 (model 0)2 (model 2)3 (model 3)4 (model 4)5 (model 5)6 (model 6)
I/O
O (no ethernet)E (ethernet)
ethernet
GLOBAL MODEL NUMBERS
E (no touchscreen) T (touchscreen)
screen
HEX C - 00 (model 0)12 (model 2)13 (model 3)14 (model 4)15 (model 5)16 (model 6)
I/O
O (no ethernet)1 (ethernet)
ethernet
EUROPEAN MODEL NUMBERS
E22 (no touchscreen) T24 (touchscreen)
screen
00 (dark colour)01 (llight colour)02 (blank)03-99 (custom)
overlay type
0 (no CAN*)1 (CsCAN)2 (CANopen)4 (DeviceNet)5 (J1939)
*No CAN is only available on XLe
CAN option


