
XML Developer’s Guide
V E R SI O N 8
Borland Software Corporation100 Enterprise Way, Scotts Valley, CA 95066-3249www.borland.com
Borland®
JBuilder®
Refer to the file deploy.html located in the redist directory of your JBuilder product for a complete list of files that you can distribute in accordance with the JBuilder License Statement and Limited Warranty.
Borland Software Corporation may have patents and/or pending patent applications covering subject matter in this document. Please refer to the product CD or the About dialog box for the list of applicable patents. The furnishing of this document does not give you any license to these patents.
COPYRIGHT © 1997–2002 Borland Software Corporation. All rights reserved. All Borland brand and product names are trademarks or registered trademarks of Borland Software Corporation in the United States and other countries. All other marks are the property of their respective owners.
For third-party conditions and disclaimers, see the Release Notes on your JBuilder product CD.
Printed in the U.S.A.
JBE0080WW21002xml 5E5R10020203040506-9 8 7 6 5 4 3 2 1PDF
i
Chapter 1Introduction 1-1Documentation conventions . . . . . . . . . . . 1-3Developer support and resources . . . . . . . . 1-4
Contacting Borland Technical Support. . . . 1-4Online resources . . . . . . . . . . . . . . . . 1-5World Wide Web . . . . . . . . . . . . . . . . 1-5Borland newsgroups . . . . . . . . . . . . . . 1-5Usenet newsgroups . . . . . . . . . . . . . . 1-6Reporting bugs . . . . . . . . . . . . . . . . . 1-6
Chapter 2Using JBuilder’s XML features 2-1XML features in the Java 2 Platform . . . . . . . 2-2Creating XML-related documents . . . . . . . . 2-2
Creating XML documents manually . . . . . 2-2Creating XML documents with wizards . . . 2-3
Creating an XML document from a DTD . . . . . . . . . . . . . . . . . . . 2-4
Creating a DTD from an XML document . . . . . . . . . . . . . . . . . 2-5
Viewing XML documents . . . . . . . . . . . . . 2-6Using the XML viewer . . . . . . . . . . . . . 2-7Setting XML options . . . . . . . . . . . . . . 2-9
General options . . . . . . . . . . . . . . . 2-10Transform Trace options . . . . . . . . . . 2-10
Validating XML documents. . . . . . . . . . . . 2-10Presenting XML documents . . . . . . . . . . . 2-13
Presenting XML with Cocoon. . . . . . . . . 2-13Creating a Cocoon web application. . . . 2-14Running Cocoon . . . . . . . . . . . . . .2-17
Transforming XML documents . . . . . . . . 2-18Applying internal stylesheets . . . . . . .2-19Applying external stylesheets . . . . . . . 2-20Setting transform trace options . . . . . . 2-21
Manipulating XML programmatically. . . . . .2-22Creating a SAX handler . . . . . . . . . . . . 2-23Manipulating XML through data
binding. . . . . . . . . . . . . . . . . . . . . 2-27The marshalling framework . . . . . . . . 2-27BorlandXML. . . . . . . . . . . . . . . . .2-28Castor . . . . . . . . . . . . . . . . . . . .2-29
Interfacing with business data in databases . . 2-31
Chapter 3Using JBuilder’s XML database components 3-1
Using the model-based components . . . . . . . 3-2XML-DBMS . . . . . . . . . . . . . . . . . . . 3-2JBuilder and XML-DBMS. . . . . . . . . . . . 3-3Creating a map document and a SQL
script file . . . . . . . . . . . . . . . . . . . . 3-4Setting properties for the model-based
components . . . . . . . . . . . . . . . . . . 3-8Setting properties with the
customizer . . . . . . . . . . . . . . . . . 3-8Setting properties with the Inspector . . 3-11
Using the template-based components . . . . . 3-11Setting properties for the template
beans . . . . . . . . . . . . . . . . . . . . . 3-12Setting properties with the
customizer . . . . . . . . . . . . . . . . 3-12Setting properties with the Inspector . . 3-19Setting properties with an XML query
document . . . . . . . . . . . . . . . . . 3-19
Chapter 4Tutorial: Creating and validating XML documents 4-1
Step 1: Creating an XML document. . . . . . . . 4-2Creating an XML document manually . . . . 4-2Creating an XML document with the
DTD To XML wizard . . . . . . . . . . . . . 4-3Step 2: Validating the XML document . . . . . . 4-6Step 3: Viewing the XML document . . . . . . . 4-7
Chapter 5Tutorial: Transforming XML documents 5-1
Step 1: Enabling the XML viewer . . . . . . . . . 5-2Step 2: Associating stylesheets with
the document . . . . . . . . . . . . . . . . . . . 5-3Step 3: Transforming the document using
stylesheets . . . . . . . . . . . . . . . . . . . . . 5-3Step 4: Setting transform trace options . . . . . . 5-4
Contents
ii
Chapter 6Tutorial: Creating a SAX Handler for parsing XML documents 6-1
Step 1: Using the SAX Handler wizard . . . . . 6-2Step 2: Editing the SAX parser . . . . . . . . . . 6-4Step 3: Running the program . . . . . . . . . . . 6-7Step 4: Adding attributes . . . . . . . . . . . . . 6-8MySaxParser.java source code . . . . . . . . . . 6-10
Chapter 7Tutorial: DTD data binding with BorlandXML 7-1
Step 1: Generating Java classes from a DTD . . 7-2Step 2: Unmarshalling the data. . . . . . . . . . 7-5Step 3: Adding an employee record . . . . . . . 7-6Step 4: Modifying an employee record . . . . . 7-7Step 5: Running the completed application . . . 7-8
Chapter 8Tutorial: Schema data binding with Castor 8-1
Step 1: Generating Java classes from a schema. . . . . . . . . . . . . . . . . . . . . . . 8-2
Step 2: Unmarshalling the data. . . . . . . . . . 8-5Step 3: Adding an employee record . . . . . . . 8-6Step 4: Modifying the new employee data . . . 8-6Step 5: Running the completed application . . . 8-7
Chapter 9Tutorial: Transferring data with the model-based XML database components 9-1
Step 1: Getting started . . . . . . . . . . . . . . . 9-2Step 2: Creating the map and SQL script files . 9-4
Entering JDBC connection information . . . 9-4Testing the connection . . . . . . . . . . . 9-5
Specifying the file names . . . . . . . . . . . 9-6
Step 3: Creating the database tables. . . . . . . . 9-7Step 4: Working with the sample test
application . . . . . . . . . . . . . . . . . . . . . 9-8Using XMLDBMSTable’s customizer . . . . . 9-9
Selecting and testing a JDBC connection . . . . . . . . . . . . . . . . . 9-9
Transferring data from XML to the database. . . . . . . . . . . . . . . . 9-10
Transferring data from the database to XML . . . . . . . . . . . . . . . . . . 9-11
Using XMLDBMSQuery’s customizer . . . 9-14Selecting and testing a JDBC
connection . . . . . . . . . . . . . . . . 9-14Transferring data with a SQL
statement . . . . . . . . . . . . . . . . . 9-14Understanding the map file . . . . . . . 9-16
Chapter 10Tutorial: Transferring data with the template-based XML database components 10-1
Step 1: Getting started . . . . . . . . . . . . . . 10-2Step 2: Working with the sample test
application . . . . . . . . . . . . . . . . . . . . 10-2Step 3: Using XTable’s customizer . . . . . . . 10-3
Entering JDBC connection information . . . 10-3Transferring data from the database
to XML . . . . . . . . . . . . . . . . . . . . 10-4Step 4: Using XQuery’s customizer . . . . . . . 10-6
Selecting a JDBC connection . . . . . . . . . 10-7Transferring data with a SQL statement . . 10-7
Index I-1
iii
2.1 DTD with ATTLIST definitions . . . . . . 2-52.2 XML created by the wizard. . . . . . . . . 2-52.3 XML view with default stylesheet . . . . . 2-72.4 XML view without a stylesheet . . . . . . 2-72.5 Cascading stylesheet source . . . . . . . . 2-82.6 XML document with stylesheet
instruction . . . . . . . . . . . . . . . . . . 2-82.7 XML document with cascading
stylesheet applied . . . . . . . . . . . . . . 2-92.8 Errors folder in structure pane . . . . . . . 2-112.9 XML validation errors using a DTD . . . . 2-122.10 XML validation errors using schema . . .2-13
2.11 XML source code for index.xml . . . . . . 2-172.12 Stylesheet source code for index.xsl . . . 2-172.13 Web view of index.xml . . . . . . . . . . . 2-182.14 Web view source of index.xml. . . . . . . 2-182.15 Transform view toolbar . . . . . . . . . . 2-192.16 Transform view with external
stylesheet applied. . . . . . . . . . . . . . 2-202.17 Transform view without a stylesheet . . . 2-212.18 Transform view with default
stylesheet tree view. . . . . . . . . . . . . 2-212.19 Marshalling framework . . . . . . . . . . 2-27
Figures
iv
Creating and validating XML documents. . . . 4-1Transforming XML documents . . . . . . . . . . 5-1Creating a SAX Handler for parsing XML
documents . . . . . . . . . . . . . . . . . . . . 6-1DTD data binding with BorlandXML . . . . . . 7-1
Schema data binding with Castor . . . . . . . . . 8-1Transferring data with the model-based
XML database components . . . . . . . . . . . 9-1Transferring data with the template-based
XML database components . . . . . . . . . . 10-1
Tutorials
I n t r o d u c t i o n 1-1
C h a p t e r
1Chapter1Introduction
XML support is a featureof JBuilder SE and
Enterprise
The XML Developer’s Guide explains how to use JBuilder’s XML features and contains the following chapters:
• Chapter 2, “Using JBuilder’s XML features”
Explains how to use JBuilder’s XML features. This chapter contains the following topics:
• “Creating XML-related documents”
• “Viewing XML documents”
• “Validating XML documents”
• “Presenting XML documents” This is a feature of JBuilder Enterprise.
• “Manipulating XML programmatically” This is a feature of JBuilder Enterprise.
• Chapter 3, “Using JBuilder’s XML database components”
Explains how to use the XML model and template bean components for database queries and transfer of data between XML documents and databases. This is a feature of JBuilder Enterprise.
• Tutorials:
Available in JBuilder SE and Enterprise:
• Chapter 4, “Tutorial: Creating and validating XML documents”
Explains how to use JBuilder’s XML features to create and validate an XML document.
1-2 X M L D e v e l o p e r ’ s G u i d e
I n t r o d u c t i o n
Available in JBuilder Enterprise:
• Chapter 5, “Tutorial: Transforming XML documents”
Explains how to use JBuilder’s XML features to transform XML documents using stylesheets.
• Chapter 6, “Tutorial: Creating a SAX Handler for parsing XML documents”
Create a SAX parser for parsing your XML documents using JBuilder’s SAX Handler wizard.
• Chapter 7, “Tutorial: DTD data binding with BorlandXML”
Explains how to use JBuilder’s XML data binding features using DTDs and BorlandXML.
• Chapter 8, “Tutorial: Schema data binding with Castor”
Explains how to use JBuilder’s XML data binding features using schema and Castor.
• Chapter 9, “Tutorial: Transferring data with the model-based XML database components”
Explains how to use JBuilder’s model-based XML database components to transfer data from an XML document to a database and retrieve that data back again from the database to an XML document. It also explains how to use the XML-DBMS wizard to create the required map file used in the transferring of data and how to create a SQL script file you can use to create the database.
• Chapter 10, “Tutorial: Transferring data with the template-based XML database components”
Explains how to use JBuilder’s template-based XML database components to retrieve data from a database to an XML file.
For an explanation of documentation conventions, see “Documentation conventions” on page 1-3.
I n t r o d u c t i o n 1-3
D o c u m e n t a t i o n c o n v e n t i o n s
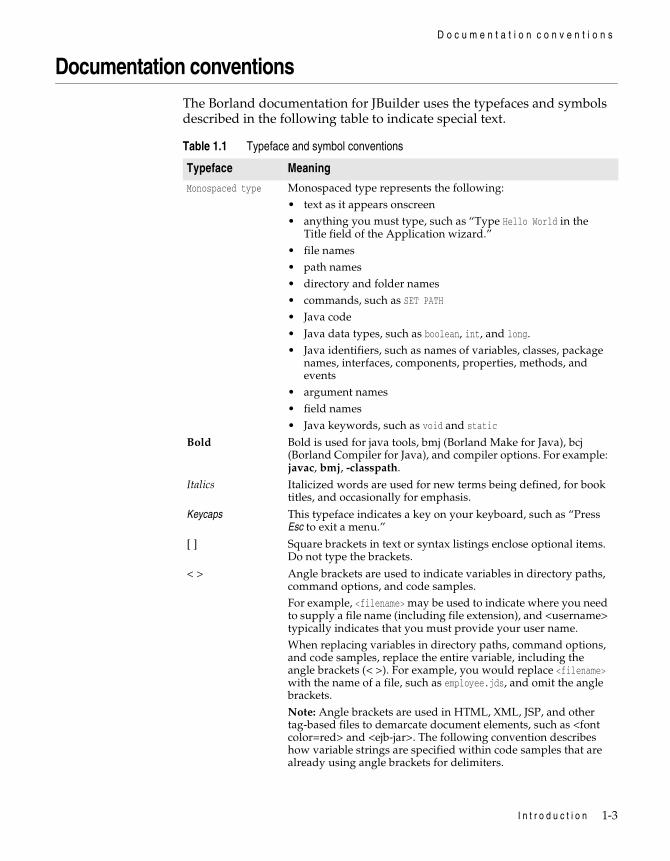
Documentation conventionsThe Borland documentation for JBuilder uses the typefaces and symbols described in the following table to indicate special text.
Table 1.1 Typeface and symbol conventions
Typeface Meaning
Monospaced type Monospaced type represents the following:• text as it appears onscreen• anything you must type, such as “Type Hello World in the
Title field of the Application wizard.”• file names• path names• directory and folder names• commands, such as SET PATH• Java code• Java data types, such as boolean, int, and long.• Java identifiers, such as names of variables, classes, package
names, interfaces, components, properties, methods, and events
• argument names• field names• Java keywords, such as void and static
Bold Bold is used for java tools, bmj (Borland Make for Java), bcj (Borland Compiler for Java), and compiler options. For example: javac, bmj, -classpath.
Italics Italicized words are used for new terms being defined, for book titles, and occasionally for emphasis.
Keycaps This typeface indicates a key on your keyboard, such as “Press Esc to exit a menu.”
[ ] Square brackets in text or syntax listings enclose optional items. Do not type the brackets.
< > Angle brackets are used to indicate variables in directory paths, command options, and code samples.For example, <filename> may be used to indicate where you need to supply a file name (including file extension), and <username> typically indicates that you must provide your user name.When replacing variables in directory paths, command options, and code samples, replace the entire variable, including the angle brackets (< >). For example, you would replace <filename> with the name of a file, such as employee.jds, and omit the angle brackets.Note: Angle brackets are used in HTML, XML, JSP, and other tag-based files to demarcate document elements, such as <font color=red> and <ejb-jar>. The following convention describes how variable strings are specified within code samples that are already using angle brackets for delimiters.
1-4 X M L D e v e l o p e r ’ s G u i d e
D e v e l o p e r s u p p o r t a n d r e s o u r c e s
JBuilder is available on multiple platforms. See the following table for a description of platform conventions used in the documentation.
Developer support and resourcesBorland provides a variety of support options and information resources to help developers get the most out of their Borland products. These options include a range of Borland Technical Support programs, as well as free services on the Internet, where you can search our extensive information base and connect with other users of Borland products.
Contacting Borland Technical Support
Borland offers several support programs for customers and prospective customers. You can choose from several categories of support, ranging from free support on installation of the Borland product to fee-based consultant-level support and extensive assistance.
Italics, serif This formatting is used to indicate variable strings within code samples that are already using angle brackets as delimiters. For example, <url="jdbc:borland:jbuilder\\samples\\guestbook.jds">
... In code examples, an ellipsis (...) indicates code that has been omitted from the example to save space and improve clarity. On a button, an ellipsis indicates that the button links to a selection dialog box.
Table 1.2 Platform conventions
Item Meaning
Paths Directory paths in the documentation are indicated with a forward slash (/).For Windows platforms, use a backslash (\).
Home directory The location of the standard home directory varies by platform and is indicated with a variable, <home>.• For UNIX and Linux, the home directory can vary. For
example, it could be /user/<username> or /home/<username>• For Windows NT, the home directory is C:\Winnt\Profiles\
<username>
• For Windows 2000 and XP, the home directory is C:\Documents and Settings\<username>
Screen shots Screen shots reflect the Metal Look & Feel on various platforms.
Table 1.1 Typeface and symbol conventions (continued)
Typeface Meaning
I n t r o d u c t i o n 1-5
D e v e l o p e r s u p p o r t a n d r e s o u r c e s
For more information about Borland’s developer support services, see our web site at http://www.borland.com/devsupport/, call Borland Assist at (800) 523-7070, or contact our Sales Department at (831) 431-1064.
When contacting support, be prepared to provide complete information about your environment, the version of the product you are using, and a detailed description of the problem.
For support on third-party tools or documentation, contact the vendor of the tool.
Online resources
You can get information from any of these online sources:
World Wide Web
Check www.borland.com/jbuilder regularly. This is where the Java Products Development Team posts white papers, competitive analyses, answers to frequently asked questions, sample applications, updated software, updated documentation, and information about new and existing products.
You may want to check these URLs in particular:
• http://www.borland.com/jbuilder/ (updated software and other files)
• http://www.borland.com/techpubs/jbuilder/ (updated documentation and other files)
• http://community.borland.com/ (contains our web-based news magazine for developers)
Borland newsgroups
You can register JBuilder and participate in many threaded discussion groups devoted to JBuilder. The Borland newsgroups provide a means for the global community of Borland customers to exchange tips and techniques about Borland products and related tools and technologies.
World Wide Web http://www.borland.com/
FTP ftp://ftp.borland.com/
Technical documents available by anonymous ftp.
Listserv To subscribe to electronic newsletters, use the online form at: http://info.borland.com/contact/listserv.html
or, for Borland’s international listserver, http://info.borland.com/contact/intlist.html
1-6 X M L D e v e l o p e r ’ s G u i d e
D e v e l o p e r s u p p o r t a n d r e s o u r c e s
You can find user-supported newsgroups for JBuilder and other Borland products at http://www.borland.com/newsgroups/.
Usenet newsgroups
The following Usenet groups are devoted to Java and related programming issues:
• news:comp.lang.java.advocacy • news:comp.lang.java.announce • news:comp.lang.java.beans • news:comp.lang.java.databases • news:comp.lang.java.gui • news:comp.lang.java.help • news:comp.lang.java.machine • news:comp.lang.java.programmer • news:comp.lang.java.security • news:comp.lang.java.softwaretools
Note These newsgroups are maintained by users and are not official Borland sites.
Reporting bugs
If you find what you think may be a bug in the software, please report it in the Support Programs page at http://www.borland.com/devsupport/namerica/. Click the “Reporting Defects” link to bring up the Entry Form.
When you report a bug, please include all the steps needed to reproduce the bug, including any special environmental settings you used and other programs you were using with JBuilder. Please be specific about the expected behavior versus what actually happened.
If you have comments (compliments, suggestions, or issues) for the JBuilder documentation team, you may email [email protected]. This is for documentation issues only. Please note that you must address support issues to developer support.
JBuilder is made by developers for developers. We really value your input.
U s i n g J B u i l d e r ’ s X M L f e a t u r e s 2-1
C h a p t e r
2Chapter2Using JBuilder’s XML features
XML support is a featureof JBuilder SE and
Enterprise
JBuilder provides several features and incorporates various tools to provide support for the Extensible Markup Language (XML). XML is a platform-independent method of structuring information. Because XML separates the content of a document from the structure, it can be a useful means of exchanging data. For example, XML can be used to transfer data between databases and Java programs. Also, because content and structure are separate, stylesheets can be applied to display the same content in different formats, such as Portable Document Format (PDF), HTML for display in a web browser, and so on.
XML features vary by JBuilder edition. JBuilder SE provides these features: manually creating XML documents, viewing XML documents in the XML browser, and validating XML documents. All XML features are included in JBuilder Enterprise.
In working with XML, JBuilder separates functionality into several layers:
• Creation and validation of XML documents
These are features of JBuilder Enterprise:
• Presentation of XML documents
• Programmatic manipulation of XML documents
• Interface to business data in databases
See also
• World Wide Web Consortium (W3C) at http://www.w3.org/
• The XML Cover Pages at http://www.oasis-open.org/cover/sgml-xml.html or http://xml.coverpages.org/
• XML.org at http://xml.org/
2-2 X M L D e v e l o p e r ’ s G u i d e
X M L f e a t u r e s i n t h e J a v a 2 P l a t f o r m
Additional XML resources are also included in the full JBuilder installation in the extras directory: Xerces, Xalan, Castor, Borland XML. and Cocoon. Documentation, Javadoc, and samples are also included.
XML features in the Java 2 PlatformJDK 1.4 includes the Java API for XML Processing (JAXP). JAXP includes the basic facilities for working with XML documents: Document Object Model (DOM), Simple API for XML Parsing (SAX), XSL Transformations (XSLT), and a pluggability layer for parsers. The JDK includes Crimson as the default parsing implementation and Xalan-J as the XSLT processor.
For more information on these features, see http://java.sun.com/j2se/1.4/docs/guide/xml/jaxp/index.html and http://java.sun.com/xml/jaxp/index.html.
Creating XML-related documentsJBuilder provides a variety of features that allow you to create, edit, view, and validate your XML documents without ever leaving the development environment. You can manually create your XML-related documents, use wizards to create them for you in JBuilder Enterprise, view them in the XML viewer, edit the text in JBuilder’s editor, find errors, and finally, validate documents. Although DTD documents aren’t XML documents, they are included in this discussion, because they are related to XML documents.
To see a tutorial on creating XML documents, see Chapter 4, “Tutorial: Creating and validating XML documents.”
Creating XML documents manually
This is a feature ofJBuilder SE and
Enterprise
The JBuilder editor provides full support for creating XML-related documents. If you name a file with an XML-related extension, such as DTD, XSD, XSL, and XML, the editor automatically recognizes it as an XML-related document.
To create a new XML document in your project,
1 Open a project.
2 Choose Project|Add Files/Packages.
3 Choose the Explorer tab, browse to the project directory, and enter a file name with the appropriate file extension in the File Name field, such as .dtd, xml, or xsd.
4 Click OK.
U s i n g J B u i l d e r ’ s X M L f e a t u r e s 2-3
C r e a t i n g X M L - r e l a t e d d o c u m e n t s
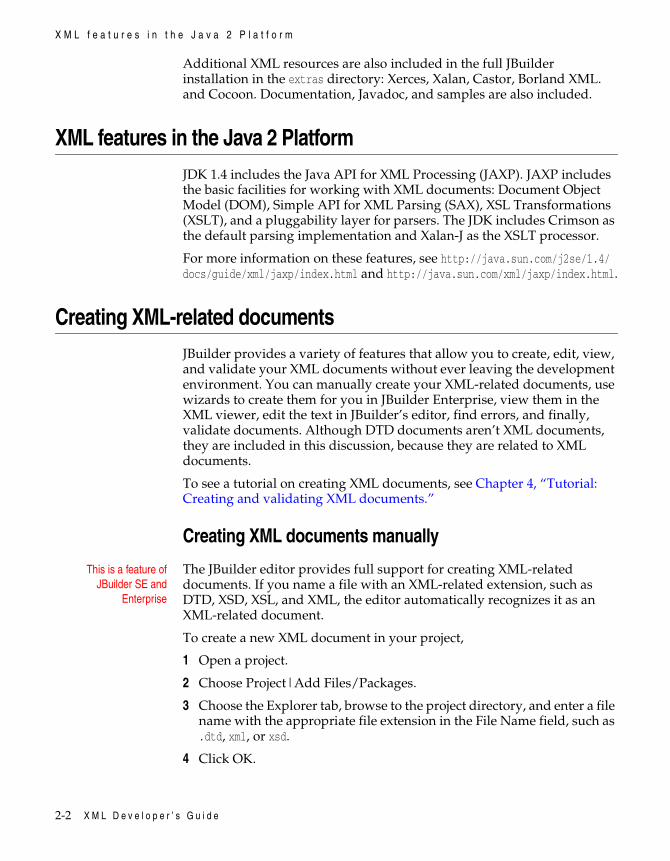
5 Click OK again when prompted to create the new file. The new file is added to the project and appears in the project pane with the appropriate XML icon.
6 Open the file in the editor and enter the appropriate text. Notice that the editor uses syntax highlighting to differentiate elements and attributes. By default, elements are blue and attributes are red.
7 Save the project.
Two editor features assist you in working with XML documents:
• Syntax highlighting• Error messages
The editor uses syntax highlighting to display XML elements and attributes in different colors to visually differentiate them. XML elements are blue and attributes are red. To customize the colors in the editor, choose Tools|Editor Options|Color. To change the element color, select HTML Tag in the Screen Element list and choose the desired color. To change the attribute color, select HTML Attribute in the Screen Element list and choose the desired color.
The editor also dynamically displays error messages in an Errors folder in the structure pane as you type. Click an error message in the structure pane to highlight it in the editor. Double-click the error message to change the focus to the line of code in the editor. Note that the line of code indicated by the error message may not be the origin of the error.
Creating XML documents with wizardsThese are features of
JBuilder EnterpriseJBuilder provides wizards for creating XML-related documents within the IDE:
• Creating an XML document from a DTD• Creating a DTD from XML documents
These wizards are available from the context menu in the project pane and from the XML page of the object gallery (File|New).
2-4 X M L D e v e l o p e r ’ s G u i d e
C r e a t i n g X M L - r e l a t e d d o c u m e n t s
Tip You can also create empty XML-related documents, and the editor recognizes the file type and provides syntax highlighting. See “Creating XML documents manually” on page 2-2.
Creating an XML document from a DTDThe DTD To XML wizard is a quick way to create an XML document from an existing Document Type Definition (DTD). The DTD is a set of rules that describes the structure of the XML document. Validating parsers use the DTD to validate the XML markup. The DTD To XML wizard creates an XML template from the DTD with pcdata placeholders. Replace the pcdata placeholders with your own content.
To create an XML document from a DTD,
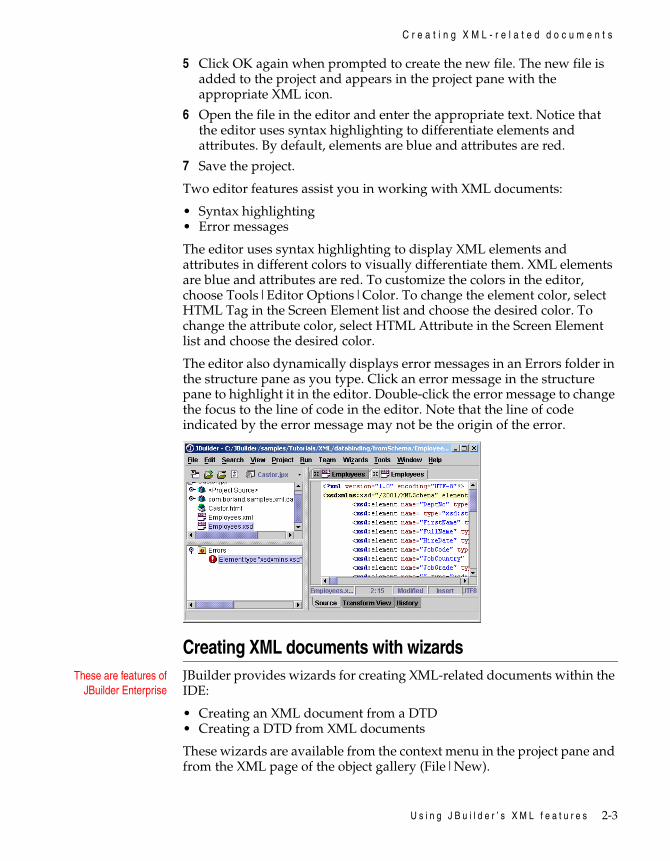
1 Right-click the DTD file in the project pane and choose Generate XML. This will automatically enter the DTD file name in the Input DTD File field of the wizard. You can also access this wizard on the XML page of the object gallery (File|New).
2 Select the root element from the Root Element drop-down list. The root element, the first element in the document, contains all the other elements in the document.
3 Accept the default file name in the Output XML File field or click the ellipsis (...) button to enter a file name for the XML document.
4 Optional: Enter any identifiers for the DOCTYPE declaration.
• Public: enter the URI for the specified standards library.
<!DOCTYPE HTML PUBLIC "-//W3C//DTD HTML3.2 Final//EN">
• System: enter the name of the DTD file.
<!DOCTYPE root SYSTEM "Employees.dtd">
U s i n g J B u i l d e r ’ s X M L f e a t u r e s 2-5
C r e a t i n g X M L - r e l a t e d d o c u m e n t s
5 Click OK to close the wizard. The XML document is added to the project and appears in the project pane.
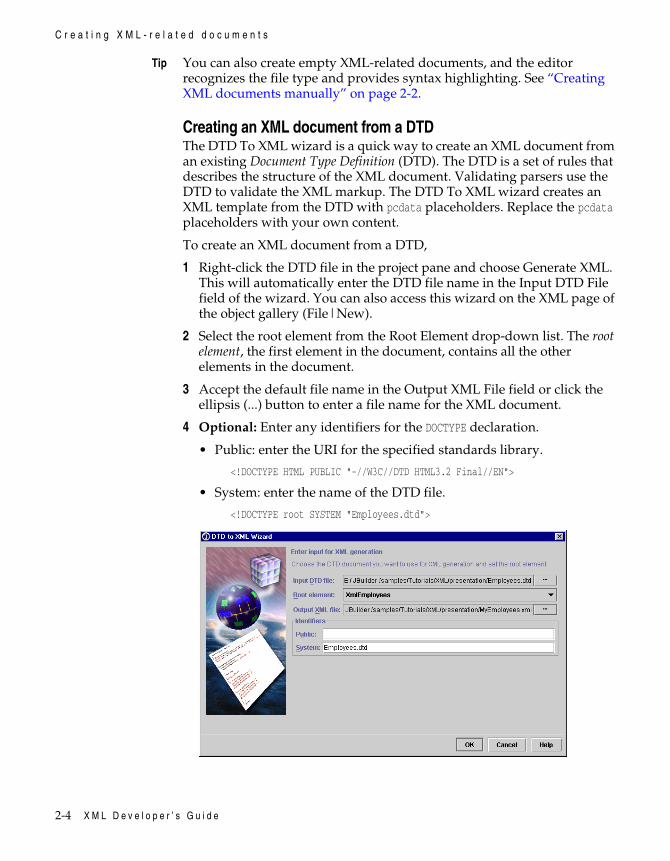
The wizard also handles attributes, which are used to further define elements, and converts the ATTLIST definitions in the DTD into attributes in the XML document. The ATTLIST keyword in the DTD is used to list the elements’ attributes. This attribute list includes the attribute name, values, and defaults.
Figure 2.1 DTD with ATTLIST definitions
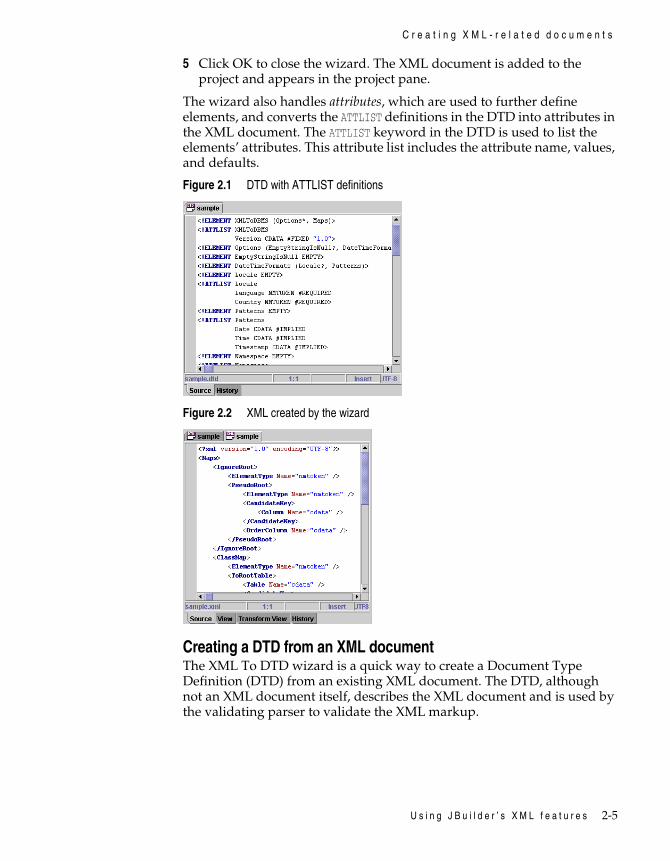
Figure 2.2 XML created by the wizard
Creating a DTD from an XML documentThe XML To DTD wizard is a quick way to create a Document Type Definition (DTD) from an existing XML document. The DTD, although not an XML document itself, describes the XML document and is used by the validating parser to validate the XML markup.
2-6 X M L D e v e l o p e r ’ s G u i d e
V i e w i n g X M L d o c u m e n t s
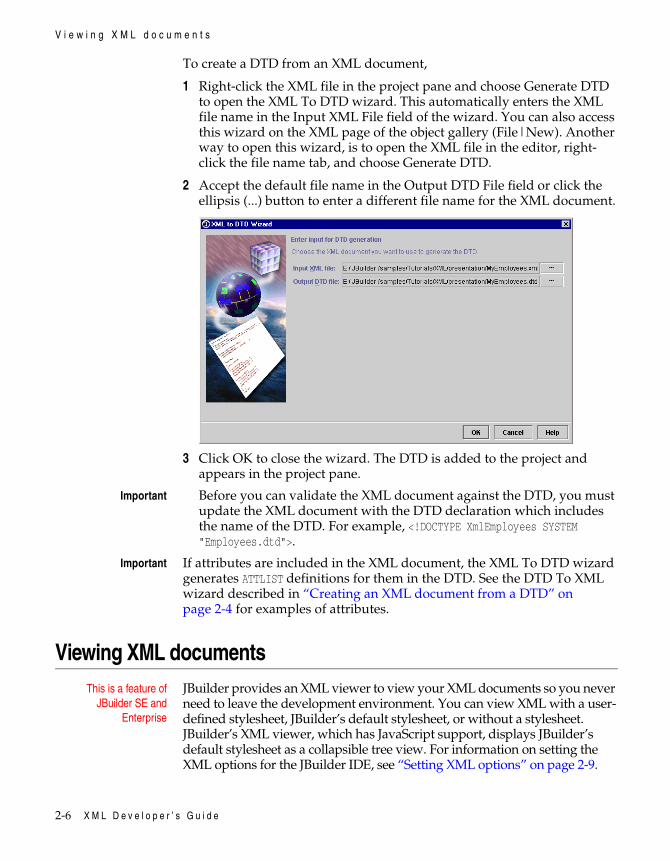
To create a DTD from an XML document,
1 Right-click the XML file in the project pane and choose Generate DTD to open the XML To DTD wizard. This automatically enters the XML file name in the Input XML File field of the wizard. You can also access this wizard on the XML page of the object gallery (File|New). Another way to open this wizard, is to open the XML file in the editor, right-click the file name tab, and choose Generate DTD.
2 Accept the default file name in the Output DTD File field or click the ellipsis (...) button to enter a different file name for the XML document.
3 Click OK to close the wizard. The DTD is added to the project and appears in the project pane.
Important Before you can validate the XML document against the DTD, you must update the XML document with the DTD declaration which includes the name of the DTD. For example, <!DOCTYPE XmlEmployees SYSTEM "Employees.dtd">.
Important If attributes are included in the XML document, the XML To DTD wizard generates ATTLIST definitions for them in the DTD. See the DTD To XML wizard described in “Creating an XML document from a DTD” on page 2-4 for examples of attributes.
Viewing XML documentsThis is a feature of
JBuilder SE andEnterprise
JBuilder provides an XML viewer to view your XML documents so you never need to leave the development environment. You can view XML with a user-defined stylesheet, JBuilder’s default stylesheet, or without a stylesheet. JBuilder’s XML viewer, which has JavaScript support, displays JBuilder’s default stylesheet as a collapsible tree view. For information on setting the XML options for the JBuilder IDE, see “Setting XML options” on page 2-9.
U s i n g J B u i l d e r ’ s X M L f e a t u r e s 2-7
V i e w i n g X M L d o c u m e n t s
Using the XML viewer
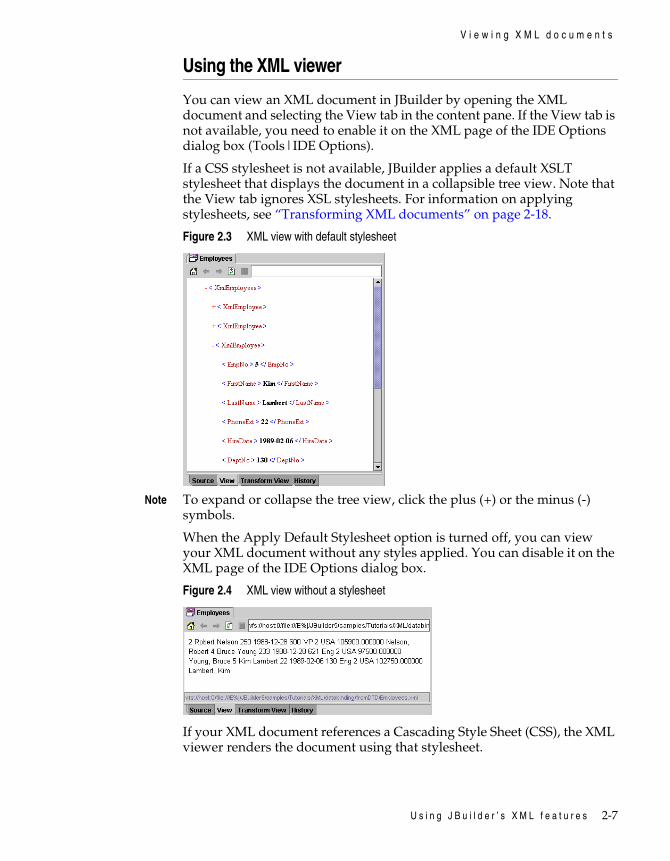
You can view an XML document in JBuilder by opening the XML document and selecting the View tab in the content pane. If the View tab is not available, you need to enable it on the XML page of the IDE Options dialog box (Tools|IDE Options).
If a CSS stylesheet is not available, JBuilder applies a default XSLT stylesheet that displays the document in a collapsible tree view. Note that the View tab ignores XSL stylesheets. For information on applying stylesheets, see “Transforming XML documents” on page 2-18.
Figure 2.3 XML view with default stylesheet
Note To expand or collapse the tree view, click the plus (+) or the minus (-) symbols.
When the Apply Default Stylesheet option is turned off, you can view your XML document without any styles applied. You can disable it on the XML page of the IDE Options dialog box.
Figure 2.4 XML view without a stylesheet
If your XML document references a Cascading Style Sheet (CSS), the XML viewer renders the document using that stylesheet.
2-8 X M L D e v e l o p e r ’ s G u i d e
V i e w i n g X M L d o c u m e n t s
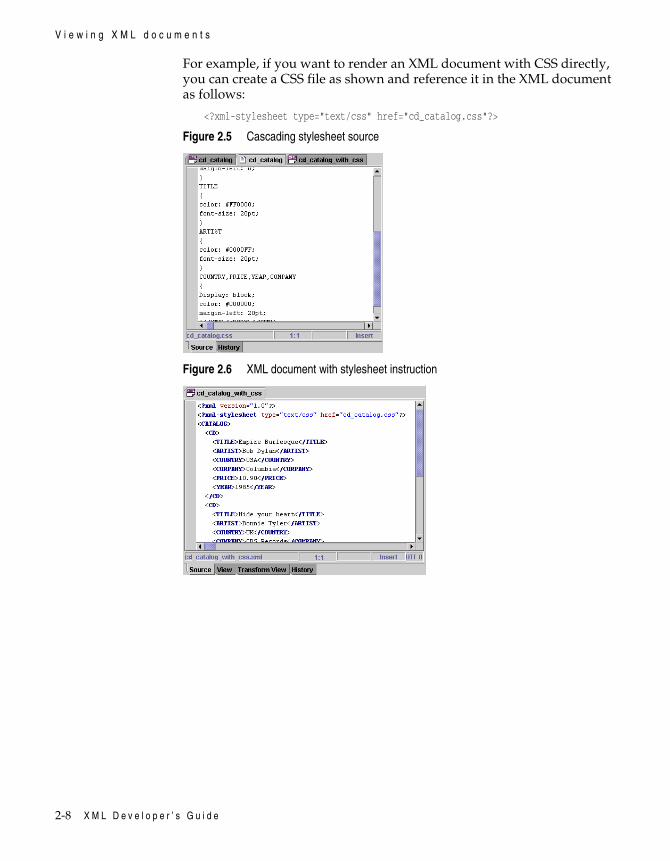
For example, if you want to render an XML document with CSS directly, you can create a CSS file as shown and reference it in the XML document as follows:
<?xml-stylesheet type="text/css" href="cd_catalog.css"?>
Figure 2.5 Cascading stylesheet source
Figure 2.6 XML document with stylesheet instruction
U s i n g J B u i l d e r ’ s X M L f e a t u r e s 2-9
V i e w i n g X M L d o c u m e n t s
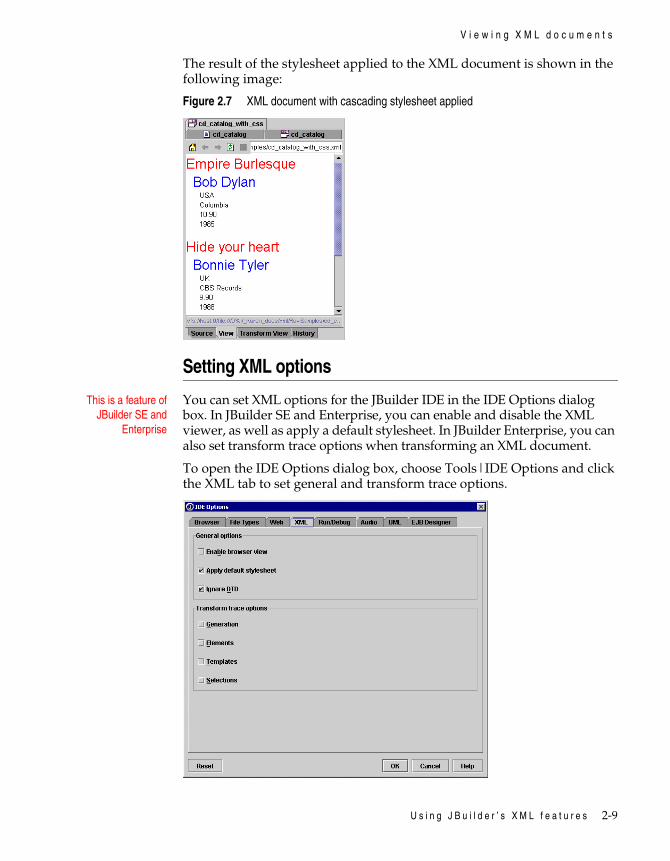
The result of the stylesheet applied to the XML document is shown in the following image:
Figure 2.7 XML document with cascading stylesheet applied
Setting XML options
This is a feature ofJBuilder SE and
Enterprise
You can set XML options for the JBuilder IDE in the IDE Options dialog box. In JBuilder SE and Enterprise, you can enable and disable the XML viewer, as well as apply a default stylesheet. In JBuilder Enterprise, you can also set transform trace options when transforming an XML document.
To open the IDE Options dialog box, choose Tools|IDE Options and click the XML tab to set general and transform trace options.
2-10 X M L D e v e l o p e r ’ s G u i d e
V a l i d a t i n g X M L d o c u m e n t s
General optionsThe General options include the following:
• Enable Browser View: enables JBuilder’s XML viewer. When this option is enabled, a View tab is available in the content pane.
• Apply Default Stylesheet: applies a default stylesheet (XSL), which is a tree view, to the XML document displayed in the XML viewer (View tab of the content pane).
Note This is different from the Default Stylesheet button on the transform view toolbar, which applies a tree view to the transformation displayed in the transform view of the content pane.
• Ignore DTD: ignore DTDs when parsing XML files. When this option ischecked, JBuilder doesn’t resolve the DTD and doesn’t report any errors in the structure pane. This makes it possible to work offline and also results in faster response time if you’re working online. If this option is checked, the editor must resolve the DTD each time and also reports any errors in the structure pane.
Transform Trace optionsTransform Trace optionsare features of JBuilder
Enterprise
Set transform trace options so that after a transformation occurs, you can follow the sequence in which the various stylesheet elements were applied. The Transform Trace options include the following:
• Generation: outputs information after each result tree generation event, such as start document, start element, characters, and so on.
• Templates: outputs an event when a template is invoked. For example, xsl:template match='stocks'.
• Elements: outputs events that occur as each node is executed in the stylesheet. For example, xsl:value-of select='borland'.
• Selections: outputs information after each selection event. For example xsl:value-of, select='borland@StockQuote':StockQuote.
For more information on XML transformation, see “Transforming XML documents” on page 2-18.
Validating XML documentsThis is a feature of
JBuilder SE andEnterprise
In XML, there are two types of validation: well-formedness and grammatical validity. Well-formed documents must follow the XML rules for the physical document structure and syntax. For example, all elements require end tags and an XML declaration is required at the top of the document. Also, all XML documents must have a single root element, the first element in the document which contains all the other elements.
U s i n g J B u i l d e r ’ s X M L f e a t u r e s 2-11
V a l i d a t i n g X M L d o c u m e n t s
In contrast, a valid XML document is a well-formed document that also conforms to the stricter rules specified in the Document Type Definition (DTD) or in the schema (XSD). The DTD describes a document’s structure, specifies which element types are allowed, and defines the properties for each element. A well-formed document is not checked against an external DTD.
Schemas, like DTDs, describe the structure of the document. But schemas are more powerful than DTDs, because they can also describe the structure of other information, such as databases. They also provide additional information about inheritance and data types in the XML document.
JBuilder integrates the Xerces parser to provide XML parsing for validating XML documents. For information about Xerces, see the Xerces documentation and samples available in the extras directory of the JBuilder full installation or visit the Apache web site at http://xml.apache.org/.
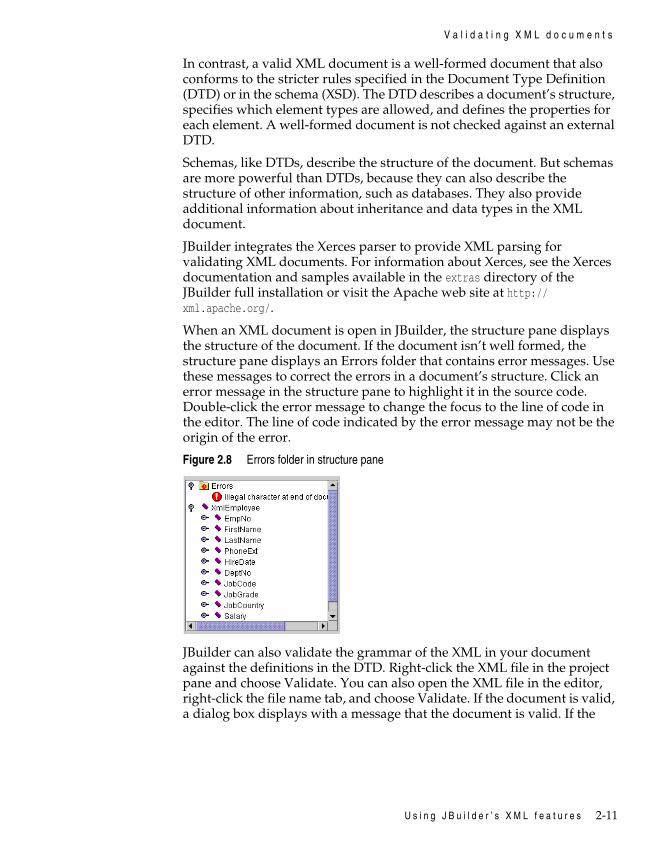
When an XML document is open in JBuilder, the structure pane displays the structure of the document. If the document isn’t well formed, the structure pane displays an Errors folder that contains error messages. Use these messages to correct the errors in a document’s structure. Click an error message in the structure pane to highlight it in the source code. Double-click the error message to change the focus to the line of code in the editor. The line of code indicated by the error message may not be the origin of the error.
Figure 2.8 Errors folder in structure pane
JBuilder can also validate the grammar of the XML in your document against the definitions in the DTD. Right-click the XML file in the project pane and choose Validate. You can also open the XML file in the editor, right-click the file name tab, and choose Validate. If the document is valid, a dialog box displays with a message that the document is valid. If the
2-12 X M L D e v e l o p e r ’ s G u i d e
V a l i d a t i n g X M L d o c u m e n t s
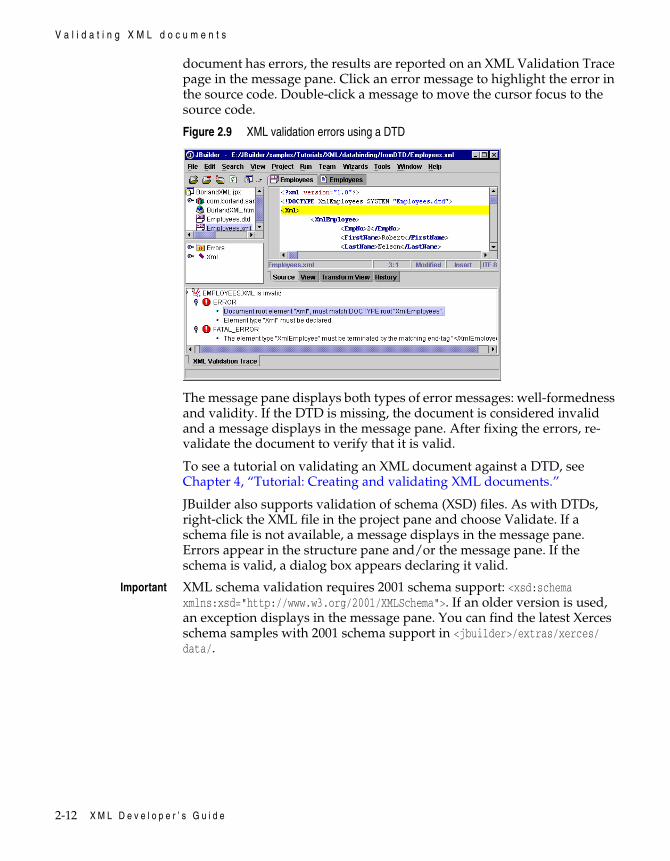
document has errors, the results are reported on an XML Validation Trace page in the message pane. Click an error message to highlight the error in the source code. Double-click a message to move the cursor focus to the source code.
Figure 2.9 XML validation errors using a DTD
The message pane displays both types of error messages: well-formedness and validity. If the DTD is missing, the document is considered invalid and a message displays in the message pane. After fixing the errors, re-validate the document to verify that it is valid.
To see a tutorial on validating an XML document against a DTD, see Chapter 4, “Tutorial: Creating and validating XML documents.”
JBuilder also supports validation of schema (XSD) files. As with DTDs, right-click the XML file in the project pane and choose Validate. If a schema file is not available, a message displays in the message pane. Errors appear in the structure pane and/or the message pane. If the schema is valid, a dialog box appears declaring it valid.
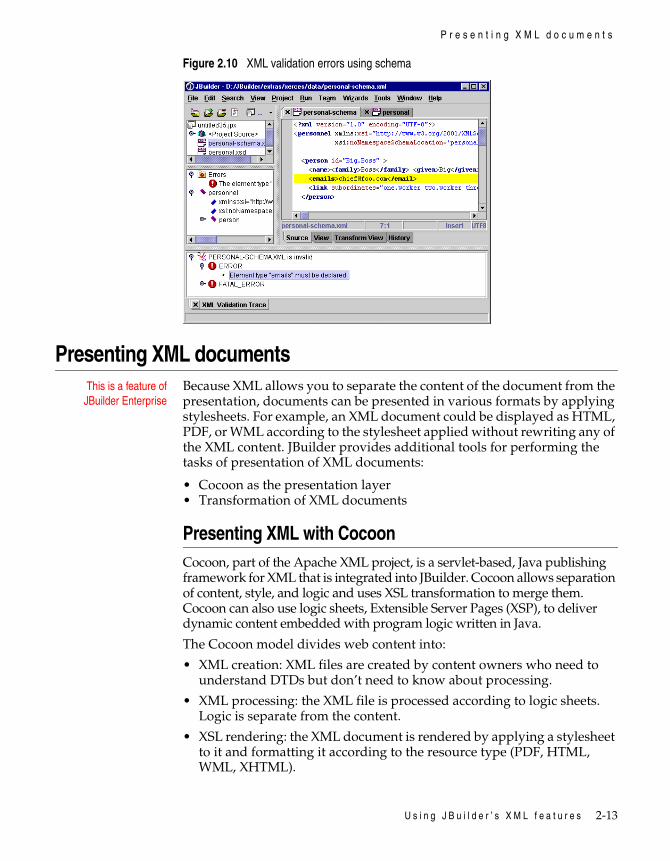
Important XML schema validation requires 2001 schema support: <xsd:schema xmlns:xsd="http://www.w3.org/2001/XMLSchema">. If an older version is used, an exception displays in the message pane. You can find the latest Xerces schema samples with 2001 schema support in <jbuilder>/extras/xerces/data/.
U s i n g J B u i l d e r ’ s X M L f e a t u r e s 2-13
P r e s e n t i n g X M L d o c u m e n t s
Figure 2.10 XML validation errors using schema
Presenting XML documentsThis is a feature of
JBuilder EnterpriseBecause XML allows you to separate the content of the document from the presentation, documents can be presented in various formats by applying stylesheets. For example, an XML document could be displayed as HTML, PDF, or WML according to the stylesheet applied without rewriting any of the XML content. JBuilder provides additional tools for performing the tasks of presentation of XML documents:
• Cocoon as the presentation layer• Transformation of XML documents
Presenting XML with CocoonCocoon, part of the Apache XML project, is a servlet-based, Java publishing framework for XML that is integrated into JBuilder. Cocoon allows separation of content, style, and logic and uses XSL transformation to merge them. Cocoon can also use logic sheets, Extensible Server Pages (XSP), to deliver dynamic content embedded with program logic written in Java.
The Cocoon model divides web content into:
• XML creation: XML files are created by content owners who need to understand DTDs but don’t need to know about processing.
• XML processing: the XML file is processed according to logic sheets. Logic is separate from the content.
• XSL rendering: the XML document is rendered by applying a stylesheet to it and formatting it according to the resource type (PDF, HTML, WML, XHTML).
2-14 X M L D e v e l o p e r ’ s G u i d e
P r e s e n t i n g X M L d o c u m e n t s
For complete information about using Cocoon, see the Cocoon documentation and samples in the extras/cocoon directory of your JBuilder installation or visit the Apache web site at http://xml.apache.org/cocoon/index.html.
For more information on web applications, see the Web Application Developer’s Guide.
Creating a Cocoon web applicationThere are two ways to create a Cocoon web application:
• Cocoon Web Application wizard
• Web Application wizard
When you create a Cocoon web application with either of these wizards, Cocoon is configured to use the version of Cocoon that’s bundled with JBuilder.
To create a Cocoon web application with the Cocoon Web Application wizard,
1 Create a project with the Project wizard (File|New Project).
2 Choose File|New and choose the XML tab of the object gallery.
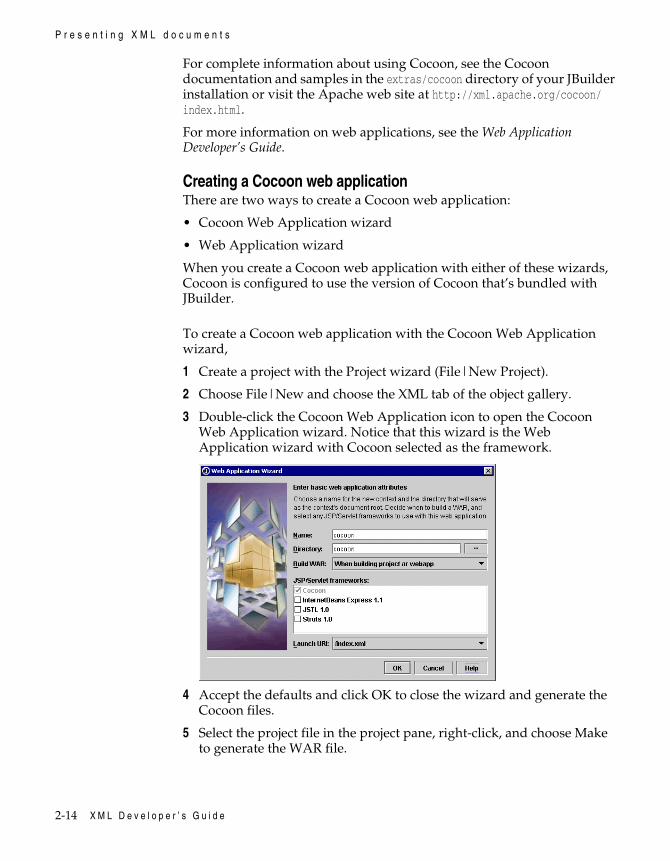
3 Double-click the Cocoon Web Application icon to open the Cocoon Web Application wizard. Notice that this wizard is the Web Application wizard with Cocoon selected as the framework.
4 Accept the defaults and click OK to close the wizard and generate the Cocoon files.
5 Select the project file in the project pane, right-click, and choose Make to generate the WAR file.
U s i n g J B u i l d e r ’ s X M L f e a t u r e s 2-15
P r e s e n t i n g X M L d o c u m e n t s
6 Add any of your XML and XSL files to the project using the Add To Project button on the project pane toolbar.
7 Save the project.
To create a Cocoon web application with the Web Application wizard,
1 Create a project with the Project wizard (File|New Project).
2 Choose File|New and choose the Web tab of the object gallery.
3 Double-click the Web Application icon to open the Web Application wizard.
4 Select Cocoon as the framework. The Name and the Directory fields, which are editable, are filled out automatically as cocoon. The Launch URI defaults to index.xml, which is the default JBuilder Cocoon page that displays when you run the cocoon node.
5 Accept the defaults and click OK to close the wizard and generate the Cocoon files.
6 Select the project file in the project pane, right-click, and choose Make to generate the WAR file.
7 Add any of your XML and XSL files to the project using the Add To Project button on the project pane toolbar.
8 Save the project.
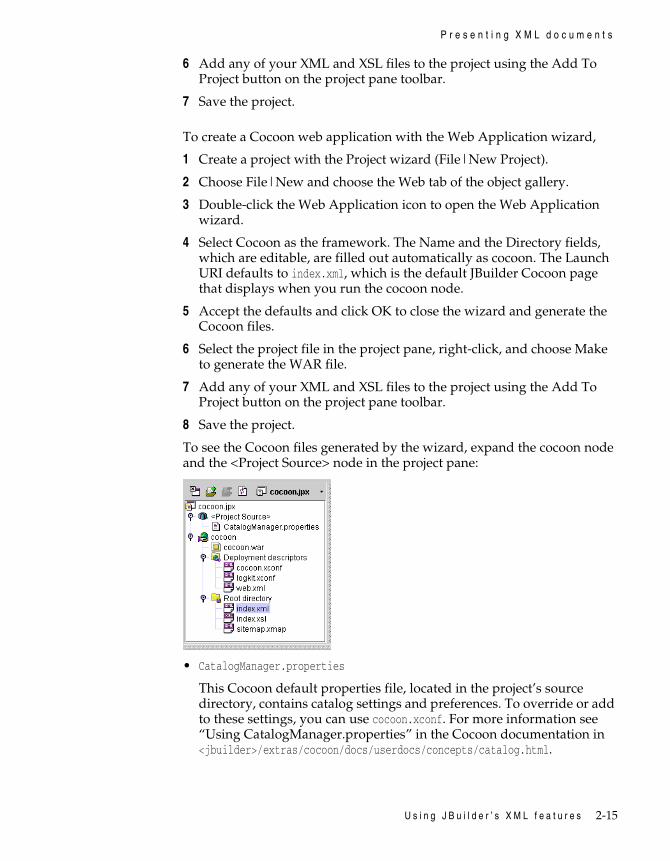
To see the Cocoon files generated by the wizard, expand the cocoon node and the <Project Source> node in the project pane:
• CatalogManager.properties
This Cocoon default properties file, located in the project’s source directory, contains catalog settings and preferences. To override or add to these settings, you can use cocoon.xconf. For more information see “Using CatalogManager.properties” in the Cocoon documentation in <jbuilder>/extras/cocoon/docs/userdocs/concepts/catalog.html.
2-16 X M L D e v e l o p e r ’ s G u i d e
P r e s e n t i n g X M L d o c u m e n t s
• cocoon.war
A web archive file.
• cocoon.xconf
A configuration file containing logic sheet registrations. This file describes each core component and any optional components. It also specifies the location of sitemap.xmap and other parameters. For example, this file might specify a parser, a JSP engine, and so on.
• logkit.xconf
A configuration file to control log files. Logging provides debugging, deployment, and operational information. Logging files can be created with the LogKit toolkit. For information on the LogKit toolkit, see http://jakarta.apache.org/avalon/logkit/index.html.
• web.xml
A servlet deployment descriptor that specifies the location of cocoon.xconf, log file location, and other parameters.
• index.xml
A sample XML document that is specified as the launch URI by default. This document displays automatically when you run Cocoon.
• index.xsl
A sample stylesheet that’s used to apply HTML formatting to index.xml.
• sitemap.xmap
This file maps the Uniform Resource Identifier (URI) space to resources. It consists of two parts: components and pipelines, which consist of components. The Cocoon Web Application wizard adds a mapping to this file to point to the stylesheet for the JBuilder Cocoon sample page, index.xml.
You can edit most of these files directly in the editor if you want to make changes later without running the wizard again. You can also edit the original files used by the wizard located in <jbuilder>/defaults/cocoon. For more information on configuring Cocoon, see the Cocoon documentation in the JBuilder extras/cocoon/docs directory.
For more information on web.xml and the editor for the deployment descriptor, see the “Deployment descriptors” topics in “Working with WebApps and WAR files” and “Deploying your web application” in the Web Application Developer’s Guide.
U s i n g J B u i l d e r ’ s X M L f e a t u r e s 2-17
P r e s e n t i n g X M L d o c u m e n t s
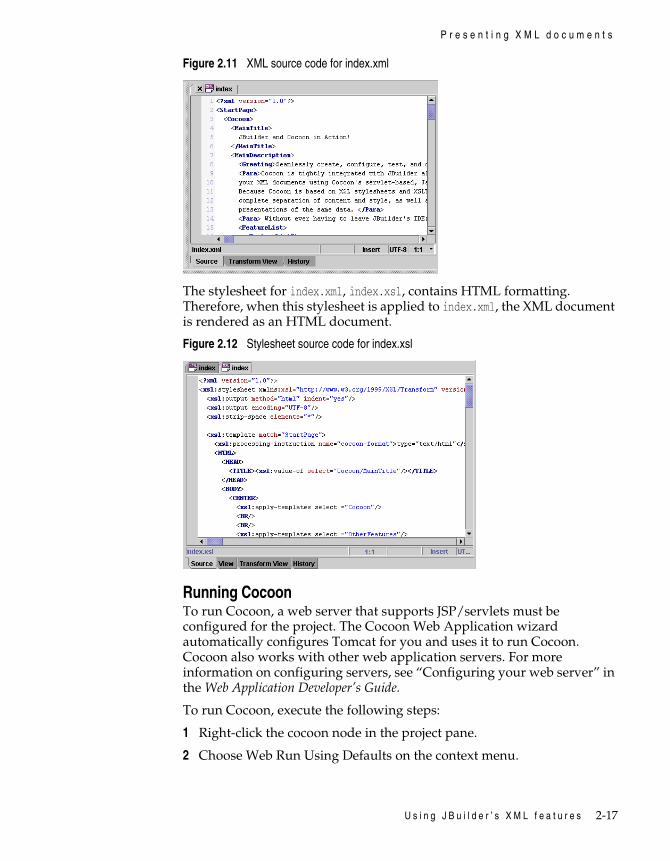
Figure 2.11 XML source code for index.xml
The stylesheet for index.xml, index.xsl, contains HTML formatting. Therefore, when this stylesheet is applied to index.xml, the XML document is rendered as an HTML document.
Figure 2.12 Stylesheet source code for index.xsl
Running CocoonTo run Cocoon, a web server that supports JSP/servlets must be configured for the project. The Cocoon Web Application wizard automatically configures Tomcat for you and uses it to run Cocoon. Cocoon also works with other web application servers. For more information on configuring servers, see “Configuring your web server” in the Web Application Developer’s Guide.
To run Cocoon, execute the following steps:
1 Right-click the cocoon node in the project pane.
2 Choose Web Run Using Defaults on the context menu.
2-18 X M L D e v e l o p e r ’ s G u i d e
P r e s e n t i n g X M L d o c u m e n t s
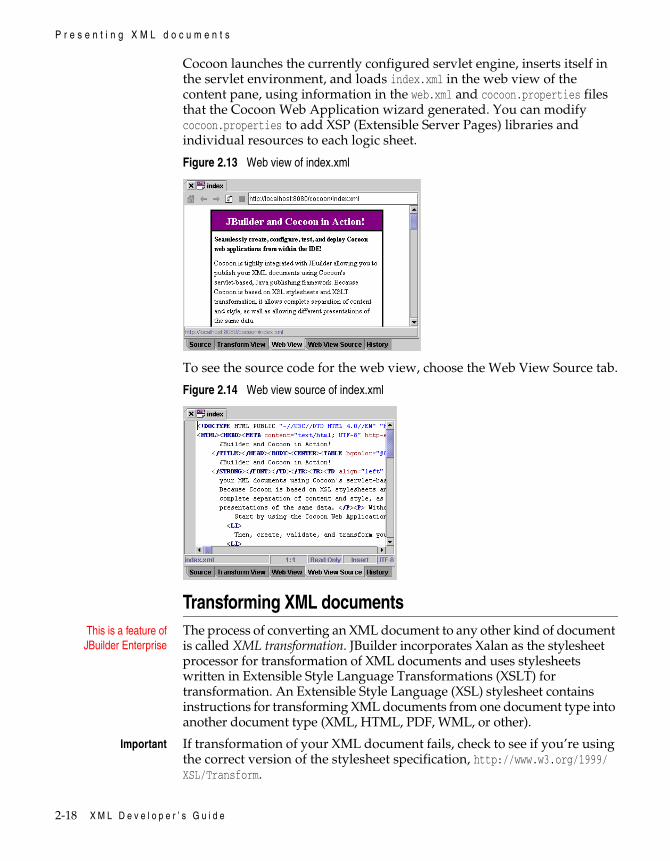
Cocoon launches the currently configured servlet engine, inserts itself in the servlet environment, and loads index.xml in the web view of the content pane, using information in the web.xml and cocoon.properties files that the Cocoon Web Application wizard generated. You can modify cocoon.properties to add XSP (Extensible Server Pages) libraries and individual resources to each logic sheet.
Figure 2.13 Web view of index.xml
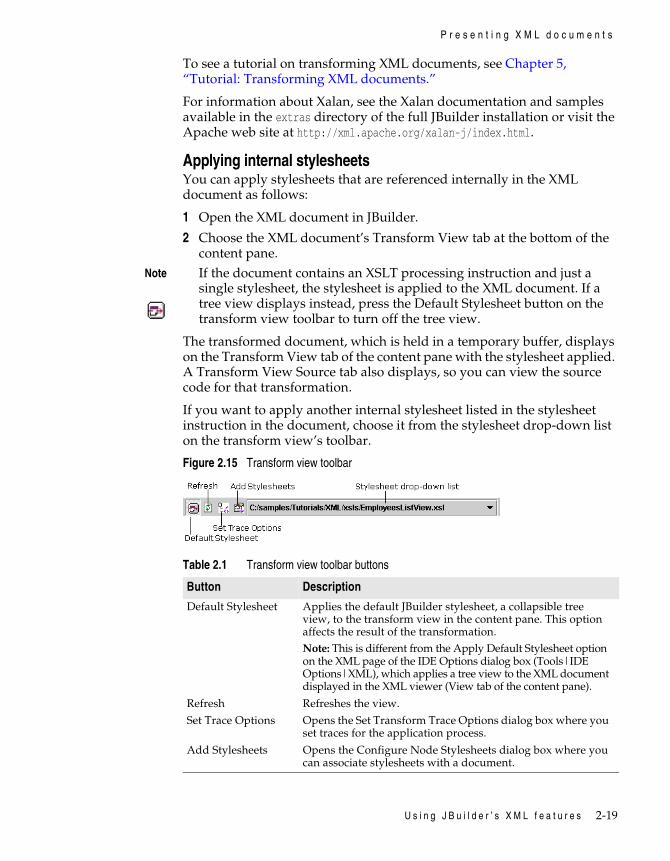
To see the source code for the web view, choose the Web View Source tab.
Figure 2.14 Web view source of index.xml
Transforming XML documentsThis is a feature of
JBuilder EnterpriseThe process of converting an XML document to any other kind of document is called XML transformation. JBuilder incorporates Xalan as the stylesheet processor for transformation of XML documents and uses stylesheets written in Extensible Style Language Transformations (XSLT) for transformation. An Extensible Style Language (XSL) stylesheet contains instructions for transforming XML documents from one document type into another document type (XML, HTML, PDF, WML, or other).
Important If transformation of your XML document fails, check to see if you’re using the correct version of the stylesheet specification, http://www.w3.org/1999/XSL/Transform.
U s i n g J B u i l d e r ’ s X M L f e a t u r e s 2-19
P r e s e n t i n g X M L d o c u m e n t s
To see a tutorial on transforming XML documents, see Chapter 5, “Tutorial: Transforming XML documents.”
For information about Xalan, see the Xalan documentation and samples available in the extras directory of the full JBuilder installation or visit the Apache web site at http://xml.apache.org/xalan-j/index.html.
Applying internal stylesheetsYou can apply stylesheets that are referenced internally in the XML document as follows:
1 Open the XML document in JBuilder.
2 Choose the XML document’s Transform View tab at the bottom of the content pane.
Note If the document contains an XSLT processing instruction and just a single stylesheet, the stylesheet is applied to the XML document. If a tree view displays instead, press the Default Stylesheet button on the transform view toolbar to turn off the tree view.
The transformed document, which is held in a temporary buffer, displays on the Transform View tab of the content pane with the stylesheet applied. A Transform View Source tab also displays, so you can view the source code for that transformation.
If you want to apply another internal stylesheet listed in the stylesheet instruction in the document, choose it from the stylesheet drop-down list on the transform view’s toolbar.
Figure 2.15 Transform view toolbar
Table 2.1 Transform view toolbar buttons
Button Description
Default Stylesheet Applies the default JBuilder stylesheet, a collapsible tree view, to the transform view in the content pane. This option affects the result of the transformation.Note: This is different from the Apply Default Stylesheet option on the XML page of the IDE Options dialog box (Tools|IDE Options|XML), which applies a tree view to the XML document displayed in the XML viewer (View tab of the content pane).
Refresh Refreshes the view.
Set Trace Options Opens the Set Transform Trace Options dialog box where you set traces for the application process.
Add Stylesheets Opens the Configure Node Stylesheets dialog box where you can associate stylesheets with a document.
2-20 X M L D e v e l o p e r ’ s G u i d e
P r e s e n t i n g X M L d o c u m e n t s
Applying external stylesheetsYou can also apply external stylesheets to a document. First, you need to associate them with the XML document.
1 Choose one of these methods to open the dialog box:
• Right-click the XML document in the project pane and choose Properties.
• Click the Add Stylesheets button on the transform view toolbar.
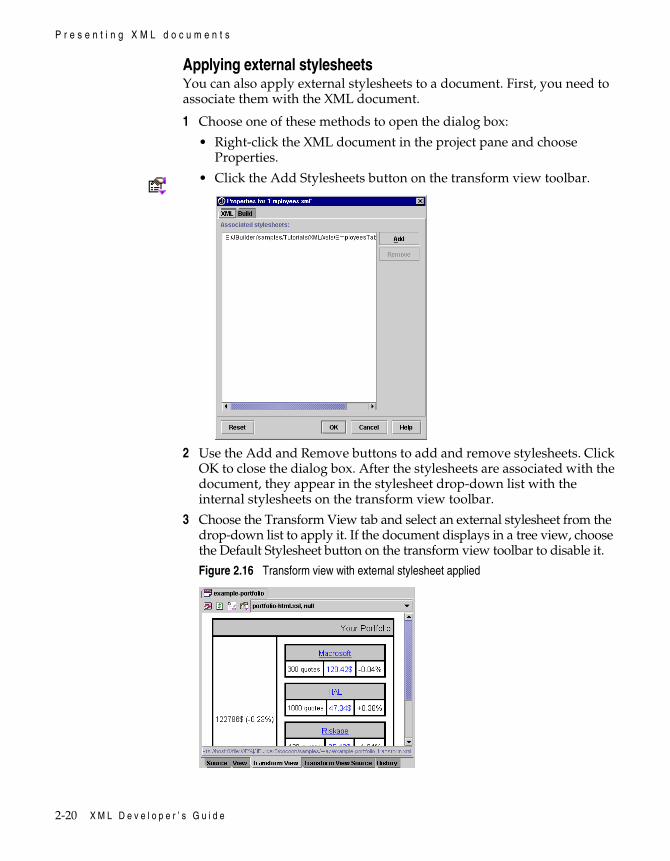
2 Use the Add and Remove buttons to add and remove stylesheets. Click OK to close the dialog box. After the stylesheets are associated with the document, they appear in the stylesheet drop-down list with the internal stylesheets on the transform view toolbar.
3 Choose the Transform View tab and select an external stylesheet from the drop-down list to apply it. If the document displays in a tree view, choose the Default Stylesheet button on the transform view toolbar to disable it.
Figure 2.16 Transform view with external stylesheet applied
U s i n g J B u i l d e r ’ s X M L f e a t u r e s 2-21
P r e s e n t i n g X M L d o c u m e n t s
Note If a stylesheet is not available, a message displays in the transform view indicating that a stylesheet is not associated with the document.
Figure 2.17 Transform view without a stylesheet
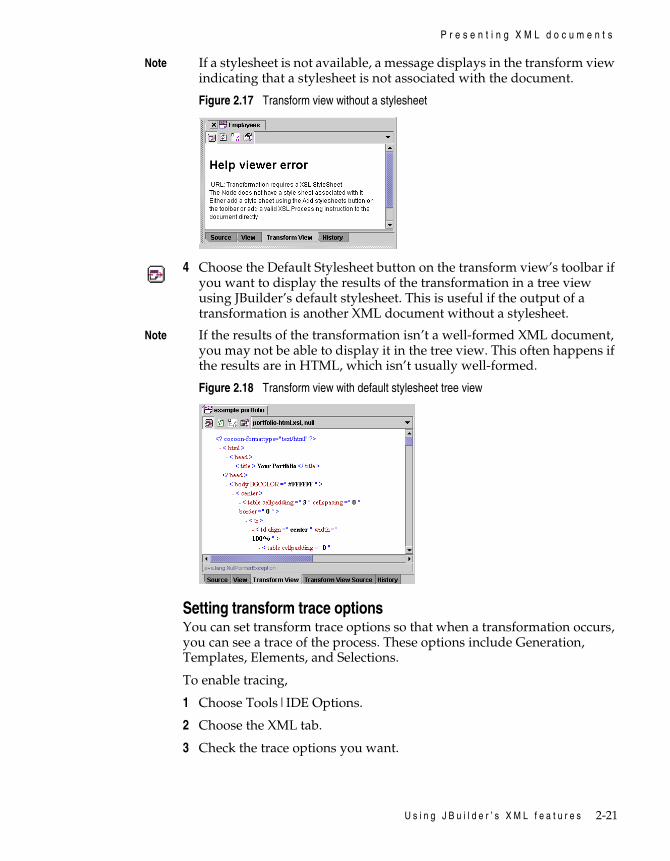
4 Choose the Default Stylesheet button on the transform view’s toolbar if you want to display the results of the transformation in a tree view using JBuilder’s default stylesheet. This is useful if the output of a transformation is another XML document without a stylesheet.
Note If the results of the transformation isn’t a well-formed XML document, you may not be able to display it in the tree view. This often happens if the results are in HTML, which isn’t usually well-formed.
Figure 2.18 Transform view with default stylesheet tree view
Setting transform trace optionsYou can set transform trace options so that when a transformation occurs, you can see a trace of the process. These options include Generation, Templates, Elements, and Selections.
To enable tracing,
1 Choose Tools|IDE Options.
2 Choose the XML tab.
3 Check the trace options you want.
2-22 X M L D e v e l o p e r ’ s G u i d e
M a n i p u l a t i n g X M L p r o g r a m m a t i c a l l y
See also
• Transform Trace options, described in “Setting XML options” on page 2-9
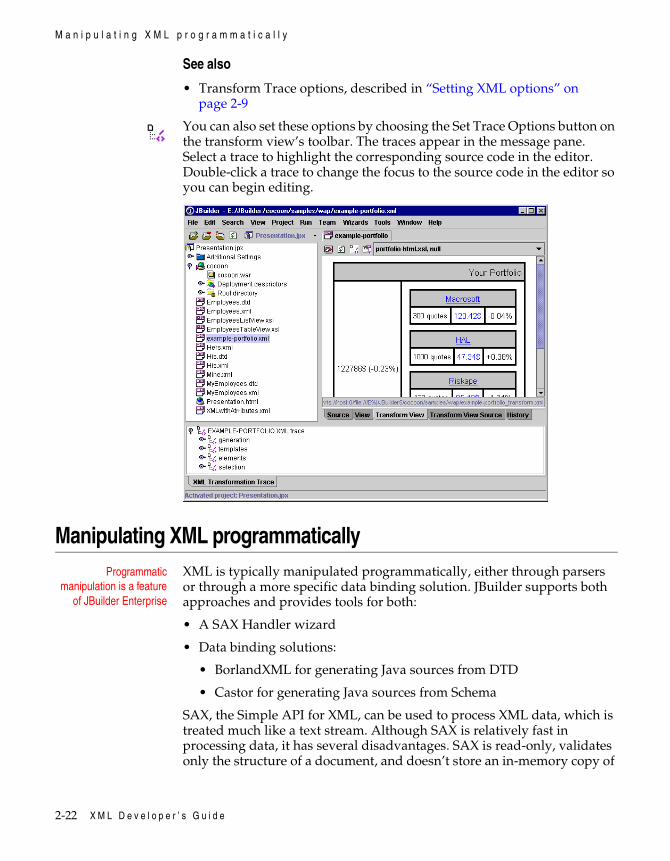
You can also set these options by choosing the Set Trace Options button on the transform view’s toolbar. The traces appear in the message pane. Select a trace to highlight the corresponding source code in the editor. Double-click a trace to change the focus to the source code in the editor so you can begin editing.
Manipulating XML programmaticallyProgrammatic
manipulation is a featureof JBuilder Enterprise
XML is typically manipulated programmatically, either through parsers or through a more specific data binding solution. JBuilder supports both approaches and provides tools for both:
• A SAX Handler wizard
• Data binding solutions:
• BorlandXML for generating Java sources from DTD
• Castor for generating Java sources from Schema
SAX, the Simple API for XML, can be used to process XML data, which is treated much like a text stream. Although SAX is relatively fast in processing data, it has several disadvantages. SAX is read-only, validates only the structure of a document, and doesn’t store an in-memory copy of
U s i n g J B u i l d e r ’ s X M L f e a t u r e s 2-23
M a n i p u l a t i n g X M L p r o g r a m m a t i c a l l y
the data. Data binding solutions, such as BorlandXML and Castor, can read and write XML data, validate the content of the data as well as the structure, process the data much faster than SAX, and are low maintenance. Each solution, however, has its appropriate uses. For example, SAX is appropriate when working with simple applications that don’t require content validation. A data binding solution is best used when working with more complex applications that require writing XML and data content validation.
JBuilder bundles many pre-defined libraries that you can add to your project: JDOM, Xerces, BorlandXML, Castor, and so on. If you’re using JBuilder wizards, the appropriate libraries are added for you automatically. You can add these to your project in the Project Properties dialog box. Choose Project|Project Properties and choose the Paths page. Choose the Required Libraries tab and add the libraries. Once the libraries are added, JBuilder’s CodeInsight has access to them and can display context-sensitive pop-up windows within the editor that show accessible data members, methods, classes, and parameters expected for the method being coded, as well as drilling down into source code. If you’re using JBuilder wizards, the appropriate libraries are added for you automatically.
Creating a SAX handler
This is a feature ofJBuilder Enterprise
There are two types of XML APIs: tree-based APIs and event-based APIs. A tree-based API, which compiles an XML document into an internal tree structure, allows an application to navigate the tree. The tree-based API is currently being standardized as a Document Object Model (DOM).
SAX, the Simple API for XML, is a standard interface for event-based XML parsing. SAX reports parsing events directly to the application through callbacks. The application implements handlers to deal with the different events, similar to event handling in a graphical user interface.
For example, an event-based API looks at this document:
<?xml version="1.0"?>
<page> <title>Event-based example</title> <content>Hello, world!</content></page>
and breaks it into these events:
start documentstart element: pagestart element: titlecharacters: Event-based exampleend element: titlestart element: content

2-24 X M L D e v e l o p e r ’ s G u i d e
M a n i p u l a t i n g X M L p r o g r a m m a t i c a l l y
characters: Hello, world!end element: contentend element: pageend document
JBuilder makes it easier to use SAX to manipulate your XML programmatically. The SAX Handler wizard uses JAXP (Java API for XML Processing), included in JDK 1.4, to create a SAX parser implementation template that includes just the methods you want to implement to parse your XML. JAXP provides support for processing XML documents using SAX, DOM, and XSLT.
1 Choose File|New to open the object gallery, click the XML tab, and double-click the SAX Handler icon to open the wizard.
2 Specify the name of the class and package names or accept the default names.
3 Select the interfaces and methods you want to override and click Next. For more information about these methods and interfaces, see the SAX API documentation.
4 Select the SAX parser and any options you want. The options vary according to the SAX parser selected.
The General parser is a JAXP-compatible parser, which only supports JAXP required features. JDK 1.4 uses Crimson as the default parser. For more information, see the SAXParserFactory class.
The Xerces parser supports all Xerces 2 features. For more information on Xerces and the options it supports, see the documentation in <jbuilder>\extras\xerces\docs\features.html or visit the Apache web site at http://xml.apache.org/xerces2-j/features.html.

U s i n g J B u i l d e r ’ s X M L f e a t u r e s 2-25
M a n i p u l a t i n g X M L p r o g r a m m a t i c a l l y
Important If you’re using JDK 1.3 for your project, use Xerces as the parser, since JDK 1.3 doesn’t include a JAXP parser. When you choose Xerces as the parser, JBuilder automatically adds the Xerces library to the project.
5 Click Next to continue to the last page of the wizard. Here you see that the wizard automatically creates a runtime configuration for the SAX application.
2-26 X M L D e v e l o p e r ’ s G u i d e
M a n i p u l a t i n g X M L p r o g r a m m a t i c a l l y
6 Click Finish to create a class that implements a SAX parser.
7 Edit the source code and add the logic to implement the selected methods.
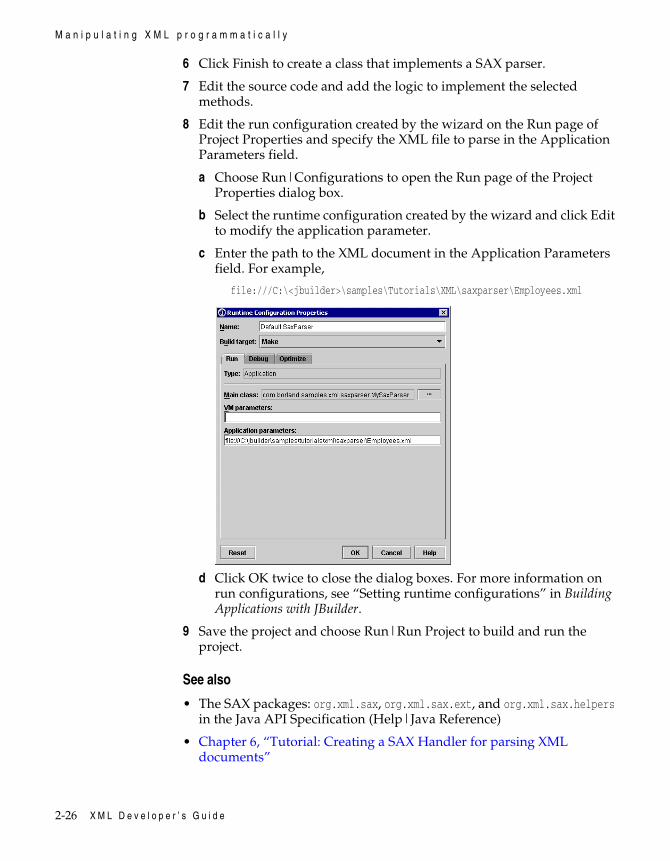
8 Edit the run configuration created by the wizard on the Run page of Project Properties and specify the XML file to parse in the Application Parameters field.
a Choose Run|Configurations to open the Run page of the Project Properties dialog box.
b Select the runtime configuration created by the wizard and click Edit to modify the application parameter.
c Enter the path to the XML document in the Application Parameters field. For example,
file:///C:\<jbuilder>\samples\Tutorials\XML\saxparser\Employees.xml
d Click OK twice to close the dialog boxes. For more information on run configurations, see “Setting runtime configurations” in Building Applications with JBuilder.
9 Save the project and choose Run|Run Project to build and run the project.
See also
• The SAX packages: org.xml.sax, org.xml.sax.ext, and org.xml.sax.helpers in the Java API Specification (Help|Java Reference)
• Chapter 6, “Tutorial: Creating a SAX Handler for parsing XML documents”
U s i n g J B u i l d e r ’ s X M L f e a t u r e s 2-27
M a n i p u l a t i n g X M L p r o g r a m m a t i c a l l y
Manipulating XML through data binding
This is a feature ofJBuilder Enterprise
Data binding is a means of accessing data and manipulating it, then sending the revised data back to the database or displaying it with an XML document. The XML document can be used as the transfer mechanism between the database and the application. This transfer is done by binding a Java object to an XML document. The data binding is implemented by generating Java classes to represent the constraints contained in a grammar, such as in a DTD or an XML schema. You can then use these classes to create XML documents that comply with the grammar, read XML documents that comply with the grammar, and validate XML documents against the grammar as changes are made to the documents.
JBuilder offers several data binding solutions: BorlandXML and open source Castor. BorlandXML generates Java classes from DTD files, while Castor generates Java classes from schema files (XSD).
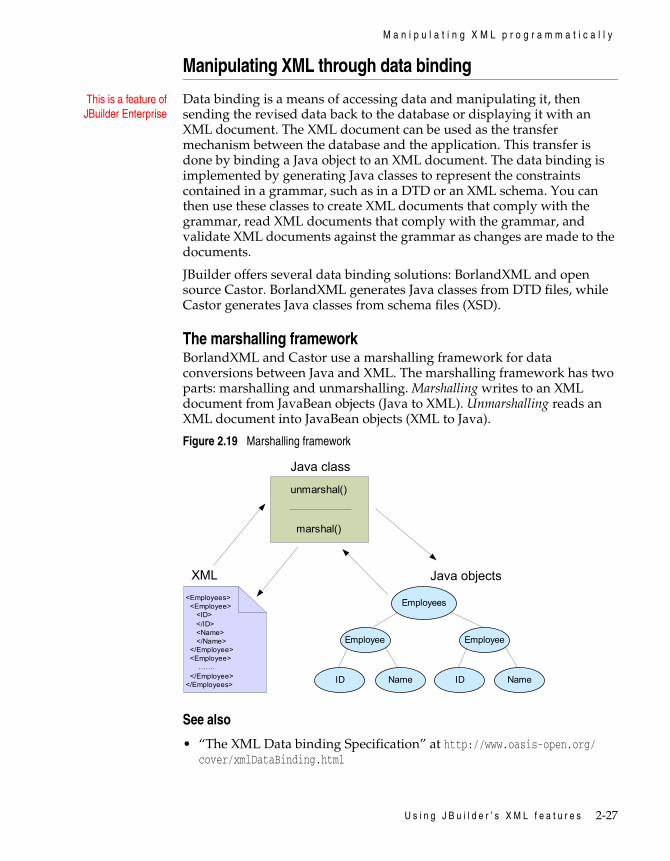
The marshalling frameworkBorlandXML and Castor use a marshalling framework for data conversions between Java and XML. The marshalling framework has two parts: marshalling and unmarshalling. Marshalling writes to an XML document from JavaBean objects (Java to XML). Unmarshalling reads an XML document into JavaBean objects (XML to Java).
Figure 2.19 Marshalling framework
See also
• “The XML Data binding Specification” at http://www.oasis-open.org/cover/xmlDataBinding.html
XML
Employees
Java class
unmarshal()
marshal()
<Employees> <Employee> <ID> </ID> <Name> </Name> </Employee> <Employee> ……. </Employee></Employees>
Java objects
Employee
NameID
Employee
NameID
2-28 X M L D e v e l o p e r ’ s G u i d e
M a n i p u l a t i n g X M L p r o g r a m m a t i c a l l y
BorlandXMLBorlandXML provides a data binding mechanism that hides the details of XML and reduces code complexity with ease of maintenance. BorlandXML is a template-based programmable class generator used to generate JavaBean classes from a Document Type Definition (DTD). You then use the simple JavaBean programming convention to manipulate XML data without worrying about the XML details.
BorlandXML uses DTDs in a two-step process to generate Java classes. In the first step, BorlandXML generates a class model file from a DTD. The class model file is an XML file with .bom extension. This file describes a high-level structure of the target classes and provides a way to customize these classes. In the second step, BorlandXML generates Java classes from the .bom file (class model XML file).
BorlandXML supports several features:
• JavaBean manipulation: manipulates a bean to construct an XML document or access data in the document.
• A marshalling framework for conversion between Java and XML.
• Document validation: validates JavaBean objects before marshalling objects to XML or after unmarshalling an XML document back to JavaBean objects.
• PCDATA customization: allows PCDATA to be customized to support different primitive data types, such as integer and long, and to support customized property names.
• Variable names: allows generated variable names for elements and attributes to have customized prefixes and suffixes.
To generate Java classes from a DTD, use the Databinding wizard as follows:
1 Right-click the DTD file in the project pane and choose Generate Java to open the Databinding wizard. The DTD File field in the wizard is automatically filled in with the file name. The Databinding wizard is also available on the XML tab of the object gallery (File|New).
2 Select BorlandXML, which is DTD-based only, as the Databinding Type and click Next.
3 Fill in the required fields, such as the name and location of the DTD being used, the root element, and the package name. The root element, the first element in the document, contains all the other elements in the document.
U s i n g J B u i l d e r ’ s X M L f e a t u r e s 2-29
M a n i p u l a t i n g X M L p r o g r a m m a t i c a l l y
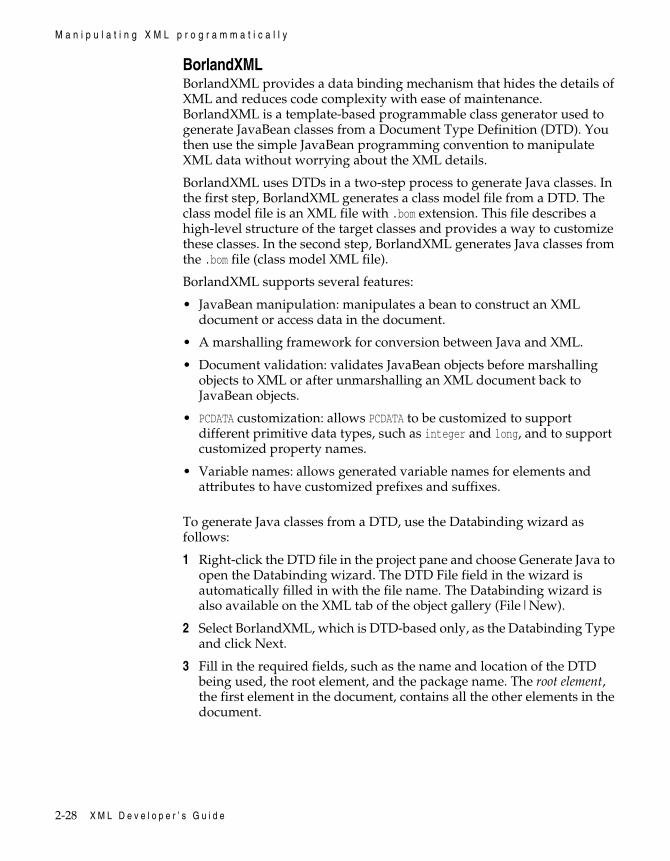
4 Enter a PUBLIC or SYSTEM identifier which is inserted into the DOCTYPE declaration.
5 Click Finish.
6 Expand the generated package node in the project pane to see the .java files generated by the wizard.
7 Write the code to interact with these classes and unmarshal (read) and marshal (write) the data. For example,
Foo foo = Foo.unmarshal("D:\Temp\foo.xml"); \\Read from foo.xmlfoo.setBar("This is an element"); \\Modify element barfoo.marshal("D:\Temp\foo-modified.xml"); \\Write to foo-modified.xml
To see a tutorial on data binding with BorlandXML, see Chapter 7, “Tutorial: DTD data binding with BorlandXML.”
BorlandXML samples and documentation are provided in the extras directory of the JBuilder full installation.
CastorCastor is an XML data binding framework that maps an instance of an XML schema to an object model that represents the data. This object model includes a set of classes and types, as well as descriptors, which are used to obtain information about a class and its fields.
Castor uses a marshalling framework that includes a set of ClassDescriptors and FieldDescriptors to describe how an Object should be marshalled and unmarshalled from XML.
Castor uses schema to create Java classes instead of using DTDs. Schemas (XSD), more robust and flexible, have several advantages over DTDs. Schemas are XML documents, whereas DTDs contain non-XML syntax. Schemas also support namespaces, which are required to avoid naming conflicts, and offer more extensive data type and inheritance support.
2-30 X M L D e v e l o p e r ’ s G u i d e
M a n i p u l a t i n g X M L p r o g r a m m a t i c a l l y
Important Castor requires 2001 schema support: <xsd:schema xmlns:xsd="http://www.w3.org/2001/XMLSchema">. If an older schema version is used, an exception displays in the message pane. The same is true for XML schema validation. You can find the latest Xerces schema samples with 2001 schema support in <jbuilder>/extras/xerces/data/.
To generate Java classes from an XML schema, use the Databinding wizard as follows:
1 Right-click the schema file (XSD) in the project pane and choose Generate Java to open the Databinding wizard. The XML Schema File field in the wizard is automatically filled in with the file name. The Databinding wizard is also available on the XML tab of the object gallery (File|New).
2 Select Castor, which supports XML schemas, as the Databinding Type and click Next.
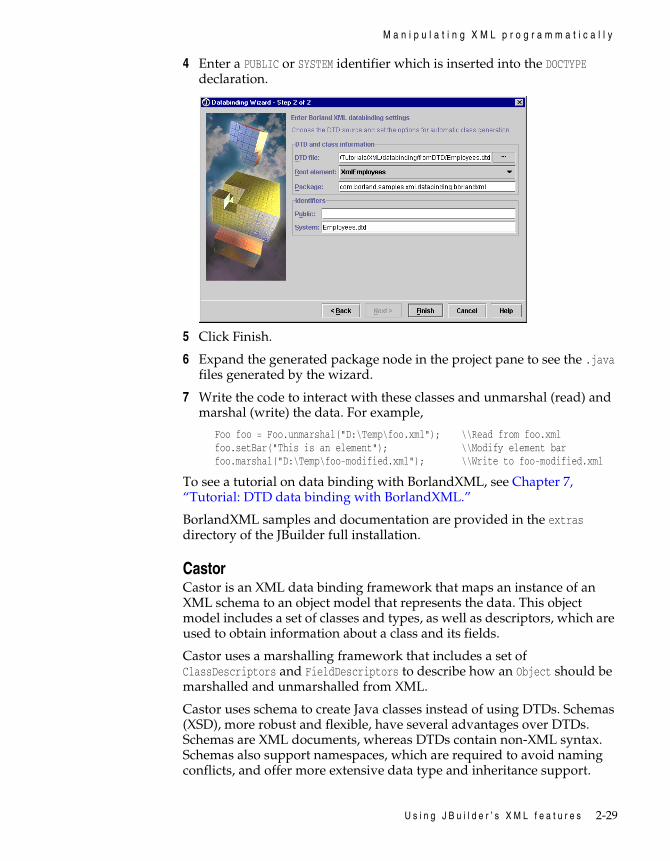
3 Fill in the required fields, such as the package name, and specify the options you want.
4 Click Finish.
5 Expand the generated package node in the project pane to see the .java files generated by the wizard.
6 Write the code to interact with these classes and unmarshal (read) and marshal (write) the data. For example,
\\Read fileFoo foo = Foo.unmarshal(new FileReader("D:\Temp\foo.xml")); \\Modify element barfoo.setBar("This is an element"); \\Write to file foo.marshal(new java.io.FileWriter("D:\Temp\foo-modified.xml"));
U s i n g J B u i l d e r ’ s X M L f e a t u r e s 2-31
I n t e r f a c i n g w i t h b u s i n e s s d a t a i n d a t a b a s e s
Important You’ll see compiler deprecation warnings, because Castor generates code that uses Sax 1.0.
Note By default, Castor’s marshaller writes XML documents without indentation, because indentation inflates the size of the generated XML documents. To turn indentation on, modify the castor.properties file with the following content: org.exolab.castor.indent=true. There are also other properties in this file that you may want to modify. The castor.properties file is created automatically by the Databinding wizard in the source directory of the project.
To see a tutorial on data binding with Castor, see Chapter 8, “Tutorial: Schema data binding with Castor.”
Castor samples and documentation are provided in the extras directory of the JBuilder full installation or visit the Castor web site at http://castor.exolab.org.
Interfacing with business data in databasesThis is a feature of
JBuilder EnterpriseXML database support in JBuilder falls into two categories: model-based and template-based. The model-based solution uses a map document that determines how the data transfers between an XML structure and the database metadata. The model-based components, XMLDBMSTable and XMLDBMSQuery, are implemented using XML-DBMS, an open source XML middleware that is bundled with JBuilder.
The template-based solution works with a template, a set of rules. The template-based components, XTable and XQuery, are very flexible as there is no predefined relationship between the XML document and the set of database metadata you are querying.
For more information on XML database components, see Chapter 3, “Using JBuilder’s XML database components.”
See also
• XML-DBMS at http://www.rpbourret.com/xmldbms/

2-32 X M L D e v e l o p e r ’ s G u i d e
U s i n g J B u i l d e r ’ s X M L d a t a b a s e c o m p o n e n t s 3-1
C h a p t e r
3Chapter3Using JBuilder’s XML database
componentsThis is a feature of
JBuilder EnterpriseJBuilder’s XML database support is available through a set of components on the XML page of the component palette in the UI designer. The runtime code for the beans is provided as part of a redistributable library in xmlbeans.jar.
The XML database components in the XmlBeans library consist of two types of components:
• Model-based components
• Template-based components
Model-based components use a map document that determines how the data transfers between an XML structure and the database metadata. Because the user specifies a map between an element in the XML document to a particular table or column in a database, deeply nested XML documents can be transferred to and from a set of database tables. The model-based components are implemented using XML-DBMS, an open source XML middleware that is bundled with JBuilder.
To use template-based components, you supply a SQL statement, and the component generates an appropriate XML document. The SQL you provide serves as the template that is replaced in the XML document as the result of applying the template. The template-based solution is very flexible as there is no predefined relationship between the XML document and the set of database metadata you are querying. Although template-based components are flexible in getting data out of a database and into an XML document, the format of the XML document is flat and relatively simple. In addition, the template-based components can generate HTML
3-2 X M L D e v e l o p e r ’ s G u i d e
U s i n g t h e m o d e l - b a s e d c o m p o n e n t s
documents based on default stylesheets or on a custom stylesheet provided by the user.
See also
• com.borland.jbuilder.xml.database.template package in the XML Database Components Reference of the DataExpress Component Library Reference
• com.borland.jbuilder.xml.database.xmldbms package in the XML Database Components Reference of the DataExpress Component Library Reference
• com.borland.jbuilder.xml.database.common package in the XML Database Components Reference of the DataExpress Component Library Reference
Using the model-based componentsJBuilder uses XML-DBMS in the model-based components. XML-DBMS, which is middleware for transferring data between XML documents and relational databases, uses object-relational mapping to map objects to the database. XML-DBMS is redistributed with JBuilder. XML-DBMS source, samples, and documentation are located in the <jbuilder>/extras/xmldbms directory.
JBuilder provides two beans to actually transfer XML-DBMS data: XMLDBMSTable and XMLDBMSQuery, which are the third and fourth beans on the XML page of the component palette in JBuilder’s UI designer. The XMLDBMSTable uses a specified table and keys to serve as the select criteria for the transfer, while the XMLDBMSQuery works on results of a SQL query.
To see a tutorial about using the model-based XML components, see Chapter 9, “Tutorial: Transferring data with the model-based XML database components.”
To drop a bean in your application, choose the Design tab and click the XML tab on the component palette. Choose a bean and drop it in the designer.
XML-DBMS
The XML-DBMS solution consists of the following:
• A relational database with a JDBC driver
• An XML document for input/output of data
• An XML map document which defines the mapping between the database and the XML document
• A library with a set of API methods to transfer data between the database and the XML document
U s i n g J B u i l d e r ’ s X M L d a t a b a s e c o m p o n e n t s 3-3
U s i n g t h e m o d e l - b a s e d c o m p o n e n t s
At the core of XML-DBMS is the mapping document specified in XML. This is defined by a mapping language and is documented as part of the XML-DBMS distribution. See the XML-DBMS documentation and the sources in the JBuilder extras directory for more information.
The main elements of the mapping language include:
• ClassMap
The ClassMap is the root of the mapping. A ClassMap maps a database table to XML elements which contain other elements (element content model). In addition, a ClassMap nests PropertyMaps and RelatedClassMap.
• PropertyMap
The PropertyMap maps PCDATA-only elements and single-value attributes to specific columns in a database table.
• RelatedClassMap
RelatedClassMap maps interclass relationships. This is done by referring to another ElementType (for example, ClassMap) declared elsewhere and specifying the basis for the relationship. The map specifies the primary key and foreign key used in the relationship as well as which of the two tables hold the primary key. Note that the identifier CandidateKey is used to represent a primary key.
In addition, key generation is supported. There are scenarios in which the keys are actual business data such as CustNo or EmpNo. In others, keys must be created just for the purpose of linking. This is possible by using a generate attribute as part of the respective key definition.
An optional orderColumn with auto key generation, if necessary, is also supported as part of the mapping.
• MiscMaps and Options
In addition to the above mappings, there are a few others to handle nulls, to ignore a root element which does not have any corresponding data in the database but just serves as a grouping element, and date and time formats.
JBuilder and XML-DBMSJBuilder provides the following XML-DBMS support:
• XML-DBMS wizard
• XModelBean: base class for XMLDBMSTable and XMLDBMSQuery
• XMLDBMSTable: transfers data based on a table and key
• XMLDBMSQuery: transfers data based on a result set as defined by a SQL query
3-4 X M L D e v e l o p e r ’ s G u i d e
U s i n g t h e m o d e l - b a s e d c o m p o n e n t s
Creating a map document and a SQL script file
JBuilder’s XML-DBMS wizard is part of the model/map-based solution that uses the Map_Factory_DTD API in XML-DBMS. Given a DTD, the wizard generates a template map document and SQL script file for creating the metadata. In all but the simplest cases, the map document merely serves as a starting point to create the required mapping. The SQL script, a set of Create Table statements, also must be modified because XML-DBMS doesn’t regenerate the SQL scripts from the modified map document.
Currently, XML-DBMS doesn’t support creating a map file from a database schema. If you are starting with an existing database, you must create the map file manually. If you have the XML document, you can open it, right-click it and generate the DTD. Then you can use the generated DTD to generate the map file and edit it to match the database schema.
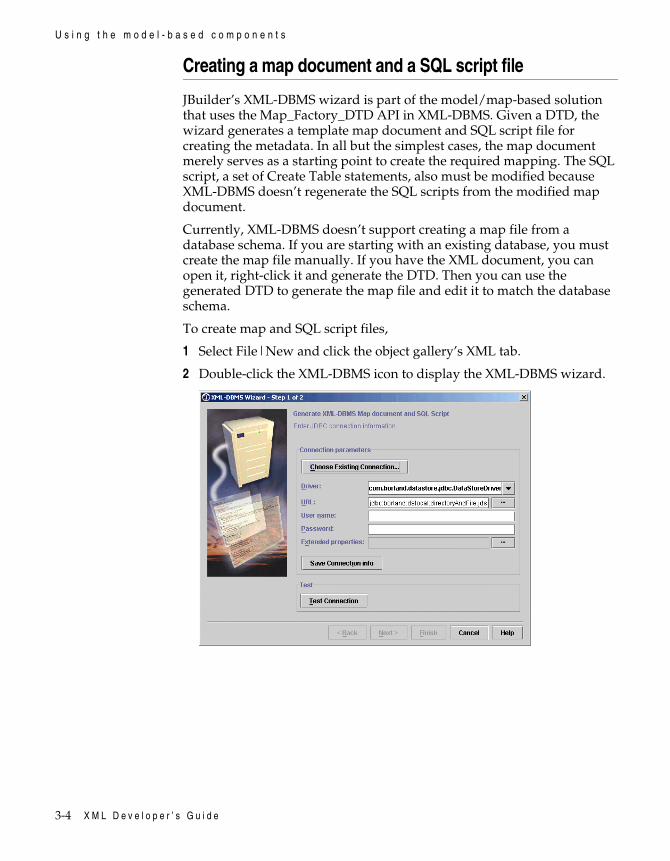
To create map and SQL script files,
1 Select File|New and click the object gallery’s XML tab.
2 Double-click the XML-DBMS icon to display the XML-DBMS wizard.
U s i n g J B u i l d e r ’ s X M L d a t a b a s e c o m p o n e n t s 3-5
U s i n g t h e m o d e l - b a s e d c o m p o n e n t s
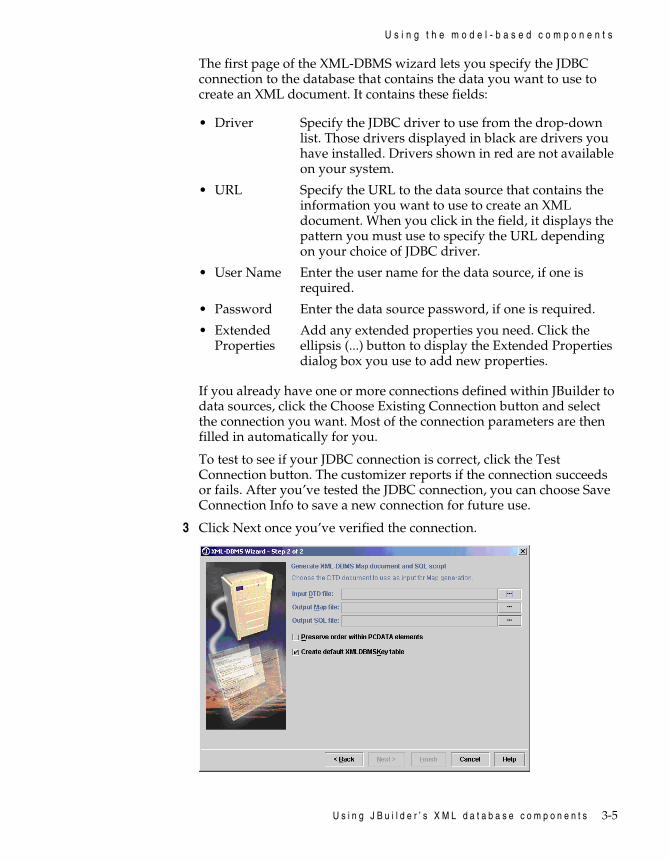
The first page of the XML-DBMS wizard lets you specify the JDBC connection to the database that contains the data you want to use to create an XML document. It contains these fields:
If you already have one or more connections defined within JBuilder to data sources, click the Choose Existing Connection button and select the connection you want. Most of the connection parameters are then filled in automatically for you.
To test to see if your JDBC connection is correct, click the Test Connection button. The customizer reports if the connection succeeds or fails. After you’ve tested the JDBC connection, you can choose Save Connection Info to save a new connection for future use.
3 Click Next once you’ve verified the connection.
• Driver Specify the JDBC driver to use from the drop-down list. Those drivers displayed in black are drivers you have installed. Drivers shown in red are not available on your system.
• URL Specify the URL to the data source that contains the information you want to use to create an XML document. When you click in the field, it displays the pattern you must use to specify the URL depending on your choice of JDBC driver.
• User Name Enter the user name for the data source, if one is required.
• Password Enter the data source password, if one is required.
• Extended Properties
Add any extended properties you need. Click the ellipsis (...) button to display the Extended Properties dialog box you use to add new properties.
3-6 X M L D e v e l o p e r ’ s G u i d e
U s i n g t h e m o d e l - b a s e d c o m p o n e n t s
You use this page to specify the DTD you are using to generate the Map file and the SQL script to create the database table. Fill in these fields:
4 Click OK to close the wizard. The wizard generates the map and SQL files and adds them to your project.
For example, suppose you have a DTD, request.dtd:
<!ELEMENT request (req_name, parameter*)><!ELEMENT parameter (para_name, type, value)><!ELEMENT req_name (#PCDATA)><!ELEMENT para_name (#PCDATA)><!ELEMENT type (#PCDATA)><!ELEMENT value (#PCDATA)>
The XML-DBMS wizard would generate this request.map file:
<?xml version='1.0' ?><!DOCTYPE XMLToDBMS SYSTEM "xmldbms.dtd" >
<XMLToDBMS Version="1.0"> <Options> </Options> <Maps> <ClassMap> <ElementType Name="request"/> <ToRootTable> <Table Name="request"/> <CandidateKey Generate="Yes"> <Column Name="requestPK"/> </CandidateKey> </ToRootTable> <PropertyMap> <ElementType Name="req_name"/> <ToColumn> <Column Name="req_name"/> </ToColumn> </PropertyMap> <RelatedClass KeyInParentTable="Candidate"> <ElementType Name="parameter"/> <CandidateKey Generate="Yes"> <Column Name="requestPK"/> </CandidateKey> <ForeignKey> <Column Name="requestFK"/> </ForeignKey>
• DTD File Specify an existing DTD file.
• Output directory Accept the default name or change it as you like.
• MAP File Specify the name of the Map file you want generated.
• SQL Script File Specify the name of the SQL script file you want generated.
U s i n g J B u i l d e r ’ s X M L d a t a b a s e c o m p o n e n t s 3-7
U s i n g t h e m o d e l - b a s e d c o m p o n e n t s
</RelatedClass> </ClassMap> <ClassMap> <ElementType Name="parameter"/> <ToClassTable> <Table Name="parameter"/> </ToClassTable> <PropertyMap> <ElementType Name="para_name"/> <ToColumn> <Column Name="para_name"/> </ToColumn> </PropertyMap> <PropertyMap> <ElementType Name="type"/> <ToColumn> <Column Name="type"/> </ToColumn> </PropertyMap> <PropertyMap> <ElementType Name="value"/> <ToColumn> <Column Name="value"/> </ToColumn> </PropertyMap> </ClassMap> </Maps></XMLToDBMS>
The XML-DBMS wizard would create the following request.sql file:
CREATE TABLE "request" ("req_name" VARCHAR(255), "requestPK" INTEGER);CREATE TABLE "parameter" ("para_name" VARCHAR(255), "type" VARCHAR(255), "requestFK" INTEGER, "value" VARCHAR(255));CREATE TABLE XMLDBMSKey (HighKey Integer);INSERT INTO XMLDBMSKey VALUES (0);
Once you have a map file and a SQL script file, you can modify them as you wish. For example, while an element name might be “HireDate”, you know the column name is actually “Date_Hired”. You can make that change by editing the map file directly. Usually the SQL script file is just a starting point for creating the type of table you want, so you often need to edit it also.
When you have your SQL script file to your liking, execute it to create the database tables. A simple way to do this is to copy the SQL statements to the Database Pilot and click the Execute button. For information about using Database Pilot, see “Database Pilot” in the Database Application Developer’s Guide. For specific information about executing SQL statements, see “Executing SQL statements” topic in the “Database administration tasks” chapter in the Database Application Developer’s Guide.
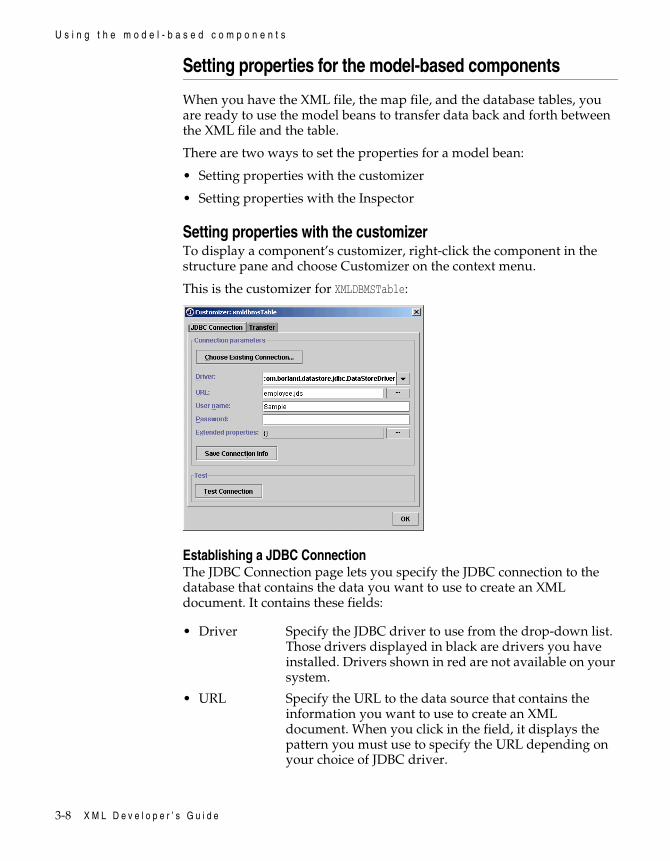
3-8 X M L D e v e l o p e r ’ s G u i d e
U s i n g t h e m o d e l - b a s e d c o m p o n e n t s
Setting properties for the model-based components
When you have the XML file, the map file, and the database tables, you are ready to use the model beans to transfer data back and forth between the XML file and the table.
There are two ways to set the properties for a model bean:
• Setting properties with the customizer
• Setting properties with the Inspector
Setting properties with the customizerTo display a component’s customizer, right-click the component in the structure pane and choose Customizer on the context menu.
This is the customizer for XMLDBMSTable:
Establishing a JDBC ConnectionThe JDBC Connection page lets you specify the JDBC connection to the database that contains the data you want to use to create an XML document. It contains these fields:
• Driver Specify the JDBC driver to use from the drop-down list. Those drivers displayed in black are drivers you have installed. Drivers shown in red are not available on your system.
• URL Specify the URL to the data source that contains the information you want to use to create an XML document. When you click in the field, it displays the pattern you must use to specify the URL depending on your choice of JDBC driver.
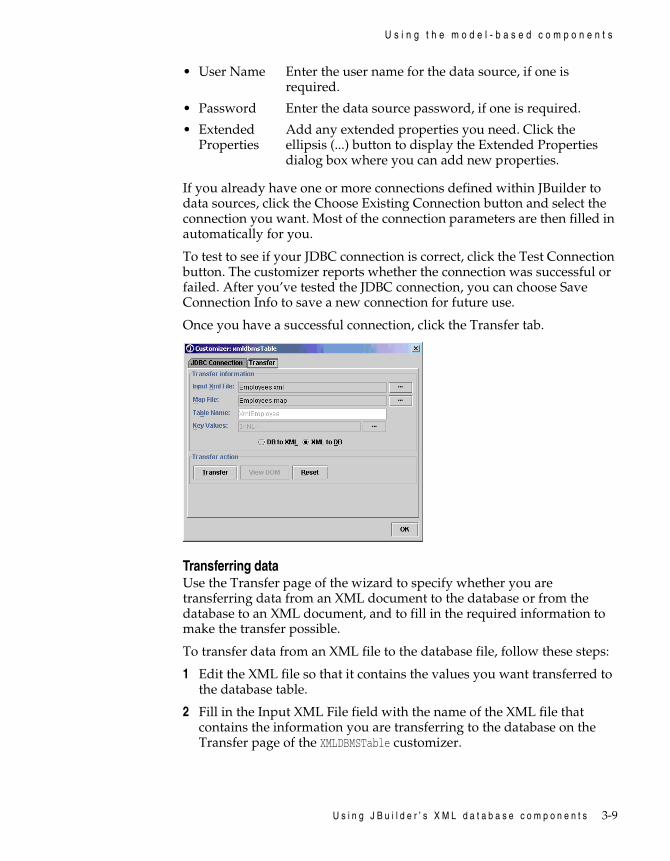
U s i n g J B u i l d e r ’ s X M L d a t a b a s e c o m p o n e n t s 3-9
U s i n g t h e m o d e l - b a s e d c o m p o n e n t s
If you already have one or more connections defined within JBuilder to data sources, click the Choose Existing Connection button and select the connection you want. Most of the connection parameters are then filled in automatically for you.
To test to see if your JDBC connection is correct, click the Test Connection button. The customizer reports whether the connection was successful or failed. After you’ve tested the JDBC connection, you can choose Save Connection Info to save a new connection for future use.
Once you have a successful connection, click the Transfer tab.
Transferring dataUse the Transfer page of the wizard to specify whether you are transferring data from an XML document to the database or from the database to an XML document, and to fill in the required information to make the transfer possible.
To transfer data from an XML file to the database file, follow these steps:
1 Edit the XML file so that it contains the values you want transferred to the database table.
2 Fill in the Input XML File field with the name of the XML file that contains the information you are transferring to the database on the Transfer page of the XMLDBMSTable customizer.
• User Name Enter the user name for the data source, if one is required.
• Password Enter the data source password, if one is required.
• Extended Properties
Add any extended properties you need. Click the ellipsis (...) button to display the Extended Properties dialog box where you can add new properties.
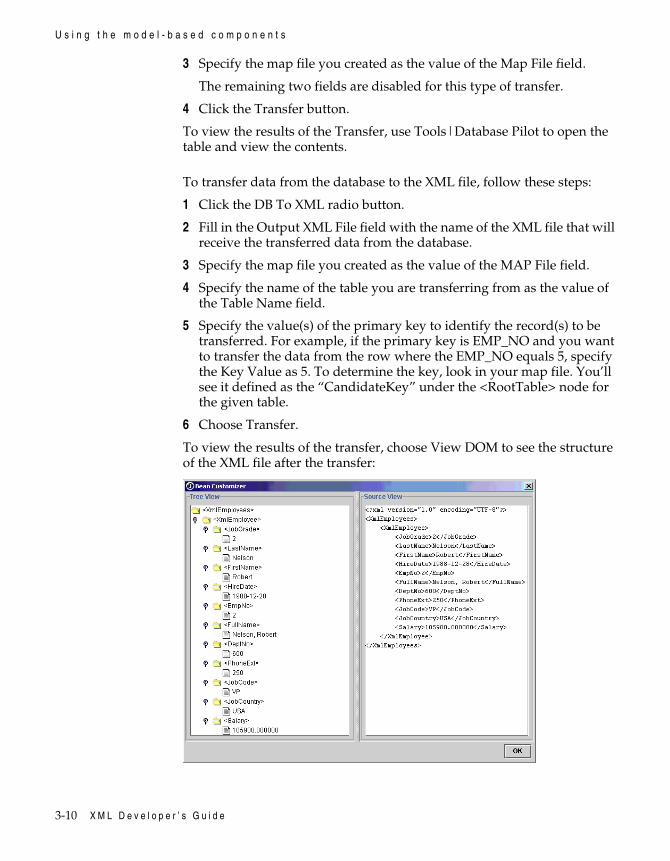
3-10 X M L D e v e l o p e r ’ s G u i d e
U s i n g t h e m o d e l - b a s e d c o m p o n e n t s
3 Specify the map file you created as the value of the Map File field.
The remaining two fields are disabled for this type of transfer.
4 Click the Transfer button.
To view the results of the Transfer, use Tools|Database Pilot to open the table and view the contents.
To transfer data from the database to the XML file, follow these steps:
1 Click the DB To XML radio button.
2 Fill in the Output XML File field with the name of the XML file that will receive the transferred data from the database.
3 Specify the map file you created as the value of the MAP File field.
4 Specify the name of the table you are transferring from as the value of the Table Name field.
5 Specify the value(s) of the primary key to identify the record(s) to be transferred. For example, if the primary key is EMP_NO and you want to transfer the data from the row where the EMP_NO equals 5, specify the Key Value as 5. To determine the key, look in your map file. You’ll see it defined as the “CandidateKey” under the <RootTable> node for the given table.
6 Choose Transfer.
To view the results of the transfer, choose View DOM to see the structure of the XML file after the transfer:
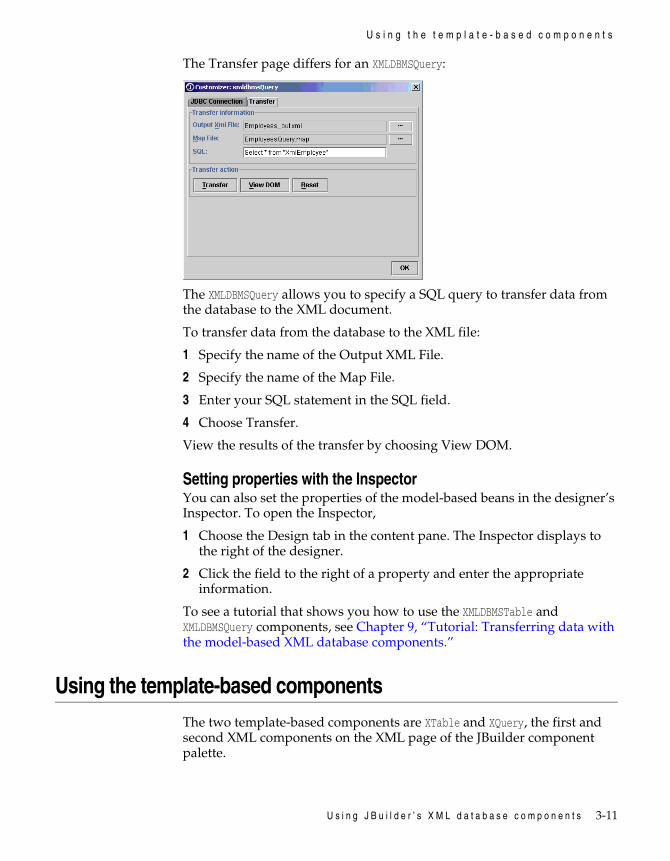
U s i n g J B u i l d e r ’ s X M L d a t a b a s e c o m p o n e n t s 3-11
U s i n g t h e t e m p l a t e - b a s e d c o m p o n e n t s
The Transfer page differs for an XMLDBMSQuery:
The XMLDBMSQuery allows you to specify a SQL query to transfer data from the database to the XML document.
To transfer data from the database to the XML file:
1 Specify the name of the Output XML File.
2 Specify the name of the Map File.
3 Enter your SQL statement in the SQL field.
4 Choose Transfer.
View the results of the transfer by choosing View DOM.
Setting properties with the InspectorYou can also set the properties of the model-based beans in the designer’s Inspector. To open the Inspector,
1 Choose the Design tab in the content pane. The Inspector displays to the right of the designer.
2 Click the field to the right of a property and enter the appropriate information.
To see a tutorial that shows you how to use the XMLDBMSTable and XMLDBMSQuery components, see Chapter 9, “Tutorial: Transferring data with the model-based XML database components.”
Using the template-based componentsThe two template-based components are XTable and XQuery, the first and second XML components on the XML page of the JBuilder component palette.
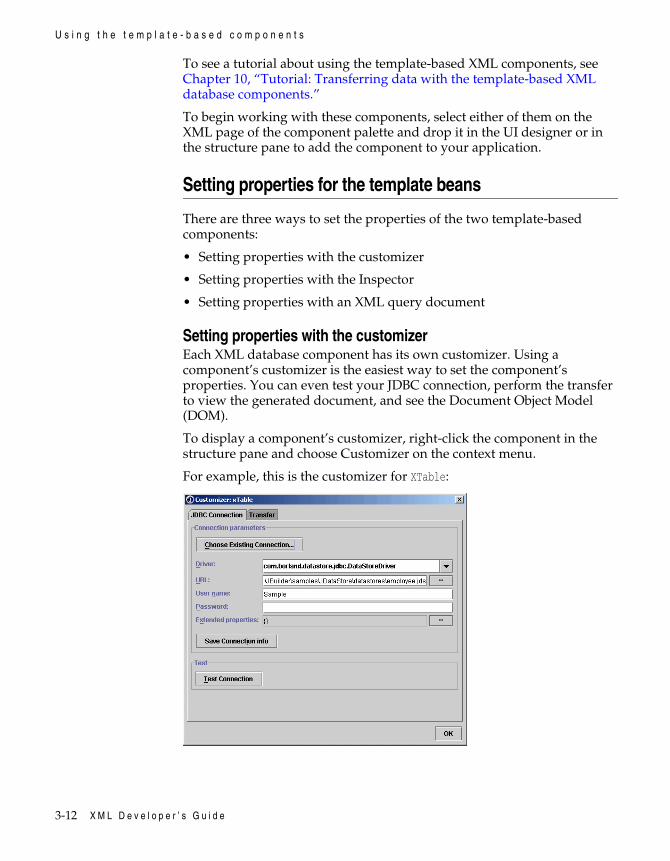
3-12 X M L D e v e l o p e r ’ s G u i d e
U s i n g t h e t e m p l a t e - b a s e d c o m p o n e n t s
To see a tutorial about using the template-based XML components, see Chapter 10, “Tutorial: Transferring data with the template-based XML database components.”
To begin working with these components, select either of them on the XML page of the component palette and drop it in the UI designer or in the structure pane to add the component to your application.
Setting properties for the template beans
There are three ways to set the properties of the two template-based components:
• Setting properties with the customizer
• Setting properties with the Inspector
• Setting properties with an XML query document
Setting properties with the customizerEach XML database component has its own customizer. Using a component’s customizer is the easiest way to set the component’s properties. You can even test your JDBC connection, perform the transfer to view the generated document, and see the Document Object Model (DOM).
To display a component’s customizer, right-click the component in the structure pane and choose Customizer on the context menu.
For example, this is the customizer for XTable:
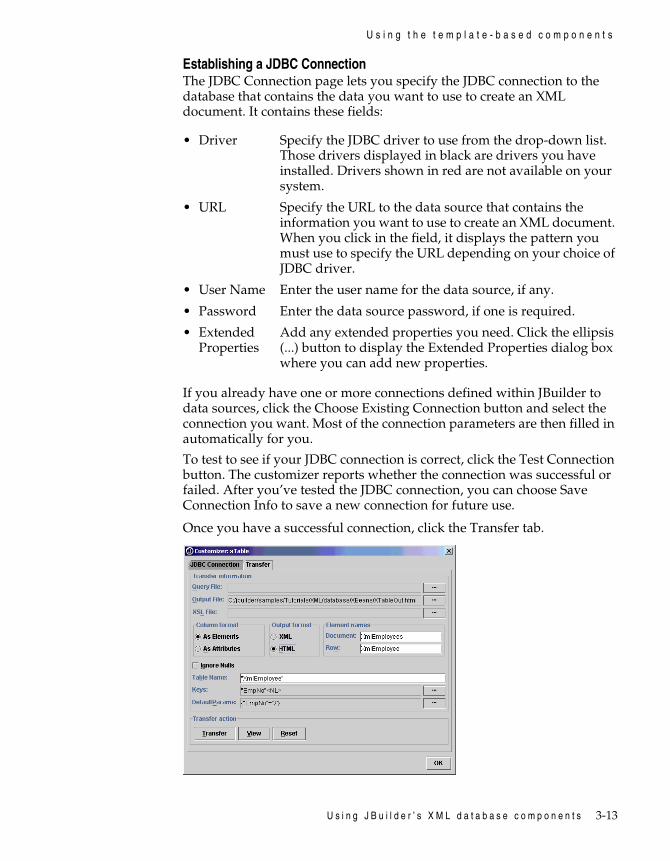
U s i n g J B u i l d e r ’ s X M L d a t a b a s e c o m p o n e n t s 3-13
U s i n g t h e t e m p l a t e - b a s e d c o m p o n e n t s
Establishing a JDBC ConnectionThe JDBC Connection page lets you specify the JDBC connection to the database that contains the data you want to use to create an XML document. It contains these fields:
If you already have one or more connections defined within JBuilder to data sources, click the Choose Existing Connection button and select the connection you want. Most of the connection parameters are then filled in automatically for you.
To test to see if your JDBC connection is correct, click the Test Connection button. The customizer reports whether the connection was successful or failed. After you’ve tested the JDBC connection, you can choose Save Connection Info to save a new connection for future use.
Once you have a successful connection, click the Transfer tab.
• Driver Specify the JDBC driver to use from the drop-down list. Those drivers displayed in black are drivers you have installed. Drivers shown in red are not available on your system.
• URL Specify the URL to the data source that contains the information you want to use to create an XML document. When you click in the field, it displays the pattern you must use to specify the URL depending on your choice of JDBC driver.
• User Name Enter the user name for the data source, if any.
• Password Enter the data source password, if one is required.
• Extended Properties
Add any extended properties you need. Click the ellipsis (...) button to display the Extended Properties dialog box where you can add new properties.
3-14 X M L D e v e l o p e r ’ s G u i d e
U s i n g t h e t e m p l a t e - b a s e d c o m p o n e n t s
Transferring dataThe Transfer page contains the following fields:
• Query File Specify an XML query document (optional). If you use an XML query document, you won’t be filling in any of the other fields in the customizer except the Output File name and optionally the XSL File’s name as the query document will specify your property settings. For more information about creating and using an XML query document, see “Setting properties with an XML query document” on page 3-19.
• Output File Specify the name of the XML or HTML file you want to generate.
• XSL File Specify the name of the XSL stylesheet file you want used to transform the output file, if any. If no file is specified, a default stylesheet is generated and placed in the same directory as the output file. The name of the XSL file generated is JBuilderDefault.xsl. The XSL file can be copied and then modified to create a more custom presentation. If you want to edit the XSL file, make sure the XSL File name property is set to point to the modified file. Note that JBuilder won’t override a previously existing default stylesheet.
• Column Format Specify whether you want the columns of the data source to appear as elements or as attributes in the generated XML file.
• Output Format Specify whether you want the generated file to be in XML or HTML format.
• Element Names Specify a name for the Document element and another for the Row element.
• Ignore Nulls Check this check box if you want nulls to be ignored in your XML output. If this check box remains unchecked, “null” will be used as a placeholder.
U s i n g J B u i l d e r ’ s X M L d a t a b a s e c o m p o n e n t s 3-15
U s i n g t h e t e m p l a t e - b a s e d c o m p o n e n t s
• Table Name Specify the name of the table that contains the data you are interested in. Place double quotation marks around the name; for example, “XmlEmployee”.
• Keys Specify the key(s) that identifies the row(s) in the table you want to become part of the generated XML document. To specify a key, click the ellipsis (...) button next to the Keys field to open the Keys Editor. Click the Add button to add an item to the array. Change the name of the added item to a column in the table, placing double quotation marks around the name. Continue adding keys until you’ve added all the keys you want. If you specify a table name but don’t specify any keys, all the rows of the table will be returned.
• DefaultParams Use this field to specify name/value pairs for the names entered in the Keys field. If you specified a value for the Keys field, you must specify a default parameter for the column or columns specified as keys. Click the ellipsis (...) button next to the DefaultParams field to add any default parameters to your query. In the Default Params dialog box, click the Add button to add a default parameter. In the new blank line that is added, specify the name of the parameter in the Param Name field, and the value of the parameter in the Param Value field. For example, if you want to see the record of employee number 5, you would specify “EMP_NO” as the Param Name and specify the value ‘5’ in the EMP_NO column. Remember to put single quotes around any string values. For more information about adding default parameters, see “Specifying parameters” on page 3-17.
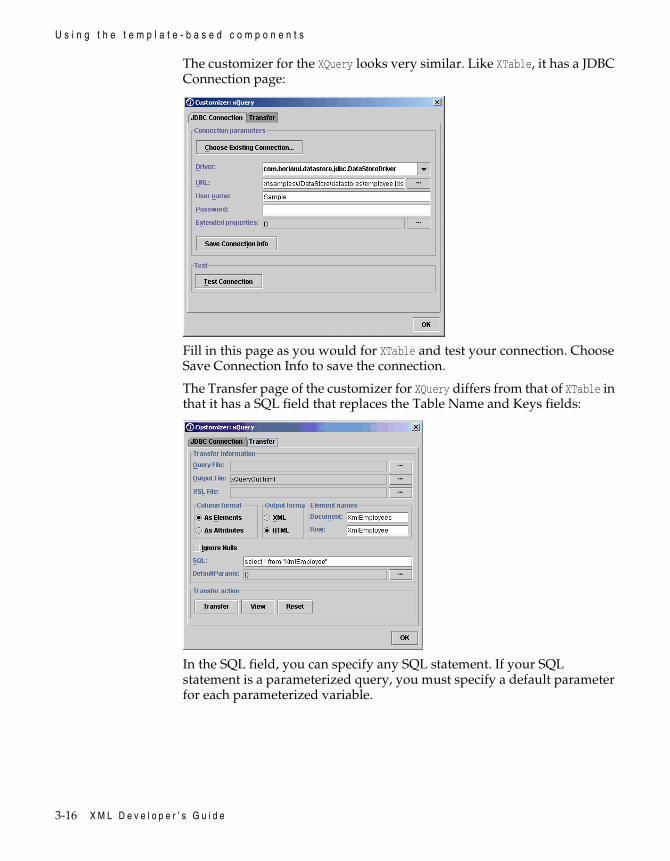
3-16 X M L D e v e l o p e r ’ s G u i d e
U s i n g t h e t e m p l a t e - b a s e d c o m p o n e n t s
The customizer for the XQuery looks very similar. Like XTable, it has a JDBC Connection page:
Fill in this page as you would for XTable and test your connection. Choose Save Connection Info to save the connection.
The Transfer page of the customizer for XQuery differs from that of XTable in that it has a SQL field that replaces the Table Name and Keys fields:
In the SQL field, you can specify any SQL statement. If your SQL statement is a parameterized query, you must specify a default parameter for each parameterized variable.
U s i n g J B u i l d e r ’ s X M L d a t a b a s e c o m p o n e n t s 3-17
U s i n g t h e t e m p l a t e - b a s e d c o m p o n e n t s
Specifying parametersIf the query you are using is a parameterized query, you must specify a value for the default parameter before generating the XML or HTML file. Default parameters are passed using the setDefaultParams() method. You can override the default parameter value with another parameter value if you add the setParams() method to your code.
To see how to use parameters and default parameters, look at a sample query:
Select emp_name from employee where emp_no = :emp_no
Let’s say the table Employee contains the following entries:
There are two ways to provide the parameter :emp_no:
• Use a default parameter specified at design time in the customizer. Default parameters are passed in the setDefaultParams() method.
• Override the default parameter at runtime by adding the setParams() method to your code and passing a different parameter.
Here are the possibilities:
• No parameters of any kind are specified. The result: the query returns an error.
• defaultParams set to :emp_no = 1. The result: the query returns Tom.
• defaultParams set to :emp_no = 1 and a setParams() method used at runtime passing the argument,
:emp_no = 2. The result: the query returns Dick.
For example, your code at runtime might look like this:
xTable.setParams(XData.convertToHashMap (new String [][] { {"\"EmpNo\"","\'2\'"},}));
In other words, if a parameter is specified using the setParams() method at runtime, it overrides the default parameter value set at design time. The parameter names are case-sensitive.
Table 3.1 Employee table
emp_no emp_name
1 Tom
2 Dick
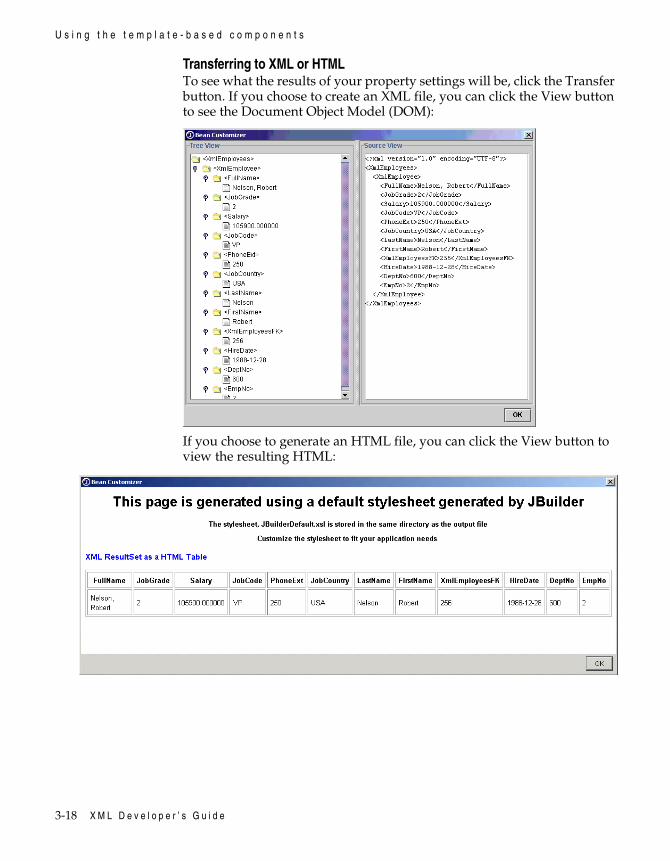
3-18 X M L D e v e l o p e r ’ s G u i d e
U s i n g t h e t e m p l a t e - b a s e d c o m p o n e n t s
Transferring to XML or HTMLTo see what the results of your property settings will be, click the Transfer button. If you choose to create an XML file, you can click the View button to see the Document Object Model (DOM):
If you choose to generate an HTML file, you can click the View button to view the resulting HTML:
U s i n g J B u i l d e r ’ s X M L d a t a b a s e c o m p o n e n t s 3-19
U s i n g t h e t e m p l a t e - b a s e d c o m p o n e n t s
Setting properties with the InspectorYou can also set these properties in the designer’s Inspector. To open the Inspector,
1 Choose the Design tab in the content pane. The Inspector displays to the right of the designer.
2 Click the field to the right of a property and enter the appropriate information.
Setting properties with an XML query documentAnother way to set the connection and transfer options is through an XML query document. You create an XML query document and specify it as the value of the Query File field in the component’s customizer or in the Inspector.
Note XML element names are case-sensitive.
Here is a sample query document for an XTable:
<Query> <Options OutputType=XML" ColumnFormat="AsElements" IgnoreNulls="True" DocumentElement="MyDoc" RowElement="YourRow">
<Connection Url="jdbc:odbc:foodb" Driver="sun.jdbc.odbc.JdbcOdbcDriver" User="me" Password="ok" ExtendedProperties="name=value;name=value...">
<Params> <Param Name=":Part" Default="'ab-c'"> <Param Name=":Number" Default="2"> </Params>
<table name="LINES"> <Key Name="Number"> <Key Name="Part"> </table> </Query>
3-20 X M L D e v e l o p e r ’ s G u i d e
U s i n g t h e t e m p l a t e - b a s e d c o m p o n e n t s
The above query should return the following XML document:
<MyDoc> <YourRow> <col1>some data</col1> <col2>some data</col2> <Number>2</Number> <Part>ab-c</Part> </YourRow> <YourRow> <col1>some other data</col1> <col2>some other data</col2> <Number>2</Number> <Part>ab-c</Part> </YourRow></MyDoc>
Note If the column format of the query document is “AsAttributes”, then col1, col2, Number and Part would be attributes of YourRow.
Here is a sample query document for an XQuery:
<Query> <Options OutputType="XML" ColumnFormat="AsElements" IgnoreNulls="True" DocumentElement="MyDoc" RowElement="YourRow">
<Connection Url="jdbc:odbc:foodb" Driver="sun.jdbc.odbc.JdbcOdbcDriver" User="me" Password="ok" ExtendedProperties="name=value;name=value...">
<Params> <Param Name=":Part" Default="'ab-c'"> <Param Name=":Number" Default="2"> </Params> <Sql Value="SELECT * FROM LINES where Number >= :Number AND Number <= :Number"/> <!--The above should use CDATA section or escape with lt/gt entity references --></Query>
To see a tutorial about using the XTable and XQuery components, see Chapter 10, “Tutorial: Transferring data with the template-based XML database components.”
T u t o r i a l : C r e a t i n g a n d v a l i d a t i n g X M L d o c u m e n t s 4-1
C h a p t e r
4Chapter4Tutorial: Creating and validating
XML documentsThis tutorial uses features
in JBuilder SE andEnterprise
This step-by-step tutorial explains how to use JBuilder’s XML features for creating and validating XML documents. A sample is provided in the JBuilder samples/tutorials/XML/presentation/ directory. For users with read-only access to JBuilder samples, copy the samples directory into a directory with read/write permissions. A DTD and stylesheets (XSLs) are provided as samples.
This tutorial contains specific examples that show you how to do the following:
• Create an XML document manually in the JBuilder editor.
• Create an XML document from an existing DTD using a wizard in JBuilder Enterprise.
• Add data to the XML document, such as employee ID, name, office location, and so on.
• Validate the XML document against the DTD.
• Locate errors in the XML document.
• View the XML document using the XML viewer and JBuilder’s default stylesheet tree view.
This tutorial assumes you have a working knowledge of JBuilder and XML. If you are new to JBuilder, see “The JBuilder environment” (Help|JBuilder Environment). For more information on JBuilder’s XML features, see Chapter 1, “Introduction.”
JBuilder Enterprise has additional transformation features for XML documents. If you’re a JBuilder Enterprise user, once you’ve completed
4-2 X M L D e v e l o p e r ’ s G u i d e
S t e p 1 : C r e a t i n g a n X M L d o c u m e n t
this tutorial, you can continue on to Chapter 5, “Tutorial: Transforming XML documents” to learn how to transform XML documents in JBuilder.
The Accessibility options section in the JBuilder Quick Tips contains tips on using JBuilder features to improve JBuilder’s ease of use for people with disabilities.
For information on documentation conventions used in this tutorial and other JBuilder documentation, see “Documentation conventions” on page 1-3.
Step 1: Creating an XML documentThere are several ways to create XML documents in JBuilder. In JBuilder SE and Enterprise, you can create XML documents manually in the editor. JBuilder Enterprise provides the DTD To XML wizard for quickly creating an XML document from an existing Document Type Definition (DTD).
Create the XML document according to your edition of JBuilder:
• JBuilder SE: See “Creating an XML document manually” on page 4-2
• JBuilder Enterprise: See “Creating an XML document with the DTD To XML wizard” on page 4-3
Creating an XML document manuallyThis step is for JBuilder
SE users.The JBuilder editor provides full support for creating XML-related documents. If you name a file with an XML-related extension, such as DTD, XSD, XSL, and XML, the editor automatically recognizes it as an XML-related document. Several editor features assist you as you work on your XML documents: syntax highlighting and error messages.
To create a new XML document in your project,
1 Open Presentation.jpx in the JBuilder samples directory: samples/Tutorials/XML/presentation/.
2 Choose Project|Add Files/Packages.
3 Choose the Explorer tab, browse to the project directory, samples/Tutorials/XML/presentation/, and enter MyEmployees.xml in the File Name field.
4 Click OK.
5 Click OK again when prompted to create the new file. MyEmployees.xml is added to the project and appears in the project pane with the appropriate XML icon.
6 Open MyEmployees.xml in the editor.
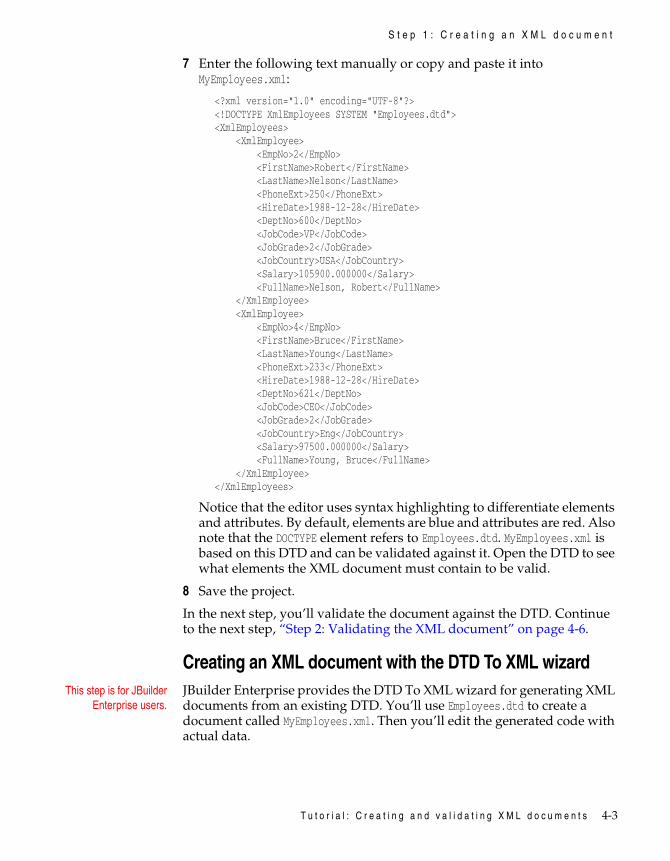
T u t o r i a l : C r e a t i n g a n d v a l i d a t i n g X M L d o c u m e n t s 4-3
S t e p 1 : C r e a t i n g a n X M L d o c u m e n t
7 Enter the following text manually or copy and paste it into MyEmployees.xml:
<?xml version="1.0" encoding="UTF-8"?><!DOCTYPE XmlEmployees SYSTEM "Employees.dtd"><XmlEmployees> <XmlEmployee> <EmpNo>2</EmpNo> <FirstName>Robert</FirstName> <LastName>Nelson</LastName> <PhoneExt>250</PhoneExt> <HireDate>1988-12-28</HireDate> <DeptNo>600</DeptNo> <JobCode>VP</JobCode> <JobGrade>2</JobGrade> <JobCountry>USA</JobCountry> <Salary>105900.000000</Salary> <FullName>Nelson, Robert</FullName> </XmlEmployee> <XmlEmployee> <EmpNo>4</EmpNo> <FirstName>Bruce</FirstName> <LastName>Young</LastName> <PhoneExt>233</PhoneExt> <HireDate>1988-12-28</HireDate> <DeptNo>621</DeptNo> <JobCode>CEO</JobCode> <JobGrade>2</JobGrade> <JobCountry>Eng</JobCountry> <Salary>97500.000000</Salary> <FullName>Young, Bruce</FullName> </XmlEmployee></XmlEmployees>
Notice that the editor uses syntax highlighting to differentiate elements and attributes. By default, elements are blue and attributes are red. Also note that the DOCTYPE element refers to Employees.dtd. MyEmployees.xml is based on this DTD and can be validated against it. Open the DTD to see what elements the XML document must contain to be valid.
8 Save the project.
In the next step, you’ll validate the document against the DTD. Continue to the next step, “Step 2: Validating the XML document” on page 4-6.
Creating an XML document with the DTD To XML wizardThis step is for JBuilder
Enterprise users.JBuilder Enterprise provides the DTD To XML wizard for generating XML documents from an existing DTD. You’ll use Employees.dtd to create a document called MyEmployees.xml. Then you’ll edit the generated code with actual data.
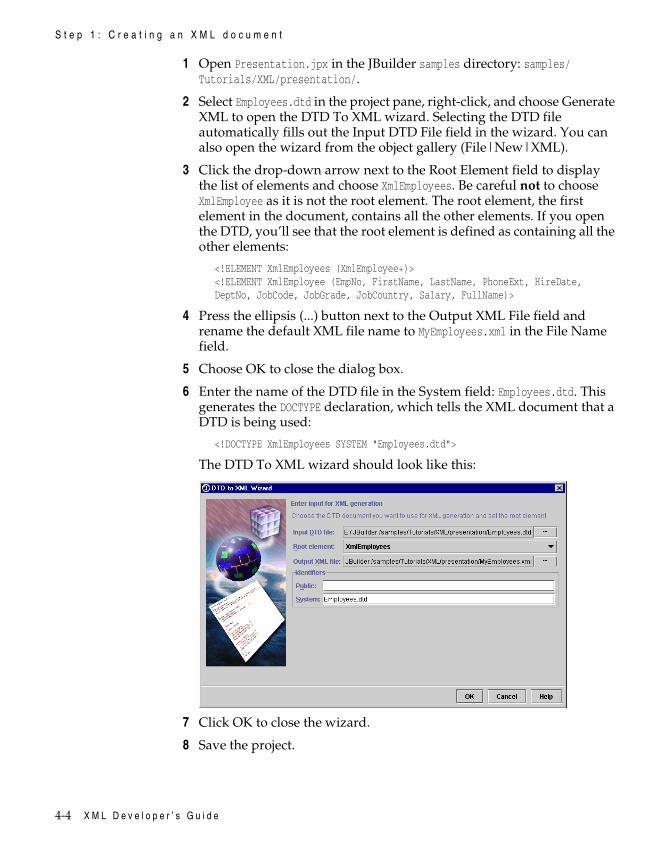
4-4 X M L D e v e l o p e r ’ s G u i d e
S t e p 1 : C r e a t i n g a n X M L d o c u m e n t
1 Open Presentation.jpx in the JBuilder samples directory: samples/Tutorials/XML/presentation/.
2 Select Employees.dtd in the project pane, right-click, and choose Generate XML to open the DTD To XML wizard. Selecting the DTD file automatically fills out the Input DTD File field in the wizard. You can also open the wizard from the object gallery (File|New|XML).
3 Click the drop-down arrow next to the Root Element field to display the list of elements and choose XmlEmployees. Be careful not to choose XmlEmployee as it is not the root element. The root element, the first element in the document, contains all the other elements. If you open the DTD, you’ll see that the root element is defined as containing all the other elements:
<!ELEMENT XmlEmployees (XmlEmployee+)><!ELEMENT XmlEmployee (EmpNo, FirstName, LastName, PhoneExt, HireDate, DeptNo, JobCode, JobGrade, JobCountry, Salary, FullName)>
4 Press the ellipsis (...) button next to the Output XML File field and rename the default XML file name to MyEmployees.xml in the File Name field.
5 Choose OK to close the dialog box.
6 Enter the name of the DTD file in the System field: Employees.dtd. This generates the DOCTYPE declaration, which tells the XML document that a DTD is being used:
<!DOCTYPE XmlEmployees SYSTEM "Employees.dtd">
The DTD To XML wizard should look like this:
7 Click OK to close the wizard.
8 Save the project.
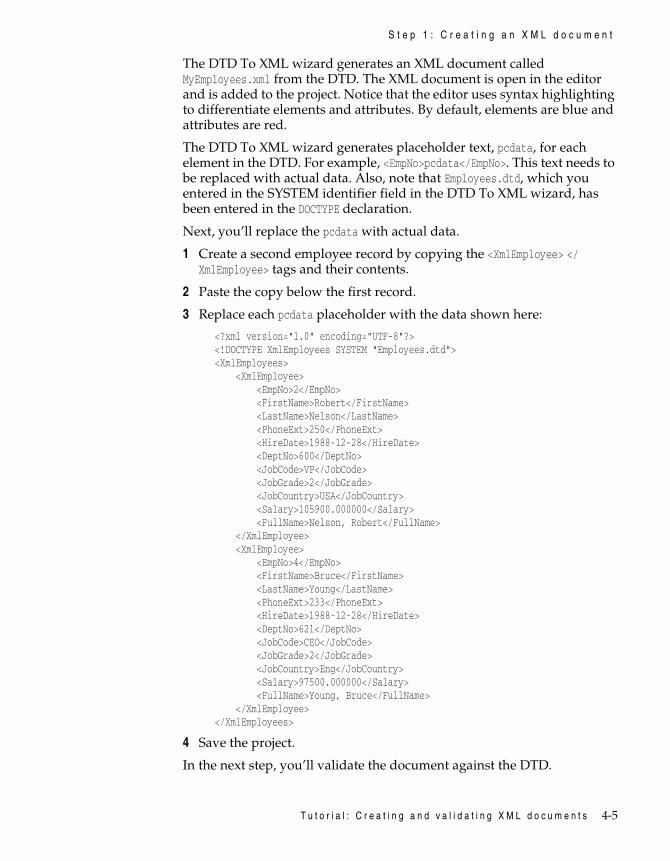
T u t o r i a l : C r e a t i n g a n d v a l i d a t i n g X M L d o c u m e n t s 4-5
S t e p 1 : C r e a t i n g a n X M L d o c u m e n t
The DTD To XML wizard generates an XML document called MyEmployees.xml from the DTD. The XML document is open in the editor and is added to the project. Notice that the editor uses syntax highlighting to differentiate elements and attributes. By default, elements are blue and attributes are red.
The DTD To XML wizard generates placeholder text, pcdata, for each element in the DTD. For example, <EmpNo>pcdata</EmpNo>. This text needs to be replaced with actual data. Also, note that Employees.dtd, which you entered in the SYSTEM identifier field in the DTD To XML wizard, has been entered in the DOCTYPE declaration.
Next, you’ll replace the pcdata with actual data.
1 Create a second employee record by copying the <XmlEmployee> </XmlEmployee> tags and their contents.
2 Paste the copy below the first record.
3 Replace each pcdata placeholder with the data shown here:
<?xml version="1.0" encoding="UTF-8"?><!DOCTYPE XmlEmployees SYSTEM "Employees.dtd"><XmlEmployees> <XmlEmployee> <EmpNo>2</EmpNo> <FirstName>Robert</FirstName> <LastName>Nelson</LastName> <PhoneExt>250</PhoneExt> <HireDate>1988-12-28</HireDate> <DeptNo>600</DeptNo> <JobCode>VP</JobCode> <JobGrade>2</JobGrade> <JobCountry>USA</JobCountry> <Salary>105900.000000</Salary> <FullName>Nelson, Robert</FullName> </XmlEmployee> <XmlEmployee> <EmpNo>4</EmpNo> <FirstName>Bruce</FirstName> <LastName>Young</LastName> <PhoneExt>233</PhoneExt> <HireDate>1988-12-28</HireDate> <DeptNo>621</DeptNo> <JobCode>CEO</JobCode> <JobGrade>2</JobGrade> <JobCountry>Eng</JobCountry> <Salary>97500.000000</Salary> <FullName>Young, Bruce</FullName> </XmlEmployee></XmlEmployees>
4 Save the project.
In the next step, you’ll validate the document against the DTD.
4-6 X M L D e v e l o p e r ’ s G u i d e
S t e p 2 : V a l i d a t i n g t h e X M L d o c u m e n t
Step 2: Validating the XML documentIn XML, there are two types of validation: well-formedness and grammatical validity. A well-formed document must follow the XML rules for the physical document structure and syntax. For example, all XML documents must have a single root element, the first element in the document that contains all the other elements. A well-formed document is not checked against an external DTD.
A valid XML document is a well-formed document that also conforms to the stricter rules specified in the Document Type Definition (DTD). The DTD describes a document’s structure, specifies which element types are allowed, and defines the properties for each element. If a DTD is not present, an XML document is not valid.
JBuilder performs both types of validation. If a document is not well-formed, errors are displayed in an Errors folder in the structure pane. If a document isn’t grammatically valid, errors are displayed in the message pane.
The document you created in the previous step is well-formed because the Errors folder does not appear in the structure pane. If you remove the root element, which is required for a well-formed XML document, the Errors folder appears in the structure pane.
Now, introduce an error in this well-formed document to see how JBuilder displays errors.
1 Select the root element, <XmlEmployees>, in the editor and cut it from the document. In a well-formed document, all elements must have start and end tags, so this should display as an error. Note that an Errors folder displays in the structure pane.
2 Open the Errors folder and select the error to highlight it in the code. Double-click the error to change the focus to the line of code in the editor. The line of code indicated by the error message may not be the origin of the error. In this example, the error occurs because the start tag for the root element is missing.
3 Re-enter the root element in the XML document. Notice that the Errors folder disappears. The document is now well-formed again.
Next, check if your document is grammatically valid compared to the DTD.
1 Right-click MyEmployees.xml in the project pane and choose Validate. A message displays in a Success dialog box indicating that the document is valid.

T u t o r i a l : C r e a t i n g a n d v a l i d a t i n g X M L d o c u m e n t s 4-7
S t e p 3 : V i e w i n g t h e X M L d o c u m e n t
2 Introduce a validation error by selecting the DOCTYPE declaration and cutting it from the document:
<!DOCTYPE XmlEmployees SYSTEM "Employees.dtd">
3 Validate the document again. The XML Validation Trace page displays in the message pane with an ERROR node.
4 Expand the ERROR node in the message pane to display the error:
MYEMPLOYEES.XML is invalid ERROR There is no DTD or Schema present in this document
5 Re-enter or paste the DOCTYPE declaration into the document.
6 Introduce another error by changing the casing of ‘N’ in <FirstName> to ‘n’: <Firstname>.
7 Right-click the XML file and choose Validate. Notice the error messages:
MYEMPLOYEES.XML is invalid ERROR Element type "Firstname" must be declared. FATAL_ERROR The element type "Firstname" must be terminated by the matching end-tag "</Firstname>".
There are two errors here: the element Firstname is not declared in the DTD and it doesn’t have a closing tag.
8 Change <Firstname> back to <FirstName>.
9 Right-click the XML file and choose Validate. Now your document is valid again.
Step 3: Viewing the XML documentYou can view XML documents with JBuilder’s default stylesheet in the XML viewer. This stylesheet is written in Extensible Style Language Transformations (XSLT) and displays documents in a collapsible tree view on the View tab of the content pane. To view an XML document in the XML viewer, you must first enable the XML viewer. Once you’ve done this, a View tab displays at the bottom of the content pane.
In this step, you’ll enable the XML viewer and then view the XML document without the default JBuilder stylesheet and then with the stylesheet. First, you need to enable the XML viewer.
1 Choose Tools|IDE Options, choose the XML page, and set the Enable Browser View option. This enables the XML viewer on the View tab. Note that the Apply Default Stylesheet option is set by default. The default stylesheet displays XML documents in a collapsible tree view.
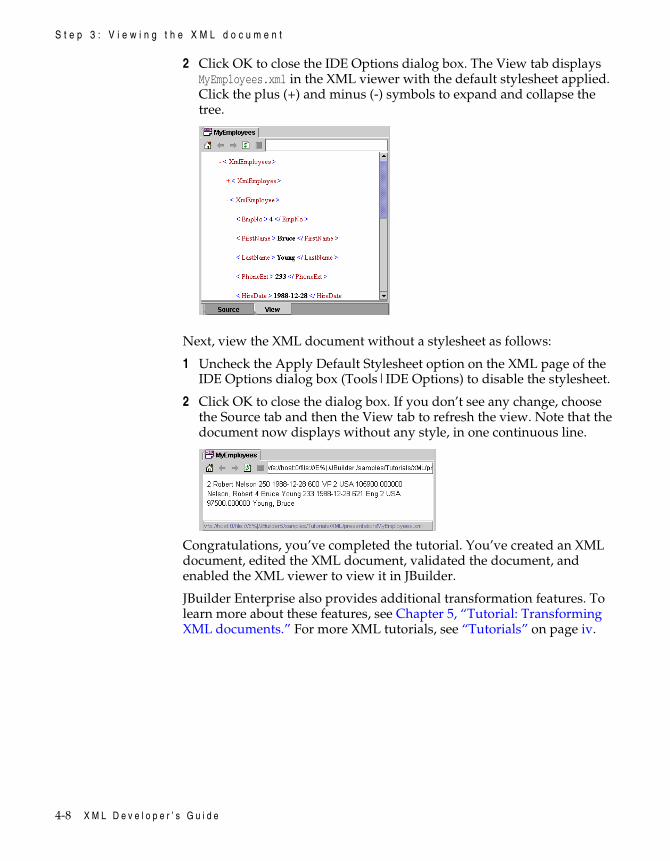
4-8 X M L D e v e l o p e r ’ s G u i d e
S t e p 3 : V i e w i n g t h e X M L d o c u m e n t
2 Click OK to close the IDE Options dialog box. The View tab displays MyEmployees.xml in the XML viewer with the default stylesheet applied. Click the plus (+) and minus (-) symbols to expand and collapse the tree.
Next, view the XML document without a stylesheet as follows:
1 Uncheck the Apply Default Stylesheet option on the XML page of the IDE Options dialog box (Tools|IDE Options) to disable the stylesheet.
2 Click OK to close the dialog box. If you don’t see any change, choose the Source tab and then the View tab to refresh the view. Note that the document now displays without any style, in one continuous line.
Congratulations, you’ve completed the tutorial. You’ve created an XML document, edited the XML document, validated the document, and enabled the XML viewer to view it in JBuilder.
JBuilder Enterprise also provides additional transformation features. To learn more about these features, see Chapter 5, “Tutorial: Transforming XML documents.” For more XML tutorials, see “Tutorials” on page iv.
T u t o r i a l : T r a n s f o r m i n g X M L d o c u m e n t s 5-1
C h a p t e r
5Chapter5Tutorial: Transforming XML
documentsThis tutorial uses features
in JBuilder EnterpriseThis step-by-step tutorial explains how to use JBuilder’s XML features for transforming an XML document. A sample is provided in the JBuilder samples/tutorials/XML/presentation/ directory. For users with read-only access to JBuilder samples, copy the samples directory into a directory with read/write permissions. A DTD and stylesheets (XSLs) are provided as samples.
Before beginning this tutorial, you must first create the XML document as explained in “Step 1: Creating an XML document” on page 4-2.
This tutorial contains specific examples that show you how to do the following:
• Enable the XML viewer.
• Associate stylesheets with the XML document.
• Transform the XML document by applying several stylesheets.
• Set transform trace options.
This tutorial assumes you have a working knowledge of JBuilder and XML. If you are new to JBuilder, see “The JBuilder environment” (Help|JBuilder Environment). For more information on JBuilder’s XML features, see Chapter 1, “Introduction.”
The Accessibility options section in the JBuilder Quick Tips contains tips on using JBuilder features to improve JBuilder’s ease of use for people with disabilities.
For information on documentation conventions used in this tutorial and other JBuilder documentation, see “Documentation conventions” on page 1-3.
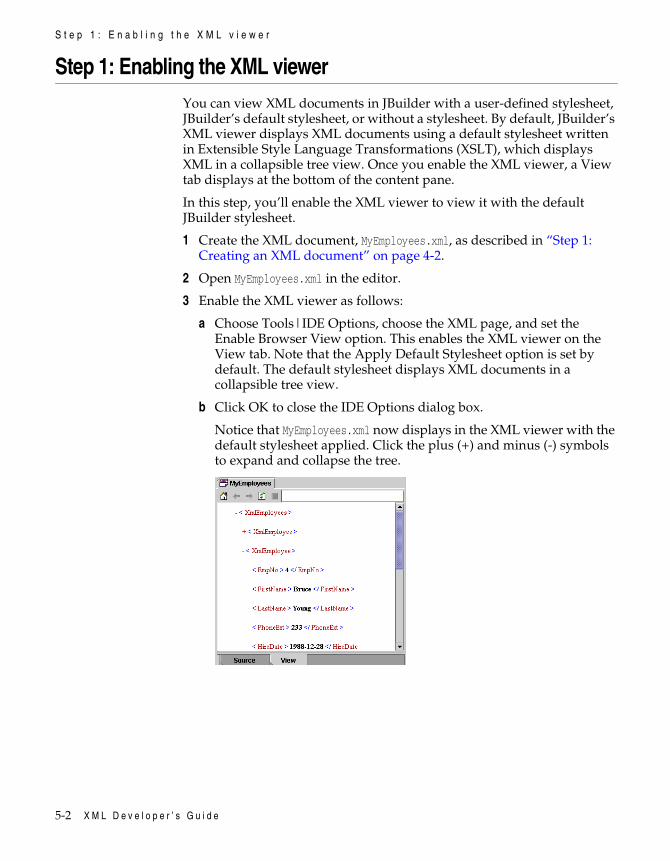
5-2 X M L D e v e l o p e r ’ s G u i d e
S t e p 1 : E n a b l i n g t h e X M L v i e w e r
Step 1: Enabling the XML viewerYou can view XML documents in JBuilder with a user-defined stylesheet, JBuilder’s default stylesheet, or without a stylesheet. By default, JBuilder’s XML viewer displays XML documents using a default stylesheet written in Extensible Style Language Transformations (XSLT), which displays XML in a collapsible tree view. Once you enable the XML viewer, a View tab displays at the bottom of the content pane.
In this step, you’ll enable the XML viewer to view it with the default JBuilder stylesheet.
1 Create the XML document, MyEmployees.xml, as described in “Step 1: Creating an XML document” on page 4-2.
2 Open MyEmployees.xml in the editor.
3 Enable the XML viewer as follows:
a Choose Tools|IDE Options, choose the XML page, and set the Enable Browser View option. This enables the XML viewer on the View tab. Note that the Apply Default Stylesheet option is set by default. The default stylesheet displays XML documents in a collapsible tree view.
b Click OK to close the IDE Options dialog box.
Notice that MyEmployees.xml now displays in the XML viewer with the default stylesheet applied. Click the plus (+) and minus (-) symbols to expand and collapse the tree.
T u t o r i a l : T r a n s f o r m i n g X M L d o c u m e n t s 5-3
S t e p 2 : A s s o c i a t i n g s t y l e s h e e t s w i t h t h e d o c u m e n t
Step 2: Associating stylesheets with the documentIn addition to viewing documents in a tree view, you can also apply custom stylesheets to the XML document. This process of converting an XML document to any other kind of document is called XML transformation.
To apply custom stylesheets in JBuilder, you need to associate the stylesheet with the document. Alternately, you could include an XSLT processing instruction in your XML document that references the stylesheets.
Next, associate stylesheets with your document as follows:
1 Choose the Transform View tab. Notice that a message indicates that a stylesheet is not associated with the document.
2 Click the Add Stylesheets button on the transform view toolbar to open the Configure Node Stylesheets dialog box.
3 Click the Add button in the dialog box and open the samples/Tutorials/XML/presentation/xsls directory where the stylesheets are located. Select EmployeesListView.xsl and click OK.
4 Click the Add button again to add the second stylesheet, EmployeesTableView.xsl. The XSL stylesheets are now associated with the document. Click OK to close the dialog box.
Note You can also add stylesheets in the Properties dialog box. Right-click the XML document in the project pane and choose Properties.
Step 3: Transforming the document using stylesheetsNow that the stylesheets are linked to the XML document, you can transform the document using several different stylesheets. The associated stylesheets are now available from the stylesheet drop-down list on the transform view toolbar.
Notice that MyEmployees.xml is displayed in the default tree view. By default, transform view uses the default stylesheet to display the document if a stylesheet is not available. Turn this view off, then apply the stylesheet.
1 Click the enabled Default Stylesheet button to turn off the tree view.
2 Choose EmployeesListView.xsl from the stylesheet drop-down list. The transform view now displays the transformed document as a list, as determined by the applied stylesheet. The Transform View Source tab

5-4 X M L D e v e l o p e r ’ s G u i d e
S t e p 4 : S e t t i n g t r a n s f o r m t r a c e o p t i o n s
displays the source code for the transformed document. Your XML document should look something like this:
3 Apply the second stylesheet by choosing EmployeesTableView.xsl from the drop-down list and look at the resulting transformation to a table in the transform view.
Step 4: Setting transform trace optionsYou can set Transform Trace options so that when a transformation occurs, you can follow the flow as the stylesheet is applied. These options include Generation, Templates, Elements, and Selections. The traces appear in the message pane. Click a trace to highlight the corresponding source code. Double-click a trace to change the focus to the source code in the editor so you can begin editing.
To set the Trace options,
1 Click the Set Trace Options button on the transform view toolbar or choose Tools|IDE Options and click the XML tab.
T u t o r i a l : T r a n s f o r m i n g X M L d o c u m e n t s 5-5
S t e p 4 : S e t t i n g t r a n s f o r m t r a c e o p t i o n s
2 Select all the trace options and choose OK.
Now, transform MyEmployees.xml by applying EmployeesListView.xsl and notice what happens in the message pane.
1 Choose EmployeesListView.xsl from the stylesheet drop-down list. Note that when the transformation occurs the message pane opens and four nodes appear: generation, templates, elements, selections.
• generation: outputs information after each result tree generation event, such as start document, start element, characters, and so on.
• templates: outputs an event when a template is invoked.
• elements: outputs events that occur as each node is executed in the stylesheet.
• selections: outputs information after each selection event.
2 Expand each node to view the flow of the document’s transformation.
Congratulations, you’ve completed the tutorial. You’ve enabled the XML viewer, associated stylesheets with the document, transformed the document with stylesheets, and set transform trace options.
For more XML tutorials, see “Tutorials” on page iv.

5-6 X M L D e v e l o p e r ’ s G u i d e
T u t o r i a l : C r e a t i n g a S A X H a n d l e r f o r p a r s i n g X M L d o c u m e n t s 6-1
C h a p t e r
6Chapter6Tutorial: Creating a SAX Handler
for parsing XML documentsThis tutorial uses features
in JBuilder EnterpriseThis step-by-step tutorial explains how to use JBuilder’s SAX Handler wizard to create a SAX parser for parsing your XML documents. Samples are provided in the JBuilder samples/Tutorials/XML/saxparser/ directory. For users with read-only access to JBuilder samples, copy the samples directory into a directory with read/write permissions. This tutorial uses a sample XML document that contains employee data, such as employee number, first name, last name, and so on.
There are two types of XML APIs: tree-based APIs and event-based APIs. SAX, the Simple API for XML, is a standard interface for event-based XML parsing. It reports parsing events directly to the application through callbacks. The application implements handlers to deal with the different events, similar to event handling in a graphical user interface.
JBuilder makes it easy to use SAX to manipulate your XML programmatically. The SAX Handler wizard creates a SAX parser implementation template that includes just the methods you want to implement to parse your XML.
This tutorial contains specific examples that show you how to do the following:
• Create a SAX parser with the SAX Handler wizard.
• Edit the SAX parser code to customize the parsing.
• Run the program and view the parsing results.
• Add attributes to the XML document, add code to handle the attributes, and parse the document again.
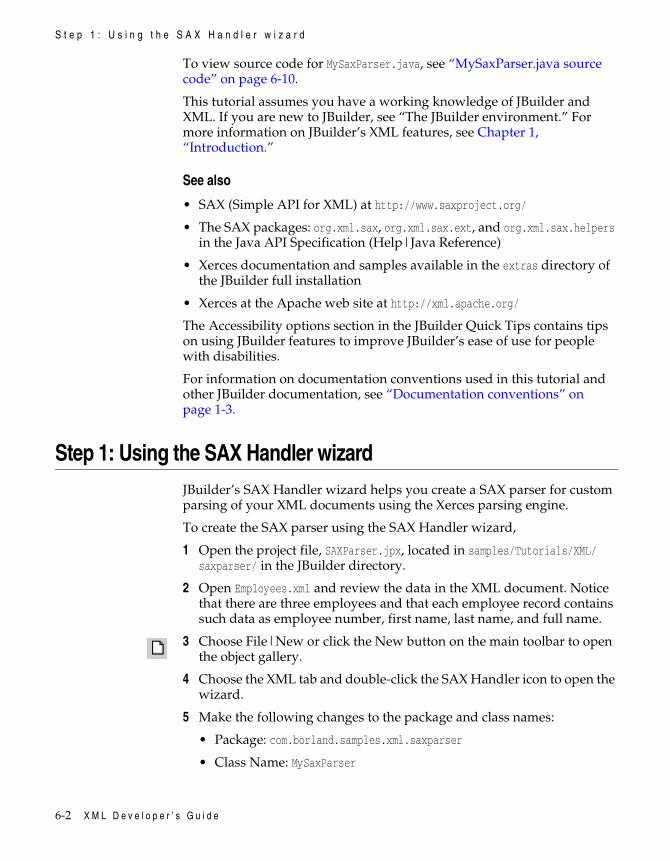
6-2 X M L D e v e l o p e r ’ s G u i d e
S t e p 1 : U s i n g t h e S A X H a n d l e r w i z a r d
To view source code for MySaxParser.java, see “MySaxParser.java source code” on page 6-10.
This tutorial assumes you have a working knowledge of JBuilder and XML. If you are new to JBuilder, see “The JBuilder environment.” For more information on JBuilder’s XML features, see Chapter 1, “Introduction.”
See also
• SAX (Simple API for XML) at http://www.saxproject.org/
• The SAX packages: org.xml.sax, org.xml.sax.ext, and org.xml.sax.helpers in the Java API Specification (Help|Java Reference)
• Xerces documentation and samples available in the extras directory of the JBuilder full installation
• Xerces at the Apache web site at http://xml.apache.org/
The Accessibility options section in the JBuilder Quick Tips contains tips on using JBuilder features to improve JBuilder’s ease of use for people with disabilities.
For information on documentation conventions used in this tutorial and other JBuilder documentation, see “Documentation conventions” on page 1-3.
Step 1: Using the SAX Handler wizardJBuilder’s SAX Handler wizard helps you create a SAX parser for custom parsing of your XML documents using the Xerces parsing engine.
To create the SAX parser using the SAX Handler wizard,
1 Open the project file, SAXParser.jpx, located in samples/Tutorials/XML/saxparser/ in the JBuilder directory.
2 Open Employees.xml and review the data in the XML document. Notice that there are three employees and that each employee record contains such data as employee number, first name, last name, and full name.
3 Choose File|New or click the New button on the main toolbar to open the object gallery.
4 Choose the XML tab and double-click the SAX Handler icon to open the wizard.
5 Make the following changes to the package and class names:
• Package: com.borland.samples.xml.saxparser
• Class Name: MySaxParser
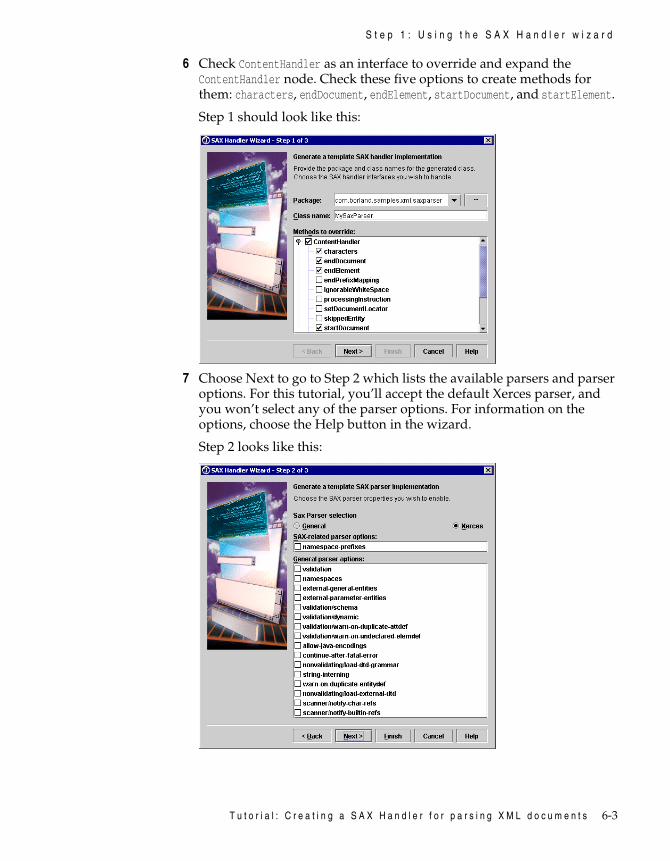
T u t o r i a l : C r e a t i n g a S A X H a n d l e r f o r p a r s i n g X M L d o c u m e n t s 6-3
S t e p 1 : U s i n g t h e S A X H a n d l e r w i z a r d
6 Check ContentHandler as an interface to override and expand the ContentHandler node. Check these five options to create methods for them: characters, endDocument, endElement, startDocument, and startElement.
Step 1 should look like this:
7 Choose Next to go to Step 2 which lists the available parsers and parser options. For this tutorial, you’ll accept the default Xerces parser, and you won’t select any of the parser options. For information on the options, choose the Help button in the wizard.
Step 2 looks like this:
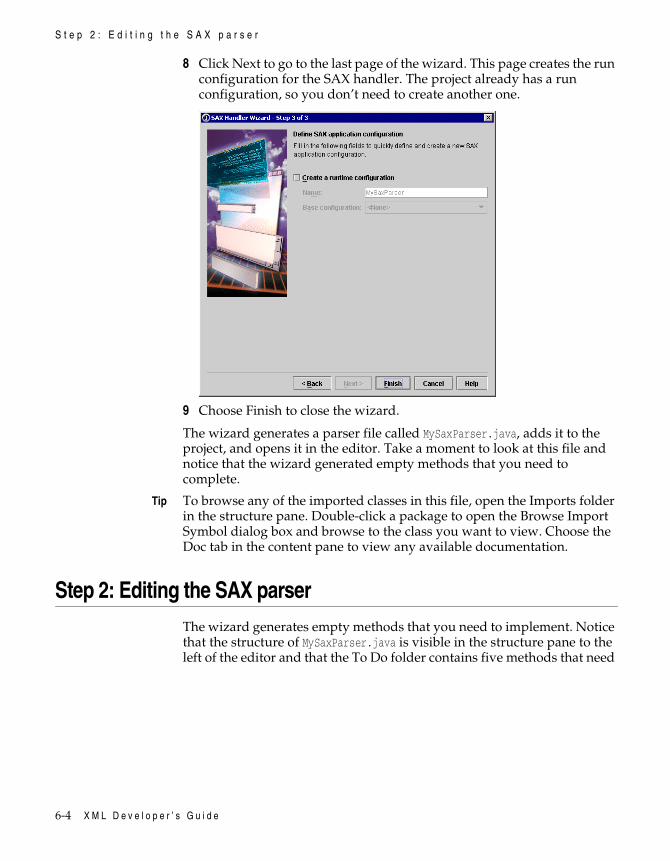
6-4 X M L D e v e l o p e r ’ s G u i d e
S t e p 2 : E d i t i n g t h e S A X p a r s e r
8 Click Next to go to the last page of the wizard. This page creates the run configuration for the SAX handler. The project already has a run configuration, so you don’t need to create another one.
9 Choose Finish to close the wizard.
The wizard generates a parser file called MySaxParser.java, adds it to the project, and opens it in the editor. Take a moment to look at this file and notice that the wizard generated empty methods that you need to complete.
Tip To browse any of the imported classes in this file, open the Imports folder in the structure pane. Double-click a package to open the Browse Import Symbol dialog box and browse to the class you want to view. Choose the Doc tab in the content pane to view any available documentation.
Step 2: Editing the SAX parserThe wizard generates empty methods that you need to implement. Notice that the structure of MySaxParser.java is visible in the structure pane to the left of the editor and that the To Do folder contains five methods that need
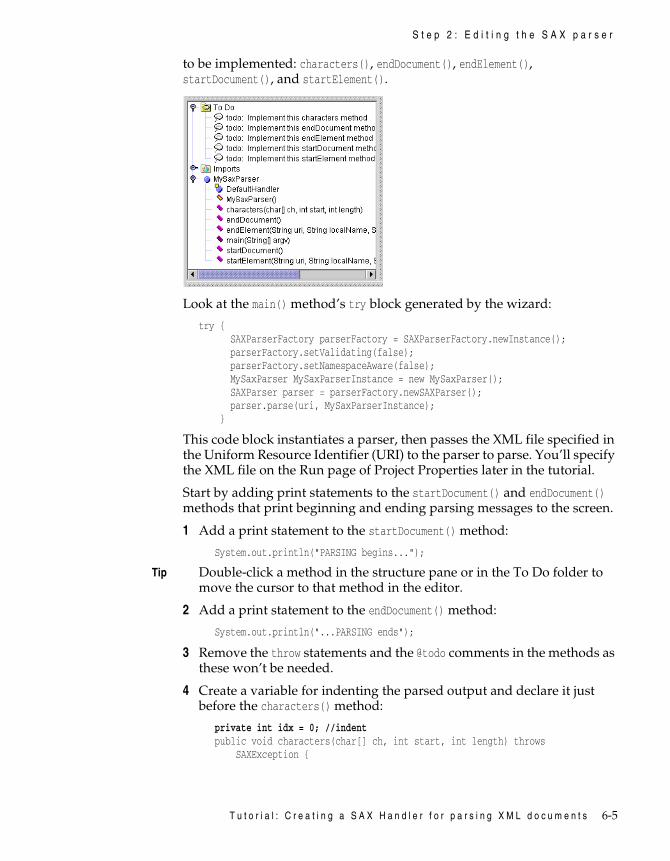
T u t o r i a l : C r e a t i n g a S A X H a n d l e r f o r p a r s i n g X M L d o c u m e n t s 6-5
S t e p 2 : E d i t i n g t h e S A X p a r s e r
to be implemented: characters(), endDocument(), endElement(), startDocument(), and startElement().
Look at the main() method’s try block generated by the wizard:
try { SAXParserFactory parserFactory = SAXParserFactory.newInstance(); parserFactory.setValidating(false); parserFactory.setNamespaceAware(false); MySaxParser MySaxParserInstance = new MySaxParser(); SAXParser parser = parserFactory.newSAXParser(); parser.parse(uri, MySaxParserInstance); }
This code block instantiates a parser, then passes the XML file specified in the Uniform Resource Identifier (URI) to the parser to parse. You’ll specify the XML file on the Run page of Project Properties later in the tutorial.
Start by adding print statements to the startDocument() and endDocument() methods that print beginning and ending parsing messages to the screen.
1 Add a print statement to the startDocument() method:
System.out.println("PARSING begins...");
Tip Double-click a method in the structure pane or in the To Do folder to move the cursor to that method in the editor.
2 Add a print statement to the endDocument() method:
System.out.println("...PARSING ends");
3 Remove the throw statements and the @todo comments in the methods as these won’t be needed.
4 Create a variable for indenting the parsed output and declare it just before the characters() method:
private int idx = 0; //indentpublic void characters(char[] ch, int start, int length) throws SAXException {
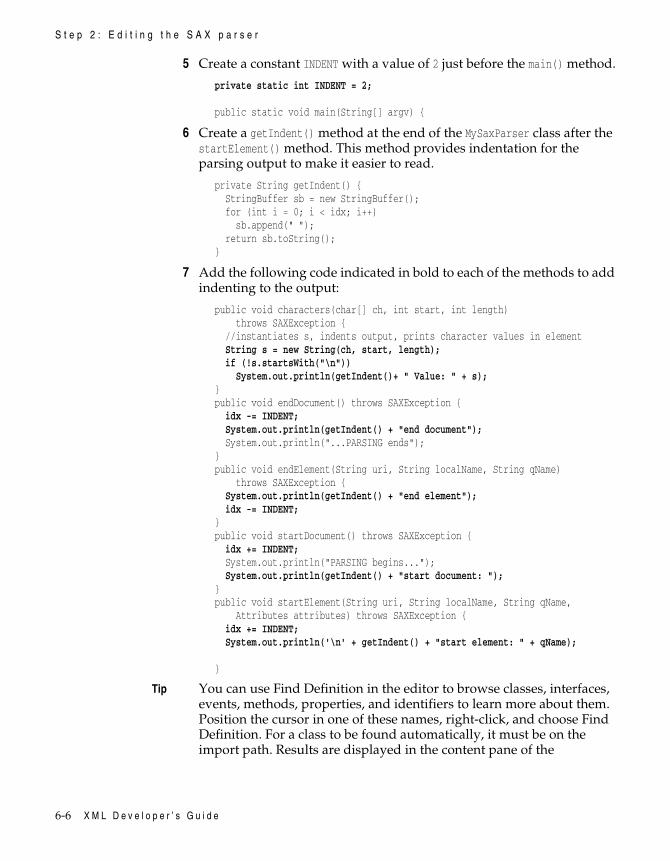
6-6 X M L D e v e l o p e r ’ s G u i d e
S t e p 2 : E d i t i n g t h e S A X p a r s e r
5 Create a constant INDENT with a value of 2 just before the main() method.
private static int INDENT = 2;
public static void main(String[] argv) {
6 Create a getIndent() method at the end of the MySaxParser class after the startElement() method. This method provides indentation for the parsing output to make it easier to read.
private String getIndent() { StringBuffer sb = new StringBuffer(); for (int i = 0; i < idx; i++) sb.append(" "); return sb.toString();}
7 Add the following code indicated in bold to each of the methods to add indenting to the output:
public void characters(char[] ch, int start, int length) throws SAXException { //instantiates s, indents output, prints character values in element String s = new String(ch, start, length); if (!s.startsWith("\n")) System.out.println(getIndent()+ " Value: " + s);}public void endDocument() throws SAXException { idx -= INDENT; System.out.println(getIndent() + "end document"); System.out.println("...PARSING ends");}public void endElement(String uri, String localName, String qName) throws SAXException { System.out.println(getIndent() + "end element"); idx -= INDENT;}public void startDocument() throws SAXException { idx += INDENT; System.out.println("PARSING begins..."); System.out.println(getIndent() + "start document: ");}public void startElement(String uri, String localName, String qName, Attributes attributes) throws SAXException { idx += INDENT; System.out.println('\n' + getIndent() + "start element: " + qName);
}
Tip You can use Find Definition in the editor to browse classes, interfaces, events, methods, properties, and identifiers to learn more about them. Position the cursor in one of these names, right-click, and choose Find Definition. For a class to be found automatically, it must be on the import path. Results are displayed in the content pane of the
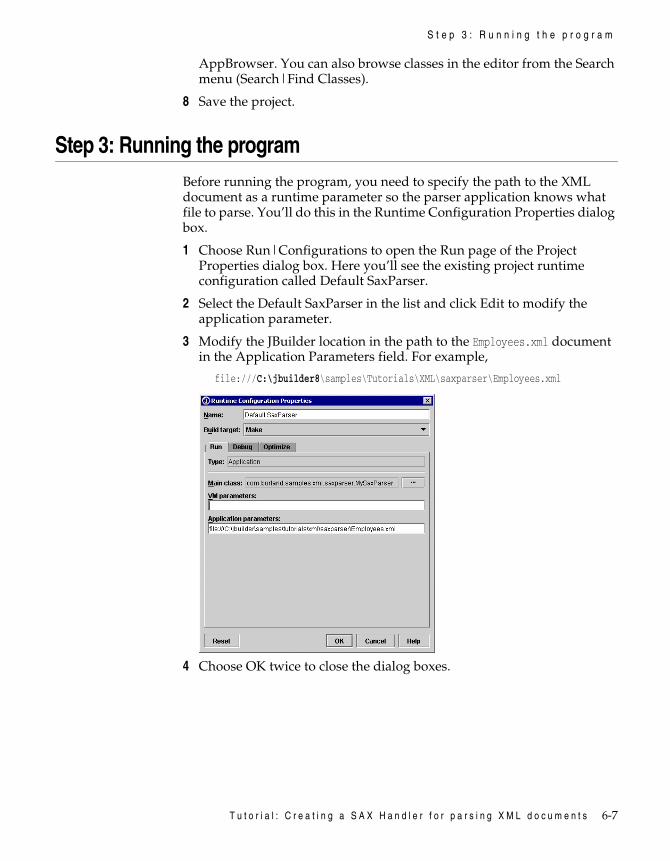
T u t o r i a l : C r e a t i n g a S A X H a n d l e r f o r p a r s i n g X M L d o c u m e n t s 6-7
S t e p 3 : R u n n i n g t h e p r o g r a m
AppBrowser. You can also browse classes in the editor from the Search menu (Search|Find Classes).
8 Save the project.
Step 3: Running the programBefore running the program, you need to specify the path to the XML document as a runtime parameter so the parser application knows what file to parse. You’ll do this in the Runtime Configuration Properties dialog box.
1 Choose Run|Configurations to open the Run page of the Project Properties dialog box. Here you’ll see the existing project runtime configuration called Default SaxParser.
2 Select the Default SaxParser in the list and click Edit to modify the application parameter.
3 Modify the JBuilder location in the path to the Employees.xml document in the Application Parameters field. For example,
file:///C:\jbuilder8\samples\Tutorials\XML\saxparser\Employees.xml
4 Choose OK twice to close the dialog boxes.
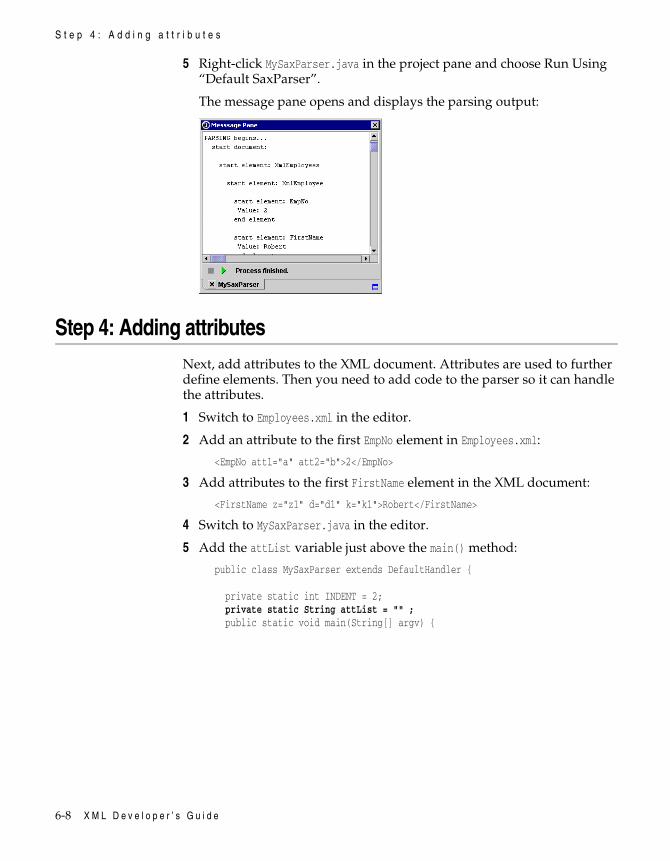
6-8 X M L D e v e l o p e r ’ s G u i d e
S t e p 4 : A d d i n g a t t r i b u t e s
5 Right-click MySaxParser.java in the project pane and choose Run Using “Default SaxParser”.
The message pane opens and displays the parsing output:
Step 4: Adding attributesNext, add attributes to the XML document. Attributes are used to further define elements. Then you need to add code to the parser so it can handle the attributes.
1 Switch to Employees.xml in the editor.
2 Add an attribute to the first EmpNo element in Employees.xml:
<EmpNo att1="a" att2="b">2</EmpNo>
3 Add attributes to the first FirstName element in the XML document:
<FirstName z="z1" d="d1" k="k1">Robert</FirstName>
4 Switch to MySaxParser.java in the editor.
5 Add the attList variable just above the main() method:
public class MySaxParser extends DefaultHandler {
private static int INDENT = 2; private static String attList = "" ; public static void main(String[] argv) {
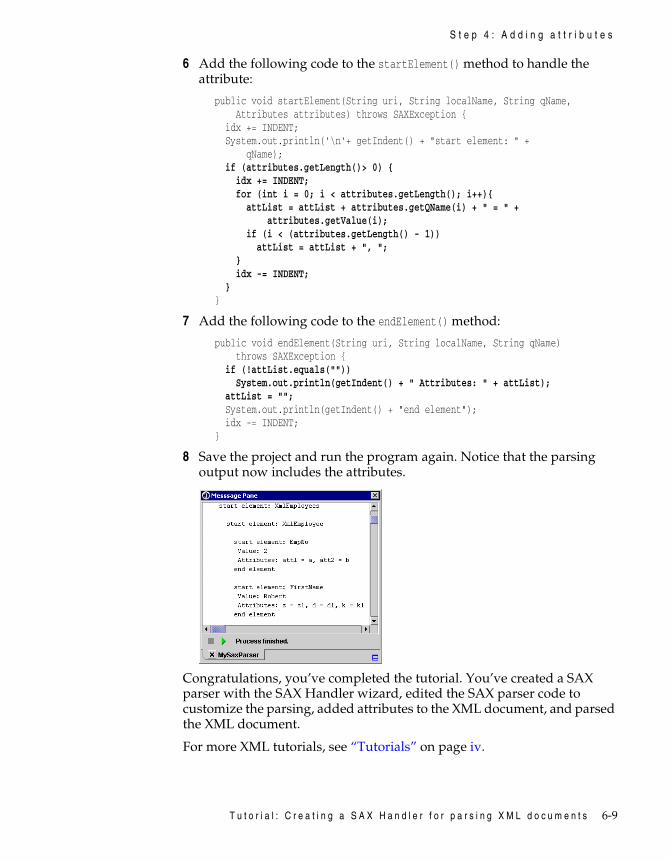
T u t o r i a l : C r e a t i n g a S A X H a n d l e r f o r p a r s i n g X M L d o c u m e n t s 6-9
S t e p 4 : A d d i n g a t t r i b u t e s
6 Add the following code to the startElement() method to handle the attribute:
public void startElement(String uri, String localName, String qName, Attributes attributes) throws SAXException { idx += INDENT; System.out.println('\n'+ getIndent() + "start element: " + qName); if (attributes.getLength()> 0) { idx += INDENT; for (int i = 0; i < attributes.getLength(); i++){ attList = attList + attributes.getQName(i) + " = " + attributes.getValue(i); if (i < (attributes.getLength() - 1)) attList = attList + ", "; } idx -= INDENT; }}
7 Add the following code to the endElement() method:
public void endElement(String uri, String localName, String qName) throws SAXException { if (!attList.equals("")) System.out.println(getIndent() + " Attributes: " + attList); attList = ""; System.out.println(getIndent() + "end element"); idx -= INDENT;}
8 Save the project and run the program again. Notice that the parsing output now includes the attributes.
Congratulations, you’ve completed the tutorial. You’ve created a SAX parser with the SAX Handler wizard, edited the SAX parser code to customize the parsing, added attributes to the XML document, and parsed the XML document.
For more XML tutorials, see “Tutorials” on page iv.
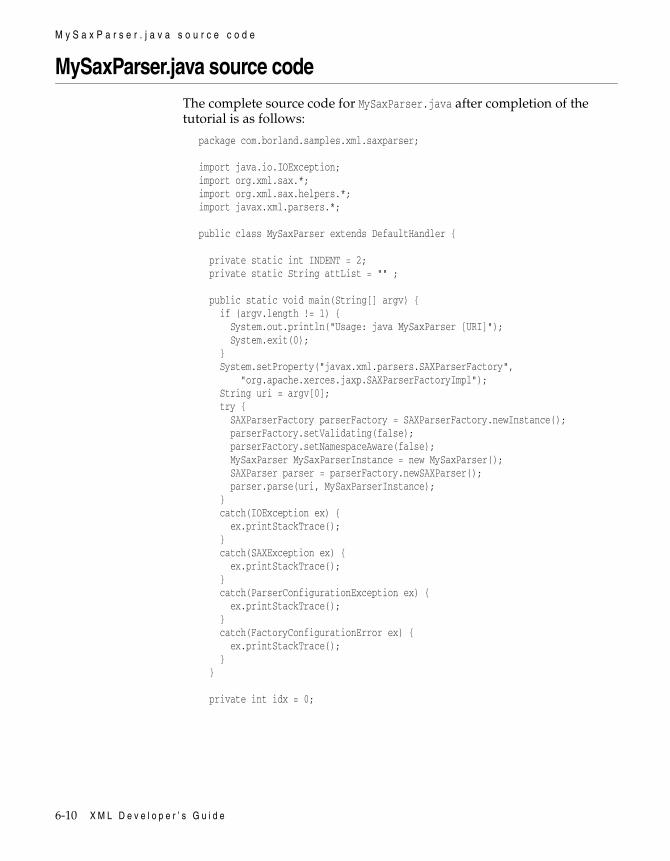
6-10 X M L D e v e l o p e r ’ s G u i d e
M y S a x P a r s e r . j a v a s o u r c e c o d e
MySaxParser.java source codeThe complete source code for MySaxParser.java after completion of the tutorial is as follows:
package com.borland.samples.xml.saxparser;
import java.io.IOException;import org.xml.sax.*;import org.xml.sax.helpers.*;import javax.xml.parsers.*;
public class MySaxParser extends DefaultHandler {
private static int INDENT = 2; private static String attList = "" ;
public static void main(String[] argv) { if (argv.length != 1) { System.out.println("Usage: java MySaxParser [URI]"); System.exit(0); } System.setProperty("javax.xml.parsers.SAXParserFactory", "org.apache.xerces.jaxp.SAXParserFactoryImpl"); String uri = argv[0]; try { SAXParserFactory parserFactory = SAXParserFactory.newInstance(); parserFactory.setValidating(false); parserFactory.setNamespaceAware(false); MySaxParser MySaxParserInstance = new MySaxParser(); SAXParser parser = parserFactory.newSAXParser(); parser.parse(uri, MySaxParserInstance); } catch(IOException ex) { ex.printStackTrace(); } catch(SAXException ex) { ex.printStackTrace(); } catch(ParserConfigurationException ex) { ex.printStackTrace(); } catch(FactoryConfigurationError ex) { ex.printStackTrace(); } }
private int idx = 0;
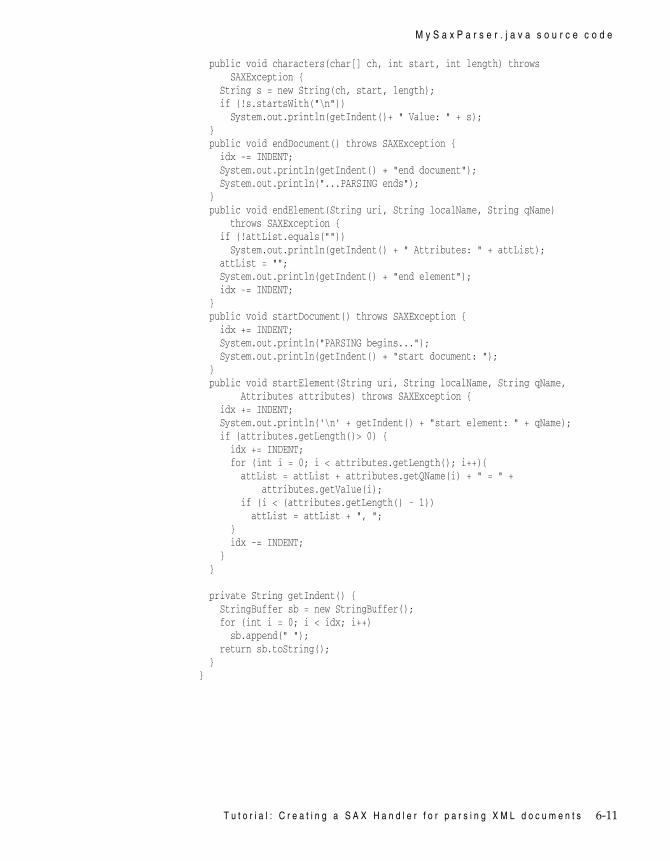
T u t o r i a l : C r e a t i n g a S A X H a n d l e r f o r p a r s i n g X M L d o c u m e n t s 6-11
M y S a x P a r s e r . j a v a s o u r c e c o d e
public void characters(char[] ch, int start, int length) throws SAXException { String s = new String(ch, start, length); if (!s.startsWith("\n")) System.out.println(getIndent()+ " Value: " + s); } public void endDocument() throws SAXException { idx -= INDENT; System.out.println(getIndent() + "end document"); System.out.println("...PARSING ends"); } public void endElement(String uri, String localName, String qName) throws SAXException { if (!attList.equals("")) System.out.println(getIndent() + " Attributes: " + attList); attList = ""; System.out.println(getIndent() + "end element"); idx -= INDENT; } public void startDocument() throws SAXException { idx += INDENT; System.out.println("PARSING begins..."); System.out.println(getIndent() + "start document: "); } public void startElement(String uri, String localName, String qName, Attributes attributes) throws SAXException { idx += INDENT; System.out.println('\n' + getIndent() + "start element: " + qName); if (attributes.getLength()> 0) { idx += INDENT; for (int i = 0; i < attributes.getLength(); i++){ attList = attList + attributes.getQName(i) + " = " + attributes.getValue(i); if (i < (attributes.getLength() - 1)) attList = attList + ", "; } idx -= INDENT; } }
private String getIndent() { StringBuffer sb = new StringBuffer(); for (int i = 0; i < idx; i++) sb.append(" "); return sb.toString(); }}

6-12 X M L D e v e l o p e r ’ s G u i d e
T u t o r i a l : D T D d a t a b i n d i n g w i t h B o r l a n d X M L 7-1
C h a p t e r
7Chapter7Tutorial: DTD data binding with
BorlandXMLThis tutorial uses features
in JBuilder EnterpriseThis step-by-step tutorial explains how to use JBuilder’s XML data binding features using DTDs and BorlandXML to generate Java classes. The sample is provided in the JBuilder samples directory: samples/Tutorials/XML/databinding/fromDTD/. For users with read-only access to JBuilder samples, copy the samples directory into a directory with read/write permissions. This tutorial uses employee records as a sample with such fields as employee number, first name, last name, and so on. An XML document and DTD are provided as samples, as well as a test application to manipulate the data.
Data binding is a means of accessing data and manipulating it, then sending the revised data back to the database or displaying it with an XML document. The XML document can be used as the transfer mechanism between the database and the application. This transfer is done by binding Java objects to an XML document. The data binding is implemented by generating Java classes to represent the constraints contained in a grammar, such as in a DTD or an XML schema. You can then use these classes to create XML documents that comply with the grammar, read XML documents that comply with the grammar, and validate XML documents against the grammar.
This tutorial contains specific examples that show you how to do the following:
• Generate Java classes from a DTD using BorlandXML.
• Unmarshal the data from XML objects and convert it to Java objects.
• Edit the data by adding an employee record and modifying an existing employee’s name.
• Marshal the Java objects back to the XML document.
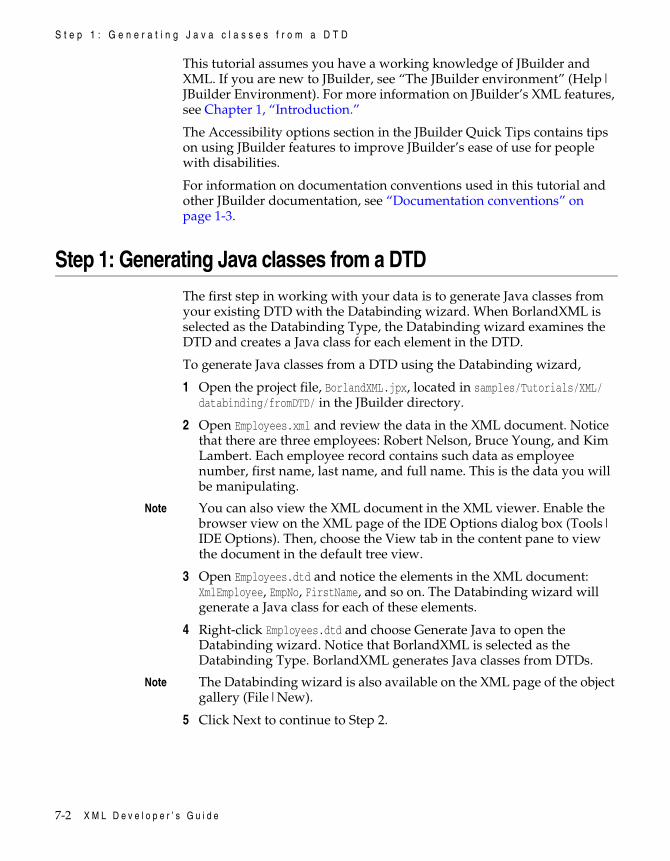
7-2 X M L D e v e l o p e r ’ s G u i d e
S t e p 1 : G e n e r a t i n g J a v a c l a s s e s f r o m a D T D
This tutorial assumes you have a working knowledge of JBuilder and XML. If you are new to JBuilder, see “The JBuilder environment” (Help|JBuilder Environment). For more information on JBuilder’s XML features, see Chapter 1, “Introduction.”
The Accessibility options section in the JBuilder Quick Tips contains tips on using JBuilder features to improve JBuilder’s ease of use for people with disabilities.
For information on documentation conventions used in this tutorial and other JBuilder documentation, see “Documentation conventions” on page 1-3.
Step 1: Generating Java classes from a DTDThe first step in working with your data is to generate Java classes from your existing DTD with the Databinding wizard. When BorlandXML is selected as the Databinding Type, the Databinding wizard examines the DTD and creates a Java class for each element in the DTD.
To generate Java classes from a DTD using the Databinding wizard,
1 Open the project file, BorlandXML.jpx, located in samples/Tutorials/XML/databinding/fromDTD/ in the JBuilder directory.
2 Open Employees.xml and review the data in the XML document. Notice that there are three employees: Robert Nelson, Bruce Young, and Kim Lambert. Each employee record contains such data as employee number, first name, last name, and full name. This is the data you will be manipulating.
Note You can also view the XML document in the XML viewer. Enable the browser view on the XML page of the IDE Options dialog box (Tools|IDE Options). Then, choose the View tab in the content pane to view the document in the default tree view.
3 Open Employees.dtd and notice the elements in the XML document: XmlEmployee, EmpNo, FirstName, and so on. The Databinding wizard will generate a Java class for each of these elements.
4 Right-click Employees.dtd and choose Generate Java to open the Databinding wizard. Notice that BorlandXML is selected as the Databinding Type. BorlandXML generates Java classes from DTDs.
Note The Databinding wizard is also available on the XML page of the object gallery (File|New).
5 Click Next to continue to Step 2.
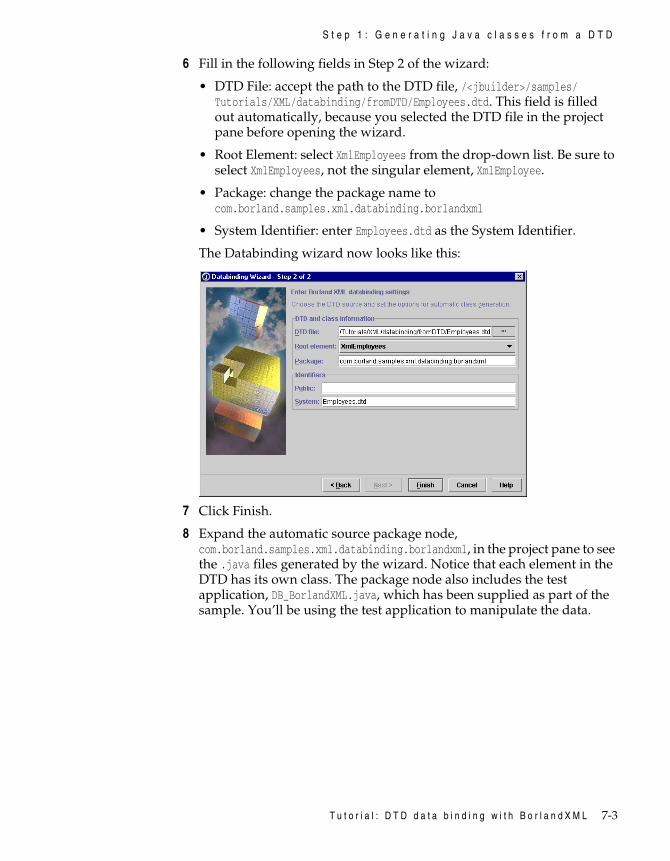
T u t o r i a l : D T D d a t a b i n d i n g w i t h B o r l a n d X M L 7-3
S t e p 1 : G e n e r a t i n g J a v a c l a s s e s f r o m a D T D
6 Fill in the following fields in Step 2 of the wizard:
• DTD File: accept the path to the DTD file, /<jbuilder>/samples/Tutorials/XML/databinding/fromDTD/Employees.dtd. This field is filled out automatically, because you selected the DTD file in the project pane before opening the wizard.
• Root Element: select XmlEmployees from the drop-down list. Be sure to select XmlEmployees, not the singular element, XmlEmployee.
• Package: change the package name to com.borland.samples.xml.databinding.borlandxml
• System Identifier: enter Employees.dtd as the System Identifier.
The Databinding wizard now looks like this:
7 Click Finish.
8 Expand the automatic source package node, com.borland.samples.xml.databinding.borlandxml, in the project pane to see the .java files generated by the wizard. Notice that each element in the DTD has its own class. The package node also includes the test application, DB_BorlandXML.java, which has been supplied as part of the sample. You’ll be using the test application to manipulate the data.
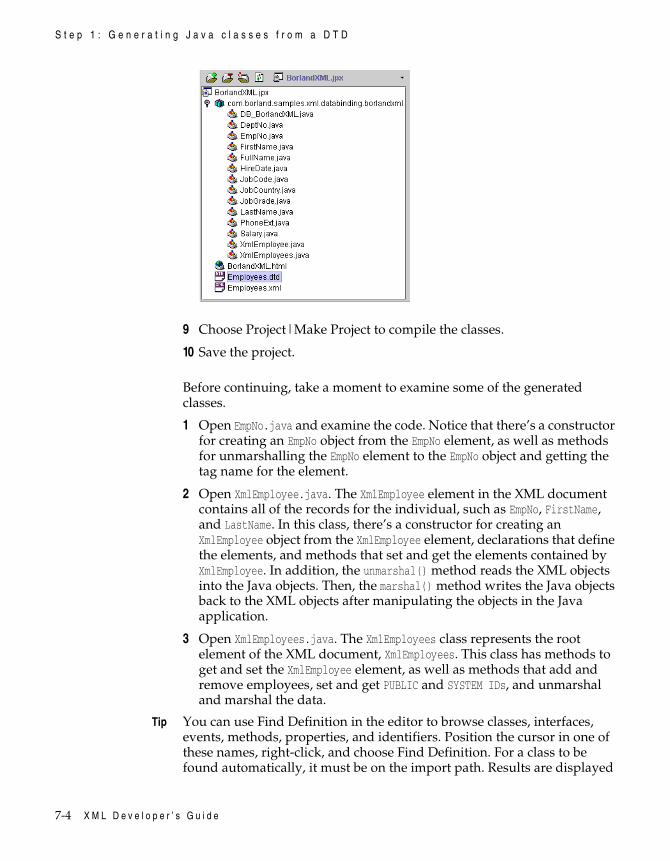
7-4 X M L D e v e l o p e r ’ s G u i d e
S t e p 1 : G e n e r a t i n g J a v a c l a s s e s f r o m a D T D
9 Choose Project|Make Project to compile the classes.
10 Save the project.
Before continuing, take a moment to examine some of the generated classes.
1 Open EmpNo.java and examine the code. Notice that there’s a constructor for creating an EmpNo object from the EmpNo element, as well as methods for unmarshalling the EmpNo element to the EmpNo object and getting the tag name for the element.
2 Open XmlEmployee.java. The XmlEmployee element in the XML document contains all of the records for the individual, such as EmpNo, FirstName, and LastName. In this class, there’s a constructor for creating an XmlEmployee object from the XmlEmployee element, declarations that define the elements, and methods that set and get the elements contained by XmlEmployee. In addition, the unmarshal() method reads the XML objects into the Java objects. Then, the marshal() method writes the Java objects back to the XML objects after manipulating the objects in the Java application.
3 Open XmlEmployees.java. The XmlEmployees class represents the root element of the XML document, XmlEmployees. This class has methods to get and set the XmlEmployee element, as well as methods that add and remove employees, set and get PUBLIC and SYSTEM IDs, and unmarshal and marshal the data.
Tip You can use Find Definition in the editor to browse classes, interfaces, events, methods, properties, and identifiers. Position the cursor in one of these names, right-click, and choose Find Definition. For a class to be found automatically, it must be on the import path. Results are displayed
T u t o r i a l : D T D d a t a b i n d i n g w i t h B o r l a n d X M L 7-5
S t e p 2 : U n m a r s h a l l i n g t h e d a t a
in the content pane of the AppBrowser. You can also browse classes in the editor from the Search menu (Search|Find Classes).
Step 2: Unmarshalling the dataNow that you have created your Java objects from the XML objects, take a look at the test application, DB_BorlandXML.java. This application passes the data between the XML document and the Java objects. It uses the marshalling framework to handle the conversion between Java and XML. First, the data is unmarshalled and read from XML into Java. Next, the data is marshalled back and written from Java to XML.
1 Double-click DB_BorlandXML.java in the project pane to open it in the editor. Notice that in the main() method of the application, there is a db_BorlandXML class variable that calls different methods. Three of these have been commented out. These method calls will be implemented later.
public class DB_BorlandXML {
public DB_BorlandXML() { } public static void main(String[] args) {
db_BorlandXML = new DB_BorlandXML(); db_BorlandXML.readEmployees();
// db_BorlandXML.addEmployee();// db_BorlandXML.modifyEmployee();// db_BorlandXML.readEmployees(); }....}
In the next step, you’ll run the application without modifying any of the code. The application will read the employees from the XML document, converting them to Java objects. In later steps, you’ll manipulate the data by modifying the code, so the application can add and modify employees. The first step is to read the employees from the XML document.
2 Run the application by right-clicking DB_BorlandXML.java in the project pane and choosing Run Using “BorlandXML”. The application runs, reads the employee information, and prints the following to the message pane:
== unmarshalling "Employees.xml" ==Total Number of Employees read = 3First Employee's Full Name is Nelson, RobertLast Employee's Full Name is Lambert, Kim
7-6 X M L D e v e l o p e r ’ s G u i d e
S t e p 3 : A d d i n g a n e m p l o y e e r e c o r d
Step 3: Adding an employee recordIn this step, you’ll add an employee record and marshal the data back to the XML document. To do this you’ll need to uncomment the line that calls the addEmployee() method.
You’ll also add another readEmployees() method call to read the new data after the employee is added. Then you’ll run the program and Charlie Chaplin will be added as a new employee using the addEmployee() method.
1 Remove the comments from this method call:
db_BorlandXML.addEmployee();
2 Add another readEmployees() method call just below the line you just uncommented. Your code should look like this:
public static void main(String[] args) {
db_BorlandXML = new DB_BorlandXML(); db_BorlandXML.readEmployees();
db_BorlandXML.addEmployee(); db_BorlandXML.readEmployees();//db_BorlandXML.modifyEmployee();//db_BorlandXML.readEmployees();}
Look at the addEmployee() and readEmployees() methods so you understand what they do.
3 Save the project.
4 Run the program again. Note the output in the message pane.
== unmarshalling "Employees.xml" ==Total Number of Employees read = 3First Employee's Full Name is Nelson, RobertLast Employee's Full Name is Lambert, Kim== unmarshalling "Employees.xml" ==Total Number of Employees read = 4First Employee's Full Name is Nelson, RobertLast Employee's Full Name is Chaplin, Charlie
5 Switch to Employees.xml and notice that Charlie Chaplin has been added as the fourth employee.
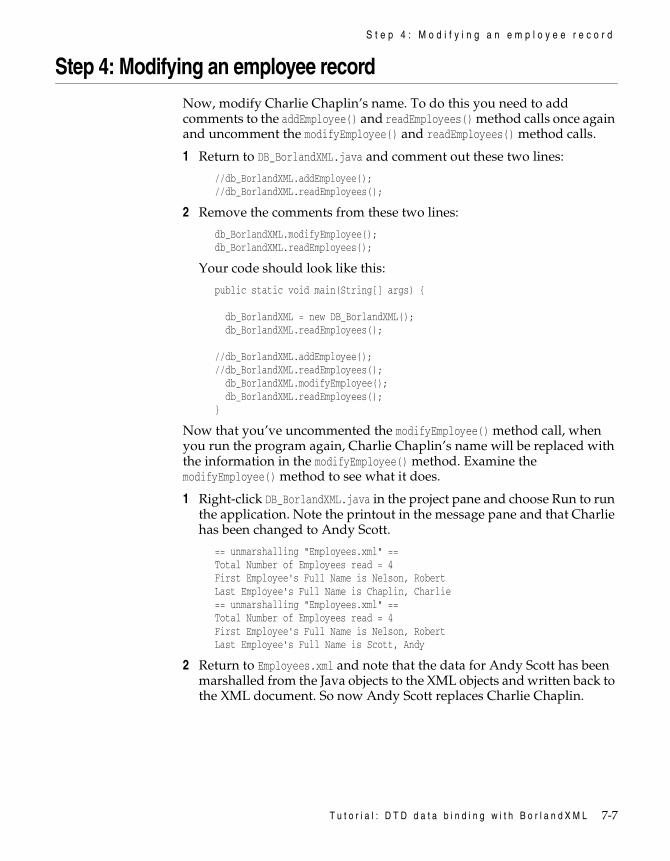
T u t o r i a l : D T D d a t a b i n d i n g w i t h B o r l a n d X M L 7-7
S t e p 4 : M o d i f y i n g a n e m p l o y e e r e c o r d
Step 4: Modifying an employee recordNow, modify Charlie Chaplin’s name. To do this you need to add comments to the addEmployee() and readEmployees() method calls once again and uncomment the modifyEmployee() and readEmployees() method calls.
1 Return to DB_BorlandXML.java and comment out these two lines:
//db_BorlandXML.addEmployee();//db_BorlandXML.readEmployees();
2 Remove the comments from these two lines:
db_BorlandXML.modifyEmployee();db_BorlandXML.readEmployees();
Your code should look like this:
public static void main(String[] args) {
db_BorlandXML = new DB_BorlandXML(); db_BorlandXML.readEmployees();
//db_BorlandXML.addEmployee();//db_BorlandXML.readEmployees(); db_BorlandXML.modifyEmployee(); db_BorlandXML.readEmployees();}
Now that you’ve uncommented the modifyEmployee() method call, when you run the program again, Charlie Chaplin’s name will be replaced with the information in the modifyEmployee() method. Examine the modifyEmployee() method to see what it does.
1 Right-click DB_BorlandXML.java in the project pane and choose Run to run the application. Note the printout in the message pane and that Charlie has been changed to Andy Scott.
== unmarshalling "Employees.xml" ==Total Number of Employees read = 4First Employee's Full Name is Nelson, RobertLast Employee's Full Name is Chaplin, Charlie== unmarshalling "Employees.xml" ==Total Number of Employees read = 4First Employee's Full Name is Nelson, RobertLast Employee's Full Name is Scott, Andy
2 Return to Employees.xml and note that the data for Andy Scott has been marshalled from the Java objects to the XML objects and written back to the XML document. So now Andy Scott replaces Charlie Chaplin.
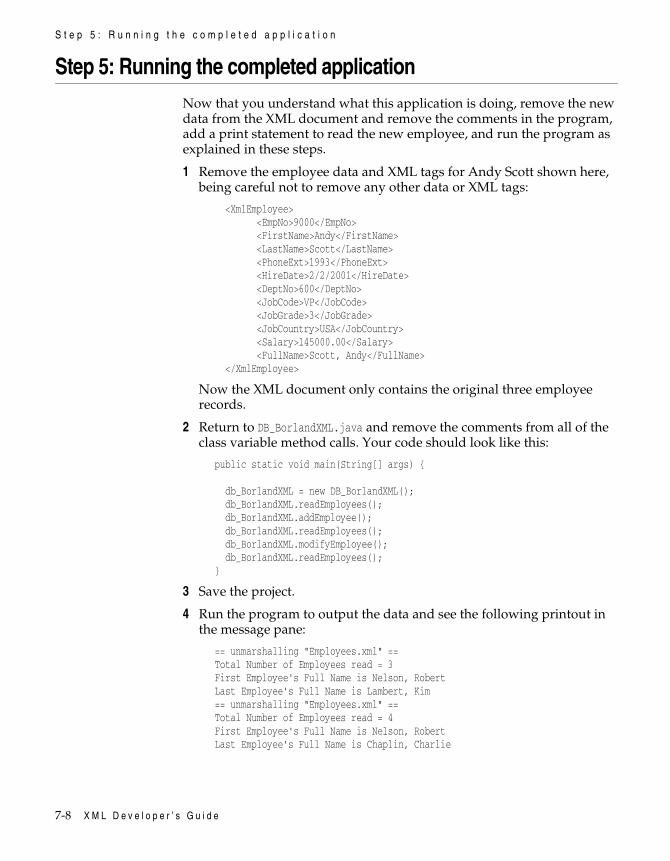
7-8 X M L D e v e l o p e r ’ s G u i d e
S t e p 5 : R u n n i n g t h e c o m p l e t e d a p p l i c a t i o n
Step 5: Running the completed applicationNow that you understand what this application is doing, remove the new data from the XML document and remove the comments in the program, add a print statement to read the new employee, and run the program as explained in these steps.
1 Remove the employee data and XML tags for Andy Scott shown here, being careful not to remove any other data or XML tags:
<XmlEmployee> <EmpNo>9000</EmpNo> <FirstName>Andy</FirstName> <LastName>Scott</LastName> <PhoneExt>1993</PhoneExt> <HireDate>2/2/2001</HireDate> <DeptNo>600</DeptNo> <JobCode>VP</JobCode> <JobGrade>3</JobGrade> <JobCountry>USA</JobCountry> <Salary>145000.00</Salary> <FullName>Scott, Andy</FullName> </XmlEmployee>
Now the XML document only contains the original three employee records.
2 Return to DB_BorlandXML.java and remove the comments from all of the class variable method calls. Your code should look like this:
public static void main(String[] args) {
db_BorlandXML = new DB_BorlandXML(); db_BorlandXML.readEmployees(); db_BorlandXML.addEmployee(); db_BorlandXML.readEmployees(); db_BorlandXML.modifyEmployee(); db_BorlandXML.readEmployees();}
3 Save the project.
4 Run the program to output the data and see the following printout in the message pane:
== unmarshalling "Employees.xml" ==Total Number of Employees read = 3First Employee's Full Name is Nelson, RobertLast Employee's Full Name is Lambert, Kim== unmarshalling "Employees.xml" ==Total Number of Employees read = 4First Employee's Full Name is Nelson, RobertLast Employee's Full Name is Chaplin, Charlie
T u t o r i a l : D T D d a t a b i n d i n g w i t h B o r l a n d X M L 7-9
S t e p 5 : R u n n i n g t h e c o m p l e t e d a p p l i c a t i o n
== unmarshalling "Employees.xml" ==Total Number of Employees read = 4First Employee's Full Name is Nelson, RobertLast Employee's Full Name is Scott, Andy
5 Switch to Employees.xml to verify that the data has been marshalled back to the XML document. Notice that Charlie Chaplin, the new employee, has been replaced by Andy Scott.
Congratulations! You’ve completed the tutorial. You’ve read, added, and modified employee data in an XML document using a Java application and Java classes generated from a DTD using the Databinding wizard.
For more XML tutorials, see “Tutorials” on page iv.

7-10 X M L D e v e l o p e r ’ s G u i d e
T u t o r i a l : S c h e m a d a t a b i n d i n g w i t h C a s t o r 8-1
C h a p t e r
8Chapter8Tutorial: Schema data binding
with CastorThis tutorial uses features
in JBuilder EnterpriseThis step-by-step tutorial explains how to use JBuilder’s XML data binding features using schema and Castor to generate Java classes. The sample is provided in the JBuilder samples directory: samples/Tutorials/XML/databinding/fromSchema. For users with read-only access to JBuilder samples, copy the samples directory into a directory with read/write permissions. This tutorial uses employee records as a sample with such fields as employee number, first name, last name, and so on. An XML document and schema file (XSD) are provided as samples, as well as a test application to manipulate the data.
Data binding is a means of accessing data and manipulating it, then sending the revised data back to the database or displaying it with an XML document. The XML document can be used as the transfer mechanism between the database and the application. This transfer is done by binding a Java object to an XML document. The data binding is implemented by generating Java classes to represent the constraints contained in a grammar, such as in a DTD or an XML schema. You then use these classes to create XML documents that comply with the grammar, read XML documents that comply with the grammar, and validate XML documents against the grammar as changes are made to them.
This tutorial contains specific examples that show you how to do the following:
• Generate Java classes from a schema file using Castor and the Databinding wizard.
• Unmarshal the data from XML objects and convert it to Java objects.
8-2 X M L D e v e l o p e r ’ s G u i d e
S t e p 1 : G e n e r a t i n g J a v a c l a s s e s f r o m a s c h e m a
• Edit the data by adding an employee record and modifying an existing employee record.
• Marshal the Java objects back to the XML document.
For more information on Castor, see the Castor documentation in the extras directory of the JBuilder full installation or the Castor web site at http://www.castor.org.
This tutorial assumes you have a working knowledge of JBuilder and XML. If you are new to JBuilder, see “The JBuilder environment” (Help|JBuilder Environment). For more information on JBuilder’s XML features, see Chapter 1, “Introduction.”
The Accessibility options section in the JBuilder Quick Tips contains tips on using JBuilder features to improve JBuilder’s ease of use for people with disabilities.
For information on documentation conventions used in this tutorial and other JBuilder documentation, see “Documentation conventions” on page 1-3.
Step 1: Generating Java classes from a schemaThe first step in working with your data is to generate Java classes from your existing schema file. When Castor is selected as the Databinding Type, the Databinding wizard examines the selected schema file and creates Java classes based on that schema.
To generate Java classes from a schema using the Databinding wizard,
1 Open the project file, castor.jpx, located in samples/Tutorials/XML/databinding/fromSchema in the JBuilder directory.
2 Open Employees.xml and review the data in the XML document. Notice that there are three employees: Robert Nelson, Bruce Young, and Kim Lambert. Each employee record contains such data as employee number, first name, last name, and full name. This is the data you will be manipulating.
Note You can also view the XML document in the XML viewer. To enable the XML viewer, choose Tools|IDE Options, and choose the XML tab. Under General Options, select the Enable Browser View option. Notice that the Apply Default Stylesheet option is already enabled. The stylesheet option renders the XML document in a tree view. Now, choose the View tab in the content pane to view the document in this tree view.
3 Open Employees.xsd and review the file. The Databinding wizard generates Java classes according to the schema (XSD) file.
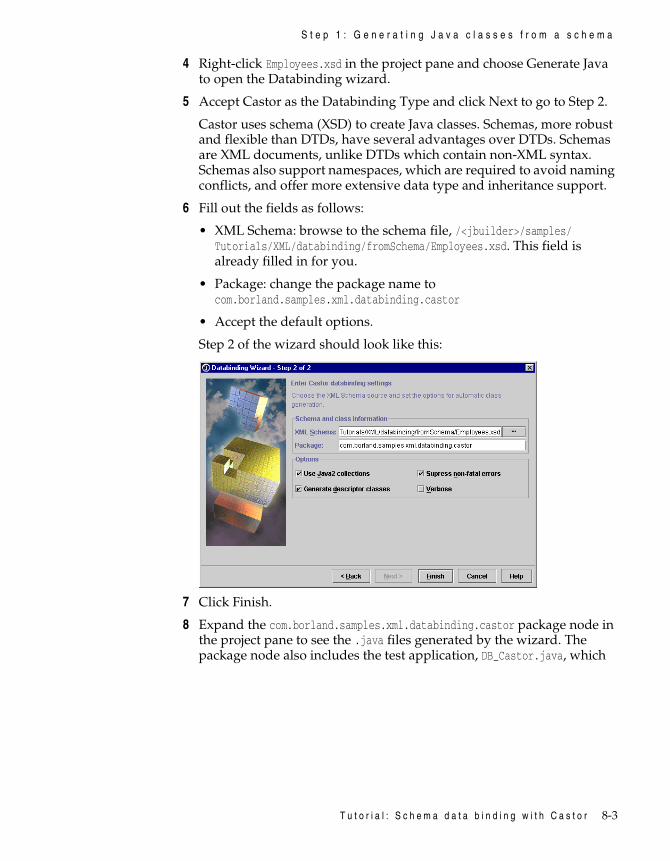
T u t o r i a l : S c h e m a d a t a b i n d i n g w i t h C a s t o r 8-3
S t e p 1 : G e n e r a t i n g J a v a c l a s s e s f r o m a s c h e m a
4 Right-click Employees.xsd in the project pane and choose Generate Java to open the Databinding wizard.
5 Accept Castor as the Databinding Type and click Next to go to Step 2.
Castor uses schema (XSD) to create Java classes. Schemas, more robust and flexible than DTDs, have several advantages over DTDs. Schemas are XML documents, unlike DTDs which contain non-XML syntax. Schemas also support namespaces, which are required to avoid naming conflicts, and offer more extensive data type and inheritance support.
6 Fill out the fields as follows:
• XML Schema: browse to the schema file, /<jbuilder>/samples/Tutorials/XML/databinding/fromSchema/Employees.xsd. This field is already filled in for you.
• Package: change the package name to com.borland.samples.xml.databinding.castor
• Accept the default options.
Step 2 of the wizard should look like this:
7 Click Finish.
8 Expand the com.borland.samples.xml.databinding.castor package node in the project pane to see the .java files generated by the wizard. The package node also includes the test application, DB_Castor.java, which
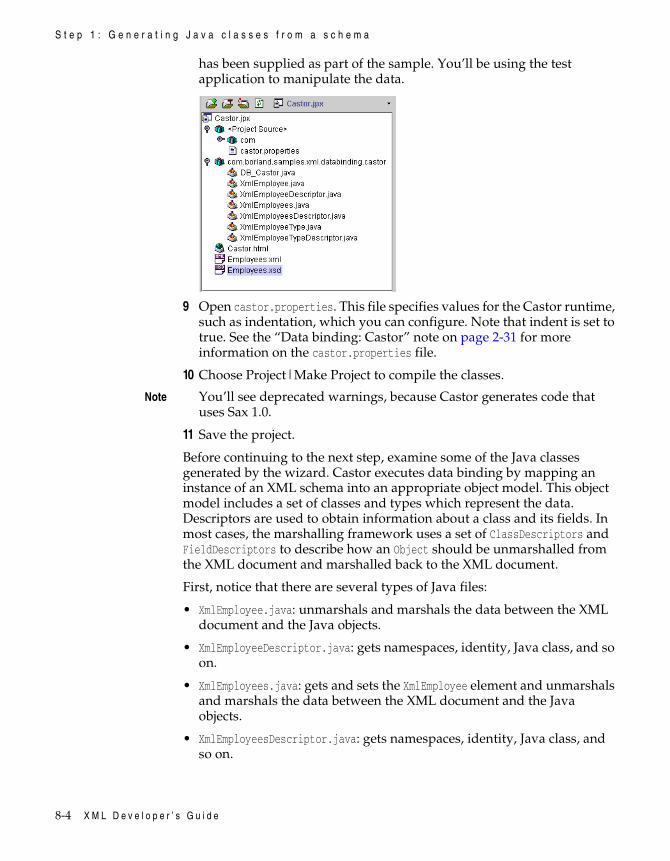
8-4 X M L D e v e l o p e r ’ s G u i d e
S t e p 1 : G e n e r a t i n g J a v a c l a s s e s f r o m a s c h e m a
has been supplied as part of the sample. You’ll be using the test application to manipulate the data.
9 Open castor.properties. This file specifies values for the Castor runtime, such as indentation, which you can configure. Note that indent is set to true. See the “Data binding: Castor” note on page 2-31 for more information on the castor.properties file.
10 Choose Project|Make Project to compile the classes.
Note You’ll see deprecated warnings, because Castor generates code that uses Sax 1.0.
11 Save the project.
Before continuing to the next step, examine some of the Java classes generated by the wizard. Castor executes data binding by mapping an instance of an XML schema into an appropriate object model. This object model includes a set of classes and types which represent the data. Descriptors are used to obtain information about a class and its fields. In most cases, the marshalling framework uses a set of ClassDescriptors and FieldDescriptors to describe how an Object should be unmarshalled from the XML document and marshalled back to the XML document.
First, notice that there are several types of Java files:
• XmlEmployee.java: unmarshals and marshals the data between the XML document and the Java objects.
• XmlEmployeeDescriptor.java: gets namespaces, identity, Java class, and so on.
• XmlEmployees.java: gets and sets the XmlEmployee element and unmarshals and marshals the data between the XML document and the Java objects.
• XmlEmployeesDescriptor.java: gets namespaces, identity, Java class, and so on.
T u t o r i a l : S c h e m a d a t a b i n d i n g w i t h C a s t o r 8-5
S t e p 2 : U n m a r s h a l l i n g t h e d a t a
• XmlEmployeeType.java: defines the datatype of each object.
• XmlEmployeeTypeDescriptor.java: initializes the element descriptors and has various methods to get the XML file name, Java class, and namespace.
Tip You can use Find Definition in the editor to browse classes, interfaces, events, methods, properties, and identifiers. Position the cursor in one of these names, right-click, and choose Find Definition. For a class to be found automatically, it must be on the import path. Results are displayed in the content pane of the AppBrowser. You can also browse classes in the editor from the Search menu (Search|Find Classes).
See also
• Castor API in the extras directory of the JBuilder full installation
• Castor web site at http://www.castor.org/javadoc/overview-summary.html
Step 2: Unmarshalling the dataNow that you have created your Java objects for the XML objects, take a look at the test application, DB_Castor.java. This application passes the data between the XML document and the Java objects using the marshalling framework, which handles the conversion between Java and XML. Unmarshalling reads the XML objects and converts them to Java objects, while marshalling writes the Java objects back to the XML objects.
1 Double-click DB_Castor.java in the project pane to open it in the editor.
2 Examine the source code and notice that there are several method calls that manipulate the data. First, the application unmarshals or reads the data from the XML document. Then it prints employee count and names to the screen. Next, an employee is added, then modified. And lastly, the data is marshalled back to the XML document.
Tip To browse any of the imported classes in this file, open the Imports folder in the structure pane and double-click a package to open the Browse Import Symbol dialog box and browse to the class you want to view.
If you ran the application without any changes, it would add and modify an employee. But first, break it down into steps, so you can see what’s happening. In the next step, you’ll add an employee. Later, you’ll modify that new employee data.
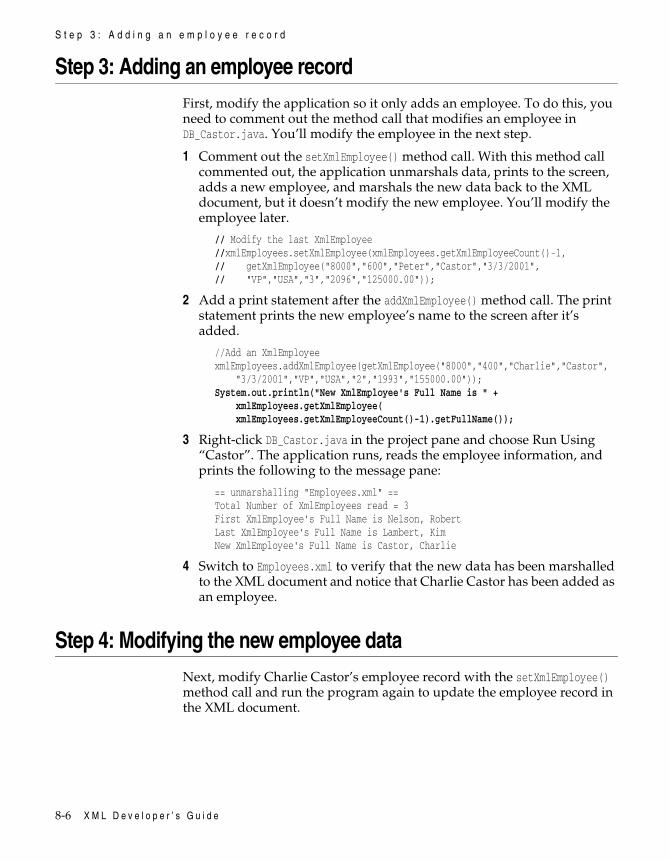
8-6 X M L D e v e l o p e r ’ s G u i d e
S t e p 3 : A d d i n g a n e m p l o y e e r e c o r d
Step 3: Adding an employee recordFirst, modify the application so it only adds an employee. To do this, you need to comment out the method call that modifies an employee in DB_Castor.java. You’ll modify the employee in the next step.
1 Comment out the setXmlEmployee() method call. With this method call commented out, the application unmarshals data, prints to the screen, adds a new employee, and marshals the new data back to the XML document, but it doesn’t modify the new employee. You’ll modify the employee later.
// Modify the last XmlEmployee //xmlEmployees.setXmlEmployee(xmlEmployees.getXmlEmployeeCount()-1,// getXmlEmployee("8000","600","Peter","Castor","3/3/2001",// "VP","USA","3","2096","125000.00"));
2 Add a print statement after the addXmlEmployee() method call. The print statement prints the new employee’s name to the screen after it’s added.
//Add an XmlEmployeexmlEmployees.addXmlEmployee(getXmlEmployee("8000","400","Charlie","Castor", "3/3/2001","VP","USA","2","1993","155000.00"));System.out.println("New XmlEmployee's Full Name is " + xmlEmployees.getXmlEmployee( xmlEmployees.getXmlEmployeeCount()-1).getFullName());
3 Right-click DB_Castor.java in the project pane and choose Run Using “Castor”. The application runs, reads the employee information, and prints the following to the message pane:
== unmarshalling "Employees.xml" ==Total Number of XmlEmployees read = 3First XmlEmployee's Full Name is Nelson, RobertLast XmlEmployee's Full Name is Lambert, KimNew XmlEmployee's Full Name is Castor, Charlie
4 Switch to Employees.xml to verify that the new data has been marshalled to the XML document and notice that Charlie Castor has been added as an employee.
Step 4: Modifying the new employee dataNext, modify Charlie Castor’s employee record with the setXmlEmployee() method call and run the program again to update the employee record in the XML document.
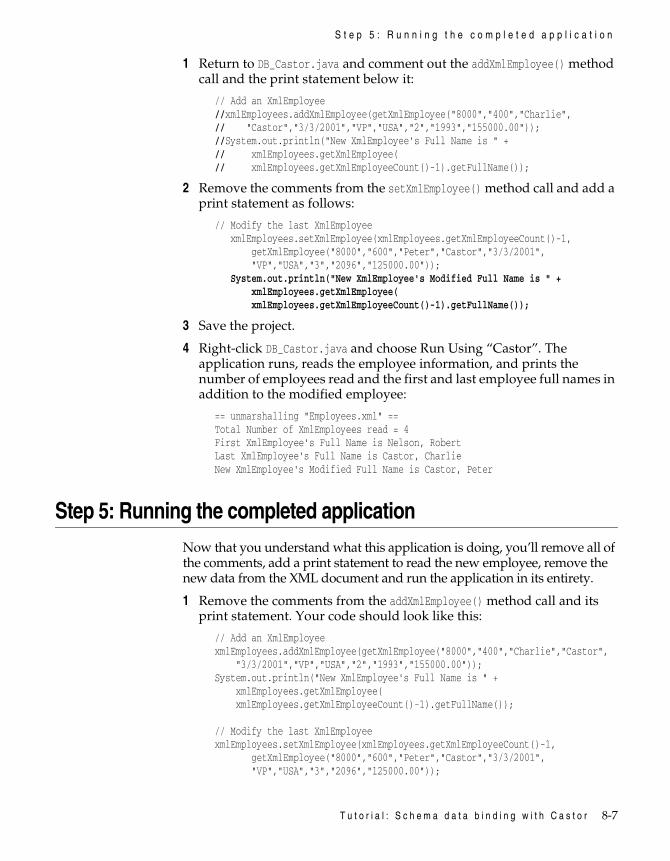
T u t o r i a l : S c h e m a d a t a b i n d i n g w i t h C a s t o r 8-7
S t e p 5 : R u n n i n g t h e c o m p l e t e d a p p l i c a t i o n
1 Return to DB_Castor.java and comment out the addXmlEmployee() method call and the print statement below it:
// Add an XmlEmployee//xmlEmployees.addXmlEmployee(getXmlEmployee("8000","400","Charlie",// "Castor","3/3/2001","VP","USA","2","1993","155000.00"));//System.out.println("New XmlEmployee's Full Name is " +// xmlEmployees.getXmlEmployee(// xmlEmployees.getXmlEmployeeCount()-1).getFullName());
2 Remove the comments from the setXmlEmployee() method call and add a print statement as follows:
// Modify the last XmlEmployee xmlEmployees.setXmlEmployee(xmlEmployees.getXmlEmployeeCount()-1, getXmlEmployee("8000","600","Peter","Castor","3/3/2001", "VP","USA","3","2096","125000.00")); System.out.println("New XmlEmployee's Modified Full Name is " + xmlEmployees.getXmlEmployee( xmlEmployees.getXmlEmployeeCount()-1).getFullName());
3 Save the project.
4 Right-click DB_Castor.java and choose Run Using “Castor”. The application runs, reads the employee information, and prints the number of employees read and the first and last employee full names in addition to the modified employee:
== unmarshalling "Employees.xml" ==Total Number of XmlEmployees read = 4First XmlEmployee's Full Name is Nelson, RobertLast XmlEmployee's Full Name is Castor, CharlieNew XmlEmployee's Modified Full Name is Castor, Peter
Step 5: Running the completed applicationNow that you understand what this application is doing, you’ll remove all of the comments, add a print statement to read the new employee, remove the new data from the XML document and run the application in its entirety.
1 Remove the comments from the addXmlEmployee() method call and its print statement. Your code should look like this:
// Add an XmlEmployee xmlEmployees.addXmlEmployee(getXmlEmployee("8000","400","Charlie","Castor", "3/3/2001","VP","USA","2","1993","155000.00"));System.out.println("New XmlEmployee's Full Name is " + xmlEmployees.getXmlEmployee( xmlEmployees.getXmlEmployeeCount()-1).getFullName());
// Modify the last XmlEmployeexmlEmployees.setXmlEmployee(xmlEmployees.getXmlEmployeeCount()-1, getXmlEmployee("8000","600","Peter","Castor","3/3/2001", "VP","USA","3","2096","125000.00"));
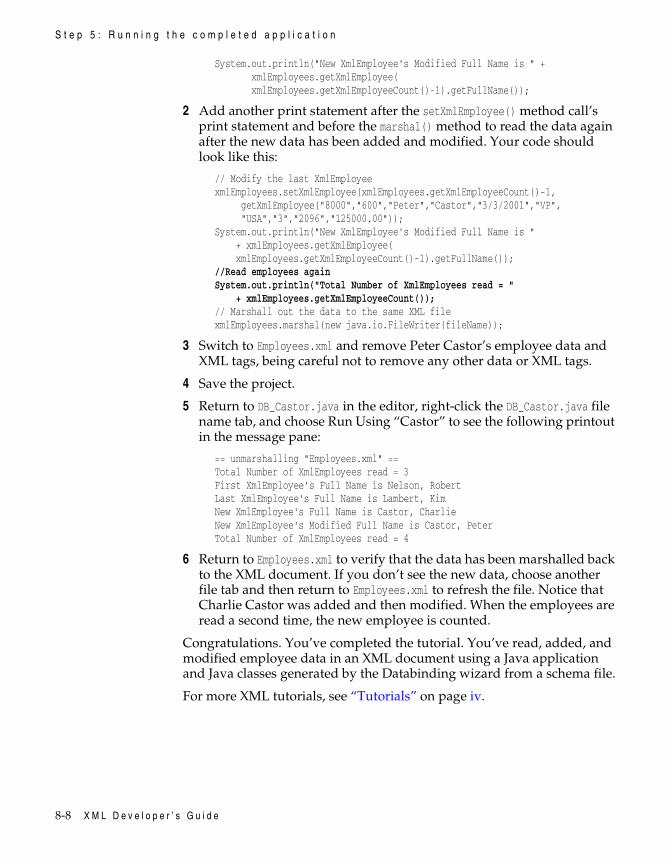
8-8 X M L D e v e l o p e r ’ s G u i d e
S t e p 5 : R u n n i n g t h e c o m p l e t e d a p p l i c a t i o n
System.out.println("New XmlEmployee's Modified Full Name is " + xmlEmployees.getXmlEmployee( xmlEmployees.getXmlEmployeeCount()-1).getFullName());
2 Add another print statement after the setXmlEmployee() method call’s print statement and before the marshal() method to read the data again after the new data has been added and modified. Your code should look like this:
// Modify the last XmlEmployee xmlEmployees.setXmlEmployee(xmlEmployees.getXmlEmployeeCount()-1, getXmlEmployee("8000","600","Peter","Castor","3/3/2001","VP", "USA","3","2096","125000.00"));System.out.println("New XmlEmployee's Modified Full Name is " + xmlEmployees.getXmlEmployee( xmlEmployees.getXmlEmployeeCount()-1).getFullName());//Read employees againSystem.out.println("Total Number of XmlEmployees read = " + xmlEmployees.getXmlEmployeeCount());// Marshall out the data to the same XML filexmlEmployees.marshal(new java.io.FileWriter(fileName));
3 Switch to Employees.xml and remove Peter Castor’s employee data and XML tags, being careful not to remove any other data or XML tags.
4 Save the project.
5 Return to DB_Castor.java in the editor, right-click the DB_Castor.java file name tab, and choose Run Using “Castor” to see the following printout in the message pane:
== unmarshalling "Employees.xml" ==Total Number of XmlEmployees read = 3First XmlEmployee's Full Name is Nelson, RobertLast XmlEmployee's Full Name is Lambert, KimNew XmlEmployee's Full Name is Castor, CharlieNew XmlEmployee's Modified Full Name is Castor, PeterTotal Number of XmlEmployees read = 4
6 Return to Employees.xml to verify that the data has been marshalled back to the XML document. If you don’t see the new data, choose another file tab and then return to Employees.xml to refresh the file. Notice that Charlie Castor was added and then modified. When the employees are read a second time, the new employee is counted.
Congratulations. You’ve completed the tutorial. You’ve read, added, and modified employee data in an XML document using a Java application and Java classes generated by the Databinding wizard from a schema file.
For more XML tutorials, see “Tutorials” on page iv.
T u t o r i a l : T r a n s f e r r i n g d a t a w i t h t h e m o d e l - b a s e d X M L d a t a b a s e c o m p o n e n t s 9-1
C h a p t e r
9Chapter9Tutorial: Transferring data withthe model-based XML database
componentsThis is a feature of
JBuilder EnterpriseThis tutorial explains how to use JBuilder’s model-based XML database components to transfer data from an XML document to a database and retrieve that data back again from the database to an XML document. It also explains how to use the XML-DBMS wizard to create the required map file used in the transferring of data and how to create a SQL script file you can use to create the database.
Model-based components use a map document that determines how the data transfers between an XML structure and the database metadata. Because the user specifies a map between an element in the XML document to a particular table or column in a database, deeply nested XML documents can be transferred to and from a set of database tables. The model-based components are implemented using XML-DBMS, an open source XML middleware that is bundled with JBuilder.
Working through this tutorial, you’ll learn how to do the following:
• Create a map file that maps the elements of a DTD file to the columns in a database table.
• Create a SQL script file that creates the database table metadata.
• Use the XDBMSTable component to transfer data from an XML document to a database table.
• Use the same XDBMSTable component to transfer data from the database table to an XML document.
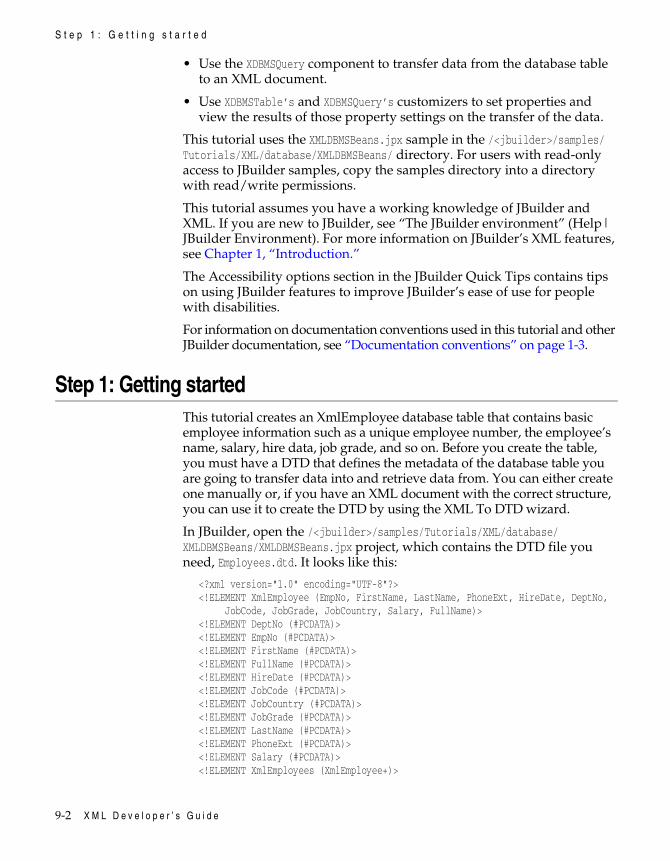
9-2 X M L D e v e l o p e r ’ s G u i d e
S t e p 1 : G e t t i n g s t a r t e d
• Use the XDBMSQuery component to transfer data from the database table to an XML document.
• Use XDBMSTable’s and XDBMSQuery’s customizers to set properties and view the results of those property settings on the transfer of the data.
This tutorial uses the XMLDBMSBeans.jpx sample in the /<jbuilder>/samples/Tutorials/XML/database/XMLDBMSBeans/ directory. For users with read-only access to JBuilder samples, copy the samples directory into a directory with read/write permissions.
This tutorial assumes you have a working knowledge of JBuilder and XML. If you are new to JBuilder, see “The JBuilder environment” (Help|JBuilder Environment). For more information on JBuilder’s XML features, see Chapter 1, “Introduction.”
The Accessibility options section in the JBuilder Quick Tips contains tips on using JBuilder features to improve JBuilder’s ease of use for people with disabilities.
For information on documentation conventions used in this tutorial and other JBuilder documentation, see “Documentation conventions” on page 1-3.
Step 1: Getting startedThis tutorial creates an XmlEmployee database table that contains basic employee information such as a unique employee number, the employee’s name, salary, hire data, job grade, and so on. Before you create the table, you must have a DTD that defines the metadata of the database table you are going to transfer data into and retrieve data from. You can either create one manually or, if you have an XML document with the correct structure, you can use it to create the DTD by using the XML To DTD wizard.
In JBuilder, open the /<jbuilder>/samples/Tutorials/XML/database/XMLDBMSBeans/XMLDBMSBeans.jpx project, which contains the DTD file you need, Employees.dtd. It looks like this:
<?xml version="1.0" encoding="UTF-8"?><!ELEMENT XmlEmployee (EmpNo, FirstName, LastName, PhoneExt, HireDate, DeptNo, JobCode, JobGrade, JobCountry, Salary, FullName)><!ELEMENT DeptNo (#PCDATA)><!ELEMENT EmpNo (#PCDATA)><!ELEMENT FirstName (#PCDATA)><!ELEMENT FullName (#PCDATA)><!ELEMENT HireDate (#PCDATA)><!ELEMENT JobCode (#PCDATA)><!ELEMENT JobCountry (#PCDATA)><!ELEMENT JobGrade (#PCDATA)><!ELEMENT LastName (#PCDATA)><!ELEMENT PhoneExt (#PCDATA)><!ELEMENT Salary (#PCDATA)><!ELEMENT XmlEmployees (XmlEmployee+)>
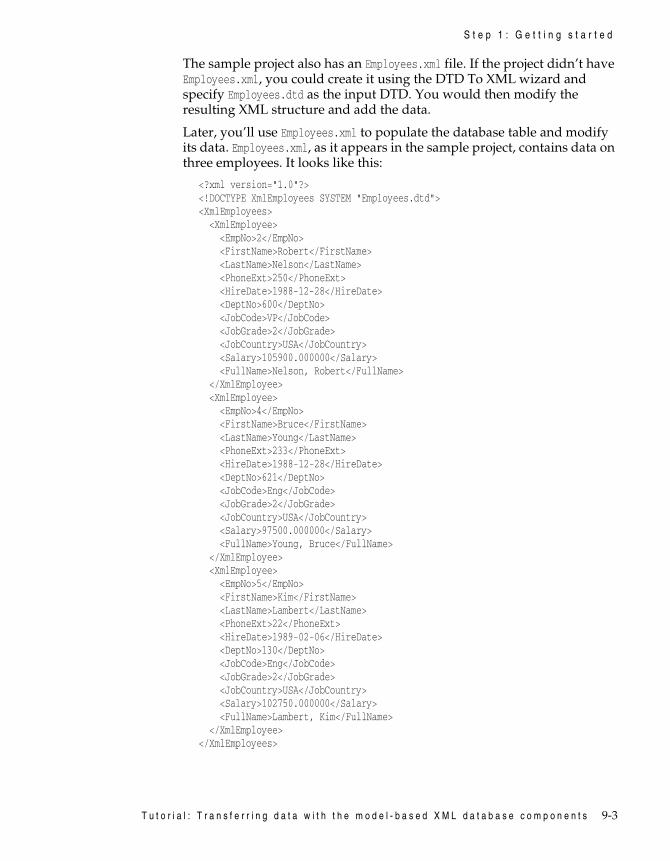
T u t o r i a l : T r a n s f e r r i n g d a t a w i t h t h e m o d e l - b a s e d X M L d a t a b a s e c o m p o n e n t s 9-3
S t e p 1 : G e t t i n g s t a r t e d
The sample project also has an Employees.xml file. If the project didn’t have Employees.xml, you could create it using the DTD To XML wizard and specify Employees.dtd as the input DTD. You would then modify the resulting XML structure and add the data.
Later, you’ll use Employees.xml to populate the database table and modify its data. Employees.xml, as it appears in the sample project, contains data on three employees. It looks like this:
<?xml version="1.0"?><!DOCTYPE XmlEmployees SYSTEM "Employees.dtd"><XmlEmployees> <XmlEmployee> <EmpNo>2</EmpNo> <FirstName>Robert</FirstName> <LastName>Nelson</LastName> <PhoneExt>250</PhoneExt> <HireDate>1988-12-28</HireDate> <DeptNo>600</DeptNo> <JobCode>VP</JobCode> <JobGrade>2</JobGrade> <JobCountry>USA</JobCountry> <Salary>105900.000000</Salary> <FullName>Nelson, Robert</FullName> </XmlEmployee> <XmlEmployee> <EmpNo>4</EmpNo> <FirstName>Bruce</FirstName> <LastName>Young</LastName> <PhoneExt>233</PhoneExt> <HireDate>1988-12-28</HireDate> <DeptNo>621</DeptNo> <JobCode>Eng</JobCode> <JobGrade>2</JobGrade> <JobCountry>USA</JobCountry> <Salary>97500.000000</Salary> <FullName>Young, Bruce</FullName> </XmlEmployee> <XmlEmployee> <EmpNo>5</EmpNo> <FirstName>Kim</FirstName> <LastName>Lambert</LastName> <PhoneExt>22</PhoneExt> <HireDate>1989-02-06</HireDate> <DeptNo>130</DeptNo> <JobCode>Eng</JobCode> <JobGrade>2</JobGrade> <JobCountry>USA</JobCountry> <Salary>102750.000000</Salary> <FullName>Lambert, Kim</FullName> </XmlEmployee></XmlEmployees>
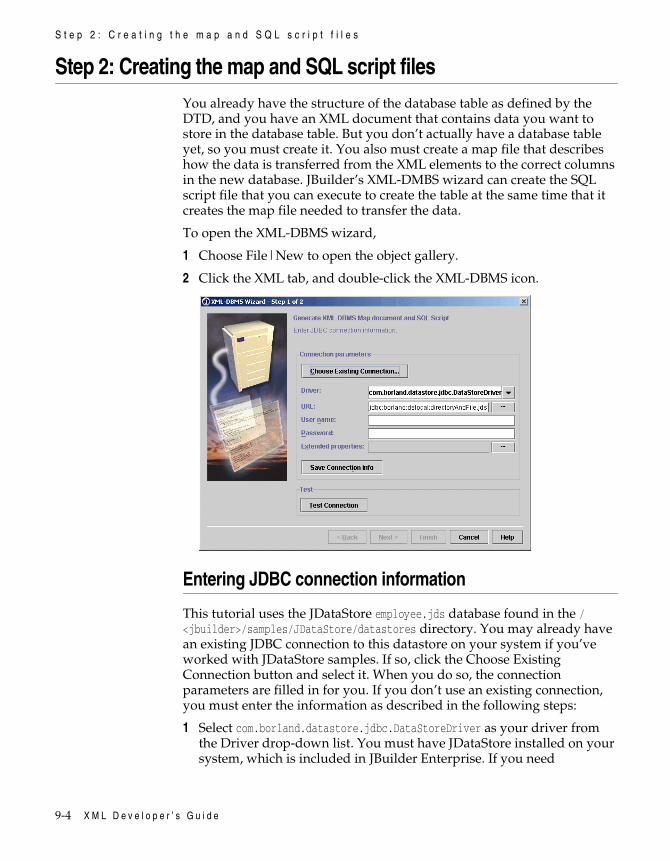
9-4 X M L D e v e l o p e r ’ s G u i d e
S t e p 2 : C r e a t i n g t h e m a p a n d S Q L s c r i p t f i l e s
Step 2: Creating the map and SQL script filesYou already have the structure of the database table as defined by the DTD, and you have an XML document that contains data you want to store in the database table. But you don’t actually have a database table yet, so you must create it. You also must create a map file that describes how the data is transferred from the XML elements to the correct columns in the new database. JBuilder’s XML-DMBS wizard can create the SQL script file that you can execute to create the table at the same time that it creates the map file needed to transfer the data.
To open the XML-DBMS wizard,
1 Choose File|New to open the object gallery.
2 Click the XML tab, and double-click the XML-DBMS icon.
Entering JDBC connection information
This tutorial uses the JDataStore employee.jds database found in the /<jbuilder>/samples/JDataStore/datastores directory. You may already have an existing JDBC connection to this datastore on your system if you’ve worked with JDataStore samples. If so, click the Choose Existing Connection button and select it. When you do so, the connection parameters are filled in for you. If you don’t use an existing connection, you must enter the information as described in the following steps:
1 Select com.borland.datastore.jdbc.DataStoreDriver as your driver from the Driver drop-down list. You must have JDataStore installed on your system, which is included in JBuilder Enterprise. If you need
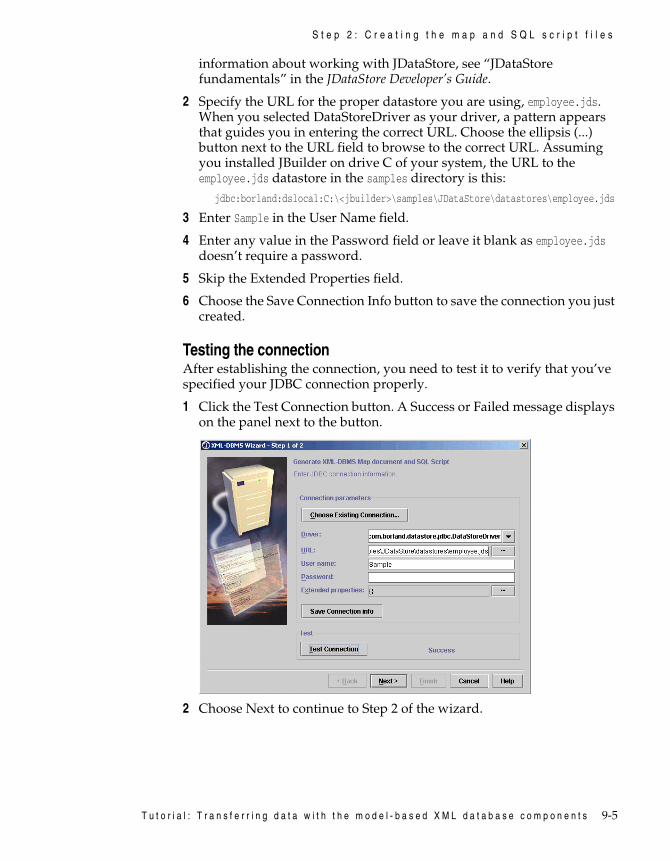
T u t o r i a l : T r a n s f e r r i n g d a t a w i t h t h e m o d e l - b a s e d X M L d a t a b a s e c o m p o n e n t s 9-5
S t e p 2 : C r e a t i n g t h e m a p a n d S Q L s c r i p t f i l e s
information about working with JDataStore, see “JDataStore fundamentals” in the JDataStore Developer’s Guide.
2 Specify the URL for the proper datastore you are using, employee.jds. When you selected DataStoreDriver as your driver, a pattern appears that guides you in entering the correct URL. Choose the ellipsis (...) button next to the URL field to browse to the correct URL. Assuming you installed JBuilder on drive C of your system, the URL to the employee.jds datastore in the samples directory is this:
jdbc:borland:dslocal:C:\<jbuilder>\samples\JDataStore\datastores\employee.jds
3 Enter Sample in the User Name field.
4 Enter any value in the Password field or leave it blank as employee.jds doesn’t require a password.
5 Skip the Extended Properties field.
6 Choose the Save Connection Info button to save the connection you just created.
Testing the connectionAfter establishing the connection, you need to test it to verify that you’ve specified your JDBC connection properly.
1 Click the Test Connection button. A Success or Failed message displays on the panel next to the button.
2 Choose Next to continue to Step 2 of the wizard.
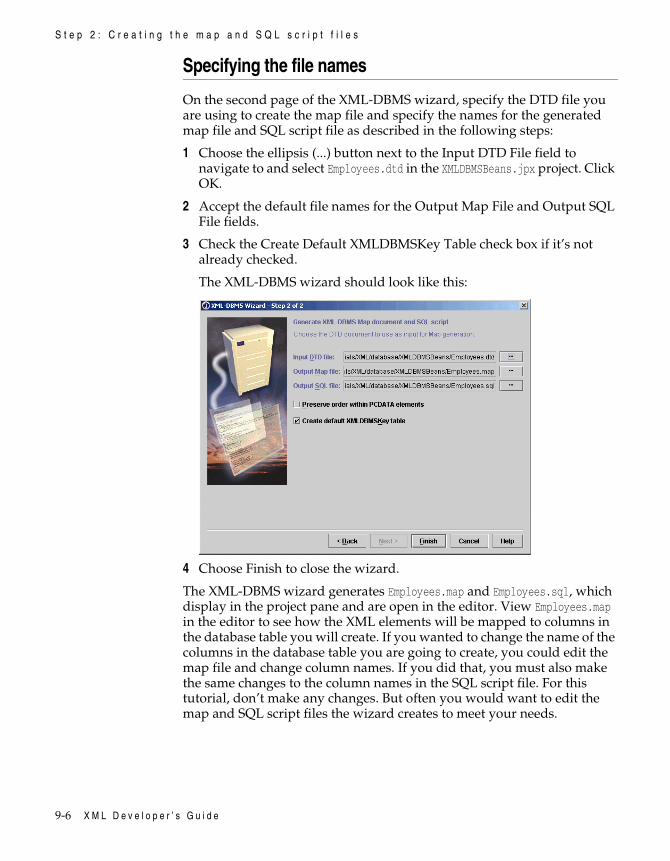
9-6 X M L D e v e l o p e r ’ s G u i d e
S t e p 2 : C r e a t i n g t h e m a p a n d S Q L s c r i p t f i l e s
Specifying the file names
On the second page of the XML-DBMS wizard, specify the DTD file you are using to create the map file and specify the names for the generated map file and SQL script file as described in the following steps:
1 Choose the ellipsis (...) button next to the Input DTD File field to navigate to and select Employees.dtd in the XMLDBMSBeans.jpx project. Click OK.
2 Accept the default file names for the Output Map File and Output SQL File fields.
3 Check the Create Default XMLDBMSKey Table check box if it’s not already checked.
The XML-DBMS wizard should look like this:
4 Choose Finish to close the wizard.
The XML-DBMS wizard generates Employees.map and Employees.sql, which display in the project pane and are open in the editor. View Employees.map in the editor to see how the XML elements will be mapped to columns in the database table you will create. If you wanted to change the name of the columns in the database table you are going to create, you could edit the map file and change column names. If you did that, you must also make the same changes to the column names in the SQL script file. For this tutorial, don’t make any changes. But often you would want to edit the map and SQL script files the wizard creates to meet your needs.
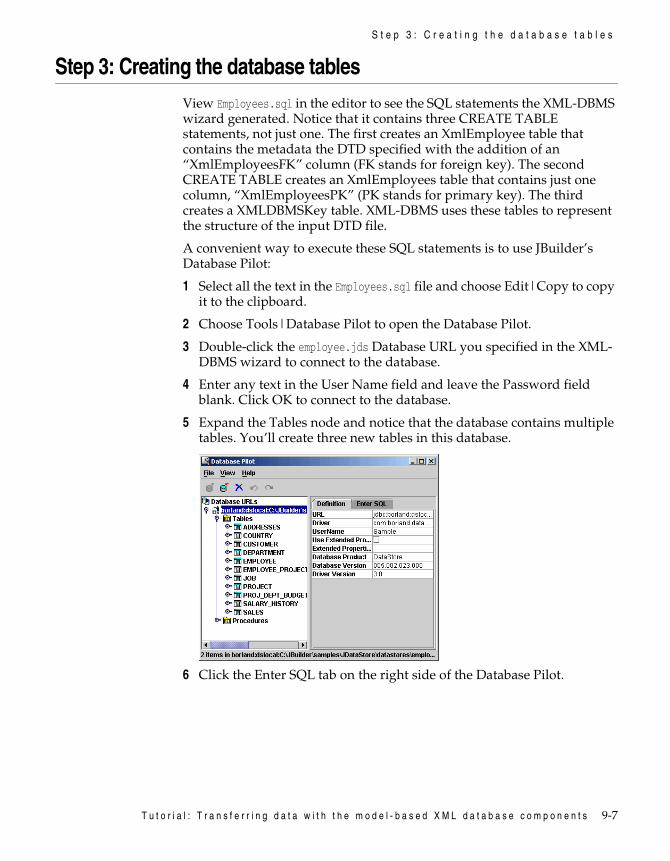
T u t o r i a l : T r a n s f e r r i n g d a t a w i t h t h e m o d e l - b a s e d X M L d a t a b a s e c o m p o n e n t s 9-7
S t e p 3 : C r e a t i n g t h e d a t a b a s e t a b l e s
Step 3: Creating the database tablesView Employees.sql in the editor to see the SQL statements the XML-DBMS wizard generated. Notice that it contains three CREATE TABLE statements, not just one. The first creates an XmlEmployee table that contains the metadata the DTD specified with the addition of an “XmlEmployeesFK” column (FK stands for foreign key). The second CREATE TABLE creates an XmlEmployees table that contains just one column, “XmlEmployeesPK” (PK stands for primary key). The third creates a XMLDBMSKey table. XML-DBMS uses these tables to represent the structure of the input DTD file.
A convenient way to execute these SQL statements is to use JBuilder’s Database Pilot:
1 Select all the text in the Employees.sql file and choose Edit|Copy to copy it to the clipboard.
2 Choose Tools|Database Pilot to open the Database Pilot.
3 Double-click the employee.jds Database URL you specified in the XML-DBMS wizard to connect to the database.
4 Enter any text in the User Name field and leave the Password field blank. Click OK to connect to the database.
5 Expand the Tables node and notice that the database contains multiple tables. You’ll create three new tables in this database.
6 Click the Enter SQL tab on the right side of the Database Pilot.

9-8 X M L D e v e l o p e r ’ s G u i d e
S t e p 4 : W o r k i n g w i t h t h e s a m p l e t e s t a p p l i c a t i o n
7 Paste the copied SQL statements into the SQL Statement box:
8 Click Execute. The Database Pilot creates the three tables in the employee.jds datastore.
9 Choose View|Refresh in the Database Pilot and expand the Tables node again to see the three new tables added to the database.
10 Close the Database Pilot.
Step 4: Working with the sample test applicationUsually when you use JBuilder’s XML database components, you’ll be developing an application that presents a GUI for your users to interact with. You won’t be doing that for this tutorial. Instead you’ll use the sample test application, XMLDBMS_Test.java, which is simply a Java class that contains the model-based XML database components and sets the properties of those components. This tutorial shows you how to work with the components’ customizers to set properties and view the results of
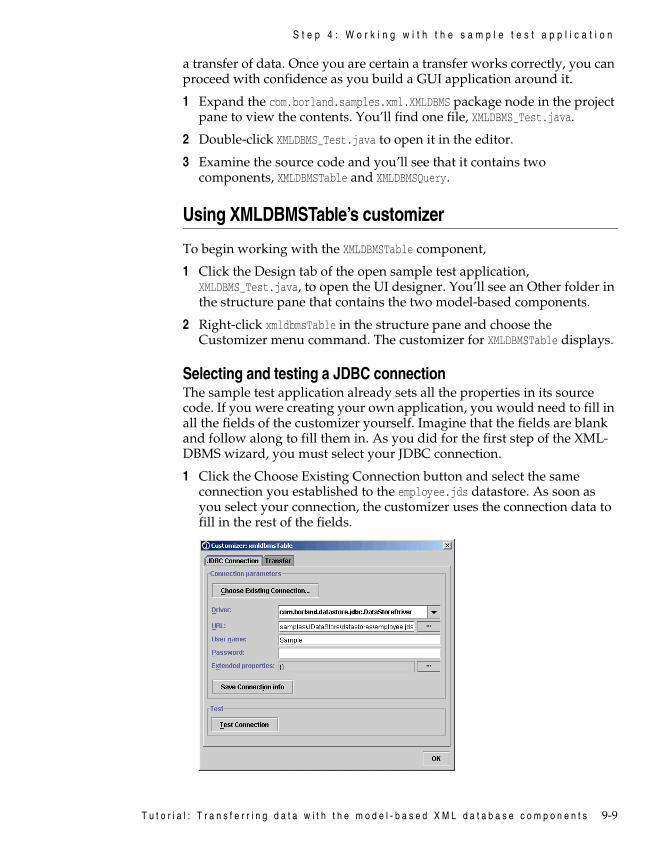
T u t o r i a l : T r a n s f e r r i n g d a t a w i t h t h e m o d e l - b a s e d X M L d a t a b a s e c o m p o n e n t s 9-9
S t e p 4 : W o r k i n g w i t h t h e s a m p l e t e s t a p p l i c a t i o n
a transfer of data. Once you are certain a transfer works correctly, you can proceed with confidence as you build a GUI application around it.
1 Expand the com.borland.samples.xml.XMLDBMS package node in the project pane to view the contents. You’ll find one file, XMLDBMS_Test.java.
2 Double-click XMLDBMS_Test.java to open it in the editor.
3 Examine the source code and you’ll see that it contains two components, XMLDBMSTable and XMLDBMSQuery.
Using XMLDBMSTable’s customizer
To begin working with the XMLDBMSTable component,
1 Click the Design tab of the open sample test application, XMLDBMS_Test.java, to open the UI designer. You’ll see an Other folder in the structure pane that contains the two model-based components.
2 Right-click xmldbmsTable in the structure pane and choose the Customizer menu command. The customizer for XMLDBMSTable displays.
Selecting and testing a JDBC connectionThe sample test application already sets all the properties in its source code. If you were creating your own application, you would need to fill in all the fields of the customizer yourself. Imagine that the fields are blank and follow along to fill them in. As you did for the first step of the XML-DBMS wizard, you must select your JDBC connection.
1 Click the Choose Existing Connection button and select the same connection you established to the employee.jds datastore. As soon as you select your connection, the customizer uses the connection data to fill in the rest of the fields.
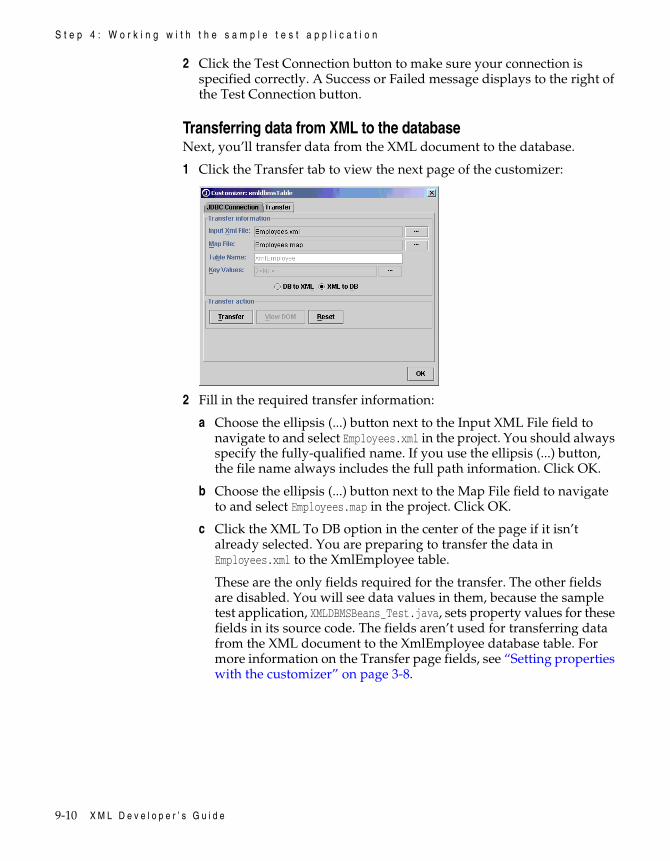
9-10 X M L D e v e l o p e r ’ s G u i d e
S t e p 4 : W o r k i n g w i t h t h e s a m p l e t e s t a p p l i c a t i o n
2 Click the Test Connection button to make sure your connection is specified correctly. A Success or Failed message displays to the right of the Test Connection button.
Transferring data from XML to the databaseNext, you’ll transfer data from the XML document to the database.
1 Click the Transfer tab to view the next page of the customizer:
2 Fill in the required transfer information:
a Choose the ellipsis (...) button next to the Input XML File field to navigate to and select Employees.xml in the project. You should always specify the fully-qualified name. If you use the ellipsis (...) button, the file name always includes the full path information. Click OK.
b Choose the ellipsis (...) button next to the Map File field to navigate to and select Employees.map in the project. Click OK.
c Click the XML To DB option in the center of the page if it isn’t already selected. You are preparing to transfer the data in Employees.xml to the XmlEmployee table.
These are the only fields required for the transfer. The other fields are disabled. You will see data values in them, because the sample test application, XMLDBMSBeans_Test.java, sets property values for these fields in its source code. The fields aren’t used for transferring data from the XML document to the XmlEmployee database table. For more information on the Transfer page fields, see “Setting properties with the customizer” on page 3-8.
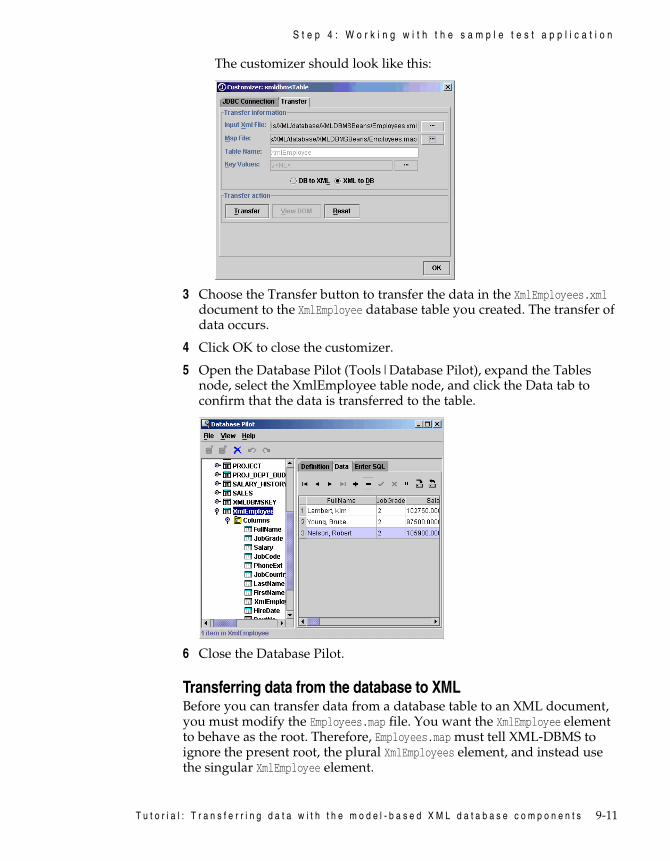
T u t o r i a l : T r a n s f e r r i n g d a t a w i t h t h e m o d e l - b a s e d X M L d a t a b a s e c o m p o n e n t s 9-11
S t e p 4 : W o r k i n g w i t h t h e s a m p l e t e s t a p p l i c a t i o n
The customizer should look like this:
3 Choose the Transfer button to transfer the data in the XmlEmployees.xml document to the XmlEmployee database table you created. The transfer of data occurs.
4 Click OK to close the customizer.
5 Open the Database Pilot (Tools|Database Pilot), expand the Tables node, select the XmlEmployee table node, and click the Data tab to confirm that the data is transferred to the table.
6 Close the Database Pilot.
Transferring data from the database to XMLBefore you can transfer data from a database table to an XML document, you must modify the Employees.map file. You want the XmlEmployee element to behave as the root. Therefore, Employees.map must tell XML-DBMS to ignore the present root, the plural XmlEmployees element, and instead use the singular XmlEmployee element.
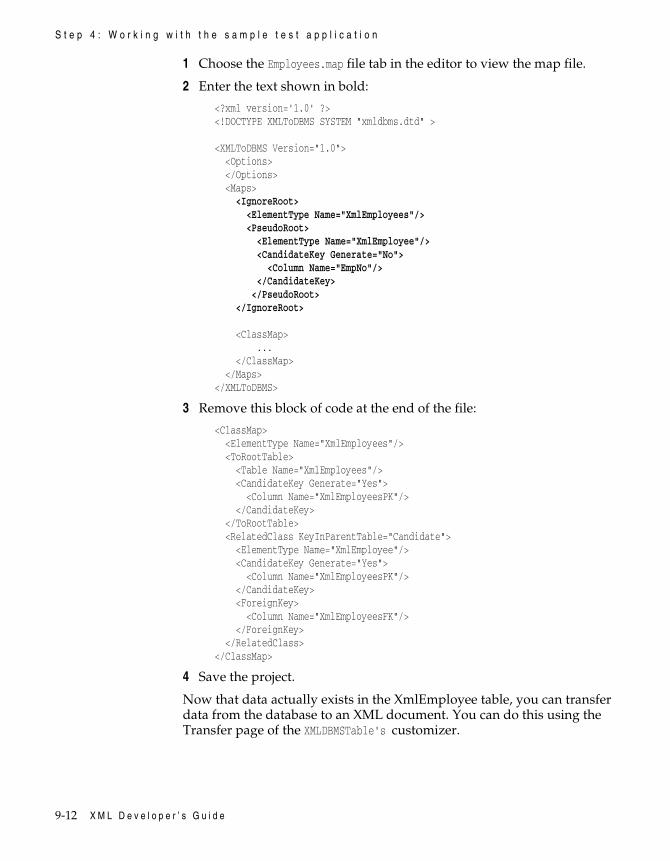
9-12 X M L D e v e l o p e r ’ s G u i d e
S t e p 4 : W o r k i n g w i t h t h e s a m p l e t e s t a p p l i c a t i o n
1 Choose the Employees.map file tab in the editor to view the map file.
2 Enter the text shown in bold:
<?xml version='1.0' ?><!DOCTYPE XMLToDBMS SYSTEM "xmldbms.dtd" >
<XMLToDBMS Version="1.0"> <Options> </Options> <Maps> <IgnoreRoot> <ElementType Name="XmlEmployees"/> <PseudoRoot> <ElementType Name="XmlEmployee"/> <CandidateKey Generate="No"> <Column Name="EmpNo"/> </CandidateKey> </PseudoRoot> </IgnoreRoot>
<ClassMap> ... </ClassMap> </Maps></XMLToDBMS>
3 Remove this block of code at the end of the file:
<ClassMap> <ElementType Name="XmlEmployees"/> <ToRootTable> <Table Name="XmlEmployees"/> <CandidateKey Generate="Yes"> <Column Name="XmlEmployeesPK"/> </CandidateKey> </ToRootTable> <RelatedClass KeyInParentTable="Candidate"> <ElementType Name="XmlEmployee"/> <CandidateKey Generate="Yes"> <Column Name="XmlEmployeesPK"/> </CandidateKey> <ForeignKey> <Column Name="XmlEmployeesFK"/> </ForeignKey> </RelatedClass></ClassMap>
4 Save the project.
Now that data actually exists in the XmlEmployee table, you can transfer data from the database to an XML document. You can do this using the Transfer page of the XMLDBMSTable's customizer.

T u t o r i a l : T r a n s f e r r i n g d a t a w i t h t h e m o d e l - b a s e d X M L d a t a b a s e c o m p o n e n t s 9-13
S t e p 4 : W o r k i n g w i t h t h e s a m p l e t e s t a p p l i c a t i o n
To transfer data from the XmlEmployee table to an XML document named Employees_out.xml,
1 Return to the Design tab of XMLDBMS_Test.java.
2 Right-click xmldbmsTable in the structure pane and choose the Customizer menu command to open the customizer again.
3 Choose the Transfer tab.
4 Select the DB To XML option. The customizer fields change slightly. The Table Name and Key Values fields are now enabled.
5 Click the ellipsis (...) button next to the Output XML File field and change the name to Employees_out.xml. Click OK.
6 Accept the default name in the Map File field, Employees.map (the file you modified), including the path name.
7 Accept the table name, XmlEmployee.
8 Accept the key value of 2 in the Key Values field. This is the value of the “EmpNo” column of the employee you want to transfer from the database table to the Employees_out.xml document. The “EmpNo” column is the primary key for XmlEmployee. If you want to transfer the records of multiple employees, use the Key Values field and its property editor to specify multiple employee numbers.
9 Choose View DOM to transfer data from the XmlEmployee table to Employees_out.xml. You can see the results of your transfer request. In the left pane, a tree view of Employees_out.xml displays, and in the right pane, you’ll see the actual XML source code:
10 Click OK twice to close the DOM view and the customizer.
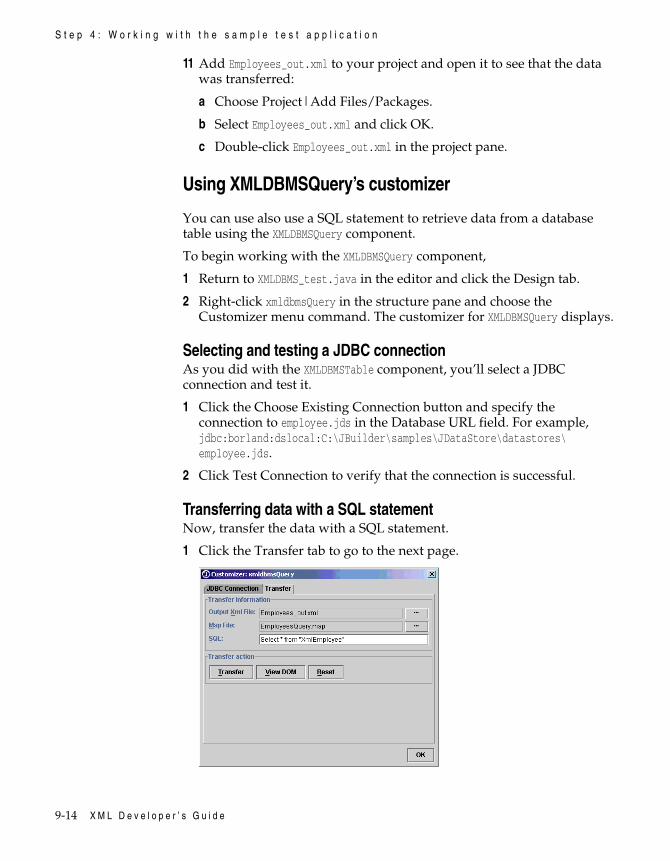
9-14 X M L D e v e l o p e r ’ s G u i d e
S t e p 4 : W o r k i n g w i t h t h e s a m p l e t e s t a p p l i c a t i o n
11 Add Employees_out.xml to your project and open it to see that the data was transferred:
a Choose Project|Add Files/Packages.
b Select Employees_out.xml and click OK.
c Double-click Employees_out.xml in the project pane.
Using XMLDBMSQuery’s customizer
You can use also use a SQL statement to retrieve data from a database table using the XMLDBMSQuery component.
To begin working with the XMLDBMSQuery component,
1 Return to XMLDBMS_test.java in the editor and click the Design tab.
2 Right-click xmldbmsQuery in the structure pane and choose the Customizer menu command. The customizer for XMLDBMSQuery displays.
Selecting and testing a JDBC connectionAs you did with the XMLDBMSTable component, you’ll select a JDBC connection and test it.
1 Click the Choose Existing Connection button and specify the connection to employee.jds in the Database URL field. For example, jdbc:borland:dslocal:C:\JBuilder\samples\JDataStore\datastores\employee.jds.
2 Click Test Connection to verify that the connection is successful.
Transferring data with a SQL statementNow, transfer the data with a SQL statement.
1 Click the Transfer tab to go to the next page.
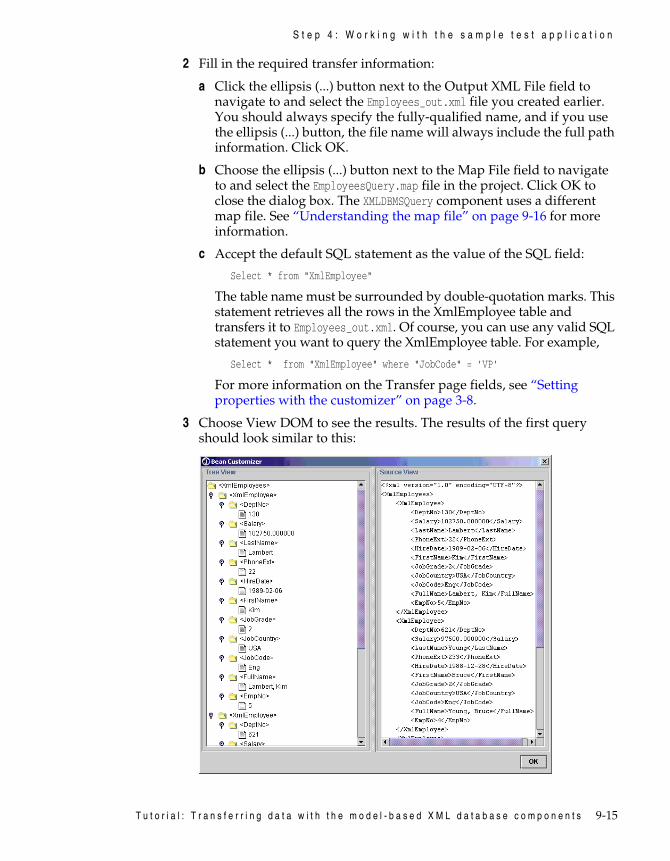
T u t o r i a l : T r a n s f e r r i n g d a t a w i t h t h e m o d e l - b a s e d X M L d a t a b a s e c o m p o n e n t s 9-15
S t e p 4 : W o r k i n g w i t h t h e s a m p l e t e s t a p p l i c a t i o n
2 Fill in the required transfer information:
a Click the ellipsis (...) button next to the Output XML File field to navigate to and select the Employees_out.xml file you created earlier. You should always specify the fully-qualified name, and if you use the ellipsis (...) button, the file name will always include the full path information. Click OK.
b Choose the ellipsis (...) button next to the Map File field to navigate to and select the EmployeesQuery.map file in the project. Click OK to close the dialog box. The XMLDBMSQuery component uses a different map file. See “Understanding the map file” on page 9-16 for more information.
c Accept the default SQL statement as the value of the SQL field:
Select * from "XmlEmployee"
The table name must be surrounded by double-quotation marks. This statement retrieves all the rows in the XmlEmployee table and transfers it to Employees_out.xml. Of course, you can use any valid SQL statement you want to query the XmlEmployee table. For example,
Select * from "XmlEmployee" where "JobCode" = 'VP'
For more information on the Transfer page fields, see “Setting properties with the customizer” on page 3-8.
3 Choose View DOM to see the results. The results of the first query should look similar to this:
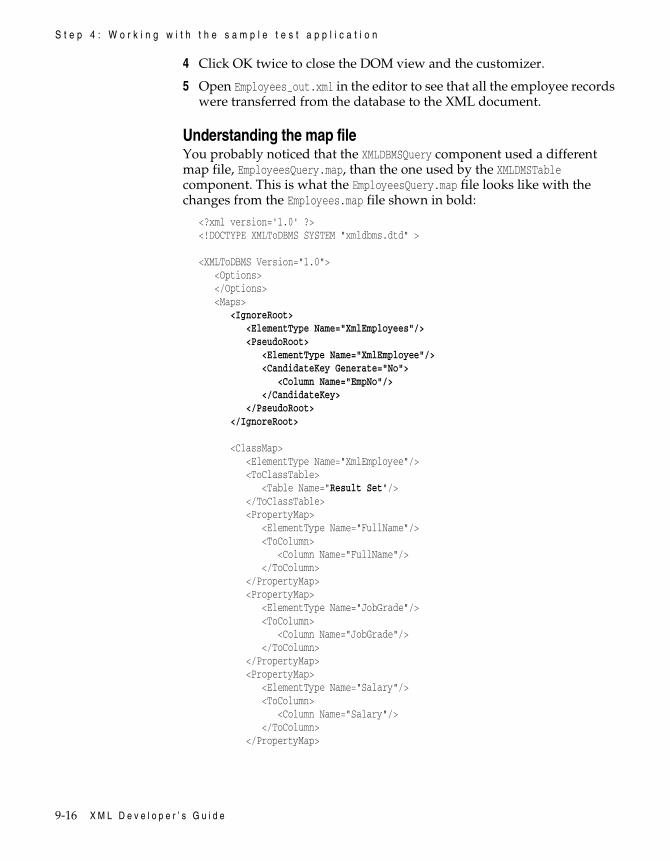
9-16 X M L D e v e l o p e r ’ s G u i d e
S t e p 4 : W o r k i n g w i t h t h e s a m p l e t e s t a p p l i c a t i o n
4 Click OK twice to close the DOM view and the customizer.
5 Open Employees_out.xml in the editor to see that all the employee records were transferred from the database to the XML document.
Understanding the map fileYou probably noticed that the XMLDBMSQuery component used a different map file, EmployeesQuery.map, than the one used by the XMLDMSTable component. This is what the EmployeesQuery.map file looks like with the changes from the Employees.map file shown in bold:
<?xml version='1.0' ?><!DOCTYPE XMLToDBMS SYSTEM "xmldbms.dtd" >
<XMLToDBMS Version="1.0"> <Options> </Options> <Maps> <IgnoreRoot> <ElementType Name="XmlEmployees"/> <PseudoRoot> <ElementType Name="XmlEmployee"/> <CandidateKey Generate="No"> <Column Name="EmpNo"/> </CandidateKey> </PseudoRoot> </IgnoreRoot>
<ClassMap> <ElementType Name="XmlEmployee"/> <ToClassTable> <Table Name="Result Set"/> </ToClassTable> <PropertyMap> <ElementType Name="FullName"/> <ToColumn> <Column Name="FullName"/> </ToColumn> </PropertyMap> <PropertyMap> <ElementType Name="JobGrade"/> <ToColumn> <Column Name="JobGrade"/> </ToColumn> </PropertyMap> <PropertyMap> <ElementType Name="Salary"/> <ToColumn> <Column Name="Salary"/> </ToColumn> </PropertyMap>
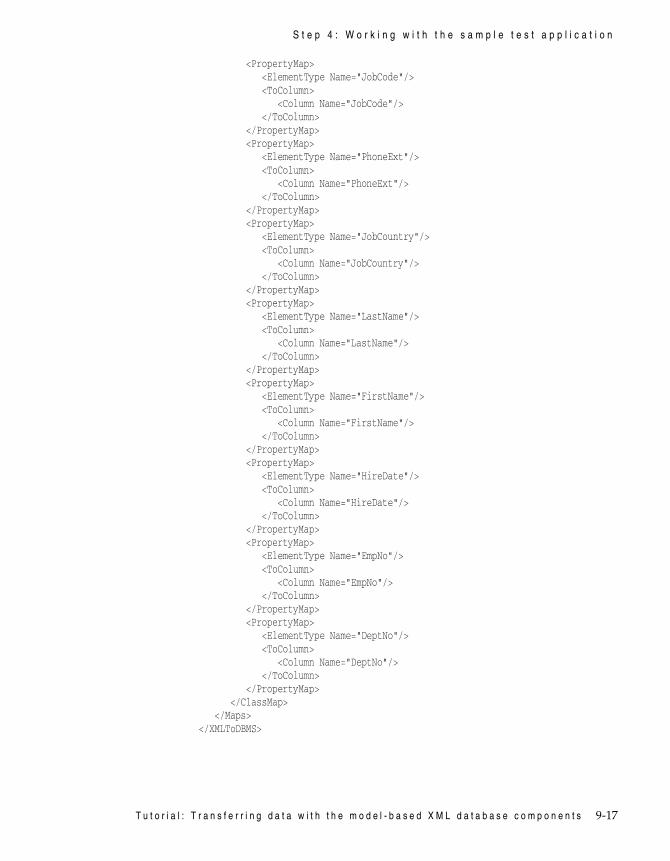
T u t o r i a l : T r a n s f e r r i n g d a t a w i t h t h e m o d e l - b a s e d X M L d a t a b a s e c o m p o n e n t s 9-17
S t e p 4 : W o r k i n g w i t h t h e s a m p l e t e s t a p p l i c a t i o n
<PropertyMap> <ElementType Name="JobCode"/> <ToColumn> <Column Name="JobCode"/> </ToColumn> </PropertyMap> <PropertyMap> <ElementType Name="PhoneExt"/> <ToColumn> <Column Name="PhoneExt"/> </ToColumn> </PropertyMap> <PropertyMap> <ElementType Name="JobCountry"/> <ToColumn> <Column Name="JobCountry"/> </ToColumn> </PropertyMap> <PropertyMap> <ElementType Name="LastName"/> <ToColumn> <Column Name="LastName"/> </ToColumn> </PropertyMap> <PropertyMap> <ElementType Name="FirstName"/> <ToColumn> <Column Name="FirstName"/> </ToColumn> </PropertyMap> <PropertyMap> <ElementType Name="HireDate"/> <ToColumn> <Column Name="HireDate"/> </ToColumn> </PropertyMap> <PropertyMap> <ElementType Name="EmpNo"/> <ToColumn> <Column Name="EmpNo"/> </ToColumn> </PropertyMap> <PropertyMap> <ElementType Name="DeptNo"/> <ToColumn> <Column Name="DeptNo"/> </ToColumn> </PropertyMap> </ClassMap> </Maps></XMLToDBMS>
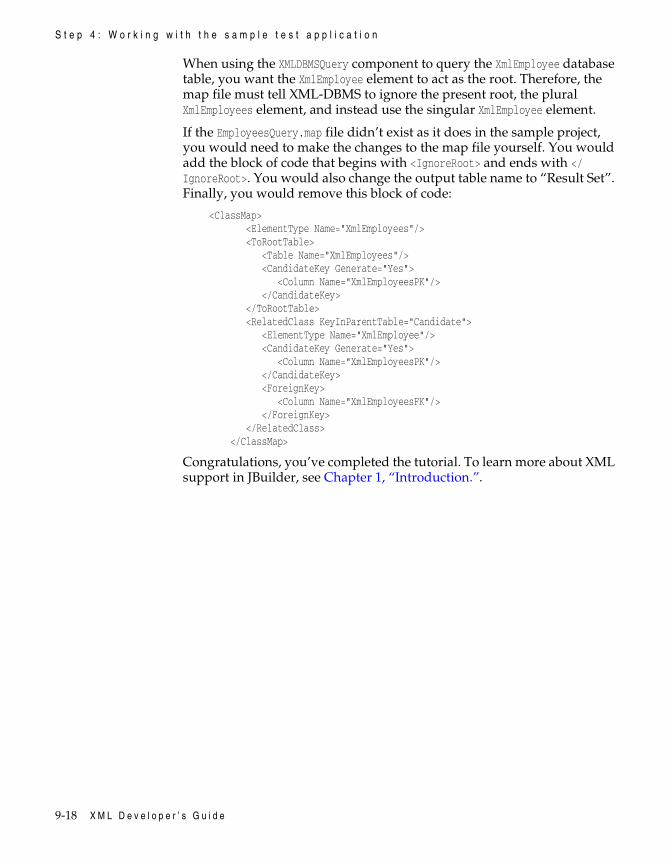
9-18 X M L D e v e l o p e r ’ s G u i d e
S t e p 4 : W o r k i n g w i t h t h e s a m p l e t e s t a p p l i c a t i o n
When using the XMLDBMSQuery component to query the XmlEmployee database table, you want the XmlEmployee element to act as the root. Therefore, the map file must tell XML-DBMS to ignore the present root, the plural XmlEmployees element, and instead use the singular XmlEmployee element.
If the EmployeesQuery.map file didn’t exist as it does in the sample project, you would need to make the changes to the map file yourself. You would add the block of code that begins with <IgnoreRoot> and ends with </IgnoreRoot>. You would also change the output table name to “Result Set”. Finally, you would remove this block of code:
<ClassMap> <ElementType Name="XmlEmployees"/> <ToRootTable> <Table Name="XmlEmployees"/> <CandidateKey Generate="Yes"> <Column Name="XmlEmployeesPK"/> </CandidateKey> </ToRootTable> <RelatedClass KeyInParentTable="Candidate"> <ElementType Name="XmlEmployee"/> <CandidateKey Generate="Yes"> <Column Name="XmlEmployeesPK"/> </CandidateKey> <ForeignKey> <Column Name="XmlEmployeesFK"/> </ForeignKey> </RelatedClass> </ClassMap>
Congratulations, you’ve completed the tutorial. To learn more about XML support in JBuilder, see Chapter 1, “Introduction.”.
T u t o r i a l : T r a n s f e r r i n g d a t a w i t h t h e t e m p l a t e - b a s e d X M L d a t a b a s e c o m p o n e n t s 10-1
C h a p t e r
10Chapter10Tutorial: Transferring data with
the template-based XML databasecomponents
This is a feature ofJBuilder Enterprise
This tutorial explains how to use JBuilder’s template-based XML database components to retrieve data from a database to an XML file. It uses the XBeans.jpx sample in the /<jbuilder>/samples/Tutorials/XML/database/ directory. For users with read-only access to JBuilder samples, copy the samples directory into a directory with read/write permissions.
Using the template-based components, you formulate a query and the template-based component generates an appropriate XML document. The query you provide serves as the template that is replaced in the XML document as the result of applying the template. Because there is no predefined relationship between the XML document and the set of database metadata you are querying, the template-based solution is quite flexible. The format of the resulting XML document is flat and relatively simple. You can choose to present the resulting XML document as you like, using either the default or custom stylesheets.
This tutorial shows you how to do the following:
• Transfer data from a database table to an XML document using the XTable component.
• Transfer data from a database table to an XML document using a SQL statement created by the XQuery component.
• Use XTable’s and XQuery’s customizers to set properties and view the results of those property settings on the transfer of the data.
This tutorial assumes you have a working knowledge of JBuilder and XML. If you are new to JBuilder, see “The JBuilder environment” (Help|
10-2 X M L D e v e l o p e r ’ s G u i d e
S t e p 1 : G e t t i n g s t a r t e d
JBuilder Environment). For more information on JBuilder’s XML features, see Chapter 1, “Introduction.”
The Accessibility options section in the JBuilder Quick Tips contains tips on using JBuilder features to improve JBuilder’s ease of use for people with disabilities.
For information on documentation conventions used in this tutorial and other JBuilder documentation, see “Documentation conventions” on page 1-3.
Step 1: Getting startedThis tutorial uses the same XmlEmployee database table you created in Chapter 9, “Tutorial: Transferring data with the model-based XML database components.” If you haven’t worked through that tutorial yet, you should do so now. At the very least, you should use the XML-DBMS wizard to create the map and SQL script files that tutorial describes, and then execute the SQL statements to create the XmlEmployee table. Chapter 9 tells you how.
1 Open the sample /<jbuilder>/samples/Tutorials/XML/database/XBeans.jpx project.
2 Expand the com.borland.samples.xml.XBeans package node to find the XBeans_Test.java sample test application. Double-click this sample test application to display it in the editor.
Step 2: Working with the sample test applicationUsually when you use JBuilder’s XML database components, you’ll be developing an application that presents a user interface for the user to interact with. You won’t be doing that for this tutorial. Instead, you’ll use the sample test application, XBeans_Test.java, which is simply a Java class that contains the template-based XML database components and sets the properties of those components. This tutorial shows you how to work with the components’ customizers to set properties and to view the results of a data transfer. Once you are certain a transfer works correctly, you can proceed with confidence as you build a GUI application around it.
Examine the source code and you’ll see that it contains the two components, xTable and xQuery. If you were creating your own test
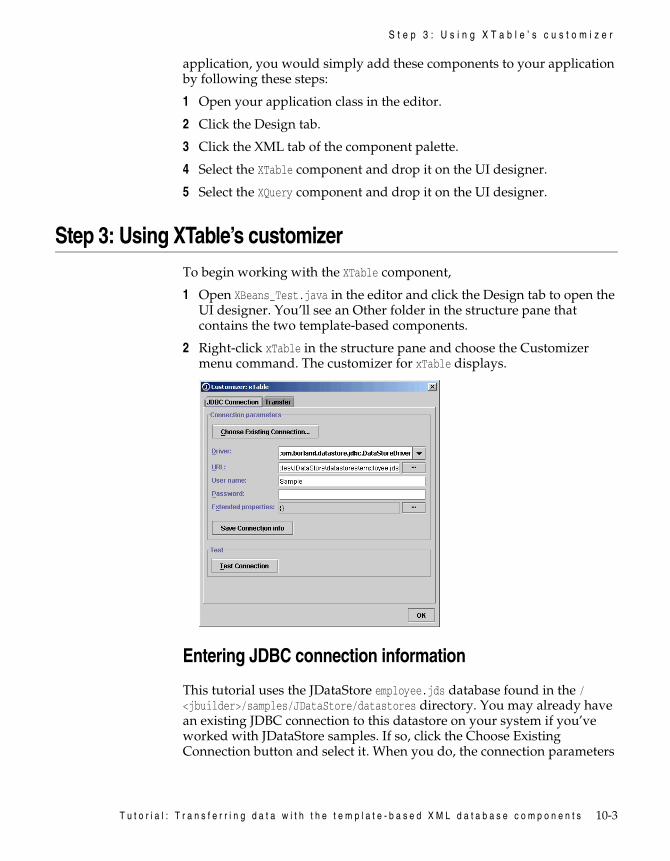
T u t o r i a l : T r a n s f e r r i n g d a t a w i t h t h e t e m p l a t e - b a s e d X M L d a t a b a s e c o m p o n e n t s 10-3
S t e p 3 : U s i n g X T a b l e ’ s c u s t o m i z e r
application, you would simply add these components to your application by following these steps:
1 Open your application class in the editor.
2 Click the Design tab.
3 Click the XML tab of the component palette.
4 Select the XTable component and drop it on the UI designer.
5 Select the XQuery component and drop it on the UI designer.
Step 3: Using XTable’s customizerTo begin working with the XTable component,
1 Open XBeans_Test.java in the editor and click the Design tab to open the UI designer. You’ll see an Other folder in the structure pane that contains the two template-based components.
2 Right-click xTable in the structure pane and choose the Customizer menu command. The customizer for xTable displays.
Entering JDBC connection information
This tutorial uses the JDataStore employee.jds database found in the /<jbuilder>/samples/JDataStore/datastores directory. You may already have an existing JDBC connection to this datastore on your system if you’ve worked with JDataStore samples. If so, click the Choose Existing Connection button and select it. When you do, the connection parameters
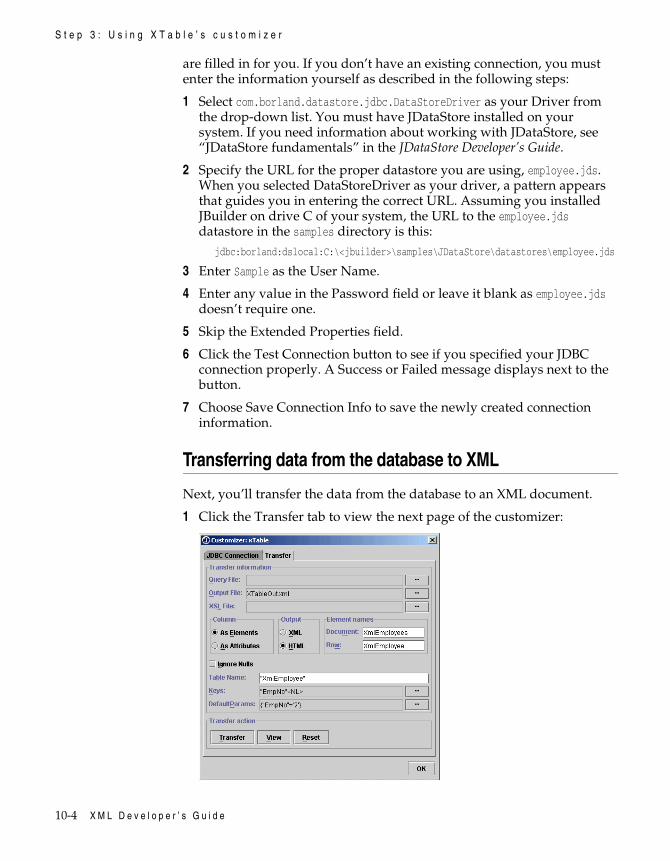
10-4 X M L D e v e l o p e r ’ s G u i d e
S t e p 3 : U s i n g X T a b l e ’ s c u s t o m i z e r
are filled in for you. If you don’t have an existing connection, you must enter the information yourself as described in the following steps:
1 Select com.borland.datastore.jdbc.DataStoreDriver as your Driver from the drop-down list. You must have JDataStore installed on your system. If you need information about working with JDataStore, see “JDataStore fundamentals” in the JDataStore Developer’s Guide.
2 Specify the URL for the proper datastore you are using, employee.jds. When you selected DataStoreDriver as your driver, a pattern appears that guides you in entering the correct URL. Assuming you installed JBuilder on drive C of your system, the URL to the employee.jds datastore in the samples directory is this:
jdbc:borland:dslocal:C:\<jbuilder>\samples\JDataStore\datastores\employee.jds
3 Enter Sample as the User Name.
4 Enter any value in the Password field or leave it blank as employee.jds doesn’t require one.
5 Skip the Extended Properties field.
6 Click the Test Connection button to see if you specified your JDBC connection properly. A Success or Failed message displays next to the button.
7 Choose Save Connection Info to save the newly created connection information.
Transferring data from the database to XML
Next, you’ll transfer the data from the database to an XML document.
1 Click the Transfer tab to view the next page of the customizer:
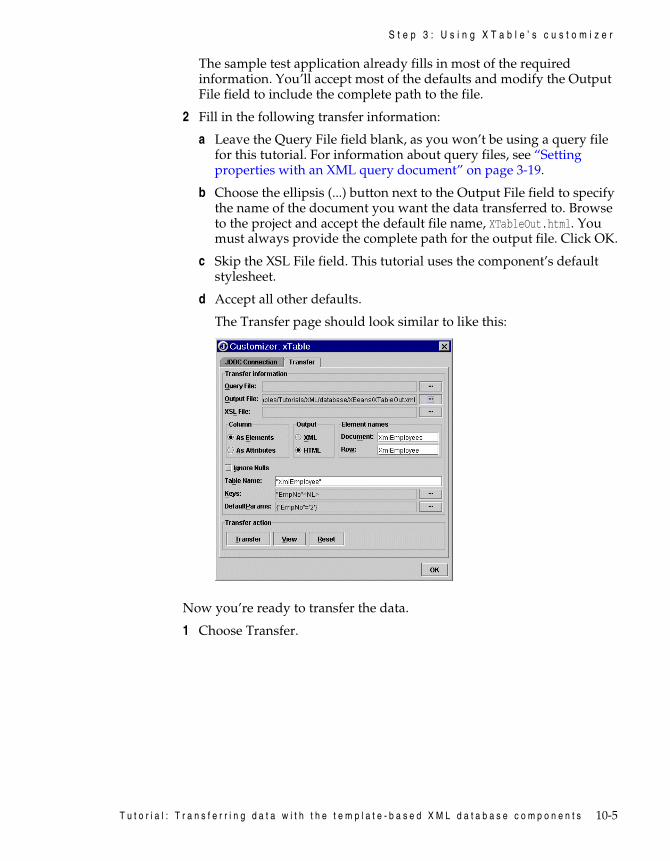
T u t o r i a l : T r a n s f e r r i n g d a t a w i t h t h e t e m p l a t e - b a s e d X M L d a t a b a s e c o m p o n e n t s 10-5
S t e p 3 : U s i n g X T a b l e ’ s c u s t o m i z e r
The sample test application already fills in most of the required information. You’ll accept most of the defaults and modify the Output File field to include the complete path to the file.
2 Fill in the following transfer information:
a Leave the Query File field blank, as you won’t be using a query file for this tutorial. For information about query files, see “Setting properties with an XML query document” on page 3-19.
b Choose the ellipsis (...) button next to the Output File field to specify the name of the document you want the data transferred to. Browse to the project and accept the default file name, XTableOut.html. You must always provide the complete path for the output file. Click OK.
c Skip the XSL File field. This tutorial uses the component’s default stylesheet.
d Accept all other defaults.
The Transfer page should look similar to like this:
Now you’re ready to transfer the data.
1 Choose Transfer.
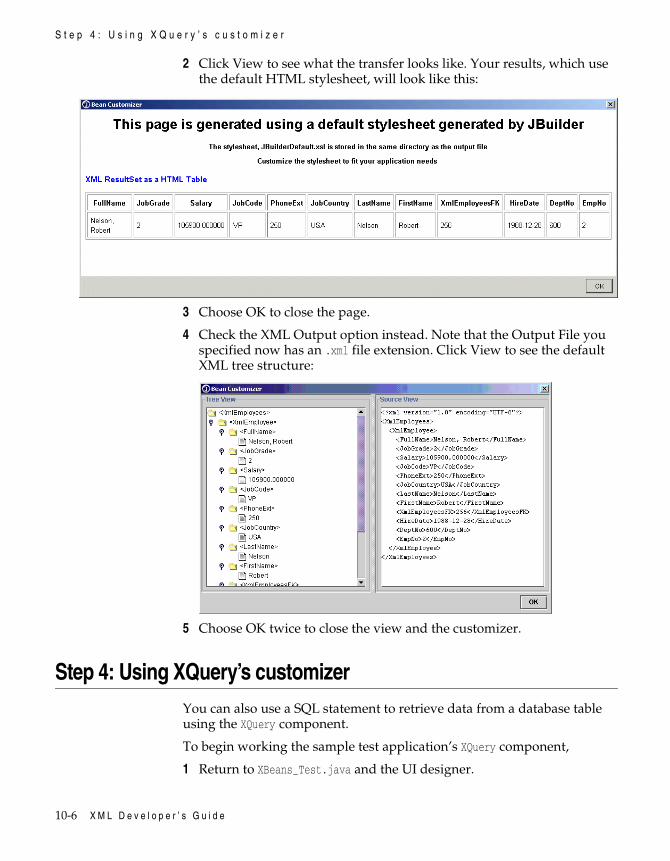
10-6 X M L D e v e l o p e r ’ s G u i d e
S t e p 4 : U s i n g X Q u e r y ’ s c u s t o m i z e r
2 Click View to see what the transfer looks like. Your results, which use the default HTML stylesheet, will look like this:
3 Choose OK to close the page.
4 Check the XML Output option instead. Note that the Output File you specified now has an .xml file extension. Click View to see the default XML tree structure:
5 Choose OK twice to close the view and the customizer.
Step 4: Using XQuery’s customizerYou can also use a SQL statement to retrieve data from a database table using the XQuery component.
To begin working the sample test application’s XQuery component,
1 Return to XBeans_Test.java and the UI designer.
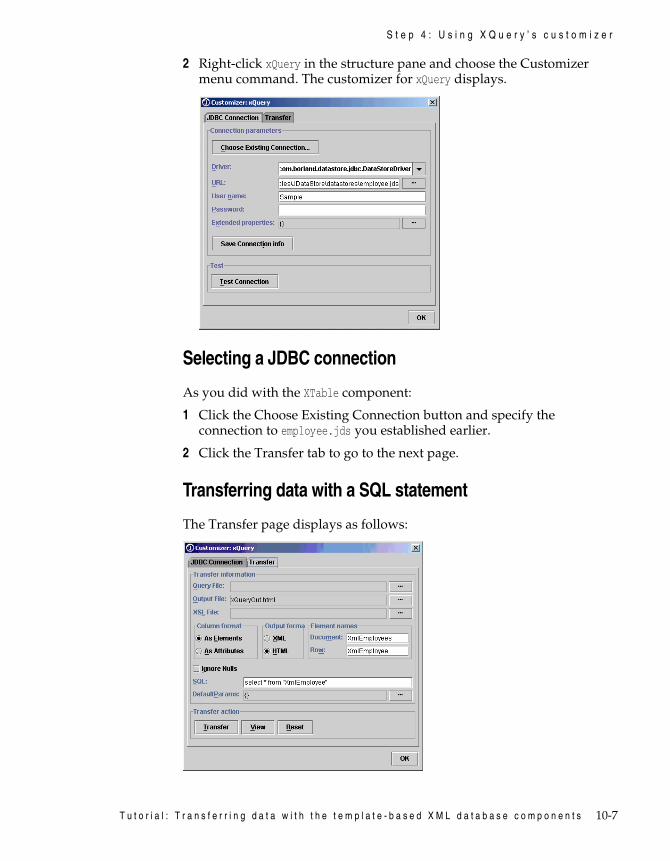
T u t o r i a l : T r a n s f e r r i n g d a t a w i t h t h e t e m p l a t e - b a s e d X M L d a t a b a s e c o m p o n e n t s 10-7
S t e p 4 : U s i n g X Q u e r y ’ s c u s t o m i z e r
2 Right-click xQuery in the structure pane and choose the Customizer menu command. The customizer for xQuery displays.
Selecting a JDBC connection
As you did with the XTable component:
1 Click the Choose Existing Connection button and specify the connection to employee.jds you established earlier.
2 Click the Transfer tab to go to the next page.
Transferring data with a SQL statement
The Transfer page displays as follows:
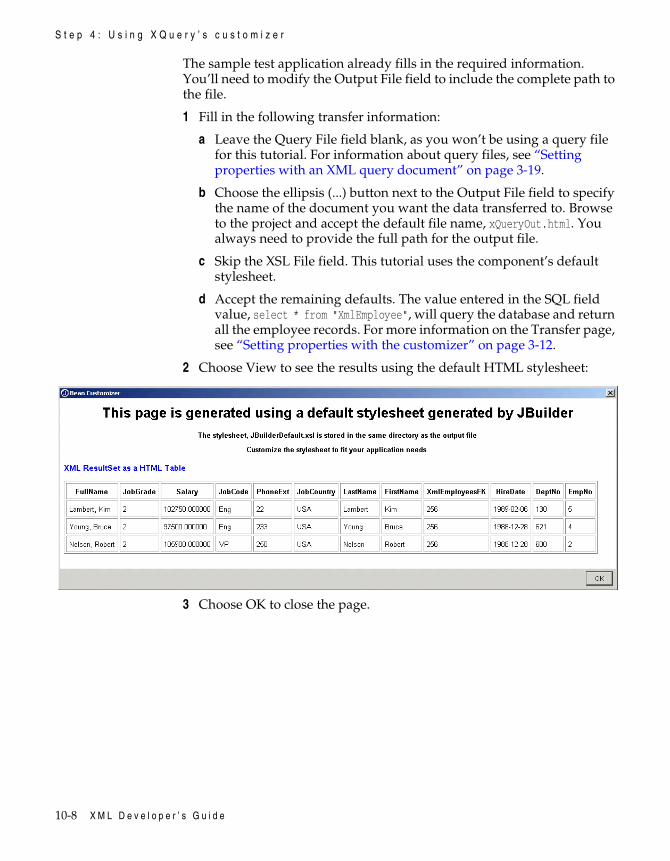
10-8 X M L D e v e l o p e r ’ s G u i d e
S t e p 4 : U s i n g X Q u e r y ’ s c u s t o m i z e r
The sample test application already fills in the required information. You’ll need to modify the Output File field to include the complete path to the file.
1 Fill in the following transfer information:
a Leave the Query File field blank, as you won’t be using a query file for this tutorial. For information about query files, see “Setting properties with an XML query document” on page 3-19.
b Choose the ellipsis (...) button next to the Output File field to specify the name of the document you want the data transferred to. Browse to the project and accept the default file name, xQueryOut.html. You always need to provide the full path for the output file.
c Skip the XSL File field. This tutorial uses the component’s default stylesheet.
d Accept the remaining defaults. The value entered in the SQL field value, select * from "XmlEmployee", will query the database and return all the employee records. For more information on the Transfer page, see “Setting properties with the customizer” on page 3-12.
2 Choose View to see the results using the default HTML stylesheet:
3 Choose OK to close the page.
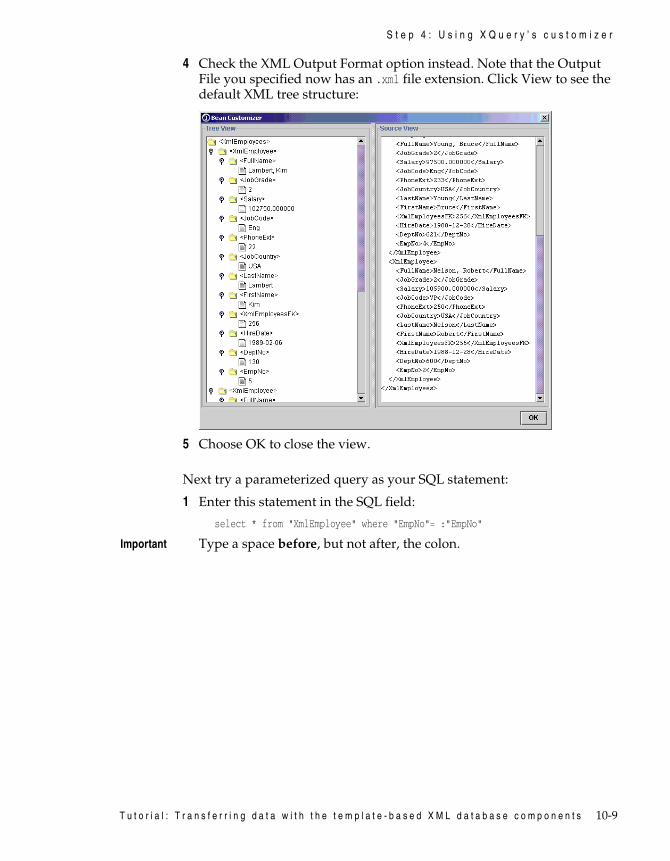
T u t o r i a l : T r a n s f e r r i n g d a t a w i t h t h e t e m p l a t e - b a s e d X M L d a t a b a s e c o m p o n e n t s 10-9
S t e p 4 : U s i n g X Q u e r y ’ s c u s t o m i z e r
4 Check the XML Output Format option instead. Note that the Output File you specified now has an .xml file extension. Click View to see the default XML tree structure:
5 Choose OK to close the view.
Next try a parameterized query as your SQL statement:
1 Enter this statement in the SQL field:
select * from "XmlEmployee" where "EmpNo"= :"EmpNo"
Important Type a space before, but not after, the colon.
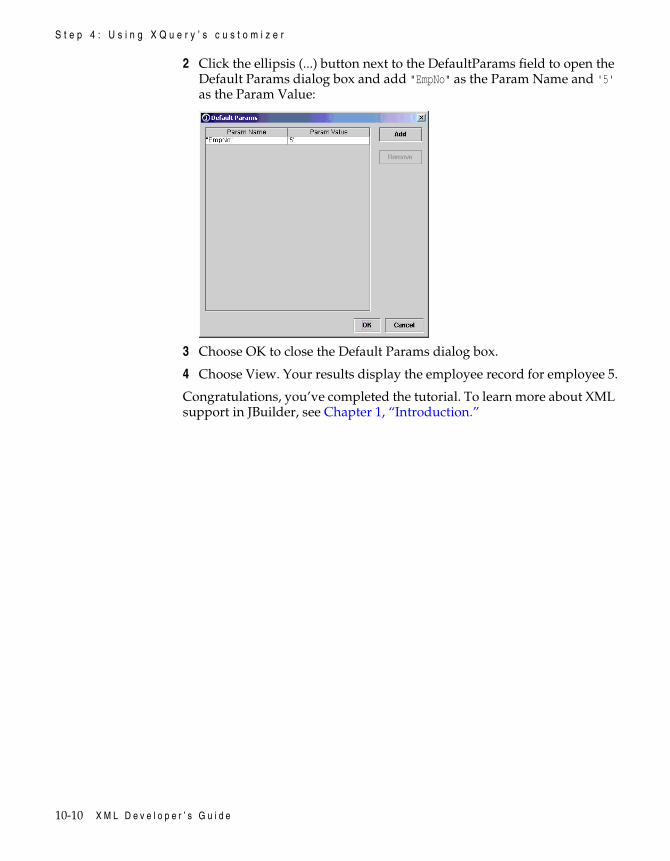
10-10 X M L D e v e l o p e r ’ s G u i d e
S t e p 4 : U s i n g X Q u e r y ’ s c u s t o m i z e r
2 Click the ellipsis (...) button next to the DefaultParams field to open the Default Params dialog box and add "EmpNo" as the Param Name and '5' as the Param Value:
3 Choose OK to close the Default Params dialog box.
4 Choose View. Your results display the employee record for employee 5.
Congratulations, you’ve completed the tutorial. To learn more about XML support in JBuilder, see Chapter 1, “Introduction.”
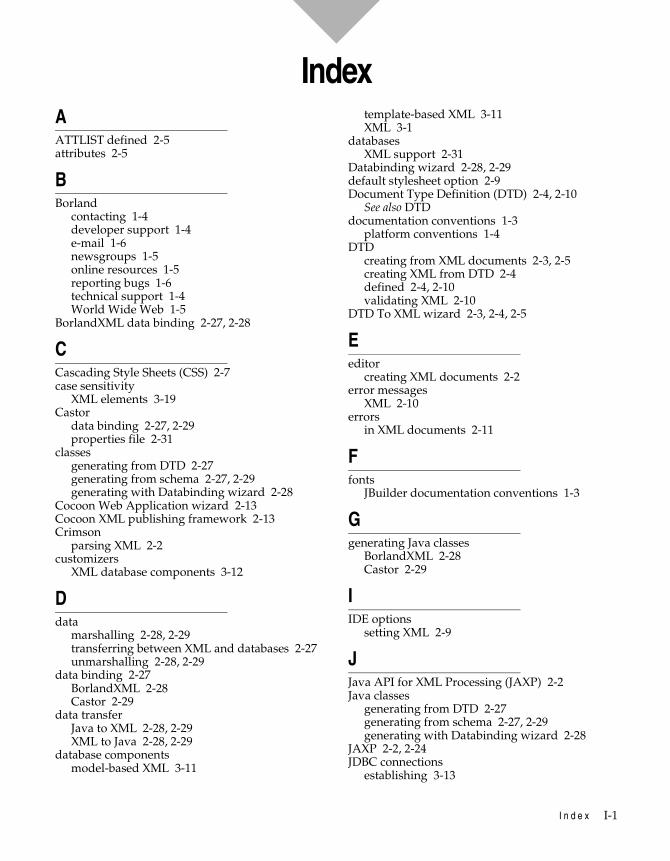
I n d e x I-1
AATTLIST defined 2-5attributes 2-5
BBorland
contacting 1-4developer support 1-4e-mail 1-6newsgroups 1-5online resources 1-5reporting bugs 1-6technical support 1-4World Wide Web 1-5
BorlandXML data binding 2-27, 2-28
CCascading Style Sheets (CSS) 2-7case sensitivity
XML elements 3-19Castor
data binding 2-27, 2-29properties file 2-31
classesgenerating from DTD 2-27generating from schema 2-27, 2-29generating with Databinding wizard 2-28
Cocoon Web Application wizard 2-13Cocoon XML publishing framework 2-13Crimson
parsing XML 2-2customizers
XML database components 3-12
Ddata
marshalling 2-28, 2-29transferring between XML and databases 2-27unmarshalling 2-28, 2-29
data binding 2-27BorlandXML 2-28Castor 2-29
data transferJava to XML 2-28, 2-29XML to Java 2-28, 2-29
database componentsmodel-based XML 3-11
template-based XML 3-11XML 3-1
databasesXML support 2-31
Databinding wizard 2-28, 2-29default stylesheet option 2-9Document Type Definition (DTD) 2-4, 2-10
See also DTDdocumentation conventions 1-3
platform conventions 1-4DTD
creating from XML documents 2-3, 2-5creating XML from DTD 2-4defined 2-4, 2-10validating XML 2-10
DTD To XML wizard 2-3, 2-4, 2-5
Eeditor
creating XML documents 2-2error messages
XML 2-10errors
in XML documents 2-11
Ffonts
JBuilder documentation conventions 1-3
Ggenerating Java classes
BorlandXML 2-28Castor 2-29
IIDE options
setting XML 2-9
JJava API for XML Processing (JAXP) 2-2Java classes
generating from DTD 2-27generating from schema 2-27, 2-29generating with Databinding wizard 2-28
JAXP 2-2, 2-24JDBC connections
establishing 3-13
Index
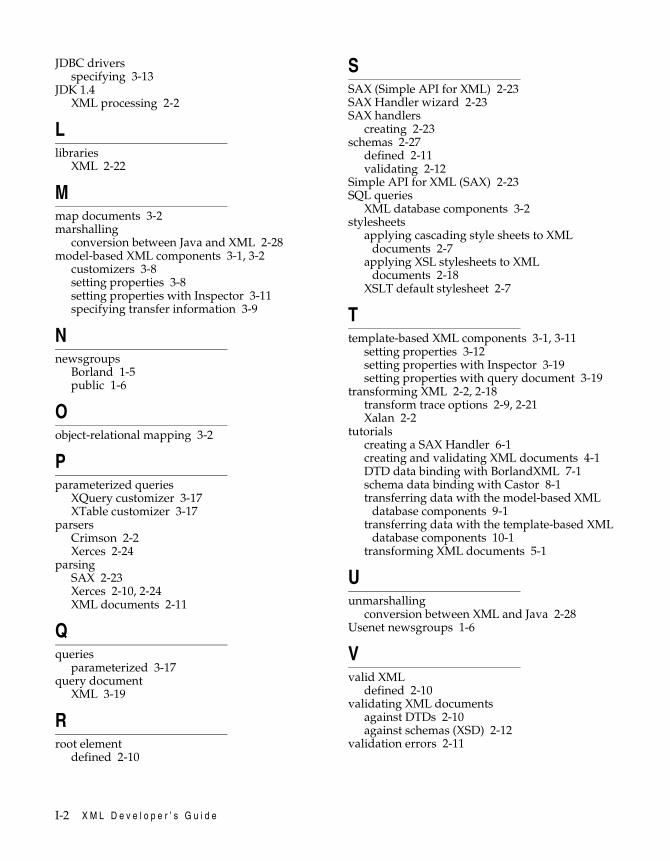
I-2 X M L D e v e l o p e r ’ s G u i d e
JDBC driversspecifying 3-13
JDK 1.4XML processing 2-2
Llibraries
XML 2-22
Mmap documents 3-2marshalling
conversion between Java and XML 2-28model-based XML components 3-1, 3-2
customizers 3-8setting properties 3-8setting properties with Inspector 3-11specifying transfer information 3-9
Nnewsgroups
Borland 1-5public 1-6
Oobject-relational mapping 3-2
Pparameterized queries
XQuery customizer 3-17XTable customizer 3-17
parsersCrimson 2-2Xerces 2-24
parsingSAX 2-23Xerces 2-10, 2-24XML documents 2-11
Qqueries
parameterized 3-17query document
XML 3-19
Rroot element
defined 2-10
SSAX (Simple API for XML) 2-23SAX Handler wizard 2-23SAX handlers
creating 2-23schemas 2-27
defined 2-11validating 2-12
Simple API for XML (SAX) 2-23SQL queries
XML database components 3-2stylesheets
applying cascading style sheets to XML documents 2-7
applying XSL stylesheets to XML documents 2-18
XSLT default stylesheet 2-7
Ttemplate-based XML components 3-1, 3-11
setting properties 3-12setting properties with Inspector 3-19setting properties with query document 3-19
transforming XML 2-2, 2-18transform trace options 2-9, 2-21Xalan 2-2
tutorialscreating a SAX Handler 6-1creating and validating XML documents 4-1DTD data binding with BorlandXML 7-1schema data binding with Castor 8-1transferring data with the model-based XML
database components 9-1transferring data with the template-based XML
database components 10-1transforming XML documents 5-1
Uunmarshalling
conversion between XML and Java 2-28Usenet newsgroups 1-6
Vvalid XML
defined 2-10validating XML documents
against DTDs 2-10against schemas (XSD) 2-12
validation errors 2-11
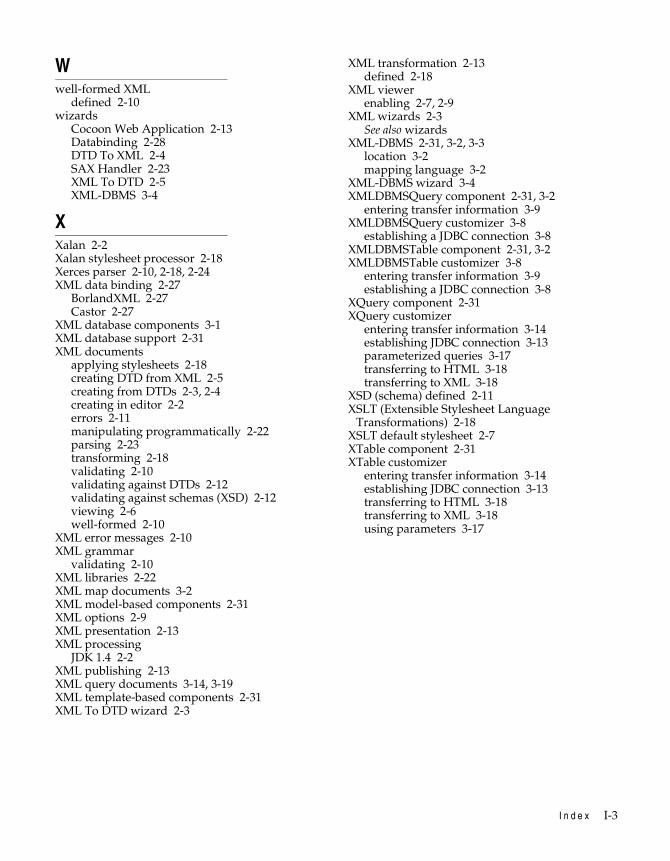
I n d e x I-3
Wwell-formed XML
defined 2-10wizards
Cocoon Web Application 2-13Databinding 2-28DTD To XML 2-4SAX Handler 2-23XML To DTD 2-5XML-DBMS 3-4
XXalan 2-2Xalan stylesheet processor 2-18Xerces parser 2-10, 2-18, 2-24XML data binding 2-27
BorlandXML 2-27Castor 2-27
XML database components 3-1XML database support 2-31XML documents
applying stylesheets 2-18creating DTD from XML 2-5creating from DTDs 2-3, 2-4creating in editor 2-2errors 2-11manipulating programmatically 2-22parsing 2-23transforming 2-18validating 2-10validating against DTDs 2-12validating against schemas (XSD) 2-12viewing 2-6well-formed 2-10
XML error messages 2-10XML grammar
validating 2-10XML libraries 2-22XML map documents 3-2XML model-based components 2-31XML options 2-9XML presentation 2-13XML processing
JDK 1.4 2-2XML publishing 2-13XML query documents 3-14, 3-19XML template-based components 2-31XML To DTD wizard 2-3
XML transformation 2-13defined 2-18
XML viewerenabling 2-7, 2-9
XML wizards 2-3See also wizards
XML-DBMS 2-31, 3-2, 3-3location 3-2mapping language 3-2
XML-DBMS wizard 3-4XMLDBMSQuery component 2-31, 3-2
entering transfer information 3-9XMLDBMSQuery customizer 3-8
establishing a JDBC connection 3-8XMLDBMSTable component 2-31, 3-2XMLDBMSTable customizer 3-8
entering transfer information 3-9establishing a JDBC connection 3-8
XQuery component 2-31XQuery customizer
entering transfer information 3-14establishing JDBC connection 3-13parameterized queries 3-17transferring to HTML 3-18transferring to XML 3-18
XSD (schema) defined 2-11XSLT (Extensible Stylesheet Language
Transformations) 2-18XSLT default stylesheet 2-7XTable component 2-31XTable customizer
entering transfer information 3-14establishing JDBC connection 3-13transferring to HTML 3-18transferring to XML 3-18using parameters 3-17


