draft version 0.1.3 - cyberinfrastructure and geospatial information
TRANSCRIPT

SimpleGrid: A Toolkit for Learning and Developing a Simple Science Gateway (Draft Version 0.1.3)
Yan Liu and Shaowen Wang
1. CyberInfrastructure and Geospatial Information Laboratory (CIGI) 2. Department of Geography
3. GISolve (TeraGrid GIScience Gateway) Project 4. National Center for Supercomputing Applications
5. University of Illinois at Urbana-Champaign
1. Introduction
This tutorial presents a software toolkit called SimpleGrid for developing a simple TeraGrid science and engineering gateway. SimpleGrid is developed based on the following design principles and technologies of the GISolve (i.e., TeraGrid GIScience Gateway).
• Friendly user interface to domain scientists • Scalable architecture based on Grid services • Standard-based portlet development • Transparent access to cyberinfrastructure based on an easy-to-use Grid
application development framework The audience of this tutorial may include science gateway developers, and domain science communities that are interested in porting their applications onto TeraGrid and leveraging TeraGrid resources in their scientific computing. The main theme of this tutorial is to provide efficient learning and development experience in converting a legacy application into a Grid-enabled and web portal-based science gateway. We use a GIScience application example to demonstrate various SimpleGrid technologies.
1.1. Objectives
This tutorial aims to provide: • Overview of existing technologies used in each SimpleGrid component • Hands-on experience in building a simple science gateway • References to related technologies to help choose technologies for production
gateway development The hands-on part covers:
• Using TeraGrid resources for domain-specific scientific computing • Creating a GridSphere-based portal server as a science gateway interface • Developing JSR-168 compliant portlets to build gateway functionalities
1.2. Scope
1 of 30

This tutorial is designed to facilitate the understanding of both learning and development curves in building a science gateway (Figure 1).
Figure 1. Tutorial scope
The tutorial is carried out through three main levels/stages: command line, Grid-enabled application development, and gateway portal. Command line level gives user intuitive understandings of the capabilities that TeraGrid services provide to meet domain-specific scientific computing needs. Application development level shows how to automate the Grid-based domain-specific computing by providing a simple but generic Grid application development API and customizing it for the actual needs of a particular domain. Gateway portal level illustrates how to develop standard-based portal user interfaces to access Grid services. Through these three levels/stages, users will be able to get solid understanding of the development of a simple TeraGrid science gateway.
SimpleGrid comes with a pre-built Grid-enabled application and portal package that is straightforward for users to learn quickly and directly extensible for generic gateway development. Along with the tutorial, exercises are designed for users to have hands-on experience based on this pre-built package.
A real-world GIScience application is used as an example to illustrate how to build a science gateway to support domain-specific scientific computing and community collaboration based on the use of TeraGrid services. In aggregate, this tutorial based on SimpleGrid enables users to quickly learn how to port their applications onto TeraGrid and using TeraGrid resources and services by defining and implementing an application workflow.
1.3. Technologies
2 of 30

Grid security • Grid certificate and Globus-based authentication • MyProxy
Grid data management • GridFTP
Grid job submission and management • GRAM • WS-GRAM
Grid-enabled application development • Java COG Kit • Globus API
Science gateway development • GridSphere portlet container • JSR-168 java Portlet API • Portlet rendering • GridSphere Visual UI / JSP • Velocity
1.4. Tutorial user requirements
Tutorial participants need a web browser and a SSH client tool to login to their training accounts on a tutorial server.
2. Preparation and Requirements
One or more tutorial servers need to be setup to host the SimpleGrid that can be extended to build a customized science gateway. For development purpose, we provide instructions on how to setup GridSphere and SimpleGrid coding and debugging environment in Eclipse, a popular Java IDE (http://www.eclipse.org).
2.1. Tutorial server setup
2.1.1. TeraGrid accounts
Participants of this tutorial should get training accounts from TeraGrid for Grid resource access to UC (University of Chicago), NCSA (National Center for Supercomputing Applications), and SDSC (San Diego Supercomputing Center).
2.1.2. Unix account
This tutorial uses a normal Unix account "tomcat" on the tutorial server. BASH is used as the default shell. This account is also referred as tutorial admin account.
2.1.3. Software installation
3 of 30

One or a few Linux tutorial servers are required to support this tutorial. On the server, create a normal user account, e.g., "tomcat". On each server, the following software is required:
• Globus Toolkit 4.0.3 or above. Globus 4.x provides both GRAM and WS-GRAM.
• MySQL server and client 5.0 • Java 1.5 or above • Ant 1.6.5 or above • Tomcat 5.5.23. The tomcat directory should have read/write permissions for
user "tomcat". For Tomcat 5.5.x, three packages need to be downloaded: bin package, admin package, and compatibility package. They should be extracted into the same directory (referred as ${CATALINA_HOME})
• GridSphere 3.0.5. User svn to get the source distribution. The location of GridSphere source distribution on tutorial server is referred as ${GRIDSPHERE_DIR} (e.g., /home/tomcat/gs3)
• SimpleGrid. To get SimpleGrid package, go to http://cigi.uiuc.edu/doku.php/projects/simplegrid/index and download both SimpleGrid and CA directory packages to the home directory of tutorial admin user "tomcat". The location of extracted SimpleGrid package is referred as ${SIMPLEGRID_DIR} (e.g., /home/tomcat/SimpleGrid).
$ cd $HOME $ svn co https://svn.gridsphere.org/gridsphere/tags/GRIDSPHERE_3_0_5 gridsphere # download SimpleGrid and CA packages from CIGI website $ tar xvfz SimpleGrid-0.5.tar.gz $ mkdir .globus $ cd .globus $ tar xvfz ../cert.tar.gz
2.1.4. User environment
In SimpleGrid/etc/, there is template shell script to set tutorial admin user environment. Adjustments are needed if tutorial server host environment is different.
${SIMPLEGRID_DIR}/etc/simplegrid-env.sh: # Grid environment export GLOBUS_LOCATION=/grow/apps-local/vdt/globus . ${GLOBUS_LOCATION}/etc/globus-user-env.sh export GLOBUS_TCP_PORT_RANGE=40000,50000 # JAVA environment export JAVA_HOME=/usr/java/jdk1.5.0_11 export ANT_HOME=/grow/apps-local/apache-ant export CATALINA_HOME=/grow/apps-local/tomcat export APPSERVER_HOME=${CATALINA_HOME} export PATH=${JAVA_HOME}/bin:${ANT_HOME}/bin:$PATH # increase memory for production use export JAVA_OPTS="-Xmx512m"
4 of 30

Each time tutorial admin user logs in, this shell script must be sourced. To automate it, source it in .bashrc (BASH) or .cshrc (CSH).
$ . $HOME/SimpleGrid/etc/simplegrid-env.sh
Also, firewall settings must open the port range set by $GLOBUS_TCP_PORT_RANGE (40000-50000 in simplegrid-env.sh).
2.1.5. Database setup
Once MySQL server is installed, two databases should be created: gridsphere and simplegrid.
$ mysql -u root –p mysql> CREATE DATABASE gridsphere; mysql> CREATE DATABASE simplegrid;
In this tutorial, user "root" of the MySQL database server is used. The password for database user "root" must be changed after initializing the database server.
2.1.6. GridSphere deployment
With user environment setup by simplegrid-env.sh, we only need to change database connection configuration in GridSphere source directory (${GRIDSPHERE_DIR}). Part of ${GRIDSPHERE_DIR}/webapps/gridsphere/WEB-INF/CustomPortal/database/hibernate.properties: ## MySQL # download jdbc driver from http://www.mysql.com/downloads/api-jdbc.html hibernate.dialect org.hibernate.dialect.MySQLDialect #hibernate.connection.driver_class org.gjt.mm.mysql.Driver hibernate.connection.driver_class com.mysql.jdbc.Driver hibernate.connection.url jdbc:mysql://localhost/gridsphere hibernate.connection.username root hibernate.connection.password root As indicated in this file, a MySQL JDBC driver jar file (e.g., mysql-connector-java-5.0.5-bin.jar) must be copied to ${CATALINA_HOME}/common/lib/. To deploy GridSphere to tomcat, just do "ant install" in ${GRIDSPHERE_DIR}. Answer "y" to license question and "n" to api-doc question. After successful deployment, start tomcat and create the initial portal admin account (referred as "gisolve-admin"). After logging in with user "gisolve-admin", go to "layout" page and load "loggedin" layout configuration which is empty now. This is where we add SimpleGrid portlets onto portal page later.
5 of 30

$ cd ${GRIDSPHERE_DIR} $ ant install $ ${CATALINA_HOME}/bin/catalina.sh start # open browser and point to http://localhost:8080/gridsphere/gridsphere $ ${CATALINA_HOME}/bin/catalina.sh stop
2.1.7. SimpleGrid deployment
SimpleGrid package deployment includes: • Deploying SimpleGrid portlets into GridSphere container as another Tomcat web
application • Deploying the legacy GIScience DMS (Dynamically Memorized Search)
application to designated TeraGrid sites. DMS executable will be invoked on allocated TeraGrid computing nodes.
• Installing necessary Grid CAs (Certificate Authorities) for Grid authentication and authorization
Three files need to be modified to deploy SimpleGrid to GridSphere/Tomcat: ${SIMPLEGRID_DIR}/simplegrid/build.properties ${SIMPLEGRID_DIR}/simplegrid/webapp/WEB-INF/persistence/hibernate.properties ${SIMPLEGRID_DIR}/simplegrid/webapp/simplegrid.properties In build.properties, change gridsphere.home and gridsphere.build according to the actual ${GRIDSPHERE_DIR}. Modification to hibernate.properties is similar with GridSphere deployment except using “simplegrid” as the MySQL database name. In simplegrid.properties file, change "Security" and "Grid resources" part based on your TeraGrid account name. Here for example, we use TeraGrid GIScience Gateway community account name: gisolve. Part of ${SIMPLEGRID_DIR}/simplegrid/webapp/simplegrid.properties: ... ... # Security grid.myproxy.server = myproxy.teragrid.org grid.myproxy.port = 7512 grid.myproxy.username = gisolve grid.myproxy.proxyfile = storage/grid/x509up_tg07tutorial # Grid resources grid.sites = UC, NCSA, SDSC grid.sites.dmsdir.UC = /home/gisolve/gisolve/DMS grid.sites.dmsdir.NCSA = /home/ac/gisolve/gisolve/DMS grid.sites.dmsdir.SDSC = /users/gisolve/gisolve/DMS ... ...
$ ${CATALINA_HOME}/bin/catalina.sh stop $ cd ${SIMPLEGRID_DIR}/simplegrid/ $ ant install
In ${SIMPLEGRID_DIR}/applications/, install the three binary DMS packages to the
6 of 30

home directory of corresponding training account at UC, NCSA, and SDSC, respectively. This can be done by scp and tar command. After installation, the location of DMS executable is at $HOME/gisolve/DMS/release/. The CA directory is in $HOME/.globus/certificates. The file $HOME/.globus/cog.properties must be modified to reflect the actual location of CA directory. This file is used by Java Cog Kit which is the most commonly used Globus Java API. $HOME/.globus/cog.properties: cacert=/home/tomcat/.globus/certificates/ Now we can start tomcat and login to GridSphere portal with portal admin user
Figure 2. Portal layout configuration in GridSphere "gisolve-admin". To add SimpleGrid portlets, load the "loggedin" layout configuration to display, create two menu tabs, one named "Home" with SimpleGrid User portlet added, the other named "DMS" with SimpleGrid DMS portlet added, then click "save". When clicking "home" on upper right corner, we can see the two SimpleGrid portlets in GridSphere container. When we look at the DMS portlet, we notice that the dataset list is empty. Datasets are supposed to be loaded or generated by DMS users. In this tutorial, we have a sample dataset in ${SIMPLEGRID_DIR}/simplegrid/webapp/storage/samples/. We need to copy the sample dataset to the deployed simplegrid web application in tomcat:
7 of 30

$ cd ${SIMPLEGRID_DIR}/simplegrid/webapp/storage/samples/ $ cp ./sample ${CATALINA_HOME}/webapps/simplegrid/storage/gisolve-admin/dms/datasets/ $ cp ./sample.jpg ${CATALINA_HOME}/webapps/simplegrid/storage/gisolve-admin/dms/images/
Now refresh the web page to display the copied sample dataset and its original visualization image.
Figure 3. SimpleGrid portlets
8 of 30

2.2. Eclipse development environment setup
This section may be of particular interest to science gateway developers. Setting the coding and debugging environment for GridSphere and SimpleGrid in Eclipse facilitates the development process of a science gateway. We will show how to install GridSphere and SimpleGrid as Eclipse projects in the following stepwise fashion. 1. Install Java, Ant, Tomcat, MySQL, and Globus as required. Modify your “simplegrid-env.sh” if necessary. 2. Install Eclipse 3.2.2 or above with at least Java perspective. Before starting Eclipse, be sure to source “simplegrid-env.sh” which sets environmental variables. Eclipse needs these settings to detect external Java and Ant tools. 3. Install sysdeo tomcat plugin for Eclipse. Configure Eclipse to point tomcat setting to your tomcat version and directory ${CATALINA_HOME} (Perspective -> Tomcat). With sysdeo tomcat plugin, your tomcat can be launched and stopped within Eclipse. 4. Install subeclipse plugin for Eclipse. We need this to use svn in Eclipse. Follow the instruction on http://subclipse.tigris.org/ which tells you to add a new eclipse update site to http://subclipse.tigris.org/update_1.2.x . 5. Open your Eclipse, "new" a svn project that says "check out projects from svn". Set svn repository to "https://svn.gridsphere.org/gridsphere" and select "tags/GRIDSPHERE_3_0_5" as module. Then choose "Check out a project configured using New Project Wizard". In the new project wizard, select a common Java project and point output directory to "build/classes" (THIS IS IMPORTANT!). Name the project whatever name you like, say "gs3". 6. After checkout, open project->properties. In "tomcat", check "is a Tomcat project". In "context name", say "gridsphere". In the following 3 checkboxes, check only "Redirect context logger to eclipse console". Set subdirectory to "/webapps/gridsphere". 7. In "libraries" tab, extend TOMCAT_HOME variable ("add variable"->click TOMCAT_HOME -> click "extend") to include ${TOMCAT_HOME}/common/lib/(jasper-runtime.jar, jsp-api.jar, servlet-api.jar) and ${TOMCAT_HOME}/common/endorsed/(*.jar). Add all the jars in ${GRIDSPHERE_HOME}/lib. Add ${ANT_HOME}/lib/ant.jar. 8. In "Order and Export" tab, select all. Then build the project. 9. In "Window -> Preferences -> Tomcat -> Source Path", put the GridSphere project (i.e., gs3) in tomcat plug-in source paths. 10. In package explorer, right click ${GRIDSPHERE_DIR}/build.xml and select "run as -> Ant build...". In ant job configuration "Main" dialog, set base dir to
9 of 30

"${workspace_loc:/gs3}", add one argument "-Dcatalina.home=/usr/portal/apache-tomcat-5.5.23" (the actual path of tomcat varies). In "target" dialog, select "install". In "properties" dialog, uncheck "Use global ...." and add ${GRIDSPHERE_DIR}/build.properties to property file set. Now run "ant build" on this build.xml to deploy GridSphere to tomcat. 11. For SimpleGrid setup in Eclipse, if there are Eclipse project configuration files in ${SIMPLEGRID_DIR}/simplegrid/ (i.e., .classpath and .project. Find it out with command "ls -la"), remove them first. 12. In Eclipse, "new" a regular java project, named "simplegrid", and include ${SIMPLEGRID_DIR}/simplegrid/ as project directory. Remember to set build/classes as output folder. Then open "Project->Properties->Build path". In "Projects" tab, include GridSphere project that was just created (i.e., gs3). In "Libraries" tab, make sure all the jar files in ${SIMPLEGRID_DIR}/simplegrid/lib/ and its subdirectories are included. Then build the created "simplegrid" project. In "Window -> Preferences -> Tomcat -> Source Path", put simplegrid project in tomcat plug-in source paths. 13. Start Tomcat in Eclipse. Now you can use Eclipse debugging features for SimpleGrid and GridSphere source files.
Figure 4. Eclipse setup for SimpleGrid package
10 of 30

3. Using TeraGrid Services for Domain-Specific Computing
In this section, we will learn how to use TeraGrid for a GIScience application example. The goal is to understand basic TeraGrid services and use these services to access TeraGrid resources through a command line exercise. For Grid access, we use Globus Toolkit.
3.1. Example application: DMS
The DMS application which we use as an example of domain-specific scientific computing application is a practical GISolve two-dimensional spatial interpolation application. The overall process of performing a DMS analysis on TeraGrid is:
1. Request an individual or community account on TeraGrid. In this tutorial, TeraGrid training accounts are used. GISolve provides its community account for all GISolve users.
2. Install DMS executables on three TeraGrid sites: UC, NCSA, and SDSC. This step has been done in a previous section. The default path of DMS installation is $HOME/gisolve/DMS. Executables are in $HOME/gisolve/DMS/release/; dataset storage folder is in $HOME/gisolve/DMS/datasets/; DMS results are put in $HOME/gisolve/DMS/results/.
3. Prepare a dataset on a local machine. SimpleGrid package provides a sample dataset in ${SIMPLEGRID_DIR}/simplegrid/webapp/storage/samples/
4. Transfer a specified dataset to a TeraGrid site (e.g., NCSA) 5. Submit a Grid job to the specified TeraGrid site with user chosen parameters 6. The submitted job is scheduled to be executed on one of the computing nodes on
the specified TeraGrid site 7. When the job is finished, the result of analysis is written into the data directory
of DMS installation on the TeraGrid site 8. Transfer the result back to your local machine 9. Visualize the result using the DMS visualization tool which is a Java-based
application in ${SIMPLEGRID_DIR}/simplegrid/lib/viz/ TeraGrid provides a computing software environment (CTSS) through the configuration of softenv. On user's TeraGrid Unix account, the software environment is configured in a file, called .soft, in user's home directory. [email protected]:$HOME/.soft: # Common TeraGrid Software Stack Version 3 (CTSSv3) # Please consult TeraGrid user documentation at # http://www.teragrid.org/userinfo/software/softenv.php # for information on customizing this file. # TeraGrid wide basic software suite @teragrid-basic # TeraGrid wide Globus 4 and Grid software suite @globus-4.0 # Platform recommended development software suite @teragrid-dev [Reference - TeraGrid access]: http://teragrid.org/userinfo/access/index.php
11 of 30
[Reference - TeraGrid software environment]: http://teragrid.org/userinfo/software/ctss.php
3.2. Grid security
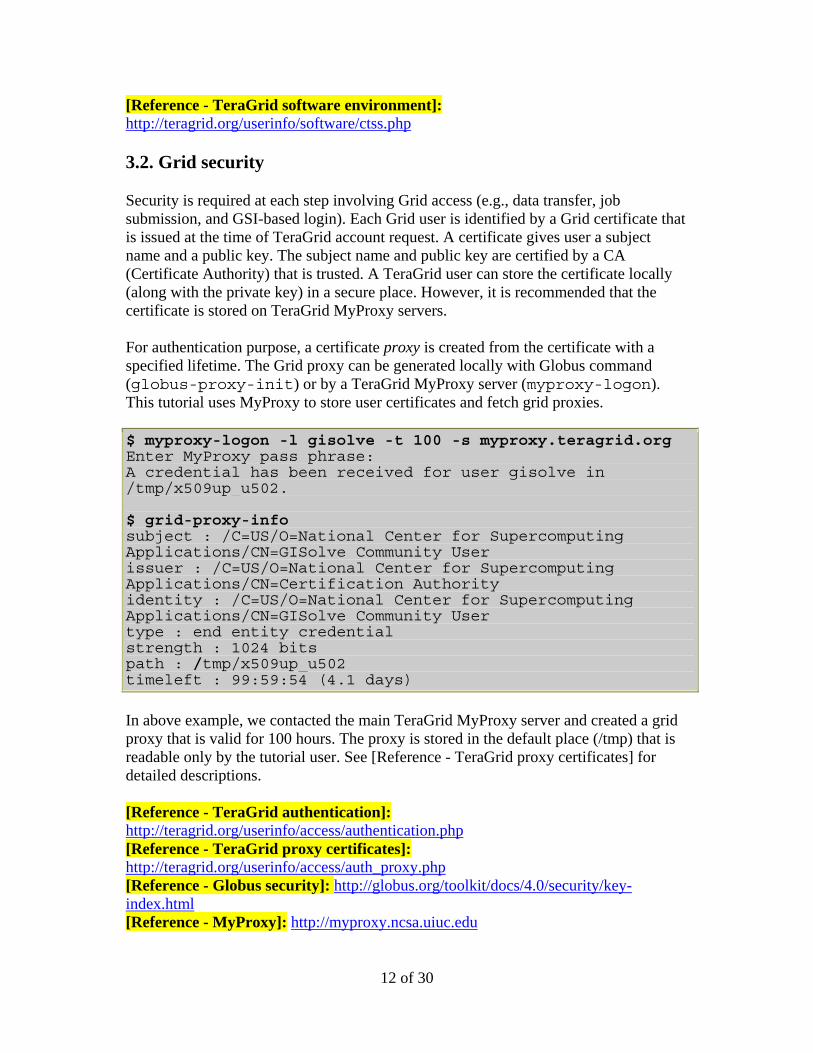
Security is required at each step involving Grid access (e.g., data transfer, job submission, and GSI-based login). Each Grid user is identified by a Grid certificate that is issued at the time of TeraGrid account request. A certificate gives user a subject name and a public key. The subject name and public key are certified by a CA (Certificate Authority) that is trusted. A TeraGrid user can store the certificate locally (along with the private key) in a secure place. However, it is recommended that the certificate is stored on TeraGrid MyProxy servers. For authentication purpose, a certificate proxy is created from the certificate with a specified lifetime. The Grid proxy can be generated locally with Globus command (globus-proxy-init) or by a TeraGrid MyProxy server (myproxy-logon). This tutorial uses MyProxy to store user certificates and fetch grid proxies.
$ myproxy-logon -l gisolve -t 100 -s myproxy.teragrid.org Enter MyProxy pass phrase: A credential has been received for user gisolve in /tmp/x509up_u502. $ grid-proxy-info subject : /C=US/O=National Center for Supercomputing Applications/CN=GISolve Community User issuer : /C=US/O=National Center for Supercomputing Applications/CN=Certification Authority identity : /C=US/O=National Center for Supercomputing Applications/CN=GISolve Community User type : end entity credential strength : 1024 bits path : /tmp/x509up_u502 timeleft : 99:59:54 (4.1 days)
In above example, we contacted the main TeraGrid MyProxy server and created a grid proxy that is valid for 100 hours. The proxy is stored in the default place (/tmp) that is readable only by the tutorial user. See [Reference - TeraGrid proxy certificates] for detailed descriptions. [Reference - TeraGrid authentication]: http://teragrid.org/userinfo/access/authentication.php [Reference - TeraGrid proxy certificates]: http://teragrid.org/userinfo/access/auth_proxy.php [Reference - Globus security]: http://globus.org/toolkit/docs/4.0/security/key-index.html [Reference - MyProxy]: http://myproxy.ncsa.uiuc.edu
12 of 30

3.3. Grid data transfer
When a researcher has his datasets on a local machine, he needs to transfer his datasets to TeraGrid sites for analysis. In this tutorial, with a grid proxy created, we can use GridFTP to transfer a sample dataset within the SimpleGrid to a remote TeraGrid site without inputting any password (authentication is done by the underlying Grid Security Infrastructure (GSI) middleware). Globus provides other data management tools and services. See [Reference - Globus data management] for more details.
$ globus-url-copy file:/home/tomcat/SimpleGrid/simplegrid/webapp/storage/samples/sample gsiftp://gridftp-hg.ncsa.teragrid.org:2811/~/sample1 $ ssh [email protected] tg-login2 ac/gisolve> ls -l sample1 -rw-r--r-- 1 gisolve lpt 1116491 2007-05-29 21:28 sample1 For the proper GridFTP server contact on TeraGrid, see [Reference - TeraGrid GridFTP servers]. [Reference - Globus data management]: http://globus.org/toolkit/docs/4.0/data/key/ [Reference - TeraGrid data transfer]: http://teragrid.org/userinfo/data/transfer.php [Reference - TeraGrid GridFTP servers]: http://teragrid.org/userinfo/data/transfer_location.php [Reference - TeraGrid GridFTP]: http://teragrid.org/userinfo/data/gridftp.php
3.4. Grid job submission and management
After dataset uploaded, we need to compose and submit a Globus job to a designated TeraGrid site (e.g., NCSA) for DMS analysis. We demonstrate both GRAM (GT2) and WS-GRAM (GT4) job submission methods here.
3.4.1. GRAM job submission
Firstly, we put the description of such a job in a Globus job description file in RSL (Resource Specification Language) format: &(jobType="single") (count=1) (host_count="1") (project=TG-SES070007N) (directory="/home/gisolve/gisolve/DMS/release") (executable=/home/gisolve/gisolve/DMS/release/process.pl) (arguments="500" "500" "20" "/home/gisolve/sample1" "/home/gisolve/result1") (stdout="stdout.gisolve.test") (stderr="stderr.gisolve.test")
13 of 30

The explanation of the file:
• count: the number of processes to be requested to run this job • host_count: the number of CPUs to be requested to run this job • project: the name of corresponding TeraGrid project with sufficient allocated
computing time (see [Reference - TeraGrid account and access]) • directory: the base directory of the job • executable: the executable to be invoked • arguments: command line arguments. They are application specific. For DMS, it
takes 5 arguments with the last two specifying input and output files, respectively
• stdout and stderr: file names for job output To submit this job, Globus provides globusrun command. For gateway developers, the batch mode job submission ("-b") is useful because, in a gateway, it is unacceptable to wait and return until job is finished. Instead, we expect the call to job submission returns immediately and the status of the job could be retrieved later. With batch mode, globusrun returns a unique GRAM job handle with which we can use another command globus-job-status to monitor the running status of the job.
$ globusrun -b -f ./gt2.rsl -r grid-hg.ncsa.teragrid.org:2120/jobmanager-pbs globus_gram_client_callback_allow successful GRAM Job submission successful https://tg-grid1.uc.teragrid.org:50004/19686/1180493030/ $ globus-job-status https://tg-grid1.uc.teragrid.org:50004/19686/1180493030/ DONE
The commands above submit the job, specified by RSL file gt2.rsl, to NCSA and use PBS as job scheduler. See [Reference - TeraGrid Globus support] for other TeraGrid site contact and job scheduler information.
3.4.2. WS-GRAM job submission
WS-GRAM is based on Grid service architecture. In the case of WS-GRAM, a job description file is written in XML RSL format. See [Reference - RSL schema] for RSL definition and [Reference - GT2 and GT4 RSL mapping] for the mapping between RSL and XML RSL. <job> <factoryEndpoint xmlns:gram="http://www.globus.org/namespaces/2004/10/gram/job" xmlns:wsa="http://schemas.xmlsoap.org/ws/2004/03/addressing"> <wsa:Address> https://tg-login1.uc.teragrid.org:8443/wsrf/services/ManagedJobFactoryService </wsa:Address> <wsa:ReferenceProperties>
14 of 30

<gram:ResourceID>PBS</gram:ResourceID> </wsa:ReferenceProperties> </factoryEndpoint> <executable>/home/gisolve/gisolve/DMS/release/process.pl</executable> <directory>/home/gisolve/gisolve/DMS/release</directory> <argument>500</argument> <argument>500</argument> <argument>20</argument> <argument>/home/gisolve/sample1</argument> <argument>/home/gisolve/result1</argument> <stdout>/users/gisolve/gisolve/DMS/results/stdout.sample1</stdout> <stderr>/users/gisolve/gisolve/DMS/results/stderr.sample1</stderr> </job>
$ globusrun-ws -submit -b -f gt4.xml Submitting job...Done. Job ID: uuid:1c65da2e-380a-11dc-84b3-0017a478d013 Termination time: 07/23/2007 04:14 GMT <ns00:EndpointReferenceType xmlns:ns00="http://schemas.xmlsoap.org/ws/2004/03/addressing"><ns00:Address>https://tg-login3.ncsa.teragrid.org:8443/wsrf/services/ManagedExecutableJobService</ns00:Address><ns00:ReferenceProperties><ResourceID xmlns="http://www.globus.org/namespaces/2004/10/gram/job">1c65da2e-380a-11dc-84b3-0017a478d013</ResourceID></ns00:ReferenceProperties><wsa:ReferenceParameters xmlns:wsa="http://schemas.xmlsoap.org/ws/2004/03/addressing"/></ns00:EndpointReferenceType> $ vi my.epr $ cat my.epr <ns00:EndpointReferenceType xmlns:ns00="http://schemas.xmlsoap.org/ws/2004/03/addressing"><ns00:Address>https://tg-login3.ncsa.teragrid.org:8443/wsrf/services/ManagedExecutableJobService</ns00:Address><ns00:ReferenceProperties><ResourceID xmlns="http://www.globus.org/namespaces/2004/10/gram/job">1c65da2e-380a-11dc-84b3-0017a478d013</ResourceID></ns00:ReferenceProperties><wsa:ReferenceParameters xmlns:wsa="http://schemas.xmlsoap.org/ws/2004/03/addressing"/></ns00:EndpointReferenceType> $ globusrun-ws -status -job-epr-file my.epr Current job state: Active
Similar to pre-WS GRAM job submission, WS-GRAM job submission command returns a unique id for the job as an EPR entry. With this entry, we can monitor the running status of the job with the same command. [Reference - TeraGrid Globus support]: http://teragrid.org/userinfo/jobs/globus.php [Reference - TeraGrid RSL schema]: http://globus.org/toolkit/docs/4.0/execution/wsgram/schemas/gram_job_description.html [Reference - TeraGrid GT2 and GT4 RSL mapping]: http://www.globus.org/toolkit/docs/4.0/execution/wsgram/WS_GRAM_Migrating_Guide.html
15 of 30

3.4.3. MPI job submission
MPI job submission is similar to batch job submission. TeraGrid supports various MPI software versions. On a TeraGrid site, use “softenv | grep mpi” to check various MPI software environments and choose the proper one for your application. For MPI job submission within a single TeraGrid cluster, we only need to modify the following attributes in the RSL file:
• Specify “count” element in RSL. “count” is the number of MPI processes to be spawned
• Specify “host_count” element in RSL. “host_count” is the number of CPUs for MPI execution. The same number for "count" and "host_count" means each CPU runs one MPI process
• Specify “jobType=mpi”
3.5. DMS analysis summary
After the submitted DMS job is finished, we can use GridFTP to transfer the result to local machine and use local visualization package to view the result image. This completes a straightforward Grid-based DMS analysis workflow. From the perspective of accessing TeraGrid, the following functionalities of TeraGrid command line tools are used in the DMS analysis workflow:
• Grid security. A Grid proxy can be obtained by either local globus-proxy-init command or contacting with a MyProxy server
• Data transfer. GridFTP can be used to transfer datasets between local machine and TeraGrid sites, as well as third party transfer (e.g., between two TeraGrid sites)
• Job submission and monitoring. This includes RSL file composition and GRAM and WS-GRAM job submission and monitoring. Batch mode job submission is desirable for gateway developers
In next chapter, we will see how to implement these functionalities in a programming way in order to write a Grid-enabled DMS analysis application in Java.
4. Automating the Access to TeraGrid Services
In this section, we will learn how to do the things which we have done in previous chapter in a programming way. As a science gateway developer, automating the access to TeraGrid services for Grid-based applications is critical for a large number of scientific computing tasks and providing a seamless and user-friendly interface for domain scientists who are not supposed to understand all the details of Grid computing.
4.1. Grid access API: Java Cog Kit
16 of 30

Java Cog Kit is the most commonly used API for Grid access through Globus. It is included in Globus Toolkit. Most of the Grid access code in this tutorial uses Java Cog API. [Reference - Java Cog Kit]: http://wiki.cogkit.org [Reference - Java Cog manual]: http://www.globus.org/cog/manual-user.pdf
4.2. Source code
The source code of Grid-enabled DMS analysis is in ${SIMPLEGRID_DIR}/simplegrid/src/. This package requires all the jar files (except for servlet.jar) from Globus Toolkit 4.0.3 libraries and puts them under ${SIMPLEGRID_DIR}/simplegrid/lib/globus/. The JFreeChart based visualization is provided as binary jar files in ${SIMPLEGRID_DIR}/simplegrid/lib/viz and ${SIMPLEGRID_DIR}/simplegrid/lib/jfreechart. All the Grid access code is in org.gisolve.demo.grid Java source package. To compile, use "ant compile" under ${SIMPLEGRID_DIR}/simplegrid/.
4.2.1. Grid-related configuration
We use a configuration file (simplegrid.properties) to define the TeraGrid resources we use in SimpleGrid. Part of ${SIMPLEGRID_DIR}/simplegrid/webapp/simplegrid.properties: ## Grid configuration # Security grid.myproxy.server = myproxy.teragrid.org grid.myproxy.port = 7512 grid.myproxy.username = gisolve grid.myproxy.proxyfile = storage/grid/x509up_tg07tutorial # Grid resources grid.sites = UC, NCSA, SDSC grid.sites.dmsdir.UC = /home/gisolve/gisolve/DMS grid.sites.dmsdir.NCSA = /home/ac/gisolve/gisolve/DMS grid.sites.dmsdir.SDSC = /users/gisolve/gisolve/DMS # Data transfer grid.gridftp.UC = tg-gridftp.uc.teragrid.org grid.gridftp.NCSA = tg-login1.ncsa.teragrid.org grid.gridftp.SDSC = tg-login1.sdsc.teragrid.org # Job submission grid.gram.UC = tg-grid1.uc.teragrid.org:2120/jobmanager-pbs grid.gram.NCSA = grid-hg.ncsa.teragrid.org:2120/jobmanager-pbs grid.gram.SDSC = tg-login1.sdsc.teragrid.org/jobmanager-pbs grid.wsgram.UC = https://tg-grid.uc.teragrid.org:8443/wsrf/services/ManagedJobFactoryService grid.wsgram.rm.UC = PBS grid.wsgram.NCSA = https://grid-hg.ncsa.teragrid.org:8443/wsrf/services/ManagedJobFactoryService grid.wsgram.rm.NCSA = PBS grid.wsgram.SDSC = https://tg-login1.sdsc.teragrid.org:8443/wsrf/services/ManagedJobFactoryService grid.wsgram.rm.SDSC = PBS
17 of 30
These settings are straightforward and based on the Grid resource information provided by TeraGrid website. This configuration file is loaded at startup of DMS Java applications.
4.2.2. Grid security: SimpleCred
org.gisolve.demo.grid.security.SimpleCred is the implementation of Grid proxy creation and management. It has two methods to get a Grid proxy:
• load(): Load a local valid proxy file via Globus API (equivalent to globus-proxy-init command)
• logon(): Fetch the proxy file by contacting a MyProxy server defined by SimpleGrid configuration (equivalent to myproxy-logon command).
The get() method tries to load() first. If it failed, logon() method is called. The result of get() is a standard GSSCredential object instance stored as class variable. The export() method saves the GSSCredential instance to a file.
4.2.3. Grid data transfer: SimpleTransfer
org.gisolve.demo.grid.data.SimpleTransfer is a simple wrapup of import org.globus.ftp.GridFTPClient class in Java Cog API. The SimpleTransfer only implements file transferring between local machine and remote TeraGrid site. It takes a valid GSSCredential to authenticate with remote side and provides ftp-like get() and put() for file transfers. Usually, the server side is in passive mode.
4.2.4. Grid job submission: SimpleRSL, SimpleRunGT2, SimpleRunGT4
org.gisolve.demo.grid.job.SimpleRSL is a DMS-specific RSL generation class. But it can be extended to support more generic RSL generation. org.gisolve.demo.grid.job.SimpleRunGT2 is the implementation of GRAM job submission. It is a wrapper over org.globus.gram.GramJob Java Cog API. It takes a standard GSSCredential for authentication with remote sites, and submits a Globus job (execute()), and monitors job status (getStatus()). org.gisolve.demo.grid.job.SimpleRunGT4 is the implementation of WS-GRAM job submission. It is a wrapper over org.globus.exec.client.GramJob (notice the package name difference from GRAM API) Java Cog API. It takes a standard GSSCredential for authentication with remote sites, and submits a Globus job (execute()), and monitors job status (getStatus()). Both per-WS GRAM and WS-GRAM code must use batch mode to submit jobs in order to return immediately. [Reference - WS-GRAM Programming]:
18 of 30
http://www.globus.org/toolkit/docs/4.0/execution/wsgram/developer-index.html#id2563059
4.3. Grid-enabled DMS analysis
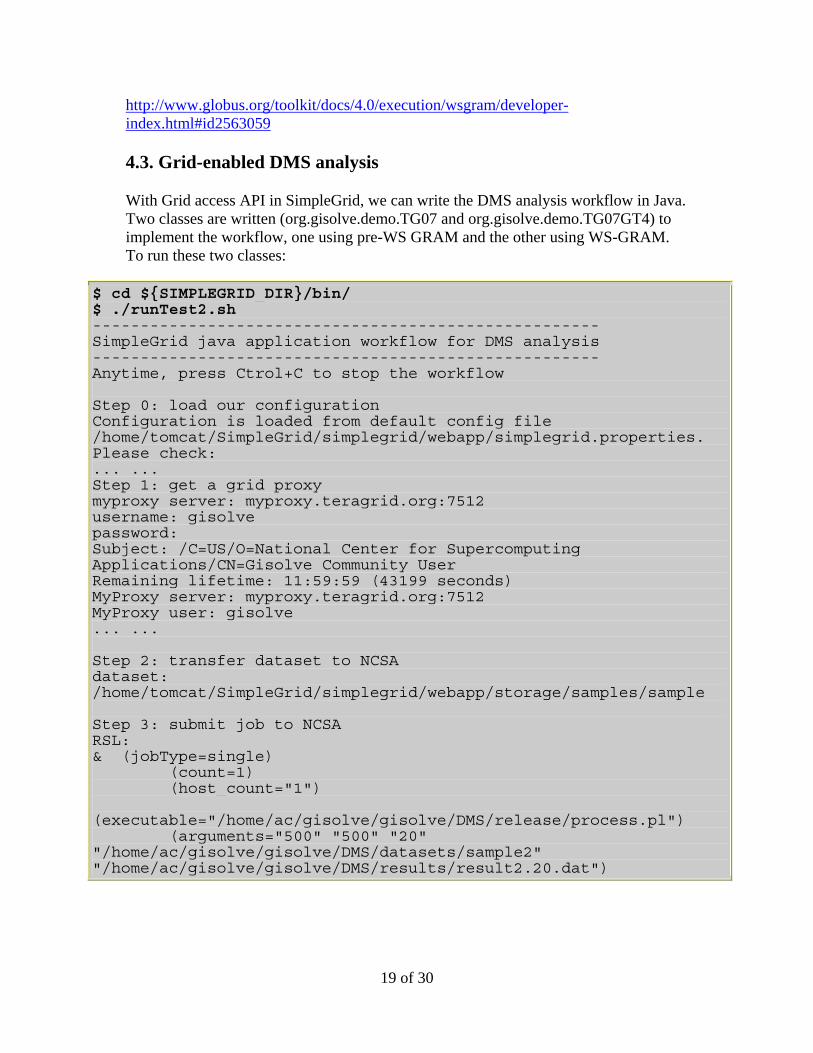
With Grid access API in SimpleGrid, we can write the DMS analysis workflow in Java. Two classes are written (org.gisolve.demo.TG07 and org.gisolve.demo.TG07GT4) to implement the workflow, one using pre-WS GRAM and the other using WS-GRAM. To run these two classes:
$ cd ${SIMPLEGRID_DIR}/bin/ $ ./runTest2.sh ----------------------------------------------------- SimpleGrid java application workflow for DMS analysis ----------------------------------------------------- Anytime, press Ctrol+C to stop the workflow Step 0: load our configuration Configuration is loaded from default config file /home/tomcat/SimpleGrid/simplegrid/webapp/simplegrid.properties. Please check: ... ... Step 1: get a grid proxy myproxy server: myproxy.teragrid.org:7512 username: gisolve password: Subject: /C=US/O=National Center for Supercomputing Applications/CN=Gisolve Community User Remaining lifetime: 11:59:59 (43199 seconds) MyProxy server: myproxy.teragrid.org:7512 MyProxy user: gisolve ... ... Step 2: transfer dataset to NCSA dataset: /home/tomcat/SimpleGrid/simplegrid/webapp/storage/samples/sample Step 3: submit job to NCSA RSL: & (jobType=single) (count=1) (host_count="1") (executable="/home/ac/gisolve/gisolve/DMS/release/process.pl") (arguments="500" "500" "20" "/home/ac/gisolve/gisolve/DMS/datasets/sample2" "/home/ac/gisolve/gisolve/DMS/results/result2.20.dat")
19 of 30

(directory="/home/ac/gisolve/gisolve/DMS/release") (stdout="/home/ac/gisolve/gisolve/DMS/results/stdout.result2.20") (stderr="/home/ac/gisolve/gisolve/DMS/results/stderr.result2.20") globus-job-run: SUCCESS, ghandle: https://tg-login3.ncsa.teragrid.org:42217/19382/1185110206/ Job submitted. ID: https://tg-login3.ncsa.teragrid.org:42217/19382/1185110206/ Job Status: PENDING Job Status: PENDING Job Status: ACTIVE Job Status: ACTIVE Job Status: Error fetching status (meaning dequeued by remote job scheduler) Step 4: transfer result from NCSA result file: /home/ac/gisolve/gisolve/DMS/results/result2.20.dat loaded 48 states boundary box: (-124867,24395) (-66862,49387) loaded US boundary polygon 93 of 93 edges loaded dataset /home/tomcat/SimpleGrid/test2/result2 with 500x500 unit grids boundary box: (-128000,24000) (-65000,50000) $ ./runTest4.sh ... ... Step 3: submit job to NCSA ... ... Job submitted. RSL: <job> <factoryEndpoint xmlns:gram="http://www.globus.org/namespaces/2004/10/gram/job" xmlns:wsa="http://schemas.xmlsoap.org/ws/2004/03/addressing"> <wsa:Address>https://grid-hg.ncsa.teragrid.org:8443/wsrf/services/ManagedJobFactoryService</wsa:Address> <wsa:ReferenceProperties> <gram:ResourceID>PBS</gram:ResourceID> </wsa:ReferenceProperties> </factoryEndpoint> <executable>/home/ac/gisolve/gisolve/DMS/release/process.pl</executable> <directory>/home/ac/gisolve/gisolve/DMS/release</directory> <argument>500</argument> <argument>500</argument> <argument>20</argument>
20 of 30

<argument>/home/ac/gisolve/gisolve/DMS/datasets/sample2</argument> <argument>/home/ac/gisolve/gisolve/DMS/results/result2.20.dat</argument> <stdout>/home/ac/gisolve/gisolve/DMS/results/stdout.result2.20</stdout> <stderr>/home/ac/gisolve/gisolve/DMS/results/stderr.result2.20</stderr> </job> Job submitted. ID: https://tg-login3.ncsa.teragrid.org:8443/wsrf/services/ManagedExecutableJobService?835a2c20-3856-11dc-9499-b87f8313488b ... ...
Illustrations in this section show that automating a scientific computing workflow using Java programming facilitates large-scale computing and avoids errors caused by human factors. In next section, we will show how to port Grid-enabled applications into web application (portal) components (portlets) in order to provide an easy-to-use web portal-based interface for domain-specific scientific computing. By converting Grid-enabled applications into portlets and deploying them into a portal server (portlet container), we will demonstrate the process of building a simple science gateway.
5. Building a community web portal
With the Grid-enabled DMS analysis package developed, it’s ready to build a SimpleGrid-based science gateway by porting the Grid-enabled DMS application into GridSphere as portlets.
5.1. Science gateways
The concept of TeraGrid science gateway features the following capabilities: • Provide an online access point to TeraGrid. Science community users do not
need individual accounts on TeraGrid. Instead, they share a community account. This community account is managed by gateways (Grid portal) so that users can focus on their domain science applications.
• Aggregate domain science application-level capabilities. With a scalable development framework, user applications can be plugged into a gateway as portlets easily (see SimpleGrid interface figure). This framework minimizes the development effort on web interface, request handling, and Grid access. A science gateway is a place holder of such portlets. Although the number of portlets evolves based on development progress and community interest, the gateway is always a single access point for users. For each user, the layout of her/his web interface can be customized based on her/his interests. This involves a configuration of a subset of portlets on portal layout.
21 of 30

• Hide the complexity of using TeraGrid. A gateway can provide Grid access interfaces and capabilities to users. But for domain scientists, their scientific computing demands seamless and transparent access to cyberinfrastructure. This is critical for gateways to be successful in gluing domain science applications and Grids. Often, a workflow can be designed as an abstraction of user's computing process and implemented as a group of portlets controlled by scientific analysis logic. In this tutorial, we follow a step-by-step approach to illustrate how to provide TeraGrid access at each DMS analysis step. But in a practical science gateway workflow, Grid access should be hidden from users.
• Build a Grid portal to meet above needs. Portal provides a highly configurable and deployable container to present user application logic. In this tutorial, we use a JSR-168 compliant portlet container (portal server), GridSphere, to illustrate the development curve of a science gateway.
5.2. JSR-168 Portlet API
JSR-168 is a Portlet API standard specified by the Java Community Process (JCP). This Portlet API aims to achieve interoperability among different portals by defining the standard APIs portlet preferences, portlet requests and responses, packaging and deployment, and security. For more information, see [Reference - JSR-168]. GridSphere is a JSR-168 compliant portal that has been used in several TeraGrid science gateways, including GISolve. See [Reference - GridSphere documentation] for more details on how to use GridSphere in portlet development and portal server setup. This tutorial covers the following features of GridSphere:
• New portlet project creation. The SimpleGrid portlet package is generated in ${SIMPLEGRID_DIR}/simplegrid/ by issuing "ant newproject" command in GridSphere 3.0.5 distribution directory (${GRIDSPHERE_DIR})
• User management. Portal user information is fetched from GridSphere portal server
• Portlet layout management. After SimpleGrid portlets are deployed into tomcat as a web application, it is recognized by GridSphere and added onto portal layout through layout management interface
• Portlet development. GridSphere provides its visual UI for portlet rendering and ActionPortlet class for request handling. We will show how to use them to develop one of the two DMS analysis portlets.
There are functionalities that are not defined in JSR-168 but necessary for portlet development, such as user data access, object persistence, and rendering method. In GridSphere, there are also non-standard content, such as ActionPortlet and portlet service framework (from IBM WebSphere). Other open source portal technologies include Apache Jetspeed/Pluto and Sakai. [Reference - JSR-168]: http://developers.sun.com/portalserver/reference/techart/jsr168/ [Reference - GridSphere documentation]:
22 of 30

http://www.gridsphere.org/gridsphere/gridsphere/guest/docsTab/r/ [Reference - Apache pluto]: http://portals.apache.org/pluto [Reference - sakai]: http://www.sakaiproject.org/
5.3. Portlet development
Using GridSphere, we are now ready to develop the DMS analysis portlets which use our Grid-enabled DMS Java API developed in previous section.
5.3.1. DMS analysis portlet design
For an illustrative purpose of this tutorial, two portlets are designed to port the Grid-enabled DMS Java package into the SimpleGrid portal:
• User portlet. In User portlet, logged in portal user information is displayed, as well as Grid security configuration. TeraGrid certificate proxy is loaded in this User portlet by calling the org.gisolve.demo.grid.security.SimpleCred API. User information is displayed to illustrate how to fetch portal user information in GridSphere. User information is useful for portals using TeraGrid community account which does not differentiate individual users in the community. In community account case, it is the portal's responsibility to manage user data and jobs.
• DMS portlet. DMS portlet provides a web interface for DMS analysis parameter input and job management. In this portlet, a DMS analysis process flows from dataset and parameter selection, job creation, dataset transfer to job submission to TeraGrid, result transfer, and local visualization. A "next" button and text area are used to trigger next stage and show the status of the action. For job submission and data transfer, DMS portlet uses the loaded proxy from the User portlet via inter-portlet communication.
To illustrate alternative technologies that can be used to develop JSR-168 compliant portlets, the User portlet employs GridSphere based method, i.e., ActionPortlet and JSP-based Visual UI while the DMS portlet employs Apache Velocity-based method. Also, we use the User portlet to show the overall process of portlet development.
5.3.2. Portlet packaging and deployment
The source code structure of the DMS portlet project is generated by "ant newproject" in ${GRIDSPHERE_DIR}/. We name the new project as "simplegrid" whose root directory is ${SIMPLEGRID_DIR}/simplegrid/. Under the root directory, the following items need to be mentioned:
• src/org.gisolve.demo.portlets: Portlet action classes • lib/: Libraries for Globus and JFreeChart • webapp/jsp/: JSP pages for user interface rendering • webapp/WEB-INF/persistence/hibernate.properties: Configuration for
backend database access
23 of 30

• webapp/WEB-INF/portlet.xml: Portlet definition of unique portlet id, portlet class, etc.
• webapp/simplegrid.properties: SimpleGrid specific configuration about Grid resources. It is loaded at the first time the UserPortlet is visited
• build.xml: Ant build file to compile, deploy, and install SimpleGrid portlets to GridSphere. It needs to be changed if you have your own libraries or packages developed
• build.properties: Definition of project name and location of GridSphere where SimpleGrid finds dependent GridSphere java classes and PortletAPI (javax.portlet.*) definitions
To deploy the simplegrid project, just do "ant install". This will install simplegrid as a web application in Tomcat. Because GridSphere is also a web application in Tomcat, here comes a question: how does GridSphere know the portlets in simplegrid web application? This is done by "touching" a file, whose name is "simplegrid", in ${CATALINA_HOME}/webapps/gridsphere/WEB-INF/CustomPortal/portlets/. When GridSphere finds the file, it dynamically loads the web application whose name is the file name, i.e., "simplegrid". For the User portlet, ${SIMPLEGRID_DIR}/simplegrid/src/org/gisolve/demo/portlets/UserPortlet.java
5.3.3. Portlet life cycle
First, let us look at a basic portlet class:
import javax.portlet.*; /* GenericPortlet is the base class for all portlet classes */ public class SimplePortlet extends GenericPortlet { /* portlet initialization */ public void init (PortletConfig config) { } /* portlet destroy */ public void destroy ( ) { } /* request handling */ public void processAction (ActionRequest req, ActionResponse res ) { } /* rendering method: default in VIEW mode */ public void doView (RenderRequest req, RenderResponse res ) { } /* rendering method: EDIT mode */ public void doEdit (RenderRequest req, RenderResponse res ) { } /* rendering method: HELP mode */ public void doHelp (RenderRequest req, RenderResponse res ) { } }
24 of 30

Defined in Portlet API, a portlet class is derived from javax.portlet.GenericPortlet class. It is initialized when the portlet is loaded by portal server for the first time through init() method. Portlet page rendering supports three modes: View, Edit, and Help. By default, the doView() method is called to render the page. Upon user actions, such as button clicking, the processAction() method is called to process actions and redirect portlet page based on processing logic. When the portal server removes the portlet, the destroy() method is called to finalize the life cyle of the portlet. PortletRequest (extended to ActionRequest and RenderRequest) and PortletResponse (extended to ActionRequest and ActionResponse) are defined to exchange information between the generic HttpRequest & HttpResponse and portlet container. In rendering, URLs are created through PortletURL class. Implementations of action processing and rendering vary based on different technologies used. In GridSphere, PortletRequest and PortletResponse are contained in ActionFormEvent class. Page rendering, i.e., Visual UI, is a JSP taglib. Therefore, actions are defined in JSP pages and processed by the method with the same action name in portlet class. With Velocity method, we use a modified version of the VelocityPortlet class developed by Indiana University for action processing. Velocity rendering has its own dynamic HTML syntax to link HTTP page to portlet request and response. Rendering pages are written as Velocity templates.
5.3.4. Portlet definition
Portlet API defines a portlet in XML format. Here is the definition of the User portlet (portlet.xml):
<portlet> <!-- place portlet description here --> <description xml:lang="en">SimpleGrid user portlet</description> <!-- place unique portlet name here --> <portlet-name>SimpleGridUserGisolve</portlet-name> <display-name xml:lang="en">SimpleGrid user gisolve</display-name> <!-- place your portlet class name here --> <portlet-class>org.gisolve.demo.portlets.UserPortlet</portlet-class> <expiration-cache>0</expiration-cache> <supports> <mime-type>text/html</mime-type> <portlet-mode>VIEW</portlet-mode> </supports> <supported-locale>en</supported-locale> <portlet-info> <title>SimpleGrid User home for gisolve</title> <short-title>simplegrid-gisolve</short-title> <keywords>simplegrid, gisolve, user</keywords> </portlet-info> </portlet>
25 of 30

Portlet name must be unique across the portal server. Portlet class must be in the classpath of web applications. At least, VIEW mode must be supported in a portlet.
5.3.5. Portlet action processing and rendering
In the User portlet, "simplegrid_user.jsp" is a rendering JSP page. When the User portlet is loaded for the first time, init() method is called in UserPortlet class to set the default rendering method to show(), which sets the view page to the "simplegrid_user.jsp" JSP page. Then, doView() method is called to render the page. In doView(), show() method is called (implicitly). The portal user data is accessed through this line:
User user = (User) req.getAttribute(SportletProperties.PORTLET_USER); Then user data is stored in the PortletRequest instance and eventually is passed to the JSP page for rendering. Note that the User class is GridSphere specific.
Figure 5. User portlet with Grid credential loaded
26 of 30

MyProxy configuration is loaded from simplegrid.properties file and stored in a SimpleCred object at portlet startup time. Before rendering, the SimpleCred object is passed from application scope storage to the PortletRequest object in UserPortlet::show() method as an attribute. In the JSP page, the PortletRequest object instance is implicitly accessible as renderRequest. From there, the MyProxy configuration information is loaded and displayed on screen. In the JSP page, an action is specified: configSimpleCred. This corresponds to the UserPortlet::configSimpleCred() method based on Java name reflection. In configSimpleCred(), input parameters about Grid credentials and MyProxy contact are retrieved through beans contained in ActionFormEvent instance. org.gisolve.demo.grid.security.SimpleCred is called to get a valid proxy. Then the proxy information is displayed in the same JSP page, indicated by the setNextState() call. [Reference - GridSphere Visual UI]: http://www.gridsphere.org/gridsphere/docs/TagGuide/TagGuide.html
5.3.6. Inter-portlet communication
In UserPortlet::configSimpleCred(), a SimpleCred instance is stored in PortletSession as an attribute object. By specifying PortletSession.APPLICATION_SCOPE scope, this object is also accessible in other portlets, e.g., DMS portlet. Therefore, PortletSession provides a way to exchange information among multiple portlets. Of course, another way is that we can use Hibernate to store objects into database and read them in other portlets. In fact, the SimpleCred instance created in the User portlet will be used by the DMS portlet for Grid data transfer and job submission.
5.3.7. Velocity-based DMS portlet development
Velocity is a Model-View-Control (MVC) techonology from Apache for dynamic HTML generation. Velocity rendering starts from writing Velocity templates (in ${SIMPLEGRID_DIR}/simplegrid/webapp/templates/). The DMS portlet is developed using Velocity. There are two templates developed for DMS portlet. “dms-0.vm” is used to provide simple DMS job management and an input interface for users to specify DMS analysis parameters at the time of DMS job creation. “dms-1.vm” is used to display DMS analysis result visualization in the same portlet after a DMS job is finished. DMS portlet definition specifies the default template, i.e., “dms-0.vm”, to be loaded by portal server. In addition, a Velocity configuration file, velocity.properties, must be put in the root directory of the deployed web application for Velocity initialization purpose. When a user triggers an action, the portlet class is called and dispatch the action to the action processing method with appropriate name mapping (from "actionMethod_doSomething" in template to "doSomething()" in extended VelocityPortlet class). In action processing method, input parameters can be retrieved by calling ActionRequest.getParameter() method. To set rendering objects, VelocityContext.put(name, object) method is called to pass object to underlying
27 of 30
HttpRequest. Rendering page navigation and redirection are done by the setTemplate() method.
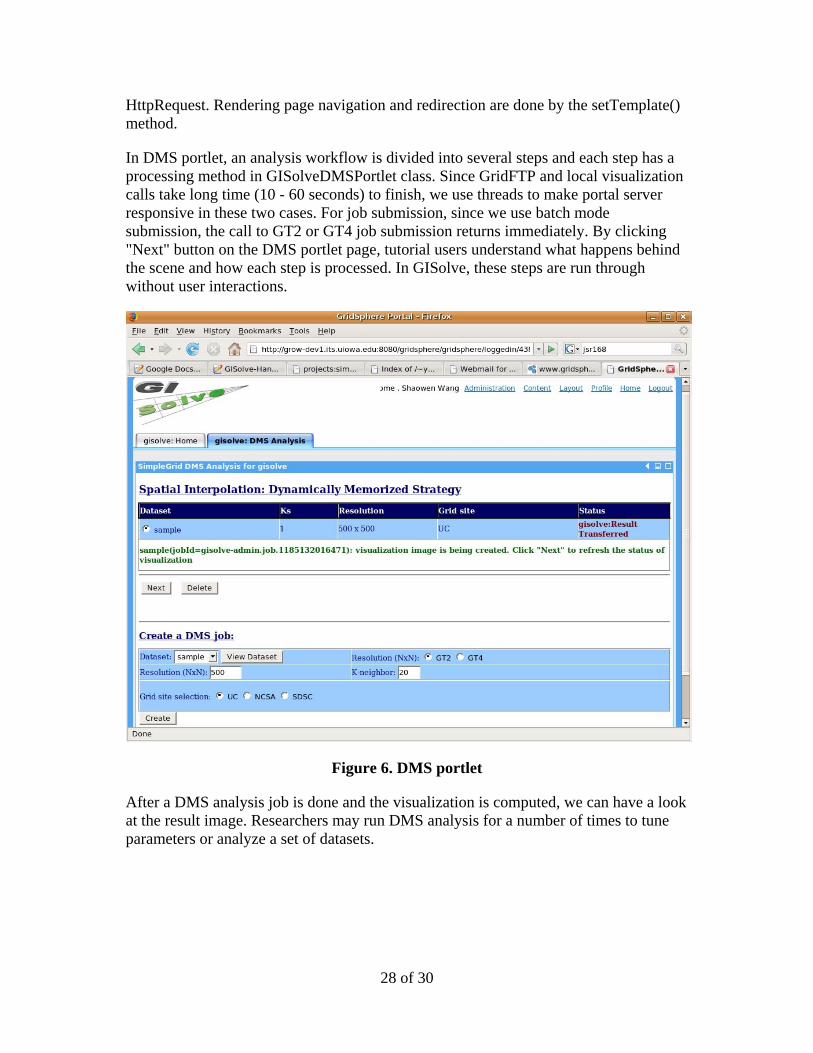
In DMS portlet, an analysis workflow is divided into several steps and each step has a processing method in GISolveDMSPortlet class. Since GridFTP and local visualization calls take long time (10 - 60 seconds) to finish, we use threads to make portal server responsive in these two cases. For job submission, since we use batch mode submission, the call to GT2 or GT4 job submission returns immediately. By clicking "Next" button on the DMS portlet page, tutorial users understand what happens behind the scene and how each step is processed. In GISolve, these steps are run through without user interactions.
Figure 6. DMS portlet
After a DMS analysis job is done and the visualization is computed, we can have a look at the result image. Researchers may run DMS analysis for a number of times to tune parameters or analyze a set of datasets.
28 of 30

Figure 7. DMS visualization
[Reference - Velocity portlet]: http://www.collab-ogce.org/ogce2/velocity-portlets.html [Reference - Velocity manual]: http://velocity.apache.org/engine/releases/velocity-1.5/user-guide.html
6. Concluding discussion
The SimpleGrid toolkit uses a practical GIScience application as an example to illustrate ways in which domain science communities access TeraGrid resources and services for scientific computing, convert applications to be based on Grids, and port applications as portlets into a Grid portal. Through this tutorial, users will be able to understand the basic, but essential components needed to build a TeraGrid science gateway and learn a scalable way to develop and share their applications in a gateway portal. The code in SimpleGrid is modularized, and thus can be directly extracted for a generic science gateway development. Related technologies are carefully referenced so that users can jump quickly from here to the details of each technology for development of sophisticated functions.
29 of 30

Comments and feedbacks are welcome to improve the quality of this document. We plan to include more components as plug-ins in SimpleGrid, as new technologies are explored and developed by us, or contributed by the TeraGrid science gateway development community which is highly encouraged and appreciated.
30 of 30