driver instructions - eatonpub/@eaton/@roadranger/docume… · precautions warnings & cautions...
TRANSCRIPT
Driver Instructions
Fuller Automated TransmissionsTRDR0082September 2007
FO-6406A-ASWFO-8406A-ASW
Video Instruction AvailableInstructional videos are available for download at no charge at roadranger.com
Videos are also available for purchase. To order, call 1-888-386-4636. Ask for item # RRSD0002

Precautions
Warnings & Cautions
Read the entire driver instructions before operating this transmission.
Before starting a vehicle always be seated in the driver's seat, select “N” on the shift control, and set the parking brakes.
If engine cranks in any gear other than neutral, service your vehicle immedi-ately.
Before working on a vehicle, parking the vehicle, or leaving the cab with the engine running, place the transmission in neutral, set the parking brakes, and block the wheels.
For safety reasons, always engage the service brakes, prior to selecting gear positions from "N".
Do not release the parking brake or attempt to select a gear until the air pres-sure is at the correct level.
Before operating the PTO, refer to “Transmission Power Take Off Operation”.
Never coast with the transmission in the neutral position.
Battery (+) and (-) must be disconnected prior to any type of welding on any UltraShift™ equipped vehicle.
WARNING!
CAUTION!

Table of Contents
Introduction
UltraShift™............................................................................................ 1
Basic Operation
Shift Console Positions ......................................................................... 2Gear Display.......................................................................................... 3Start-up and Power Down..................................................................... 4Driving Tips........................................................................................... 5
Additional Operation
Drive Mode............................................................................................ 7Reverse Mode ....................................................................................... 7MANUAL Mode ..................................................................................... 8LOW Mode ............................................................................................ 9Power Take Off Operation ................................................................... 10
Maintenance
Nomenclature...................................................................................... 11Diagnostics ......................................................................................... 12Vehicle Towing.................................................................................... 14Maintaining Oil Level........................................................................... 15

1
Introduction
UltraShift™
Congratulations on your purchase of a vehicle equipped with an Eaton® Fuller® UltraShift automated mechanical transmission. The UltraShift trans-mission provides fully automatic operation (no clutch pedal) using an indus-try-preferred Eaton Fuller manual transmission coupled with electronic modules that automate the shifts. The electronics direct the transmission to make each shift at the ideal engine speed, delivering improved transmission performance and efficiency. The UltraShift offers you the best of both worlds … the driveability and operating efficiency of an automatic, combined with the reliability and serviceability of an industry-proven manual transmission.
Please read this manual carefully to understand how to get the most benefit from your new transmission. Thanks again for purchasing an Eaton Fuller transmission product. We appreciate your business and hope you enjoy the performance benefits of the UltraShift.
Every effort has been made to ensure the accuracy of all information in this brochure. However, Eaton Truck Components makes no expressed or implied warranty or representation based on the enclosed information. Any errors or omissions may be reported to Eaton Truck Components, Technical Service, PO Box 4013, Kalamazoo, MI 49003.

2
Basic Operation
Shift Console Positions
R - Reverse
N - Neutral
D - Drive
MANUAL
LOW
- Upshift
- Downshift
SERVICE
SHIFT
MANUAL
EATON FULLERTRANSMISSIONS
LOW
D
N
R
Service Indicator
PTO Indicator
Button not used
Selects Reverse gear once vehicle speed is less than 2 mph.
N
Low
Manual
R
Service
Up/Down Buttons
D
PTO
Selects Neutral.
Selects the default starting gear and automaticallyselects gears between the starting gear and top gear.
Allows the driver to hold current gear and manuallyselect the appropriate gear for road conditions usingthe up/down buttons.
Transmission downshifts at the earliest opportunityfor maxium engine braking down to the lowestallowable gear, untill MANUAL or Drive is selected.
The service indicator alerts the driver of potentialtransmission problems.
Used in the MANUAL mode to select upshiftsand downshifts.
Power Take Off is activated and transmission is ready for PTO operation.

3
Basic Operation
Gear Display
The Gear Display shows the current gear position of the transmission. The Gear Display will flash the target gear position of the transmission when in neutral during a shift.
Down arrows on the Gear Display indicate the transmission is waiting to verify decreased input shaft speed, before a gear engagement from Neutral can be completed.
The “DASH” indicates the transmission may be torque locked in gear (see Ser-vice and Maintenance Locked in Gear).
5
Satisfactory engagement in 5th gear
Out of gear waiting for engine/trans rpm to reach synchronous
Satisfactory engagement in 6th gear
SOLID FLASHING SOLID
66
2

4
Basic Operation
Start-up and Power Down
Start-up
1. Turn the ignition key to “ON” and allow the UltraShift to power-up. • Engine cranking is delayed until the transmission power-up is
complete and the gear display shows a solid “N”.
2. Start the engine.3. Apply service brake. 4. Select the desired mode and starting gear, on the shift console.5. Release the vehicle parking brakes.6. Release service brake and apply accelerator.
• The transmission is not intended to provide hill-hold capability. The service brakes should be used to stop and hold the vehicle on an incline. To prevent the vehicle from rolling when starting on an incline, place both feet on the brake pedal before sliding the right foot to the throttle pedal. Gradually back off the brake while applying as little throttle as necessary to move along the incline.
Power Down
1. Select Neutral on the shift control.• If gear display does not show solid “N”, neutral has not yet been
obtained.
2. Set the vehicle parking brakes.3. Turn off the ignition key and allow the engine to shut down.

Basic Operation
Driving Tips
Proper Starting GearYou can choose a starting gear appropriate for the load and grade conditions. ASW allows starting in 1st or 2nd.
Skip ShiftingIn the 6-Speed, there are no skip shifts available during up shifting. The sys-tem may skip shift during downshifting.
Optimal Engine BrakingFor optimal engine braking, the LOW mode should be selected while moving. This initiates downshifts as soon as possible.
Cruse ControlThe transmission is totally compatible with Cruise Control.
Coast ModeWhen coasting to a stop, ASW will not finish downshifting until the driver gets back on the throttle. This is normal for the ASW. Never coast with the trans-mission in “N” Neutral.
Load Based ShiftingIn Drive, the ASW will adapt to the changing conditions of the vehicle. Right after power-up or after changing loads, ASW needs to learn the new condi-tions. While learning, it may hold a gear instead of upshifting. Simply push the up button to start the upshift. It may take three or four shifts for the ASW to learn the new conditions. After that it will handle upshifts and downshift auto-matically.
ParkingWhen parking the vehicle, select “N” Neutral on the shift console, set the park-ing brakes and if on an incline, for safety reasons block the wheels before leaving the vehicle.
WARNING: Do not leave the vehicle with “D”, “R”, “LOW”, or “MANUAL” selected on the shift console.
5

Basic Operation
Clutch ProtectionWhen clutch abuse is detected, a warning tone will sound continuously, one second on and one second off, at the same time the gear display will flash a “C” then an “A” followed by the selected gear position. The alarm will continue until the clutch system cools, the throttle is released or the clutch is fully engaged.
Some conditions which may trigger clutch abuse warning:
• Using throttle to hold the vehicle on a grade• Improper start gear for vehicle load• Overloaded vehicle condition• High idle in modes other than “N” Neutral
Note: The transmission is not intended to provide hill-hold capability. The ser-vice brakes should be used to stop and hold the vehicle on an incline. To prevent the vehicle from rolling when starting on an incline, place both feet on the brake pedal before sliding the right foot to the throttle pedal. Gradually back off the brake while applying as little throttle as necessary to move along the incline.
Clutch calibrationThe ASW system automatically adjusts for clutch wear. An automatic calibra-tion occurs each time the unit is powered up when the following conditions are reached: the engine is at normal operating temperature, the vehicle must be stopped, the engine is at idle, neutral is selected on the shift console. Cali-bration may take up to two minutes to complete. You may notice the engine slows and returns to normal idle several times during calibration. It is accept-able to stop calibration by selecting a driving mode.
C A 1
6

7
Additional Operation
Drive Mode
There are two forward starting gears available. While the vehicle is stopped in Drive, the shift buttons are used to change the starting gear. This selection is used until it is changed again, or the ASW is powered down.
The driver can advance a shift (by about 75 RPM) by pressing the proper shift button (up for upshifts, down for downshifts) when the transmission is within 75 RPM of the load based shift point.
The Gear Display shows the status of the shift:
• The current gear is displayed solid.• At the start of the shift, the current gear is displayed solid until the
transmission is pulled to the neutral position.• While the transmission is in neutral and synchronizing for the target
gear, the target gear is flashed.• When the shift is complete, the new current gear is displayed solid.
Reverse Mode
The vehicle speed must be less than 2 mph before Reverse is permitted. If the driver requests Reverse above 2 mph, the shift is not performed until the speed is proper.
8
Additional Operation
MANUAL Mode
MANUAL mode should be used whenever you want to select the shifts instead of letting ASW select them for you. For example, when you are moving around the yard and on certain grade conditions.
Selecting MANUAL from Neutral:
• As described above for Drive mode, the starting gear can be changed in exactly the same way in MANUAL mode.
• If MANUAL mode is selected from a stop, the starting gear is main-tained - no shifts are performed, except for conditions noted in Transmission Manual Override.
• The driver can request shifts using the proper shift button (up for upshifts, down for downshifts). The upshift or downshift is per-formed by the transmission provided the resulting engine speed is not outside of defined limits. For upshifts, the resulting engine speed must be greater than 900 RPM; for downshifts, the resulting engine speed must be less than engine rated speed.
Selecting MANUAL from Drive or LOW while moving:
• If MANUAL mode is selected while moving, the current gear is main-tained - no shifts are performed, except for conditions noted in Transmission Manual Override.
• As described above, the driver can request shifts using the proper shift button (up for upshifts, down for downshifts) within the same limits described.
Transmission Manual Override:
• If the vehicle is being back driven and the engine is approaching a higher than normal level (approximately 300 RPM above rated speed), the ASW overrides the MANUAL position and performs an upshift to prevent engine damage.
• If the gear being maintained is higher than starting gear, and the driver depresses the throttle, the ASW system will override the MAN-UAL mode and shift to the best available gear if the engine lugs excessively.

9
Additional Operation
LOW Mode
LOW mode should be used any time you want to maximize engine braking and minimize the use of the brake pedal, for example when driving down long grades or when coming to a stop.
Selecting LOW from Neutral:
• If LOW mode is selected from Neutral while stopped, the starting gear is always 1st gear. The starting gear cannot be changed in LOW mode.
• If LOW mode is selected from Neutral while stopped, 1st gear is maintained - no shifts are performed, except for conditions noted in Transmission LOW Override.
Selecting LOW from Drive or MANUAL while moving:
• If LOW mode is selected while moving, the current gear is main-tained. No upshifts are performed, except for conditions noted in Transmission LOW Override.
• Downshifts are performed at higher RPM than normal to enhance engine braking. The downshift point is chosen such that the engine speed after the shift is about 50 RPM below engine rated speed.
Transmission LOW Override
• If the vehicle is being back driven and the engine is approaching a higher than normal level (approximately 300 RPM above rated speed), the ASW overrides the LOW position and performs an upshift to prevent engine damage.

10
Application Specific
Power Take Off Operation
Stationary PTO Operation
The transmission countershaft PTO is used in this application.
To engage the PTO for stationary operation perform the following steps:
1. Select “D”, “MANUAL”, or “LOW” on the Shift Control (this stops countershaft rotation for PTO engagement).
2. Select transmission PTO switch.3. Select “N” on the Shift Control.
Mobile PTO operation
The transmission countershaft PTO is used in this application, and provides limited mobile operation in the starting gears.
To engage the PTO for mobile operation perform the following steps:
1. Vehicle must be stopped before engaging PTO.2. Select “MANUAL” on the Shift Control (this stops countershaft rota-
tion for PTO engagement).3. Select PTO switch.4. Select “MANUAL”, “Neutral”, “Reverse”, as required for vehicle
movement.5. Release parking brake.6. Release service brake.
Split shaft PTO Operation (stationary only)
To engage the transmission for split shaft operation perform the following steps:
1. Select “D” on the Shift Control.2. Select PTO switch.
11
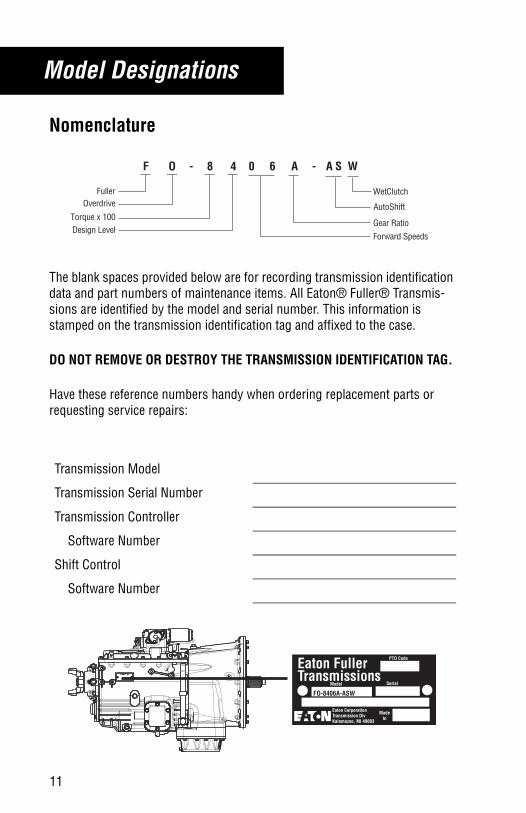
Model Designations
Nomenclature
The blank spaces provided below are for recording transmission identification data and part numbers of maintenance items. All Eaton® Fuller® Transmis-sions are identified by the model and serial number. This information is stamped on the transmission identification tag and affixed to the case.
DO NOT REMOVE OR DESTROY THE TRANSMISSION IDENTIFICATION TAG.
Have these reference numbers handy when ordering replacement parts or requesting service repairs:
Transmission Model
Transmission Serial Number
Transmission Controller
Software Number
Shift Control
Software Number
W
FullerOverdrive
Torque x 100Design Level
AutoShift
Gear Ratio
Forward Speeds
F O 8 0 64- A - A S
WetClutch
Eaton FullerTransmissions
PTO Code
Model Serial
MadeIn
Eaton CorporationTransmission DivKalamazoo, MI 49003
FO-8406A-ASW

Maintenance
Diagnostics
In the event there is a problem with the UltraShift, there are three primary tasks the driver should perform:
1. Note the driving condition under which the problem occurred.2. Note the condition of the UltraShift under which the problem
occurred (i.e. operation mode (Drive, MANUAL, LOW), current gear, engine speed, etc.).
3. Reset system.
Transmission Reset Procedure
In some cases, proper transmission operation can be restored by “resetting” the transmission Electronic Control Unit (ECU). Use the following procedure to reset the ECU:
1. When it is safe to do so, stop the vehicle.2. Place the transmission shift lever in neutral and turn the ignition key
to the “off” position.3. Wait at least 2 minutes.4. Restart the engine.5. If the problem continues, contact a service facility to have the vehicle
and transmission system evaluated.
12
Maintenance
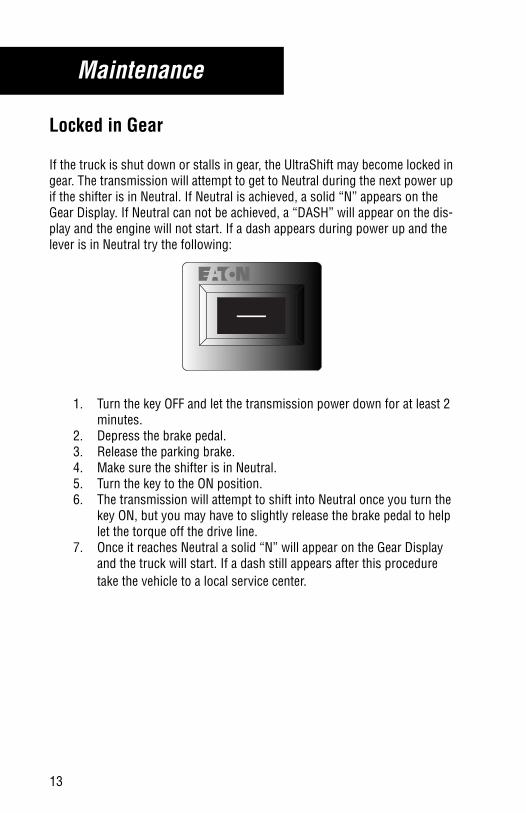
Locked in Gear
If the truck is shut down or stalls in gear, the UltraShift may become locked in gear. The transmission will attempt to get to Neutral during the next power up if the shifter is in Neutral. If Neutral is achieved, a solid “N” appears on the Gear Display. If Neutral can not be achieved, a “DASH” will appear on the dis-play and the engine will not start. If a dash appears during power up and the lever is in Neutral try the following:
1. Turn the key OFF and let the transmission power down for at least 2 minutes.
2. Depress the brake pedal.3. Release the parking brake.4. Make sure the shifter is in Neutral.5. Turn the key to the ON position.6. The transmission will attempt to shift into Neutral once you turn the
key ON, but you may have to slightly release the brake pedal to help let the torque off the drive line.
7. Once it reaches Neutral a solid “N” will appear on the Gear Display and the truck will start. If a dash still appears after this procedure take the vehicle to a local service center.
13

14
Service and Maintenance
Vehicle Towing
When towing the vehicle, the output shaft of the transmission must not be allowed to spin or turn. If the vehicle is towed with the drive wheels still in contact with the road surface, the vehicle axle shafts or driveline must be removed or disconnected.
WARNING: Serious Internal transmission damage can result from improper vehicle towing.
Correct
WRONG

Maintenance
Maintaining Oil Level
WARNING: Before working on a vehicle, place the transmission in neutral, set the parking brake, and block the wheels.
Vehicle should be on level ground when checking oil level.
View of the Oil Dipstick
Checking WetClutch Oil Level
• The Wetclutch fluid is checked using the dipstick located in the engine compartment.
• Place transmission in neutral.• Allow the engine to idle at 700 to 800 RPM for a minimum of two
minutes.• Check WetClutch fluid with engine idling.• Insure transmission temp is 60° to 120°F (16° to 49°C).• WetClutch fluid level is correct if fluid is within the cold band.• If fluid level is below the COLD-ADD mark, then correct fluid level
and check for leaks.
Checking Transmission Oil Level
• Check with engine off.• Remove fill plug on side of gear case.• Oil should be level with the bottom edge of the fill hole.
Proper Oil LevelImproper Oil Level
15

Maintenance
DO NOT MIX OR SUBSTITUTE LUBRICANTS
The WetClutch system uses Synthetic Dexron III to be installed through the fill tube only.
The Gear box system uses Eaton RoadRanger CD50 or equivalent to be installed through the gear case side.
Refer to TCMT-0021 for additional lubrication information.
Operating Temperatures
On vehicles equipped with a transmission oil temperature gauge, the tempera-ture is normally below 225°F; however, intermittent sump temperatures to 250°F do not harm the transmission.
When the average temperature of the transmission oil exceeds the tempera-ture limits as stated above, more frequent oil changes may be needed.
The following conditions in any combination can cause the recommended transmission oil temperatures to be exceeded:
1. Operating the transmission in a "stall" condition; i.e., extended opera-tion while in gear with the vehicle stopped or slowly moving.
2. High density of starts and stops at slow operating speed. 3. Minimal cooler capacity and/or restricted flow to the transmission oil
cooler.4. Exhaust system too close to the transmission.5. Improper oil level/incorrect oil.
Lubrication Change and Inspection
HIGHWAY USE
First 1,000 to 1,500 miles Inspect oil levels at WetClutch dipstick and gearbox. Check for oil leaks.
Every 2,500 miles Inspect oil levels at WetClutch dipstick and gearbox, Check for oil leaks
Every 150,000 miles or every 3 years
Change transmission gear box oil, Change WetClutch system oil and filters.
16


Copyright Eaton Corporation, 2012.Eaton hereby grant their customers,vendors, or distributors permissionto freely copy, reproduce and/ordistribute this document in printedformat. It may be copied only inits entirety without any changes ormodifications. THIS INFORMATIONIS NOT INTENDED FOR SALE ORRESALE, AND THIS NOTICE MUSTREMAIN ON ALL COPIES.
Note: Features and specificationslisted in this document are subject tochange without notice and representthe maximum capabilities of thesoftware and products with all optionsinstalled. Although every attempt hasbeen made to ensure the accuracy ofinformation contained within, Eatonmakes no representation about thecompleteness, correctness or accuracyand assumes no responsibility forany errors or omissions. Features andfunctionality may vary depending onselected options.
For spec’ing or service assistance, call 1-800-826-HELP (4357) or visit www.eaton.com/roadranger.In Mexico, call 001-800-826-4357.
Eaton CorporationVehicle GroupP.O. Box 4013Kalamazoo, MI 49003 USA800-826-HELP (4357)www.eaton.com/roadranger
Printed in USA
Roadranger: Eaton and trusted partners providing the best products and services in the industry, ensuring more time on the road.