dry transfer decals - woodland scenics€¦ · how to apply dry transfer decals ... tips for...
TRANSCRIPT
WOODLAND SCENICS® PO Box 98, Linn Creek, MO 65052 • woodlandscenics.com
DRY TRANSFER DECALS
F6 ©1990 O CO
Conforms to Health Requirements of ASTM D4236This item is not a Children’s Product and is not intended for use by Children.
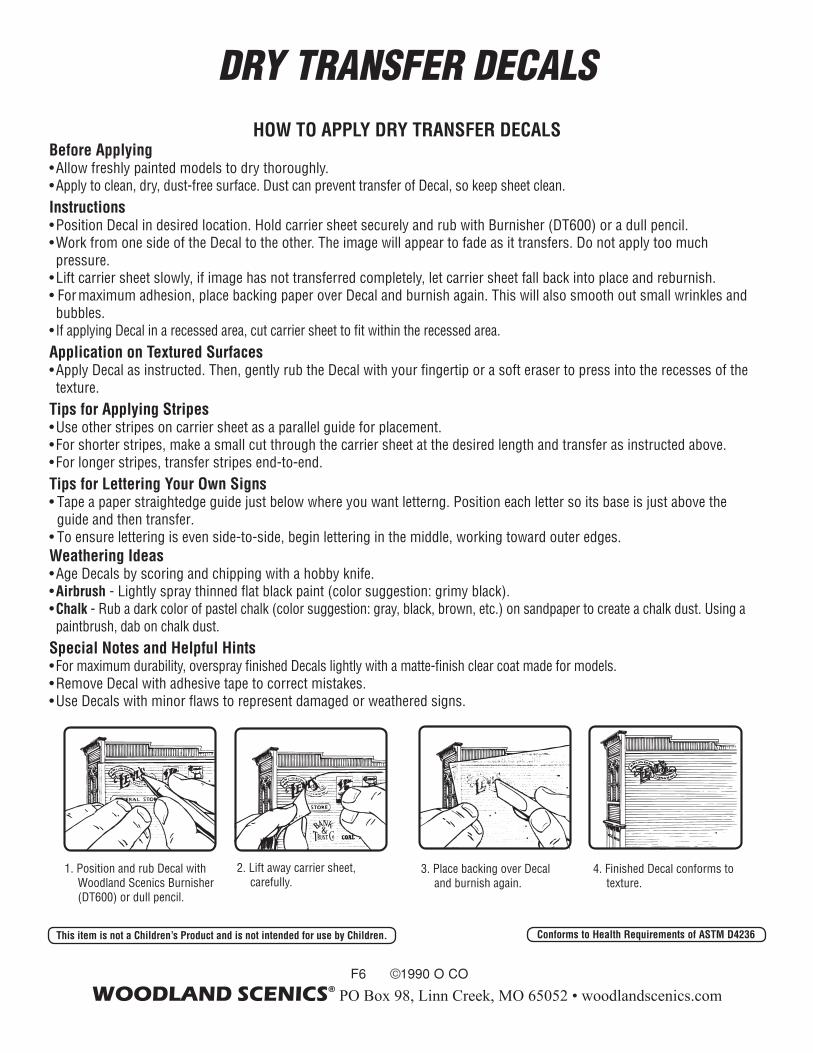
HOW TO APPLY DRY TRANSFER DECALSBefore Applying• Allow freshly painted models to dry thoroughly.• Apply to clean, dry, dust-free surface. Dust can prevent transfer of Decal, so keep sheet clean.Instructions • Position Decal in desired location. Hold carrier sheet securely and rub with Burnisher (DT600) or a dull pencil.• Work from one side of the Decal to the other. The image will appear to fade as it transfers. Do not apply too much pressure.
• Lift carrier sheet slowly, if image has not transferred completely, let carrier sheet fall back into place and reburnish.• For maximum adhesion, place backing paper over Decal and burnish again. This will also smooth out small wrinkles and bubbles.
• If applying Decal in a recessed area, cut carrier sheet to within the recessed area. Application on Textured Surfaces • Apply Decal as instructed. Then, gently rub the Decal with your or a soft eraser to press into the recesses of the texture.
Tips for Applying Stripes• Use other stripes on carrier sheet as a parallel guide for placement.• For shorter stripes, make a small cut through the carrier sheet at the desired length and transfer as instructed above.• For longer stripes, transfer stripes end-to-end.Tips for Lettering Your Own Signs • Tape a paper straightedge guide just below where you want letterng. Position each letter so its base is just above the guide and then transfer.• To ensure lettering is even side-to-side, begin lettering in the middle, working toward outer edges.Weathering Ideas • Age Decals by scoring and chipping with a hobby knife.• Airbrush - Lightly spray thinned black paint (color suggestion: grimy black).• Chalk - Rub a dark color of pastel chalk (color suggestion: gray, black, brown, etc.) on sandpaper to create a chalk dust. Using a paintbrush, dab on chalk dust.
Special Notes and Helpful Hints• For maximum durability, overspray Decals lightly with a clear coat made for models.• Remove Decal with adhesive tape to correct mistakes.• Use Decals with minor to represent damaged or weathered signs.
1. Position and rub Decal with Woodland Scenics Burnisher (DT600) or dull pencil.
2. Lift away carrier sheet, carefully.
3. Place backing over Decal and burnish again.
4. Finished Decal conforms to texture.