drying and preserving plant materials for decorative uses
TRANSCRIPT

CIR495
Drying and Preserving Plant Materials for Decorative Uses1
Sydney Park Brown2
1. This document is CIR495, one of a series of the Environmental Horticulture Department, UF/IFAS Extension. Original publication date November 1981. Revised August 2007, November 2013, December 2016 and April 2020. Visit the EDIS website at https://edis.ifas.ufl.edu. Article originally published by Sydney Park Brown, Patricia White, Benny Tija, and Marion R. Sheehan.
2. Sydney Park Brown, retired associate professor emeritus, Environmental Horticulture Department, UF/IFAS Extension, Gainesville, FL 32611.
The Institute of Food and Agricultural Sciences (IFAS) is an Equal Opportunity Institution authorized to provide research, educational information and other services only to individuals and institutions that function with non-discrimination with respect to race, creed, color, religion, age, disability, sex, sexual orientation, marital status, national origin, political opinions or affiliations. For more information on obtaining other UF/IFAS Extension publications, contact your county’s UF/IFAS Extension office. U.S. Department of Agriculture, UF/IFAS Extension Service, University of Florida, IFAS, Florida A & M University Cooperative Extension Program, and Boards of County Commissioners Cooperating. Nick T. Place, dean for UF/IFAS Extension.
Dried and preserved plant materials are popular for home decor. Dried arrangements (Figure 1), both formal and informal, can preserve the graceful lines, textures, and colors of flowers and foliage with a subtle and gently aged appearance.
Many preserved materials will last almost indefinitely with little care. If they become dusty, a careful whisk with a soft brush is usually sufficient to clean them. Dried materials can be used in vases, baskets, plaques, shadow boxes, and fresh flower arrangements. They also may be used as wall decorations; in wreaths, corsages, and leis; or as decorations on greeting cards and gift boxes. Brandy snifters, candy jars, terrariums, and other glassware provide dramatic displays for dried materials. Pressed flowers and leaves framed under glass take on a fresh, life-like appearance.
HistoryPreserving plant materials in a dried form is not a new idea; it has been considered an art for hundreds of years. Fragrant dried herbs were encased with mummified bodies in Egyptian pyramids. During the Middle Ages, monks dried flowers, foliage, and herbs for use in decorative motifs or for making dyes to color their hand-printed books. Dried flower arrangements have been popular in Europe for centuries, and as early as 1700, colonial Americans used dried flowers to brighten their homes, especially during the dark winter months.
With the development of some new preservation techniques, dried materials no longer have to appear withered and somber gray or brown. Plant materials available commercially, as well as those that can be preserved at home with modern methods, are almost
Figure 1. Arrangement of dried flowers and foliage.Credits: iStock

2Drying and Preserving Plant Materials for Decorative Uses
unbelievably fresh-looking and represent a wide range of colors. Thus new areas of creativity are now open to the artistically-inclined.
Collecting Plant MaterialsAlmost any plant part—flowers, leaves, or stems—can be dried naturally or artificially. Many interesting and decora-tive cones, nuts, gourds, seed pods, flowers, foliage, fruits, and even small, graceful tree branches can be obtained by taking a walk in meadows, woods, or along roadsides. Nature, with its seasonal variability, offers a tremendous diversity of colors, textures, shapes, and sizes of plant materials from which to select, the only limitation being the collector’s imagination. There is no one time of the year to collect materials for drying, since some can be gathered every month and stored for future use. Do not wait until late fall and then try to gather everything all at once.
For best results, all materials gathered should be in excel-lent condition. Approximately twice the volume of plant parts needed should be collected to compensate for the inevitable loss that occurs both in the drying process and the subsequent makeup of a design. Avoid collecting plants when they are moist from dew or irrigation.
Consider the importance of conservation when plants are gathered from the wild. Check with the state park service or other concerned organizations to learn which plants are endangered or protected and therefore should not be touched. For example, gathering sea oat seeds from public lands is against Florida law. Never deplete a population of
plants in an area; instead, leave a clump that will continue to grow.
There are two general categories of dried materials, those collected in an already dry condition and those picked fresh and in need of artificial drying.
Naturally Dry MaterialsSome dry grasses, reeds, pine and other cones, and most seed pods dry naturally. They should be harvested when they are still in good condition, usually in the fall of the year at the end of their growing season, but before they become weathered in appearance. Cattails, however, should be picked when they first turn brown, while flowers are still visible at the top of the spike.
Usually some grooming is all that is necessary for collected materials. However, cones and pods may need to be washed in water and a mild detergent. Fragile seed heads, such as those of pampas grass and mature cattails, may be sprayed with hairspray or other aerosol lacquers or plastics to prevent shattering as they age. (Besides helping to preserve materials, lacquers or shellacs sprayed or painted on fruits and cones give them a shinier, decorative look.) Remove seeds from pine cones to prevent shedding, which may occur at a later time.
Artificial DryingFresh plant materials should be dried by one of several methods described in the following sections. Whichever method is used, the principle of drying flowers or leaves is the same: to remove moisture slowly while at the same time maintaining as much of the original shape and texture as possible.
Generally, fresh materials to be dried or preserved should be picked at midday, when water and food stored in the plant parts are at low levels. Collect foliage at the peak of its growing season, and pick flowers in perfect or near-perfect condition at early maturity, but not quite at full bloom. Avoid flowers that are damaged or defective. Use a sharp knife or shears to cut the material and place them in water to keep them from wilting.
Since stems dry very slowly and add unwanted bulk, remove them from flowers, leaving only an inch or two to which a wire may be fastened. Remove leaves from branches that are to be preserved. Groom foliage so that only the desired portion is dried.
Figure 2. Almost any plant part can be dried naturally or artificially.Credits: iStock

3Drying and Preserving Plant Materials for Decorative Uses
Air DryingThis is by far the simplest and least expensive method used to dry leaves and flowers. It takes little time and skill and nearly always produces satisfactory results. All flowers or stems that are semi-dry and that do not wilt readily can be used. Use a drying rack (an old window screen works fine) for individual specimens or tie flowers in loose bunches with rubber bands or twist-ties and hang upside down in a cool, dry, well-ventilated room. Large flower heads should be hung individually. Do not place the material in a warm oven or in front of electric heaters to speed up the process, because this can be dangerous. Some air circula-tion is necessary to prevent growth of mold and to allow proper drying. Flowers usually take one to three weeks to dry, depending on the thickness of stems and foliage. The fleshier the flowers or foliage, the more time it will take to dry.
Desiccants (Drying Agents)Flowers that wilt must be dried in a supportive substance to preserve their form and shape. There are several methods that can be used for this.
1. SANDThe oldest, least expensive, and still one of the best desic-cants is dry, fine, washed sand that is almost salt free. The major problems with sand are that it is heavy and sometimes bruises delicate petals. It is also slow-acting in comparison to other drying agents. A mixture of 2 parts borax to 1 part sand may be used, adding 1 tablespoon salt to each quart to speed drying.
2. BORAX MIXTURESAlthough borax is relatively inexpensive to buy, it should be used with caution, because prolonged exposure to borax dust may cause eye, skin, and/or lung irritation.
Pure borax may be used for rapid drying, but there is dan-ger of burning and/or bleaching the flower parts, especially with delicate flowers. For a milder drying agent, borax is usually mixed with either white or yellow corn meal. The mixture will not damage delicate flowers if it is used and handled with care. A mixture of one part borax to one part cornmeal mixture is satisfactory for rapid drying; a mixture of one part borax and up to 3 parts cornmeal should suffice for slower drying. Add one tablespoon of salt to each quart of the mix to speed up the drying process.
Borax and borax mixtures can be reused, but the mixture must be dry. Spread in a shallow pan and place in a warm oven (250°–275°), stirring occasionally for about an hour or until it feels dry. Store in an airtight container.
3. SILICA GELSilica gel is the fastest-acting drying agent available and plant materials dried in it retain good color. Silica gel is a lightweight blue crystal with a high water-absorbing capac-ity. It is fairly expensive, but can be used indefinitely, so it is worth the investment for those who continually collect and dry plant materials. Silica gel is the desiccant that is placed in small packets to keep food and moisture-sensitive equip-ment (such as cameras) dry. It may be purchased at hobby and craft shops, from florists and garden supply stores, or from chemical supply sources. Silica gel must be used in an airtight container to be effective. If it becomes saturated with moisture from the air, it will not have the capacity to dry plant materials.
As silica gel absorbs moisture, it turns pale blue-gray or pinkish gray and must be dried again by placing it in an oven. Spread in a shallow pan, place in a warm oven (250°–275°), stirring occasionally until it returns to its original bright blue color. Store silica gel in an airtight container until it is used again.
4. OTHER DESICCANTSOther desiccants that may be used include expanded clay, kitty litter, perlite, dry sawdust, and cornstarch. A mixture of 4 parts cornmeal and 2 parts dry detergent with or without the addition of 1 part borax may also be used.
Figure 3. Air drying is a simple and inexpensive method for drying certain plant parts.Credits: Anja Jerin/iStock/Thinkstock, ©Anja Jerin

4Drying and Preserving Plant Materials for Decorative Uses
HOW TO USE DESICCANTSChoose boxes, cans, or other containers that will hold the flowers without leaving too much excess space, but that will prevent crowding or bending of parts (Figure 4). Flower spikes will require an elongated container such as a florist’s box. Dome-shaped flowers fit into almost any container. Plants dried in borax mixtures should be left uncovered to allow for faster drying and good air circulation. Silica gel requires an airtight container such as a can with a tight lid, a plastic storage container, or a plastic bag.
Place 1/2 inch to 1 inch of the drying agent in the bottom of the container. Place the first layer of flowers on top. If you have attached wires to their stems, bend the wires to fit the container. Flat-faced flowers such as daisies may be placed face down; all others face up. Be sure that flowers are spread apart so that they do not touch or overlap. Sift some of the drying agent over and around the flowers, being careful to retain their form by keeping petals in their natural posi-tions. Cover the layer 1/2 inch to 1 inch deep with desiccant and position a second layer of flowers in the container. Continue in this manner allowing space at the top to cover the last layer 1/2 inch deep with desiccant. Cover the container and do not disturb. Check for drying, using Table 1 for minimum times.
Drying is complete when flowers are crisp and dry to the touch, but not brittle. The thickest parts are slowest to dry. If only the petals are completely dry, you may remove
the flowers and complete the drying process using the air drying method.
To remove dried materials, gently brush the drying agent away with a soft paint brush. Then lift the flowers out. It is best to handle the flower by the wire that was attached to the stem. Shake off any remaining desiccant or brush it away with an artist’s or make up brush.
To prevent shattering, you may need to drop a dab of white or clear glue on the bases of the petals of some flowers either before or after drying. If you apply glue before dry-ing, allow it to dry completely before you place the flowers in a desiccant.
If flowers become misshapen in spite of careful burying in the desiccant, steam them lightly and quickly rearrange the petals.
Microwave DryingUsing a microwave oven for drying flowers is another method to preserve flowers and other plant materials. Microwave drying, which takes only a few minutes in the oven, provides material that looks fresher and more colorful than that obtained by other methods.
Do not use wire or any metal materials. To retain the flowers’ natural forms, put them in a supportive substance before placing them in the microwave oven. Silica gel, borax mixtures, and expanded clay cat litter all work well, though silica gel is the preferred substance. Use only glass, microwave-safe paper, or other microwave-approved containers to hold the flowers and desiccants. Do not cover the container. Always place a small cup of water in the oven before cooking to prevent excessive drying.
Cooking times vary, depending on the characteristics of the leaf or flower. After cooking, allow the water to cool and leave the flowers in the drying agent for several hours. Some specimens need an overnight standing period.
When using a microwave oven, experiment with length of cooking time and length of time that the dried flowers should remain in the desiccant before you remove them. Table 2 contains some suggestions on microwaving and standing times for specific flowers.
PressingThe colors and forms of many leaves and some flowers can be preserved by placing them between layers of newspaper or pages of a catalog and weighting the top with a heavy
Figure 4. Choose appropriate containers when using desiccants.Credits: Dorling Kindersley/Dorling Kindersley RF/Thinkstock
5Drying and Preserving Plant Materials for Decorative Uses
flat object. Foliage should dry within one week, flowers in two weeks. Wires can be added to stems later for ease of arranging.
Flat or single flowers work best; double or thick ones may mold before they dry. Sprays of small flowers may be readily pressed and dried. Ferns dry well in this manner, as do branches of thin-leaved foliage and leaves, such as maple and oak, which are especially attractive when in fall color.
Freeze DryingFreeze drying plants and flowers typically results in the most natural-looking preserved materials. However, this approach requires specialized and expensive equipment and is best accomplished by professionals.
Special Preservation Techniques“Glycerin”Glycerin, available through drug stores, can be used to pre-serve foliage. Although stems and leaves turn brown in this process, they will remain flexible and pliable indefinitely.
Cut stems in the morning when they are fully hydrated and place them 2–4 inches deep in a mixture of 1 part glycerin to 2 parts water. The glycerin solution will be absorbed up the stem and into the leaves slowly, turning them brown as it moves up. When the entire branch is brown, remove it from the glycerin. You may need to add more of the solu-tion to the container if it has all been absorbed before the process is complete. Average time for this treatment is 2 to
3 weeks, but it can take several weeks longer. This method is best suited for preserving foliage of plants such as magnolia, ligustrum, and other broad-leaved evergreens.
Other plant materials absorb glycerin through the leaf surface and can be submerged in a 1:1 solution of water and glycerin for 2 weeks or until the leaf parts have changed color. This can be done with ferns and with single leaves of magnolia, poplar, and palmetto.
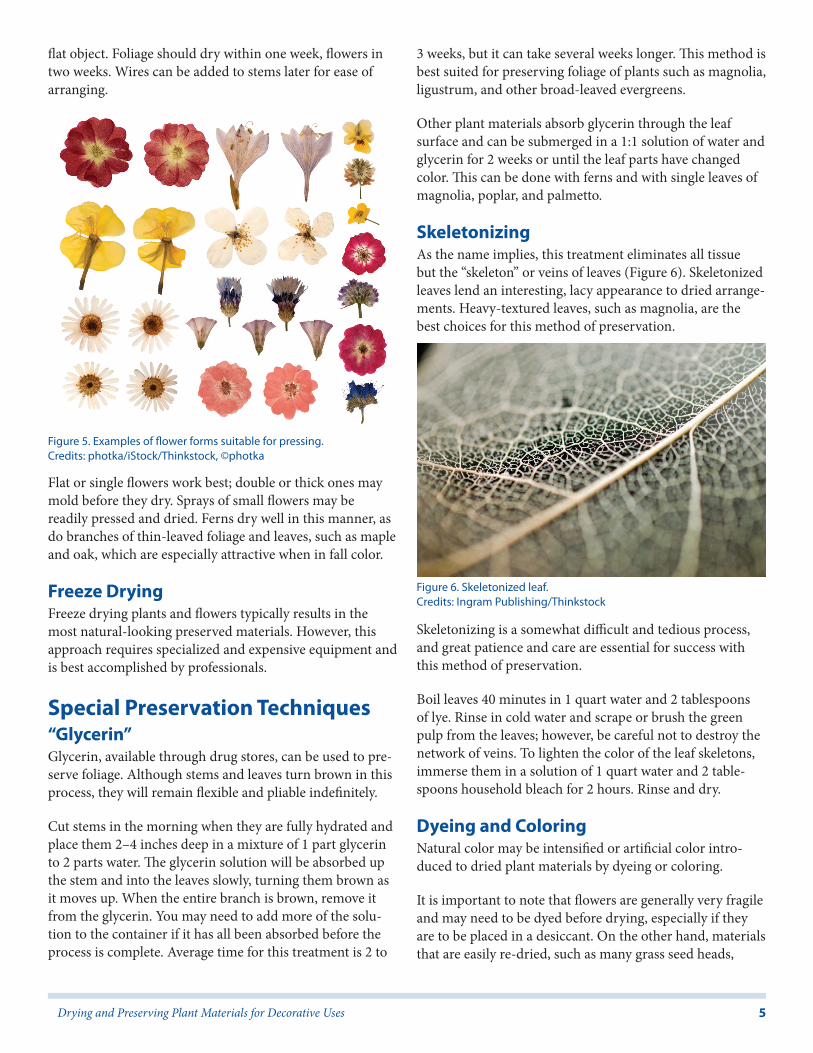
SkeletonizingAs the name implies, this treatment eliminates all tissue but the “skeleton” or veins of leaves (Figure 6). Skeletonized leaves lend an interesting, lacy appearance to dried arrange-ments. Heavy-textured leaves, such as magnolia, are the best choices for this method of preservation.
Skeletonizing is a somewhat difficult and tedious process, and great patience and care are essential for success with this method of preservation.
Boil leaves 40 minutes in 1 quart water and 2 tablespoons of lye. Rinse in cold water and scrape or brush the green pulp from the leaves; however, be careful not to destroy the network of veins. To lighten the color of the leaf skeletons, immerse them in a solution of 1 quart water and 2 table-spoons household bleach for 2 hours. Rinse and dry.
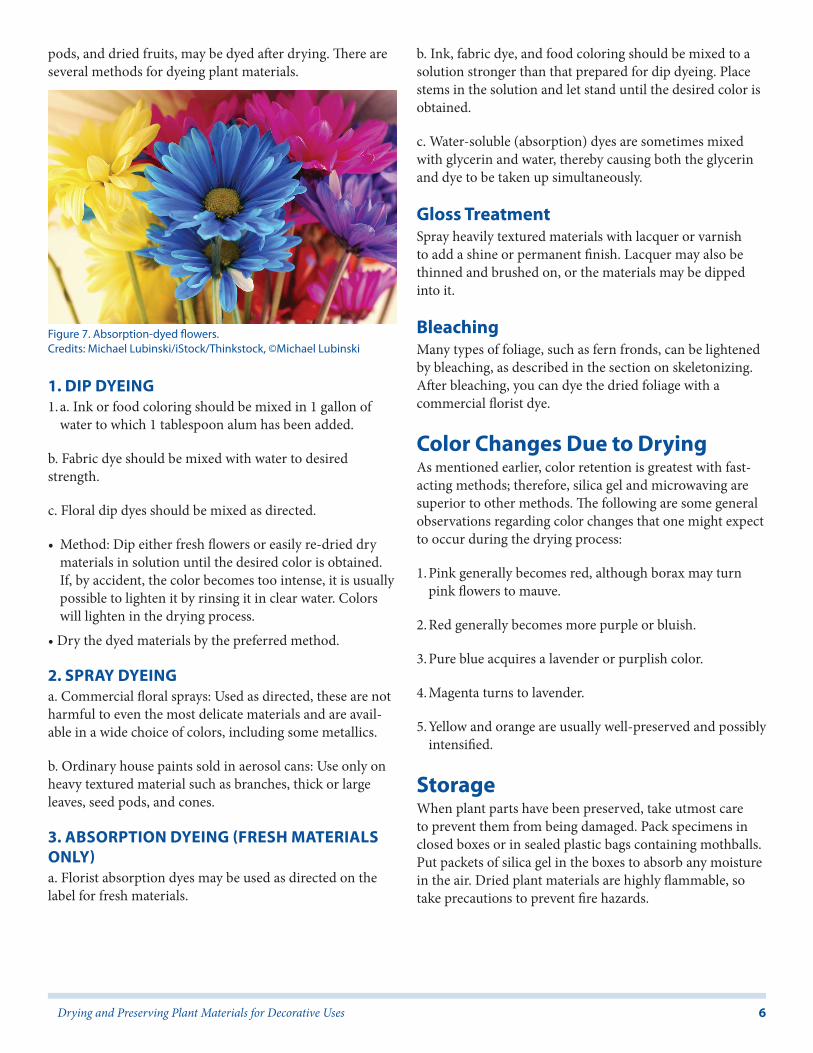
Dyeing and ColoringNatural color may be intensified or artificial color intro-duced to dried plant materials by dyeing or coloring.
It is important to note that flowers are generally very fragile and may need to be dyed before drying, especially if they are to be placed in a desiccant. On the other hand, materials that are easily re-dried, such as many grass seed heads,
Figure 5. Examples of flower forms suitable for pressing.Credits: photka/iStock/Thinkstock, ©photka
Figure 6. Skeletonized leaf.Credits: Ingram Publishing/Thinkstock
6Drying and Preserving Plant Materials for Decorative Uses
pods, and dried fruits, may be dyed after drying. There are several methods for dyeing plant materials.
1. DIP DYEING1. a. Ink or food coloring should be mixed in 1 gallon of
water to which 1 tablespoon alum has been added.
b. Fabric dye should be mixed with water to desired strength.
c. Floral dip dyes should be mixed as directed.
• Method: Dip either fresh flowers or easily re-dried dry materials in solution until the desired color is obtained. If, by accident, the color becomes too intense, it is usually possible to lighten it by rinsing it in clear water. Colors will lighten in the drying process.
• Dry the dyed materials by the preferred method.
2. SPRAY DYEINGa. Commercial floral sprays: Used as directed, these are not harmful to even the most delicate materials and are avail-able in a wide choice of colors, including some metallics.
b. Ordinary house paints sold in aerosol cans: Use only on heavy textured material such as branches, thick or large leaves, seed pods, and cones.
3. ABSORPTION DYEING (FRESH MATERIALS ONLY)a. Florist absorption dyes may be used as directed on the label for fresh materials.
b. Ink, fabric dye, and food coloring should be mixed to a solution stronger than that prepared for dip dyeing. Place stems in the solution and let stand until the desired color is obtained.
c. Water-soluble (absorption) dyes are sometimes mixed with glycerin and water, thereby causing both the glycerin and dye to be taken up simultaneously.
Gloss TreatmentSpray heavily textured materials with lacquer or varnish to add a shine or permanent finish. Lacquer may also be thinned and brushed on, or the materials may be dipped into it.
BleachingMany types of foliage, such as fern fronds, can be lightened by bleaching, as described in the section on skeletonizing. After bleaching, you can dye the dried foliage with a commercial florist dye.
Color Changes Due to DryingAs mentioned earlier, color retention is greatest with fast-acting methods; therefore, silica gel and microwaving are superior to other methods. The following are some general observations regarding color changes that one might expect to occur during the drying process:
1. Pink generally becomes red, although borax may turn pink flowers to mauve.
2. Red generally becomes more purple or bluish.
3. Pure blue acquires a lavender or purplish color.
4. Magenta turns to lavender.
5. Yellow and orange are usually well-preserved and possibly intensified.
StorageWhen plant parts have been preserved, take utmost care to prevent them from being damaged. Pack specimens in closed boxes or in sealed plastic bags containing mothballs. Put packets of silica gel in the boxes to absorb any moisture in the air. Dried plant materials are highly flammable, so take precautions to prevent fire hazards.
Figure 7. Absorption-dyed flowers.Credits: Michael Lubinski/iStock/Thinkstock, ©Michael Lubinski

7Drying and Preserving Plant Materials for Decorative Uses
AcknowledgementsFormer faculty that contributed to earlier versions of this publication include Patricia White, former graduate assistant; Benny Tjia, former associate professor, Extension Floriculture Specialist; Marion R. Sheehan, former visiting assistant professor; Environmental Horticulture Depart-ment, UF/IFAS Extension, Gainesville, FL.
Table 1. Guide for minimum times.Flower or leaf thickness Minimum times
Silica gel
Thin textures 2 days
Medium textures 3–4 days
Heavy textures 5–7 days
Other desiccants
Thin textures 4–5 days
Medium textures 6–9 days
Heavy textures 10–14 days
Table 2. Suggested microwave cooking and standing times for specific flowers.Flower Cooking time Standing time
Roses 2 1/2 min. overnight
Daisy-type flowers: zinnias, marigolds, daisies, chrysanthemums 1 1/2 min. 10 hours
Carnations 1 1/2 min. 10 hours
Large dahlias 3 min. 36 hours
Large chrysanthemums 3 min. 36 hours
Peonies 3 min. 36 hours
Small orchids 1 1/2 min. 24 hours
Large orchids 2 1/2 min. 24 hours