dslr astroimaging - tutorial - holland observatory · coma corrector without with ... large disc...
TRANSCRIPT
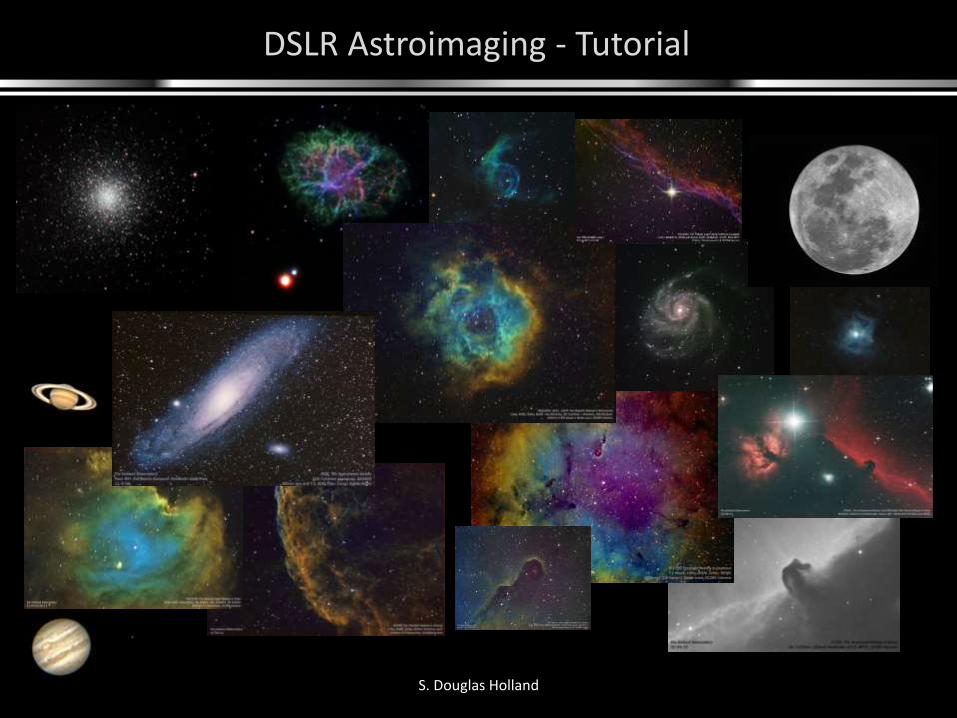
DSLR Astroimaging - Tutorial
S. Douglas Holland

DSLR Astroimaging - Tutorial
S. Douglas Holland
A step-by-step approach to Astroimaging:The steps required to take this image =>
DSLR Astroimaging - Tutorial
S. Douglas Holland
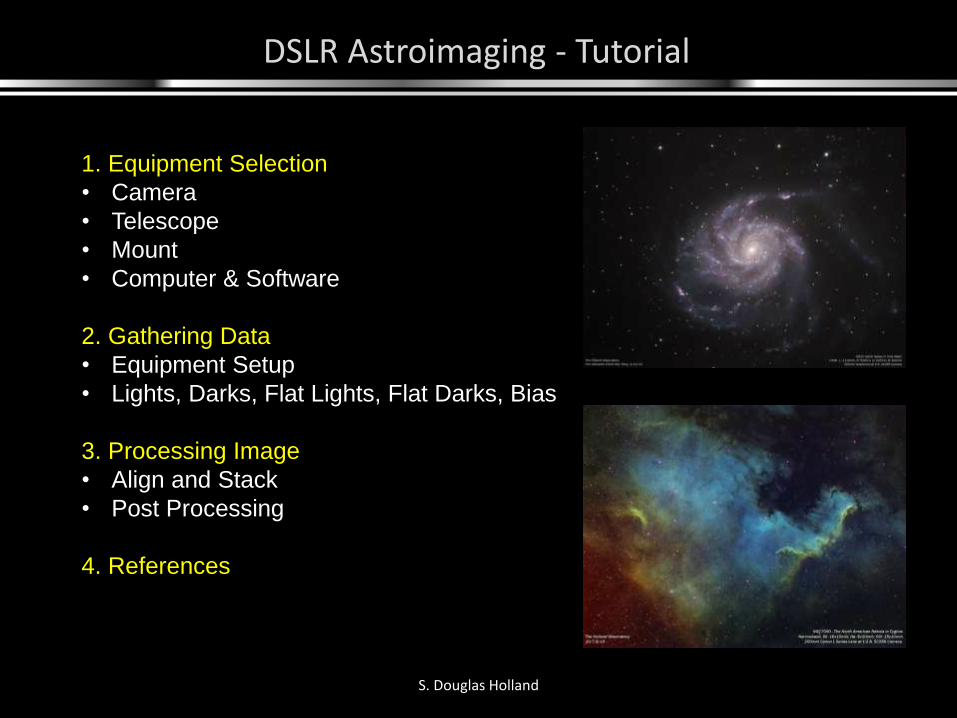
1. Equipment Selection
• Camera
• Telescope
• Mount
• Computer & Software
2. Gathering Data
• Equipment Setup
• Lights, Darks, Flat Lights, Flat Darks, Bias
3. Processing Image
• Align and Stack
• Post Processing
4. References
DSLR Astroimaging - Tutorial
S. Douglas Holland
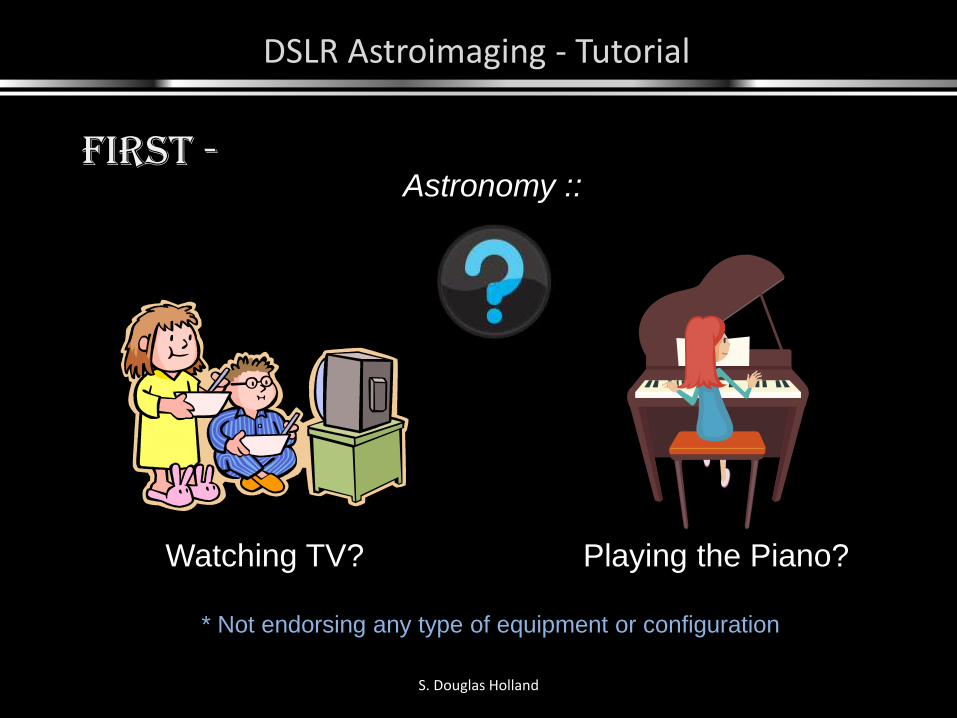
First -
Watching TV? Playing the Piano?
Astronomy ::
* Not endorsing any type of equipment or configuration
DSLR Astroimaging - Tutorial
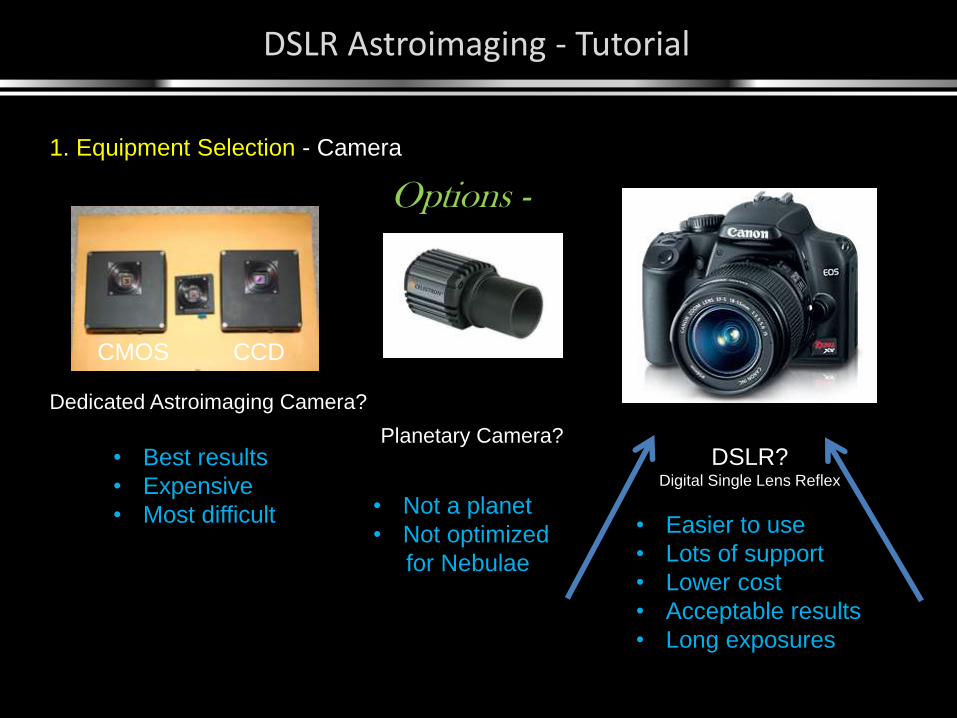
1. Equipment Selection - Camera
CMOS CCD
Options -
Dedicated Astroimaging Camera?
Planetary Camera?DSLR?
Digital Single Lens Reflex
• Best results
• Expensive
• Most difficult • Not a planet
• Not optimized
for Nebulae
• Easier to use
• Lots of support
• Lower cost
• Acceptable results
• Long exposures
DSLR Astroimaging - Tutorial
S. Douglas Holland
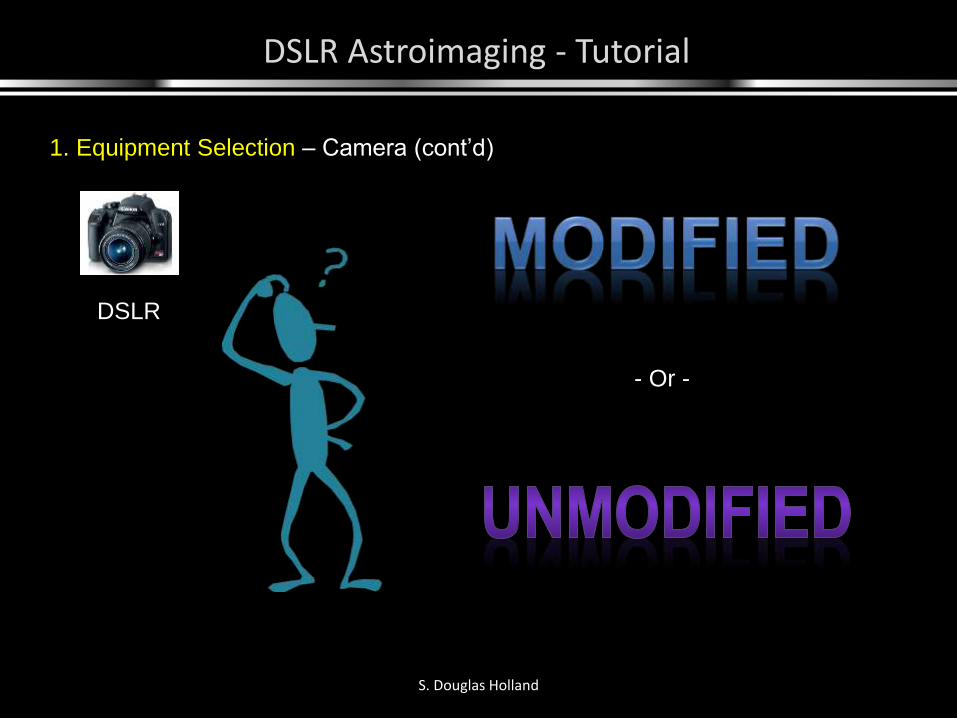
1. Equipment Selection – Camera (cont’d)
- Or -
DSLR
DSLR Astroimaging - Tutorial
S. Douglas Holland
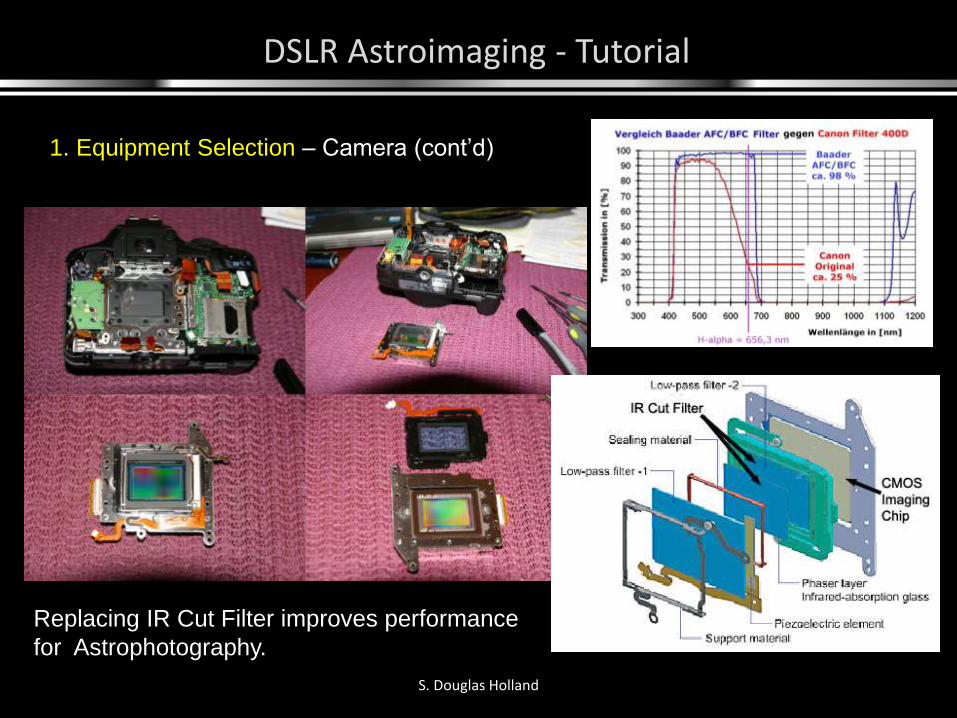
1. Equipment Selection – Camera (cont’d)
Replacing IR Cut Filter improves performance
for Astrophotography.
DSLR Astroimaging - Tutorial
S. Douglas Holland
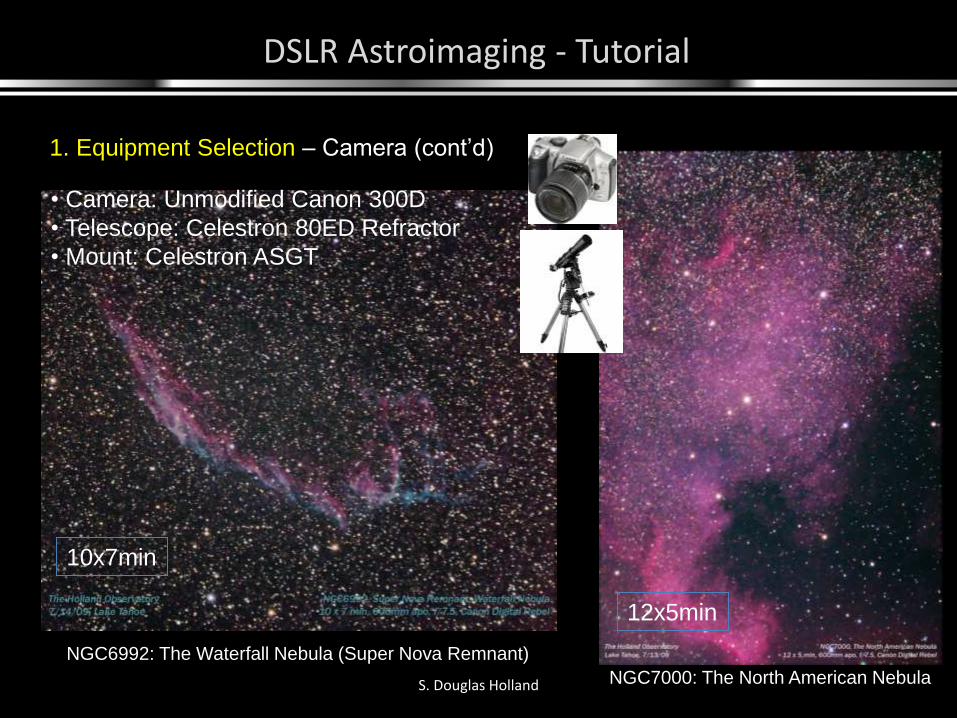
1. Equipment Selection – Camera (cont’d)
NGC6992: The Waterfall Nebula (Super Nova Remnant)
NGC7000: The North American Nebula
• Camera: Unmodified Canon 300D
• Telescope: Celestron 80ED Refractor
• Mount: Celestron ASGT
10x7min
12x5min
DSLR Astroimaging - Tutorial
S. Douglas Holland
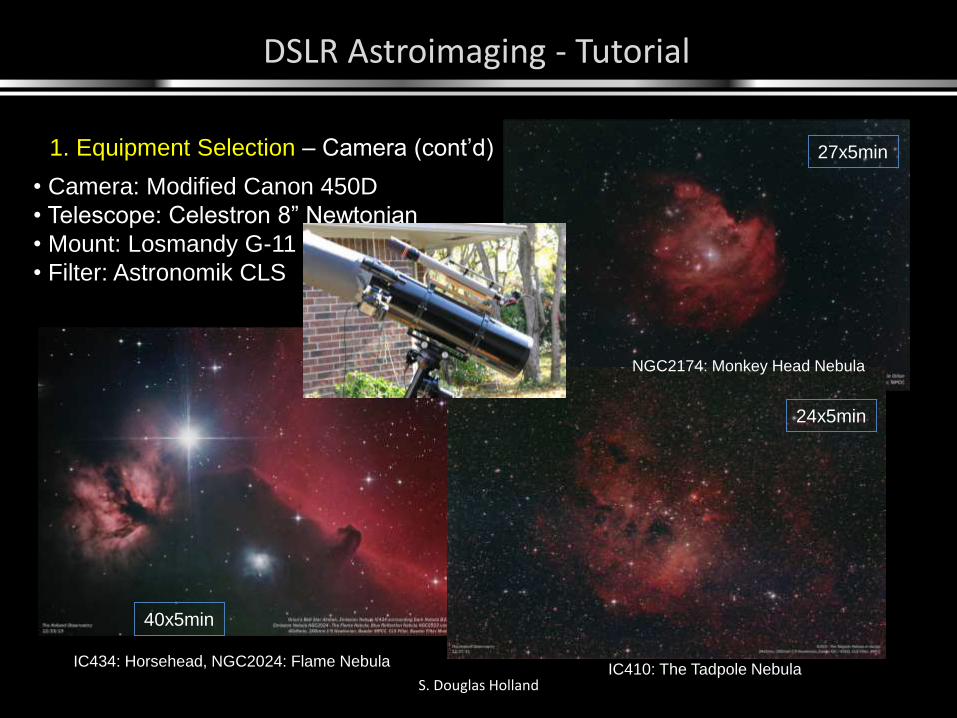
1. Equipment Selection – Camera (cont’d)
IC434: Horsehead, NGC2024: Flame Nebula
NGC2174: Monkey Head Nebula
IC410: The Tadpole Nebula
40x5min
27x5min
24x5min
• Camera: Modified Canon 450D
• Telescope: Celestron 8” Newtonian
• Mount: Losmandy G-11
• Filter: Astronomik CLS
DSLR Astroimaging - Tutorial
S. Douglas Holland
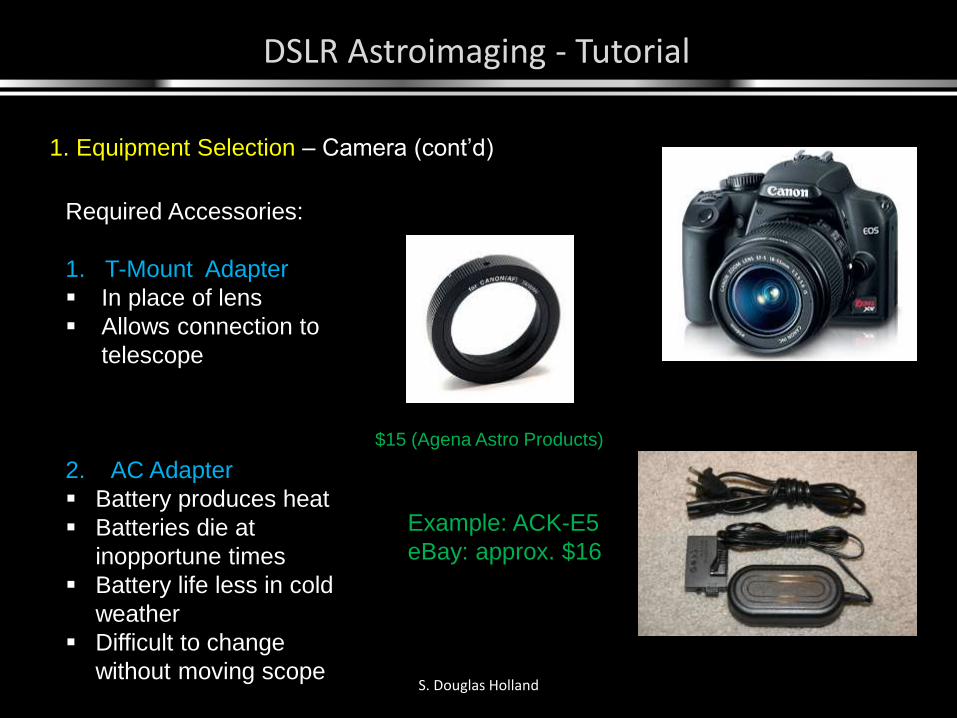
1. Equipment Selection – Camera (cont’d)
Required Accessories:
1. T-Mount Adapter
In place of lens
Allows connection to
telescope
2. AC Adapter
Battery produces heat
Batteries die at
inopportune times
Battery life less in cold
weather
Difficult to change
without moving scope
$15 (Agena Astro Products)
Example: ACK-E5
eBay: approx. $16
DSLR Astroimaging - Tutorial
S. Douglas Holland
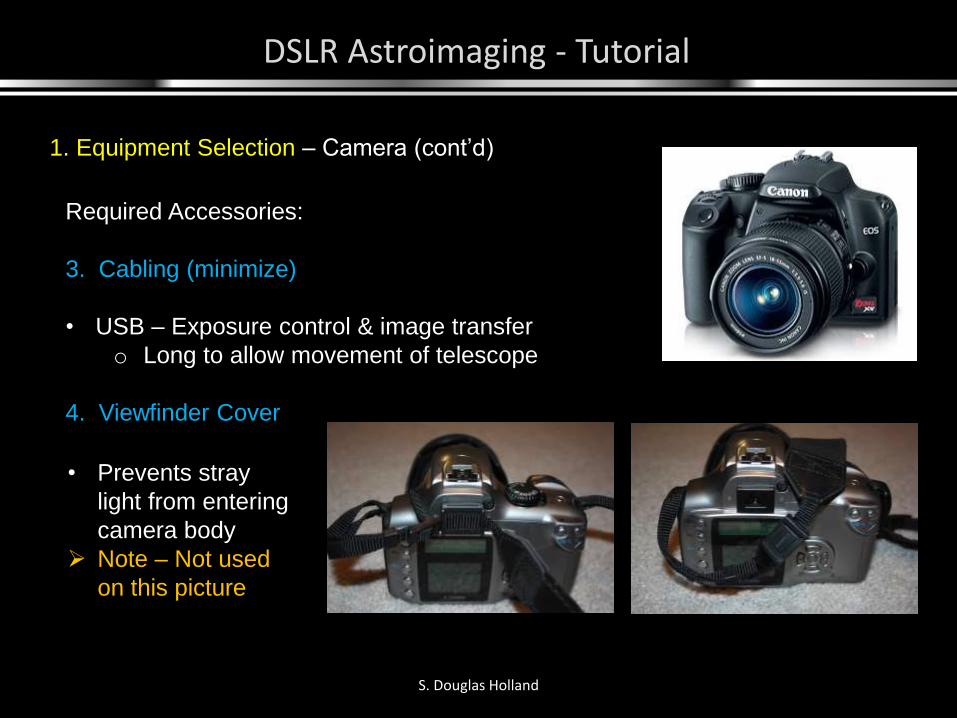
1. Equipment Selection – Camera (cont’d)
Required Accessories:
3. Cabling (minimize)
• USB – Exposure control & image transfer
o Long to allow movement of telescope
4. Viewfinder Cover
• Prevents stray
light from entering
camera body
Note – Not used
on this picture

DSLR Astroimaging - Tutorial
S. Douglas Holland
1. Equipment Selection – Camera (cont’d)
Light Pollution from Imaging Site
Object to right ======
Located in front yard of imaging site
DSLR Astroimaging - Tutorial
S. Douglas Holland
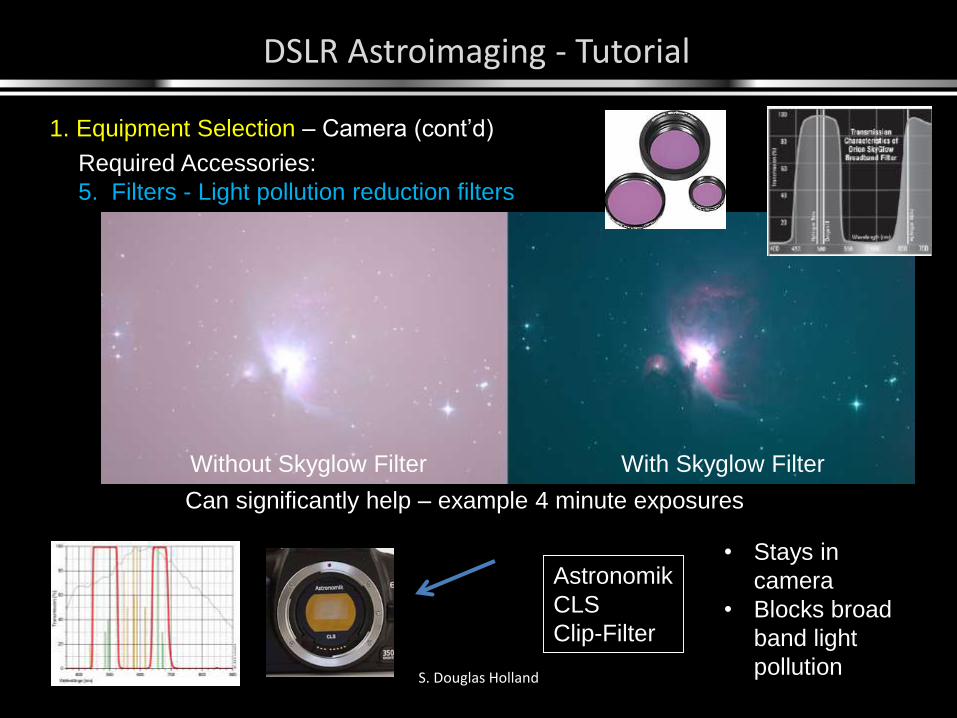
1. Equipment Selection – Camera (cont’d)
Required Accessories:
5. Filters - Light pollution reduction filters
Can significantly help – example 4 minute exposures
With Skyglow FilterWithout Skyglow Filter
Astronomik
CLS
Clip-Filter
• Stays in
camera
• Blocks broad
band light
pollution
DSLR Astroimaging - Tutorial
S. Douglas Holland
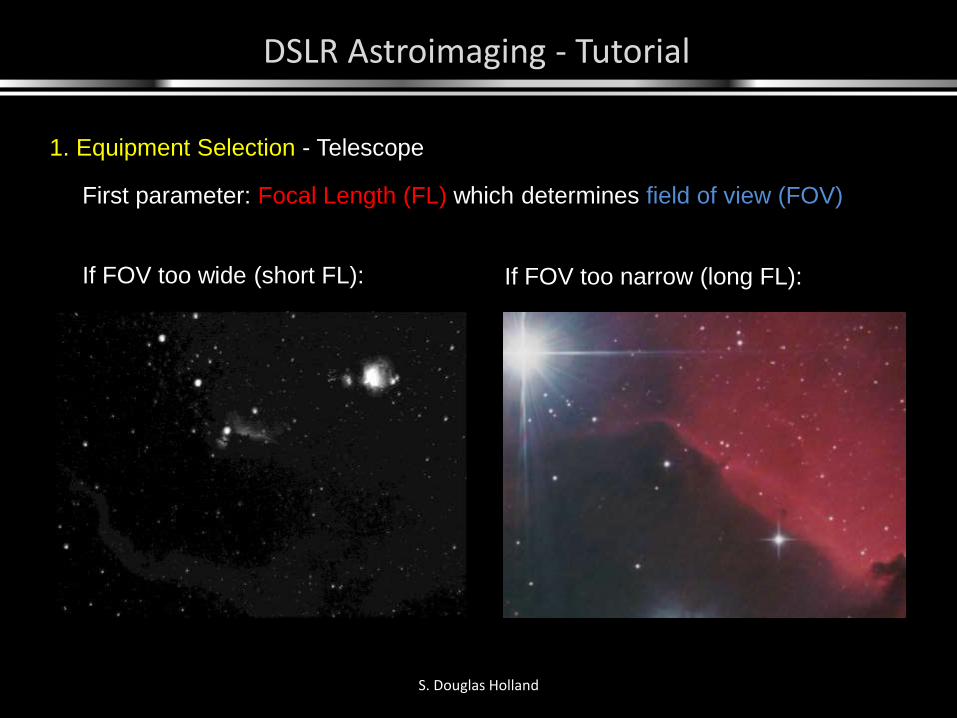
1. Equipment Selection - Telescope
First parameter: Focal Length (FL) which determines field of view (FOV)
If FOV too wide (short FL): If FOV too narrow (long FL):
DSLR Astroimaging - Tutorial
S. Douglas Holland
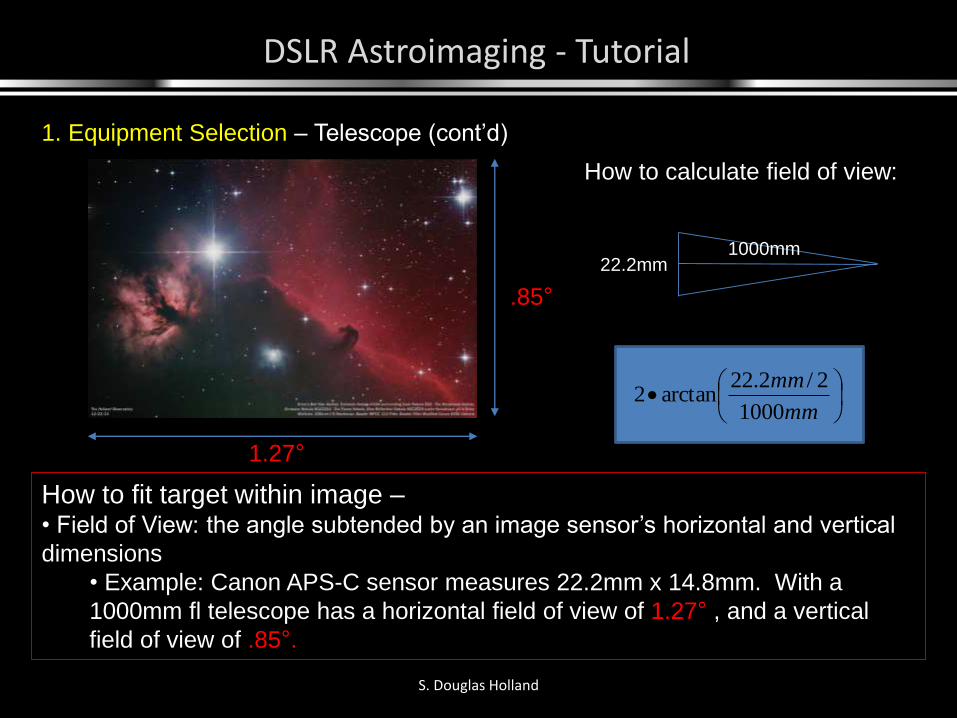
How to fit target within image –• Field of View: the angle subtended by an image sensor’s horizontal and vertical
dimensions
• Example: Canon APS-C sensor measures 22.2mm x 14.8mm. With a
1000mm fl telescope has a horizontal field of view of 1.27° , and a vertical
field of view of .85°.
How to calculate field of view:
1000mm
mm
mm
1000
2/2.22arctan2
22.2mm
1. Equipment Selection – Telescope (cont’d)
1.27°
.85°
DSLR Astroimaging - Tutorial
S. Douglas Holland
1. Equipment Selection – Telescope (cont’d)
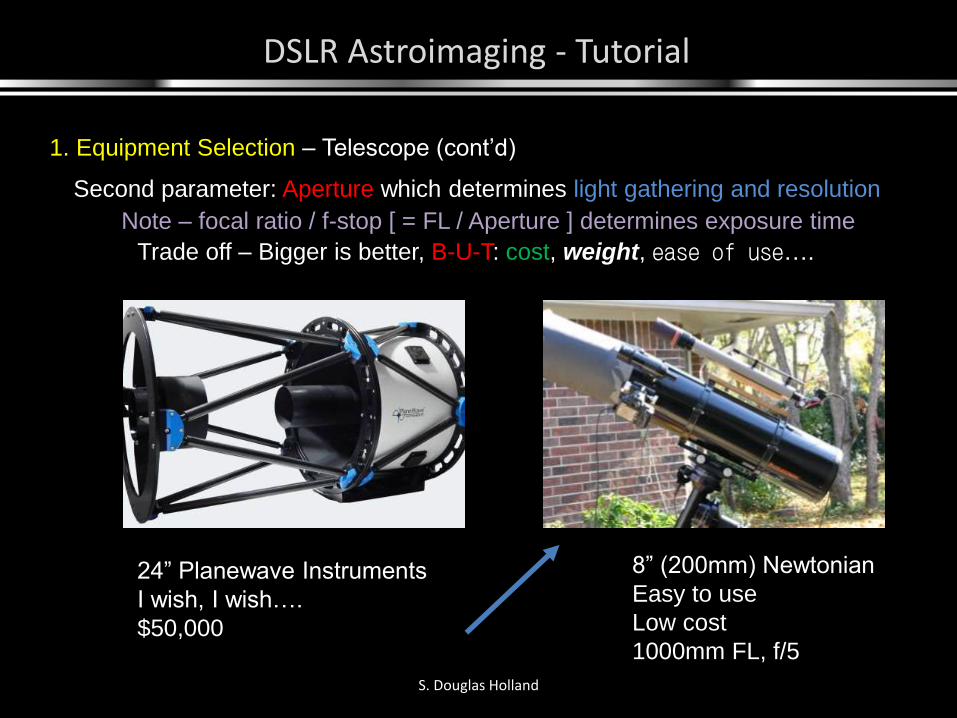
Second parameter: Aperture which determines light gathering and resolution
Trade off – Bigger is better, B-U-T: cost, weight, ease of use….
24” Planewave Instruments
I wish, I wish….
$50,000
8” (200mm) Newtonian
Easy to use
Low cost
1000mm FL, f/5
Note – focal ratio / f-stop [ = FL / Aperture ] determines exposure time
DSLR Astroimaging - Tutorial
S. Douglas Holland
1. Equipment Selection – Telescope (cont’d)
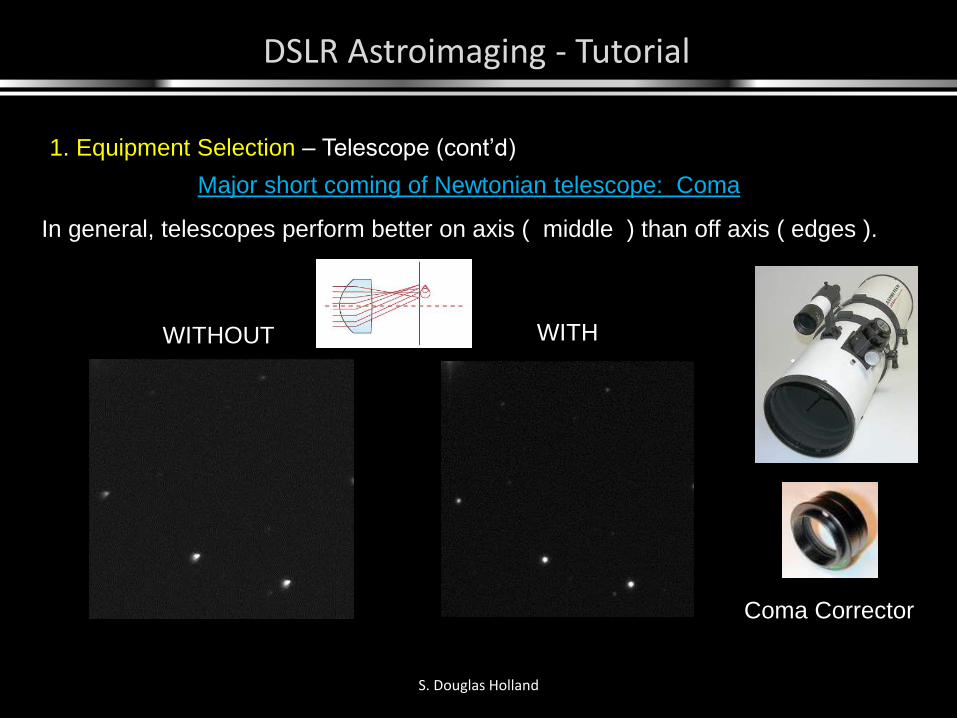
Major short coming of Newtonian telescope: Coma
Coma Corrector
WITHWITHOUT
In general, telescopes perform better on axis ( middle ) than off axis ( edges ).
DSLR Astroimaging - Tutorial
S. Douglas Holland
1. Equipment Selection – Telescope (cont’d)
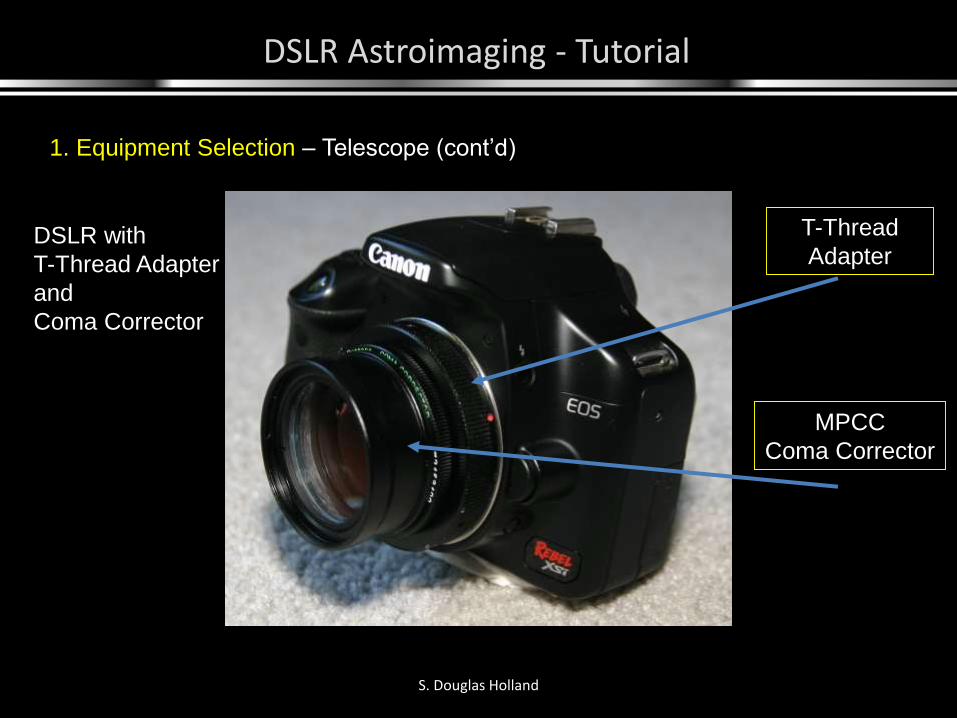
DSLR with
T-Thread Adapter
and
Coma Corrector
T-Thread
Adapter
MPCC
Coma Corrector
DSLR Astroimaging - Tutorial
S. Douglas Holland
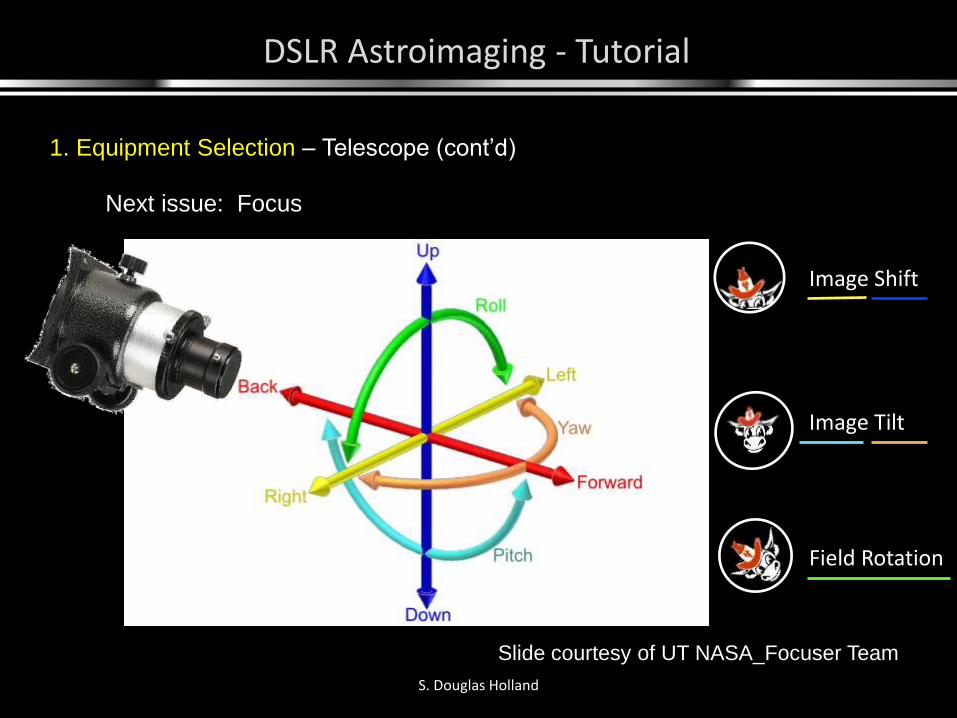
1. Equipment Selection – Telescope (cont’d)
Next issue: Focus
Field Rotation
Image Tilt
Image Shift
Slide courtesy of UT NASA_Focuser Team
DSLR Astroimaging - Tutorial
S. Douglas Holland
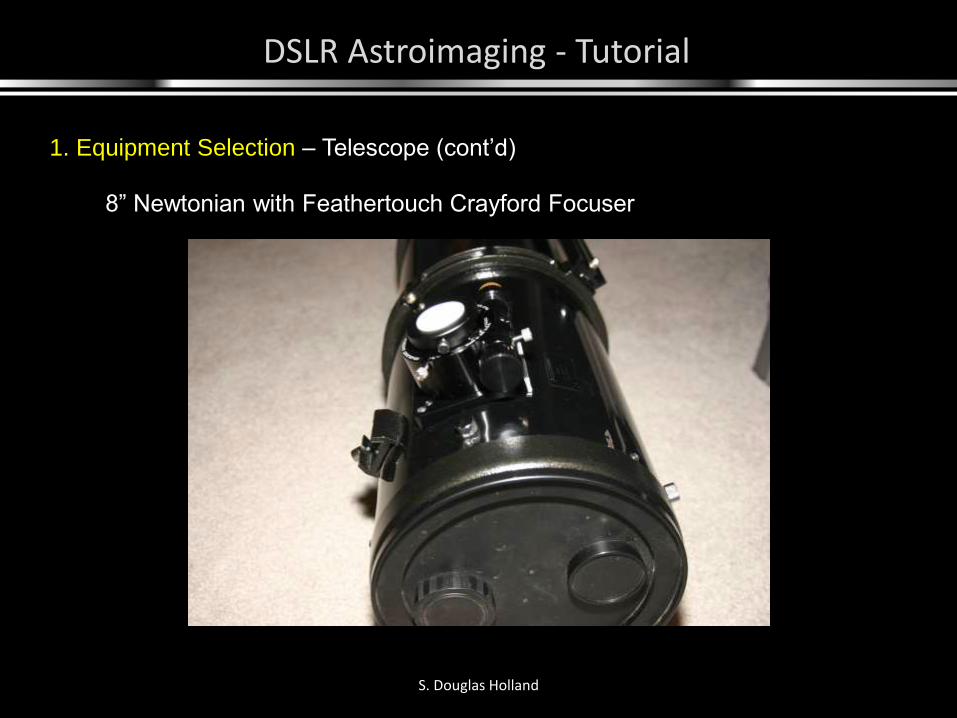
1. Equipment Selection – Telescope (cont’d)
8” Newtonian with Feathertouch Crayford Focuser
DSLR Astroimaging - Tutorial
S. Douglas Holland
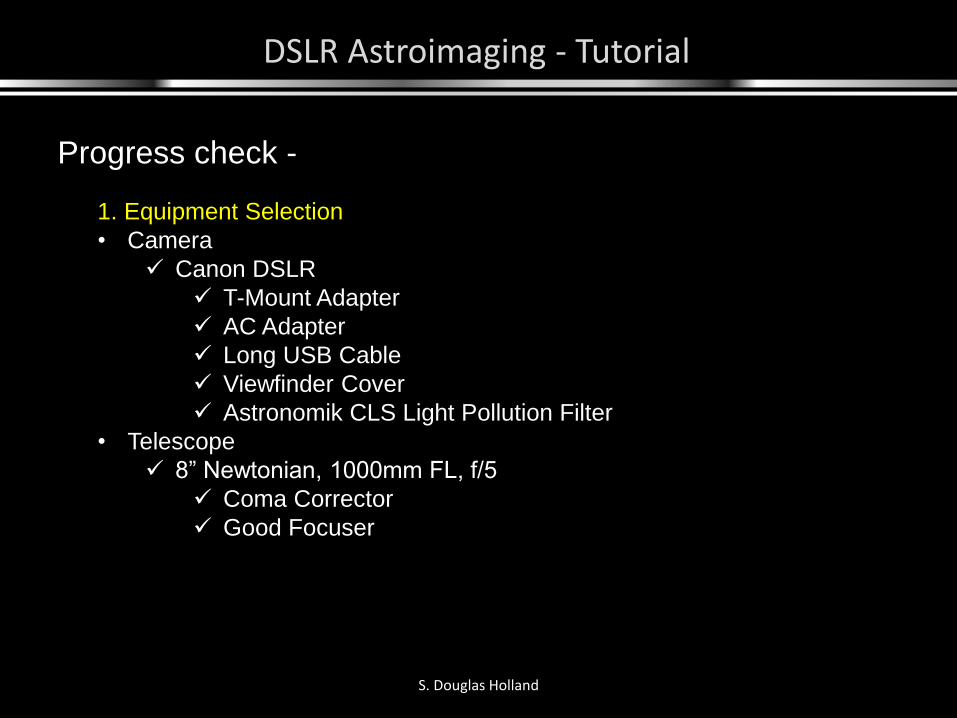
Progress check -
1. Equipment Selection
• Camera
Canon DSLR
T-Mount Adapter
AC Adapter
Long USB Cable
Viewfinder Cover
Astronomik CLS Light Pollution Filter
• Telescope
8” Newtonian, 1000mm FL, f/5
Coma Corrector
Good Focuser
DSLR Astroimaging - Tutorial
S. Douglas Holland
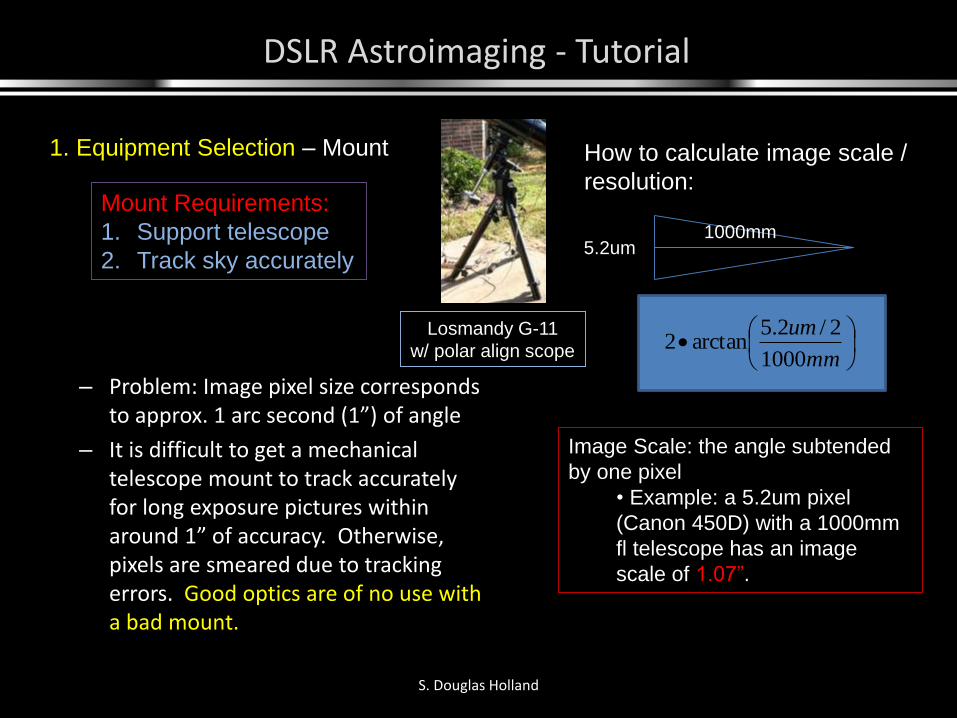
1. Equipment Selection – Mount
Image Scale: the angle subtended
by one pixel
• Example: a 5.2um pixel
(Canon 450D) with a 1000mm
fl telescope has an image
scale of 1.07”.
How to calculate image scale /
resolution:
5.2um1000mm
mm
um
1000
2/2.5arctan2
– Problem: Image pixel size corresponds to approx. 1 arc second (1”) of angle
– It is difficult to get a mechanical telescope mount to track accurately for long exposure pictures within around 1” of accuracy. Otherwise, pixels are smeared due to tracking errors. Good optics are of no use with a bad mount.
Mount Requirements:
1. Support telescope
2. Track sky accurately
Losmandy G-11
w/ polar align scope
DSLR Astroimaging - Tutorial
S. Douglas Holland
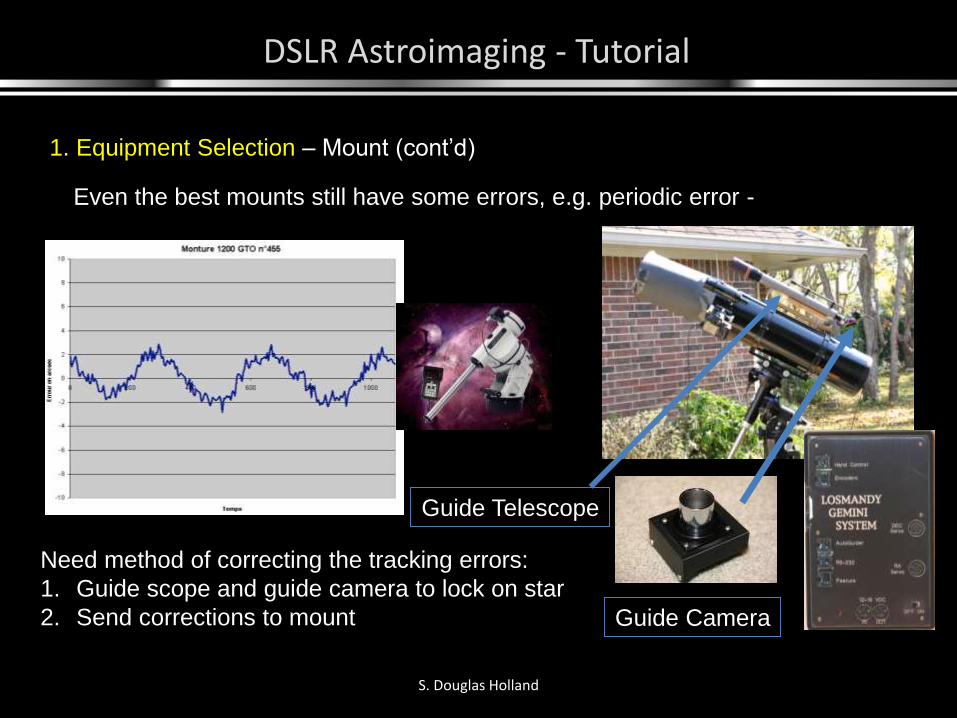
1. Equipment Selection – Mount (cont’d)
Even the best mounts still have some errors, e.g. periodic error -
Need method of correcting the tracking errors:
1. Guide scope and guide camera to lock on star
2. Send corrections to mount Guide Camera
Guide Telescope
DSLR Astroimaging - Tutorial
S. Douglas Holland
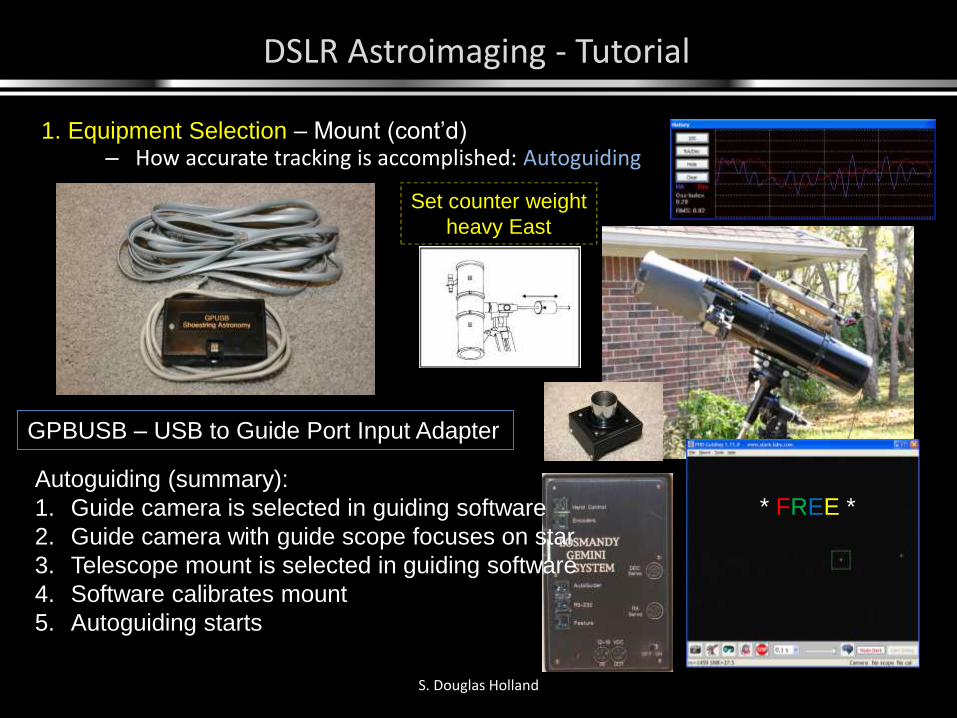
– How accurate tracking is accomplished: Autoguiding
* FREE *
Set counter weight
heavy East
1. Equipment Selection – Mount (cont’d)
Autoguiding (summary):
1. Guide camera is selected in guiding software
2. Guide camera with guide scope focuses on star
3. Telescope mount is selected in guiding software
4. Software calibrates mount
5. Autoguiding starts
GPBUSB – USB to Guide Port Input Adapter
DSLR Astroimaging - Tutorial
S. Douglas Holland
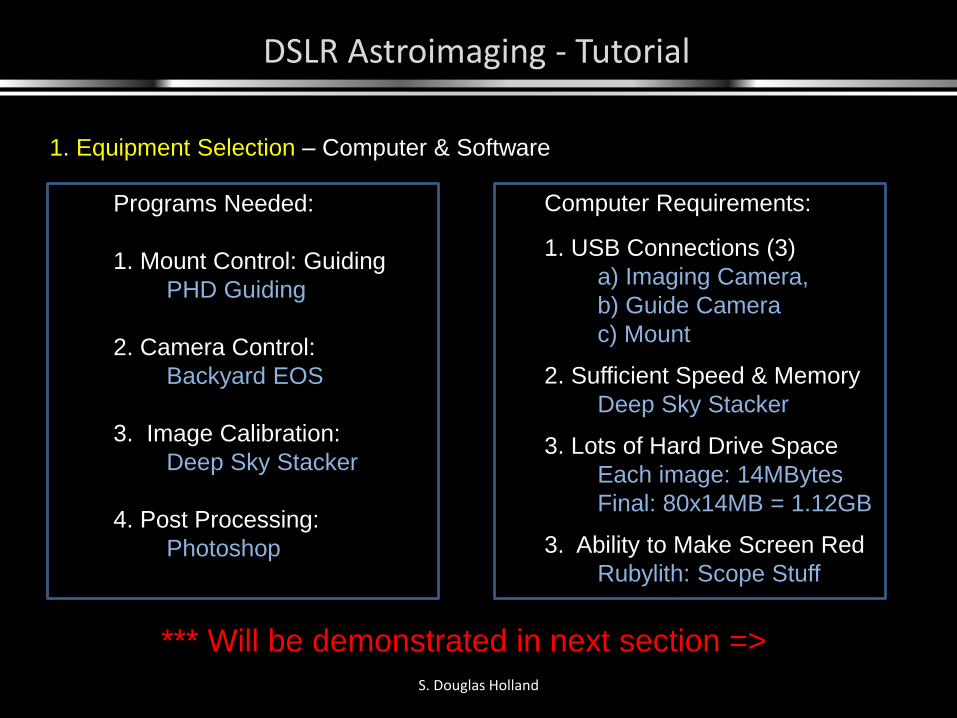
1. Equipment Selection – Computer & Software
Programs Needed:
1. Mount Control: Guiding
PHD Guiding
2. Camera Control:
Backyard EOS
3. Image Calibration:
Deep Sky Stacker
4. Post Processing:
Photoshop
Computer Requirements:
1. USB Connections (3)
a) Imaging Camera,
b) Guide Camera
c) Mount
2. Sufficient Speed & Memory
Deep Sky Stacker
3. Lots of Hard Drive Space
Each image: 14MBytes
Final: 80x14MB = 1.12GB
3. Ability to Make Screen Red
Rubylith: Scope Stuff
*** Will be demonstrated in next section =>
DSLR Astroimaging - Tutorial
S. Douglas Holland
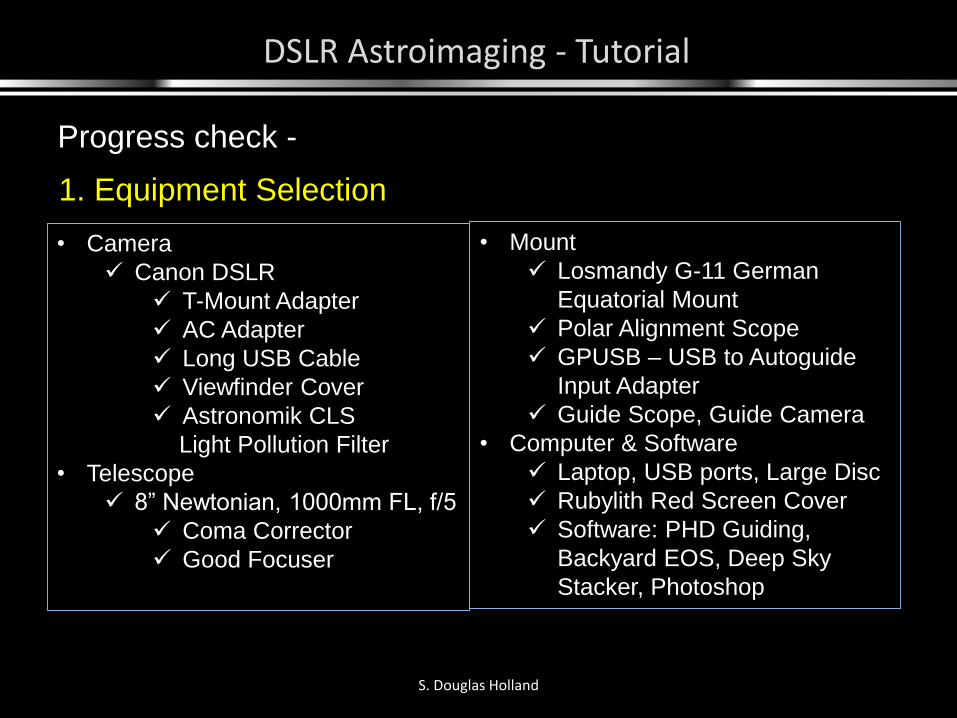
Progress check -
• Camera
Canon DSLR
T-Mount Adapter
AC Adapter
Long USB Cable
Viewfinder Cover
Astronomik CLS
Light Pollution Filter
• Telescope
8” Newtonian, 1000mm FL, f/5
Coma Corrector
Good Focuser
1. Equipment Selection
• Mount
Losmandy G-11 German
Equatorial Mount
Polar Alignment Scope
GPUSB – USB to Autoguide
Input Adapter
Guide Scope, Guide Camera
• Computer & Software
Laptop, USB ports, Large Disc
Rubylith Red Screen Cover
Software: PHD Guiding,
Backyard EOS, Deep Sky
Stacker, Photoshop
DSLR Astroimaging - Tutorial
S. Douglas Holland
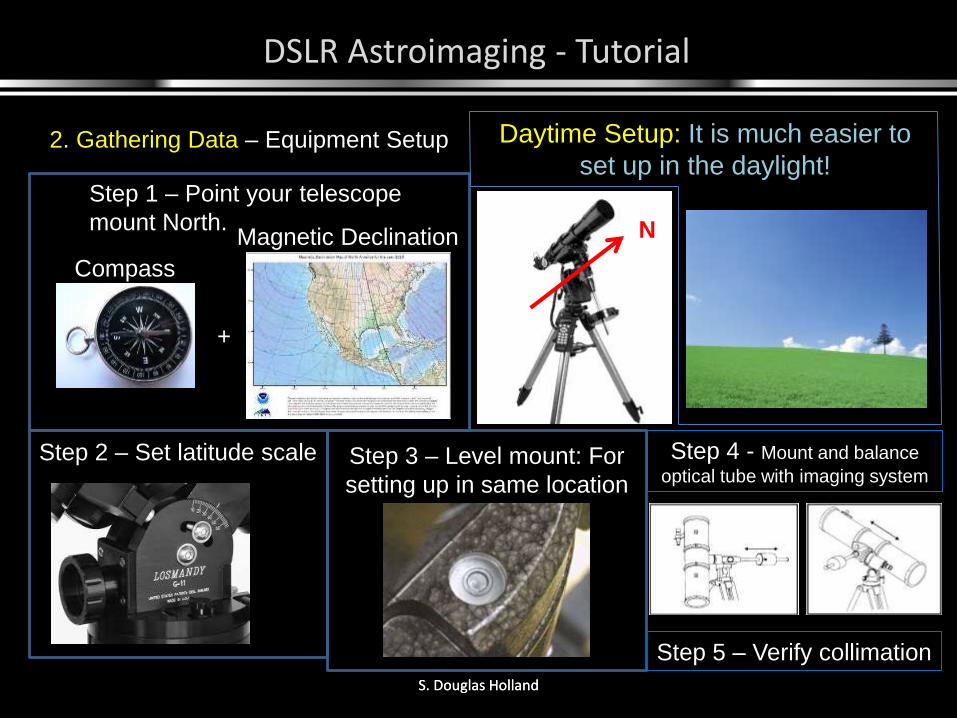
2. Gathering Data – Equipment Setup
S. Douglas Holland
Daytime Setup: It is much easier to
set up in the daylight!Step 1 – Point your telescope
mount North.
Compass
+
Magnetic Declination
Step 2 – Set latitude scale Step 3 – Level mount: For
setting up in same location
N
Step 4 - Mount and balance
optical tube with imaging system
Step 5 – Verify collimation
DSLR Astroimaging - Tutorial
S. Douglas Holland
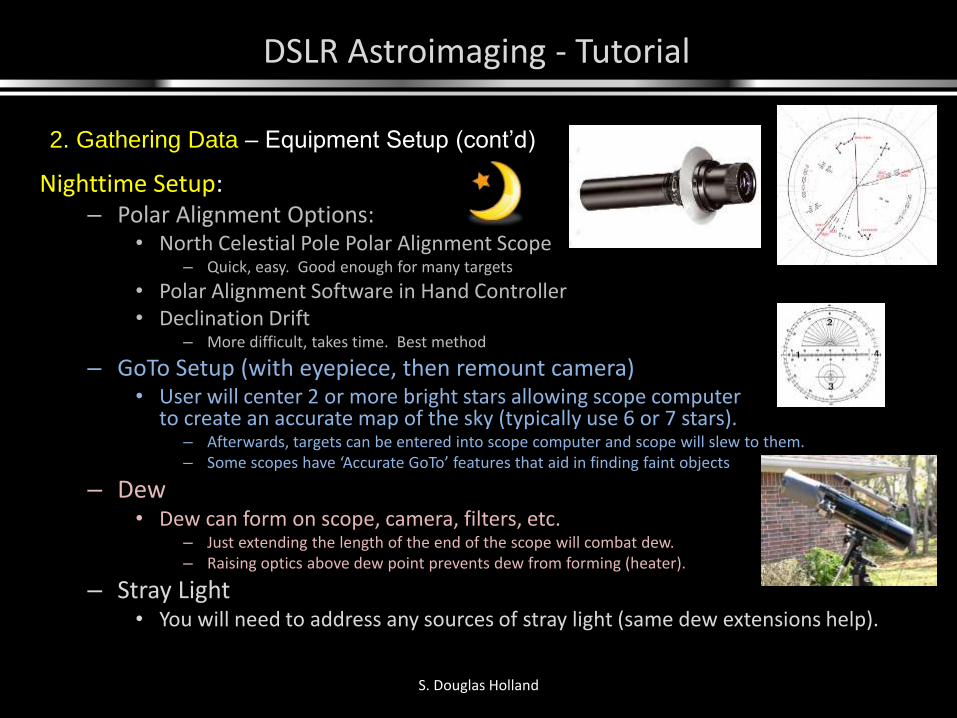
2. Gathering Data – Equipment Setup (cont’d)
Nighttime Setup:– Polar Alignment Options:
• North Celestial Pole Polar Alignment Scope– Quick, easy. Good enough for many targets
• Polar Alignment Software in Hand Controller• Declination Drift
– More difficult, takes time. Best method
– GoTo Setup (with eyepiece, then remount camera)• User will center 2 or more bright stars allowing scope computer
to create an accurate map of the sky (typically use 6 or 7 stars).– Afterwards, targets can be entered into scope computer and scope will slew to them.– Some scopes have ‘Accurate GoTo’ features that aid in finding faint objects
– Dew• Dew can form on scope, camera, filters, etc.
– Just extending the length of the end of the scope will combat dew.– Raising optics above dew point prevents dew from forming (heater).
– Stray Light• You will need to address any sources of stray light (same dew extensions help).
DSLR Astroimaging - Tutorial
S. Douglas Holland
2. Gathering Data – Equipment Setup (cont’d)
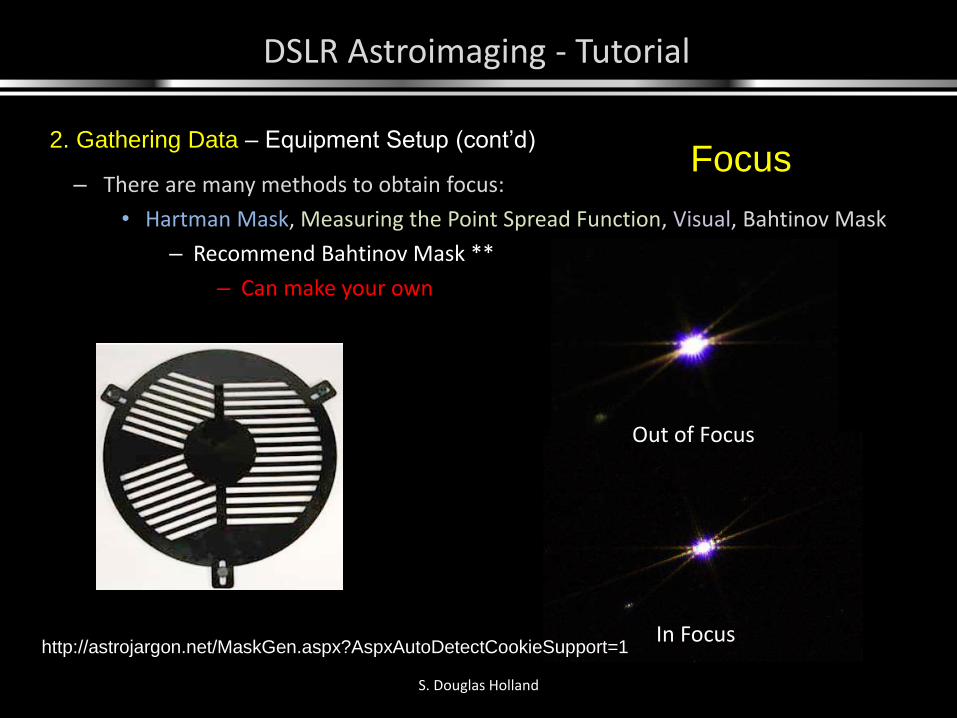
– There are many methods to obtain focus:
• Hartman Mask, Measuring the Point Spread Function, Visual, Bahtinov Mask
– Recommend Bahtinov Mask **
– Can make your own
Out of Focus
In Focushttp://astrojargon.net/MaskGen.aspx?AspxAutoDetectCookieSupport=1
Focus
DSLR Astroimaging - Tutorial
S. Douglas Holland
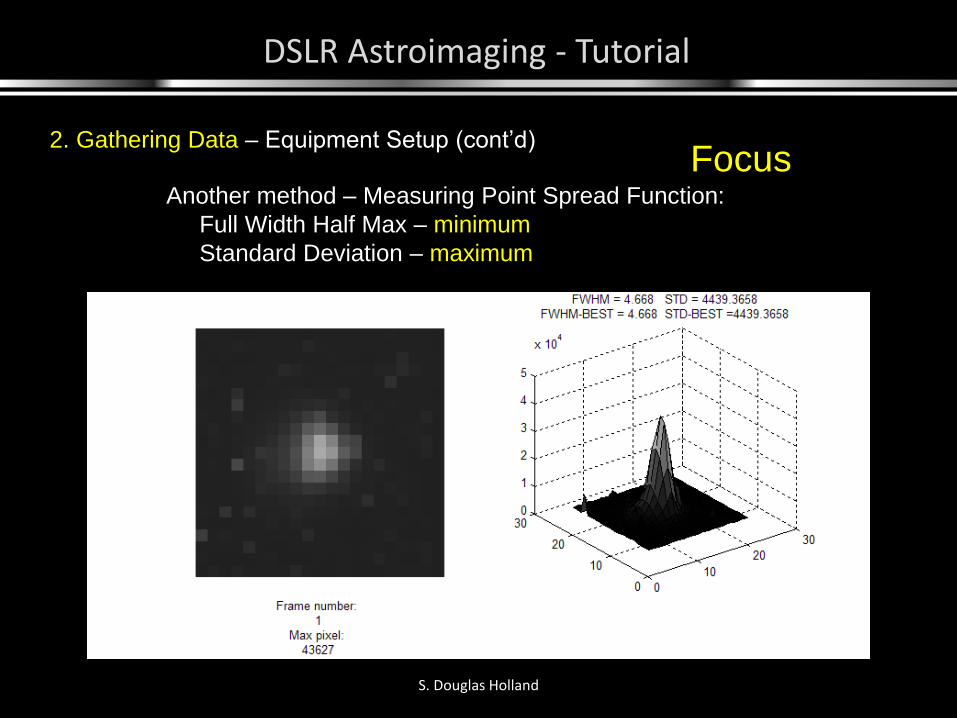
Another method – Measuring Point Spread Function:
Full Width Half Max – minimum
Standard Deviation – maximum
2. Gathering Data – Equipment Setup (cont’d) Focus

DSLR Astroimaging - Tutorial
S. Douglas Holland
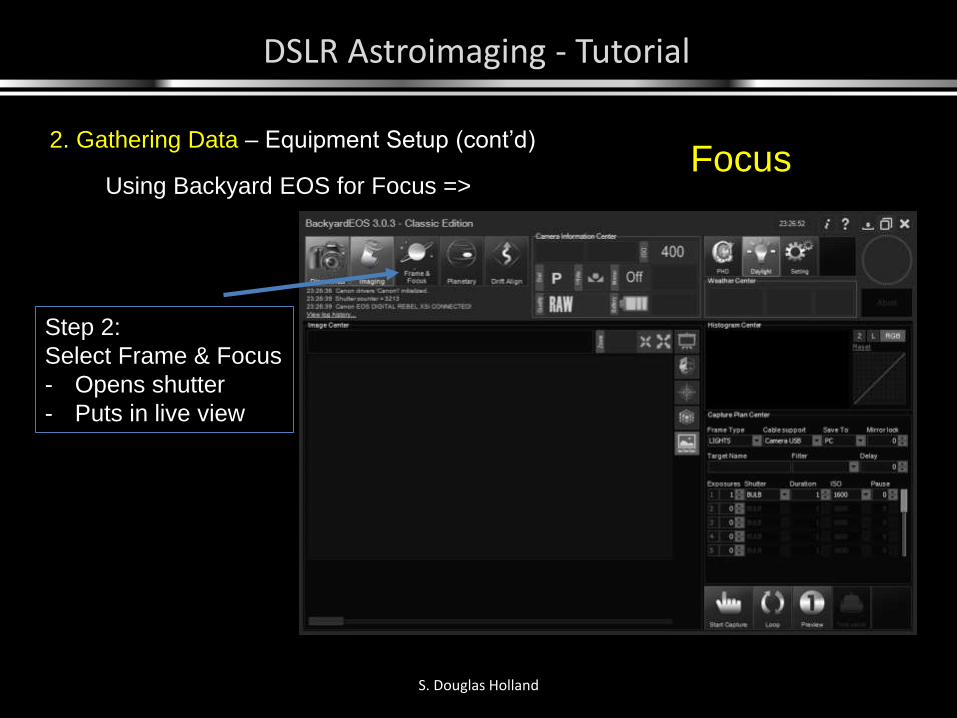
2. Gathering Data – Equipment Setup (cont’d) Focus
Using Backyard EOS for Focus =>
Step 1:
Connect Camera
DSLR Astroimaging - Tutorial
S. Douglas Holland
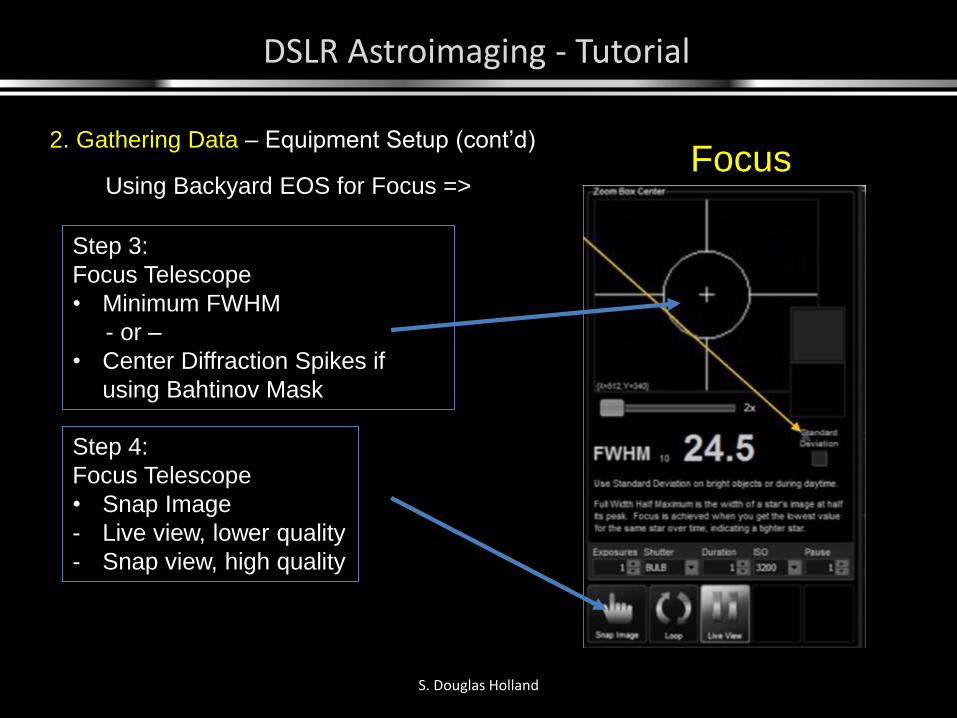
2. Gathering Data – Equipment Setup (cont’d) Focus
Using Backyard EOS for Focus =>
Step 2:
Select Frame & Focus
- Opens shutter
- Puts in live view
DSLR Astroimaging - Tutorial
S. Douglas Holland
2. Gathering Data – Equipment Setup (cont’d) Focus
Using Backyard EOS for Focus =>
Step 3:
Focus Telescope
• Minimum FWHM
- or –
• Center Diffraction Spikes if
using Bahtinov Mask
Step 4:
Focus Telescope
• Snap Image
- Live view, lower quality
- Snap view, high quality
DSLR Astroimaging - Tutorial
S. Douglas Holland
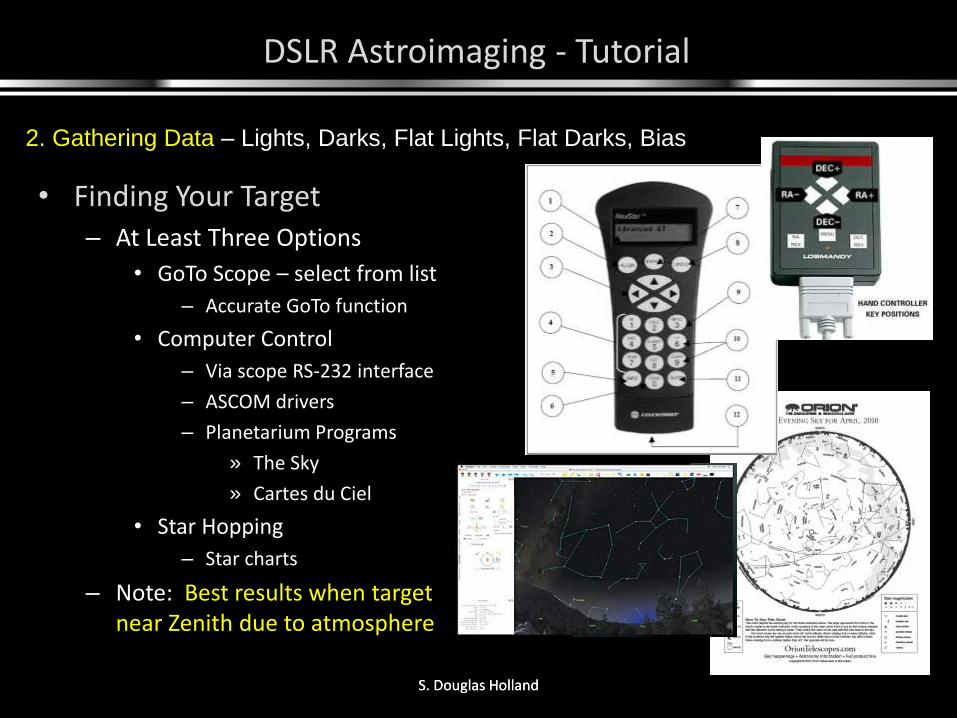
• Finding Your Target– At Least Three Options
• GoTo Scope – select from list
– Accurate GoTo function
• Computer Control
– Via scope RS-232 interface
– ASCOM drivers
– Planetarium Programs
» The Sky
» Cartes du Ciel
• Star Hopping
– Star charts
– Note: Best results when target near Zenith due to atmosphere
S. Douglas Holland
2. Gathering Data – Lights, Darks, Flat Lights, Flat Darks, Bias
DSLR Astroimaging - Tutorial
S. Douglas Holland
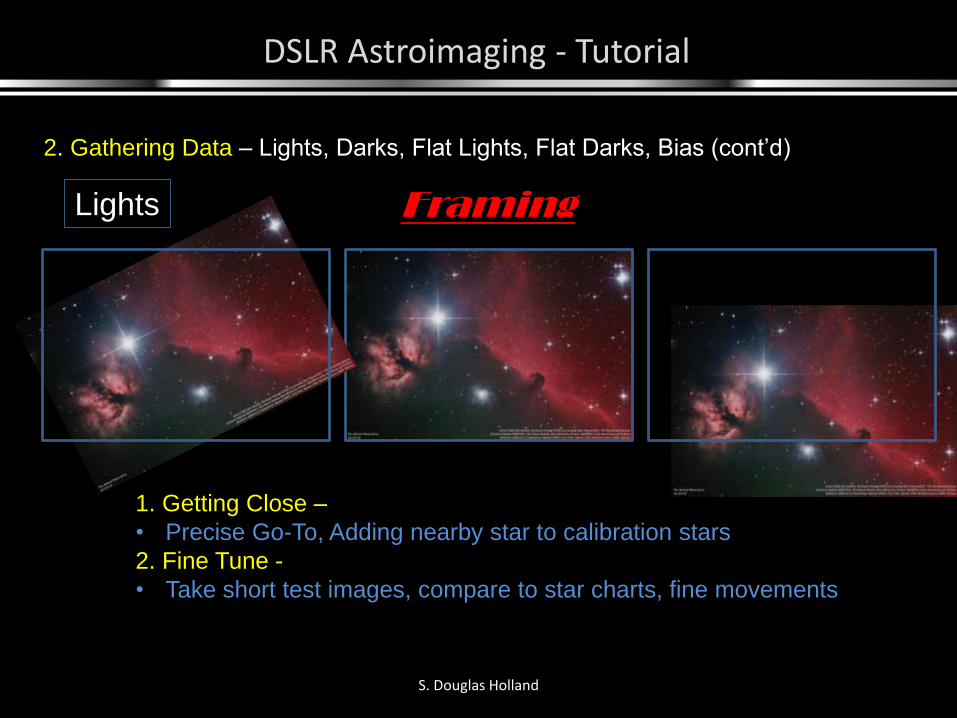
2. Gathering Data – Lights, Darks, Flat Lights, Flat Darks, Bias (cont’d)
Lights Framing
1. Getting Close –
• Precise Go-To, Adding nearby star to calibration stars
2. Fine Tune -
• Take short test images, compare to star charts, fine movements
DSLR Astroimaging - Tutorial
S. Douglas Holland
2. Gathering Data – Lights, Darks, Flat Lights, Flat Darks, Bias (cont’d)
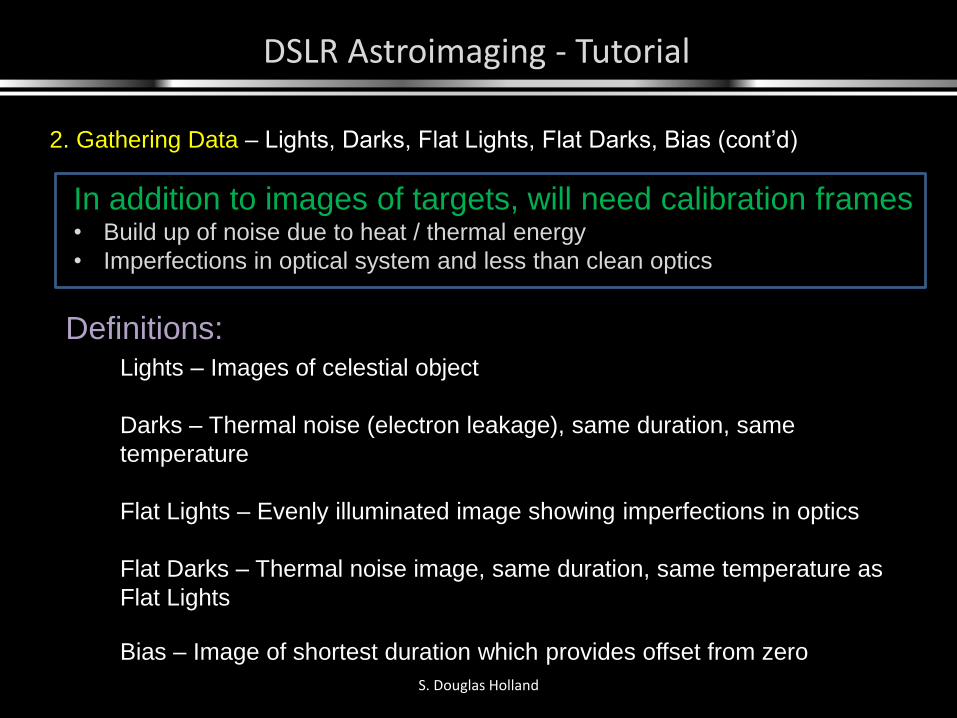
Lights – Images of celestial object
Darks – Thermal noise (electron leakage), same duration, same
temperature
Flat Lights – Evenly illuminated image showing imperfections in optics
Flat Darks – Thermal noise image, same duration, same temperature as
Flat Lights
Bias – Image of shortest duration which provides offset from zero
In addition to images of targets, will need calibration frames• Build up of noise due to heat / thermal energy
• Imperfections in optical system and less than clean optics
Definitions:
DSLR Astroimaging - Tutorial
S. Douglas Holland
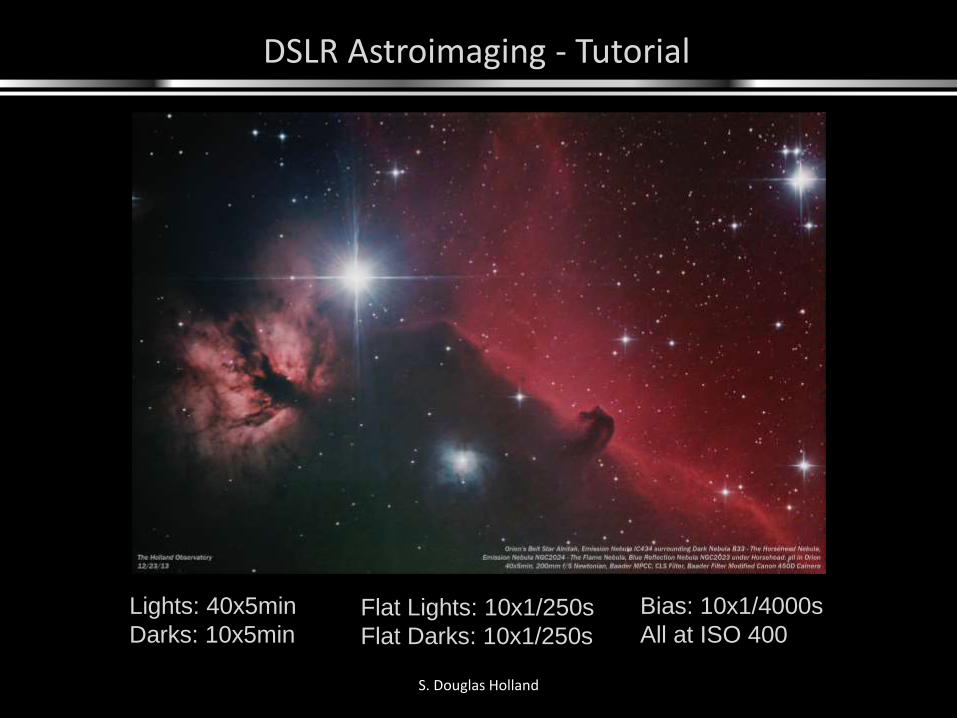
Lights: 40x5min
Darks: 10x5minFlat Lights: 10x1/250s
Flat Darks: 10x1/250s
Bias: 10x1/4000s
All at ISO 400
DSLR Astroimaging - Tutorial
S. Douglas Holland
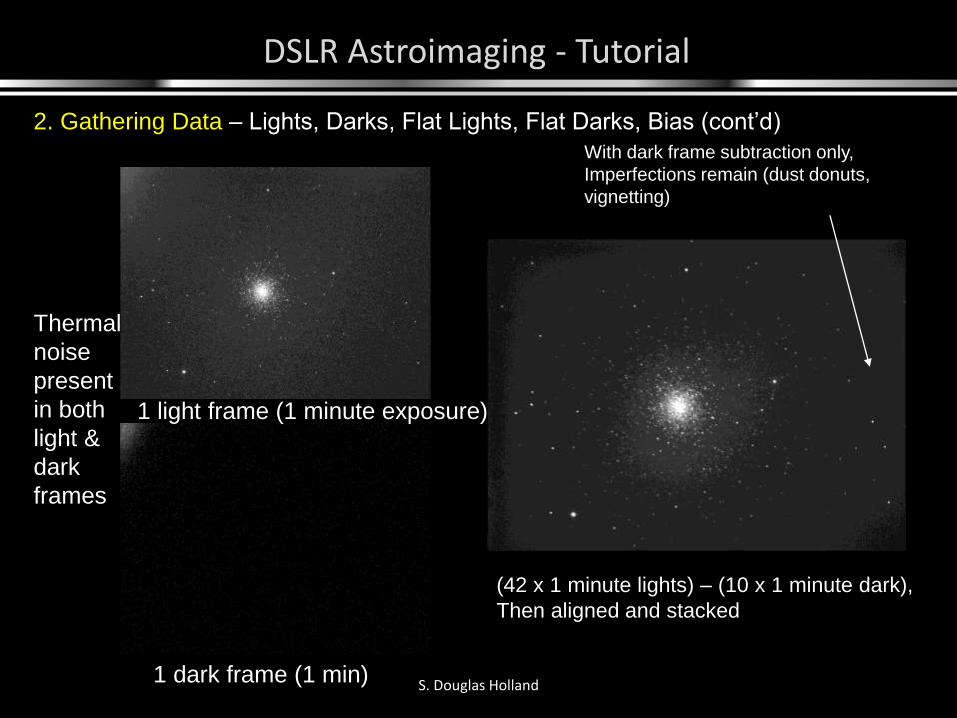
1 light frame (1 minute exposure)
1 dark frame (1 min)
Thermal
noise
present
in both
light &
dark
frames
(42 x 1 minute lights) – (10 x 1 minute dark),
Then aligned and stacked
With dark frame subtraction only,
Imperfections remain (dust donuts,
vignetting)
2. Gathering Data – Lights, Darks, Flat Lights, Flat Darks, Bias (cont’d)
DSLR Astroimaging - Tutorial
S. Douglas Holland
2. Gathering Data – Lights, Darks, Flat Lights, Flat Darks, Bias (cont’d)
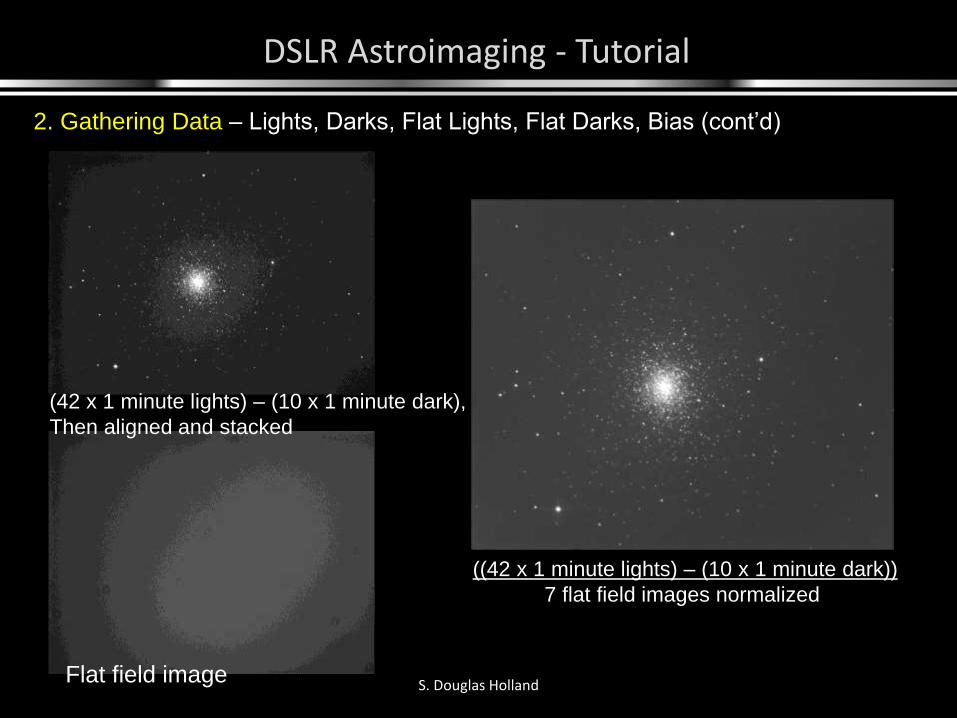
(42 x 1 minute lights) – (10 x 1 minute dark),
Then aligned and stacked
Flat field image
((42 x 1 minute lights) – (10 x 1 minute dark))
7 flat field images normalized
DSLR Astroimaging - Tutorial
S. Douglas Holland
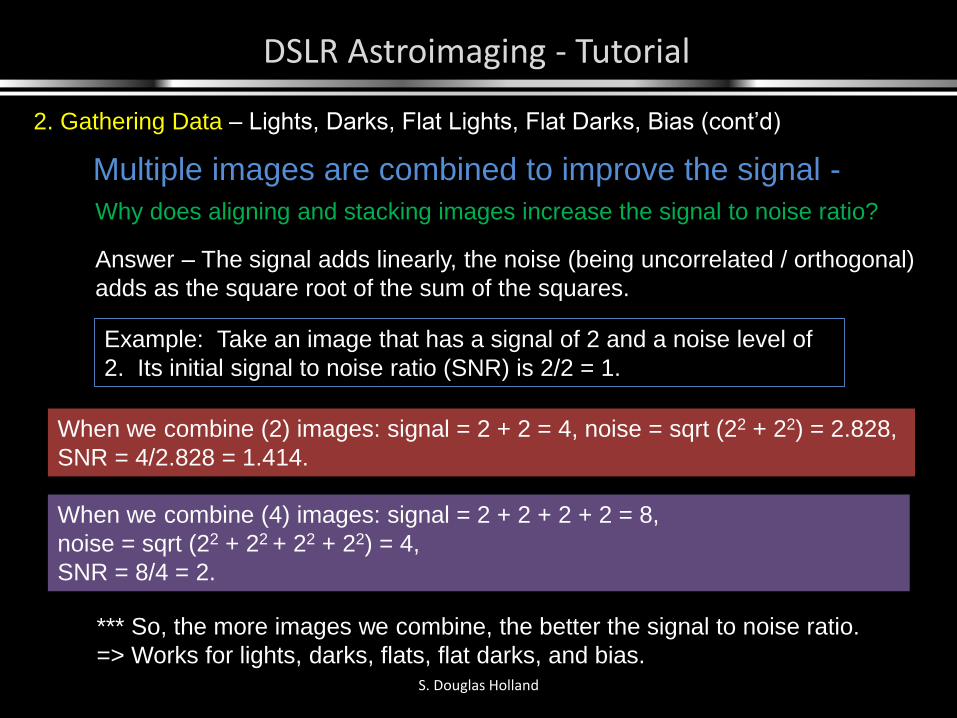
Why does aligning and stacking images increase the signal to noise ratio?
Answer – The signal adds linearly, the noise (being uncorrelated / orthogonal)
adds as the square root of the sum of the squares.
Example: Take an image that has a signal of 2 and a noise level of
2. Its initial signal to noise ratio (SNR) is 2/2 = 1.
When we combine (2) images: signal = 2 + 2 = 4, noise = sqrt (22 + 22) = 2.828,
SNR = 4/2.828 = 1.414.
When we combine (4) images: signal = 2 + 2 + 2 + 2 = 8,
noise = sqrt (22 + 22 + 22 + 22) = 4,
SNR = 8/4 = 2.
*** So, the more images we combine, the better the signal to noise ratio.
=> Works for lights, darks, flats, flat darks, and bias.
Multiple images are combined to improve the signal -
2. Gathering Data – Lights, Darks, Flat Lights, Flat Darks, Bias (cont’d)
DSLR Astroimaging - Tutorial
S. Douglas Holland
2. Gathering Data – Lights, Darks, Flat Lights, Flat Darks, Bias (cont’d)
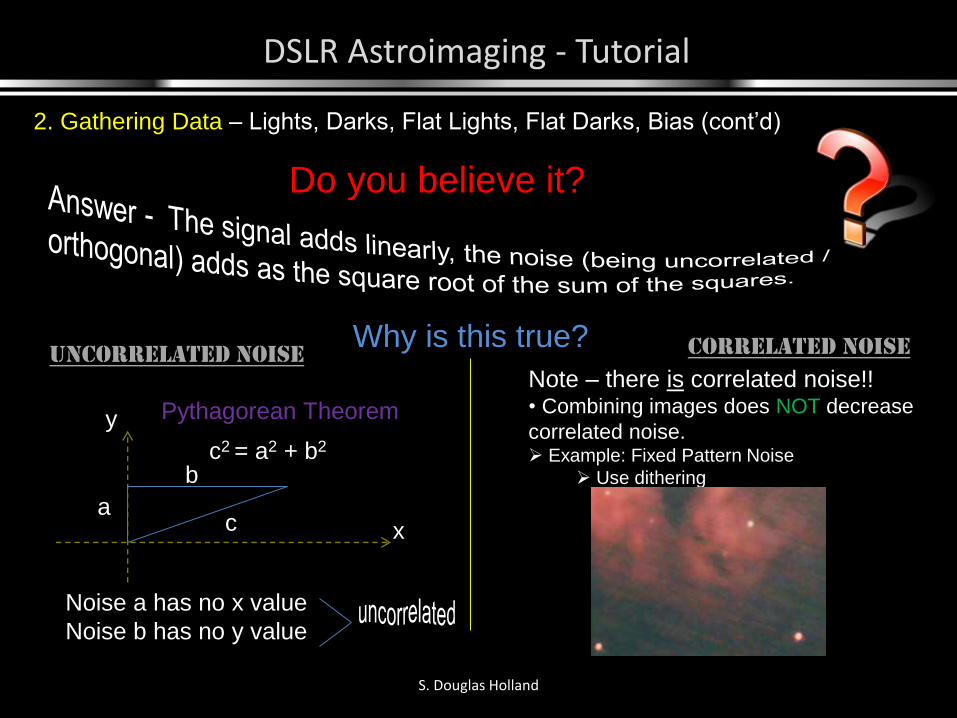
Do you believe it?
Why is this true?Uncorrelated Noise correlated Noise
a
b
c x
y Pythagorean Theorem
Noise a has no x value
Noise b has no y value
c2 = a2 + b2
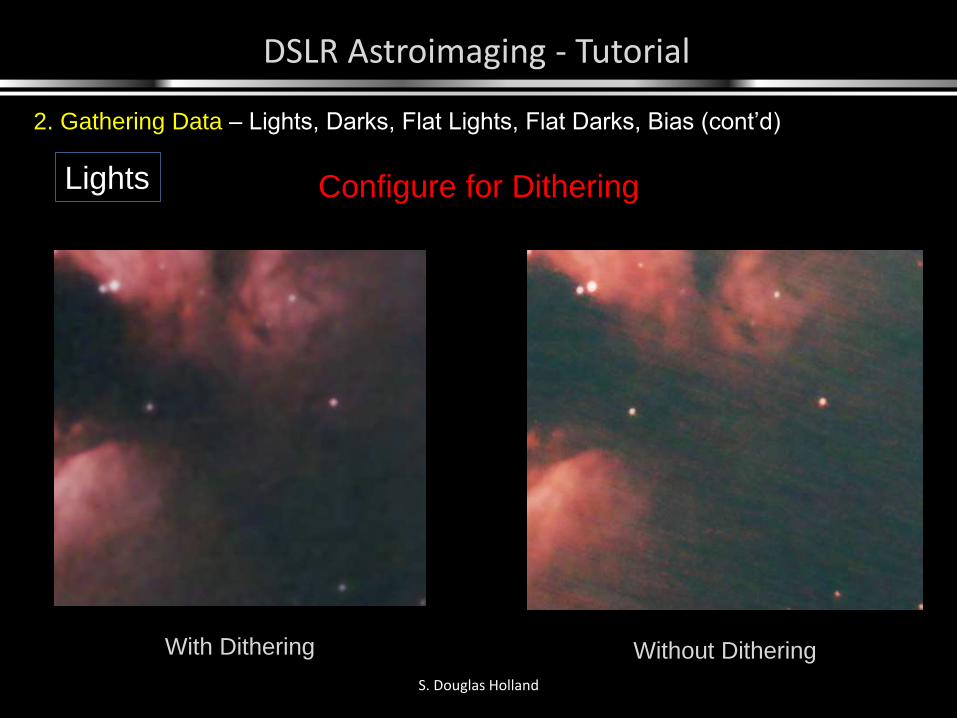
Note – there is correlated noise!!• Combining images does NOT decrease
correlated noise. Example: Fixed Pattern Noise
Use dithering
DSLR Astroimaging - Tutorial
S. Douglas Holland
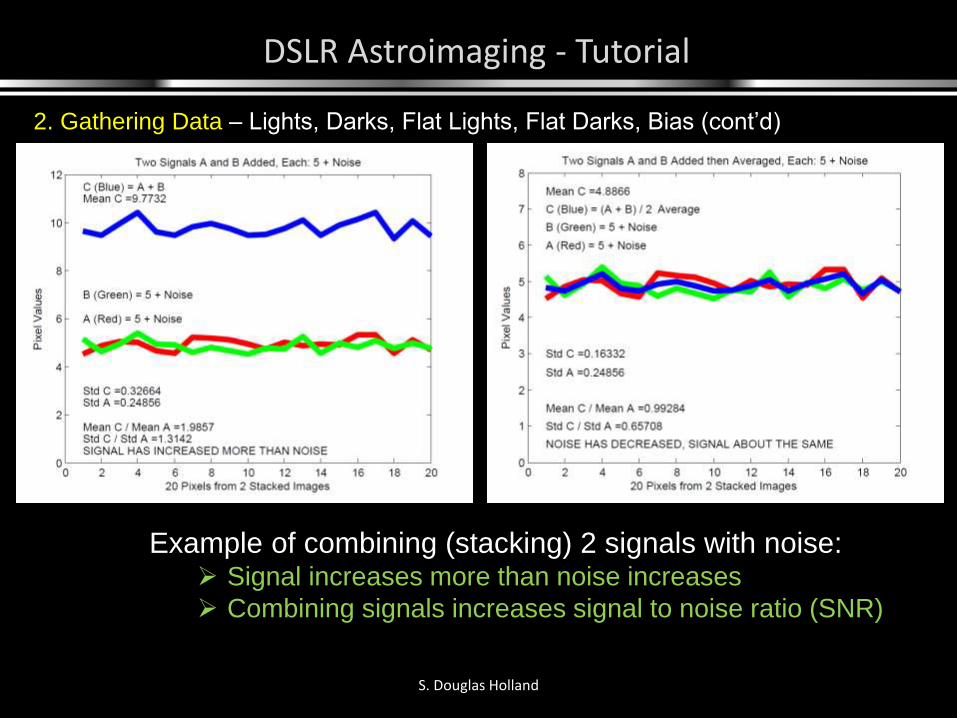
Example of combining (stacking) 2 signals with noise: Signal increases more than noise increases
Combining signals increases signal to noise ratio (SNR)
2. Gathering Data – Lights, Darks, Flat Lights, Flat Darks, Bias (cont’d)
DSLR Astroimaging - Tutorial
S. Douglas Holland
2. Gathering Data – Lights, Darks, Flat Lights, Flat Darks, Bias (cont’d)
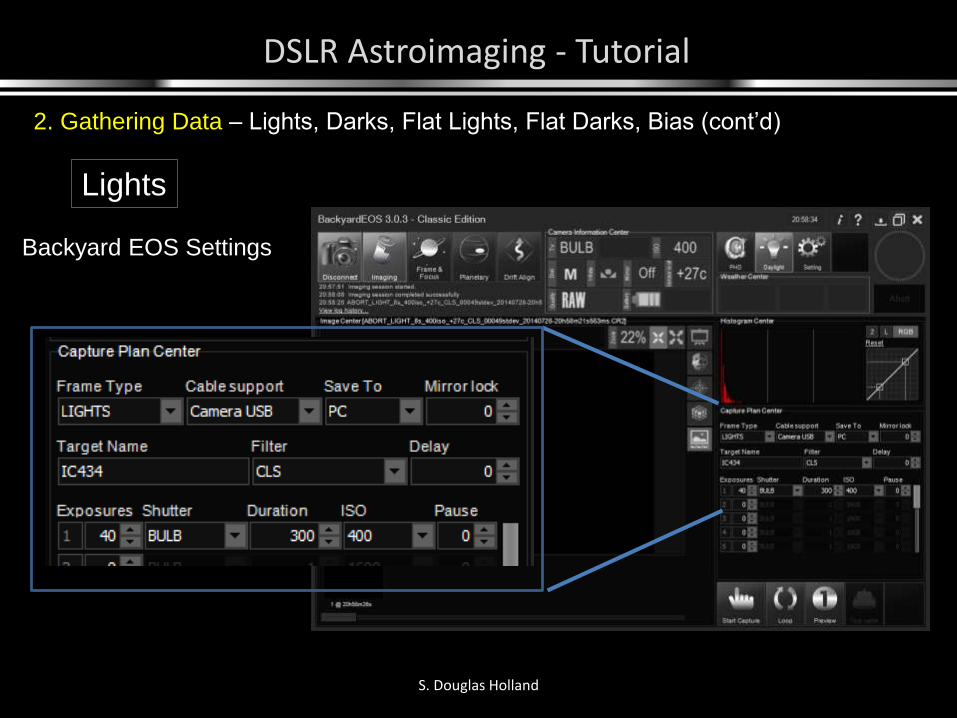
Lights
Backyard EOS Settings
DSLR Astroimaging - Tutorial
S. Douglas Holland
2. Gathering Data – Lights, Darks, Flat Lights, Flat Darks, Bias (cont’d)
Lights Configure for Dithering
With Dithering Without Dithering
DSLR Astroimaging - Tutorial
S. Douglas Holland
2. Gathering Data – Lights, Darks, Flat Lights, Flat Darks, Bias (cont’d)
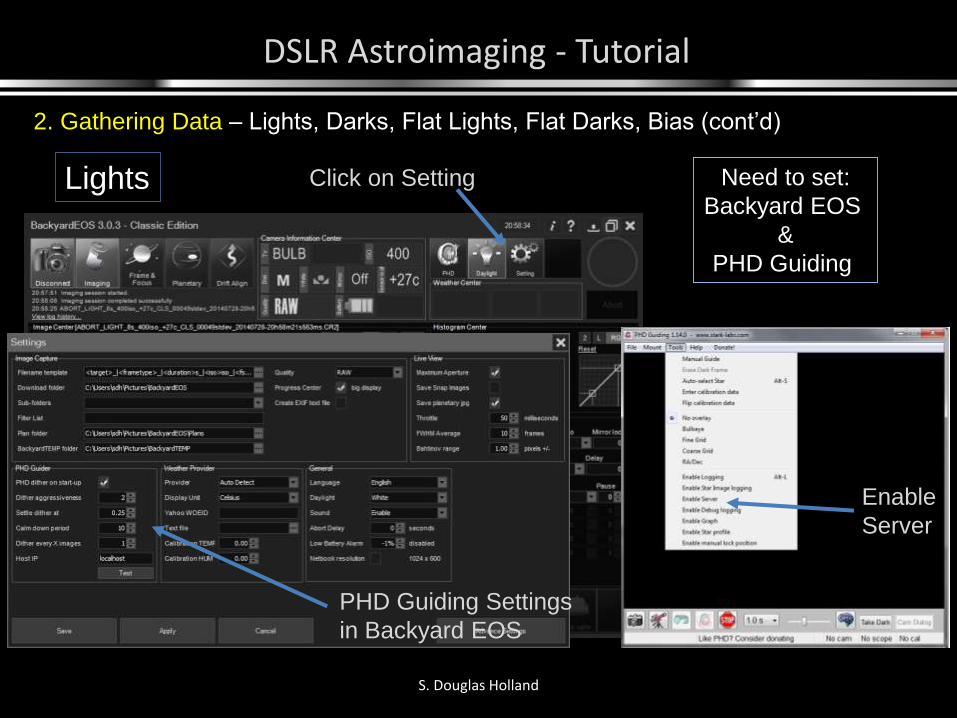
Lights Need to set:
Backyard EOS
&
PHD Guiding
Enable
Server
Click on Setting
PHD Guiding Settings
in Backyard EOS
DSLR Astroimaging - Tutorial
S. Douglas Holland
2. Gathering Data – Lights, Darks, Flat Lights, Flat Darks, Bias (cont’d)
Lights
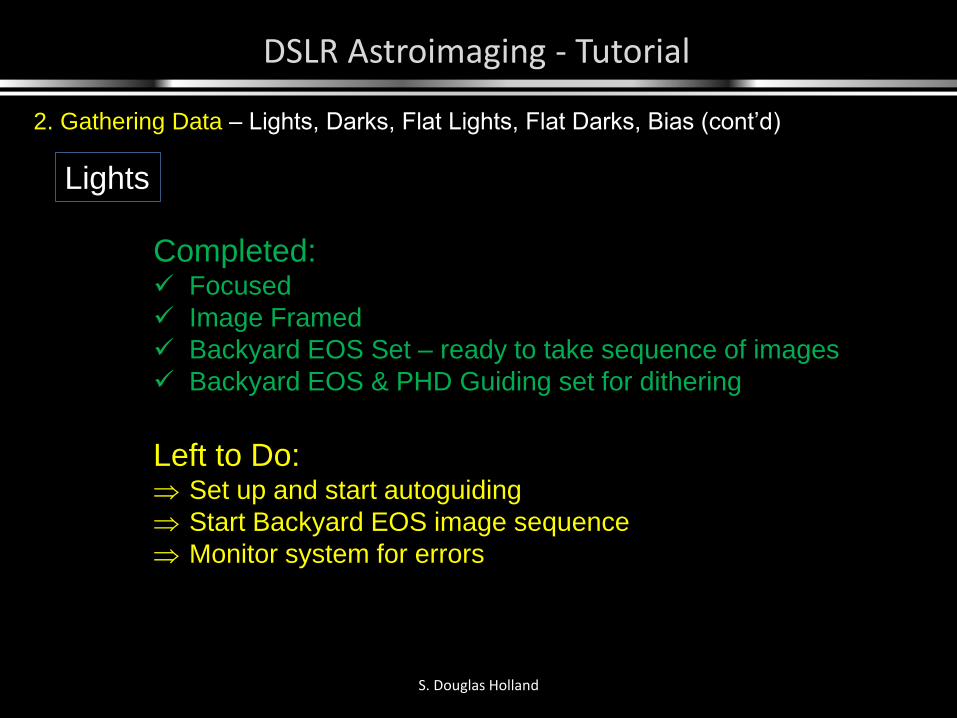
Completed: Focused
Image Framed
Backyard EOS Set – ready to take sequence of images
Backyard EOS & PHD Guiding set for dithering
Left to Do: Set up and start autoguiding
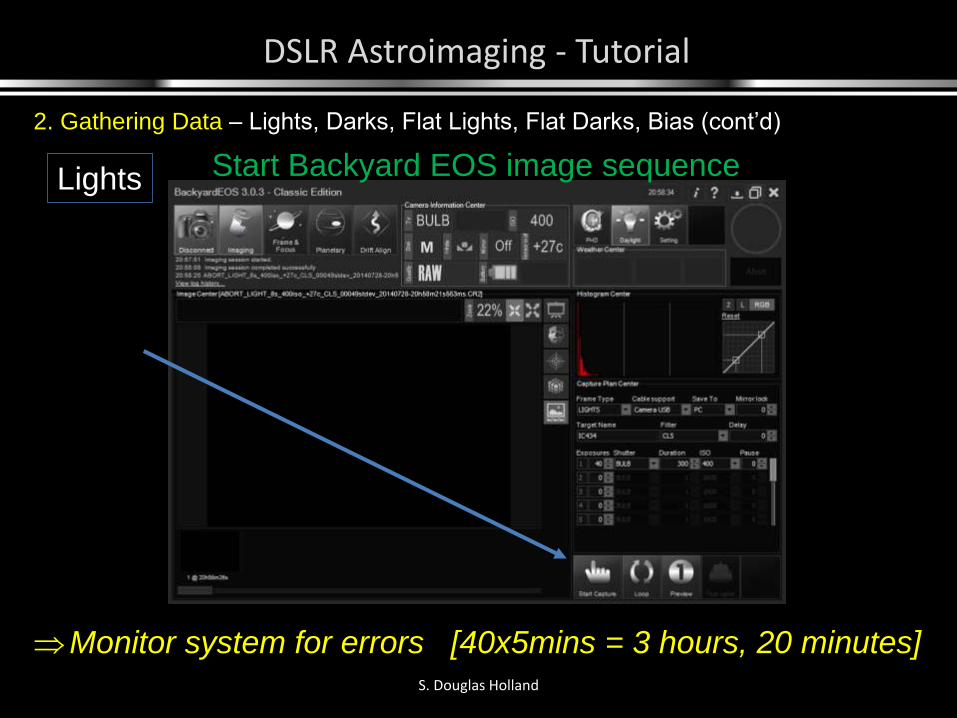
Start Backyard EOS image sequence
Monitor system for errors

DSLR Astroimaging - Tutorial
2. Gathering Data – Lights, Darks, Flat Lights, Flat Darks, Bias (cont’d)
Lights Autoguiding
1. Select GPUSB
for mount
2. Connect to
telescope3. Select camera
4. Start guide camera
imaging, find guide
star, click on guide star
5. Adjust settings
=>
6. Perform calibration
7. PHD Guiding
starts autoguding
after calibration =>
DSLR Astroimaging - Tutorial
S. Douglas Holland
2. Gathering Data – Lights, Darks, Flat Lights, Flat Darks, Bias (cont’d)
Lights
Monitor system for errors [40x5mins = 3 hours, 20 minutes]
Start Backyard EOS image sequence
DSLR Astroimaging - Tutorial
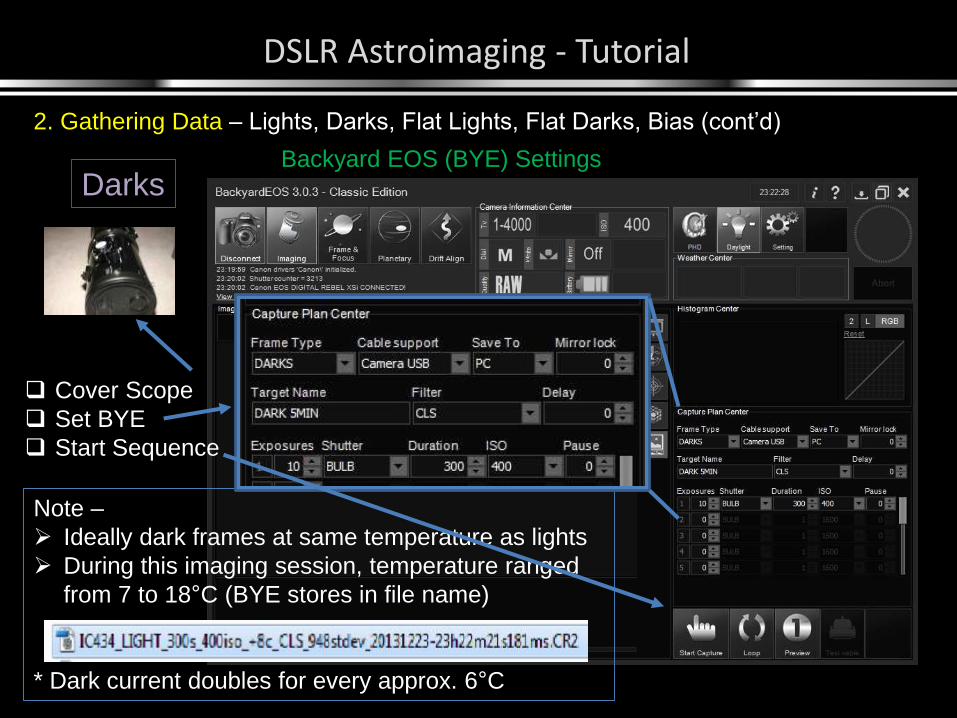
2. Gathering Data – Lights, Darks, Flat Lights, Flat Darks, Bias (cont’d)
DarksBackyard EOS (BYE) Settings
Cover Scope
Set BYE
Start Sequence
Note –
Ideally dark frames at same temperature as lights
During this imaging session, temperature ranged
from 7 to 18°C (BYE stores in file name)
* Dark current doubles for every approx. 6°C
DSLR Astroimaging - Tutorial
S. Douglas Holland
2. Gathering Data – Lights, Darks, Flat Lights, Flat Darks, Bias (cont’d)
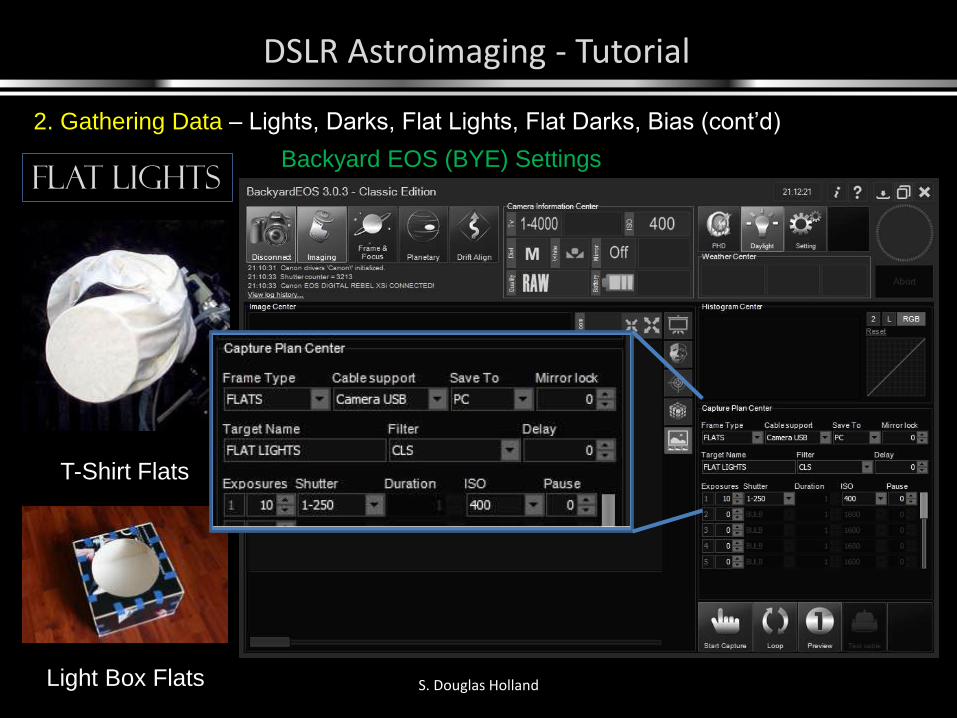
Flat lightsBackyard EOS (BYE) Settings
T-Shirt Flats
Light Box Flats
DSLR Astroimaging - Tutorial
S. Douglas Holland
2. Gathering Data – Lights, Darks, Flat Lights, Flat Darks, Bias (cont’d)
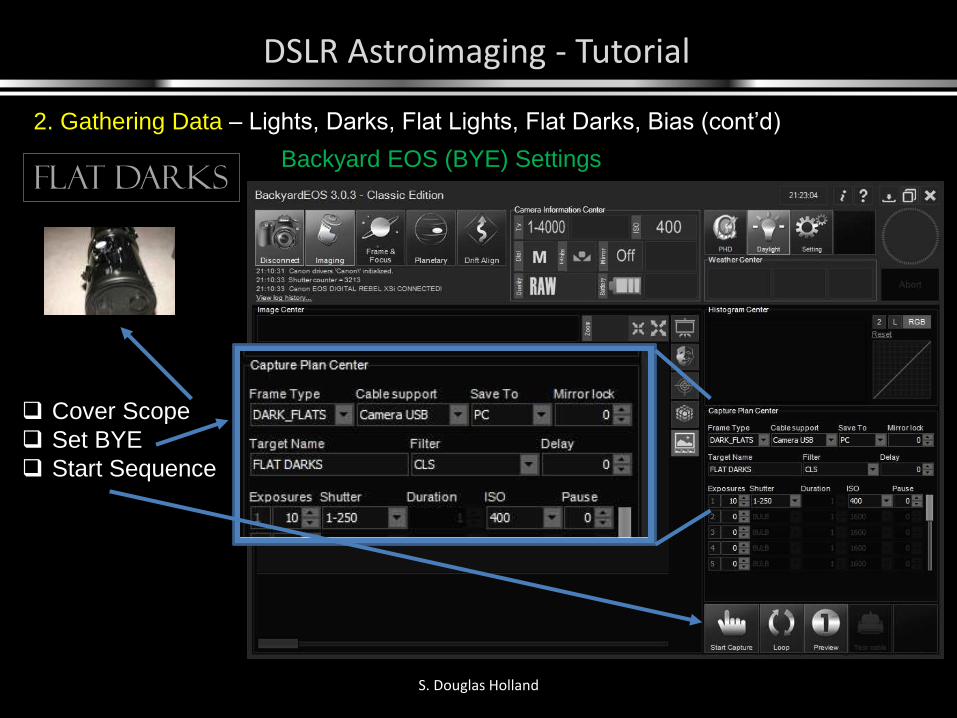
Flat DARKSBackyard EOS (BYE) Settings
Cover Scope
Set BYE
Start Sequence
DSLR Astroimaging - Tutorial
S. Douglas Holland
2. Gathering Data – Lights, Darks, Flat Lights, Flat Darks, Bias (cont’d)
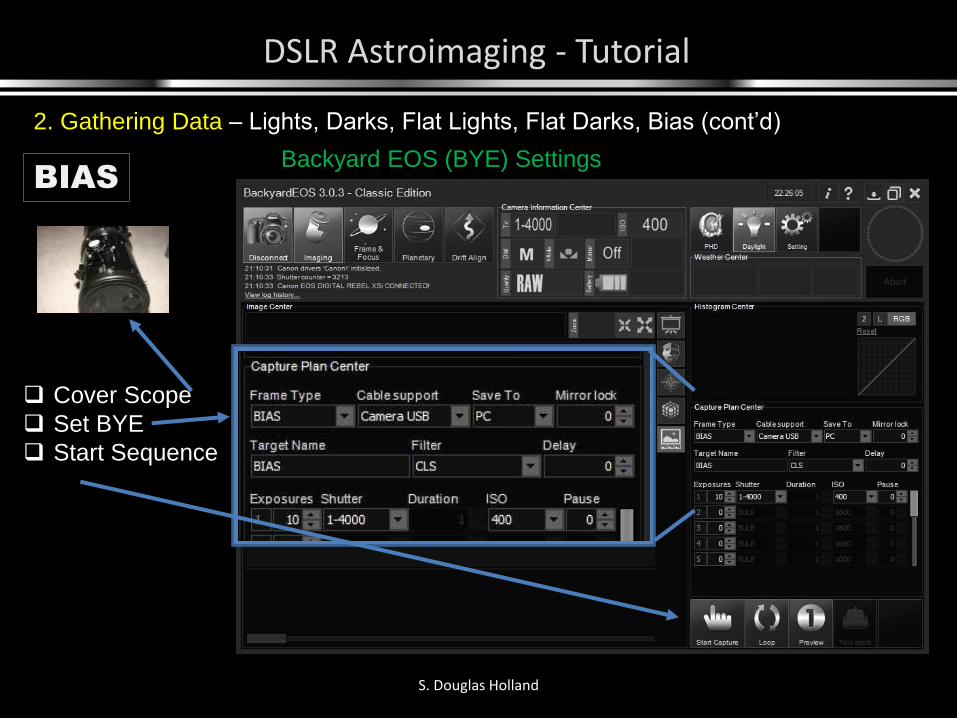
BIAS
Backyard EOS (BYE) Settings
Cover Scope
Set BYE
Start Sequence
DSLR Astroimaging - Tutorial
S. Douglas Holland
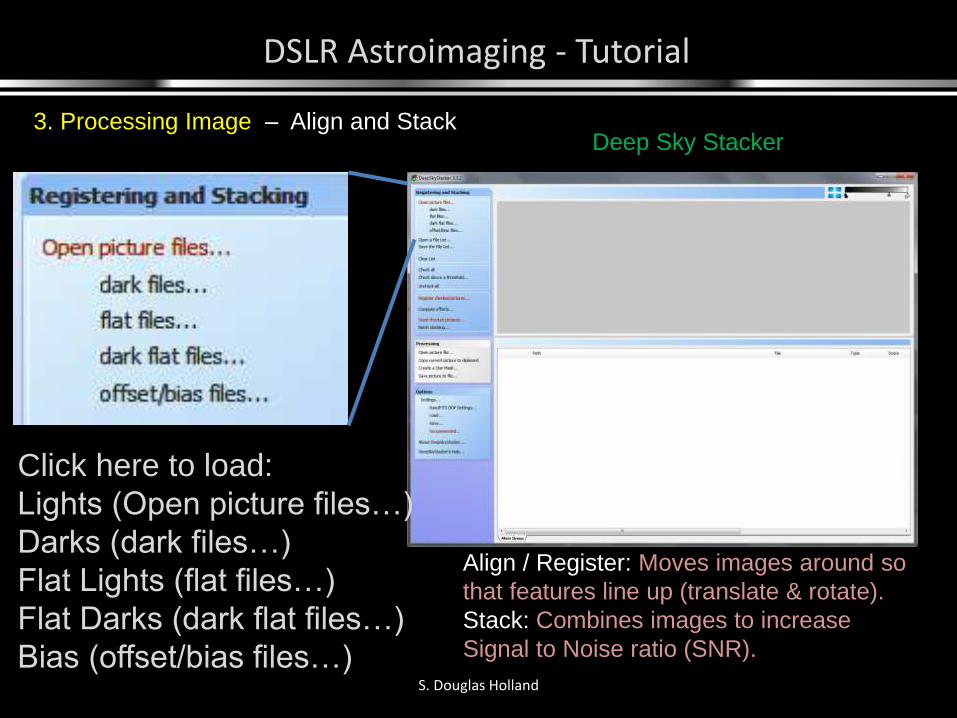
3. Processing Image – Align and Stack Deep Sky Stacker
Click here to load:
Lights (Open picture files…)
Darks (dark files…)
Flat Lights (flat files…)
Flat Darks (dark flat files…)
Bias (offset/bias files…)
Align / Register: Moves images around so
that features line up (translate & rotate).
Stack: Combines images to increase
Signal to Noise ratio (SNR).
DSLR Astroimaging - Tutorial
S. Douglas Holland
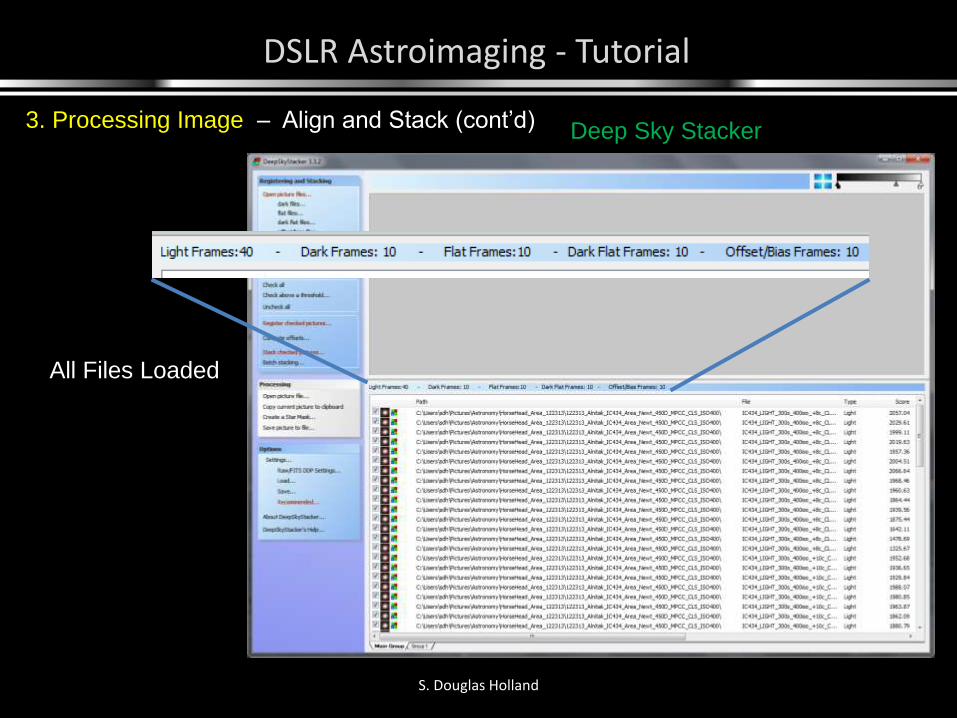
Deep Sky Stacker
All Files Loaded
3. Processing Image – Align and Stack (cont’d)
DSLR Astroimaging - Tutorial
S. Douglas Holland
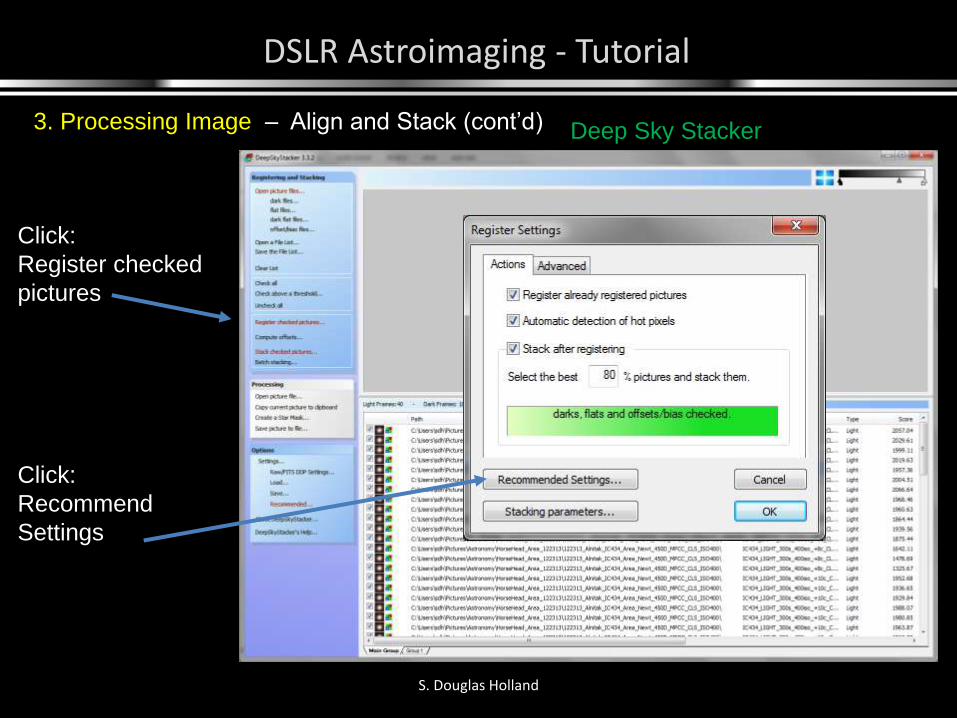
Click:
Register checked
pictures
Click:
Recommend
Settings
3. Processing Image – Align and Stack (cont’d) Deep Sky Stacker
DSLR Astroimaging - Tutorial
S. Douglas Holland
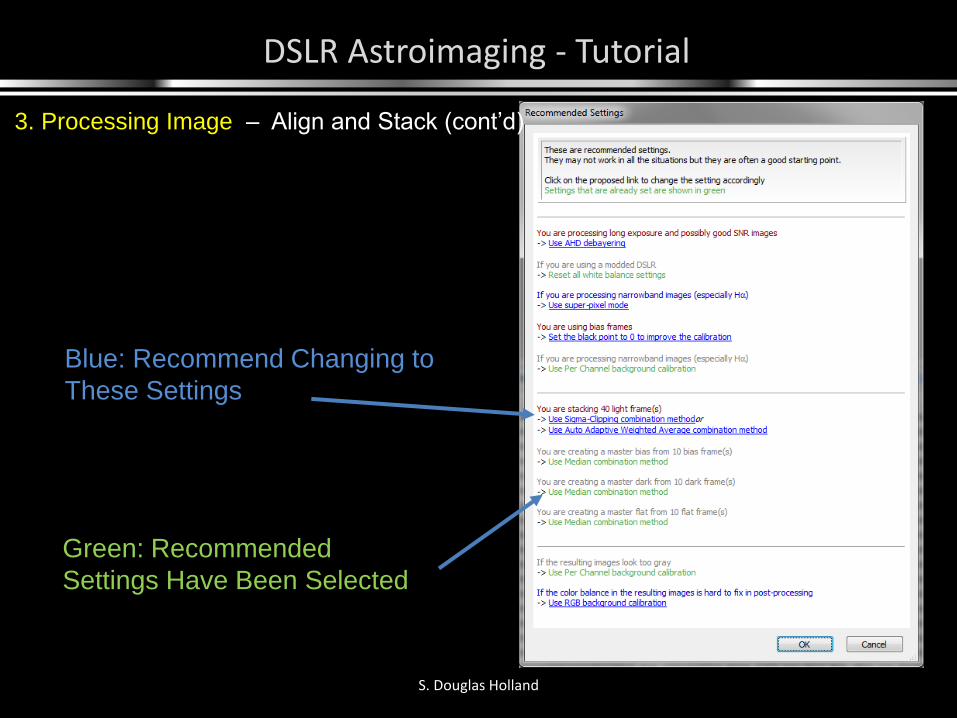
Green: Recommended
Settings Have Been Selected
Blue: Recommend Changing to
These Settings
3. Processing Image – Align and Stack (cont’d)
DSLR Astroimaging - Tutorial
S. Douglas Holland
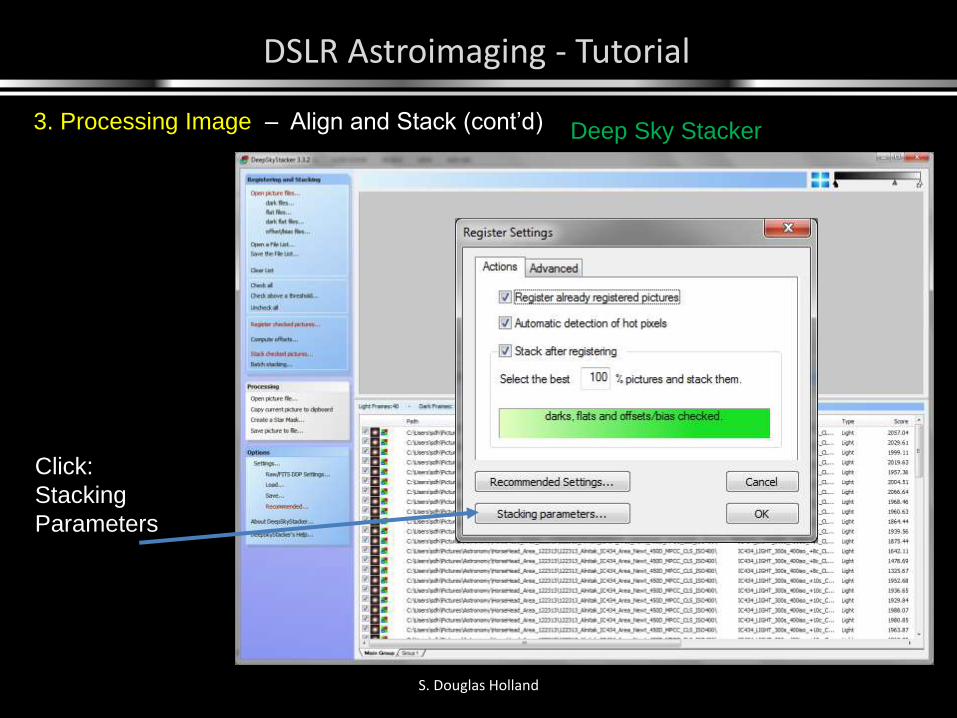
3. Processing Image – Align and Stack (cont’d)
Click:
Stacking
Parameters
Deep Sky Stacker
DSLR Astroimaging - Tutorial
S. Douglas Holland
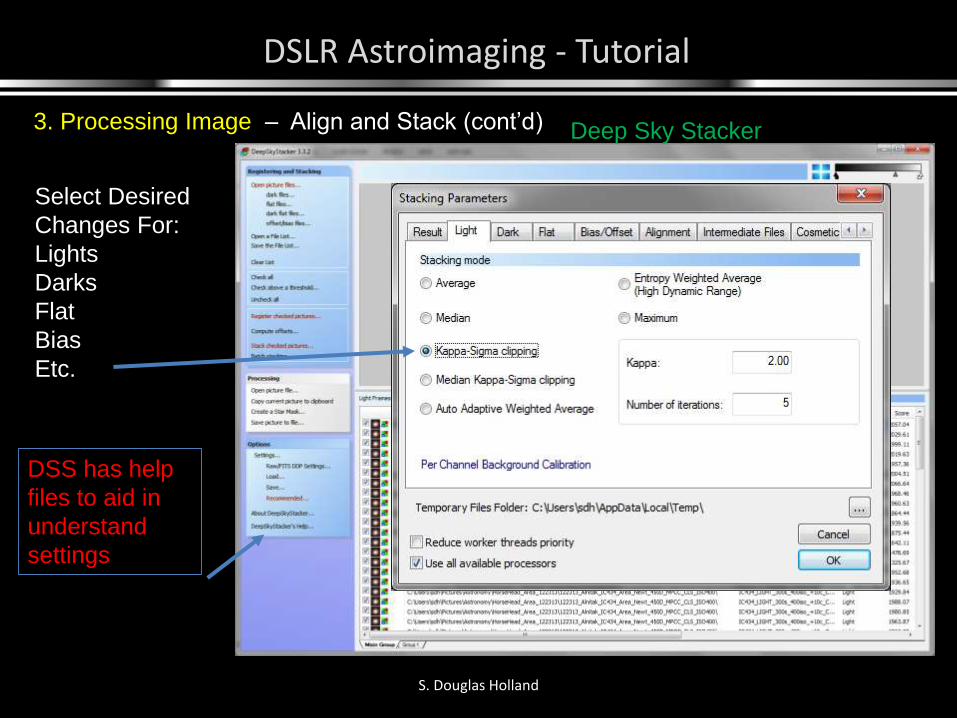
3. Processing Image – Align and Stack (cont’d)
Select Desired
Changes For:
Lights
Darks
Flat
Bias
Etc.
Deep Sky Stacker
DSS has help
files to aid in
understand
settings
DSLR Astroimaging - Tutorial
S. Douglas Holland
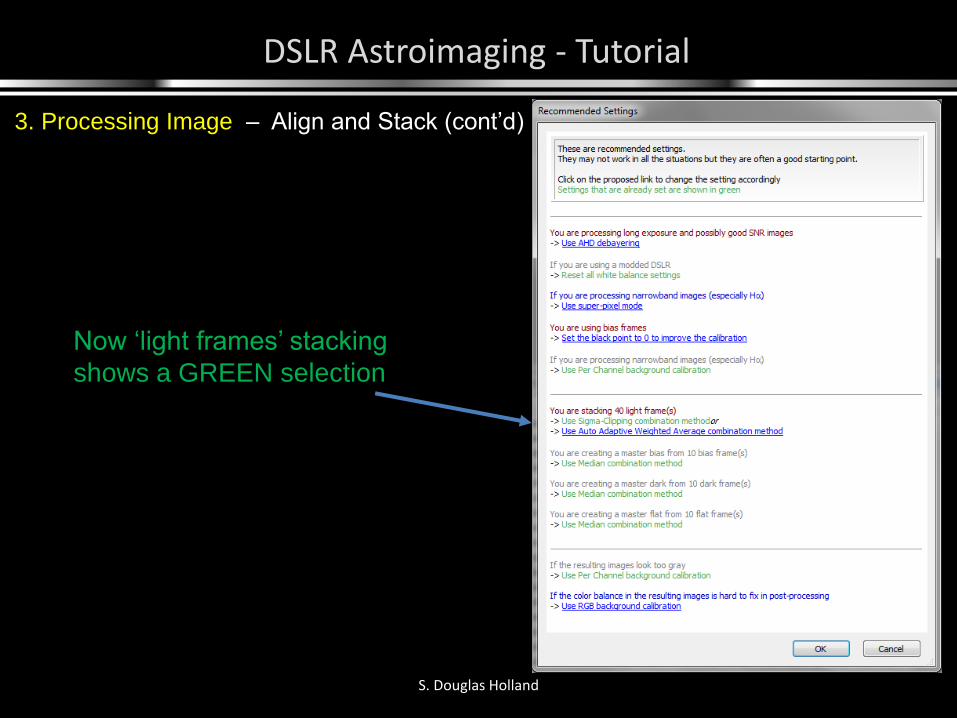
Now ‘light frames’ stacking
shows a GREEN selection
3. Processing Image – Align and Stack (cont’d)
DSLR Astroimaging - Tutorial
S. Douglas Holland
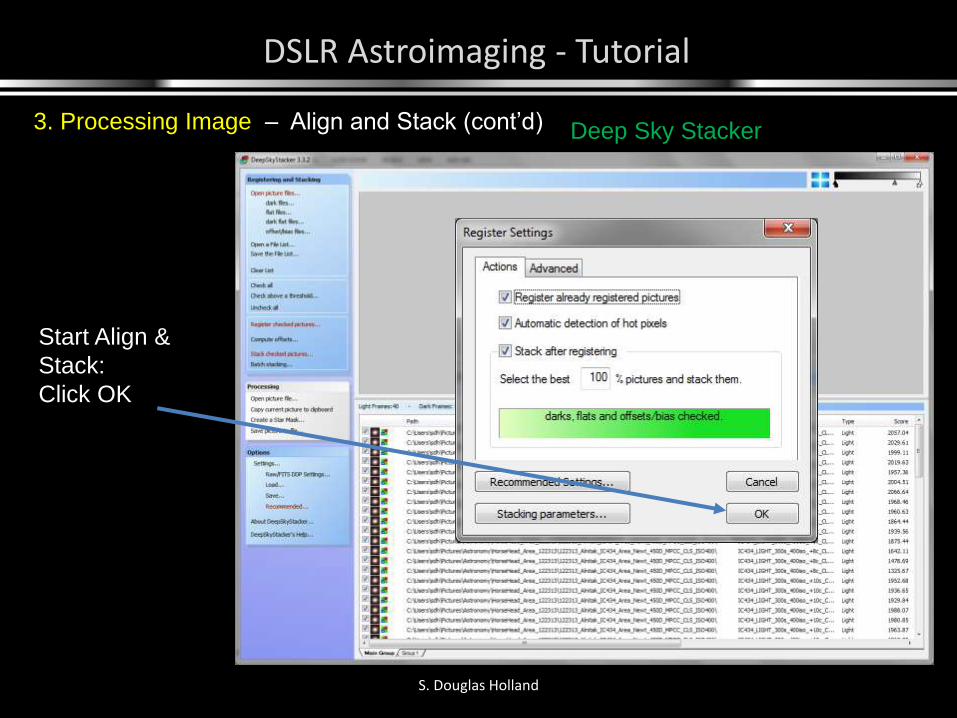
3. Processing Image – Align and Stack (cont’d)
Start Align &
Stack:
Click OK
Deep Sky Stacker
DSLR Astroimaging - Tutorial
S. Douglas Holland
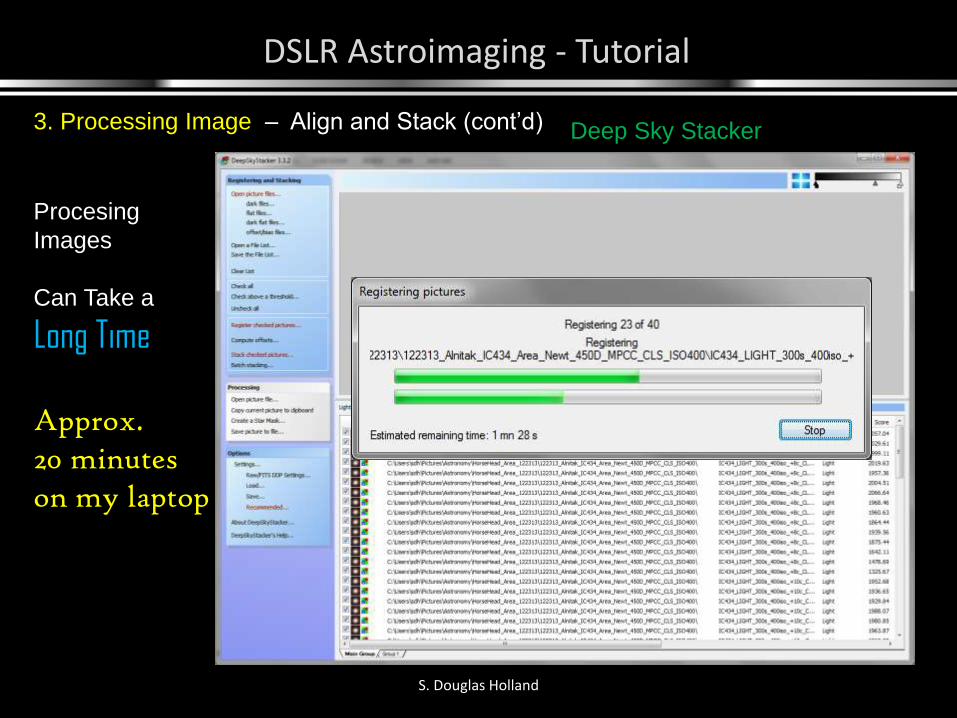
3. Processing Image – Align and Stack (cont’d) Deep Sky Stacker
Procesing
Images
Can Take a
Long Time
Approx.20 minuteson my laptop
DSLR Astroimaging - Tutorial
S. Douglas Holland
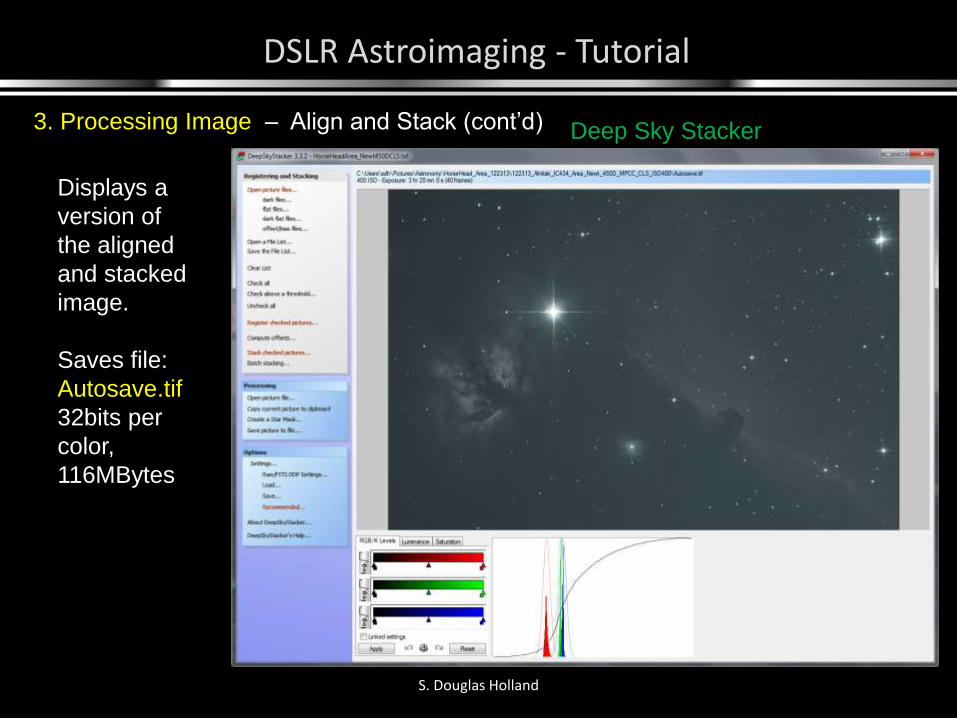
3. Processing Image – Align and Stack (cont’d) Deep Sky Stacker
Displays a
version of
the aligned
and stacked
image.
Saves file:
Autosave.tif
32bits per
color,
116MBytes
DSLR Astroimaging - Tutorial
S. Douglas Holland
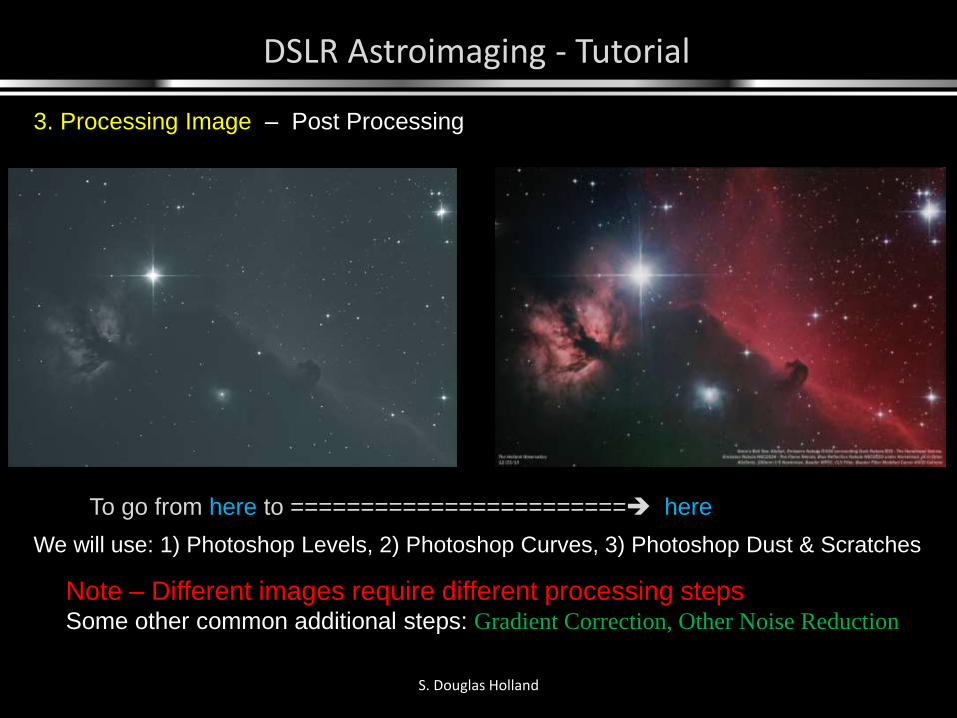
3. Processing Image – Post Processing
To go from here to ======================== here
We will use: 1) Photoshop Levels, 2) Photoshop Curves, 3) Photoshop Dust & Scratches
Note – Different images require different processing stepsSome other common additional steps: Gradient Correction, Other Noise Reduction
DSLR Astroimaging - Tutorial
S. Douglas Holland
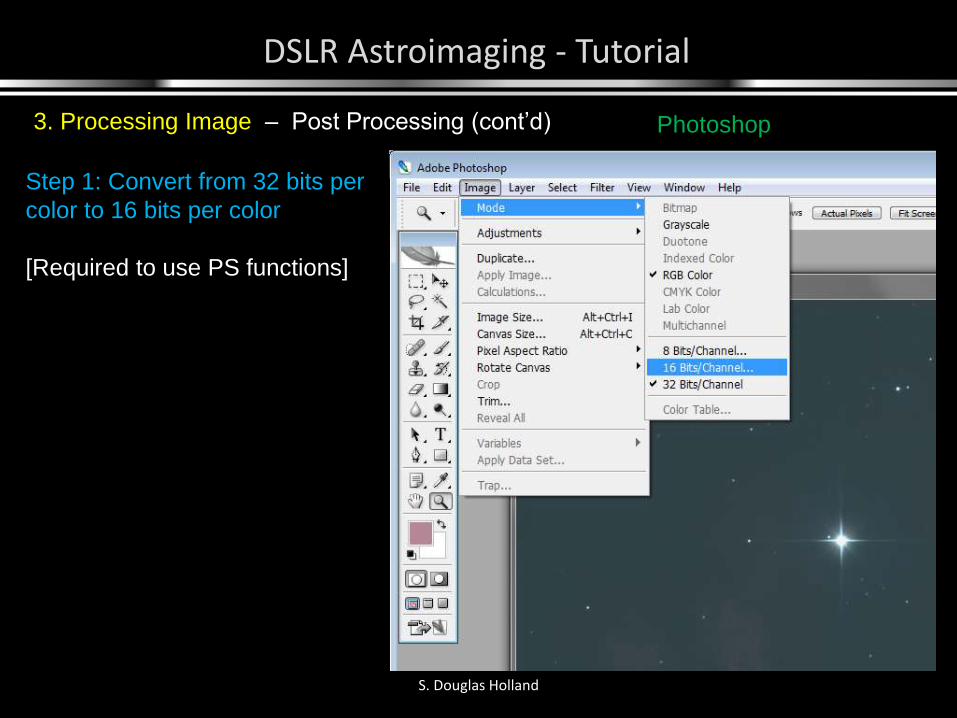
3. Processing Image – Post Processing (cont’d) Photoshop
Step 1: Convert from 32 bits per
color to 16 bits per color
[Required to use PS functions]
DSLR Astroimaging - Tutorial
S. Douglas Holland
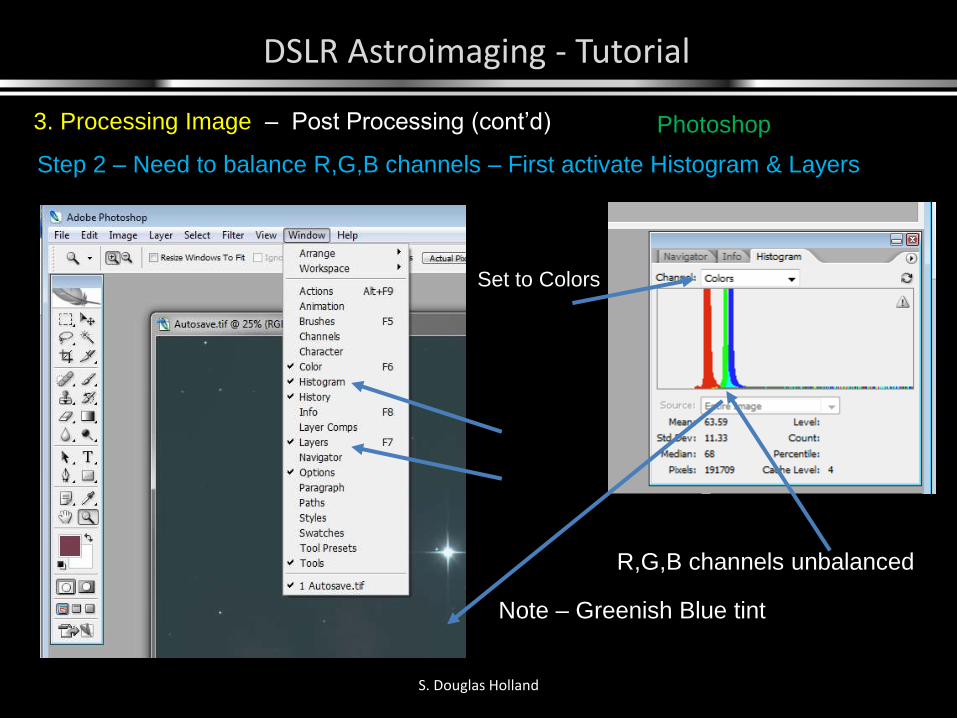
3. Processing Image – Post Processing (cont’d)
Step 2 – Need to balance R,G,B channels – First activate Histogram & Layers
Set to Colors
R,G,B channels unbalanced
Note – Greenish Blue tint
Photoshop
DSLR Astroimaging - Tutorial
S. Douglas Holland
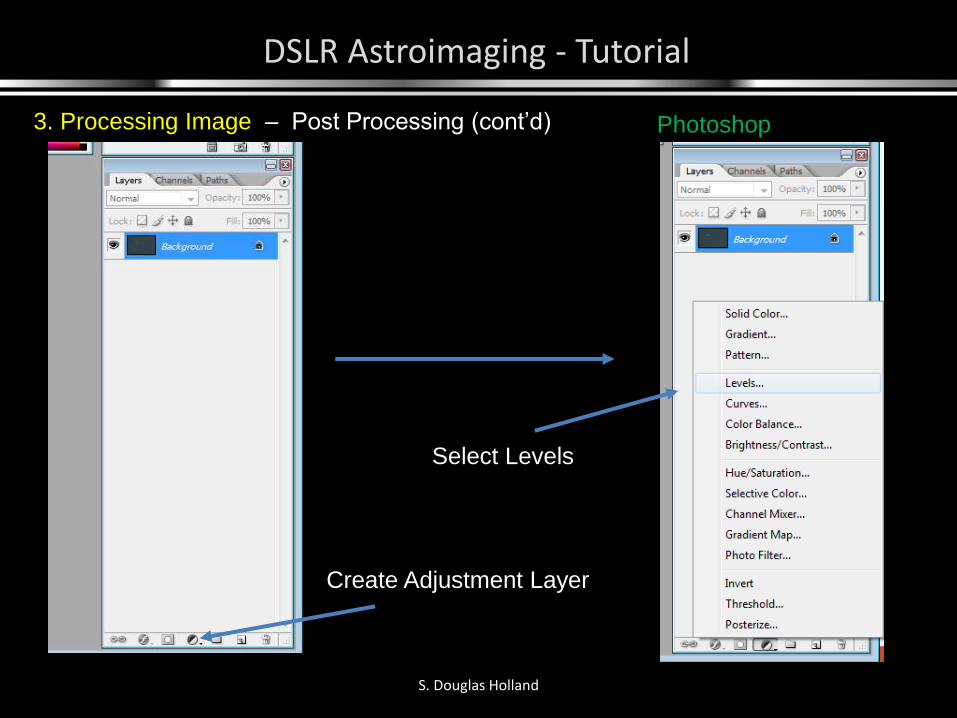
3. Processing Image – Post Processing (cont’d) Photoshop
Create Adjustment Layer
Select Levels

DSLR Astroimaging - Tutorial
S. Douglas Holland
3. Processing Image – Post Processing (cont’d) Photoshop
Levels Adjust
Results shown
on Histogram
DSLR Astroimaging - Tutorial
S. Douglas Holland
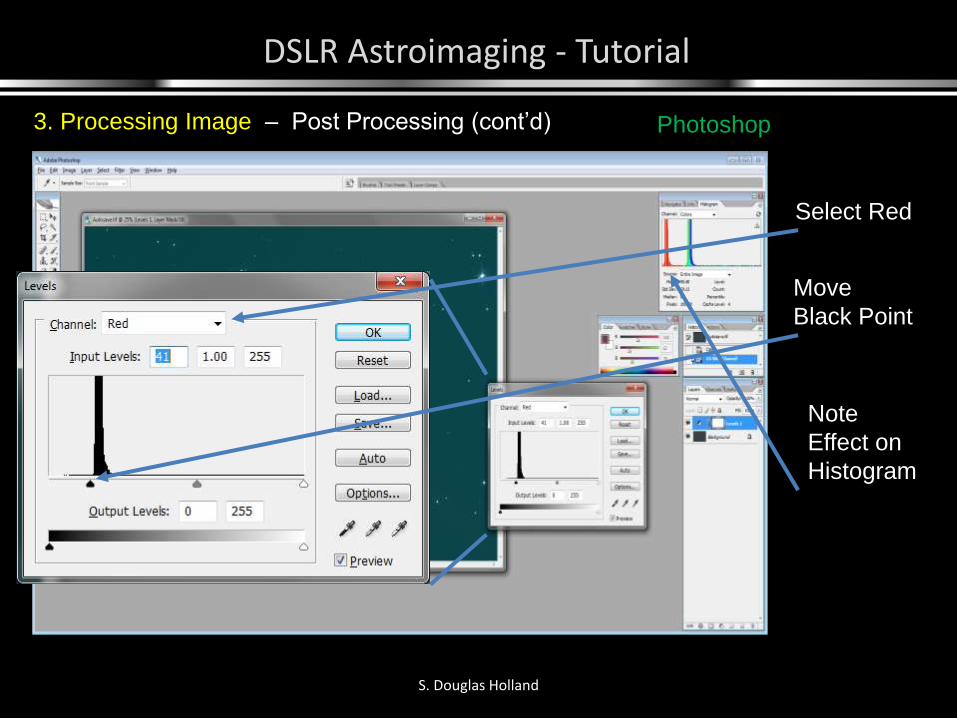
3. Processing Image – Post Processing (cont’d) Photoshop
Select Red
Move
Black Point
Note
Effect on
Histogram
DSLR Astroimaging - Tutorial
S. Douglas Holland
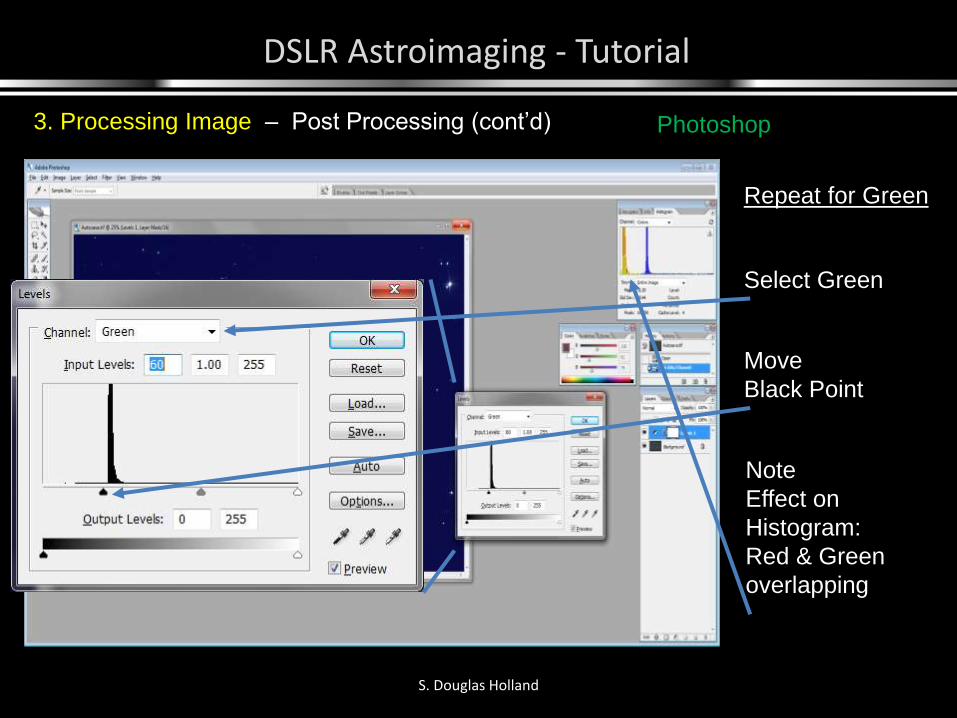
3. Processing Image – Post Processing (cont’d) Photoshop
Repeat for Green
Select Green
Move
Black Point
Note
Effect on
Histogram:
Red & Green
overlapping
DSLR Astroimaging - Tutorial
S. Douglas Holland
3. Processing Image – Post Processing (cont’d) Photoshop
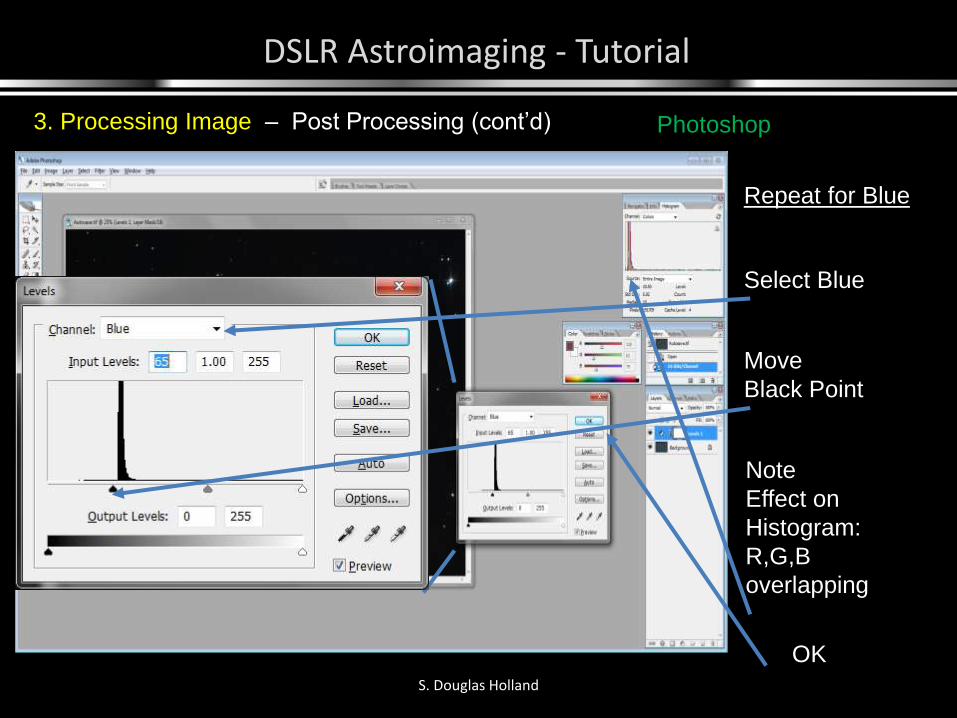
Repeat for Blue
Select Blue
Move
Black Point
Note
Effect on
Histogram:
R,G,B
overlapping
OK
DSLR Astroimaging - Tutorial
S. Douglas Holland
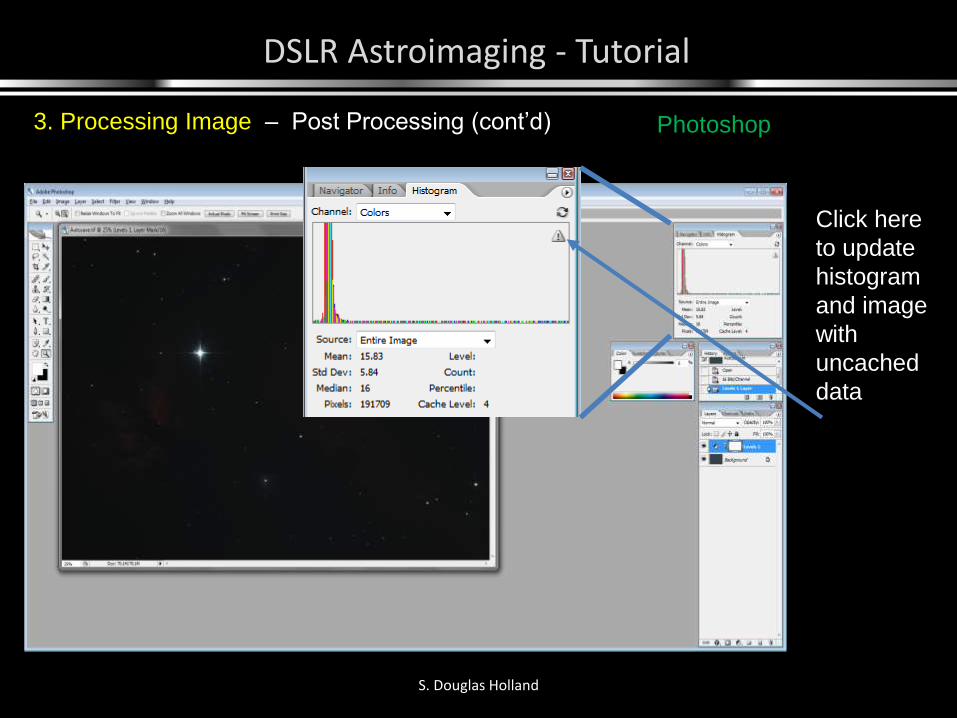
3. Processing Image – Post Processing (cont’d) Photoshop
Click here
to update
histogram
and image
with
uncached
data
DSLR Astroimaging - Tutorial
S. Douglas Holland
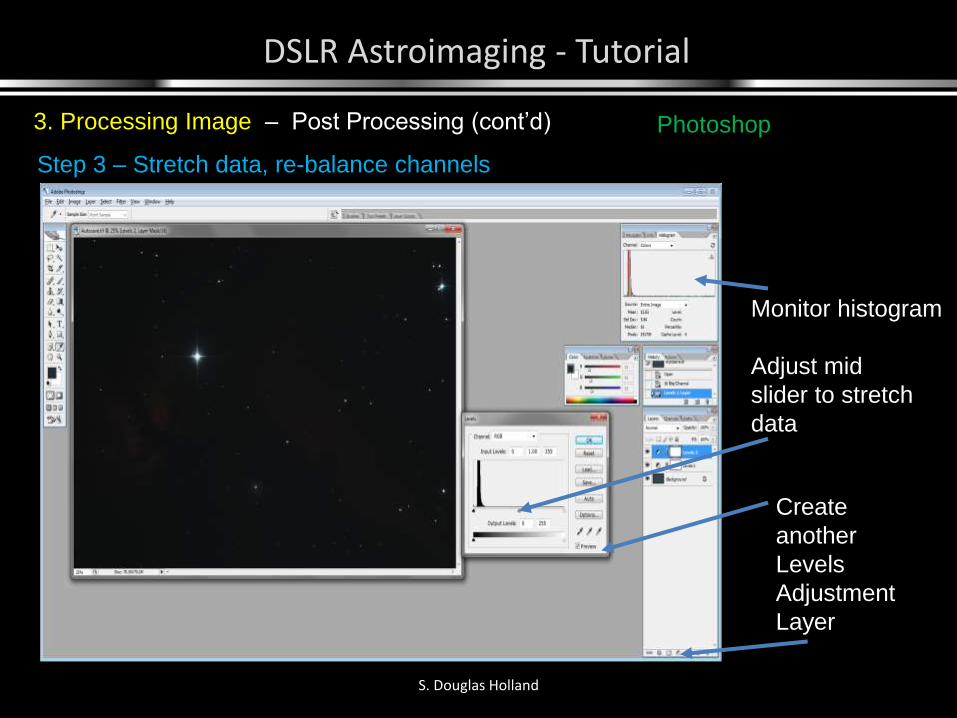
3. Processing Image – Post Processing (cont’d) Photoshop
Step 3 – Stretch data, re-balance channels
Create
another
Levels
Adjustment
Layer
Monitor histogram
Adjust mid
slider to stretch
data
DSLR Astroimaging - Tutorial
S. Douglas Holland
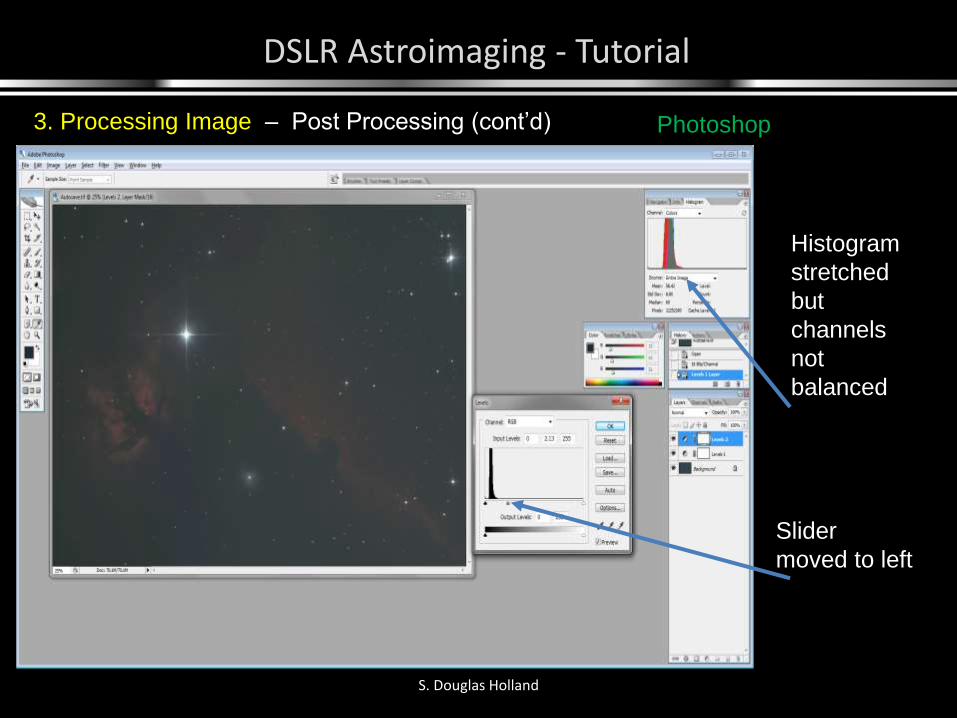
3. Processing Image – Post Processing (cont’d) Photoshop
Slider
moved to left
Histogram
stretched
but
channels
not
balanced
DSLR Astroimaging - Tutorial
S. Douglas Holland
3. Processing Image – Post Processing (cont’d) Photoshop
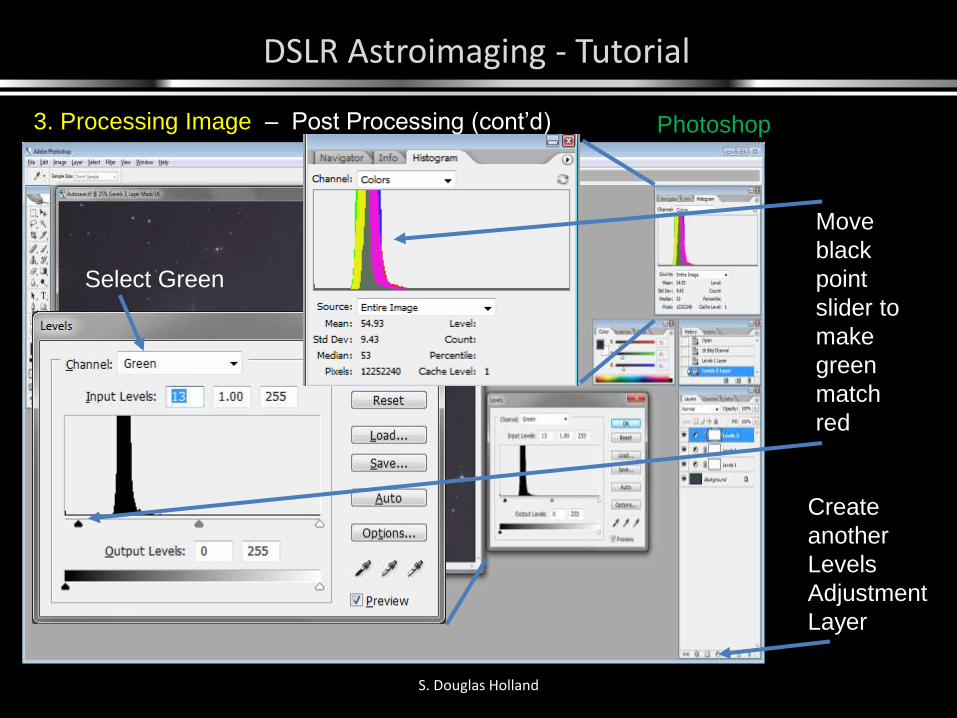
Create
another
Levels
Adjustment
Layer
Move
black
point
slider to
make
green
match
red
Select Green

DSLR Astroimaging - Tutorial
S. Douglas Holland
3. Processing Image – Post Processing (cont’d) Photoshop
Select Blue
Move
black
point
slider to
make
blue
match
red &
green
OK

DSLR Astroimaging - Tutorial
S. Douglas Holland
3. Processing Image – Post Processing (cont’d) Photoshop
Create
another
Levels
Adjustment
Layer
Adjust black
point of all RGB
channels
OK
Select RGB
DSLR Astroimaging - Tutorial
S. Douglas Holland
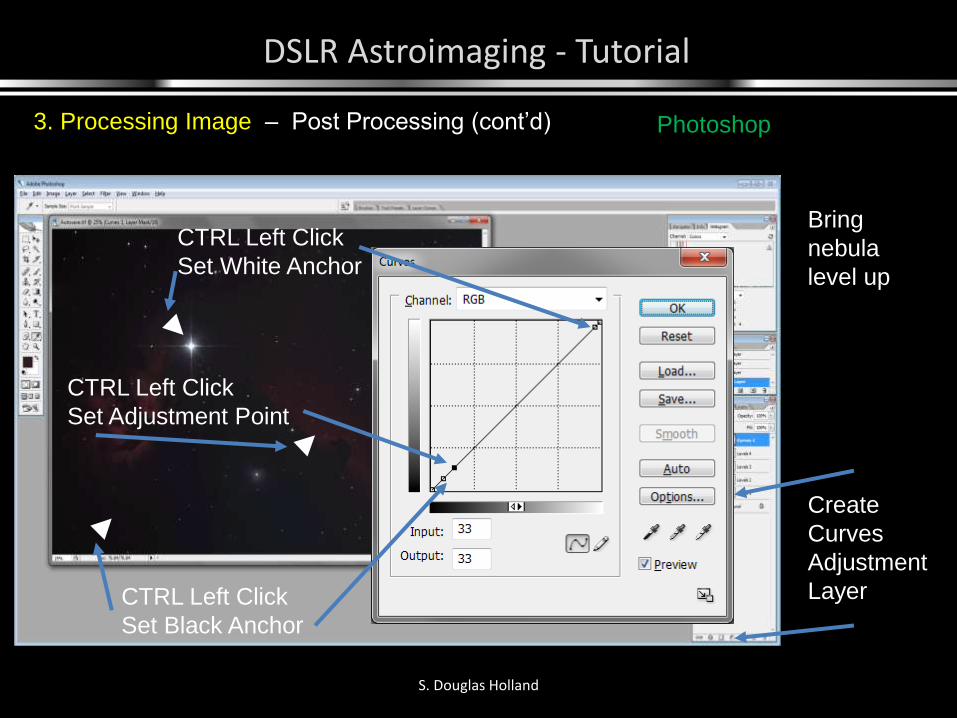
3. Processing Image – Post Processing (cont’d) Photoshop
Create
Curves
Adjustment
LayerCTRL Left Click
Set Black Anchor
CTRL Left Click
Set White Anchor
CTRL Left Click
Set Adjustment Point
Bring
nebula
level up
DSLR Astroimaging - Tutorial
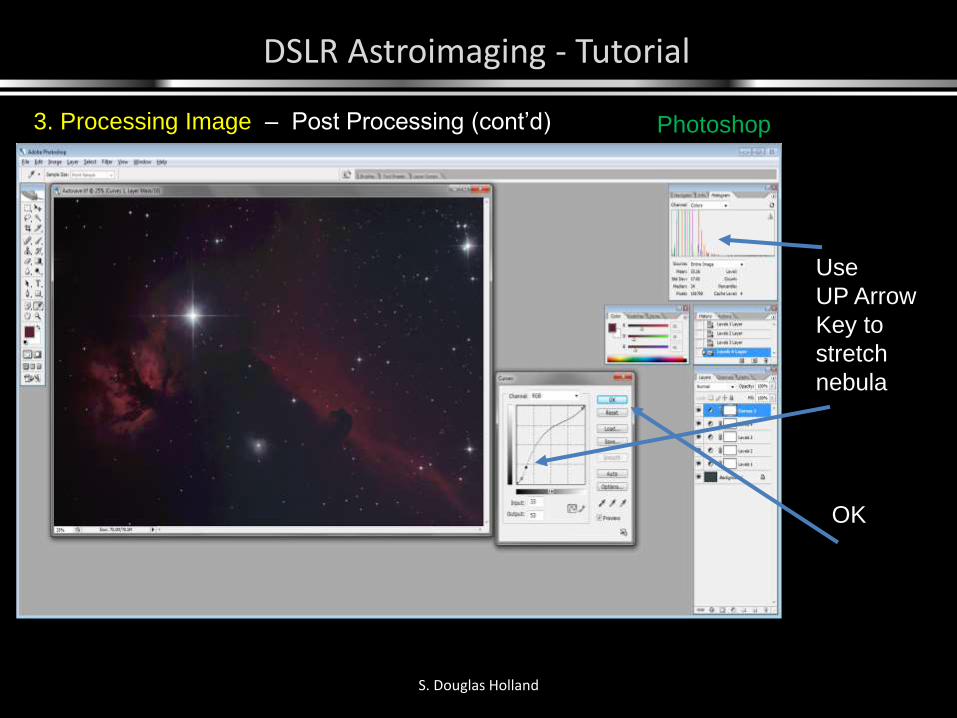
S. Douglas Holland
Use
UP Arrow
Key to
stretch
nebula
3. Processing Image – Post Processing (cont’d) Photoshop
OK
DSLR Astroimaging - Tutorial
S. Douglas Holland
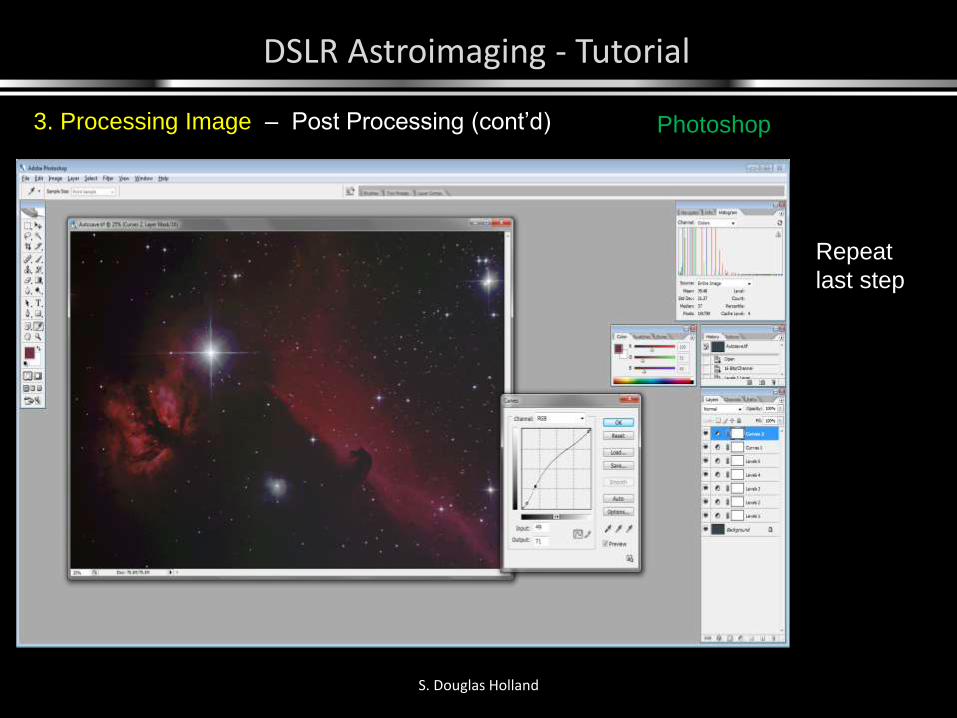
3. Processing Image – Post Processing (cont’d) Photoshop
Repeat
last step
DSLR Astroimaging - Tutorial
S. Douglas Holland
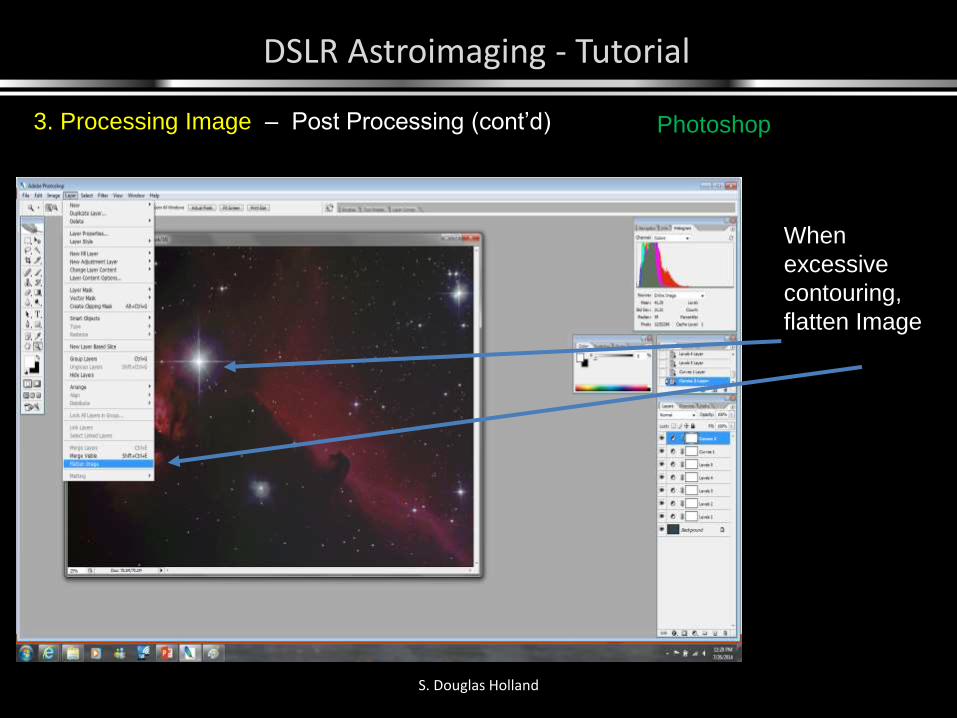
3. Processing Image – Post Processing (cont’d) Photoshop
When
excessive
contouring,
flatten Image
DSLR Astroimaging - Tutorial
S. Douglas Holland
Adjust
Green
& Blue
to
match
Red
3. Processing Image – Post Processing (cont’d) Photoshop
Create
another
Curves
Adjustment
Layer
CTRL Left Click
Move point up
Select Green
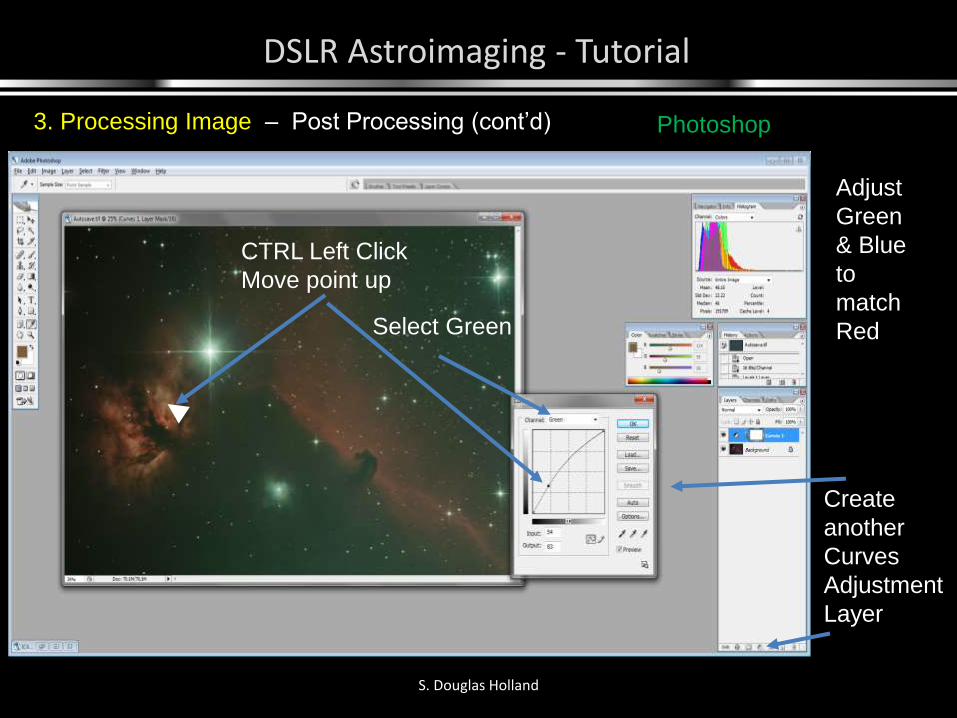
DSLR Astroimaging - Tutorial
S. Douglas Holland
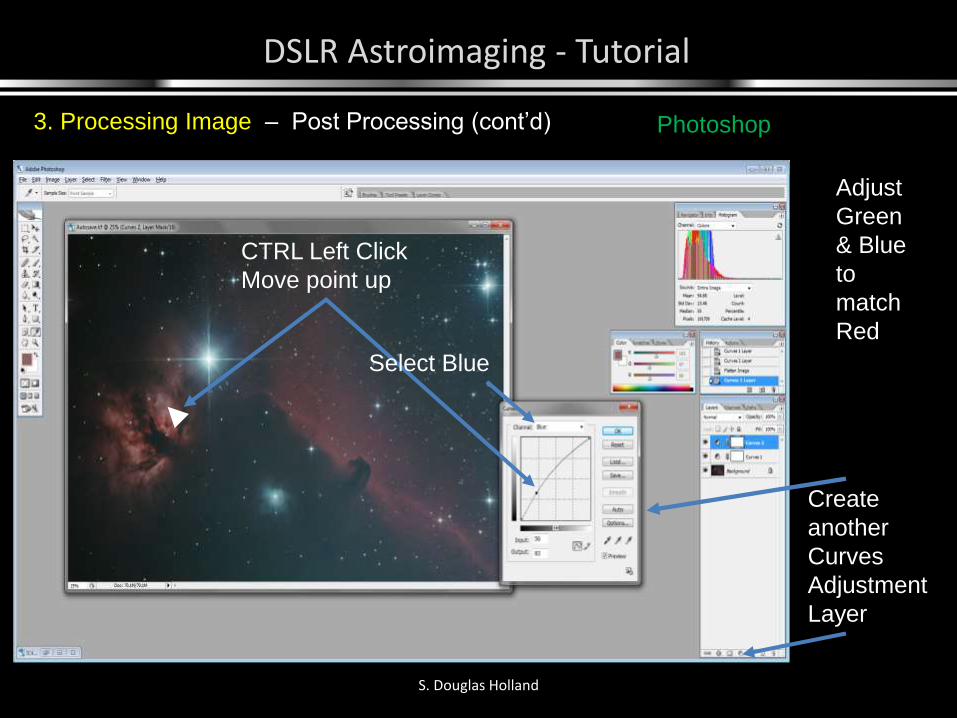
3. Processing Image – Post Processing (cont’d) Photoshop
Create
another
Curves
Adjustment
Layer
CTRL Left Click
Move point up
Select Blue
Adjust
Green
& Blue
to
match
Red

DSLR Astroimaging - Tutorial
S. Douglas Holland
3. Processing Image – Post Processing (cont’d) Photoshop
Create
another
Curves
Adjustment
Layer
Bring Red
up to
accentuate
the nebula
CTRL Left Click
Move point up
Select Red
DSLR Astroimaging - Tutorial
S. Douglas Holland
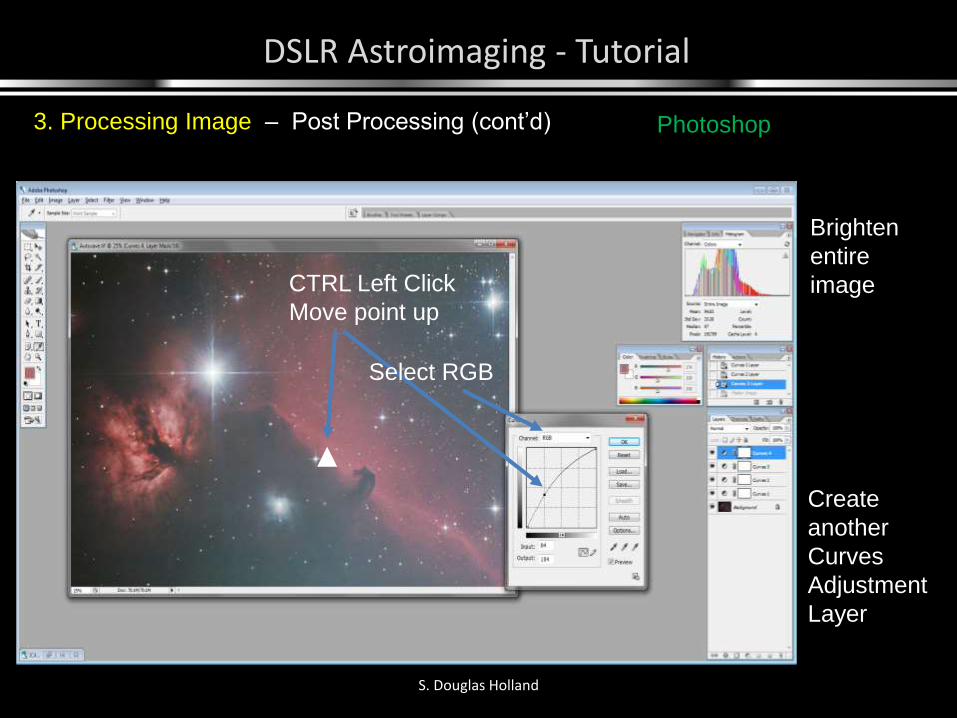
3. Processing Image – Post Processing (cont’d) Photoshop
Create
another
Curves
Adjustment
Layer
Brighten
entire
imageCTRL Left Click
Move point up
Select RGB
DSLR Astroimaging - Tutorial
S. Douglas Holland
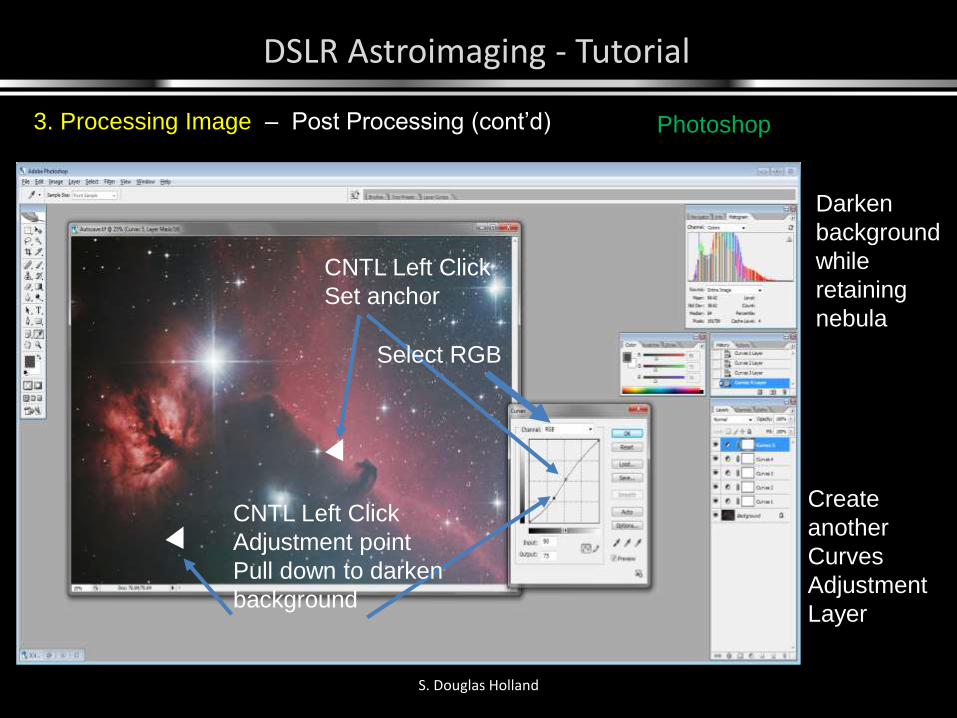
3. Processing Image – Post Processing (cont’d) Photoshop
Create
another
Curves
Adjustment
Layer
Darken
background
while
retaining
nebula
CNTL Left Click
Set anchor
CNTL Left Click
Adjustment point
Pull down to darken
background
Select RGB
DSLR Astroimaging - Tutorial
S. Douglas Holland
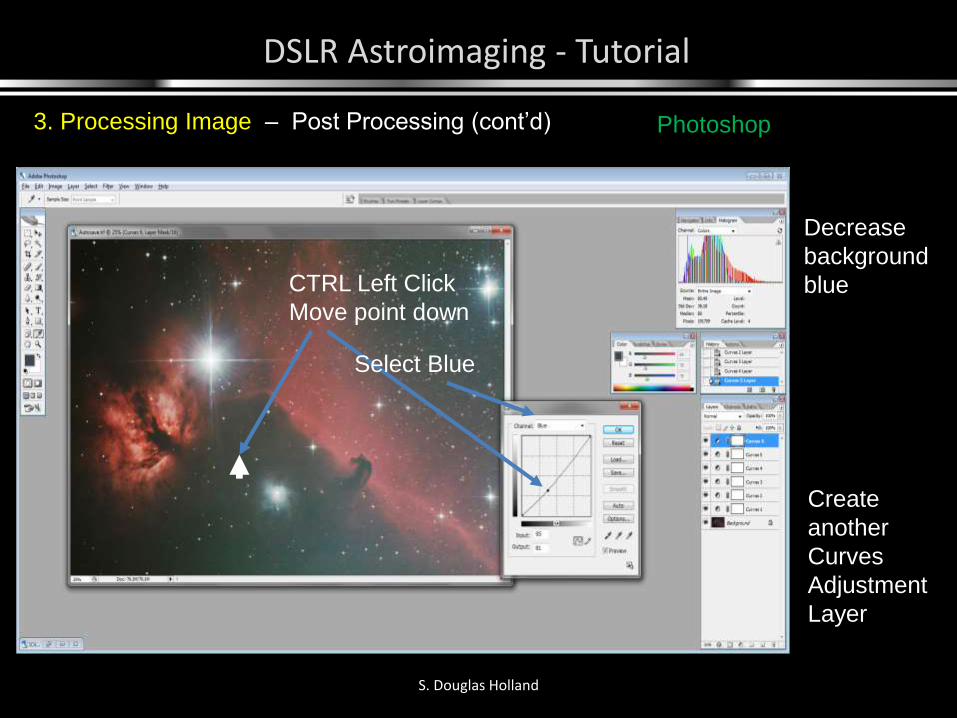
3. Processing Image – Post Processing (cont’d) Photoshop
Create
another
Curves
Adjustment
Layer
Decrease
background
blueCTRL Left Click
Move point down
Select Blue
DSLR Astroimaging - Tutorial
S. Douglas Holland
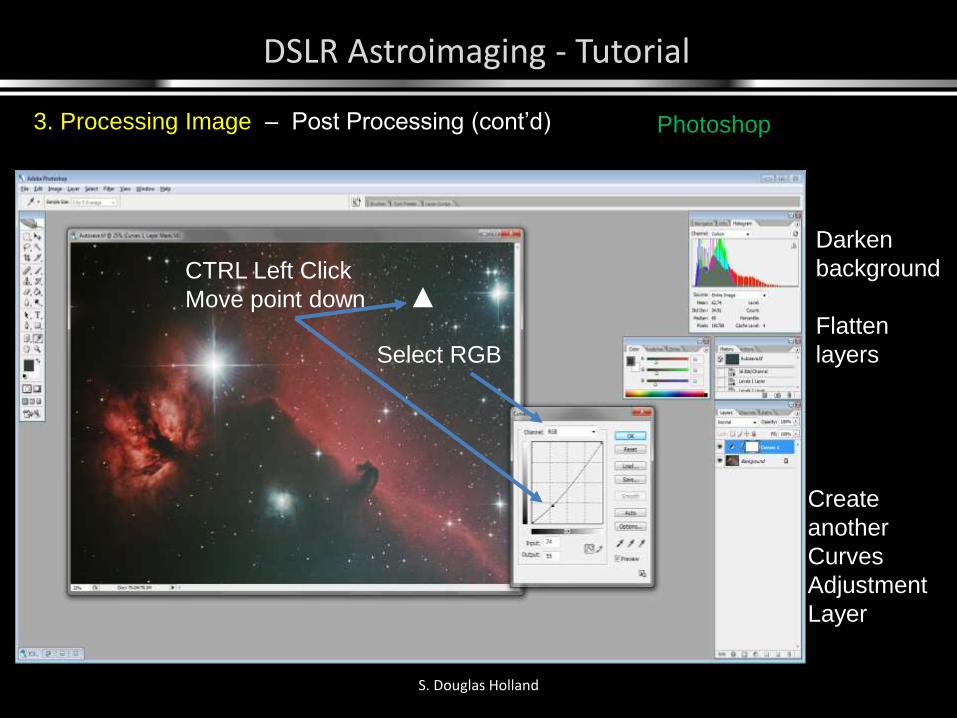
3. Processing Image – Post Processing (cont’d) Photoshop
Create
another
Curves
Adjustment
Layer
Darken
background
Flatten
layers
CTRL Left Click
Move point down
Select RGB
DSLR Astroimaging - Tutorial
S. Douglas Holland
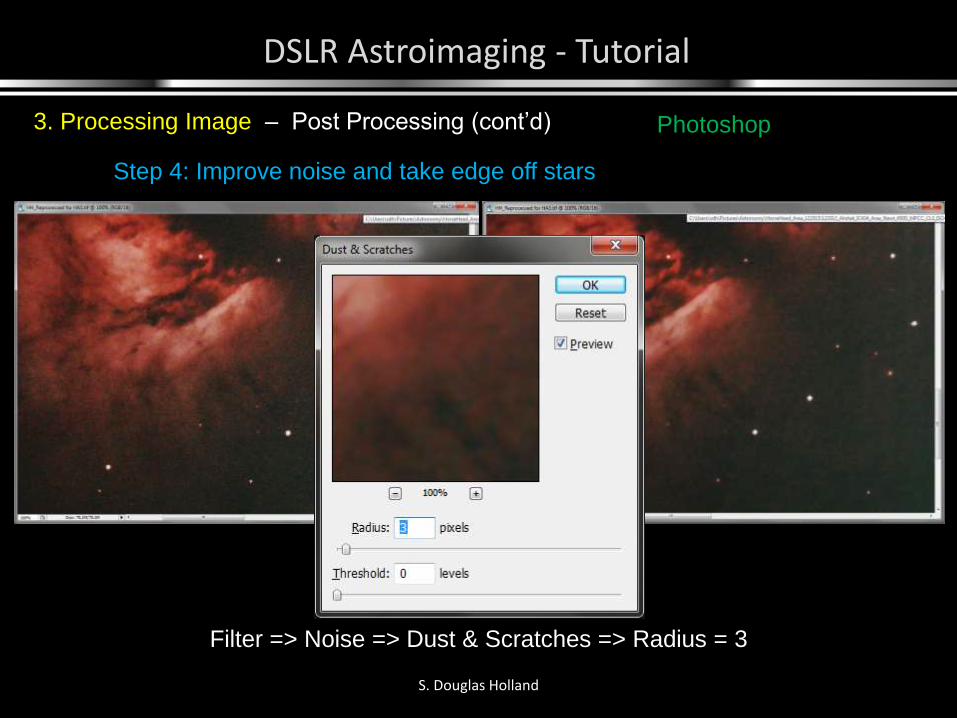
3. Processing Image – Post Processing (cont’d) Photoshop
Filter => Noise => Dust & Scratches => Radius = 3
Step 4: Improve noise and take edge off stars
DSLR Astroimaging - Tutorial
S. Douglas Holland
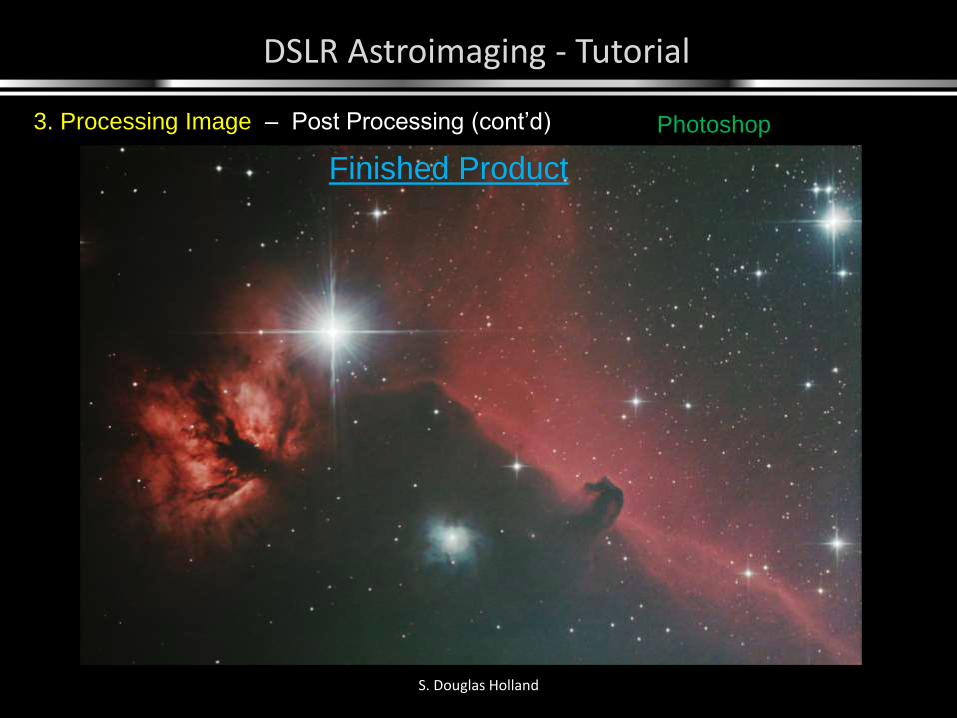
3. Processing Image – Post Processing (cont’d) Photoshop
Finished Product
DSLR Astroimaging - Tutorial
– DSLR Astrophotography by Michael A. Covington
– The Handbook of Astronomical Image Processing by Richard Berry and James Burnell
• Best book to understand theory of image calibration, comes with AIP4WIN software
– The 100 Best Astrophotography Targets by Ruben Kier
– Photoshop Astronomy by R. Scott Ireland
– Telescopes, Eyepieces, Astrographs by Smith, Ceragioli & Berry
• Tells the pros and cons of different telescope designs
Visit my web page:– www.holland-observatory.net
– The presentation posted under ‘Astrophotography => Technique’
S. Douglas Holland
4. References