durallo - hvg · durallo splashbacks and panels have been assessed for fire safety properties. hvg...
TRANSCRIPT
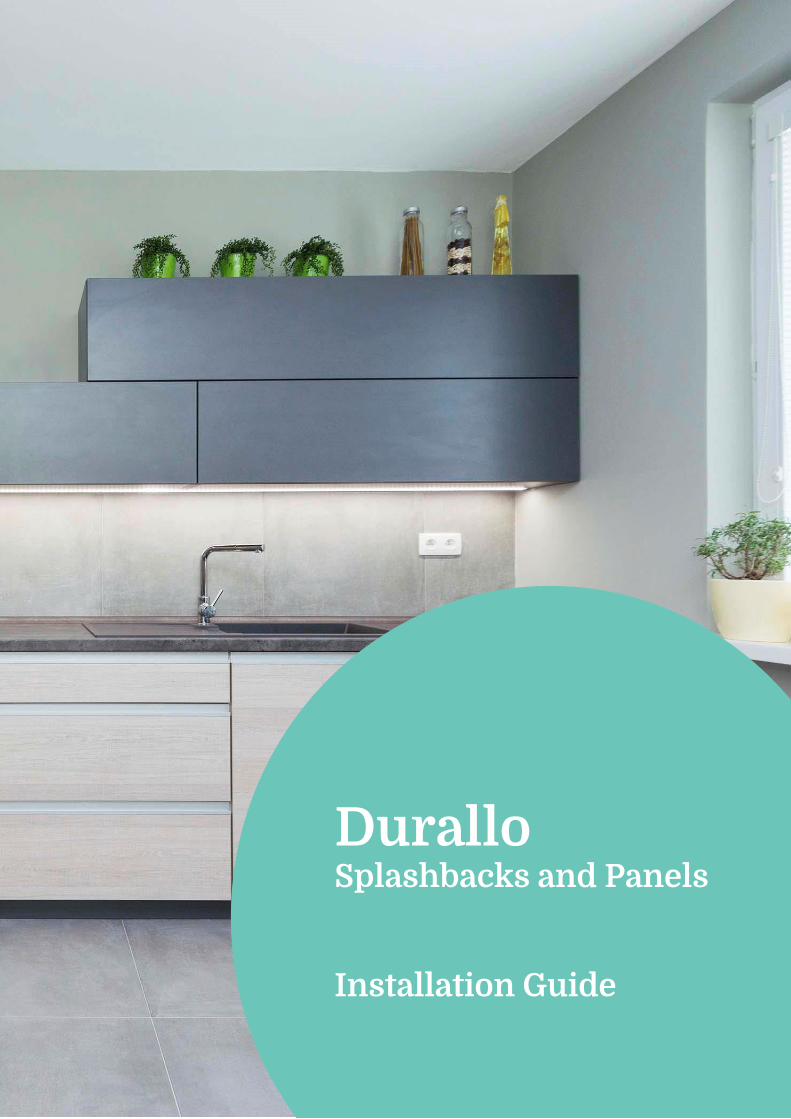
Durallo Splashbacks and Panels Installation Guide
HVG Decorative Building Products 29 Henderson Street Turrella, NSW, 2205 P: 1300 854 166 F: 02 9556 1975 E: [email protected] www.hvgbuilding.com.au
Page 1 of 20
CONTENTS Part 1: Things to Know about Durallo Splashbacks and Panels ...................................................................... 3
Important Information ........................................................................................................................ 3
General Information ............................................................................................................................. 3
Protective Film ..................................................................................................................................... 3
Processing ........................................................................................................................................... 4
Part 2: Introduction to Durallo Splashbacks and Panels ................................................................................. 5
The Product ......................................................................................................................................... 5
Durallo Applications ............................................................................................................................ 5
Sheet Sizes .......................................................................................................................................... 5
Colours ................................................................................................................................................ 5
Adhesives ............................................................................................................................................ 6
Technical Specifications ...................................................................................................................... 6
MSDS ................................................................................................................................................... 6
Part 3: Pre-Installation Preparations .............................................................................................................. 7
Health and Safety ................................................................................................................................ 7
Thermal Expansion and Assembly Directions ..................................................................................... 7
Sheet Inspection ................................................................................................................................. 7
Fixing elements without Jamming ...................................................................................................... 7
Processing Methods ............................................................................................................................ 8
SAWING WITH HAND-HELD CIRCULAR SAWS ................................................................................. 8
SAWING WITH JIG SAWS ................................................................................................................. 8
ROUTING ......................................................................................................................................... 8
WATER JET CUTTING ....................................................................................................................... 8
PUNCHING / SHEARING .................................................................................................................. 9
BENDING ......................................................................................................................................... 9
Routing and Folding .......................................................................................................................... 10
General .......................................................................................................................................... 10
Advantages .................................................................................................................................... 10
MACHINERY FOR ROUTING AND FOLDING TECHNIQUE ............................................................... 11
TOOLS FOR ROUTING AND FOLDING TECHNIQUE ........................................................................ 11
Fabrication Types: Corners and joins ................................................................................................ 12
Folded Internal Corners ................................................................................................................ 12
Folded External Corners ................................................................................................................ 12
HVG Decorative Building Products 29 Henderson Street Turrella, NSW, 2205 P: 1300 854 166 F: 02 9556 1975 E: [email protected] www.hvgbuilding.com.au
Page 2 of 20
Folded Rolled Edges ...................................................................................................................... 13
Finished Corner Details ................................................................................................................. 13
ALTERNATIVE METHOD ................................................................................................................. 13
Part 4: Installation and Post-Installation Guide ............................................................................................14
Cooktop Installations ........................................................................................................................ 14
Surface preparation .......................................................................................................................... 14
Wall Flatness and Squareness ........................................................................................................... 15
Dimensional measurement ............................................................................................................... 15
Taping ................................................................................................................................................ 15
Dry Fit ................................................................................................................................................ 15
Final Fitting ........................................................................................................................................ 15
Removal of Protective Film ............................................................................................................... 16
Sealing with Silicone ......................................................................................................................... 16
Part 5: Warranty, Care and Maintenance .....................................................................................................17
Durallo Splashbacks and Panels Care and Maintenance .................................................................. 17
General .......................................................................................................................................... 17
Regular Care and Maintenance..................................................................................................... 17
Scratch Prevention ........................................................................................................................ 17
In summary ................................................................................................................................... 17
Durallo Splashbacks and Panels Lifetime Limited Warranty............................................................. 18
Warranty ....................................................................................................................................... 18
What this warranty does not cover .............................................................................................. 18
Claiming under this warranty ........................................................................................................ 18
What HVG will do upon receiving your defect claim .................................................................... 19
Repair and Replacement of the Product ....................................................................................... 19
Limitation of warranty .................................................................................................................. 19
Warranty Card...............................................................................................................................................20
HVG Decorative Building Products 29 Henderson Street Turrella, NSW, 2205 P: 1300 854 166 F: 02 9556 1975 E: [email protected] www.hvgbuilding.com.au
Page 3 of 20
PART 1: THINGS TO KNOW ABOUT DURALLO SPLASHBACKS AND PANELS
Important Information The only way to install Durallo Splashbacks and Panels is outlined in Part 4: Installation and Post-Installation Guide. A
registration card must be completed by the installer to verify compliance with the fabrication guidelines. Non-registered
installations will void HVG’s Lifetime Limited Warranty.
The minimum distance between the installed Durallo Splashbacks and Panels and any type of cook top is 50mm.
Installations that are closer will not be warranted. Durallo Splashbacks and Panels are suitable for installations where
the benchtop is a minimum of 600mm deep.
Durallo Splashbacks and Panels are stain and heat resistant and can be cleaned easily. Refer to Part 5: Warranty, Care
and Maintenance for details. Deep scratches caused by abrasive cleaners or scouring pads will not be warranted.
Durallo Splashbacks and Panels have been assessed for fire safety properties. HVG Durallo Splashbacks and Panels
have the typical fire indices of 0 (Ignitability index), 0 (Spread of flame index), 0 (Heat evolved index) and 2 (Smoke
developed index).
General Information Always wear appropriate Personal Protection Equipment (PPE) when handling and processing Durallo Splashbacks and Panels.
Individual panels must be lifted off the pallet by two people holding all four corners and not drawn over each other. Carry the panels vertically to avoid buckling. Wear gloves to avoid staining.
Durallo Splashback and Panels must be transported horizontally and supported along the entire length of the panel. To
prevent damage of the panels ensure they are protected by coversheets and tied up carefully. Multiple sheets should be
transported with the decorative faces together (do not remove protective film).
Upon delivery the pallets must be examined for any damage due to transportation and moisture. Any damage must be reported
immediately and confirmed by the forwarding agent. Installation of sheets with visible damage on the usage area will not be
warranted.
Store the pallets so that they are protected against any wetness penetrating due to rain and spray water and avoid any
condensation forming (e.g. when transporting cold panels to warmer rooms).
Store the pallets stacked one over the other (do not store Durallo® panels standing vertically) with a maximum of 6 pallets
of the same format stacked on top of each other (heavy pallets at the bottom).
Protective Film Durallo Splashbacks and Panels are manufactured with a protective film on the decorated side of the panel. Protective film
MUST ONLY be removed as per Part 4: Installation and Post-Installation Guide instructions. To ensure perfect functioning of the
Durallo® protective film, the following information should be observed:
Storage exceeding 6 months should be avoided. Because of severe temperature fluctuations and exposure to direct sunlight
the protective film may become very difficult to remove.
Do not mark the protective film with inks (markers), tapes or labels. Solvent or plasticizer may penetrate the film and affect
the lacquered surface.
Should the protective film partially come off during processing or after assembly, dirtied edges can occur in the course of
time, which may be difficult to remove.
Remove the protective film as soon as possible after installation. Protective film that remains on the panels for an extended
period of exterior exposure may be very difficult to remove.
Make sure not to remove the protective film at temperatures below 10°C.
HVG Decorative Building Products 29 Henderson Street Turrella, NSW, 2205 P: 1300 854 166 F: 02 9556 1975 E: [email protected] www.hvgbuilding.com.au
Page 4 of 20
Processing Use a dedicated aluminium-cutting blade for all straight cuts. The use of vacuum extraction is highly recommended.
Durallo Splashbacks and Panels can be bent into internal and external corners to give a continuous look without
any joins. HVG recommends folding edges and corners to give the installation a premium appearance.
Durallo Splashbacks and Panels can be butt joined together or into corners to make installation simpler. Allowance
for a 3mm expansion gap for silicone sealing is required.
Durallo Splashbacks and Panels can be cut for plumbing and electrical installations with hole saws or jigsaws.
Allowance for a 3mm expansion gap around joins is required. All electrical work must be performed by a licensed
electrician, as Durallo Splashbacks and Panels are electrically conductive. And all plumbing work must be performed
by a licensed plumber or gas fitter.
HVG Decorative Building Products 29 Henderson Street Turrella, NSW, 2205 P: 1300 854 166 F: 02 9556 1975 E: [email protected] www.hvgbuilding.com.au
Page 5 of 20
PART 2: INTRODUCTION TO DURALLO SPLASHBACKS AND PANELS
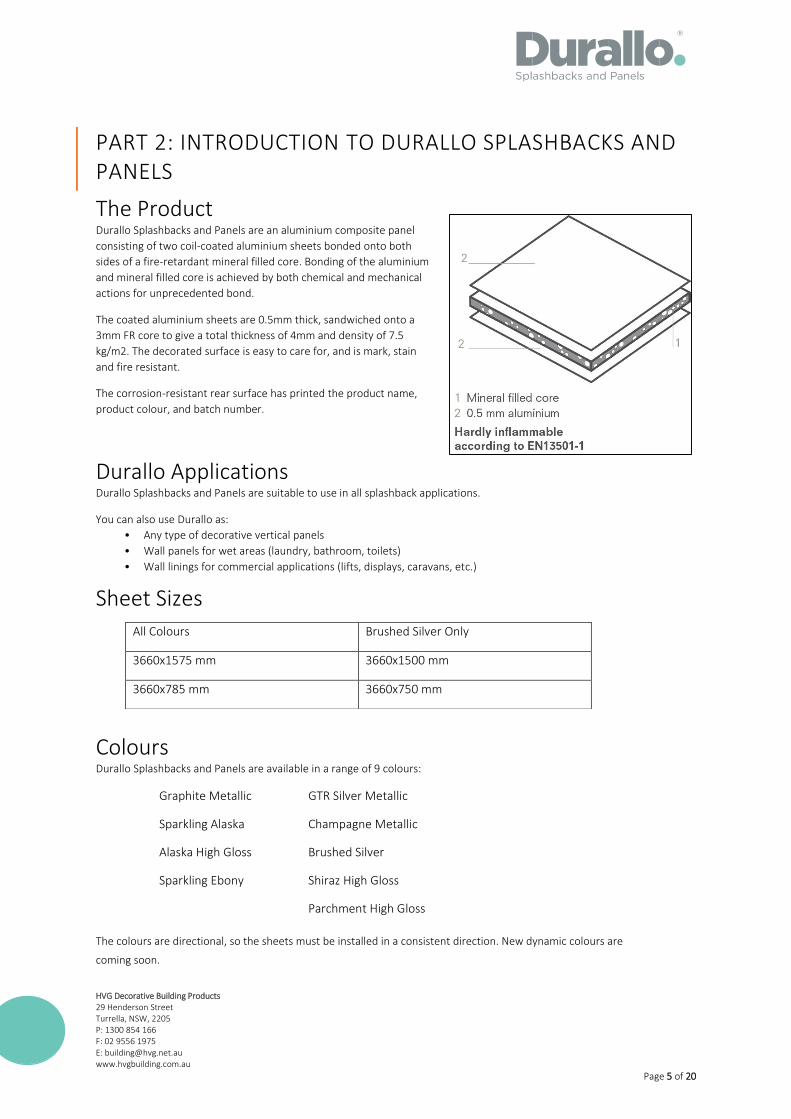
The Product Durallo Splashbacks and Panels are an aluminium composite panel
consisting of two coil-coated aluminium sheets bonded onto both
sides of a fire-retardant mineral filled core. Bonding of the aluminium
and mineral filled core is achieved by both chemical and mechanical
actions for unprecedented bond.
The coated aluminium sheets are 0.5mm thick, sandwiched onto a
3mm FR core to give a total thickness of 4mm and density of 7.5
kg/m2. The decorated surface is easy to care for, and is mark, stain
and fire resistant.
The corrosion-resistant rear surface has printed the product name,
product colour, and batch number.
Durallo Applications Durallo Splashbacks and Panels are suitable to use in all splashback applications.
You can also use Durallo as:
• Any type of decorative vertical panels
• Wall panels for wet areas (laundry, bathroom, toilets)
• Wall linings for commercial applications (lifts, displays, caravans, etc.)
Sheet Sizes
Colours Durallo Splashbacks and Panels are available in a range of 9 colours:
Graphite Metallic GTR Silver Metallic
Sparkling Alaska Champagne Metallic
Alaska High Gloss Brushed Silver
Sparkling Ebony Shiraz High Gloss
Parchment High Gloss
The colours are directional, so the sheets must be installed in a consistent direction. New dynamic colours are
coming soon.
All Colours Brushed Silver Only
3660x1575 mm 3660x1500 mm
3660x785 mm 3660x750 mm

HVG Decorative Building Products 29 Henderson Street Turrella, NSW, 2205 P: 1300 854 166 F: 02 9556 1975 E: [email protected] www.hvgbuilding.com.au
Page 6 of 20
Adhesives Neutral cure silicone adhesive is to be used for all installation.
The recommended double-sided tape is to be used for installation. Double-sided Tesa tape will be available in rolls
from your local HVG sales and distribution centre.
Technical Specifications Details Standard Unit Durallo Splashbacks and Panels 4mm
Aluminium Skin Thickness mm 0.5
Core 93% Mineral Filling
Weight kg/m2 7.6
Section Modulus DIN 53293 cm3/m 1.75
Rigidity DIN53293 kNcm2/m 2400
Modulus of Elasticity EN 1999 1.1 Mpa 70,000
Alloy EN 573.3 EN AW 5005A (AlMg1)
Temper EN 515 H22 / H42
Tensile Strength EN 485.2 MPa Rm =>130
0.2% Proof Stress EN 485.2 MPa Rp0.2 =>90
Elongation EN 485.2 % A50 =>5
Linear Thermal Expansion EN 1999 1.1 2.4mm/m at 100deg C temperature difference
Finish Coil Coated Fluoropolymer (PVDF or FEVE)
Gloss EN 13523.2 Finish Dependant - Standard = 30-40%
Pencil Hardness EN 13523.4 HB - F
Acoustic Properties
Sound Absorption Factor ISO 354 0.05
Sound Transmission Loss EN ISO 140.3 dB 27
Thermal Properties
Thermal Resistance DIN 52612 m2K/W 0.009
Thermal Conductivity DIN 52612 W/mK 0.33/mm thicknes of core
Heat Transition Coefficient DIN 4108 W/m2K 5.58
Temperature Resistance Deg C -50 up to +80
Fire Behaviour
AS/NZ 1530.3 Ignitibility = 0 Flame Spread = 0
Heat Evolved = 0 Smoke Developed = 2
When cutting and routing, the thermal expansion in length of Durallo® must be taken into account to ensure the
dimensional accuracy of the components during assembly. We recommend that prior to processing the panels should be
stored at room temperature for at least one day.
MSDS A Material Safety Data Sheet for Durallo Splashbacks and Panels is available from HVG Decorative Building Products website www.hvgbuilding.com.au
PROPERTY TOLERANCE
Thickness tolerance +/- 0.2 mm
Width tolerance -0/ + 4 mm
Length tolerance 1000 – 4000 mm -0/ + 6 mm
Length tolerance 4001 – 8000 mm -0/ + 10 mm

HVG Decorative Building Products 29 Henderson Street Turrella, NSW, 2205 P: 1300 854 166 F: 02 9556 1975 E: [email protected] www.hvgbuilding.com.au
Page 7 of 20
PART 3: PRE-INSTALLATION PREPARATIONS
Health and Safety Personal protective equipment:
Cutting Durallo Splashbacks and panels will generate noise, flying hot swarf and sharp edges. Eye protection, hearing
protection and gloves should be worn at all times during cutting operations.
Occupational Health and Safety:
Durallo 3660mm x 785mm sheet weighs approximately 22kgs and a 3660mm x 1575mm sheet weighs approximately 45kgs.
Both sheet sizes require assisted handling.
Manual handling
Two-three person lift
Lift on edge to avoid buckling
Mechanical devices
Vacuum lifting
Transport on a flat trolley of a suitable size
Fire Safety
Durallo Splashbacks and Panels require the installation of Durallo Calcium Silicate board directly behind the cooktop to
ensure adequate fire safety is achieved. The above is not applicable when Durallo Splashbacks and Panels are installed
directly onto rendered brickwork, cement or brick walls.
Thermal Expansion and Assembly Directions Thermal Expansion
Durallo Splashbacks and Panels is an aluminium based composite material and it will expand and contract during heating and
cooling. Thermal movement must be considered at all times.
An expansion gap of 3mm between Durallo Splashbacks and Panels must be allowed when butt joining them. An edge gap of
3mm must be allowed around all Durallo Splashbacks and Panels for silicone and sealing.
Assembly direction
To avoid possible reflection differences, we recommend that the composite panels should be installed in the same direction
as marked on the protective film. Colour variations may occur between panels originating from different production batches.
To be sure of homogeneous colouring, the total requirement for a project should be ordered in one batch (see pallet label or
stamp on the reverse side).
Sheet Inspection Always inspect Durallo sheets for signs of damage. If any damage is visible and is on the usable part of the sheet DO NOT
FABRICATE this sheet. Make sure that all sheets of the same colour are from the same manufacturing batch. Write down the
product batch number for warranty purposes.
Fixing elements without Jamming Linear expansion coefficient of Durallo® 2.4 mm/m/100°C
The minimum gap depends on the expected expansion of the panel
Larger hole diameters in the panel must be taken into account when fixing the panel with screws and rivets
Holes in the panel and in the substructure must be drilled centrically (use drilling jigs)
Arrange the butt joints of the supporting sections at the panel joints to avoid jamming due to opposing thermal
expansion
HVG Decorative Building Products 29 Henderson Street Turrella, NSW, 2205 P: 1300 854 166 F: 02 9556 1975 E: [email protected] www.hvgbuilding.com.au
Page 8 of 20
Processing Methods
SAWING WITH HAND-HELD CIRCULAR SAWS Machine
With regard to the cutting speed, the following hand-held circular saw is suitable for processing Durallo®:
FESTOOL hand-held circular saw, type TS 55 EB Q-Plus-FS, speed 2,000 – 5,200 rpm
Please pay attention to the speed reduction!
SAWING WITH JIG SAWS Machine
Use hand-held jigsaws with pendulum stroke
Tools - Saw blades for aluminium, tooth pitch = 2 mm, e.g. FESTOOL saw blade HS 60/2 bi
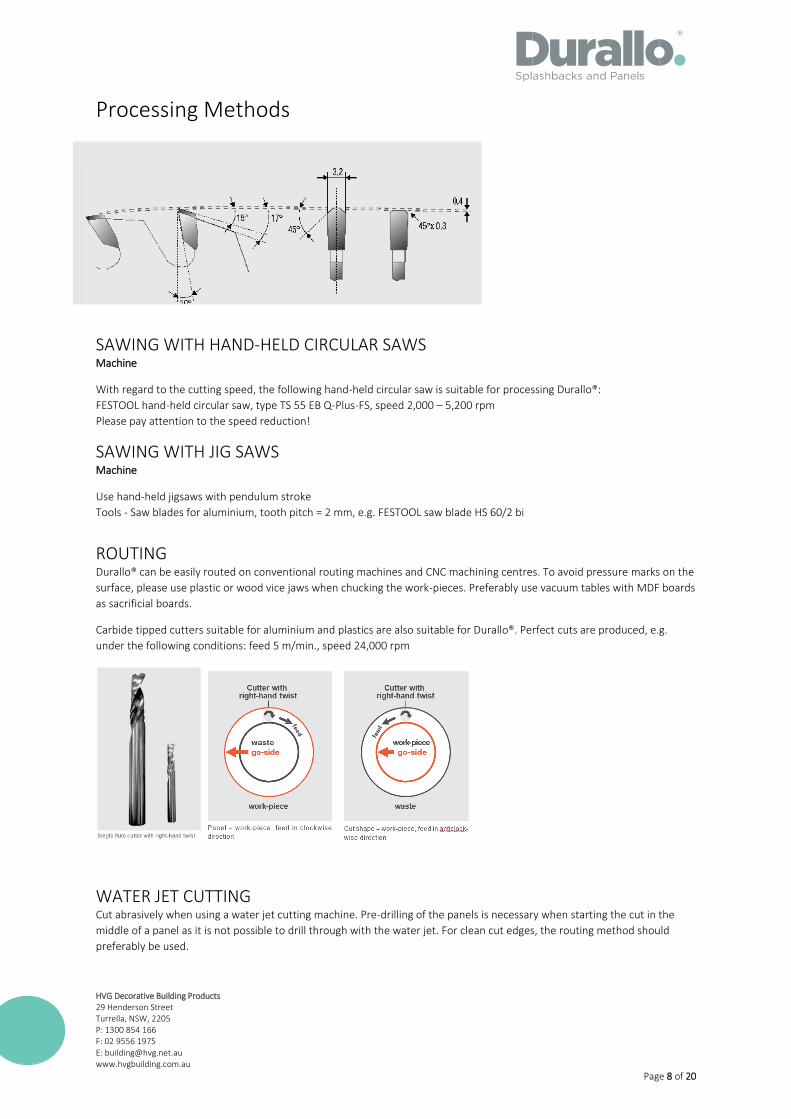
ROUTING Durallo® can be easily routed on conventional routing machines and CNC machining centres. To avoid pressure marks on the
surface, please use plastic or wood vice jaws when chucking the work-pieces. Preferably use vacuum tables with MDF boards
as sacrificial boards.
Carbide tipped cutters suitable for aluminium and plastics are also suitable for Durallo®. Perfect cuts are produced, e.g.
under the following conditions: feed 5 m/min., speed 24,000 rpm
WATER JET CUTTING Cut abrasively when using a water jet cutting machine. Pre-drilling of the panels is necessary when starting the cut in the
middle of a panel as it is not possible to drill through with the water jet. For clean cut edges, the routing method should
preferably be used.
HVG Decorative Building Products 29 Henderson Street Turrella, NSW, 2205 P: 1300 854 166 F: 02 9556 1975 E: [email protected] www.hvgbuilding.com.au
Page 9 of 20
PUNCHING / SHEARING
Punching
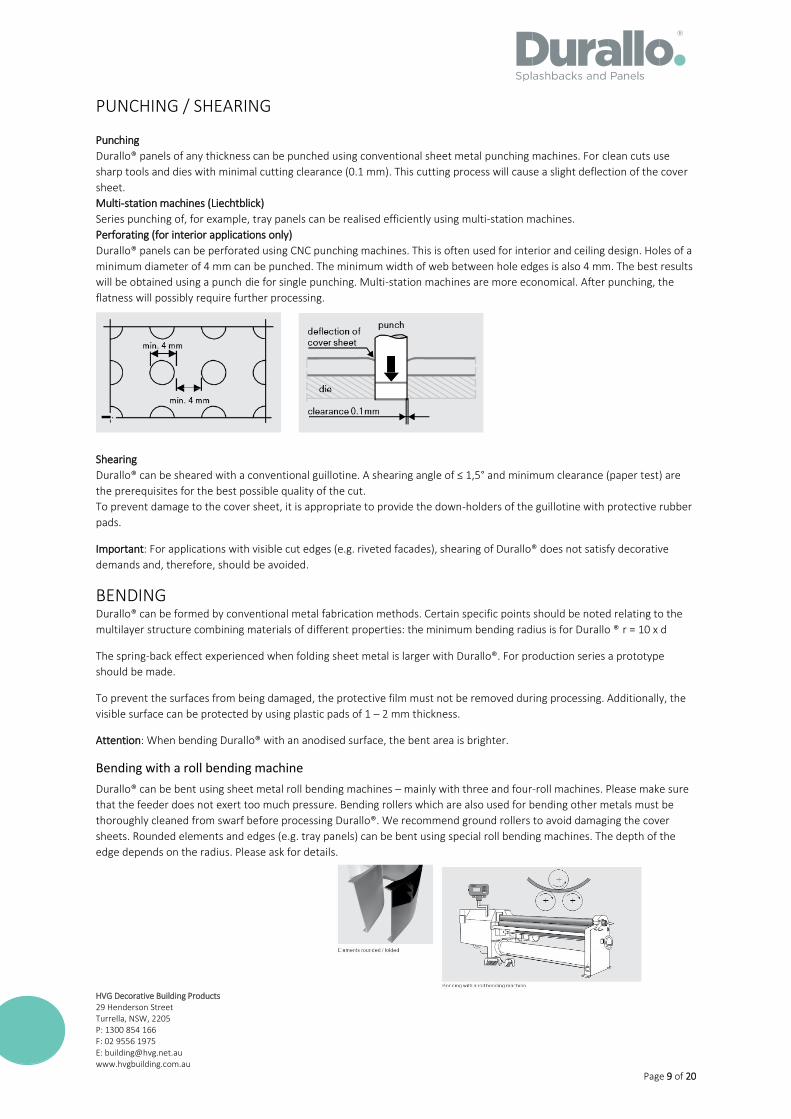
Durallo® panels of any thickness can be punched using conventional sheet metal punching machines. For clean cuts use
sharp tools and dies with minimal cutting clearance (0.1 mm). This cutting process will cause a slight deflection of the cover
sheet.
Multi-station machines (Liechtblick)
Series punching of, for example, tray panels can be realised efficiently using multi-station machines.
Perforating (for interior applications only)
Durallo® panels can be perforated using CNC punching machines. This is often used for interior and ceiling design. Holes of a
minimum diameter of 4 mm can be punched. The minimum width of web between hole edges is also 4 mm. The best results
will be obtained using a punch die for single punching. Multi-station machines are more economical. After punching, the
flatness will possibly require further processing.
Shearing
Durallo® can be sheared with a conventional guillotine. A shearing angle of ≤ 1,5° and minimum clearance (paper test) are
the prerequisites for the best possible quality of the cut.
To prevent damage to the cover sheet, it is appropriate to provide the down-holders of the guillotine with protective rubber
pads.
Important: For applications with visible cut edges (e.g. riveted facades), shearing of Durallo® does not satisfy decorative
demands and, therefore, should be avoided.
BENDING Durallo® can be formed by conventional metal fabrication methods. Certain specific points should be noted relating to the
multilayer structure combining materials of different properties: the minimum bending radius is for Durallo ® r = 10 x d
The spring-back effect experienced when folding sheet metal is larger with Durallo®. For production series a prototype
should be made.
To prevent the surfaces from being damaged, the protective film must not be removed during processing. Additionally, the
visible surface can be protected by using plastic pads of 1 – 2 mm thickness.
Attention: When bending Durallo® with an anodised surface, the bent area is brighter.
Bending with a roll bending machine
Durallo® can be bent using sheet metal roll bending machines – mainly with three and four-roll machines. Please make sure
that the feeder does not exert too much pressure. Bending rollers which are also used for bending other metals must be
thoroughly cleaned from swarf before processing Durallo®. We recommend ground rollers to avoid damaging the cover
sheets. Rounded elements and edges (e.g. tray panels) can be bent using special roll bending machines. The depth of the
edge depends on the radius. Please ask for details.
HVG Decorative Building Products 29 Henderson Street Turrella, NSW, 2205 P: 1300 854 166 F: 02 9556 1975 E: [email protected] www.hvgbuilding.com.au
Page 10 of 20
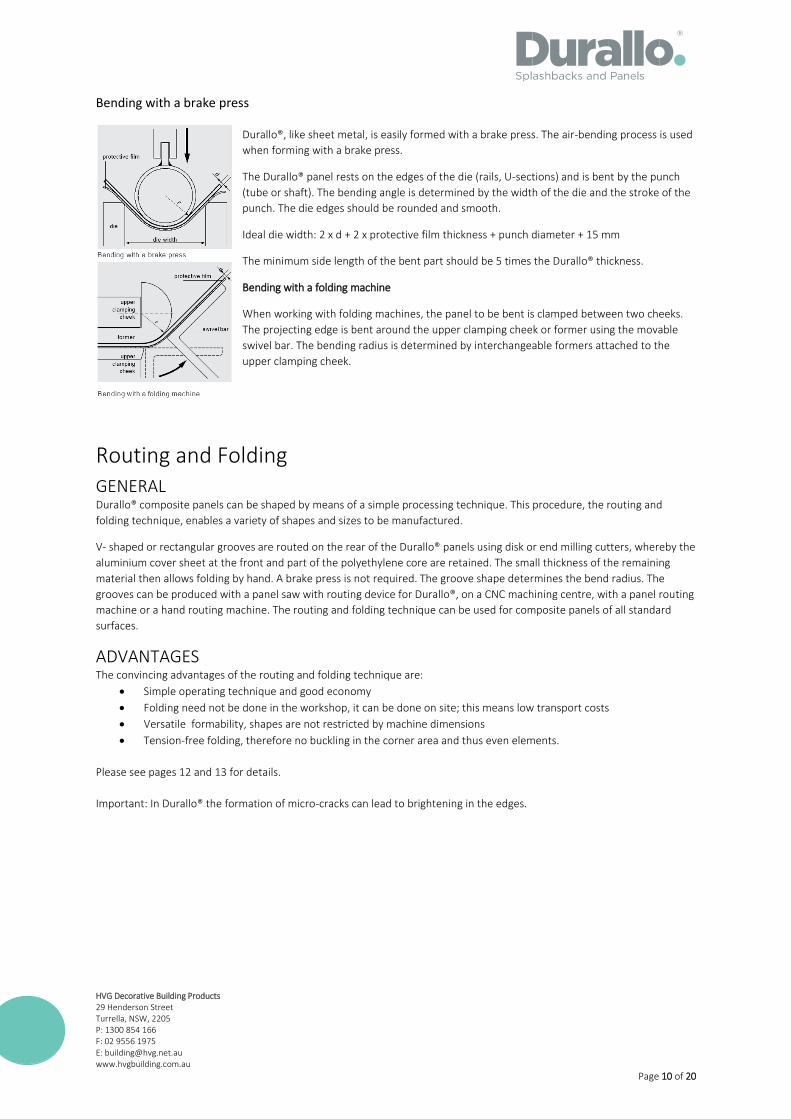
Bending with a brake press
Durallo®, like sheet metal, is easily formed with a brake press. The air-bending process is used
when forming with a brake press.
The Durallo® panel rests on the edges of the die (rails, U-sections) and is bent by the punch
(tube or shaft). The bending angle is determined by the width of the die and the stroke of the
punch. The die edges should be rounded and smooth.
Ideal die width: 2 x d + 2 x protective film thickness + punch diameter + 15 mm
The minimum side length of the bent part should be 5 times the Durallo® thickness.
Bending with a folding machine
When working with folding machines, the panel to be bent is clamped between two cheeks.
The projecting edge is bent around the upper clamping cheek or former using the movable
swivel bar. The bending radius is determined by interchangeable formers attached to the
upper clamping cheek.
Routing and Folding GENERAL Durallo® composite panels can be shaped by means of a simple processing technique. This procedure, the routing and
folding technique, enables a variety of shapes and sizes to be manufactured.
V- shaped or rectangular grooves are routed on the rear of the Durallo® panels using disk or end milling cutters, whereby the
aluminium cover sheet at the front and part of the polyethylene core are retained. The small thickness of the remaining
material then allows folding by hand. A brake press is not required. The groove shape determines the bend radius. The
grooves can be produced with a panel saw with routing device for Durallo®, on a CNC machining centre, with a panel routing
machine or a hand routing machine. The routing and folding technique can be used for composite panels of all standard
surfaces.
ADVANTAGES The convincing advantages of the routing and folding technique are:
Simple operating technique and good economy
Folding need not be done in the workshop, it can be done on site; this means low transport costs
Versatile formability, shapes are not restricted by machine dimensions
Tension-free folding, therefore no buckling in the corner area and thus even elements.
Please see pages 12 and 13 for details.
Important: In Durallo® the formation of micro-cracks can lead to brightening in the edges.
HVG Decorative Building Products 29 Henderson Street Turrella, NSW, 2205 P: 1300 854 166 F: 02 9556 1975 E: [email protected] www.hvgbuilding.com.au
Page 11 of 20
MACHINERY FOR ROUTING AND FOLDING TECHNIQUE Vertical panel saws with routing device for routing Durallo® (special accessory)
Holz-Her vertical panel saw,
Striebig, vertical panel saw, Standard II for composite panels
Other panel saws with a special routing device can also be supplied or retrofitted by the manufacturer. If necessary, the
frame has to be raised.
General information regarding the routing and folding technique
Processing temperature: During folding, the ambient and material temperature should not be below 16°C.
Tracing rollers: Make sure to use tracing rollers with dustproof bearings.
Speed 2,400 rpm (= ½ speed with panel saws of Striebig and Holz-Her)
Feed max. 20 m/min. Pay attention to a constant feed.
Routing of rectangular groove not possible.
CNC machining centres
Durallo® can be processed easily on CNC machining centres. Depending on the equipment of the machines, various
processing steps can be performed: sawing, milling (routing and folding), contour cutting, drilling.
MACHINES FOR ROUTING AND FOLDING TECHNIQUE
Festool panel routing machine PF 1200 E-Plus
Supplied with:
Tracing roller for 4 mm
Cutter disk for V-grooves 90°
Adjustment template
Transport box
Hand routing machines
Commercially available hand routing machines with a minimum rating of 800 W are suitable. Collet chucks 8 mm dia.
Mobile dust extractors
E.g. Festool mobile dust extractors, types CTM approved for dust class M for dust with MAK values > 0.1 mg / m³ for sheet
milling machines, hand routers and hand-held circular saws.
TOOLS FOR ROUTING AND FOLDING TECHNIQUE Carbide tipped disk milling cutters for vertical panel saws
With a nominal panel thickness, the diameters of tracing rollers and cutter discs are adjusted so as to leave a residual core
thickness of
0.3 mm (V-groove) or 1 mm (rectangular groove). The dimensions given in the drawings show the cover panel thickness of
0.5 mm plus the corresponding residual core thickness.
For inquiries relating to disc milling cutters with indexable inserts suitable for processing Durallo® for Holz-Her panel saws,
please contact Reich, Holz-Her or LEUCO.
For ordering disk milling cutters with indexable inserts V-groove 90° and V-groove 135° as well as the corresponding tracing
rollers for all types of Striebig panel saws, please contact Striebig AG.
HVG Decorative Building Products 29 Henderson Street Turrella, NSW, 2205 P: 1300 854 166 F: 02 9556 1975 E: [email protected] www.hvgbuilding.com.au
Page 12 of 20
Fabrication Types: Corners and joins
Durallo Splashbacks and Panels can be fabricated in two main styles:
PREFERRED METHOD:
Folded internal corners, rolled edges
This method gives a premium finish with no exposed cut edges and more professional corner detail.
Utilises Durallo’s unique forming characteristics to produce an internal or external folded corner.
No joins and seamless finish
ALTERNATIVE METHOD:
Butt joined corners, straight cut edges
This method is the same as traditional glass splashback installation and offers a less sophisticated appearance,
without sacrificing the benefits of Durallo splashback panels
Joins will be visible and edges will be exposed
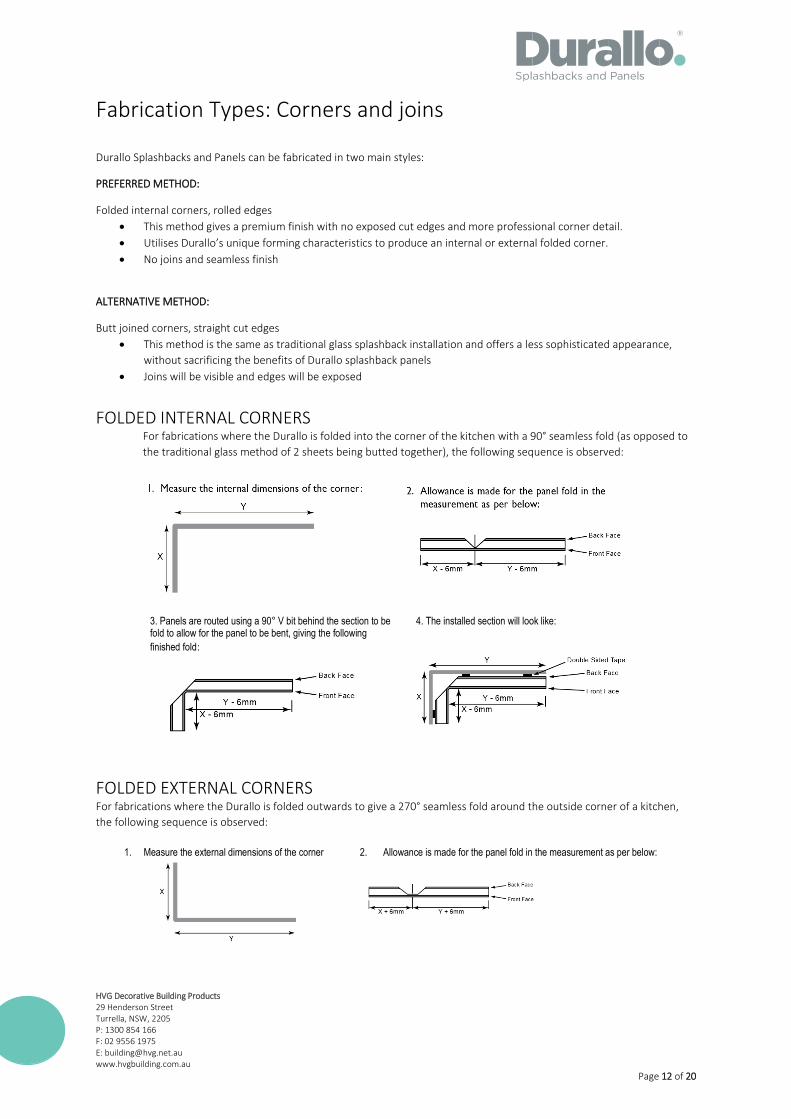
FOLDED INTERNAL CORNERS For fabrications where the Durallo is folded into the corner of the kitchen with a 90° seamless fold (as opposed to
the traditional glass method of 2 sheets being butted together), the following sequence is observed:
3. Panels are routed using a 90° V bit behind the section to be fold to allow for the panel to be bent, giving the following
finished fold:
4. The installed section will look like:
FOLDED EXTERNAL CORNERS For fabrications where the Durallo is folded outwards to give a 270° seamless fold around the outside corner of a kitchen,
the following sequence is observed:
1. Measure the external dimensions of the corner 2. Allowance is made for the panel fold in the measurement as per below:
HVG Decorative Building Products 29 Henderson Street Turrella, NSW, 2205 P: 1300 854 166 F: 02 9556 1975 E: [email protected] www.hvgbuilding.com.au
Page 13 of 20
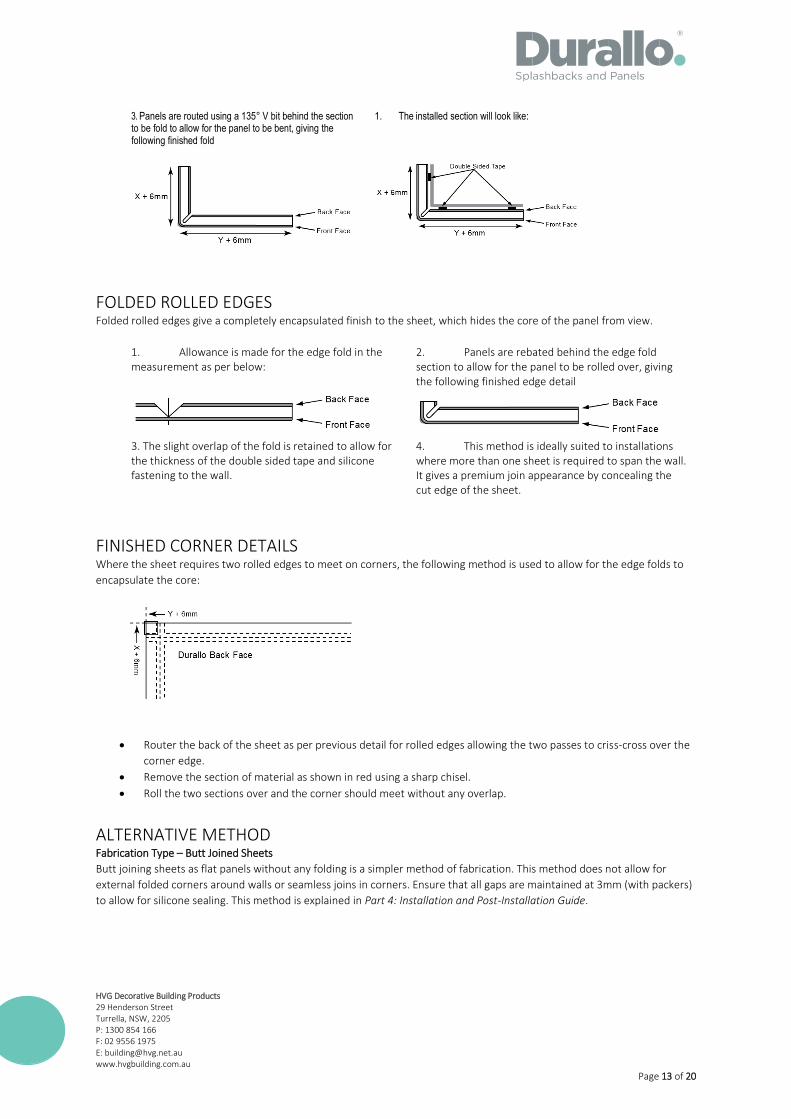
3. Panels are routed using a 135° V bit behind the section to be fold to allow for the panel to be bent, giving the following finished fold
1. The installed section will look like:
FOLDED ROLLED EDGES Folded rolled edges give a completely encapsulated finish to the sheet, which hides the core of the panel from view.
1. Allowance is made for the edge fold in the measurement as per below:
2. Panels are rebated behind the edge fold section to allow for the panel to be rolled over, giving the following finished edge detail
3. The slight overlap of the fold is retained to allow for the thickness of the double sided tape and silicone fastening to the wall.
4. This method is ideally suited to installations where more than one sheet is required to span the wall. It gives a premium join appearance by concealing the cut edge of the sheet.
FINISHED CORNER DETAILS Where the sheet requires two rolled edges to meet on corners, the following method is used to allow for the edge folds to
encapsulate the core:
Router the back of the sheet as per previous detail for rolled edges allowing the two passes to criss-cross over the
corner edge.
Remove the section of material as shown in red using a sharp chisel.
Roll the two sections over and the corner should meet without any overlap.
ALTERNATIVE METHOD Fabrication Type – Butt Joined Sheets
Butt joining sheets as flat panels without any folding is a simpler method of fabrication. This method does not allow for
external folded corners around walls or seamless joins in corners. Ensure that all gaps are maintained at 3mm (with packers)
to allow for silicone sealing. This method is explained in Part 4: Installation and Post-Installation Guide.

HVG Decorative Building Products 29 Henderson Street Turrella, NSW, 2205 P: 1300 854 166 F: 02 9556 1975 E: [email protected] www.hvgbuilding.com.au
Page 14 of 20
PART 4: INSTALLATION AND POST-INSTALLATION GUIDE The following is required for installation of Durallo Splashbacks and Panels
Double-sided tape tesa®62936 or ACXplus 7048
Neutral Cure silicone
Silicone application gun
Glazier’s suction cup x 2
Straight edge
Builders square
Measuring tape
Scraper or similar
Plaster patching compound
Plasterboard saw
Fixing screws – 25mm length, self-tapping
Utility knife
3mm packers
Durallo Splashback panels
9mm calcium silicate mineral board – Durallo Splashback Calcium Silicate board (not required for installations
where Durallo Splashbacks and Panels are installed directly onto rendered brick and/or cement brick walls)
Important Note: Minimum installation distance for gas and electric cooktops is 50 mm
Durallo Splashbacks and Panels must be installed with a minimum of 50mm set back from the rear of a gas, electric or
induction cooktop. The minimum benchtop width suitable for HVG Durallo Splashback installation is 600mm depth.
Installations where these minimum distances are not observed will void Durallo lifetime limited warranty.
Cooktop Installations
Gas and Electric Cook tops require the installation of Durallo Calcium Silicate mineral board directly behind the cooktop to
provide additional heat protection for the wall structure and ensure compliance with the relevant BCA requirements. The
Durallo Calcium Silicate mineral board must be installed to a minimum height of 150mm above the benchtop level across the
full width of the cooktop.
HVG supplies 9mm calcium silicate board with all Durallo Splashback panels. Substitute mineral boards must not be used.
Installation of 9mm calcium silicate board not required where Durallo Splashbacks and Panels are installed directly onto
rendered brick and/or cement brick walls.
Surface preparation
If plaster or cement sheet:
The wall must be clean, even and dry. No crumbling plaster, no holes, no burrs, no sticking out nail heads or grease are
allowed on the surface.
If bricks or cement blocks, grey coat render or white coat plaster:
The wall area must be a dry and clean surface. All new wall installations will require 7 days for curing Crumbling plaster
should be sanded off, or repaired with plaster filler. Grease should be removed with isopropanol (IPO) or thinners and wiped
dry. Mortar or plaster filler should be sanded or scraped off. Sandy or loose render on brickwork or cement blockwork must
be sealed with appropriate sealer/ primer. (HVG recommends ArdexP51 Porous Substrate Primer. Follow manufacturer’s
application instructions.) Any holes larger than 100mm across must patched or filled. Electrical or plumbing penetrations
should be cut to slightly oversized for ease of installation, however they should not be excessively oversized to ensure wall
integrity.
HVG Decorative Building Products 29 Henderson Street Turrella, NSW, 2205 P: 1300 854 166 F: 02 9556 1975 E: [email protected] www.hvgbuilding.com.au
Page 15 of 20
Wall Flatness and Squareness
Before splashback dimensions are taken the wall area should be checked for flatness and squareness. Areas requiring
packing out should be corrected. It is recommended to use double-sided tape as the method for packing out low sections of
the wall. Tolerance for wall flatness is + /- 2mm/m vertically and horizontally. Wall squareness is +/- 5º from a right angle
(90°).
Dimensional measurement
Wall dimensions should be taken after wall preparation and/or corrections are complete. Measurements are to be to the
nearest 1mm, with allowance for diagonal variations. Check all measurements before transferring to Durallo Splashbacks
and Panels surface. Dimensions will depend on the selected method of installation (folded vs butt joined method).
Taping
Double-sided tape must be used to provide initial adhesion during the installation process. HVG recommends the use of tesa®62936 or ACXplus 7048 double-sided tape to assist in the installation process.
The double-sided tape performs 2 key functions:
Provides initial adhesion of panel to the wall during silicone cure.
Allows adjustment of the wall flatness to pack the panel out for plumb fit.
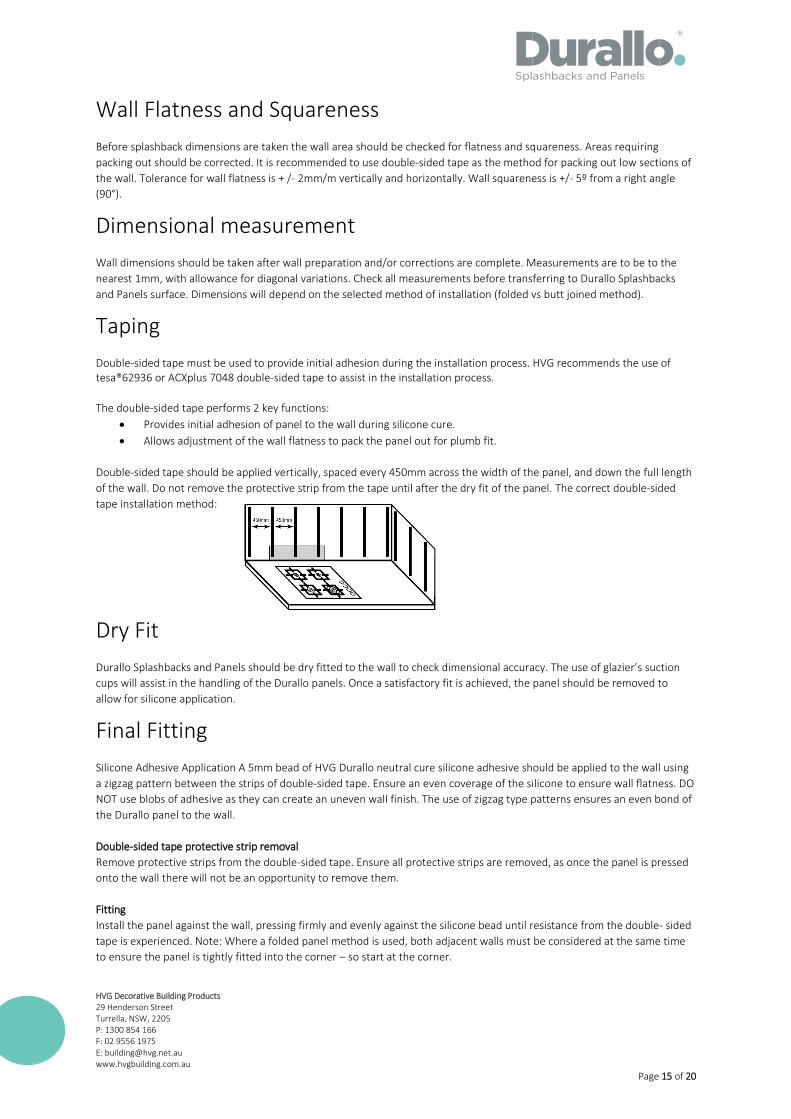
Double-sided tape should be applied vertically, spaced every 450mm across the width of the panel, and down the full length
of the wall. Do not remove the protective strip from the tape until after the dry fit of the panel. The correct double-sided
tape installation method:
Dry Fit
Durallo Splashbacks and Panels should be dry fitted to the wall to check dimensional accuracy. The use of glazier’s suction
cups will assist in the handling of the Durallo panels. Once a satisfactory fit is achieved, the panel should be removed to
allow for silicone application.
Final Fitting
Silicone Adhesive Application A 5mm bead of HVG Durallo neutral cure silicone adhesive should be applied to the wall using
a zigzag pattern between the strips of double-sided tape. Ensure an even coverage of the silicone to ensure wall flatness. DO
NOT use blobs of adhesive as they can create an uneven wall finish. The use of zigzag type patterns ensures an even bond of
the Durallo panel to the wall.
Double-sided tape protective strip removal
Remove protective strips from the double-sided tape. Ensure all protective strips are removed, as once the panel is pressed
onto the wall there will not be an opportunity to remove them.
Fitting
Install the panel against the wall, pressing firmly and evenly against the silicone bead until resistance from the double- sided
tape is experienced. Note: Where a folded panel method is used, both adjacent walls must be considered at the same time
to ensure the panel is tightly fitted into the corner – so start at the corner.
HVG Decorative Building Products 29 Henderson Street Turrella, NSW, 2205 P: 1300 854 166 F: 02 9556 1975 E: [email protected] www.hvgbuilding.com.au
Page 16 of 20
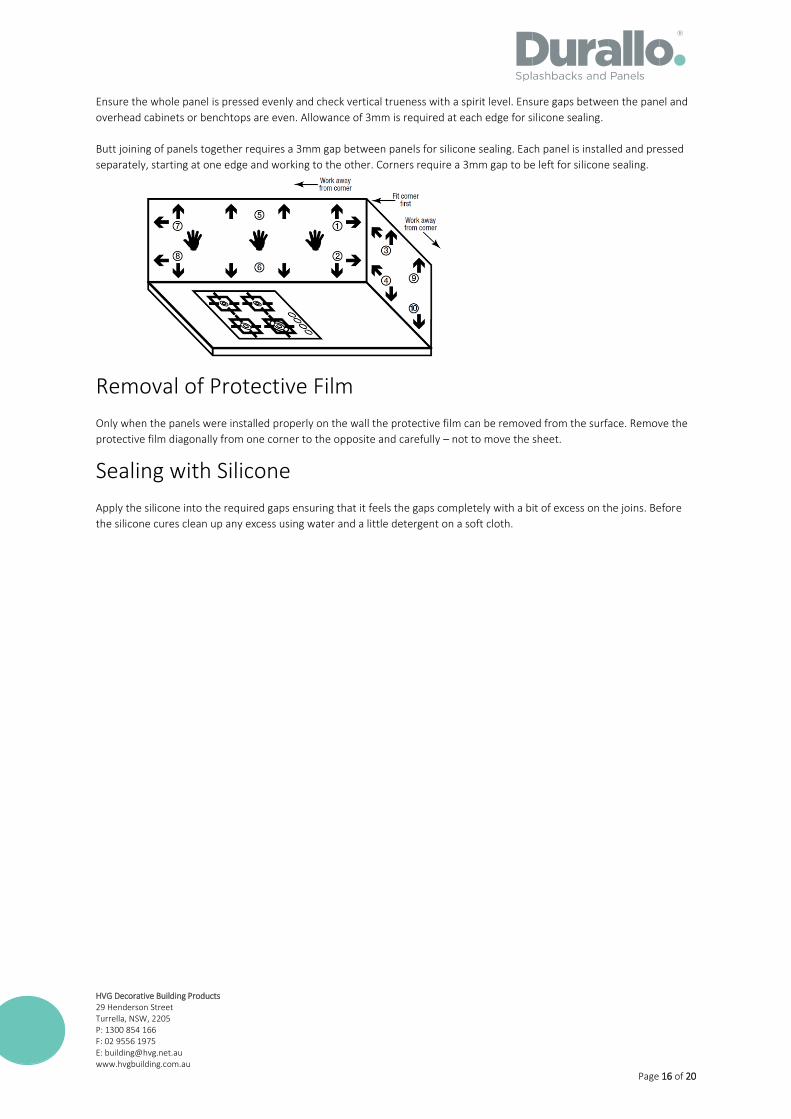
Ensure the whole panel is pressed evenly and check vertical trueness with a spirit level. Ensure gaps between the panel and
overhead cabinets or benchtops are even. Allowance of 3mm is required at each edge for silicone sealing.
Butt joining of panels together requires a 3mm gap between panels for silicone sealing. Each panel is installed and pressed
separately, starting at one edge and working to the other. Corners require a 3mm gap to be left for silicone sealing.
Removal of Protective Film
Only when the panels were installed properly on the wall the protective film can be removed from the surface. Remove the
protective film diagonally from one corner to the opposite and carefully – not to move the sheet.
Sealing with Silicone
Apply the silicone into the required gaps ensuring that it feels the gaps completely with a bit of excess on the joins. Before
the silicone cures clean up any excess using water and a little detergent on a soft cloth.
HVG Decorative Building Products 29 Henderson Street Turrella, NSW, 2205 P: 1300 854 166 F: 02 9556 1975 E: [email protected] www.hvgbuilding.com.au
Page 17 of 20
PART 5: WARRANTY, CARE AND MAINTENANCE
Durallo Splashbacks and Panels Care and Maintenance GENERAL Durallo Splashbacks and Panels do not require any special cleaning products. Regular cleaning using a mild detergent and a
soft micro-fibre, non-abrasive cloth will ensure your Durallo surface remains in good condition.
Excessive heat from large burners that are not adjusted correctly can damage/scorch the Durallo surface. To avoid this
damage ensure you review in details the user guide for your cooktop.
REGULAR CARE AND MAINTENANCE The surface should be cleaned regularly and ensure that you do not allow food stuffs, cooking oils, fats etc. to build up on
the surface. The use of a mild detergent with a micro-fibre cloth is the recommended method to clean the Durallo
Splashbacks and Panels Surface.
Avoid cleaning the Durallo surface when hot. Do not clean the surface with cleaning products that are highly caustic or acidic
and or abrasive.
SCRATCH PREVENTION Do not place sharp or metallic cooking and kitchen implements, appliances or items against the Durallo surface.
The use of abrasive cleaners, scotch brite pads, steel wool etc. are to be avoided. Use a micro-fibre cloth and a mild
detergent to clean the surface.
IN SUMMARY • DO use a soft micro-fibre cloth with a mild detergent
• DO clean the surface regularly
• DO ensure that your cooktop burners are adjusted to the manufacturers recommendations
• DO NOT allow food stuffs to build up on the surface
• DO NOT use abrasive cleaners, scotch brite pads, steel wool etc.
• DO NOT use cleaning solutions that are highly acidic or caustic
• DO NOT clean the surface if it is hot
• DO NOT place metallic or sharp implements against the surface, which can cause scratching
HVG Decorative Building Products 29 Henderson Street Turrella, NSW, 2205 P: 1300 854 166 F: 02 9556 1975 E: [email protected] www.hvgbuilding.com.au
Page 18 of 20
Durallo Splashbacks and Panels Lifetime Limited Warranty
Halifax Vogel Group Pty Limited (ACN 104 808 853) of 29 Henderson Street, Turrella NSW 2205 (“HVG”)
Phone no - 1300 854 166
Email address - [email protected]
1. In this warranty, “Product” means any Durallo Splashbacks and Panels.
WARRANTY 2. If the Product:
a) is purchased from HVG after 1st February 2017 for interior domestic and commercial applications in Australia;
b) has remained installed at the same location at which it was first installed; and
c) has been maintained as detailed in the Durallo Splashbacks and Panels Care and Maintenance document; and
d) has been installed, maintained, used and protected in the manner recommended by HVG in the published
Fabrication Manual at the time of installation, then
HVG warrants that it will either repair or replace the Product where the Product is defective and the defect is directly caused
by either the manufacture of the Product or HVG’s action in supplying or delivering the Product.
3. This warranty covers reasonable labour charges which are necessary for the repair or replacement of Products covered by this warranty. 4. This warranty is not transferable or assignable. 5. This warranty is provided for a period of Lifetime from the date that the Product is first purchased from HVG, or an authorised installer (whichever is the later). 6. The benefit of this warranty is in addition to other rights and remedies that you have under the Australian Consumer Law.
WHAT THIS WARRANTY DOES NOT COVER 7. This warranty does not cover any defect caused by: a) acts or circumstances outside HVG’s control; b) failure to follow any of HVG’s recommended procedures as detailed in the Durallo Splashbacks and panels Fabrication Manual; c) failure to follow HVG’s Care and Maintenance recommendations; d) physical abuse, misuse, accidents, exposure to excessive heat, exposure to excessive moisture, exposure to chemical products, the use of solvents or inappropriate cleaning products, improper maintenance, normal wear and tear, abrasion, scuffing, scratching, burning, cutting, stains or wipe marks on darker colour surfaces; e) general fading, discolouration or damage due to exposure to light; f) Product being used in applications that are not recommended by HVG; g) faulty workmanship by any person other than HVG; or h) variation in colour, pattern or shade of material compared with any sample or display material or printed illustrations; i) failure to follow the recommendations in relation to the correct use of the burners as detailed by the manufacturer of the Cooktop. 8. This warranty does not cover any other product used or installed in conjunction with the Product. 9. This warranty is void if the Product is used in an exterior application.
CLAIMING UNDER THIS WARRANTY 10. You must register this warranty by completing and posting to HVG, at the address provided above, the warranty card that was provided to you. If you do not register this warranty within 30 days of the installation of the Product, this warranty is void. 11. To claim under this warranty you must:
a) have registered this warranty in accordance with clause 10; b) provide written notice to HVG of any defect within 30 days of you noticing the defect or, within 30 days of when the
defect would be apparent to a reasonable person (whichever occurs first). 12. The written notice to HVG of the defect must:
a) State the date on which the Product was installed; b) State the name of the person, or company, that installed the Product; c) State the colour and finish of the Product; d) Contain evidence that the person who installed the Product was paid; and e) Contain a description of the defect.
13. You bear the expense of claiming under this warranty. 14. If you do not register this warranty you have not waived your rights under the Australian Consumer Law, however, the Lifetime Warranty will be void.
HVG Decorative Building Products 29 Henderson Street Turrella, NSW, 2205 P: 1300 854 166 F: 02 9556 1975 E: [email protected] www.hvgbuilding.com.au
Page 19 of 20
WHAT HVG WILL DO UPON RECEIVING YOUR DEFECT CLAIM 15. Within a reasonable period of receiving notice of the alleged defect, HVG will contact you to arrange either:
a) to inspect the Product that contains the alleged defect; or b) for you to send to HVG such photographic evidence or other evidence, as HVG requires, of the alleged defect which
HVG will use and rely upon to make an assessment under this warranty. 16. It is entirely within HVG’s discretion to require a physical inspection of the Product before making a determination under this warranty or to rely solely on photographic or other evidence before making a determination under this warranty 17. Within a reasonable time of inspecting the Product, or receiving photographic evidence or such other evidence as HVG requires of the alleged defect, HVG will notify you that your claim has been accepted or rejected.
REPAIR AND REPLACEMENT OF THE PRODUCT 18. HVG will take reasonable steps to ensure that facilities for the repair of Products, and parts for Products, are available for a reasonable period after Products are supplied. However, a replacement product may not be available from HVG in the same shape, type or colour as the original Products covered by this warranty. If a replacement product of the same shape, type or colour is not available, HVG will provide a replacement product of a similar shape, type and colour match as is reasonably possible from HVG’s then current product range in satisfaction of its obligations under this warranty.
LIMITATION OF WARRANTY 19. Our goods come with guarantees that cannot be excluded under the Australian Consumer Law. You are entitled to a replacement or refund for a major failure and compensation for any other reasonably foreseeable loss or damage. You are also entitled to have the goods repaired or replaced if the goods fail to be of acceptable quality and the failure does not amount to a major failure. 20. Some State, Territory and Federal legislation imply warranties, guarantees or conditions or impose liability on HVG in relation to Product or its supply which cannot, or can only to a limited extent, be excluded, restricted or modified. Except for those warranties, guarantees or conditions and such liability (which for the avoidance of doubt includes those warranties, guarantees, conditions and liabilities that cannot be excluded under the Australian Consumer Law), and for the warranty described above:
a) all warranties, guarantees and conditions (whether express or implied, statutory or otherwise) relating to the Product or its supply are expressly excluded; and
b) HVG will not be liable for any loss or damage suffered by any person (including the purchaser of the Product in any way relating to or arising from the Product or its use (including loss or damage arising from the negligence of, or contributed to by HVG)
21. If liability for breach by HVG of a warranty, guarantee or condition or any other liability imposed on HVG by legislation which cannot be excluded may be limited, HVG’s liability is limited to the extent permitted by law, and if liability may be limited in any one of a number of ways, HVG’s liability is limited in any one of the permitted ways chosen by HVG in its absolute discretion.
HVG Decorative Building Products 29 Henderson Street Turrella, NSW, 2205 P: 1300 854 166 F: 02 9556 1975 E: [email protected] www.hvgbuilding.com.au
Page 20 of 20
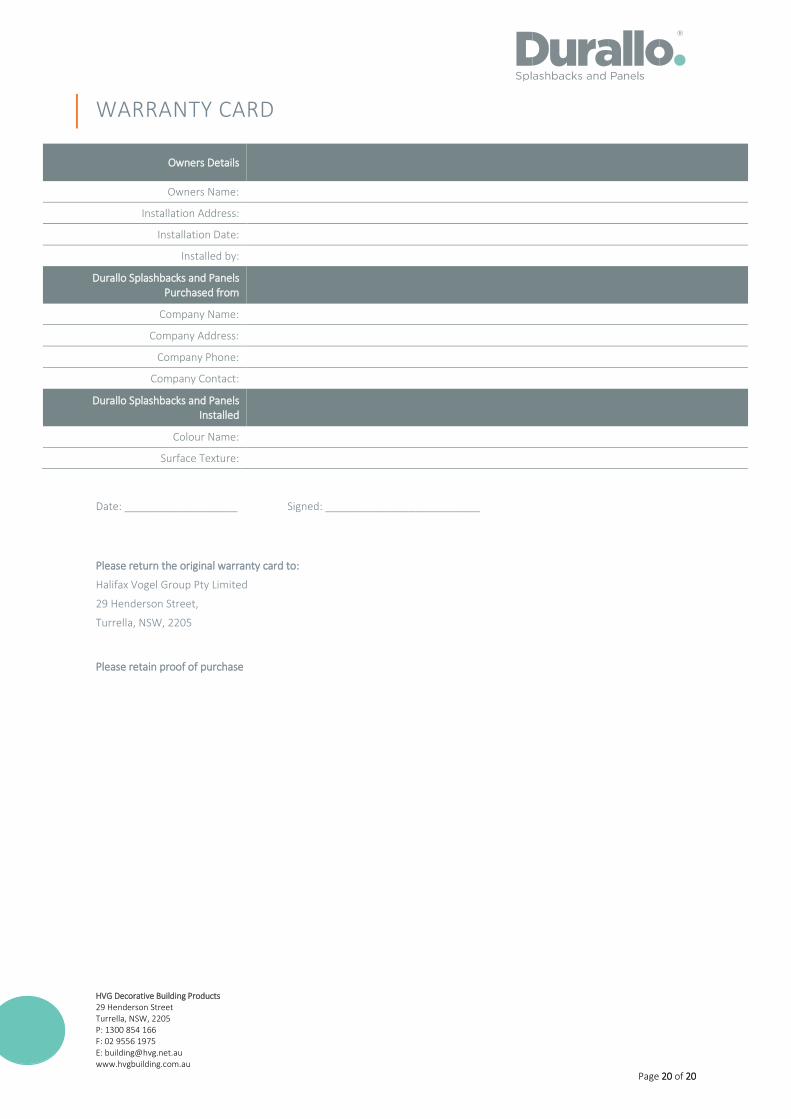
WARRANTY CARD
Date: ___________________ Signed: __________________________
Please return the original warranty card to:
Halifax Vogel Group Pty Limited
29 Henderson Street,
Turrella, NSW, 2205
Please retain proof of purchase
Owners Details
Owners Name:
Installation Address:
Installation Date:
Installed by:
Durallo Splashbacks and Panels Purchased from
Company Name:
Company Address:
Company Phone:
Company Contact:
Durallo Splashbacks and Panels Installed
Colour Name:
Surface Texture: