dw4020: d4 remote installation guide - highspeedsat dw4020 v1.2.doc 29/08/02 7 4. press enter at the...
TRANSCRIPT

Version 1228 August 2002
DDWW44002200 DD44RReemmoottee IInnssttaall llaatt iioonn GGuuiiddeean IBG Release
D4 DW4020 v12doc 290802 2
Change History
Version Date Comments10 12-Aug-02 Begontildea Rascon
11 23-Aug-02 Alex Ekonomou
12 28-Aug-02 Ammi Midstokke
PROPRIETARY NOTICE
All rights reserved This publication contains proprietary and commercially sensitive information and itscontents are proprietary to Hughes No part of this publication may be disclosed duplicated reproduced forany purpose other than in the review and evaluation and cannot be disclosed to any third party without the
written permission of Hughes Network Systems Saxon Street Linford Wood Milton Keynes UK
Copyright copy 2001 Hughes Network Systems
D4 DW4020 v12doc 290802 3
D4 REMOTE INSTALLATION GUIDE DW4020
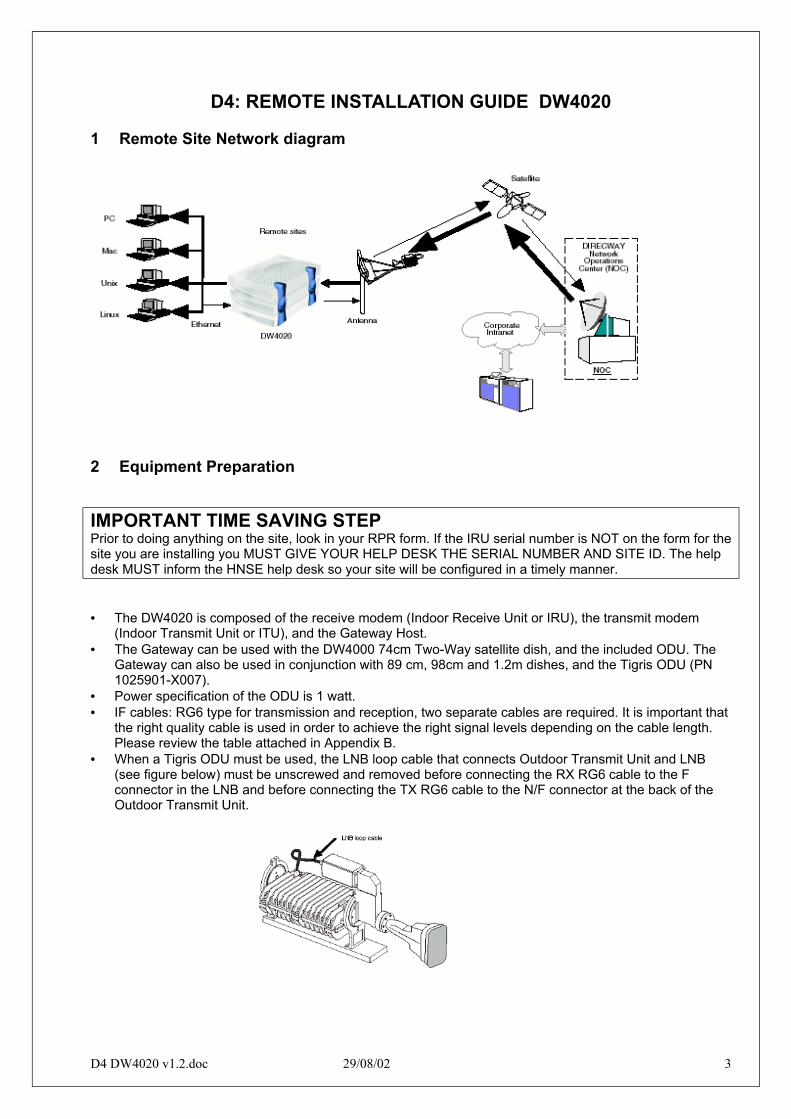
1 Remote Site Network diagram
2 Equipment Preparation
IMPORTANT TIME SAVING STEPPrior to doing anything on the site look in your RPR form If the IRU serial number is NOT on the form for thesite you are installing you MUST GIVE YOUR HELP DESK THE SERIAL NUMBER AND SITE ID The helpdesk MUST inform the HNSE help desk so your site will be configured in a timely manner
bull The DW4020 is composed of the receive modem (Indoor Receive Unit or IRU) the transmit modem(Indoor Transmit Unit or ITU) and the Gateway Host
bull The Gateway can be used with the DW4000 74cm Two-Way satellite dish and the included ODU TheGateway can also be used in conjunction with 89 cm 98cm and 12m dishes and the Tigris ODU (PN1025901-X007)
bull Power specification of the ODU is 1 wattbull IF cables RG6 type for transmission and reception two separate cables are required It is important that
the right quality cable is used in order to achieve the right signal levels depending on the cable lengthPlease review the table attached in Appendix B
bull When a Tigris ODU must be used the LNB loop cable that connects Outdoor Transmit Unit and LNB(see figure below) must be unscrewed and removed before connecting the RX RG6 cable to the Fconnector in the LNB and before connecting the TX RG6 cable to the NF connector at the back of theOutdoor Transmit Unit
D4 DW4020 v12doc 290802 4
bull When using Tigris ODU with part number 1025901-0007 one F to N connector will be required for theconnection between the TX RG6 cable and the N connector at the back of the Outdoor Transmit Unit
bull When using Tigris ODU with part number 1025901-1007 no F to N connector is required between theTX RG6 cable and the F connector at the back of the Outdoor Transmit Unit this ODU always comeswith F connector
bull The satellite modem receiver or Indoor Receive Unit (IRU) is always placed on top of the satellitemodem transmitter or Indoor Transmit Unit (ITU) when assembling the two units This is important forheat dissipation
bull UNPLUG indoor power connection before connecting Tx and Rx IF cables to the IRU and ITU
bull The DW4020 must use a power supply with the part number PN 1031105-0001 The part number is ona sticker on the power supply Verify that you are using the correct power supply Do not use anythingbut the power supply supplied with the Gateway system (1031105-0001)Using a DW4000 power supplyto power the DW4020 will cause damage to both power supply and the DW4020
At the end of the install only one power supply is used The IRU is powered via the short grey powersupply pig tail cable
bull The three units must be stacked correctly to ensure proper heat dissipation The receive modem must beinstalled on top of the transmit modem which is in turn installed on top of the Gateway host
bull Remove the rubber ldquofeetrdquo from any of the units (if they are attached)bull Make sure that the 3-way brackets are placed in such a way that the word ldquoHUGHESrdquo is upright and that
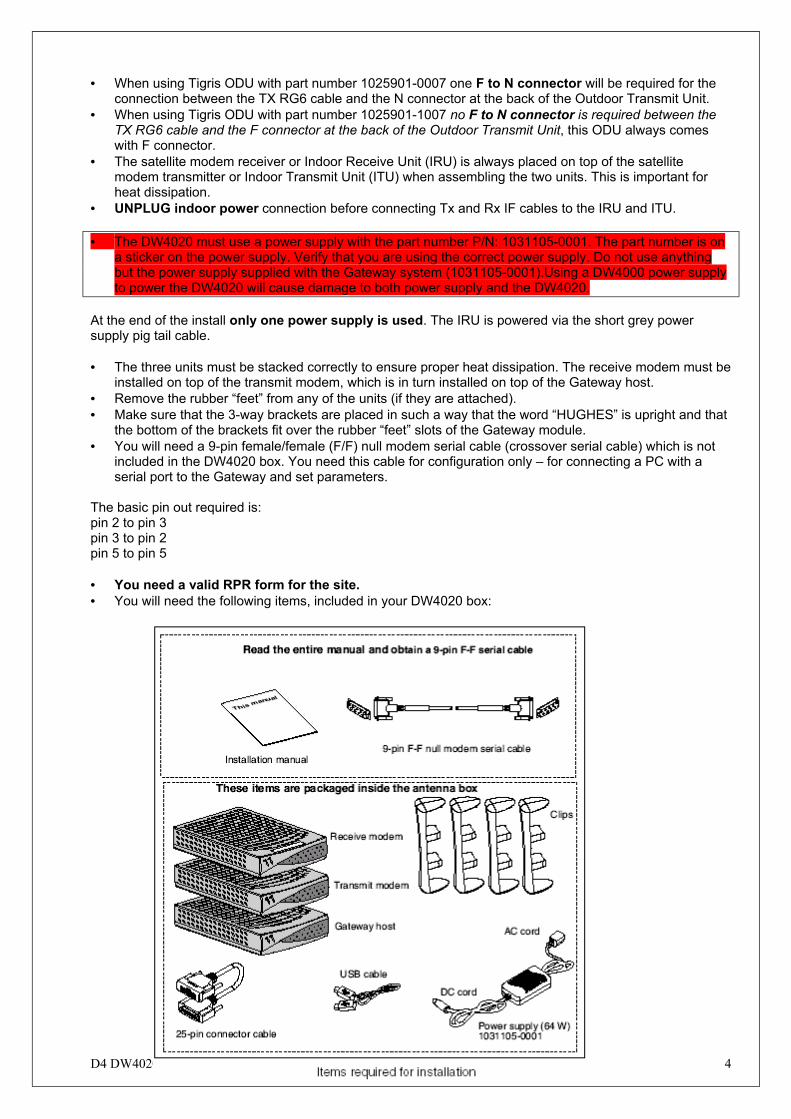
the bottom of the brackets fit over the rubber ldquofeetrdquo slots of the Gateway modulebull You will need a 9-pin femalefemale (FF) null modem serial cable (crossover serial cable) which is not
included in the DW4020 box You need this cable for configuration only ndash for connecting a PC with aserial port to the Gateway and set parameters
The basic pin out required ispin 2 to pin 3pin 3 to pin 2pin 5 to pin 5
bull You need a valid RPR form for the sitebull You will need the following items included in your DW4020 box
D4 DW4020 v12doc 290802 5
Connect the satellite IRU ITU and GWH as in the figure
D4 DW4020 v12doc 290802 6
3 Gateway configuration
31 Connecting Gateway host and PC for configuration of boot parameters
1 Attach one end of a 9-pin F-F (femalefemale) null modem serial cable to the serial port on your PC2 Attach the other end of the cable to the Gateway host serial port at the back3 At your PC run Hyper Terminal to access the Gateway host software proceed as follow
Start Menu Programs Accessories Communications Hyper Terminal
Configure the Hyper terminal parameters as follows and press OK
D4 DW4020 v12doc 290802 7
4 Press ENTER at the program prompt to display the Gateway Host Main Menu
32 Configuring Gateway host
The parameters needed for configuring the DW4020 are as shown below Several parameters are global andwill be the same across all sites the rest of them will be site specific and you will find them in the RPR formfor the specific site Note that the values shown in table below as ldquosite specificrdquo are only examplesplease find the site specific values for your site in your sitersquos RPR
Parameter Value GlobalSite specific
VSAT Return Path Inroute GlobalSatellite Longitude degrees 10 GlobalSatellite Longitude minutes 0 Global
Satellite Hemisphere East GlobalVSAT Longitude degrees 0 Site specificVSAT Longitude minutes 46 Site specific
VSAT Longitude Hemisphere West Site specificVSAT Latitude degrees 52 Site specificVSAT Latitude minutes 0 Site specific
VSAT Latitude Hemisphere North Site specificSatellite Channel Frequency 15240 Global
Receive Symbol Rate 30000000 GlobalLNB Polarization Vertical Global
LNB 22KHz Switch On GlobalFilter Rolloff 20 Global
LAN1 IP Address 17216149 Site specificLAN1 Subnet Mask 255255255240 Site specific
IP Gateway IP Address 195238505 Site specificSDL Control Channel Multicast IP
Address224016 Global
VSAT Management IP Address 1011284 Site specificDefault Gateway (for DMV with LAN
return path only)0000 Global
Number of Static Routes in Routing Table 0 Global
D4 DW4020 v12doc 290802 8
1 Check that the IRU sn matches with that one in your RPR form
On the Hyper Terminal you must have the Gateway host Main Menu as shown below select option C atMain Menu and then option C again for the Satellite Interface Serial Number
2 Return to Main Menu by typing Z On Main Menu select option A for ldquoConfigure Boot Parametersrdquo
As each one-line parameter appears type the value as defined in the previous table for ldquoglobalrdquo parametersand as defined in your sitersquos RPR for the ldquosite specificrdquo parameters Pressing ENTER will bring you to thenext parameter
Note that the values for ldquosite specificrdquo parameters in the previous table are only examples and that you mustget those ldquosite specificrdquo parameters from your RPR form
D4 DW4020 v12doc 290802 9
Type - and press ENTER at the prompt to go to the previous parameter You can also skip the remainingparameters by typing and pressing ENTER
3 When you have entered all parameters return to the Main Menu and type pw This saves theconfiguration parameters to the flash memory At this point depending on the parameters that weremodified the Gateway host may reset
4 At the Main Menu select B option to ldquodisplay current configurationrdquo Verify that the parameters enteredmatch those ones in the previous table if they are global and in your RPR if they are ldquosite specificrdquo
D4 DW4020 v12doc 290802 10
5 After you have entered and verified the boot parameters return to the Main Menu and select option i forInstallation
Hit ldquoenterrdquo when prompted with ldquoInstaller IDrdquoAt the Installation Menu prompt enter A to obtain antenna pointing values and assigned satellite parameters
Fine tune the antenna with the values for Elevation Azimuth and Polarization angles displayed on yourscreen
The Signal Quality Factor (SQF) at the bottom of the screen represents the strength of the received signalrelative to noise SQF is an integer value between 0 and 99 The SQF value is interpreted as follows
bull 0~29 The Gateway is not locked onto the desired signalbull 31~99 The Gateway is locked onto the desired satellite signal
Note The SQF value of 30 is not supported
If the SQF is less than 55 refine the antenna pointing andor polarisation to bring the SQF over 55 and to asclose to 99 as possible The SQF message updates automatically There is a delay of up to 10 secondsbetween the displayed SQF value and the current SQF value
Refine your antenna pointing until you get an SQF higher than what is shown in the table below
Weather conditions (remote) SQFClear sky 55Light cloud 50Heavy cloud 45Rain or snow 40
If you cannot achieve a satisfactory SQF take the following steps until the situation is corrected
a Check for unobstructed view to satelliteb Refine antenna aimingc Check polarisation (Complete antenna ldquoskewrdquo in the case of the 74 cn antenna)d Check cables connectivity and length (you may need better quality cable or inline amplifiers)e Replace ODU
D4 DW4020 v12doc 290802 11
f Replace entire Gateway DW4020 unit6 At this point you are ready to have the Transmitter enabled In order to do so you need to collect thefollowing information and then call your VAR Help Desk For tracking and procedural reasons the followingsteps must be followed
a Collect the following informationbull CUSTOMER site IDbull IRU Serial Numberbull Site IDbull IP Addressbull Gateway IP addressbull Service Planbull Weather conditions (clear sky light cloud heavy cloud rain)bull SQF
b Call the VAR Help Desk and inform them that this is a DW4020 installation and give them the informationlisted above
c Wait until the VAR Help Desk communicates back to you that you are now Transmit enabled and withintolerance in your SQF (Receive signal Quality as shown in the statistics discussed above) and EbNo(Signal quality of your transmission as received at the hub)
7 Return to Installation menu by pressing ENTER select now D for ldquoVerify Rangingrdquo
Ranging has succeeded if the Test Result on the screen show ldquoPASSrdquo Ranging has not been successful ifldquoNO RANGErdquo appears
If you do not see ldquoPASSrdquo repeat the ldquoVerify Rangingrdquo step 3 times in 5 minute intervals
If you do not see ldquoPASSrdquo re-check your Latitude and Longitude entries change them to more accuratevalues and go through the Parameter Write step Power cycle the unit as described in the attachedprocedure
If you still have a problem contact your help desk
Return to Main Menu by pressing ENTER
D4 DW4020 v12doc 290802 12
33 Verifying software download
If the Gateway is configured correctly for outroute reception and SQF is acceptable it will acquire theoutroute As soon as the Gateway acquires the outroute it tries to perform software download
1 At the Main Menu select F for Software Download MonitorThe following message is displayed at the bottom of the screen
SDL Initialization complete Awaiting first heartbeat msg
This message is dynamically updated It indicates that SDL (Software Download process) has started and iswaiting to connect with the HUB server
2 At Main Menu select option rd to force download and acquire new keys DW4020 resets after thiscommand Wait until Main Menu appears again select f for monitoring the SDL
You should see on the screen
SDL Initialization complete Awaiting first heartbeat msg
Received first heartbeat message
Received FileGroup message Reconciling files
MM loading
Transferring MM to flashAll files downloaded Notifying CFM
Note It may be 20 minutes before the first heartbeat message is received If you see errors like ldquoV1_SendTrap Sendto failed unable to send trapto manager 19216811180162 at line 1707 in file cm_datapessdrem2snmpsnmp14217snmpdunixtrapcrdquo they can be ignored
Upon successful download the Gateway host automatically resets to reflect the new software The newconfiguration takes effect After reset the Gateway host goes through the boot-up sequence again PressENTER for the Main Menu to appear and select option f again you should see on the screen
SDL Initialization complete Awaiting first heartbeat msgAll files downloaded No pending changes
If SDL does not progress at Main Menu select B for Display Current Configuration and check the following
bull SDL Control Channel Multicast Address value entered and used are 224016bull IP Gateway IP Address value entered and used are the one in your RPR for this ldquosite specificrdquo
parameter
34 Verifying correct Gateway operation
1 At the Main Menu select C again for Satellite Interface Statistics and select A for Main StatisticsYou should see
bull Signal quality factor over 60bull Frames receivedbull Receive Status operationalbull Transmit Status available
D4 DW4020 v12doc 290802 13
At this point your help desk (VAR Help Desk) needs to approve the installation The VAR HD approves theinstallation based on possibly a wide number of criteria As far as the satellite equipment installation isconcerned HNSE must verify two basic parameters The SQF and the EbNo Of these only the SQF isvisible to the installer on site The EbNo is only visible at the NOC The HNSE HD will communicate theseparameters to the VAR HD and will communicate if the values are acceptable The VAR HD will then be ableto accept the installation
If the values are not acceptable then the installer will have to take steps to improve the sitersquos performanceFollow the same steps as described in 5 a to f above Indicate to the VAR HD that you are ready to be re-ranged The HNSE HD will give new SQF and EbNo figures This process needs to continue until the site iswithin correct operational limits
VAR HD may issue to the installer a Commissioning Number for tracking purposes
When DW4020 is configured close the Hyper Terminal window
4 Configuring PC for TCPIP connectivity
For the PC interface to be connected to the Gateway Host must be configured with the following parameters
bull IP Address one IP Address from the Host IP range in RPR (site specific parameter recorded in RPR)bull Subnet Mask LAN1 Subnet Mask configured in Gateway Host (site specific parameter recorded in
RPR)bull Default Gateway IP Address LAN1 IP Address configured in Gateway Host (site specific parameter
recorded in RPR)bull Preferred DNS Server 19523850254bull Alternate DNS Server 195238621
To configure this LAN interface in Windows OS proceed as follows
Start Menu Settings Network Connections (If not direct access from here go to Control Panel Network Connections)
Right click on the icon for the Local Area Connection interface that you will connect to the DW4020 for trafficclick on ldquoPropertiesrdquo
D4 DW4020 v12doc 290802 14
On the Properties window click on ldquoInternet Protocol (TCPIP)rdquo and then click on Properties button
Fill in the previous parameters and click OK on this screen and in the previous one still open
Reboot the PC after LAN interface is configured
D4 DW4020 v12doc 290802 15
5 Installing Optimisation Software HPEP
Note The HPEP and Browser optimisation SW MUST be installed on all the PCs in the LAN that will beusing the DW4020 system
If this is an upgrade on a site running a DW4000 de-install the DW4000 SW before proceeding Go toControl Panel addremove programs Highlight the DirecWay (or DirecPC depending on SW version) clientand click remove
51 Download the Optimization packages
Open in your WEB Browser the CCS Support Page on http19523862133
Download the optimization packages by clicking on the corresponding HERE link When asked to eitheropen or save the file select ldquoOpenrdquo and the SW will be automatically installed (Answer ldquoYesrdquo to thedistribution warning question)
52 Installation of HPEP Downstream Proxy
Double click the HPEP DownstreamProxyexe file to initiate the decompression of the installation packageOn the following window confirm the folder where to unzip the HPEP Downstream Proxy If necessary youcan change the location by typing the new folder name
D4 DW4020 v12doc 290802 16
After the decompression is finished press the Close button
Open folder CHPEP (or the folder you have selected to unzip to) and double click on Setupexe to startinstallation
Press ldquoNextrdquo to proceed with the installation
D4 DW4020 v12doc 290802 17
Press ldquoNextrdquo to proceed with the installation
Press ldquoNextrdquo to confirm the Installation Folder (If necessary you can change the folder by clicking Browseand selection a new one)On the following screen type-in the Port and the IP address of the Upstream Proxy
Port 86IP Address 19523862132
Press ldquoNextrdquo to start the installation process
D4 DW4020 v12doc 290802 18
Upon the end of the installation the following screen will be shown
Select ldquoYes I want to restart my computer nowrdquo Press ldquoFinishrdquo to reboot your PC in order to properly startthe HPEP Downstream Proxy Service
Now you have to configure your Internet browser properties Follow 53 for Internet Explorer browser or 54for Netscape browser
53 Configuring IE Browserbull Click on the Internet Options menu item under the Tools menubull On the dialog box that appears click on the Connections tabbull Click on LAN Settingsbull Check the use a proxy server option and click on Advancedbull Set the proxy server IP address to 127001 and port number 85 Make sure that this is set only for
HTTP and HTTPS protocols as shown bellow
bull Make sure that the checkbox for Use the same proxy server for all protocols is not checkedbull Click on OK
D4 DW4020 v12doc 290802 19
54 Configuring Netscape browserbull Click on the preferences under the Edit menubull On the dialog box that appears select Proxies under Advanced category and click on Manual Proxy
Configuration radio buttonbull Click on View buttonbull Set the proxy server IP address to 127001 and port number 85 Make sure that this is set only for
HTTP and HTTPS protocols
bull Make sure that there are no exceptions listed otherwise those sites will not be accessed via HPEPbull Click on OK
6 Power cycle reboot
1 Power down the computer21 Click on Start22 Click on Shut Down23 Select Shut down again (do not select restart)
2 Unplug the power supply to IRU (at least for 30 seconds)3 Plug the power supply back into the IRU (wait for the Ready and Rx lights to flash back and forth)4 Power ON the computer5 Confirm that the Ready light on the IRU ITU Ready and Status lights on GWH remain steady and RX
light on IRU keeps flashing after the computer boots up completely
7 Tests
71 Test 1
Open a ldquoCommand promptrdquo window (Start Run command) and type
ping 195238481 ndashw 5000 press the Return button
The response time should be between 800 and 1400 ms
D4 DW4020 v12doc 290802 20
72 Test 2
Open your Internet browser and enter into the URL line (ldquoAddressrdquo field) the IP address 1952384811
The first page you get is just a blue Hughes Network Systems Europe page that will go directly to the indexpage a large satellite dish write down the shown time to download this page Press ldquoContinuerdquo and it will download the vanhtml page that consists of 24 small pictures of Vancouver asobjects write down the shown time to download this page
Press ldquoContinuerdquo and it will download the demohtml page that is a large image Write down the shown timeto download this page
Press ldquoContinuerdquo and it will download the vancouverhtml page that consists of 12 medium size images ofVancouver as objects Write down the shown time to download this pageDepending on your Grade Of Service the pages should come in the following times
Page Standard Plus PremiumFirst (Satellite dish) 8-10 5-8 2-5Second (24 small images 8-10 5-8 2-5Third (1 large image) 26-35 18-26 11-18Fourth (12 mediumimages)
18-28 10-18 5-10
Times in seconds
Note1 In some cases the reported times are negative Add 60 to the reported time to get the actual timeExample Reported time ndash47 sec 112 msec The actual time is ndash47+60=13 sec (actually 12888 sec)
In some instances the reported time might be higher than 60 Please use your judgement (and a stop watch)If the time is clearly not as long as reported then subtract 60 from the reported time If the time is indeedhigher than 60 sec (using a stop watch) then there is something wrong with your system Please call yourhelp desk
Note 2 If the ldquoContinuerdquo soft key cannot be depressed make sure you maximise your browser window
The table below shows the performance of the same 4 sites on a directly connected dedicated (Leased) lineThis table is for demonstration purposes only
Page 128Kbps
256 Kbps512Kbps
First (Satellite dish) 12 6 3Second (24 small images 12 6 3Third (1 large image) 79 39 20Fourth (12 mediumimages)
40 24 12
Times in seconds
73 Test 3
Open a ldquoCommand promptrdquo window and type
ftp 1952384811
when prompted for ldquousernamerdquo type
anonymous
Press return key when prompted for ldquoPasswordrdquo
Download the test file type
get 2mbpak
D4 DW4020 v12doc 290802 21
Depending on your Grade of Service you should see download speeds in the following ranges Note that thespeed is reported in Kilo Bytes per second Please multiply by 8 to convert to Kilo Bits per second
GOS MIN MAXSTANDARD 128
Kbps512 Kbps
PLUS 256Kbps
10 Mbps
PREMIUM 512Kbps
20 Mbps
bps bits per second
Note The variation is due to peak and off peak system performance MIN and MAX figures indicated canvary by as much as 30
8 Communication at the end of Commissioning
Call your VAR Helpdesk and give them the results of your tests
Deliver to the end user representative the second page of the RPR form with all the relevant siteparameters
Customerrsquos Installer having test problems calls VAR HD
The installation and commissioning of the DW4020 remote is now finished
D4 DW4020 v12doc 290802 22
APPENDIX A
ACRONYMSGWH Gateway HostIDU Indoor UnitIFL Inter Facility Link (cable between IDU and ODU)IPGW IP GatewayIRU Indoor Receive UnitITU Indoor Transmit UnitLAN Local Area NetworkODU Outdoor UnitSDL Software DownloadVSAT Very Small Aperture TerminalVAR Value Added Reseller
APPENDIX B
SAMPLE RG6 CABLE LENGTHS
VendorPartNumber
Description DCConductorResistance
DC ShieldResistance
DC Limit (meters)
Tx Limit
(meters)
Rx Limit
(meters)
Overall
(meters)5729 RG6 w Solid Copper Center Conductor 640 1050 92 112 145 92005730 RG6 w Plated Steel Center Conductor 3200 1050 36 113 145 121415781 RG6 w Solid Copper Center Conductor amp
Quad Shield650 530 133 111 134 111
5916 RG11 w Plated Steel Center Conductor 1429 480 82 180 189 82Special RG11 w Solid Copper Center Conductor 300 370 234 180 189 180LDF4-
75A12 Heliax Cable 115 058 908 370 417 370
2229V RG6 w Solid Copper Center Conductor ampQuad Shield
650 530 133 89 118 89
- D4 REMOTE INSTALLATION GUIDE DW4020
- Remote Site Network diagram
- Equipment Preparation
- Gateway configuration
-
- Connecting Gateway host and PC for configuration of boot parameters
- Configuring Gateway host
- Verifying software download
- Verifying correct Gateway operation
-
- Configuring PC for TCPIP connectivity
- Installing Optimisation Software HPEP
-
- Download the Optimization packages
- Installation of HPEP Downstream Proxy
- Configuring IE Browser
- Configuring Netscape browser
-
- Power cycle reboot
- Tests
-
- Test 1
- Test 2
- Test 3
-
- Communication at the end of Commissioning
-

D4 DW4020 v12doc 290802 2
Change History
Version Date Comments10 12-Aug-02 Begontildea Rascon
11 23-Aug-02 Alex Ekonomou
12 28-Aug-02 Ammi Midstokke
PROPRIETARY NOTICE
All rights reserved This publication contains proprietary and commercially sensitive information and itscontents are proprietary to Hughes No part of this publication may be disclosed duplicated reproduced forany purpose other than in the review and evaluation and cannot be disclosed to any third party without the
written permission of Hughes Network Systems Saxon Street Linford Wood Milton Keynes UK
Copyright copy 2001 Hughes Network Systems
D4 DW4020 v12doc 290802 3
D4 REMOTE INSTALLATION GUIDE DW4020
1 Remote Site Network diagram
2 Equipment Preparation
IMPORTANT TIME SAVING STEPPrior to doing anything on the site look in your RPR form If the IRU serial number is NOT on the form for thesite you are installing you MUST GIVE YOUR HELP DESK THE SERIAL NUMBER AND SITE ID The helpdesk MUST inform the HNSE help desk so your site will be configured in a timely manner
bull The DW4020 is composed of the receive modem (Indoor Receive Unit or IRU) the transmit modem(Indoor Transmit Unit or ITU) and the Gateway Host
bull The Gateway can be used with the DW4000 74cm Two-Way satellite dish and the included ODU TheGateway can also be used in conjunction with 89 cm 98cm and 12m dishes and the Tigris ODU (PN1025901-X007)
bull Power specification of the ODU is 1 wattbull IF cables RG6 type for transmission and reception two separate cables are required It is important that
the right quality cable is used in order to achieve the right signal levels depending on the cable lengthPlease review the table attached in Appendix B
bull When a Tigris ODU must be used the LNB loop cable that connects Outdoor Transmit Unit and LNB(see figure below) must be unscrewed and removed before connecting the RX RG6 cable to the Fconnector in the LNB and before connecting the TX RG6 cable to the NF connector at the back of theOutdoor Transmit Unit
D4 DW4020 v12doc 290802 4
bull When using Tigris ODU with part number 1025901-0007 one F to N connector will be required for theconnection between the TX RG6 cable and the N connector at the back of the Outdoor Transmit Unit
bull When using Tigris ODU with part number 1025901-1007 no F to N connector is required between theTX RG6 cable and the F connector at the back of the Outdoor Transmit Unit this ODU always comeswith F connector
bull The satellite modem receiver or Indoor Receive Unit (IRU) is always placed on top of the satellitemodem transmitter or Indoor Transmit Unit (ITU) when assembling the two units This is important forheat dissipation
bull UNPLUG indoor power connection before connecting Tx and Rx IF cables to the IRU and ITU
bull The DW4020 must use a power supply with the part number PN 1031105-0001 The part number is ona sticker on the power supply Verify that you are using the correct power supply Do not use anythingbut the power supply supplied with the Gateway system (1031105-0001)Using a DW4000 power supplyto power the DW4020 will cause damage to both power supply and the DW4020
At the end of the install only one power supply is used The IRU is powered via the short grey powersupply pig tail cable
bull The three units must be stacked correctly to ensure proper heat dissipation The receive modem must beinstalled on top of the transmit modem which is in turn installed on top of the Gateway host
bull Remove the rubber ldquofeetrdquo from any of the units (if they are attached)bull Make sure that the 3-way brackets are placed in such a way that the word ldquoHUGHESrdquo is upright and that
the bottom of the brackets fit over the rubber ldquofeetrdquo slots of the Gateway modulebull You will need a 9-pin femalefemale (FF) null modem serial cable (crossover serial cable) which is not
included in the DW4020 box You need this cable for configuration only ndash for connecting a PC with aserial port to the Gateway and set parameters
The basic pin out required ispin 2 to pin 3pin 3 to pin 2pin 5 to pin 5
bull You need a valid RPR form for the sitebull You will need the following items included in your DW4020 box
D4 DW4020 v12doc 290802 5
Connect the satellite IRU ITU and GWH as in the figure
D4 DW4020 v12doc 290802 6
3 Gateway configuration
31 Connecting Gateway host and PC for configuration of boot parameters
1 Attach one end of a 9-pin F-F (femalefemale) null modem serial cable to the serial port on your PC2 Attach the other end of the cable to the Gateway host serial port at the back3 At your PC run Hyper Terminal to access the Gateway host software proceed as follow
Start Menu Programs Accessories Communications Hyper Terminal
Configure the Hyper terminal parameters as follows and press OK
D4 DW4020 v12doc 290802 7
4 Press ENTER at the program prompt to display the Gateway Host Main Menu
32 Configuring Gateway host
The parameters needed for configuring the DW4020 are as shown below Several parameters are global andwill be the same across all sites the rest of them will be site specific and you will find them in the RPR formfor the specific site Note that the values shown in table below as ldquosite specificrdquo are only examplesplease find the site specific values for your site in your sitersquos RPR
Parameter Value GlobalSite specific
VSAT Return Path Inroute GlobalSatellite Longitude degrees 10 GlobalSatellite Longitude minutes 0 Global
Satellite Hemisphere East GlobalVSAT Longitude degrees 0 Site specificVSAT Longitude minutes 46 Site specific
VSAT Longitude Hemisphere West Site specificVSAT Latitude degrees 52 Site specificVSAT Latitude minutes 0 Site specific
VSAT Latitude Hemisphere North Site specificSatellite Channel Frequency 15240 Global
Receive Symbol Rate 30000000 GlobalLNB Polarization Vertical Global
LNB 22KHz Switch On GlobalFilter Rolloff 20 Global
LAN1 IP Address 17216149 Site specificLAN1 Subnet Mask 255255255240 Site specific
IP Gateway IP Address 195238505 Site specificSDL Control Channel Multicast IP
Address224016 Global
VSAT Management IP Address 1011284 Site specificDefault Gateway (for DMV with LAN
return path only)0000 Global
Number of Static Routes in Routing Table 0 Global
D4 DW4020 v12doc 290802 8
1 Check that the IRU sn matches with that one in your RPR form
On the Hyper Terminal you must have the Gateway host Main Menu as shown below select option C atMain Menu and then option C again for the Satellite Interface Serial Number
2 Return to Main Menu by typing Z On Main Menu select option A for ldquoConfigure Boot Parametersrdquo
As each one-line parameter appears type the value as defined in the previous table for ldquoglobalrdquo parametersand as defined in your sitersquos RPR for the ldquosite specificrdquo parameters Pressing ENTER will bring you to thenext parameter
Note that the values for ldquosite specificrdquo parameters in the previous table are only examples and that you mustget those ldquosite specificrdquo parameters from your RPR form
D4 DW4020 v12doc 290802 9
Type - and press ENTER at the prompt to go to the previous parameter You can also skip the remainingparameters by typing and pressing ENTER
3 When you have entered all parameters return to the Main Menu and type pw This saves theconfiguration parameters to the flash memory At this point depending on the parameters that weremodified the Gateway host may reset
4 At the Main Menu select B option to ldquodisplay current configurationrdquo Verify that the parameters enteredmatch those ones in the previous table if they are global and in your RPR if they are ldquosite specificrdquo
D4 DW4020 v12doc 290802 10
5 After you have entered and verified the boot parameters return to the Main Menu and select option i forInstallation
Hit ldquoenterrdquo when prompted with ldquoInstaller IDrdquoAt the Installation Menu prompt enter A to obtain antenna pointing values and assigned satellite parameters
Fine tune the antenna with the values for Elevation Azimuth and Polarization angles displayed on yourscreen
The Signal Quality Factor (SQF) at the bottom of the screen represents the strength of the received signalrelative to noise SQF is an integer value between 0 and 99 The SQF value is interpreted as follows
bull 0~29 The Gateway is not locked onto the desired signalbull 31~99 The Gateway is locked onto the desired satellite signal
Note The SQF value of 30 is not supported
If the SQF is less than 55 refine the antenna pointing andor polarisation to bring the SQF over 55 and to asclose to 99 as possible The SQF message updates automatically There is a delay of up to 10 secondsbetween the displayed SQF value and the current SQF value
Refine your antenna pointing until you get an SQF higher than what is shown in the table below
Weather conditions (remote) SQFClear sky 55Light cloud 50Heavy cloud 45Rain or snow 40
If you cannot achieve a satisfactory SQF take the following steps until the situation is corrected
a Check for unobstructed view to satelliteb Refine antenna aimingc Check polarisation (Complete antenna ldquoskewrdquo in the case of the 74 cn antenna)d Check cables connectivity and length (you may need better quality cable or inline amplifiers)e Replace ODU
D4 DW4020 v12doc 290802 11
f Replace entire Gateway DW4020 unit6 At this point you are ready to have the Transmitter enabled In order to do so you need to collect thefollowing information and then call your VAR Help Desk For tracking and procedural reasons the followingsteps must be followed
a Collect the following informationbull CUSTOMER site IDbull IRU Serial Numberbull Site IDbull IP Addressbull Gateway IP addressbull Service Planbull Weather conditions (clear sky light cloud heavy cloud rain)bull SQF
b Call the VAR Help Desk and inform them that this is a DW4020 installation and give them the informationlisted above
c Wait until the VAR Help Desk communicates back to you that you are now Transmit enabled and withintolerance in your SQF (Receive signal Quality as shown in the statistics discussed above) and EbNo(Signal quality of your transmission as received at the hub)
7 Return to Installation menu by pressing ENTER select now D for ldquoVerify Rangingrdquo
Ranging has succeeded if the Test Result on the screen show ldquoPASSrdquo Ranging has not been successful ifldquoNO RANGErdquo appears
If you do not see ldquoPASSrdquo repeat the ldquoVerify Rangingrdquo step 3 times in 5 minute intervals
If you do not see ldquoPASSrdquo re-check your Latitude and Longitude entries change them to more accuratevalues and go through the Parameter Write step Power cycle the unit as described in the attachedprocedure
If you still have a problem contact your help desk
Return to Main Menu by pressing ENTER
D4 DW4020 v12doc 290802 12
33 Verifying software download
If the Gateway is configured correctly for outroute reception and SQF is acceptable it will acquire theoutroute As soon as the Gateway acquires the outroute it tries to perform software download
1 At the Main Menu select F for Software Download MonitorThe following message is displayed at the bottom of the screen
SDL Initialization complete Awaiting first heartbeat msg
This message is dynamically updated It indicates that SDL (Software Download process) has started and iswaiting to connect with the HUB server
2 At Main Menu select option rd to force download and acquire new keys DW4020 resets after thiscommand Wait until Main Menu appears again select f for monitoring the SDL
You should see on the screen
SDL Initialization complete Awaiting first heartbeat msg
Received first heartbeat message
Received FileGroup message Reconciling files
MM loading
Transferring MM to flashAll files downloaded Notifying CFM
Note It may be 20 minutes before the first heartbeat message is received If you see errors like ldquoV1_SendTrap Sendto failed unable to send trapto manager 19216811180162 at line 1707 in file cm_datapessdrem2snmpsnmp14217snmpdunixtrapcrdquo they can be ignored
Upon successful download the Gateway host automatically resets to reflect the new software The newconfiguration takes effect After reset the Gateway host goes through the boot-up sequence again PressENTER for the Main Menu to appear and select option f again you should see on the screen
SDL Initialization complete Awaiting first heartbeat msgAll files downloaded No pending changes
If SDL does not progress at Main Menu select B for Display Current Configuration and check the following
bull SDL Control Channel Multicast Address value entered and used are 224016bull IP Gateway IP Address value entered and used are the one in your RPR for this ldquosite specificrdquo
parameter
34 Verifying correct Gateway operation
1 At the Main Menu select C again for Satellite Interface Statistics and select A for Main StatisticsYou should see
bull Signal quality factor over 60bull Frames receivedbull Receive Status operationalbull Transmit Status available
D4 DW4020 v12doc 290802 13
At this point your help desk (VAR Help Desk) needs to approve the installation The VAR HD approves theinstallation based on possibly a wide number of criteria As far as the satellite equipment installation isconcerned HNSE must verify two basic parameters The SQF and the EbNo Of these only the SQF isvisible to the installer on site The EbNo is only visible at the NOC The HNSE HD will communicate theseparameters to the VAR HD and will communicate if the values are acceptable The VAR HD will then be ableto accept the installation
If the values are not acceptable then the installer will have to take steps to improve the sitersquos performanceFollow the same steps as described in 5 a to f above Indicate to the VAR HD that you are ready to be re-ranged The HNSE HD will give new SQF and EbNo figures This process needs to continue until the site iswithin correct operational limits
VAR HD may issue to the installer a Commissioning Number for tracking purposes
When DW4020 is configured close the Hyper Terminal window
4 Configuring PC for TCPIP connectivity
For the PC interface to be connected to the Gateway Host must be configured with the following parameters
bull IP Address one IP Address from the Host IP range in RPR (site specific parameter recorded in RPR)bull Subnet Mask LAN1 Subnet Mask configured in Gateway Host (site specific parameter recorded in
RPR)bull Default Gateway IP Address LAN1 IP Address configured in Gateway Host (site specific parameter
recorded in RPR)bull Preferred DNS Server 19523850254bull Alternate DNS Server 195238621
To configure this LAN interface in Windows OS proceed as follows
Start Menu Settings Network Connections (If not direct access from here go to Control Panel Network Connections)
Right click on the icon for the Local Area Connection interface that you will connect to the DW4020 for trafficclick on ldquoPropertiesrdquo
D4 DW4020 v12doc 290802 14
On the Properties window click on ldquoInternet Protocol (TCPIP)rdquo and then click on Properties button
Fill in the previous parameters and click OK on this screen and in the previous one still open
Reboot the PC after LAN interface is configured
D4 DW4020 v12doc 290802 15
5 Installing Optimisation Software HPEP
Note The HPEP and Browser optimisation SW MUST be installed on all the PCs in the LAN that will beusing the DW4020 system
If this is an upgrade on a site running a DW4000 de-install the DW4000 SW before proceeding Go toControl Panel addremove programs Highlight the DirecWay (or DirecPC depending on SW version) clientand click remove
51 Download the Optimization packages
Open in your WEB Browser the CCS Support Page on http19523862133
Download the optimization packages by clicking on the corresponding HERE link When asked to eitheropen or save the file select ldquoOpenrdquo and the SW will be automatically installed (Answer ldquoYesrdquo to thedistribution warning question)
52 Installation of HPEP Downstream Proxy
Double click the HPEP DownstreamProxyexe file to initiate the decompression of the installation packageOn the following window confirm the folder where to unzip the HPEP Downstream Proxy If necessary youcan change the location by typing the new folder name
D4 DW4020 v12doc 290802 16
After the decompression is finished press the Close button
Open folder CHPEP (or the folder you have selected to unzip to) and double click on Setupexe to startinstallation
Press ldquoNextrdquo to proceed with the installation
D4 DW4020 v12doc 290802 17
Press ldquoNextrdquo to proceed with the installation
Press ldquoNextrdquo to confirm the Installation Folder (If necessary you can change the folder by clicking Browseand selection a new one)On the following screen type-in the Port and the IP address of the Upstream Proxy
Port 86IP Address 19523862132
Press ldquoNextrdquo to start the installation process
D4 DW4020 v12doc 290802 18
Upon the end of the installation the following screen will be shown
Select ldquoYes I want to restart my computer nowrdquo Press ldquoFinishrdquo to reboot your PC in order to properly startthe HPEP Downstream Proxy Service
Now you have to configure your Internet browser properties Follow 53 for Internet Explorer browser or 54for Netscape browser
53 Configuring IE Browserbull Click on the Internet Options menu item under the Tools menubull On the dialog box that appears click on the Connections tabbull Click on LAN Settingsbull Check the use a proxy server option and click on Advancedbull Set the proxy server IP address to 127001 and port number 85 Make sure that this is set only for
HTTP and HTTPS protocols as shown bellow
bull Make sure that the checkbox for Use the same proxy server for all protocols is not checkedbull Click on OK
D4 DW4020 v12doc 290802 19
54 Configuring Netscape browserbull Click on the preferences under the Edit menubull On the dialog box that appears select Proxies under Advanced category and click on Manual Proxy
Configuration radio buttonbull Click on View buttonbull Set the proxy server IP address to 127001 and port number 85 Make sure that this is set only for
HTTP and HTTPS protocols
bull Make sure that there are no exceptions listed otherwise those sites will not be accessed via HPEPbull Click on OK
6 Power cycle reboot
1 Power down the computer21 Click on Start22 Click on Shut Down23 Select Shut down again (do not select restart)
2 Unplug the power supply to IRU (at least for 30 seconds)3 Plug the power supply back into the IRU (wait for the Ready and Rx lights to flash back and forth)4 Power ON the computer5 Confirm that the Ready light on the IRU ITU Ready and Status lights on GWH remain steady and RX
light on IRU keeps flashing after the computer boots up completely
7 Tests
71 Test 1
Open a ldquoCommand promptrdquo window (Start Run command) and type
ping 195238481 ndashw 5000 press the Return button
The response time should be between 800 and 1400 ms
D4 DW4020 v12doc 290802 20
72 Test 2
Open your Internet browser and enter into the URL line (ldquoAddressrdquo field) the IP address 1952384811
The first page you get is just a blue Hughes Network Systems Europe page that will go directly to the indexpage a large satellite dish write down the shown time to download this page Press ldquoContinuerdquo and it will download the vanhtml page that consists of 24 small pictures of Vancouver asobjects write down the shown time to download this page
Press ldquoContinuerdquo and it will download the demohtml page that is a large image Write down the shown timeto download this page
Press ldquoContinuerdquo and it will download the vancouverhtml page that consists of 12 medium size images ofVancouver as objects Write down the shown time to download this pageDepending on your Grade Of Service the pages should come in the following times
Page Standard Plus PremiumFirst (Satellite dish) 8-10 5-8 2-5Second (24 small images 8-10 5-8 2-5Third (1 large image) 26-35 18-26 11-18Fourth (12 mediumimages)
18-28 10-18 5-10
Times in seconds
Note1 In some cases the reported times are negative Add 60 to the reported time to get the actual timeExample Reported time ndash47 sec 112 msec The actual time is ndash47+60=13 sec (actually 12888 sec)
In some instances the reported time might be higher than 60 Please use your judgement (and a stop watch)If the time is clearly not as long as reported then subtract 60 from the reported time If the time is indeedhigher than 60 sec (using a stop watch) then there is something wrong with your system Please call yourhelp desk
Note 2 If the ldquoContinuerdquo soft key cannot be depressed make sure you maximise your browser window
The table below shows the performance of the same 4 sites on a directly connected dedicated (Leased) lineThis table is for demonstration purposes only
Page 128Kbps
256 Kbps512Kbps
First (Satellite dish) 12 6 3Second (24 small images 12 6 3Third (1 large image) 79 39 20Fourth (12 mediumimages)
40 24 12
Times in seconds
73 Test 3
Open a ldquoCommand promptrdquo window and type
ftp 1952384811
when prompted for ldquousernamerdquo type
anonymous
Press return key when prompted for ldquoPasswordrdquo
Download the test file type
get 2mbpak
D4 DW4020 v12doc 290802 21
Depending on your Grade of Service you should see download speeds in the following ranges Note that thespeed is reported in Kilo Bytes per second Please multiply by 8 to convert to Kilo Bits per second
GOS MIN MAXSTANDARD 128
Kbps512 Kbps
PLUS 256Kbps
10 Mbps
PREMIUM 512Kbps
20 Mbps
bps bits per second
Note The variation is due to peak and off peak system performance MIN and MAX figures indicated canvary by as much as 30
8 Communication at the end of Commissioning
Call your VAR Helpdesk and give them the results of your tests
Deliver to the end user representative the second page of the RPR form with all the relevant siteparameters
Customerrsquos Installer having test problems calls VAR HD
The installation and commissioning of the DW4020 remote is now finished
D4 DW4020 v12doc 290802 22
APPENDIX A
ACRONYMSGWH Gateway HostIDU Indoor UnitIFL Inter Facility Link (cable between IDU and ODU)IPGW IP GatewayIRU Indoor Receive UnitITU Indoor Transmit UnitLAN Local Area NetworkODU Outdoor UnitSDL Software DownloadVSAT Very Small Aperture TerminalVAR Value Added Reseller
APPENDIX B
SAMPLE RG6 CABLE LENGTHS
VendorPartNumber
Description DCConductorResistance
DC ShieldResistance
DC Limit (meters)
Tx Limit
(meters)
Rx Limit
(meters)
Overall
(meters)5729 RG6 w Solid Copper Center Conductor 640 1050 92 112 145 92005730 RG6 w Plated Steel Center Conductor 3200 1050 36 113 145 121415781 RG6 w Solid Copper Center Conductor amp
Quad Shield650 530 133 111 134 111
5916 RG11 w Plated Steel Center Conductor 1429 480 82 180 189 82Special RG11 w Solid Copper Center Conductor 300 370 234 180 189 180LDF4-
75A12 Heliax Cable 115 058 908 370 417 370
2229V RG6 w Solid Copper Center Conductor ampQuad Shield
650 530 133 89 118 89
- D4 REMOTE INSTALLATION GUIDE DW4020
- Remote Site Network diagram
- Equipment Preparation
- Gateway configuration
-
- Connecting Gateway host and PC for configuration of boot parameters
- Configuring Gateway host
- Verifying software download
- Verifying correct Gateway operation
-
- Configuring PC for TCPIP connectivity
- Installing Optimisation Software HPEP
-
- Download the Optimization packages
- Installation of HPEP Downstream Proxy
- Configuring IE Browser
- Configuring Netscape browser
-
- Power cycle reboot
- Tests
-
- Test 1
- Test 2
- Test 3
-
- Communication at the end of Commissioning
-
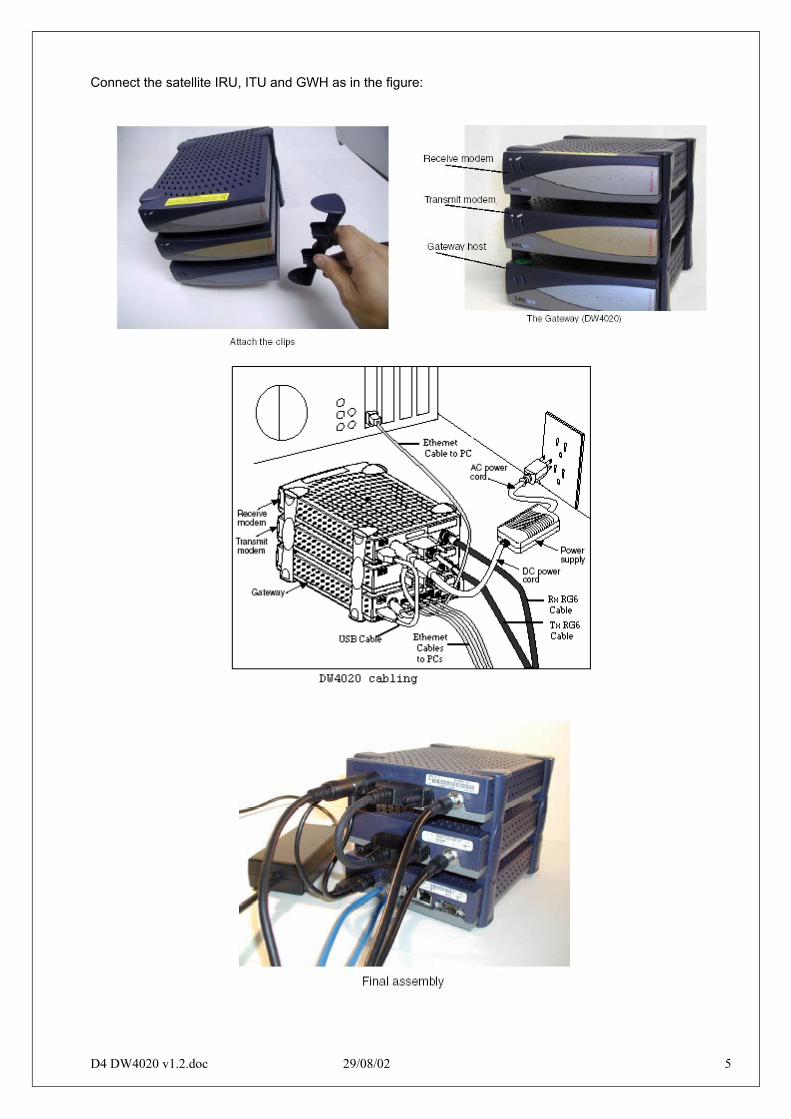
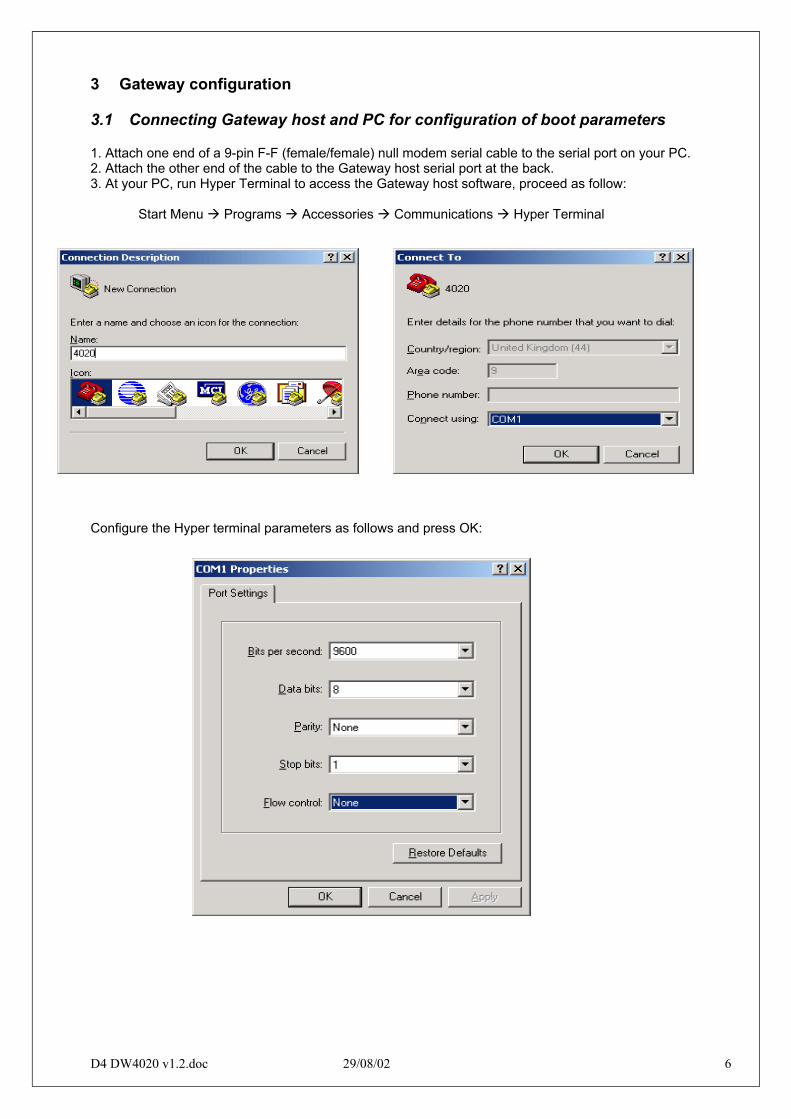
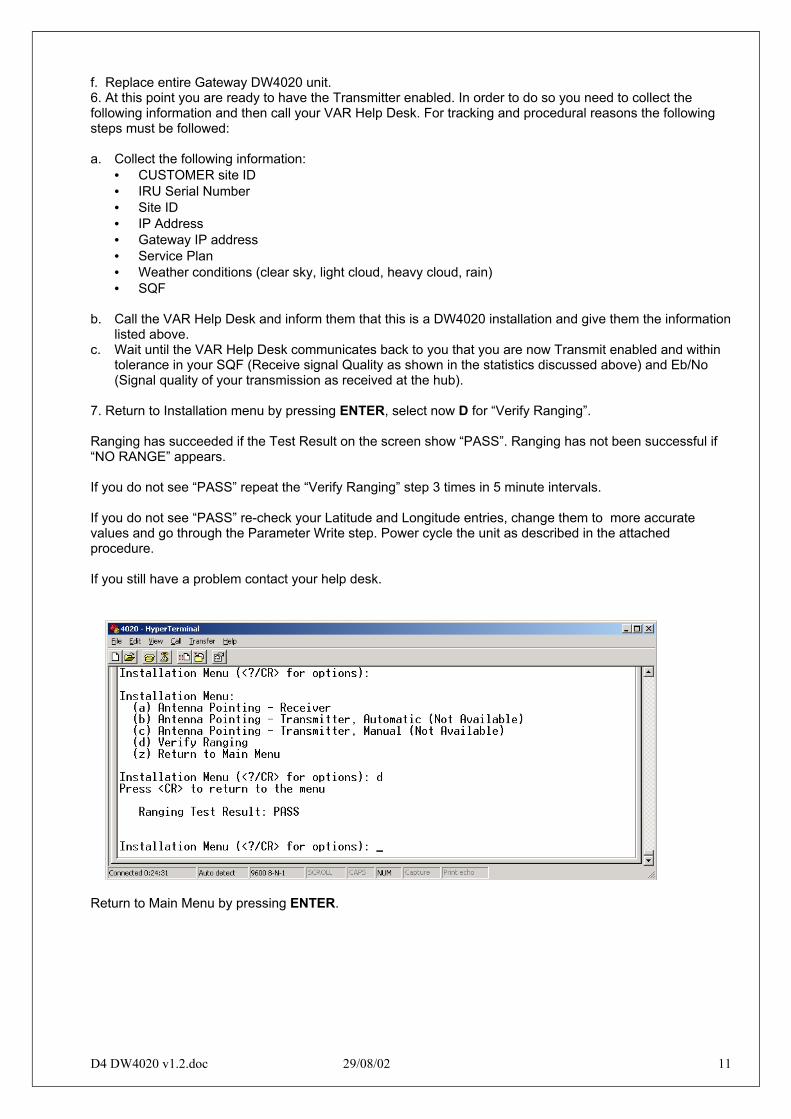
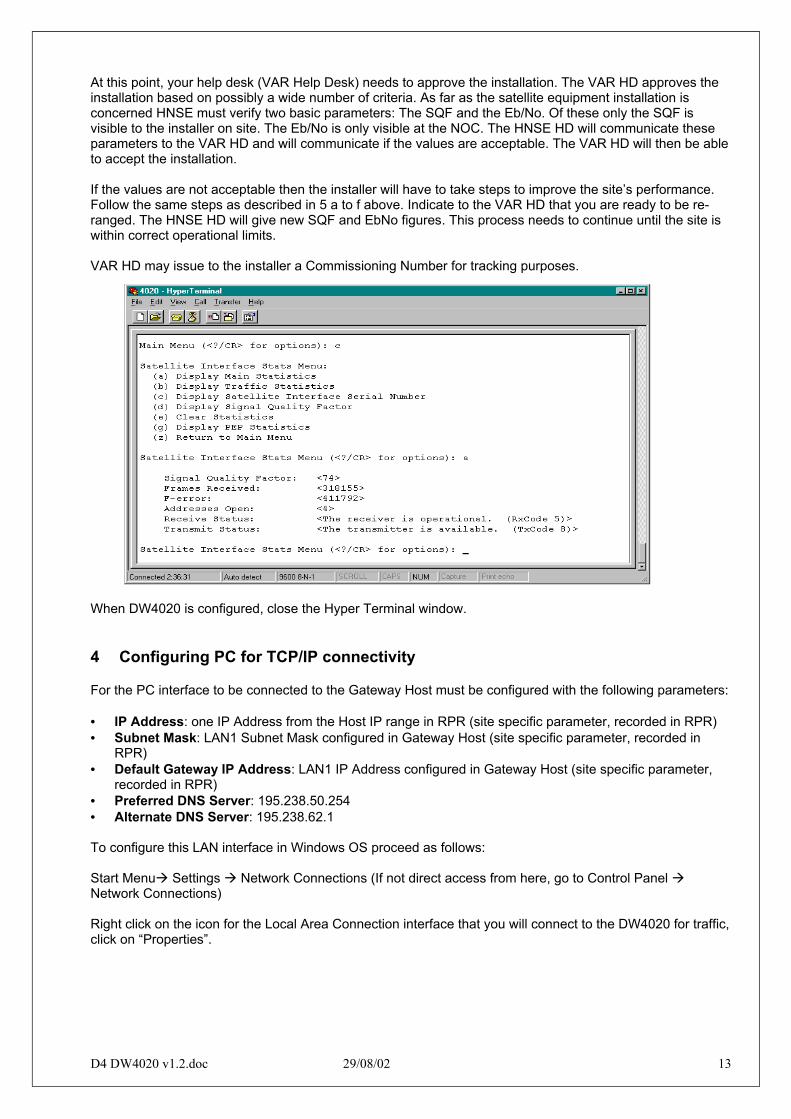
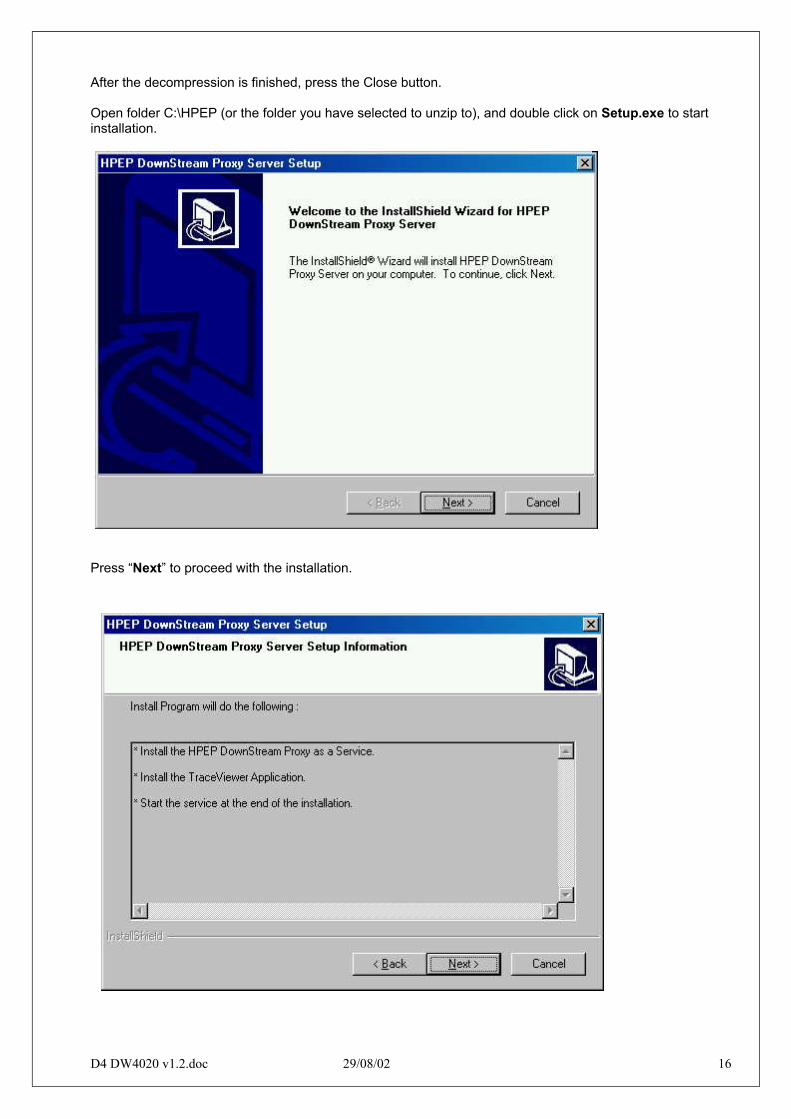
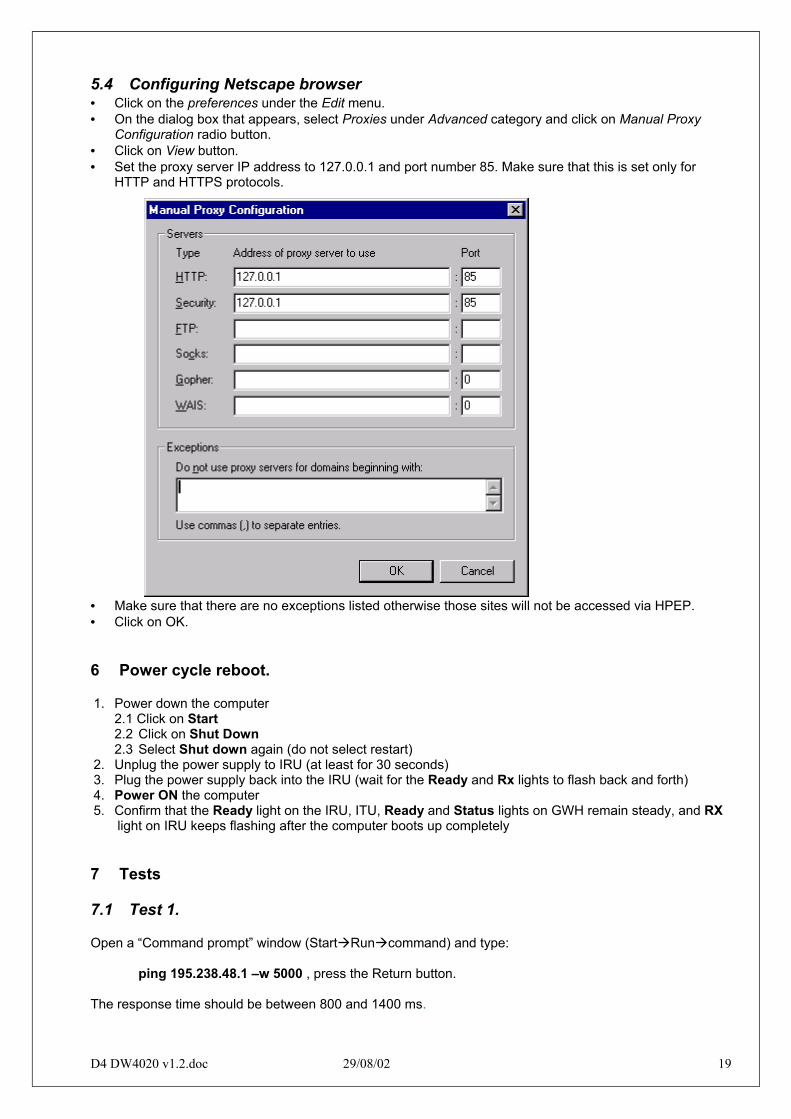
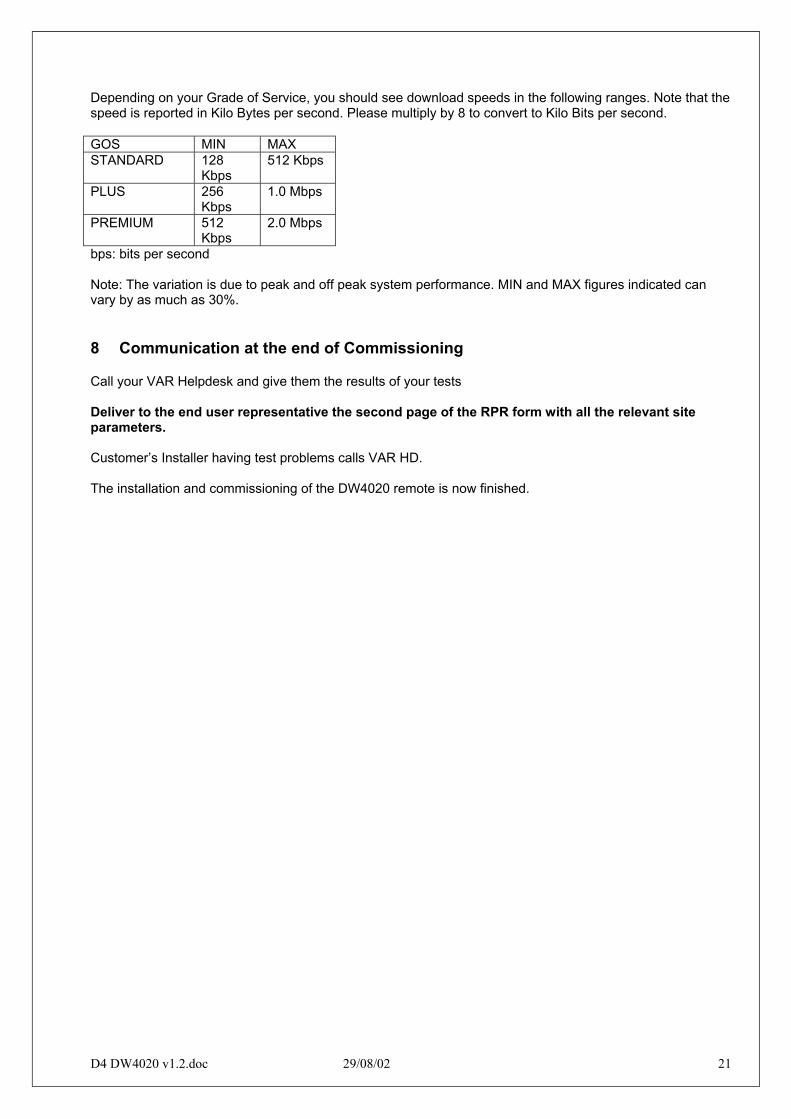