dwitiya sopan.docx
TRANSCRIPT

Dwitiya Sopan
1. Pioneering
Meaning of Pioneering:In the Scout Movement, pioneering is the art of using ropes and wooden spars joined by lashings and knots to create a structure. Pioneering can be used for constructing small items such as camp gadgets up to larger structures such as bridges and towers.
Knots and Lashing:Timber Hitch:
The timber hitch is a knot used to attach a single length of rope to a cylindrical object. Secure while tension is maintained, it is easily untied even after heavy loading.To make the knot, pass the rope completely around the object. Pass the running end around the standing part, then through the loop just formed. Make three or more turns (or twists) around the working part. Pull on the standing part to tighten around the object. A common error in tying can be avoided by assuring that the turns are made in the working part around itself.[14] When making the hitch in laid rope, the turns should be made with the lay of the rope, that is, in the same direction as the twist of the rope
Rolling Hitch: One of the most underrated knots in Scouting and Guiding, the Rolling hitch is used to attach one rope to a second, in such a manner that the first rope can be easily slid along the second. The knot can be considered a Clove hitch with an additional turn. When tension is applied and the ropes form a straight line, the rolling hitch will lock onto the first
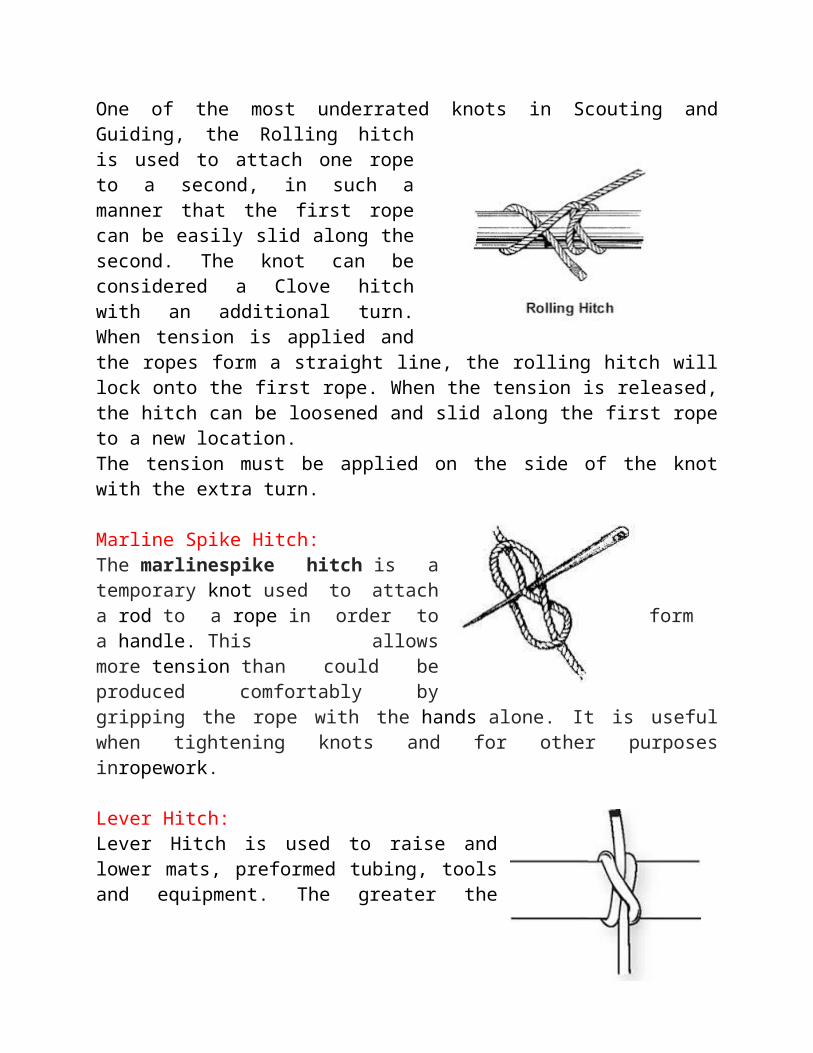
rope. When the tension is released, the hitch can be loosened and slid along the first rope to a new location.The tension must be applied on the side of the knot with the extra turn.
Marline Spike Hitch: The marlinespike hitch is a temporary knot used to attach a rod to a rope in order to form a handle. This allows more tension than could be produced comfortably by gripping the rope with the hands alone. It is useful when tightening knots and for other purposes inropework.
Lever Hitch: Lever Hitch is used to raise and lower mats, preformed tubing, tools and equipment. The greater the weight, the tighter it grips (provided it is not tied upside down).
Figure of Eight Knot:A useful “Stop” knot to temporarily bulk out the end of a rope or cord, the finished knot looks like its name. It is superior to using a Thumb Knot, because it does not jam so easily.Tip: The Figure of Eight is useful to temporarily stop the ends of a rope fraying, before it is whipped.
Sheer Lashing:A sheer lashing is often sued to bind adjacent poles together. It is also a good way to reinforce a broken or weak pole. The frapping turns used to tighten the lashing may be omitted and replaced with wedges inserted between the poles. A loose

Sheer Lashing made around the ends of two poles will allow the poles to be opened out and used as an A-frame. It can also be used to form a tripod just like the Figure-of-eight lashing.
Square Lashing:A Square Lashing is used to hold two poles that cross each other (usually at a 90-degree angle although not necessarily). If the angle of contact is less than 45 degrees a sheer lashing should be used. It can also be used where the load on one pole may cause it to slip over the other.
Diagonal Lashing:A Diagonal Lashing is used to bind two poles together that cross each other but do not touch (or are likely to be pulled apart) when their ends are lashed in place in a structure. Often used for securing diagonal braces used to hold a structure rigid. When wooden poles are used in a lattice like structure a combination of Diagonal and Square lashings is used to hold them together. The Diagonal Lashing can be used to bind poles that cross at an angle of between 90 to 45 degrees. If the angle between the poles is less than 45 degrees a sheer lashing should be used.
Camp Tools:
Four Camp tools:i) Shovel: A shovel is a tool for digging, lifting, and moving bulk materials, such as soil, coal, gravel, snow, sand, or ore. In scouting, shovel can be used to dig pits, level the ground etc.

ii) Hand Axe: In scouting, hand axes can be used to cut the branches of trees, to give a shape to sticks for the tent etc.
iii) Knife: A knife is like a partner to a scout. It helps the scout to cut medicinal plants, cut vegetables and eatables for cooking etc. It can be used as weapon too.
iv) Spade: A spade is a tool designed primarily for the purpose of digging or removing earth and spreading the soil. A spade is used in scouting for digging purposes, leveling the ground and all works related to soil and ground.
2. FireWhat is fire extinguisher?Fire extinguisher is a portable device that discharges a jet of water, foam, gas, or other material to extinguish a fire. A fire extinguisher, or extinguisher, is an active fire protection device used to extinguish or control small fires, often in emergency situations. It is not intended for use on an out-of-control fire, such as one which has reached the ceiling, endangers the user (i.e., no escape route, smoke, explosion hazard, etc.), or otherwise requires the expertise of a fire department.
What is the principle of extinguishing Fire by a fire extinguisher?You can extinguish a flame by lowering its flame temperature and thus lowering the rate of chemical reaction. This can be achieved by diluting the mixture with excess fuel, oxidizer, or other diluents such as CO2. Additionally, flames can be extinguished by conducting heat away from the reaction surface to an object such as a plate. Flames can additionally extinguish due to fluid dynamic forces which are referred to as "stretch" which can either promote the reaction rate or lead to extinction.
Mention different types of fires and fire extinguishers used to control them.

Fires: Ordinary Combustible, Electrical, Metal, Flammable liquid and gas, cooking oils and fats.
Extinguishers: Flammable Liquid and Gas: The most effective way to
extinguish a liquid or gas fueled fire is by inhibiting the chemical chain reaction of the fire, which is done by dry chemical and Halon extinguishing agents, although smothering with CO2 or, for liquids, foam is also effective.
Metal Fires: Some extinguishers are labeled as containing dry chemical extinguishing agents. This may be confused with dry powder. The two are not the same. Using a dry chemical extinguisher in error, in place of dry powder, can be ineffective or actually increase the intensity of a metal fire.
Ordinary Fires, Electrical Fires and Cooking fires can be extinguished with any type of fire extinguishing agents.
Demonstrate any three of the following:

3. CookingNot available on internet. Do on your own.
4. CompassDemonstrate practical use of compass & know the 16 points-A compass is an instrument used for navigation and orientation that shows direction relative to the geographic cardinal directions, or "points". Usually, a diagram called a compass rose, which shows the directions north, south, east, and west as abbreviated initials marked on the compass. When the compass is used, the rose can be aligned with the corresponding geographic directions, so, for example, the "N" mark on the rose really points to the north.
Before the Magnetic Compass was discovered, early map makers would draw a small 16 pointed circle on the map, and place an “N” to point to North. These were the 16 Cardinal Points from which the winds were thought to blow. This drawing was called a “Wind Rose.” When the magnetic compass came along, it was usually set on top of the Wind Rose pattern in order to help face the nautical chart in the proper direction. The wind rose started to become known as a COMPASS ROSE. Since the 1100’s, compass bearings have been split into 16 different directions:
The 16 points are:1. North 2. North North East 3. North East 4. East North East 5. East6. East South East 7. South East 8. South South East

9. South10. South South West 11. South West 12. West South West 13. West14. West North West 15. North West 16. North North West
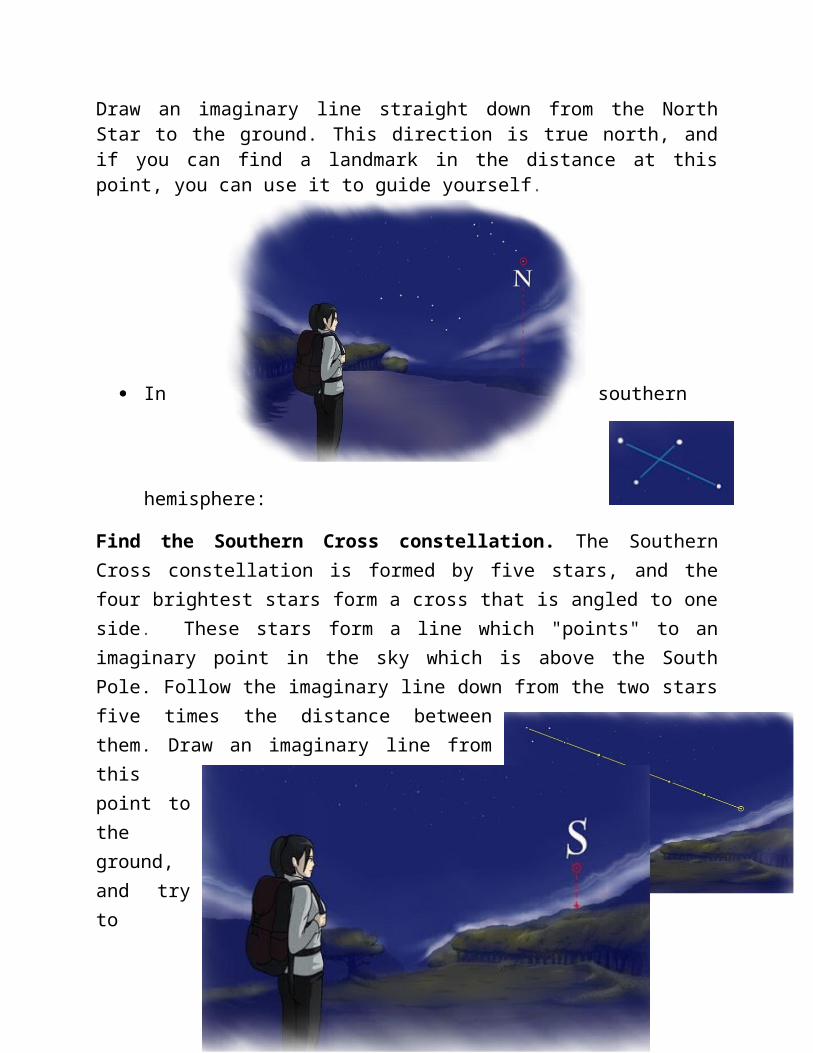
Find north by at least two constellations: (In northern hemisphere):
Draw an imaginary line straight down from the North Star to the ground. This direction is true north, and if you can find a landmark in the distance at this point, you can use it to guide yourself.
In southern
hemisphere:
Find the Southern Cross constellation. The Southern Cross constellation is formed by five stars, and the four brightest stars form a cross that is angled to one side. These stars form a line which
"points" to an imaginary point in the sky which is above the South Pole. Follow the imaginary line down from the two stars five times the distance between them. Draw an imaginary line from this point to the ground, and try to identify a corresponding landmark to steer by. Since this is true south, true north is directly opposite it (behind you as you are looking at the point).
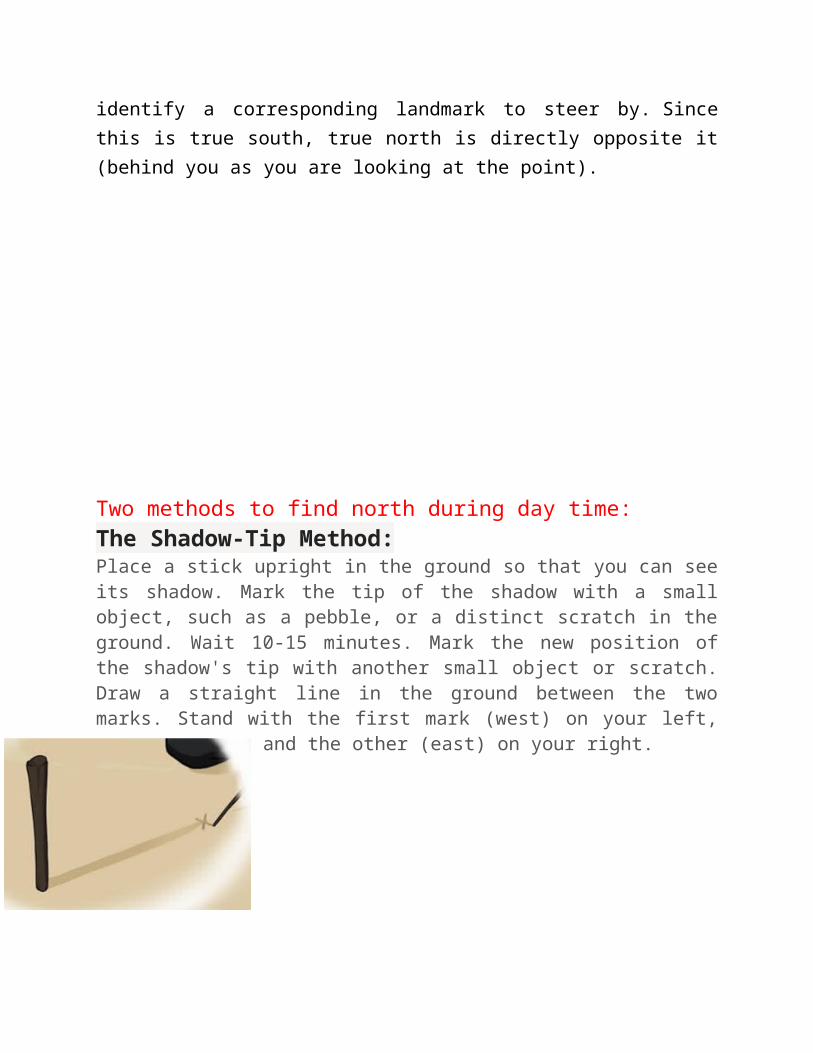
Two methods to find north during day time:The Shadow-Tip Method:Place a stick upright in the ground so that you can see its shadow. Mark the tip of the shadow with a small object, such as a pebble, or a distinct scratch in the ground. Wait 10-15 minutes. Mark the new position of the shadow's tip with another small object or scratch. Draw a straight line in the ground between the two marks. Stand with the first mark (west) on your left, and the other (east) on your right.
Watch Method: Northern HemisphereFind an analog watch (the kind with hour and minute hands) that is set accurately. Point the hour hand at the sun. Bisect (that is, find the centre point of) the angle between the hour hand and the twelve o'clock mark (the number 12 on the watch)
Have Knowledge of Paces, Bearing and map sketches.
Scout Pace:A pace (or double-pace or passus) is a measure of distance used in Ancient Rome. It is the measure of a full stride from the position of the heel when it is raised from the ground to the point the same heel is set down again at the end of the step. Thus, a distance can be “paced off” by counting each time the same heel touches ground, or, in other words, every other step. In Rome, this unit was standardized as two gradūs or five Roman feet (about 1.48 metres or 58.1 English inches). There are 1000
passus in one mille, and a mille was sometimes referred to as a mille passus.The Byzantine pace or vema (βή�μα [ˈvima]) was 2½ feet (pous)A pace in modern terminology is usually taken as being a single pace rather than a double pace. It has no formal definition but is taken as being around 30 inches
Compass bearing:A directional compass is shown below. It is used to find a direction or bearing .The four main directions of a compass are known as cardinal points. They are north (N), east (E), south (S) and west (W). Sometimes, the half-cardinal points of north-east (NE), north-west (NW), south-east (SE) and south-west (SW) are shown on the compass. The above compass shows degree measurements from 0° to 360° in 10° intervals with:north representing 0° or 360°east representing 90°south representing 180°west representing 270°When using a directional compass, hold the compass so that the point marked north points directly away from you. Note that the magnetic needle always points to the north.
Bearing:The true bearing to a point is the angle measured in degrees in a clockwise direction from the north line. We will refer to the true bearing simply as the bearing.
For example, the bearing of point P is 065º which is the number of degrees in the angle measured in a clockwise direction from the north line to the line joining the centre of the compass at O with the point P (i.e. OP).
The bearing of point Q is 300º which is the number of degrees in the angle measured in a clockwise direction from the north line to the line joining the centre of the compass at O with the point Q (i.e. OQ).

Note:The bearing of a point is the number of degrees in the angle measured in a clockwise direction from the north line to the line joining the centre of the compass with the point.A bearing is used to represent the direction of one point relative to another point.
For example, the bearing of A from B is 065º. The bearing of B from A is 245º.
Note:Three figures are used to give bearings.All bearings are measured in a horizontal plane.Map sketches:Drawing maps is a common and intuitive method for communicating spatial information and knowledge. In support of navigation, as a tool for teaching and learning geography, for expressing of what is known about the world, or simply to display a local environment and communicate geographic relationships, maps are compelling and useful constructs. In geography, and cognate disciplines, researchers often employ sketch maps to collect data at scales ranging from one’s immediate surroundings (rooms and buildings) to the entire world. Sketch maps can provide data that can be enumerated empirically or evaluated qualitatively; there seems to be little questioning that sketch maps are a useful means of expressing and understanding spatial knowledge. Sketch mapping is a popular and widely-used technique for measuring a broad range of geographic and non-geographic knowledge, attitudes, and emotions. Most sketch maps involve the production of spatial figures through drawing or other similar means of production (using drawing software, for example).Sketch maps are employed by both academic and applied researchers as well as professionals working in a variety of social, economic, political, education, and health fields. Drawing maps is a powerful tool for communicating what is known and felt about the world.
5. First AidSt John Sling

1. Support the casualty’s arm with the elbow beside the body and the hand extended towards the uninjured shoulder.2. Place an opened triangular bandage over the forearm and hand, with the apex towards the elbow.3. Extend the upper point of the bandage over the uninjured shoulder.4. Tuck the lower part of the bandage under the injured arm, bring it under the elbow and around the back and extend the lower point up to meet the upper point at the shoulder.5. Tie firmly with a reef knot.6. Secure the elbow by folding the excess material and applying a safety pin, then ensure that the sling is tucked under the arm giving firm support.
Improvised Stretcher:Types of improvised stretchers:a. Rolled Blanket stretcher
b. Blanket and 2 poles stretcher

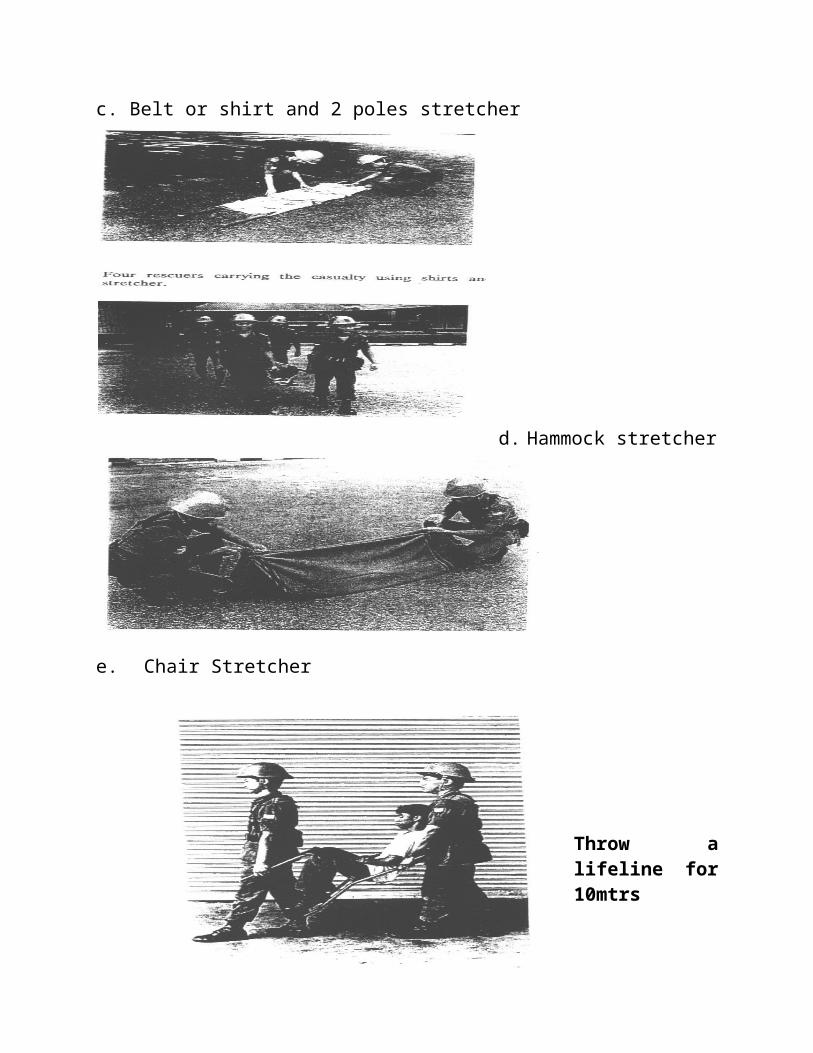
c. Belt or shirt and 2 poles stretcher
d. Hammock stretcher
e. Chair Stretcher
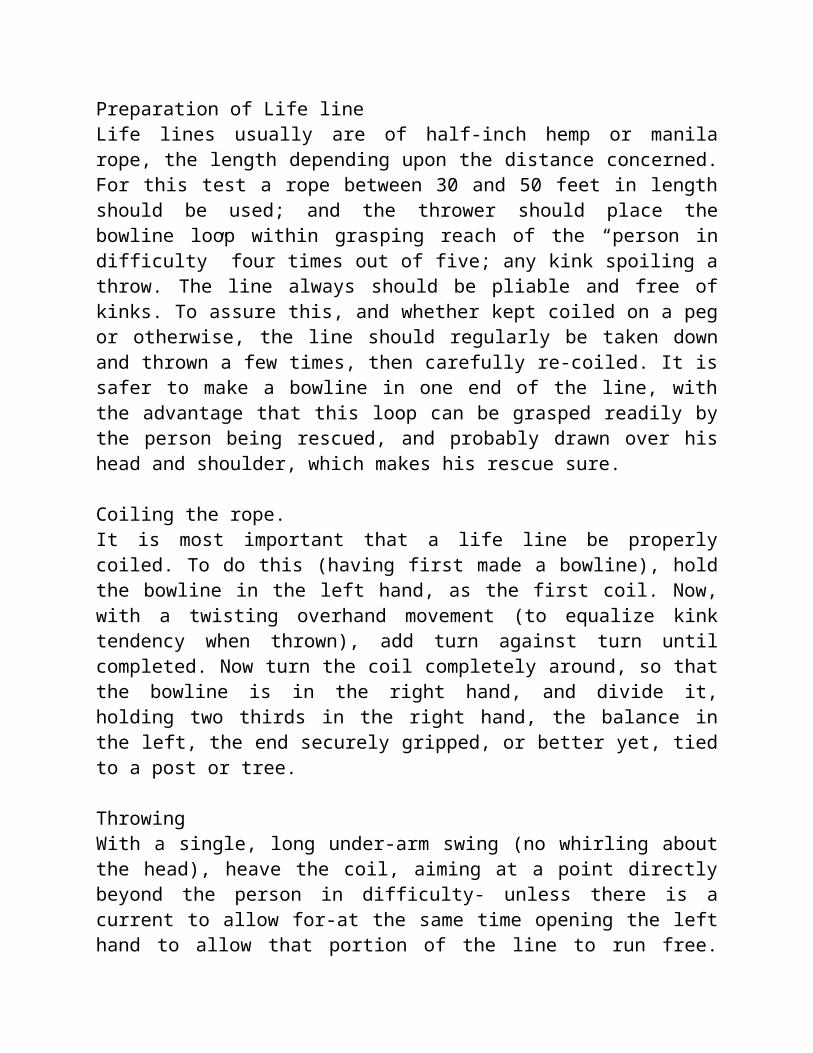
Throw a lifeline for 10mtrsPreparation of Life lineLife lines usually are of

half-inch hemp or manila rope, the length depending upon the distance concerned. For this test a rope between 30 and 50 feet in length should be used; and the thrower should place the bowline loop within grasping reach of the “person in difficulty” four times out of five; any kink spoiling a throw. The line always should be pliable and free of kinks. To assure this, and whether kept coiled on a peg or otherwise, the line should regularly be taken down and thrown a few times, then carefully re-coiled. It is safer to make a bowline in one end of the line, with the advantage that this loop can be grasped readily by the person being rescued, and probably drawn over his head and shoulder, which makes his rescue sure.
Coiling the rope.It is most important that a life line be properly coiled. To do this (having first made a bowline), hold the bowline in the left hand, as the first coil. Now, with a twisting overhand movement (to equalize kink tendency when thrown), add turn against turn until completed. Now turn the coil completely around, so that the bowline is in the right hand, and divide it, holding two thirds in the right hand, the balance in the left, the end securely gripped, or better yet, tied to a post or tree.
ThrowingWith a single, long under-arm swing (no whirling about the head), heave the coil, aiming at a point directly beyond the person in difficulty- unless there is a current to allow for-at the same time opening the left hand to allow that portion of the line to run free. (For a left-handed Scout the procedure would be reversed.)
After UseDry line before re-coiling.
New RopeA new rope will require stretching. This may be done by tying it at a “reaching” height between two suitably spaced trees, then hanging on it. As it stretches it is tightened, until the stretch limit has been reached.

First aid for the following:Burns and scalds:Treatment of Severe Burns and ScaldsDO NOT overcool the casualty; this may dangerously lower the body temperature.DO NOT remove anything sticking to the burn; this may cause further damage and cause infection.DO NOT touch or interfere with the injured area.DO NOT burst blisters.DO NOT apply lotions, ointment, or fat to the injury.
Lay the casualty down, protecting the burned area from contact with the ground, if possible.Douse the burn with copious amounts of cold liquid. Thorough cooling may take 10 minutes or more, but this must not delay the casualty’s transmission to hospital.While cooling the burns, check airway, breathing, and pulse, and be prepared to resuscitate.Gently remove any rings, watches, belts, shoes, or smoldering clothing from the injured area, before it starts to swell. Carefully remove burned clothing unless it is sticking to the burn.Cover the injury with a sterile burns sheet or other suitable non-fluffy material, to protect from infection. A clean plastic bag or kitchen film may be used. Burns to the face should be cooled with water, not covered.Ensure that the emergency service is on its way. While waiting, treat the casualty for shock. Monitor and record breathing and pulse, and resuscitate, if necessary.
Treatment of Burns to the Mouth and ThroatContact the emergency service. Report suspected burns to the airway.Take any steps to improve the casualty’s air supply, e.g., loosening clothing around the neck. Give the casualty oxygen if you are trained to do so.If the casualty becomes unconscious, place in the recovery position, and be prepared to resuscitate.
Treatment of Minor Burns and Scalds
DO NOT use adhesive dressings.DO NOT break blisters, or interfere with the injured area.DO NOT apply lotions, ointments, creams, or fats to the injured area.
Cool the injured part with copious amounts of cold water for about 10 minutes to stop the burning and relieve the pain. If water is unavailable, any cold, harmless liquid such as milk or canned drinks will suffice.Gently remove any jewellery, watches, or constricting clothing from the injured area before it starts to swell. Cover the injury with a sterile dressing, or any clean, non-fluffy material to protect from infection. A clean plastic bag or kitchen film may be used.
Sprain:OverviewSprain is the stretch/tear of ligament connecting ones Occurs in both the upper & lower part of the body Most common sites – ankle/wrists/knee
CausesTrauma/accidents Lifting heavy objects Sporting injuries SymptomsPain Swelling Lumps other than swelling Bruising/redness at site of injury Numbness Inability to move the joint TreatmentApply a cold compress to injured area for 20 min This may be done 4-8 times a day Use a plastic bag with crushed ice, wrapped in a towel Use compression bandages to reduce swelling Keep the injured leg elevated on a pillow Take anti inflammatory pills if necessary
Take rest for the recommended period When pain/swelling is diminished, do recommended exercises Consult a doctor If the following occurs-Severe pain/numbness Inability to move the joint Inability to assess the severity of injury
Steps To AvoidDo not return to normal activities if not completely cured This could lead to the problem turning chronic PreventionAvoid exercising/sporting when tired Eat a well balanced meal-for healthy muscles Avoid unhealthy weight gain Exercise daily-particularly stretching exercises Do warm-up before exercising Practice safety measures, like avoiding clutter Run on even surface
Stings and Bites:Causes Examples of biting insectsMosquitoesFleasMitesSpiders
Examples of stinging insectBeesWaspsHornets
SymptomsLocalized PainSwellingRednessItchingNumbnessBurning

Tingling sensationBreathlessnessWeakness
TreatmentRemove the stinger using a straight- edged objectWash the area thoroughly with soap and waterPlace ice wrapped in a cloth on the affected areaRepeat after every 10 minutesApply a gentle cream to prevent itchingTake anti histamines if necessaryObserve for signs of infection like pain, redness or swelling
In case of emergency-Try to keep the person calmCheck the person’s breathingRemove constricting items, like rings, from finger/nose/earsDo Cardio Pulmonary Resuscitation (CPR), if necessaryIf the person is carrying an emergency kit, use itIf required, treat the person for signs of shock Seek medical help as soon as possible
Consult a Doctor In case of the following, seek medical helpWheezingSwelling on the faceDifficulty in breathingTight feeling in the throat Body turning blue
Steps to AvoidDo not remove the stinger using a tweezerDo not apply a tourniquetAspirin, pain medications, should not be given unless advised by a doctor Prevention Avoid placing hand near the mouth of a seizure-affected personTake caution to prevent your child from developing biting habit

Bleeding from Nose:Causes • Dryness • Nose picking • Blowing nose with force • Use of medications, like aspirin • Introducing objects into nose (mostly children) • Injuries • Allergies • Infections • High BP • Atherosclerosis • Blood-clotting disorders • Use of cocaine Symptoms •
Bleeding from nose • Sometimes bleeding from ears/mouth too Types a. Anterior Nosebleed • Affects lower part of wall that separates nostrils • The wall or septum contains blood vessels • These can be broken by blow to nose/fingernail • The bleeding starts from front of nose • It flows outward when patient is sitting/standing • Occurs during dry season/harsh winter b. Posterior Nosebleed • The bleeding starts deep within the nose • It flows down the back of the mouth & throat • This happens even when the person is sitting/standing • Occurs in old people/those with high BP/injuries • This type of bleeding is severe/ requires medical help
Treatment • If your nose bleeds, • Sit down and lean forward • Using your thumb & index finger, squeeze soft part of nose • This part is between end of nose and the bridge of nose • Continue holding till bleeding stops- • Do not stop in-between • If bleeding continues, hold for another 10 minutes • If the patient is a child, divert attention by TV/Stories • Avoid picking, blowing or rubbing nose for 2 days • Place an ice pack on the bridge of nose Consult a Doctor If, • The bleeding continues for more than 15 minutes • The bleeding is caused by an injury • You get nosebleeds often
Prevention • Keep fingernails short • Quit smoking • Open your mouth while sneezing • Use a humidifier at night in case of dry weather.
7. EstimationEstimate two distances/width of not more than 100 metres:

Learning to Judge Distance As a means of checking your estimates, learn the exact length of your pace. If fairly tall, learn to pace an exact yard, heel to heel. On a quiet road, in a field, or out on the prairie, begin judging short distances to various objects, then pacing to check your “guess.” Gradually increase the distances. Do this in competition with several other Scouts and you’ll find it an interesting game. Remember that the eye measures distance as in an “air line,” from eye to object, and does not allow for irregularities of the ground. In other words, ground distance may be greater than visual distance. As an aid in making short measurements you should know a number of your personal measurements. Your known hand-span will often be particularly useful. If fully developed your measurements will be close to this:
Breadth of thumb, and nail joint of forefinger = 1 inch (2.54 centimeters). Span of the thumb and forefinger = 6.5″ (or 17 centimeters). Span of thumb and any other finger = 8.5″ (or 21.6 centimeters). Wrist to elbow = 10″ (or 25 centimeters). Elbow to tip of forefinger = 17″ (or 43 centimeters). Your reach, arms out-stretched, will nearly equal your height.

Some Further Hints At 1/2 mile or approximately 880 yards (or 800 meters) a man looks a post. At 770 yards (or 700 meters) the head is not yet visible. At 660 yards (or 600 meters) the head is visible as a dot. At 550 yards (or 500 meters) the shoulders appear bottle shaped. At 1/4 mile, or approximately 440 yards (or 400 meters) movements of the legs can be seen. At 330 yards (or 300 meters) the face can be seen. At 220 yards (or 200 meters) buttons and details of clothing are recognizable. At 110 yards (or 100 meters) eyes and mouth can be seen clearly. To estimate greater distances, judge the farthest probable distance, then the nearest possible, and “split the difference.”
9. Morse and Semaphore SignalingMorse Signals:In the Morse Code letters are formed by a series of dots and dashes by using a Morse Key attached to a buzzer. Because of its adaptability, Morse Code is more useful than Semaphore, but it requires much practice to become proficient.Morse Code signals and their meaning:VE VE VE - Calling up signal
K - Carry On. (Answer to VE, if ready to receive message)
Q - Wait. (Answer to VE if not ready to receive message.)
T - General answer

AAA - Period or decimal
AR - End of message
R - Message received correctly
8 dots - Erase.
GB - Good Bye. (Used when closing down)
Semaphore Signaling:

Semaphore signaling is used mainly for short distance communications. Some points to remember:
Signaling is useful only when it can be read. The letters must be made perfectly and must be clearly seen.The sender must exactly face the person they are signaling. They must stand firmly, with the feet apart.The flags must be at arm’s reach, arm and flag making a straight line.The arms must be in the exact position for each letter.When making T, O, and W the flags must not cover one another.When making double letters bring the flags in to the body after the first letter.Do not send too quickly. Never send faster than the other person can read.
---------------x-----------x-------------x-------------x------------x------------x-------