dynamic balance (fame and otago) knee bends with support
TRANSCRIPT

Manual 3 ResourcesAppendix 5/Exercises Page 36
Dynamic Balance (FaME and OTAGO)
Knee Bends with Support & without Support
Purpose
Tell the person this exercise will improve their balance and reduce their risk of falls and fractures.
OTAGO Teaching Instructions
• The person should be standing up tall facing the
bench with both hands on the bench
• Feet should be placed hip width apart, toes
facing forwards
• Bend the knees as if to sit down
• Ensure the knees are above the toes
• Ensure the heels do not lift throughout the
movement
Additional teaching instructions
• Let the person know the number of repetitions/
sets/seconds they will be doing
• Let the person know this exercise is low level in
terms of balance challenge
• Let the person know that as this is a balance
exercise, they may, at first, feel unsteady and
that taking a step to recover balance is normal
• Start with small movements and maximum
support
• Ask the person to imagine they are going to sit
down and stand up from a chair repeatedly
• Check posture and ensure breathing is even
as this will help to reduce tension, which may
interfere with balance
BEGIN WITH 1 SET OF 5 REPETITIONS AND
BUILD TO 10 REPETITIONS
Additional teaching points
• Keep the chest lifted and ensure they are
bending from the hips not the the waist
• Take the bottom backwards as the knees are
bending
• Keep looking straight ahead throughout the
movement
• Ensure the knees do not fall inwards
• Ensure the bottom stays above the level of the
knees to prevent strain on the knees and back
• Ensure the knees stay above the feet throughout
• Avoid locking out the knees on standing
• Ensure the spine is neutral and the tummy
muscles are pulled in
• Perform the movement slowly and with control
• Feel the muscles work in the thighs and
buttocks
Potential problems
• The person takes the chest towards the knees
by leaning forwards from the waist
• The person’s hips go forwards rather than back
causing the knees to go forwards beyond the
toes placing undue stress on the knee joints
• The person’s knees fall inwards during
movement
• The person’s bottom drops lower than knee
level placing undue stress on the knee joints
• On standing, the person comes up too quickly
and locks out the knees
© Later Life Training

Manual 3 Resources Appendix 5/Exercises Page 37
Solutions
• Emphasise keeping the back upright and looking forwards
• Imagine they are sitting down into a chair and to try to keep their knees above their toes throughout
• Keep the knees hip width apart and try to imagine there is a ball between their knees
• Remind them to stop lowering before they reach a right-angle at the knee
• Reinforce the need to perform the upward movement slowly and with control
OEP Progression
• From 10 reps with support progress to 10 reps without support
FaME/LLT Additional Progression Approaches
• With each of the following progressions begin with 5 steps and build
up to 10
• When the person is able to perform with two hands for support,
progress to one hand support
• Then two hands fingertip support only to one hand fingertip support
• No chair support
© Later Life Training
Seated alternative
Sit forwards in the chair with a long back, feet hip width apart and hands on the chair seat for support
and perform the Sit to Stand Exercise (Page 94).

Manual 3 ResourcesAppendix 5/Exercises Page 38
Dynamic Balance (FaME and OTAGO)
Toe Walking with Support & without Support
Purpose
Tell the person that this exercise will improve their balance and reduce their risk of falls and fractures.
OTAGO Teaching Instructions
• Stand up tall beside the bench
• Hold on and look ahead
• Come up onto your toes
• Walk 10 steps on your toes
• Lower the heels to the ground and turn around
• Repeat in opposite direction
Additional Teaching Instructions
• Let the person know the number of repetitions/
sets/seconds they will be doing
• Let the person know this exercise is moderate to
high level in terms of balance challenge
• Let the person know that as this is a balance
exercise, they may, at first, feel unsteady and
that taking a step to recover balance is normal
• Stand side on to the support and work out
what is the best distance from it to get sufficient
support with out having to lean to either side
• Start with small movements and maximum
support
• Check posture and ensure breathing is even
as this will help to reduce tension, which may
interfere with balance
• Stand with feet comfortably close together in
preparation for the exercise
• Transfer the weight onto the toes by lifting the
heels
• Bring the feet together to regain balance before
lowering the heels to the floor
• For safety, turn around towards the support and
repeat the toe walking with the opposite hand on
the support
BEGIN WITH 1 SET OF 3 STEPS AND BUILD TO
4 SETS OF 10 STEPS
Additional Teaching Points
• Think of keeping the weight over the big and
second toe
• Stand tall, check posture throughout
• Ensure the spine is neutral and the tummy
muscles are pulled in
• Avoid looking down at the feet
• Avoid leaning against the bench or wall
• Move steadily and with control
• Keep the steps small initially until skills improve
Potential problems
• The person’s weight is on the little toe or
outside of the foot placing undue stress on the
ankle and decreasing stability
• The person leans forwards from the hips
• The person leans towards the support
• The person completes the steps but finds it
difficult to keep their balance at the end of the
movement
• The person feels unsteady throughout
• The person initiates the walking action before
balance is achieved
• The person makes the steps too big and too
fast so that they gather speed and lose control
© Later Life Training
NB. Ensure the person has been performing and has mastered
the technique of the Calf Raise (Page 66) for several weeks before
performing the walking exercise in order to ensure sufficient ankle
strength.

Manual 3 Resources Appendix 5/Exercises Page 39
Solutions
• Keep the weight over the big and second toes so that the ankles do not roll out
• Ensure the back is tall and the person is not leaning forwards from the hips
• Ensure the person is not putting too much weight on the support
• Encourage the person to bring feet together and lower the heels with control at the end of the
movement.
• If feeling unsteady, lower the heels to the floor, rest, check posture and try again
• Ensure balance is gained before setting off on the walk
• Take small steps to maintain control of balance
OEP Progression
• 4 sets of 10 steps with support then progress to 4 sets of 10 steps without support
FaME/LLT Additional Progression Approaches
• With each of the following progressions begin with 5 steps and build up to 10. Progress by building
to 2 sets of 10 steps, then 3 sets and then 4 sets of 10 steps.
• One hand support to begin then progress to one hand, then to fingertip support, then progress to no
support
• Practise turning away from the support and gradually increase amount of time in no support
© Later Life Training
Seated alternative
Sit forwards in the chair with a long back, feet hip width apart and hands on the chair seat for support
and perform as in standing, but take small steps and limit the number to three, bring the feet together,
return to the start and repeat.

Manual 3 ResourcesAppendix 5/Exercises Page 40
Dynamic Balance (FaME and OTAGO)
Tandem Stance (heel toe stand) with Support & without Support
Purpose
Tell the person that this exercise will improve their balance and reduce their risk
of falls and fractures.
OTAGO Teaching Instructions
• Stand up tall beside the bench/chair
• Hold onto the bench and look ahead
• Place one foot directly in front of the other foot
so that the feet form a straight line
• Hold the position
• Change position, bringing the back foot to the
front
• Hold the position
Additional Teaching Instructions
• Let the person know the number of repetitions/
sets/seconds they will be doing
• Let the person know this exercise is moderate to
high level in terms of balance challenge
• Let the person know that as this is a balance
exercise, they may, at first, feel unsteady and
that taking a step to recover balance is normal
• Stand side on to the support and work out
what is the best distance from it to get sufficient
support with out having to lean to either side
• Start with small movements and maximum
support
• Check posture and ensure breathing is even
as this will help to reduce tension, which may
interfere with balance
• Start by placing the feet comfortably close
together
• Use the foot furthest away from the support
(outside leg) as the front foot to begin
• Return the foot to the starting position with both
feet together then take the inside foot forward
• For safety, turn towards the support to face the
opposite direction
BEGIN WITH 3-4 SECONDS AND BUILD TO 10
SECONDS
Additional Teaching Points
• Ensure the weight is distributed evenly over
both feet
• Stand tall with soft knees and the eyes looking
ahead
• Ensure the spine is neutral and the tummy
muscles are pulled in
Potential Problems
• The person leans backwards by having
too much weight on the back foot or leans
forwards by bending at the hips or waist or
ankles
• The person feels unsteady or unconfident in
the tandem stand position
• The person is unable to place the foot directly
in front of the other foot without losing balance
and confidence
• The person can complete the outside leg
in front but loses balance or is particularly
unsteady when the inside leg is forward
© Later Life Training

Manual 3 Resources Appendix 5/Exercises Page 41
Solutions
• Check that they are standing tall, shoulders above hips, spine in neutral, tummy muscles pulled in,
chin parallel to the floor and weight evenly distributed over both feet
• Check position in relation to the support. Is the person too far away or too close? Also check if
trying to progress too quickly. May need to go back to full hand support or perform between two
chairs
• Begin by placing the heel of the front foot beside the big toe of the back foot (semi-tandem
position)
• Just use the outside foot at first. Complete the stand then turn into the support to face in the
opposite direction and repeat. Make sure this is mastered before using the inside leg
OEP Progression
• Progress from 10 second hold with support to 10 second hold
without support
FaME/LLT Additional Progression Approaches
• With each of the following progressions begin with a 5 second
hold and build up to a 10 second hold. There should only be one
repetition of this exercise.
• One hand support to begin
• One hand fingertip support
• Progress to no support
• Gradually increase amount of time in no support to maximum 30
second hold
© Later Life Training
Seated alternative
Sit forwards in the chair with a long back, feet hip width apart and hands on the chair seat for support.
Perform as in standing.

Manual 3 ResourcesAppendix 5/Exercises Page 42
Dynamic Balance (FaME and OTAGO)
Tandem Walk (heel toe walk) with Support & without Support
Purpose
Tell the person that this exercise will improve their balance and reduce their risk of falls and fractures
OTAGO Teaching Instructions
• Stand up tall beside the bench/chair
• Hold on to the bench/chair and look straight
ahead
• Place one foot directly in front of the other so
that they form a straight line
• Place the foot behind directly in front.
• Repeat for 10 more steps
• Turn around and repeat the exercise.
Additional Teaching Instructions
• Let the person know the number of repetitions/
sets/seconds they will be doing
• Let the person know this exercise is high level in
terms of balance challenge
• Let the person know that as this is a balance
exercise, they may, at first, feel unsteady and
that taking a step to recover balance is normal
• Stand side on to the support and work out
what is the best distance from it to get sufficient
support without having to lean to either side
• Start with small movements and maximum
support
• Check posture and ensure breathing is even
as this will help to reduce tension, which may
interfere with balance
• To prepare for the walks transfer the weight to
the front foot in order to lift the back foot around
to the front.
• Leave a small gap between the heel of the front
foot and the back foot to allow for the forward
movement of the walks
• Try to build to a smooth, steady heel to toe
walking action
• When the steps are complete, bring the feet
together before turning in towards the support
to face the opposite direction
BEGIN WITH 1 SET OF 5 STEPS AND BUILD TO
2 SETS OF 10 STEPS
Additional Teaching Points
• Stand tall, check posture throughout
• Ensure the spine is neutral and the tummy
muscles are pulled in
• Ensure the knees are soft to absorb the forward
movement and to increase stability
• Avoid rocking back on or walking on the heels.
Aim for a steady walking action.
• Avoid leaning against or away from the support.
• Take small steps and move steadily and with
control
Potential Problems
• The person feels unsteady or unconfident with
the walking action
• The person is unable to place the foot directly
in front of the other foot without losing balance
and confidence
• The person puts the heel of the front foot too
close to the back foot
• The person takes steps that are too big and too
fast and loses control of balance
• The person turns too quickly to change
direction at the end of the walks
© Later Life Training

Manual 3 Resources Appendix 5/Exercises Page 43
Solutions
• Increase support or use the semi-tandem stance initially, progressing to full tandem only when
confidence improves. Perform between two chairs for extra support initially
• Place the heel of the front foot beside the toes of the back foot (rather than in front)
• Leave a small gap between the heel of the front foot and the back foot
• Aim for a slow, steady, controlled, continuous heel to toe walking action
• Ensure a pivot is not used to turn; instead encourage the person to bring both feet together and then
turn in towards the support
OEP Progression
• Progress from 2 sets of 10 steps with support to 2 sets of 10 steps
without support
FaME/LLT Additional Progression Approaches
• With each of the following progressions begin with 5 steps, build up
to 10. There should only be one set of a maximum 10 repetitions.
• One hand support to begin
• Only progress when balance can be recovered by compensatory step.
• One hand fingertip support
• When confidence and ability improves, progress to no support
• Gradually increase amount of time in no support
• Gradually increase number of steps
© Later Life Training
Seated alternative
Sit forwards in the chair with a long back, feet hip width apart and hands on the chair seat for support.
Perform as in standing but place the heel of the front foot beside the toes of the back foot (rather than
in front) and limit the number of steps to three. Bring the feet together, return to start and repeat.

Manual 3 ResourcesAppendix 5/Exercises Page 44
Dynamic Balance (FaME and OTAGO)
One Legged (Flamingo) with Support & without Support
Purpose
Tell the person that this exercise will improve their balance and reduce their risk of falls and
fractures.
OTAGO Teaching Instructions
• Stand up tall beside the bench/chair and hold
on for support
• Look straight ahead
• Stand on one leg
• Try to hold the position for 10 seconds
• Place the foot down and repeat on the other leg
Additional Teaching Instructions
• Let the person know the number of repetitions/
sets/seconds they will be doing
• Let the person know this exercise is low to
moderate level in terms of balance challenge
• Let the person know that as this is a balance
exercise, they may, at first, feel unsteady and
that taking a step to recover balance is normal
• Stand side on to the support and work out
what is the best distance from it to get sufficient
support without having to lean to either side
• Start with maximum support
• Check posture and ensure breathing is even
as this will help to reduce tension, which may
interfere with balance
• Begin standing tall, feet comfortably close
together and not greater than hip width, with
the knees slightly soft
• Draw the heel towards the bottom
• After placing the first foot down, transfer the
weight onto that leg before lifting the other foot
off the floor
BEGIN WITH 3-4 SECONDS AND BUILD TO 10
SECONDS
Additional Teaching Points
• Stand tall with good posture, looking straight
ahead
• Keep the pelvis neutral, the tummy muscles
pulled in, the shoulders above the hips and the
chin down
• Pull the tummy muscles in a little more before
transferring the weight to the support leg
• Brush the foot backwards along the floor until
the knee is several inches behind the hip
before lifting the heel towards the bottom
• Avoid holding the breath and ensure breathing
is even and regular
• Keep the knee directly in line with the hip whilst
drawing the heel towards the bottom and
during the hold
• Keep the support knee soft
• Lower the foot under control and rest briefly
© Later Life Training

Manual 3 Resources Appendix 5/Exercises Page 45
Potential Problems
• The person feels unsteady
• The person leans heavily onto the support
• The person’s core stability is so poor that they are unable to lift the leg off the floor
• The person’s core stability is so poor that they have to overuse their arms and hands to maintain
balance
Solutions
• Perform between 2 chairs initially
• Check posture and weight distribution and encourage correct use of support
• Transfer the weight to the support leg, and place the toe of other foot lightly on floor, gradually
progressing to lifting the foot off the floor
• Check posture and position the body appropriately in relation to support
OEP Progression
• Progress form 10 seconds with support to 10-30 seconds without
support
FaME/LLT Additional Progression Approaches
• With each of the following progressions begin with a 5 second
hold and build to a 10 second hold. There is only one repetition of
the exercise on each leg.
• One hand support to begin
• One hand fingertip support
• Progress to no support
• Gradually increase amount of time in no support to 20 seconds
and up to 30 seconds
© Later Life Training
Seated alternative
Sit forwards in the chair with a long back, feet hip width apart and hands on the chair seat for support.
Perform as in standing making sure the foot of the supporting leg is flat on the floor and the ankle is
directly below the knee. Ensure part of the weight is taken through the hands and tummy muscles are
pulled in.

Manual 3 ResourcesAppendix 5/Exercises Page 46
Dynamic Balance (FaME and OTAGO)
Sideways Walking with Support & without Support
Purpose
Tell the person that this exercise will improve their balance and reduce their risk of falls and fractures.
OTAGO Teaching Instructions
• Stand up tall and place your
hands on your hips
• Take 10 side steps to the right
• Take 10 side steps to the left
• Repeat to other side
Additional Teaching Instructions
• Let the person know the number
of repetitions/sets/seconds they
will be doing
• Let the person know this
exercise is moderate level in
terms of balance challenge
• Let the person know that as this is a balance
exercise, they may, at first, feel unsteady and
that taking a step to recover balance is normal
• Stand tall facing the support and work out what
is the best distance from it to get sufficient
support without having to lean forwards or back
• Start with small movements and maximum
support
• Check posture and ensure breathing is even
as this will help to reduce tension, which may
interfere with balance
• Feet should be placed comfortably close
together, facing forwards
• Take a small side step transferring the weight to
the stepping leg and bringing the unweighted
leg in to return to the feet together start position
• Move the hands along the bench/chair for
support
BEGIN WITH 1 SET OF 5 STEPS AND BUILD
TO 4 SETS OF 10 STEPS
Additional Teaching Points
• Ensure tall posture, looking straight ahead with
the pelvis neutral, the tummy muscles pulled in
and the knees soft
• On stepping, make sure the foot is securely
positioned before transferring the weight from
the ball of the foot through to the heel
• Bend knees slightly before taking the step
• Step to a hip width distance initially and build
up to shoulder width distance over time
• Ensure that weight is placed evenly on both
feet after bringing in the unweighted leg and
repeating the sideways walk again
© Later Life Training

Manual 3 Resources Appendix 5/Exercises Page 47
Potential problems
• The person turns the stepping foot outwards
placing strain on the knee and lower back
• The person leans too far over the stepping leg
• The person performs the movements too
quickly
• The person performs the movements too slowly
• The person bends at the waist and allows the
chest to drop forwards
OEP Progression
• Progress from 4 sets of 10 steps with support to 4 sets of 10 steps
without support
FaME/LLT Additional Progression Approaches
• Start behind a chair and introduce exercise with two hands for support
• Start with single side step, and gradually progress to double and triple
side steps etc.
• Progress to two hands fingertip support
• Progress to facing a wall, or standing behind a long bench or long row of
chairs
• Gradually increase no. of steps using fingertip support then progress to
hands on hips.
• With each of the above progressions begin
with:
5 side steps and build to 10
Progress to two sets of 10 then build up to 3
sets and finally 4 sets of 10
Can be progressed to side steps with a knee
bend between each step
© Later Life Training
Seated alternative
Sit forwards in the chair with a long back, feet hip width apart and hands on the chair seat for support.
Perform as in standing but take small side steps and limit the number to two.
Solutions
• Focus on keeping the hips facing forwards, the
shoulders above the hips and the eyes looking
ahead.
• Reinforce correct posture with the shoulders
above the hips
• Reinforce a rhythmic yet steady pace
• Redemonstrate and encourage them to aim for
that pace
• Ensure upright posture with the shoulders
above the hips
Manual 3 ResourcesAppendix 5/Exercises Page 48
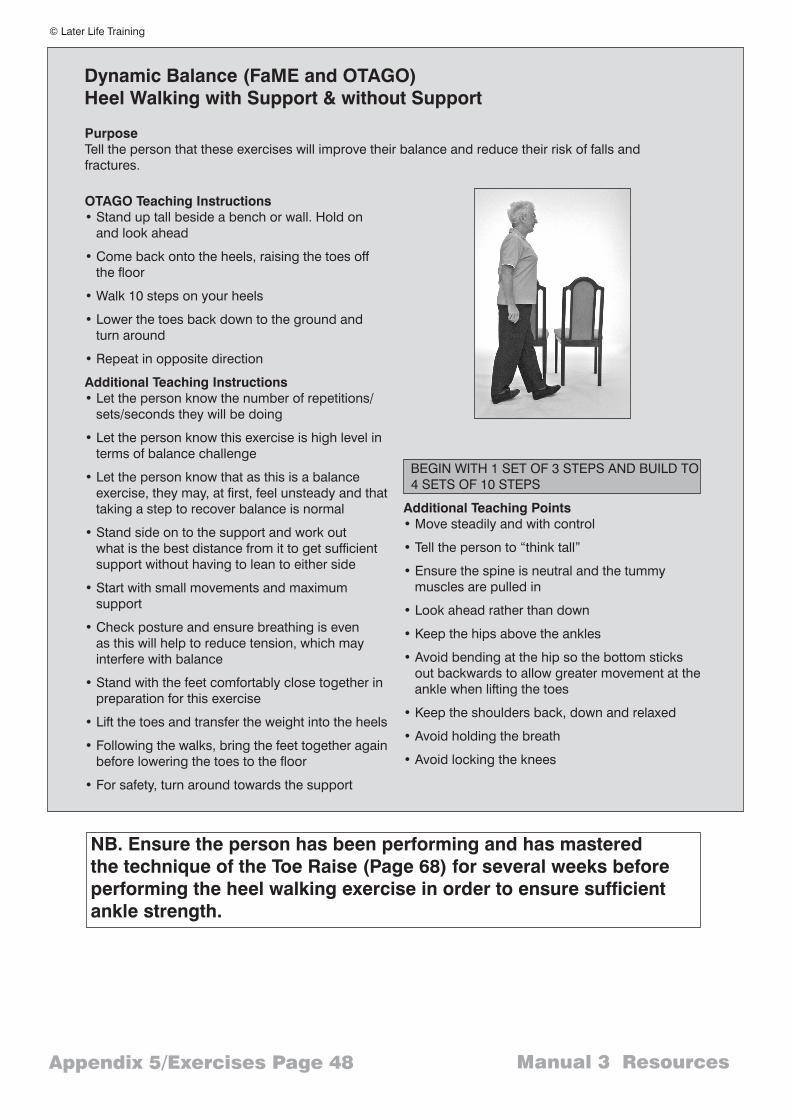
Dynamic Balance (FaME and OTAGO)
Heel Walking with Support & without Support
Purpose
Tell the person that these exercises will improve their balance and reduce their risk of falls and
fractures.
OTAGO Teaching Instructions
• Stand up tall beside a bench or wall. Hold on
and look ahead
• Come back onto the heels, raising the toes off
the floor
• Walk 10 steps on your heels
• Lower the toes back down to the ground and
turn around
• Repeat in opposite direction
Additional Teaching Instructions
• Let the person know the number of repetitions/
sets/seconds they will be doing
• Let the person know this exercise is high level in
terms of balance challenge
• Let the person know that as this is a balance
exercise, they may, at first, feel unsteady and that
taking a step to recover balance is normal
• Stand side on to the support and work out
what is the best distance from it to get sufficient
support without having to lean to either side
• Start with small movements and maximum
support
• Check posture and ensure breathing is even
as this will help to reduce tension, which may
interfere with balance
• Stand with the feet comfortably close together in
preparation for this exercise
• Lift the toes and transfer the weight into the heels
• Following the walks, bring the feet together again
before lowering the toes to the floor
• For safety, turn around towards the support
BEGIN WITH 1 SET OF 3 STEPS AND BUILD TO
4 SETS OF 10 STEPS
Additional Teaching Points
• Move steadily and with control
• Tell the person to “think tall”
• Ensure the spine is neutral and the tummy
muscles are pulled in
• Look ahead rather than down
• Keep the hips above the ankles
• Avoid bending at the hip so the bottom sticks
out backwards to allow greater movement at the
ankle when lifting the toes
• Keep the shoulders back, down and relaxed
• Avoid holding the breath
• Avoid locking the knees
© Later Life Training
NB. Ensure the person has been performing and has mastered
the technique of the Toe Raise (Page 68) for several weeks before
performing the heel walking exercise in order to ensure sufficient
ankle strength.

Manual 3 Resources Appendix 5/Exercises Page 49
Potential problems
• The person leans backwards
• The person loses their balance at the end of
the movement when coming back to the start
position
• The person makes the steps too big initially
• The person bends forwards at the hips and
sticks their bottom out in order to lift the toes off
the floor
• The person has poor control on lowering the
toes
• The person lifts the toes up too quickly and
initiates the walks before ‘centring‘ their balance
• The person feels unsteady or unconfident when
doing this exercise
• The person bangs the heels down hard on the
walks due to the knees being locked out and
so increases joint stress and reduces balance
control
OEP Progression
• Progress from 4 sets of 10 steps with support to 4 sets of 10 steps
without support
FaME/LLT Additional Progression Approaches
• With each of the following progressions begin with 5 steps and
build up to 10. Progress by building to 2 sets of 10 steps, then 3
sets and then 4 sets of 10 steps.
• One hand support to begin then one hand fingertip support,
progress to no support
• Practise turning away from the support and gradually increase time
in no support
© Later Life Training
Seated alternative
Sit forwards in the chair with a long back, feet hip width apart and hands on the chair seat for support.
Perform as in standing but take small steps and limit the number to three; bring feet together, then take
return to start and repeat.
Solutions
• Ensure the person stands tall with a neutral
spine and the shoulders above the hips
• Ensure the person brings their feet together and
lowers the toes with control at the end of the
movement
• Keep steps small until skills improve
• Ensure the posture stays tall with the spine in
neutral and the tummy and bottom in. This will
ensure the hips are above the ankles
• Encourage the person to lift and lower the toes
with control
• Ensure toes pull up slowly and gain control of
balance before setting off on the walk
• If feeling unsteady, lower the toes to the floor,
rest and try again. Reassure the person that this
exercise is very challenging, being wobbly at
first is normal and that performance will improve
very quickly
• Encourage attention to keeping the knees soft
and placing the heel down gently on each step

Manual 3 ResourcesAppendix 5/Exercises Page 50
Dynamic Balance (FaME and OTAGO)
Sit to Stand with Support & without Support
Purpose
Tell the person that this exercise will improve their balance and reduce their risk of falls and fractures. It
will also help improve the strength of the leg and hip muscles.
OTAGO Teaching Instructions
• Sit on a chair which is not too
low
• Place the feet behind the
knees
• Lean forwards over your knees
• Push off with both hands to
stand up
Additional Teaching
Instructions
• Let the person know the
number of repetitions/sets/
seconds they will be doing
• Let the person know this exercise is low level in
terms of balance challenge
• Sit tall with good posture on the front third of the
chair, legs and feet hip width apart and a right
angle at both knees
• Ensure the pelvis is neutral and the abdominals
are pulled in
• Take the feet slightly further back but keep the
heels in contact with the floor
• Hold the seat of the chair initially for support
• Pull the tummy muscles in more strongly and
lean forwards from the hips with a long spine
• Press down through the thighs and feet and
push directly up to standing
To sit down
• Step backwards until the back of the knees are
in contact with the chair (safety check)
• Bend at the knees then the hips to lower slowly
and with control into the chair
• To start again, walk the hips forwards towards
the front third of the chair
BEGIN WITH 1 SET OF 5 REPETITIONS AND
BUILD TO 10 REPETITIONS
Additional Teaching Points
• Keep the knees hip width apart throughout. Do
not let them press together
• Keep looking straight ahead
• Keep the back upright – do not bend forwards at
the hips
• Take the weight slightly forward on standing
• Imagine there is a book balanced on the head
throughout
• On standing, keep the knees soft but stand fully
upright with good posture
• On the downward phase, first bend the knees
then bend at the hips to allow the bottom to go
backwards without dropping the chest forwards
Problems
• The person is unable to get up from chair
• The person leans too far forwards on the stand
phase so that the lifting work is being done by
the back rather than the thigh muscles
• The person bends/hinges from the hips on the
lowering phase so that the lower back (not the
quadriceps) does the lowering.
• The person reaches for chair with one side of
the body during the lowering phase causing
misalignment and undue stress on the knees,
and spine
• Before or during the lowering phase, the person
turns to check the chair is close enough
• The person feels dizzy or light-headed on
standing
© Later Life Training

OEP Progression
• Progress from 5-10 reps using both hands for support to 5-10 reps with one hand for support to 10
reps with no support
FaME/LLT Additional Progression Approaches
• With each of the progressions begin with 5 repetitions and build to 10. After a rest or ‘active rest’
progress to a maximum of 2 sets of 10 repetitions.
• Both hands on chair for support
• One hand on chair for support
• No hands
• Build the lifting and lowering action up, an inch at a time, until able to stand tall in one swift,
controlled move without use of the hands.
Manual 3 Resources Appendix 5/Exercises Page 51
Solutions
• Use hands on chair to assist and/or put a firm
cushion on the chair seat to raise the starting
height until leg strength improves. To progress,
without the cushion but still with fingertip
support on the chair, try raising the buttocks an
inch off the chair, pause and lower with control.
Gradually reduce support and increase height
of raise. Continue until they have sufficient
strength to progress to standing
• Emphasise keeping back upright and looking
forwards
• Emphasise bending the knees and keeping
the spine long and looking straight ahead
as well as encouraging the image of ‘sitting
backwards’
© Later Life Training
• Emphasise the benefits of using both arms for
support and the negative effects of only using
one
• Reinforce safety check, i.e. the ability to feel
the chair with the backs of the knees to be
reassured that it is in place, then lower gently,
feeling for the chair with both hands, keeping
the eyes looking forwards at all times
• Do a few marching actions in the chair prior to
standing, and move the legs and feet gently
when upright
NB. This is the OTAGO Balance Sit to Stand exercise. The FaME Sit to Stand for
strengthening can be found on Page 94.

Manual 3 ResourcesAppendix 5/Exercises Page 52
Dynamic Balance (FaME and OTAGO)
Backwards Walking with Support & without Support
Purpose
Tell the person that these exercises will improve their balance and reduce their risk of falls and fractures.
OTAGO Teaching Instructions
• The person should stand sideways next to the
bench and hold the bench with the nearest hand.
• Stand up tall and look straight ahead
• Place feet close together
• Walk backwards 10 steps. When finished, turn
to face the other direction by turning inwards
towards the bench
• Hold the bench with the nearest hand. Repeat
the exercise
Additional Teaching Instructions
• Let the person know the number of repetitions/
sets/seconds they will be doing
• Let the person know this exercise is moderate
level in terms of balance challenge
• Let the person know that as this is a balance
exercise, they may, at first, feel unsteady and that
taking a step to recover balance is normal
• Stand side on to the support and work out
what is the best distance from it to get sufficient
support without having to lean to either side
• Start with small movements and maximum
support
• Check posture and ensure breathing is even
as this will help to reduce tension, which may
interfere with balance
• When confidence improves, gradually increase
the size of the steps
BEGIN WITH 1 SET OF 5 STEPS AND BUILD TO
4 SETS OF 10 STEPS
Additional Teaching Points
• Keep the back tall and look straight ahead
throughout the exercise
• Ensure the spine is neutral and the tummy
muscles are pulled in
• Knees soft throughout
• Ensure the balance is ‘centred’ before beginning
to walk back
• When transferring the weight onto the back foot,
use a toe through to heel action and make sure
the toe of the front foot comes off the floor as the
back heel is placed down
• Ensure that the supporting hand moves back as
the body moves back
• Take small steps and keep the pace steady and
controlled
© Later Life Training

Manual 3 Resources
Potential Problems
• The person leans backwards
• The person attempts to look behind
• The person takes steps that are too large
• The person feels wobbly or unbalanced
Appendix 5/Exercises Page 53
© Later Life Training
Seated alternative
Sit forwards in the chair with a long back, feet hip width apart and hands on the chair seat for support.
Perform as in standing but take small steps and limit the number to three; bring feet together and
repeat.
Solutions
• Maintain tall posture
• Emphasise looking straight ahead
• Emphasise small steps, for example a foot
length size to start. When steadiness and
confidence improve, gradually take larger steps
• Perform the exercise between 2 chairs initially
OEP Progression
• Progress from 4 sets of 10 steps with
support to 4 sets of 10 steps without support
FaME/LLT Additional Progression
Approaches
• One hand support to begin
• Only progress when balance can be
maintained throughout all 10 steps
• One hand then fingertip support then when
confidence and ability improves, progress to
no support
• Gradually increase amount of time in no
support and then gradually increase number
of steps
• Tailor as appropriate to the individual, with each of the above progressions:
• Begin with 5 steps and build to 10
• Then rest for two minutes or ‘actively rest’ by doing another exercise, then build to a second set of
10
• Build to 4 sets of 10

Manual 3 ResourcesAppendix 5/Exercises Page 54
Dynamic Balance (FaME and OTAGO)
Heel Toe (tandem) Walking Backwards with Support & without Support
Purpose
Tell the person that these exercises will improve their balance and reduce their risk of falls and fractures.
OTAGO Teaching Instructions
• Stand up tall and look ahead
• Place one foot directly behind the other foot
• Place the foot in front directly behind
• Repeat for 10 more steps. Turn around. Repeat
the exercise
Additional Teaching Instructions
• Let the person know the number of repetitions/
sets/seconds they will be doing
• Let the person know this exercise is high level in
terms of balance challenge
• Let the person know that as this is a balance
exercise, they may, at first, feel unsteady and
that taking a step to recover balance is normal
• Stand side on to the support and work out
what is the best distance from it to get sufficient
support without having to lean to either side
• Start with small movements and maximum
support
• Check posture and ensure breathing is even
as this will help to reduce tension, which may
interfere with balance
• The appropriate time to move the front foot
around to the back is when the weight is still
over the front of the back foot but the heel is
down. Avoid waiting until the bodyweight has
moved into the heel
BEGIN WITH 1 SET OF 3 STEPS AND BUILD TO
2 SETS OF 10 STEPS
Additional Teaching Points
• Stand tall with the spine neutral, the tummy
muscles pulled in, the knees soft and the chin
down
• Avoid leaning forwards or backwards.
• Leave a small gap between the heel of the front
foot and the toe of the back foot to allow for the
walk action
• Avoid leaning against the support
• Move steadily and with control
Potential Problems
• The person feels unsteady or unable to place the
foot in the correct position
• When moving the front foot, the person catches
their heel on the back toe
• The person turns to change direction too quickly
© Later Life Training

Manual 3 Resources Appendix 5/Exercises Page 55
Solutions
• Initially place the heel of the front foot beside
the big toe of the back foot and/or perform
between 2 chairs
• Try to place the back foot directly behind the
front foot but ensure there is sufficient space
© Later Life Training
Seated alternative
Sit forwards in the chair with a long back, feet hip width apart and hands on the chair seat for support.
Perform as in standing but place the heel of the front foot beside the toes of the back foot (rather than
in front) and limit the number of steps to three.
between the heel and toe to avoid squashing
the toe of the back foot, which may decrease
stability
• To turn around take small, steady steps and
turn in towards the support
OEP Progression
• None
FaME/LLT Additional Progression Approaches
• With each of the following progressions begin with 5 steps and
build to 10 steps, progress by turning around and repeating in
another direction. There is a maximum of 2 sets of 10 steps for this
exercise
• Stand between two chairs for extra support to start. Then one
hand and only progress when balance can be recovered by
compensatory step
• Progress onto one hand fingertip support and when confidence and
ability improves, progress to no support
• Gradually increase number of steps

Manual 3 ResourcesAppendix 5/Exercises Page 56
Dynamic Balance (OTAGO)
Walking and Turning with Support (Figure 8) & without Support
Purpose
Tell the person that this exercise will improve their balance and reduce their risk of falls and fractures.
OTAGO Teaching Instructions
• Instruct the person to walk at their regular pace
• Begin by walking in a circle in a clockwise
direction
• Come back to the starting position
• Walk in another circle in an anti-clockwise
direction
• The whole movement should represent a
figure of 8
Additional Teaching Instructions
• Let the person know the number of repetitions/
sets/seconds they will be doing
• Let the person know this exercise is high level
in terms of balance challenge and should be
tackled in stages
• Begin this exercise using a chair to help with
spatial awareness and support
• Stand tall behind a chair and imagine a circle
going out from, around the chair, and returning
to the point where they’re standing. Then ask
them to imagine a similar circle at the back
of the chair, so in fact they’re standing at the
centre of a figure of 8
• Walk with small, steady steps around the
front circle heading to either the right or left
depending which way they feel most confident
• On returning to the back of the chair, pause for
a moment to relax and ensure steadiness then
turn and walk around the back circle finishing
behind the chair (as start position)
• Try to make the circles the same size
• Repeat until it is possible to move from one
circle to the next without holding the chair for
support and without stopping between the
circles
BEGIN WITH 1 CIRCLE AND BUILD TO 2
FIGURES OF 8
Additional Teaching points
• Take small steps initially
• Try to be aware of the position of the chair to
act as a guide but avoid looking at it which
could interfere with balance. Keep the eyes
looking ahead
• Walk at a regular pace. Move steadily and with
control
• Maintain tall posture with the spine neutral, the
tummy muscles pulled in and the chin parallel
to floor
• If feeling unsteady or the pace is increasing or
decreasing inappropriately, stop for a moment,
relax, stand tall and start again
Potential Problems
• The person moves too quickly from one circle
to the next decreasing stability
• The person is unable or unwilling to set off
even with the support of a chair
• The person is able to complete the front but
not the back circle or is able to complete the
circles leading with one side of the body but
not the other
© Later Life Training

Manual 3 Resources Appendix 5/Exercises Page 57
Solutions
• Ensure the person completes one circle and pauses to prepare for the next circle initially
• Place chairs at the halfway point or at the quarter, half and three-quarter points of the circle and
remove in stages until confidence or skill improve
• Place two chairs back to back but with sufficient space between them for the person to move in and
out safely at the centre of the figure 8
OEP Progression
• Progress from 2 repetitions with support to 2 repetitions without support
FaME/LLT Additional Progression Approaches
• Begin with a brief pause between circles with the hand on the back of the chair and then complete
the other circle. Repeat twice.
• Complete without steadying on the back of the chair. Repeat twice.
• Remove the chair and repeat one full repetition of the figure of 8 and then build to two repetitions
© Later Life Training
Seated alternative
Sit forwards in the chair with a long back, and perform a combination of any two of the seated
alternatives for the other balance exercises.
Manual 3 ResourcesAppendix 5/Exercises Page 58
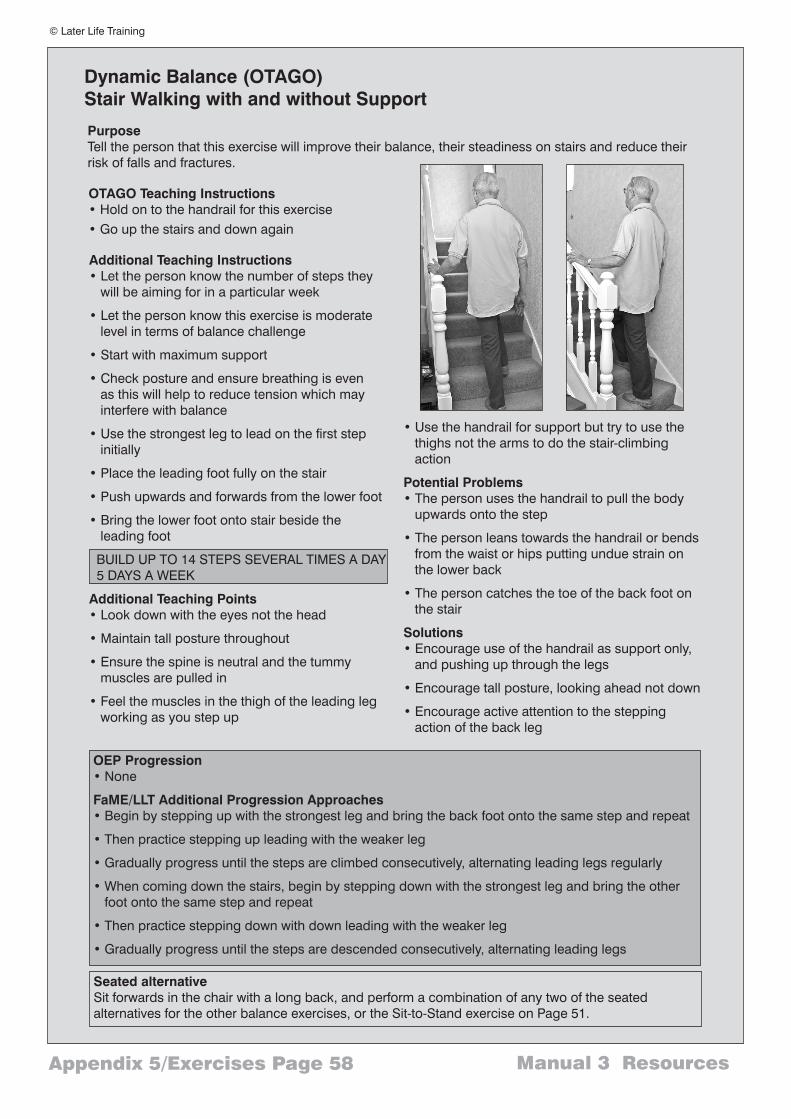
Dynamic Balance (OTAGO)
Stair Walking with and without Support
Purpose
Tell the person that this exercise will improve their balance, their steadiness on stairs and reduce their
risk of falls and fractures.
OTAGO Teaching Instructions
• Hold on to the handrail for this exercise
• Go up the stairs and down again
Additional Teaching Instructions
• Let the person know the number of steps they
will be aiming for in a particular week
• Let the person know this exercise is moderate
level in terms of balance challenge
• Start with maximum support
• Check posture and ensure breathing is even
as this will help to reduce tension which may
interfere with balance
• Use the strongest leg to lead on the first step
initially
• Place the leading foot fully on the stair
• Push upwards and forwards from the lower foot
• Bring the lower foot onto stair beside the
leading foot
BUILD UP TO 14 STEPS SEVERAL TIMES A DAY
5 DAYS A WEEK
Additional Teaching Points
• Look down with the eyes not the head
• Maintain tall posture throughout
• Ensure the spine is neutral and the tummy
muscles are pulled in
• Feel the muscles in the thigh of the leading leg
working as you step up
• Use the handrail for support but try to use the
thighs not the arms to do the stair-climbing
action
Potential Problems
• The person uses the handrail to pull the body
upwards onto the step
• The person leans towards the handrail or bends
from the waist or hips putting undue strain on
the lower back
• The person catches the toe of the back foot on
the stair
Solutions
• Encourage use of the handrail as support only,
and pushing up through the legs
• Encourage tall posture, looking ahead not down
• Encourage active attention to the stepping
action of the back leg
OEP Progression
• None
FaME/LLT Additional Progression Approaches
• Begin by stepping up with the strongest leg and bring the back foot onto the same step and repeat
• Then practice stepping up leading with the weaker leg
• Gradually progress until the steps are climbed consecutively, alternating leading legs regularly
• When coming down the stairs, begin by stepping down with the strongest leg and bring the other
foot onto the same step and repeat
• Then practice stepping down with down leading with the weaker leg
• Gradually progress until the steps are descended consecutively, alternating leading legs
© Later Life Training
Seated alternative
Sit forwards in the chair with a long back, and perform a combination of any two of the seated
alternatives for the other balance exercises, or the Sit-to-Stand exercise on Page 51.

Manual 3 Resources Appendix 5/Exercises Page 59
Dynamic Balance (FaME and OTAGO)
Picking up an Object Supported & Unsupported
Purpose
Tell the person this exercise is to practice an everyday activity to improve the strength and balance
needed to perform it skilfully and safely.
OTAGO Teaching Instructions
• Place an object in the middle of the floor
• Bend down keeping the back straight and pick
the object up
• Stand up tall with the object
• Place the object on the floor again
• Repeat
Additional Teaching Instructions
• Let the person know the number of repetitions/
sets they will be doing
• Let the person know this exercise is high level in
terms of balance challenge
• Stand side on to the chair holding on with one
hand, feet hip distance or a little wider
• Take the leg nearest the chair slightly forward
• Keeping the hand on the chair when bending
down to pick up the object with the outside hand
BEGIN WITH 1 REPETITION AND BUILD TO 2
REPETITIONS
Additional Teaching Points
• When bending down, press the hips backwards
so that the knees stay above the toes
• Do not allow the bottom to drop lower than the
hips
• Keep the knees in line with and above the toes
• Keep the chest lifted and avoid rounding the
shoulders
• Ensure the spine is neutral and the tummy
muscles are pulled in
• Avoid leaning too heavily on the chair
Potential problems
• The person has insufficient flexibility/balance/
strength to reach to the floor
Solutions
• Start by placing the object on a low table then
gradually progress to the floor
OEP Progression
• Increase the number of repetitions to 2
FaME/LLT Additional Progression Approaches
• Progress to 2 repetitions on each side of the chair
• Progress to fingertip support then no support
© Later Life Training
Seated alternative
Sit forwards in the chair with a long back, and perform a combination of any two of the seated
alternatives for the other balance exercises.

Manual 3 ResourcesAppendix 5/Exercises Page 60
Dynamic Balance (FaME and OTAGO)
Stepping over an Object Supported & Unsupported
OTAGO Teaching Instructions
• Place a slipper in the middle of the floor
• Step over the slipper
• Turn around
• Step back over the slipper
• Repeat
Additional Teaching Instructions
• Let the person know the number of
repetitions/sets they will be doing
• Let the person know this exercise is high level in
terms of balance challenge
• Stand side on to the chair holding on with one
hand, feet hip distance or a little wider
• Keep the hand on the chair whilst stepping over
the slipper with the outside leg
BEGIN WITH 1 REPETITION AND BUILD TO 2
REPETITIONS
Additional Teaching Points
• Ensure the spine is neutral and the tummy
muscles are pulled in
• Keep the chest lifted
• Ensure a large enough step to clear the slipper
safely
Potential problems
• The person catches a foot on the slipper
• The person is too nervous to perform the
movement
Solutions
• Ensure the foot is flexed at the ankle and lifted
sufficiently high
• Start by practicing the stepping action without
the slipper
Purpose
Tell the person this exercise is to practice an everyday activity to improve the strength and balance
needed to perform it skilfully and safely.
OEP Progression
• Increase the number of repetitions
to 2
FaME/LLT Additional Progression
Approaches
• Progress to 2 repetitions on each
side of the chair
• Progress to fingertip support then no
support
© Later Life Training
Seated alternative
Sit forwards in the chair with a long back, and perform a combination of any two of the seated
alternatives for the other balance exercises.

Manual 3 Resources Appendix 5/Exercises Page 61
Dynamic Balance (FaME)
One Legged (Flamingo) Swing with Support and without Support
Purpose
Tell the person this exercise improves balance and reduces the risk of falls.
Teaching Instructions
• Let the person know the number of repetitions/
sets they will be doing
• Let the person know this exercise is moderate
level in terms of balance challenge
• Stand sideways on to the chair, holding the chair
back for support
• Stand tall, with the feet slightly apart and the
weight evenly distributed between both feet
• Relax the other arm by the side of the body
• Pull the tummy muscles in and lift up out of the
hips
• Transfer the weight onto the leg nearest the chair
• Slide the other foot forwards keeping the toes in
contact with the floor, then lift the leg so that the
foot is a few inches off the floor and the knee is
bent
• Swing the leg gently backwards in a controlled
sweeping motion, keeping it close to the body
BEGIN WITH 3 SWINGS AND BUILD TO 6
SWINGS
Teaching Points
• Keep the supporting leg straight but do not lock
the knee
• Keep both hips facing forwards
• Keep the pelvis neutral and the tummy muscles
pulled in to prevent the back from arching
• Look ahead rather than down
• Feel the muscles in the supporting leg working
to maintain balance
Potential Problems
• The person performs too quickly, lacking
control
• The person’s trunk moves backwards and
forwards in the opposite direction to the leg
• The person’s support knee is locked
• The person experiences discomfort in the
supporting leg
Solutions
• Reinforce that the movement should be
executed with control
• The trunk should remain still; tighten the
tummy muscles and reduce the size of the leg
movement
• Reinforce that the support knee should remain
soft
• Check that the hip is in line with the knee and
reduce the number of repetitions
Progression
• Increase the number of repetitions from 3 to 6
• Progress to fingertip support then no support
• At all stages, make ensure the person has
maintained good technique for at least two
weeks before progressing
© Later Life Training
Seated alternative
Sit forwards in the chair with a long back, and perform a combination of any two of the seated
alternatives for the other balance exercises.

Manual 3 ResourcesAppendix 5/Exercises Page 62
Dynamic Balance (FaME)
Front, Side, Back Lunges with & without Support (Compensatory
stepping strategy)
Purpose
Tell the person this exercise improves balance and reduces the risk of falls and fractures. To help
with compensatory steps needed to regain balance in everyday life such as during loss of balance
when walking on uneven pavements or on a bus that stops suddenly.
Teaching Instructions
• Let the person know the number of
repetitions/sets they will be doing
• Let the person know this exercise is
moderate level in terms of balance
challenge
• Stand side on to the chair holding on
with one hand
• Ensure correct posture with the feet hip
width apart and the knees soft
• Take half a step forwards with the
outside leg, placing the foot flat on the floor and
bending the knees
• Press gently off this foot to bring the leg back to
the start position
• Then take half a step sideways with the outside
leg, placing the foot flat on the floor and
bending the knees
• Press gently back to the start position
• Take half a step diagonally forwards with the
outside leg, placing the foot flat on the floor and
bending the knees
• Press gently off this foot to bring the leg back to
the start position
• Finally, take half a step diagonally backwards,
again placing the foot flat on the floor and
slightly bending the knees
• Press back to the starting position
BEGIN WITH 1 REPETITION IN EACH
DIRECTION AND BUILD TO 2 REPETITIONS
Teaching Points
• Ensure tall posture, looking straight ahead
• Ensure the spine is neutral and the tummy
muscles are pulled in
• Make sure the knee does not move too far
forwards of the toe with each lunge
• Ensure that the weight is evenly distributed
between the legs during the lunge
• Avoid locking out the knee when pushing back
from the lunge to the start position
• Keep the movement controlled
• Put the weight back evenly between both feet
when returning to the centre
• Imagine the lunges are moving ‘around the clock
face’ to help with spatial awareness
Potential problems
• The person performs too quickly or slowly
• The person’s lunge is too deep putting undue
stress on the knee and decreasing stability
• The person puts too much weight over the front
leg so that the front knee moves ahead of the
front toe
Solutions
• Ensure performance at a rhythmical, controlled
speed
• Begin with half a step and progressively build up
the length and depth of the lunge; check that the
angle at the knee does not go beyond 90°
• Reinforce the need to keep the weight evenly
distributed between both legs and the knee
above the toe
© Later Life Training

Manual 3 Resources Appendix 5/Exercises Page 63
Progression
• Make each lunge a little longer and deeper
• Then make the press back to the start position
more dynamic by pushing off the floor more
powerfully and quickly then pausing briefly with
the body weight balanced on one leg before
returning to the start position
• Build from here to a double lunge in each
direction; perform the first lunge then take a
smaller lunge in the same direction. Return to the
start position as before
© Later Life Training
Seated alternative
Sit forwards in the chair with a long back, feet hip width apart and hands on the chair seat for support.
Perform as in standing, but keep size of steps small.
• One hand then fingertip support then progress
to no support
• At all stages, make sure the person has
maintained good technique for at least two
weeks before progressing
• Build to 2 sets of 1 lunge all the way ‘round the
clock’ with the right leg then the left

Manual 3 ResourcesAppendix 5/Exercises Page 64
Dynamic Balance (FaME)
Upward Reach Balance with Support & without Support
Purpose
Tell the person this exercise improves balance and reduces the risk of falls and fractures
Teaching Instructions
• Let the person know the number of repetitions/
sets they will be doing
• Let the person know this exercise is moderate to
high level in terms of balance challenge
• Stand tall side on to the chair with feet hip
distance apart and knees soft, one hand on the
chair for support
• Raise one arm up above the head as close as
possible to the ear, palm facing inwards
• At the same time lift both heels and rise up onto
the toes
• Lower the heels then arm with control
• Repeat with the other arm
• START WITH 3 LIFTS AND BUILD TO 6
Teaching Points
• Keep the spine neutral and the tummy muscles
pulled in to prevent the lower back from arching
• Keep the knees soft
• Keep the weight over the big and second toes
• Think of driving upwards and forwards with the
movement
Potential Problems
• The person’s ankles roll out
• The person leans too far backwards or
forwards
• The person feels unsteady or wobbles
Solutions
• Reinforce keeping the ankles in line with the
knees and feet and the weight over the big and
second toe
• Ensure the shoulders remain above the hips
and the spine is in neutral
• Go back to the supported version
Progression
• Progress from one hand support to fingertip to no support
• When progressing to no support use both hands above the
head
• Progress to 6 repetitions without support
Seated alternative
Sit forwards in the chair with a long back, feet hip width apart and under knees. place one hand on
chair seat for support. Perform as in standing.
© Later Life Training

Manual 3 Resources Appendix 5/Exercises Page 65
Notes
© Later Life Training

Manual 3 ResourcesAppendix 5/Exercises Page 66
Strengthening: Resistance Training Part 1 with Bodyweight (FaME and
OTAGO) - Calf Raise Strengtheners (support & no support)
Purpose
Tell the person this exercise will strengthen the calf muscles, ankles and toe joints. To help with everyday
actions such as walking, reaching up into high cupboards.
OTAGO Teaching Instructions
• Ensure the person is standing close to the bench/
chair
• Initially the person is holding with both hands
then progressing to one hand with a light hold so
that more balance work is done at the ankles
• The feet are shoulder width apart
• The movement is slow
• The body should come straight up with the
movement rather than forward
• Progress to no hold
Additional Teaching Instructions
• Let the person know the number of repetitions
and sets they will be doing
• Let the person know that they should count
quietly out loud “1,2,3” as they lift and “1,2,3” as
they lower to ensure regular breathing
• Raise and lower both heels with a smooth,
continuous lift and a controlled landing
BEGIN WITH 1 SET of 5 REPETITIONS AND
BUILD TO 10 REPETITIONS
Additional Teaching Points
• Stand tall and ensure the spine is neutral and the
tummy muscles are pulled in
• Look ahead rather than down
• Keep the weight over the big and second toe so
that the ankles cannot roll out
• Keep the shoulders back, down and relaxed
• Avoid holding the breath
• Avoid locking the knees
• Lower the heels to the point where they touch
the floor but are still under control, pause for a
second then put the weight fully back on both
feet and rest
• Feel the muscle work in the calf
Potential problems
• The person looks down or up
• The person’s ankles roll out
• The person locks out (hyperextends) the knee
• The person leans forward at the hips taking too
much weight through the arms
• The person rocks their weight backwards on
lowering the heels so that the toes lift off the floor
• The person is unable to balance with their feet hip
or shoulder distance apart
• The person lifts too quickly then stops
Solutions
• Keep reminding the person to look ahead
• Keep the weight over the big and second toes so
that the ankles do not roll out
• Ensure the knees are soft
• Ensure the back is tall and the person is not
leaning forward from the hips
• Encourage the person to lower the heels with
control maintaining an upright posture with the
toes in contact with the floor at all times
• Introduce the exercise with the feet comfortably
together before progressing to hip width apart and
finally to shoulder width apart
• Keep the effort steady and continuous and keep
working towards lifting higher
© Later Life Training

OEP Progression
• Progress from 10 repetitions with support to 10 repetitions without support
FaME/LLT Additional Progression Approaches
• BEGIN WITH 1 SET of 5 REPETITIONS AND BUILD TO 10 REPETITIONS
• BUILD TO 2 SETS OF 10 REPETITIONS
• When reducing support progress from 2 hands, to 1 hand, to 1 finger to no support
• Remember that foot position affects level of challenge; in this exercise feet hip width is more
challenging than feet close together because of the ankle strength required
Seated alternative
Sit forwards in the chair with correct posture, feet hip distance and under the knees. Hold the sides of
the chair or place the hands flat on the thighs. Perform as the standing version.
Manual 3 Resources Appendix 5/Exercises Page 67
© Later Life Training

Manual 3 ResourcesAppendix 5/Exercises Page 68
Strengthening: Resistance Training Part 1 with Bodyweight (FaME and
OTAGO) - Toe Raise Strengtheners (support & no support)
Purpose
Tell the person this exercise will strengthen the shin muscles, ankle and toe joints. This will help everyday
actions such as walking, stepping backwards and on and off pavements.
OTAGO Teaching Instructions
• Let the person know that this exercise is the
opposite exercise to the calf raises
• The person is standing close to the bench
• Initially the person is holding with both hands
then progressing to one hand with a light hold so
that more balance work is done at the ankles
• The feet are shoulder width apart
• The movement is slow
• Let the person know that the movement is only
small
• Ensure the person avoids a rocking movement
• Progress to no hold
Additional Teaching Instructions
• Let the person know the number of repetitions
and sets they will be doing
• Let the person know that they should count
quietly out loud “1,2,3” as they lift and “1,2,3” as
they lower to ensure regular breathing
• Lift and lower the toes with a smooth, continuous
action
BEGIN WITH 1 SET of 5 REPETITIONS AND
BUILD TO 10 REPETITIONS
Additional Teaching Points
• Stand tall with the spine in neutral and the tummy
muscles pulled in
• Look ahead rather than down
• Keep the hips above the ankles
• Keep the shoulders back, down and relaxed
• Avoid holding the breath
• Avoid locking the knees
• Feel the muscle work in the shins
Potential problems
• The person’s ankles are weak or have a limited
range of movement resulting in almost no
dorsiflexion (lift of the toes) initially
• The person bends forwards at the hips sticking
the bottom out in order to lift the toes off the
floor
• The person has poor control on lowering
• The person jerks into the movement rather than
performing a steady lift
• The person feels unbalanced as the toe raise is
not an everyday movement
Solutions
• Reassure the person that poor range of
movement is common and will improve quickly
with this exercise
• Ensure the posture stays tall with the spine in
neutral and the tummy and bottom in. This will
ensure the hips are above the ankles
• Encourage the person to lower the toes with
control
• Encourage the person to perform a steady,
sustained lift
• Reassure the person that being wobbly at first
is common and balance will improve quickly
with this exercise
© Later Life Training

Manual 3 Resources Appendix 5/Exercises Page 69
OEP Progression
• Progress from 10 repetitions with support to 10 repetitions without support
FaME/LLT Additional Progression Approaches
• BEGIN WITH 1 SET OF 5 REPETITIONS AND BUILD TO 10 REPETITIONS
• BUILD TO 2 SETS OF 10 REPETITIONS
• When reducing support progress from 2 hands, to 1 hand, to 1 finger to no support
• Remember that foot position affects level of challenge; in this exercise feet hip width is more challenging
than feet close together because of the ankle strength required
Seated alternative
Sit forwards in the chair with correct posture, feet hip distance apart and ankles under the knees. Hold the
sides of the chair or place the hands flat on the thighs. Perform as the standing version.
© Later Life Training

Manual 3 ResourcesAppendix 5/Exercises Page 70
Strengthening: Resistance Training Part 2 with Weights (OTAGO) -
Front Knee Strength Seated
Purpose
Tell the person this exercise will strengthen the hip muscles around the hip bones and help stabilise the
knee joint. To help with everyday actions such as walking and stair climbing
OTAGO Teaching Instructions
• The person should be sitting with the back well
supported
• Place a weight around the ankle
• The person should start the exercise with the leg
back slightly beyond a 90° angle at the knee
• Sit opposite the person and demonstrate the
movement
• Ensure that the person can attach and remove the
weight from the ankle unaided
Additional Teaching Instructions
• Let the person know the number of repetitions and
sets they will be doing
• Let the person know they should count quietly out
loud “1,2,3” as they lift and “1,2,3” as they lower to
ensure regular breathing
• Push the bottom back into the support before
straightening the spine into the upright position
against the back of the chair
• Raise the foot, straightening the knee, then lower
the foot under control
• Brush the foot along the floor before lifting and
again as it lowers to the floor
• Rest briefly with the foot flat on the floor before
performing the next repetition
BEGIN WITH 1 SET OF 5 REPETITIONS AND
BUILD TO 10 REPETITIONS
Additional Teaching Points
• Ensure the movement is slow and controlled on
both lifting and lowering
• Ensure the leg is lengthened and the knee
straightened, but not locked, when lifting
• Ensure the spine is neutral and the tummy
muscles are pulled in
• Avoid holding the breath; ensure breathing is
regular and timing accurate by counting quietly
out loud
• Feel the muscle work in the front of the thigh
• Ensure you have read the LLT Guidelines on the
use of ankle weights (Page 136)
Potential problems
• The person lifts the entire thigh off the chair
• The person performs the exercise too quickly
• The person lifts the toe and foot higher than the
hip so the back rounds and the chest slumps
• The person arches the lower back arches and
slides down away from the support
• The person takes too much weight through the
arms
• The person does not bring the leg back
sufficiently at the end of the movement
• The person does not rest the leg on the floor
between movements
• The person does not lengthen the leg (i.e. saggy
lift)
• The person locks out the knee (hyperextends)
• The person experiences discomfort or pain in
the knee
• The person holds their breath
© Later Life Training

Solutions
• Ensure the person keeps the back of the thigh
in contact with the chair
• Ensure the person performs with control
• Ensure the person sits tall and the lift is
performed without momentum and the toe
remains lower than the knee
• Reposition the back in contact with the chair
back
• Ensure the upper body is upright yet shoulders
and arms remain relaxed
• On the downward phase, ensure the person
returns the foot to slightly beyond a right-angle
(90°) at the knee
• Ensure the person briefly rests before
performing the next repetition
• Tell the person to keep the leg long and strong
as they lift
• Ensure the knee is straightened but not locked
• If exercise technique is correct, discontinue this
exercise and encourage knee brace exercise
(Page 72) or a simple knee lift keeping the foot
under the knee
• Encourage the person to count quietly out loud
FaME/LLT Additional Progression Approaches
• Begin with no weight and 1 set of 5 repetitions
• Progress to 5 repetitions and build up to 10 repetitions, using the lowest ankle cuff weight (1kg)
• Progress to next weight (1.5kg) and build up from 5 to 10 repetitions
• Progress to next weight
• Build to 2 sets of 10 repetitions
• At all stages, ensure the person has maintained good technique for at least two weeks before
progressing
Manual 3 Resources Appendix 5/Exercises Page 71
© Later Life Training
Manual 3 ResourcesAppendix 5/Exercises Page 72
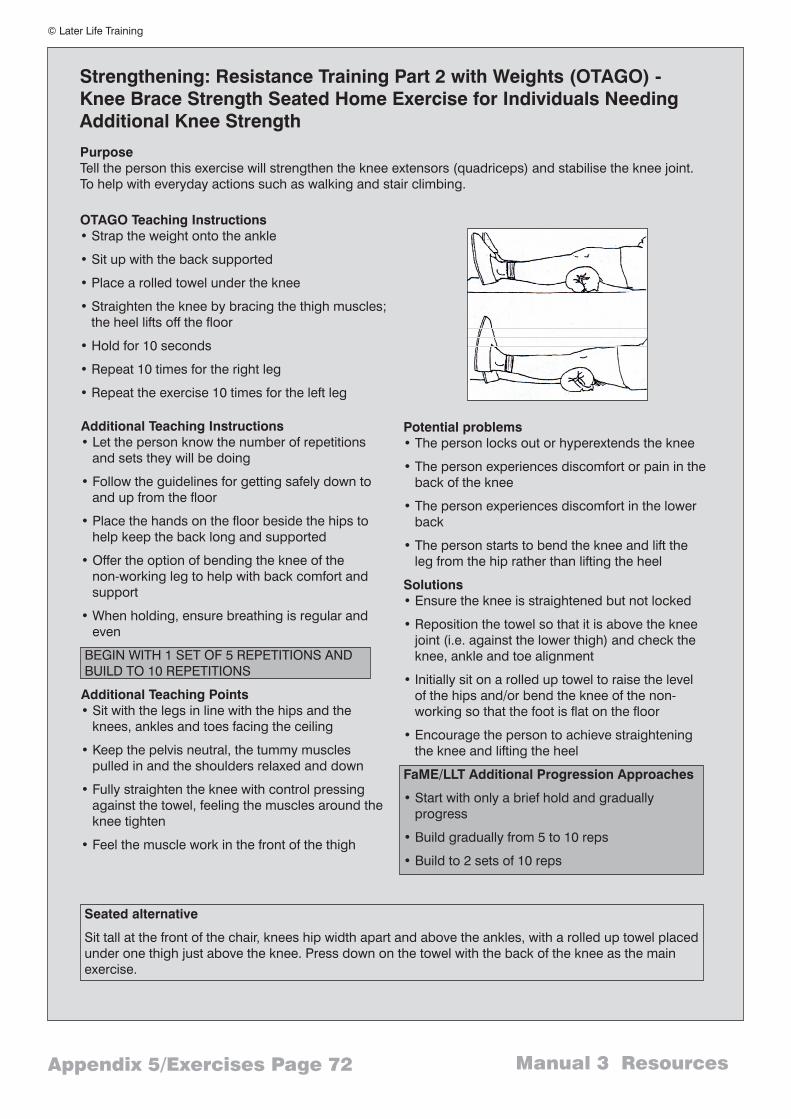
Strengthening: Resistance Training Part 2 with Weights (OTAGO) -
Knee Brace Strength Seated Home Exercise for Individuals Needing
Additional Knee Strength
Purpose
Tell the person this exercise will strengthen the knee extensors (quadriceps) and stabilise the knee joint.
To help with everyday actions such as walking and stair climbing.
OTAGO Teaching Instructions
• Strap the weight onto the ankle
• Sit up with the back supported
• Place a rolled towel under the knee
• Straighten the knee by bracing the thigh muscles;
the heel lifts off the floor
• Hold for 10 seconds
• Repeat 10 times for the right leg
• Repeat the exercise 10 times for the left leg
Additional Teaching Instructions
• Let the person know the number of repetitions
and sets they will be doing
• Follow the guidelines for getting safely down to
and up from the floor
• Place the hands on the floor beside the hips to
help keep the back long and supported
• Offer the option of bending the knee of the
non-working leg to help with back comfort and
support
• When holding, ensure breathing is regular and
even
BEGIN WITH 1 SET OF 5 REPETITIONS AND
BUILD TO 10 REPETITIONS
Additional Teaching Points
• Sit with the legs in line with the hips and the
knees, ankles and toes facing the ceiling
• Keep the pelvis neutral, the tummy muscles
pulled in and the shoulders relaxed and down
• Fully straighten the knee with control pressing
against the towel, feeling the muscles around the
knee tighten
• Feel the muscle work in the front of the thigh
Potential problems
• The person locks out or hyperextends the knee
• The person experiences discomfort or pain in the
back of the knee
• The person experiences discomfort in the lower
back
• The person starts to bend the knee and lift the
leg from the hip rather than lifting the heel
Solutions
• Ensure the knee is straightened but not locked
• Reposition the towel so that it is above the knee
joint (i.e. against the lower thigh) and check the
knee, ankle and toe alignment
• Initially sit on a rolled up towel to raise the level
of the hips and/or bend the knee of the non-
working so that the foot is flat on the floor
• Encourage the person to achieve straightening
the knee and lifting the heel
FaME/LLT Additional Progression Approaches
• Start with only a brief hold and gradually
progress
• Build gradually from 5 to 10 reps
• Build to 2 sets of 10 reps
© Later Life Training
Seated alternative
Sit tall at the front of the chair, knees hip width apart and above the ankles, with a rolled up towel placed
under one thigh just above the knee. Press down on the towel with the back of the knee as the main
exercise.

Manual 3 Resources Appendix 5/Exercises Page 73
© Later Life Training
Notes