e-biz impact™infocenter-archive.sybase.com/help/topic/com.sybase.help.doc.ebiz... · inspection,...
TRANSCRIPT

TRAN-IDE Guide
e-Biz Impact™5.4.5

DOCUMENT ID: DC10096-01-0545-01
LAST REVISED: July 2005
Copyright © 1999-2005 by Sybase, Inc. All rights reserved.
This publication pertains to Sybase software and to any subsequent release until otherwise indicated in new editions or technical notes. Information in this document is subject to change without notice. The software described herein is furnished under a license agreement, and it may be used or copied only in accordance with the terms of that agreement.
To order additional documents, U.S. and Canadian customers should call Customer Fulfillment at (800) 685-8225, fax (617) 229-9845.
Customers in other countries with a U.S. license agreement may contact Customer Fulfillment via the above fax number. All other international customers should contact their Sybase subsidiary or local distributor. Upgrades are provided only at regularly scheduled software release dates. No part of this publication may be reproduced, transmitted, or translated in any form or by any means, electronic, mechanical, manual, optical, or otherwise, without the prior written permission of Sybase, Inc.
Sybase, the Sybase logo, ADA Workbench, Adaptable Windowing Environment, Adaptive Component Architecture, Adaptive Server, Adaptive Server Anywhere, Adaptive Server Enterprise, Adaptive Server Enterprise Monitor, Adaptive Server Enterprise Replication, Adaptive Server Everywhere, Adaptive Warehouse, Afaria, Answers Anywhere, Anywhere Studio, Application Manager, AppModeler, APT Workbench, APT-Build, APT-Edit, APT-Execute, APT-Translator, APT-Library, AvantGo Mobile Delivery, AvantGo Mobile Inspection, AvantGo Mobile Marketing Channel, AvantGo Mobile Pharma, AvantGo Mobile Sales, AvantGo Pylon, AvantGo Pylon Application Server, AvantGo Pylon Conduit, AvantGo Pylon PIM Server, AvantGo Pylon Pro, Backup Server, BizTracker, ClearConnect, Client-Library, Client Services, Convoy/DM, Copernicus, Data Pipeline, Data Workbench, DataArchitect, Database Analyzer, DataExpress, DataServer, DataWindow, DataWindow .NET, DB-Library, dbQueue, Developers Workbench, Direct Connect Anywhere, DirectConnect, Distribution Director, e-ADK, E-Anywhere, e-Biz Impact, e-Biz Integrator, E-Whatever, EC Gateway, ECMAP, ECRTP, eFulfillment Accelerator, Embedded SQL, EMS, Enterprise Application Studio, Enterprise Client/Server, Enterprise Connect, Enterprise Data Studio, Enterprise Manager, Enterprise SQL Server Manager, Enterprise Work Architecture, Enterprise Work Designer, Enterprise Work Modeler, eProcurement Accelerator, EWA, Financial Fusion, Financial Fusion Server, Gateway Manager, GlobalFIX, iAnywhere, iAnywhere Solutions, ImpactNow, Industry Warehouse Studio, InfoMaker, Information Anywhere, Information Everywhere, InformationConnect, InternetBuilder, iScript, Jaguar CTS, jConnect for JDBC, M2M Anywhere, Mach Desktop, Mail Anywhere Studio, MainframeConnect, Maintenance Express, Manage Anywhere Studio, M-Business Channel, M-Business Network, M-Business Server, MDI Access Server, MDI Database Gateway, media.splash, MetaWorks, mFolio, Mirror Activator, MySupport, Net-Gateway, Net-Library, New Era of Networks, ObjectConnect, ObjectCycle, OmniConnect, OmniSQL Access Module, OmniSQL Toolkit, Open Biz, Open Client, Open ClientConnect, Open Client/Server, Open Client/Server Interfaces, Open Gateway, Open Server, Open ServerConnect, Open Solutions, Optima++, PB-Gen, PC APT Execute, PC DB-Net, PC Net Library, PocketBuilder, Pocket PowerBuilder, Power++, power.stop, PowerAMC, PowerBuilder, PowerBuilder Foundation Class Library, PowerDesigner, PowerDimensions, PowerDynamo, PowerScript, PowerSite, PowerSocket, Powersoft, PowerStage, PowerStudio, PowerTips, Powersoft Portfolio, Powersoft Professional, PowerWare Desktop, PowerWare Enterprise, ProcessAnalyst, QAnywhere, Rapport, RemoteWare, RepConnector, Replication Agent, Replication Driver, Replication Server, Replication Server Manager, Replication Toolkit, Report-Execute, Report Workbench, Resource Manager, RFID Anywhere, RW-DisplayLib, RW-Library, S-Designor, SDF, Secure SQL Server, Secure SQL Toolset, Security Guardian, SKILS, smart.partners, smart.parts, smart.script, SQL Advantage, SQL Anywhere, SQL Anywhere Studio, SQL Code Checker, SQL Debug, SQL Edit, SQL Edit/TPU, SQL Everywhere, SQL Modeler, SQL Remote, SQL Server, SQL Server Manager, SQL SMART, SQL Toolset, SQL Server/CFT, SQL Server/DBM, SQL Server SNMP SubAgent, SQL Station, SQLJ, STEP, SupportNow, S.W.I.F.T. Message Format Libraries, Sybase Central, Sybase Client/Server Interfaces, Sybase Financial Server, Sybase Gateways, Sybase IQ, Sybase MPP, Sybase SQL Desktop, Sybase SQL Lifecycle, Sybase SQL Workgroup, Sybase User Workbench, SybaseWare, Syber Financial, SyberAssist, SybFlex, SyBooks, System 10, System 11, System XI (logo), SystemTools, Tabular Data Stream, TradeForce, Transact-SQL, Translation Toolkit, UltraLite, UltraLite.NET, UNIBOM, Unilib, Uninull, Unisep, Unistring, URK Runtime Kit for UniCode, VisualWriter, VQL, WarehouseArchitect, Warehouse Control Center, Warehouse Studio, Warehouse WORKS, Watcom, Watcom SQL, Watcom SQL Server, Web Deployment Kit, Web.PB, Web.SQL, WebSights, WebViewer, WorkGroup SQL Server, XA-Library, XA-Server, XcelleNet, and XP Server are trademarks of Sybase, Inc. 02/05
Unicode and the Unicode Logo are registered trademarks of Unicode, Inc.
All other company and product names used herein may be trademarks or registered trademarks of their respective companies.
Use, duplication, or disclosure by the government is subject to the restrictions set forth in subparagraph (c)(1)(ii) of DFARS 52.227-7013 for the DOD and as set forth in FAR 52.227-19(a)-(d) for civilian agencies.
Sybase, Inc., One Sybase Drive, Dublin, CA 94568.

Contents
TRAN-IDE Guide iii
About This Book .......................................................................................................................... vii
CHAPTER 1 Overview .......................................................................................... 1What transaction production is ......................................................... 1How transaction production works ................................................... 2
Routing types ............................................................................ 3Transaction production elements ..................................................... 5
Production objects..................................................................... 5Field objects .............................................................................. 6Rule objects............................................................................... 6Rule component objects............................................................ 7Filter objects .............................................................................. 8Qualification objects .................................................................. 8Datalink objects ....................................................................... 11Table objects ........................................................................... 11ODL functions.......................................................................... 12
How production objects work ......................................................... 12Multiple rules and components example ................................. 13Qualification failure example ................................................... 15General processing example................................................... 16Rule component processing example ..................................... 20Multiple rule and component processing example .................. 21
Building production objects ............................................................ 23Requirements .......................................................................... 24Building a sample production object........................................ 26
Using name/value pairing............................................................... 28Input transaction format........................................................... 28Building field objects................................................................ 29
Using groups .................................................................................. 29Specifying group types ............................................................ 30Building field objects................................................................ 30Building rule objects ................................................................ 31Building component objects .................................................... 31Nested groups ......................................................................... 32

Contents
iv e-Biz Impact
Using collection .............................................................................. 34Defining a table ....................................................................... 35Defining the Key field .............................................................. 36General information and rules ................................................. 36Data organization .................................................................... 37Implementing collection........................................................... 38Data size limitations ................................................................ 39
TRAN-IDE objects.......................................................................... 40SFM log overview........................................................................... 43
sfmlog utility options ................................................................ 43
CHAPTER 2 Using TRAN-IDE............................................................................. 49Introduction .................................................................................... 49
Transaction production objects ............................................... 50Modules................................................................................... 53Repositories ............................................................................ 54
General use.................................................................................... 55Requirements .......................................................................... 55Object naming conventions ..................................................... 55Starting TRAN-IDE.................................................................. 56Creating projects and modules................................................ 57Working with repositories ........................................................ 58Selecting a data structure........................................................ 63Import and export options........................................................ 64Using the TRAN-IDE Options menu........................................ 68
CHAPTER 3 Building Production Objects ........................................................ 71Introduction .................................................................................... 71Building production objects ............................................................ 72
Starting TRAN-IDE.................................................................. 72Selecting a data structure........................................................ 72Building tree-to-stream production objects.............................. 73Building stream-to-tree production objects.............................. 74Building tree-to-tree production objects................................... 76Building stream-to-stream production objects ......................... 77Defining input fields ................................................................. 80Deleting production objects ..................................................... 86Editing production objects ....................................................... 86
Using import options ...................................................................... 87Importing comma-separated fields .......................................... 87Building field objects using Custom Import ............................. 87Exporting text files ................................................................... 90
Defining stream output rules .......................................................... 91

TRAN-IDE Guide v
Defining rule components (subrules).............................................. 93Adding field separators ............................................................ 96
Defining filter objects ...................................................................... 96Creating table object filters ...................................................... 99Creating built-in filters ............................................................ 100Creating custom filters ........................................................... 142Creating datalink filters .......................................................... 145Creating edit mask filters ....................................................... 146Creating database interface filters ......................................... 147Creating production object filters ........................................... 148Creating DFC filters ............................................................... 148Changing filter objects ........................................................... 149Deleting filter objects ............................................................. 149Attaching post-filters to production objects ............................ 150
Creating table objects................................................................... 150Changing the Table Objects directory ................................... 151Formatting tables ................................................................... 151Creating tables....................................................................... 152Importing table objects........................................................... 155Working with key columns and duplicate entries ................... 156Deleting table objects ............................................................ 157
Defining qualification objects ........................................................ 158Creating table object qualifications ........................................ 160Creating custom code qualifications ...................................... 160Using built-in qualifications .................................................... 163Using compare operation qualifications................................. 167Creating DB object qualifications........................................... 168Creating bitwise operator qualifications ................................. 168Attaching qualification objects to rule components................ 169
Defining data objects .................................................................... 170Writing error functions .................................................................. 172
Error functions attached to rule objects ................................. 172Error functions attached to production objects ...................... 173Error codes ............................................................................ 175
Defining ODL functions................................................................. 178Building generic ODL functions ............................................. 178
Defining production object options ............................................... 179Using the test drive....................................................................... 181
Test Drive menu and control panel options ........................... 182

Contents
vi e-Biz Impact

TRAN-IDE Guide vii
About This Book
Audience The book is written for application developers involved with e-Biz Impact transaction production.
How to use this book This book contains these chapters:
• Chapter 1, “Overview,” describes transaction production, which allows you to manipulate or transform acquired transactions before sending the data to its target destination.
• Chapter 2, “Using TRAN-IDE,” describes TRAN-IDE concepts and procedures and describes general TRAN-IDE use.
• Chapter 3, “Building Production Objects,” explains how to build productions objects.
Related documents e-Biz Impact documentation The following documents are available on the Sybase™ Getting Started CD in the e-Biz Impact 5.4.5 product container:
• The e-Biz Impact installation guide explains how to install the e-Biz Impact software.
• The e-Biz Impact release bulletin contains last-minute information not documented elsewhere.
e-Biz Impact online documentation The following e-Biz Impact documents are available in PDF and DynaText format on the e-Biz Impact 5.4.5 SyBooks CD:
• The e-Biz Impact Application Guide provides information about the different types of applications you create and use in an e-Biz Impact implementation.
• The e-Biz Impact Authorization Guide explains how to configure e-Biz Impact security.
• e-Biz Impact Command Line Tools Guide describes how to execute e-Biz Impact functionality from a command line.
• The e-Biz Impact Configurator Guide explains how to configure e-Biz Impact using the Configurator.
viii e-Biz Impact
• The e-Biz Impact Feature Guide describes new features, documentation updates, and fixed bugs in this version of e-Biz Impact.
• The e-Biz Impact Getting Started Guide provides information to help you quickly become familiar with e-Biz Impact.
• The Monitoring e-Biz Impact explains how to use the Global Console, the Event Monitor, and alerts to monitor e-Biz Impact transactions and events. It also describes how e-Biz Impact uses the standard Simple Network Management Protocol (SNMP).
• Java Support in e-Biz Impact describes the Java support available in e-Biz Impact 5.4.5.
• The e-Biz Impact MSG-IDE Guide describes MSG-IDE terminology and explains basic concepts that are used to build Object Definition Language (ODL) applications.
• The e-Biz Impact ODL Guide provides a reference to Object Definition Language (ODL) functions and objects. ODL is a high-level programming language that lets the developer further customize programs created with the IDE tools.
• The e-Biz Impact TRAN-IDE Guide (this book) describes how to use the TRAN-IDE tool to build e-Biz Impact production objects, which define incoming data and the output transactions produced from that data.
Note The e-Biz Impact ODL Application Guide has been incorporated into the e-Biz Impact ODL Guide.
The e-Biz Impact Alerts Guide, the e-Biz Impact SNMP Guide, and the e-Biz Impact Global Console Guide have been combined into a new guide—Monitoring e-Biz Impact.
Adaptive Server Anywhere documentation The e-Biz Impact installation includes Adaptive Server® Anywhere, which is used to set up a Data Source Name (DSN) used with e-Biz Impact security and authorization. To reference Adaptive Server Anywhere documentation, go to the Sybase Product Manuals Web site at Product Manuals at http://www.sybase.com/support/manuals/, select SQL Anywhere Studio from the product drop-down list, and click Go.
Note the SyBooks Installation Guide on the Getting Started CD, or the README.txt file on the SyBooks CD for instructions on installing and starting SyBooks.

About This Book
TRAN-IDE Guide ix
Other sources of information
Use the Sybase Getting Started CD, the SyBooks CD, and the Sybase Product Manuals Web site to learn more about your product:
• The Getting Started CD contains release bulletins and installation guides in PDF format, and may also contain other documents or updated information not included on the SyBooks CD. It is included with your software. To read or print documents on the Getting Started CD, you need Adobe Acrobat Reader, which you can download at no charge from the Adobe Web site using a link provided on the CD.
• The SyBooks CD contains product manuals and is included with your software. The Eclipse-based SyBooks browser allows you to access the manuals in an easy-to-use, HTML-based format.
Some documentation may be provided in PDF format, which you can access through the PDF directory on the SyBooks CD. To read or print the PDF files, you need Adobe Acrobat Reader.
Refer to the SyBooks Installation Guide on the Getting Started CD, or the README.txt file on the SyBooks CD for instructions on installing and starting SyBooks.
• The Sybase Product Manuals Web site is an online version of the SyBooks CD that you can access using a standard Web browser. In addition to product manuals, you will find links to EBFs/Maintenance, Technical Documents, Case Management, Solved Cases, newsgroups, and the Sybase Developer Network.
To access the Sybase Product Manuals Web site, go to Product Manuals at http://www.sybase.com/support/manuals/.
Sybase certifications on the Web
Technical documentation at the Sybase Web site is updated frequently.
❖ Finding the latest information on product certifications
1 Point your Web browser to Technical Documents at http://www.sybase.com/support/techdocs/.
2 Select Products from the navigation bar on the left.
3 Select a product name from the product list and click Go.
4 Select the Certification Report filter, specify a time frame, and click Go.
5 Click a Certification Report title to display the report.

x e-Biz Impact
❖ Creating a personalized view of the Sybase Web site (including support pages)
Set up a MySybase profile. MySybase is a free service that allows you to create a personalized view of Sybase Web pages.
1 Point your Web browser to Technical Documents at http://www.sybase.com/support/techdocs/.
2 Click MySybase and create a MySybase profile.
Sybase EBFs and software maintenance
❖ Finding the latest information on EBFs and software maintenance
1 Point your Web browser to the Sybase Support Page at http://www.sybase.com/support.
2 Select EBFs/Maintenance. Enter user name and password information, if prompted (for existing Web accounts) or create a new account (a free service).
3 Select a product.
4 Specify a time frame and click Go.
5 Click the Info icon to display the EBF/Maintenance report, or click the product description to download the software.
Conventions The syntax conventions used in this manual are:
Key Definition
commands and methods Command names, command option names, utility names, utility flags, Java methods/classes/packages, and other keywords are in lowercase Arial font.
variable Italic font indicates:
• Program variables, such as myServer
• Parts of input text that must be substituted, for example:
Server.log
• File names
File | Save Menu names and menu items are displayed in plain text. The vertical bar shows you how to navigate menu selections. For example, File | Save indicates “select Save from the File menu.”

About This Book
TRAN-IDE Guide xi
Accessibility features
This document is available in an HTML version that is specialized for accessibility. You can navigate the HTML with an adaptive technology such as a screen reader, or view it with a screen enlarger.
For information about how Sybase supports accessibility, see Sybase Accessibility at http://www.sybase.com/accessibility. The Sybase Accessibility site includes links to information on Section 508 and W3C standards.
If you need help Each Sybase installation that has purchased a support contract has one or more designated people who are authorized to contact Sybase Technical Support. If you cannot resolve a problem using the manuals or online help, please have the designated person contact Sybase Technical Support or the Sybase subsidiary in your area.
package 1 Monospaced font indicates:
• Information that you enter in a graphical user interface, at a command line, or as program text
• Sample program fragments
• Sample output fragments
Key Definition

xii e-Biz Impact

TRAN-IDE Guide 1
C H A P T E R 1 Overview
This chapter describes transaction production, which allows the Store and Forward Manager (SFM) to manipulate transactions received from acquisition AIM applications.
What transaction production isTransaction production is the process through which an SFM can manipulate an incoming transaction.
Transaction production allows you to transform, enhance, collect, and route data to one or more destinations. When the SFM receives data from an acquisition AIM (or another SFM), it parses the incoming data, evaluates the data, and builds output transactions based on the requirements of the receiving endpoint application.
Using transaction production, the SFM can:
• Manipulate an incoming transaction’s data to produce a different output transaction by adding or removing data, transforming the data based on preset rules or information contained in a table; or rearranging the data into a new format.
• Send one transaction to many destinations.
Topic PageWhat transaction production is 1
How transaction production works 5
How production objects work 12
Building production objects 23
Using name/value pairing 28
Using groups 29
Using collection 34
TRAN-IDE objects 40
SFM log overview 43

How transaction production works
2 e-Biz Impact
• Collect several incoming transactions and place them into one outgoing transaction.
Transaction production is an optional step, which is necessary only if you need to validate or manipulate data received from an acquisition AIM or to pass the data to more than one endpoint application.
An SFM sends data through transaction production when you use the route_vprod routing function, or when you use a transaction ID of “ENGINE” in the route_vrec or route_recx routing functions. SFM performs transaction production before sending the transaction to its destination.
How transaction production worksTransaction production uses production objects to manipulate incoming data before the data is sent to an endpoint destination.
A production object is a container for several other object types that perform different functions at specific points in transaction processing. These objects parse the incoming transaction, test the data, and make any necessary changes to create the outgoing transaction.
Production objects are stored in production files, which must be located where the e-Biz Impact server in installed. A production file may contain more than one production object.
Figure 1-1is a simple representation of a production object and some of its pieces. The arrows show how transaction production processes a transaction using the objects contained in the production object.

CHAPTER 1 Overview
TRAN-IDE Guide 3
Figure 1-1: Production object
1 The input transaction arrives from an acquisition AIM or another SFM and is delivered to the production object.
2 The field objects parse the transaction's data into fields, which can then be manipulated.
3 The qualification objects test the data to make sure it fits the specifications for transaction production to be performed. Qualification can also be used to direct the data to a specific section of production. If a transaction fails qualification, it does not proceed through the rest of the production object.
4 The rule objects use filter objects to change individual pieces of data, to fit incoming data into the format necessary for the output transaction.
5 The output transaction moves from the production object to its next destination, which can be another production object, another SFM, or a delivery AIM.
Routing typesThe transaction routing type determines the production objects to which a transaction is submitted.
• route_vprod – submits the transaction to one specific production object, as specified by the transaction’s production IDs defined in the e-Biz Impact Configurator.
• route_veng – submits a transaction to a specific group of production objects as specified with the EngGroup parameter.

How transaction production works
4 e-Biz Impact
• route_vrec or route_recx – submits the transaction to all production objects. You must specify a transaction ID of “ENGINE” in the function commands.
Transaction production can submit a transaction to one or more production files, and to one or more production objects within each production file. If a transaction is not accepted and processed by any production objects, the transaction is in error. To avoid an error, use a null destination.
Submitting a transaction to a production object does not mean the production object generates an output transaction, because a transaction may fail to qualify for production.
Figure 1-2 is represents the path an input transaction could take. The transaction is submitted to three production files, each of which has multiple production objects.
Figure 1-2: Sample transaction production

CHAPTER 1 Overview
TRAN-IDE Guide 5
The transaction in File A passes qualification in all three production objects. Each production object generates an output transaction, which is sent to a single destination. The transaction in File B passes qualification in only two of the three production objects. Each of the two production objects for which the transaction does qualify generates an output transaction, which is sent to one destination. The transaction in File C passes qualification in both production objects. Each production object generates an output transaction, one of which is sent to one destination and the other sent to three destinations.
Transaction production elementsFigure 1-3 shows the main elements of a production object—field objects, a rule object, and rule component objects. These objects are the most essential in turning an input transaction into an output transaction. The other two elements most often used in transaction production are filter objects and qualification objects.
Figure 1-3: Simple production object
Production objectsA production object is a container for other TRAN-IDE objects. A production object describes the relationship between an input transaction and the processes and procedures that transaction’s data must go through to produce the output transaction.

Transaction production elements
6 e-Biz Impact
A production object must contain at least one field object, one rule object, and one rule component object. A production object may contain any number of TRAN-IDE objects.
The name of the production object is used to identify it when setting up a SFM in the Configurator. The production objects and production object groups that you define with the Configurator specify the output destinations for transactions processed by a production object. See Chapter 3, “Building Production Objects,” for more information on defining production objects.
Field objectsField objects break down the data of the incoming transaction into fields. Each field represents a single piece of data that you want to manipulate or place into the output transaction. A field object has a data type, a length, and a reference to the location of the field in the incoming data.
For example, if an incoming transaction contained this data:
first_name|last_name|street|city|state|zipcode
you would build a field object for each discrete piece of data—first_name, last_name, street, and so on.
Note Before you build any other objects, build field objects to define all of a transaction’s data.
Rule objectsA rule object is a logical container for components and filters that manipulate a piece of an input transaction to produce a part of the output transaction. Once the input data is placed into field objects, transaction production starts with the first rule object in the production object and continues through each rule object in presentation sequence.
Each rule object contains:
• One or more rule component objects, which operate on the individual field objects. Component objects are executed in serial order.

CHAPTER 1 Overview
TRAN-IDE Guide 7
• A storage area, called a blob, where the output from the rule components is assembled. As the output of each rule component is generated, it is appended to the blob.
• One or more filters, which operate on the blob after all rule components have finished processing.
Rule component objectsEach rule component object generates a piece of the output transaction by manipulating the data in a field object with a filter object or, alternatively, defining a literal value to place into the output transaction.
A rule component object can also manipulate the rule object’s blob, affecting the output transaction up to and including its own contribution to the blob.
For example, if a rule has four components:
• Component 1 makes all letters in the input lower case.
• Component 2 reverses the order of the characters in the input.
• Component 3 adds “zzz” to the end of the input, and makes all letters in the output transaction up to that point upper case.
• Component 4 adds “abc” to the beginning of the transaction.
When the components act on a field with the data “123JKLM,” each component’s output would be:
• Component 1 – 123jklm
• Component 2 – mlkj321
• Component 3 – mlkj321zzz, then MLKJ321ZZZ
• Component 4 – abcMLKJ123ZZZ
The output of the rule object would be “abcMLKJ321ZZZ”.
Transaction production elements
8 e-Biz Impact
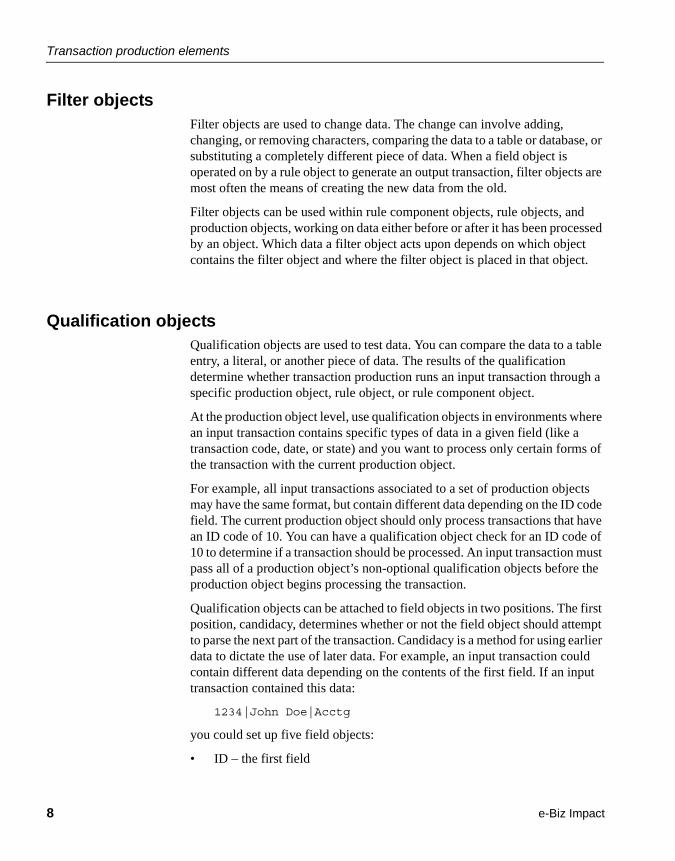
Filter objectsFilter objects are used to change data. The change can involve adding, changing, or removing characters, comparing the data to a table or database, or substituting a completely different piece of data. When a field object is operated on by a rule object to generate an output transaction, filter objects are most often the means of creating the new data from the old.
Filter objects can be used within rule component objects, rule objects, and production objects, working on data either before or after it has been processed by an object. Which data a filter object acts upon depends on which object contains the filter object and where the filter object is placed in that object.
Qualification objectsQualification objects are used to test data. You can compare the data to a table entry, a literal, or another piece of data. The results of the qualification determine whether transaction production runs an input transaction through a specific production object, rule object, or rule component object.
At the production object level, use qualification objects in environments where an input transaction contains specific types of data in a given field (like a transaction code, date, or state) and you want to process only certain forms of the transaction with the current production object.
For example, all input transactions associated to a set of production objects may have the same format, but contain different data depending on the ID code field. The current production object should only process transactions that have an ID code of 10. You can have a qualification object check for an ID code of 10 to determine if a transaction should be processed. An input transaction must pass all of a production object’s non-optional qualification objects before the production object begins processing the transaction.
Qualification objects can be attached to field objects in two positions. The first position, candidacy, determines whether or not the field object should attempt to parse the next part of the transaction. Candidacy is a method for using earlier data to dictate the use of later data. For example, an input transaction could contain different data depending on the contents of the first field. If an input transaction contained this data:
1234|John Doe|Acctg
you could set up five field objects:
• ID – the first field

CHAPTER 1 Overview
TRAN-IDE Guide 9
• NameNum – the second field if ID is numeric
• NameAlph – the second field if ID is alphabetic
• DeptNum – the third field if ID is numeric
• DeptAlph – the third field if ID is alphabetic
Using candidacy in the name and department fields allows more precise processing of input transactions.
Once a field object receives the data, you can use qualification to determine if the transaction should be processed. If the transaction does not pass this level of qualification, transaction production passes the input transaction to the next production object if the input transaction’s transaction ID is “ENGINE.” If the transaction is routed to only one production object and the transaction fails qualification, the transaction is sent to the unrouteable log file.
At the rule or rule component level, use qualification objects when the input transaction may or may not contain data the rule or rule component needs to act upon. For example, a qualification object can check for the existence of an optional field object. When the production object contains optional field objects, if data for those field objects is not present in the input transaction, then transaction production should not run the transaction through rules or rule components designed to act on that specific piece of the input transaction. If an input transaction does not pass all of a rule or component object’s non-optional qualification objects, then transaction production does not process the transaction through that specific rule or rule component.
Figure 1-4 illustrates a more complex production object that uses qualification and filter objects in addition to field and rule objects.

Transaction production elements
10 e-Biz Impact
Figure 1-4: Complex production object
Field objects contain input transaction data and can place that data into datalink objects. DataLink objects allow you to change the content of a piece of data and use the changed data within other TRAN-IDE objects. The data retains its original content in the field object.
A qualification object determines if transaction production should continue processing the transaction through the TRAN-IDE object that the qualification object is attached to. You can attach a qualification object to a field object, production object, rule object, and rule component object.
A rule object is a logical container for the rule components and their filters that generate the pieces of the output transaction. A rule component determines which pieces of the data (that is, which field objects) to manipulate and place into the rule object’s output message area.
Filter objects perform further and more complex data manipulation on the piece of the input transaction that its parent object is processing.

CHAPTER 1 Overview
TRAN-IDE Guide 11
Datalink objectsUse datalinks in a qualification function to access the contents of other field objects. A datalink defines a data variable that can hold a copy of the data from a field object or the results of a calculation, or any other purpose for which a variable field might be useful. Datalinks are optional.
When you attach a datalink to a field object, transaction production places a copy of the field object’s data into the datalink after the transaction has been parsed, and before it undergoes field and production object qualification.
Use a datalink when you need to reference a field object’s data in a TRAN-IDE object that does not work directly with the current field. For example, a rule object may have to check for an age range before allowing a senior citizen discount to go through. You can also attach a datalink to a field object that redefines a field to generate other data, like a sum, or counter, or average.
Note Manipulating the value in a datalink does not affect the object from which the datalink originally received the data. For example, a field object contains the value “hello world” in lowercase and so does the datalink attached to that field object. When you run the ToUpper Built-in Filters function on the datalink, the datalink now contains the “HELLO WORLD” in uppercase. However, the field object’s value does not change; it is still “hello world” in lowercase.
Table objectsTable objects contain one or more data columns that you use to specify which data should go into the output transaction. Field data that matches a value in the designated search column of the table is replaced with the corresponding values in the specified columns.
Use table objects in filter or qualification objects. When used in a filter object, you specify within the filter which table column in which to search for a match to the data passed to the filter. You also specify which columns’ corresponding values to place into the output transaction when data matches the search column.
When used in a qualification object, you also specify within the qualification object which table column in which to search for a match to the data passed to the qualification object. If the data does not match, then the qualification object fails.

How production objects work
12 e-Biz Impact
In most cases, you want to build special or custom tables before you define the filter objects that will use the tables.
See “Creating table object filters” on page 99 for more information on using tables.
ODL functionsODL functions are user-written functions that perform data validation or manipulation. Use these functions to perform any type of data manipulation or validation not available through a TRAN-IDE object. You code ODL functions using the Object Definition Language (ODL).
You can build several different types of ODL functions and attach them to different TRAN-IDE objects. These ODL functions have a specific purpose, are passed specific arguments, and transaction production executes them at pre-determined points when processing a transaction. See Chapter 3, “Building Production Objects,” for more information about the types of ODL functions.
You can also build generic ODL functions directly from TRAN-IDE. Generic ODL functions have a slightly different format than other functions because they do not have a specific purpose determined by a TRAN-IDE object, and because you determine what arguments to pass to them. Also, you cannot attach a generic ODL function to a TRAN-IDE object. You must call generic functions from within other functions attached to TRAN-IDE objects. See “Defining ODL functions” on page 178 for more information.
How production objects workThe following list gives an overview of how production objects (and all of the objects they can contain) work. You should have a good understanding of this sequence of events before you start defining your own system’s production objects.
For each production object:
1 Run any production object prefilter against the entire input transaction.
2 Parse input byte stream into field objects and perform field object qualification. If errors are found, stop processing the current transaction.
3 Perform production object qualification.

CHAPTER 1 Overview
TRAN-IDE Guide 13
4 If data does not pass qualification, stop processing the current transaction.
5 For each rule object, starting with first in the list and proceeding sequentially:
a Process each qualification object.
b If data does not pass, go to the next rule.
6 For each rule component object (sequentially from first in list):
a Process each qualification object.
b If data does not pass, go to next rule component.
c Move field, literal, nested group, or datalink to a temporary work area.
7 For each rule component prefilter (sequentially from first in list):
a Run the specified filter on the information in the temp work area.
b Move result to rule object’s output transaction.
8 For each rule component post filter (sequentially from first in list):
a Run the specified filter against the rule object’s output transaction.
9 For each rule post-filter (sequentially from first in list):
a Run the specified filter against the rule object’s output message area.
b Combine the result onto the production object’s output message area.
10 After the last rule object runs, run any production object post-filters against the entire transaction.
The following section provides examples of sequential processing through rule and rule component objects, examples of the path processing takes when a qualification object fails, and detailed examples and descriptions of processing through a production object and its various objects.
Multiple rules and components exampleThe picture below shows the contents of a simple production object. The arrows indicate the order in which transaction production processes the input transaction through the production object’s various objects. This example is designed to show you how processing occurs sequentially through rule and rule component objects. It assumes that the input transaction passes all of the qualification objects.

How production objects work
14 e-Biz Impact
This example does not cover all of the steps in detail that occur as the transaction passes through each object. See “General processing example” on page 16 and “Rule component processing example” on page 20 for more information.
Figure 1-5: Simple production object
1 Input transaction – transaction production passes the input transaction to the production object.
2 Field objects – the input transaction is parsed into the field objects.
3 Qp1 – executes the qualification objects attached to the production object.
4 Qr1 – executes the qualification objects attached to the first rule object.
5 R1 – enters the first rule object (R1).
6 Qc1 – executes the qualification objects for R1’s first component object (C1).
7 C1 – enters C1 and generates a piece of the output transaction.
8 Qc2 – executes the qualification objects for R1’s second component object (C2).
9 C2 – enters C2 and generates a piece of the output transaction.

CHAPTER 1 Overview
TRAN-IDE Guide 15
10 Qr2 – executes the qualification objects attached to the second rule object.
11 R2 – enters the second rule object (R2).
12 Qc3 – executes the qualification objects for R2’s first component object (C3).
13 C3 – enters C3 and generates a piece of the output transaction.
14 Qc4 – executes the qualification objects for R2’s second component object (C4).
15 C4 – enters C4 and generates a piece of the output transaction.
16 Output transaction – sends the completed output transaction to its destinations.
Qualification failure exampleThis example has the same production object contents as the previous example, however, two of the qualification objects fail, which illustrates how processing occurs when qualification fails on a rule object and on a component object.
Figure 1-6: Simple production object with qualification failures

How production objects work
16 e-Biz Impact
1 Input transaction – transaction production passes the input transaction to the production object.
2 Field objects – the input transaction is parsed into the field objects.
3 Qp1 – executes the qualification objects attached to the production object.
4 Qr1 – executes the qualification objects attached to the first rule object, but fails.
5 Qr2 – executes the qualification objects attached to the second rule object.
6 R2 – enters the second rule object (R2).
7 Qc3 – executes the qualification objects for R2’s first component object (C3), but fails.
8 Qc4 – executes the qualification objects for R2’s second component object (C4).
9 C4 – enters C4 and generates a piece of the output transaction.
10 Output transaction – sends the completed output transaction to its destinations.
General processing exampleThis example describes most of the steps that occur as a transaction passes through each object in a production object. Processing at the rule component level is quite detailed and is covered in “Rule component processing example” on page 20.
This example also introduces the blob work areas attached to rule component objects, rule objects, and production objects. The blobs are where transaction production assembles the pieces of the output transaction as it processes the input transaction through the production object. Whenever processing enters a rule or rule component, the object’s blob is initially empty.
The component’s blob contains the data you choose to manipulate in that component. The component’s filters act upon the data in this blob and concatenate the results into the rule’s blob. The rule’s blob contains all of the output from its components. When the rule is done processing, it concatenates the contents of its blob into the production object’s blob. The production object’s blob contains all of the output from its rule objects. When processing through all of a production object’s rules is complete, that production object’s blob contains the final output transaction.

CHAPTER 1 Overview
TRAN-IDE Guide 17
In this example, the input transaction contains a name, address, and age. The examples given with the various object descriptions refer to different pieces of this transaction and will not relate sequentially. For a step-by-step example of the objects needed to produce an output transaction from specific input transaction data, see the examples in “Building production objects” on page 23.
Whenever transaction production encounters a processing error in this example, it stops processing the transaction and does one of the following:
• If the SFM receives the transaction with route_vprod, it writes the transaction to the unrouteable log file and starts processing the next transaction.
• If the SFM receives the transaction with route_vrec, it passes the transaction to the next production object associated with the SFM and begins this processing sequence again.
• If the SFM receives the transaction with route_recx and the Options argument contains RO_ BYPRODNAME, it performs the same actions as for route_vprod. Otherwise, it performs the same actions as for route_vrec.
Figure 1-7: General processing example
1 Input transaction – the SFM receives the transaction with the route_vprod routing function command or with the route_recx routing function command that contains RO_BYPRODNAME in the Options argument. Transaction production passes the transaction to the production object listed in the routing function.

How production objects work
18 e-Biz Impact
or
The SFM receives the transaction with a Tran ID of “ENGINE” in the route_vrec routing function or with the route_recx routing function that contains RO_BYENGINENAME in the Options argument or with the route_vprod function specifying an engine grouping containing this production object. Transaction production passes the transaction to the first production object associated with the SFM.
2 Field objects – transaction production parses the contents of the input transaction into the field objects and performs data type validation. If parsing or validation fail, transaction production stops processing the transaction through this production object.
If the transaction passes parsing and validation, the object populates any datalink objects attached to the field objects.
3 Qf – executes any qualification objects attached to the field objects. If any required (the “Optional” preference is not selected) qualification objects fail, processing through this production object stops.
The purpose of a qualification object attached to a field object is to determine if the input transaction contains the data that the field objects should receive. This should be a broader check than that done in a production object’s qualification object, since all of the production objects in a project share the same field objects.
For example, for a field object that contains an age value, check that the value is between 21 and 55. Then individual production objects can check for an exact ages within that range.
4 Qp – executes any qualification objects attached to the production object. If any required (the “Optional” preference is not selected) qualification objects fail, then stop processing through this production object.
The purpose of a qualification object attached to a production object is to determine if the production object should process the transaction. Often, several input transactions contain the type of data that passes field object parsing, validation, and qualification, but you want the production object to process only those transactions that have a specific value in a part of the data.
For example, a piece of the input transactions may contain any value in the range between 21and 55. However, this production object should process only those transactions with that piece of data in the range 35 to 45, so the qualification object checks for that range.

CHAPTER 1 Overview
TRAN-IDE Guide 19
5 Qr – executes any qualification objects attached to the rule object. If any required (the “Optional” preference is not selected) qualification objects fail, processing stops through this rule object.
The purpose of a qualification object attached to a rule object is to determine if the rule object should process the transaction. Often, an input transaction may contain data that a particular rule object does not need to act upon.
For example, part of the input transaction is a zip code. This rule object should run only when the zip code is “94553,” so the qualification object checks the zip code data for that value.
6 R – enters the rule object.
A rule object is a logical container for the components and filters that manipulate a piece of the input transaction to produce a part of the output transaction.
7 Qc – executes any qualification objects attached to the component object. If any required (the “Optional” preference is not selected) qualification objects fail, then stop processing through this component object.
The purpose of a qualification object attached to a component object is to determine if the component object should process the transaction. Often, a rule object has one or more components that you want to run only when the data is in a specific form or when a specific piece of data is present in the input transaction.
For example, the component contains a filter that truncates the first name data to ten characters. If the first name is less than ten characters, then you do not want to enter the component and run that filter, so the qualification object checks the length of the first name data.
8 C – copies the data in the selected field object, literal, group, or datalink object into the component’s blob.
A component object defines the piece of the input transaction to manipulate and place into the output transaction. A component object is also a logical container for filters.
9 Fc – runs the component’s filters on the data in the component’s blob. Once all data manipulation is finished, concatenates the contents of the component’s blob into the rule’s blob. Processing through a component’s filters is very detailed. See “Rule component processing example” on page 20 more information.

How production objects work
20 e-Biz Impact
A component’s filters perform additional data manipulation on the piece of the input transaction defined by the component. Use filters to perform any action necessary when processing the input transaction into the required output transaction. Use of filters is optional. When filters are not present in the component, then the data that the component defines is placed unchanged into the output transaction.
For example, the component’s blob contains a first name. The destination only needs the first ten characters of the name, so this filter runs the truncL built-in filter function on the component’s blob data.
10 Fr – runs the rule’s post-filters on the data in the rule’s blob. Once all data manipulation is finished, concatenates the contents of the rule’s blob into the production object’s blob.
A rule’s post-filters perform additional data manipulation on the final output of all of the rule’s component objects.
For example, the destination needs a separator pattern added to the piece of the output transaction that the components just built, so one of the rule’s post-filters appends “|*|*|” onto the rule’s blob data.
11 Fp – runs the production object’s post-filters on the data in the production object’s blob.
A production object’s post-filters perform additional data manipulation on the final output of all rule objects.
For example, the destination needs the entire output transaction in upper case letters, so one of the production object’s post-filters runs the ToUpper built-in filter function on the production object’s blob data.
12 Output transaction – the SFM sends the output transaction to its destinations as configured in the e-Biz Impact Configurator.
Rule component processing exampleThis example describes how processing occurs through a rule component. Processing through a component object and its filters is important because the output from the component’s pre-filters is concatenated into the rule’s blob, then the component’s post-filters are run on the contents of the rule’s blob, not on the component’s blob.
CHAPTER 1 Overview
TRAN-IDE Guide 21
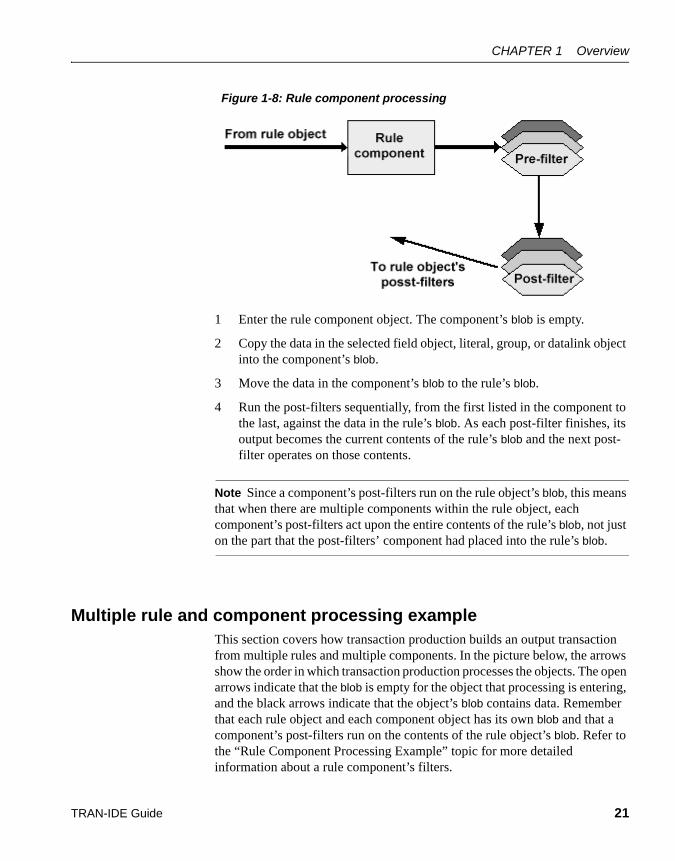
Figure 1-8: Rule component processing
1 Enter the rule component object. The component’s blob is empty.
2 Copy the data in the selected field object, literal, group, or datalink object into the component’s blob.
3 Move the data in the component’s blob to the rule’s blob.
4 Run the post-filters sequentially, from the first listed in the component to the last, against the data in the rule’s blob. As each post-filter finishes, its output becomes the current contents of the rule’s blob and the next post-filter operates on those contents.
Note Since a component’s post-filters run on the rule object’s blob, this means that when there are multiple components within the rule object, each component’s post-filters act upon the entire contents of the rule’s blob, not just on the part that the post-filters’ component had placed into the rule’s blob.
Multiple rule and component processing exampleThis section covers how transaction production builds an output transaction from multiple rules and multiple components. In the picture below, the arrows show the order in which transaction production processes the objects. The open arrows indicate that the blob is empty for the object that processing is entering, and the black arrows indicate that the object’s blob contains data. Remember that each rule object and each component object has its own blob and that a component’s post-filters run on the contents of the rule object’s blob. Refer to the “Rule Component Processing Example” topic for more detailed information about a rule component’s filters.

How production objects work
22 e-Biz Impact
Figure 1-9: Building output transactions from multiple rules and components
1 R1 – enter the first rule object, R1. R’s blob is empty.
2 C1 – enter R1’s first component object, C1. C1’s blob is empty. Copy the data in the selected field object, literal, group, or datalink object into C1’s blob.
3 F pre 1 – run C1’s pre-filters on the contents of C1’s blob. Once all of the pre-filters are finished, move the contents of C1’s blob to R1’s blob.
4 F post 1 – run C1’s post-filters on the contents of R1’s blob.
5 C2 – enter R1’s second component object, C2. C2’s blob is empty. Copy the data in the selected field object, literal, group, or datalink object into C2’s blob.
6 F pre 2 – run C2’s pre-filters on the contents of C2’s blob. Once all of the pre-filters are finished, concatenate the contents of C2’s blob onto the contents of R1’s blob.
7 F post 2 – run C2’s post-filters on the contents of R1’s blob.
8 F r-post 1 – run R1’s post-filters on the contents of R1’s blob. Move the contents of R1’s blob into the production object’s blob.
CHAPTER 1 Overview
TRAN-IDE Guide 23
9 R2 – enter the second rule object, R2. R2’s blob is empty.
10 C3 – enter R2’s first component object, C3. C3’s blob is empty. Copy the data in the selected field object, literal, group, or datalink object into C3’s blob.
11 F pre 3 – run C3’s pre-filters on the contents of C3’s blob. Once all of the pre-filters are finished, move the contents of C3’s blob to R2’s blob.
12 F post 3 – run C3’s post-filters on the contents of R2’s blob.
13 C4 – enter R2’s second component object, C4. C4’s blob is empty. Copy the data in the selected field object, literal, group, or datalink object into C4’s blob.
14 F pre 4 – run C4’s pre-filters on the contents of C4’s blob. Once all of the pre-filters are finished, concatenate the contents of C4’s blob onto the contents of R2’s blob.
15 F post 4 – run C4’s post-filters on the contents of R2’s blob.
16 F r-post 2 – run R2’s post-filters on the contents of R2’s blob. Concatenate the contents of R2’s blob onto the contents of the production object’s blob.
Building production objectsThis section describes the basic steps for building a simple production object. The example is not designed to show you how to use the TRAN-IDE tool to build each of the objects (that is, which entries to place in the various fields). Rather, it is meant to show you how to determine what objects you need to build and the sequence in which they should be built for the production object to produce the required output transaction from the input transaction.
This section uses the simplest forms of the TRAN-IDE objects and does not cover any of the various options available to these objects. Later sections in this guide cover these options, including using groups or nested groups, how to use name/value pairing, and performing collection. Most of the examples in these sections use an input transaction that is a variation on the transaction in this section, allowing you to build upon previous knowledge as you learn about the various options available in TRAN-IDE.

Building production objects
24 e-Biz Impact
RequirementsBefore you build a production object, you must know:
1 The format of the input transaction.
2 The format of the output transaction.
3 What the production object needs to do to produce the output transaction from the input transaction’s data.
4 What objects the production object needs to use to produce the output transaction from the input transaction’s data.
Input transaction format
Before you build a production object, determine the format of the incoming transaction. You need to know what data is in the input transaction, and, either what separates one piece of data from another, or the length of the piece of data. For this example, this is the incoming transaction:
John Smith|114 Center Ave|Pacheco|ca94553|123456789|758.15
This input transaction has seven pieces of data with each piece separated by a “|” symbol, except for the state data (“ca”) which has no separator because it will always be two characters in length.
Output transaction format
Next, determine the format in which the output transaction needs to be. In other words, you have to know what format the destination application requires for the data. Decide if the production object needs to add data, delete data, rearrange data, and/or change data to produce the required output transaction.
This example generates this outgoing transaction:
HEADER|123456789|758.15***JOHN SMITH|114 CenterAve|Pacheco|California|94553
This output transaction has eight pieces of data with a “|” symbol separating each piece except for the “758.15” and “JOHN SMITH” pieces which are separated by “***”.
What the production object needs to do
Plan exactly what the production object needs to do to generate the required output transaction from the input transaction’s data.

CHAPTER 1 Overview
TRAN-IDE Guide 25
For this example, to produce the specified output transaction, the production object needs to:
1 Add header information (HEADER).
2 Place the input transaction’s last two pieces of data (123456789|758.15) after the header in the output transaction, then put the remaining pieces of the input transaction into the output.
3 Add the required separator characters.
4 Change the name data (John Smith) to uppercase letters.
5 Change the state data from “ca” to “California.”
What a production object requires
Before build a production object, determine what objects are necessary to produce the required output transaction. Generally, a production object needs at least one field, one rule, and rule component objects.
• Field objects – you need a field object for each piece of data in the input transaction that the production object needs to manipulate and/or place into the output transaction. For this example, since every piece of the incoming transaction goes into the output transaction, seven field objects are needed.
• Rule objects – depending on the kind of data manipulation the production object needs to do, more than one rule object may be needed. This is because of the way that transaction production uses the blob work areas in rules and components to build up the output transaction. See “General processing example” on page 16 for more information about blob work areas. While one rule object is sufficient to produce the output transaction, this example uses three rule objects to demonstrate the use of multiple rule objects.
• Component objects – a component object is needed for each piece of data that the production object places into the output transaction. For this example, eight component objects are necessary—one to place each piece of the input transaction into the output, and one to add the header information to the output transaction.
Building production objects
26 e-Biz Impact
• Filter objects – filter objects are needed to perform any data manipulation and translation. For this example, two filters objects are needed to manipulate data into the correct format—one to change the name data to uppercase letters, and one to change the state data. The example also uses filter objects to add the necessary separator characters to the output transaction—one to add the “|” separator, and one to add the “***” separator.
• Table objects – table objects are a simple way to replace one piece of data with another. This example uses a table object within the filter object that changes the state data.
Building a sample production objectOnce you determine what the production object needs to do and what objects it requires, you are ready to build the production object.
This example discusses only the objects you need to build and the order in which to build them; it does not give step-by-step instructions on how to build those objects. See Chapter 3, “Building Production Objects.”
Sybase recommends that you build all of the objects that the production object requires from within the Production Object Information window. This allows you to build each set of objects in a logical order that generates each piece of the output transaction.
There are several ways to build the desired output transaction for this example. You could build a rule object to add the header information, then build a quick rule for each field object. This method works when there are a small number of field objects in the transaction. However, most transactions require hundreds of field objects and using the quick rule method produces too many rule objects that are difficult to track and manage. You could also build one rule object with components and filters that produce the entire output transaction. However, to demonstrate multiple rule objects in a production object, the following steps build three rule objects—Rule1, Rule2, and Rule3—to produce the output transaction.
1 Build the field objects. For the remainder of this example, the pieces of data in the input transaction are referenced by these field object names:

CHAPTER 1 Overview
TRAN-IDE Guide 27
2 Build the Rule1 rule object to place the header information, the ID, and the total into the output transaction (HEADER|123456789|758.15***).
a Build a component (C1) that adds the literal value “HEADER” to the output transaction.
b In C1, build a pre-filter that adds the “|” symbol to the output.
c Build another component (C2) to place the contents of the id_fld field object into the output transaction.
d In the C2 component, reuse the Pre-Filter that adds the “|” symbol.
e Build another component (C3) to place the contents of total_fld into the output transaction.
f In component C3, reuse a pre-filter that adds the “***” separator to the output.
3 Build Rule2 to place the name, street, and city into the output transaction (JOHN SMITH|114 Center Ave|Pacheco).
a Build a component (C4) to place the contents of name_fld into the output transaction.
b In C4, build a pre-filter that changes the data to uppercase.
c In component C4, reuse the pre-filter that adds the “|” symbol.
d Build another component (C5) to place the contents of street_fld into the output transaction.
e In C5, reuse the pre-filter that adds the “|” symbol.
f Build another component (C6) to place the contents of city_fld into the output transaction.
g In C6, reuse the pre-filter that adds the “|” symbol.
Data Field object name
John Smith
114 Center Ave
Pacheco
ca
94553
123456
789758.15
name_fld
street_fld
city_fld
state_fld
zip_fld
id_fld
total_fld

Using name/value pairing
28 e-Biz Impact
4 Build Rule3 to place the state and zip code into the output transaction.
a Build a component (C7) to place the contents of state_fld into the output transaction.
b In C7, build a pre-filter that uses a table object to change the data from “ca” to “California.”
c In C7, reuse the pre-filter that adds the “|” symbol.
d Build another component (C8) to place the contents of zip_fld into the output transaction.
The production object now contains all the pieces it needs to generate the desired output transaction from the given input transaction.
Using name/value pairingName/value pairing describes a particular way for a data source to send a transaction to an SFM. With name/value pairing, a unique name is associated with each piece of data (value) in the input transaction. This allows the data source to place the pieces of data in any order in the input transaction instead of requiring the pieces of data to be in the same order for each transaction the data source sends to the SFM. The data source must use the same unique names for the same values in each input transaction.
When using name/value pairing, you still build the production object as described in “Building a sample production object” on page 26. However, for each field object you have to use a specific offset that is determined by the unique name used with each name/value pair. See “Building field objects” on page 29 for more information.
Input transaction formatFor an input transaction to use name/value pairing, each piece of data must be in this format:
name=value
where name is the unique name that identifies the data and value is the actual data.
When using name/value pairing, this input transaction becomes:

CHAPTER 1 Overview
TRAN-IDE Guide 29
John Smith|114 Center Ave|Pacheco|ca|94553name=John Smith|street=114 Center Ave|city=Pacheco|state=ca|
And, as shown below, the pieces of the input transaction can be in any order.
city=Pacheco|name=John Smith|street=114 Center Ave|state=castreet=114 Center Ave|name=John Smith|state=ca|city=Pacheco|street=114 Center Ave|state=ca|name=John Smith|city=Pacheco
Building field objectsWhen you build each field object for the data in the input transaction, you must select the “Follows-pattern, anchor field” option as the offset. In the Pattern entry field, enter the unique name (and the =) associated with the data for that field object. For example, for the field object that defines the city=Pacheco pair, the offset is “city=”.
For more information, see Chapter 3, “Building Production Objects.”
Using groupsA group is a data area (a field) in an incoming transaction that contains a repeated set of elements, as illustrated in Figure 1-10.
Figure 1-10: Incoming transaction group
A group has specific values separating each element, separating each set of elements, and to indicate the end of the group:
a*b^c|a*b^c|a*b^c|a*b^c|###
where:
Using groups
30 e-Biz Impact
• “*” is the separator for the “a” element.
• “^” is the separator for the “b” element.
• “|” is the separator for a set of elements.
• “###” identifies the end of the group.
Specifying group typesGroups may be homogeneous or heterogeneous. A homogeneous group contains one repeating element (for example, a list of names). A heterogeneous group contains repeating sets of elements, for example, a list of names and phone numbers where a set of elements is a name and the person’s phone number.
Data in a homogeneous group looks like this:
John Smith|Jane Jones|Tom White|###
Data in a heterogeneous group looks like this:
John Smith^680-7800|Jane Jones^680-7092|Tom White^685-8564|###
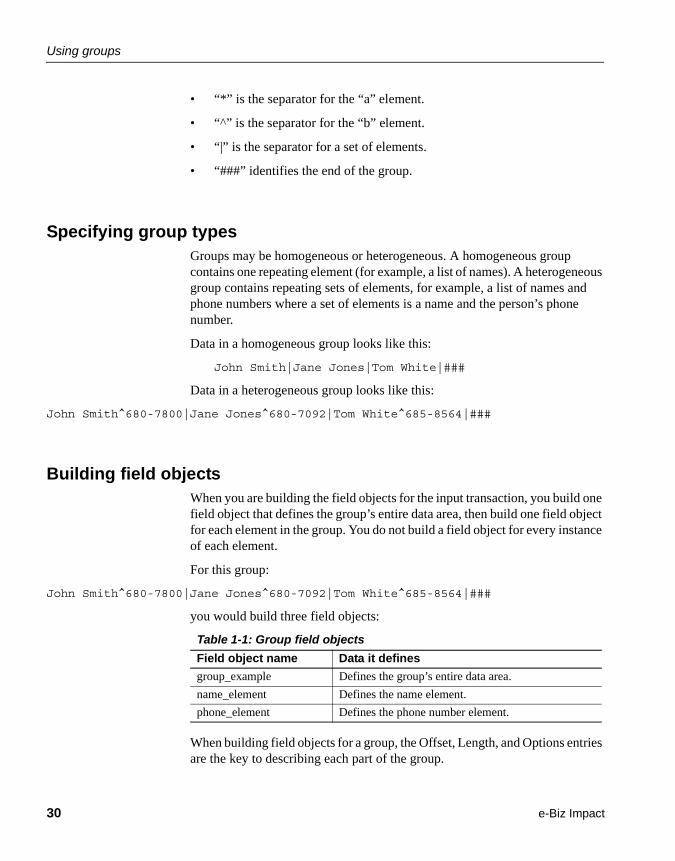
Building field objectsWhen you are building the field objects for the input transaction, you build one field object that defines the group’s entire data area, then build one field object for each element in the group. You do not build a field object for every instance of each element.
For this group:
John Smith^680-7800|Jane Jones^680-7092|Tom White^685-8564|###
you would build three field objects:
Table 1-1: Group field objects
When building field objects for a group, the Offset, Length, and Options entries are the key to describing each part of the group.
Field object name Data it defines
group_example Defines the group’s entire data area.
name_element Defines the name element.
phone_element Defines the phone number element.

CHAPTER 1 Overview
TRAN-IDE Guide 31
Table 1-2: Group field object settings
Set the Offset and Length through the Field Object Information window. Refer to “Building production objects” on page 72 for more information about these entries.
For a homogeneous group, you would build just two Field objects, one to define the entire data area of the group and one to define the group element. The Offset and Options entries required for these Field objects are the same as those used by group_example and name_element in the table above. The Length entries depend upon the separators used within the homogeneous group.
Building rule objectsYou build a rule object that will process only the group’s data area and no other part of the input transaction. In the FldGrp entry field for this rule object, enter the name of the field object that “defines the group” (in this case, the group_example field object).
Building component objectsBuild a component to process each element in the group. In other words, you need one component object for each field object that is defined as a “member of” the group. Within each component, you select the field option and, in the related entry field, enter the name of a field object that defines a “member of” the group. You then build any necessary pre-filters and/or post-filters.
Field object Offset Length Option to set
group_example The offset for this field object is based upon the group's location in the input transaction.
Separator pattern:
###
Select the “This Field object defines a group” option.
Name_element By Value: 0
The first element in the group always has an Offset of zero.
Separator: ^ Select “Member of ‘Group’ Field Object” option and select the group_example field object in the related entry field.
Phone_element Follows-fld: name_element
Separator: | Select “Member of ‘group’ Field object” and select the group_example field object in the related entry field.

Using groups
32 e-Biz Impact
Nested groupsA nested group is a group within another group. A single element within the first group (the “parent” group) is actually another group, a “nested” group. In Figure 1-11, “b” is a single element in the parent group. It contains two separate pieces of data, “x” and “y,” which are the nested group.
Figure 1-11: Incoming transaction nested group
An example of data that fits this example is a parent group containing the elements item_number (“a”), description (“b”), and amount (“c”). The description element contains within it a nested group consisting of a color (“x”) and a size (“y”).
Building field objects
You build field objects for nested groups the same as for a group, one field object defines the nested group's entire data area, and then one field object defines each element in the nested group.
For the nested group—a^color|size#$c*—where color|size is the nested group contained in element “b” in Figure 1-11, you would build two field objects and modify an existing object as shown in Table 1-3.
Table 1-3: Nested group field objects
Table 1-4 gives the offset, length, and options settings for these field objects.
Field name Data it defines
nested_grp This field object already exists as a “member of” the parent group. You modify its options so that it also defines the nested group’s entire data area.
color_element Defines the color element.
size_element Defines the size element.

CHAPTER 1 Overview
TRAN-IDE Guide 33
Table 1-4: Nested group field object settings
Building rule objects for a nested group
Build a rule object to process only the nested group’s data area and no other part of the input transaction. In the FldGrp entry field for this rule object, you must enter the name of the field object that “defines the group” (in this example, the nested_grp field object).
Warning! Do not build this rule object from within the Production Object Information window. You must build the rule object that processes a nested group from within the main TRAN-IDE window. Later, you associate this rule object with the component object that processes the element in the parent group that contains the nested group. See“Modifying component objects from the parent group” on page 34 for more information.
Building component objects for a nested group
Build a component to process each element in the nested group. In other words, you need one component object for each field object that is defined as a “member of” the nested group. Within each component, you select the Field option and, in the related entry field, enter the name of a field object that defines a “member of” the nested group; then build any necessary pre-filters and/or post-filters.
Field object Offset Length Option
nested_grp Follows-fld: a Separator: $ Select the Member of Group Field Object option and in the related entry field select the field object that defines the parent group. Select the This Field Object Defines a Group option.
color_element By Value: 0
The first element in the group always has an offset of zero.
Separator: | Select the Member of Group Field Object option and select the nested_grp field object in the related entry field.
size_element Follows-fld: color_element
Separator: # Select the Member of Group Field Object option and select the nested_grp field object in the related entry field.

Using collection
34 e-Biz Impact
Modifying component objects from the parent group
In the component objects that process the members of the parent group, the component that acts upon the field object that defines the nested group (in this case, the nested_grp field object) needs to have the Group option selected, not the Field option. This tells the component that this member of the parent group is actually a nested group.
After selecting the Group option, in the first entry field, enter the name of the field object that defines the nested group. In the second entry field, enter the name of the rule object that should process the nested group. This is the rule object discussed in “Building rule objects for a nested group.” For more information about this Group option, see Chapter 3, “Building Production Objects.”
Using collectionCollection is gathering together several transactions, or pieces of those transactions, and placing them into one larger transaction. Use collection when an application endpoint requires a single transaction containing data sent by several different acquisition AIMs. For example, an endpoint that generates patient billing may require selected information from lab, pharmacy, and admitting applications.
TRAN-IDE provides the dbInsert, dbDiskList, dbSelect, and dbDelete built-in filter functions and the dbExist and dbNotExist built-in qualification functions to facilitate collection.
• dbInsert – copies the contents of the current message area to the referenced collection file.
• dbSelect – copies the specified entry from the referenced collection file to the current message area in the production object.
• dbDiskList – finds all key fields that fit a certain search mask.
• dbDelete – deletes the specified entry from the referenced collection file.
• dbExist – verifies the existence of data in the specified collection file.
• dbNotExist – verifies that data does not exist in the specified collection file.

CHAPTER 1 Overview
TRAN-IDE Guide 35
Production objects gather the different pieces of data from the various incoming transactions and use the dbInsert filter to store them in collection files on the network server or on a personal computer workstation. If desired, use dbNotExist before using dbInsert to determine if the insertion will copy over data already present in the collection file. Once all the pieces of data are present, use dbDiskList to list all the relevant files and dbSelect to collect all relevant data from these files and send the output transaction to a delivery AIM. If necessary, use dbExist to verify whether data is present in the collection file before calling dbSelect. Use dbDelete to remove data from a collection file.
To use a database to perform collection, use the Database filter. You can create a database interface object that includes SQL statements to manipulate the transaction elements. See the e-Biz Impact ODL Guide for more information.
Defining a tableA “table,” in this e-Biz Impact context, is a user-defined name that you specify in the arguments to db filters and functions. Each table name must be unique for each acquisition AIM, and a good suggestion is to make each table name similar to the reference name of the acquisition AIM. For example, for transactions sent by a general ledger application, use the table name “GENLEDGE.”
For the dbInsert, dbDiskList, dbSelect, and dbDelete built-in filter functions, you place this table name into the Table argument field in the Filter Information window. For the dbExist and dbNotExist built-in qualification functions, you place this table name into the Args argument field in the Qualification Object Information window.
When necessary, transaction production truncates the table’s name to meet your system’s file name limitations. Within the file name, transaction production maps all alpha characters to uppercase and converts \ . : / and space characters to % # ^ $ and _ respectively. Any character that is less than a space or greater than a tilde is mapped to a question mark.
Warning! The table name must be unique enough to be truncated and mapped to a unique name. If two transactions with the same Key have different table names that map to the same table name, transaction production writes the second transaction’s data over the first transaction’s data in the collection file.

Using collection
36 e-Biz Impact
Defining the Key fieldThe Key field is a piece of an incoming transaction’s data that is unique to all transactions that transaction production should collect together for an endpoint. You may define a field object or a datalink object for this data area. For example, if the relevant transactions gathered from the lab, pharmacy, and admitting applications all contained the patient ID “123456789” in the data, the production objects that gather and process these transactions would define a field object or datalink object for the “123456789” segment of data. This field object or datalink object becomes the key for those transactions.
For the dbInsert, dbDiskList, dbSelect, and dbDelete built-in filter functions, in the Filter Information window, place either the field object’s name into the Key field argument field or the datalink object’s name into the Key DataLink argument field. If you place an entry in both the Key field and DataLink argument fields, TRAN-IDE always uses the value in the field object as the key unless the field object is empty or missing in the transaction. When using the dbDiskList Builtin Filter Function, you can also supply a literal search mask in the “Key Lit” field, using wild cards if necessary. This field is used only if the “Key Field” and “Key DataLink” fields are empty. For the dbExist and dbNotExist Built-in Qualification functions, select the FldObj option in the Qualification Object Information Window and place this field object’s name into the entry field.
When necessary, transaction production truncates and maps the Key’s name following the conventions listed in “Defining a table” on page 35.
The dbDiskList also requires a separator, which is placed between the results of the search. That separator is user-provided, and can be entered in the Sep Lit field. The default is a colon (:).
Note The key must be unique enough that it truncates and maps to a unique name. If two transactions for the same table have different keys that map to the same name, then transaction production writes the second transaction's data over the first's in the collection file.
General information and rules
General information
The following general information applies to using collection:

CHAPTER 1 Overview
TRAN-IDE Guide 37
• The dbInsert filter overwrites any existing data if the key is already present in the specified table name. Use the dbNotExist function to verify that there is not already data present in the collection file.
• The dbSelect filter copies the data from the collection files, so production objects can collect the data more than once and place it into different output transactions. However, the dbSelect filter does not perform concatenation, so if there is already data present in the current message area, this filter overwrites it. Therefore, call this filter from within an empty rule component object each time you want to copy an entry from a collection file to the output transaction.
• Once you no longer need the data, use the dbDelete filer to remove the data from the collection file. However, do not delete data from a collection file until all outstanding transactions using that data have a successful return from their delivery AIMs. This keeps the data available in case a system failure results in the loss of the collected transaction.
Rules
When using collection, keep these rules in mind:
• Place transactions from different acquisition AIM into different tables.
• All transactions that transaction production should collect together must have the same key, even if they are in separate Tables.
• Each transaction placed into a table must have a unique key.
Data organizationYou can perform collection on either a network server or using the test drive feature on a personal computer workstation. Transaction production stores the collection files in different locations depending on whether you are performing collection on a server or a workstation.
Collection files are organized by table name. Within each collection file, each transaction’s data is in a separate file with the same name as the data content of the Key field.

Using collection
38 e-Biz Impact
Implementing collection
Format 1
For transactions that always arrive in the same known order:
1 Define a field or datalink object for the data area that is the key.
2 Use the dbInsert filter to copy the data to the appropriate collection file. The production object can then send the transaction off to a null destination or to any delivery AIM that may need just that transaction’s data.
3 Once an acquisition AIM sends the last necessary piece of data, use the dbSelect filter to copy the other pieces of data from the collection files into that output transaction. Remember to make each call to the dbSelect filter from within an empty rule component object.
Note Remember, the dbSelect filter does not perform concatenation. If there is already data present in the current message area, this filter overwrites it.
4 Send the output transaction to the delivery AIM that routes to the application endpoint that required these pieces of data in one transaction. Optionally, use recycling to send the output transaction back through transaction production for further processing before passing it on to the delivery AIM.
5 If desired, use the dbDelete filter to delete the entries from the collection files.
Format 2
For transactions that do not arrive in a known order:
1 Define a field or datalink object for the data area that is the key.
2 Use the dbInsert filter to copy the data to the appropriate collection file. The production object then sends the transaction off to a null destination or to any delivery AIM that may need just that transaction’s data.

CHAPTER 1 Overview
TRAN-IDE Guide 39
3 Because the acquisition AIMs do not send the transactions in a predictable order, each production object needs to contain the rules for gathering all the data from the collection files. In other words, each production object must make all of the dbSelect calls needed to gather all of the necessary data from the collection files.
To find out which files hold the data you want, call dbDiskList with the appropriate search field. Remember to make each call to the dbSelect filter from within an empty rule component object.
Note Remember, the dbSelect filter does not perform concatenation. If there is already data present in the current message area, this filter overwrites it.
Before each dbSelect call, use the dbExist qualification function in the qualification object of the rule component that makes the dbSelect call. If the dbExist function fails, then some of the transactions have not arrived yet and the production object should stop trying to gather the data from the collection files.
4 Send the output transaction to the delivery AIM that routes to the application endpoint that required these pieces of data in one transaction. Optionally, use recycling to send the output transaction back through transaction production for further processing before passing it on to the delivery AIM.
Each production object must contain either all the logic necessary for processing and sending the completed transaction to the delivery AIM, or the production objects must all recycle to another production object that contains that logic.
5 If desired, use the dbDelete filter to delete the entries from the collection files.
Data size limitationsThe dbSelect filter does not restrict the amount of data you can copy into a production object’s output transaction. However, it is possible to exceed the system resources available using the collection option.
Do not use collection if it will generate an output transaction that exceeds the resources available on the server where the software will be put into production.

TRAN-IDE objects
40 e-Biz Impact
If you have to use collection because manipulation of one piece of data requires knowledge of the contents of other pieces, then you must segment the output transaction into smaller pieces and have the delivery AIM put it back together before passing it on to the endpoint application. In such a case, the delivery AIM must be located on a server with enough system resources to handle the combined transaction.
TRAN-IDE objectsThis section lists the various objects that you can include in a production object to manipulate the incoming transaction’s data. There is also a brief description of each object’s purpose.
TRAN-IDE objects can be parent and/or child objects. A parent object is any object that contains other objects. Transaction production always processes an input transaction through a parent object, then through its child objects. See “How production objects work” on page 12 for more information about production object processing.
Object Description
Datalinks A datalink defines a data variable. The common use for a datalink object is to hold a copy of a field object’s data. You can then use the datalink in qualification and filter objects. To use the data variable outside of its module, you must make it “public.” A datalink contains:
• Datalink name
• Module name
• Data type
• Private (static) or public state
Fields A field object defines a single piece of an input transaction (that is, a record or message) gathered by an acquisition AIM. A field object may contain one or more:
• Data location and length information (required)
• Data type information
• Datalink object references
• Default literal values
• Member-of references
• Qualification object references
• Options

CHAPTER 1 Overview
TRAN-IDE Guide 41
Filters A filter object manipulates the data in one or more field objects. It can validate, add to, copy, translate, and transform data, or perform any other type of data manipulation you require. A filter object may contain one or more:
• Built-in filter function references
• Custom code references
• Function arguments
• Field object references
• DataLink object references
• Datalink operation codes (for example, <, and so on)
• Table object reference names
• Edit masks
• Options
ODL functions Object Definition Language (ODL) functions are user-written functions that perform data validation or manipulation. Use ODL functions to perform any type of data manipulation or validation not available through a TRAN-IDE object. See the e-Biz Impact ODL Guide for information about this language. An ODL function is attached to or referenced within:
• Filter objects (custom filter function)
• Production objects (error function)
• Qualification objects (qualification function)
• Rule objects (error function)
Production A production object defines the requirements and procedures needed to produce a single output transaction from the input transaction. A production object may contain one or more:
• Field object references (required)
• Qualification object references (optional)
• Rule object references (at least one)
• Post-filter object references (optional)
• Comments
Object Description

TRAN-IDE objects
42 e-Biz Impact
Qualifications A qualification object determines if transaction production should process a transaction through a specific production, rule, or rule component object. A qualification object may contain one or more:
• Field objects or datalink object references (required)
• Literal values
• Operation codes
• Custom code references
• Table object references
• Options
Rules A rule object contains the components and filters that act on the incoming transaction to produce the output transaction. A rule object may contain one or more:
• Normalized lengths
• Qualification objects
• Rule component objects (one required)
• Post-filter object references
• Options
Rule components A rule component object defines one or more specific filter objects to process against the transaction, and also defines what piece of data or field object to process. A rule component object may contain one or more:
• Field object references
• Pre-filter object references
• Post-filter object references
• Literal values
• Options
Tables A table object contains columns of data. You use one of the columns to search for a match to field object data, then place data from one or more of the other columns into the output transaction. A table object may contain one or more:
• Columns of data
• Descriptions
• Options
Object Description

CHAPTER 1 Overview
TRAN-IDE Guide 43
SFM log overviewThe data in the SFM transaction log file (including unprocessable transactions) and the unrouteable transaction file is in binary format. The sfmlog utility is an application that parses the SFM log files to display transaction information. It provides options to:
• Filter transactions according to attributes
• Extract data from a transaction record
• Set transaction status.
sfmlog is run from a Windows command-line or UNIX terminal window.
The transaction log file maintenance features available in Global Console can be used to view and modify specific transactions in the unrouteable transaction file, and to view and modify transactions in the unprocessable transaction log file. However, use the sfmlog utility to view all transactions, or to print transactions that are separated and includes serial number, time, date received, transaction ID, status, and contents.
The sfmlog utility can also be used to create a back-up copy of the log files for an SFM. Do not use the name of the sfmlog utility input file as the name of the output file for this command.
sfmlog utility optionsWhen you execute the sfmlog utility, use the options in Table 1-5 to specify actions, including input and output files used by the utility, filter behavior, and the output format of the data.
To run sfmlog, enter:
ims sfmlog options
Note There is no space between the option flag and the argument value. For example:
ims sfmlog -ftestfile -v2
Table 1-5: sfmlog Display and output options
Options Description
-h Displays a summary of sfmlog options and their associated functions.
-ffile Specifies the input log file to parse. You can specify multiple log files.

SFM log overview
44 e-Biz Impact
-ofileName (lowercase “o”) Specifies the file to receive sfmlog output.
-OfileName (uppercase “O”) Specifies the output file and overwrites the existing output file if it exists.
-vlevel Use to set the verbosity of the result display. Three levels are available: 0, 1, and 2, with 2 being the most verbose.
-Q Quiet mode. This option suppress all output to the console.
-S Summary mode. This option displays only the result summary to the console.
-I Information mode. This option displays the overall transaction status and route status for each transaction.
-T This option sorts by transaction entry time during display. sfmlog displays transactions according to timestamp rather than order within the log file.
-X This option sorts by transaction serial number during display. sfmlog displays transactions according to their serial number rather than order within the log file.
-Z Sets transaction and associated route status to specified status and output to file. Requires the -o option to provide the output file name to which sfmlog writes data. Valid status codes are:
• PENDING
• COMPLETE
• CANCELLED
• SKIPPED
Example –
ims sfmlog -fPending.log -ooutput.log -ZPENDING
-G Extracts transaction record and outputs to a file. Requires the -o option to provide the output file name. This option retains the log file format recognized by the SFM.
Example –
ims sfmlog -fPending.log -ooutput.log -G
-g[h, o]pattern Extracts transaction data and output to file. Requires the -o option to provide the output file name. You can provide an optional delimiter pattern to separate transaction data within the output file. The delimiter pattern can be hexadecimal or octal, with each byte separated by a comma.
Example 1 – this sample extracts all transaction data from the Complete.log and writes to the output.log file. Each transaction data is separated by the hexidecimal pattern 41, 42, 43, 20, 31, 32, and 33:
ims sfmlog -fComplete.log -ooutput.log -gh41,42,43,20,31,32,33
Example 2 – this sample performs the same operation as the previous sample. The only difference is that the data pattern is specified in octal format. Notice three digits are required for each byte, thus 040 instead of 40 are in the pattern):
ims sfmlog -fComplete.log -output.log -go101,102,103,040,061,052,063
-d Creates a summary file in plain text format. Requires the -o (output file) option.
Options Description

CHAPTER 1 Overview
TRAN-IDE Guide 45
Transaction filtering options
These options filter all transactions in the input file. Only transactions that satisfy the filtering condition are included in the result set.
Key:
• gt – greater than
• ge – greater than or equal to
• lt – less than
• le – less than or equal to
Option Description
-x[gt,ge,lt,le]sernum Filters by serial number. See key for description type.
Example – to display all transactions with serial number greater than 150:
ims sfmlog -fPending.log -xgt150
-w[gt,ge,lt,le]pronum Filters by progenitor number. See key for description type.
Example – to display all transactions with progenitor number less than or equal to 150:
ims sfmlog -fPending.log -wle150
-ytranid Filters by transaction ID, which corresponds to the Fkey field passed into a route call.
Example – to display all transactions with transaction ID equal to “id1”:
ims sfmlog -fPending.log -yid1
-eprodname Filters by production object name.
Example – to display all transactions routed by production object “prod1”:
ims sfmlog -fPending.log -eprod1
-ddestflavor Filters by destination flavor.
Example – to display all transactions that are or will be dispatched to the destination with a flavor of 5:
ims sfmlog -fPending.log -d5
-a[gt,lt]age Filters by transaction age from current time. The age format is in DDD:HH:MM:SS. This option can filter older transactions, but not older than a certain age.
Example – to display all transactions older than 5 hours 30 nominates from current time in the log file:
ims sfmlog -fPending.log -agt0:5:30:0
-t[gt,ge,lt,le]time Filters by transaction timestamp. The time format is YYYY/MM/DD:HH:MM:SS[.mmm] (milliseconds are optional). This option filters transactions with timestamps greater than, greater than or equal to, less than, or less than or equal to the time argument.
Example – to display all transactions with timestamps greater than or equal to 2003/04/01:15:30:00.000:
ims sfmlog -fPending.log -tge2003/04/01:15:30:00.000

SFM log overview
46 e-Biz Impact
-ppat Filters by transaction data ASCII string pattern. This option filters transactions that contain the specified ASCII string patterns in the data portion.
Example – to display all transactions that contain the string pattern “hello world” in the data portion:
ims sfmlog -fPending.log -p”hello world”
-bhexpat Filters by transaction data hexadecimal pattern. This option filters transactions that contain certain hexadecimal patterns and takes the data pattern argument in hexadecimal, separated by commas.
Example – to display all transactions that contain the hexidecimal pattern 41, 42, 43, 44, and 45 in the data portion:
ims sfmlog -fPending.log -b41,42,43,44,45
-zstat[,stat] Filters by transaction status. This filter takes more than one status code as a parameter, and filters out transactions with the same status as the status parameters.
Example – to display all transactions having a COMPLETE or SKIPPED status:
ims sfmlog -fComplete.log -zCOMPLETE,SKIPPED
-rroute Filters by route name. This route name corresponds to the TranID field passed into a route call.
Example – to display all transactions with route name equal to “R1”:
ims sfmlog -fPending.log -rR1
-usrcname Filters by source name. This source name corresponds to the Source field passed into a route call.
Example – to display all transactions that originate from SRC1:
ims sfmlog -fPending.log -uSRC1
-i Filters by incomplete transactions.
Example – to display all transactions that are not complete. The same result can be achieved using the -z option:
ims sfmlog -fPending.log -i
-c Filters by completed transactions.
Example – to display all completed transactions. The same result can be achieved using the -z option.:
ims sfmlog -fCompleted.log -c
-R Reverse filter. This option reverses the result of the filter so that it does not return transactions that satisfy the filtering condition, but all transactions that do not.
Example – to display all transactions that do not have a CANCELLED status:
ims sfmlog -fPending.log -zCANCELLED -R
Option Description

CHAPTER 1 Overview
TRAN-IDE Guide 47
Transaction status
The output of the sfmlog utility can include transaction status. Possible values are:
• PENDING – the SFM still needs to submit the transaction to one or more destinations.
• COMPLETE – the transaction successfully passed through the SFM.
• CANCELLED – a destination “cancelled” the transaction.
• SKIPPED – the transaction was skipped. You can return to it later.
-j Filters transactions by destination status. Valid parameters are jdesttype, destflavor, and status.
Example – filters for transactions containing pending instances for destination (aim, 1) in the pending log:
ims sfmlog -fPending.log -jaim,1,PENDING
Option Description

SFM log overview
48 e-Biz Impact
TRAN-IDE Guide 49
C H A P T E R 2 Using TRAN-IDE
This chapter describes production objects and their components, lists object requirements, and provides instructions for general TRAN-IDE use.
IntroductionThe Transaction Integrated Development Environment (TRAN-IDE) tool allows you to define incoming data, and to develop rules for producing output transactions from that data that gets passed on to applications for processing. In most cases, you can perform all output generation procedures with the capabilities TRAN-IDE. However, in the event that custom functions are necessary, e-Biz Impact allows you to build and use them accordingly.
You can use TRAN-IDE to gather data received by an application to update one or more other applications. For example, the data going into an order processing application can be gathered and used to update both an inventory application and an accounts receivable application.
As another example, TRAN-IDE allows data received by a hospital’s admitting application to be used to update lab, radiology, and pharmacy applications, even though these applications require the data in different formats and with different values in certain fields.
TRAN-IDE organizes the different processes of transaction production into several specific types of objects. See “Transaction production objects” on page 50.
Topic PageIntroduction 49
General use 55

Introduction
50 e-Biz Impact
Transaction production objectsTransaction production uses the following types of objects, which you create and configure using TRAN-IDE.
A production object is a logical container for other TRAN-IDE objects. Production objects describe the relationship between an input transaction and the processing a transaction’s data must go through to produce the output transaction.
Note A production object may contain any number of objects, but must contain at least one input object (input field), one rule object (output rule), and one rule component object (rule component).
The production object’s name is used to identify the production object when you configure an SFM in the e-Biz Impact Configurator. See the e-Biz Impact Configuration Guide.
Production objects can include:
• Input objects Input objects (input fields) are required for each piece of data in the input transaction that the production object needs to manipulate or place into the output transaction. For example, if an incoming transaction contained the following data, you would build an input field object for each discrete piece of data—first_name, last_name, street, and so on.
first_name|last_name|street|city|state|zipcode
Note Build input field objects to define all of a transaction’s data before you build any other objects.
• Rule objects Rule objects are a logical container for the components and filters that manipulate a piece of the input transaction to produce a part of the output transaction. Once you place the input data into input field objects, transaction production starts with the first rule object in the production object and continues through each rule in the list.
Each rule object contains:
• One or more rule component objects, which operate on individual input field objects. Component objects are executed in serial order.

CHAPTER 2 Using TRAN-IDE
TRAN-IDE Guide 51
• A storage area, called a blob, where the output from the rule components is assembled. As the output of each rule component is generated, it is appended to the blob.
• One or more filters, which operate on the blob after all rule components have finished processing.
• Subrule (rule component) objects Each rule component object generates a piece of the output transaction by manipulating the data in an input field object with a filter object, or by defining a literal value to place into the output transaction.
A rule component object can also manipulate a rule object’s blob, affecting the output transaction up to and including its own contribution to the blob.
• Filter objects Filter objects perform further and more complex data manipulation on the piece of an input transaction that its parent object is processing.
Filter object changes can add, change, or remove characters, compare the data to a table or database, or substitute a different piece of data. When an input field object is operated on by a rule object to generate an output transaction, filter objects are most often the means of creating the new data from the old.
You can use filter objects within rule component objects, or rule objects, working on data either before or after it has been processed by an object. The data that the filter object acts upon depends on which object contains the filter object and where the filter object is placed in that object.
• Table objects Table objects contain one or more columns of data that specify data that should go into the output transaction. Field data that matches a value in the designated search column of the table is replaced with the corresponding values in the specified columns.
You can use table objects in filter or qualification objects. When you use them in a filter object, specify within the filter the table column to search for data that matches the data passed to the filter. You can also specify which columns’ corresponding values to put in the output transaction when data matches on the search column.
When you use table objects in a qualification object, specify which table column to search for data that matches the data passed to the qualification object. If the data does not match, the qualification object fails.

Introduction
52 e-Biz Impact
• Variable (datalink) objects A datalink defines a data variable used to hold a copy of data from an input field object, results of a calculation, or any other data for which a variable field is useful. Datalinks objects are optional.
When you attach a datalink to an input field object, transaction production places a copy of the input field object’s data into the datalink after the transaction has been parsed and before it undergoes field and production object qualification. You can use datalink objects in a qualification function to access the contents of other input field objects.
You can also use datalinks to reference an input field object’s data in an object that does not work directly with the current field. For example, a rule object may check for an age range before allowing a senior citizen discount to go through.
• Qualification objects Qualification objects are used to test data. The data can be compared to a table entry, a literal value, or another piece of data. Qualification results determine whether or not transaction production should run an input transaction through a specific production object, rule object, or rule component object.
At the production object level, use qualification objects when an input transaction contains specific types of data in a field (like a transaction code, date, or state) and you want to process only certain forms of the transaction with the current production object. For example, if a production object’s input transactions have the same format, but contain different data depending on the ID code field, the production object could process only transactions that have an ID code of “10”. You have a qualification object check for an ID code of “10” to determine if a transaction should be processed. An input transaction must pass all of a production object’s required qualification objects before the transaction begins processing.
You can attach qualification objects to input field objects in two positions. The first position, candidacy, determines whether the field object should try to parse the next part of the transaction. Candidacy is a way to use earlier data to dictate the use of later data.
At the rule or rule component level, use qualification objects when the input transaction may contain data that the rule or rule component needs to act upon. If an input transaction does not pass all of a rule or component object’s required qualification objects, transaction production does not process the transaction through that specific rule or rule component.

CHAPTER 2 Using TRAN-IDE
TRAN-IDE Guide 53
• Function objects ODL functions are user-written functions that perform data validation or manipulation. ODL function objects are used to perform any type of data manipulation or validation not available through other TRAN-IDE objects. ODL function code is developed using MSG-IDE.
You can build several types of ODL functions and attach them to different TRAN-IDE objects. ODL functions have a specific purpose, receive specific arguments, and transaction production executes them at pre-determined points when processing a transaction.
You can also build generic ODL functions directly in the TRAN-IDE tool. Generic ODL functions have a slightly different format than other functions because they do not have a specific purpose determined by a TRAN-IDE object, and because you determine what arguments to pass to them. Generic ODL functions cannot be attached to a TRAN-IDE object; they must be called from within other functions attached to TRAN-IDE objects.
ModulesProduction objects are grouped together in logical containers—modules— and stored in project files (.prj), which must be on the SFM server (specifically, where the e-Biz Impact server is installed). A project file can contain more than one module.
Figure 2-1: Project module files
A module may have:
• One set of input fields
Introduction
54 e-Biz Impact
• One input transaction format definition
• As many production objects as needed to update all endpoint destinations
• Multiple output transactions per module
When using multiple modules in a project, follow these rules:
• All TRAN-IDE objects, except for datalinks and functions (custom filter, error, and qualification functions), must reside within only one project module.
Note A function can be located in a different module, but the TRAN-IDE object containing that function must be in the module that contains all of the TRAN-IDE objects.
• To place datalinks or functions into other modules, select the Public option.
• If you use the File | Include Module to include a module in your project that contains TRAN-IDE objects other than datalinks or functions, the included module must be the only one in the project that contains non-datalink or non-function objects. If, after including the module, you have to build additional non-datalink or non-function objects, you must place them in this same module.
• You must save all project modules in the same directory.
• Module names must be unique within a project. No TRAN-IDE objects or functions can share a name even if they reside within different modules.
Place datalink objects and functions in a separate module when they can be used by several projects, then include the module in each project for which it is required. When you include a module of functions in another project, remember to build production objects that contain those functions.
RepositoriesRepositories allow you to load production objects from or save production objects to a predefined Adaptive Server Anywhere database. Repositories let you reuse production objects in different modules without having to re-create the objects each time. The repository must have an associated data source name (DSN) to establish connectivity for TRAN-IDE.
CHAPTER 2 Using TRAN-IDE
TRAN-IDE Guide 55
TRAN-IDE provides pre-built Health Level 7 (HL7) formats you can use with the database repository. See “Using the HL7 objects repository” on page 59 for details.
General useThis section provides general information on how to use TRAN-IDE to build transaction production files (*.prj and *.mod).
RequirementsBefore you define production objects using TRAN-IDE, have the following information available:
• Specifications and samples for the data that you are receiving from the initial source. This information is used to define the input data. Data is defined as a transaction.
• For each definition, you must have the destination requirements for each of the endpoints that receive some part or all of the transaction data. This information is used to define the output format required by the endpoints. Based on your specifications and input format definitions, e-Biz Impact transforms and routes the data in the format required by the endpoint.
• A name for the production object that produces the transaction, and the transaction ID name for the output transaction. These names are placed in the transaction ID and production ID records in the SFM configuration file.
Object naming conventionsWhen you build new objects, TRAN-IDE assigns the object a default name. You can accept the default name or enter a new name, following these rules:
• Table object names are limited to eight characters because they are saved to a directory on your Windows machine. Names for other TRAN-IDE objects can contain unlimited characters.

General use
56 e-Biz Impact
• Table object names are not case sensitive. All other TRAN-IDE objects names are case sensitive.
• Allowable characters include A – Z, a – z, 0 – 9, and underscore (_).
Starting TRAN-IDE
Note TRAN-IDE runs only on Windows systems.
To start TRAN-IDE, select Start | Programs | Sybase | e-Biz Impact 5.4 | Tran-IDE. You see the TRAN-IDE main window.
Figure 2-2: TRAN-IDE tool

CHAPTER 2 Using TRAN-IDE
TRAN-IDE Guide 57
Note To reduce initial loading time, TRAN-IDE does not load all project modules into memory when you launch it. It loads the filter, upload/download, repository, and table modules into memory the first time you access or build one of these objects, resulting in a slight delay before the specified window loads the first time.
Creating projects and modulesWhen you start TRAN-IDE, you can start a new project or open an existing project.
• To open a new project In TRAN-IDE, select File | New, or click the New button below the menu.
You may then start by building TRAN-IDE objects or by including modules that containing the objects you need.
• To build a new module Select File | Build New Module. When the Build a New Module window displays, enter a name for the new module and click OK, or click Cancel to exit the window.
• To open an existing project Select File | Open, or click File below the menu bar. When the Open window displays, navigate to the project to open, select the project (.prj), then click Open.
• To include an existing module Select File | Include Module. When the Open window displays, navigate to the module to include, select the module (.mod) then click Open. This option allows you use the same module in multiple projects.
• To remove a module Select File | Remove Module. When the Remove a Module window displays, select the module you want to remove from the drop-down list, then click OK. Removing the module from the project does not delete the module from your computer; you can still include it in other projects.
• To save a project Select File | Save, or click the Save button below the menu bar.

General use
58 e-Biz Impact
When you save a project for the first time, you are first prompted to save the module (default name, newmod.mod), then prompted to save the project (default name newproj.prj). Thereafter, click Save to save a module and existing project with the same name, or select File | Save As to save a module and project under a different name. You can also save the module under a new name, but save the project under the same name and vice versa.
Note Project names cannot start with a number. All files must begin with either a letter or an underscore (_). For example, 1del.prj is an illegal file name, while _del1.prj is a legal file name.
Working with repositoriesYou can load production objects from or save production objects to a pre-defined database repository. The repository must have an associated Data Source Name (DSN).
To load existing production objects from a repository Select File | Repository | Load Objects From. When the Select Data Source window displays, select the Data Source Name of the repository on the Machine Data Source tab, then click OK.
To save production objects to a repository Follow these steps:
1 Select File | Repository | Save Objects To.
When the Save to Repository window displays, select the Data Source Name of the repository in which you want to save the objects, then click OK.
2 Log in to the selected database server using the trusted connection.
3 The Save Object to Repository window appears.
4 Use the fields to filter production objects according to type, name, or project. The production objects that meet the filter criteria appear in the right panel according to type and name.
5 Select Sort by Type/name to sort the objects.
6 Click Select Individual Objects, or click Select All to select all objects.
7 Click Done to add the objects to the repository.

CHAPTER 2 Using TRAN-IDE
TRAN-IDE Guide 59
Using the HL7 objects repository
TRAN-IDE provides prebuilt Health Level 7 (HL7) formats you can use with the database repository. The HL7 repository contains TRAN-IDE field objects for standard 2.1, 2.2, and 2.3 inbound HL7 message segments, and skeleton TRAN-IDE rule objects with rule component objects for standard 2.1, 2.2, or 2.3 outbound HL7 message segments.
These objects are stored in the HL7 repository with a:
• Type – clTrFld for field objects and a clRule for rule objects.
• Name – in the format “segname_ver,” where “segname” is the three letter name for the segment (for example, OBX for observation segment), and “ver” is the version of the segment (2.1, 2.2, or 2.3).
• Keyword – in the format “segname_ver_in” for field objects and “segname_ver_out” for the rule objects, where “segname” is the three letter name for the segment (for example, “OBX” for observation segment), and “ver” is the version of the segment (2.1, 2.2, or 2.3).
Some of these objects require that other objects be loaded first.
Before you can use the HL7 repository, you must set up the database connection to the repository.
❖ Configuring the HL7 repository connection
1 On Windows, select Start | Settings | Control Panel.
2 Select Administrative Tools.
3 Select Data Sources (ODBC). The ODBC Data Source Administrator window appears.
4 Select the System DSN tab and click Add.
5 From the driver list, select “imc54 Adaptive Server Anywhere 8.0” and click Finish.
Note Typically, the e-Biz Impact server is installed on a different machine from the e-Biz Impact client. If you have the server and client installed on the same machine, two entries display in the driver list; however, both entries represent the same driver.
The ODBC Configuration for Adaptive Server Anywhere 8 window appears.
6 Complete these options on the ODBC tab:

General use
60 e-Biz Impact
• Data Source Name – enter HL7repo. This tells the ODBC driver manager or Embedded SQL library where to look in the file or registry to find the ODBC data source information.
• Description – enter an optional longer description of the data source to help you or end users to identify this data source from among their list of available data sources.
Leave the remaining fields blank.
Note See the ASA Database Administration Guide for more information:
a Go to the Technical Library Product Manuals Web site at Product Manuals at http://www.sybase.com/support/manuals/, select SQL Anywhere Studio from the product drop-down list, and click Go.
b When the Core Documentation list displays, select SQL Anywhere Studio 8.0, then choose the PDF or online version of the ASA Database Administration Guide.
7 Select the Login tab, then select Supply User ID and Password, but leave the actual user ID and password fields blank.
8 Select the Database tab and complete these options:
• Server Name – the name of the local machine or network server where the HL7 repository is located and the e-Biz Impact client is installed.
• Start Line – leave blank.
• Database Name – enter HL7repo, which is the name of the HL7 database to which you want to connect. This entry is case sensitive.
• Database file – enter the full path and name of the Adaptive Server Anywhere database file. Click Browse to locate the file. For example:
x:\Sybase\ImpactClient-5_4\DevApplication\.bin\hl7repo.db
9 Accept the defaults for the remaining options.
10 Click OK to save your entries and close the ODBC Configuration window.
11 Click OK to exit the ODBC Data Source Administrator.
❖ Starting the database
• Start Adaptive Server Anywhere.
Windows

CHAPTER 2 Using TRAN-IDE
TRAN-IDE Guide 61
1 Go to x:\Sybase\ImpactServer-5_4\asa\ on Windows (where “x” is the drive or network server where the e-Biz Impact server is installed), and double-click dbsrv8.exe.
2 When the Server Startup Options dialog box appears, complete these fields:
• Database – browse to x:\Sybase\ImpactClient-5_4\DevApplication\bin (where “x” is the drive where the client is installed) and select hl7repo.db.
• Server Name – enter the name of your local host; that is the PC on which the e-Biz Impact client is installed.
• Cache Size – accept the default.
• Options – enter -n hl7repo.
3 Click OK. You see the Sybase Adaptive Server Anywhere window that confirms the database start up.
UNIX
1 In a terminal window, go to ~/Sybase/ImpactServer-5_4/asa (where “~” is where the e-Biz Impact server is installed) and enter:
dbsrv8 -n hl7repo.db
❖ Loading the repository in TRAN-IDE
Note TRAN-IDE is available only on Windows.
1 On Windows, select Start | Programs | Sybase | e-Biz Impact 5.4 | TRAN-IDE.
2 When the TRAN-IDE window appears, select File | Repository | Load Objects From.
3 When the Select Data Source window appears, select HL7repo and click OK.
4 When the Connect to Adaptive Server Anywhere window appears and you see the User ID of “cai” on the Login tab, click OK. You see the Load From Repository window with the HL7 objects listed in the Repository pane (Figure 2-3).

General use
62 e-Biz Impact
Figure 2-3: HL7 repository objects
❖ Using TRAN-IDE field objects
1 Determine what HL7 message segments are in the incoming transaction.
2 Scroll down the list to the beginning of the clTrfld types. Select the appropriate version of the field object for the inbound message header (MSH) segment in the Repository list. The selection’s properties display on the left.
Click Load.
3 Repeat step 2 to load in the other inbound segments required to define the transaction, following these load order restrictions:
a Load the batch header segment (BHS) before the batch trailer segment (BTS).
b Load the file header segment (FHS) before the file trailer segment (FTS).
c When you finish, click Done. Your selections display in the Input Fields list in main TRAN-IDE window.

CHAPTER 2 Using TRAN-IDE
TRAN-IDE Guide 63
❖ Using TRAN-IDE rule objects and their rule component objects
1 In the main TRAN-IDE window, click Rules.
2 Select File | Repository | Load Objects. Because you previously opened the repository to use the field objects, you see the Load From Repository window.
3 Determine which HL7 message segments should be in the outgoing transaction.
4 Select the appropriate version of the rule object (clRule type) for the outbound MSH segment, then click Load.
5 Repeat step 4 to load in the other rule objects for the outbound segments required to build the outgoing transaction, following the load order restrictions listed below.
a Load the BHS segment before the BTS segment.
b Load the FHS segment before the FTS segment.
6 For each rule object, double-click the rule in the Output Rules list to build the outgoing transaction. The rule and rule component objects are only blank templates; you must edit them to specify what the object should place in the outgoing transaction.
Selecting a data structureFor each module you create, before you create production objects, select the structure of the incoming data to parse (Input Mode) and the structure of the data to generate going out (Output Mode). The selection applies to the entire module, but you can create production objects in this module later that output a different type of data.
In the TRAN-IDE main window, click the Pro-Obj icon, then click New below the left pane. You see the Production Object Input and Output Modes window. Once you select the modes, click OK to save your entries and close the window.
Supported data structures
e-Biz Impact supports these data structures for incoming and outgoing data:
General use
64 e-Biz Impact
• Stream-to-stream Default. Parses binary large object (blob) data as input, generates blob data as output.
Note blobs can contain any binary or ASCII data, for example, large text files, data processing documents, CAD program files, graphics and images, videos, music files, and so on. blobs are defined as table columns. Their memory size is nearly unlimited as they can be stored across several pages.
• Stream-to-tree Parses blob data as input, generates an output New Era Data Object (NDO) tree.
Note NDO is a generic structure that allows named data with hierarchy, data typing, optionality, and repetition. NDO is composed of two trees: a data tree and a schema tree. A data tree has two data nodes, each of which can contain one item of data, which can be of several different types. It also contains an unlimited number of attributes, which are name-value pairs. A schema tree has schema nodes, which contain metadata describing the organization of a document represented by a data node.
• Tree-to-stream Parses NDO data tree as input, generates blob data on output.
• Tree-to-tree Parses NDO data tree as input, generates a new NDO tree as output.
Import and export optionsUse predefined formats to build field object definitions; for example, a flat text file that lists the fields in a message, delimited by commas. Currently, TRAN-IDE supports comma-separated fields and custom import.
Select File | Import from the main TRAN-IDE window, then select the import option to use.
Importing comma-separated fields
Select File | Import | Comma Sep. Fields to open the Import Text File window, a standard Windows open file window. After you select a file, TRAN-IDE opens it and attempts to build field objects with the data contained in the file.

CHAPTER 2 Using TRAN-IDE
TRAN-IDE Guide 65
Building field objects using Custom Import
The Custom Import Feature gives you the ability to build field objects from an external file when you know the format of the file.
1 Select File | Import | Custom Import. The Custom Import Criteria window opens where you define the format of a series of records in the external file, where each record identifies the characteristics of a single field.
2 Complete the fields in the window with the values that correspond to the data for the field object definitions. See
3 Click one of these options:
• OK – to have TRAN-IDE build the field objects from the data in the file using the values you entered in the Custom Import Criteria window. When you click OK, the Import Custom File window opens. Navigate to and select the file that contains data for the field object definitions and click OK.
• Save Settings – to save the settings as a file with a .cis extension. You can use the Load Settings option later to use previously saved settings.
• Load Settings – load settings that you saved previously with the Save Settings option.
• Close – close the window.
Entering values in the Custom Import Criteria fields
The Start column value is the column position in the data file for that entry. The Length column value is the number of columns in the data file for that entry. Column positions for each record in the file start at “1.” Use a value of zero (0) to tell TRAN-IDE to use the default value for a particular field.
Example This example shows content from a metadata file that describes field objects, which allows TRAN-IDE to build production object fields automatically.
Note This functionality applies only to stream fields (not tree fields).
12345678910111213141516171819202122232425262728
@ part1 0 12 nN9@ part26 12 8 nN9@ part305 20 15 nN9

General use
66 e-Biz Impact
Each line of the file (except the first line), represents data describing one field object. When you enter values in the Custom Import Criteria window, you instruct TRAN-IDE where in the line to find the data needed to build the field object. The example entries are shown in Figure 2-4.
Figure 2-4: Custom Import example input
Note Remember that the values shown in the metadata file are not the values you enter in the Custom Import Criteria fields. The file values describe the actual content for the field object. The values you enter describe where the data begins and the data’s length, so TRAN-IDE knows what data to extract to create the production object fields.
• Field Name – in the example, the first field is “part1” and the field name starts at position 6 on a line and has a length of 10 characters, which is what you would enter in the Start and Length fields.
• Field Offset – the field’s offset (“0”) starts at position 17 on each line and has a length of 2 characters.
• Field Length – the field’s length (“12”) starts at the position 21 and can be up to two characters in length.
• Field Separator – this example uses the default field separator (the pipe symbol), so no entries are required in these fields.
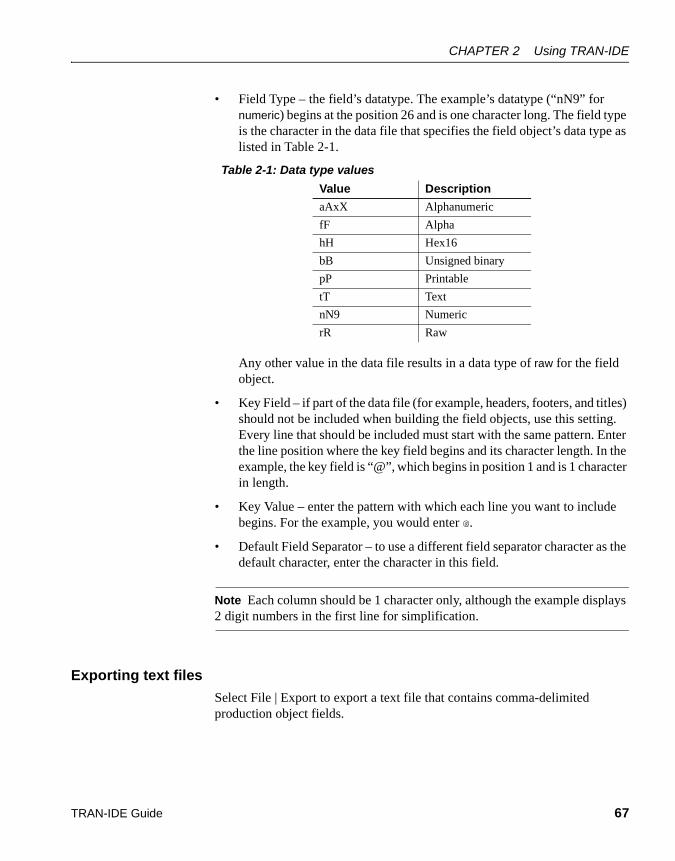
CHAPTER 2 Using TRAN-IDE
TRAN-IDE Guide 67
• Field Type – the field’s datatype. The example’s datatype (“nN9” for numeric) begins at the position 26 and is one character long. The field type is the character in the data file that specifies the field object’s data type as listed in Table 2-1.
Table 2-1: Data type values
Any other value in the data file results in a data type of raw for the field object.
• Key Field – if part of the data file (for example, headers, footers, and titles) should not be included when building the field objects, use this setting. Every line that should be included must start with the same pattern. Enter the line position where the key field begins and its character length. In the example, the key field is “@”, which begins in position 1 and is 1 character in length.
• Key Value – enter the pattern with which each line you want to include begins. For the example, you would enter @.
• Default Field Separator – to use a different field separator character as the default character, enter the character in this field.
Note Each column should be 1 character only, although the example displays 2 digit numbers in the first line for simplification.
Exporting text files
Select File | Export to export a text file that contains comma-delimited production object fields.
Value Description
aAxX Alphanumeric
fF Alpha
hH Hex16
bB Unsigned binary
pP Printable
tT Text
nN9 Numeric
rR Raw

General use
68 e-Biz Impact
Using the TRAN-IDE Options menuThe main TRAN-IDE window provides and Options menu to help you find errors in production rule objects, to return to the TRAN-IDE state when you exited the utility, and to set the directory to which table objects are saved.
Table 2-2 list the selections available from the Option menu.
Table 2-2: Option menu selections
Action Description
Symbol Dump • Module Dump – writes a report containing information about all TRAN-IDE objects in all of the modules in the project.
• Dump All – writes a report containing information about the project and about all TRAN-IDE objects in all of the modules in the project.
Debug Causes the TRAN-IDE test drive to write a large volume of messages to the local xlog file (xlog.dv or 32xlog.dv on a personal computer workstation). This gives you the ability to view the detailed actions of your production rule objects against an incoming transaction from a data file you load, or against specific data you enter in the production object’s test value that tests a single specific rule. You can also see what the field objects look like after parsing.
AutoLoad Records the loaded file name and view state of TRAN-IDE, so that when you exit and re-start the program, it opens the last loaded file and returns to the same view state.
Table Scan Opens the Table Object Directory window where you specify the directory location in which to save all table objects in a project.
Hardcopy Generates a hardcopy.txt file containing, for each production object, all rule objects, rule component objects, filter objects, and the relationships between them.
AutoFldSort Selecting this option toggles the option on and off. Displays a check mark next to the option when “on.” When this option is turned “on,” it automatically sorts the field object list whenever you create or change a field object. Field object sorting is by offset position, not alphabetical by name.
Warning! Turning this option on greatly reduces the speed at which TRAN-IDE can build new field objects or make changes to existing ones.
AutoFldIndent Selecting this option toggles the option on and off. Displays a chicanery next to the option when “on.” When AutoFldIndent is turned “on,” the field object list indents field objects that are group members or subfields.
Warning! We do not recommend using this option when there are more than 1000 field objects in the project.

CHAPTER 2 Using TRAN-IDE
TRAN-IDE Guide 69
Object Tracking Selecting this option toggles the option on and off. Displays a check mark next to the option when “on.” When Object Tracking is turned “on,” and you click a field, datalink, rule, or rule component object, the relevant object is highlighted. For example, Fld1 is referenced by Rule1 and Fld2 by Rule2. In the Production Object Information window, when you highlight Rule1 in the Production Rules list, Fld1 is automatically highlighted in the Field Objects list. When you select Fld2, Rule2 is automatically highlighted in the Production Rules list.
Display Referential Bitmaps
Selecting this option toggles the option on and off. Displays a chicanery next to the option when “on.” If an object contains a reference to another object that does not exist, the referring object has a symbol similar to:
...
next to its name in the Production Object Information window. This indicates something is wrong with the object and that it has a relationship with a non-existent object.
TestDrive Opts • Non-self-describing NCF (New Era Canonical Format) – opens the .ncm Files Directory window where you specify the location to save all NCM files associated with the project.
When you “test drive” production objects, the production object parses the data stream in NCF (New Era Canonical Format). NCF comes in two forms—self describing and non-self describing.
A self describing format data stream does not need to provide a schema when parsed by production objects.
A data stream formatted as non-self describing is parsed only if a schema (metadata) file, in the form of a .ncm (New Era Canonical Metadata), is provided. The .ncm file is imported by TRAN-IDE when the test drive is run.
• Auto Save – selecting this option toggles the option on and off. Displays a chicanery next to the option when “on.” If you make changes to a file and use the test drive functionality, this saves the .mod files to a bak directory under the current working directory before running the test drive.
Obj Pre/Suffix Opts • Set Pre/Suffixes – allows you to edit standardized names and conventions.
• Use Pre/Suffixes – allows you to automatically implement standardized names and conventions.
Subfield Opts Dependencies On – any change to a parent field results in a prompt that asks if you want to update the child fields with the change. For example, if Field A is changed to a group, TRAN-IDE asks if you want to have the children be members of that group.
Auto Propagate Group Settings – (only available when you select Dependencies On) when you change a parent field and the field is part of a group, this option automatically updates all child fields in the group with the changes. For example, if Field A is changed in a group, that change is automatically propagated to all children in that group.
Action Description

General use
70 e-Biz Impact

TRAN-IDE Guide 71
C H A P T E R 3 Building Production Objects
This chapter explains how to build productions objects.
IntroductionA production object defines the requirements and procedures needed to produce a single output transaction from the input transaction.
Once you start TRAN-IDE (see “Starting TRAN-IDE” on page 56), and create a new project and module (“Creating projects and modules” on page 57), use the following steps to build production objects and populate them with other TRAN-IDE objects
1 Define the production object and its associated input fields. See “Defining input fields” on page 80.
2 Build output rules. See “Defining stream output rules” on page 91.
3 Build rule components. See “Defining rule components (subrules)” on page 93.
Topic PageIntroduction 71
Building production objects 72
Using import options 87
Defining stream output rules 91
Defining rule components (subrules) 93
Defining filter objects 96
Creating table objects 150
Defining qualification objects 158
Defining data objects 170
Writing error functions 172
Defining ODL functions 178
Defining production object options 179
Using the test drive 181

Building production objects
72 e-Biz Impact
4 Build optional filter objects. See “Defining filter objects” on page 96.
5 Build optional table objects. See “Creating table objects” on page 150.
6 Build optional qualification objects. See “Defining qualification objects” on page 158.
7 Build optional error handling routines. See “Writing error functions” on page 172.
8 Test the rules and the production object. See “Using the test drive” on page 181.
9 Repeat this procedure until all output transactions are defined.
Building production objects This chapter describes how to build e-Biz Impact production object using TRAN-IDE.
Starting TRAN-IDESelect Start | Programs | Sybase | e-Biz Impact 5.4 | Tran-IDE.
Selecting a data structure1 In the TRAN-IDE main window, click the Pro-Obj icon, then click New
below the left pane. You see the Production Object Input and Output Modes window.
2 Select the data structure. See “Selecting a data structure” on page 63 for a description of the available choices.
3 Once you select the modes, click OK to save your entries and close the window.

CHAPTER 3 Building Production Objects
TRAN-IDE Guide 73
Building tree-to-stream production objectsA tree-to-stream production object uses new tree field objects and existing production rules. The tree input fields describe an incoming transaction. A tree input field references a node in the incoming tree data by name or data location. With tree input, you can import a Document Type Definition (DTD).
You can also import a New Era Canonical Metadata (NCM) schema file when you are using e-Biz Integrator or a New Era of Networks adapter. The NCM schema file is metadata of the adapter When the schema is imported, TRAN-IDE automatically generates tree fields.
1 Click the Pro-Obj icon in the TRAN-IDE main window, then click New below the left pane. The Production Object Information window opens and displays the Tree Input Fields pane on the left and the Stream Output Rules pane on the right.
2 Click New below the Tree Input Fields pane.
3 Complete the fields as follows:
• Name – enter the field object name or accept the default.
• Node – enter the NDO node name.
• Datatype – this option is not available to tree-to-stream.
• Datalink – (optional) select the datalink in which to store node data, then select a predefined datalink option from the drop-down list.
4 In the Options section, select any of the following:
5 Select a filter from the Filters list or define a new one.
6 Select an attribute from the Attributes list or define a new one.
Option Description
Alternatives Checks if the NDO node is alternative. Set this property to describe mutually exclusive child nodes beneath a parent.
Invisible Checks if the NDO node is invisible. Describes a logical node used to group a set of nodes.
Repeats Set the NDO node to be repeating or not.
Field must be leaf Select this option if the NDO node the field object parses must be a leaf node.
Field may be empty
Select this option if the NDO node the field object parses may be a leaf node.
Optional Set the NDO node to optional or not.

Building production objects
74 e-Biz Impact
7 Select a qualification object from the Qualification field or define a new one.
8 Click OK to save your entries and close the window.
Define rule objects and rule component objects. See “Defining rule components (subrules)” on page 93 for instructions.
Note When selecting input fields, click the T button to view a read-only tree representation of input tree field objects.
The Group Rule Component object must reference a repeating field object. If a rule component object gets data from tree field object (defined earlier), you can access either data or an attribute of the field by selecting the appropriate radio button.
Importing a DTD
To import a DTD, select File | Tree Input Fields | Import DTD.
❖ Importing an NCM file
You can import an NCM file, generated by e-Biz Integrator or a New Era of Networks Adapter, to create the input tree fields and their associated properties.
1 From the Production Object Information window, select File | Tree Input Fields | Import NCM.
2 Select the appropriate ncm file and click OK.
TRAN-IDE generates tree input fields based on the NCM file schema.
Building stream-to-tree production objectsThe stream-to-tree production object comprises existing stream field objects and tree output node component objects defined to include all information required to generate schema. Nodes describe the structured output required for stream-to-tree and tree-to-tree production objects. Each node component object is a hierarchical list of child objects of the same type. You can also attach a list of attributes represented by the attribute object.

CHAPTER 3 Building Production Objects
TRAN-IDE Guide 75
❖ Defining tree output nodes
1 Click New below the Tree Output Nodes pane.
2 When the Node Component Information window opens, complete the fields and options as follows:
• Name – enter the name of the current node component.
• Node – enter the physical NDO data node name.
• Node Type – select one of the options to create a branch node. This disables the data source selections unless you are creating a repeating node:
• Data Source (only for leaf nodes) – select the source of node data for leaf nodes:
Option Description
Branch Create a branch node. When you select branch node, you can make the branch invisible or alternative. The initial node cannot be invisible.
• Invisible – checks if the NDO node is invisible. Describes a logical node used to group a set of nodes.
• Alternatives – checks if the NDO node is alternative. Set this property to describe mutually exclusive child nodes beneath a parent.
Clone Copy the input node to the output tree, inheriting all attributes and child nodes.
Leaf Create a leaf node. When you select a leaf node, select a datatype from the drop-down list that displays.
Option Description
Field Assign an input field’s data to the output node. When you select Field, select Data or Attribute, then from the attributes list, select the associated attributes.
To create node attributes, assign the following properties to the attribute object—name, data source (stream or tree field object, literal, or datalink), qualification list, and filter list.
Datalink The output node data comes from a selected variable.
Literal The output node data is a literal value that you enter in the field that displays by this option.
None No data. Run the output node with no data or with a filter.

Building production objects
76 e-Biz Impact
• Repeats – select this option to indicate that the node is repeating. If you select repeating, also indicate the maximum number of instances. Add an optional break qualification to stop iteration when a certain condition is met. Select Use Field Object info and select a field object name in the Field drop-down list only if repeating data is retrieved from the input transaction. You can also select other data sources for a repeating node.
Note When the Alternatives property is set, its associated child nodes may not be repeating. A qualification attached to this child node becomes the rule for whether the child node is selected to produce the output data. If a qualification on the child is not set, production fails. Repeating nodes can be built from groups or repeating tree field object. The number of instances is determined using the maximum number of instances property, number of instances of the source field or node, and optionally break qualifications.
• Filters (only for leaf and branch nodes) – select or create filters that apply to leaf and branch nodes.
Importing tree output nodes
❖ Import tree output nodes
1 From the Production Object Information window, select File | Tree Output Nodes.
2 Select Import NCM or Import DTD.
3 Select the appropriate file and click OK.
Building tree-to-tree production objectsA tree-to-tree production object must have tree field objects defined for the input and node component objects defined for the output. See the preceding sections for more information on tree field objects (input) and node component objects (output).

CHAPTER 3 Building Production Objects
TRAN-IDE Guide 77
Building stream-to-stream production objectsStream-to-stream mode, which is the new production object default, parses binary large object (blob) data as input, and generates blob data as output.
Note blobs can contain any binary or ASCII data, for example, large text files, data processing documents, CAD program files, graphics and images, videos, music files, and so on. blobs are defined as table columns. Their memory size is nearly unlimited as they can be stored across several pages.
❖ Create stream-to-stream production object
1 Click New below the Stream Input Fields pane.The Input Field Information window appears. An input field defines a single piece of an input transaction, for example, a record or message, gathered by an acquisition AIM.
2 When the Input Field Information window displays, complete these options:
• Name – enter the input field’s name. To make the name easily recognizable, append _fld or _f to the name.
Note The default field names are Field1, Field2, and so on. Allowable characters are A – Z, a-z, 0-9, and underscore (_). The name must start with an underscore or alphabetic character. Append “_f”, “_fld”, or “_field” to the field name, as in “pid_f”, “pid_fld”, or “pid_field.”
• Offset – select one of the following option to define the Offset:

Building production objects
78 e-Biz Impact
3 When you select Follows-Pattern, Anchor Field, additional options display:
Option Description
By Value
Offset
If the input field always lives at a specific location in the input transaction., enter the input field location relative to the beginning of the value in the Offset field. The first position in a field is always byte 0 (zero), and the maximum record size is 9,999. Set the associated length to the field length. For example, if the field is an ID number that is always six numbers, set the length to 6.
Follows-fld If the current input field location might change, select the name of the preceding input field from the drop-down list, which displays only if you have previously defined a field.
Always define the position of the first field in an input transaction with the value offset and define all subsequent fields with the Follows-fld offset. If the transaction format changes at a later time and you must insert a field, you only need to modify the entry for the input field that follows the new inserted field.
Redefines-fld If the current input field begins at the same location as another input field, select the other input field name from the drop-down list
Follows-Pattern, Anchor Field
If the input field begins after a specific character pattern., enter a unique pattern in the Pattern field.
Set the additional field options as necessary:
• Select Inclusive to include the pattern when computing the input field offset.
• Select Anchor to indicate which input field the pattern starts with or follows. This field is required if the input field is optional. Use this field whenever possible, because Impact searches for the pattern at the start of the transaction if this field is not defined.
• Select Redefine Anchor to indicate that the pattern begins with the Anchor field value. If this field is not selected, Impact searches for the pattern after the Anchor field value.
Option Description
Pattern
Anchor
• Pattern – when the input field begins after a specific character pattern., enter a unique pattern.
• Inclusive – include the pattern when computing the input field offset.
• Anchor – indicate which input field the pattern starts with or follows. This field is required if the input field is optional. Use this field whenever possible, because e-Biz Impact searches for the pattern at the start of the transaction if this field is not defined.
• Redefine Anchor – indicate that the pattern begins with the Anchor field value. If this field is not selected, e-Biz Impact searches for the pattern after the Anchor field value.
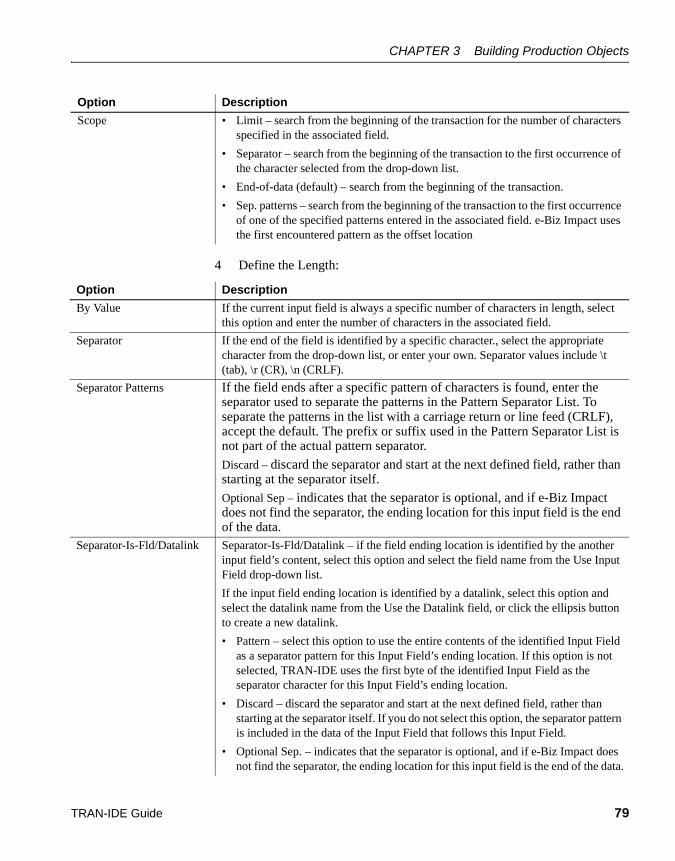
CHAPTER 3 Building Production Objects
TRAN-IDE Guide 79
4 Define the Length:
Scope • Limit – search from the beginning of the transaction for the number of characters specified in the associated field.
• Separator – search from the beginning of the transaction to the first occurrence of the character selected from the drop-down list.
• End-of-data (default) – search from the beginning of the transaction.
• Sep. patterns – search from the beginning of the transaction to the first occurrence of one of the specified patterns entered in the associated field. e-Biz Impact uses the first encountered pattern as the offset location
Option Description
Option Description
By Value If the current input field is always a specific number of characters in length, select this option and enter the number of characters in the associated field.
Separator If the end of the field is identified by a specific character., select the appropriate character from the drop-down list, or enter your own. Separator values include \t (tab), \r (CR), \n (CRLF).
Separator Patterns If the field ends after a specific pattern of characters is found, enter the separator used to separate the patterns in the Pattern Separator List. To separate the patterns in the list with a carriage return or line feed (CRLF), accept the default. The prefix or suffix used in the Pattern Separator List is not part of the actual pattern separator.
Discard – discard the separator and start at the next defined field, rather than starting at the separator itself.
Optional Sep – indicates that the separator is optional, and if e-Biz Impact does not find the separator, the ending location for this input field is the end of the data.
Separator-Is-Fld/Datalink Separator-Is-Fld/Datalink – if the field ending location is identified by the another input field’s content, select this option and select the field name from the Use Input Field drop-down list.
If the input field ending location is identified by a datalink, select this option and select the datalink name from the Use the Datalink field, or click the ellipsis button to create a new datalink.
• Pattern – select this option to use the entire contents of the identified Input Field as a separator pattern for this Input Field’s ending location. If this option is not selected, TRAN-IDE uses the first byte of the identified Input Field as the separator character for this Input Field’s ending location.
• Discard – discard the separator and start at the next defined field, rather than starting at the separator itself. If you do not select this option, the separator pattern is included in the data of the Input Field that follows this Input Field.
• Optional Sep. – indicates that the separator is optional, and if e-Biz Impact does not find the separator, the ending location for this input field is the end of the data.
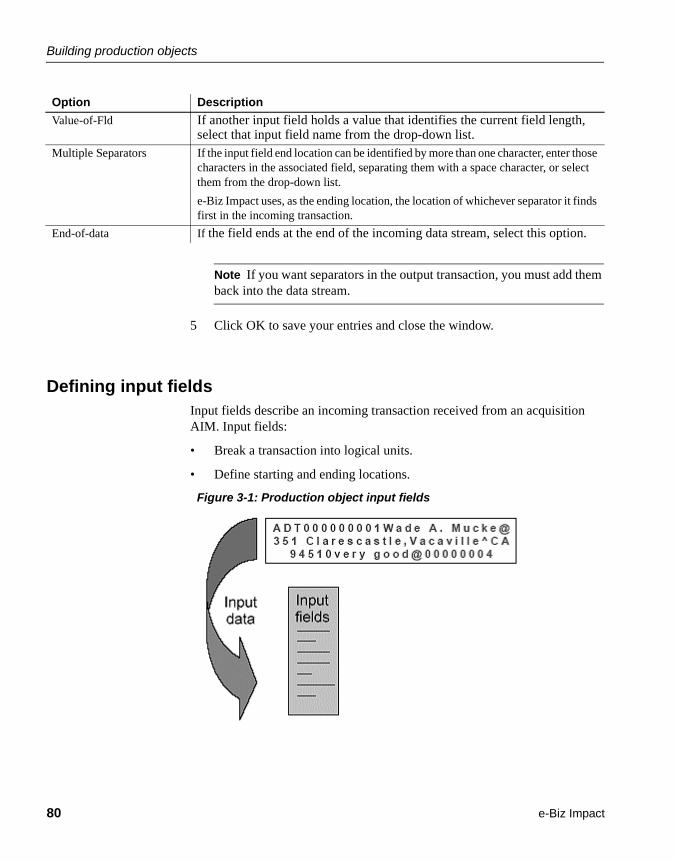
Building production objects
80 e-Biz Impact
Note If you want separators in the output transaction, you must add them back into the data stream.
5 Click OK to save your entries and close the window.
Defining input fieldsInput fields describe an incoming transaction received from an acquisition AIM. Input fields:
• Break a transaction into logical units.
• Define starting and ending locations.
Figure 3-1: Production object input fields
Value-of-Fld If another input field holds a value that identifies the current field length, select that input field name from the drop-down list.
Multiple Separators If the input field end location can be identified by more than one character, enter those characters in the associated field, separating them with a space character, or select them from the drop-down list.
e-Biz Impact uses, as the ending location, the location of whichever separator it finds first in the incoming transaction.
End-of-data If the field ends at the end of the incoming data stream, select this option.
Option Description

CHAPTER 3 Building Production Objects
TRAN-IDE Guide 81
Before you create input fields, have a sample, or specifications, of the transaction’s data format. Figure 3-2 shows general information about a customer transaction record.
Figure 3-2: Transaction sample record
❖ Adding input field options
1 Click Options at the bottom of the Input Field Information window to further define options for the selected input field. You see the Input Field Options window.
2 Complete these options:
• Char. Set – select the field’s character set—ASCII (the default) or EBCDIC (Extended Binary-Coded Decimal Interchange Code), which is an IBM code for representing characters as numbers, mostly on large IBM computers.
• Datatype – enables field datatype validation. The default is raw. Select the field’s datatype:
Datatype Description
Alpha Letters only
Alpha-numeric Any letter, number, or space character
Hex16 A 2-byte hexadecimal representation of a number
Hex32 A 4-byte hexadecimal representation of a number
Numeric Includes numbers and a sign character
Printable Any printable character
Raw (default) Any character the system can transmit, including control characters
Signed binary A binary representation of a signed integer value
Text Any letter, number, punctuation, or space character

Building production objects
82 e-Biz Impact
• Default Value – enter a literal value. e-Biz Impact puts this value in the input field if the input field is empty.
If you leave this option blank and the input field is empty, e-Biz Impact does not give the field a value. To include a null byte in the literal value, use “\NUL”, not “\000”.”
Note You can also use the Default Value during a test drive to test the action of one or more fields through a production rule. If you do this, delete this value after you run the test drive and before you use the file in a production setting.
• Filters – see “Defining filter objects” on page 96.
• Datalink – select an existing datalink or create a new one. A datalink is a global variable for temporary storage. After you assign this name, use the name to reference the field’s contents. This is especially important in filter objects. See “Building a datalink” on page 85.
Note This is an advanced programming option. Use this option with caution and only for input fields that define the same data, such as a name or address, or phone number. Also, the contents of datalinks are not automatically cleared between uses. The developer must clear the contents.
• Operation – when you select a datalink, select the operation to perform on the selected datalink:
• Add – add input to the datalink.
• Set (default) – place input into the datalink.
• Clear – make the datalink value zero.
• Increment – add 1 to the datalink.
• Decrement – subtract 1 from the datalink.
• Subtract – subtract input from the datalink.
• Multiply – multiply the datalink by the input.
Unsigned binary (default for auto-parented subfields)
A binary representation of an integer value
Datatype Description

CHAPTER 3 Building Production Objects
TRAN-IDE Guide 83
• Divide – divide the datalink by the input.
Note Some options may not display unless other options are selected.
• Options – selection from these options:
• This Input Field Defines a Group – identifies the input field’s data area as a group. Use the “Member of group input field” to identify other input fields as elements of the object’s group. A group is the data area of the incoming transaction that contains repeating sets of elements.
Figure 3-3: Incoming transaction group with repeating elements
• Instance Separator – the character that separates each group instance. A group instance is one set of repeating elements in a group. As shown in Figure 3-3, the elements a, b, and c comprise one group instance.
Select a character from the drop-down list or type a single character into the entry field.
• Member of Group Input Field – defines input fields as elements of a group defined by a previous input field. You need not build the input fields in the order of the element’s occurrence, but you must still define them in the order of the input field’s occurrence. In other words, using Figure 3-3, element “b” comes after “a” and element “c” comes after “b”, and you must define the input field offsets and lengths appropriately.
The drop-down list displays all input fields that have the “This Input Field Defines a Group” option selected.
For parsing to occur correctly, you must account for all bytes in a set of group elements even if you do not intend to process some of those bytes. For example, in Figure 3-3, even if you wanted to process only the contents of elements “a” and “c”, you must still define one input field for each of the three elements.

Building production objects
84 e-Biz Impact
• Subfield of Parent Input Field – creates a parent/child relationship between fields, with the subfield used by the child. You must define subfields in order of occurrence. Enter the name of the parent input field in the entry field or select it from the pull-down list.
If the parent input field is a member of a group, you must also select “Member of Group Input Field” for the subfield.
If the parent input field is optional, then you must also make the subfield optional.
• This Input Field Is Optional – displays only when “Subfield of Parent Input Field” is selected, and “Best fit data from parent field” is not selected.
When set, e-Biz Impact skips this field if the separator is not found.
• Best Fit Data From Parent Field – displays only when “Subfield of Parent Input Field” is selected.
• Make Input Field Missing If Empty – displays only when “Best Fit Data From Parent Field” is selected. e-Biz Impact marks this field as “missing” if it is empty.
• Candidacy – use as a pre-screening qualification object that is executed before the input field has parsed the data. If the data does not pass this qualification object, the input field does not exist. You can use the Candidacy option to route data to specific input fields depending on the data in a previous input field.
Select an existing qualification object from the list, or click to create a new qualification object. The input field referenced in the qualification object must already have been parsed—it cannot be an input field from later in the same transaction. If all candidacy fails for a particular object, the data is moved to the next field, so failing candidacy does not always fail the transaction. Candidacy can also reference the field that the candidacy belongs to in a compare filter.

CHAPTER 3 Building Production Objects
TRAN-IDE Guide 85
• Qualifications – use as a post-screening qualification object that is executed after the input field has parsed the data. If the data does not pass this qualification object, the transaction fails. Select an existing qualification object from the list, or click to create a new qualification object. If you use a qualification object in more than one place, it must conform in expectations of size and datatype to all of the input fields where it is used.
3 Click Done to save your entries and close the window.
4 In the Input Field Information window, click OK to exit the window.
Note To move between input fields in the Input Field Information window, use the << and >> and buttons.
5 In the Production Object Information window, select File | Save to save your work.
6 Repeat this procedure as needed for additional input fields.
Building a datalink
1 In the Input Field Options window, click the ellipsis button to the left of the Datalink drop-down list. The Datalink Information window appears.
2 Complete these options:
• Name – Enter the datalink object Name.
• Module – enter the module name or select the name from the drop-down list.
• Type – enter the datalink type or select a type from the drop-down list.
• Public – select this option if the datalink can be shared in other modules.
3 Click OK to save the datalink.
Changing an input field
1 In the Input Fields list, double-click on he input field you want to change. The Input Field Information window appears.
2 Changes the appropriate data.
3 Do one of the following:
Building production objects
86 e-Biz Impact
• Click New to update the Input Field and remain in the Input Field window.
• Click OK to update the Input Field and return to the Production Object Information window.
• Click Cancel to the update of the Input Field and return to the Production Object Information window.
Deleting an input field
1 In the Input Fields list, select the input field you want to delete.
2 Click Delete. A warning message displays and asks you to confirm the deletion.
3 Click Yes to complete the deletion. Click No to cancel the deletion.
Deleting production objects1 In the TRAN-IDE window’s Production Objects list, right-click the
production object you want to delete and select Delete.
You can also highlight the production object you want to delete and click the Delete button below the list pane.
2 A Warning message displays asking you to confirm that you want to delete the production object. Click Yes to delete the production object, or click No to cancel the deletion.
Warning! Any production object name with a symbol next to it is referencing a non-existent object and should be repaired. The symbol appears only if Display Referential Bitmaps is selected from the Options menu in the main TRAN-IDE screen.
Editing production objects1 In the Production Objects list, double-click the production object that you
want to edit. The Production object Information window appears.
2 Make your changes to the data, as necessary.
3 Do one of the following:
CHAPTER 3 Building Production Objects
TRAN-IDE Guide 87
• To save your changes to the production object, click OK.
• To save your changes and close the window, select File | Accept and Close.
• To cancel your changes, click Cancel.
• To cancel your changes and close the window, select File | Cancel and Close.
Using import optionsYou can use definitions already available in other forms (like a text file (*.txt) or some other ASCII file) to build field objects definitions. TRAN-IDE provides two options for that allow you to import these file types—Comma Separated Fields and Custom Import.
Importing comma-separated fieldsSelect File | Import | Comma Sep. Fields to open the Import Text File window, a standard Windows open file window. After you select a file, TRAN-IDE opens it and attempts to build field objects with the data contained in the file.
Building field objects using Custom ImportThe Custom Import Feature gives you the ability to build field objects from an external file when you know the format of the file.
1 Select File | Import | Custom Import. The Custom Import Criteria window opens where you define the format of a series of records in the external file, where each record identifies the characteristics of a single field.
2 Complete the fields in the window with the values that correspond to the data for the field object definitions. See
3 Click one of these options:

Using import options
88 e-Biz Impact
• OK – to have TRAN-IDE build the field objects from the data in the file using the values you entered in the Custom Import Criteria window. When you click OK, the Import Custom File window opens. Navigate to and select the file that contains data for the field object definitions and click OK.
• Save Settings – to save the settings as a file with a .cis extension. You can use the Load Settings option later to use previously saved settings.
• Load Settings – load settings that you saved previously with the Save Settings option.
• Close – close the window.
Entering values in the Custom Import Criteria fields
The Start column value is the column position in the data file for that entry. The Length column value is the number of columns in the data file for that entry. Column positions for each record in the file start at “1.” Use a value of zero (0) to tell TRAN-IDE to use the default value for a particular field.
Example
This example shows content from a metadata file that describes field objects, which allows TRAN-IDE to build production object fields automatically.
Note This functionality applies only to stream fields (not tree fields).
12345678910111213141516171819202122232425262728
@ part1 0 12 nN9@ part26 12 8 nN9@ part305 20 15 nN9
Each line of the file (except the first line), represents data describing one field object. When you enter values in the Custom Import Criteria window, you instruct TRAN-IDE where in the line to find the data needed to build the field object. The example entries are shown in Figure 3-4.

CHAPTER 3 Building Production Objects
TRAN-IDE Guide 89
Figure 3-4: Custom Import example input
Note Remember that the values shown in the metadata file are not the values you enter in the Custom Import Criteria fields. The file values describe the actual content for the field object. The values you enter describe where the data begins and the data’s length, so TRAN-IDE knows what data to extract to create the production object fields.
• Field Name – in the example, the first field is “part1” and the field name starts at position 6 on a line and has a length of 10 characters, which is what you would enter in the Start and Length fields.
• Field Offset – the field’s offset (“0”) starts at position 17 on each line and has a length of 2 characters.
• Field Length – the field’s length (“12”) starts at the position 21 and can be up to two characters in length.
• Field Separator – this example uses the default field separator (the pipe symbol), so no entries are required in these fields.
• Field Type – the field’s datatype. The example’s datatype (“nN9” for numeric) begins at the position 26 and is one character long. The field type is the character in the data file that specifies the field object’s datatype as listed in Table 3-1.

Using import options
90 e-Biz Impact
Table 3-1: Datatype values
Any other value in the data file results in a datatype of raw for the field object.
• Key Field – if part of the data file (for example, headers, footers, and titles) should not be included when building the field objects, use this setting. Every line that should be included must start with the same pattern. Enter the line position where the key field begins and its character length. In the example, the key field is “@”, which begins in position 1 and is 1 character in length.
• Key Value – enter the pattern with which each line you want to include begins. For the example, you would enter @.
• Default Field Separator – to use a different field separator character as the default character, enter the character in this field.
Note Each column should be 1 character only, although the example displays 2 digit numbers in the first line for simplification.
Exporting text filesSelect File | Export to export a text file that contains comma-delimited production object fields.
Value Description
aAxX Alphanumeric
fF Alpha
hH Hex16
bB Unsigned binary
pP Printable
tT Text
nN9 Numeric
rR Raw
CHAPTER 3 Building Production Objects
TRAN-IDE Guide 91
Defining stream output rulesWhen you select stream as the output mode, the right pane of the Production Object Information window displays Stream Output Rules.
An output rule is a logical container for a single discrete portion of an output transaction and includes the rule components and filters. A rule component determines which pieces of data (which input objects) to manipulate and place into the rule object’s output message area.
Output rules are contained in an output rules list that describes the order in which rules are run. A concatenation of each output rule’s output creates the output transaction.
You can view all existing rules in the TRAN-IDE main window.
❖ Defining output rules
1 In the main TRAN-IDE window, select View | Output Rules or click the Rules icon to list existing output rules for a loaded project and module.
Click the SubRules icon to view all rule component objects for the selected project and module.
2 To build a new output rule, click New below the Stream Output Rules pane in the TRAN-IDE window.
Note To change an existing output rule, double-click the rule name in the list.
The Current Output Rule window appears.
3 Complete these options:
Field (key) Description
Name An output rule’s name. If you select an existing rule, its name appears in this field. If you are building a new rule, enter a name in the space provided. Recommendation: Append “_r” or “rule” to all rule names.
Size Enter zero, unless the rule output must equal a specific size. Zero tells the SFM that it can use as many or as few characters as necessary to build the output field from the output rule’s components and filters.
If the rule output must be a specific size, enter the number of required characters.
Iterative Run the output rule the number of times specified.
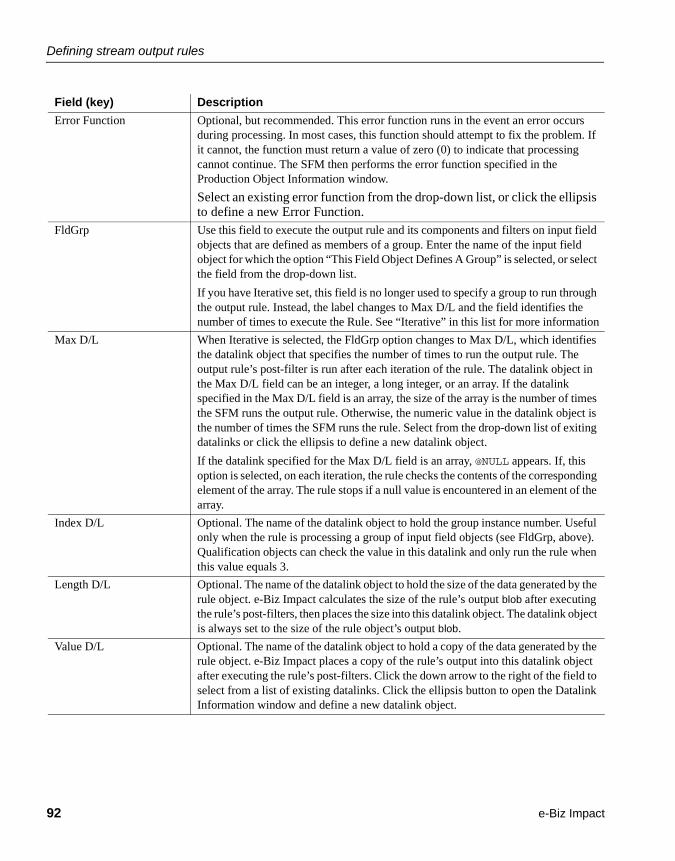
Defining stream output rules
92 e-Biz Impact
Error Function Optional, but recommended. This error function runs in the event an error occurs during processing. In most cases, this function should attempt to fix the problem. If it cannot, the function must return a value of zero (0) to indicate that processing cannot continue. The SFM then performs the error function specified in the Production Object Information window.
Select an existing error function from the drop-down list, or click the ellipsis to define a new Error Function.
FldGrp Use this field to execute the output rule and its components and filters on input field objects that are defined as members of a group. Enter the name of the input field object for which the option “This Field Object Defines A Group” is selected, or select the field from the drop-down list.
If you have Iterative set, this field is no longer used to specify a group to run through the output rule. Instead, the label changes to Max D/L and the field identifies the number of times to execute the Rule. See “Iterative” in this list for more information
Max D/L When Iterative is selected, the FldGrp option changes to Max D/L, which identifies the datalink object that specifies the number of times to run the output rule. The output rule’s post-filter is run after each iteration of the rule. The datalink object in the Max D/L field can be an integer, a long integer, or an array. If the datalink specified in the Max D/L field is an array, the size of the array is the number of times the SFM runs the output rule. Otherwise, the numeric value in the datalink object is the number of times the SFM runs the rule. Select from the drop-down list of exiting datalinks or click the ellipsis to define a new datalink object.
If the datalink specified for the Max D/L field is an array, @NULL appears. If, this option is selected, on each iteration, the rule checks the contents of the corresponding element of the array. The rule stops if a null value is encountered in an element of the array.
Index D/L Optional. The name of the datalink object to hold the group instance number. Useful only when the rule is processing a group of input field objects (see FldGrp, above). Qualification objects can check the value in this datalink and only run the rule when this value equals 3.
Length D/L Optional. The name of the datalink object to hold the size of the data generated by the rule object. e-Biz Impact calculates the size of the rule’s output blob after executing the rule’s post-filters, then places the size into this datalink object. The datalink object is always set to the size of the rule object’s output blob.
Value D/L Optional. The name of the datalink object to hold a copy of the data generated by the rule object. e-Biz Impact places a copy of the rule’s output into this datalink object after executing the rule’s post-filters. Click the down arrow to the right of the field to select from a list of existing datalinks. Click the ellipsis button to open the Datalink Information window and define a new datalink object.
Field (key) Description

CHAPTER 3 Building Production Objects
TRAN-IDE Guide 93
4 Click OK to save the rule.
Defining rule components (subrules)Rule components (subrules) determine which pieces of data (which input objects) to manipulate and place into a rule object’s output message area. Each rule component generates a piece of the output transaction by manipulating the data in an input field object with a filter object, or by defining a literal value to place into the output transaction.
A rule component object can also manipulate a rule object’s blob, affecting the output transaction up to and including its own contribution to the blob.
Default Value A literal value that the rule places into the output transaction if:
• The group specified in the FldGroup entry is empty or missing.
• A rule component fails and the component does not have an entry in its Default Val field.
• A rule post-filter fails.
• The rule has no components or post-filters defined.
When one of these conditions occurs, the SFM deletes all the output generated so far by the rule’s components from the rule object’s blob, places the default value into the blob, and continues processing the next rule.
Note If this field is empty and one of the above conditions occurs, the SFM stops processing the transaction and places it in the unprocessable log file.
Components Describe the pieces or parts of a single output rule. The output rule processes each component in order, starting with the first item in the list. When you click New, the Rule Component Information window appears. See “Defining rule components (subrules)” on page 93.
Post Filters Performs additional processing on the output transaction. The output rule processes each filter in order, starting with the first item in the list. When you click New, the Filter Information window displays. See “Defining filter objects” on page 96.
No Default Separator Do not automatically append the default rule separator to this rule object’s output. Useful only when rule separator is selected in the Production Object Information Options window.
Field (key) Description

Defining rule components (subrules)
94 e-Biz Impact
❖ Defining rule components
1 When an existing project is loaded, select View | Rules Component Objects or click the SubRules icon to display a list of all rule component objects defined in the current file.
2 To build a new rule component object, click New below the Rule Component Objects list in the TRAN-IDE window.
Note To change an existing rule component object, double-click its name in the list.
The Rule Component Information window appears.
3 Complete these options:
Field (key) Description
Name A rule component’s name. If you select an existing rule, its name displays in this field. If you are building a new rule component, enter the name here. Append “_rc” or “_part” to all rule component names.
Field Have the current rule component consist of or act on a field that is already defined. Enter the field object’s name in the space provided, or choose the name from the list that displays.
Note If the specified field object is defined as optional and is not present in the incoming transaction, the rule component’s filters are still run. If you do not want these filters run when the optional field object is not present, use a qualification object to check for the presence of the field object before entering the rule component object.
Literal Add a literal value to the output transaction, then enter the literal’s value, up to 255 bytes, in the space provided. This value will be modified by any pre-and post-filters defined in this rule component. The literal’s value can contain embedded escape sequences (for example, “\015”). When including a null byte in the literal value, use “\NUL” instead of “\000”.
Group Have the current rule component consist of or act on a nested group. In the first entry field, enter the name of the field object that defines the nested group, or click the down-arrow to choose the name from the list of field objects.
In the second entry field, enter the name of the rule object that should process the nested group, or click the down-arrow to choose the from a list of rule objects.
Warning! Rule objects that use the Group option should not be attached to a specific production object. Define the rule object from the main TRAN-IDE window (this procedure) instead of creating the rule from the Product Object Information window.

CHAPTER 3 Building Production Objects
TRAN-IDE Guide 95
Datalink Have the current rule component consist of or act on a datalink. Enter the datalink’s name or choose it from the drop-down list. Click the ellipsis button to view information about the selected datalink or to create a new datalink on the fly.
Note When the datalink is a character array, the rule component object acts on the entire array as if it were a string; it cannot access the individual elements of the array. Access the array elements using ODL code in custom filter functions. See “Writing custom filter functions” on page 142.
None If you do not want the current rule component to use a field object, a literal, a group, or a datalink, select this option. Use this option when you want the filter to generate the data or a filter function is used to perform some action that does not require the addition of new data.
Default Value Optional. The literal value to place into the output transaction if one of the component's filters fails or if the component’s data source is empty. When one of the component's pre- or post-filters fails or its data source is empty, the SFM removes all output generated by that Component from the outgoing transaction, places this literal value into the outgoing transaction instead, and continues to process the transaction with the next component.
If you do not have a value in this entry field, but do have a value in the Default Value field for the rule, and one of the component’s filters fails or the component’s data source is empty, the SFM removes all output generated by the component’s rule object from the outgoing transaction, places the default value for the rule into the outgoing transaction instead, and continues to process the transaction with the next rule object. If you do not have a value in either the component’s or rule’s Default Value field, the SFM stops processing the transaction.
The literal value uses these format specifiers: “%s” for spaces, “%d” for zeros, and “%b” for binary zeros. Place an integer number after the % to indicate the number of spaces or zeros to use. The literal value can also contain other characters that are copied into the blob exactly as entered. When including a null byte in the literal value, use “\NUL” instead of “\000”.
Example – “%5dempty%5d” results in “00000empty00000”.
Length D/L (Optional.) The name of the datalink to hold the size of the data generated by the rule component object. e-Biz Impact calculates the size of the component’s output blob after executing the component’s post-filters, then places the size into this datalink object. Because the datalink is set to the size of the component’s output blob, if the rule component has a qualification object associated with it, the datalink object is set to the size of the output blob if the rule component qualified. If the rule component does not qualify, the datalink object is set to zero since no output was generated.
Value D/L (Optional.) The name of the datalink object to hold a copy of the data generated by the rule component object. e-Biz Impact puts a copy of the component’s output into this datalink object after executing the component’s post-filters.
Field (key) Description

Defining filter objects
96 e-Biz Impact
Adding field separatorse-Biz Impact strips field separators out of the data stream before presenting the contents of any field object to any rule component or placing the data in a datalink. To use the same data characters as a field separator in the output of a rule object, add the separator back into the output data stream.
To add a field separator to an output data stream, build a filter that performs this function, then add it into the pre-filter or post-filter in the Rule Component Information window.
Defining filter objectsThis section describes each filter type that you can build.
Filter objects are used to alter the output of rule components, output rules, and production objects. Filter objects can validate, add to, copy, translate, transform data, or perform any other type of data manipulation you require.
A filter object can be of these types:
• Table objects – add to or remove table columns from generated output.
• Built-in functions – translate and modify data using predefined functions.
• Custom functions – use custom code for complex or custom translations.
• Datalink objects – modify global datalink variables.
Pre-Filters A list of the pre-filter functions. The filters work on the data source you specify. The SFM runs the filters in sequence, from the top to bottom. See “Defining filter objects” on page 96.
Post-Filters Post filters perform additional processing on the outgoing transaction as it has been built up to that point. The SFM performs each post-filter in sequence. See “Defining filter objects” on page 96.
No Default Separator Select to not automatically append the default rule component separator to this rule component object’s output. This option is useful only when the rule component separator is selected in the production object Options window.
Field (key) Description

CHAPTER 3 Building Production Objects
TRAN-IDE Guide 97
• Edit masks – limit the number of characters, suppress leading zeros, add a fixed or floating currency symbol, add comma and decimal separators, insert characters, display plus and minus signs, and display negative values in brackets (<>).
• Database objects – modify data using user-defined SQL statements.
• Production objects – send output to another nonstatic production object in another module within the current project.
• DFC – make distributed function calls from within a production object.
In addition to creating filters directly from the TRAN-IDE main window (click the Filters icon, then click New), filters can also be created from a production object’s Input Field Options window, from Current Output Rule window, and from the Rule Component Information window.
Production objects input field filters Production object filters modify input transactions. These type of filters are often used to initialize datalinks, to establish destination routing, and to set transaction priority.
Production object post-production filters modify the transaction output.
Output rule filters Output rule post-production filters modify output rules, including all rule components.
Rule component filters Rule component filters modify the component’s input; post-production filters modify the rule component’s output up to and including itself.
When you create a filter during the creation of another object, the filter is automatically attached to the object you are creating, and is added to the main filter list from which you can select it to use when you create other objects.
❖ Creating filter objects
1 From the main TRAN-IDE window, select View | Filter Objects or click the Filter icon to display a list of all filter objects defined in the current file.
2 Double-click an existing filter in the Filter Objects list to modify an existing filter, or click New below the Filter Objects list to create a new filter. The Filter Information window appears.
Note When filter options (for example, Pre-Filters or Post-Filters) appear in an object information window (for example, the Rule Component Information window), and you can click New to create a new filter, the same Filter Information window displays as when you access filters from the main TRAN-IDE window.

Defining filter objects
98 e-Biz Impact
3 Click the button for the type of filter you want to create; for example, to create a table object filter, click Table Obj. The options on the right of the window change depending on the filter option you select. Supported filters are:
4 When you complete your entries, click OK to save the filter and close the window.
Filter type Description
Table Obj Compare the data in the current blob with the entries in the key column specified for the referenced table object. See “Creating table object filters” on page 99.
Built-in Provides pre-built filters—formatting, editing, text manipulation, date and time, miscellaneous, and TDM-related (dynamic routing). See “Creating built-in filters” on page 100.
For all filters, the current blob area references the data that the filter receives. Exactly what the filter receives is dependent on how and when you use it.
Note Using built-in filters does not require programming knowledge, however, you must know the type of data you expect to process.
Custom Provides custom filter functions—findYear_func, stuck_cust, and set_age_func, which you can append and save. See “Creating custom filters” on page 142.
Datalink Performs the specified operation between the incoming data and the value in the specified datalink and places the result in the datalink. See “Creating datalink filters” on page 145.
Edit Mask Runs the edit mask against the data in the current blob and replaces the data in the current blob with the result. See “Creating edit mask filters” on page 146.
Database Executes the statement in the database interface object. See “Creating database interface filters” on page 147.
Prod Obj Sets data links or performs alternate processing of data based on the result of qualification objects. See “Creating production object filters” on page 148.
DFC Makes a DFC call from a production object, which avoids using ODL to make the DFC call. Use this filter to handle throughput issues. See “Creating production object filters” on page 148.

CHAPTER 3 Building Production Objects
TRAN-IDE Guide 99
Creating table object filtersCreate table object filters to compare the data in the current blob with the entries in the key column specified for the referenced table object. If the data matches an entry in the key column, e-Biz Impact places into the output transaction the values in the corresponding entry of the columns listed in the Selected Cols list. If the data does not match any values in the key column, the filter fails.
The key values for table object filters specify how e-Biz Impact should identify the table name, which can be eight characters long and contain only letters, numbers, and the underscore (_) character.
Note Table objects are different than collection tables. See “Using collection” on page 34.
Table 3-2: Table object filter keys
Field (key) Description
Basic Name The table name for which e-Biz Impact should look. Use this option when you have static tables with fixed names. Enter the table name, or click the down-arrow to select the name from a list of existing tables. Click the ellipsis to open the Table Maintenance window. See “Creating table objects” on page 150.
Use FieldObj Use the data referenced by the field object as the table’s name. (See the Name Mask field description below.) Click the down-arrow to select from a list of existing field objects.
Use Datalink Use the contents of the datalink as the table’s name. (See the Name Mask field description below.) Click the down-arrow to select from a list of existing datalinks. Click the ellipsis button to open the Datalink Information window. See “Building a datalink” on page 85.
Name Mask This option displays only when you select Use FieldObj or Use Datalink to specify the content of the table’s name.
If you enter nothing, TRAN-IDE places a “%s” mask in this field and e-Biz Impact uses the data value in the selected field object or datalink as the table’s name. If you enter other values with the “%s” mask, e-Biz Impact combines these values to form the table’s name.
• Example 1 – the content of the p_state field object is “CA”, the Name mask field contains only “%s”; the SFM looks for a table file named “CA.TBL.”
• Example 2 – the content of p_state is “CA” and the Name mask field contains “MY%sCC”; the SFM looks for the table file named “MYCACC.TBL.”
Key Column The column contents that e-Biz Impact should compare for a match against the data in the current blob area.
All Cols A list of all the table columns.
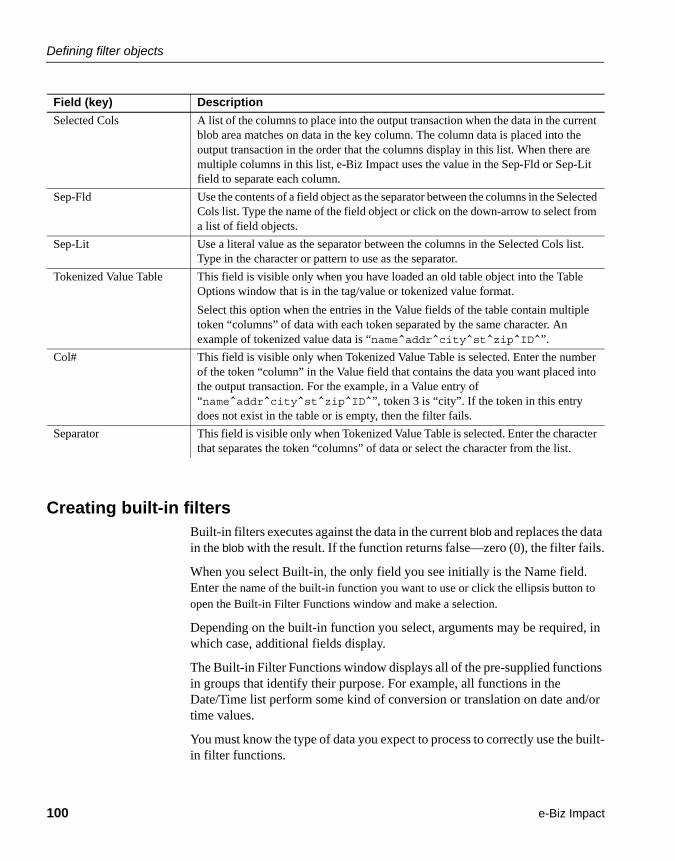
Defining filter objects
100 e-Biz Impact
Creating built-in filtersBuilt-in filters executes against the data in the current blob and replaces the data in the blob with the result. If the function returns false—zero (0), the filter fails.
When you select Built-in, the only field you see initially is the Name field. Enter the name of the built-in function you want to use or click the ellipsis button to open the Built-in Filter Functions window and make a selection.
Depending on the built-in function you select, arguments may be required, in which case, additional fields display.
The Built-in Filter Functions window displays all of the pre-supplied functions in groups that identify their purpose. For example, all functions in the Date/Time list perform some kind of conversion or translation on date and/or time values.
You must know the type of data you expect to process to correctly use the built-in filter functions.
Selected Cols A list of the columns to place into the output transaction when the data in the current blob area matches on data in the key column. The column data is placed into the output transaction in the order that the columns display in this list. When there are multiple columns in this list, e-Biz Impact uses the value in the Sep-Fld or Sep-Lit field to separate each column.
Sep-Fld Use the contents of a field object as the separator between the columns in the Selected Cols list. Type the name of the field object or click on the down-arrow to select from a list of field objects.
Sep-Lit Use a literal value as the separator between the columns in the Selected Cols list. Type in the character or pattern to use as the separator.
Tokenized Value Table This field is visible only when you have loaded an old table object into the Table Options window that is in the tag/value or tokenized value format.
Select this option when the entries in the Value fields of the table contain multiple token “columns” of data with each token separated by the same character. An example of tokenized value data is “name^addr^city^st^zip^ID^”.
Col# This field is visible only when Tokenized Value Table is selected. Enter the number of the token “column” in the Value field that contains the data you want placed into the output transaction. For the example, in a Value entry of “name^addr^city^st^zip^ID^”, token 3 is “city”. If the token in this entry does not exist in the table or is empty, then the filter fails.
Separator This field is visible only when Tokenized Value Table is selected. Enter the character that separates the token “columns” of data or select the character from the list.
Field (key) Description

CHAPTER 3 Building Production Objects
TRAN-IDE Guide 101
Current blob area For all dynamic routing filter functions, the current blob area references the data that the filter receives. Exactly what the filter receives is dependent on how and when you use it.
Filters always receive the current blob area in the form of a blob.
Return values When a built-in filter function fails, its filter object fails and writes information about the cause of the failure to the production object’s error log.
When the dbDelete, dbInsert, dbSelect, loadFile, logger, shellCmd, and writeFile built-in filter functions fail, also included in the error log is the negative value of the UNIX error number for the problem that caused the method to fail.
Warning! You cannot use the octal value “\000” in a filter’s arguments to indicate a null value. Use “\NUL” to place a null character into a filter argument.
❖ Creating built-in filter functions
1 To select a function in the Built-in Filter Function window, double-click a function or select a function and click OK.
2 Click Cancel to return to the Filter Information window without accepting the your selection.
Function categories include:
Where filter is selected “Current blob area” reference
Component pre-filter Temporary work area containing the data in the selected field object, literal, group, or datalink object.
Component post-filter Temporary work area containing the output generated by any of the rule’s components that ran before this component; plus, the output generated by this component’s pre-filters; plus, the output generated by any post-filters that ran before the current filter.
Rule post-filter Temporary work area containing the combined output of all the current rule’s Components.
Production object post filter Output area that contains the entire data stream assembled from all the current production object’s rules. Especially useful for adding on protocol data.
Category Description
Formatting Help perform basic formatting actions on the output data.
Editing Edit the current blob area’s data in some way, like adding data to it, or eliminating data or extra spaces. Some filter functions in this section allow you to use octal escape sequences or ASCII characters. When using octal escape sequences in a filter’s arguments, you must use “\NUL” instead of “\000” to indicate a null value.

Defining filter objects
102 e-Biz Impact
Formatting filter functions
These functions help you perform basic formatting actions on the output data.
charHexConv()
Description Expands each byte of character data into the ASCII hexadecimal equivalent. If reverse mode is selected, the filter converts hexadecimal data to character data.
Argument None.
Text Manipulation Manipulate the data content of the current blob area.
Note If a field filtered by text manipulation functions has a zero length, the filter function returns zero (0). The SFM treats this return as a failure. To allow a zero length on a field:
• Use a rule-level error function to trap this condition and force a continuation of processing.
• Use rule-level qualification to skip the entire transaction.
• Provide a default value in the related field object.
Date and Time Append the date and/or time in a specific format to the current output blob area.
Miscellaneous These functions do not fit in any of the other categories, but perform useful functions, like conversion of EBCDIC data to ASCII and vice versa, sending data through mail, and so on.
TDM Related (dynamic routing)
Built-in dynamic routing functions. These functions allow you to add, delete, or specify destinations for the transaction that were not originally part of the transaction’s route. When you use dynamic routing (TDM related) filter functions, note that:
• You can use only destinations or a distributed SFM that is already defined to the local SFM through ID records in the SFM’s configuration file.
• If one of the destinations you add or specify is a NullDest, or if the ID record in the configuration file specifies a NullDest, only the NullDest is used. Other destinations are ignored.
• If the SFM does not recognize a destination or distributed SFM as valid, the transaction fails production object qualification. These filter functions do not change the SFM configuration file in any way.
• A dynamic routing function can only be used as part of a post-qualification rule. Any other rule that uses a dynamic routing function is ignored.
• When a transaction qualifies for multiple production objects, and one or more of those production objects uses dynamic routing, the SFM rejects the transaction.
Category Description
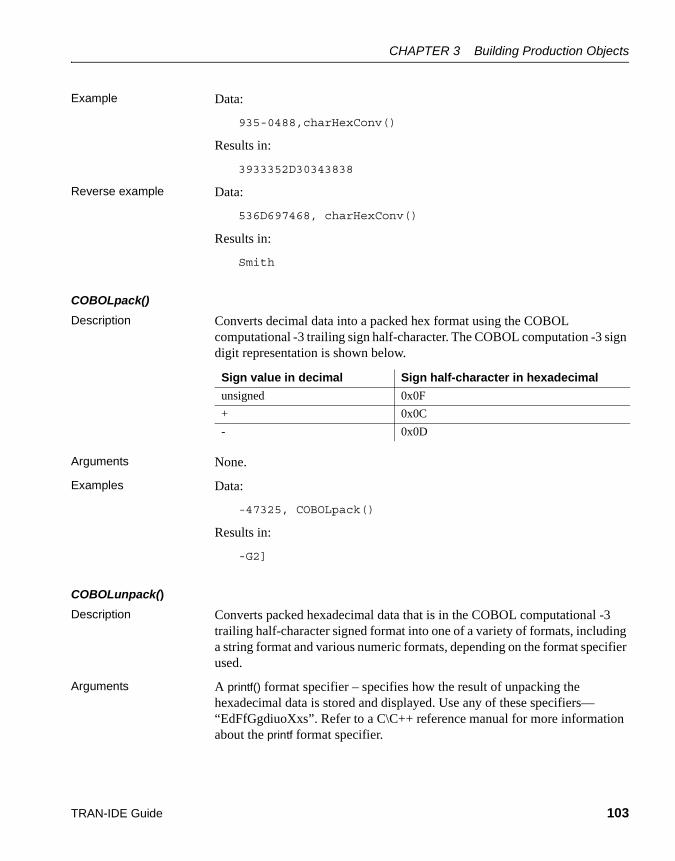
CHAPTER 3 Building Production Objects
TRAN-IDE Guide 103
Example Data:
935-0488,charHexConv()
Results in:
3933352D30343838
Reverse example Data:
536D697468, charHexConv()
Results in:
Smith
COBOLpack()
Description Converts decimal data into a packed hex format using the COBOL computational -3 trailing sign half-character. The COBOL computation -3 sign digit representation is shown below.
Arguments None.
Examples Data:
-47325, COBOLpack()
Results in:
-G2]
COBOLunpack()
Description Converts packed hexadecimal data that is in the COBOL computational -3 trailing half-character signed format into one of a variety of formats, including a string format and various numeric formats, depending on the format specifier used.
Arguments A printf() format specifier – specifies how the result of unpacking the hexadecimal data is stored and displayed. Use any of these specifiers— “EdFfGgdiuoXxs”. Refer to a C\C++ reference manual for more information about the printf format specifier.
Sign value in decimal Sign half-character in hexadecimal
unsigned 0x0F
+ 0x0C
- 0x0D

Defining filter objects
104 e-Biz Impact
Positively signed data (0x0C trailing half-character) is not signed when converted. Place a plus sign (+) in the format specifier to explicitly sign the unpacked data (for example, %+d) If the data is negatively signed, then a plus sign in the format specifier has no effect.
Using the “s” specifier results in formatting the output from unpacking the packed hexadecimal data as a string of digits, where each digit is a digit in the decimal value that was originally COBOLpacked. When reverse mode is unselected, a leading zero is inserted at the beginning of the string. When Reverse Mode is selected, no leading zero is inserted.
Use the “s” specifier in cases where the decimal value of the number you want to display is too large to store in a numeric format but still needs to display. An example of this would be a telephone number that is being COBOLunpacked.
Examples Data:
-G2], COBOLunpack()
Results in:
-47325
hex16()
Description Converts numeric data to a machine-independent two byte binary representation of the data. 65535 is the maximum value on which this function can operate. If the data is greater than 65535, the hexadecimal 16 function truncates the result.
Arguments None.
Examples Data:
4867, hex16()
Results in:
1303
hex32()
Description Converts numeric data to a machine-independent four byte binary representation of the data. 4294967295 is the maximum value on which this function can operate. If the data is greater than 4294967295, the hexadecimal 32 function truncates the result.
Arguments None.
Examples Data:

CHAPTER 3 Building Production Objects
TRAN-IDE Guide 105
93024718, hex32()
Results in:
058b71ce
hexDecConv()
Description Converts hexadecimal data to decimal data. If Reverse Mode is selected, the filter converts decimal data to hexadecimal data. FFFF is the maximum value that this function can handle. If the data is greater than FFFF, the filter fails.
Arguments None.
Examples • Data:
35AC, hexDecConv()
Results in:
13740
• Reverse example. Data:
7598, hexDecConv()
Results in:
1DAE
hl7FixedChar()
Description Left justifies the data and uses space characters to pad the current blob area to the length indicated in the argument. If the current blob area is an empty string (contains only “ ”), then this built-in filter function pads the current blob area with space characters to the length indicated in the argument. If the current blob area contains nothing (it is null), then this builtins uses null characters to pad current blob area to the length indicated in the argument.
Arguments Length of resultant field.
Examples Data:
foo hl7FixedChar(8)
Results in:
“foo “

Defining filter objects
106 e-Biz Impact
hl7FixedNum()
Description Right justifies the data and uses zeros to pad the current blob area to the length indicated in the argument. If the current blob area is an empty string (contains only “ ”), then this built-in filter function pads the current blob area with zeros to the length indicated in the argument. If the current blob area contains nothing (it is null), then this built-in filter function uses null characters to pad current blob area to the length indicated in the argument.
Arguments Length of resultant field.
Examples Data:
12345 hl7FixedChar(10)
Results in:
0000012345
justify()
Description Justifies the data in the specified direction and uses the specified fill character to increase the current blob area to the indicated length.
Arguments • Direction of justification—left or right.
• Fill character.
• Length of resultant field.
Examples L$24 left justifies and fills with a dollar sign ($) to a length of 24.
R*126 right justifies using an asterisk (*) as fill to a length of 126.
ljbf()
Description Left justifies the current data and blank (space) fill for the length given in the argument.
Arguments Length of resultant field; for example, “44”.
ljzf()
Description Left justifies the current data and zero fills for the length given in the argument string.
Arguments Length of resultant field; for example, “123”.

CHAPTER 3 Building Production Objects
TRAN-IDE Guide 107
pack()
Description Converts incoming decimal data to the AS/400 compatible packed format. Any incoming data that is not an integer or a sign extension is skipped and not packed.
Note If a field object or datalink object contains the packed data, then that object can be any datatype that accepts digits and printable characters (for example, raw, alphanumeric, printable, and so on).
Arguments None.
rjbf()
Description Right justifies the current data into a field length identified by the argument and blank (space) fill extra characters.
Arguments Length of resultant field; for example “22”.
rjzf()
Description Right justifies the current data into a field length identified by the argument and zero fills extra characters.
Arguments Length of resultant field; for example “14”.
strTruncL()
Description Truncates the current blob area after the pattern specified in the arguments.
Arguments The character or pattern after which to truncate the data.
Examples Data:
123hellozvt, strTruncL(hello)
Results in:
123hello
strTruncR()
Description Truncates the current blob area up to the pattern specified in the arguments.
Arguments The character or pattern up to which to truncate the data.
Examples Data:
“123hellozvt”, strTruncR(hello)

Defining filter objects
108 e-Biz Impact
Results in:
“hellozvt”
truncL()
Description Truncates the current blob area to a specified length, starting from its right-most position. In other words, truncates the current blob area to the left-most values for the specified length. If you do not pass an argument to this built-in filter function, then it clears the current blob area of all data.
Arguments The length of the data you want to retain, with left justification; for example, “122”.
Examples Data:
ABCDE, truncL(3)
Results in:
ABC
Note Both truncL and truncR filters insert null characters when the original blob is shorter than the new length
truncR()
Description Truncates the current blob area to a specified length, starting from its left-most position. In other words, truncates the current blob area to the right-most values for the specified length. If you do not pass an argument to this function, it clears the current blob area of all data.
Arguments The length of the data you want to retain, with right justification; for example, “23”.
Examples Data:
ABCDE, truncR(3)
Results in:
CDE

CHAPTER 3 Building Production Objects
TRAN-IDE Guide 109
unpack()
Description Converts incoming AS/400 packed data to decimal format. Optional argument string allows printf style formatting of the unpacked data.
Note The field object or datalink object containing the packed data can be any datatype that accepts digits and printable characters (for example, raw, alphanumeric, printable).
Arguments Optional. The printf style formatting string; for example, “%.2f”.
Examples Data:
0x123C, unpack(%.2f)
Results in:
-1.23
Editing functions
Editing filter functions edit the data in the current blob area; for example, adding data or eliminating data or extra spaces. With some of the filter functions in this category, you can use octal escape sequences or ASCII characters. When using octal escape sequences in a filter’s arguments, use “\NUL” instead of “\000” to indicate a null value.
append()
Description Adds the data in the argument string (for example, add literals, or punctuation values to an existing field or component) to the end of the current blob area.
Arguments The text you want to add to the blob area; for example, “M.D.”.
delimit()
Description Removes all data from the current blob area that follows a specific character as identified by the value in the argument, and also removes the specified character. Adjusts its internal information to the new shorter length value. This function works from left to right in the blob area and stops when it reaches the first occurrence of the specified character.
Arguments The character that delimits the field; for example, “ (quote) or \ (backslash) or , (comma).
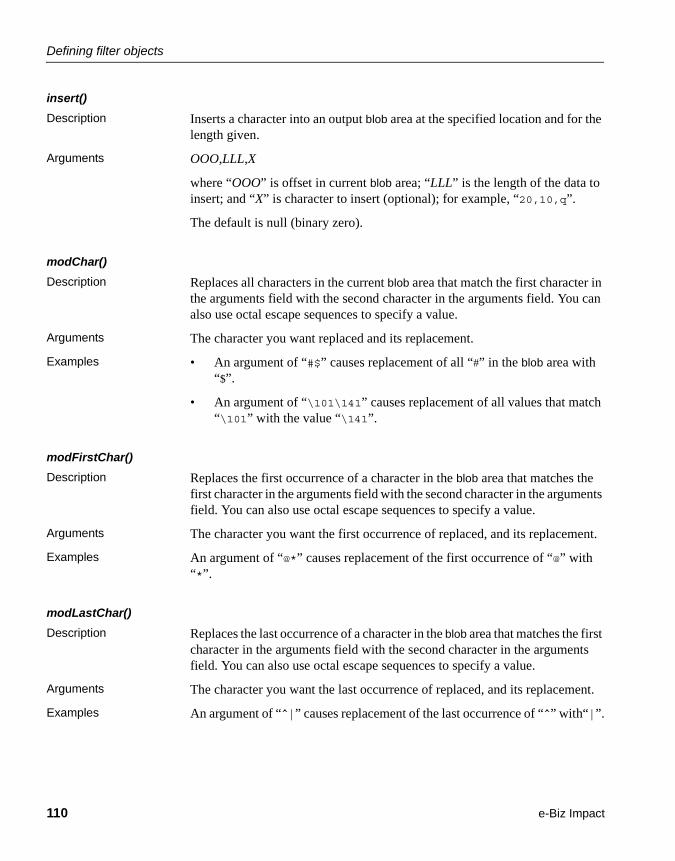
Defining filter objects
110 e-Biz Impact
insert()
Description Inserts a character into an output blob area at the specified location and for the length given.
Arguments OOO,LLL,X
where “OOO” is offset in current blob area; “LLL” is the length of the data to insert; and “X” is character to insert (optional); for example, “20,10,q”.
The default is null (binary zero).
modChar()
Description Replaces all characters in the current blob area that match the first character in the arguments field with the second character in the arguments field. You can also use octal escape sequences to specify a value.
Arguments The character you want replaced and its replacement.
Examples • An argument of “#$” causes replacement of all “#” in the blob area with “$”.
• An argument of “\101\141” causes replacement of all values that match “\101” with the value “\141”.
modFirstChar()
Description Replaces the first occurrence of a character in the blob area that matches the first character in the arguments field with the second character in the arguments field. You can also use octal escape sequences to specify a value.
Arguments The character you want the first occurrence of replaced, and its replacement.
Examples An argument of “@*” causes replacement of the first occurrence of “@” with “*”.
modLastChar()
Description Replaces the last occurrence of a character in the blob area that matches the first character in the arguments field with the second character in the arguments field. You can also use octal escape sequences to specify a value.
Arguments The character you want the last occurrence of replaced, and its replacement.
Examples An argument of “^|” causes replacement of the last occurrence of “^” with“|”.

CHAPTER 3 Building Production Objects
TRAN-IDE Guide 111
modLeadChar()
Description Replaces all leading characters in the current blob area that match the first character in the arguments field with the second character in the arguments field. You can also use octal escape sequences to specify a value.
Arguments The character you want replaced, and its replacement.
Examples An argument of “#$” causes replacement of leading “#” with “$”.
modTrailChar()
Description Replaces all trailing characters specified in the arguments from the current blob area. You can also use octal escape sequences to specify a value.
Arguments The character you want replaced, and its replacement.
Examples • An argument of “#$” causes replacement of trailing “#” with “$”.
• An argument of “\NUL\003” causes replacement of trailing”\000” with “\003”.
modPattern()
Description Replaces the characters specified in the arguments from the current blob area. You can use octal escape sequences to specify a value.
Arguments Search pattern | replacement pattern.
Examples An argument of “\012123|A\010BC” causes replacement of all “<FORM FEED>123” with “A<LINE FEED>BC”.
snip()
Description Removes part of the current output blob area at the specified location (offset) and for the given length.
Arguments OOO,LLL
where “OOO” is the offset in current blob area; “LLL” is the length to cut with a maximum of 32767. To cut to end of blob, use the maximum value.
Examples 012,003 specifies that at offset position 12, remove 3 characters.
strInsChar()
Description Inserts a string into the current blob area following the first occurrence of the specified character. You can also use octal escape sequences for the specified character. Use a comma or a pipe to separate the arguments.

Defining filter objects
112 e-Biz Impact
Arguments character, string
where “character” is the character after which to insert the string, and “string” is the data to insert.
Examples $,new data specifies that after the first $, insert “new data”.
strInsert()
Description Inserts a string into the current blob area at the specified offset location (optional). If you do not specify an offset, the filter inserts the string at the beginning of the blob area. When not using an offset, the string must start with an alphabetic character. Use a comma to separate the arguments.
Arguments offset,string
where “offset” is the location to insert the string, starting from zero (0), and
“string” is the data to insert.
Examples • “25,123ABC” specifies that at offset position “25”, insert “123ABC”.
• “ABC123” specifies to insert “ABC123” at the beginning of the current blob area (position 0).
• “0,123ABC” specifies to insert “123ABC” at the beginning of the current blob area (position 0).
strInsPattern()
Description Inserts a string into the current blob area following the first occurrence of the specified pattern. Use a comma or a pipe to separate the arguments. The pattern cannot contain a comma or a pipe; the filter treats it as the argument “separator.”
Arguments pattern,string
where “pattern” is the pattern after which to insert the string, and “string” is the data to insert.
Examples • ^^^^,new data specifies that after the first occurrence of “^^^^”, insert “new data”.
• “put here|new data” specifies that after the first occurrence of “put here”, insert “new data”.

CHAPTER 3 Building Production Objects
TRAN-IDE Guide 113
zap()
Description Removes the characters listed in the arguments from the current blob area. You cannot use octal escape sequences to specify a value.
Arguments The characters you want removed.
Examples • An argument of “#” causes removal of all “#” from the blob area.
• An argument of “and” causes removal of all “a”, “n”, and “d” characters.
zapChar()
Description Removes the character specified in the arguments from the current blob area. You can also use octal escape sequences to specify a value.
Arguments The character you want removed.
Examples • An argument of “#” causes removal of all “#” from the blob area.
• An argument of “\003” causes removal of all “\003” values from the blob area.
zapFirstChar()
Description Removes the first occurrence of the character specified in the arguments from the current blob area. You can also use octal escape sequences to specify a value.
Arguments The character that you want the first occurrence of removed.
Examples An argument of “@” causes removal of the first occurrence of “@” from the blob area.
zapLastChar()
Description Removes the last occurrence of the character specified in the arguments from the current blob area. You can also use octal escape sequences to specify a value.
Arguments The character that you want the last occurrence of removed.
Examples An argument of “&” causes removal of the first occurrence of “&” from the blob area.
zapLeadChar()
Description Removes all leading characters specified in args from the current blob area. You can also use octal escape sequences to specify a value.

Defining filter objects
114 e-Biz Impact
Arguments None.
Examples An argument of “#” causes removal of leading “#” from the blob area.
zapLeadSpaces()
Description Removes all leading spaces from the current blob area.
Arguments None.
zapPattern()
Description Removes the sequence of characters specified in the arguments from the current blob area. You cannot use octal escape sequences to specify a value.
Arguments The pattern of characters you want removed.
Examples An argument of “123ABC” causes removal of all “123ABC” from the blob area.
zapRange()
Description Removes the range of characters specified in the arguments from the current blob area. You can also use octal escape sequences to specify a value.
Arguments The beginning and end of the range of characters that you want removed.
Examples • An argument of “az” causes removal of all characters from “a” to “z” inclusive.
• An argument of “\133\177” causes removal of all characters from “[“ to hexadecimal “7F” inclusive.
zapSpaces()
Description Removes all spaces from the current blob area.
Arguments None.
zapTrailChar()
Description Removes all trailing characters specified in the arguments field from the current blob area. You can also use octal escape sequences to specify a value.
Arguments The character you want removed.
Examples • An argument of “#” causes removal of all trailing “#” values.
• An argument of “\003” causes removal of a trailing octal values that match “\003”.

CHAPTER 3 Building Production Objects
TRAN-IDE Guide 115
zapTrailSpaces()
Description Removes all trailing spaces from the current blob area.
Arguments None.
Text manipulation functions
These functions manipulate the data content of the current blob area.
Note If the field filtered by these functions has a zero length, the filter function returns zero (0). Transaction production treats this return as a failure. To allow a zero length on the field, do one of the following:
• Use a rule-level error function to trap this condition and force a continuation of processing.
• Use rule-level qualification to skip the whole transaction.
• Provide a default value in the related field object.
squish()
Description Removes white space (blanks) between a comma and any value that follows it. Use this filter function to shrink words into a single, unified whole.
Arguments None.
ToLower()
Description Converts alphabetic characters in the current blob area to lower case. Returns the number of characters filtered.
Arguments None.
ToUpper()
Description Converts alphabetic characters in the current blob area to upper case. Returns the number of characters filtered.
Arguments None.

Defining filter objects
116 e-Biz Impact
trim()
Description Starts from the blob area’s right-most position and removes trailing spaces and/or form manipulation control characters until it finds a specific character, as identified by the argument, or finds another character. If it finds the character in the argument, it also removes that character from the blob area. Form manipulation control characters include FF, LF, CR, VT, HT, and TAB. The function then adjusts its internal data about the current blob area’s length to the new value.
Arguments A character that delimits the trailing spaces deletion.
wordcap()
Description Capitalizes the first letter of every word in the current data field. Words are data elements in the current data field that are delimited by spaces, tabs, or backspace characters.
Arguments None.
Date/time functions
These functions append the date and/or time in a specific format to the current output blob area.
currDateHL7()
Description Adds the current date in HL7 format YYYYMMDDHHMMSS#PPPP where “#PPPP” is plus or minus hours and minutes from Greenwich Mean Time (GMT).
Arguments None.
Examples “0844” is 8 hours and 44 minutes from GMT.
currEuroDate()
Description Adds the current date in the format: DD.MM.YYYY; for example, “20.12.2005”.
Arguments None.
currMMDDYY()
Description Adds the current date in the format MMDDYY; for example, “032005”.
Arguments None.

CHAPTER 3 Building Production Objects
TRAN-IDE Guide 117
currMMDDYYSlash()
Description Adds the current date in the format MM/DD/YY; for example, “02/17/05”.
Arguments None.
currMMDDYYYY()
Description Adds the current date in the format MMDDYYYY, for example, “09072005”.
Arguments None.
currYYMMDD()
Description Adds the current date in the format YYMMDD; for example, “050501”.
Arguments None.
currHHMMSS()
Description Adds the current time in the format HHMMSS; for example, “231104”.
Arguments None.
currHHMMSSColon()
Description Adds the current time to current output blob area in the format HH:MM:SS.
Arguments None.
fmtAge()
Description Calculates as an age the difference between the current date and the date in the current blob area, and replaces the current blob area with the result. If the date in the current blob area is in the future, this function returns the difference as a negative value. The date in the current blob area must be in one of the following formats—yymmdd, yyyymmdd, yy/mm/dd, or yyyy/mm/dd.
Arguments Date Format – use one or more format specifiers and any ordinary characters. Valid specifiers are %y for the age in years, %d for the remainder of the age in days (use with the %y specifier), and %D for the entire age in days.
• Year 1900 Base – use this option when both dates being passed have a 1900 base century (1900 – 1999). For example, the two dates that are passed are 85/03/29 and 99/03/29. When Year 1900 Base is selected, 85 and 99 are considered to be the years 1985 and 1999.

Defining filter objects
118 e-Biz Impact
• Year 2000 Base – use this option when both dates being passed have a 2000 base century (2000-2999). For example, the two dates that are passed are 01/03/29 and 05/03/29. When Year 2000 Base is selected, 01 and 03 are considered to be 2001 and 2003.
• Trust Current OS Base – use this option when you want to apply the base century of the operating system (OS) being used to the dates being passed. For example, the two dates that are passed are 85/03/29 and 99/03/29. When Trust Current OS Base is selected, 85 and 99 are considered to be 1985 and 1999 if the Current OS Base is also a 1900 base century, or 2085 and 2099 if the Current OS Base is a 2000 base century.
• Window Year – use this option when you want to set a two-digit window year to be applied by the engine to determine base century of the dates passed. Enter the two-digit window year in the field next to the Window Year option. If the two-digit dates that are passed are greater than the number in the Window Year field, the engine assigns a 1900 base century. If the two-digit dates are less than or equal to that number, the engine assigns a 2000 base century.
Examples The two-digit date in the Window Year field is “50”. The two dates passed are “01/01/01” and “99/12/31”. The 01 and 99 are compared to the 50 that is in the Window Year filed, and 01 is assigned a 2000 base (2001) because it is less than or equal to 50, and the 99 is assigned a 1900 base (1999) because it is greater than 50.
When setting the Window Year date, if you set it to a date that is low, you must increase it to before the end of the year so the engine does not revert to 1900 when the year is over.
fmtCurrDate()
Description Adds the current date and/or time to the current output blob area. Format depends on the format specifier used. All characters that are not format specifiers are copied unchanged into the output blob area in the same position as they are in the arguments.
This string consists of zero or more conversion specifications and ordinary characters. Ordinary characters, such as dashes, are copied directly into the buffer. A conversion specification consists of a percent sign and one other character.

CHAPTER 3 Building Production Objects
TRAN-IDE Guide 119
Arguments Date Format – any format specifier that is valid with the C function strftime(), and any ordinary characters; for example, “%m - %d - %y”.
Note Refer to your platform and version-specific C developers guide for the valid strftime() arguments available to you. These arguments may vary depending on platform and OS version.
fmtDateDiff()
Description Calculates the difference between the date in the current blob and the date specified in either the FieldObj argument or the Datalink argument, and replaces the current blob area with the result. The date in the current blob area must be in one of the following formats: yymmdd, yyyymmdd, yy/mm/dd, or yyyy/mm/dd.
Note If either of the dates you are passing have a base year of 1800, you must use either the yyyymmdd or yyyy/mm/dd format. If the date specified in either the FieldObj argument or the Datalink argument is earlier, chronologically, than the current blob, the result is a negative number.
Arguments • Format – enter the output format:
• %Y – years between two dates, without limitation to a 365 day year. For example, the two dates passed are 00/01/01 and 01/01/01, with a format argument of %Y. The output would be 1, even though the year 2000 actually has 366 days.
• %y – total days between the two dates, divided by 365. For example, The two dates passed are 00/01/01 and 01/01/01, with a format argument of %y. The output would be 1, even though the year 2000 actually has 366 days.
• %D – total days between the two dates. For example, the two dates passed are 00/01/01 and 01/01/01, with a format argument of %D. The output would be 366, because the year 2000 is a leap year and has 366 days.
• FieldObj – enter a date.
• Datalink – enter a date.
Examples • With a Format argument field of:
%D, %Y, %y, %r

Defining filter objects
120 e-Biz Impact
a datalink date of “01/01/01”, and a current blob date of “00/01/01”, the output is:
366,1,0,1,1
• With a Format argument field of:
%D, %Y, %y, %r
a current blob date of “01/01/01”, and a datalink date of “00/01/01”, the output is:
-366,-1,0,-1,-1
fmtDate()
Description Converts from an input date format to an output date format. The format of the incoming data can be described by a field object, a datalink, or a literal. The fields are mutually exclusive. If no field object is specified, the datalink is used; if no datalink is specified, the literal is used.
The format of the incoming date is specified using any number of these characters and any other ordinary characters:
The output format must be described by a literal, using C date-formatting specifiers. YYJJJ formats use a century value based on the option button selected in the Filter Information window. In the Filter Information window you can select a 1900 or 2000 year base. You can also trust the current OS base.
Arguments • In FieldObj – the name of a field object containing the date format.
• In Datalink – the name of a datalink object containing the date format.
• In Literal – a format specifier using the letters above, and any ordinary characters.
• Out – any format specifier that is valid with the C function strftime(), and any ordinary characters.
Character Description
D Day of the month.
M Month of the year.
Y Year.
J Julian date (1-366).
j Julian date (0-365).
W Day of the week, starting Sunday (1-7).
w Day of the week, starting Sunday (0-6).

CHAPTER 3 Building Production Objects
TRAN-IDE Guide 121
Examples When In Literal is “MMDDYY” (as in 123197) and Out is “%m - %d - %y”, the result becomes “12 - 31 - 97”.
Note Refer to your platform and version-specific C developers guide for the valid strftime() arguments available to you. These arguments may vary depending on platform and OS version.
fmtGregorian()
Description Converts the incoming data from a Gregorian format (YYMMDD or YYYYMMDD) to the format indicated by the arguments and places it into the current output blob area.
Arguments Date Format – any format specifier that is valid with the C function strftime() and any ordinary characters.
• Year 1900 Base – use this option when both dates being passed have a 1900 base century (1900 – 1999). For example, the two dates that are passed are 85/03/29 and 99/03/29. When Year 1900 Base is selected, 85 and 99 are considered to be the years 1985 and 1999.
• Year 2000 Base – use this option when both dates being passed have a 2000 base century (2000-2999). For example, the two dates that are passed are 01/03/29 and 05/03/29. When Year 2000 Base is selected, 01 and 03 are considered to be 2001 and 2003.
• Trust Current OS Base – use this option when you want to apply the base century of the operating system being used to the dates being passed. For example, the two dates that are passed are 85/03/29 and 99/03/29. When Trust Current OS Base is selected, 85 and 99 are considered to be 1985 and 1999 if the current OS base is also a 1900 base century, or 2085 and 2099 if the current OS base is a 2000 base century.
• Window Year – use this option when you want to set a two-digit window year to be applied by the engine to determine base century of the dates passed. Enter the two-digit year in the field next to the Window Year option. If the two-digit dates that are passed are greater than the number in the Window Year field, the engine assigns a 1900 base century. If the two-digit dates are less than or equal to that number, the engine assigns a 2000 base century.
Defining filter objects
122 e-Biz Impact
Examples %D, %Y
Note When setting the Window Year date, if you set it to a date that is low, you must increase it before the end of that year so the engine does not revert to 1900 when that year is over.
Refer to your platform and version-specific C developers guide for the valid strftime() arguments available to you. These arguments may vary depending on platform and OS version.
fmtJulian()
Description Converts the incoming data from Julian format (YYJJJ or YYYYJJJ) to the format indicated by the arguments and places it into the current output blob area.
Arguments Date Format – any format specifier that is valid with the C function strftime() and any ordinary characters.
• Year 1900 Base – use this option when both dates being passed have a 1900 base century (1900 – 1999). For example, the two dates that are passed are 85/03/29 and 99/03/29. When Year 1900 Base is selected, 85 and 99 are considered to be the years 1985 and 1999.
• Year 2000 Base – use this option when both dates being passed have a 2000 base century (2000-2999). For example, the two dates that are passed are 01/03/29 and 05/03/29. When Year 2000 Base is selected, 01 and 03 are considered to be 2001 and 2003.
• Trust Current OS Base – use this option when you want to apply the base century of the operating system being used to the dates being passed. For example, the two dates that are passed are 85/03/29 and 99/03/29. When Trust Current OS Base is selected, 85 and 99 are considered to be 1985 and 1999 if the current OS base is also a 1900 base century, or 2085 and 2099 if the current OS base is a 2000 base century.
• Window Year – use this option when you want to set a two-digit window year to be applied by the engine to determine base century of the dates passed. Enter the two-digit year in the field next to the Window Year option. If the two-digit dates that are passed are greater than the number in the Window Year field, the engine assigns a 1900 base century. If the two-digit dates are less than or equal to that number, the engine assigns a 2000 base century.
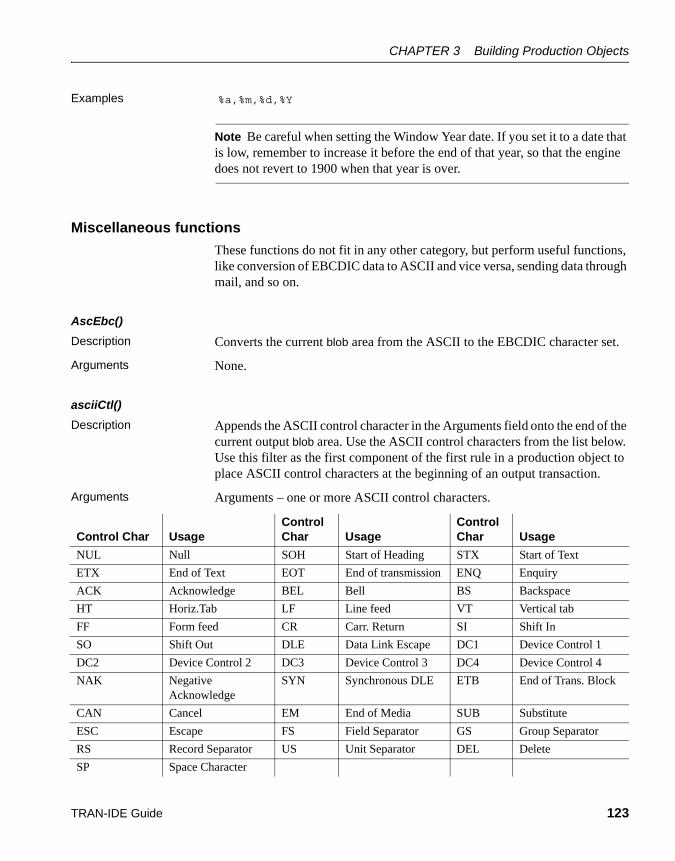
CHAPTER 3 Building Production Objects
TRAN-IDE Guide 123
Examples %a,%m,%d,%Y
Note Be careful when setting the Window Year date. If you set it to a date that is low, remember to increase it before the end of that year, so that the engine does not revert to 1900 when that year is over.
Miscellaneous functions
These functions do not fit in any other category, but perform useful functions, like conversion of EBCDIC data to ASCII and vice versa, sending data through mail, and so on.
AscEbc()
Description Converts the current blob area from the ASCII to the EBCDIC character set.
Arguments None.
asciiCtl()
Description Appends the ASCII control character in the Arguments field onto the end of the current output blob area. Use the ASCII control characters from the list below. Use this filter as the first component of the first rule in a production object to place ASCII control characters at the beginning of an output transaction.
Arguments Arguments – one or more ASCII control characters.
Control Char UsageControl Char Usage
Control Char Usage
NUL Null SOH Start of Heading STX Start of Text
ETX End of Text EOT End of transmission ENQ Enquiry
ACK Acknowledge BEL Bell BS Backspace
HT Horiz.Tab LF Line feed VT Vertical tab
FF Form feed CR Carr. Return SI Shift In
SO Shift Out DLE Data Link Escape DC1 Device Control 1
DC2 Device Control 2 DC3 Device Control 3 DC4 Device Control 4
NAK Negative Acknowledge
SYN Synchronous DLE ETB End of Trans. Block
CAN Cancel EM End of Media SUB Substitute
ESC Escape FS Field Separator GS Group Separator
RS Record Separator US Unit Separator DEL Delete
SP Space Character

Defining filter objects
124 e-Biz Impact
Examples • ETX appends an ETX to the current output blob area.
• CR,LF appends the sequence of CRLF to the current output blob area.
binaryVli()
Description Generates either an 8-bit or a 16-bit binary variable length indicator (VLI) for the current blob area and places the VLI either at the beginning or the end of that blob area, depending on the information in the Arguments field. Use this function, or the formatted VLI function in a production object’s post-filter, to calculate the VLI for the entire output transaction.
Default (no arguments included) is a 16-bit VLI placed at the beginning of the blob area.
Arguments Arguments – “1” is 8-bit, “2” is 16-bit, and “post” specifies to build trailing VLI.
Examples • “post” builds a 16-bit trailing VLI.
• “2post” is same as “post”.
• “1” builds an 8-bit leading VLI.
• “1post” builds an 8-bit trailing VLI.
charTranslate()
Description Translates data from one character set to another.
Arguments • Source – the character set of the source data.
• Target – the character set into which the source data should be translated.
The characters sets available for substitution for either source or target are ASCII, BCDIC, T-11 EBCDIC, and TN EBCDIC.
crc16()
Description Appends a 16-bit CRC (Cyclical Redundancy Check) value to an output blob area in the format HIGHBYTELOWBYTE. The function processes the entire output blob area to compute the 16-bit value.
Arguments Arguments – optional. Enter “pre” or “prefix” (without the quotes) to place the CRC value at the front of the output blob area.

CHAPTER 3 Building Production Objects
TRAN-IDE Guide 125
cutColumn()
Description Replaces the value in the current blob with the value contained in the column specified by the argument. To use this filter, the content of the current blob must consist of columns of data with each column separated by the character specified in the argument. An example of data fitting this format is “here^is^some^data^”. This example has four columns, each separated by a “^” character.
If the column specified in the argument does not exist or is empty, the function fails.
Arguments Column Number[,Separator] – where Column Number is the number of the column whose contents you want to use to replace the value of the current blob, and Separator is the character that separates each column of data in the blob; for example, “3,#”. If a separator is not specified, the filter uses “^” by default.
Examples Data:
Here|are|6|columns|of|data|cutColumn(4,|)
Results in:
columns
dbAssemble()
Description Retrieves data from collection files (obtains collection file names by calling dbDiskList) into a temporary Binary Search Tree (BST), and replaces the current blob data with the sorted data from the BST, inserting an optional separator string between collection data in the current blob.
Returns “MCMEM” if BST cannot be completed.
Retrieves only the data from collection files that match file name mask (key). Before end of function, the temporary BST is completely removed from memory.
Arguments • Table – literal name of the collection on file subdirectory; dbDiskList error is blank or not found.
• Key Field – enter tor select the field from which to retrieve the data.
• Key Datalink – enter tor select the datalink for the field from which to retrieve the data.
• Key Lit – enter the optional literal string by which to separate the output data.

Defining filter objects
126 e-Biz Impact
• Sep Lit – enter the optional literal separator by which to separate the output data.
dbDelete()
Description Deletes the specified entry from the referenced collection file.
Arguments • Table – the name of the collection file.
• Key Field – the entry to delete.
• Key Datalink – the datalink for the entry to delete.
dbDiskAgeList()
Description The dbDiskAgeList built-in function builds up a key list based on the age of keys rather than using a mask on the key name like memKeyList.
Arguments See “memKeyList()” on page 131 for a description of this function’s arguments.
dbDiskList()
Description Finds the elements in the referenced collection file that match a pattern and writes a list of those elements to a file, separated by a literal string.
Arguments • Table – the name of the collection file.
• Key Field – the entry for which to search.
• Key Datalink – the datalink for the entry to for which to search.
• Key Lit – the literal string by which to separate the elements in the list.
• Sep Lit – the literal separator by which to separate the elements in the list.
dbInsert()
Description Copies the contents of the current blob area to the referenced collection file.
Arguments • Table – the name of the collection file.
• Key Field – enter or select the field containing the data to copy and insert.
• Key Datalink – enter or select the datalink for the field containing the data to copy and insert.

CHAPTER 3 Building Production Objects
TRAN-IDE Guide 127
dbSelect()
Description Copies the specified entry from the referenced collection file to the current blob area in the production object. The dbSelect() filter writes over the current contents of the blob area rather than concatenating the entry onto the current contents of the blob area. Call this filter from within an empty rule object each time you want to copy an entry from a collection file to the output transaction.
Arguments • Table – the name of the collection file.
• Key Field – enter or select the field containing the data to copy.
• Key Datalink – enter or select the datalink for the field containing the data to copy.
EbcAsc()
Description Converts the current blob area from the EBCDIC to the ASCII character set.
Arguments None.
email()
Description Sends the current blob area to the destination specified in the argument. The content of the argument is the e-mail destination.
Arguments Dest. – the e-mail address where the current blob area should be mailed.
emailByFld()
Description Sends the current blob area to the e-mail destination specified in the argument.
Arguments Dest Fld – the field that contain the e-mail address where the current blob area should be mailed.
emailByData()
Description Sends the current blob area to the destination specified in the argument.
Arguments Dest Data – the datalink that contains the e-mail address where the current blob area should be mailed.

Defining filter objects
128 e-Biz Impact
formattedVli()
Generates a variable length indicator (VLI) for the current blob area and places the VLI either at the beginning or the end of that blob area. The formatting and position of the VLI depend on the information in the argument. Use this function, or the binaryVli function in a production object’s post-filter, to calculate the VLI for the entire output transaction.
The default (no arguments included) is a 16-bit VLI placed at the beginning of the blob area.
Arguments Format – format-control specifiers, as follows: %<len><type>, where <len> is the size of the VLI in bytes, 0 for leading zero, and <type> is any one of: “i” for integer, “u” for unsigned integer, “d” for decimal, “o” for octal, “orx” for hexadecimal. Entering “post” anywhere in the arguments generates a trailing VLI.
Examples When the blob contains “12345”:
• %04dpost - builds a 4-byte, decimal, trailing VLI (“123450005”).
• %04d “;” – builds a 4-byte, decimal, leading VLI, with the “;” separator (“0005;12345”).
• %04d “;” post – builds a 4-byte, decimal, leading VLI, with the “;” separator (“12345;00005”).
• %02x – builds a 2-byte, hexadecimal, leading VLI (“0512345”).
• %010i – builds a 10-byte, integer, leading VLI (“000000000512345”).
• %03opost – builds a 3-byte, octal, trailing VLI (“12345005”).
Note If you do not want to not have the length “0” filled, remove the “0” from the command; for example, “%04dpost = %4dpost”.
loadFile()
Description Copies the contents of the file specified in the argument and places it in the current blob area, overriding the current contents of the blob.
Arguments Use only one of the available argument fields to identify the file to read. The argument can include a path or just the filename. When the argument includes a path, always use forward slashes (/). Leave the argument fields blank to use the contents of the current blob as the argument to the filter.
• File – the name of the file to read.

CHAPTER 3 Building Production Objects
TRAN-IDE Guide 129
• FieldObj – the name of the field object containing the name of the file to read.
• Datalink – the name of the datalink object containing the name of the file to read.
logger()
Description Appends the current blob area to the file name in the arguments. The file name can include its location. If the location is not included, then the file should reside in the current user’s PATH environment variable. If the function cannot find the file, it attempts to build the file and write to it. If the function cannot open the file, or cannot write to it, the function returns the system’s error number as a negative value to transaction production. Transaction production indicates in the current xlog file which operation failed (read or write), what the return value was, and ends processing of the current production object.
Arguments File – the location (optional) and name of a file to which the current blob area should be appended; for example, “/usr/impact/logfiles/accounting.log”.
lrc()
Description Adds an 8-bit or 16-bit LRC (Longitudinal Redundancy Check) value to the output blob area. The function processes the current output blob area to compute the value. Format of a 16-bit value is “HIGHBYTELOWBYTE”.
Arguments Arguments – enter “2” to produce a 16-bit value. The default “LRC” is an 8-bit value.
memAssemble()
Description Retrieves node data from the BST specified by table, then replaces the current blob data with the sorted node data, inserting an optional separator string between node data in the current blob. Retrieves data only from nodes with key values that match the key mask.
Arguments • Table – literal name of the table. Generates an error if left blank (MCINPUT) or not found (MCFIND).
Note The Key Field, Key Datalink, and Key Lit arguments are required and mutually exclusive. The first non-null value to occur is used. Generates an error (MCINPUT) if all arguments are null (blank). The “Key..” is used as a mask for a substring search (as opposed to an exact match). Use “*” or “?” as a wildcard. An error is generated (MCFIND) if no data is found.

Defining filter objects
130 e-Biz Impact
• Key Field – name of field object to use as key mask.
• Key Datalink – name of datalink to use as key mask; used only if the Key Field is left blank.
• Key Lit – literal key mask; used only if both the Key Field and Key Datalink are left blank.
• Sep Lit – optional. Literal string to separate node data in the current blob. The default value is “:”.
memDelete()
Description Removes a single node (releasing the node’s allocated memory) from the BST specified by the Table argument; if the table is empty after removing the BST node, the table node is also removed and its allocated memory released.
Arguments • Table – literal name of the table. Generates an error if left blank (MCINPUT) or not found (MCFIND).
Note The Key Field and Key Datalink arguments a required and mutually exclusive. Only one argument is used; that is, the first non-null value to occur in the list. An error is generated (MCINPUT) if both are null (blank). The Key argument value must be exact. An error is generated (MCFIND) if the key is not found.
• Key Field – name of the field object to use as the key.
• Key Datalink – name of the datalink to use as the key; used only if the Key Field argument is left.
memDeleteAll()
Description Removes (releases allocated memory of) all nodes from the table specified by the Argument, or it removes all nodes from all tables if the Argument is blank.
Arguments Arguments – literal name of the table to be completely deleted. Generates an error (MCFIND) if a table is specified but does not exist. If left blank (the default), then all tables are deleted.
memInsert()
Description Adds the current blob data to a new node in the table.

CHAPTER 3 Building Production Objects
TRAN-IDE Guide 131
Arguments • Table – literal name of the table. Generates an error if left blank (MCINPUT). If the table does not yet exist then a new table node is created and added to the table list. The MCMEM error is returned if the memory cannot be allocated for a new table node.
Note The Key Field and Key Datalink arguments are required and mutually exclusive. The first non-null value to occur is used. Generates an error (MCINPUT) if both arguments are null (blank). The “Key..” value must be exact. An error is generated (MCDUPKEY) if the key already exists in the table as specified by the Table argument. The MCMEM error is returned if memory cannot be allocated for the new node.
• Key Field – name of field object to use as the key.
• Key Datalink – name of datalink to use as the key; used only if the Key Field is left blank.
memKeyList()
Description Replaces current blob data with an index (ordered list) of all node key values in the BST specified by the Table argument, inserting an optional separator string between each key value returned. Only retrieves key values that match the key mask.
Arguments • Table – literal name of the table. Generates an error if left blank (MCINPUT) or not found (MCFIND).
Note The Key Field, Key Datalink, and Key Lit arguments are required and mutually exclusive. The first non-null value to occur is used. Generates an error (MCINPUT) if all arguments are null (blank). The “Key..” is used as a mask for a substring search (as opposed to an exact match). Use “*” or “?” as a wildcard. An error is generated (MCFIND) if no matches are found.
• Key Field – literal name of the table. Generates an error if left blank (MCINPUT) or if the specified table is not found (MCFIND).
• Key Datalink – name of datalink to use as key mask; used only if the Key Field is left blank.
• Key Lit – literal key mask; used only if both the Key Field and Key Datalink are left blank.
• Sep Lit – optional. Literal string to separate key names in the current blob. The default value is “:”.

Defining filter objects
132 e-Biz Impact
memSelect()
Description Replaces current blob data with stored data from a node, which is retrieved from the BST specified by the Table argument.
Arguments • Table – literal name of the table. Generates an error if left blank (MCINPUT) or not found (MCFIND).
Note The Key Field and Key Datalink arguments are required and mutually exclusive. The first non-null value to occur is used. Generates an error (MCINPUT) if all arguments are null (blank). The Key value must be exact. Generates an error (MCFIND) if the key is not found.
• Key Field – name of the field object to use as the key.
• Key Datalink – name of datalink to use as key mask; used only if the Key Field is left blank.
memTableAgeList()
Description This function builds a key list based on the key age rather than using a mask on the key name, like memKeyList.
Arguments See“dbDiskAgeList()” on page 126 for a description of the arguments.
memUpdate()
Description The memUpdate function works like memInsert except if a key already exists, it overwrites the data behind the key, as opposed to failing. In reverse mode, the function appends the data.
Arguments See “memInsert()” on page 130 for a description of the arguments.
shellCmd()
Description Executes the UNIX command, or shell script file reference, in the arguments. The current blob area is not passed as an argument to the command or shell script.
Arguments • Cmd – a UNIX command or the name of a shell script file; for example, “myshscript”. If you enter the name of a shell script file, the file must exist in one of the directories included in your PATH environment variable.
• Status – optional. The exit status of the command. If the exit status does not match the status specified in this argument, then the shellCmd() filter function fails and returns a value of zero.
CHAPTER 3 Building Production Objects
TRAN-IDE Guide 133
Select a status from the drop-down list or type a status in the entry field using this format (without the brackets):
<comparison operator><blank space><integer value>
If the status entered does not match this format, the function fails and returns a value of -1.
If you do not use the Status argument, the filter does not fail regardless of the exit status of the command. However, it could still fail for other reasons.
tblEdit()
Description Warning! Use this function only with tables that are in a tag/value format.
Allows you to add, change, or delete a translation table file. The incoming transaction contains the delimiter (optional), the name of the translation table file to edit (optional), the action to perform on the table (add, change, delete, reload), the tag, and the value. You can also optionally write an audit trail to the significant event log. The audit trail shows the date and time the filter ran, the name of the filter (tblEdit()), the name of the acquisition module that sent the transaction (SRCRef in the route_rec() call), the directory location of the table, the action performed, the tag, and the value.
Arguments • Table Name – enter the name of the translation table file to edit only if the incoming transaction does not contain the name of the table. To indicate when to write an audit trail to the significant event log, enter “,AUDIT” after the table name in this field. The comma in front of “AUDIT” is required even if you do not enter the table name in this field.
For example, enter:
table_name,AUDIT
where table_name is the name of the translation table file to edit. Enter the table name in this argument only if the incoming transaction does not contain the name of the table.
If the table name is in the incoming transaction, you can enter “,AUDIT”.
• FieldObj – if the incoming transaction does contain the name of the table to edit, enter the field object that contains the table name.
For example, enter “FldObj_name”, where FldObj_name is the name of the field object containing the name of the translation table file to edit.
The production object puts the action to perform on the table (add, change, delete, reload), a delimiter, the tag, the delimiter, and the value.

Defining filter objects
134 e-Biz Impact
The tblEdit filter always uses the character following the action as the delimiter, therefore, the delimiter must be the same between the action and the tag, and between the tag and the value.
The information needed to edit the translation table file can either be part of an incoming transaction or the entire transaction. When it is the production object’s entire input transaction, run this filter in the production object’s post-filters. Otherwise, run this filter from a rule or rule component object.
Warning! The tblEdit() filter reads the entire table from disk, performs the edit, and saves the table back to disk, which can affect throughput.
Error values If the tblEdit() filter fails, e-Biz Impact places one of the following error codes into the error message text. Use the geterrtext() method within an error function to extract this error code from the error message. See “Writing error functions” on page 172.
Examples • Example 1 – in this example, all of the necessary information is in the incoming transaction.
The incoming transaction data is:
^PRCECODE.TBL^C^123-45-678^55.60^
Code Description
0 The arguments to the filter are bad or invalid, or the system is out of memory, or the system suffered a disk I/O failure.
-1 A change failed due to an invalid action code or not enough available memory.
-2 An add failed due to a duplicate key. Seen only in releases prior to e-Biz Impact version 2.19.
-3 An add failed due to not enough available memory.
-4 A delete failed because the key could not be found.
-5 A change failed due to not enough available memory.
-6 File open error on input.
-7 File open error on output.
-8 File write error on output.
-9 File write error on output items.
-10 Rename error on regeneration of translation table.
-11 Backup error on regeneration of translation table.
-12 Unlink error on regeneration of translation table.
-13 Translation table is not in a tag/value format.

CHAPTER 3 Building Production Objects
TRAN-IDE Guide 135
where “^” is the delimiter, “PRCECODE.TBL” is the name of the translation table file to edit, “C” is the action to perform on the table, “123-45-678” is the tag, and “55.60” is the value to change.
The function builds this outgoing transaction:
C^123-45-678^55.60
Note The delimiter does not have to be the same in the outgoing transaction as it is in the incoming transaction.
First the function builds field objects for the four data areas of the incoming transaction.
Next, the function builds rule component objects that place the action, tag, and value into the outgoing transaction.
Last, the function builds a post-filter to run on the outgoing transaction.
Select the tblEdit filter and place the name of the field object that contains the name of the translation table to edit into the FldObj argument field. If desired, place “,AUDIT” into the Tbl Name argument field.
• Example 2 – for this example, the name of the translation table to edit is not present in the incoming transaction.
The incoming transaction data is:
*A*55783*123.45
where “*” is the delimiter, “A” is the action to perform on the table, “55783” is the tag, and “5.60” is the value to change.
The function builds this outgoing transaction:
A*55783*123.45
First the function builds field objects for the three data areas of the incoming transaction.
Next, the function builds rule component objects that place the action, tag, and value into the outgoing transaction.
Last, the function builds a post-filter to run on the outgoing transaction.
Select the tblEdit filter and type the name of the translation table to edit in the Tbl Name argument field. You can put “,AUDIT” after the name of the table to edit.

Defining filter objects
136 e-Biz Impact
• Example 3 – this example shows an incoming transaction that uses a trigger event.
The incoming transaction data is:
xyzzy#003|gamma|
“xyzzy#” indicates that the following information is an addition for the ABC123.TBL file and that the delimiter is a pipe ( | ) symbol. For example, the programmer knows that a trigger event with “xyzzy#” is for the specific table and uses that delimiter. “003” is the tag and “gamma” is the value.
The function builds this outgoing transaction:
A|003|gamma
First, the function builds field objects for the three data areas of the incoming transaction.
Second, the function builds rule component objects that place the action, tag, and value into the outgoing transaction. You know that the action should be “A” because “xyzzy#” indicates an addition to the table.
Last, the function builds a post-filter to run on the outgoing transaction.
Select the tblEdit filter and in the Tbl Name argument, then enter the name of the translation table to edit, and, optionally, enter “,AUDIT”.
writeFile()
Description Writes the contents of the current blob area to the file specified in the arguments.
Arguments Use one of the available argument fields to identify the file in which to write. The argument can include a path or just the filename. When the argument includes a path, always use forward slashes (/). If the subdirectories specified in a path do not exist, the filter attempts to create them. Leave all argument fields blank to use the contents of the current blob as the argument to the filter.
• File – the name of the file in which to write.
• FieldObj – the name of the field object containing the name of the file in which to write.
• Datalink – the name of the datalink object containing the name of the file in which to write.

CHAPTER 3 Building Production Objects
TRAN-IDE Guide 137
Dynamic routing functions
Dynamic routing built-in functions (labelled “TDMRelated” in the Built-in Filter Functions window), allow you to add, delete, or specify destinations for a transaction that are not originally part of the transaction’s route. You can use only destinations or a distributed SFM already defined to the local SFM through destination ID records in the SFM’s configuration file.
Note If one of the destinations you add or specify is a NullDest, or if the transaction ID record in the SFM configuration file specifies a NullDest, only the NullDest is used. Other destinations are ignored.
If the SFM does not recognize a destination as valid, the transaction fails production object qualification. These filter functions do not change the SFM configuration file in any way.
Note Use a dynamic routing function only as part of a post-qualification rule. Any other rule that uses a dynamic routing function is ignored.
When a transaction qualifies for multiple production objects and one or more of those production objects uses dynamic routing, the SFM rejects the transaction.
addDestName()
Description Adds a destination to those already specified for this production object’s output. You can specify up to ten destinations per use of this function, and each destination name can be up to 32-characters long.
Arguments Use only one of the available argument fields to identify the destination to be added to the destination list. Use a carat (^) character to separate each destination name in the argument field; for example “MQB1^MQB2^DST7”.
• Literal – the name of the destination as listed in the SFM configuration file.
• FieldObj – the name of a field object that contains the destination names.
• Datalink – the name of a datalink object containing the destination names.

Defining filter objects
138 e-Biz Impact
addDestNameData()
Description Uses the contents of the current blob to add a destination to those already specified for the production object’s output. The contents of the blob can specify up to ten destinations to add, and each destination name can be up to 32 characters long. Each destination must be separated with a carat (^) character.
Arguments None.
delDestName()
Description Deletes a destination for this production object’s output. You can specify up to ten destinations to delete per use of this function. Use a carat (^) character to separate each destination name in the argument field.
Arguments Use only one of the available argument fields to identify the destination or distributed SFM to be removed. Use a carat (^) character to separate each destination name in the argument field; for example “MQB1^MQB2^DST7”.
• Literal – the name of the destination or distributed SFM as listed in the SFM configuration file.
• FieldObj – the name of a field object containing the destination names.
• Datalink – the name of a datalink object containing the destination names.
delDestNameData()
Description Uses the contents of the current blob to delete a destination for this production object’s output. The contents of the blob can specify up to ten destinations to delete. Each destination must be separated with a carat (^) character.
Arguments None.
setDestName()
Description Overrides all previous destinations specified for this production object’s output with the destination listed in the argument field. You can specify up to ten destinations per use of this function, and each destination name can have a maximum of 32 characters. If you need to specify additional destinations, multiple calls of the setDestName() function should be used. Use a carat (^) character to separate each destination name in the argument field.
Arguments Use only one of the available argument fields to identify the destination to be used as the destination list. Use a carat (^) character to separate each destination name in the argument field; for example “MQB1^MQB2^DST7”.

CHAPTER 3 Building Production Objects
TRAN-IDE Guide 139
• Literal – the name of the destination or distributed SFM as listed in the SFM configuration file.
• FieldObj – the name of a field object that contains the destination names.
• Datalink – the name of a datalink object containing the destination names.
setDestNameData()
Description Overrides all previous destinations specified for this production object’s output with the destination listed in the contents of the current blob. The contents of the blob can specify up to ten destinations, and each destination name can be up to 32 characters long. To specify additional destinations, use multiple calls of the setDestNameData() function. Each destination must be separated with a carat (^) character.
Arguments None.
Non-dynamic routing functions
submit()
Description Submits the data that the filter object is processing back to the SFM via a production record. The name of the production object for which the new transaction is being submitted.
Warning! There must be a routing function name in the SFM configuration file, which cannot be “ENGINE.”
Arguments • ProdObj Field – enter or select the field to which the output will be submitted.
• ProdObj Datalink – enter or select the datalink (variables) for the field to which the output will be submitted.
• ProdObj Lit – the name of the production object as listed in the SFM configuration file.
Note If you have a null character in the data string, but not at the beginning, the data is truncated to the point of the null.

Defining filter objects
140 e-Biz Impact
tranCancel()
Description Specifies the actions that the SFM should perform when a transaction encounters a processing error through a production object. Allows the destination to continue to receive new transactions, just as if the destination had returned a -999 for the transaction. Overrides any error option selections made in the Production Object Options window.
Arguments None.
submitTran()
Description Submits the data that the filter object is processing back to the SFM via a transaction record. If you have a null character in the data string, but not at the beginning, the data is truncated to the point of the null.
Warning! There must be a routing function name in the SFM configuration file, which cannot be “ENGINE.”
Arguments • TranID field – enter or select the field to which the output will be submitted.
• TranID Datalink – enter or select the datalink (variables) for the field to which the output will be submitted.
• TranID Lit – enter the transaction ID.
tranDestID()
Description Appends the ID number (flavor value) of the production object’s destination, as defined in the SFM configuration file, to the current blob area.
Argument None.
tranDestName()
Description Appends the reference name of the production object’s destination, as defined in the SFM configuration file, to the current blob area.
Arguments None.

CHAPTER 3 Building Production Objects
TRAN-IDE Guide 141
tranHalt()
Description Specifies the actions that SFM should perform when a transaction encounters a processing error through this production object. Halts the destination, and prevents it from receiving any further transactions until the unprocessable transaction is placed in the unprocessable log. Overrides any error option selections made in the Production Object Options window.
Argument None.
tranPriority()
Description Warning! Use only in the post-qualification rule in a production object. If you call tranPriority() at any other point during transaction production, it has no effect.
Assigns a priority to the transaction. Whenever e-Biz Impact receives a transaction that has a priority set, it processes that transaction before any non-prioritized transactions. When more than one prioritized transaction is waiting for processing, e-Biz Impact processes transactions from the highest priority to the lowest. If multiple transactions have the same priority, e-Biz Impact processes them based on their timestamp.
A priority set with this builtins filter function overrides a priority assignment in a route or production object setting in the SFM configuration or a priority assignment in the Priority argument in the route_recx() function.
Arguments Priority – enter a number (0 to 255), where 1 is the lowest priority and 255 is the highest.
Note Limit your priorities to 1-16, as 17-255 are reserved. 0 removes a priority set through the Transaction ID record.
tranSerialNo()
Description Appends the serial number assigned by the SFM to the current module to the end of the current blob area. The serial number data is in string format.
Arguments None.
tranSourceName()
Description Appends the source name sent from the input transaction’s acquisition module to the end of the current blob area.
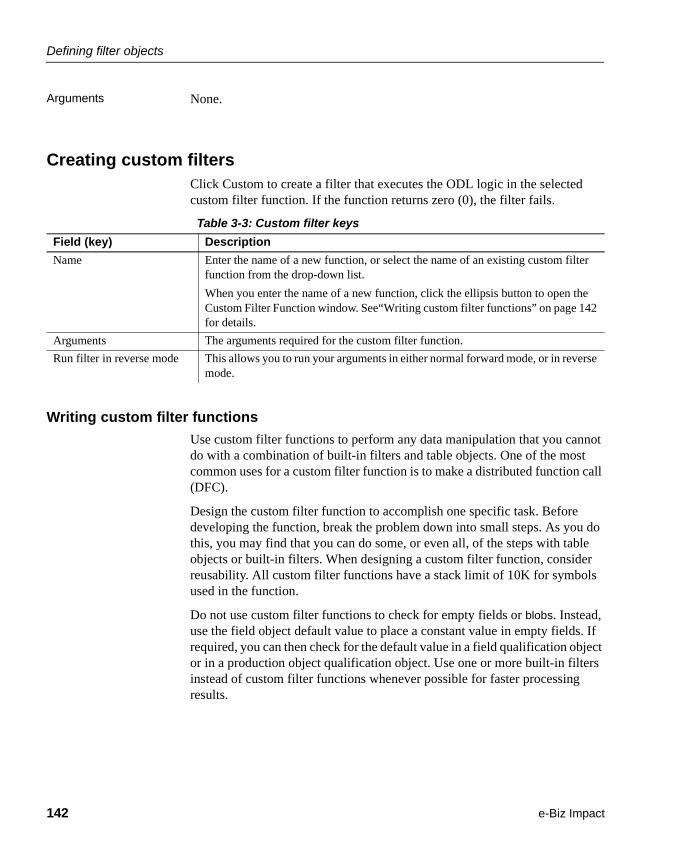
Defining filter objects
142 e-Biz Impact
Arguments None.
Creating custom filtersClick Custom to create a filter that executes the ODL logic in the selected custom filter function. If the function returns zero (0), the filter fails.
Table 3-3: Custom filter keys
Writing custom filter functions
Use custom filter functions to perform any data manipulation that you cannot do with a combination of built-in filters and table objects. One of the most common uses for a custom filter function is to make a distributed function call (DFC).
Design the custom filter function to accomplish one specific task. Before developing the function, break the problem down into small steps. As you do this, you may find that you can do some, or even all, of the steps with table objects or built-in filters. When designing a custom filter function, consider reusability. All custom filter functions have a stack limit of 10K for symbols used in the function.
Do not use custom filter functions to check for empty fields or blobs. Instead, use the field object default value to place a constant value in empty fields. If required, you can then check for the default value in a field qualification object or in a production object qualification object. Use one or more built-in filters instead of custom filter functions whenever possible for faster processing results.
Field (key) Description
Name Enter the name of a new function, or select the name of an existing custom filter function from the drop-down list.
When you enter the name of a new function, click the ellipsis button to open the Custom Filter Function window. See“Writing custom filter functions” on page 142 for details.
Arguments The arguments required for the custom filter function.
Run filter in reverse mode This allows you to run your arguments in either normal forward mode, or in reverse mode.

CHAPTER 3 Building Production Objects
TRAN-IDE Guide 143
A custom filter function return value indicates whether or not e-Biz Impact should continue processing the transaction. A return value of “1” (one) indicates that the filter operation was successful and processing continues. A return value of “0” (zero) indicates that the filter operation was not successful, and causes the SFM to terminate transaction processing and enter the appropriate error function. If the custom filter is attached to a rule or rule component object, it enters the rule object error function; otherwise, it enters the production object error function.
When you finish entering the function, check the statement syntax and make sure your arguments are parsed correctly. The TRAN-IDE tool checks your syntax when you click OK. Syntax checking only ensures that you have not made a syntactical error in your function statements. To check the output of the function, you must test drive a transaction through the related production objects. See “Using the test drive” on page 181.
Use the buttons in the Custom Filter Function window to load or append text files to the code, and to save, print, or cancel your work. Select Public to make the function global (public).
Table 3-4: Arguments
Table 3-5: Custom filter function keys
Key Description
blob *pb A pointer to the current blob. In a pre-filter, the blob contains the field data the filter is acting on. In a post-filter, the blob contains the outgoing transaction that has been built up to that point.
char mode The mode setting. Contains a value of “2” if you set the reverse mode, otherwise contains a value of “1”.
string args A string containing the arguments that you entered in the Filter Information window.
Field (key) Description
Goto Line# Moves the cursor to the specified line of ODL text in the function. Type the line number to go to, then press enter. The ODL text editor moves the cursor to the specified line of text and highlights it.
Warning! Click once on the text or use an arrow key to unselect it before typing any characters, otherwise the selected line is replaced by the new characters.
DFC’s View a list of the current DFC commands, click the down arrow. To define a new DFC command, click the ellipsis button. The Distributed Function Declaration window opens.
Datalinks To view a list of the current datalink definitions, click the down arrow. To define a new datalink, click the ellipsis button. The Datalink Information window opens.

Defining filter objects
144 e-Biz Impact
Alternate error return values
Use the setErrNum(), setErrTxt(), and getAlterrtext() object methods to augment the return value and error text generated by a production object custom filter, error, generic, and qualification functions. This allows you to add a unique error number and error message to each function so that you can immediately determine within which function the processing error occurred.
Use the setErrNum() and setErrTxt() methods to add an alternate error number and error message to the error text generated by the production object. You must use both of these methods for the getAlterrtext() method to function. These methods do not replace the error number and error text generated by the production object, but append extra information to the error message generated by the production object, using the format
tran error text, which can contain line feedsthe alternate error textrv = the alternate error number
When a processing failure occurs, the alternate error values displayed are those of the last function that called one of these methods. For example, a custom filter function that calls these methods fails, and then the error function executed next also uses these methods. The error message generated by the production object contains the alternate error text set by the error function, not that set by the custom filter.
Also, when you use these methods in a function, they set the alternate error text regardless of whether or not the function encounters a processing error. Therefore, if the function that fails does not call the setErrNum() and setErrTxt() methods, but a previously executed function did, the alternate error text generated by the production object does not reflect the function where the processing failure actually occurred.
Use the getAlterrtext() method to read the alternate error number and alternate error message into an integer and string data variables. This is useful if you want to perform specific actions in the production object error function depending on which function encountered the processing error.
Note For detailed information about these functions, see the e-Biz Impact ODL Guide.
Module To place the function into a different module, click the down arrow and select another module. If you put the function into a different module, then you must make the function public.
Field (key) Description

CHAPTER 3 Building Production Objects
TRAN-IDE Guide 145
Creating datalink filtersClick datalink to define a filter that performs the specified operation between the incoming data and the value in the specified datalink and places the result in the datalink. The data in the current blob is always the first operand in the equation, as in: current blob data operation datalink. If the SFM is unable to perform the specified operation, the filter fails.
Table 3-6: Datalink filter keys
Field (key) Description
Datalink The datalink with the value you want to manipulate with this filter. The datalink you select for this type of filter operation must have a numeric datatype. In effect, this option uses the data coming into the filter to operate in some way on the specified datalink, and place the result in the datalink.
Click the down-arrow to the right of the field to select the name from a list of existing datalinks. Click the ellipsis button to open the Datalink Information window to define a new datalink.
Operation Select the operation to perform on the selected datalink from the drop-down list of operations.
Operation action
Datalink types
Datalink operation
Add the input to the datalink.
string, char, blob, float, long, int, short, decimal
Add
Subtract the input from the datalink.
char, float, long, int, short, decimal
Subtract
Multiply the datalink by the input.
char, float, long, int, short, decimal
Multiply
Divide the datalink by the input.
char, float, long, int, short, decimal
Divide
Add 1 to the datalink.
char, float, long, int, short, decimal
Increment

Defining filter objects
146 e-Biz Impact
Creating edit mask filtersClick Edit Mask to create a filter that runs the edit mask against the data in the current blob and replaces the data in the current blob with the result. If e-Biz Impact is unable to run the edit mask; for example, if the data is not the correct type for the mask, the filter fails.
Table 3-7: Edit mask filter keys
You can filter and manipulate data with an edit mask as follows:
• Limit number of characters displayed.
• Suppress leading zeros.
• Add a fixed or floating currency symbol.
• Add comma and/or decimal separators.
• Insert characters.
• Display plus (+) and minus (-) signs.
Subtract 1 from the datalink.
char, float, long, int, short, decimal
Decrement
Place the input into the datalink.
string, char, blob, float, long, int, short, decimal
Set
Clear the datalink value to zero.
string, char, blob, float, long, int, short, decimal
Clear
Perform a modulus operation on the input by the datalink.
char, long, int, short
Modulus
Field (key) Description
Field (key) Description
Edit Mask Enter the edit mask you want to use to massage the input data.
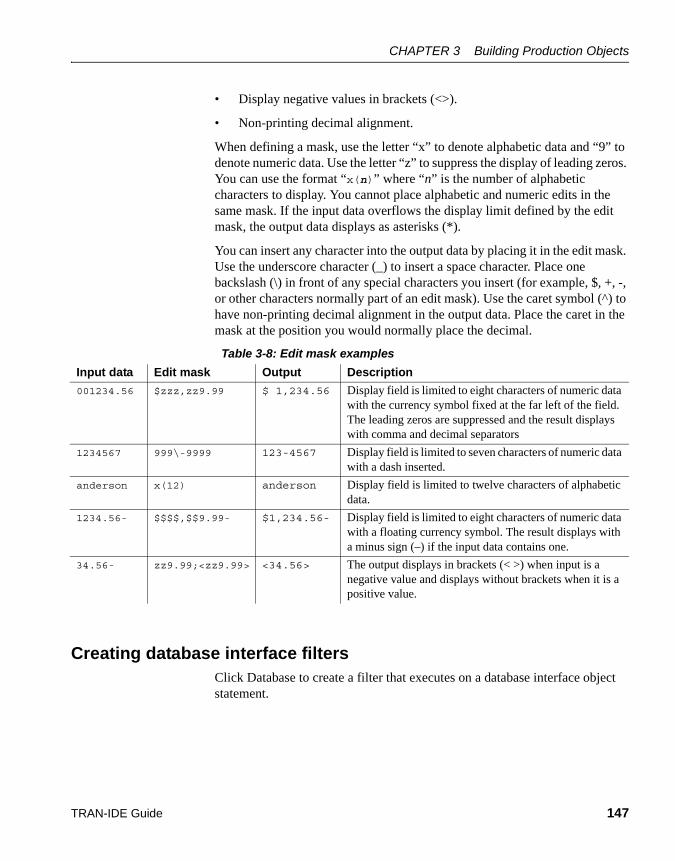
CHAPTER 3 Building Production Objects
TRAN-IDE Guide 147
• Display negative values in brackets (<>).
• Non-printing decimal alignment.
When defining a mask, use the letter “x” to denote alphabetic data and “9” to denote numeric data. Use the letter “z” to suppress the display of leading zeros. You can use the format “x(n)” where “n” is the number of alphabetic characters to display. You cannot place alphabetic and numeric edits in the same mask. If the input data overflows the display limit defined by the edit mask, the output data displays as asterisks (*).
You can insert any character into the output data by placing it in the edit mask. Use the underscore character (_) to insert a space character. Place one backslash (\) in front of any special characters you insert (for example, $, +, -, or other characters normally part of an edit mask). Use the caret symbol (^) to have non-printing decimal alignment in the output data. Place the caret in the mask at the position you would normally place the decimal.
Table 3-8: Edit mask examples
Creating database interface filtersClick Database to create a filter that executes on a database interface object statement.
Input data Edit mask Output Description
001234.56 $zzz,zz9.99 $ 1,234.56 Display field is limited to eight characters of numeric data with the currency symbol fixed at the far left of the field. The leading zeros are suppressed and the result displays with comma and decimal separators
1234567 999\-9999 123-4567 Display field is limited to seven characters of numeric data with a dash inserted.
anderson x(12) anderson Display field is limited to twelve characters of alphabetic data.
1234.56- $$$$,$$9.99- $1,234.56- Display field is limited to eight characters of numeric data with a floating currency symbol. The result displays with a minus sign (–) if the input data contains one.
34.56- zz9.99;<zz9.99> <34.56> The output displays in brackets (< >) when input is a negative value and displays without brackets when it is a positive value.

Defining filter objects
148 e-Biz Impact
Table 3-9: Database interface filter keys
Creating production object filtersClick Prod Obj to create a filter that runs a production object against the data being filtered. The production object output goes into the current blob, unless the No Output option is selected. This filter is used to set datalinks or perform alternate processing of data based on the result of qualification objects.
The production object filter must be in the current project, but in a different module from the one in which the filter object resides, and the production object’s static scope checkbox must be deselected. The production object using the filter object and the production object used as the filter object must not share any objects, except datalinks.
Table 3-10: Production object filter keys
Creating DFC filtersClick DFC to create a filter that makes a DFC call from your production object. This allows you to avoid using ODL to make the DFC call. Use this filter to handle throughput issues.
Table 3-11: DFC filters
Field (key) Description
Database Interface Object Enter or select the database object to use to act on the input data. When you enter a new name, click the ellipsis button to define the new database interface object.
Statement Name Select the statement to be executed against the current blob from the drop-down list.
Use Current Blob Use the current data blob as input for the database interface object.
Allow 0 Result-rows Select this option to prevent the filter from failing if zero rows are modified or selected from the database.
Field (key) Description
ProdObj Select a production object from the drop-down list of available production objects in other modules of the same project whose scope is global.
No Output Select this option to prevent the output of the production object being placed into the current blob.
Name Description
Func Field Enter the name of the field to use or the field from the drop-down list.

CHAPTER 3 Building Production Objects
TRAN-IDE Guide 149
Changing filter objects1 In the main TRAN-IDE window, click the Filters icon.
Double-click the filter you want to modify in the Filter Objects list.
2 When the Filter Information window opens, make your changes to the data.
3 Click OK to update the Filter or click Cancel to cancel any changes to the existing filter.
Deleting filter objectsYou cannot delete the built-ins filter objects. To delete a user-defined filter:
• In the main TRAN-IDE window, click the Filters icon.
• Select the filter you want to delete in the Filter Objects list.
• Click Delete. When the dialog box displays asking for confirmation, click Yes to complete the deletion or click No to cancel the deletion.
Func DL If you do not already have a function field, you can use a function datalink. If you do have a function field and enter a function datalink, the datalink is ignored. To create a function datalink, type it in the space provided or select one from the drop-down list.
Func Lit If you do not have a function field or a function datalink, you can use a function literal. If you do have either one of the other functions, the function literal is ignored. To create a function literal, enter the name.
Flavor This is the DFC function flavor. To increase or decrease the flavor, click the up or down arrows to the right of the field.
Timeout This is how long the DFC call waits for a response before timing out. To increase or decrease the time-out, click the up or down arrows to the right of the field.
Fire and Forget This function sends a DFC call, and does not wait for a response. When this option is selected, the timeout function is ignored.
Flow Control This function appears only when the Fire and Forget option is selected. By enabling this function, you are telling the filter that on every “Nth” call, make a block call using the timeout function. Where “N” is the number of instances that can be spawned by your server.
Name Description

Creating table objects
150 e-Biz Impact
Attaching post-filters to production objects1 Click Pro-Obj in the main TRAN-IDE window.
2 In the Production Objects list, double-click the production objection to which you want to attach a post-filter.
3 In the Production Object Information window, select Production Object | Post Filters from the menu bar. The Production Object Post Filters window opens, displaying the filter objects that act on the output transaction.
You can build post filters in any order, and use the spin buttons at the right to reorder them.
4 You can perform several operations from this window:
• To view the contents of an existing filter, double-click the filter in the list.
• To reuse an existing filter, click Reuse, select the filter in the Add Existing Filter window and click OK.
• To remove a filter from this production object, select the filter and click Unlink.
• Click New to create a new filter. See “Defining filter objects” on page 96.
5 Click OK when you finish to save any changes and additions, and to close the Production Object Post Filters window.
Creating table objectsSelect View | Table Objects or click the Tables icon in the main TRAN-IDE window to display a list of all table objects defined in the current file. The table objects list may include a series of tables that are generic to e-Biz Impact or the list may contain user-defined tables.
To be included in this list, a table object file must reside on the current workstation in the selected table object directory, and the filename must have the three-character extension .tbl.

CHAPTER 3 Building Production Objects
TRAN-IDE Guide 151
Changing the Table Objects directory1 To change where TRAN-IDE looks for and saves tables, select Options |
Table Scan.
2 When the Table Object Directory dialog box opens, enter the directory where you want TRAN-IDE to look for tables in the Directory field.
3 Click OK.
Formatting tablesTable objects can be in a multi-column format and contain as many columns as you require. You can load a table object that is in any format into the Table Maintenance window and edit it.
e-Biz Impact supports these table formats:
• Tag/Value A two-column table. The Tag column contains the data you expect to find in the incoming transaction; the Value column contains the data you want put into the output transaction in place of the input data. Saved in the Tag Value Table (*TBL) format.
• Tokenized value A tag/value table that contains multiple pieces of data (tokens) in the Tokenized Value column with each token separated by the same character. An example of a tokenized value field’s data is:
name^addr^city^st^zip^ID^
Save this format in the Tag Value Table (*TBL) format.
Note This tokenized value format was originally referred to as “multi-column” because the Value column simulated multiple columns. However, because TRAN-IDE still treats the entire value column as one column, when you load a tokenized value table into the Table Maintenance window, the tokenized value column is considered one column.
• Multi-column A table that contains any number of columns. When you use a multi-column table in a filter or qualification object, specify which column to search on for a match to the data in the current blob and which columns to place into the output transaction if data matches.

Creating table objects
152 e-Biz Impact
Creating tables1 To create a new table, click the Tables icon in the main TRAN-IDE
window, then click New below the Table Objects list in the left pane. The Table Maintenance window opens.
Note When you have existing tables, double-click the table name in the Table Objects list. TRAN-IDE loads the table in the Table Maintenance window.
2 Enter the Table Name. The name can be a maximum of eight characters and contain only letters, numbers, and the underscore (_) character. TRAN-IDE uses this name to reference the table in a rule object.
Warning! All table names must be in lowercase letters.
3 Enter an optional Description of the table’s content.
4 Add the columns that you need:
a Click Add Column. The Add Column window appears.
b Enter the Column Name, then select the Datatype from the drop-down list—raw, alpha, or numeric.
Warning! You can access the Datatype only when you first build the table.
c Repeat steps 7a and 7b for each column you need in the table. You now have columns, but no data. Now you need to add rows and the data that each row contains.
d To specify that a column cannot have any duplicate entry, click Edit Column, select Key in the Column Information window, then click OK.
5 After you add columns, click Add Row to add a new row. The row you added is highlighted in the display pane. Add the row data:
a In the Cell Value field, enter the data for the cell where the row and column intersect, then press Enter.
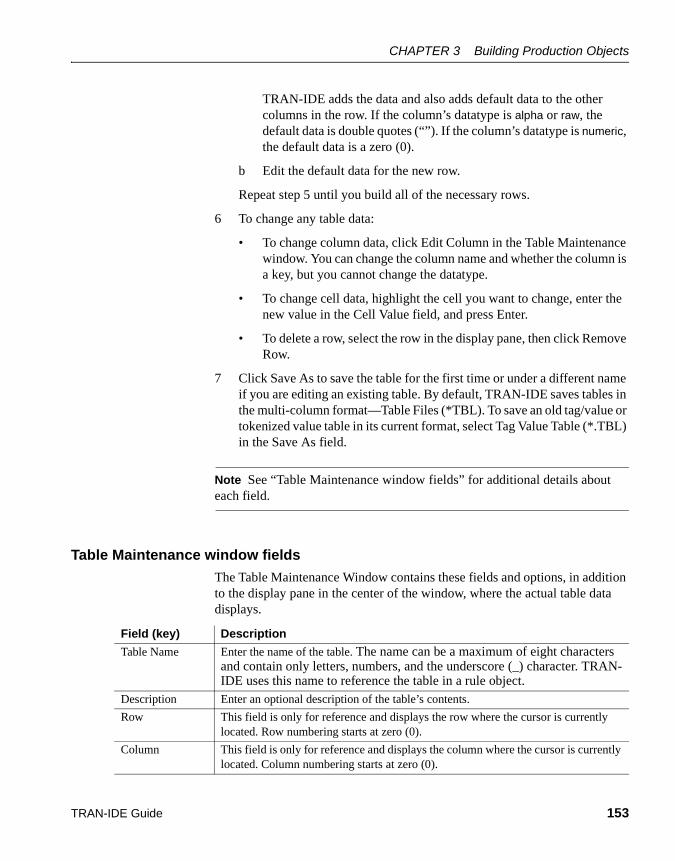
CHAPTER 3 Building Production Objects
TRAN-IDE Guide 153
TRAN-IDE adds the data and also adds default data to the other columns in the row. If the column’s datatype is alpha or raw, the default data is double quotes (“”). If the column’s datatype is numeric, the default data is a zero (0).
b Edit the default data for the new row.
Repeat step 5 until you build all of the necessary rows.
6 To change any table data:
• To change column data, click Edit Column in the Table Maintenance window. You can change the column name and whether the column is a key, but you cannot change the datatype.
• To change cell data, highlight the cell you want to change, enter the new value in the Cell Value field, and press Enter.
• To delete a row, select the row in the display pane, then click Remove Row.
7 Click Save As to save the table for the first time or under a different name if you are editing an existing table. By default, TRAN-IDE saves tables in the multi-column format—Table Files (*TBL). To save an old tag/value or tokenized value table in its current format, select Tag Value Table (*.TBL) in the Save As field.
Note See “Table Maintenance window fields” for additional details about each field.
Table Maintenance window fields
The Table Maintenance Window contains these fields and options, in addition to the display pane in the center of the window, where the actual table data displays.
Field (key) Description
Table Name Enter the name of the table. The name can be a maximum of eight characters and contain only letters, numbers, and the underscore (_) character. TRAN-IDE uses this name to reference the table in a rule object.
Description Enter an optional description of the table’s contents.
Row This field is only for reference and displays the row where the cursor is currently located. Row numbering starts at zero (0).
Column This field is only for reference and displays the column where the cursor is currently located. Column numbering starts at zero (0).

Creating table objects
154 e-Biz Impact
The Table Maintenance window also has these buttons:
Page The page number you are viewing. There are 50 rows to a page. To view a different page, enter the page number in the field or click the up and down arrows until you reach the desired page number, then press Enter.
Width The width of the currently selected column, between 1 and 40 characters. Enter a value in this field and press Enter or click Update to change all columns to that width.
Cell Value The data to enter in the selected cell. Also displays the contents of the currently selected cell.
Search Allows you to search for a row in the table. You only the currently selected column. Select the column in which you want to search for data, then enter the value for which to search in this field and press Enter or click Go.
If the value is present, TRAN-IDE highlights the value in display pane and displays the row’s data in Cell Value field. If the value is not present, TRAN-IDE displays a message that prompts you to select Add Row to add the row to the table.
Search is case sensitive, so a search for “jane doe” will not match on the value “Jane Doe”.
Default Row Select this option to mark the currently selected row as the table’s default row. A default row has an asterisk (*) following its values in the display pane.
Add Row button Adds a row to the end of the table. The cursor rests on the far left column of the new row. Enter the value to enter in this cell in the Cell Value field and press Enter. TRAN-IDE places empty strings ("") or zeros (depending on a column’s datatype) into the other columns. Use the Cell Value field to edit the other columns in the new row.
Input Modes Specifies how the cursor responds when you add the data that entered in the Cell Value field.
• Cell – after entering the data in the Cell Value field, the cursor remains on that cell.
• Row – after entering the data in the Cell Value field, the cursor moves to the next row down. If the data was entered in the last row, the cursor remains there.
• Column – after entering the data in the Cell Value field, the cursor moves to the next column to the right. If the data was entered in the last column, the cursor remains there.
• Add Row – when you have Row or Column chosen and select this option, you can add rows to the end of the table by simply pressing Enter. The data entered in the new row replicates the data that the cursor highlighted when you pressed Enter or the data in the Search field.
Field (key) Description
Button Description
Add Row Adds a row to the end of the table using the value in the Search field for the selected column cell. Empty strings ("") or zeros (depending on a column’s datatype) into the other columns. Use the Cell Value field to edit the other columns in the new row.
Remove Row Removes the entire row of the currently cell.

CHAPTER 3 Building Production Objects
TRAN-IDE Guide 155
Importing table objects1 To import a file from which to build table objects, click Import in the Table
Maintenance window. Use this window to identify the ASCII text file to import into the table object or the tag/value table to load. You do not need to use the Table Import window to load a tag/value table.
When importing an ASCII text file to build the data in a table, TRAN-IDE uses “Col#” as the name for each column where # is 1, 2, 3, etc., and uses “raw” as the datatype for each column. After importing the file, you can edit the column and change its name; however, you cannot change its datatype.
Note When you import a file into a table, the file’s contents overwrite any existing data in the table. Use the import option only on an empty table.
2 Complete these options:
Table 3-12: Table Import window keys
Add Column Opens the Add Column window, which allows you to add a column after the table’s last column on the right.
Edit Column Opens the Column Information window. You can change the column name and whether the column is a key column. You cannot change the datatype.
Update Adjusts every column to the value specified in the width field, or changes the selected cell’s data to the data that you enter in the Cell Value field.
Import Opens the Table Import window, which allows you to import a file from which to build a table. See “Importing table objects” on page 155 for instructions.
Save Saves a new table with the name you enter or saves an existing table with the same name.
Save As Saves a new table with the name you enter pr saves an existing table with a different name.
Close Closes the window after asking if you want to save any changes.
Button Description
Field (key) Description
Import Type The choices in this box identify whether you are importing a tag/value table or an ASCII text file.
TRAN-IDE Tag/Value Table
Select this to import a table object that is in the tag/value format. You do not need to use the Table Import window to load a tag/value table into a table object.
Custom Select this to use the contents of an ASCII text file to build the Table object.

Creating table objects
156 e-Biz Impact
3 Click Load. TRAN-IDE loads the file into the Table Maintenance window and attempts to build a table object with the data contained in the file.
4 To save the table object, click Save or Save As.
Working with key columns and duplicate entriesWhen you make duplicate column entries in a column that has the Key option selected in the Column Information window, you see this message:
Duplicates found. Column[column_name] unique property removed.
Separators These fields identify the file or table to import, as well as metadata. When a TRAN-IDE tag/value table is selected for the Import Type, the Table Path field is the only available option here.
Table Path The path to and name of the file or tag/value table to import. By default, this field displays the default directory location as specified in the Table Object Directory window.
Row Separator The character separating each row in the file. If the row separator is a printable character, type that character in this field, otherwise type the octal value for the row separator. If the rows are separated by both a carriage return and a line feed, type the octal value for a line feed in this field.
Column Separator The character separating each column in the file. If the separator is a printable character, type that character in this field, otherwise type the octal value for the separator.
If the columns in the file have open and close token separators instead of a single column separator, leave this field blank.
If the columns in the file have both open and close token separators and a column separator, leave this field blank. You do not need to specify a column separator when using open and close token separators.
This character is not included in the data loaded into the table.
Open Token Separator The character at the beginning of each column’s data, for example, the bracket “[“ character in “[Dublin]”. This character is optional and need not be present in the file, but when it is present, there must also be a close token separator. This character is not included in the data loaded into the table.
Close Token Separator The character at the end of each column’s data; for example, the bracket (]) character in “[Dublin]”. This character is optional and need not be present in the file, but when it is present, there must also be an open token separator.This character is not included in the data loaded into the table.
Field (key) Description

CHAPTER 3 Building Production Objects
TRAN-IDE Guide 157
This means that TRAN-IDE unselected the Key option for the column that contains duplicates. Click OK.
When you make duplicate entries in a column that does not have the Key option selected, but then edit the column and select the Key option, you see this message:
Col[column_name] has [#] duplicate[entry]. Edit duplicates now?
Select OK to open the Edit Duplicates window. If you click Cancel, TRAN-IDE unselects Key in the Column Information window.
When you edit duplicate keys, complete these options:
When you finish, click Done to save the changes and close the window.
Note If a column has duplicate entries and the column is marked as a search (key) column in a filter or qualification object, the SFM performs a linear search of the table, otherwise, it performs a binary search, which takes less time.
Deleting table objectsTo delete a table object:
1 In the TRAN-IDE window, click the Tables icon.
In the Table Objects list, select the table you want to delete.
2 Click Delete.
When a prompt asks you to confirm the deletion, click Yes to delete the table, or click No to cancel the deletion.
Item Description
Column Name Displays the column name. You cannot edit this information.
Row and Duplicate Value
Displays the duplicate column values.
• Row – displays the ordinal position of the rows containing the duplicate values (the first row is always at 0 position).
• Duplicate Value – displays the duplicate values.
Highlight the row containing the data you want to change, then use the Value field to edit the data.
Value Displays the data in the highlighted row. Type a new value in the field.

Defining qualification objects
158 e-Biz Impact
Defining qualification objectsA qualification object determines the criteria for the data in an incoming transaction, and whether the SFM should process a transaction through a specific production, rule, rule component, or node component object. A qualification object contains one or more:
• Input fields or datalink object references, which is required
• Literal values
• Operation codes
• Custom code references
• Table object references
• Options
If the data meets this criteria, the data is passed on to the qualification object’s parent object for further processing. The parent object can be a production object, rule object, or rule component, or node component object.
You can run the qualification object against either the data in an input field, or the data in a data object. Node attribute data can also be qualified for tree fields.
❖ Creating qualification objects
1 In the main TRAN-IDE window, select View | Qualification Objects or click the Qualify icon to display all qualification objects defined in the current module.
2 To change an existing qualification object, double-click the object’s name in the Qualification Object list.
To create a new qualification object, click New beneath the Qualification Object list.
Note To delete a qualification object, select the object’s name in the Qualification Object list and click Delete.
The Qualification Object Information window appears.
3 Complete these options, then select the type of qualification objection you want to create.
Table 3-13: Qualification object keys
Field (key) Description
Name Enter a reference name for the qualification object.

CHAPTER 3 Building Production Objects
TRAN-IDE Guide 159
4 Select the qualification object you want to create. The options on the right of the window change depending on the qualification option you select. Supported qualification objects are:
FldObj The name of the field object whose contents you want to qualify. Enter in the name or select the name from the drop-down list.
Datalink The name of the datalink object whose contents you want to qualify. Enter in the name or click the down-arrow to the right of the field to select from a list of all datalink objects. Click the ellipsis button to create a new datalink object.
FldAttr For tree fields only. Select the attribute from the drop-down list to qualify it’s data.
Optional When this option is selected, it makes the qualification object’s criteria optional, which allows you to use AND/OR logic.
For example, you could have three qualification objects, one that checks that an age field's data is between 25 – 35, another that checks for a range of 45 – 65, and the last that checks for a specific heart condition. If the first two qualification objects have Optional selected, and the last one does not, then the incoming data must satisfy either of the qualification objects that specify the age range and it must also satisfy the heart condition qualification object.
If all of the qualification objects for a production object have Optional selected, the incoming data must satisfy at least one of the qualification objects before e-Biz Impact continues processing.
Ignore When selected, it causes SFM to not process the transaction even though the transaction passed production object qualification. During transaction production, if the transaction qualifies for only one production object and a qualification object attached to the production object has this selected, then SFM returns a value greater than 0 to the Acquisition AIM but does not log or process the transaction.
This option allows you to process only a subset of a certain transaction type without having to send the transactions you do not want to process to the NullDest destination.
Field (key) Description
Qualification object type Description
Table Object The SFM checks the data in the Qualification Object Information windows’s FldObj or Datalink field against the tag field or key column in each item of the referenced table until it finds a match. See “Creating table object qualifications” on page 160.
Custom Code The SFM executes the ODL logic in the qualification function. See “Creating custom code qualifications” on page 160.
Built-in The SFM executes the selected built-in qualification function against the data in the Qualification Object Information windows’s FldObj or Datalink field. See “Using built-in qualifications” on page 163.

Defining qualification objects
160 e-Biz Impact
5 When you complete your entries, click OK to save the qualification object and close the window.
Creating table object qualificationsCreate table object qualifiers to have the SFM check the data in the Qualification Object Information windows’s FldObj or Datalink field against the tag field or key column in each item of the referenced table until it finds a match. If there is no match, this qualification object fails. Table objects are different than collection tables, discussed in the e-Biz Impact ODL Guide.
Table 3-14: Table object keys
Creating custom code qualificationsChoose this option to have the SFM execute the ODL logic in the qualification function. If the function returns zero (0), the object fails.
1 Click Custom Code.
Compare Operations The SFM performs a specific comparison operation between the data in the Qualification Object Information windows’s FldObj or Datalink field and a literal, or the contents of another datalink object, or the contents of another input field. See “Using compare operation qualifications” on page 167.
DB Object The SFM executes the database interface object. See “Creating DB object qualifications” on page 168.
Bitwise e-Biz Impact performs a bitwise operation on the contents of the Qualification Object Information windows’s FldObj or Datalink field. See “Creating bitwise operator qualifications” on page 168.
Qualification object type Description
Field (key) Description
Table Object Name The name of the table object to use for qualification. Enter a table object’s name (8 characters maximum) or select an existing table from the drop-down list. Click the ellipsis button on the right to build a new table object or view the contents of the selected table object.
Key Column For use with multi-column tables only. This is the column that e-Biz Impact should use to compare against the data in the referenced field or datalink object.
Not Match When selected, the qualification object fails if the value in the selected field object or datalink matches a value in the table.

CHAPTER 3 Building Production Objects
TRAN-IDE Guide 161
2 Enter the Custom Function Name, which is the name of the custom qualification function you want executed, or select the name of an existing qualification function from the drop-down list.
3 Click the ellipsis button to build the new qualification function or edit an existing function. The Qualification Function window displays.
4 Write the custom qualification function in the text editor pane. Click Load to load a text file into the function. Click Append to load a text file to append on to the function.
5 When you finish, select from these options:
• OK – save the qualification function without closing the window.
• Save – save the qualification function and close the window.
• Cancel – cancel the qualification function, exit and close the window.
• Print – print the qualification function.
Field (key) Description
Public Sets the qualification function status to “public.” This means that modules other than the current module can use this qualification function. The default is “static,” which means that only the production objects in the current module can use the qualification function.
Argument The content of the “fldval” argument passed to this function is the current value of either the field object or datalink object you select when defining the qualification object that executes this function.
Goto Line# Moves the cursor to the specified line of ODL text in the function. Enter the line number to go to then press Enter. The ODL text editor moves the cursor to the specified line of text and highlights it.
Click once on the text or use an arrow key to deselect it before typing any characters, otherwise the highlighted line is deleted and replaced with the new characters.
DFC’s To view a list of the current DFC commands, select a DFC from the drop-down list. To define a new DFC command, click the ellipsis button. The Distributed Function Declaration Window opens. See the e-Biz Impact MSG-IDE Guide for more information.
Datalink Datalinks allow you to share data with other functions and TRAN-IDE objects, which can also change the data in the datalink. To view a list of the current datalink definitions, select a datalink from the drop-down list. To define a new datalink, click the ellipsis button.
Module To place the qualification function into a different module, select the module from the drop-down list. If you place the qualification function into a different module, you must make the function public.
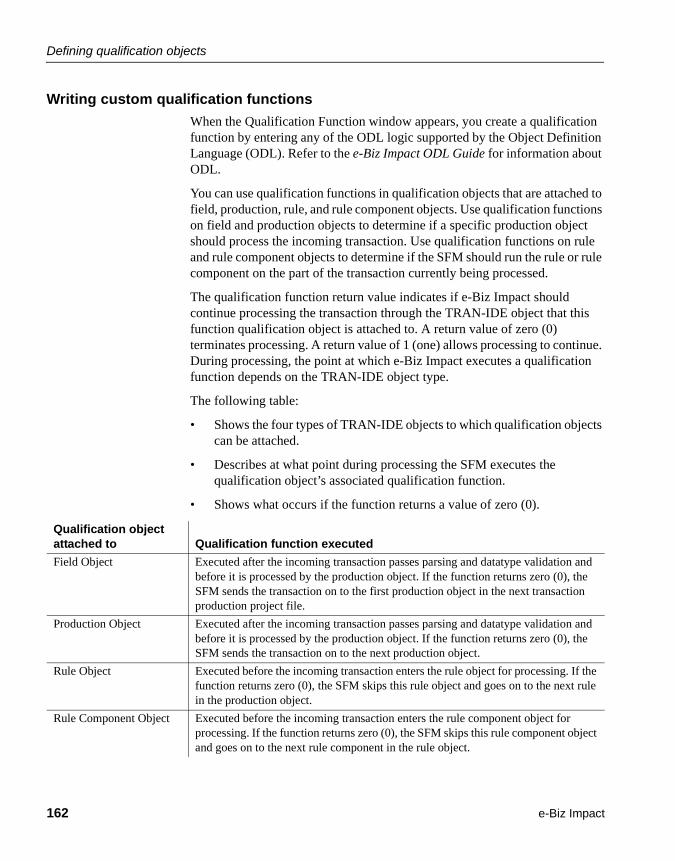
Defining qualification objects
162 e-Biz Impact
Writing custom qualification functions
When the Qualification Function window appears, you create a qualification function by entering any of the ODL logic supported by the Object Definition Language (ODL). Refer to the e-Biz Impact ODL Guide for information about ODL.
You can use qualification functions in qualification objects that are attached to field, production, rule, and rule component objects. Use qualification functions on field and production objects to determine if a specific production object should process the incoming transaction. Use qualification functions on rule and rule component objects to determine if the SFM should run the rule or rule component on the part of the transaction currently being processed.
The qualification function return value indicates if e-Biz Impact should continue processing the transaction through the TRAN-IDE object that this function qualification object is attached to. A return value of zero (0) terminates processing. A return value of 1 (one) allows processing to continue. During processing, the point at which e-Biz Impact executes a qualification function depends on the TRAN-IDE object type.
The following table:
• Shows the four types of TRAN-IDE objects to which qualification objects can be attached.
• Describes at what point during processing the SFM executes the qualification object’s associated qualification function.
• Shows what occurs if the function returns a value of zero (0).
Qualification object attached to Qualification function executed
Field Object Executed after the incoming transaction passes parsing and datatype validation and before it is processed by the production object. If the function returns zero (0), the SFM sends the transaction on to the first production object in the next transaction production project file.
Production Object Executed after the incoming transaction passes parsing and datatype validation and before it is processed by the production object. If the function returns zero (0), the SFM sends the transaction on to the next production object.
Rule Object Executed before the incoming transaction enters the rule object for processing. If the function returns zero (0), the SFM skips this rule object and goes on to the next rule in the production object.
Rule Component Object Executed before the incoming transaction enters the rule component object for processing. If the function returns zero (0), the SFM skips this rule component object and goes on to the next rule component in the rule object.

CHAPTER 3 Building Production Objects
TRAN-IDE Guide 163
Using built-in qualifications1 Select Built-ins to have the SFM execute the selected built-in qualification
function against the data in the referenced field or datalink object. If the function returns false (0), this qualification object fails.
2 In the Built-in Function Name field, enter the name of the built-in qualification function to run, or select the name from available built-in qualification functions from the drop-down list. See “Built-in qualification functions” on page 163 for a description of each available function.
3 In the Args field, enter the arguments to pass to the built-in qualification function.
4 Click OK to save the function.
Built-in qualification functions
The following built-in qualification functions are available:
dbExist
Description Verifies the existence of data in the specified collection file. Use this function before using the dbSelect built-in filter function when you cannot be certain if data is in a collection file.
Arguments Must match the pattern string in the Qualification Object Information windows’s FldObj or Datalink field.
dbNotExist
Description Verifies that data is not present in the specified collection file. Use this function before using the dbInsert built-in filter function to verify that there is no data in the collection file that the dbInsert operation would overwrite.
Arguments Must match the pattern string in the Qualification Object Information windows’s FldObj or Datalink field.
isDate
Description Performs a byte-by-byte comparison of the content in the Qualification Object Information windows’s FldObj or Datalink field to the date format specifiers in the argument string. If they match, the function returns true (1).

Defining qualification objects
164 e-Biz Impact
Arguments
Any other character must match the data in the Qualification Object Information windows’s FldObj or Datalink field.
If the referenced object’s data contains at least the month and day, then isDate also verifies that the date is valid (for example, “9 – 31” is invalid). To verify leap year dates, the referenced object must contain the month, day, and year.
Because isDate compares each format specifier in the argument string to one byte of data in the referenced field or datalink object, the bytes of data must exactly match the format specifiers. For example, if the data for the month is “3” instead of “03”, use the “m” argument instead of the “mm” argument.
Examples • YY/mm/dd W – In the incoming data, the year, month, and day must each be two characters. The two slashes (/) and the space character must be present in the data exactly as entered in the argument string.
• JJ – In the incoming data, the Julian date can be only two characters, specifically, from 01 to 99.
• m-YYYY – In the incoming data, the month can only have one character, from 1 to 9, and the year must have four characters. The dash must be present in the data, exactly as entered in the argument string.
isMatch
Description Compares the content of the Qualification Object Information windows’s FldObj or Datalink field to the argument string. If they match, the function returns true (1).
Arguments Must match the pattern string in the Qualification Object Information windows’s FldObj or Datalink field.
Argument Description
YY The last two digits of the year.
YYYY The year.
jjj The Julian date (0 – 365).
JJJ The for Julian date (1 – 366).
mm The month (1 – 12).
dd The day (1 – 31).
w The day of the week (0 – 6).
W The day of the week (1 – 7).

CHAPTER 3 Building Production Objects
TRAN-IDE Guide 165
isNotMatch
Description Compares the content of the Qualification Object Information windows’s FldObj or Datalink field to the argument string. If they do not match, the function returns true (1).
Arguments Must not match the pattern string in the Qualification Object Information windows’s FldObj or Datalink field.
isNotRegEx
Description Checks the content of the Qualification Object Information windows’s FldObj or Datalink field for the regular expression in the argument string. If it is not present, the function returns true (1). You can use a simple literal or a UNIX-style regular expression.
Arguments The regular expression in the Qualification Object Information windows’s FldObj or Datalink field.
isRegEx
Description Checks the content of the Qualification Object Information windows’s FldObj or Datalink field for the regular expression in the argument string. If it is present, the function returns true (1). You can use a simple literal or a UNIX-style regular expression.
Arguments The regular expression in the Qualification Object Information windows’s FldObj or Datalink field.
Because isTime compares each format specifier in the arguments string to one byte of data in the Qualification Object Information windows’s FldObj or Datalink field, the bytes of data must exactly match the format specifiers. For example, if the data for the minutes is “7” instead of “07”, use the “m” argument of mm. However, “xx” must always contain two characters, and “zzz” must always contain three-characters.
Examples • hh:mm xx – In the incoming data, the hour and minutes must each be two characters. The colon and the space characters must be in the data exactly as entered in the argument string.
• ss:m:H – In the incoming data, the seconds must be two characters, ie. from 01 to 59, and the minutes and hour can only be one character each, ie. from 0 to 9.
When you use the isRegEx() and isNotRegEx() qualification functions, the regular expression in the argument string can contain special symbols so the value matches a range of values in the data area.

Defining qualification objects
166 e-Biz Impact
Examples • To scan for the string “[TASK-01] C:>”, where the numbers can change to any other numbers, use:
\[TASK-[0-9][0-9]\] C:.>
• To accept a value without case sensitivity, follow the example below. This example accepts any combination of these letters, but in the correct sequence, to make the word date.
Symbol Description
[ ] Brackets define a range of characters to match a single character position.
Example – “abc[def]g” matches “abcdg”, “abceg”, or “abcfg”.
. A period matches any single character except newline.
Example – “abc.g” matches “abcag”, “abcbg”, “abccg”, and so on.
* An asterisk matches any character or characters.
Example – “a*” matches “aa”, “a9”, “a+”, “az”, and so on.
^ A caret at the start of an expression causes a match only on the initial segment of a line. If the caret precedes a string in brackets, a match occurs on any character except the characters in the string and new line.
Example – “abc[^def]g” matches the same values as the expression “abc.g” except the strings “abcdg”, “abceg”, “abcfg” and “abc(newline)g”.
+ A plus sign following a regular expression means one or more times.
Example – “[1-5]+” is equivalent to “[1-5][1-5]*”.
$ A dollar sign as the last character of a regular expression anchors the expression to the end of a line. The strings that end in the expression's characters just preceding the $ fulfill the search criteria.
Example – “ab$” matches “erafxab” but not “abrefok”.
– • If the minus sign is in an expression in brackets, it indicates a string of consecutive values.
Example – “[a-e]” is equivalent to “[abcde]”.
• If the minus sign is the first or last character in brackets, it appears as itself.
Example – “[-[]” matches the characters “-” and “[“.
{m} {m,} {m,u}
Integers that specify the number of times to apply the preceding regular expression. “m” is the minimum number and “u” is a number in the range of 0 – 255. The expression “{m}” by itself indicates the exact number of times the preceding regular expression is to be applied. The expression “{m,}” specifies “{m,infinity}”.
( ) Use parentheses to group other expressions. Operators like *, {}, and + can work on a regular expression enclosed in parentheses ( ) as well as on a single character.
\ You can use any of the above characters as their own value by preceding the character with a backslash. The backslash works on only one character at a time.
Example – “AB\.\*CD” resolves to the literal “AB.*CD”.

CHAPTER 3 Building Production Objects
TRAN-IDE Guide 167
[Dd][Aa][Tt][Ee]
• To enter an octal value, enter the character in the form “\134”.
Using compare operation qualificationsSelect Compare Oper to have the SFM perform a specific comparison operation between the data in the Qualification Object Information windows’s FldObj or Datalink field and a literal, or the contents of another datalink object, or the contents of another input field. If the comparison operation fails, this qualification object fails.
With compare operations, the content referenced in the Qualification Object Information windows’s FldObj or Datalink field is the first operand in the equation and the Literal Value/Datalink/Input Field value listed below the operation is the second operand, as in “Field Object/datalink” “operation” “Literal Value/datalink/Field Object”.
Field (key) Description
Oper Enter the operation to use between the Qualification Object Information windows’s FldObj or Datalink field and the Literal Value/Datalink/Input Field value, or choose the operation from the drop-down list. Available operations are
• Equal – the first operand is equal to the second operand.
• Not Equal – the first operand is not equal to the second operand.
• Less Than – the first operand is less than the second operand.
• Greater Than – the first operand is greater than the second operand.
• Less/Equal – the first operand is less than or equal to the second operand.
• Greater/Equal – the first operand is greater than or equal to the second operand.
• Missing – the first operand was not found in the incoming transaction.
• Not Missing – the first operand is in the incoming transaction.
• Empty – the first operand does not contain data.
• Not Empty – the first operand does contain data.
• inRange – the first operand is between the two values in the literal range (to be entered as “low,high”; for example, “3,6”).
• outOfRange – the first operand is not between the two values in the literal range (to be entered as “low,high”; for example, “3,6”).

Defining qualification objects
168 e-Biz Impact
Creating DB object qualificationsSelect DB Object to have the SFM execute the database interface object. If it does not return at least one row, this qualification object fails. See the database interface object section of the e-Biz Impact MSG-IDE Guide for more information.
Table 3-15: DB object keys
Creating bitwise operator qualificationsSelect Bitwise to have e-Biz Impact perform a bitwise operation on the contents of the Qualification Object Information windows’s FldObj or Datalink field. The actual contents of the FldObj or Datalink are not changed. If the result of the bitwise operation is false or zero (0), the qualification fails.
Literal Value The byte-sensitive value against which the related input field is compared. Be careful when entering a Literal Value to match it to an expected input field value.
If you choose the Missing, Not Missing, Empty, or Not Empty operation, select Literal Value and enter any value. The SFM ignores this value for these four operations but still requires an entry in the field.
If you choose the inRange or outOfRange operation, a single field appears. Put the range in this field. The two range boundaries must be integers separated by a comma. For example, if the number must be between 13 and 35, the literal range would be “13,35”. If the range is invalid, the qualification object fails.
Datalink Select to use the contents of a datalink as the second operand. Enter the name of the datalink object or click the down-arrow to the right of the field to choose from a list of existing datalink objects.
Input Field Select to use the contents of a field object as the second operand. Enter the name of the field object select the input field from a list of existing field objects.
Field (key) Description
Field (key) Description
Database Interface Object Enter the name of the database object you want to act on the input data, or select the name of an existing database object from the drop-down list. Click the ellipsis button to open the Database Interface Object window and define a new database interface object.
Statement Name Select the statement to execute from the drop-down list of statements in the database interface object.
Not Match When this option is selected, the qualification object succeeds if the SQL statements in the database interface object fail.

CHAPTER 3 Building Production Objects
TRAN-IDE Guide 169
Table 3-16: Bitwise keys
Attaching qualification objects to rule componentsTo attach a qualification object to a rule component:
1 In the main TRAN-IDE window, select View | Production Objects or click the Pro-Obj icon in the main TRAN-IDE window.
Field (key) Description
Operator Select the bitwise operator from the drop-down list to use on the contents of the Qualification Object Information windows’s FldObj or Datalink field. Available operators are:
• On – the bit indicated by the Bit Loc field is on. The bits of the field object or datalink are numbered from left to right, starting with zero (0).
• Off – the bit indicated by the Bit Loc field is off. The bits are numbered from left to right, starting with zero (0).
• & – performs a bitwise AND between the referenced field object or datalink and the value provided for Literal Value/Datalink/Input Field.
• | – performs a bitwise OR between the referenced field object or datalink and the value provided for Literal Value/Datalink/Input Field.
• ^ – performs a bitwise EXCLUSIVE OR between the referenced field object or datalink and value provided for Literal Value/Datalink/Input Field.
• >> – performs a right bit shift. The newly opened places are filled with zero. Supply the number of places to shift in the Literal Value/Datalink/Input Field fields.
• << – performs a left bit shift. The newly opened places are filled with zero. Supply the number of places to shift in the Literal Value/Datalink/Input Field fields.
• ~ – performs a bitwise complement. For example, if you have “0101”, the complement is “1010”.
Bit loc This field appears only when on or off is chosen as the operator. Select the bit you want to evaluate. If the bit selected is beyond the scope of the data, the Qualification fails.
Literal Value This field appears only when &, |, ^, <<, and >> operators are used. Select this to use a literal value as the second operand. Enter a value in the entry field.
Datalink This field appears only when &, |, ^, <<, and >> operators are used. Select this to use the contents of a datalink as the second operand. Enter the name of the datalink object or select the Down Arrow to choose from a list of existing datalink objects.
Input Field This field appears only when &, |, ^, <<, and >> operators are used. Select this to use the contents of a Field object as the second operand. Enter the name of the Field object or select the Down Arrow to choose from a list of existing Field objects.

Defining data objects
170 e-Biz Impact
2 Double-click an production object in the Production Objects list. The Production Object Information window opens.
3 Select Production Object | Qualifications from the menu bar. The Current Qualifications Objects window opens.
4 The options are:
5 When you finish, click OK to save your entries and close the window. Click Cancel to close the window without saving your entries.
Defining data objectsTo define a data object:
1 In the TRAN-IDE main window, select View | Data Objects or click the Variables icon to display a list of all data objects defined in the current file.
2 To define a new data object, click New below the Data Objects list.
Field (key) Description
(display pane) List the qualification objects in the current production object.
New Click New to open the Qualification Object Information window and create a new qualification object. See “Defining qualification objects” on page 158 for instructions.
Reuse Click Reuse to add qualification objects from other production objects in this production object. The Add Existing Qualification Object window opens. Select a qualification object from the list, which displays existing qualification objects for other production objects. Click OK to add the select object to the Current Qualification Objects list.
Unlink Click Unlink to remove the selected qualification object from the list.
Post-Qualify Rule Select an existing output rule from the drop-down list to run after the qualification object. You can also enter the name of a new rule. Click the ellipsis button to open the Current Output Rule window where you add information for a new rule or modify an existing rule.

CHAPTER 3 Building Production Objects
TRAN-IDE Guide 171
To edit an existing variable, double-click its name in the Data Objects list.
Note To delete data objects, select the object’s name in the Data Object list and click Delete.
The Datalink Information window appears where the Name and Type fields define the data object.
3 Complete these fields and options:
Table 3-17: Data object keys
4 When you finish, click OK to save the data object (variable) and close the window.
Field (key) Description
Name The name you want to assign to the data object.
Module The name of the module where you want TRAN-IDE to place this data object.
Type The datatype of the data object. You can choose any one of the items in the list. To view all the options, click the down-arrow at the end of this field. Options include: blob, string, integer, long integer, short integer, character, clFile, and decimal.
You can also create a one dimensional array of any type. Type “nn”, where “nn” is the size of the array, after the type (for example, “string[30]” would create an array of 30 strings). In a character array, the size of the array should be the same as the number of characters in the field object’s data area, because e-Biz Impact fills the array by placing the first character from the data area into the first array element, the second character from the data area into the second array element, and so on. A rule component object cannot access the individual elements of the array. Access the array elements using ODL code in custom filter functions.See “Writing custom filter functions” on page 142.
Public Sets the datalink to a “public” status. This means that different modules can use this data variable. The default is “static” (unselected), which mean that only the production objects in the current module can use the datalink. In most cases, you want to place all public datalinks in their own module.
Display Shows the current value of the datalink.

Writing error functions
172 e-Biz Impact
Writing error functionsRule objects and production objects use error functions, which are described in this section.
Error functions attached to rule objectsWhen an error function is attached to a rule object, e-Biz Impact executes the error function when an error is encountered while processing the rule object, its components, and filters. An error function attached to a rule object can attempt to correct problems encountered during transaction. The error function can look for and attempt to repair the most common errors that halt transaction processing, such as a transaction containing an unexpected item that needs to be added to a translation table.
When an error function attached to a rule can repair the data in the blob, the error function should return a value of 1 (one) to indicate that processing can continue.
If the error function attached to the rule cannot return the data in the blob to a state where e-Biz Impact can continue, the function must return a value of 0 (zero). e-Biz Impact then executes the primary error function, which is the error function attached to the production object.
Writing rule object error functions
Error recovery happens only at the current production rule failure level and never at the production object level. A production rule that allows for error recovery should execute only one operation. Group components carefully when making production rules; for example, layout on paper how the output should look.
Below is a sample error recovery function. The input component is a field that can have a null value in the input transaction, but the output transaction requires a number that is four characters in length, left justified, and zero filled. The filter that would fail, and call this routine, is a table. Tables cannot contain null values and this is a simple way around the problem. In more critical areas, a different error recovery scheme could be used.

CHAPTER 3 Building Production Objects
TRAN-IDE Guide 173
if (reason == 7){pb->set("0000");// using the set blob method to replace the // blob contentsreturn 1;}return 0;
Returning a 1 from an error function allows the production object to continue with the production rule following the one that failed. Components within the production rule that follow the error are not executed.
Error functions attached to production objectsAn error function attached to a production object cannot change the contents of the blob, and, thus, cannot attempt to repair the error. Error functions at this level should notify an administrator that an unrecoverable error has occurred, and, if desired, e-mail the administrator the blob contents.
Error functions attached to production objects must always return a value of zero (0) to indicate that all further processing of the transaction by the current production object should end because the error cannot be repaired. When the SFM executes the error function, the production object stops processing the current input data, deletes all fields built so far for the current output transaction, and waits for the next input transaction.
Writing production object error functions
Production object error functions receive the same arguments as rule error functions. Use production object error functions to log the transaction in a file or perform whatever logging is necessary so the transaction is not lost.
After the SFM enters this function, no further transaction recovery for the current production object can be attempted. When this function exits, e-Biz Impact exits the production object and continues with the next production object in sequence.
Production object methods
There are two production object methods used in error functions to extract information from the error text generated by the production object and to dump information about a runtime error to the xlog file—geterrtext() and debug(). For more information about these methods, see the e-Biz Impact ODL Guide.

Writing error functions
174 e-Biz Impact
Alternate error return values
Use the setErrNum(), setErrTxt(), and getAlterrtext() production object methods to augment the return value and error text generated by a production object’s custom filter, error, generic, and qualification functions. These methods allow you to add a unique error number and error message to each function so that you can immediately determine within which function the processing error occurred.
Use the setErrNum() and setErrTxt() methods to add an alternate error number and error message to the error text generated by the production object.
Note You must use both of these methods for the getAlterrtext() method to function.
These methods do not replace the error number and error text generated by the production object. They append extra information to the error message generated by the production object, using this format:
tran error text, which can contain line feeds the alternate error text rv = the alternate error number
When a processing failure occurs, the alternate error values that display are those of the last function that called one of these methods. For example, when a custom filter function that calls these methods fails, the error function executed next also uses these methods. The error message generated by the production object contains the alternate error text set by the error function, not the custom filter.
When you use setErrNum(), and setErrTxt() methods in a function, they set the alternate error text regardless of whether the function encounters a processing error. Therefore, if the function that fails does not call the setErrNum() and setErrTxt() methods, but a previously executed function did, the alternate error text generated by the production object does not reflect the function where the processing failure actually occurred.
Use the getAlterrtext() method to read the alternate error number and alternate error message into datalink objects or data variables. This is useful to perform specific actions in the production object’s error function depending on which function encountered the processing error.

CHAPTER 3 Building Production Objects
TRAN-IDE Guide 175
Error codesWhen checking the value of the reason argument, use either the mnemonic (for example, EPARSE) or the integer value (for example, 5).
Table 3-18: Error codes
* When error 1 or 2 occur, if your error function returns a value of 1, the SFM truncates or extends the blob, as necessary, and attempts to continue.
❖ Writing error functions
1 To create a production object error function:
a Select Pro-Obj in the main TRAN-IDE window.
Error code Value Description
1 * The production rule has generated too many bytes.
2 * The production rule has generated too few bytes.
3 Not used.
ETRANSPORT 4 Transport error—DFC.
EPARSE 5 Parse error; could not satisfy input field with data given.
EIDFAILED 6 Validation function on field failed.
EFILTER 7 Filter failed. A custom filter function returned a value of zero (0).
EBADFLD 8 Input field invalid; message too short.
EINVALDATA 9 Invalid data character where numeric.
EBADRULE 10 Rule object damaged or invalid. Part cannot find field reference.
ENOFLDDATA 11 Input field empty. Datalink with no data in it.
EBADFLDLEN 12 Input field overrun. Input message length too big (usually a default value problem).
ENOQUAL 13 Qualification object failed; only seen during a test drive. A transaction did not pass a production rule’s qualification function criteria
ENOTABLE 14 A table file required by the production object cannot be found.
EBADTYPE 15 Datatype mismatch—the data in the incoming transaction does not agree with the input field’s datatype.
ENOTHIT 16 Data in the incoming transaction does not match any tag in the specified table object.
ECHAIN 17 Recursive input field chaining detected. For example, fld_b follows fld_a, fld_c follows fld_b, and fld_a follows fld_c.
18 Not used.
ENOTBLMEM 19 Out of memory. The table object is too big to load into memory.
ETBLDUPES 20 Cannot load table object due to duplicate entries.
EMEMORY 21 Out of memory.

Writing error functions
176 e-Biz Impact
b To create an error function in a new production object, click New below the Production Objects list. To create or edit an error function for an existing production object, double-click the object in the Production Object list.
c In the Production Object Information window, enter a name in the Error Func field and click the ellipsis button. To edit an existing error function, select the function from the Error Func drop-down list, and click the ellipsis. The Error Function window appears.
2 To create a rule object error function:
a Select Pro-Obj in the main TRAN-IDE window, then click the Rules icon. The Output Rules list displays in the left pane.
b To create an error function in a new rule, click New below the Output Rules list. To create or edit an error function for an existing rule object, double-click the rule in the Output Rules list.
c In the Current Output Rule window, enter a name in the Error Func field and click the ellipsis button. To edit an existing error function, select the function from the Error Func drop-down list, and click the ellipsis. The Error Function window appears.
3 Write the error function in the text editor pane. Click Load to load a text file into the function. Click Append to load a text file to append on to the error function.
Error function arguments included:
• int reason – an error status code.
• blob *pb – a pointer to the current blob. If the error function is attached to a rule object, then the current blob is the part of the transaction that the rule object is currently processing. if the error function is attached to a production object, then the current blob is the output message built to the point that the error occurred plus the part of the transaction where processing failed.
For example, a production object has two input fields containing the data “Hello” and “brave new world”. Rule1 changes the data in Field1 to uppercase characters, and Rule2 removes the first ten characters of data in Field2. If processing fails at Rule2, the contents of the blob sent to Rule2’s error function would be “brave new world” since Rule2 was processing only the contents of Field2. The contents of the blob sent to the production object’s error function would be “HELLO

CHAPTER 3 Building Production Objects
TRAN-IDE Guide 177
brave new world”; the output message built to the point where processing failed, plus the part of the transaction where processing failed.
4 Complete these options in the Error Function window:
5 When you finish, select from these options:
• OK – save the error function without closing the window.
• Save – save the error function and close the window.
• Cancel – cancel the error function, exit and close the window.
• Print – print the error function.
Field (key) Description
Public Sets the error function status to public, which means that different modules can use this error function. The default is static (unselected), which means that only the production and rule objects in the current module can use the error function.
Goto Line# Moves the cursor to the specified line of ODL text in the function text editor pane. Enter the line number to go to then press Enter. The ODL text editor moves the cursor to the specified line of text and highlights it.
Warning! Click once on the text or use an arrow key to de-select it before typing anything new, otherwise the selected line is replaced with the new characters.
DFC’s Select the DFC to add to this error function. Select an existing DFC from the drop-down list, or click the ellipsis button to create a new DFC. See the e-Biz Impact MSG-IDE Guide for more information.
Datalink Datalinks allow you to share data with other functions and TRAN-IDE objects, which can also change the data in the datalink. Select an existing datalink from the drop-down list. Click the ellipsis button to create a new datalink. See “Building a datalink” on page 85.
Module To place the error function into a different module, select the module from the drop-down list. If you place the error function into a different module, you must make the function public.

Defining ODL functions
178 e-Biz Impact
Defining ODL functionsGeneric ODL functions have a slightly different format than other functions because they are not specific to TRAN-IDE objects, and you determine what arguments to pass to them. You cannot attach a generic ODL function to a TRAN-IDE object; you must call a generic function from within other functions attached to TRAN-IDE objects.
You code a generic ODL function differently from the other functions. You must include the full function definition within the coding window, including the function’s return value type, its name, and its arguments, not just the parts that fall between the brackets { }.
A generic ODL function is public by default and available to any function in the project. To make a function available only to functions in the selected module, you must place “static” before the function’s name and return type; for example, “static int foo(int a, int b)”.
Warning! Do not attach a generic ODL function directly to a TRAN-IDE object. Instead, call it from within another function that is attached to a TRAN-IDE object, such as a custom filter function, error function, or qualification function. More than one of these other functions can call the same generic function.
Building generic ODL functions1 In the main TRAN-IDE window, select View | ODL Functions or click the
Function icon in the TRAN-IDE main window to display a list of all generic ODL functions defined in the current file.
2 To build a new generic ODL function, click New. To edit an existing ODL function, double-click the function name in the ODL Functions list.
Note To delete an ODL function, select the function’s name in the ODL Functions list and click Delete.
The ODL Function window opens.
3 Use the following options to build the ODL function:

CHAPTER 3 Building Production Objects
TRAN-IDE Guide 179
4 When you finish, click OK. TRAN-IDE names the generic ODL function with the name you used in the function’s definition. Afterward, you can edit only what is in the function’s brackets.
Defining production object options1 In the TRAN-IDE window, select View | Production Objects or click the
Pro-Obj icon. Double-click an existing object in the Production Objects list. The Production Objection Information window opens.
2 Select Production Object | Options from the menu bar. The Production Object Options window opens.
3 Complete these fields and options:
Field (key) Description
Goto Line# Moves the cursor to the specified line of ODL text in the function. Type the line number to go to, then press Enter. The ODL text editor moves the cursor to the specified line of text and highlights it.
Click once on the text or use an arrow key to deselect it before typing any characters, otherwise the highlighted line is deleted and replaced with the new characters.
DFC’s To view a list of the current DFC commands, click the down arrow. To define a new DFC command, click Detail. The Distributed Function Declaration window opens. See the e-Biz Impact MSG-IDE Guide for more information.
Datalink Datalinks allow you to share data with other functions and TRAN-IDE objects, which can also change the data in the datalink. To view a list of the current datalink definitions, click the down arrow. To define a new datalink, click Detail. The Datalink Information window opens.
Module To place the function into a different module, click the down arrow and select another module. A generic ODL function is public by default and available to any function in the project. To make this function available only to functions in the selected module, make it static. See “Modules” on page 53 for more information about module requirements.
Field (key) Description
Static Scope All production objects are static by default. To call a production object with the produce() method from within an ODL function in another module, or to use the production object as part of a filter object, unselect this option to make the production object global.

Defining production object options
180 e-Biz Impact
Recycle Output As A New Transaction
Recycle the output of the current production object as input. To have the production object only recycle its output transaction and not send it to a destination as well, map the production object to the NullDest destination.
Input NDO Serialization When processing tree input, select the appropriate input NDO serialization.
• NCF: Self-describing – the default.
• NCF: Non-self-describing – select this option if you are generating a format description based on an NCM file generated by Formatter, then enter the file name.
• XML – select this option if your input message is in an XML format.
Output NDO Serialization When processing tree output, you must select the appropriate output NDO serialization.
• NCF: Self-describing – the default.
• NCF: Non-self-describing – select this option if your output will be used by Formatter.
• XML – select this option if your output requires an XML format.
Error Options Specify actions that e-Biz Impact should perform when a transaction encounters a processing error through this production object. You can use the tranHalt() and tranCancel() built-in filter functions to override the option settings.
Error Rule The name of the rule object to run after executing the production object error function. Use this rule object to execute any other actions you want to perform when a transaction encounters a processing error through this production object. For example, you could examine datalink and input fields and write the contents to a file or e-mail them.
This rule object can add more data to the production object output blob, but it cannot change or delete any data currently in the blob. This rule object can use the tranHalt() or tranCancel() built-in filter function to determine which actions e-Biz Impact should take, but it cannot force continued processing of the transaction.
Halt Processing To AIM Same as the destination returning a zero or negative value. Places the transaction in the unprocessable log file, halts the destination, and prevents it from receiving any further transactions until this unprocessable transaction is repaired and resent to the destination. By default, e-Biz Impact performs the halt actions whenever a transaction encounters a processing error through a production object.
Cancel & Keep Going Same as the destination returning a -999. Places the transaction in the unprocessable logfile and allows the destination to continue to receive new transactions.
Skip & Keep Going Skips the entire transaction and continues to receive new transactions. Places the transaction in the unprocessable log file.
Defaults The options available identify a default separator to append to all rule object and/or rule component object output.
Field (key) Description

CHAPTER 3 Building Production Objects
TRAN-IDE Guide 181
4 Click OK to save the entries and close the window. To exit the window without changing or accepting new entries, click Cancel.
Using the test driveYou can test drive production object definitions to determine if they parse correctly and run against all defined rules.
1 Click Pro-Obj in the main TRAN-IDE window.
2 Double-click the production object you want to test from the Production Objects list.
Rule Separator Select this option to have e-Biz Impact append a separator to the output of every rule object. To use a literal value as the default separator, select the Literal option and enter the desired value into the adjacent entry field. To use the contents of an input field as the default separator, select FldObj, then select the desired input field from the drop-down list.
If you do not want an individual rule object to use the default separator, select No Default Separator in the Current Production Rule window when defining the rule object.
Rule Component Separator Select this option to have e-Biz Impact append a separator to the output of every rule component object. To use a literal value as the default separator, select the Literal option and enter the desired value into the adjacent entry field. To use the contents of an Input Field as the default separator, select the FldObj option, then select the desired input field from the drop-down list.
If you do not want an individual rule object to use the default separator, select No Default Separator in the Rule Component Information window when defining the rule component object.
Pre Filters Define one or more filter objects to run against the input transaction. These filters are the first action taken on a transaction when e-Biz Impact presents them to a production object and are run before input field parsing or any qualification takes place.
Use this option to run a filter on an entire transaction; for example, converting the transaction data to upper or lowercase or changing all pipe “|” symbols to dollar signs “$”.
Note This filter does not change the actual transaction logged by the SFM; it affects only the copy of that transaction presented to this production object.
Field (key) Description
Using the test drive
182 e-Biz Impact
3 From the Production Object Information window, select Test Drive | Start Test Drive. Four windows display—the Test Drive control panel, the Input Value window, the Output Value window, and the Input Field Parsed Data window.
4 Use Test Drive | Toggle to move between each of windows. Use the other Test Drive menu options to test the production object.
Note To retain your window view after you configure toggle settings, use the Test Drive | Window Geography menu options.
Test Drive menu and control panel optionsThe following options are available from the Production Object Information window Test Drive menu. When the same option is available from the Test Drive control panel, the equivalent option is listed in the second column.

CHAPTER 3 Building Production Objects
TRAN-IDE Guide 183
Test Drive menu option
Test Drive control panel option Description
Start Test Drive
Field Value
Starts the test drive for the current production object. Four windows display:
• Test Drive control panel – opens the Test Drive window. This windows options allow you to control the testing input, output, and parameters. See
• Input Value window – when you enter data in the Test Drive control panel’s Field Value to test a production rule, the this window displays the value you entered. When you use a data file to test a production rule, it displays the content of the input transaction. The maximum display of the Input Value window is 256 characters. The data displays in character format on the top line and in hexadecimal on the second line with a position notation on the third line.
• Output Value window – displays the value produced by a single selected production rule or by all of a production object’s rules depending upon whether you used run rule or run all. Like the Input. The maximum display of is 256 characters. The data displays in character format on the top line and in hexadecimal on the second line. The third line has position notation.
• Input Field Parsed Data window (Input Field Dump) – displays parsed results. Click Dump to save the results to a text file.
Toggle Window none Allows you to toggle between, open and close, the four test drive windows (Test Drive, Input/Output Value, Input Field Parsed Data).

Using the test drive
184 e-Biz Impact
Load
Load File
Load First
Load Next
Load the data to test drive:
• Whole File – loads a file that contains a complete input transaction. When you load a data file, TRAN-IDE clears the datalink objects and places the appropriate data into each field object’s datalink, when defined.
• First Trxn – loads a data file that contains multiple transactions, then loads the first transaction in the data file.
• Next Trxn – loads the next transaction in the data file selected using First Trxn.
• Set Trxn Delimiter – opens the Multi-Record Detail window:
• Transaction Separator – if using a transaction separator character as a delimiter, select one from the drop-down list of common separators, or type the separator in the entry field.
• Fixed Record Length – if the records have a fixed length, enter that value.
Run
Run All Rules
Run Rule
Run Until
Select the data to run:
• All Output Rules – once a file is loaded, select this option to run the transaction through the entire set of production rules in the Production Rules list, in the order presented in that list.
• Current Output Rule – test the currently selected output rule.
• Until Current Output Rule – once a file is loaded, select this option to run the transaction through the production rules up to and including the rule currently selected in the Production Rules list. All production rules after the selected rule are not run on the transaction.
View Datalinks View Datalinks Opens the View Datalinks window and displays the production object’s datalinks and their contents. The top pane displays all datalinks. The bottom pane displays the contents of the datalink selected in the top pane. Click Done to exit and close the window.
Test Drive menu option
Test Drive control panel option Description

CHAPTER 3 Building Production Objects
TRAN-IDE Guide 185
Addition test drive control panel options
In addition to the options listed in the preceding table, the test drive control panel has these options.
Find Rule Find Rule Use this option after testing a complete production object with all rules. Highlight a portion of data in the Output Value window and select this option. TRAN-IDE moves the selection bar in the production rule list to the production rule that generated the data. If you do not select any data in the Output Value window and select this option, TRAN-IDE selects the production rule that generated the data that starts at the far left position in the window.
End Test Drive none Stops the test drive.
Window Geography none Select from the following options:
• Save Current Geo – saves the current geography of the test drive windows so that the next time you use the test drive, the windows are in the same position on the screen.
• Load Custom Geo – restorers the test drive windows to the position on the screen they were in the last time Save Current Geo was selected.
• Load Default Geo – restores the test drive windows to the TRAN-IDE default location.
• Reset Geography – resets the test drive windows to the position where they were located when the test drive was started.
Test Drive menu option
Test Drive control panel option Description
Option Description
Clear
Parse
Save Input Writes the input data to disk. Saves files with a .dat extension
Save Output Saves the output of a transaction’s travel through the Test Drive for later review or test usage. Saves files with a .dat extension.
Hex Dump/Line Dump Toggles between hexadecimal and line dump views in the Input and Output Value windows.

Using the test drive
186 e-Biz Impact
Debug On/Debug Off Toggles the test drive debugger. The debugger outputs to the xlog in the TRAN-IDE working directory.
SFM Not currently used.
Option Description