e-pattern flutter circle skirt - sew mama sesfluttercircleskirt.pdf · 5 cutting layout d + b b...
TRANSCRIPT
simple · modern · contemporary sewing patterns
FlutterCircle Skirt
happy sewing!
Difficulty levelbeginner
e-pattern
2
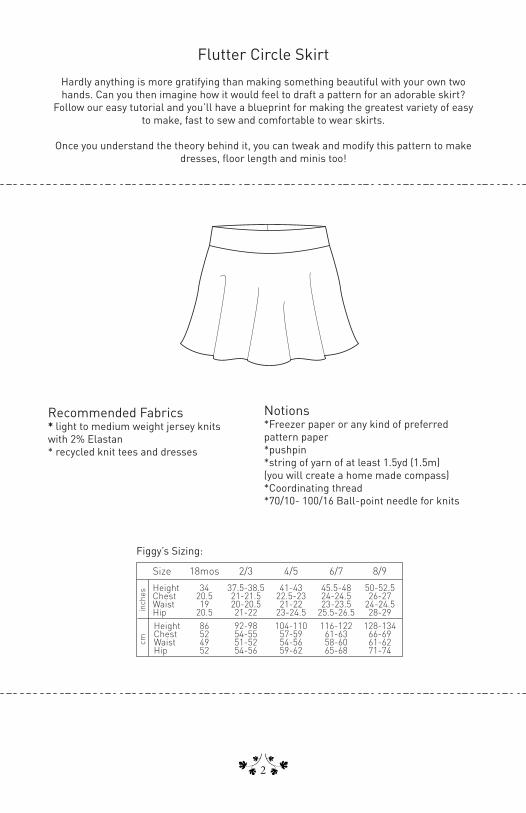
Recommended Fabrics* light to medium weight jersey knits with 2% Elastan * recycled knit tees and dresses
Notions*Freezer paper or any kind of preferred pattern paper*pushpin *string of yarn of at least 1.5yd (1.5m) (you will create a home made compass)*Coordinating thread *70/10- 100/16 Ball-point needle for knits
Figgy’s Sizing:
Size
HeightChestWaistHip
2/3
37.5-38.521-21.520-20.521-22
18mos
3420.519
20.5
4/5
41-4322.5-2321-22
23-24.5
6/7
45.5-4824-24.523-23.5
25.5-26.5
8/9
50-52.526-27
24-24.528-29in
ches
cm
HeightChestWaistHip
86524952
92-9854-5551-5254-56
104-11057-5954-5659-62
116-12261-6358-6065-68
128-13466-6961-6271-74
Flutter Circle Skirt
Hardly anything is more gratifying than making something beautiful with your own two hands. Can you then imagine how it would feel to draft a pattern for an adorable skirt?
Follow our easy tutorial and you’ll have a blueprint for making the greatest variety of easy to make, fast to sew and comfortable to wear skirts.
Once you understand the theory behind it, you can tweak and modify this pattern to make dresses, floor length and minis too!
3
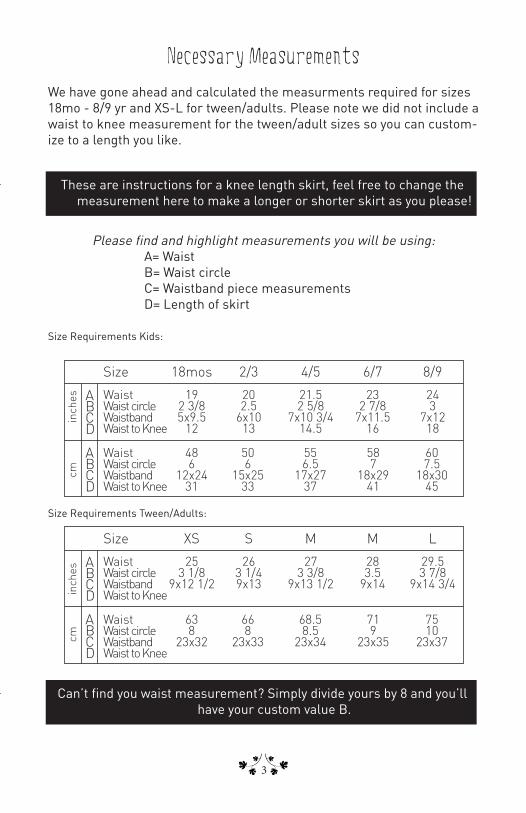
Necessary Measurements
Size Requirements Kids:
We have gone ahead and calculated the measurments required for sizes 18mo - 8/9 yr and XS-L for tween/adults. Please note we did not include a waist to knee measurement for the tween/adult sizes so you can custom-ize to a length you like.
Size Requirements Tween/Adults:
Size
WaistWaist circleWaistbandWaist to Knee
ABCD
ABCD
ABCD
ABCD
WaistWaist circleWaistbandWaist to Knee
2/3
202.5
6x10¹³
18mos
192 3/85x9.5
12
486
12x2431
506
15x2533
556.5
17x2737
587
18x2941
607.5
18x3045
4/5
21.52 5/8
7x10 3/414.5
6/7
232 7/8
7x11.516
8/9
243
7x1218
inch
escm
Size
WaistWaist circleWaistbandWaist to Knee
WaistWaist circleWaistbandWaist to Knee
S
263 1/49x13
XS
253 1/8
9x12 1/2
638
23x32
668
23x33
68.58.5
23x34
719
23x35
7510
23x37
M
273 3/8
9x13 1/2
M
283.5
9x14
L
29.53 7/8
9x14 3/4
inch
escm
Size
WaistWaist circleWaistbandWaist to Knee
ABCD
ABCD
ABCD
ABCD
WaistWaist circleWaistbandWaist to Knee
2/3
202.5
6x10¹³
18mos
192 3/85x9.5
12
486
12x2431
506
15x2533
556.5
17x2737
587
18x2941
607.5
18x3045
4/5
21.52 5/8
7x10 3/414.5
6/7
232 7/8
7x11.516
8/9
243
7x1218
inch
escm
Size
WaistWaist circleWaistbandWaist to Knee
WaistWaist circleWaistbandWaist to Knee
S
263 1/49x13
XS
253 1/8
9x12 1/2
638
23x32
668
23x33
68.58.5
23x34
719
23x35
7510
23x37
M
273 3/8
9x13 1/2
M
283.5
9x14
L
29.53 7/8
9x14 3/4
inch
escm
Please find and highlight measurements you will be using: A= Waist B= Waist circle C= Waistband piece measurements D= Length of skirt
These are instructions for a knee length skirt, feel free to change the measurement here to make a longer or shorter skirt as you please!
Can’t find you waist measurement? Simply divide yours by 8 and you’ll have your custom value B.

4
Drafting the Pattern
1. Total the value of D+B. Make a mark on one long edge of your pattern paper that equals that value.
2. Fold the paper in half along the marking.
D + B
B
FoldFold
Skirt piece
Skirt piece
Waistbandpiece
FoldDC
Waistbandpiece
D + B
B
FoldFold
Skirt piece
Skirt piece
Waistbandpiece
FoldDC
Waistbandpiece
3. Using the measurement for B, make a mark at the measured length from the fold.
4. Measure length B on the piece of string. Make a loop to insert a pen at the B measurement, cut the string. Repeat with another piece of string to mark measurement of D+B.
5. Using an even and penetrable work surface, attach a push pin into one end of the B measured string at the top folded corner of the paper. Push the pin down to hold in place.
6. Draw a quarter circle for value B - this is the waist circle. Remove the pin and string.
Use a length of pattern paper twice as long as you want your skirt to measure.

5
Cutting Layout
D + B
B
FoldFold
Skirt piece
Skirt piece
Waistbandpiece
FoldDC
Waistbandpiece
D + B
B
FoldFold
Skirt piece
Skirt piece
Waistbandpiece
FoldDC
Waistbandpiece
7. Using the prepared D-measurement string, repeat step 5&6 to draw a larger quarter circle - this is the hem of the circle skirt.
8. Use the C measurements to mark the waistband pattern piece on the paper pattern.
9. Cut out the pattern and mark as shown below.
e.g for size 18mo: 2.375+12= 14.375 x2= 28.75+5=32.75”
B + = ...........x2=.........+D C=yardage
Calculate your fabric usage with this simple calculation:

6
All seam allowances are 3/8” unless otherwise stated.
Sewing the Skirt
Waistband
10. Change the stitch on the sewing machine to a zigzag stitch with the length set on 3.0 and the width .05-1.0.
11. Change the needle to a ballpoint jersey needle.
TIPS: • There is no need to finish knits as most of them don’t fray.• If you want to use a serger, choose the wide serge stitch and serge
all seams except the hems. Always pin parallel to seams.• If you are new to sewing with knits, it may be helpful to apply seam
stabilizer to the edges of waistband and skirt waist.
12. Right sides facing, fold the waistband piece in half lengthwise. Stitch. Press the seems open.
13. Wrong sides facing, fold the waistband in half widthwise.
7
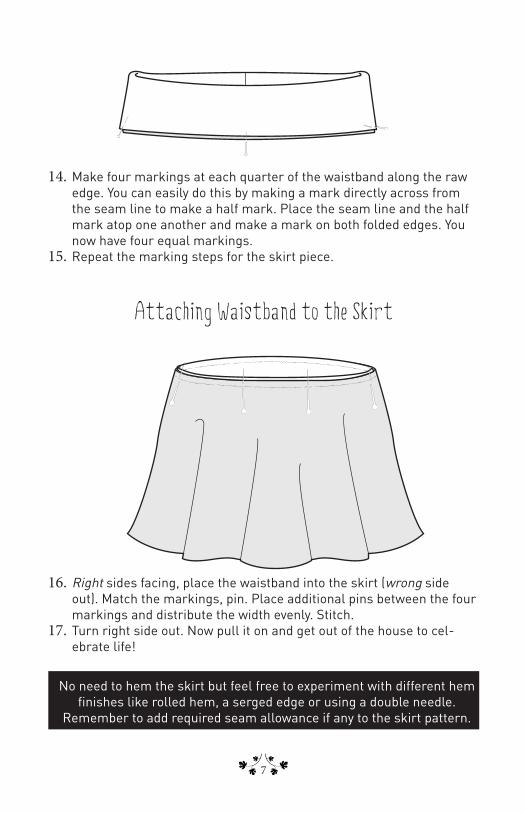
Attaching Waistband to the Skirt
No need to hem the skirt but feel free to experiment with different hem finishes like rolled hem, a serged edge or using a double needle.
Remember to add required seam allowance if any to the skirt pattern.
14. Make four markings at each quarter of the waistband along the raw edge. You can easily do this by making a mark directly across from the seam line to make a half mark. Place the seam line and the half mark atop one another and make a mark on both folded edges. You now have four equal markings.
15. Repeat the marking steps for the skirt piece.
16. Right sides facing, place the waistband into the skirt (wrong side out). Match the markings, pin. Place additional pins between the four markings and distribute the width evenly. Stitch.
17. Turn right side out. Now pull it on and get out of the house to cel-ebrate life!

8
• Baste Stitch: A temporary stitch made by hand or machine by in-creasing the machine stitch to the longest length.
• Bias Tape: A fabric strip cut at a 45˚ angle from the selvadge of the fabric. Cutting fabric on the bias allows more stretch, drape and/or flow.
• Casing: A tunnel made by folding over the top of a hem to hold elas-tic or drawstrings.
• Ease: Distributing the fullness of fabric when joining a shorter piece of fabric to a longer piece of fabric without creating gathers. It’s often used when setting an armhole.
• Edge stitch: A stitch line that is 1/8” away from the folded edge or seam line.
• Gathering Stitch: Sewing two parallel rows of baste stitches along one edge of the fabric. The bobbin threads are then pulled and the fabric forms small folds.
• Interfacing: A fabric or fusible fabric placed on the back of another fabric to add shape and support. It can be used when creating but-tonholes and collars.
• Stay Stitch: Stay stitching is a single line of stitching to stabilize the fabric, preventing it from becoming stretched or distorted.
• Stitch in the Ditch: Stitching directly into the seam line.• Top stitch: A stitch sewn on the right side of the garment 1/8-1/4”
from the finished edge. Using a slightly longer stitch can add a pro-fessional look and emphasize a seam.
• Finish: There are multiple ways to “finish” the raw edge of the fabric. • Clean Finish: A simple straight stitch at the raw edge to help prevent
fraying and it may be combined with a pinked seam finish.• Pinked Finish: Created with pinking shears and is used mostly for
fabrics that don’t fray easily. • Zigzag Finish: This seam is created by changing the type of stitch on
the sewing machine. Using a zigzag stitch along the raw edge of the fabric will help prevent the fabric from fraying.
• Serger or Overlock: A stitch that sews over the edge of one or two pieces of fabric for edging, hemming or seaming.
www.figgyspatterns.comhttp://www.flickr.com/groups/patternsbyfiggys/
http://www.facebook.com/patternsbyfiggystwitter: @figgys
*Glossary