e-smart 2.0 & eph reader user guide (student version)
TRANSCRIPT

1
e-Smart 2.0 & EPH Reader
User guide (Student Version)

2
e-Smart 2.0 and eBook User Tutorials
Click the links below to watch the video tutorials about how to use the eBooks for different subjects.
General Studies
Quick Start on PC: https://e-smart.ephhk.com/download/bookshelf_gs_std_htu1_1.mp4
Quick Start on tablets: https://e-smart.ephhk.com/download/bookshelf_gs_std_htu2_2.mp4
To learn more about other e-Learning tools, visit the subject website and watch the tutorials.
Mathematics
Quick Start on PC: https://e-smart.ephhk.com/download/bookshelf_maths_std_htu1_1.mp4
Quick Start on tablets: https://e-smart.ephhk.com/download/bookshelf_maths_std_htu2_2.mp4
To learn more about other e-Learning tools, visit the subject website and watch the tutorials.
How To Use Guides
How To Use Guides
https://ephgs.ephhk.com/student
https://ephpmaths.ephhk.com/student
3
e-Smart 2.0 and eBook User Tutorials
Click the links below to watch the video tutorials about how to use the eBooks for different subjects.
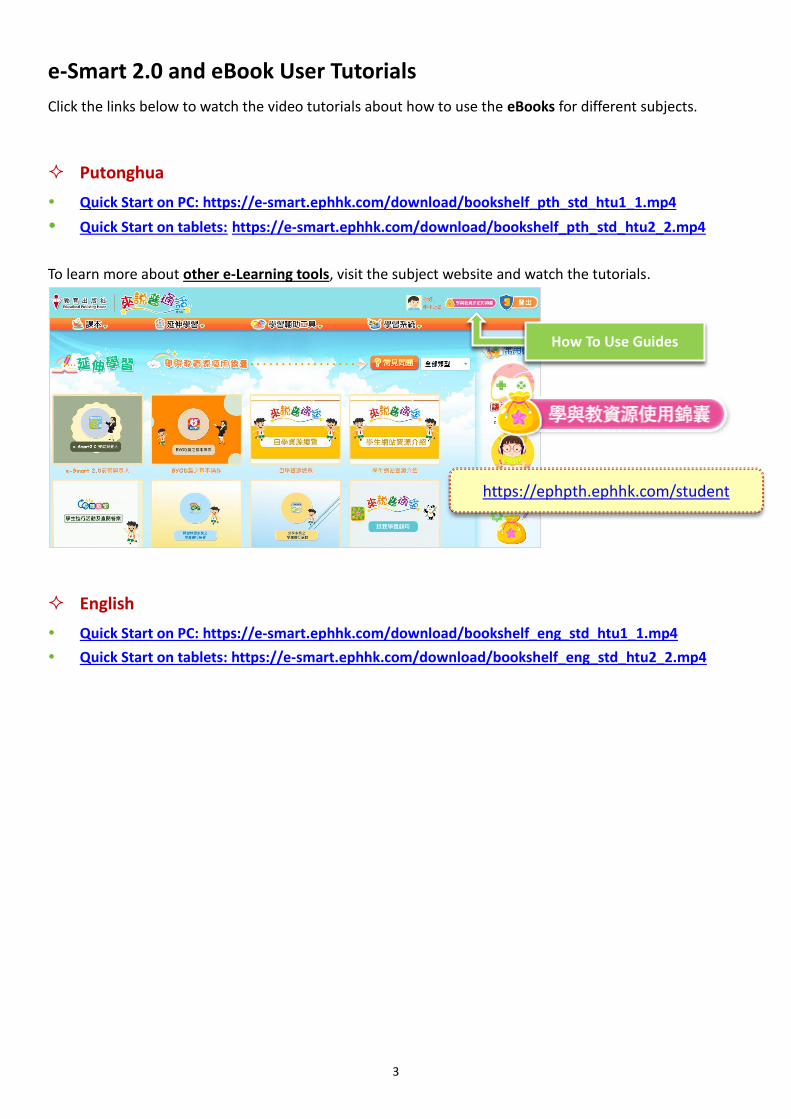
Putonghua
Quick Start on PC: https://e-smart.ephhk.com/download/bookshelf_pth_std_htu1_1.mp4
Quick Start on tablets: https://e-smart.ephhk.com/download/bookshelf_pth_std_htu2_2.mp4
To learn more about other e-Learning tools, visit the subject website and watch the tutorials.
English
Quick Start on PC: https://e-smart.ephhk.com/download/bookshelf_eng_std_htu1_1.mp4
Quick Start on tablets: https://e-smart.ephhk.com/download/bookshelf_eng_std_htu2_2.mp4
How To Use Guides
https://ephpth.ephhk.com/student
4
Content
1. How to install e-Smart 2.0 ....................................................................................................................... 5
2. How to log in e-Smart 2.0 ........................................................................................................................ 5
3. Tool List ..................................................................................................................................................... 7
4. Menu ........................................................................................................................................................ 8
5. EPH Reader ............................................................................................................................................... 9
5.1 e-Textbookshelf ................................................................................................................................ 9
5.2 e-Textbook ...................................................................................................................................... 12
6. FAQs ............................................................................................................................................................. 25

5
1. How to install
The EPH Reader is suitable for use on tablet PCs running on iOS, Android and Windows systems.
Installation is easy, fast and convenient for use in different environments.
1.1 Please go to http://e-smart.ephhk.com/ephreader/ to check if your tablet or PC meets the
recommended system requirements of the EPH Reader.
1.2 You can choose to download the right EPH Reader based on the operating system of your tablet
or PC.
2. How to login
(1) Once the program has been successfully installed, the e-Smart 2.0 icon will appear on the
desktop. Click to open.
(1) After clicking on the icon, you will see the login page. Key in your e-Smart EPH ID and password,
and click “Log in”.
Key in your EPH ID and
password, then click “Login”.
You can also scan the QR code
to log in.
Student input the valid
authentication code here to
read the paid e-Textbook . If
student want to activate the
e-Textbook in their account,
please input the
authentication code in EPH
Reader.

6
(3) Select the subject and curriculum on the main page of e-Smart 2.0, the related system(s), tool(s) and
subject website(s) shown on the page.
(I) Menu
Select subject and curriculum, refer to 4. Menu.
(II) Systems and Tools for subject
When you selected a subject, the related systems and tools for this subject shown on the page.
Please refer to the user guides of corresponding systems for further use.
If I forget my EPH ID or password, what can I do?
You can consult your class teacher or your subject teacher.
Where can I get my QR code for logging in?
You can consult your class teacher or your subject teacher. Before you use your QR code to log in, please make sure
that your tablet’s camera is functioning properly.
Can I log in to the EPH Reader using the QR code on a Windows PC?
No. You can only log in using your EPH ID and password on the Windows version of the EPH Reader.
(I)
(II)
(III)

7
(III) Connectivity
This sign is the signal strength indicator of the EPH Reader. You can use the EPH Reader and read
the e-Textbook offline, but your device must be online when downloading e-Textbooks or using
the online resources.
: Strong : Normal : Unstable : Disconnect : Offline
3. Tool List
Open tool list by clicking on the on the top left hand corner.
(I) Handbook
Student can view all the exercises of LTT systems, eHomework and eTest of e-Smart assigned by
teachers in here.
(II)
(III)
(IV)
(V)
(I)
Subject Summary pop up when the
handbook opened, it listed the
number of assigned activities and
exercises of all subjects, click on the
number to go to related systems.
In the main page of handbook, activities and
eHomework put in order by assigned date,
and there are divided in three pages “To be
Completed”, “Completed” and “Expired”.

8
(II) Message
Student can received messages sent by teachers.
(III) Language options
Click this to change the language to Traditional Chinese or English.
(IV) About
Click this to check the version of the e-Smart 2.0 installed in the device, download the User Guide
or read the profile of EPH in the "About Us" section.
(V) Logout
Clicking on this will take you away from the e-Smart 2.0 and back to the log in page.
4. Menu
You can find corresponding systems or e-Textbook by select level, subject, curriculum and catergory .
Main page of e-Smart 2.0
Select subject and curriculum here
Open the tool list, the number beside the Message icon means the quantity of new messages.
There are several
curriculums in some
subjects (e.g. English, GS),
select one of them here.
Clicking on the number to go to the
mailbox and read message

9
5. EPH Reader
Clicking on to EPH Reader. After logging in, you will see the e-Textbookshelf and
you can start downloading the e-Textbooks you require. You can read e-Textbook in offline situation if
the first time you logged in online and downloaded required e-Textbook.
5.1 e-Textbookshelf
The various tools on the e-Textbookshelf help you use the e-Textbookshelf easily and efficiently.
Select one of the above and the e-
Textbookshelf will display the
corresponding e-Textbooks.
5.1.1
5.1.2

10
5.1.1 eTextbook management
5.1.1.1 Open
Each e-Textbook obtains all the units of the book, click open to read or download.
5.1.1.2 e-Textbook status
These buttons indicate the status of the e-Textbooks.
(1) indicates that the e-Textbook has not been downloaded onto your e-
Textbookshelf. The e-Textbook will begin downloading when you click on this button:
(2) indicates that the e-Textbook has been downloaded onto your e-Textbookshelf.
You can begin reading the book by clicking on the button.
(3) indicates that the contents of the e-Textbook has been updated. Click on the
button to update the book.
(4) Click to delete an e-Textbook.
The “Download” button will change to “Cancel” during the process of
downloading. Do not click on this or it will stop the download. After the e-
Textbook has been downloaded, the files need to be unzipped. At this
time, the button will change to “Unzipping” . Please wait for
“View” before clicking on it.
Total number of units in
this book
Click to open units list.

11
(5) Click to download all the units in the e-Textbook. If there are more than 4 units
in an e-Textbook, the first four units will be downloaded after clicking on the button.
5.1.2 Other functions
5.1.2.1 Space used/available
This shows the storage space used on your tablet PC capacity, which enables you to
determine how much space you have left before downloading e-Textbooks.
5.1.2.2 Language options
Click this to change the language to Traditional Chinese or English.
5.1.2.3 Authentication (for students only)
If you find that there are no e-Textbooks on the e-Textbookshelf after logging in, and you
have received the authentication code from your school, then you can click here and enter
the code to activate and download the e-Textbooks.
5.1.2.4 About
Click this to check the version of the e-Smart 2.0 installed in the device, download the User
Guide or read the profile of EPH in the "About Us" section.
Will there be any problems if I do not update the e-Textbooks?
You can continue viewing the e-Textbooks if you do not update them. However, this could affect some of the
functions in the e-Textbooks, for example the e-Textbook synchronisation function.
Can I use an e-Textbook that I have already deleted again?
Deleted e-Textbooks will resume their “Download” status. If you have backed up your notes onto the cloud
storage before deleting the e-Textbook, you can click on the “Restore” button after downloading the book again to
restore your notes. For synchronisation steps, please refer to 5.2.1.2 Sync personal details.

12
5.2 e-Textbook
EPH’s e-Textbooks are easy to use on all operating systems. The e-Textbooks have the same content
as the printed textbooks, but they also include multimedia resources and are connected to a
number of important functions on the e-Smart Learning Management System. Apart from using the
e-Textbooks in class, you can also use the e-Textbooks for self-study purposes after class. EPH’s e-
Textbooks make learning a more interesting and enjoyable experience.
5.2.1 e-Textbook management tool bar
5.2.1.1 Note-taking tools
(1) Tool-in-use button
The icon of the selected tool [from (2) to (6)] will be displayed here. Click on the button to stop
using the tool before you turn to another page. You cannot go to another page when the button
is on. You can click on the button to use the tool again.
The e-Textbooks contain diverse and
flexible features. The toolbar, for example,
provides a variety of tools to help record
and store information, manage lessons,
share resources with other teachers and
students, etc.
For example, if you choose “Highlighter”, the icon will be displayed here in colour.
(1) (2) (3) (4) (5) (6) (7)

13
(2) Highlighter
The “Highlighter” has a variety of colours and degrees of thickness. This conveniently enables
you to highlight information based on its importance.
(3) Drawing tool
The “Drawing tools” come in different patterns, colours, degrees of transparency and thickness,
and are suitable for writing and drawing.
(4) Eraser
You can use the eraser to remove unwanted marks or notes on the page.
Use the highlighter to mark on any part of the text in a
linear fashion to emphasise its importance. The
highlighter colours are transparent, enabling you to
read the original text under the highlighter’s colour.
Use the drawing tools to write or draw on any part
of the text to aid memory-recall and learning.
You can manipulate the eraser to remove unwanted
highlights or marks on the page by selecting .
Selecting will automatically remove all highlights
and marks on the page.
Can I select to clear all highlights and strokes on a page?
Selecting will not ensure the complete removal of all highlights and strokes. The "Bookmarks/ Notes" tool
bar of the page will still have a record of them. It is recommended that you use to clear all highlights and strokes
on the page.
14
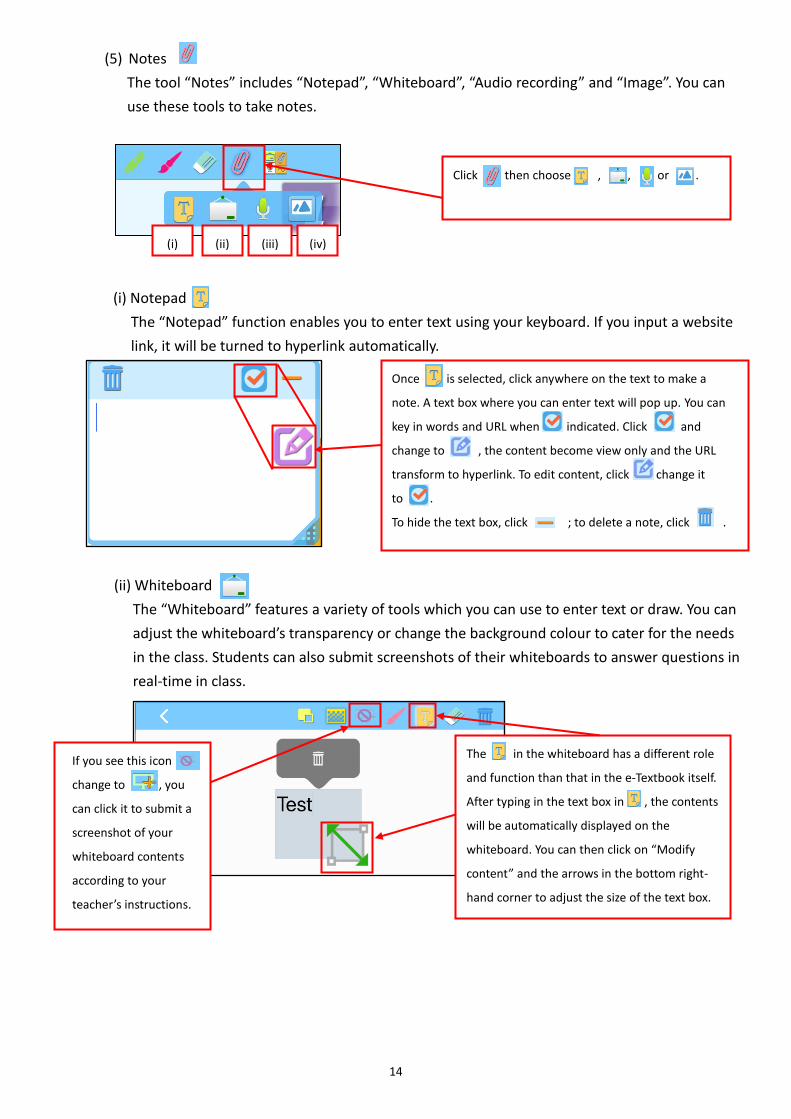
(5) Notes
The tool “Notes” includes “Notepad”, “Whiteboard”, “Audio recording” and “Image”. You can
use these tools to take notes.
(i) Notepad
The “Notepad” function enables you to enter text using your keyboard. If you input a website
link, it will be turned to hyperlink automatically.
(ii) Whiteboard
The “Whiteboard” features a variety of tools which you can use to enter text or draw. You can
adjust the whiteboard’s transparency or change the background colour to cater for the needs
in the class. Students can also submit screenshots of their whiteboards to answer questions in
real-time in class.
Click then choose , , or .
(i) (ii) (iii) (iv)
The in the whiteboard has a different role
and function than that in the e-Textbook itself.
After typing in the text box in , the contents
will be automatically displayed on the
whiteboard. You can then click on “Modify
content” and the arrows in the bottom right-
hand corner to adjust the size of the text box.
If you see this icon
change to , you
can click it to submit a
screenshot of your
whiteboard contents
according to your
teacher’s instructions.
Once is selected, click anywhere on the text to make a
note. A text box where you can enter text will pop up. You can
key in words and URL when indicated. Click and
change to , the content become view only and the URL
transform to hyperlink. To edit content, click change it
to .
To hide the text box, click ; to delete a note, click .

15
(iii) Audio recording
You can also do a direct recording of audio notes to save time on writing and copying.
(iv) Image
This tool is for inserting pictures onto the pages.
(3) Display/Hide notes
You can hide the notes on the page when you are reading.
After you have finished recording, the will
reappear. Click on the recording display window
and the icon to play your recording.
Once is selected, click anywhere on the page
and the recording display window will pop up.
Click on to start recording, then click on
“stop” to stop recording.
Once is selected, click anywhere on the
page to insert a picture. The picture inserting
window will pop up. Click to use the camera
to capture an image, or choose an existing image
from your device’s photo gallery. To hide the
window, click ; to delete the picture,
click .
How can I retrieve the pages with highlighted contents, drawings, notepad/whiteboard notes, recordings and
pictures?
All pages with highlighted contents, drawings, notepad/whiteboard notes, recordings and pictures can be retrieved
via “Bookmarks/Notes” . Are there any restrictions or limits to notes, audio recordings and pictures?
You can record up to 2 segments per page, with each segment not more than 2 minutes long. For notes, you can tag up
to 100 notepad notes and 4 whiteboard notes per page. For pictures, you can insert up to 4 pictures on each page.

16
(4) Pinyin tool
This tool is designed specifically for Chinese e-Textbooks. Click on the icon to display Chinese
characters, Hanyu Pinyin or both.
(5) Screenshot (for students only)
This function is only available in class. When the icon changes from to , it indicates
that you can submit a screenshot of your current page to your teacher by clicking it.
5.2.1.2 Sync personal details
The e-Textbooks come with a cloud storage feature. You can store your personal records (notes,
exercises, answers, etc.) in the e-Textbooks on the cloud storage. This allows you to access and
update individual records in the e-Textbook on any computer you use.
Backup ︰You can store your personal records in an e-Textbook (notes, exercises, answers,
etc.) on the cloud storage.
Situation Notification
You are accessing this e-
Textbook for the first time
and there are no
individual records in the
book.
You are accessing this e-
Textbook after having
added your personal
records.
Click to hide the notes.
After clicking the icon, it will
change to and the notes on
the page will be hidden. Click the
icon again and the notes will
reappear.

17
You have backed up your
personal records in an e-
Textbook on this machine,
and then modified your
records before backing up
again.
You have backed up your
personal records in an e-
Textbook on another
computer and you have no
new personal records in
this one.
Restore : Take your personal records stored on the cloud and download them onto the e-
Textbook you are using now.
Situation Notification
You are accessing this e-
Textbook for the first time
and you have not added
any individual records in
the book.
You have added and
backed up personal
records in this e-Textbook.
You did not do a “Restore”
after accessing an e-
Textbook but you had
added new personal
records.
I used a school computer to back-up or restore electronic textbooks. Can other people access my records on the
same computer?
Backing-up or restoring your records in e-Textbooks on a public computer should not be a problem because you
have to log into the e-Textbook system using your personal ID. Other people should be not able to access your
records. However, you must remember to log out of the system after use.
If you decide to back
up your records onto
the cloud storage, click
“OK”, otherwise click
“Cancel”.
If you decide to back
up your records onto
the cloud storage, click
“OK”, otherwise click
“Cancel”.
If you click “OK” your backed
up personal records on the
cloud will be downloaded into
the copy of the e-Textbook you
are now using.
If you decide not to keep the
personal records you have just
made in the e-Textbook, click
"OK". Otherwise, click
"Cancel" to back up your data.

18
5.2.1.3 Return to e-Textbookshelf
Click on to return to the e-Textbookshelf.
5.2.1.4 Bookmarks / Notes
There are bookmarks and notes function that enables you to go directly to the content you
want.
(1) Bookmarks
The “Bookmarks” function helps you bookmark important pages for ease of access.
If you want to delete a bookmark, click on to proceed.
In “Thumbnail” mode, click on the “Edit” button.
Then, click on the in the top right-hand
corner of the page and click to delete
the bookmark on that page.
Bookmark the page by clicking on .
(1) (2)

19
(2) Notes
Here, you can find the usage records of the highlighter, drawing tools, notepad, whiteboard,
audio recording and image functions.
You can use the "Clear All " function under the "Eraser" tool to remove all highlights and
strokes on a particular page; or click to delete all notepad/whiteboard notes, audio recordings
or pictures on the page.
5.2.1.5 Print
When you click on , the “Print” interface will be displayed. Select the suitable print parameters before printing the page.
5.2.1.6 Tool list / Resources / Sharing System
Corresponding to the Teaching resources tool panel on the left hand side (refer to 5.3), click to
open related tool bar.
5.2.1.7 Audio tools
Audio tools will display during the audio playing, you can pause, play again and control the volume.
Audios in some subjects (e.g. Putonghua) provide “speed of speech” control.
In “List” mode, after clicking on the “Edit”
button, click on the before the page
number. Wait for the “Delete” button
to pop up and click on it to delete the
bookmark on that page.
When you use the highlighter and drawing
tools , notepad , whiteboard ,
audio recording and image
functions on the page, they will automatically
be recorded here.
Why can’t I print out some of the pages in the e-Textbook?
You can only print out the page when the icon is on. You also need to check that you have set up a printer
and have installed the corresponding software.

20
5.2.1.8 Hand Tool / Zoom in and out
You can use the zoom in/out sliders to zoom in/out the page. When the Hand Tool is selected,
you can drag the page to the designated position easily.
5.2.1.9 Page bar
When you are not sure which page you want to go to, the “Page bar” enables you to preview
each page so that you can find the page you want to go to.
5.2.1.10 Double screen mode
Click to view two books at the same
time (e.g. an e-Textbook and an e-Workbook)
to enhance learning and teaching.
5.2.1.11 Single/Double page mode
This is only available in vertically-orientated e-Textbooks. Clicking on can change the page
display into either a single page or spread. You can switch the display mode by clicking on the
icon again. Please note that this feature will only appear on a computer or tablet PC that is
horizontally placed on a flat surface.
You can also use or or your fingers to drag and move
the thumbnails. Click the appropriate thumbnail to go to the
page you want.
Pull the page number on the bar will make
the thumbnail of the page pop up.

21
5.2.1.12 Fit to page width / Fit to page height
The e-Textbook comes with an autofit function that you can click to make the page fit to width or
height of the screen.
5.2.1.13 Touch screen blocker
This feature is designed specifically for the tablet PC, allowing you to avoid touching the tools at
the bottom of the screen and affecting operations when you are writing.
5.3 Learning resources tool bar
This toolbar shows the available learning resources in the e-Textbook,
such as worksheets, PowerPoint presentations, charts, etc. As it is also
connected to the e-Smart tools, you can use the tools at any time.
Press and hold the tab to activate
the touch screen blocker. You can use your
finger to drag the blocker up and down to
adjust the height.
Click on the tabs on the left-hand side or the
buttons at the bottom to reveal the panels.

22
5.3.1 Contents
Click to open the subdirectory. Click on
the relevant topic to access the
corresponding page.
5.3.2 Tool list
A variety of e-Smart links and tools are listed here according to the related subjects for your usage.
Please note that some of the tools need plugins to run.
Contents / Tool
Default resources / Online teacher Resources / Exercises
Chinese
Sharing system
English

23
5.3.3 Default resources /Online teacher resources / Exercises
Worksheets, practice questions, PowerPoint presentations, images, etc., that are related to the e-
Textbook are provided here. You can use the resources at any time.
(1) Default resources / Online teacher resources
Default resources are the e-Textbook resources shared by the teachers; Online teacher
resources are the additional school-based resources and notes provided by the teachers.
(2) Practice questions
Every e-Textbook comes with practice questions. You can complete and submit them during
lessons according to the teacher’s instructions or you can use them for self-study. You have
to make sure you are connected to the Internet before you submit your answers.
The “Submit” button will change according to your progress. Different “Submit” buttons have
different meaning:
: You have not completed the exercise yet.
Why are there no resources in ‘Default resources’ and ‘Online teacher resources’?
If your teachers have not shared any resources, these columns will remain empty.
Different types of practice questions help you consolidate what you have learned. After completing
the questions, click the “Submit” button at the bottom of the exercise and the results will be sent to
your teacher. Press “Reset” to clear all the answers, then redo and submit the exercise again.

24
: You have completed the exercise and ready to submit.
: Unable to submit your answers. Please check the connection and try again.
: Your answers have been submitted successfully.
5.3.4 Chinese handwriting / stroke order practice
Apart from typing in text, you can write answers using the handwriting panel in some exercises.
(1) Chinese handwriting practice
Click the answer area and the handwriting panel will pop up. Then you can write answers on
the panel. It can be used with any input device, such as a touchscreen or a mouse.
(2) Chinese stroke order practice
This function helps you practise the correct stroke order and you can play the
demonstrations repeatedly.
5.3.5 Sharing System (To use this function, you need to install the Sharing System app beforehand.)
This tab on the panel shows the activities which your teacher has assigned to you using the
Sharing System. If you have already installed the Sharing System app, you will be directed to the
activity by clicking on the activity name or the blue button next to the activity name.
Please go to http://e-smart.ephhk.com/ss/ to read the installation instruction for the Sharing
System.
Click the tool-in-use button to
disable the tool that you are
using. Then you can move the
panel by dragging it.
Click to demonstrate the
stroke order.
Click and your text will be transferred to the answer area.
Click or to jump to the previous or next question. Click
to close the handwriting panel; and click to move the
panel to another location.

25
5.3.6 Multimedia resources
Different e-Textbooks
provide you with different
types of multimedia
resources, for example
short videos, animations,
audio recordings, games,
exercises and PowerPoint
presentations, to make
your learning experience
more interesting and
engaging.
6. FAQs
Please go to http://e-smart.ephhk.com/ephreader/ and press to download and
view the FAQs and answers about our e-products.
※End※