ear-eye-nose injuries - ø the #1 human anatomy and ... · human anatomy course.com ear-eye-nose...
TRANSCRIPT

TABLE OF CONTENTS Lesson Paragraphs INTRODUCTION 1. IRRIGATE, INSTILL EYE DROPS, AND APPLY OINTMENTS TO THE EYE 1-1--1-6 Exercises 2. IDENTIFY PRINCIPLES OF APPLICATION OF A DRESSING TO AN EYE INJUR 2-1--2-3 Exercises 3. TREAT FOREIGN BODIES OF THE EYE 3-1--3-5 Exercises. 4. TREAT LACERATIONS, CONTUSIONS, AND EXTRUSIONS OF THE EYE4-1--4-7 Exercises 5. TREAT BURNS OF THE EYE 5-1--5-8 Exercises 6. IRRIGATE AN OBSTRUCTED EAR 6-1--6-9 Exercises 7. TREAT A PATIENT WITH EPISTAXIS (NOSEBLEED) 7-1--7-4 Exercises
MD0547 i
www.HumanAnatomyCourse.com

LESSON ASSIGNMENT LESSON 1 Irrigate, Instill Eye Drops, and Apply Ointments to the Eye. TEXT ASSIGNMENT Paragraphs 1-1 through 1-6. TASK TAUGHT 081-833-0054, Irrigate Eyes. LESSON OBJECTIVES After completing this lesson, you should be able to: 1-1. Identify the procedures used to irrigate an eye. 1-2. Identify the procedures for instilling eye drops into an eye. 1-3. Identify the procedures for applying ophthalmic ointment to an eye. SUGGESTION After completing the assignment, work the exercises at the end of this lesson. These exercises will help you achieve the lesson objectives.
MD0547 1-1
www.HumanAnatomyCourse.com
LESSON 1
IRRIGATE, INSTILL EYE DROPS, AND APPLY OINTMENTS TO THE EYE 1-1. GENERAL As we well know, life revolves around our eyes. Eye injuries do happen and can be very painful and serious. Accurate and immediate treatment can minimize pain and may help to prevent damage to the eye. This lesson will include procedures to irrigate, instill eye drops, and apply ointments to the eye. However, we will begin the lesson by reviewing background information. 1-2. REVIEW OF THE EYE STRUCTURE a. The eye is also called oculus. It is the organ for vision. The eye is approximately 1-inch in diameter, spherical in shape and is suspended within the bony orbit of the skull. The shape of the eye is maintained by a jelly-like mass called vitreous humor. b. Abbreviations associated with the eye are: (1) O.D. (oculus dexter)--right eye. (2) O.S. (oculus sinister)--left eye. (3) O.U. (oculus uterque)--both eyes. 1-3. PARTS OF THE EYE It will be to your advantage to become familiar with the following terms and definitions. You should also know their location. (See figure 1-1.) a. Iris--the colored portion of the eye. b. Pupil--the opening in the center of the iris where light is permitted to enter. c. Cornea--he normally transparent anterior surface of the eye. d. Sclera-- the "white coat" of the eye. e. Limbus-- the edge of the cornea where the cornea joins the sclera. f. Inner/outer canthus--the angle formed by lids at either end of the eyelids. g. Nasolacrimal duct--the channel where tears flow from the eye (lacrimal punctum) through the nose.
MD0547 1-2
www.HumanAnatomyCourse.com
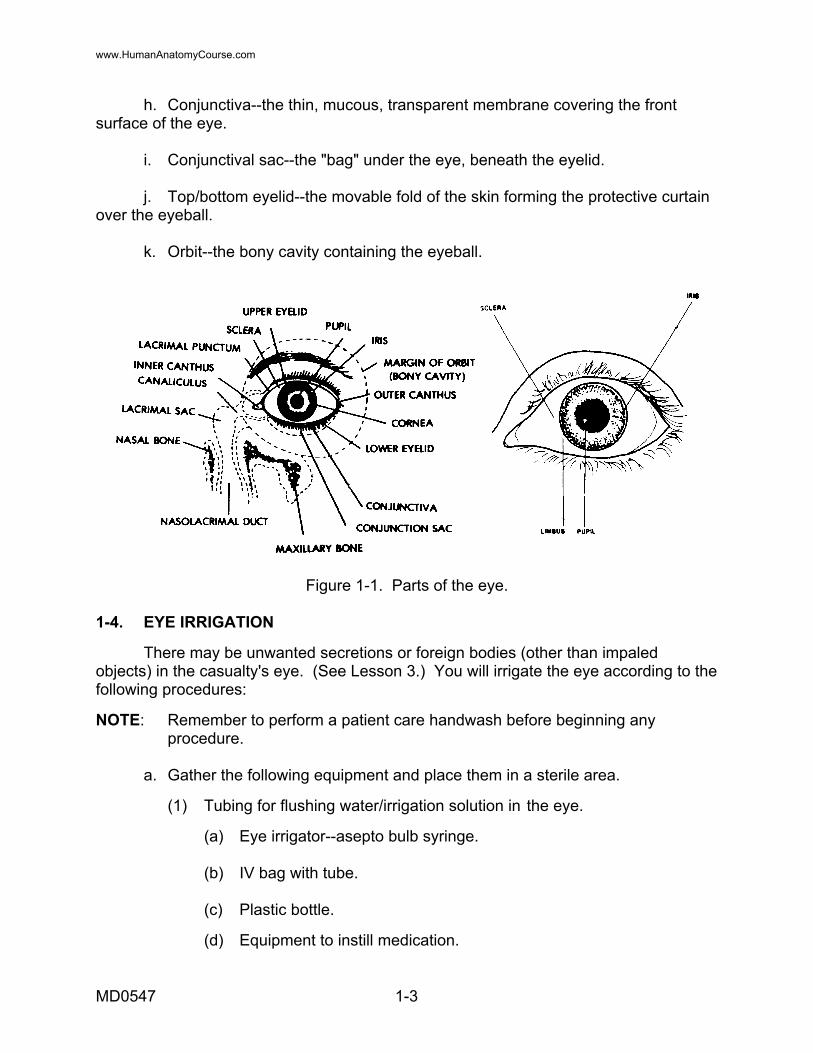
h. Conjunctiva--the thin, mucous, transparent membrane covering the front surface of the eye. i. Conjunctival sac--the "bag" under the eye, beneath the eyelid. j. Top/bottom eyelid--the movable fold of the skin forming the protective curtain over the eyeball. k. Orbit--the bony cavity containing the eyeball.
Figure 1-1. Parts of the eye. 1-4. EYE IRRIGATION There may be unwanted secretions or foreign bodies (other than impaled objects) in the casualty's eye. (See Lesson 3.) You will irrigate the eye according to the following procedures: NOTE: Remember to perform a patient care handwash before beginning any procedure. a. Gather the following equipment and place them in a sterile area. (1) Tubing for flushing water/irrigation solution in the eye. (a) Eye irrigator--asepto bulb syringe. (b) IV bag with tube. (c) Plastic bottle. (d) Equipment to instill medication.
MD0547 1-3
www.HumanAnatomyCourse.com
(2) Water/irrigation solution. (3) Towel. (4) Gauze/cotton balls. (5) Catch basin. (6) Light source. b. Verify the correctness of the items to include the type of medication, the correct amount/concentration, and the temperature for administration. Ensure the correct eye receives treatment. c. Ensure the patient is aware of the treatment. (1) Identify the patient by his name. (2) Inform the patient about the need for treatment. (3) Explain the procedure for treatment. (4) Ask the patient to remove his contact lenses/glasses, if necessary. d. Position the patient and equipment. (1) Patient lying in bed. (a) Place patient in a supine position. (b) Tilt patient's head slightly to the side to be irrigated. (c) Cover patient's area that may be splashed by solution with waterproof cover and/or towel, if applicable. (d) Position the catch basin next to the patient's affected side to catch the flow. (e) Position the light/lamp. Ensure there is adequate light and avoid shinning the light directly over the patient. (2) Patient sitting up. (a) Have the patient place his head in an inclined position to the side to be irrigated.
MD0547 1-4
www.HumanAnatomyCourse.com
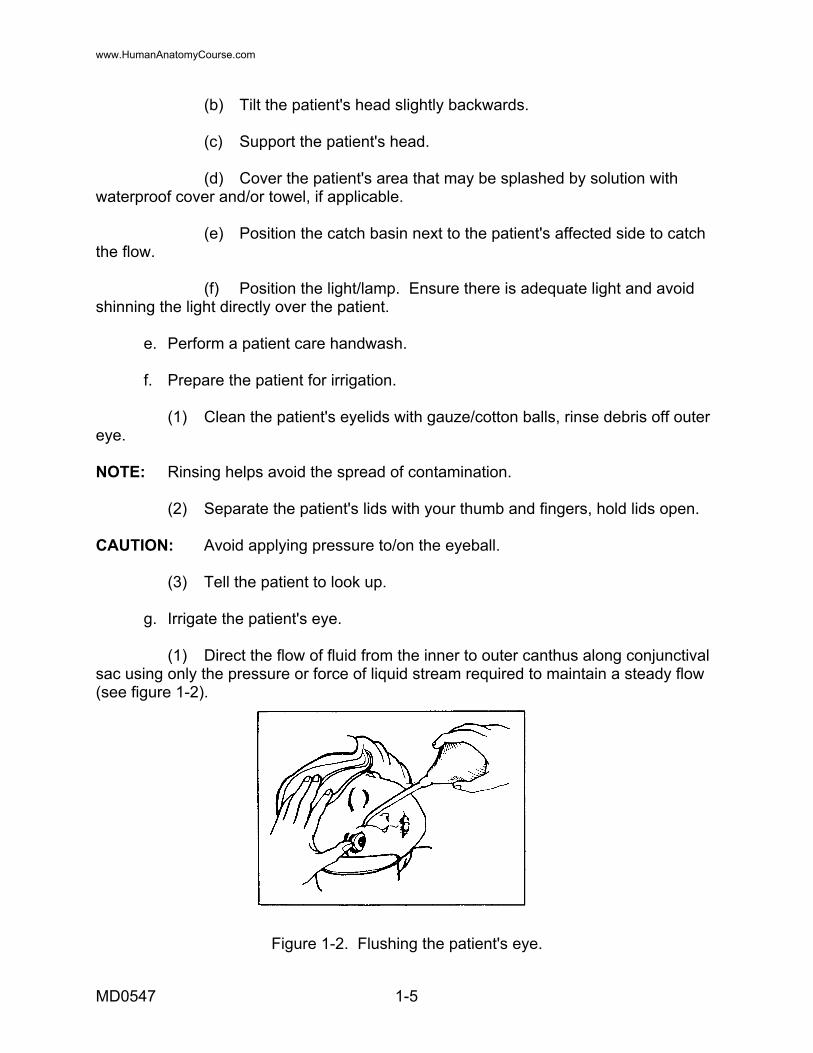
(b) Tilt the patient's head slightly backwards. (c) Support the patient's head. (d) Cover the patient's area that may be splashed by solution with waterproof cover and/or towel, if applicable. (e) Position the catch basin next to the patient's affected side to catch the flow. (f) Position the light/lamp. Ensure there is adequate light and avoid shinning the light directly over the patient. e. Perform a patient care handwash. f. Prepare the patient for irrigation. (1) Clean the patient's eyelids with gauze/cotton balls, rinse debris off outer eye. NOTE: Rinsing helps avoid the spread of contamination. (2) Separate the patient's lids with your thumb and fingers, hold lids open. CAUTION: Avoid applying pressure to/on the eyeball. (3) Tell the patient to look up. g. Irrigate the patient's eye. (1) Direct the flow of fluid from the inner to outer canthus along conjunctival sac using only the pressure or force of liquid stream required to maintain a steady flow (see figure 1-2).
Figure 1-2. Flushing the patient's eye.
MD0547 1-5
www.HumanAnatomyCourse.com
CAUTION: Use just enough force (flow) to gently dislodge the unwanted secretions/foreign bodies. CAUTION: Never touch the patient's eye with the irrigator. It could cause the spread of infection, contamination, or further injury to the eye. NOTE: Do not irrigate an impaled object. (2) Tell the patient to look up to expose the conjunctiva. (3) Gently flush the patient's eye. CAUTION: Ensure that the irrigator tip is 1 to 1 1/2 inches away from the patient's eye. (4) Dry eyelids by gently patting area surrounding orbit dry as soon as sac is thoroughly flushed. CAUTION: Do not pat directly over the patient's eye. h. Perform a patient care handwash. i. Record treatment. if necessary. 1-5. INSTILL DROPS When you instill eye drops into a patient's eyes, you must be absolutely sure of three things: the correct patient, the correct eye, and the correct drops. Medication errors with eye drops can be extremely serious. Your task will begin with the preparation of the patient and the medication. a. Preparation. (1) Identify the patient by his name. Inform the patient of the need and the reason for instilling drops in his eye. Explain the procedures and tell the patient to remove his contact lenses/glasses, if necessary. Ensure you know the correct eye for the treatment. (2) Verify the medication requirements to include the type of medication, the correct amount/concentration, and the temperature for administration. (3) Position the patient. (a) Patient lying in bed. 1 Place the patient in a supine position.
MD0547 1-6
www.HumanAnatomyCourse.com
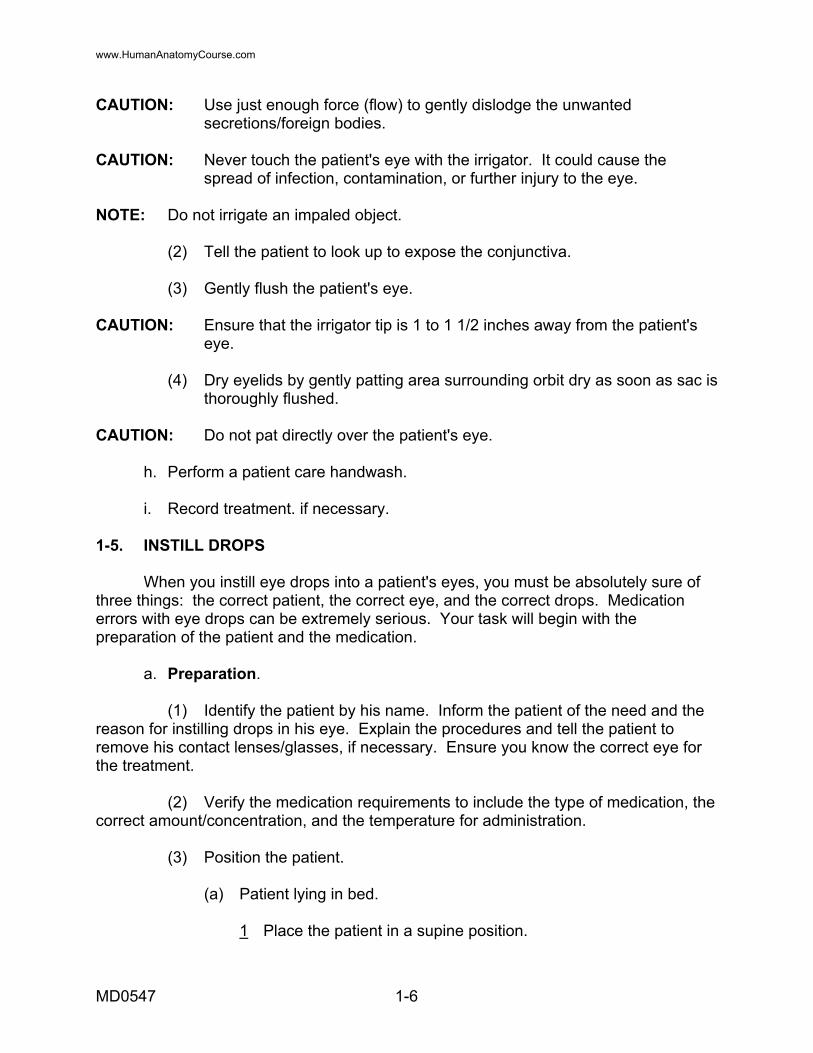
2 Position light/lamp. Ensure there is adequate light. Avoid shinning the light directly on the patient. 3 Tilt the patient's head slightly to the side to instill the eyedrops. (b) Patient sitting up. 1 Tell the patient to place his head in an inclined position to the side to instill eyedrops. 2 Tilt the patient's head slightly backwards. 3 Support the patient's head. 4 Position the light/lamp. Ensure there is adequate light and avoid shinning the light directly over the patient. (4) Perform a patient care handwash. (5) Check the eye dropper for cracks or chips. b. Instill Drops. (1) Using your forefinger, gently pull down the patient's lower eyelid. (2) Tell the patient to look up (as for eye irrigations). NOTE: The patient may look down only if required by the physician. (3) Instill one drop of medication into center of the patient's lower eyelid, unless otherwise directed by a physician. (4) Tell the patient to slowly close his eyes, not squeezing them together, and not to rub his eyes (see figure 1-3).
Figure 1-3. Instill drops.
MD0547 1-7
www.HumanAnatomyCourse.com

(5) Wipe off the excess solution with a gauze square. c. Handwash. Perform a patient care handwash. d. Record Treatment. Record the time, type of medication, strength of medication, and eye into which medication was instilled. 1-6. APPLY OPHTHALMIC OINTMENT This task is similar to instilling drops into a patient's eye. You must again be aware of the correct patient, the correct eye, and the correct ointment. a. Preparation. (1) Identify the patient by his name. Inform the patient of the need and the reason for applying ointment to the eye. Explain the procedures and ask the patient to remove his contact lenses/ glasses, if applicable. Ensure you know the correct eye for the treatment. (2) Verify the medication requirements to include the type of medication, the correct amount, concentration, and the temperature for administration. (3) Position the patient. (a) Patient lying in bed. 1 Place the patient in a supine position. 2 Position light/lamp. Ensure there is adequate light and avoid shinning the light directly over the patient. 3 Tilt the patient's head slightly to the side to instill eyedrops. (b) Patient sitting up. 1 Have the patient place his head in an inclined position to the side to apply ointment. 2 Position light/lamp. Ensure there is adequate light and avoid shining the light directly over the patient. 3 Tilt the patient's head slightly backwards. 4 Support the patient's head. (4) Perform a patient care handwash.
MD0547 1-8
www.HumanAnatomyCourse.com
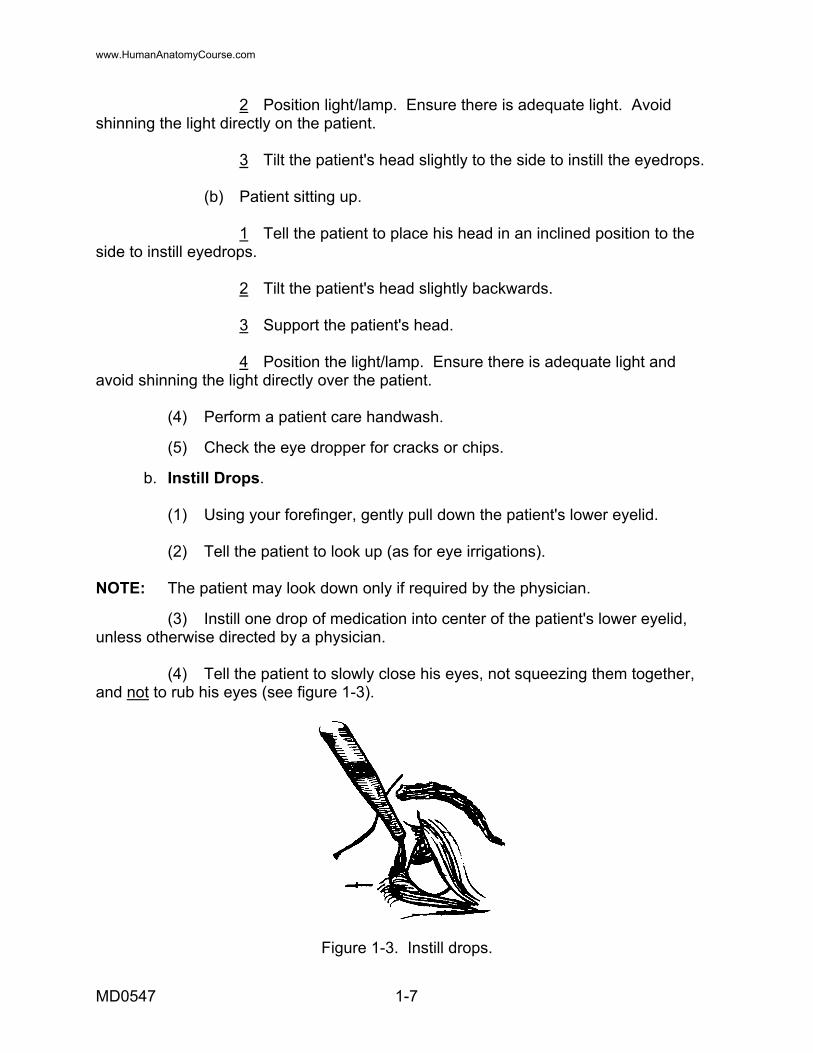
b. Apply Ointment. (1) Expel a small amount of ointment from the tube (see figure 1-4). (2) Squeeze (with your hand) a ribbon of ointment about 4 cm (one and one half inches) into the patient's lower eyelid. CAUTION: Do not touch any part of the patient's eye with the tube.
Figure 1-4. Ointment expelled. c. Handwash. Perform a patient care handwash. d. Record Treatment. Include the time, type of medication, and the eye to which medication was applied.
Continue with Exercises
MD0547 1-9
www.HumanAnatomyCourse.com
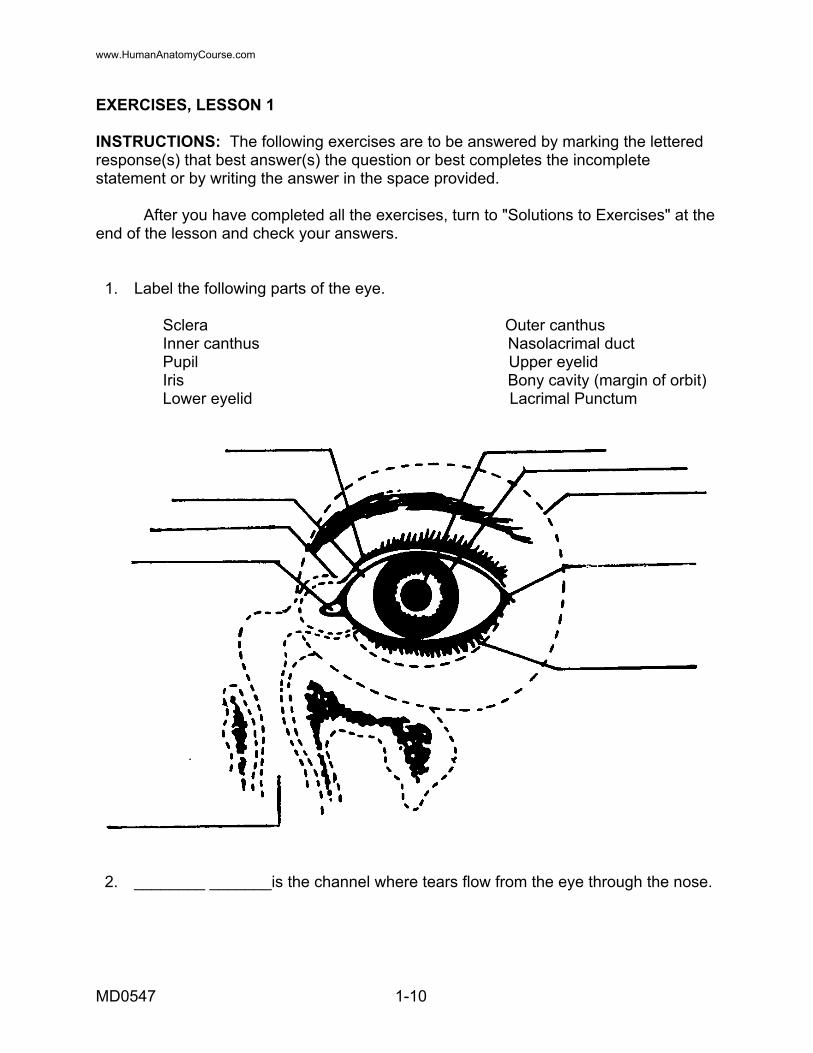
EXERCISES, LESSON 1 INSTRUCTIONS: The following exercises are to be answered by marking the lettered response(s) that best answer(s) the question or best completes the incomplete statement or by writing the answer in the space provided. After you have completed all the exercises, turn to "Solutions to Exercises" at the end of the lesson and check your answers. 1. Label the following parts of the eye. Sclera Outer canthus Inner canthus Nasolacrimal duct Pupil Upper eyelid Iris Bony cavity (margin of orbit) Lower eyelid Lacrimal Punctum
2. ________ _______is the channel where tears flow from the eye through the nose.
MD0547 1-10
www.HumanAnatomyCourse.com
3. What is the colored portion of the eye? a. Orbit. b. Iris. c. Limbus. d. Pupil. 4. ________________ is normally the transparent anterior surface of the eye. 5. When irrigating a patient's eye, you would place the catch basin next to the patient's _______________ _________________ to catch the flow. 6. Which of the following abbreviations is used for the left eye? a. O.D. (oculus dexter). b. O.U. (oculus uterque). c. O.C. (oculus cavity). d. O.S. (oculus sinister). 7. How much ointment would you initially expel from the tube of ointment before applying ointment to the patient's eye? a. A small amount. b. About 1 inch. c. About 1 1/4 inches. d. A large amount.
Check Your Answers on Next Page
MD0547 1-11
www.HumanAnatomyCourse.com
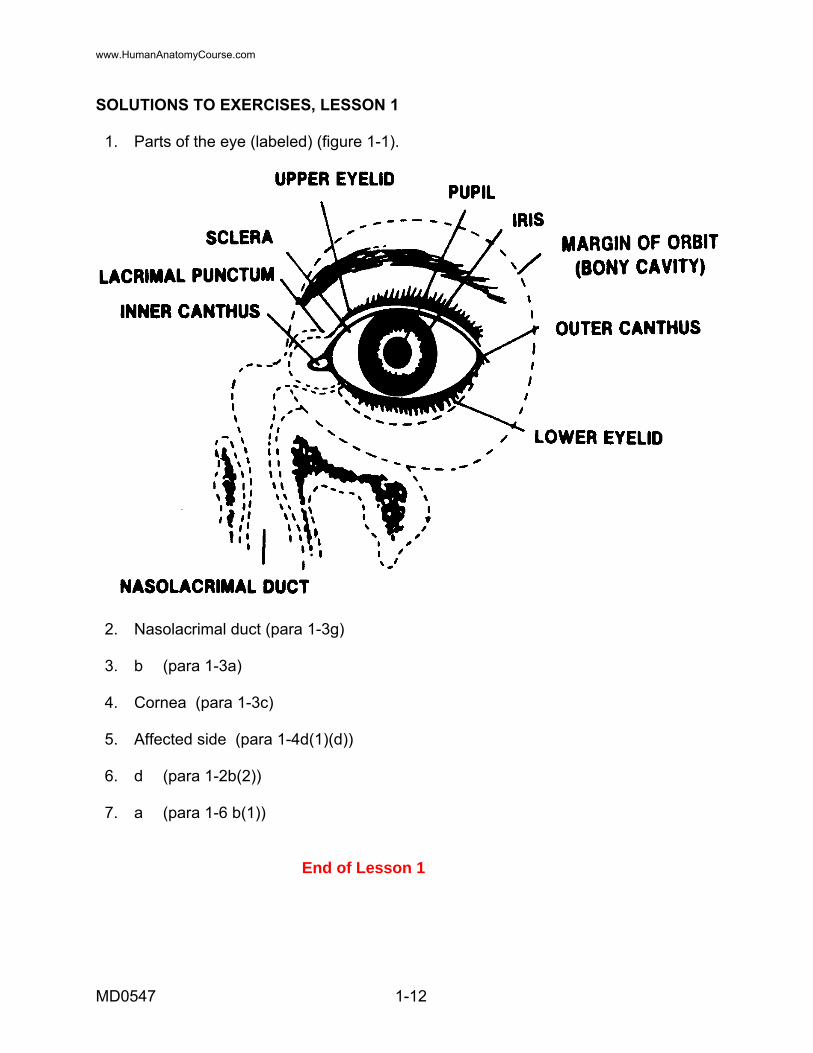
SOLUTIONS TO EXERCISES, LESSON 1 1. Parts of the eye (labeled) (figure 1-1).
2. Nasolacrimal duct (para 1-3g) 3. b (para 1-3a) 4. Cornea (para 1-3c) 5. Affected side (para 1-4d(1)(d)) 6. d (para 1-2b(2)) 7. a (para 1-6 b(1))
End of Lesson 1
MD0547 1-12
www.HumanAnatomyCourse.com
LESSON ASSIGNMENT LESSON 2 Identify Principles of Application of a Dressing to an Eye Injury. TEXT ASSIGNMENT Paragraphs 2-1 through 2-3. TASK TAUGHT 081-833-0055, Apply a Dressing to an Eye Injury. LESSON OBJECTIVES After completing this lesson, you should be able to: 2-1. Identify the reasons for using an eye dressing. 2-2. Identify the principles of application of a dressing to an eye injury. 2-3. Identify the procedures of application of a dressing to an eye injury. SUGGESTION After completing the assignment, complete the exercises at the end of this lesson. These exercises will help you to achieve the lesson objectives.
MD0547 2-1
www.HumanAnatomyCourse.com

LESSON 2 IDENTIFY PRINCIPLES OF APPLICATION OF A DRESSING TO AN EYE INJURY 2-1. GENERAL The eye is a vital sensory organ. Proper care must be initiated immediately, not only to relieve pain, but also to help prevent permanent eye injury and loss of vision. This lesson includes principles of application of a dressing to an eye injury.
Figure 2-1. The front and side view of the eye.
2-2. REASONS FOR USING AN EYE DRESSING
Eye dressings are applied in order to: a. Protect the eye from light, infection, and further injury. b. Limit movement and prevent usage of the eye. c. Absorb secretions and blood. d. Hold extrusions in place. 2-3. PRINCIPLES OF APPLYING A DRESSING a. Reassure the patient. From your own experience and personal insight, you know that eye injuries are very frightening. Explain to the patient what you are going to do.
MD0547 2-2
www.HumanAnatomyCourse.com

NOTE: Remember that the eye is a sensitive structure and the patient will have a natural tendency to protectively withdraw. b. Explain to the patient not to squeeze his eyelids together. NOTE: Squeezing the eyelids together could cause further damage to the eyeball (globes). c. Position the patient. Positioning the patient helps to control pain and bleeding. (1) Conscious patient--place him in a sitting position. (2) Unconscious patient--place him in a supine position. This will help to prevent pressure from building in the eye. d. Take precautions to protect the eyeball. Do not touch or remove any penetrating foreign body protruding from the eyeball. (1) This will help to prevent the vitreous humor (jelly-like fluid) from leaking out. The vitreous humor fills the space behind the lens. It also maintains the shape of the eyeball. Loss of vitreous humor will cause the eyeball to collapse. (2) Protruding objects are only removed by surgery. e. DO NOT push an extruded eyeball back into the socket. It can cause contamination, mechanical damage, and/or further eyesight loss. f. Avoid exerting pressure on the patient's eye. pressure or pressure dressing may cause additional eyeball damage, forcing out the vitreous humor and/or eyeball to lose its shape. NOTE: A pressure dressing is applied only by a physician's order. g. Never force open a patient's eyelids when there is severe eye injuries or indications of severe eye injuries. NOTE: The patient may experience little or no pain or the injury may seem to be minor. The patient may complain of severe pain or will probably squeeze his eyelids tightly shut. NOTE: Remember that force can cause further damage. It is possible that a foreign body may be in the eye and the object may be attached to the inside of the eyelid.
MD0547 2-3
www.HumanAnatomyCourse.com
h. Close eyelids prior to dressing. This will protect the eye from possible scratching of the cornea by a gauze pad. (1) Conscious patient--tell him to gently close his eyelids. (2) Unconscious patient--you must gently close his eyelids. NOTE: Closing the eyelids helps to prevent drying. Drying can cause more damage. Also, damage can be caused by strong light, whether the patient is conscious or unconscious. Strong light could come from the sun, welding equipment, snow, or ice. i. Cover severely injured eyes (eyeball) with loose dressing. (1) Cover both eyes even if only one eye is injured. Remember that when one eye moves, the other eye duplicates this movement (this is referred to as sympathetic movement). Covering the eyes will also reduce further damage. (2) The patient should be evacuated with both eyes covered. j. Cover injury to soft surrounding eye tissues, (black eyes, cut on eyebrow, or eyelids). Cover only one eye. This will allow the patient to walk around without being assisted by others. NOTE: In hazardous surroundings, it may be necessary to leave the uninjured eye uncovered, regardless of severity of the injury to the uninjured eye. k. Dressing techniques. (1) Use only sterile dressing. (2) Avoid covering a patient's nose, mouth, and ears. (3) Prevent dressing from slipping down to the patient's neck. l. Prepare Patient for Evacuation. NOTE: Allow for patient to be evacuated quietly and in a supine position if he is unable to walk or is unconscious.
Continue with Exercises
MD0547 2-4
www.HumanAnatomyCourse.com
EXERCISES, LESSON 2 INSTRUCTIONS: The following exercises are to be answered by marking the lettered response(s) that best answer(s) the question or best completes the incomplete statement or by writing the answer in the space provided. After you have completed all the exercises, turn to "Solutions to Exercises" at the end of the lesson and check your answers. 1. Which of the following statements is NOT a reason to use an eye dressing? a. Holds extrusion in place. b. Absorbs secretions and blood. c. Limits movement and usage of the eye. d. Reassures casualty that he has a minor wound. 2. What can happen if the patient squeezes his eyelids tightly shut? a. Can cause further damage to the brain. b. Can cause further damage to the eyeball. c. Will not allow air to seep through. d. Will not allow for blood to circulate properly. 3. Why should you not push an extruded eyeball back into it's socket? ______________________________________________________________ 4. When is a pressure dressing applied to an eye injury? ______________________________________________________________
Check Your Answers on Next Page
MD0547 2-5
www.HumanAnatomyCourse.com
MD0547 2-6
SOLUTIONS TO EXERCISES, LESSON 4 1. d (para 2-2) 2. b (para 2-3b) 3. It can cause contamination, mechanical damage and/or further loss of eyesight (para 2-3e) 4. At physician's order (para 2-3f, NOTE)
End of Lesson 2
www.HumanAnatomyCourse.com
LESSON ASSIGNMENT LESSON 3 Treat Foreign Bodies of the Eye. TEXT ASSIGNMENT Paragraphs 3-1 through 3-5. TASK TAUGHT 081-833-0056, Treat Foreign Bodies of the Eye. LESSON OBJECTIVES After completing this lesson, you should be able to: 3-1. Identify the procedures to locate foreign bodies of the eyes. 3-2. Identify the procedures to remove foreign bodies of the eyes. SUGGESTION After completing the assignment, complete the exercises at the end of this lesson. These exercises will help you to achieve the lesson objectives.
MD0547 3-1
www.HumanAnatomyCourse.com
LESSON 3
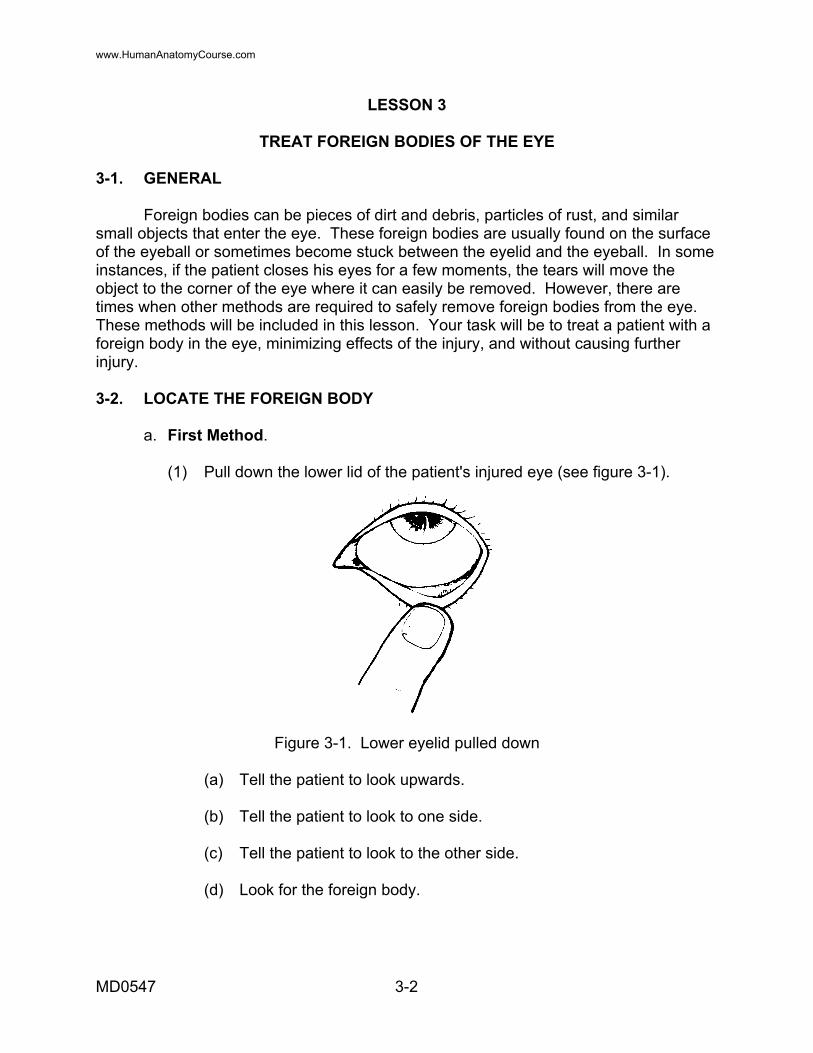
TREAT FOREIGN BODIES OF THE EYE 3-1. GENERAL Foreign bodies can be pieces of dirt and debris, particles of rust, and similar small objects that enter the eye. These foreign bodies are usually found on the surface of the eyeball or sometimes become stuck between the eyelid and the eyeball. In some instances, if the patient closes his eyes for a few moments, the tears will move the object to the corner of the eye where it can easily be removed. However, there are times when other methods are required to safely remove foreign bodies from the eye. These methods will be included in this lesson. Your task will be to treat a patient with a foreign body in the eye, minimizing effects of the injury, and without causing further injury. 3-2. LOCATE THE FOREIGN BODY a. First Method. (1) Pull down the lower lid of the patient's injured eye (see figure 3-1).
Figure 3-1. Lower eyelid pulled down (a) Tell the patient to look upwards. (b) Tell the patient to look to one side. (c) Tell the patient to look to the other side. (d) Look for the foreign body.
MD0547 3-2
www.HumanAnatomyCourse.com
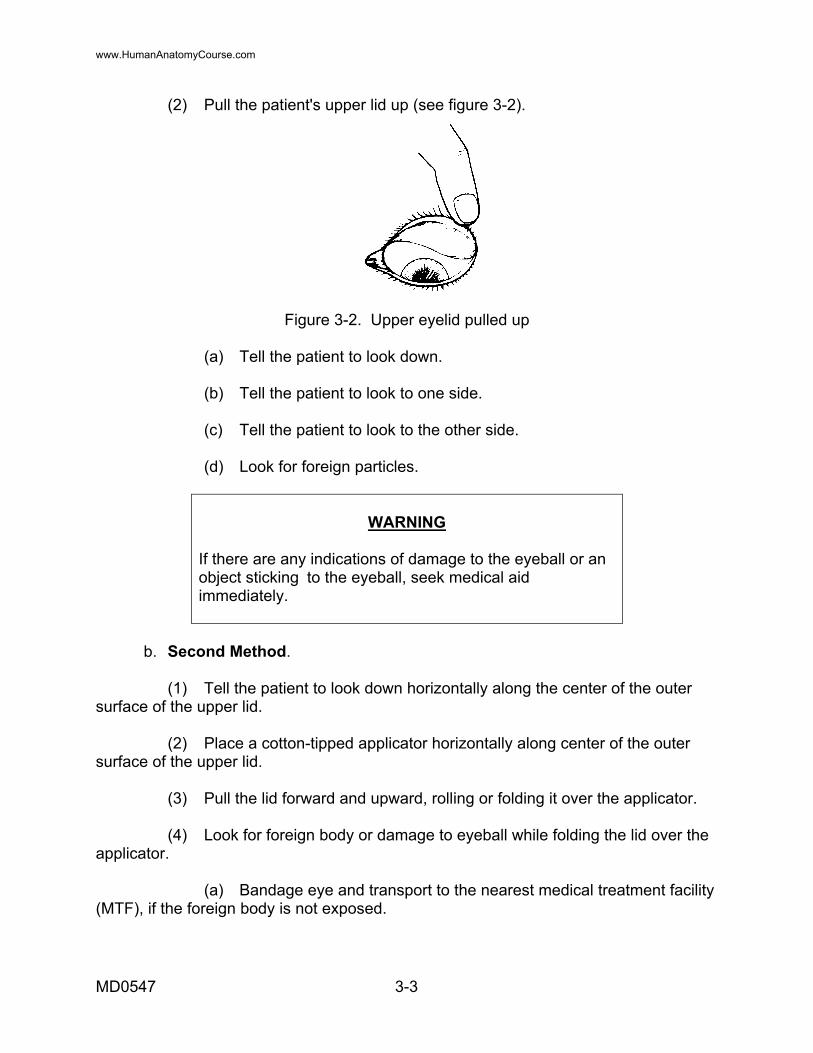
(2) Pull the patient's upper lid up (see figure 3-2).
Figure 3-2. Upper eyelid pulled up (a) Tell the patient to look down. (b) Tell the patient to look to one side. (c) Tell the patient to look to the other side. (d) Look for foreign particles.
WARNING
If there are any indications of damage to the eyeball or an object sticking to the eyeball, seek medical aid immediately.
b. Second Method. (1) Tell the patient to look down horizontally along the center of the outer surface of the upper lid. (2) Place a cotton-tipped applicator horizontally along center of the outer surface of the upper lid. (3) Pull the lid forward and upward, rolling or folding it over the applicator. (4) Look for foreign body or damage to eyeball while folding the lid over the applicator. (a) Bandage eye and transport to the nearest medical treatment facility (MTF), if the foreign body is not exposed.
MD0547 3-3
www.HumanAnatomyCourse.com
(b) If the foreign body has adhered to the cornea over the iris or the pupil: 1 Do not try to remove it. 2 Put a bandage over both eyes. 3 Evacuate the patient to the nearest MTF. 3-3. REMOVE FOREIGN BODY a. First Method. Gently wipe foreign body away or pick up object with a slightly moistened, cotton swab or with the edge of a slightly moistened, clean handkerchief. b. Second Method. Gently wash object out with water. (1) Allow water to flow from inner canthus to outer canthus (see figure 3-4), using your thumb and forefinger to keep eye open. (2) If the foreign body is not easily removed, bandage both eyes and transport the patient to the nearest MTF. (3) If there is pain in the eye or loss of vision, refer the patient to the nearest MTF. c. Notes. (1) Do not put pressure on the eyeball. (2) If the foreign body is not easily removed, bandage both eyes and transport patient to the medical treatment facility. (3) If there is pain in the eye or loss of vision, bandage the eyes and seek further medical aid immediately. 3-4. OBTAIN HISTORY a. Determine source and type of foreign body. This may indicate amount of tissue destruction and/or may indicate time necessary for healing. b. Determine cause of foreign body. high velocity particles are more likely to penetrate and perforate. Wind blown particles are more likely to embed superficially to cornea.
MD0547 3-4
www.HumanAnatomyCourse.com

c. Determine duration and/or time of onset or discomfort. d. Determine whether any ointments or irrigations have been applied. e. Ask patient about history of previous injury to the eye, if necessary. 3-5. RECORD TREATMENT Record treatment to include time, type of medication, and the eye to which treatment was given.
Continue with Exercises
MD0547 3-5
www.HumanAnatomyCourse.com

EXERCISES, LESSON 3 INSTRUCTIONS: The following exercises are to be answered by marking the lettered response(s) that best answer(s) the question or best completes the incomplete statement or by writing the answer in the space provided. After you have completed all the exercises, turn to "Solutions to Exercises" at the end of the lesson and check your answers. 1. Which of the following is used in Method I to locate a foreign object in the eye? a. Wash eye. b. Bandage eye. c. Pull patient's upper lid up. d. Use applicator to locate object. 2. What is the second method used to remove a foreign body in the eye? _____________________________________________________________ 3. How many methods are used to remove a foreign body from the eye? a. 2. b. 3. c. 4. d. 5. 4. What is used to keep the eye open when you are allowing water to flow from the inner canthus to the outer canthus? a. Cotton balls. b. Clean handkerchief. c. Cotton swab applicator. d. Your thumb and forefinger.
Check Your Answers on Next Page
MD0547 3-6
www.HumanAnatomyCourse.com
MD0547 3-7
SOLUTIONS TO EXERCISES, LESSON 3 1. c (para 3-2a(2)) 2. Gently wash object out with water (para 3-3b) 3. a (para 3-3a and b) 4. d (para 3-3b(1))
End of Lesson 3
www.HumanAnatomyCourse.com

LESSON ASSIGNMENT LESSON 4 Treat Lacerations, Contusions, and Extrusions of the Eye. TEXT ASSIGNMENT Paragraphs 4-1 through 4-7. TASK TAUGHT 081-833-0057, Treat Lacerations, Contusions, Extrusions of the Eye. LESSON OBJECTIVES After completing this lesson, you should be able to: 4-1. Identify eye injury terms and their definitions. 4-2. Identify the procedures to position a patient. 4-3. Identify the procedure to examine a patient's eyes. 4-4. Identify signs and symptoms of eye injuries. 4-5. Identify the procedures to treat an injury to the tissue surrounding the eyes, to the eyeball, and a protruding object eye injury. 4-6. Identify the procedures to treat an avulsed, enucleated, or extruded eyeball. SUGGESTION After completing the assignment, complete the exercises at the end of this lesson. These exercises will help you to achieve the lesson objectives.
MD0547 4-1
www.HumanAnatomyCourse.com
LESSON 4
TREAT LACERATIONS, CONTUSIONS, AND EXTRUSIONS OF THE EYE 4-1. GENERAL Treating a patient with eye injuries is very important to him especially on the battlefield. Loss of sight may cause not only severe pain, but also loss of orientation (the patient with an eye injury may have totally, or at least partially, lost one of his senses). You must constantly reassure the patient of what you are doing while treating him for eye injuries. As a medical specialist, you will treat lacerations, contusions, and extrusions of the eye, minimizing effect of the injury, and without further injury to the patient. You should first become familiar with the following terms and their definitions. 4-2. REVIEW OF TERMS a. Laceration--jagged tear or wound. b. Contusion--bruise. c. Avulsed eye--eye torn from its socket; also called an extruded eyeball, or an enucleation. d. Protruding--extending outward. e. Globe--eyeball. f. Socket--hollow into which eyeball fits. g. Sympathetic movement--one eye reacts to the movement of the other eye. NOTE: Survey the patient before you begin with the following step and remove his helmet, if necessary. 4-3. POSITION THE PATIENT a. If the patient is conscious, place him in a sitting position. b. If the patient is unconscious, place him on his back (supine position) with head slightly higher than the rest of the body. NOTE: Ensure the patient's airway is clear. c. Examine the patient's eyes. Look for signs and symptoms of eye injuries.
MD0547 4-2
www.HumanAnatomyCourse.com
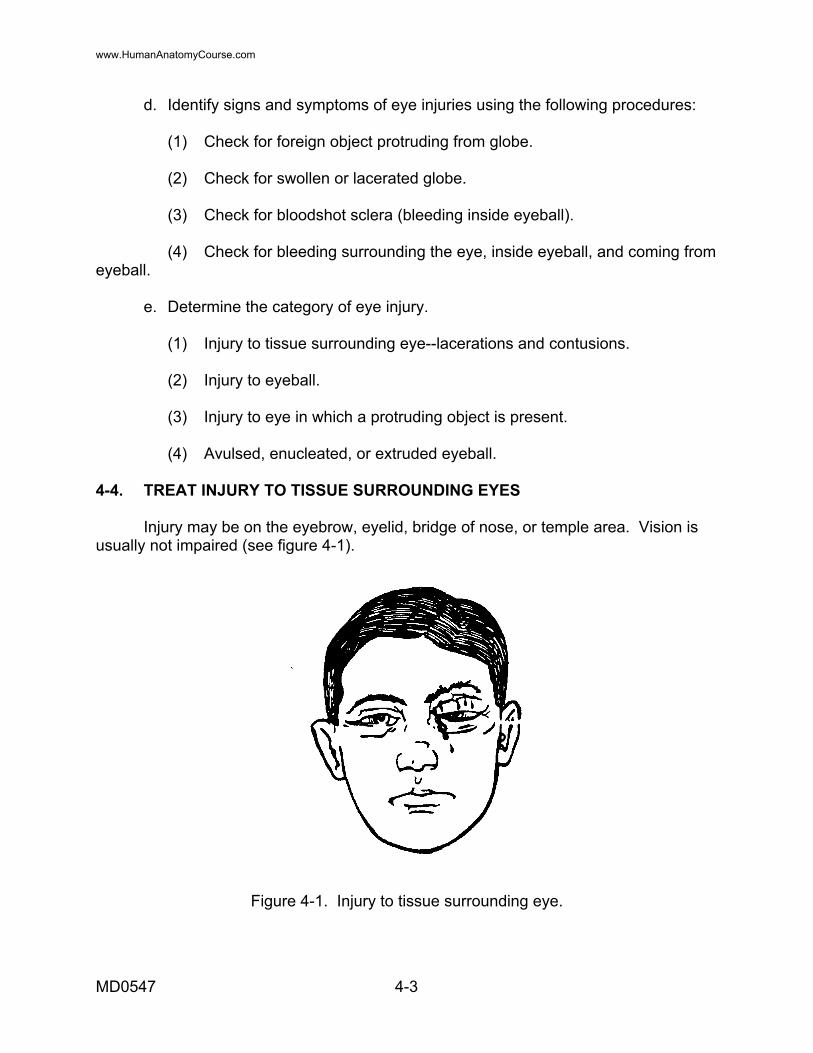
d. Identify signs and symptoms of eye injuries using the following procedures: (1) Check for foreign object protruding from globe. (2) Check for swollen or lacerated globe. (3) Check for bloodshot sclera (bleeding inside eyeball). (4) Check for bleeding surrounding the eye, inside eyeball, and coming from eyeball. e. Determine the category of eye injury. (1) Injury to tissue surrounding eye--lacerations and contusions. (2) Injury to eyeball. (3) Injury to eye in which a protruding object is present. (4) Avulsed, enucleated, or extruded eyeball. 4-4. TREAT INJURY TO TISSUE SURROUNDING EYES Injury may be on the eyebrow, eyelid, bridge of nose, or temple area. Vision is usually not impaired (see figure 4-1).
Figure 4-1. Injury to tissue surrounding eye.
MD0547 4-3
www.HumanAnatomyCourse.com
a. Close the patient's injured eye's eyelid prior to dressing. b. Cover the injured eye with an eye pad or other sterile dressing. (1) Avoid putting pressure on wound because eyeball may be injured. (2) Pressure may cause more damage. c. Cover torn eyelids with loose dressing. (1) Handle torn eyelids very carefully to prevent further injury. (2) Wrap detached fragment of eyelid skin separately in moist bandage. Send fragment along with the patient to the hospital (surgeon may use it to repair eyelid). d. Place a first aid field dressing over the eye pad on the injured eye. (1) Wrap tails around head. (a) Cross one tail over top of head. (b) Take second tail under ear on injured side. (2) Cross tails under ear on injured side, take under chin, over head and tie on opposite side from where they were crossed. (3) Dressing should not cover nose, mouth, or ears. (4) Since this is injury to tissue around eye, and not the eyeball, bandage only injured eye. (5) Ensure tail under chin does not slip down on neck interfering with breathing. 4-5. TREAT AN INJURY TO THE EYEBALL NOTE: Bleeding may or may not be present. a. Close the patient's eyelid and cover the injured eye with an eye pad or other sterile dressing. (See paragraphs 4-4a and b.) b. Cover both eyes with pads using one or more dressings to prevent sympathetic movement and to avoid further injury.
MD0547 4-4
www.HumanAnatomyCourse.com

NOTE: Remember to cover both eyes even if only one eye is injured. When one eye moves, the other eye duplicates its movement. c. Tell the patient not to squeeze eyelids together. d. Do not apply pressure to eyeball and be especially reassuring to the patient. 4-6. TREAT AN EYE INJURY OF A PROTRUDING OBJECT a. Place padding around the impaled object. Use very clean cloth material and fold to fit eye area for padding (see figure 4-2).
Figure 4-2. Padding around impaled object NOTE: Be especially careful not to apply pressure to the eyeball and do not put pressure on object with padding. b. Build up padding until it prevents the object(s) from moving. Use tape to hold padding in place. c. Instruct the casualty to not squeeze his eyelids together. d. Place an eye pad on uninjured eye to restrict movement. Apply a second pad so that both eyes are covered). e. Cut dressing partially through so it will fit around object, this will depend on location of impaled object and will keep object from being pushed further into eye. f. Apply a second dressing so that both eyes are covered. Secure dressing. NOTE: Leave the good eye uncovered in hazardous surroundings long enough to ensure safety.
MD0547 4-5
www.HumanAnatomyCourse.com
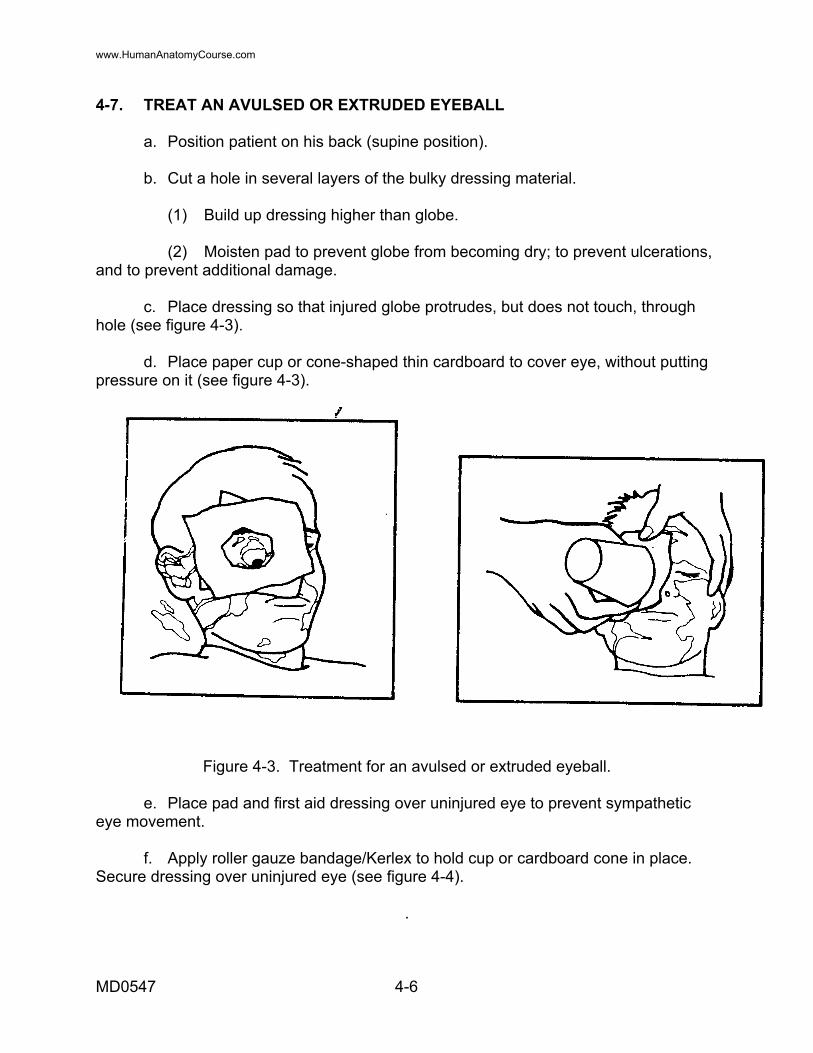
4-7. TREAT AN AVULSED OR EXTRUDED EYEBALL a. Position patient on his back (supine position). b. Cut a hole in several layers of the bulky dressing material. (1) Build up dressing higher than globe. (2) Moisten pad to prevent globe from becoming dry; to prevent ulcerations, and to prevent additional damage. c. Place dressing so that injured globe protrudes, but does not touch, through hole (see figure 4-3). d. Place paper cup or cone-shaped thin cardboard to cover eye, without putting pressure on it (see figure 4-3).
Figure 4-3. Treatment for an avulsed or extruded eyeball. e. Place pad and first aid dressing over uninjured eye to prevent sympathetic eye movement. f. Apply roller gauze bandage/Kerlex to hold cup or cardboard cone in place. Secure dressing over uninjured eye (see figure 4-4).
.
MD0547 4-6
www.HumanAnatomyCourse.com

Figure 4-4. Dressing secured over uninjured eye. CAUTION: Do not attempt to replace eyeball in its socket, more harm or injury could be done, to include blindness. Replacement is only done by a physician. Detachment of the retina may result from such injury if patient is not kept quiet and on his back. NOTE: Remember to include information regarding patient's use of contact lenses, if appropriate. NOTE: If patient wears glasses, evacuate them with the patient, even if broken. NOTE: Transport patient with eye injury on his back, with head elevated and immobilized.
Continue with Exercises
MD0547 4-7
www.HumanAnatomyCourse.com

EXERCISES, LESSON 4 INSTRUCTIONS: The following exercises are to be answered by marking the lettered response(s) that best answer(s) the question or best completes the incomplete statement or by writing the answer in the space provided. After you have completed all the exercises, turn to "Solutions to Exercises" at the end of the lesson and check your answers. 1. How would you position an unconscious patient who has a laceration, contusion, or extrusion of the eye? a. Have patient stand up. b. Place patient on his back. c. Place patient on his side. d. Place patient in a sitting position. 2. Which of the following treatments is NOT done to an injury to tissue surrounding the eye? a. Cover injured eye with loose dressing. b. Cover torn eyelids with loose dressing. c. Place first aid field dressing over eye pad on injured eye. d. Cover uninjured eye with eye pad or other sterile dressing. 3. ____________________ may or may not be present to an injury of the eyeball. 4. Which of the following procedures is correct when treating a patient's eye injury of a protruding object? a. Place padding around impaled object. b. Do not apply pressure to the eyeball. c. Use tape to hold impaled object in place. d. Remind patient not to squeeze his eyelids together.
Check Your Answers on Next Page
MD0547 4-8
www.HumanAnatomyCourse.com
MD0547 4-9
SOLUTIONS TO EXERCISES, LESSON 4 1. b (para 4-3b). 2. a (para 4-4b). 3. Bleeding (para 4-5, NOTE). 4. a (para 4-6a).
End of Lesson 4
www.HumanAnatomyCourse.com
LESSON ASSIGNMENT
LESSON 5 Treat Burns of the Eye. TEXT ASSIGNMENT Paragraphs 5-1 through 5-8. TASK TAUGHT 081-833-0058, Treat Burns of the Eye. LESSON OBJECTIVES After completing this lesson, you should be able to: 5-1. Identify chemical, radiant, and thermal burns. 5-2. Identify the procedures for treatment of chemical, radiant, and thermal burns. SUGGESTION After completing the assignment, complete the exercises at the end of this lesson. These exercises will help you to achieve the lesson objectives.
MD0547 5-1
www.HumanAnatomyCourse.com

LESSON 5
TREAT BURNS OF THE EYE 5-1. GENERAL As a medical specialist, you will probably treat a patient for burns to the eye. The three major burns that can affect the eyes are chemical burns, radiant energy or intensely bright light burns, and thermal burns. Correct initial emergency aid to a patient's injured eye will help relieve the pain and will also help to prevent injury and possible loss of vision. 5-2. EVALUATE AND REASSURE PATIENT NOTE: These tasks will be done before you begin treatment for burns of the eye. a. Check for and treat life-threatening conditions. (1) Task #081-831-0019, "Clear an Upper Airway Obstruction." (2) Task #081-831-0048, "Perform Rescue Breathing." (3) Task #081-831-0046, "Administer External Chest Compressions." NOTE: The above tasks can be found in the Soldier's Training Publication for your MOS or in FM 8-230, Medical Specialist. b. Reassure the patient. When eyes are burned or injured, individuals are easily frightened and fearful of losing their sight. (1) Tell patient that medical aid will be provided. (2) Do not try to cheer a patient with a cheerful prognosis, it could be wrong. 5-3. IDENTIFY CHEMICAL BURNS TO THE EYE Chemical burns can cause severe injury to the eyes and thus require immediate emergency treatment. These burns can irritate or eat into the tissues if they are not flushed out immediately. Sources of chemical burns are acid, alkali, and petroleum. You should be familiar with the following signs and symptoms: a. Pain. b. Watering, tearing of the eye. c. Chemicals tend to stick to the eye.
MD0547 5-2
www.HumanAnatomyCourse.com

d. Redness of sclera/conjunctiva. (1) The sclera is the outermost layer of the eyeball and is made up of tough, firm, connective tissue (see figure 5-1). (2) The conjunctiva is the delicate membrane that lines the eyelids and covers the exposed surface of the sclera (see figure 5-1). e. Possible erosion of the corneal surface.
Figure 5-1. The sclera/conjunctiva of the eye. 5-4. TREAT CHEMICAL BURNS TO THE EYE a. Gently hold patient's eye open with your fingertip. Pain may make it difficult for the patient to keep his eye open (see figure 5-2). b. Use sterile water in flushing the patient's eye. If sterile water is not available, use potable water, or IV solution. Any liquid that is safe to drink may be used in an emergency (see figure 5-3).
MD0547 5-3
www.HumanAnatomyCourse.com
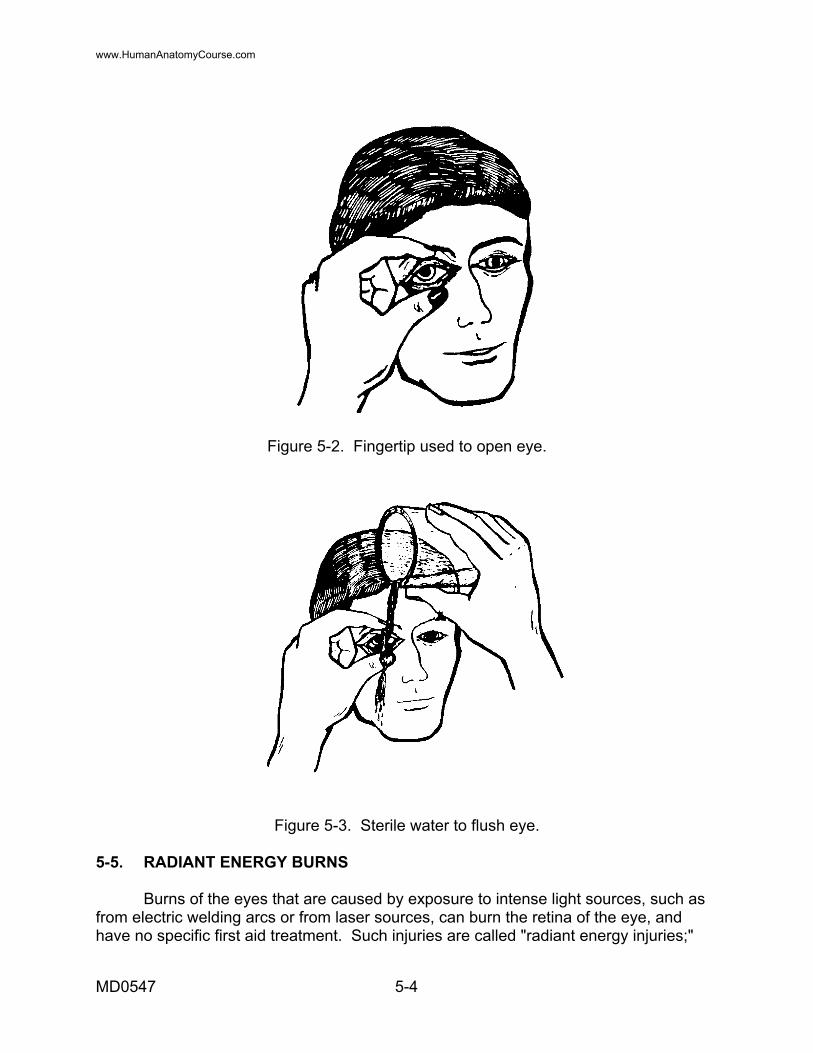
Figure 5-2. Fingertip used to open eye.
Figure 5-3. Sterile water to flush eye. 5-5. RADIANT ENERGY BURNS Burns of the eyes that are caused by exposure to intense light sources, such as from electric welding arcs or from laser sources, can burn the retina of the eye, and have no specific first aid treatment. Such injuries are called "radiant energy injuries;"
MD0547 5-4
www.HumanAnatomyCourse.com

radiant energy includes bright visible light, ultra-violet light that is not visible, also infra-red light that is not visible, as well as other forms of energy that are not visible, such as strong microwave and radar waves. Sometimes, in the event of radiant energy injuries, the patient will feel more comfortable if the eyes are bandaged to reduce exposure to light. a. Electric Welding Arc. (1) Signs and symptoms of electric welding arc burns of the eye include gritty feeling, severe pain, inability to tolerate light, watering/ tearing, and the burns often do not appear until several hours after exposure. (2) There is no specific treatment recommended for electric welding arc burns. Bandaging of the eyes often makes a patient more comfortable (see figure 5-4). The patient should wear dark glasses (improvised or sunglasses). Recovery and pain relief usually takes place in 2 to 3 days.
Figure 5-4. Bandage over electric welding arc burn.
b. Laser Injuries. (1) Signs and symptoms of laser injuries include immediate decrease in vision and pain is usually not present. (2) Do not bandage eyes for treatment. Keep the patient out of bright light, avoid further light exposure. 5-6. THERMAL BURNS These burns come from hot liquids and flames or fire. The eyelids close rapidly and the burned eyelids swell. a. Signs and symptoms of thermal burns are: (1) Charred or swollen eyelids.
MD0547 5-5
www.HumanAnatomyCourse.com

(2) Singed eyelashes. (3) Pain or irritation. b. Treatment. (1) Remove patient from source of danger. (2) Protect the patient from exposure to direct sunlight. (3) Give treatment for burns of the face, as necessary. NOTE: Treatment of burned eyelids requires specialized care. CAUTION: Do not bandage the eye of a thermal burn. 5-7. RECORD TREATMENT Record the treatment to include time and the type of burn treated. 5-8. PREPARE THE PATIENT FOR EVACUATION Place the patient in a comfortable position according to his injury.
Continue with Exercises
MD0547 5-6
www.HumanAnatomyCourse.com

EXERCISES, LESSON 5 INSTRUCTIONS: The following exercises are to be answered by marking the lettered response(s) that best answer(s) the question or best completes the incomplete statement or by writing the answer in the space provided. After you have completed all the exercises, turn to "Solutions to Exercises" at the end of the lesson and check your answers. 1. What are the sources of chemical burns? ___________________________________________________________ ___________________________________________________________ ___________________________________________________________ 2. The _______________________ is the delicate membrane that lines the eyelids and covers the exposed surface of the sclera. 3. What are the two types of radiant energy burns? ___________________________________________________________ ___________________________________________________________ 4. Which of the following signs/symptoms is not one for thermal burns? a. Charred eyelids. b. Swollen eyelids. c. Singed eyelashes. d. Gritty feeling under eyelids.
Check Your Answers on Next Page
MD0547 5-7
www.HumanAnatomyCourse.com
MD0547 5-8
SOLUTIONS TO EXERCISES, LESSON 5 1. Acid Alkali. Petroleum (para 5-3) 2. Conjunctiva (para 5-3, NOTE) 3. Electric Welding Arc. Laser injuries (para 5-5a and b) 4. d (para 5-6a)
End of lesson 5
www.HumanAnatomyCourse.com
LESSON ASSIGNMENT LESSON 6 Irrigate an Obstructed Ear. TEXT ASSIGNMENT Paragraphs 6-1 through 6-9. TASK TAUGHT 081-833-0059, Irrigate an Obstructed Ear. LESSON OBJECTIVES After completing this lesson, you should be able to: 6-1. Identify the structures of the ear. 6-2. Identify the equipment and solutions used for an ear irrigation. 6-3. Identify the procedures to irrigate an ear. SUGGESTION After completing the assignment, complete the exercises at the end of this lesson. These exercises will help you to achieve the lesson objectives.
MD0547 6-1
www.HumanAnatomyCourse.com

LESSON 6
IRRIGATE AN OBSTRUCTED EAR 6-1. GENERAL The ear is often regarded as two important organs housed in one anatomical structure. Hearing is one of the organs in which sound waves are converted into nerve impulses. Sense of balance is the other organ that maintains the proper relationship between head positioning and motion. This lesson provides procedures used to irrigate an obstructed ear. We will first review the structure of the ear. The ear is divided into three parts: the external ear, the middle ear, and the inner ear. (See figure 6-1 and paragraph 6-2.)
Figure 6-1. Structure of the ear.
6-2. STRUCTURE OF THE EAR a. External Ear. The external ear includes the outer ear (pinna), the auditory canal, and the eardrum. The pinna is the most prominent structure of the external ear. Its shape is maintained by cartilage. The auditory canal is the opening and the canal that runs from the pinna into the skull. This canal ends at the eardrum. The eardrum separates the inner end of the canal from the middle ear. The principal function of the external ear is the collection and conduction of sound waves to the middle and inner ear. b. Middle Ear. The middle ear (tympanic cavity) is an irregular space in the temporal bone filled with air and containing the three ossicles of the ear: malleus
MD0547 6-2
www.HumanAnatomyCourse.com

(hammer), incus (anvil), and stapes (stirrup). These bones conduct vibrations from the eardrum to the internal ear. The eustachian tube connects the middle ear with the nasopharynx. Its principal function is to keep the air pressure equal on either side of the eardrum. It is also the avenue of infection by which disease spreads from the throat to the middle ear. c. Inner Ear. The inner ear contains receptors for hearing and equilibrium. The receptor for hearing lies within the cochlea. The cochlea is coiled and resembles a snail shell. Sound waves, which pass through the external auditory canal, vibrate the eardrum and ossicles, and are transmitted through the fluid of the inner ear. The inner ear also contains three circular canals that control equilibrium. 6-3. EAR IRRIGATION There will be times when you should know when and when not to irrigate a patient's ear. The information listed below will help you in making your decision. a. Irrigation is done to cleanse the external auditory canal, to soften and remove impacted ear wax (cerumen), to dislodge foreign bodies, to apply heat to the tissues of the ear, and to administer antiseptics or medication. NOTE: If the foreign body in the ear is an insect that did not respond to shining light into the ear, then you must irrigate. b. Avoid irrigation when: (1) Foreign matter that swells is present in the ear. The foreign matter may be peas, corn, beans, etc. These foreign matters will increase in size as they come in contact with water. (2) The eardrum is punctured. Irrigation will cause additional middle ear infection and can carry debris or discharge to the middle ear from the external auditory canal. 6-4. EQUIPMENT/SOLUTIONS USED FOR EAR IRRIGATION a. Equipment. See figure 6-2. (1) Rubber bulb. (2) Asepto syringe (glass). (3) Pomeroy syringe.
MD0547 6-3
www.HumanAnatomyCourse.com
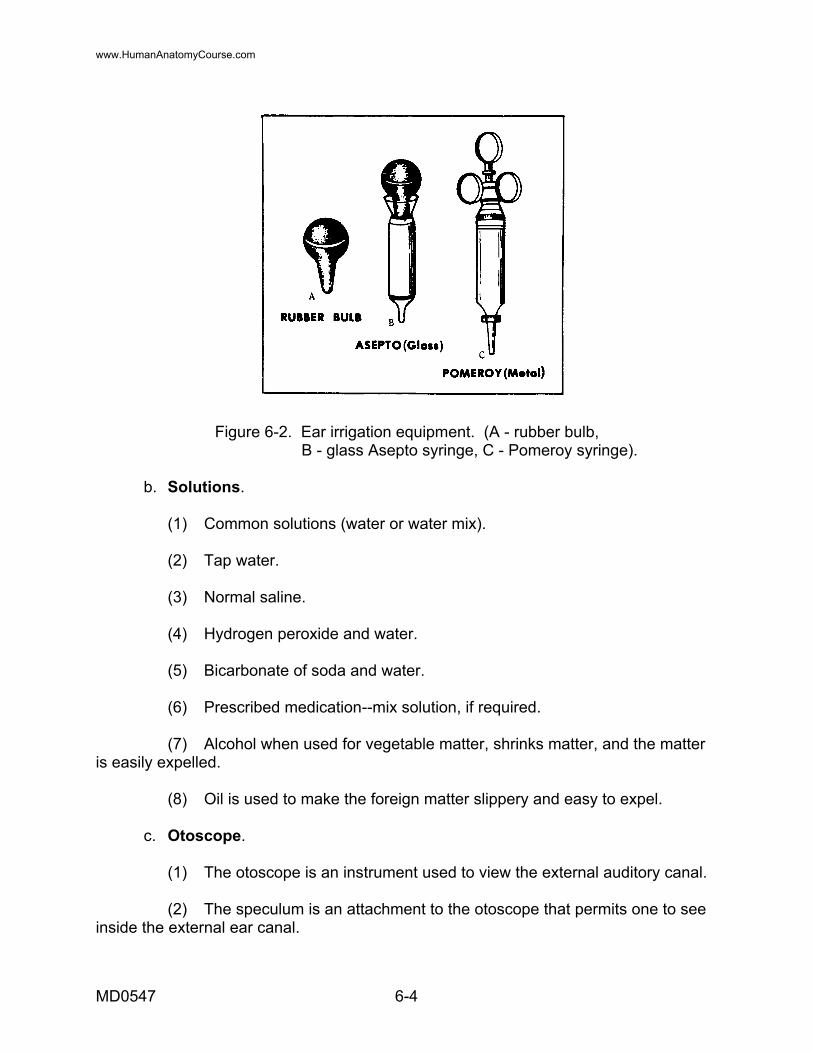
Figure 6-2. Ear irrigation equipment. (A - rubber bulb, B - glass Asepto syringe, C - Pomeroy syringe).
b. Solutions. (1) Common solutions (water or water mix). (2) Tap water. (3) Normal saline. (4) Hydrogen peroxide and water. (5) Bicarbonate of soda and water. (6) Prescribed medication--mix solution, if required. (7) Alcohol when used for vegetable matter, shrinks matter, and the matter is easily expelled. (8) Oil is used to make the foreign matter slippery and easy to expel. c. Otoscope. (1) The otoscope is an instrument used to view the external auditory canal. (2) The speculum is an attachment to the otoscope that permits one to see inside the external ear canal.
MD0547 6-4
www.HumanAnatomyCourse.com
6-5. IDENTIFY PATIENT Ask the patient his name or check his identa-band, bed card, or medical record. 6-6. EXPLAIN PROCEDURE Explain the irrigation procedure to the patient before you begin the procedure. 6-7. PROCEDURES TO IRRIGATE THE EAR a. Perform a patient care handwash and gather the equipment and solutions required for the ear irrigation. b. Warm and test the solution. (1) Place the container of warm solution in a pan of warm water until solution is between 95º to 105ºF (a little warmer than the normal body temperature). (2) Test the temperature of the solution by allowing a small amount of the fluid to run on the inner aspect of the wrist. NOTE: Cold solutions are uncomfortable and may cause dizziness or nausea as a result of stimulation of the equilibrium sensors in the semicircular canals. c. Insert the otoscope speculum into the external ear canal. (1) Assist the patient to assume the position, which allows a good view. (2) Tip the patient's head toward the opposite shoulder or ear to be irrigated. (3) Straighten the external ear canal by gently pulling the auricle upward and backward for adults, and downward and backward for a child. (4) Turn on the otoscope light and insert the speculum just inside the opening of the ear (see figure 6-4). d. Observe the external ear canal and the tympanic membrane for abnormalities. (1) Check the external ear canal for redness, swelling, drainage, or foreign bodies.
MD0547 6-5
www.HumanAnatomyCourse.com

Figure 6-3. Straightening the external ear canal.
Figure 6-4. Speculum inserted. (2) Check the tympanic membrane for bulging, perforation, and color change. (a) Normally, a blue, yellow, amber, red, or pink eardrum indicates disease of infection. NOTE: The eardrum is normally shiny and pearly gray. (b) A continued bulge in the eardrum indicates possible pus or fluid in the middle ear. Do not irrigate the ear.
MD0547 6-6
www.HumanAnatomyCourse.com
(c) If a hole or tear is noted when viewing the eardrum, do not irrigate the ear. It would cause pain and possibly transmit serious infection to the middle ear. NOTE: A hole or tear in the ear should be reported to the supervisor. e. Position the patient for irrigation. The patient should be positioned with his head tilted slightly towards the affected side. This position is used for a patient sitting or lying. f. Drape the patient. Drape his shoulder with absorbent pads under the affected ear; cover the shoulder and the upper arm area. g. Cleanse the external ear and meatus at the entrance of the ear canal. Place one 4 X 4-inch sponge in irrigation solution, wring out excess solution, and clean any debris from the external ear and the meatus of the auditory canal. NOTE: When using a cotton-tipped applicator, be careful not to stick it to far into the ear as the tympanic membrane could be ruptured. h. Fill the irrigating syringe. (1) Grasp the syringe bulb and/or plunger. (2) Depress the bulb of the irrigating syringe. (3) Place the tip of the irrigating syringe in the solution. (4) Release the bulb and allow syringe to fill, or pull back on the syringe plunger. i. Test the flow of solution from the syringe. Expel a small quantity of solution back into the container. j. Position the emesis basin. (1) Place the basin just below the ear on the affected side (see figure 6-5). (2) Press firmly against the patient's neck (have the patient hold the basin if he is capable). k. Straighten the ear canal. (1) Gently grasp the auricle of the patient's affected ear. (2) Pull the auricle up and backward for an adult. (3) Pull the auricle down and backward for a child.
MD0547 6-7
www.HumanAnatomyCourse.com

Figure 6-5. Emesis basin position. l. Irrigate the patient's ear. (1) Place the tip of the irrigating syringe just inside the meatus of the ear, with the tip directed toward the roof of the ear canal (see figure 6-6). (2) Depress the bulb or plunger on the irrigating syringe. NOTE: Never completely block the ear canal with the syringe. If space is not left around the syringe tip, the solution will not be able to return, and undue pressure in the canal will result. (a) Direct a slow, steady stream of irrigating solution against the roof of the ear canal (see figure 6-7). (b) Use no more than 500cc of irrigating solution unless ordered.
m. Repeat steps h through l until the irrigating solution returns free of wax or debris, and until the prescribed amount of solution has been used. n. Remove the emesis basin and dry the external ear. o. Tell the Patient to tilt his head. The patient should lean toward the affected side for a few minutes to allow any remaining solution to drain out of the ear and to dry the external ear.
MD0547 6-8
www.HumanAnatomyCourse.com

Figure 6-6. Irrigating syringe placed inside the ear.
Figure 6-7. Irrigate ear.
p. Remove the drape from the patient. q. Dispose of or clean and store equipment. 6-8. HANDWASH Perform a patient care handwash.
MD0547 6-9
www.HumanAnatomyCourse.com

6-9. REPORT AND RECORD PROCEDURE a. Date of irrigation. b. Time irrigation was done. c. Kind and amount of solution used. d. Nature of return of flow.
Continue with Exercises
MD0547 6-10
www.HumanAnatomyCourse.com

EXERCISES, LESSON 6 INSTRUCTIONS: The following exercises are to be answered by marking the lettered response(s) that best answer(s) the question or best completes the incomplete statement or by writing the answer in the space provided. After you have completed all the exercises, turn to "Solutions to Exercises" at the end of the lesson and check your answers. 1. The external ear includes: ______________________________________________________________ ______________________________________________________________ ______________________________________________________________ 2. What is another name for the middle ear? a. Pinna. b. Eardrum. c. Malleus. d. Tympanic cavity. 3. List the equipment used for an ear irrigation other than emesis basin. ______________________________________________________________ ______________________________________________________________ ______________________________________________________________ 4. Why is oil used to irrigate an ear? ______________________________________________________________
Check Your Answers on Next Page
MD0547 6-11
www.HumanAnatomyCourse.com
MD0547 6-12
SOLUTIONS TO EXERCISES, LESSON 6 1. Outer ear (pinna). Auditory canal. Eardrum (para 6-2a). 2. d. (para 6-2b). 3. Rubber bulb. Asepto syringe (glass). Pomeroy syringe (para 6-4a). 4. To make the foreign matter slippery and easy to expel. (para 6-4b(8)).
End of Lesson 6
www.HumanAnatomyCourse.com
LESSON ASSIGNMENT LESSON 7 Treat a Patient with Epistaxis (Nosebleed). TEXT ASSIGNMENT Paragraphs 7-1 through 7-4. TASK TAUGHT 081-833-0071, Treat a Patient with Epistaxis (Nosebleed). LESSON OBJECTIVES After completing this lesson, you should be able to: 7-1. Identify the causes of epistaxis (nosebleed). 7-2. Identify the procedures to treat epistaxis (nosebleed). SUGGESTION After completing the assignment, complete the exercises at the end of this lesson. These exercises will help you to achieve the lesson objectives.
MD0547 7-1
www.HumanAnatomyCourse.com
LESSON 7
TREAT A PATIENT WITH EPISTAXIS (NOSEBLEED) 7-1. GENERAL A casualty suffering with epistaxis (nosebleed) should be treated immediately. Prolonging treatment could cause an excessive loss of blood that could develop into a more serious situation. This lesson will provide you with the causes of and the treatment for epistaxis.
7-2. CAUSES OF EPISTAXIS
Bleeding from the nose can be caused by the following conditions:
a. Injury from trauma to the face or head and/or picking of the nose.
b. Drying and crusting of nasal mucosa.
c. Diseases, including hypertension and local infection such as sinusitis or rhinitis.
7-3. TREAT EPISTAXIS
Most epistaxis can be treated successfully by the following procedures.
a. Tell patient not to breathe through his nose and not to blow his nose.
b. Tell patient to sit facing you.
c. Tell patient to tilt his head slightly forward.
d. Tell patient to pinch the fatty part of his nose 5 to 10 minutes.
e. Apply cold compress (if available) to the bridge of the nose.
7-4. EXCESSIVE LOSS OF BLOOD
NOTE: If there is a significant amount of bleeding and there is a possibility of shock, the patient should be evacuated or referred for further treatment. (Refer to 081-833-0047, Initiate Treatment for Hypovolemic Shock.)
a. Obtain a short history of the patient to include cause, duration, previous incidents of nosebleed, and an estimation of the amount of blood loss.
Continue with Exercises
b. Obtain and record vital signs.
MD0547 7-2
www.HumanAnatomyCourse.com

EXERCISES, LESSON 7 INSTRUCTIONS: The following exercises are to be answered by marking the lettered response(s) that best answer(s) the question or best completes the incomplete statement or by writing the answer in the space provided. After you have completed all the exercises, turn to "Solutions to Exercises" at the end of the lesson and check your answers. 1. Epistaxis (nosebleed) is caused by: _____________________________________________________________ _____________________________________________________________ _____________________________________________________________ 2. Which of the following procedures would be done to treat epistaxis (nosebleed)? a. Tell patient to sit facing you. b. Tell the patient to blow his nose. c. Tell the patient to breathe through his nose. d. Tell patient to pinch the fatty part of his nose for 11 to 15 minutes. 3. In treating a patient with epistaxis (nosebleed), where would you place a cold compress? a. Over patient's mouth. b. On patient's forehead. c. On the bridge of patient's nose. d. As close to the patient's nostrils as possible.
MD0547 7-3
Check Your Answers on Next Page
www.HumanAnatomyCourse.com
MD0547 7-4
SOLUTIONS TO EXERCISES, LESSON 7 1. Injury Drying and crusting of nasal mucosa Diseases (paras 7-2a, b, c) 2. a (para 7-3b) 3. c (para 7-3e)
End of Lesson 7
www.HumanAnatomyCourse.com