easi-joist site guide - manderwood.co.uk
TRANSCRIPT

Floor Definitions Perimeter nogging
Binder
Strongback
Girder
Ring beam
Stair trimmer
Trimmer
Rimboard
Bearing/wallplate
Girder
easi-joist®
Binder
Ground floor/1st & 2nd floor - restraint straps required at a maximum of 2m
centres. 3rd floor & above - additional restraint straps
required at 1250m centres. Alternatively
use proprietary metalwork.
Parallel restraint strap at max 2m centres
Parallel Restraint BracingJoists Perpendicular to Masonry Wall
easi-joist® Nominal Size
Strongback Max Spacing
Strongback Size and Grade
Alternative Strongback
WS200 - 1953.0m35 x 97 TR2635 x 97 C16
WS200 - 2194.0m35 x 97 TR2635 x 97 C16
WS2504.0m35 x 97 TR2635 x 122 C16
WS3004.0m35 x 122 TR2635 x 147 C16
WS4004.0m35 x 147 TR2635 x 172 C16
Horizontal Restraint StrapHorizontal bracing straps are required to be fixed to loadbearing walls perpendicular to easi-joist®. This member must be continuous over a minimum of 3 easi-joist®.
Straps to be fixed in strict accordance with manufacturer’s instructions.
Strap fixed with minimum 8/no 3.35 x 65mm nails, two of which to be over the third joist
35 x 97mm timber fixed to each joist by 2/no 4.0 x 75mm nails
Perimeter nogging
Decking
easi-joist®
Intermediate support
Insulation
Insulation support netting
Noggins, each side of intermediate support
Typical easi-joist® Ground Floor Detail
Shilton Industrial Estate, Shilton, Coventry CV7 9QL
Tel: 02476 602303 Email: [email protected]
www.wolfsystem.co.uk
Wolf Systems, Engineering Ease.
DO ORIENT CORRECTLY
Joists are designed with a specific top and bottom chord. Refer to joist profile plots for correct orientation.
DO SPACE CORRECTLY
Refer to joist profile plots for maximum joist spacing.
DO NOT DRILL TIMBER
DO NOT CUT TIMBER
DO NOT EXPOSE TO EXCESSIVE MOISTURE
DO NOT DAMAGE OR REMOVE WEBS
DO NOT NOTCH TIMBER
DO USE WEB OPENINGS FOR
SERVICES
DO CUT TRIMMABLE ENDS IF REQUIRED
easi-joists® are manufactured as part of the floor system as a whole
Modification of joists is strictly prohibited
IMPORTANTJoist DefinitionsThe easi-joist® system comprises a number of parts that make up the complete floor structure. Knowledge of each part and its use is essential to the basic understanding of floor design. Below, we provide the typical definitions for these parts as defined for an individual joist member and the floor system as a whole.
Decking
Column plate
Top chord
Top chord splice
Column
End column
Intermediate support
Bottom chord splice
Strongback
Bottom chord
End bearing
easi-joist® metal web joists are available in 6 different depths utilising 35mm and 47mm top and bottom timber chords.
FixingFixing of multi-ply joists is to be carried out to metalwork suppliers instructions using propriety fastening screws.
Type and spacing as specified by easi-joist® software.
Clearance for circular services
D
W
A
HD1
WS200WS250WS300WS400
A (mm) 125160210323
D (mm)100150200280
D1(mm)100100130190
WS200WS250WS300WS400
H mmW mmW mmW mmW mm
50300300330500
100100200250410
1505070170330
200N/AN/A70250
250N/AN/AN/A170
300N/AN/AN/A70
Clearance for rectangular services
Joist Specification(All dimensions in mm)
768
284
417
47
323
47
100
600
216
304
47
210
47
84
600
211
254
47
160
47
89
600
203
219
47
125
47
97
600
203
207
35
125
47
97
600
203
195
35
125
35
97
768
284
417
47
323
47
100
600
216
304
47
210
47
84
600
211
254
47
160
47
89
600
203
219
47
125
47
97
600
203
207
35
125
47
97
600
203
195
35
125
35
97
768
284
417
47
323
47
100
600
216
304
47
210
47
84
600
211
254
47
160
47
89
600
203
219
47
125
47
97
600
203
207
35
125
47
97
600
203
195
35
125
35
97
Available in all joist depths
Multi-ply joist widths
144, 194, 244 or 294
Joist WidthsSingle joist widths
7297122147
172197
222
7297122147
172197
222
7297122147
172197
222
768
284
417
47
323
47
100
600
216
304
47
210
47
84
600
211
254
47
160
47
89
600
203
219
47
125
47
97
600
203
207
35
125
47
97
600
203
195
35
125
35
97
768
284
417
47
323
47
100
600
216
304
47
210
47
84
600
211
254
47
160
47
89
600
203
219
47
125
47
97
600
203
207
35
125
47
97
600
203
195
35
125
35
97
768
284
417
47
323
47
100
600
216
304
47
210
47
84
600
211
254
47
160
47
89
600
203
219
47
125
47
97
600
203
207
35
125
47
97
600
203
195
35
125
35
97
Do Not Cut or DrillDeflection Limits
When strongbacks are used, easi-joist® beams have a maximum deflection limit of 14mm or span x 0.003, whichever is least. If strongbacks are not provided NHBC Standards 6.4-D4 (a) stipulates a maximum 12mm deflection limit. NHBC requires that strongbacks are to be used and located according to the following rules:
• Spans less than 4.0m = strongback not required
• Spans between 4.0m and 8.0m = 1 strongback at centre of span
• Spans greater than 8.0m = 2 strongbacks at equal spacing
Splice joint
600mm minimum timbersplice nailed with minimum
6/no. nails either side
Strongback Sizes & InstallationStrongbacks are an essential part of the floor construction as a whole. They provide essential damping qualities to the floor by connecting joists together to form a load sharing system that limits deflection and stiffens the floor. In addition they provide a useful form of lateral bracing within the floor during its construction (see pages 24, 29 and 51 for further strongback bracing details).
Fixing & SplicingCorrect installation of the Strongback and flooring material will ultimately determine how well the easi-joist® floor system will perform. It is recommended that the Strongback be installed tight to the top chord of the easi-joist® beam and should be twice nailed to the columns provided with 3.35 x 65mm wire nails. Strongbacks may be spliced where required by fixing a 600mm timber splice equally over the joint, and nailed using 6 no 3.35 x 65mm nails on either side of the joint.
IMPORTANT
The correct fixing of the strongback is essential to overall floor performance and must be carried out as instructed above. Fixing the strongback by screwing is also satisfactory.
Strongback DetailsFix 75 x 38mm (min) blocks to top and bottom chords with 2.no. 65 x 3.35mm wire nails. Insert strongback through joists before fixing joists in position, as it may not be possible to do this at a later stage. Position strongback tight to underside of top flange. Fix 97 x 35mm (min) strongback to blocks with 2/no. 65 x 3.35mm wire nails.
Extract taken from Code of Practice for Engineered Wood Products
Fix 97 x 35mm (min) strongbacks to joists with 2/no. 65 x 3.35mm wire nails.
Handling• The site manager or contractor will be
responsible for the handling of easi-joist® from the time of unloading the delivery.
• Avoid dropping, twisting or subjecting easi-joist®
to heavy impact.
• Always lift easi-joist® in the upright position to prevent lateral distortion.
• Use a fabric sling for lifting joists and ensure even weight distribution.
Storage• Storage time of easi-joist® prior to installation
should be kept to a minimum.
• easi-joist® should be left in bundles and remain in packaging until used.
• During such time, joists should be kept as dry as possible, and laid horizontally in an upright position, clear from the ground. Bearers should be used underneath web or column joints to prevent distortion.
• Joists are unstable until fully braced or boarded. Do not walk or store materials on an unrestrained floor area.
• Sheet materials stacked on the easi-joist® floor should not exceed 250mm in height and 150 kg per joist. The stack must not extend more than 1500mm from the edge of the floor with its longest span perpendicular to the joists.
Safety• Use protective gloves when manually handling
easi-joist®.
• Refer to plans for joist weights, remembering to account for multi-ply girders.
• Observe health and safety regulations as set out by the current standards and regulations.
Planning• Study layout drawings and plan which section
will be erected first, starting from which end. Identify girder joists and stair trimmer which will need to be installed first to provide support for others.
• Check support conditions for all joists ensuring all internal supporting walls are present and that all supporting masonry is cured.
• Identify joists by reference number and place them next to required areas. (Joists should not be moved from dry storage until immediately before erection.)
Installation• All joists are to be installed truly vertical, parallel
and top side up.
• Refer to layout plans or profiles for the correct orientation of the joist.
• Noggings, restraint straps, decking and strongbacks should be properly installed to the specification of the manufacturer or designer.
• Where masonry hangers are used, ensure at least three courses of blockwork or equivalent have been laid and the mortar cured before the floor is used.
• Spacing and loading of easi-joist® must not exceed that stated in the design.
Checking• Ensure all joists are fully bearing on their
supports, packing gaps if necessary.
• Check adjacent joists are level with each other and the ends of the joists form a straight line.
Lifting JoistsDo not use chains or steel cable
Use fabric sling only Approx 50º
IMPORTANT: It is inadvisable to stack building materials on floor joists other than floor decking as described above.
Stacking Materials
250mm
1500mm
Health and Safety
The solid trimmable end is a design solution to a problem presented by some construction projects where parallel walls are uneven. A 47mm web is fixed between the chords using 3.35mm x 65mm nails. The positioning of the nails is determined by the software and will be fixed in the factory.
Trimmable end detail has been tested to allow up to 400mm solid timber webs at each end of the joist which provides huge flexibility should a project require it.
Each trimmable end joist is designed so that it can be supported along the length of the solid web section, adding to the variety of situations and effectiveness of the joists used on site.
Care should be taken on site to ensure that when cutting the solid section, there is at least 50mm of timber remaining to the web to allow for the edge distance of the nails in the nailplate zone of the metalweb.
When trimming ensure a minimum of 50mm gap to the end of a metal web or plate
Joist trimmed back to support edge on site
Remaining blocking and easi-joist not to be trimmed
Trimmable section
200 50 50
1001
1001
1001
1001
1001
1001
1001
1001
1002
1002
1002
1002
1002
Solid Trimmable End Support
Plywood fixed with 4No. 3.1x50 gun fired nails to each column
9mm plywood, full depth of column
Roof Bottom Chord Restraint Detail
StrongbackPlywoodStrongback located on the bottom chord of easi-joist®
Note: Plywood to be placed at 6m intervals, fixed to a minimun of 3 easi-joists® and located at each end of the strongback.
easi-joists® can easily be adapted to create pitched roof structures as a lighter, more thermally efficient alternative to solid sawn timber. By redesigning the end column configuration, the easi-joist® system can be installed onto a wallplate or ridge beam without the need for a bevelled wallplate or special metalwork items. This versatile connection detail enables top and bottom supports to accommodate a range of bearing widths and can also incorporate intermediate supports.
Using joists for roof structures requires consideration of external load factors and more complex geometry at eaves and ridge locations.
Tolerance at ridge
EWP ridge beam
Insulation
Insulation
Plasterboard
Ridge Detail
Insulation
Decking
Plasterboard
Fix overhang timber to top chord
Wallplate
Rimboard
Overhang from min. 97mm timber
Min. 72mm timber afterbirdsmouth cut
Eaves Detail
Bracingeasi-joist® roofs should be temporarily braced longitudinally and diagonally during erection Structural sarking is the preferred method of providing racking resistance for the roof structure, however longitudinal and diagonal bracing can also be used.
Pitched Roofs Health and Safety
Temporary Erection BracingThe builder is responsible for identifying and minimising the risks involved in erecting open-web joists to ensure that the health and safety of workers is maintained. Builders should be aware of the health and safety responsibilities imposed on them by the Construction (Design and Management) Regulations 2007.
Proper erection procedures and bracing are vital to the safe construction of open web joist floors.
The following notes may assist builders in preparing a safety assessment.
• Un-braced joists may be unstable.
• Do not allow anyone to walk on unbraced joists.
• Do not store building materials on unbraced joists.
• Open-web joists should be erected straight and vertical. Horizontal deviation : 10mm max. Vertical deviation: 2mm max.
• Temporary bracing comprises diagonal brace, longitudinal brace and permanent strongbacks.
• All longitudinal braces, diagonal braces, strongbacks and hangers should be completely installed and fully nailed as detailed.
• Lateral strength should be provided by a diagonally braced system across at least 3 joists as shown in the temporary bracing
diagram. Additional braced and blocked systems should be provided at 12m spacing in long joist runs.
• Construction materials may only be stored on joists when all bracing is in place. The material should be spread over at least 4 joists and not more than 1500mm from a support. Floor/ceiling boards may be stacked up to 250mm high (150 kg per joist at 600mm centres, 100 kg per joist at 400mm centres) on braced floors.
• Flooring should be fully fixed to the joists before additional loads are placed on the floor.
• Temporary bracing may be progressively removed as decking is fixed.
Construction materials shall only be stored in the 1.5m edge zone at one end of the joist only
Joists supported by masonry hangers to have minimum 675mm cured masonry above hanger level or as advised by hanger manufacturer
97 x 22mm diagonal brace
Strongback bracing fixed as details above
2.4m max.97 x 22mm longitudinal braces connected to diagonal bracing at one end of joist run
Do not store construction material
close to trimmers
Nail all binders and braces toeach joist with 2/no. 65 x
3.35mm nails
Remove Safety Bracing asDecking Proceeds
72 x 47mm top chord restraint noggings
Temporary Bracing This diagram indicates temporary erection bracing only. It is applicable to both masonry and timber frame construction.
1.5m max.
250mm
Decking can be laid in lieu of diagonal bracing
2.4m max.
Wolf Systems, Engineering Ease.
Engineered Metal Web System
This product has been manufactured and supplied by the following company. Any questions, not detailed in this guide should be referenced to the manufacturer. Please refer to the full easi-joist® technical guide for more detailed information.
Site Guide
Wolf Systems Limited, Shilton Industrial Estate, Shilton, Coventry CV7 9QLTel: 02476 602303 Email: [email protected] www.wolfsystem.co.uk
easi-joist® Floor Details
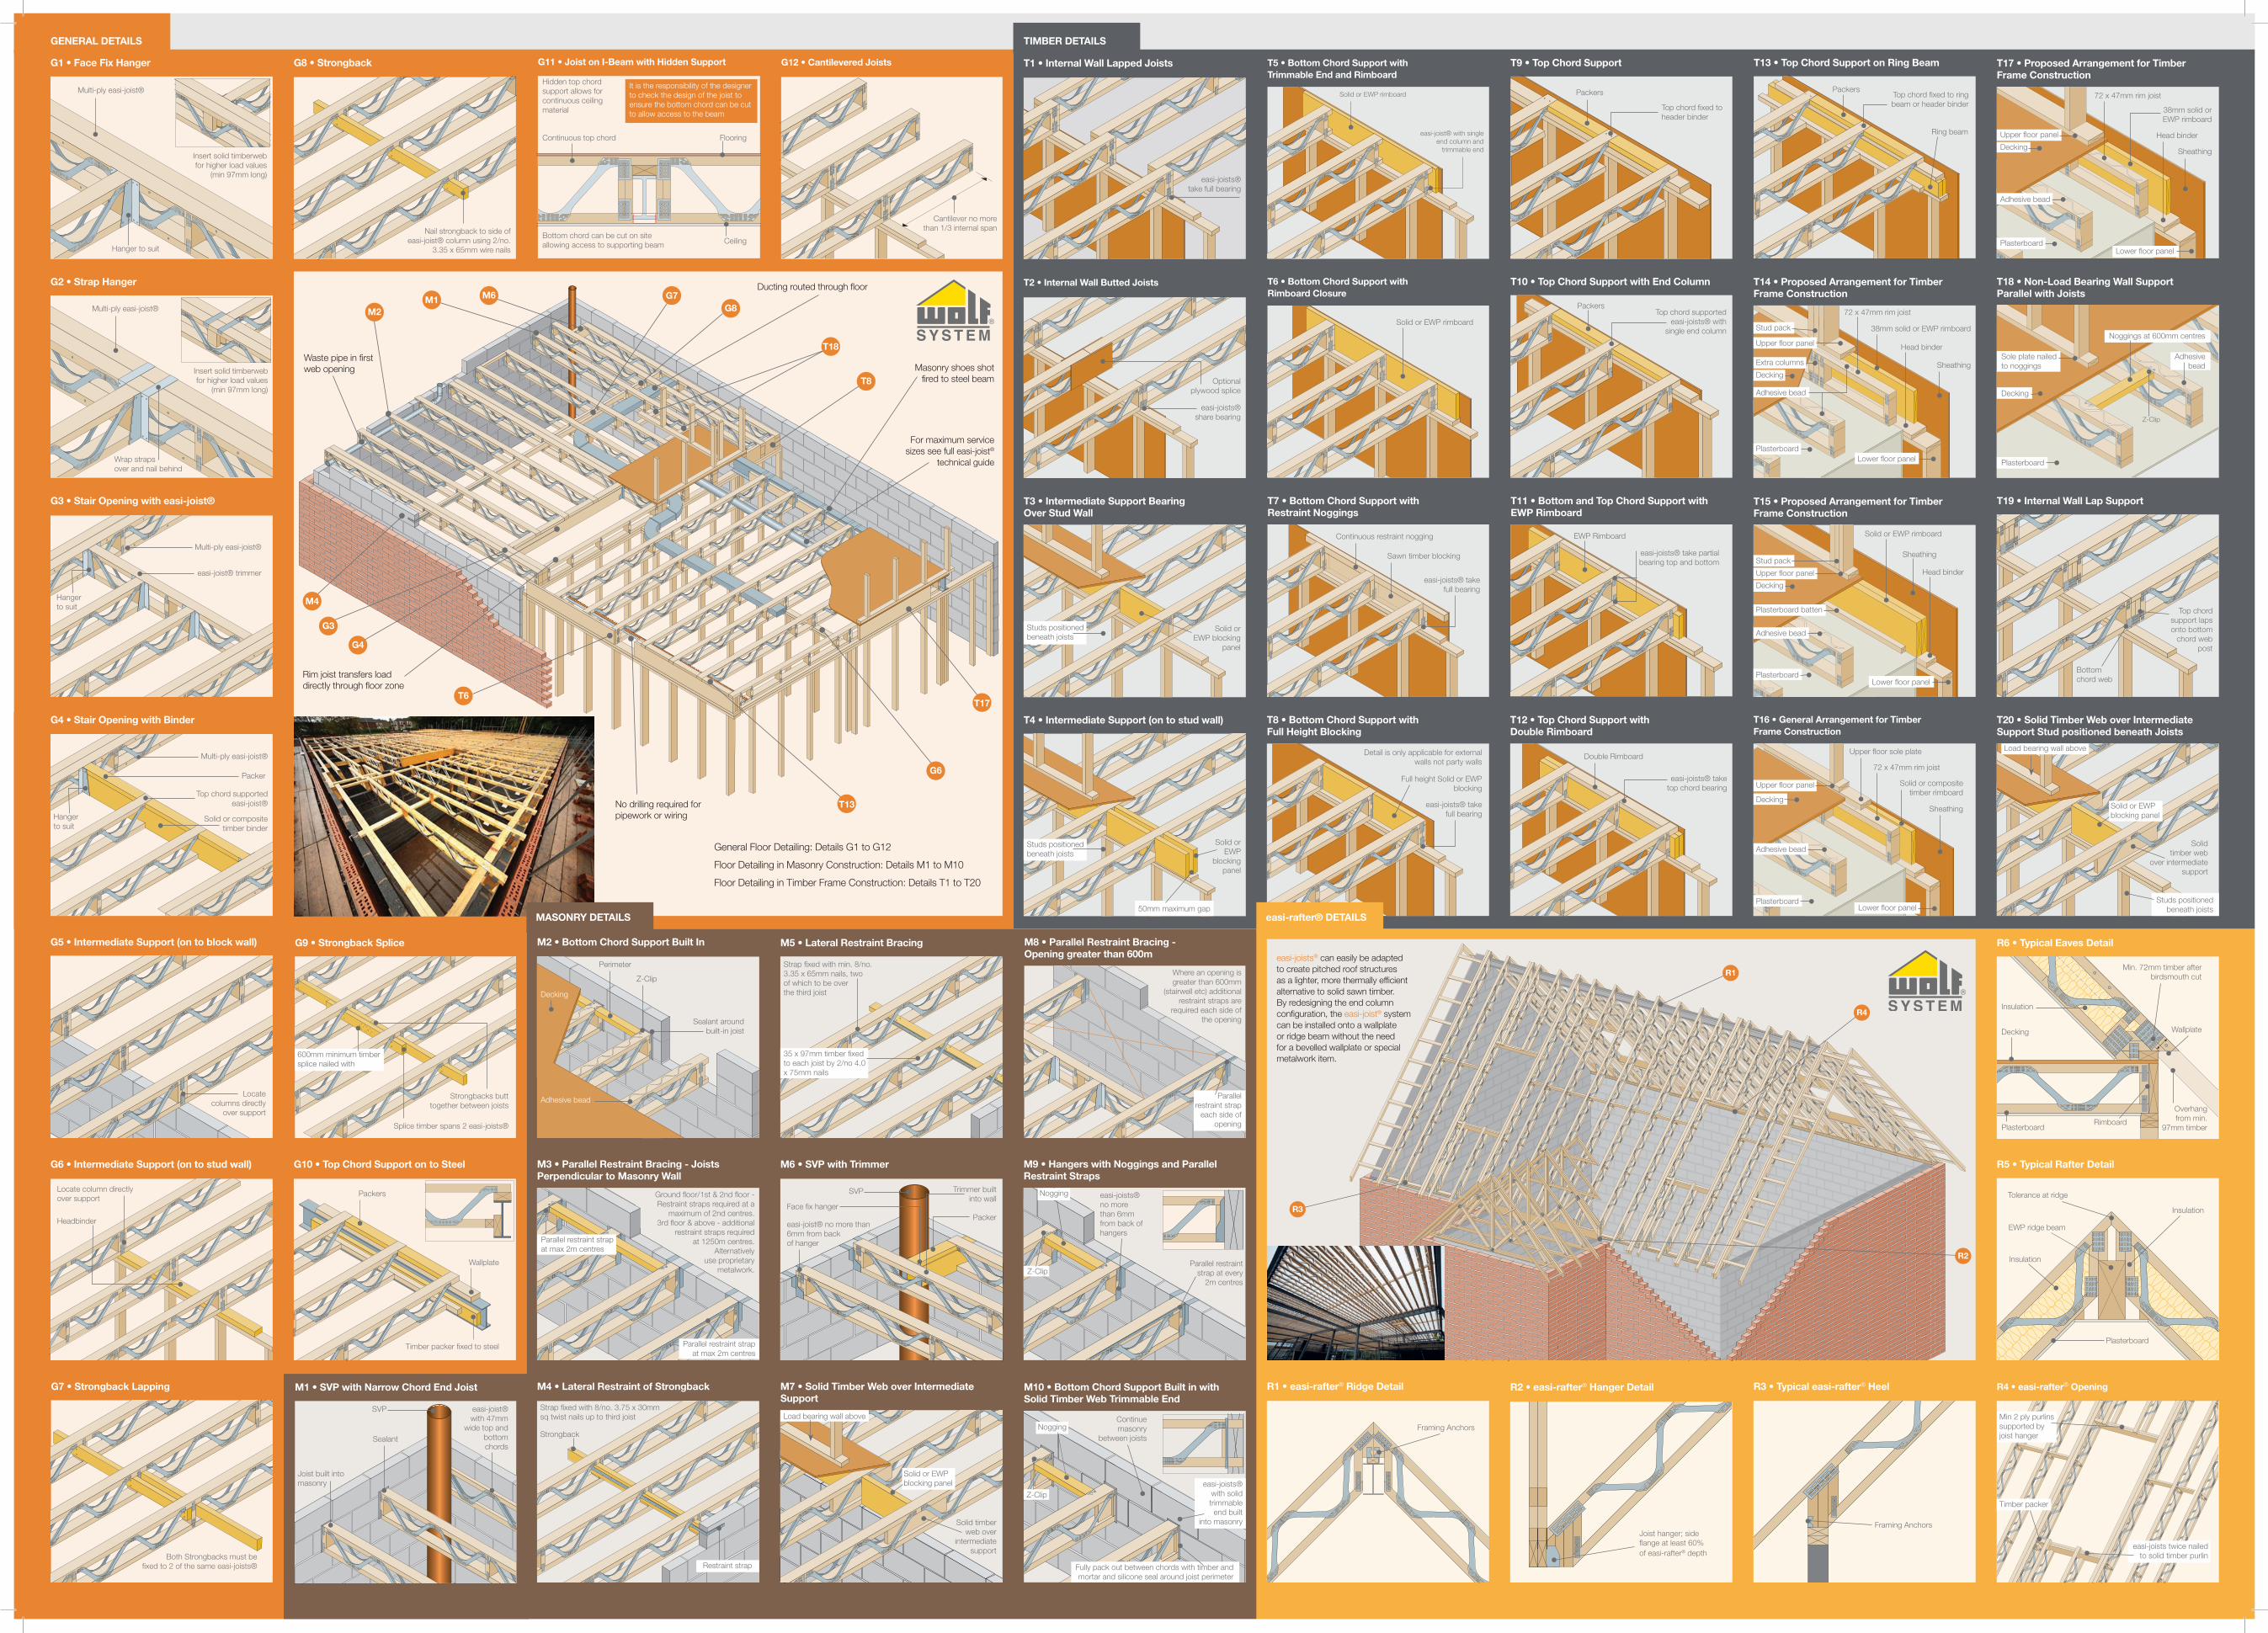
M1
M1 • SVP with Narrow Chord End Joist
Joist built intomasonry
Sealant
SVP easi-joist® with 47mm
wide top and bottom chords
G12 • Cantilevered Joists
Cantilever no morethan 1/3 internal span
M4 • Lateral Restraint of Strongback
Strongback
Strap fixed with 8/no. 3.75 x 30mm sq twist nails up to third joist
Restraint strap
M5 • Lateral Restraint Bracing
Strap fixed with min. 8/no.3.35 x 65mm nails, twoof which to be overthe third joist
35 x 97mm timber fixed to each joist by 2/no 4.0 x 75mm nails
M6 • SVP with Trimmer
easi-joist® no more than6mm from backof hanger
Face fix hanger
Trimmer builtinto wall
Packer
SVP
G7 • Strongback Lapping
Both Strongbacks must be fixed to 2 of the same easi-joists®
G8 • Strongback
Nail strongback to side ofeasi-joist® column using 2/no.
3.35 x 65mm wire nails
G9 • Strongback Splice
Strongbacks butttogether between joists
Splice timber spans 2 easi-joists®
600mm minimum timbersplice nailed with
G10 • Top Chord Support on to Steel
Timber packer fixed to steel
Wallplate
Packers
G11 • Joist on I-Beam with Hidden Support
Ceiling
FlooringContinuous top chord
Bottom chord can be cut on siteallowing access to supporting beam
Hidden top chordsupport allows forcontinuous ceilingmaterial
It is the responsibility of the designer to check the design of the joist to ensure the bottom chord can be cut to allow access to the beam
M6
G4
No drilling required for pipework or wiring
Waste pipe in first web opening
M4
G3
Rim joist transfers load directly through floor zone
T6
T13
G6
T17
For maximum service sizes see full easi-joist®
technical guide
Masonry shoes shot fired to steel beamT8
T18
Ducting routed through floor
G8G7M1
M2
General Floor Detailing: Details G1 to G12
Floor Detailing in Masonry Construction: Details M1 to M10
Floor Detailing in Timber Frame Construction: Details T1 to T20
R4
R1
R3
R2
easi-joists® can easily be adapted to create pitched roof structures as a lighter, more thermally efficient alternative to solid sawn timber. By redesigning the end column configuration, the easi-joist® system can be installed onto a wallplate or ridge beam without the need for a bevelled wallplate or special metalwork item.
G1 • Face Fix Hanger
Multi-ply easi-joist®
Hanger to suit
Insert solid timberweb for higher load values
(min 97mm long)
G5
G5 • Intermediate Support (on to block wall)
Locate columns directly
over support
G3G3 • Stair Opening with easi-joist®
Multi-ply easi-joist®
easi-joist® trimmer
Hanger to suit
G4
G4 • Stair Opening with Binder
Multi-ply easi-joist®
Packer
Solid or compositetimber binder
Top chord supported easi-joist®
Hanger to suit
G6G6 • Intermediate Support (on to stud wall)
Locate column directly over support
Headbinder
G2G2 • Strap Hanger
Multi-ply easi-joist®
Wrap straps over and nail behind
Insert solid timberweb for higher load values
(min 97mm long)
M3 • Parallel Restraint Bracing - Joists Perpendicular to Masonry Wall
Ground floor/1st & 2nd floor - Restraint straps required at a
maximum of 2nd centres. 3rd floor & above - additional
restraint straps required at 1250m centres.
Alternatively use proprietary
metalwork.
Parallel restraint strap at max 2m centres
Parallel restraint strap at max 2m centres
M7 • Solid Timber Web over Intermediate Support
Load bearing wall above
Solid timber web over
intermediate support
Solid or EWP blocking panel
M9 • Hangers with Noggings and Parallel Restraint Straps
Parallel restraint strap at every
2m centres
easi-joists® no more than 6mm from back of hangers
Nogging
Z-Clip
M10 • Bottom Chord Support Built in with Solid Timber Web Trimmable End
Nogging
Z-Clip
Continue masonry
between joists
easi-joists® with solid trimmable
end built into masonry
Fully pack out between chords with timber and mortar and silicone seal around joist perimeter
M8 • Parallel Restraint Bracing - Opening greater than 600m
Parallel restraint strap
each side of opening
Where an opening is greater than 600mm
(stairwell etc) additional restraint straps are
required each side of the opening
T7 • Bottom Chord Support withRestraint Noggings
Continuous restraint nogging
Sawn timber blocking
easi-joists® takefull bearing
T8 • Bottom Chord Support withFull Height Blocking
Full height Solid or EWP blocking
easi-joists® takefull bearing
Detail is only applicable for external walls not party walls
T1 • Internal Wall Lapped Joists
easi-joists® take full bearing
T2 • Internal Wall Butted Joists
easi-joists®share bearing
Optionalplywood splice
T3 • Intermediate Support Bearing Over Stud Wall
Solid orEWP blocking
panel
Studs positionedbeneath joists
T4 • Intermediate Support (on to stud wall)
Solid or EWP
blocking panel
Studs positionedbeneath joists
50mm maximum gap
T6 • Bottom Chord Support withRimboard Closure
Solid or EWP rimboard
T5 • Bottom Chord Support withTrimmable End and Rimboard
Solid or EWP rimboard
easi-joist® with singleend column and
trimmable end
T9 • Top Chord Support
Packers
Top chord fixed toheader binder
T10 • Top Chord Support with End Column
PackersTop chord supported
easi-joists® withsingle end column
T11 • Bottom and Top Chord Support withEWP Rimboard
EWP Rimboard
easi-joists® take partial bearing top and bottom
T12 • Top Chord Support withDouble Rimboard
Double Rimboard
easi-joists® take top chord bearing
T13 • Top Chord Support on Ring Beam
Ring beam
PackersTop chord fixed to ring beam or header binder
T14 • Proposed Arrangement for TimberFrame Construction
72 x 47mm rim joist
38mm solid or EWP rimboard
Sheathing
Head binder
Stud pack
Upper floor panel
Extra columns
Decking
Plasterboard
Adhesive bead
Lower floor panel
T20 • Solid Timber Web over Intermediate Support Stud positioned beneath Joists
Load bearing wall above
Solid timber web
over intermediate support
Solid or EWP blocking panel
Studs positioned beneath joists
T19 • Internal Wall Lap Support
Top chord support laps onto bottom
chord web post
Bottom chord web
T15 • Proposed Arrangement for TimberFrame Construction
Head binder
Sheathing
Solid or EWP rimboard
Stud pack
Plasterboard batten
Upper floor panel
Decking
Plasterboard
Adhesive bead
Lower floor panel
T16 • General Arrangement for TimberFrame Construction
Upper floor sole plate
72 x 47mm rim joist
Sheathing
Solid or compositetimber rimboard
PlasterboardLower floor panel
Upper floor panel
Decking
Adhesive bead
T17 • Proposed Arrangement for TimberFrame Construction
Sheathing
Upper floor panel
Decking
Plasterboard
Adhesive bead
Lower floor panel
Head binder
38mm solid or EWP rimboard
72 x 47mm rim joist
R1 • easi-rafter® Ridge Detail
Framing Anchors
R2 • easi-rafter® Hanger Detail
Joist hanger; side flange at least 60% of easi-rafter® depth
R3 • Typical easi-rafter® Heel
Framing Anchors
R4 • easi-rafter® Opening
easi-joists twice nailed to solid timber purlin
Min 2 ply purlins supported by joist hanger
Timber packer
R6 • Typical Eaves Detail
Insulation
Decking
Plasterboard
Wallplate
Rimboard
Overhang from min.
97mm timber
Min. 72mm timber afterbirdsmouth cut
T18 • Non-Load Bearing Wall Support Parallel with Joists
Plasterboard
Sole plate nailedto noggings
Decking
Noggings at 600mm centres
Adhesive bead
Z-Clip
R5 • Typical Rafter Detail
Tolerance at ridge
EWP ridge beam
Insulation
Insulation
Plasterboard
MASONRY DETAILS easi-rafter® DETAILS
GENERAL DETAILS TIMBER DETAILS
M2
M2 • Bottom Chord Support Built In
Perimeter
Z-Clip
Sealant aroundbuilt-in joist
Decking
Adhesive bead