eastman® blue streai(!> brute machines/eastman 627x - 629x...turning otf the machine ... knife...
TRANSCRIPT
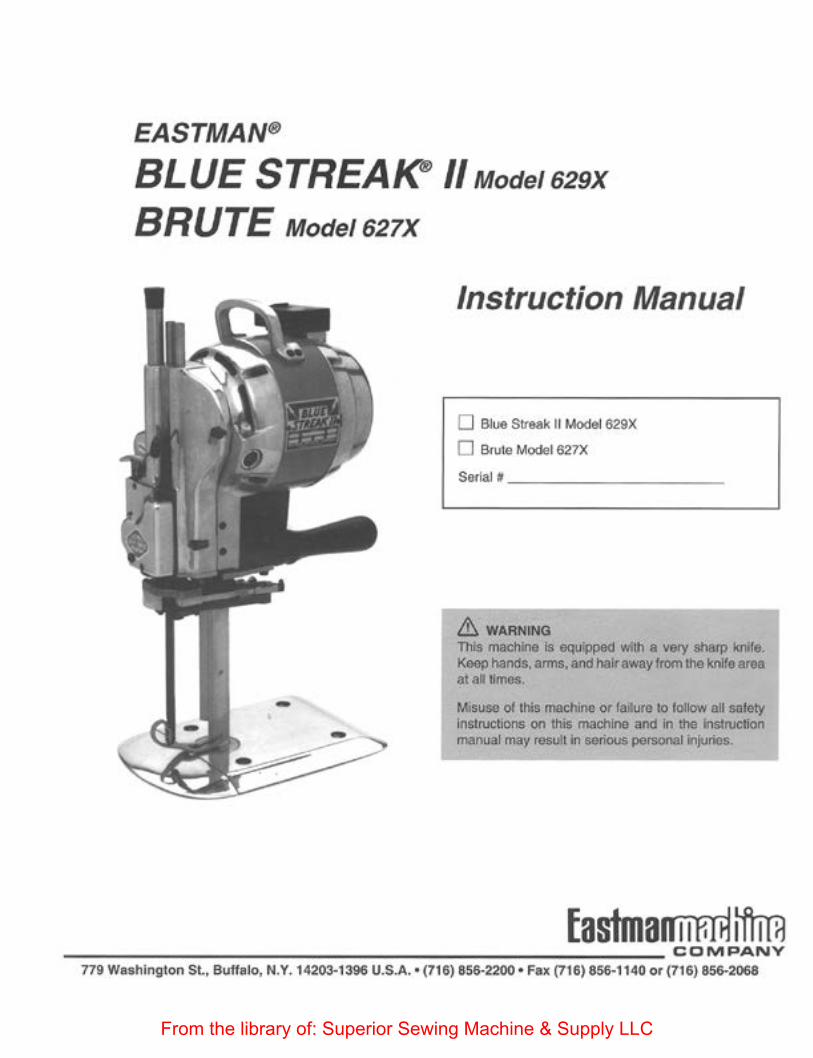
EASTMAN®
BLUE STREAI(!> 1/ Mode/629X
BRUTE Mode/627X
Instruction Manual
0 BIU<> Slroak II Model 629X
0 BrUle Model 627X
Serlal t _ _ _______ _
& WARNING This mac:hine Is equipped w;th a very sharp knife. Keep hands, arms, and hair away from the knife area at all times.
Mlsu.SQ ot this 1'1'\achine ot failure to follow all safety instructions on this machine and in the instruction manual may resu11 in serious personal injuries.
fasfmaO'flf,Tij lttml -----------------------------COMPANY
779 Washington St., Buffalo, N.Y. 14203-1396 U.S.A. • (716) 856·2200 • Fox (716) 856-1140 or (716) 856·2068
From the library of: Superior Sewing Machine & Supply LLC
Table of Contents
Safety Information ......................................... 1
General Safety Precautions ...................................... 1
Adjusting the BeH Sharpener .................................. 7 Changing Sharpener Bel1s ......................................... 7 Adjusting Stabilizers for Central Alignmenl ................ 7 Checking tho Sharpener Shoos ................................. 8
Operation ...... ................................................. 2 Chocl<lng the Extromc Down Position of tho Sharpe-nor ............................................................. 8
Initial SGt Up ............................................................... 2 Checking !he Stop Screw on the Sharpener Shoe ..... 9 Check the Wtdth of the Bevel on the Knife ................. 9
Operating Procedure ................................................ 3 Changing the Knife ...................................................... 9 Safety Consicterations ................................................. 3 Starting tho Mach!no ................................................... 4 Adjusting Bevel Slo~ Shoos ................................. 11
MaJong a C..t ............................................................... • Turning Otf the MaChine ............................................. .4
Troubleshooting ...................................................... 14
Freeing Frozen Guides ........................................... 16
Routine Maintenance ................................... .4
Care of the Machine ..................................................... 4 Accessories .................. ............................... 16
Oaify ............................................................................ 4 Metal Mesh Gloves .................................................. 16 Twice Vleetdy .............................................................. ~ Weekly ........................................................................ 5
Ordering Details ........................................................ 17
Genuine Eastman Abrasive Betts ......................... 17 LUbr'iCaUon ................................................................. 5 Daily ............................................................................ 5 Ergo·Handle ............................................................. 18 Weekly ........................................................................ 5 Monthly ....................................................................... 5 Specialty Machines ................................................. 19
Plastic Masler Modei627PM.f629PM ....................... 19 Sharpening the Knife ................................................ 5 MiCro Fog Modei627MF1629MF .............................. 19 Removing the Sharpener ............................................ 5
Replacing the Rubber Driver Pulley ....................... 6
IMPORTANT This manual contains instructions alld part numbers lor two d1Nerent machines: Brute Model 627 and Blue S1teak II Model 629. It you contact Eastman Machine COmpany lor information or to Older parts, always specify the machine name and model number.
If you are ordering electricaJ componen1s. specify lhe volt· ago. froqucncy (Hz). and speed (RPM) of your machine. You can lf'ld this intormalion on a label anached to your machine.
Patents Statement Some parts of this manual and the equ~ment it describes are prolecled by the following U.S. palents: 5,178,232. 4,609.244. 5,111,582. 4,76t.878. and 028t .416. Other patents pending.
Tradamark.s Statement The names Eastman, Uni·Safe, Blue Streak, and Bevel Bloc are registered trac:Jemarks ol the Eastman Machine Company.
[asfmanmml tftTm ------- --------- --------------CO MPANY
From the library of: Superior Sewing Machine & Supply LLC
Safety Information
Throughout this manual, safety infotmat.ion is presented by use of the terms Wamitlg, CautkM, and Not9. These terms have the following meanings;
/A WARNING A warning contains critical infonnation regarding poten· tial safely hazards that can occur during proper use or miSuse Of the mact'line. Fe.ilul'& 10 fOllOw these pc'OOG· dures may result in serious personal injury to the user.
/A CAUTION A caution contains Instructions for the use or mainte· nance of the machine. Failure to tOibw these pcooe. dures may result in damage to tOO machioo.
Supplementary information may be given in a Note.
S3fety and lndemnlfleaUon Ouf'ing the Ute ot thO madllno, the purchasor agrees to ptOVide to an machine usem (including irs own employees and lr'Kiependent contractors) au rolovant safety in10tma· tion, including warning labels and instruction manuals. The purchaser also agrees to maintain the safety features a~d working condition of the machine, and to adcquatcty trwn aJ users In tho safo use and maintenance of the machine. ThO purChaSer agreos to defend, protect. indemnify, and hold Eastman Machine Company harmless from and against ell claims, losses, expenses, damages, and liabili· ties to the extent that they have been caused by the purchaser's failure to comply with the terms and insttuc· dons ot this manual.
General Safety Precautions
/A WARNING • This maChine is oquippod with a wry shatp and dan·
get'ous knrle. Keep handS, allYl$, and hair a:-va~ from the knife area at all times. When the mach•ne IS not io use. keep the pr$$Sure foot knife guatd Sow$red and locked at all times. Safety glows and glasses and appropriate clothing may prevent serious per· sonallnjurfes.
• 01sconnec1 the power supply from the maChine wnon it i:s not in use or during routinG maintenance, in· clucting IIA:lrication.
• The purchaser must instruct ell operators in the proper usc of tile machine aooording to the instruc· tlons on the machine and In ttMs manual. This train· lng must lncludo Instruction on the potential saJety hazards arismg rrom th9 use or miSUSG of the rna· chine. In additiOn to such training, the purchaser should provide written wont instructions as neces· $8lY to ensure corr~ use of the machine lor spe. cific cutting applications.
• The purchaser must provide appropriate safety mea· sures and equipment as recommended in this manual. ObsetVe allstatutOf\1 requitements coocetn· ing the use of hazardOus maehinety that apply to your location.
• Do not modify this machine or ci&able safety features. Unauthori~ed modification may result in seri· ous personal injuries to the user. Electrical connections to this machine must be made by a qualified eloctrlctan fam•hat with appllcablo codos and rogu· lations. To prevent electrocution, a ground 5ead must be oonnected to terminal "E'" on the attachment plug.
• This machine is intended ONLY for hand-held operation. Misuse of this machine or use of this machine as part of another machine may resuh in sen. ous personal in;uries to the user.
• Safety labels must be kept clean and legible at all times. Call the Eastman Machine lactory to ordor replacement labelS.
fasfmalfi jf,Jij i1trrB --------------------------------COMPANY
From the library of: Superior Sewing Machine & Supply LLC
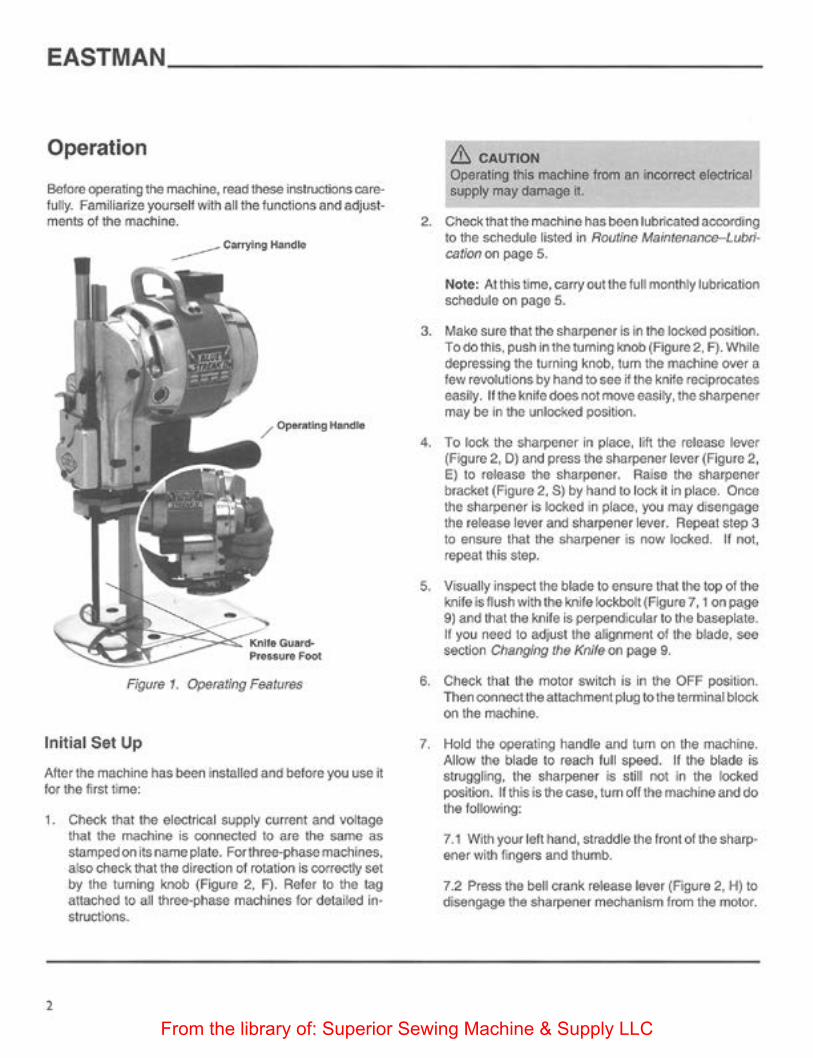
EASTMAN ________________________________ ___
Operation
Before operating the machine, read these instructjons care. tully. Familiarize yourself with a!l the functions and adjust4
ments of the macfline.
Figure 1. Operating Features
Initial Set Up
After the machine has been inSiatled and before you use it for the first time:
1. Check that the electrical supply current and voltage that the machine is oonnected to are the same as stamped on its nameplate. For three-phase machines, also check that the dlrecclon of rotation Is oorroctty set by tOO turning knob (Figure 2, F). Reror to tho tag anachcd to an three-phase machines for detaikld in· structions.
2
& CAUnON Operating this machine from an incorrect electrical su.ppty may damage it
2. Check that the machino has been lubricated aooording to the schedule listed in Routfnc Malntenal"'etrLubrl· cation on page 5.
Note: At this time, carry out the full mont~ lubrication schedule on page 5.
3. Mako suro that the sl\atpenor Is In tho lockOd position. To dO thiS, puSh in the tuming knOb (Figt~ro 2, F). Wh1l& depressing the turning knob, tum the machin& over a few revolutions by hand to see if the knife rec:iprocates easily. If !he knife does not move easiry, the sharpener may be in the untod<ed position.
4. To fock the sharpener in place, lih the release fever (Figure 2. 0) and press the sharpener lever (Figure 2, E) to roklaso the sharpener. Ralso the sharpener btackot (Figufo 2, S) by hat1d to lock it in place. Onoo tho sharpooer is klcked •n place, you may dJsengage the release lever and shaiJ)&ner lever. Repeat step 3 to ensure that the sharpener is now locl<ed. If nol, repeitl this step.
5. Visually inspect the blac:Je to ensure that the top of the knife ls ftushwlth the knife lockbott {Figure 7, 1 on pago 9) and that the knife Is perpendicular to the baseplate. If you need to adJUst the aligfl(l')Cnt of tho blade. sec section Changing tl'l6 Knlft~ oo page 9.
6. Check that the motor switch is in the OFF posibon. Then oooood the attachment plug to the terminal block on the machine.
7. Hold the operating handle and tum on the machine. Allow the blacSe to reach full speed. If the blacSe is struggling, the sharpener is still not in the kxked ~ition. If this is the case. tum orf tho machine and do the following:
7.1 With your left hand, straddle the front of tho shai'J)· ener with frllge.rs and thumb.
7.2 Press the beiJ aank r&lease ~ver (F"tQure 2, H) to d"l$8ngage the $harp&nEH mechanism from the motor.
From the library of: Superior Sewing Machine & Supply LLC
7.3 With your (igllt hand, hOld the operaling handle and turn on the motor switeh. AUow the motor 10 gather full speed and then release the release lever. Tllis automatically returns the sharpener to the locked position.
& CAliTION Tum the motor on and off a few times before run· ning the machine oootinuously. This permits the Oil to warm up and flow easity into the clo$e-fitting movIng parts. Failure todothls may result in damage to your machine.
The maChine iS nm ... mady for us.e.
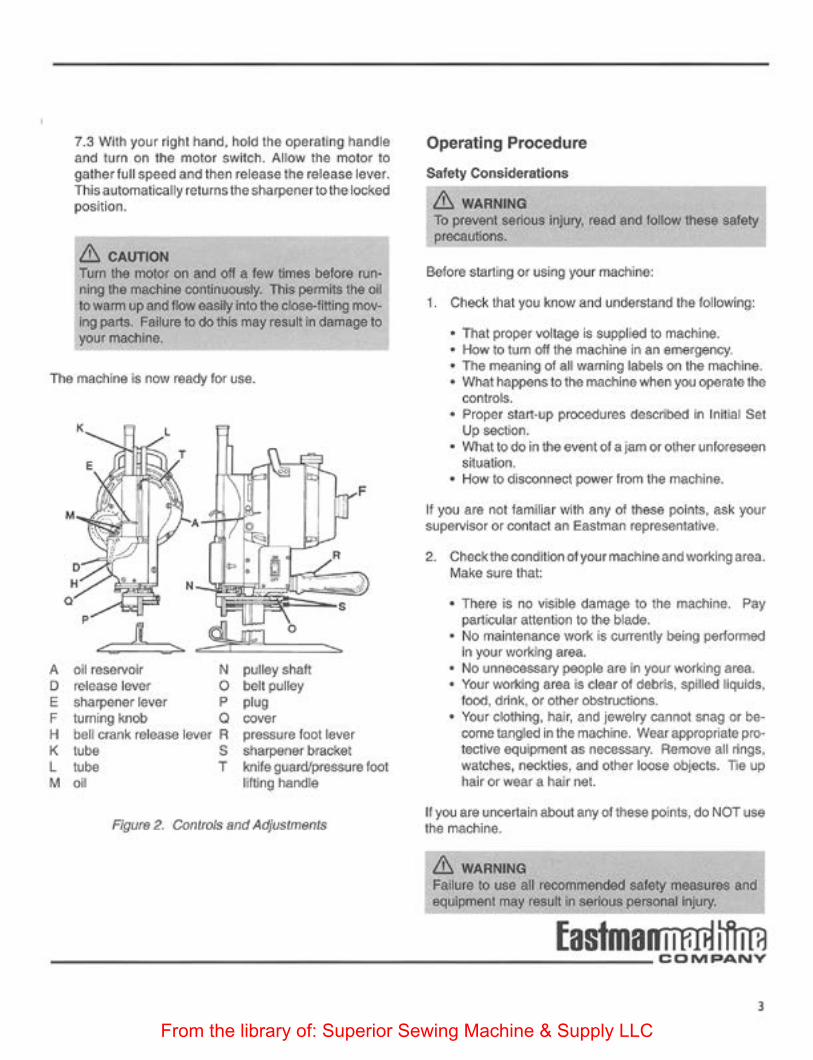
A oil reSOtVoir N D re-lease laver 0 E sharpener lever P F tuming knob Q H bell crank release lever A K lube S L 1\Jbe T M oi
pulley shaft belt pulley plug cover pressure foot lever sharpener btacket knife guardlprOS$U(e foot lifting handle
Figure 2. Conlfols and Adjusl!116nts
Operating Procedure
Safety Considerations
& WARNING To prevtmt serious injury, l'ead and folk>w these safety prooautions.
Bofom starting ot using you( machioo:
1. Check lhat you know and undetstand the tollowing:
• That proper voltage is supphed to machiM. • How to tum off the machine in an emergency. • The meaning of au wamlng labels on the machine. • What happens to n'Kl machine when you oporoto tho
controls. • Proper ~art·up procedures desc(l)ed in lnilial Set
Up section. • What to do in the event of a jam or other unfOteseen
situation. • How to disconnect power from the machine.
If you are not familiar with any of these points. ask your supervisor or oontact an Eastman ropresentatflle.
2. Cheek thO oonditioo ot your mad"'lno and working ar~. Make sure that:
• There is no visible damage to the machine. Pay partic\llar attention to the blade.
• No maintenance wort<. is currently being performed In your workrlg area.
• No unnecoosary people are in your working area. • Your working ar&a is t:l&ar ot debris, spiJied liQuids.
food, drink, or other obstructions. • Your clothing, hair, and jewelry cannot snag or be
oomc tangled in the machine. Wear appropriate protective oqulpmont as necossary. Romove au rings. watChes, neckti&S, and other toose Objecls. Tte up hair or wear a hair net.
If you are uneenain about any of these points, do NOT use the machine.
& WARNING Failure to use all recommended safety measuros and equipment may result in serious personal injury.
fastman 11mB ltti'm ----------------------------------- COMPANY
3
From the library of: Superior Sewing Machine & Supply LLC
EASTMAN ________________________________ _
Starting tf'IO Machine rt you haYO 1\ad rna mac::IWIG loSI than ono month « It d nos stood icta tor any ~ngth ot tlft\0, tum tM: mocor on and ott a few timOs bolore running i1 continuously. This per· mlts the oil towo.rm up and now oMily into tho ctoso-tining moW'I) pe11S
& CAunON Failure to warm ~your machine adequately may damage the motor
Mltdng a Cut
& WARNINO Failure to keer:> hands. arms. end hair away from the knife area at all tlmiM may ,.,.,. in &erious pei'&OfVII Injury.
' . Bring the machine up to thO material spt"aad.
2. Raise thO knl1e guardfpfosaure toot by deptosslng th9 pressuro loot 'Wer (Figuro 2. R) Md irtw'IQ the knife guatd{pt_,. loollifting-(Fogure 2. T). Roise 111e pr....,.. 1oo1 orlly enough 10 dear 1he moiOriol being cut.
3. Tum on tho machine, allow the blade to teach fuU speed, ar1d enter the Iabrie.
• · UW>gtho _.uro --(Flg.n 2. Rl•"" .,.l<nife guanl'p.-eloolliflrng handle (f'9Jro 2. T), lower the prossuro toot so that hIs Dghtly abollo the matorial being cut. This will provont tho material from reciptoeating.
e. When you 8ft not making 8 CU1. or when the maChine Is not In use, keep the knlfft guard/pres.suro loot lowered to the b6seplate by deprMSing the prM&Ure foot lever (Fig\n 2. R).
1. Turn oft .,. mac:l1ine w1>0n nol cutting labile.
4
Tllmlng Oft the Machine Whorl you """" llnilhOd using your machine:
1 . Posl1ion the power switch to off,
2. Make sure thO l<t\lfo guarcVprosaurc toot is toworod to 11>e baseplaiO by depl....-.g tile pressure lool IoYer (Figure 2. R)
3. Dlsconneo'l the anac:hmem plug from the power aource.
4. In cold wNthOr, ensure that tho machine is kopt in a warm place when nol in us&.
Routine Maintenance
& WAIINWO
Nways unplug ""' machne - peo1ormlng -· nance, acl!ustmontl, or repa.il"l.
& WARNINO -r seMong""' machne. ""'"Y" ............ ""'plo08 boll nul ,. socuruly 1.-..., (Ftgure 3, X on pogo 6)
bolore resumong cunong operatoan=·-------'
Cere ol the Machine
To ttniUf8 properopefeticw'l ofyout mac::hiiiG. carry OU'Ithe follc>Mng ~"''at llle lntervaltindlcaled. t1 you use yovr mac:hlne lntenslvefy, consider performing thMt prootdures lll()(t often.
Oollly
RomoYc lho ""'' ar1d dean tho lcnole - "'lh .,. ""' eloano< (FJQUro 7. 2 on page 9) 1-with machno. To pt'GVGnt uncsuo aocumufation ol tlnl. do NOT oil the plate rollers.. 11 tno rouors eti<:k, r&mov9 them from the plate and wuh them in CIOOI\Ing solvent
Nee Weekly uso an approvod elf hose or bGIOWI to blow any hnt trom around tile motor and sharpener.
From the library of: Superior Sewing Machine & Supply LLC
& WARNING Failure to wear eye proteaion when using air hose or belk:lws may result in serious eye or facial injuries.
Weekly Remove the cover (Figure 2, 0) and clean any lint from around the screw mechaniSm in the sharpener.
Lubrication
Lubricate your machine according to the following schedule:
&, CAunON use ooly speCiaJ1y compounded Eastman »weight. non-detergent oiL use oe sewing maChine oil or detergent oil may result in damage to your machine. Do not oil the baseplate roUers. Use of an excessive amount of ol may damage the machine.
Dally
1. Place two drops of oil at each of the two locations shown In Flgure2, M. Useanoll canwithasmallspout. (A suitable oil can is fumished with the maChine.)
2. Fill the oil reservoir (Figure 2, A) (Of continoou$ U$8. II you only use the machine intermittently. you can use Aess oiL
weekly
1. Carry out the Oai/ylubrication6Chedu1e above.
2. Apply one cttop of oil onty to each of the folloY<ing:
• Tubes at locations shown as Figure 2, K and L. • Putley shaft shown as Figure 2. N. • Bett pulley Shown a& Figure 2. 0.
Monthty
1. Cany out the Daffy and WMk/ylubricatlon schedules above.
2. Remove the plug(Figure 2, P)and insert a grease tube. Squeeze an amount ol grease approximately the site of a pea Into the opening.
& WARNING Routinely Oheck the tightness of the operating handle to &n$Ura a oocure oonooC1iOn.
Sharpening the Knife
Sharpen the knife at frequent intecvals or whenever you feel it Is not cutting adequately:
1. Take the machine out of the lay.
2. Drop the knife guard/ptessure foot using the pressure toot lever (Figure 2 . A on page 3), located next 10 the machine operating handle.
3. Press the sharpenerlever(Figure 2, E)downwardwith a slow, firm pressure to engage the sharpening mecha· nlsm. Too fast a lever action may cause the lever to lock. U this oocufS, lift the tcleasc lever (Figure 2, 0) and start over again.
Removing the Sharpener
1. Disconnect tho maehinc from tho power source.
2. Usi.ng tho tumlng knob (F"~gurc 2, F) raise the blade to top position.
3. Press the Sharpener lever (F'.gure 3, E on page 6) approximately haHway down and to the neutral poSition, and lower the sharpener by hand.
& WARNING This mad'llne Is equipped with a very Sharp knife. Re· move the knife When wortdng in this area. Failure to keep hands, arms, and hair away from the knife area may re· suit in serious personal injury.
4. RO<nOV<l the back guldo (Figuro 3).
fastman 11 r.nHftifll -------- ------------------------COMPANY
s From the library of: Superior Sewing Machine & Supply LLC
EASTMAN __________________________________ __
5. Prf)S.S tholevot (Figure 3, E) to a n&utral position and raise the sharpener to the top (original) position.
6. R~movo tho four hOkJ.down nuts (F'.guro 3, V) and remove the sharpeoet.
Note: If you press the shatpen&r lever (Agure 3, E) down too far {be)'O(ld the neutral position), it will kXk lho sharpe-ncr bmckeL If lhis occurs, lift the rooetasc IOVGr (Figure 3, 0) and start over again.
X
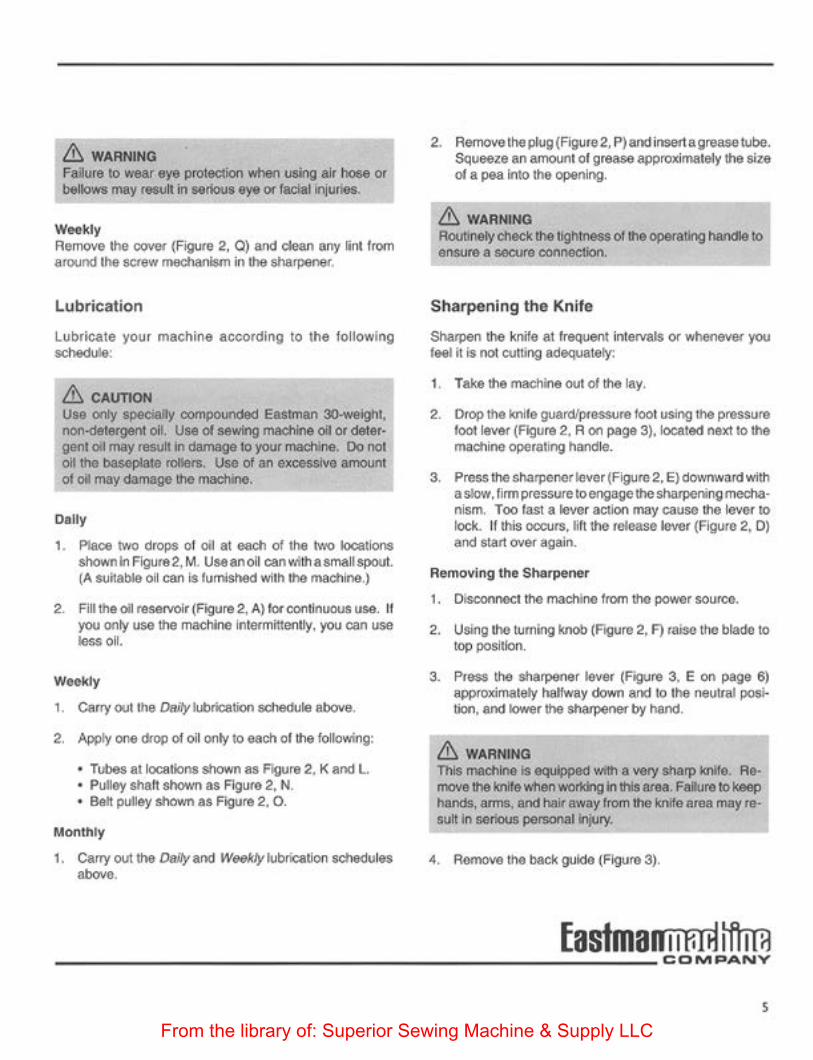
0 release lever E Sharpener 5ever V hokf..<Jown nut X plate bolt nut
Figure 3. Removing the Sharpener
Replacing the Rubber Driver Pulley
The sharpener is driven by a rubber driver pulley, as shown In Figure 4. Replace this driver puUoy wtlcoevOf It a.p· pears to be wom or damaged, as follows:
1. Remove the sharpener from the madllne (see Remov· ing the Sh8rpeneron page 5).
2. Press the sharpene:r lever (Ftgure 3. E) to a neutral position and lower the sharpener until an inch of the $Quare shah (Figure 4, W) is exposed.
6
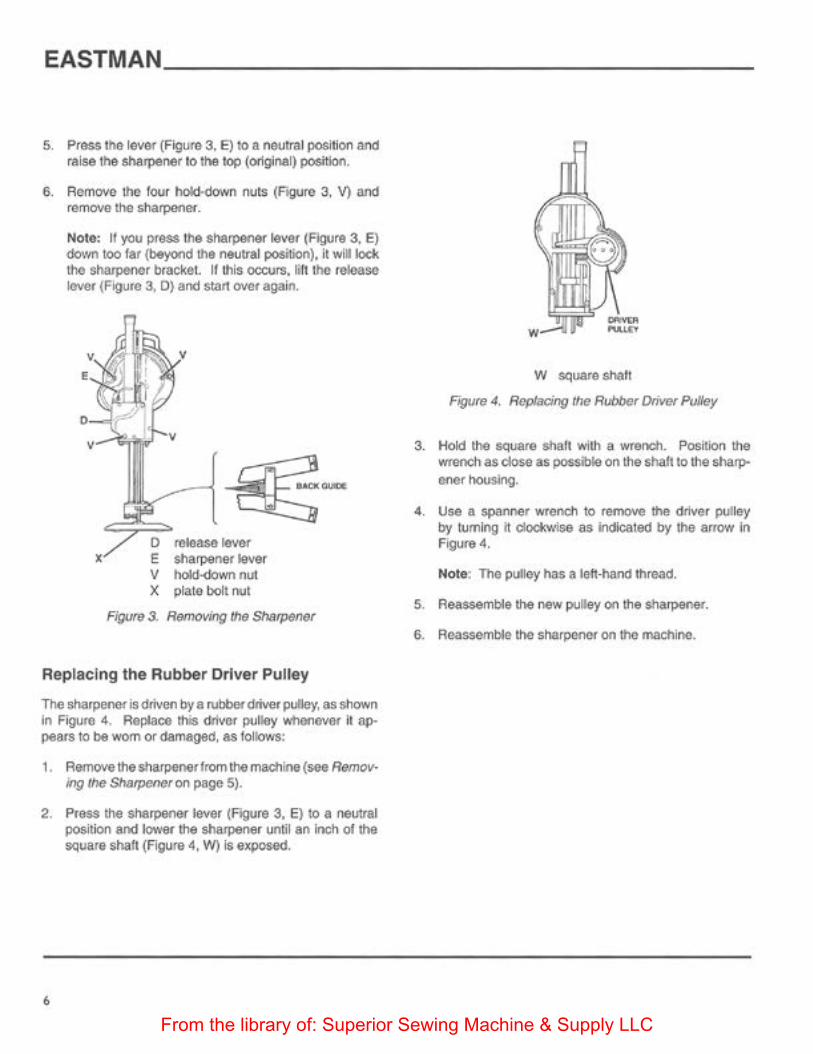
W square shatt
Fl{}ure 4. Replacing the Rubber Driver Pulley
3. Hold the square Shall with a wrench. Position the wrench as close as possible on the shalt to the sharpcoer hOusing,
4. Use a spanner wrench to remove the driver pulley by tumlng it clockwise as indicated by the arrow in Figure 4.
Note: The pulley has a leh·hand thread.
5. Reassemble the new pulley on the sharpener.
6. Reassemble the sharpener on the machine.
From the library of: Superior Sewing Machine & Supply LLC
Adjusting the Belt Sharpener
Note: You can Obtain aJilhe special tools you will requiro lor adjusUng the sharpener by ordering tool kit #820C2.
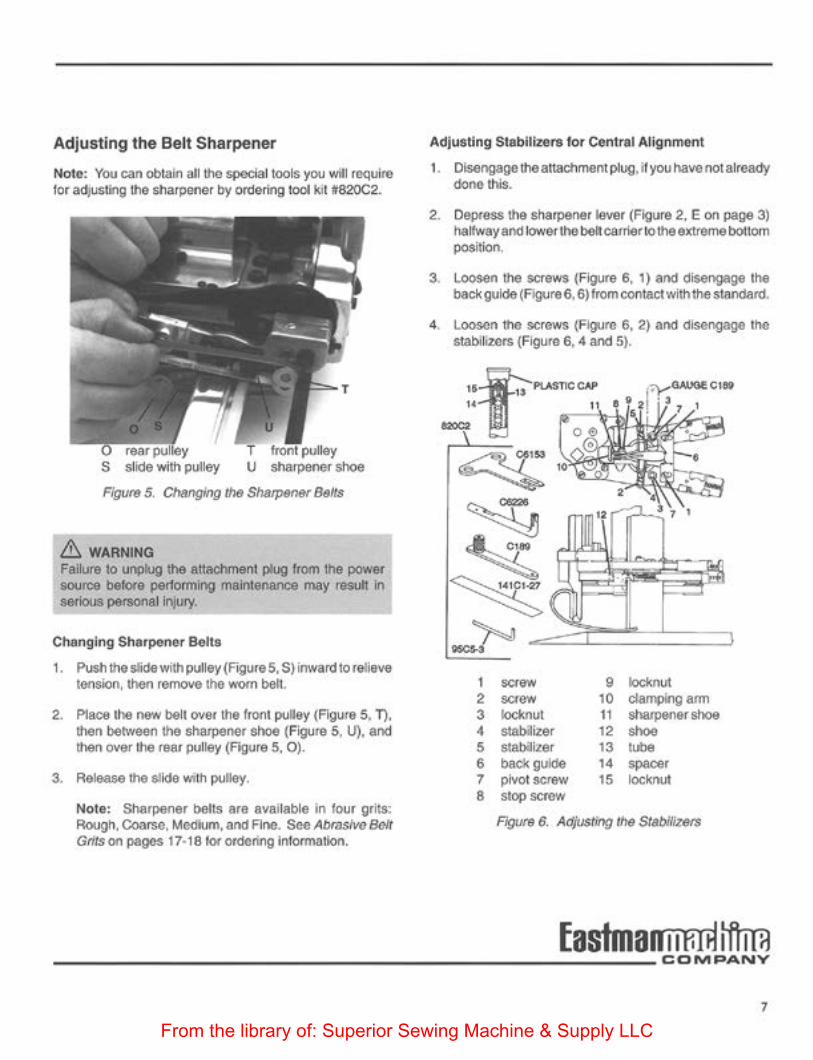
pulley s U sharpener shoe
F/gufO 5. Changing tho Shatp6nor Bolts
& WARNING Failure to unplug th& attachment plug from the power sovroe before pertorming maintenance may re$uh in serious personal injury.
Changing Sharpener Bette
1. Push theslidewithpul!ey (Figure 5, S) imvardto relieve tension, then remove the worn belt.
2. Place the new belt over the front pulley (Figure 5. 1j, then between the sharpen-er shOe {Figure 5, U), and then over Lhe rear pulley (Ftgure 5, 0).
3. Re:!ease the &fide with pulley.
Note: Sharpener belts are available in four grits: Rough, Coarse, Medium, and Fine. Sec AOraslvc 8clr Grits on pages 17·18 fOt ordering lnlorm;:atlon.
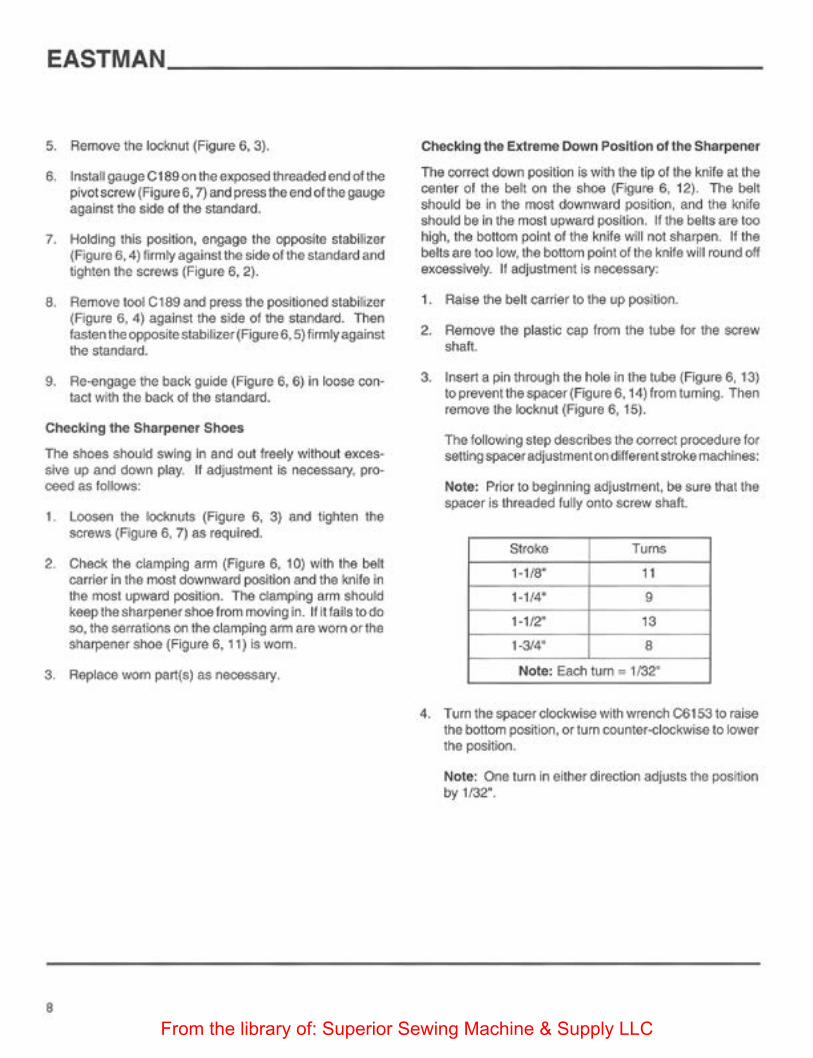
Adjusting Stabilizers for Central Alignment
1. Disengage the attachment plug, if you have not already dono this.
2. O&J)t'ess the sharpener Jever (Figu(& 2, Eon pag.e 3) halfway and lower th& belt carrie( to lhe ext(eme bOll om position.
3. Loosen the screws (Figure 6. 1) end disengage the back guide (F;gure 6, 6) from contact with the standard.
4. Loosen the screws (FI~re 6, 2) and disengage the stabih.zers (Figure 6, 4 and 5).
I SO< OW 9 locl<nut 2 S<t!YW 10 cfa~ngarm 3 locl<nut 11 shatp&fler shoe 4 stabilizer 12 ShOe 5 Stabilizer 13 lube 6 baol< guicl'e 14 spaoer 7 pivot screw 15 locknut 8 stop screw
Figure 6. Adjusting the Stabilizers
fastmam ilml tftml --------------------------------COMPANY
7
From the library of: Superior Sewing Machine & Supply LLC
EASTMAN ________________________________ _
5. RelllCM! the locknut (Figure 6, 3).
6. Install gauge C 189 on the exposed threaded end of the plvotscrcw(Ftgure 6, 7) and press the end of the 98-uge against tho side of tho standard.
7. Holding this posldon, ongago the opposite slabillzcr (Figuro 6, 4) firmly against thoQ sidO or lho standard and tighten the screws (Figura 6, 2).
8. Remove lool C189 and pc-ess the positioned stabilizer (Rgure 6 , 4) against the Side of the standard. Then f-asten the opposite stabilize~ (Figure 6. 5) firmly against the stanclard.
9. Re-engage the back guide (Figure 6. 6) in loose con· tac:l wfth the back of tho standard.
Checking the Sharpener Shoes
The shoes should $wing in and out freely without extas· 6ive up and down play. If adjustment is necessary, prooeed as follows:
1. loo$en the kxtuluts (Figure 6, 3) and tighten the screws (Figure 6, 7) as required.
2 . Check the clamping arm (Figure 6, 10) with the bell carrier In the most downward position and the knife in tho most upwar'd position. The damping B1m Shoukl keep the sharpener Shoe from f'OO\Ii.ng in. If il fails to dO so, the serrations on the clamping ann a1e wom or the sha!pener shoe (Figure 6, 1 1) is worn.
3. Replace wom part(s) as noceosary.
8
Che<:ldng the Extrema Down Position of the Sharpener
The ooneQ down position is with the Up of the knife at the center of the bett on the shoe (Figure 6. 12). The belt should be in the most dovmward position, and the knife should be In the most upward position. It the berts are too high, the bottom point of the knlfe will not sharpen. If the be"sare too kY.v, the bottom point of the knife will round off exOMSivety. It adjustment is necessa!'y:
1. Raise the belt earner to the up position.
2. Remove the plastic cap from lhe tube fOf the SCfew shaft.
3. lnsen a pin through the hole in the tube (Figure 6, 13) topreventthespacer(F'~gure6.14)fromtuming. Then remove the k>cknut (Figure 6, 15).
The following step describes the correct procedure for setting spacer adjustment on <ifferellt stroke machines:
Note: Prior to begiMing adjustment. be sure that the spacer is th1eaded fully onto screw shaft.
Stroke Turns
1 ~1/8" 11
1·1/4' 9
1-1/2" 13
1'314" s Note: Each tum = 1132·
4. Tum the spacer clockwi$e with wrench 061 S3to raise tho bottom position. or tum oountor--clockwise to lower tho posldon.
Note: One tum In either direction adjusts tho posltfon by 1/32".
From the library of: Superior Sewing Machine & Supply LLC

5. WMn the space-r Is adjustOd, usc tho pk'lto hold thospacer in position, reassemble, and tighten tho klcknut (Figure 6 , 15).
6. Replace lhe plastic cap.
Checking the Stop Screw on the Sharpener Shoe
1. With new behs on tho can1or,lnsan: .010 foolor gauoo #141C1·27 betWG&n the stOf) screw (Figure 6, 8) and the knife. Ensute that Lhe Clamping arm (Figure 6. 10) has ~n released from the sharpener shoe (Figure 6, 11 ). The gauge shoukl just fill the space bet\-'16en the screw and the knife.
2. If an adjustment Is necessruy, loosen thO locknut (Figure 6, 9). Adjust the set screw to the proper spacing, and re·lighten the lodcnut.
Check the Width of the Bevel on the Knife
Tho bevel shOuld bo appro>dmatoty t /16' on botn sktos. If it Is not:
1. Install a naw kndo and new bei1S.
2. Color the bevel with a wax pencil.
3. Run the sharpener up and down the knife several times.
4 . If an adjustment is required for Flex·Pad shoes, insert tool C6226 over the belt guide pad. Move the free end od the tool to the teat to ir.crease the bevel, or to the front to oocrease bevel.
Changing tMt Knife
.1:, WARNING AJ.ways handle knives with cat&. Safety c:Sspose of used lmivas.
1 knife klekbOit 2 slot cleaner E lever
A pressure foot fever X pressure foot Y T· handte knife bolt wrench Z standard
F"I(JU/8 7. Cha(Jg/ttg th8 Knits
fastman 11 mij lftml ---------------------------- ----COMPANY
From the library of: Superior Sewing Machine & Supply LLC
EASTMAN ________________________________ __
Changing the Knife (continued)
/1::, WARNING Unplug the attachment plug from power source.
1. Make sure the sha.rpener is in the locked position.
2. Raise the pressure fool (Figure 7, X on page 9) to the top position U$ing the pres.sure 10041ever (Ftgure 7, A}, Yttlidl is klcated next to the machine operating handle.
3. Lay the machine on a table, as shown in Figure 7.
4. Press in the turning knob (Figure 2. F on page 3) and tum the knife to the bottom position.
5. Insert the T ·handle knife bolt wrench (Figure 7, Y) and loosen the knife toc:kbolt (Figure 7, 1}.
6. Acmovo tho knife through tho bottom of the stancSard (Figure 7, Z).
7. After removing the knife, clean the knife skit in the sta!ldatd will> tho slot cleaner (Figure 7. 2).
8. Insert a new knife in the knife stot Be S\lre to set the knife UghUy against the knife lockbolt. Hold the bottom ol the knife against the back of the SlOt in the standatd and tighten the knife to<:kbOit.
10
9. After tightening the kni1e IOckbOll, cheok to sae it the knife runs freely in lhe slanclard by rota ling lhe lumi()Q knob.
10. lnslall new sharpener betts and operale the sharpener three or 1our times belore starting to cut.
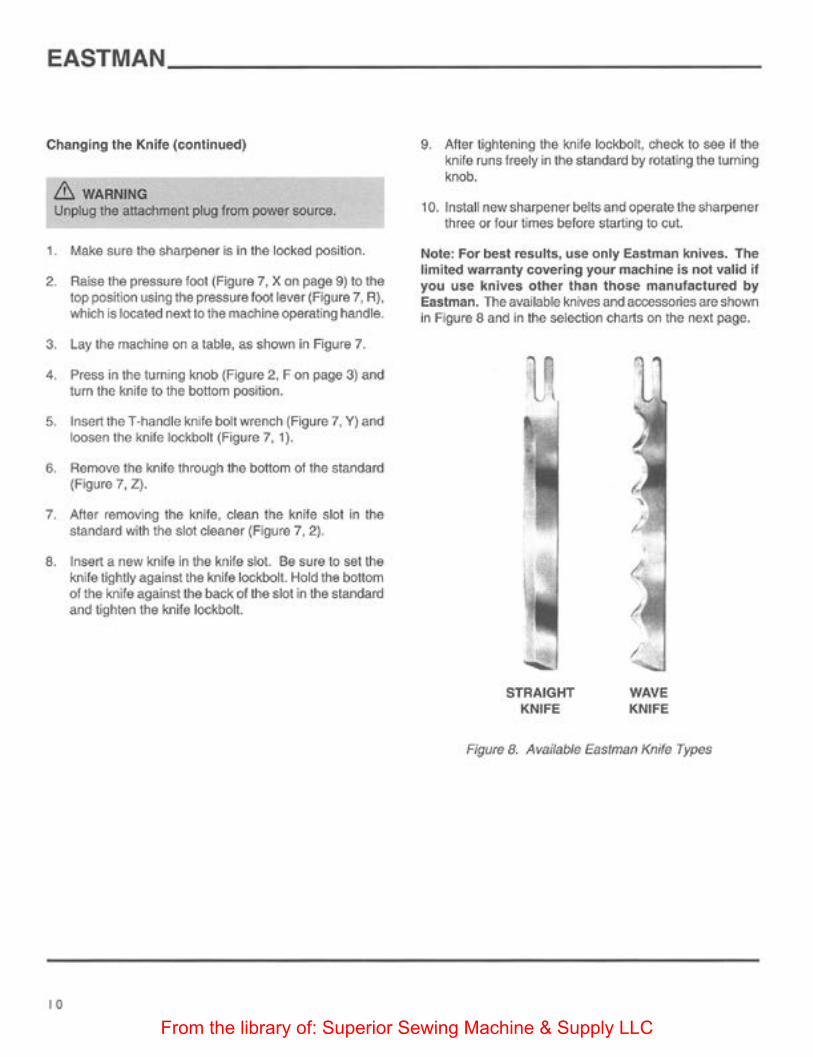
Note: For best results, use only Eastman knives. The limited warranty covering your machine is not valid if you use knives other than those manufaciUred by Eastman. The available knives and aooessories are shotml In Figure 8 and In the selection char1s on the next page.
STRAIGHT KNIFE
WAVE KNIFE
Figure 8. Available EbstmtJn Knife Types
From the library of: Superior Sewing Machine & Supply LLC
WAVE KNIVES REQUIRE SPEClAL SHOES AND RELATED PART$ LtST'ED BELOW
743C1-27 34C1o-47 20C12·57
L..H. Shoe L.H. Spring Scf8\'1
(tOf Jl'lot)
743C1·26 R.H. Shoe 34C10·57 R.H. Sp<ing 20C12·57 Screw
(IO<Sho<)
WHEN USING THESE SPEClAL SHOES, THE FOLLOW· INO PARTS MUST BE REMOVED FROM THE LOWER
GEAR BRACKET
3SC7·2S 34CH).123 20C12·143
Clamping Arm Spring Set ow
See page 20 lor stow speed dr"'IVe note.
See pago21
STRAIGHT KNIFE SELECTION CHART CARBON STEEL HIGH·SPEED STEEL SPECIAL
PROCESS
KNIFE STRAIGHT SAW WAVE STRAIGHT ROUND ANGLE SAW WAVE STRAtGHT SIZ£ FRONT TOOTH EDGE FRONT n P TIP TOOTH EDGE FRONT
• 80(:4 $0C4-14 80C4->9 80(:4H$ &OC4-14HS 80C4-19HS
• OOC5 80CS.14 &OC$-19 ooc•HS ooc ...... """""HS 80CS-14HS 80C6-19HS OOCSSP • 80C8 80C8-14 80C&-19 80C8HS ooc ........ OOC*36HS 80C6-14HS 80C6-19HS OOCSSP 7 80C7 80C7·14 80C7·19 80C7HS 80C7HS.ft 80C7-36HS 80C7· 19HS e<><:7SP
• 80C8 80C0-14 80CI-11J SOCaH$ 80C81<$.ft OOC$-MHS 8oct-19HS IOCOSP 9 OOC9 80C9-19 80C9HS OOC!lt<S.ft aoco.MHS 80C9-19HS 80C9SP 10 80CIO 810C1G-19 80C10HS 80C10HS·R 80C1o-36HS 80C1Q-19HS 80CIOSP
11·112 80C11·112 80C11·1/2HS 80C11·112HS·R 80C11·112-36HS aDC11-112·19HS 80CI1•1/lSP
" 80C13 80C13HS 80C13H$-R 80(:13SP
80C6-47HS 6 • HI$JI'I·SPMCI WttY• Speciel Groo"o'8d KntvN tor Micro Fog M&ehfne 80C7-47HS 7• Hlgi'I•SI)Md WttY• ~bll GrooV$(1 Knf'YN for Micro Fog I.IKNne
Teflon-co.ted knives avaltltlle. Ordef" by adding ''T" to end of kni1• ordM.
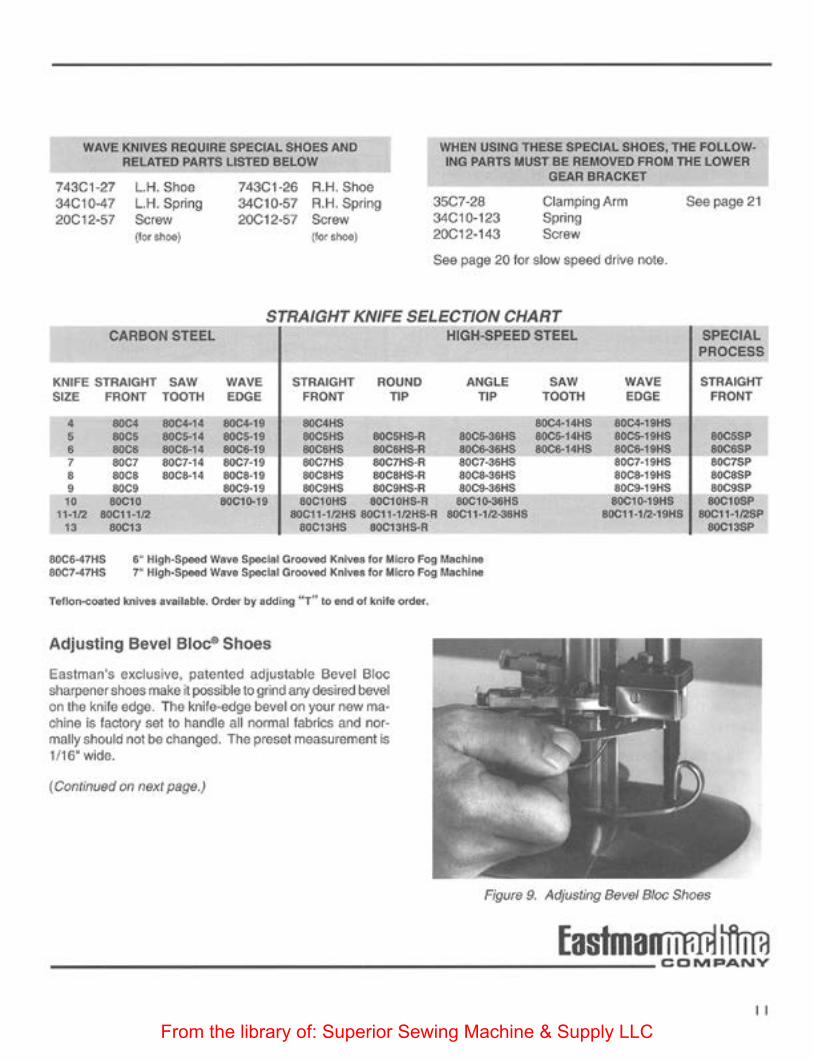
Adjusting Bevel Bloc" Shoes
Eastman's exclusive, patented adjustable Bevel Bloc shatpcnor shoes make it possible 10 gMd any desired bevel on the knifG edQe. The knif&-edge bevel on your now ma· chine i$ factory set to handle all normaltabric$ and normally shouk:t not be changed. The preset measurement i$ 1/16' wldo.
(Cootinu9d on next page.)
F/g<Jre 9. Adjus6ng 88v8J Bloc Shoos
~astman" 'ffffi lftml ---------------------------------COMPANY
II
From the library of: Superior Sewing Machine & Supply LLC
EASTMAN ________________________________ ___
Adjusting Bevel Blw Shoes (continued)
It you need to adjust the bevil)f on the knife Mgeto a differ· ent length. proooocl as follows:
1. Oisoonnect the machine from the power source.
2. Lower the knife to the boHom of the stJoke wi1h the machine turning knob (Figure 2, F on page 3).
3. Lower the sharpener manually. by holcfing the sharpener lever (Figure 2, E) halfway down •o its neutral position.
4. Pun tne sharponer belt down to expose tho set screw (Figure 9 on page 11) on the Bevel BlOC.
5. tnsen AIIOn wrenCh 95C5·5 Into thO set screw and toosan i1 slightly.
6. For a k:lnger t:>twel on thO kniteeog,e, movothe key and bk)c to the rear. For a shorter bevel, move them to the front
7. Re-ti9hten the set screw.
8. Adjust the Bevel tuocs on both s.hoes.
9 . Retvm the sharpener to the top (locked) position.
10. Check tho stop screws on the sharpener shoes tor COfTcct setting, as doscfibed In Checking t!to Stop Screw on the Sllarpcncr Sllocon page 9.
11 . C<llor·mark tho front sides ol tho knife edge wl"th marking ink Ot a wax penciL ReoonMct and tum on pawer. Then move the sharpener dOwn and up several times.
12. Check the bevel on both sides ot the knife. Readjust it neoessary.
I 2
OI'TlONAL fiQUIPMENr B£\1[1,. tL.OCe SHOES &PE:CW..
!
Figuf8 10. 861161 Bloc ShOO ASSIJmbly
From the library of: Superior Sewing Machine & Supply LLC
SUIIASS!IIILV 7&X).1 INCU.IOU:
20C13-63 100C2-36 766C1-1 308C10·1
PART NO.
4C2-63 71SC1·16 71SC1·18 620C1-4()
12C15-93 20C6-25' 20C12·153 20C13-63 21C14-7 34C10.145 34C10.146 9SC5-3 9SC5-5' 103C2-35 103C2-35 308C10·1' 766C1' 766C1·1' 620C1-39
Sa...,, Set Shoe, Sha-LH. Bevel BlocAa4rrbtoj LH. Saew, Sookell!/32" x 5116' (2 roquoflld)
OESCAIPT10H
LH. Nut (2 requored) t..-Gea1Bradcal~e5'·1f1' KnH lwr. Gear EQdtet Com 11 1/2'"·13. Kndo Cor>wtsion 1<11 R.H. & L.H.-
INCLUDES T1i£ FOllOWIHO: _ _j
-Shoe (4 requ«<d) Saow Aqusl Saew. ~ Shoe(2 ._.00) Saew, Set e..stwog, Shoe (2 -·00) Spring Shoe LH. Spring Shoe A H Wrench. Allen Wron<h,Allon Shoo. Shalpene< A.H Shoe, Shalpene< L.H Screw. Socket 8/32' x 5/16' (2 required) Bevel Block A....,bly A H Bevel BloCk Assembly LH. Corrvet8ion Kit lnctudee • partt abovt.
Note: 766C1 and 766C1· 1 oro aoklln pa!ra w1lh kits only.
103C2·3S 766C1 308C10.1
BUBASSI!MBLY 743CS INct.UDU:
Shoe, Sharpener R.H. Bevel BloekA&Urrbtoj A.H. Screw. Socker8/32' x 5116' (2 required)
PART NO.
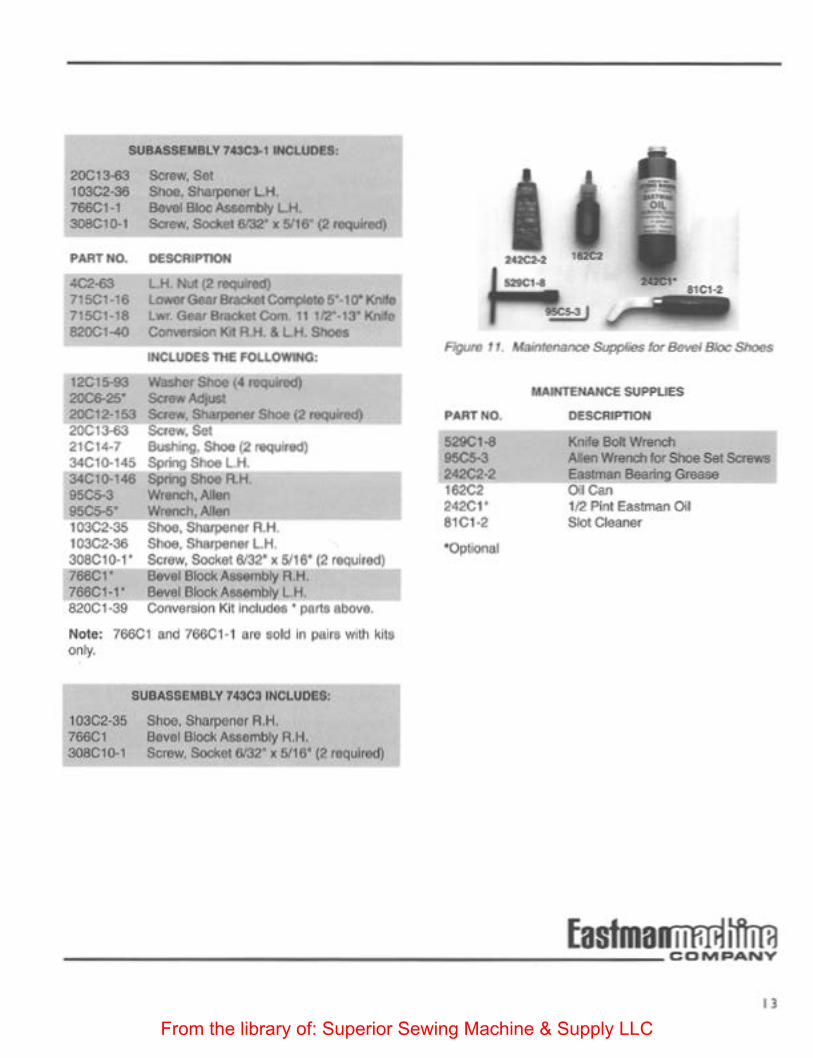
529C1-8 ~3 242C2·2 182C2 242C1' 81C1·2
•Optronal
MAINTENANCE SUPPLIES
DESCRIPTIOH
Knife Boll Wrench Alen Wrench for Shoo Set Screws Eastman Beating Grease Oil Con 112 Pillt Easoman Oil Slo<Cklaoor
~astmao 1 jf,Iij tfimJ ------------------------------COMPANY
I)
From the library of: Superior Sewing Machine & Supply LLC
EASTMAN ________________________________ _
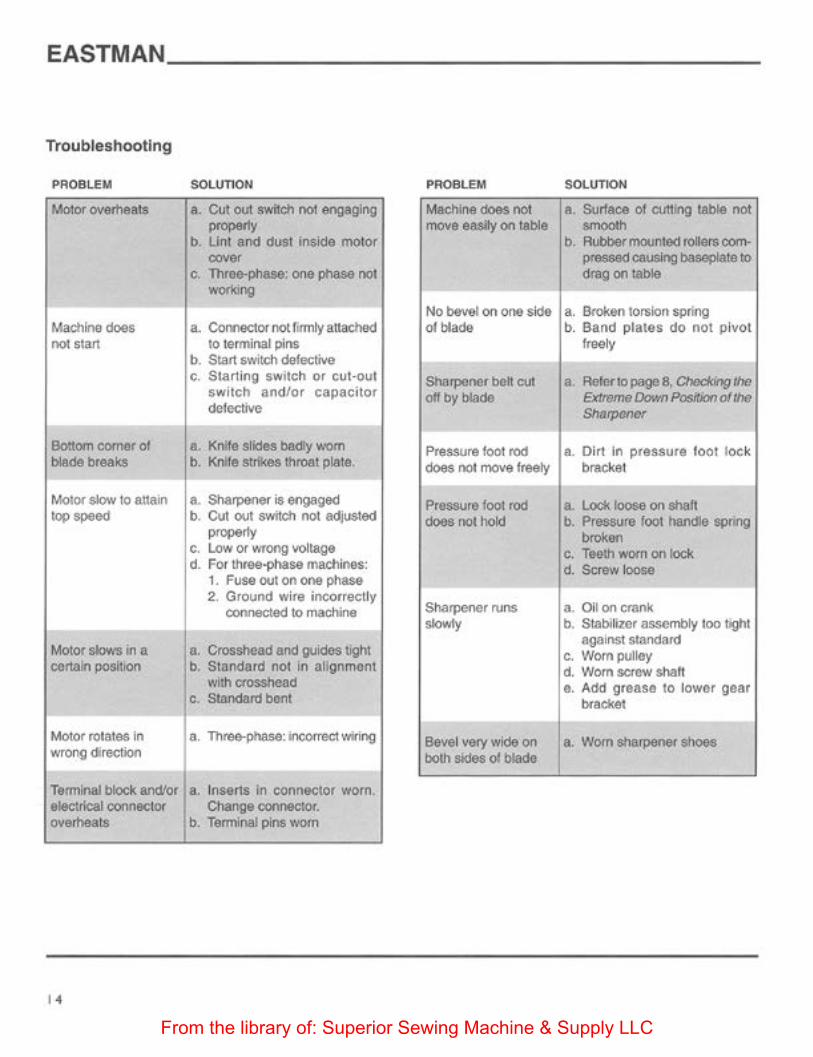
Troubleshooting
PROBLEM
Motor overheats
Madlin& dOeS no1 start
Bottom COtner of blade breaks
Motor slow to anain top speed
Motor slows in a certain poslt1on
Motor rotates in wrong direction
Tetmlnal block and/or electrical connector overheats
,.
SOLUTION
a. Cut out swffch not engaging propMy
b. Lint and dust inside motor cover
c. Three-phase: one phase not working
a Connector not fllmiY auached to terminal pins
b. Start switch defective c. Star1ing switch or cut·out
switch and/or capacitor defective
a. Knife slides badry Y.'Om
b. Knife strikes throat plate.
a. Sharpener is engaged b . Cut ovt switch not adjusted
propeny c. Low or wrong voltage d. For three·phase macl'lines:
1 . Fuse out on one phase 2. Ground wire incorrectly
connected to machine
a. Crosshead and guides tight b. Standard not in alignment
w11h etosshead c. Slandard bent
a. Thre&--phase: incorrecl wiring
a. lnsens in connector worn. Change connector.
b. Terminal pins worn
PROBLEM
Machine does not move easily on table
No bevel on ooo side ot blade
Sharpener belt cut oHby blade
Pressure foot rod does nol move freely
Pressure foot rod docs not hold
Sharpener rvns slowly
Bevel very wide on both sld .. o1 blade
SOLUTION
a. Surface of cutting table not &moo<h
b. Rubber mounted rollers com+ pressed causing baseplate to drag on tabl6
a. Btoken torsion spMg b. Band plates do not pivot
freely
a. Refer 10 page 8, Chocl<ing the Extreme Down Position of the Sharpener
a. Dirt in pressure foot lock bracket
a. lock loose on shaft b. Pressure foot handle sprlng
broken c. Teeth worn on lOCk d. Screw loose
a. 011 on crank b. Stabilizer assembly too tight
against ~andard c. Worn pulley d. wom sc:rcw shatt e. Add grease to lower gear
blaekel
a. Worn sharpener shoes
From the library of: Superior Sewing Machine & Supply LLC
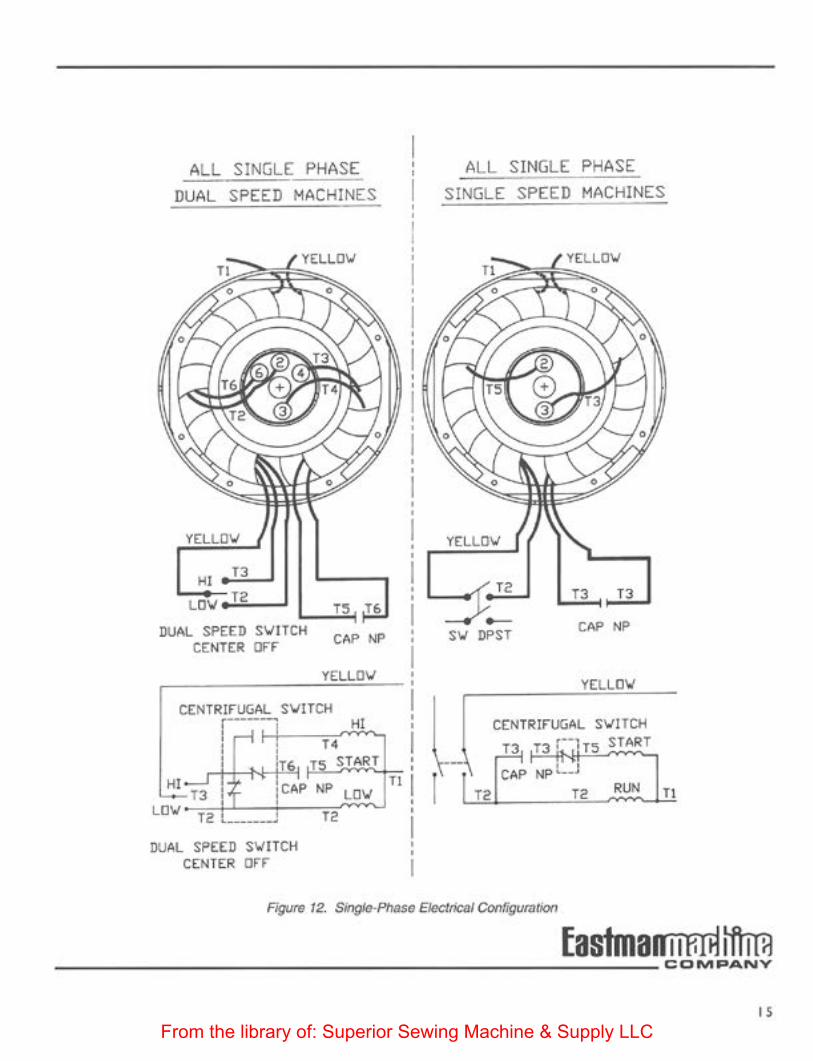
ALL SINGLE PHASE
DUAL SPEED MACHINES
YELL0\1
HI TJ
LOV T2
DUAL SPEED SVITCH CENTER OFF
T5 T6
CAP NP
r---------------~Y~E~L~L~0\1=---: I CENTRIFUGAL SVITCH
r-----~ HI · ;-I ' T4 I ' TS START ' ' ' •T6
HI
LOV • TJ ~
' ~CAP NP LOV
' T2 ., ______ ..,
DUAL SPEED SVITCH CENTER OFF
T2
T1
ALL SINGLE PHASE
SINGLE SPEED MACHINES
YELLOV
T2 TJ TJ
CAP NP
YELLOV
CENTRIFUGAL SVITCH
...... ~ 13 r--1 TS START
T2 T2 RUN T1
Figure 12. Single-Phase Cleetrical Configuration
fastmanmmllftml ------------------------------------------------...:_~::.:_:..:_: C 0 M PANV
I S
From the library of: Superior Sewing Machine & Supply LLC
EASTMAN ________________________________ __
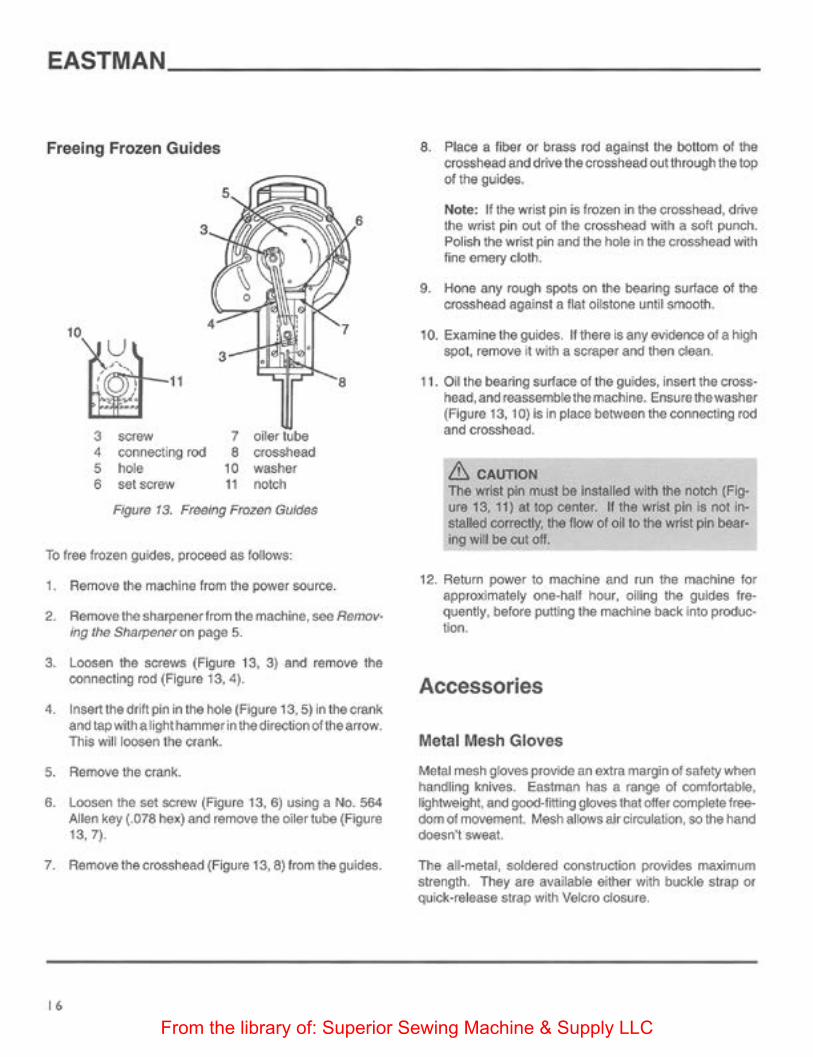
Freeing Frozen Guides
3 sorew 7 oiler 4 connecting rod 8 crosshead 5 hole 10 washer 6 set screw 11 notch
FJgurs 13. Fl'tiOOlg Frozen GuJdes
To tree frozen gu:des, proceed as fOllows:
1. Remove the machine from the power source.
2. Re-move thQ sharp&ner from the machkle, soo Retnov· ing lhe Sharpener on page 5.
3. LOO$en the S<::rGW$ (Figure 13, 3) And remove the oonnecling rod (Figure 13, 4).
4. Insert the drift pin in the hOle (F'tgure 13, 5) in the crank and tap with a light hammer in the direction of the arrow. This will loosen the crank.
5. Remove the crank.
6. Loosen the set sore·w (Ftgure 13, 6) using a No. 564 Anen key (.078 hex) and remove the oiler tube (Figure 13, 7).
7. Remove the crosshead (Figure 13, 8) from the guides.
16
8. Place a fiber or brass rOd agaii\S-1 the bOUom ol the crosshead and drive the crosshead out through the top of the guides.
Note: It the wrist pin is frozen in the crosshead, drive the wrist pin out of the crosshead with a soft punch. Polish the wri$1 pin and the hole in the cros.shead with fine emery cloth.
9. Hone any rough spots on the bearing surface of the cr05Sllead against a flat oilstone until smooth.
10. Examine the guides. If there is any evicl'enoe of a high spot, remove It \-nth a scraper and then clean.
11. 011 the bearing surface of the guides, Insert the crosshoad,and roassombtethe machine. Ensure tho washer (Figure 13, 10) ls In placo bCI\'>'ocn tho connocting rOd and crosshoad.
& CA~ION The wrist pin must be Installed with the notch (Figure 13, 11} at top center. U the wrist pW'Ils notlr.stalted correctly, the flow of on to the wrtst pin bear· ing will be cut off.
12. Return power to machine and run the machine for approximately one·half hour. oiling the guicfes frequently, before putting the machine back Into procluc· tioo.
Accessories
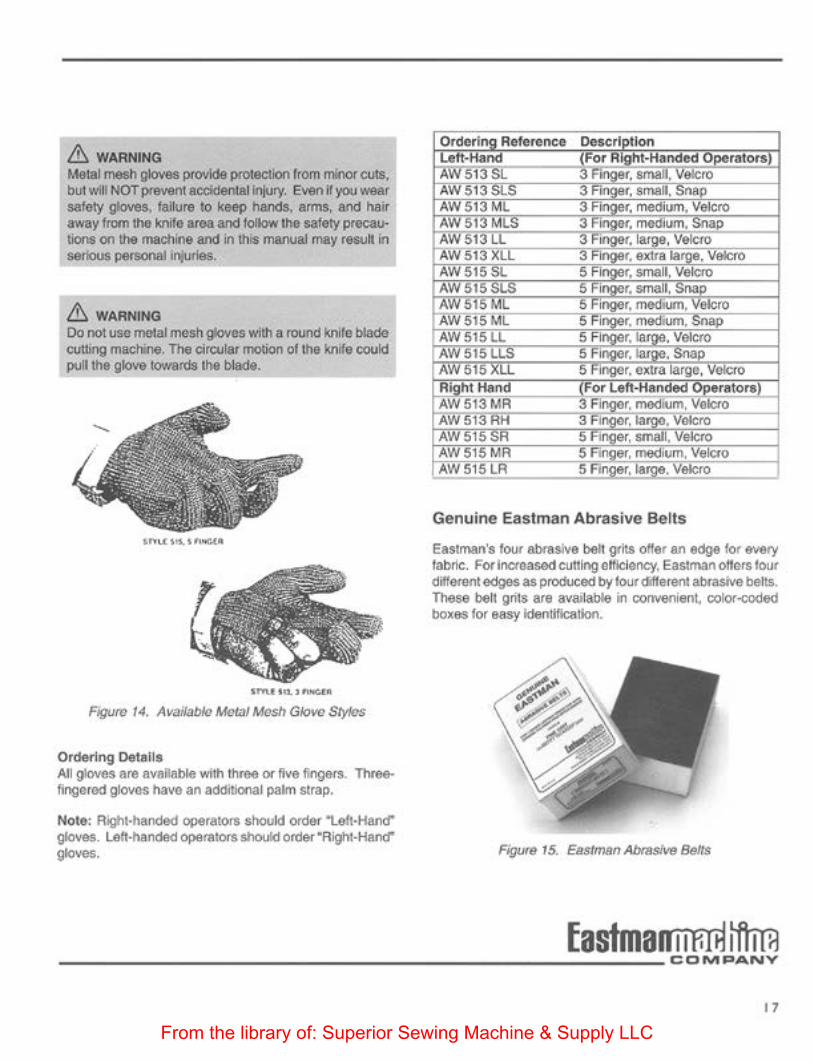
Metal Mesh Gloves
Metal mesh gloves PfOvide an extra margin of safety when handling knives. Eastman has a range of comfortable, lishtweight, and good· fitting gk:lves that offer complete freedom of movement Mesh allows air circulation, so the hand doesn't sweat.
The all-metaJ. soldered c:onstru~ion provides maximum strength. They are available either with buckle strap or qulct<·release strap with Veteto closure.
From the library of: Superior Sewing Machine & Supply LLC
fA WARNING Metal mesh gloves provide protection from minor cuts, but will NOT prevent aCCidental injury. Evan if you wear safety gloves, failure to keep hands. arms, and hair away from the knife area and follow tho safety precautions on the machine and In this manual may result in sertous: parsonaJ injuries.
/A WARNING Oo not use metal mesh gloves with a round knife blade c::utting machine. The cirQ.I1ar motion of the knife oould pull the glove towards the blade.
F"I{JUre 14. Avaikfble MeUJI MeSh GlOve Styk!s
Ordering Details All g1oves are available with three or five fingers. Threefingered glovos havG an additional palm strap.
Note: Right-handed operators should Of'der ~eft-Haner gloves. Lett-handed operators should order •Right-Hand" gloves.
Genuine Eastman Abrasive Belts
Eastman's four abtaslve belt gtlts offer an edge for wery fabric. For lnoraaSGCI cunlng efflcloncy, Eastman otters tour different edges as produced by tour different abrasive belts. These bel1 grils are available in convenient, color-<:oded boxes for easy klentfficatlon.
Flgure 15. Eastmlltl A/NaSive Belts
fastmarru 'fiiB lftm:J ---------------------------------COMPANY
I 7
From the library of: Superior Sewing Machine & Supply LLC
EASTMAN ________________________________ ___
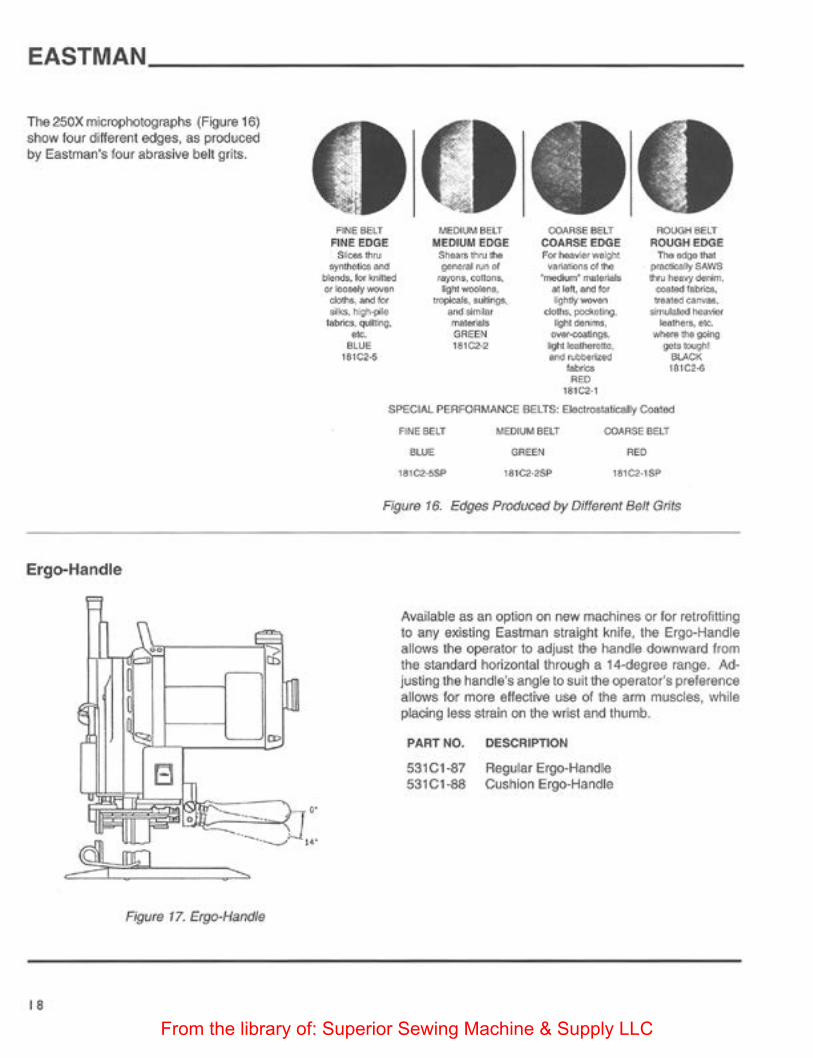
The 250X microphotoglllj)h$ (FilrJre 16) show four different edges, as produced by eastman's four abrasive belt grits.
Ergo-Handle
Figure 17. Ergo-Ha.nd/8
18
,... .... , FINE EDGE ....... """""""" ............. .,....,_ __ .. tikf.~ llllbr'a.~.
"" ..... I$1C2-$
UEOIUU6Et.T MEDIUJ.I EDGE Shoiol5 h'u .. QIIIWJI! 1\1'1 of
rayons. eollons. ..... -. . -,,_,tlm ... f -GREEN 1SIC2<2
OQAASE 8E:I.T COARSE EDGE t!Ot hiN'wW ••ttc
IIJINI".ootlt dIN •meeJ,.m• ~~~~~~
•loll, .-.db' .,.,.,_ dolhi.I)O(fo.O;tit'lQ, .... ...... -.,._ ---""' 1$1~1
AOUGHeE~T
ROUG.HEOGE
""'-"" _ .. .,. h\1 llN'W)' deo'Wn, coelllld t~ •..-dearwM. ...,._,..,..,
lollnelt. * · _ ... _ ... ..... """"' UIIC2-&
SPECW. PERFOOMAI4CE BElTS: ElocttCSIItlicllry Coll~OCI
f'lNESELT
ewe ,.,~
W.C::OIUN8El.T
GI\EEN
181¢2·2$1)
FI{Juro 16. Edges Produood by Different Bslt Grits
Available as an oplion on new machines or tor retrofitting to any existing Eastman straight knife, the Ergo-Handle a!IO\vs the operator to adjust the handle downward from the standard horizontal through a 14-degree range. Ad· justing the handle's angle to suit the opera tOt's prefetence allo·ws for mom effectiva use of the arm muscles, while placing less strain on the wr'iS:t and thumb.
PART NO.
531C1-87 531C1·88
DESCRIPTtON
Regular Ergo·Hancne Cushion Ergo-Handle
From the library of: Superior Sewing Machine & Supply LLC
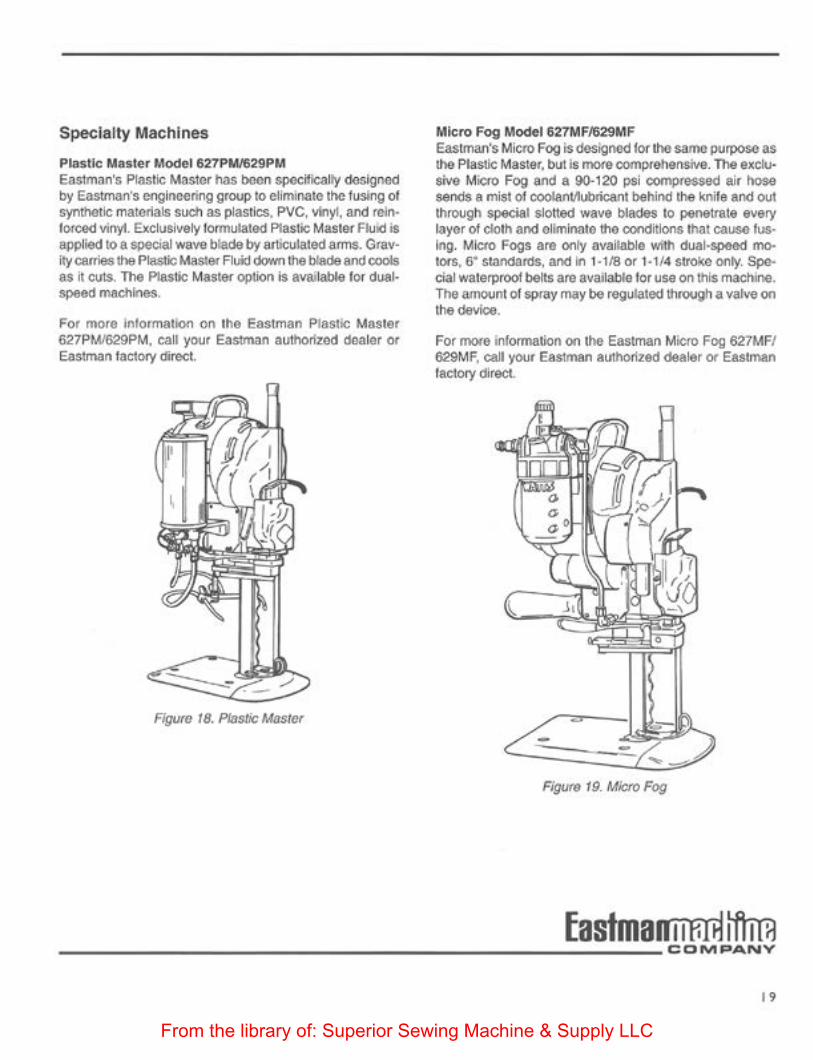
Specialty Machines
Pla.stlc Master Model 627PM/629PM Eastman's Plastic: Mastor has been specifically designed by Eastman's et~glnccring group to eliminate the fusing of synthetic matotlals such as plastics, PVC, Wlyl, and refn· forced vinyl. Exclusively tormulated Plastic Master Flutd is applied to a special wave blade by articulated arms. Grav· ity carries the Plastic Master Fluid down the blade and oools as it cuts. The Plastic Master option is available for dual· speed macll lnes.
For more Information on ttle Eastman Ptasttc Master 627PMf629PM, call your Eastman authorized dealer or Eastman laclory direct.
FI{JUre 18. Plastic Master
Mk:ro Fog Model 627MF1629MF Eastman's Mlcto Fog is designed tor tho samo purpose as the Plastic Master, but is more oompt&hensive. The exclu· sive Mioco Fog and a 00.120 psi compressed air hose sends a mist ot eoo&anVIubricant behind the knife and out through special slotted wave blades to penetrate every layer of ctoth and clfmlnoto tho oondltlons that cause fus· lng. Mleto Fogs are only available witr'l dual-speed mo. tOfs, s· standards, and in 1·1/8 or 1·1/4 sttoke onry. SpGcial waterprool belts are availabfe lor use on this machine. The amount of spray may be regulated through a valVe on the devioo.
For mote information on the Eastman Micro Fog 627MF/ 629MF. call your EaS1man authorized dealer Of' Eastman 1ae1ory direct
Figum 19. Micto Fog
fastmanrrf.IB lttml --------------------------------COMPANY
I 9
From the library of: Superior Sewing Machine & Supply LLC
LH.
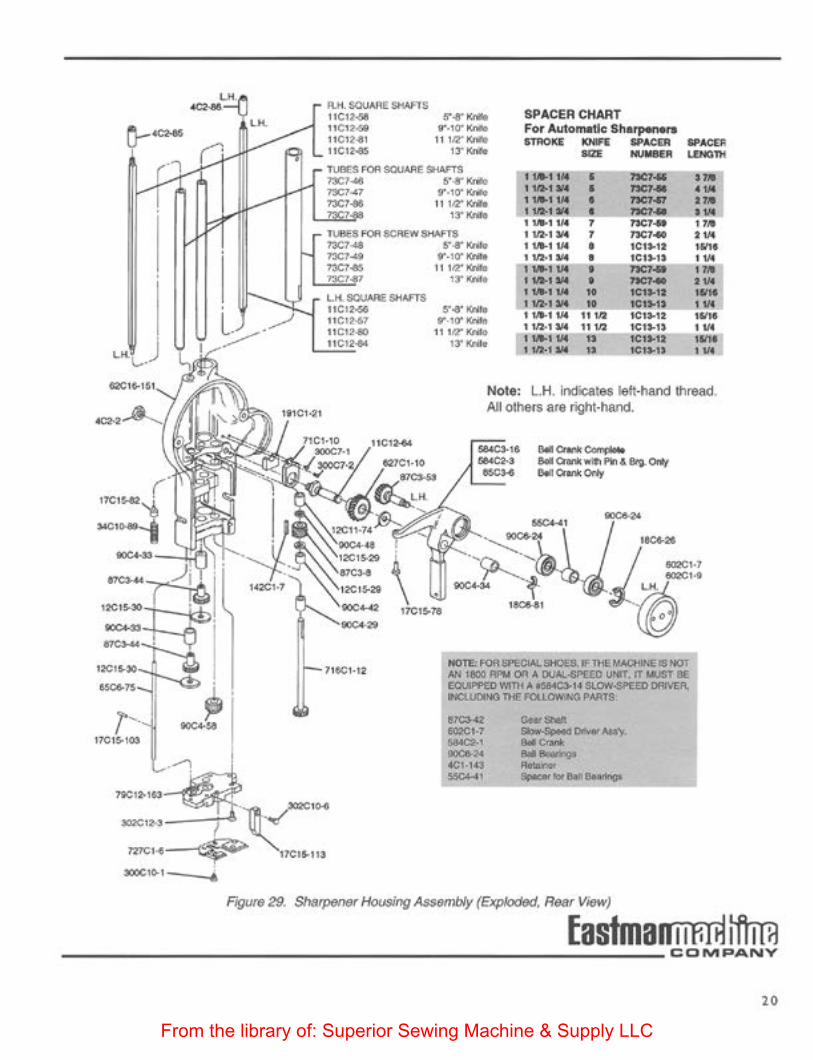
ftH. SOUAAC SHIJ'TS SPACER CHART 11Ct2-68 $'~' Ktilt
U CI:N:oe t"•IO"~ For Automatic Sharpen.,. 11Ct:t..et I I 112" Kn1lt STROKE ..... IPACiR SP.AC[R 11CIMS 13'~ .... HUMBEA .......... TUIES FOR SOUAFIE SHAFTS
1 W-1 114 ' ,., ... ,.,, ... s·..- KMro ... 13C747 9'·10'~ t\0-IM ' ..., .. .... 13C7 ... 1 1112'~ '""'1M • -~ ""' 13'~ ... 1 ... • ..., ... ...
I Wol l/4 ' ,.,, ... I " ' 1U8eS fQA $CReY# $HitJ'T$ 1 \12·1 31'4 ' 11<7 .. '"' 13C7 ... ""' ... 13C7 ...
I..H. SClt.JAAf SHAfTS UCI2>66 nCt!-67 11CI2.SO
6'•8" l(tlfo 1 t/1-1 114 • tCt .. t:r "'" t"·IO' ICMe I 112•1 214 • tCt).t) '"' II I I'Z' l(ftJo ...... vc • ,., .. , .. 1)'1<1'010 1 &/lolllf • ,., ... ...
I .... tut .. tc:tl-1:1 ""' 5'>8" ~·
1 VZ.I"" .. ICI. I ll! t'· IO' ~(rife 11,11.-1 t.U 11 112 IC1).12 "'" 11112"' KriiO t tn·• "" n tn tCU·t:. ' ..
13" K.rilo tW.t IH " t<:tt-1:1 '"" 1 1/J.t ,.. " te:••n ' "' Note: L.H. indicates ieft·hand thread. AJI others are right·hand.
HOT£; FOR SPECIAL SHOES. IF THE t.'ACHit.E 15 NOT AN 1800 APN OA A OUA1.-sPCCO UNIT. IT MUST 8C EOUII'f'f:D WITH A t584C3-t 4 SlOW..Si'EED DAIVER. INClUDING nil! fOU.O\'o;"'G PAATS
~ 602CI·7 ...,.., ..,.... 4Ct•t43 ..,...,
FliJVflt 29. Sharponor H<>osing Assoml>/y (Explodod, Roar lr-)
Eastmamj"f,fij lftrm --------------------------------COMPANY 20
From the library of: Superior Sewing Machine & Supply LLC
,,,,, ..
________ J
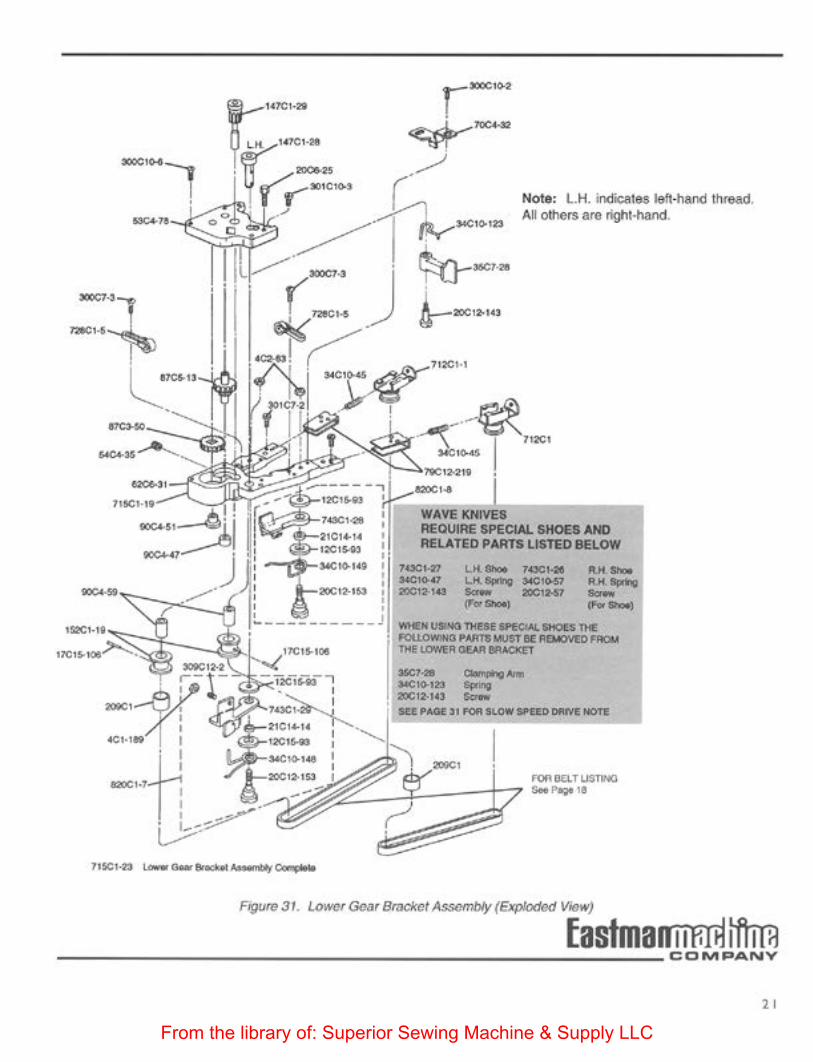
Note: l.H. indicates 'eft-hand thread. AU others arc right·hand.
LH. She. 743CI·2t LH. Spring 34C lo.57 Sa.... 20Ct2-$7 ""-·
R.H.stw:. R.H Spmg -('or Shoot)
wtlfH USUrfO THESE $1'ECIAI.. SHO!S THE FOllOWING PAATS MUST Elf REMOV£0 FROM THE t..OWI:R GEAR BAACICE'T -.,.,.,
""-SEEPAGE :u FOR SlOW SPEEDOAIVE NOTE
Figure 31. I.Dwer Ge•r Brocket Assembly (Exploded VIew)
fastma~ lftTIB -----------------------------------COMPANY 21
From the library of: Superior Sewing Machine & Supply LLC