easy pool action guide - dtcc
TRANSCRIPT
5.1 January 2008
Mortgage-Backed Securities Division
EPN (EaSy Pool)
ACTION GUIDE

EaSy Pool Action Guide – Version 5.1
1
The MBS EPN Guidelines and Codes Guide (hereinafter, the "Guide") is provided as a convenience to Participants and for information only.
Although FICC may make this Guide available to Participants, it shall be under no obligation to do so nor, having once or more done so, shall
FICC have a continuing obligation to make available this Guide or other related information of a certain type.
FICC DOES NOT REPRESENT THE ACCURACY, ADEQUACY, TIMELINESS, COMPLETENESS, OR FITNESS FOR ANY PARTICULAR
PURPOSE OF ANY INFORMATION PROVIDED TO MEMBERS IN THIS GUIDE, WHICH IS PROVIDED AS-IS. FICC SHALL NOT BE LIABLE
FOR ANY LOSS RELATED TO SUCH INFORMATION (OR THE ACT OR PROCESS OF PROVIDING SUCH INFORMATION) RESULTING
DIRECTLY OR INDIRECTLY FROM MISTAKES, ERRORS, OR OMISSIONS, OTHER THAN THOSE CAUSED DIRECTLY BY GROSS
NEGLIGENCE OR WILLFUL MISCONDUCT ON THE PART OF FICC. FICC SHALL NOT BE LIABLE FOR: (1) ANY LOSS RESULTING
DIRECTLY OR INDIRECTLY FROM INTERRUPTIONS, DELAYS, OR DEFECTS ARISING FROM OR RELATED TO PROVIDING THIS GUIDE;
AND (2) ANY SPECIAL, CONSEQUENTIAL, EXEMPLARY, INCIDENTAL, OR PUNITIVE DAMAGES.
Further, the information contained in this Guide is subject to change. Participants and other authorized users of the Guide will find the most current version of the Guide on FICC’s internet site, www.ficc.com. FICC shall bear no responsibility for any losses associated with the failure of Participants or other authorized users to follow FICC’s most current Guide.

EaSy Pool Action Guide – Version 5.1
2
TABLE OF CONTENTS
I. INTRODUCTION I
About this Guide I-ii
Format I-ii
General Information I-ii
II. GETTING STARTED II
EaSy Pool (ESP) Installation Procedure II-1
Entering Licensing Information II-5
Procedures For Starting and Exiting ESP II-9
III. USER SCREENS III
EaSy Pool Main Screen Purpose: III-1
Received EPN Messages III-1
Received EPN Messages III-2
Pending EPN Messages III-5
Message Entry Screen III-8
Detail Entry Screen III-12
Global Clear III-14
Global Replace III-15
Sent EPN Messages III-17
Hot Printing III-20
Archived EPN Messages III-22
Import Data III-25
Ad-Hoc Reporting III-29
AD HOC REPORT REQUEST III-30
Message Selection/Filter III-31
Send Pending Messages III-33
Retransmission Request Screen III-35
Maintenance Menu III-37
Clean Up Data III-43
Message Trace III-44
View Log File III-45

EaSy Pool Action Guide – Version 5.1
3
Heartbeat Messages III-46
IV. APPENDICES IV-1
Process Flow IV-2
Disaster Recovery IV-3
TBA CUSIP IV-5
EPN Filters IV-7
Filters/Multi-Copy IV-8

EaSy Pool Action Guide – Version 5.1
4
TABLE OF FIGURES
Figure 1: EaSy Pool Main Menu Screen ......................................................................................................................................................................................... II-3 Figure 2: Communication Setup Screen .......................................................................................................................................................................................... II-4 Figure 3: ESP License Configuration Screen ................................................................................................................................................................................... II-6 Figure 4: License Saving Prompt Screen .......................................................................................................................................................................................... II-6 Figure 5: License “Done Saving” Screen ......................................................................................................................................................................................... II-7 Figure 6: ESP License Configuration Screen -- License Issued ....................................................................................................................................................... II-7 Figure 7: EaSy Pool License Splash Screen ..................................................................................................................................................................................... II-8 Figure 8: EaSy Pool Main Menu Bar Screen ................................................................................................................................................................................. II-11 Figure 9: Communication Setup Screen ........................................................................................................................................................................................ II-13 Figure 10: IP Connection NOT Established Screen........................................................................................................................................................................ III-1 Figure 11: IP Connection Established Screen ................................................................................................................................................................................. III-1 Figure 12: Received EPN Messages Screen .................................................................................................................................................................................... III-3 Figure 13: Received Non-Business Messages Screen ..................................................................................................................................................................... III-4 Figure 14: Pending EPN Messages Screen ...................................................................................................................................................................................... III-6 Figure 15: Pending Screen after “to EPN” selected ......................................................................................................................................................................... III-7 Figure 16: Message Entry Screen .................................................................................................................................................................................................... III-8 Figure 17: Message Entry Screen .................................................................................................................................................................................................. III-11 Figure 18: Detail Entry Screen ...................................................................................................................................................................................................... III-12 Figure 19: Global Clear Screen ..................................................................................................................................................................................................... III-14 Figure 20: Global Replace Screen - When first displayed ............................................................................................................................................................. III-15 Figure 21: Global Replace Screen - 2 fields to be changed ........................................................................................................................................................... III-16 Figure 22: Sent Message Screen .................................................................................................................................................................................................... III-18 Figure 23: Sent Non-Business Messages Screen ........................................................................................................................................................................... III-19 Figure 24: Set Message Types for Hot Printing Screen ................................................................................................................................................................. III-20 Figure 25: Sample Hot Printed Message ....................................................................................................................................................................................... III-21 Figure 26: Archived Message Screen ............................................................................................................................................................................................ III-23 Figure 27: Archived Message Screen with Status After Restore ................................................................................................................................................... III-24 Figure 28: File Open Dialog Screen for Importing Data into ESP ................................................................................................................................................ III-25 Figure 29: Main Screen during read of .csv ................................................................................................................................................................................... III-26 Figure 30: Import Data Screen ...................................................................................................................................................................................................... III-27 Figure 31: Import All Message Screen .......................................................................................................................................................................................... III-28 Figure 32: Import Screen After Import .......................................................................................................................................................................................... III-28 Figure 33: Ad-Hoc Report Request Screen ................................................................................................................................................................................... III-29 Figure 34: Message Selection/Filter Screen when first displayed ................................................................................................................................................. III-31 Figure 35: Message Selection Screen - Selecting based upon 2 fields .......................................................................................................................................... III-32 Figure 36: Send Pending Warning Screen ..................................................................................................................................................................................... III-33 Figure 37: Main EaSy Pool Screen after Send Pending ................................................................................................................................................................. III-34 Figure 38: Retransmission Request Screen ................................................................................................................................................................................... III-35 Figure 39 : Maintenance Menu Screen .......................................................................................................................................................................................... III-37

EaSy Pool Action Guide – Version 5.1
5
Figure 40: Security Maintenance Screen ....................................................................................................................................................................................... III-38 Figure 41: Account Maintenance Screen ....................................................................................................................................................................................... III-39 Figure 42: SubAccount Maintenance Screen ................................................................................................................................................................................. III-40 Figure 43: Cancel, DK Reason and Pool Substitution Reason Code Maintenance Screen ............................................................................................................ III-41 Figure 44: Reject Reason Code Maintenance Screen .................................................................................................................................................................... III-42 Figure 45: Clean Up Data Screen .................................................................................................................................................................................................. III-43 Figure 46: Message Trace Window Screen ................................................................................................................................................................................... III-44 Figure 47: View Log File Screen ................................................................................................................................................................................................... III-45 Figure 48: Main EaSy Pool Screen After HeartBeat ..................................................................................................................................................................... III-46 Figure 49: ESP Process Flow .......................................................................................................................................................................................................... IV-2
EaSy Pool Action Guide – Version 5.1
6
TABLES
Table 1: Header Message Entry Fields ............................................................................................................................................................................................ III-9 Table 2: Header Message Entry Fields (Continued) ...................................................................................................................................................................... III-10 Table 3: Pool Detail Fields Description ......................................................................................................................................................................................... III-13 Table 4: Ad-Hoc Report Request Input Values ............................................................................................................................................................................. III-30 Table 5: Retransmission Request Input Values ............................................................................................................................................................................. III-36

I. INTRODUCTION
EaSy Pool Action Guide – Version 5.1
Introduction Page I-ii
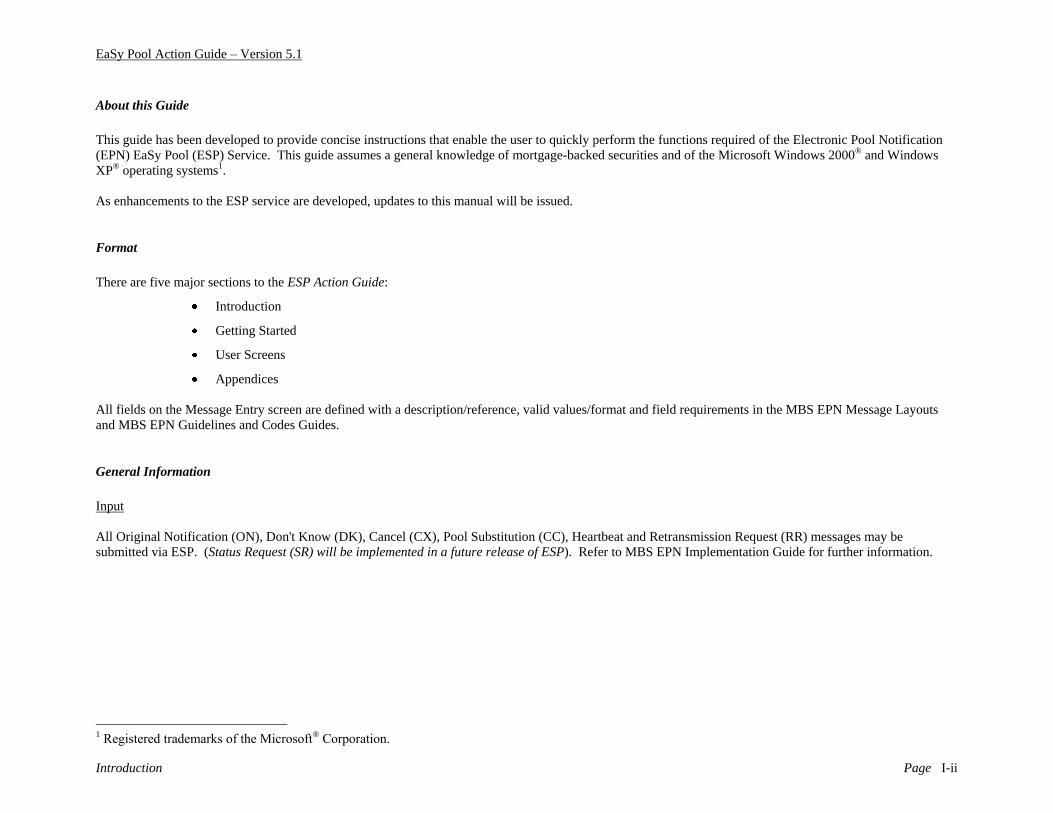
About this Guide
This guide has been developed to provide concise instructions that enable the user to quickly perform the functions required of the Electronic Pool Notification
(EPN) EaSy Pool (ESP) Service. This guide assumes a general knowledge of mortgage-backed securities and of the Microsoft Windows 2000® and Windows
XP® operating systems1.
As enhancements to the ESP service are developed, updates to this manual will be issued.
Format
There are five major sections to the ESP Action Guide:
Introduction
Getting Started
User Screens
Appendices
All fields on the Message Entry screen are defined with a description/reference, valid values/format and field requirements in the MBS EPN Message Layouts
and MBS EPN Guidelines and Codes Guides.
General Information
Input
All Original Notification (ON), Don't Know (DK), Cancel (CX), Pool Substitution (CC), Heartbeat and Retransmission Request (RR) messages may be
submitted via ESP. (Status Request (SR) will be implemented in a future release of ESP). Refer to MBS EPN Implementation Guide for further information.
1 Registered trademarks of the Microsoft® Corporation.

II. GETTING STARTED

EaSy Pool Action Guide – Version 5.1
Getting Started Page II-1
EaSy Pool (ESP) Installation Procedure
This section describes how to do the initial installation of EaSy Pool to your PC.
Requirements:
A PC running Microsoft Windows 2000® or Windows XP® (a stand-alone PC is highly recommended)2.
Your username and password to access the “For Members Only” section on FICC‟s Website at www.ficc.com, which can be obtained from the Relationship
Manager.
A phone number to dial in to the SMART Network - supplied by the Participant Interface Planning group, who can be contacted at (888) 382-2721 and
selecting option 1 followed by option 3.
The SMART Dialer User Guide, which can be downloaded from the DTCC Website at www.dtcc.com. (Select „Network Services – SMART‟ from the drop
down menu under „Products and Services.‟ This will reveal the Network Services page with further information and links for SMART.)
Non-registered IP address supplied by MBSD.
Subscriber ID, account ID and connection ID supplied by MBSD.
A local printer attached to the aforementioned PC.
2 EaSy Pool is not compatible with Microsoft® Exchange and other programs, which try to take control of the modem.

EaSy Pool Action Guide – Version 5.1
Getting Started Page II-2
Installation and Update Instructions:
The following installation procedures will assist you in getting started:
1. Close any programs that may already be running.
1. On FICC‟s Website at www.ficc.com, log into the MBSD “For Members Only” section.
2. Select the “EaSy Pool Software vX.Y” link (where “X.Y” is the version release number), complete the Registration form, and press the Submit button.
3. The instructions appear for downloading and installing the “ESP vX.Y” software files.
Note: It is highly recommended that you print these instructions, as you will need to refer to them later in the installation process.
4. To download the files, select one of the following links and follow the onscreen instructions.
EaSy Pool vX.Y – Full Release
EaSy Pool vX.Y – Upgrade
Note:
If a Security Warning appears and indicates that the Publisher could not be verified, select the Run button to download the ESP installation files.
The ESP installation files are automatically downloaded to the “C:\ESP_X.Y” folder. If you decide to change the default folder, please write down
the name of the new folder or path. This information is used in the next step.
5. When the download is done, go to the “C:\ESP_X.Y” folder (or the location where the downloaded files are saved), and select one of the following:
for the full installation package, select the file “setup.exe”.
for the upgrade package, select the file “update.exe”.
6. The installation will begin and start copying files to your system.
Note:
If you get a “File in Use error”, please press the Ignore button on the screen. This usually means that ESP is trying to copy a file that is already in
use on the system. (If it is in use, it must be there, and therefore does not need to be re-copied).
If you get the message “your version of file is new …keep it”, please press the “Yes” button.
7. When the installation is complete, read the file “ESP-updX.YReleaseNotes.doc”. This file describes the enhancements that were made to the software.
EaSy Pool Action Guide – Version 5.1
Getting Started Page II-3
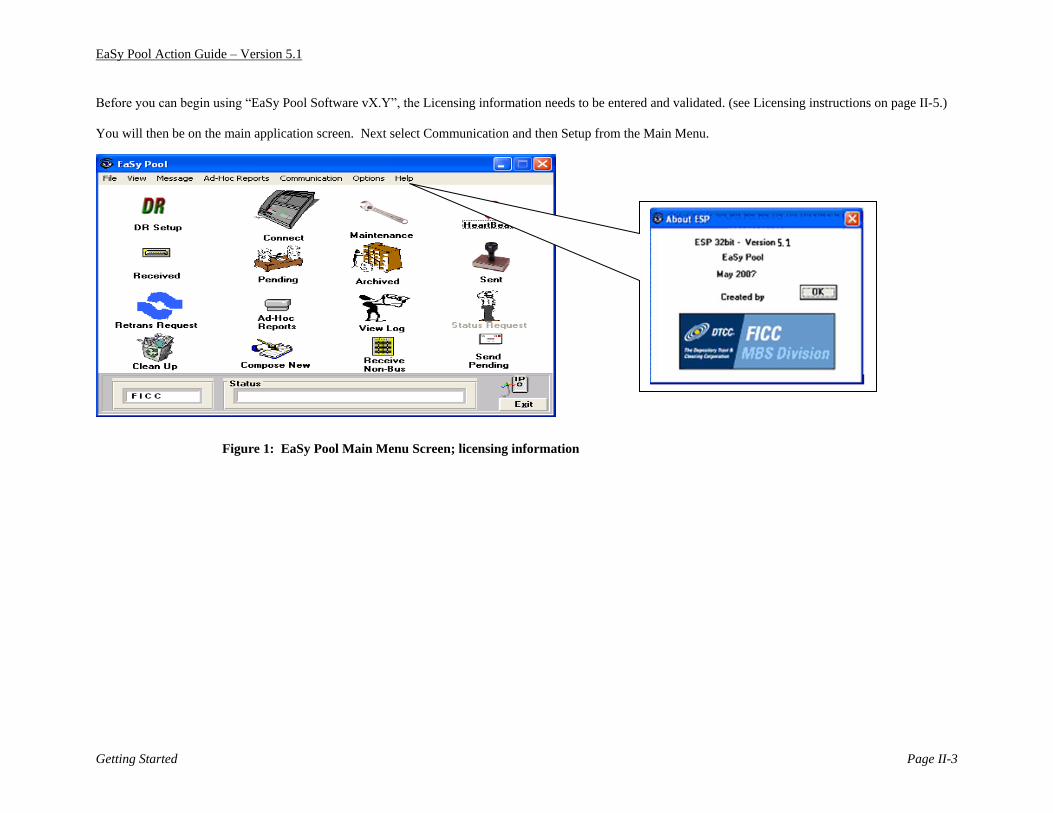
Before you can begin using “EaSy Pool Software vX.Y”, the Licensing information needs to be entered and validated. (see Licensing instructions on page II-5.)
You will then be on the main application screen. Next select Communication and then Setup from the Main Menu.
Figure 1: EaSy Pool Main Menu Screen; licensing information

EaSy Pool Action Guide – Version 5.1
Getting Started Page II-4
In the Communication Setup window, enter the values assigned to you by the Participant Interface Planning group.
All network users will only need to enter your primary IP address. All three sites, PDC, ADC and RDC will have the same IP address. IPs are provided by
Network Engineering and Operations. The Participant Interface Planning group, who can be contacted at (888) 382-2721 and selecting option 1 followed by
option 3.
Destination IP: This is the IP address of EPN.
Depending on your selection, this field is
automatically populated with values from either the
Production IP or Disaster IP box on this screen.
Subscriber ID: This is your EPN subscriber ID.
This is supplied by MBSD.
Account ID: This is your account ID. It is
supplied by MBSD.
Production IP: This is your default IP address.
When selected, the address will be automatically
copied to the Destination IP above.
Figure 2: Communication Setup Screen
Destination Port: This is the TCP/IP Port to
connect. See the EPN Implementation Guide for
the proper values.
Send/Single Connection and Pwd & Recv
Connection and Password: These are your
connection ID and passwords -- supplied by
MBSD.
Disaster IP: This is the IP address of the Remote
Site. This IP address will be the same as
production (PDC) and Alternate (ADC) sites..
The remote site will only be used if there is a
regional disaster encompassing both the primary
and alternate sites.
Next, click on the OK button. You are now ready to connect to EPN.
EaSy Pool Action Guide – Version 5.1
Getting Started Page II-5
Entering Licensing Information Purpose:
The licensing protection feature allows MBSD to distribute the ESP software, as well as protect the user, so that the software is not moved or copied without
MBSD‟s knowledge.
Access:
EaSy Pool includes a security feature whereby the first time that you run the ESP software, a license configuration screen will be displayed. This screen requests
a Site Key to validate ESP. The Site Key is a unique number that will be given to the user by MBSD, after the user has given MBSD their Site Code (displayed
on the screen). The Site Code is a unique number generated by your computer and displayed on the license configuration screen. The license configuration
screen also displays an MBSD contact name in a message box.
When the Site Key has been entered, full access will be given to the ESP Software.
Action/Information:
The user needs to call MBSD or email their Site Code to the email address supplied to receive their Site Key. The Site Key then needs to be typed on the license
configuration screen, and the Validate button selected. When this is complete, an unlimited license will have been issued. This is a one-time procedure. Once
the unlimited license has been issued, there will be no need to obtain another Site Key, as EaSy Pool will recognize the user has already been issued a license.

EaSy Pool Action Guide – Version 5.1
Getting Started Page II-6
Notes:
On the first attempt to run EaSy Pool after installation, the following screen will appear:
Figure 3: ESP License Configuration Screen
Once the Site key has been entered, and the Validate button pressed, a box stating “Saving”…. (below) will appear.
Figure 4: License Saving Prompt Screen

EaSy Pool Action Guide – Version 5.1
Getting Started Page II-7
Click on the OK button. The box will change to “Done Saving”.
Figure 5: License “Done Saving” Screen
Click on the OK button. The license configuration box will change to display the type of license you have been issued.
Figure 6: ESP License Configuration Screen -- License Issued
EaSy Pool Action Guide – Version 5.1
Getting Started Page II-8
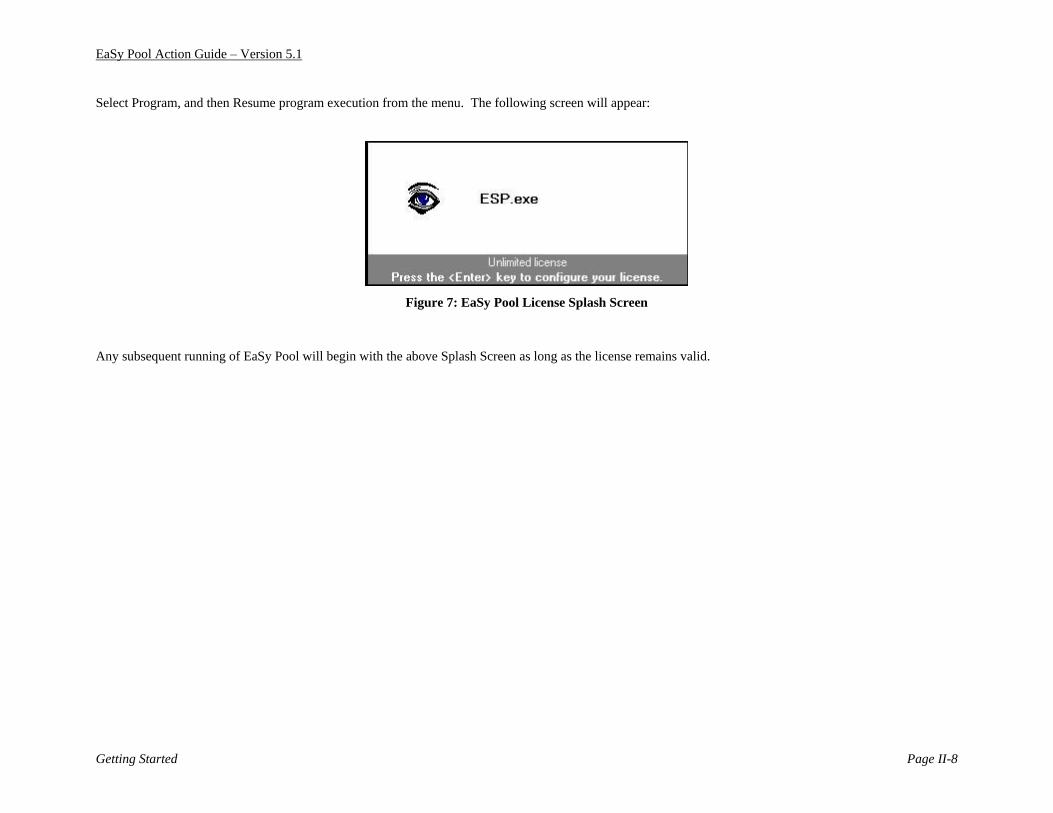
Select Program, and then Resume program execution from the menu. The following screen will appear:
Figure 7: EaSy Pool License Splash Screen
Any subsequent running of EaSy Pool will begin with the above Splash Screen as long as the license remains valid.

EaSy Pool Action Guide – Version 5.1
Getting Started Page II-9
Procedures For Starting and Exiting ESP Starting ESP:
1. From the Start menu, select Programs, then ESP.exe.
2. After a brief period, the EaSy Pool Main screen will appear. This is the primary ESP screen from which all ESP functions can be accessed.
3. Click on the Connect icon (the telephone) to connect to EPN via ESP.
4. Once connected, login messages will automatically be sent to EPN, and you will see a message in the Status Bar indicating that your login was successfully
Accepted.
All ESP screens/functions may now be accessed/performed by clicking on the applicable button or menu bar choice.
Exiting ESP:
1. Click on the Exit button, or
2. Click on the File choice from the menu bar, then click on the Exit button.

EaSy Pool Action Guide – Version 5.1
Getting Started Page II-10
Screen Access
All ESP screens/functions may be accessed via the specific function button identified on the EPN EaSy Pool (ESP) screen or by using the choices from the menu
bar. From this screen, you can:
Compose new messages
View/send pending messages
View business and non-business messages sent
View archived messages
Send Heartbeat messages
View business and non-business messages received
Request Ad-Hoc Reports from EPN
Send retransmission requests
Access maintenance screens
Clean-up/Delete old messages
Switch setup from Production to DR and DR to Production
Access additional screens, enabling the user to:
Turn or delete messages received
Clone, change, and delete pending messages
Re-send or delete messages sent
Import message data from Comma-delimited files (.csv) files
Save messages to Comma-delimited files (.csv) files
Screen Processing
Printing - By selecting the appropriate Print Option from the file menu, you can either Print Screen from any of the main header display screens or maintenance
screens, or you can print message headers and details as maintained in your ESP database. For EPN reports, select Ad-Hoc Reporting from the main menu.

EaSy Pool Action Guide – Version 5.1
Getting Started Page II-11
EaSy Pool Main Menu Descriptions
The EaSy Pool Main screen Menu Bar contains the following options:
Figure 8: EaSy Pool Main Menu Bar Screen
File View Message Ad-Hoc Reports Communication Options Help
Open Received Send All Pending Dial Set Hot Printing About ESP...
Maintenance Pending Compose New Ctrl-N Hangup Export Format
Sent Send Heartbeat Ctrl-H IP Connect Receive Trace
Archived Retransmission Request IP Disconnect Send Trace
Received Non-Business Msgs Last Sequence Request Setup Send Delay
Sent Non-Business Msgs Clean up Switch to
Restore Windows® Production 1
Log File Production 2
Message Trace Disaster

EaSy Pool Action Guide – Version 5.1
Getting Started Page II-12
The File Menu is composed of:
Open: Used to Import Data from comma-delimited (.csv) files. For more information, see Import Data in the User Screens Section.
Maintenance: Brings up the Maintenance Menu. For more information, see Maintenance Menu in the User Screens Section.
The View Menu is composed of:
Received: Used to view business messages received from EPN. For more information, see Received EPN Messages in the User Screens Section.
Pending: Used to view business messages that are pending transmission to EPN. For more information, see Pending EPN Messages in the User Screens
Section.
Sent: Used to view business messages sent to EPN. For more information, see Sent EPN Messages in the User Screens Section.
Archived: Used to view archived business messages. For more information, see Archived EPN Messages in the User Screens Section.
Received Non-Business Messages: Used to view non-business messages received from EPN. Examples of non-business messages include AA, HA, LS and
Text Messages. For more information about Non-Business Messages, see the EPN Implementation Guide.
Sent Non-Business Messages: Used to view non-business messages sent to EPN. Examples of non-business messages include HP and HD, RR and SR
Messages. For more information about Non-Business Messages, see the EPN Implementation Guide.
Restore Windows®: This will display all open ESP windows on the screen (un-minimized).
Log File: This brings up a view screen to peruse the “Dump Log”. The dump log contains partial messages and Non-Business Messages with appropriate
explanations. This information is maintained in ESP for a single business day.
Message Trace: Opens the communications message trace.
The Message Menu is composed of:
Send All Pending: Used to send all messages in the pending screen to EPN.
Compose New: Used to create a new business message to be sent to EPN.
Send Heartbeat: Used to send an HP or HD to EPN.
Retransmission Request: Used to request retransmission from EPN of specified business messages. For more information, see Retransmission Request in
the User Screens Section.
Last Sequence Request: Used to determine last sequence number received by EPN. This is generally used during Disaster Recovery to determine the last
sequence number that EPN received.
Clean Up: Used to delete all old messages from the ESP database. For more information, see Clean Up Data in the User Screens Section.
The Ad-Hoc Reports Menu option will:
Bring up the Ad-Hoc Reports Request Screen to request EPN generated Reports.
The Communication Menu is composed of:
Dial: This function appears on the menu, but has been disabled..
Hangup: This function appears on the menu, but has been disabled.
IP Connect: If the option to dial without autoconnecting was chosen, this option must be selected to start the IP session. The option to connect only one of
the two available sockets or both, is available. This is recommended only for experienced users.
IP Disconnect: Will disconnect the IP session with EPN without disconnecting the telephone line. The option of only disconnecting one of the two available
sessions is available. This is only recommended for knowledgeable users.

EaSy Pool Action Guide – Version 5.1
Getting Started Page II-13
Setup: This brings up the Communication Setup Screen required for installation. The fields on the Communications Setup Screen are as follows:
Destination IP: This is the IP address of EPN.
Depending on your selection, this field is
automatically populated with values from the
Production IP box on this screen.
Subscriber ID: This is your EPN subscriber ID.
This is supplied by MBSD.
Account ID: This is your account ID. It is supplied
by MBSD.
Production IP: This is your default IP address.
When selected, the address will be automatically
copied to the Destination IP above. (See
information on how to obtain the IP addresses in the
“EaSy Pool Installation” section above.)
Figure 9: Communication Setup Screen
Destination Port: This is the TCP/IP Port to
connect. See the EPN Implementation Guide
for the proper values.
Send/Single Connection and Pwd & Recv
Connection and Password These are your
connection ID and passwords -- supplied by
MBSD.
Disaster IP: This is the IP address of the
Remote Site. When selected, the address will
be automatically copied to the Destination IP
above. This will only be used if there is a
regional disaster encompassing both the
primary/alternate sites and MBSD is operating
out of its remote data center.
Switch To: This is used to switch the IP Address to Disaster Recovery or back to Production whenever there is a need for the switchover. It has two options,
namely “DR setup” and “Prod Setup,” one of which is always disabled depending on the existing setup configuration. Please note; with the recent
enhancements to EPN the Disaster recovery IP address is the same as the production and alternate IP address. When you click the DR function on the site it
will have the same IP address
Production 1: This function appears on the menu, but has been disabled.
Production 2: This function appears on the menu, but has been disabled.
Disaster: This function appears on the menu, but has been disabled.
The Options Menu is composed of:
Set Hot Printing: This option allows you to determine locally what if any messages you wish to “Hot Print” (i.e., print automatically when received).
Export Format: This option allows the choice of numeric format on export of data to comma-delimited file. The options are either implicit decimal or
explicit decimal. Implicit is the default value.
Receive Trace: This option allows display of the raw data coming in from EPN in the Message Trace window. For more information, see Message Trace in
the User Screens section.
Send Trace: This option allows display of the raw data going to EPN in the Message Trace window. For more information, see Message Trace in the User
Screens section.
Send Delay: This specifies the delay ESP waits before sending the next buffer of data. The default is long. It is recommended that this value not be changed.
The Help menu is composed of:
About ESP: is used to display the version number and date of this copy of ESP.

III. USER SCREENS

EaSy Pool Action Guide – Version 5.1
User Screens Page III-1
EaSy Pool Main Screen Purpose: To connect to EPN via ESP, compose and send business messages, send heartbeat (non-business) messages, view sent, received and pending messages, request
retransmission of messages, request ad-hoc reports and import message data from comma-delimited (.csv) files, perform clean-up of old messages and access
maintenance screens or switch IP Address from Production to DR or DR to Production.
Action/Information:
Once the EaSy Pool Main screen appears, click on the appropriate icon, function button or menu choice on the menu bar.
Notes:
Most choices from this screen will bring the user to a corresponding screen from which additional actions can be taken. Above the Exit button is an “IP
Connected/Disconnected icon”. In Figure 10, the IP Connection is not established. In Figure 11, the icon shows an established IP Connection.
Figure 10: IP Connection NOT Established Screen Figure 11: IP Connection Established Screen

EaSy Pool Action Guide – Version 5.1
User Screens Page III-2
Received EPN Messages
Purpose:
To view, select, turn, save to a comma-delimited (.csv) file or delete business messages or view non-business messages received from EPN via ESP.
Access:
From the EaSy Pool Main screen, click on the Received button.
Action/Information:
To view message details, double click on the message header of the message to be viewed or highlight the message header and click on the Detail button. The
Message Display screen will appear. See the Message Entry and Detail Entry sections of this guide for a field by field explanation of the Message Display
screen.
To turn a message, highlight the message header of the corresponding message and click on the Turn button. The Message Entry screen will appear, containing
the corresponding message. From this screen, you can make any necessary changes. It is possible for a message to be turned before all pool information has
been received. ESP will validate the number of pools in the header with the actual count of pools being sent. If there is a discrepancy, ESP will automatically
change the number of pools in the header to match the actual count of pools being sent (except for Pool Substitution messages where the user must accurately
enter the number of replacement pools) and alert you with a message in the View Log (see description in "View Log" section below). If a mismatch occurs, you
can perform one of the following actions:
Option If you intend to: Then, you should:
1 Send the complete message with all the pools (1) Delete the previous message with the incomplete count of pools from the Pending Screen.
(2) Wait for all pools to be received.
(3) Turn the message again from the Receive Screen.
2 Send the partial message as is Ignore the notification in the View Log.
3 Update the message (e.g., send different
pools, make a correction, etc.)
Make the necessary changes/updates in the Pending Screen before sending.
For message selection, choose Message Selection from the view menu. The message selection screen will appear. See Message Selection/Filter for more
information.
To save a message to a comma-delimited (.csv) file, highlight one or more message header(s) and then click on File, followed by Save As (highlighting none is
the same as highlighting all). The Save Comma Delimited File As screen will appear where you can name the file and save to a directory or diskette. Once
saved, the message headers will disappear from this screen. To view these messages after saving, see the Archive Screen.
To delete a message, highlight the message header and click on Action, followed by delete (highlighting none is the same as highlighting all).
To Print a list of “Received headers”, select headers to be printed, select File Print Message Headers (or Ctrl-H). This will send a list of all message headers on
the Received screen to the printer.

EaSy Pool Action Guide – Version 5.1
User Screens Page III-3
Notes:
The very last column when scrolling across shows the message origination (Orig). The only possible value on this screen is: “R” - for received.
Received administrative messages may be viewed from this screen by clicking on the Non-Bus. button.
Figure 12: Received EPN Messages Screen

EaSy Pool Action Guide – Version 5.1
User Screens Page III-4
Figure 13: Received Non-Business Messages Screen

EaSy Pool Action Guide – Version 5.1
User Screens Page III-5
Pending EPN Messages
Purpose:
To view, clone, change, select, delete or send pending messages to EPN via ESP.
Access:
From the EaSy Pool Main screen, click on the Pending button. The Pending EPN Messages screen is displayed.
Action/Information:
To send selected business messages to EPN, highlight the Message Header(s) of the pending message(s) to be sent to EPN and click on the TO EPN button
(highlighting none is the same as highlighting all), or use the Selection option on the menu to select messages based upon particular criteria -- for more
information, see the Message Selection/Filter screen. A Status bar on the Pending EPN Messages screen will show the progress of each individual message sent,
and the Status window will indicate “___ Messages Sent To EPN From Pending” .
To view message details, double click on the message header of the message to be viewed or highlight the message header and click on the Detail button. The
Message Display screen will appear. See the Message Entry and Detail Entry sections of this guide for a field by field explanation of the Message Display
screen.
To Clone an existing message, highlight the message header and click on the Clone button. The Message Entry screen containing the corresponding message on
which the user can make necessary changes is displayed.
To Change an existing message, highlight the message header and click on the Change button. The Message Entry screen containing the corresponding message
on which the user can make necessary changes is displayed.
To delete a message, highlight the message header and click on Action, followed by Delete (highlighting none is the same as highlighting all).
To Print a list of “Pending headers”, select headers to be printed, select File Print Message Headers (or Ctrl-H). This will send a list of all message headers on
the pending screen to the printer.
Notes:
The very last column when scrolling across, shows the message origination (Orig). Possible values are: “I” - for Import, “T” - for Turned and “E” for Entered
into ESP.
The pending screen cannot be closed once message transmission has begun (although it can be minimized).

EaSy Pool Action Guide – Version 5.1
User Screens Page III-6
Figure 14: Pending EPN Messages Screen

EaSy Pool Action Guide – Version 5.1
User Screens Page III-7
Figure 15: Pending Screen after “to EPN” selected

EaSy Pool Action Guide – Version 5.1
User Screens Page III-8
Message Entry Screen
Purpose:
To enter new or edit existing pending business messages for EPN via ESP.
Access:
From the EaSy Pool Main screen, click on the Compose New button.
Action/Information:
To Print the message, select File, Print Message from the menu. The current message will be spooled to the default printer.
Notes:
Message Headers are entered on this screen. Pool details are entered on the Detail Entry screen, which is accessed by double clicking on the appropriate line in
the Pool Details section of this screen.
Figure 16: Message Entry Screen
EaSy Pool Action Guide – Version 5.1
User Screens Page III-9
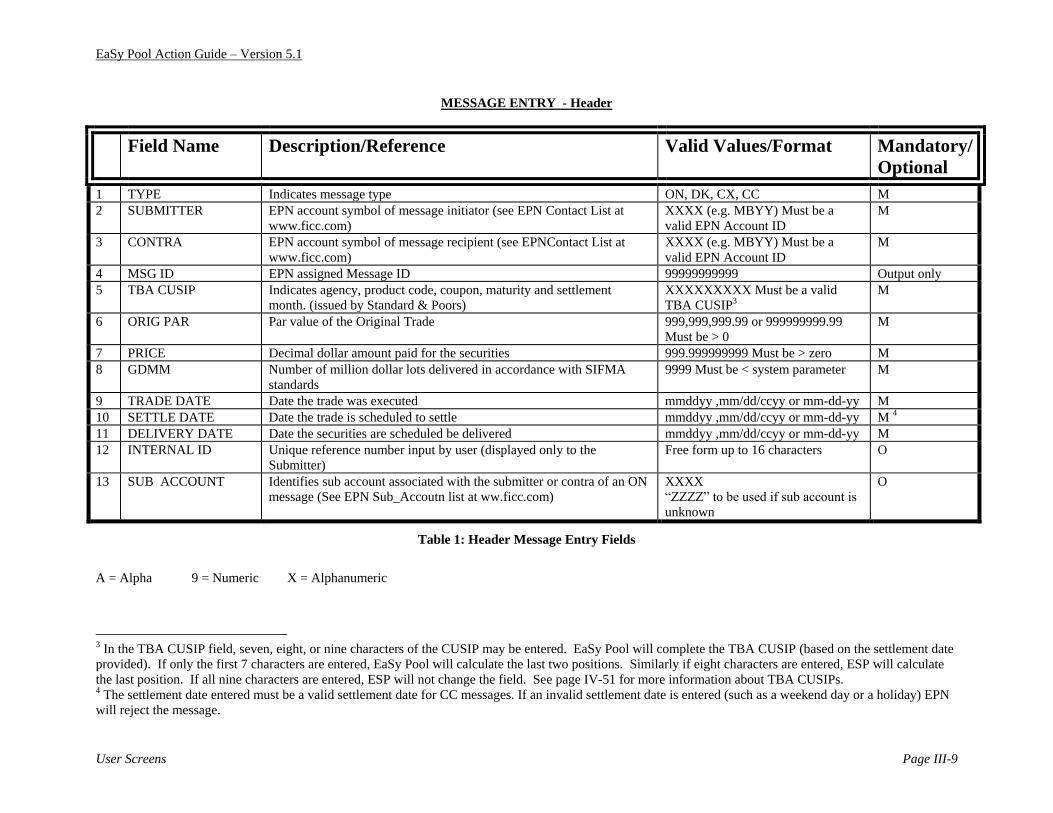
MESSAGE ENTRY - Header
Field Name Description/Reference Valid Values/Format Mandatory/
Optional
1 TYPE Indicates message type ON, DK, CX, CC M
2 SUBMITTER EPN account symbol of message initiator (see EPN Contact List at
www.ficc.com)
XXXX (e.g. MBYY) Must be a
valid EPN Account ID
M
3 CONTRA EPN account symbol of message recipient (see EPNContact List at
www.ficc.com)
XXXX (e.g. MBYY) Must be a
valid EPN Account ID
M
4 MSG ID EPN assigned Message ID 99999999999 Output only
5 TBA CUSIP Indicates agency, product code, coupon, maturity and settlement
month. (issued by Standard & Poors)
XXXXXXXXX Must be a valid
TBA CUSIP3
M
6 ORIG PAR Par value of the Original Trade 999,999,999.99 or 999999999.99
Must be > 0
M
7 PRICE Decimal dollar amount paid for the securities 999.999999999 Must be > zero M
8 GDMM Number of million dollar lots delivered in accordance with SIFMA
standards
9999 Must be < system parameter M
9 TRADE DATE Date the trade was executed mmddyy ,mm/dd/ccyy or mm-dd-yy M
10 SETTLE DATE Date the trade is scheduled to settle mmddyy ,mm/dd/ccyy or mm-dd-yy M 4
11 DELIVERY DATE Date the securities are scheduled be delivered mmddyy ,mm/dd/ccyy or mm-dd-yy M
12 INTERNAL ID Unique reference number input by user (displayed only to the
Submitter)
Free form up to 16 characters O
13 SUB ACCOUNT Identifies sub account associated with the submitter or contra of an ON
message (See EPN Sub_Accoutn list at ww.ficc.com)
XXXX
“ZZZZ” to be used if sub account is
unknown
O
Table 1: Header Message Entry Fields
A = Alpha 9 = Numeric X = Alphanumeric
3 In the TBA CUSIP field, seven, eight, or nine characters of the CUSIP may be entered. EaSy Pool will complete the TBA CUSIP (based on the settlement date
provided). If only the first 7 characters are entered, EaSy Pool will calculate the last two positions. Similarly if eight characters are entered, ESP will calculate
the last position. If all nine characters are entered, ESP will not change the field. See page IV-51 for more information about TBA CUSIPs. 4 The settlement date entered must be a valid settlement date for CC messages. If an invalid settlement date is entered (such as a weekend day or a holiday) EPN
will reject the message.

EaSy Pool Action Guide – Version 5.1
User Screens Page III-10
MESSAGE ENTRY - Header (cont.)
Field Name Description/Reference Valid Values/Format Mandatory
/Optional
14 TARGET MSG ID Message ID referencing the original message being acted upon 99999999999 O
15 XREF Tag assigned by the submitter (displayed only to the Submitter) Free form up to 15 characters O
16 SPEC INSTR Informational trade terms Free form up to 30 characters O
17 # POOLS Number of pools contained within this message 9999 M5
18 DUP Indication that output message may be a duplicate X ( = yes) or Blank ( = no) O
19 RSN CD Reason for the action taken (see EPN Reason Code listing) 9999 Must be a valid EPN Reason
Code
O (Mandatory for
DKs/CXs)
20 T2 TIME Time enqueued message is acquired by a message processor which
performs a series of steps to process the message
hh:mm:ss Output only
Table 2: Header Message Entry Fields (Continued)
A = Alpha 9 = Numeric X = Alphanumeric
5 The number of pools entered in this field on a CC message must equal the number of replacement pools in the message. If the user enters an incorrect value in
this field, EPN will reject the message.

EaSy Pool Action Guide – Version 5.1
User Screens Page III-11
Figure 17: Message Entry Screen

EaSy Pool Action Guide – Version 5.1
User Screens Page III-12
Detail Entry Screen
Purpose:
To enter pool details to new pending business messages or edit pool details on existing pending messages for EPN via ESP.
Access:
From the EaSy Pool Main screen, click on the Compose New button then double click on the appropriate line in the Pool Details section of the Message Entry
screen, or Select Edit Add Pool Detail from the menu of the Message Entry screen.
Action/Information:
This screen will remain open when adding Pool Details. When all details necessary have been added, the Cancel button or the “X” button must be clicked in
order to close. On modify, it will close when the OK has been pressed to approve the changes.
Notes:
N/A
Figure 18: Detail Entry Screen

EaSy Pool Action Guide – Version 5.1
User Screens Page III-13
DETAIL ENTRY - Pool Details
Field Name Description/Reference Valid Values/Format Mandatory/
Optional
21 LOT ID Lot-sequence of Good Delivery Million pool(s) XXXXXX M (for ONs)
22 POOL ID Pool Number assigned and published by issuer XXXXXXX M
23 ORIG FACE Principal amount of MBS at date of issue 999,999,999 or 999999999
Note: pennies not accepted
M
24 COUPON Amount of interest the pool is expected to pay out 99.9999 Must be > zero M
25 MATY DT Anticipated date the pool will issue final payment mmddyy O
26 NEW ISSUE Identifies a new pool issue X (= yes) or Blank (= no) O
27 TRADE NUMBER Internal trade number XXXXXXXXXX O
28 CONTROL NUMBER Individual pool detail reference number assigned by the user Free form up to 15 characters O
29 CURRENT FACE The outstanding principal of the underlying mortgage 999,999,999.99 or 999999999.99 O
30 FACTOR Percentage of the pool‟s original face outstanding 9.999999999 Must be > or equal to
zero and less than 2
O
31 CUSIP Pool CUSIP Number XXXXXXXXX O
32 ISSUE DT Date the mortgage pool was issued mmddyy O
33 TERMINATOR Value of Good Delivery MMs of the preceding lot6 9999 (Odd-lot = 9999) M7
34 PRINCIPAL Portion of payment applied to underlying mortgages that reduces the
outstanding balance of a mortgage
999,999,999.99 or 999999999.99 O
35 INTEREST Interest accrued on the outstanding balance of a mortgage 999,999,999.99 or 999999999.99 O
36 NET MONEY Net Money 999,999,999.99 or 999999999.99 O
37 SPECIAL
INSTRUCTIONS
Informational pool detail terms Free form up to 30 characters O
Table 3: Pool Detail Fields Description
A = Alpha 9 = Numeric X = Alphanumeric
6See MBS EPN Guidelines and Codes Guide for more information. 7 Editing is performed on CC messages to check that the canceled pools are paired to the replacement pools. Users are advised to review the EPN Guidelines for
Pool Substitutions for additional information. CC message terminators that do not satisfy the terminator guidelines will be rejected.

EaSy Pool Action Guide – Version 5.1
User Screens Page III-14
Global Clear
Purpose:
To clear selected fields from all pool details attached to the message currently being edited.
Access:
From the Message Entry screen, press CTRL-C, or click on Edit and then select “Global Clear”.
Action/Information:
Select or De-Select fields by clicking on check box. All fields checked will be cleared for All pool details. The default values are Principal, Interest and Net
Money.
Notes:
N/A
Figure 19: Global Clear Screen
EaSy Pool Action Guide – Version 5.1
User Screens Page III-15
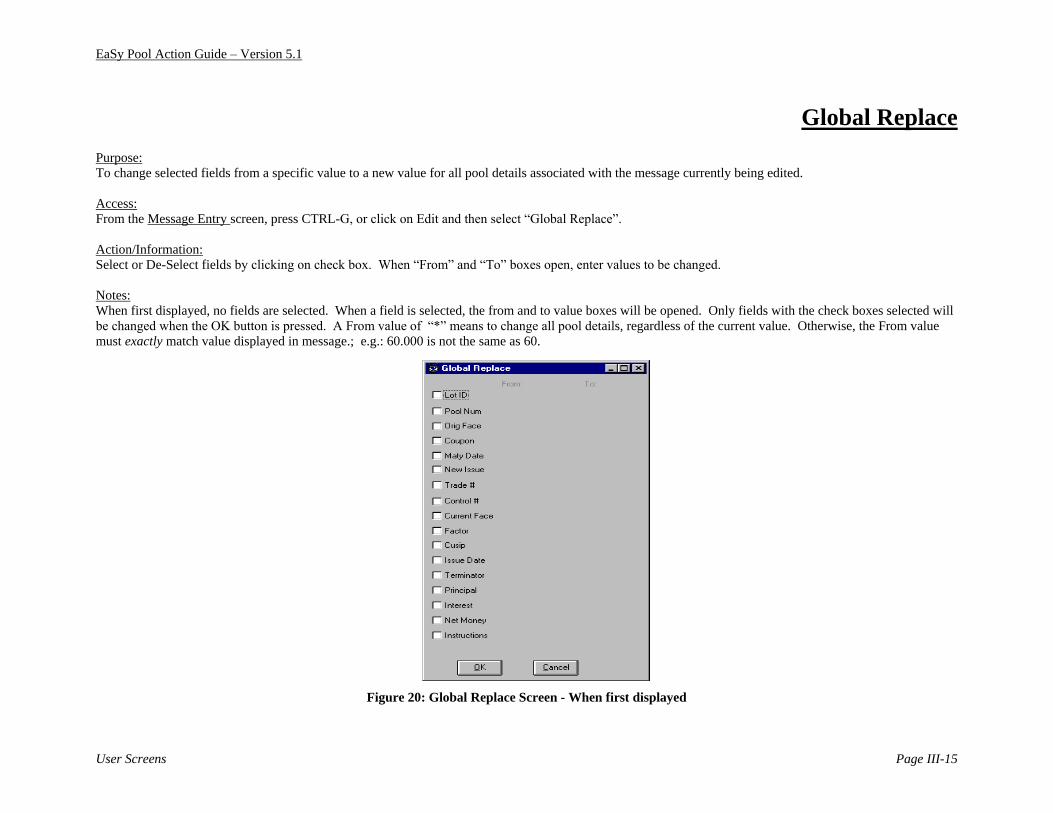
Global Replace
Purpose:
To change selected fields from a specific value to a new value for all pool details associated with the message currently being edited.
Access:
From the Message Entry screen, press CTRL-G, or click on Edit and then select “Global Replace”.
Action/Information:
Select or De-Select fields by clicking on check box. When “From” and “To” boxes open, enter values to be changed.
Notes:
When first displayed, no fields are selected. When a field is selected, the from and to value boxes will be opened. Only fields with the check boxes selected will
be changed when the OK button is pressed. A From value of “*” means to change all pool details, regardless of the current value. Otherwise, the From value
must exactly match value displayed in message.; e.g.: 60.000 is not the same as 60.
Figure 20: Global Replace Screen - When first displayed

EaSy Pool Action Guide – Version 5.1
User Screens Page III-16
Figure 21: Global Replace Screen - 2 fields to be changed

EaSy Pool Action Guide – Version 5.1
User Screens Page III-17
Sent EPN Messages
Purpose:
To view, select, resend, save to a comma-delimited (.csv) file or delete business messages or view non-business messages sent to EPN via ESP.
Access:
From the EaSy Pool Main screen, click on the Sent button. The Sent EPN Messages screen is received.
Action/Information:
To view message details, double click on the message header of the message to be viewed or highlight the message header and click on the Detail button. The
Message Display screen will appear. See the Message Entry and Detail Entry sections of this guide for a field by field explanation of the Message Display
screen.
For message selection, choose Message Selection from the view menu. The message selection screen will appear. See Message Selection/Filter for more
information.
To resend a message, highlight the message header of the corresponding message and click on the Resend button. The user receives the Message Entry screen
containing the corresponding message, on which the user can make any necessary changes.
To save a message to a comma-delimited (.csv) file, highlight the message header(s) and then click on File, followed by Save As (selecting no messages headers
is the same as selecting all message headers). The Save Comma Delimited File As screen will appear on which you can name the file and save to a directory or
diskette. Once saved, the message headers will disappear from the Sent Message screen, but will still be available on the Archived Messages screen.
To delete a message, highlight the message header and click on Action, followed by Delete (highlighting none is the same as highlighting all).
To Print a list of “Sent headers”, select headers to be printed, select File Print Message Headers (or Ctrl-H). This will send a list of all message headers on the
Sent screen to the printer.
Notes:
The very last column when scrolling across, shows the message origination (Orig). Possible values are: “I” - for Import, “T” - for Turned and “E” for Entered
into ESP
Sent administrative messages can be viewed from this screen by clicking on the “Non-Bus.” button.

EaSy Pool Action Guide – Version 5.1
User Screens Page III-18
Figure 22: Sent Message Screen

EaSy Pool Action Guide – Version 5.1
User Screens Page III-19
Figure 23: Sent Non-Business Messages Screen

EaSy Pool Action Guide – Version 5.1
User Screens Page III-20
Hot Printing Purpose:
To specify automatic printing of incoming (received) messages from EPN.
Access:
From the EaSy Pool Main screen, click on the Options Menu, then click on Set Hot Printing.
Action/Information:
“Hot Printing” a message is for automatic printing of incoming messages. Using this screen, you have the ability to specify by message type, the messages to be
printed upon receipt from EPN. By clicking on the appropriate box, Hot Printing for a message type is either turned on (checked) or turned off.
If configured as in the screen below, only DK, CX and CC messages will auto print upon receipt.
Figure 24: Set Message Types for Hot Printing Screen

EaSy Pool Action Guide – Version 5.1
User Screens Page III-21
Figure 25: Sample Hot Printed Message
Business Message Received:
Message ID: 07240000011
Type Submit Contra TBA CUSIP Orig Par Price GDMM
DK MBXX MBYY 01F060666 002000000.00 098.500000000 0002
Trade Settle Delivery Internal ID Sub Ac Trag Msg ID
06/18/2007 07/20/2007 07/20/2007
Cross Ref Special Instructions #Pools Dup Rsn Code T2 Time
0005 0999 10:49:41
Lot ID Pool Orig Face Coupon Maturity N Trade Num Control Curr Face Factor CUSIP Issue Term Principal InterestNet
===========================================================================================================================================
1AA 0377695 000607519 07.5000 CZ4 000000000.00 0.000000000 0000 000000000.00 000000000.00 000000000.00
1BB 0404709 000250000 07.5000 CZ4 000000000.00 0.000000000 0000 000000000.00 000000000.00 000000000.00
1CC 0425911 000197519 07.0000 CZ4 000000000.00 0.000000000 0001 000000000.00 000000000.00 000000000.00
2AA 0425911 000572481 07.0000 CZ4 000000000.00 0.000000000 0000 000000000.00 000000000.00 000000000.00
2BB 0410168 000490523 07.0000 CZ4 000000000.00 0.000000000 0001 000000000.00 000000000.00 000000000.00

EaSy Pool Action Guide – Version 5.1
User Screens Page III-22
Archived EPN Messages
Purpose:
To view, select, restore or delete archived business messages or view non-business messages. Archived messages are those that have been saved to a comma-
delimited (.csv) file.
Access:
From the EaSy Pool Main screen, click on the Archived button.
Action/Information:
To view message details, double click on the message header of the message to be viewed or highlight the message header and click on the Detail button. The
Message Display screen will appear. See the Message Entry and Detail Entry sections of this guide for a field by field explanation of the Message Display
screen.
To restore a message, highlight the message header of the corresponding message and click on the Restore button (highlighting none is the same as highlighting
all). The user receives a status message indicating “ ___ Message(s) Restored to pre-Archived State”.
For message selection, choose Message Selection from the view menu. The message selection screen will appear. See Message Selection/Filter for more
information.
To delete a message, highlight the message header and click on Action, followed by Delete (highlighting none is the same as highlighting all).
To Print a list of “Archived headers”, select headers to be printed, select File Print Message Headers (or Ctrl-H). This will send a list of all message headers on
the Archived screen to the printer.
Notes:
The very last column when scrolling across, shows the message origination (Orig). Possible values are: “R” - for Received, “I” - for Import/Sent, “T” - for
Turned/Sent and “E” for Entered/Sent into ESP.

EaSy Pool Action Guide – Version 5.1
User Screens Page III-23
Figure 26: Archived Message Screen

EaSy Pool Action Guide – Version 5.1
User Screens Page III-24
Figure 27: Archived Message Screen with Status After Restore

EaSy Pool Action Guide – Version 5.1
User Screens Page III-25
Import Data
Purpose:
To view or import data from a comma-delimited (.csv) file to the ESP Pending Message screen.
Access:
From the EaSy Pool Main screen, click on the File option from the menu bar, then click on Open. Once the Open Comma-Delimited File screen appears, click
on the file you would like to open (must be a .csv file). The EaSy Pool Main screen appears with “Reading Comma Delimited File please wait” appearing in the
Status window followed by the Import Data screen.
Action/Information:
To import specified messages on the Import Data screen, highlight the Message Header(s) of the message(s) you want to import to ESP and click on the To Pend.
button. Status window displays “___ Messages Written to Pending. To import all messages displayed to ESP, click on the To Pend button without highlighting
any message headers. A confirmation message is received stating “All messages will be written to Pending, OK, Cancel”. If OK is chosen, the Status window
displays “___ Messages Written to Pending”.
To Clone an existing message from the Import Data Screen, highlight the message header and click on the Clone button. The user receives the Message Entry
screen containing the corresponding message on which the user can make necessary changes.
Notes:
To view the message details, double click on the Message Header of the message to be viewed or highlight the Message Header of the message to be viewed and
click on the Detail button. The Message Display screen will appear. See the Message Entry and Detail Entry sections of this guide for a field by field explanation
of the Message Display screen.
Figure 28: File Open Dialog Screen for Importing Data into ESP

EaSy Pool Action Guide – Version 5.1
User Screens Page III-26
Figure 29: Main Screen during read of .csv

EaSy Pool Action Guide – Version 5.1
User Screens Page III-27
Figure 30: Import Data Screen

EaSy Pool Action Guide – Version 5.1
User Screens Page III-28
Figure 31: Import All Message Screen
Figure 32: Import Screen After Import

EaSy Pool Action Guide – Version 5.1
User Screens Page III-29
Ad-Hoc Reporting Purpose:
To Request EPN “Ad-Hoc” Reports based upon specified criteria.
Access:
From the EaSy Pool Main Screen, select Ad-Hoc Reporting from the menu.
Action/Information:
To request a Message Summary or Message Detail Report from EPN that includes data from all of the EPN Messages both sent and received by your account for
the current date, click on the appropriate Report Type, and then click on OK. Once the report is created, it will be posted to FICC‟s Report Center under the
“EPN” link where the user can review or print it. To customize reports, enter valid selection criteria to the appropriate fields on the Ad Hoc Report Request
screen and click OK. After the request is processed, a TX message will be delivered to the non-business messages list and a pop-up message will be displayed.
Note: Users may request up to 2 days worth of information prior to the current business trade date.
Figure 33: Ad-Hoc Report Request Screen

EaSy Pool Action Guide – Version 5.1
User Screens Page III-30
AD HOC REPORT REQUEST
Field Name Description/Reference Valid Values/Format Mandatory
/Optional
1 ACCOUNT EPN account symbol of message initiator (see EPN Contact List at
www.ficc.com) – default value will be taken from the communication
setup screen.
XXXX (e.g. MBYY) Must be a
valid EPN Account ID
M
2 CONTRA EPN account symbol of message recipient (see EPN Contact List at
www.ficc.com)
XXXX (e.g. MBYY) Must be a
valid EPN Account ID
O
3 TRADE DATE Date the trade was executed (as stated on the EPN Message) mmddccyy or mm-dd-ccyy O
4 SETTLE DATE Date the trade is scheduled to settle (as stated on the EPN Message) mmddccyy or mm-dd-ccyy O
5 DELIVERY DATE Date the securities are scheduled to be delivered (as stated on the EPN
Message)
mmddccyy or mm-dd-ccyy O
6 ENTRY DATE Date the trade was transmitted to EPN – default value is current date mmddccyy or mm-dd-ccyy O
7 TBA CUSIP Indicates agency, product code, coupon, maturity and settlement month
(as issued by Standard & Poors)
XXXXXXXXX Must be a valid
TBA CUSIP
O
8 SUB ACCOUNT Identifies sub account associated with the submitter or contra of an ON
message (see EPN Sub Account list at www.ficc.com)
XXXX O
9 FROM TIME Beginning Time trade was processed by EPN (T2 Time) HH:MM O
10 TO TIME Ending Time trade was processed by EPN (T2 Time) HH:MM O
Table 4: Ad-Hoc Report Request Input Values
A = Alpha 9 = Numeric X = Alphanumeric

EaSy Pool Action Guide – Version 5.1
User Screens Page III-31
Message Selection/Filter Purpose:
To select messages based upon specified criteria.
Access:
From the view menu on any of the following screens: Pending EPN Messages, Received EPN Messages, Sent EPN Messages or Archived EPN Messages.
Action/Information:
To select messages based upon a given criteria, click on the appropriate check box(es). Fill in the filter value, and then press OK. The message screen will then
be displayed containing only those records meeting the selection criteria. All functions available on the “launching” screen, are also available on the screen
containing the selected records.
Notes:
The filter value entered must match the entire value in the field in all cases except for TBA CUSIP. In the case of TBA CUSIP, a partial value may be entered in
the selection criteria field.
Figure 34: Message Selection/Filter Screen when first displayed

EaSy Pool Action Guide – Version 5.1
User Screens Page III-32
Figure 35: Message Selection Screen - Selecting based upon 2 fields

EaSy Pool Action Guide – Version 5.1
User Screens Page III-33
Send Pending Messages
Purpose:
To send all pending messages to EPN via ESP.
Access:
1. To send all pending business messages to EPN, access the EaSy Pool Main screen and click on the Send Pending button.
2. To send selected business messages to EPN, access the Pending EPN Messages screen by clicking on the Pending button on the EaSy Pool Main screen,
highlight the Message Header(s) of the pending message(s) to be sent to EPN and click on the TO EPN button.
Action/Information:
If all messages are sent via the Send Pending button, a confirmation message stating “All messages will be sent from Pending” Yes/No will be received. If Yes
is chosen, the Status window on the EaSy Pool Main screen will indicate “Sending All Messages from Pending”.
Status window on the Pending EPN Messages screen will indicate “___ Messages Sent To EPN From Pending” when selected Pending businesses messages are
sent via the Pending EPN Messages screen.
After all messages have been sent to EPN, messages will remain on the Pending screen until accepted by EPN. Rejected message information can be found in
the log file (see page III-45).
Notes:
See Pending EPN Messages section of this Guide for example of sending selected business messages to EPN via the Pending EPN Messages screen.
Figure 36: Send Pending Warning Screen

EaSy Pool Action Guide – Version 5.1
User Screens Page III-34
Figure 37: Main EaSy Pool Screen after Send Pending

EaSy Pool Action Guide – Version 5.1
User Screens Page III-35
Retransmission Request Screen
Purpose:
To request retransmission, by sequence number, of receive messages. This is used when a message is believed to be lost or incomplete.
Access:
From the EaSy Pool Main screen, click on the Retrans Request icon.
Action/Information:
N/A
Notes:
Submitter, Original Connection ID and To Connection ID are filled in using the values from the Communication Setup screen.
Figure 38: Retransmission Request Screen

EaSy Pool Action Guide – Version 5.1
User Screens Page III-36
RETRANSMISSION REQUEST
Field Name Description/Reference Valid Values/Format Mandatory
/Optional
1 SUBMITTER EPN account symbol of RR message initiator (see EPN Contact List at
www.ficc.com)
XXXX (e.g. MBYY) Must be a
valid EPN Account ID
M8
2 ORIGINAL
CONNECTION ID
Connection ID from which the message(s) originated XXXX
Must be a valid Connection ID
M8
3 TO CONNECTION ID Connection ID to which message(s) are to be retransmitted XXXX
Must be a valid Connection ID
M8
4 FROM SEQUENCE
NUMBER
Starting sequence number of message(s) to be retransmitted 999999
Must be less than or equal to “To
Sequence #” value
M
5 TO SEQUENCE
NUMBER
Ending sequence number of message(s) to be retransmitted 999999
Must be greater than or equal to
“From Sequence #” value
M
Table 5: Retransmission Request Input Values
A = Alpha 9 = Numeric X = Alphanumeric
8A default value for this field will be filled in based upon the values found on the Communication Setup Screen.

EaSy Pool Action Guide – Version 5.1
User Screens Page III-37
Maintenance Menu
Purpose:
To update your firm‟s internal information (e.g., Account Ids, Security Codes, Sub Account Ids, Cancel/DK Codes, and Reject Codes), use the information from
MBSD‟s Important Notices. This allows ESP to convert a firm‟s internal Account Ids, Security Codes and Sub Account Ids (included in a comma-delimited
(.csv) file being imported by the firm to ESP), to EPN acceptable codes; and to convert EPN‟s Account Ids, TBA CUSIPs and Sub Account Ids to a firm‟s
internal coding when saving sent or received files to a comma-delimited (.csv) file. The Cancel/DK Codes are for user-reference only. The Reject Codes are
used to display cause for EPN rejection in the Log file and on the Status bar.
Access:
From the EaSy Pool Main screen, click on the Maintenance icon.
Action/Information:
The Easy Pool Maintenance screen will appear, from which the user can select Security, Account, Sub-Account, Cancel/DK or Reject Codes. Each choice will
bring the user to a corresponding maintenance screen. On that maintenance screen, the user can view, Add/Modify or Delete entries. If a firm uses the same
nomenclature as MBSD, then there is no need to fill in the “local” section of the tables.
Notes:
Selecting File, Print Screen from the menu will produce a printout of the currently displayed screen.
Figure 39 : Maintenance Menu Screen

EaSy Pool Action Guide – Version 5.1
User Screens Page III-38
Figure 40: Security Maintenance Screen9
9 The TBA CUSIP/Security Conversion table only includes the first 7 characters of the CUSIP. The remaining 2 places will be calculated automatically by ESP.
The settlement month can be over-ridden by entering the settlement month in the TBA CUSIP field. See page IV-51 in the Appendices for more information on
TBA CUSIPs.

EaSy Pool Action Guide – Version 5.1
User Screens Page III-39
Figure 41: Account Maintenance Screen

EaSy Pool Action Guide – Version 5.1
User Screens Page III-40
Figure 42: SubAccount Maintenance Screen

EaSy Pool Action Guide – Version 5.1
User Screens Page III-41
Figure 43: Cancel, DK Reason and Pool Substitution Reason Code Maintenance Screen

EaSy Pool Action Guide – Version 5.1
User Screens Page III-42
Figure 44: Reject Reason Code Maintenance Screen

EaSy Pool Action Guide – Version 5.1
User Screens Page III-43
Clean Up Data Purpose:
To clean up old data from the ESP database. This function can be used to minimize the space required by ESP on your hard-drive.
Access:
From the EaSy Pool Main Screen, click on the clean-up button. The Clean-Up Data Window will appear.
Action/Information:
Clean-up Data will delete (permanently) all business and non-business messages added to the database prior to the date specified. The default date is one week,
but this date can be changed.
Figure 45: Clean Up Data Screen

EaSy Pool Action Guide – Version 5.1
User Screens Page III-44
Message Trace
Purpose:
To allow a user to view the raw data being sent and received from EaSy Pool. This is generally used for debugging purposes.
Access:
Select View and then Message Trace from the EaSy Pool Main screen.
Action/Information:
This window will show the raw data sent to EPN from EaSy Pool, and sent to EaSy Pool from EPN. This screen is generally used for debugging purposes.
If the Receive Trace and Send Trace options are not checked (EaSy Pool Main Menu, Options), this window will not be updated.
Figure 46: Message Trace Window Screen

EaSy Pool Action Guide – Version 5.1
User Screens Page III-45
View Log File
Purpose:
To allow a user to view informational updates from EaSy Pool and to alert a user to errors in the pool count of a message.
Access:
From the EaSy Pool Main screen, click on Log View or Select View and then Log File from the EaSy Pool Main screen.
Action/Information:
This window will show informational messages from EaSy Pool. It will show such things as Negative AA‟s and the description of why the message was
rejected, as well as connect and disconnect times for the current day. In addition, it will identify when the actual count of pools in the Detail section fails to
match the number of pools in the header of a message. It will also display sequence gaps and other important information. This log shows only the current days‟
activity.
If a sequence gap message is generated internally in ESP, the message will be prefaced by “(ESP)”. If a sequence gap message is received, a Retransmission
Request (see page III-35) should be sent to retrieve possible missing messages.
The following messages may occur if a communication interruption occurs. Please reconnect and verify if you missed any messages. Do a Retransmission
request for missing messages:
1 - “Missing SOM received” 2 - “Missing EOM received” 3 - “Data Received before SOM” 4 - ”Data Received after EOM”
Notes:
It is recommended that the Log View remain open while connected to EPN.
Figure 47: View Log File Screen
EaSy Pool Action Guide – Version 5.1
User Screens Page III-46
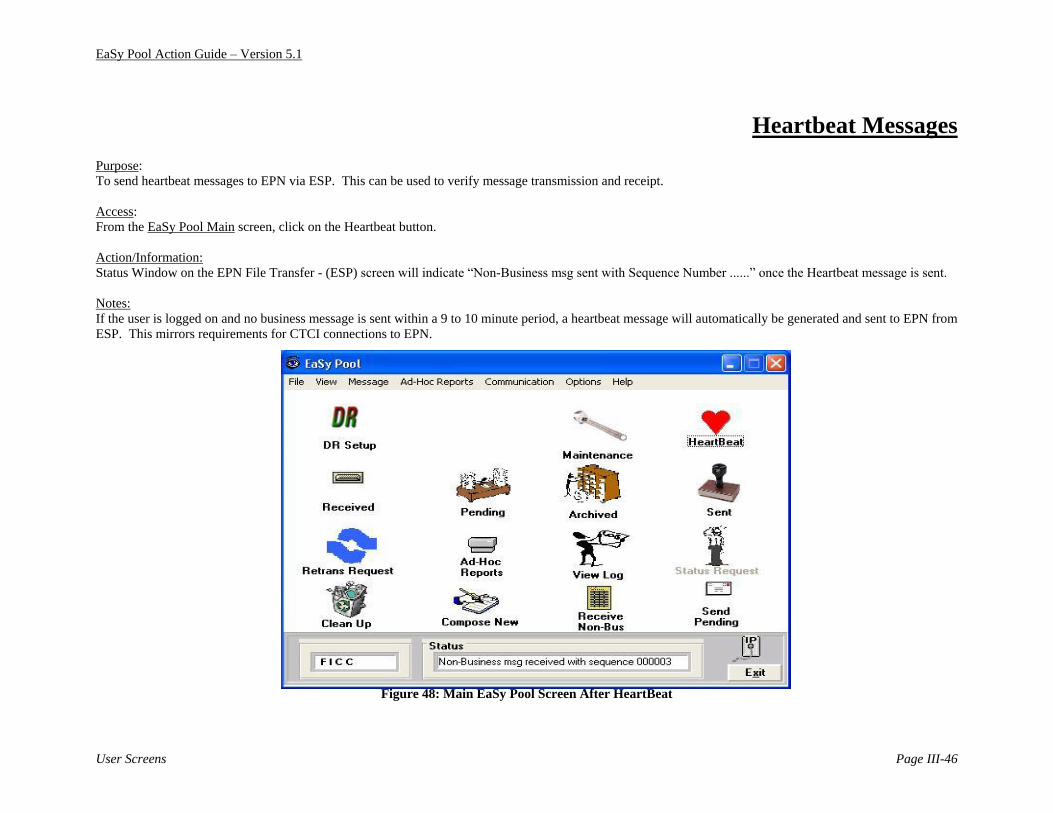
Heartbeat Messages
Purpose:
To send heartbeat messages to EPN via ESP. This can be used to verify message transmission and receipt.
Access:
From the EaSy Pool Main screen, click on the Heartbeat button.
Action/Information:
Status Window on the EPN File Transfer - (ESP) screen will indicate “Non-Business msg sent with Sequence Number ......” once the Heartbeat message is sent.
Notes:
If the user is logged on and no business message is sent within a 9 to 10 minute period, a heartbeat message will automatically be generated and sent to EPN from
ESP. This mirrors requirements for CTCI connections to EPN.
Figure 48: Main EaSy Pool Screen After HeartBeat

EaSy Pool Action Guide – Version 5.1
Appendices Page IV-1
IV. Appendices
EaSy Pool Action Guide – Version 5.1
Appendices Page IV-2
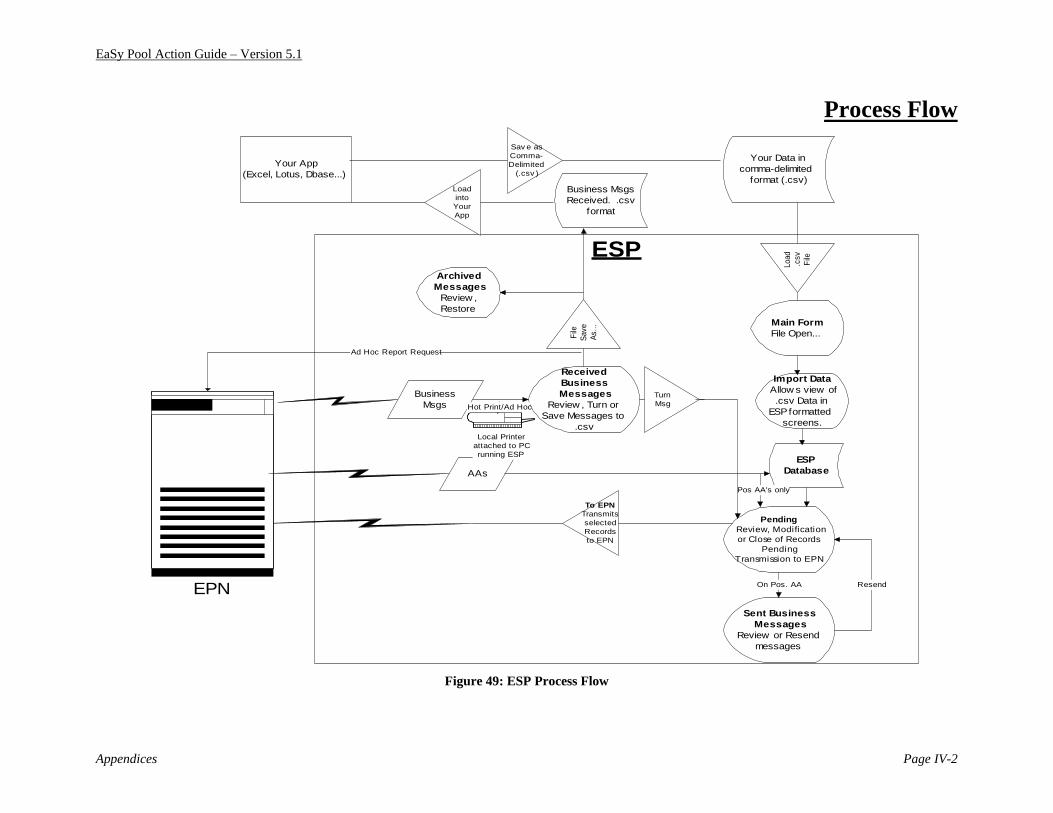
Process Flow
Your App
(Excel, Lotus, Dbase...)
Sav e as
Comma-
Delimited
(.csv )
Your Data in
comma-delimited
format (.csv)
ESP
Main Form
File Open...
Load
.csv
File
Import Data
Allow s view of
.csv Data in
ESP formatted
screens.
ESP
Database
Pending
Review, Modification
or Close of Records
Pending
Transmission to EPN
To EPN
Transmits
selected
Records
to EPN
EPN
AAs
Business
Msgs
Sent Business
Messages
Review or Resend
messages
Received
Business
Messages
Review , Turn or
Save Messages to
.csv
Turn
Msg
File
Save
As..
.
Business Msgs
Received. .csv
format
Archived
Messages
Review ,
Restore
Pos AA's only
On Pos. AA Resend
Load
into
Your
App
Local Printer
attached to PC
running ESP
Ad Hoc Report Request
Hot Print/Ad Hoc
Figure 49: ESP Process Flow
EaSy Pool Action Guide – Version 5.1
Appendices Page IV-3
Disaster Recovery The EPN system operates with a number of back-up‟s providing it with fail-over scenarios should the system experience a difficulty. In each of these failover
scenarios, the participant will loose connection to the application and will be required to reconnect to the application. Participants are advised to refer to the
Implementation Guide for additional detail regarding the disaster recovery process.
Disaster Recovery Testing
Purpose
The Disaster Recovery Test is conducted to provide an opportunity for EPN Participants to test internal disaster recovery procedures in the event of a
application/server failure either within the primary site or a failure that will require failover to the alternate site.
DR Testing is offered on a monthly basis on the last Friday of the month. The test is initiated at approximately 4:30PM and the Participant Test System will run
in DR mode for the rest of the day. The system will take about five minutes to recover.
Participation in the test is optional for all Participants, however, FICC strongly recommends that all new EPN Participants participate in the test prior to going
live or in the first test after going live.
What to Expect
As part of the test, the system will act as if an across-site failover has occurred. Once Participants re-establish connectivity to the system, they will see the
following series of events:
1. The system will deliver a Disaster Recovered text message, .The text message will display “DISASTER RECOVERED. MBSCC EPN RUNNING
AT DISASTER RECOVERY SITE”. This text message serves as the definitive indication that the production system is running at the Disaster
Recovery Site;
2. the system will deliver an unsolicited LS message;
3. The Message ID field is incremented by 100,000. This is the field of form mmddxxxxxxx which uniquely identifies any message on the system
(where mm = current month, dd= current day, xxxxxxx = incrementing number for every business message processed). For example, if the last
business message known to have been processed at the Production Site had message ID 06250001234, the next message processed at Disaster
Recovery Site after recovery would be 06250101235.
4. The HA flag will be modified to 2.
Disaster Recovery Test Procedures
(1) Using your Test System log onto the Participant Test Environment prior to the initiation of the test. You may choose to send a message to FICC‟s test
account (MBXX) or send a heartbeat message.
Any subscribers utilizing the same storage facility for both the EPN production and test environments should be careful that messages received
as part of the Disaster Recovery test are not turned or sent to production.

EaSy Pool Action Guide – Version 5.1
Appendices Page IV-4
(2) MBSD will simulate a failure across-sites, will fail both applications/servers at the primary site. The pop-up window with the message “IP(Internet
Protocol) Connection has been lost” will appear.
(4) The user should attempt to log on again and if the site has recovered, they will be sent a TX message, an LS message and the HA flag will be set to 2.
(5) Determine if there are any gaps between the last sequence numbers from EPN and last messages received or sent. If there are sequence number gaps,
the user should request a retransmission from EPN via a Retransmission Request (RR) message type for any messages necessary to close a gap between
the Production and Disaster Recovery systems

EaSy Pool Action Guide – Version 5.1
Appendices Page IV-5
TBA CUSIP A full listing of TBA CUSIPs eligible for use in the EPN system can be found at www.ficc.com.
Product Code
The first and second characters represent the security type:
01 = Single Family 11 = 11th District COFI, 12% or greater Original Life CAP,
125 Basis Point or higher margin
02 = Gold Single Family 13 = Seasoned - Coupon 9.50 - 9.99%, maturity <= 2009 or
Coupon >= 10.00%, maturity <= 2010
03 = Single Family/GPM 14 = Seasoned - Coupon < 9.00%, maturity <= 2008 or Coupon 9.00 - 9.49%, maturity <= 2009
06 = Balloon 16 = ARMs - Trade Date >= 8/1/95 & Settlement >= 10/1/95
07 = Gold Balloon 21 = Jumbos
Agency
The third character of the TBA CUSIP designates the agency issuing the security as follows:
F = FNMA H = GNMA II N = GNMA I R = FHLMC
Coupon Value
The fourth through sixth characters designate the coupon rate for all trades except zero coupon trades (e.g. COFI). The whole number portion of the coupon rate
occupies the fourth and fifth characters in the TBA CUSIP, the fractional portion is represented in the sixth character. For zero coupon trades, the fourth through
sixth characters designate the basis point margin over the appropriate index. The fractional portions have been converted to save space – see examples below.
Coupon Trades Zero Coupon Trades
12 % = 120 100 basis points = 010
12 1/4% = 121 125 basis points = 011
12 1/2% = 122 150 basis points = 012
12 3/4% = 123 175 basis points = 013
200 basis points = 020
9 % = 090
9 1/4% = 091
9 1/2% = 092
9 3/4% = 093

EaSy Pool Action Guide – Version 5.1
Appendices Page IV-6
Maturity
The seventh character represents the maturity of the security.
1 = 5 years 4 = 15 years
2 = 7 years 5 = 20 years
3 = 10 years 6 = 30 years
Settlement Month
The eighth character represents the settlement month, with A-C representing October through December.
1 = January 4 = April 7 = July A = October
2 = February 5 = May 8 = August B = November
3 = March 6 = June 9 = September C = December
Check Digit
The ninth character is reserved for the check digit. This is calculated using the CUSIP bureau‟s standard check digit formula – using the Modulus 10 Double
Add Double technique.
Examples:
02R081460 = FHLMC, GOLD SINGLE FAMILY, 8 ¼%, 15 year maturity, June settlement
11F0116A0 = FNMA, COFI, 125 basis points, 30 year maturity, October settlement
In EaSy Pool, all messages displaying on the message header screens (Pending, Sent, Received and Archived will have full 9 character CUSIPs. On the message
entry screen or in file uploads anywhere from 7 to 9 characters of the TBA CUSIP may be entered. If the full 9 character CUSIP is entered, ESP will not touch
the CUSIP. If a 7 character CUSIP is entered, ESP will take the settlement month from the settlement date on the message (if no settlement date is entered, it
will use the month from the PC‟s date). ESP will then calculate the check digit based upon this CUSIP. If you enter the 8th character (the settlement month),
ESP will simply calculate the check digit using the above approved formula.

EaSy Pool Action Guide – Version 5.1
Appendices Page IV-7
EPN Filters
This feature allows EaSy Pool users the option to add up to three additional PCs running the EaSy Pool software, specifying the types of messages directed to
those PCs.
Non-Filter EaSy Pool Users receive a single copy of every message on a single PC. With the addition of the Filter Service, EaSy Pool users have the option of
having one or more (up to three) additional PCs.
For each additional PC connected, the option of that PC receiving all of the messages, or some filtered subset of messages is available.
Filters can be specified by accounts (up to twelve), and within those accounts, by Agency or TBA CUSIP.
How Do Filters Work?
For every connection to EPN, there are two queues established. One queue is for messages coming in to EPN, and the other queue is for messages processed by
EPN and destined for the firm. This is the case for all CTCI customers including EaSy Pool connections. The Message Processor services one inbound queue
for each firm -- this is the “subscriber queue”. It then sends the messages to the appropriate outbound queue.
For Filters, a separate connection is established for each PC. A Consolidation Process takes messages from each of the inbound queues and writes them to the
subscriber queue. This means that there is theoretically a potential delay for messages to be processed by the Message Processor. In actuality, the delay is
unseen, as the consolidation process is able to write the message to the subscriber queue while it is still being transmitted, thereby eliminating any real lag in
reaching the message processor. Messages are picked up by the Consolidation process using the same Rotary Methodology as the Message Processor only
within a single firm; i.e., each Filter Firm has its own copy of the Consolidation Process to allow message processing to occur as quickly as possible.
On the outbound side, a Distribution process has been established to check the filters, and to route messages to the appropriate outbound queue based upon the
filter tables. The primary PC will continue to receive every message as soon as it is processed by the Message Processor, however the filtered PCs may
experience a slight delay as each message is checked against the filter with as many copies as necessary written to the outbound queues.
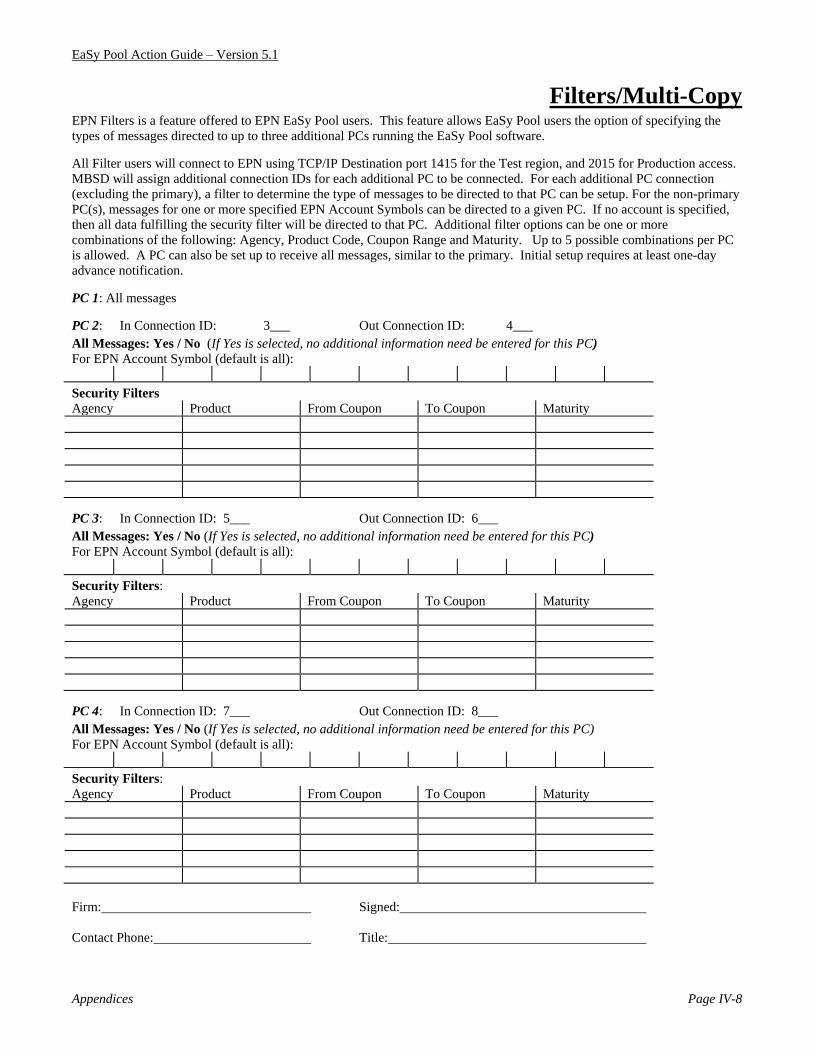
EaSy Pool Action Guide – Version 5.1
Appendices Page IV-8
Filters/Multi-Copy EPN Filters is a feature offered to EPN EaSy Pool users. This feature allows EaSy Pool users the option of specifying the
types of messages directed to up to three additional PCs running the EaSy Pool software.
All Filter users will connect to EPN using TCP/IP Destination port 1415 for the Test region, and 2015 for Production access.
MBSD will assign additional connection IDs for each additional PC to be connected. For each additional PC connection
(excluding the primary), a filter to determine the type of messages to be directed to that PC can be setup. For the non-primary
PC(s), messages for one or more specified EPN Account Symbols can be directed to a given PC. If no account is specified,
then all data fulfilling the security filter will be directed to that PC. Additional filter options can be one or more
combinations of the following: Agency, Product Code, Coupon Range and Maturity. Up to 5 possible combinations per PC
is allowed. A PC can also be set up to receive all messages, similar to the primary. Initial setup requires at least one-day
advance notification.
PC 1: All messages
PC 2: In Connection ID: 3___ Out Connection ID: 4___
All Messages: Yes / No (If Yes is selected, no additional information need be entered for this PC)
For EPN Account Symbol (default is all):
Security Filters
Agency Product From Coupon To Coupon Maturity
PC 3: In Connection ID: 5___ Out Connection ID: 6___
All Messages: Yes / No (If Yes is selected, no additional information need be entered for this PC)
For EPN Account Symbol (default is all):
Security Filters:
Agency Product From Coupon To Coupon Maturity
PC 4: In Connection ID: 7___ Out Connection ID: 8___
All Messages: Yes / No (If Yes is selected, no additional information need be entered for this PC)
For EPN Account Symbol (default is all):
Security Filters:
Agency Product From Coupon To Coupon Maturity
Firm: Signed:
Contact Phone: Title: