easy set-up guide
TRANSCRIPT
KENWOOD NAVIGATION SYSTEMS DNX4210BT-OP & DNX4210DAB-OP
Easy Set-up Guide
Volume
1

K E N W O O D
Easy Set-up Guide Bluetooth Hands-free Phone Set-up & FAQ .......................................................................... 1
How to Pair an iPhone ............................................................................................................................ 2 How to Pair a Blackberry 9300 ............................................................................................................... 3 How to Pair a Samsung Galaxy SII ........................................................................................................ 4
Additional hints, if phonebook does not download .................................................................... 5 How to Pair a Phone (General Information for other Makes/Models) .................................................... 6 Amount of Downloadable Contacts ........................................................................................................ 7 No Direct Dial .......................................................................................................................................... 7 New Phones cannot be Paired ............................................................................................................... 7 How to Check How Many Phones are Authorised to Pair? .................................................................... 7 How to Delete a Phone? ......................................................................................................................... 7
Software Updates .................................................................................................................. 8 Where to Download Software Updates .................................................................................................. 8 How to Check what Software Version you are Running ......................................................................... 8 How to Update your Software Version ................................................................................................... 9
Mapping Updates ................................................................................................................ 10 Check Mapping Data Version ............................................................................................................... 10 How to Download a Map Update .......................................................................................................... 11
How to Activate TMC (Traffic Information) ........................................................................... 14 Speed Camera POI’s ........................................................................................................... 15
How to Upload Speed Camera POI’s ................................................................................................... 15 iPod/iPhone ......................................................................................................................... 19
iPod/iPhone Compatibility ..................................................................................................................... 19 How to Connect Up an iPhone 5 ............................................................................................. 19 Video Playback Will Not Work via an iPhone 5 ....................................................................... 19 No iPod/iPhone Loading .......................................................................................................... 19 iPod/iPhone Music Playback Not Working .............................................................................. 19
DAB - Digital Radio (DNX4210DAB only) ............................................................................ 20 Initial DAB Reception Tuning ................................................................................................................ 20 Presetting DAB Stations ....................................................................................................................... 21 Priority Function .................................................................................................................................... 21
General FAQ’s ..................................................................................................................... 22 How to Dim the Display ........................................................................................................................ 22 What to do with a Blank Screen ........................................................................................................... 22 Unable to Enter a Postcode for Wales or Scotland but English Postcodes are OK ............................. 22 My iPod Icon has Disappeared from the Top Menu, Instead I have Video 1 and Video 2 Icons ......... 22
1
Chapter
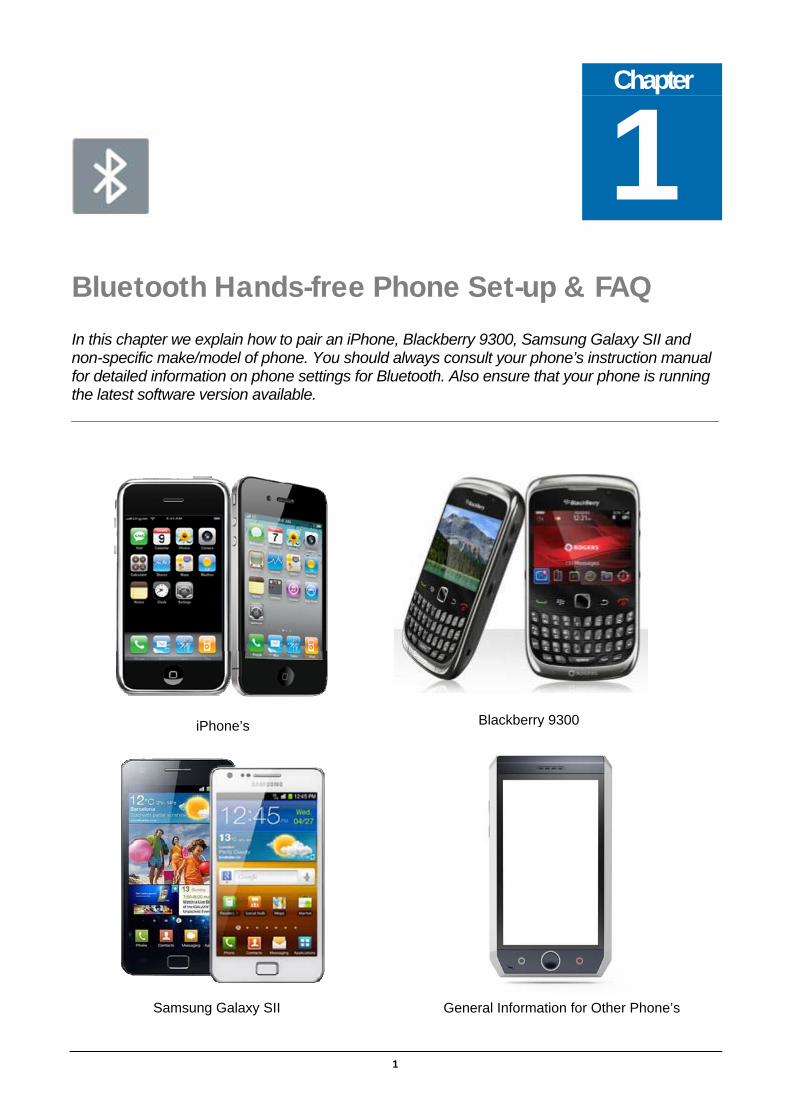
1 Bluetooth Hands-free Phone Set-up & FAQ In this chapter we explain how to pair an iPhone, Blackberry 9300, Samsung Galaxy SII and non-specific make/model of phone. You should always consult your phone’s instruction manual for detailed information on phone settings for Bluetooth. Also ensure that your phone is running the latest software version available.
Blackberry 9300 iPhone’s
Samsung Galaxy SII General Information for Other Phone’s
How You caNavigat
After paplease b
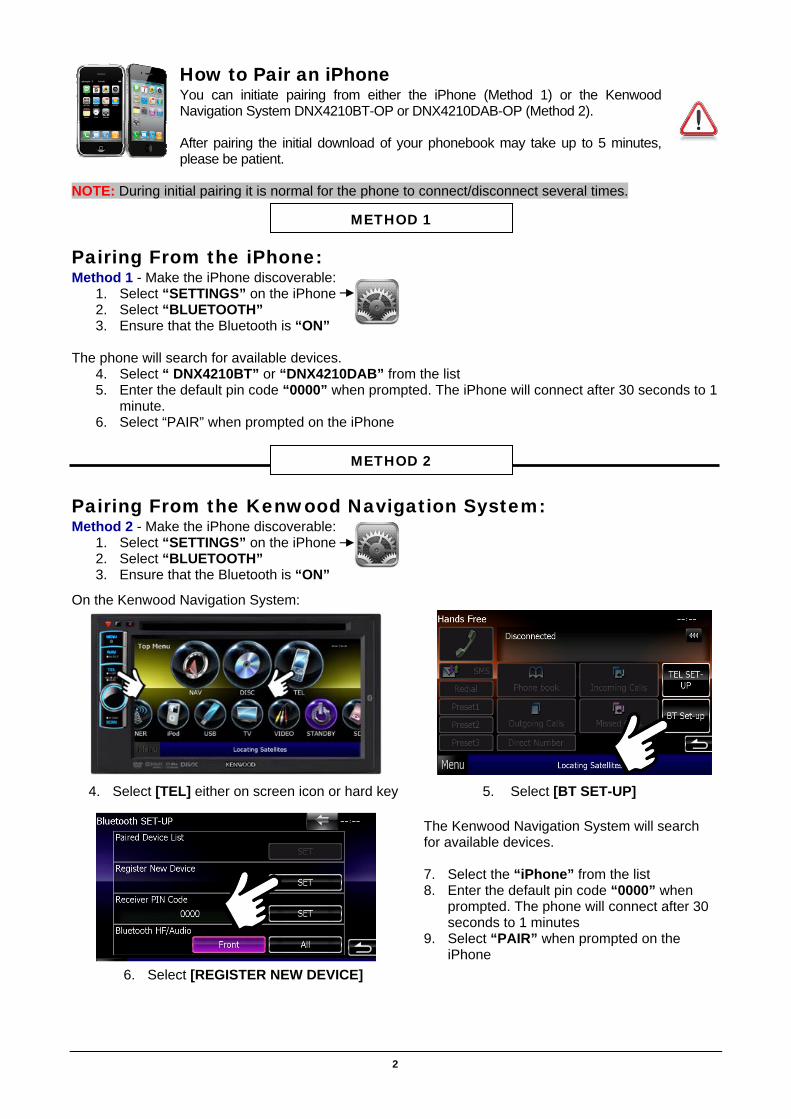
to Pair an iPhone n initiate pairing from either the iPhone (Method 1) or the Kenwood ion System DNX4210BT-OP or DNX4210DAB-OP (Method 2).
iring the initial download of your phonebook may take up to 5 minutes, e patient.
NOTE: During initial pairing it is normal for the phone to connect/disconnect several times. Pairing From the iPhone: Method 1 - Make the iPhone discoverable:
1. Select “SETTINGS” on the iPhone 2. Select “BLUETOOTH” 3. Ensure that the Bluetooth is “ON”
The phone will search for available devices.
4. Select “ DNX4210BT” or “DNX4210DAB” from the list 5. Enter the default pin code “0000” when prompted. The iPhone will connect after 30 seconds to 1
minute. 6. Select “PAIR” when prompted on the iPhone
Pairing From the Kenwood Navigation System: Method 2 - Make the iPhone discoverable:
1. Select “SETTINGS” on the iPhone 2. Select “BLUETOOTH” 3. Ensure that the Bluetooth is “ON”
On the Kenwood Navigation System:
METHOD 1
METHOD 2
4. Select [TEL] either on screen icon or hard key
The Kenwood Navigation System will search for available devices. 7. Select the “iPhone” from the list 8. Enter the default pin code “0000” when
prompted. The phone will connect after 30 seconds to 1 minutes
9. Select “PAIR” when prompted on the iPhone
6. Select [REGISTER NEW DEVICE]
5. Select [BT SET-UP]
2

How to Pair a Blackberry 9300 You can initiate pairing from either the Blackberry 9300 (Method 1) or the Kenwood Navigation System DNX4210BT-OP or DNX4210DAB-OP (Method 2).
After pairing the initial download of your phonebook may take up to 5 minutes, please be patient.
NOTE: During initial pairing you may need to do this several times.
Pairing From the Blackberry 9300: Method 1 - Make the iPhone discoverable:
1. Select Spanner Symbol on the Blackberry 9300 2. Select “BLUETOOTH” 3. Press the Blackberry Button (Touch key) 4. Select “ADD DEVICES” 5. Select “SEARCH”
The phone will list all available devices.
6. Select “ DNX4210BT” or “DNX4210DAB” from the list 7. When the phone prompts for a pin code - “0000” (Default pin code of the Kenwood Navigation
System) 8. You will get the message “ACCEPT CONNECTION REQUEST?” – Press “OK” or “YES”
METHOD 1
METHOD 2
Pairing From the Kenwood Navigation System: Method 2 On the Kenwood Navigation System:
1. Select [TEL] either on screen icon or hard key
The Kenwood Navigation System will search for available devices. 4. Select the “Blackberry 9300” from the list 5. Enter the default pin code “0000” when
prompted 6. Then “ACCEPT CONNECTION
REQUEST” press “OK” or “YES”
3. Select [REGISTER NEW DEVICE]
2. Select [BT SET-UP]
3
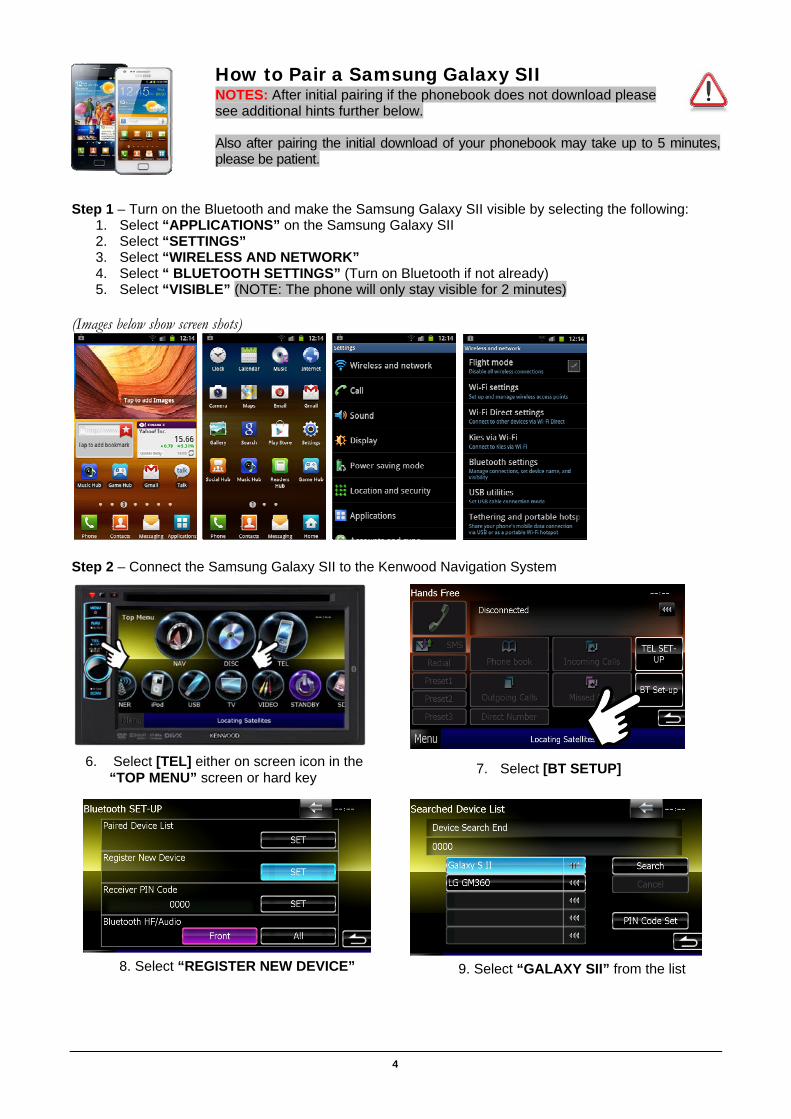
How to Pair a Samsung Galaxy SII NOTES: After initial pairing if the phonebook does not download please see additional hints further below. Also after pairing the initial download of your phonebook may take up to 5 minutes, please be patient.
Step 1 – Turn on the Bluetooth and make the Samsung Galaxy SII visible by selecting the following:
1. Select “APPLICATIONS” on the Samsung Galaxy SII 2. Select “SETTINGS” 3. Select “WIRELESS AND NETWORK” 4. Select “ BLUETOOTH SETTINGS” (Turn on Bluetooth if not already) 5. Select “VISIBLE” (NOTE: The phone will only stay visible for 2 minutes)
(Images below show screen shots)
Step 2 – Connect the Samsung Galaxy SII to the Kenwood Navigation System
6. Select [TEL] either on screen icon in the “TOP MENU” screen or hard key 7. Select [BT SETUP]
9. Select “GALAXY SII” from the list 8. Select “REGISTER NEW DEVICE”
4
Samsung Galaxy SII Continuation
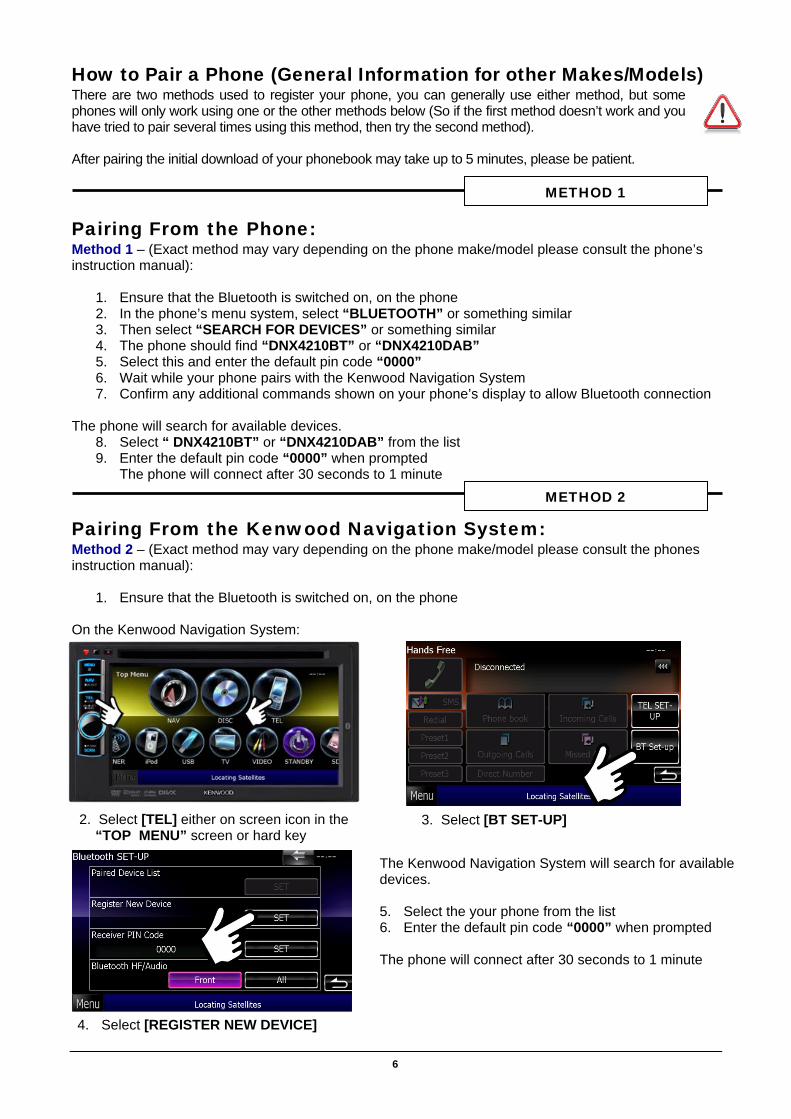
Additional hints, if phonebook does not download 1. During the initial pairing process, your phone may flash a message in the notifications area (Top
Screen) “PHONEBOOK ACCESS REQUEST”.
If you get this message, drag the very top of the screen downwards and check the setting “ALLOW PHONEBOOK ACCESS”.
2. Only contacts on the phone’s memory are transferred if your contacts are on your SIM card then transfer them to the phone’s memory.
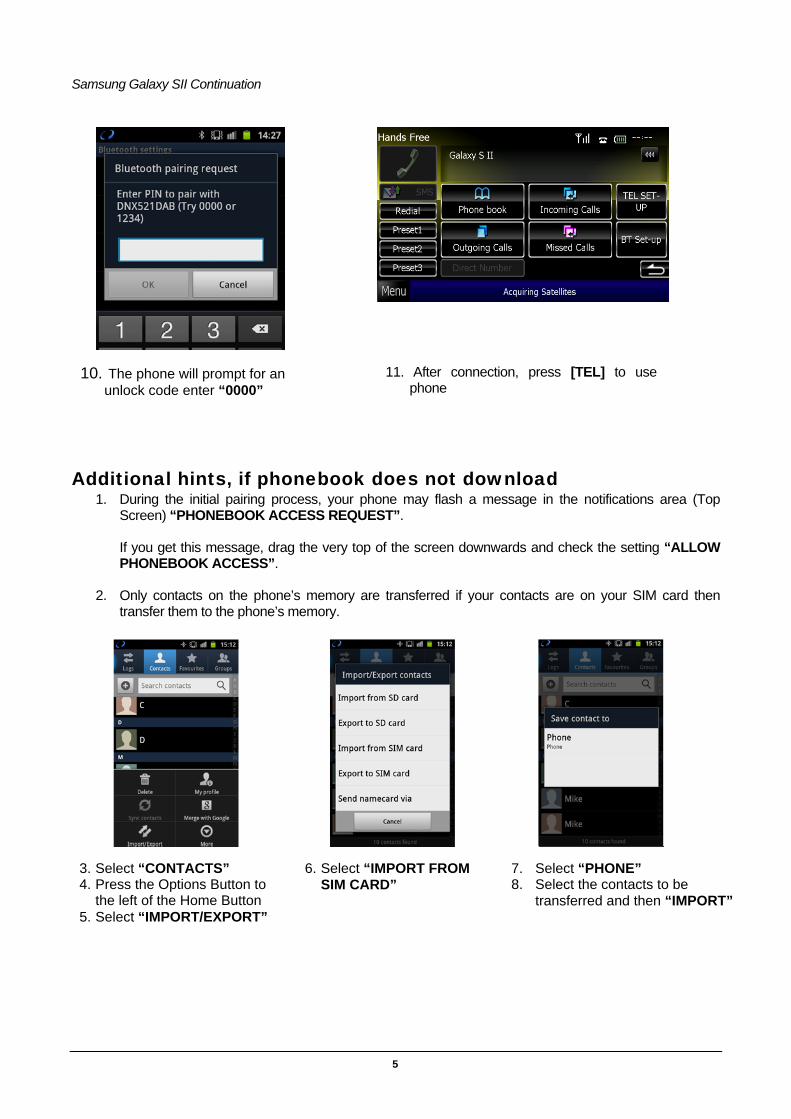
11. After connection, press [TEL] to use phone
10. The phone will prompt for an unlock code enter “0000”
7. Select “PHONE” 8. Select the contacts to be
transferred and then “IMPORT”
6. Select “IMPORT FROM SIM CARD”
3. Select “CONTACTS” 4. Press the Options Button to
the left of the Home Button 5. Select “IMPORT/EXPORT”
5
How to Pair a Phone (General Information for other Makes/Models) There are two methods used to register your phone, you can generally use either method, but some phones will only work using one or the other methods below (So if the first method doesn’t work and you have tried to pair several times using this method, then try the second method).
After pairing the initial download of your phonebook may take up to 5 minutes, please be patient.
6
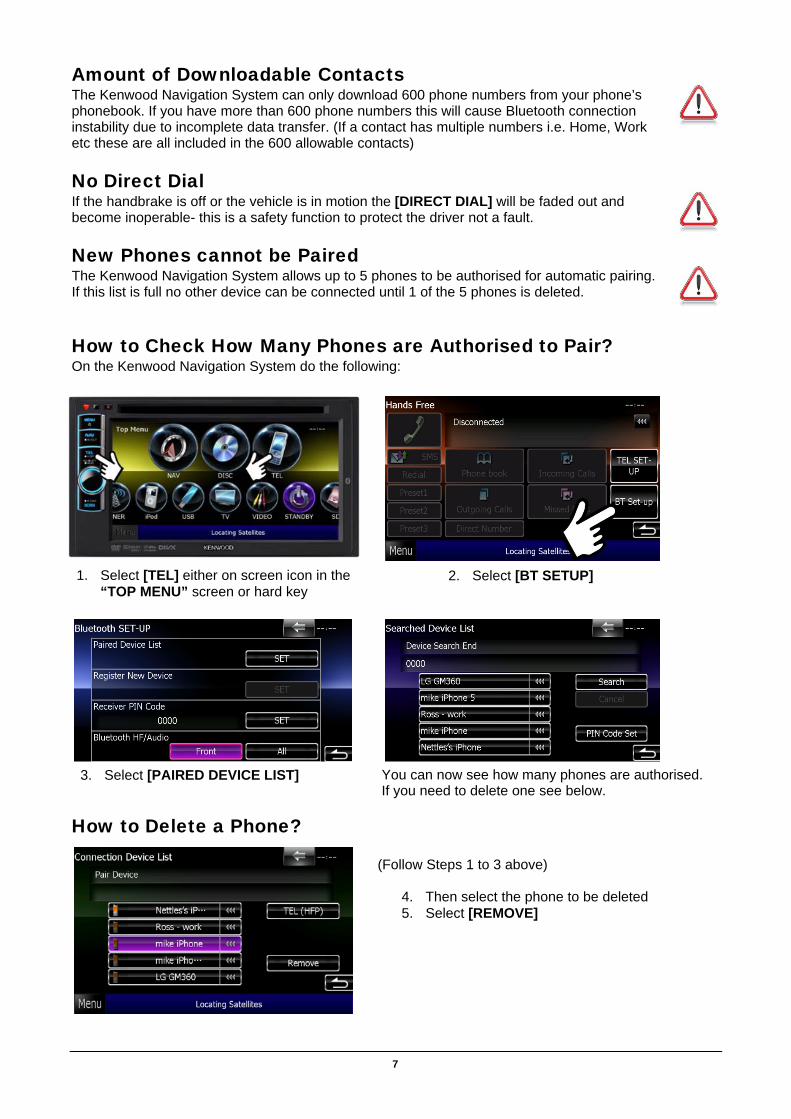
Pairing From the Phone: Method 1 – (Exact method may vary depending on the phone make/model please consult the phone’s instruction manual):
1. Ensure that the Bluetooth is switched on, on the phone 2. In the phone’s menu system, select “BLUETOOTH” or something similar 3. Then select “SEARCH FOR DEVICES” or something similar 4. The phone should find “DNX4210BT” or “DNX4210DAB” 5. Select this and enter the default pin code “0000” 6. Wait while your phone pairs with the Kenwood Navigation System 7. Confirm any additional commands shown on your phone’s display to allow Bluetooth connection
The phone will search for available devices.
8. Select “ DNX4210BT” or “DNX4210DAB” from the list 9. Enter the default pin code “0000” when prompted
The phone will connect after 30 seconds to 1 minute
Pairing From the Kenwood Navigation System: Method 2 – (Exact method may vary depending on the phone make/model please consult the phones instruction manual):
1. Ensure that the Bluetooth is switched on, on the phone On the Kenwood Navigation System:
METHOD 1
METHOD 2
3. Select [BT SET-UP] 2. Select [TEL] either on screen icon in the “TOP MENU” screen or hard key
The Kenwood Navigation System will search for available devices. 5. Select the your phone from the list 6. Enter the default pin code “0000” when prompted The phone will connect after 30 seconds to 1 minute
4. Select [REGISTER NEW DEVICE]
Amount of Downloadable Contacts The Kenwood Navigation System can only download 600 phone numbers from your phone’s phonebook. If you have more than 600 phone numbers this will cause Bluetooth connection instability due to incomplete data transfer. (If a contact has multiple numbers i.e. Home, Work etc these are all included in the 600 allowable contacts)
No Direct Dial If the handbrake is off or the vehicle is in motion the [DIRECT DIAL] will be faded out and become inoperable- this is a safety function to protect the driver not a fault.
New Phones cannot be Paired The Kenwood Navigation System allows up to 5 phones to be authorised for automatic pairing. If this list is full no other device can be connected until 1 of the 5 phones is deleted.
How to Check How Many Phones are Authorised to Pair? On the Kenwood Navigation System do the following:
How to Delete a Phone?
1. Select [TEL] either on screen icon in the “TOP MENU” screen or hard key
2. Select [BT SETUP]
You can now see how many phones are authorised. If you need to delete one see below.
(Follow Steps 1 to 3 above)
4. Then select the phone to be deleted 5. Select [REMOVE]
3. Select [PAIRED DEVICE LIST]
7
Chapter
2 Software Updates Keeping your Kenwood Navigation System up to date with the latest software releases from Kenwood ensures optimal performance, phone compatibility, bug fixes and more –make sure your system stays at its best. (NOTE: This is not mapping data see Chapter 3)
Where to Download Software Updates
Please check regularly for information about the model you own from our website. Before you update the software first check what version you are running to see if there is a later version.
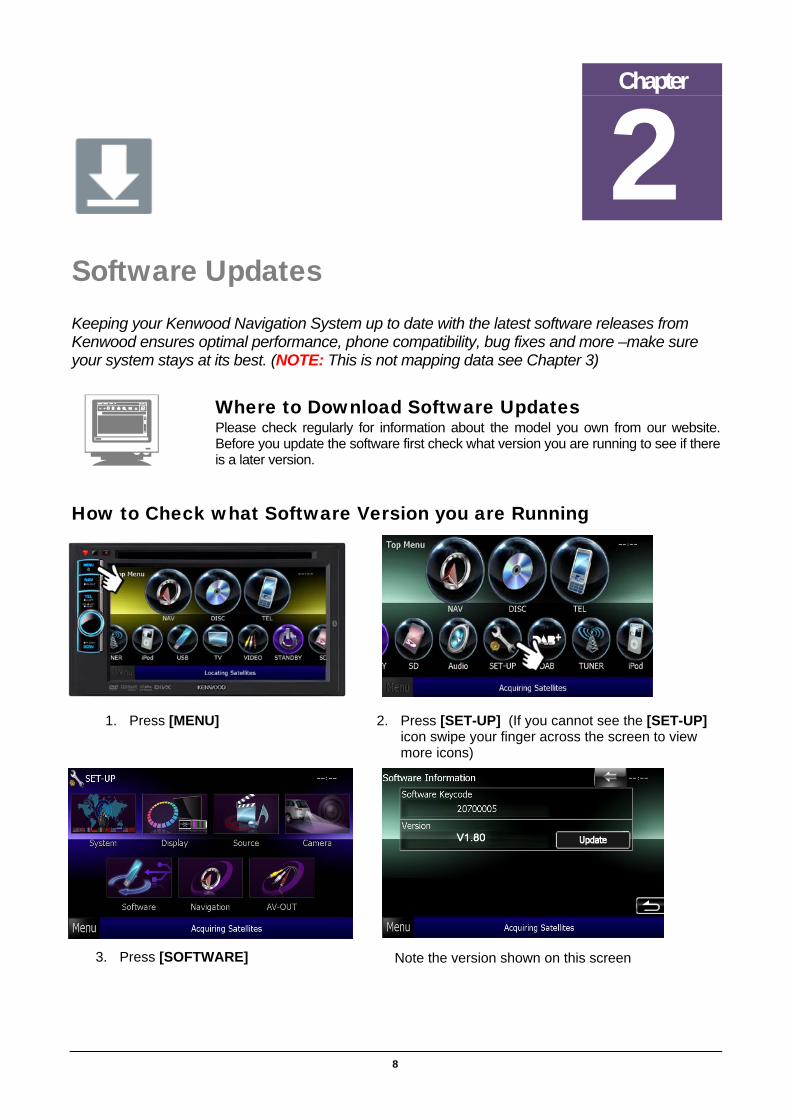
How to Check what Software Version you are Running
3. Press [SOFTWARE]
1. Press [MENU]
Note the version shown on this screen
2. Press [SET-UP] (If you cannot see the [SET-UP] icon swipe your finger across the screen to view more icons)
8
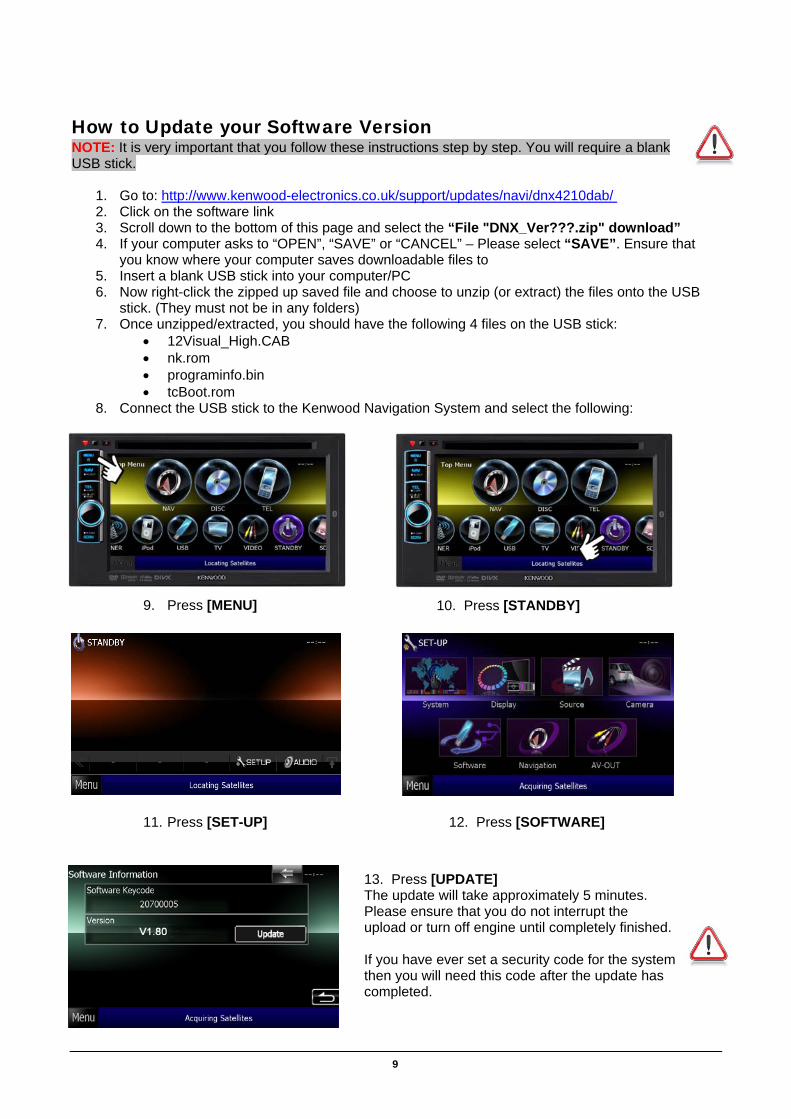
How to Update your Software Version NOTE: It is very important that you follow these instructions step by step. You will require a blank USB stick.
1. Go to: http://www.kenwood-electronics.co.uk/support/updates/navi/dnx4210dab/ 2. Click on the software link 3. Scroll down to the bottom of this page and select the “File "DNX_Ver???.zip" download” 4. If your computer asks to “OPEN”, “SAVE” or “CANCEL” – Please select “SAVE”. Ensure that
you know where your computer saves downloadable files to 5. Insert a blank USB stick into your computer/PC 6. Now right-click the zipped up saved file and choose to unzip (or extract) the files onto the USB
stick. (They must not be in any folders) 7. Once unzipped/extracted, you should have the following 4 files on the USB stick:
• 12Visual_High.CAB • nk.rom • programinfo.bin • tcBoot.rom
8. Connect the USB stick to the Kenwood Navigation System and select the following:
9. Press [MENU]
11. Press [SET-UP]
13. Press [UPDATE] The update will take approximately 5 minutes. Please ensure that you do not interrupt the upload or turn off engine until completely finished. If you have ever set a security code for the system then you will need this code after the update has completed.
12. Press [SOFTWARE]
10. Press [STANDBY]
9
Chapter
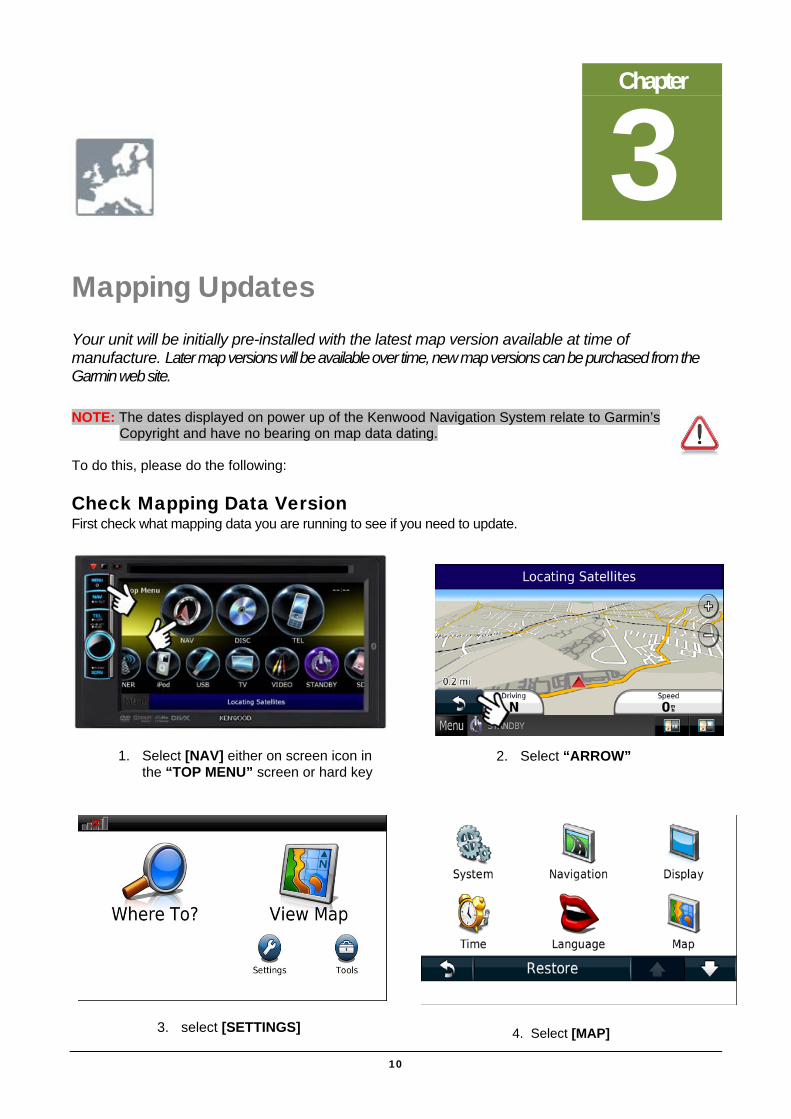
3 Mapping Updates Your unit will be initially pre-installed with the latest map version available at time of manufacture. Later map versions will be available over time, new map versions can be purchased from the Garmin web site.
NOTE: The dates displayed on power up of the Kenwood Navigation System relate to Garmin’s Copyright and have no bearing on map data dating.
10
To do this, please do the following:
Check Mapping Data Version First check what mapping data you are running to see if you need to update.
1. Select [NAV] either on screen icon in the “TOP MENU” screen or hard key
2. Select “ARROW”
3. select [SETTINGS] 4. Select [MAP]
11
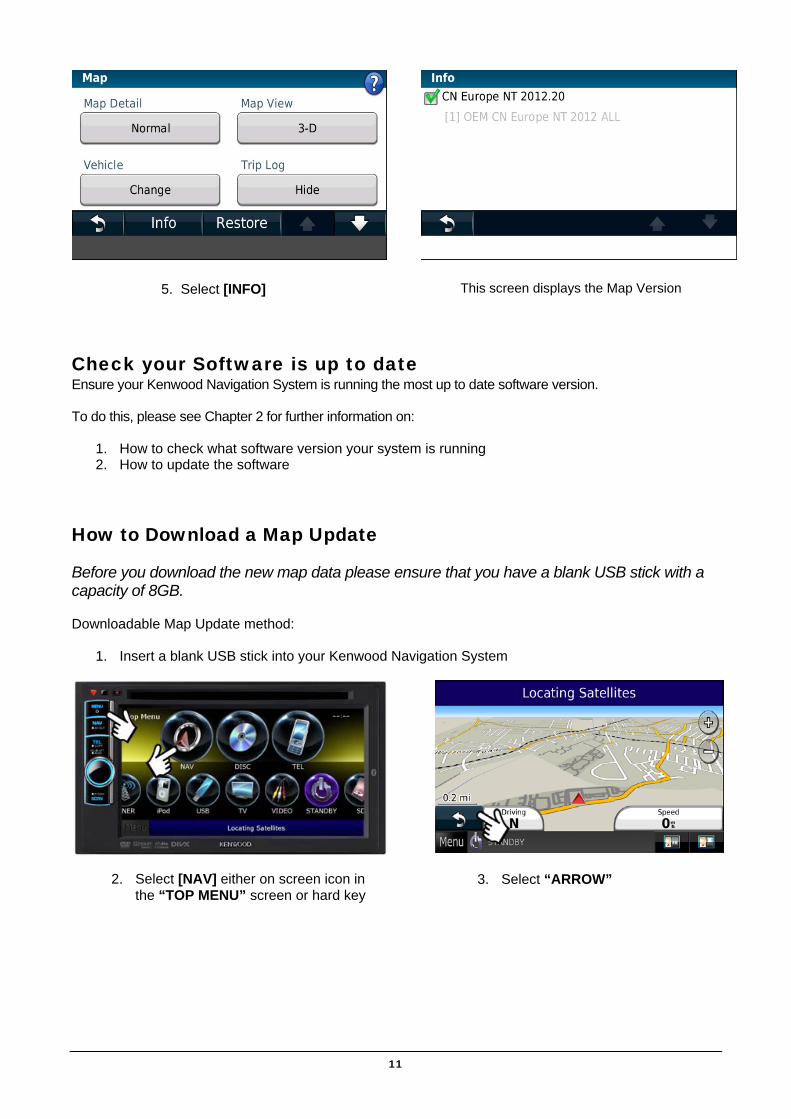
This screen displays the Map Version 5. Select [INFO]
Check your Software is up to date Ensure your Kenwood Navigation System is running the most up to date software version.
To do this, please see Chapter 2 for further information on:
1. How to check what software version your system is running 2. How to update the software
How to Download a Map Update Before you download the new map data please ensure that you have a blank USB stick with a capacity of 8GB. Downloadable Map Update method:
1. Insert a blank USB stick into your Kenwood Navigation System
2. Select [NAV] either on screen icon in the “TOP MENU” screen or hard key
3. Select “ARROW”
12
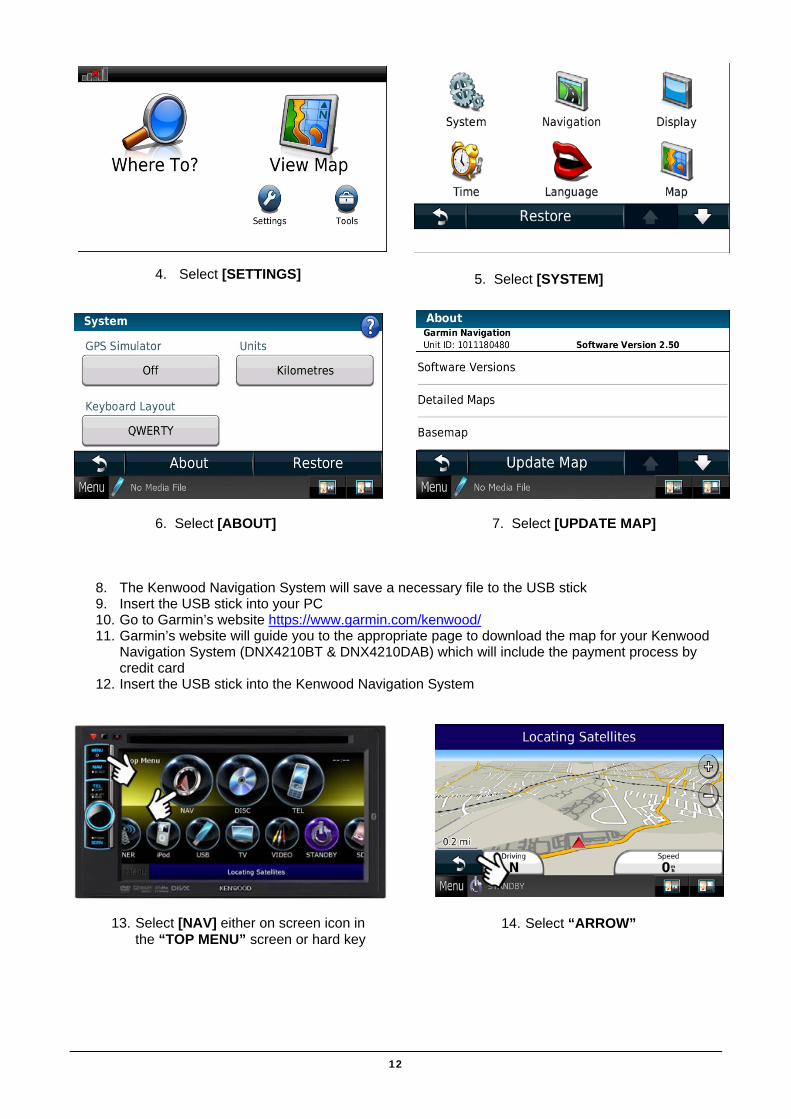
4. Select [SETTINGS] 5. Select [SYSTEM]
6. Select [ABOUT] 7. Select [UPDATE MAP]
8. The Kenwood Navigation System will save a necessary file to the USB stick 9. Insert the USB stick into your PC 10. Go to Garmin’s website https://www.garmin.com/kenwood/ 11. Garmin’s website will guide you to the appropriate page to download the map for your Kenwood
Navigation System (DNX4210BT & DNX4210DAB) which will include the payment process by credit card
12. Insert the USB stick into the Kenwood Navigation System
13. Select [NAV] either on screen icon in the “TOP MENU” screen or hard key
14. Select “ARROW”
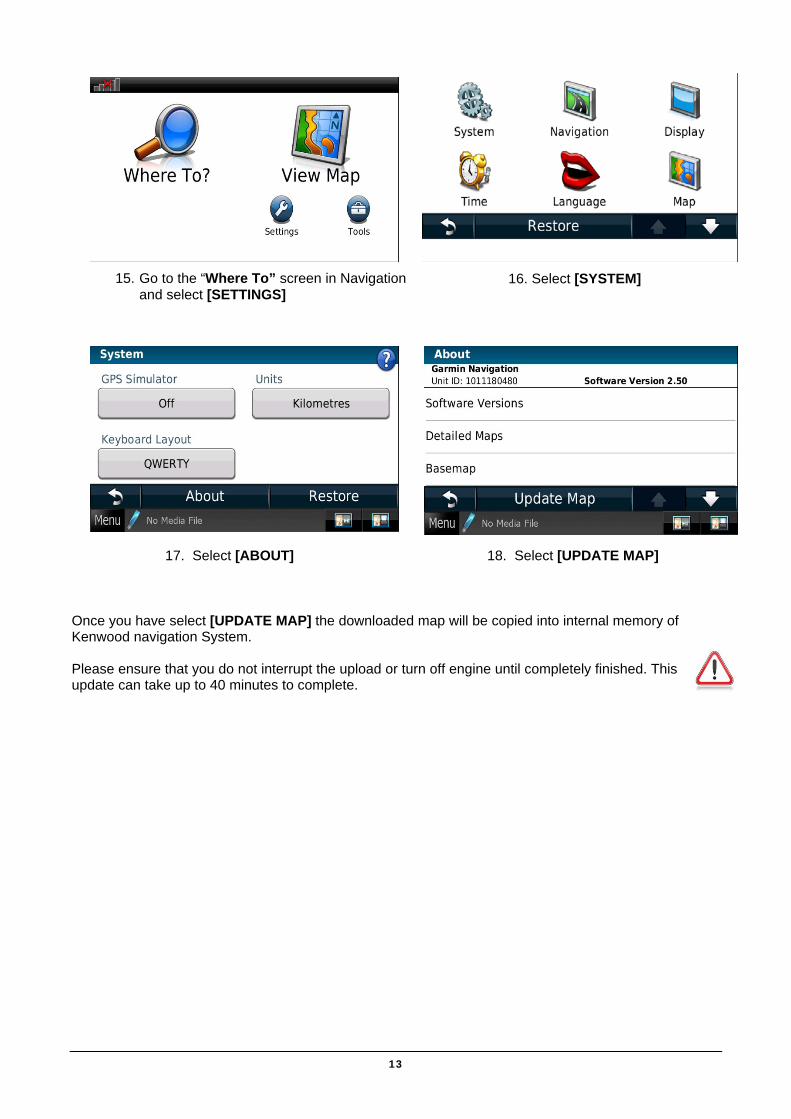
nce you have select [UPDATE MAP] the downloaded map will be copied into internal memory of enwood navigation System.
tes to complete.
13
15. Go to the “Where To” screen in Navigation and select [SETTINGS]
16. Select [SYSTEM]
17. Select [ABOUT] 18. Select [UPDATE MAP]
OK Please ensure that you do not interrupt the upload or turn off engine until completely finished. This pdate can take up to 40 minuu
Chapter
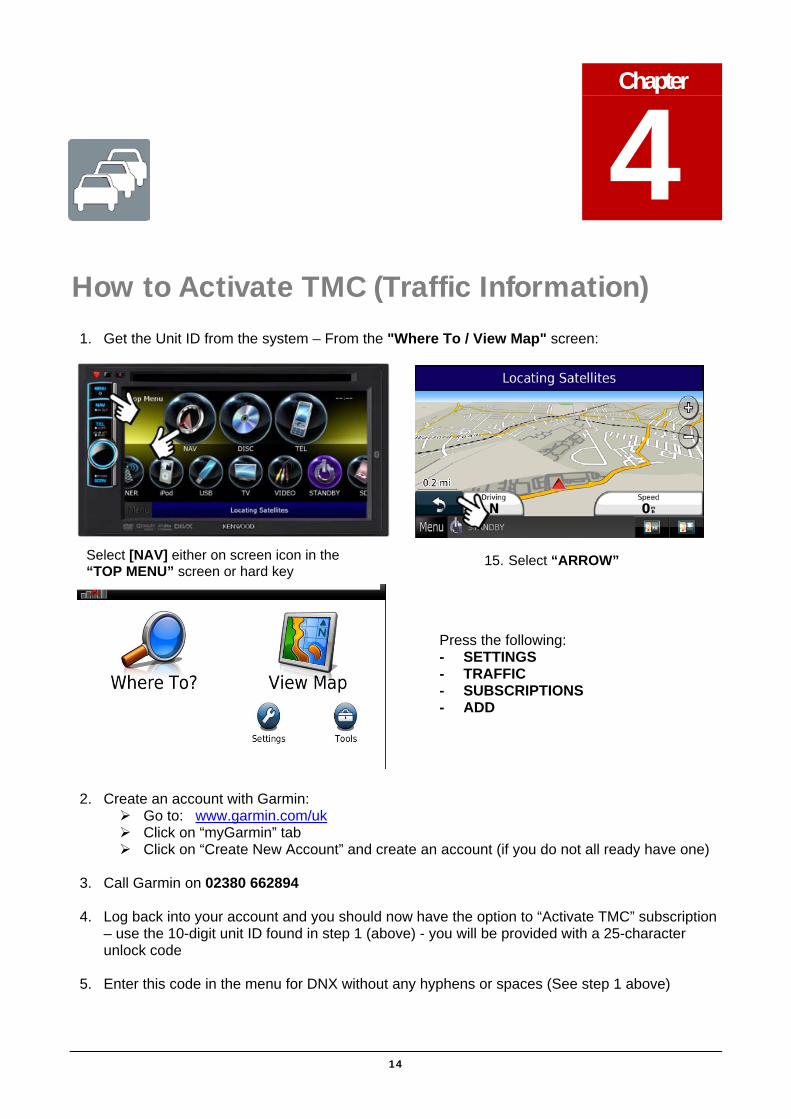
4 How to Activate TMC (Traffic Information) 1. Get the Unit ID from the system – From the "Where To / View Map" screen:
2. Create an account with Garmin:
k
14
Select [NAV] either on screen icon in the “TOP MENU” screen or hard key
15. Select “ARROW”
Press the following:
TIONS
- SETTINGS - TRAFFIC - SUBSCRIP- ADD
Go to: www.garmin.com/u
ount” and create an account (if you do not all ready have one) 3. Call Garmin on 02380 662894
4. Log back into your account and you should now have the option to “Activate TMC” subscription
5. Enter this code in the menu for DNX without any hyphens or spaces (See step 1 above)
Click on “myGarmin” tab Click on “Create New Acc
– use the 10-digit unit ID found in step 1 (above) - you will be provided with a 25-character unlock code
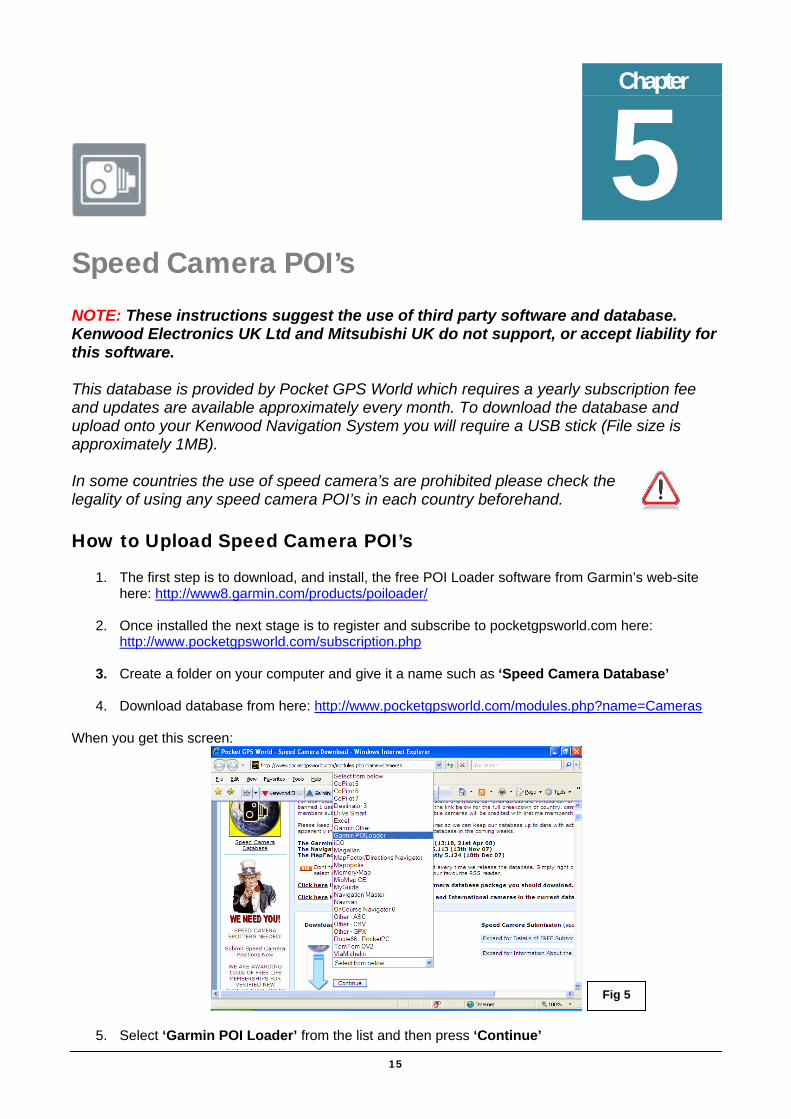
Speed Camera POI’s NOTE: These instructions suggest the use of third party software and database. Kenwood Electronics UK Ltd and Mitsubishi UK do not support, or accept liability for this software.
This database is provided by Pocket GPS World which requires a yearly subscription fee and updates are available approximately every month. To download the database and upload onto your Kenwood Navigation System you will require a USB stick (File size is approximately 1MB). In some countries the use of speed camera’s are prohibited please check the legality of using any speed camera POI’s in each country beforehand.
How to Upload Speed Camera POI’s
1. The first step is to download, and install, the free POI Loader software from Garmin’s web-site here: http://www8.garmin.com/products/poiloader/
2. Once installed the next stage is to register and subscribe to pocketgpsworld.com here:
http://www.pocketgpsworld.com/subscription.php
3. Create a folder on your computer and give it a name such as ‘Speed Camera Database’
4. Download database from here: http://www.pocketgpsworld.com/modules.php?name=Cameras When you get this screen:
Chapter
5
Fig 5
5. Select ‘Garmin POI Loader’ from the list and then press ‘Continue’
15
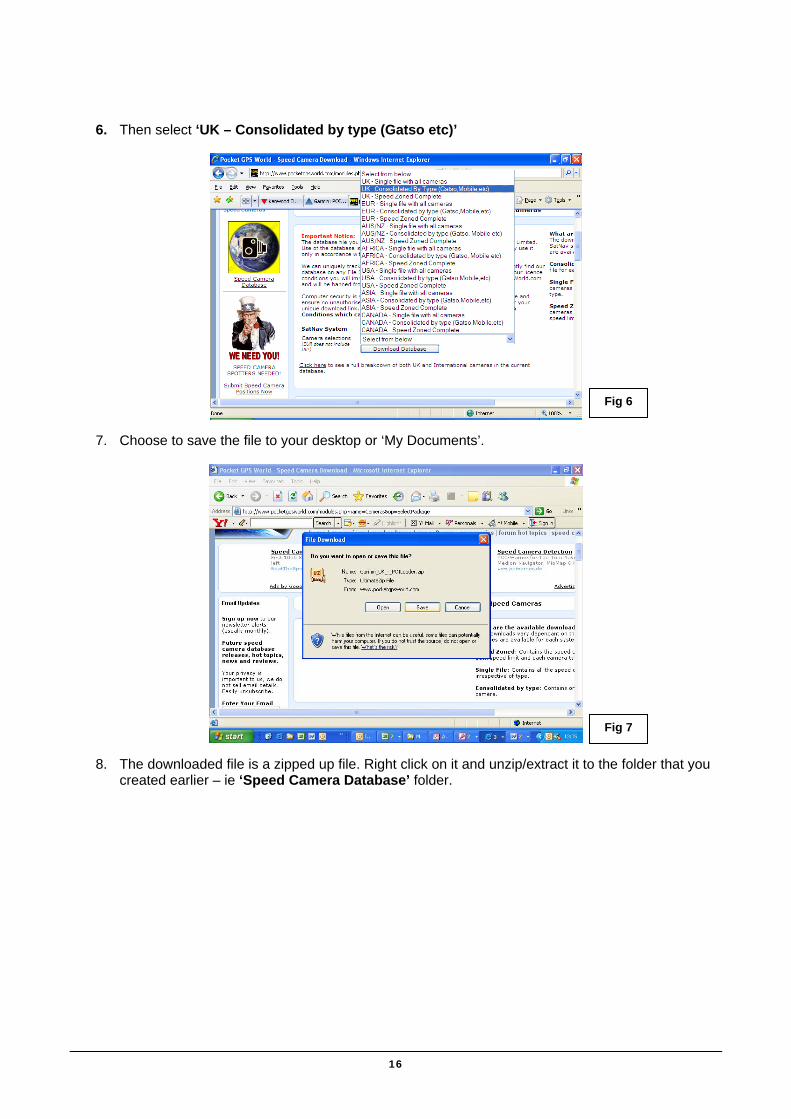
6. Then select ‘UK – Consolidated by type (Gatso etc)’
Fig 6
7. Choose to save the file to your desktop or ‘My Documents’.
Fig 7
8. The downloaded file is a zipped up file. Right click on it and unzip/extract it to the folder that you
created earlier – ie ‘Speed Camera Database’ folder.
16
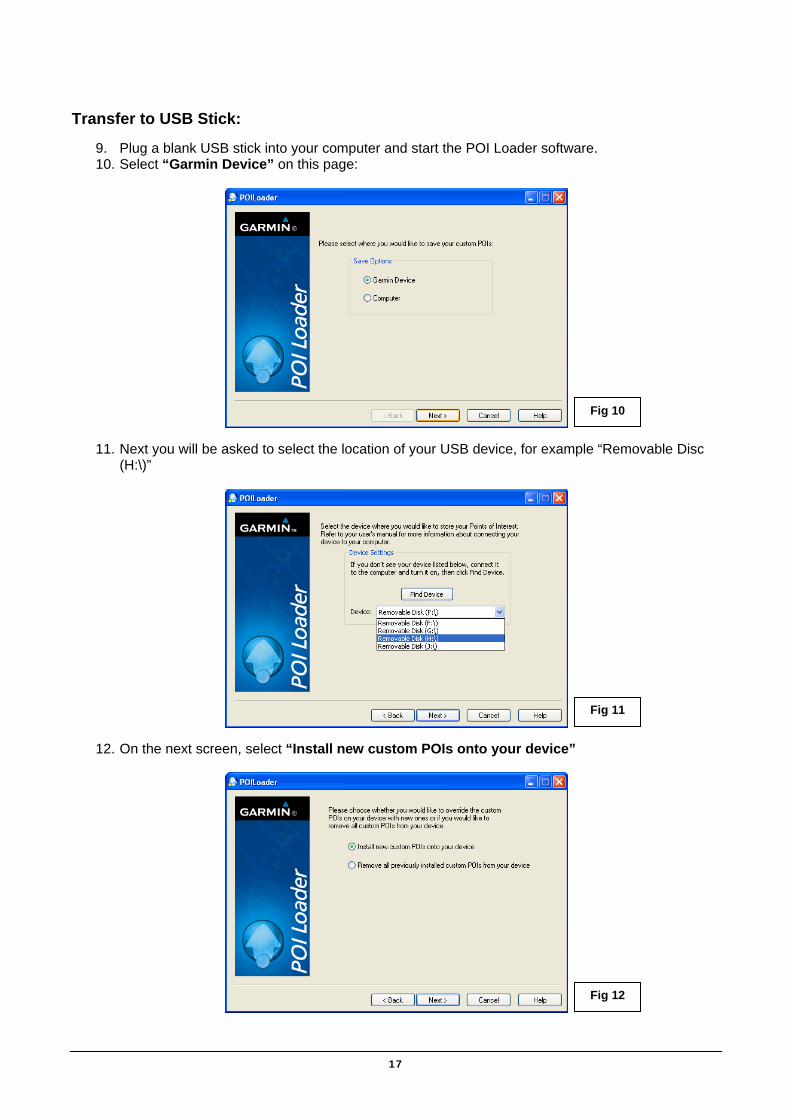
Transfer to USB Stick:
9. Plug a blank USB stick into your computer and start the POI Loader software. 10. Select “Garmin Device” on this page:
17
Fig 10
11. Next you will be asked to select the location of your USB device, for example “Removable Disc
(H:\)”
Fig 11
12. On the next screen, select “Install new custom POIs onto your device”
Fig 12
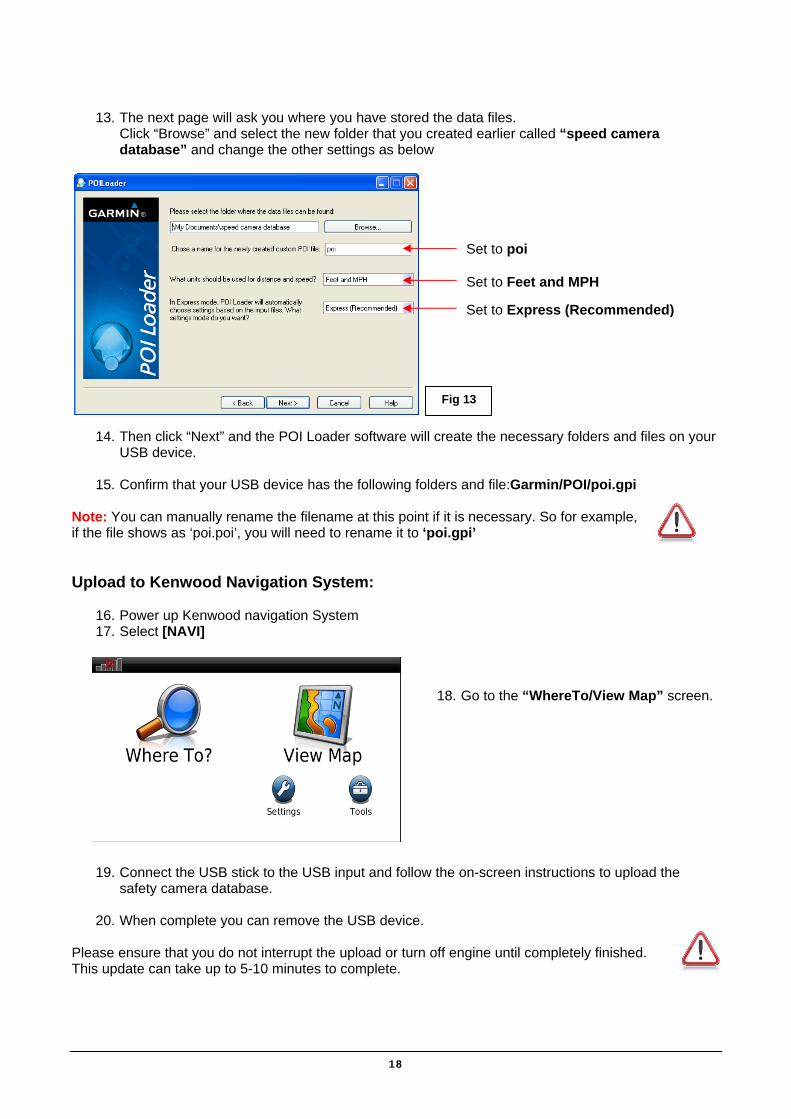
13. The next page will ask you where you have stored the data files. Click “Browse” and select the new folder that you created earlier called “speed camera database” and change the other settings as below
18
Set to poi
Set to Feet and MPH
Set to Express (Recommended)
14. Then click “Next” and the POI Loader software will create the necessary folders and files on your USB device.
15. Confirm that your USB device has the following folders and file:Garmin/POI/poi.gpi
Note: You can manually rename the filename at this point if it is necessary. So for example, if the file shows as ‘poi.poi’, you will need to rename it to ‘poi.gpi’ Upload to Kenwood Navigation System:
16. Power up Kenwood navigation System 17. Select [NAVI]
18. Go to the “WhereTo/View Map” screen.
19. Connect the USB stick to the USB input and follow the on-screen instructions to upload the
safety camera database.
20. When complete you can remove the USB device.
Please ensure that you do not interrupt the upload or turn off engine until completely finished. This update can take up to 5-10 minutes to complete.
Fig 13

iPod/iPhone
iPod/iPhone Compatibility The following iPod/iPhone’s are compatible with your Kenwood Navigation System: NOTES: Kenwood iPod lead will be required as Apple’s White USB cable will not work.
iPod Model Generation
iPod Nano 1st / 2nd / 3rd / 4th / 5th / 6th / 7th iPod Classic 6th – (80G, 120G & 160G) iPod Touch 1st / 2nd / 3rd / 4th / 5th iPod Video 5th / 6th
iPhone Model
iPhone 3G / 3GS/ 4 / 4S / 5
How to Connect Up an iPhone 5 Apple has changed the 30-pin connector used on earlier models of the iPhone to a Lightning connector used on the iPhone 5. Therefore to connect your iPhone 5 to the iPod lead of the Kenwood Navigation System you will require Apple’s “Lightning Adapter”, available from your nearest Apple Store Video Playback Will Not Work via an iPhone 5 The iPhone 5 does not support video output to 3rd party devices.
No iPod/iPhone Loading Make sure you have selected [iPOD] on the [TOP MENU] rather than “USB”.
iPod/iPhone Music Playback Not Working If you have connected your iPod/iPhone via Kenwood’s iPod lead and it will not work please do a “RESET” on the iPod/iPhone and also a “RESET” on the Kenwood Navigation System and then reconnect.
Chapter
6
[RESET] button – Press and hold for a few seconds
NOTE: When doing a reset on the Kenwood Navigation System you will lose any presets radio stations
19
DAB - Digital Radio (DNX4210DAB only)
Initial DAB Reception Tuning
:
Chapter
7
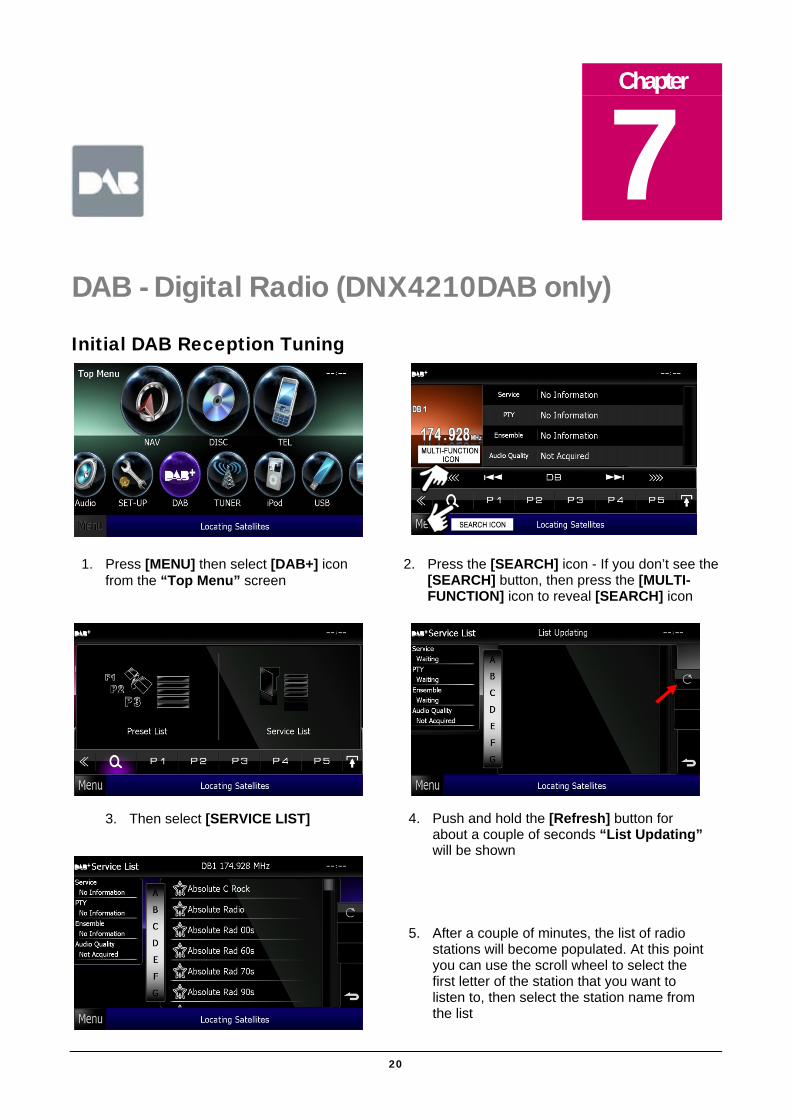
3. Then select [SERVICE LIST] 4. Push and hold the [Refresh] button for about a couple of seconds “List Updating” will be shown
5. After a couple of minutes, the list of radio stations will become populated. At this point you can use the scroll wheel to select the first letter of the station that you want to listen to, then select the station name from the list
2. Press the [SEARCH] icon - If you don’t see the [SEARCH] button, then press the [MULTI-FUNCTION] icon to reveal [SEARCH] icon
1. Press [MENU] then select [DAB+] icon from the “Top Menu” screen
20

Presetting DAB Stations You can store up to 15 DAB stations – They are stored in 3 groups of 5 presets. The groups are called DB 1, DB 2 and DB 3 (we’ll come back to this later…)
1. Follow steps 1 to 3 as on Page 19 2. Select a station that you wish to preset (see point 5 on Page 19)
5. Use the [DB] button to switch between DB 1, DB 2 and DB 3
4. If you push and hold a preset number (P1 to P5), the station you are listening to will be stored on that preset number. Once you have stored 5 stations, you can switch to DB 2 and store another 5
Note: If you don’t see the [SEARCH] button, then press the [MULTI-FUNCTION] icon to reveal the [SEARCH] icon as per image 2 on P19
3. Press the return [ARROW] icon to return to the DAB control screen
Priority Function Some stations are broadcast on DAB as well as normal FM. If the signal to DAB is lost temporarily, then the DNX will switch to the FM version of the station. There is a small time difference between normal FM stations and DAB, so when this switching occurs, you may notice a repeat in the transmission; this is normal. The priority function also works the other way around. So if you are listening to normal FM and the same station is available on DAB, then the DNX will switch over to DAB. However, it is possible to switch off this Priority function from within the menu system. To do this:
1. Press [Menu] hard key, then [SET-UP] (If you cannot see the [SET-UP] icon swipe your finger across the screen to view more icons)
3. Then [DAB SET-UP] 2. Press [SOURCE]
Switch [PRIORITY] to “OFF”
21
Chapter
8 General FAQ’s
How to Dim the Display Note: this adjustment needs to be carried out separately for navigation and each source
• Press the [SCRN] button • Then set the [Dimmer] option to OFF
o Set up the brightness, contrast and black level controls to the desired level for daylight conditions Note: in some sources, such as video, it is also possible to adjust colour, tint and sharpness
• Set the [Dimmer] to ON o Set up the same controls for night time driving
• Set the [Dimmer] to either ‘SYNC’ or ‘NAV-SYNC’ – this determines when the screen will switch to night mode. SYNC = when the car’s lights are turned on NAV-SYNC = at sunset
What to do with a Blank Screen If the screen has gone blank, but the buttons are still illuminated and sound continues to play, then try holding down the [TEL] button for about a second. This operation switches the screen off or on It is also possible to get a blank screen if you select [VIDEO] from the Top Menu: selecting this source switches to the video input, but if there is no video signal present, then you will get a blank screen – in this case, just press the [Menu] button and select another source. If the screen has gone blank, but also button illumination has switched off and there is no sound playing (i.e. system has switched off) – it is possible that the system has been manually turned off by holding down the [Menu] button. If you do this, you will need to manually turn the system back on by pushing the [Menu] button once (with the ignition on). If all else fails please try pressing the reset button (you need a pen for this) The reset button on the DNX4210BT/DAB is the red illuminated triangle.
Unable to Enter a Postcode for Wales or Scotland but English Postcodes are OK Press [NAV], then press [Where To?] > [Address] > [Change Country] – change the country to ‘United Kingdom’
My iPod Icon has Disappeared from the Top Menu, Instead I have Video 1 and Video 2 Icons Disconnect the iPod from the system Press [Menu] > [Standby] > [SETUP] > [Source] > [AV IN SET-UP] Change the setting called “iPod AV Interface Use” to “iPod”
22