easydl 2.0 integration guide
TRANSCRIPT

EasyDL 2.0 TotalFreedom™ Formatting Plug-In
Integration Guide
Disclaimer Honeywell International Inc. (“HII”) reserves the right to make changes in specifications and other information contained in this document without prior notice, and the reader should in all cases consult HII to determine whether any such changes have been made. The information in this publication does not represent a commitment on the part of HII. HII shall not be liable for technical or editorial errors or omissions contained herein: nor for incidental or consequential damages resulting from the furnishing, performance, or use of this manual.
This document contains propriety information that is protected by copyright. All rights reserved. No part of this document may be photocopied, reproduced, or translated into another language without the prior written consent of HII.
© 2013-2019 Honeywell International Inc. All rights reserved.
Web Address: www.honeywellaidc.com
Trademarks EasyDL and TotalFreedom are trademarks or registered trademarks of Metrologic Instruments, Inc or Honeywell International, Inc. in the United States and/or other countries. Other product names mentioned in this manual may be trademarks or registered trademarks of their respective companies and are the property of their respective owners.
Patents For patent information, please refer to www.hsmpats.com.
iii
Table of Contents
Introduction ............................................................................................. 1 Overview .......................................................................................................... 1
Getting Started Software Installation ......................................................................................... 3 Software Activation ........................................................................................... 4 To Enable Software Plug-In .............................................................................. 5
Data Transmission Configuration Configuration .................................................................................................... 7
Enter/Exit Programming Mode Bar Codes .................................................... 8 Start/End Configuration Bar Codes ............................................................... 8 Data Field Options for Programming Mode ................................................... 9 Header Options ........................................................................................... 23 Formatting Options for Select Data Fields ................................................... 25 Separators for Programming Mode ............................................................. 32
Global Settings ............................................................................................... 51 Error Beep Programming Bar Codes........................................................... 51 Prefix of ID for Data Elements ..................................................................... 51 Non-Standard Data Dump ........................................................................... 52 Appending NONE for No Data Found ......................................................... 52 Data Validation ............................................................................................ 53
Configuration Utility .............................................................................. 55
Inserting Delays between Fields.......................................................... 57
Version Identification ............................................................................ 59
Customer Support ................................................................................. 61 Technical Assistance ...................................................................................... 61

iv
1
Introduction Overview Honeywell’s EasyDL 2.0 software plug-in parses bar code data found on United States and Canadian government-issued identification cards (i.e., driver's licenses and military identification cards) delivering ready to use data to host system applications for age verification or automatic electronic form population. EasyDL 2.0 may be purchased pre-installed on select Honeywell area-imaging products or purchased as a standalone upgrade. Refer to EasyDL 2.0 Data Sheet, available at www.honeywellaidc.com, for a complete list of supported products. Note: Honeywell cannot be held responsible for driver’s licenses, identification,
or U.S. Department of Defense identification that do not comply with the formatting standards set forth by the American Association for Motor Vehicle Administrators (AAMVA).

2

3
Getting Started
Software Installation Note: Honeywell products ordered with EasyDL 2.0 do not require software
installation or software activation. Skip to page 5 for instructions on how to enable the software plug-in.
If you need to install/upgrade EasyDL 2.0, you will need the following items: • A computer with access to the internet• The imager’s User's Guide, downloadable from www.honeywellaidc.com• The firmware upgrade cable specified in the User's Guide• EZConfig-Scanning software, downloadable at no additional cost from
www.honeywellaidc.com
The following installation procedure is not applicable for imagers that do not support firmware updates through EZConfig-Scanning download feature. Consult the imager’s User’s Guide to verify the capabilities of the imager before proceeding.
To install the EasyDL 2.0 software plug-in:
1. Download and save the EasyDL 2.0 trial software available atwww.honeywellaidc.com.
2. Consult the imager's User's Guide for information on the specific cablerequired for firmware updates.
3. Connect the cable to the imager and an available RS232 serial or USBport on the host system.
4. Start the EZConfig-Scanning software. Click on the Help file in themenu bar. Select Help Topics and follow the steps under Connecting toa Device.
5. In the Application Explorer, select Download. In the Main Workspace,click on the “…” button to browse for the EasyDL 2.0 flash image file(*.moc). Click on the Download to Device button.
The free trial version of EasyDL 2.0 has limited capabilities. To prevent random “X” characters from appearing in the transmitted data stream, a full EasyDL 2.0 license must be purchased. Contact customer service for more information on how to purchase an EasyDL 2.0 license. See page 61 for contact information.

4
Software Activation A licensing key is required to activate the full version of EasyDL 2.0. Contact a customer service representative for information on purchasing a licensing key. Regional contact information is on page 61. The free trial version of EasyDL 2.0 has limited capabilities. To prevent
random “X” characters from appearing in the transmitted data stream, a full EasyDL 2.0 license must be purchased. Contact customer service for more information on how to purchase an EasyDL 2.0 license. See page 61 for contact information.
5
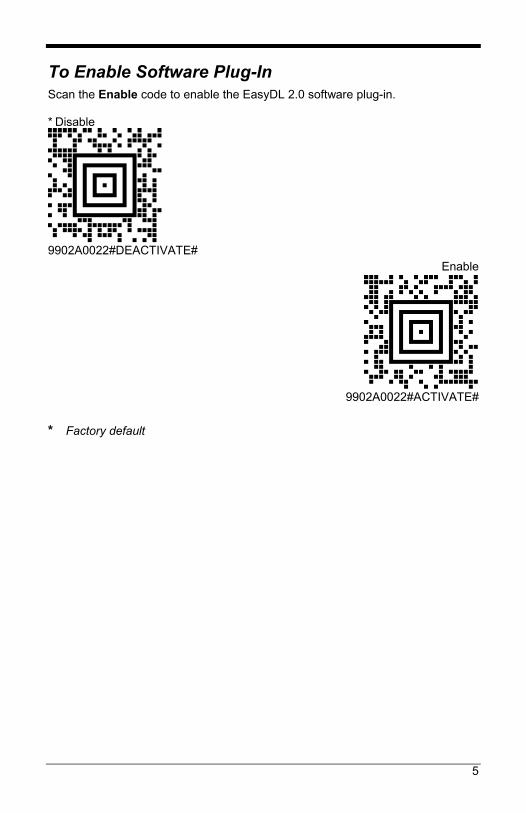
To Enable Software Plug-In Scan the Enable code to enable the EasyDL 2.0 software plug-in. * Disable
9902A0022#DEACTIVATE# Enable
9902A0022#ACTIVATE# * Factory default

6

7
Data Transmission Configuration
Before starting the configuration process, identify the necessary data fields required for the application and the order in which the data must be transmitted to the electronic form or database.
Note: Skip to page 55 for configuration using Honeywell’s EasyDL 2.0 configuration utility.
Configuration To configure the imager for Programming Mode configuration:
1. Scan the Enter Programming Mode bar code on page 8. 2. Scan the Start Configuration bar code on page 8. 3. Scan each required data field bar code in the order of the desired
transmission sequence (see pages 9 - 16), if necessary, desired formatting option (page 24) with desired separators for data fields (see pages 29).
4. Scan the End Configuration bar code on page 8. 5. Scan the Exit Programming Mode bar code on page 8.
Note: The bar codes must be scanned in this sequence. If scanned out of sequence the imager will razz and no action will be taken.

8
Formatting Option Notes EasyDL 2.0 supports various formats for different fields present in different documents. If formatting is required, scan the data field bar code followed by the desired format for the field (see page 24.)
Enter/Exit Programming Mode Bar Codes Enter Programming Mode
9902EntA0022 Exit Programming Mode
99Exit.
Start/End Configuration Bar Codes Start Configuration
9902#START# End Configuration
9902#END#

9
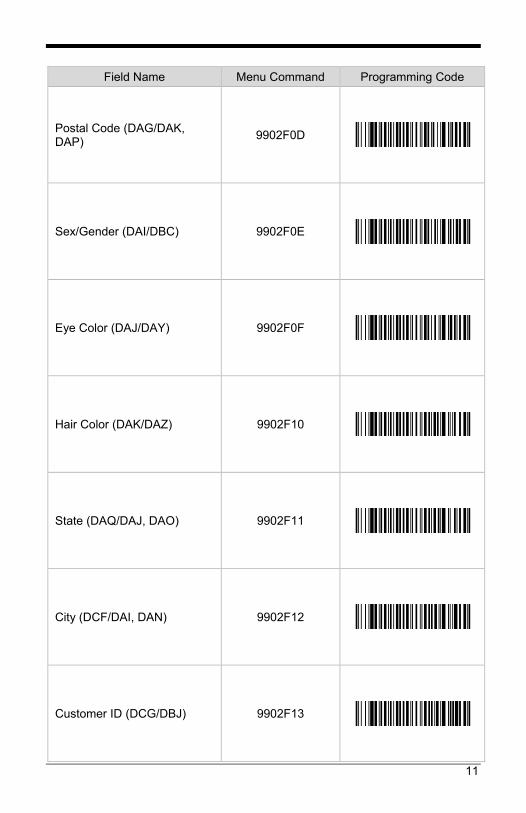
Data Field Options for Programming Mode
Note: Data Key Header and Alternate Data Key Sub-headers are dependent on the version of AAMVA specifications.
Field Name Menu Command Programming Code
First Name (DCA/DAC, DBP, DAA, DCT, DBG, DAB) 9902F00
Middle Name (DCB/DAD, DBQ, DAA, DCT, DAB) 9902F01
Last Name (DCD/DCS, DAB, DAA, DBN, DBO) 9902F02
Weight (DBA/DAW, DAX) 9902F03
Height (DCS/DAU, DAV) 9902F04
Organ Donor (DAC/DDK, DBH) 9902F05

10
Field Name Menu Command Programming Code
Name Suffix (DCT/DAE, DBR, DBS, DCU, DAA, DCT, DAB, DBN)
9902F06
Name Prefix (DAD/DAF) 9902F07
Address – Street 1 (DBD/DAG, DAL) 9902F08
Address – Street 2 (DBB/DHA, DAM, DAH) 9902F09
Place of Birth (DBC/DCI) 9902F0A
Date of Birth (DAY/DBB, DBL) 9902F0B
Social Security Number (DAU/DBK, DBM) 9902F0C
11
Field Name Menu Command Programming Code
Postal Code (DAG/DAK, DAP) 9902F0D
Sex/Gender (DAI/DBC) 9902F0E
Eye Color (DAJ/DAY) 9902F0F
Hair Color (DAK/DAZ) 9902F10
State (DAQ/DAJ, DAO) 9902F11
City (DCF/DAI, DAN) 9902F12
Customer ID (DCG/DBJ) 9902F13
12
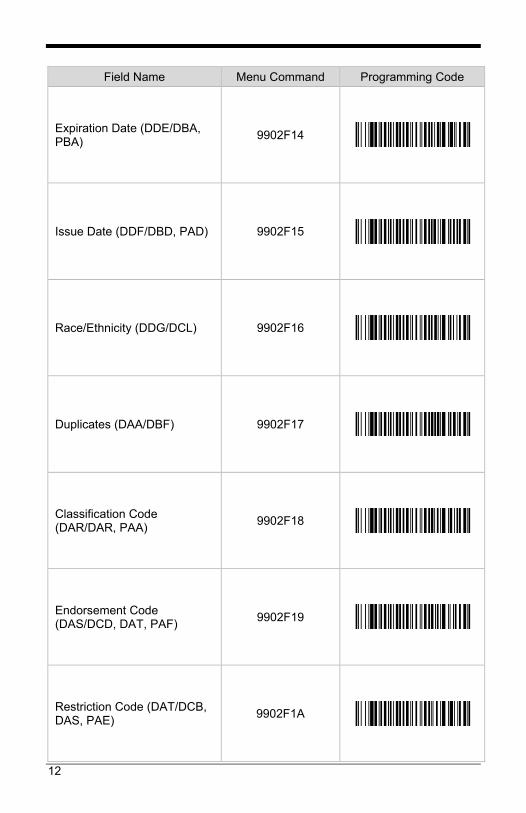
Field Name Menu Command Programming Code
Expiration Date (DDE/DBA, PBA) 9902F14
Issue Date (DDF/DBD, PAD) 9902F15
Race/Ethnicity (DDG/DCL) 9902F16
Duplicates (DAA/DBF) 9902F17
Classification Code (DAR/DAR, PAA) 9902F18
Endorsement Code (DAS/DCD, DAT, PAF) 9902F19
Restriction Code (DAT/DCB, DAS, PAE) 9902F1A

13
Field Name Menu Command Programming Code
Class (DHA/DCA, DAR) 9902F1B
Veteran Indicator (DZA/DDL) 9902F1C
Unique Customer Identifier (DCI/DBJ) 9902F1D
Non-Resident Indicator (DCJ/DBI) 9902F1E
Issue Time Stamp (DCK/DBE) 9902F1F
Permit Identifier (DBN/PAB) 9902F20
Under 18 Until (DBG/DDH) 9902F21

14
Field Name Menu Command Programming Code
Under 19 Until (DBS/DDI) 9902F22
Under 21 Until (DCU/DDJ) 9902F23
Limited Duration Document Indicator (DCE/DDD) 9902F24
HAZMAT Endorsement Expiration Date (DCL/DDC) 9902F25
Card Revision Date (DCM/DDB) 9902F26
Compliance Type (DCN/DDA) 9902F27
Jurisdiction-Specific Vehicle Classification Description (DCO/DCP)
9902F28
15
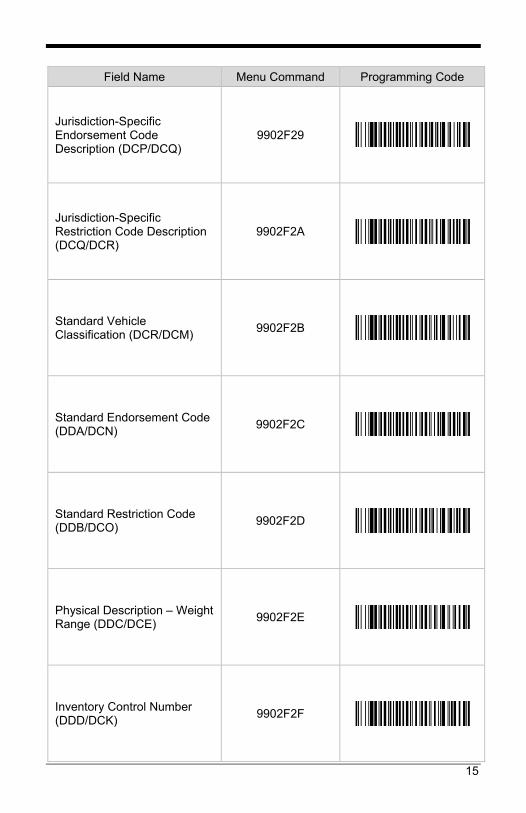
Field Name Menu Command Programming Code
Jurisdiction-Specific Endorsement Code Description (DCP/DCQ)
9902F29
Jurisdiction-Specific Restriction Code Description (DCQ/DCR)
9902F2A
Standard Vehicle Classification (DCR/DCM) 9902F2B
Standard Endorsement Code (DDA/DCN) 9902F2C
Standard Restriction Code (DDB/DCO) 9902F2D
Physical Description – Weight Range (DDC/DCE) 9902F2E
Inventory Control Number (DDD/DCK) 9902F2F

16
Field Name Menu Command Programming Code
Audit Information (DAW/DCJ) 9902F30
Document Discriminator (DAX/DCF) 9902F31
Country Identification (DDH/DCG) 9902F32
Family Name Truncation (DDI/DDE) 9902F33
First Name Truncation (DDJ/DDF) 9902F34
Middle Name Truncation (DDK/DDG) 9902F35
ID Number (DBK/DAQ) 9902F36

17
Field Name Menu Command Programming Code
PD Code Type (PAA) 9902F37
EDIPI (PAB) 9902F38
Personnel Category Code (PAB) 9902F39
Branch Code (PAD) 9902F3A
Personnel Entitlement Condition Type (PAE) 9902F3B
Rank (PAF) 9902F3C
Pay Plan Code (DAB) 9902F3D

18
Field Name Menu Command Programming Code
Pay Plan Grade Code (DAE) 9902F3E
Card Instant Reader (DAF) 9902F3F
ID Card Flag (DAL) 9902F40
Reserved for Future Use (DAM) 9902F41
DEERS Dependent Suffix (DAN) 9902F42
Direct Care Flag (DAO) 9902F43
CHAMPUS Flag (DAP) 9902F44
19
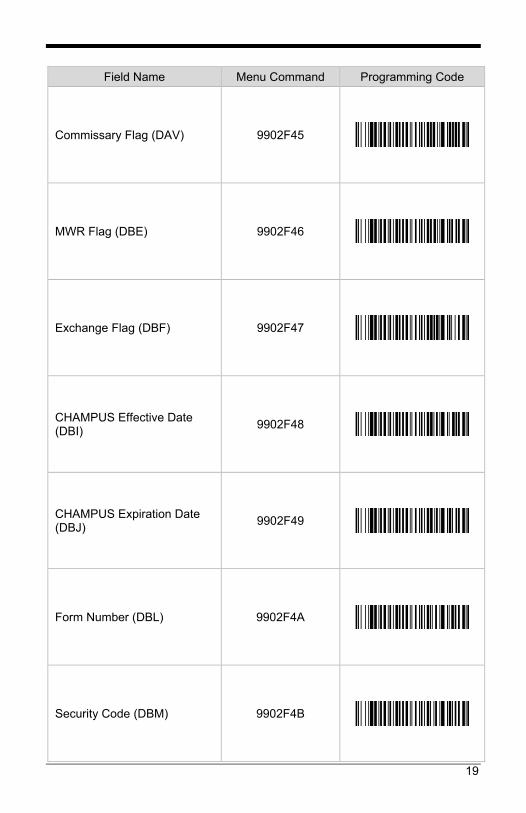
Field Name Menu Command Programming Code
Commissary Flag (DAV) 9902F45
MWR Flag (DBE) 9902F46
Exchange Flag (DBF) 9902F47
CHAMPUS Effective Date (DBI) 9902F48
CHAMPUS Expiration Date (DBJ) 9902F49
Form Number (DBL) 9902F4A
Security Code (DBM) 9902F4B

20
Field Name Menu Command Programming Code
Service or Component Code (DBN) 9902F4C
Status (DBO) 9902F4D
Branch of Service (DBP) 9902F4E
Rank (DBQ) 9902F4F
Pay Grade 9902F51
Geneva Conventions Code 9902F52
Blood Type 9902F53

21
Field Name Menu Command Programming Code
Sponsor Name 9902F54
Sponsor PDI 9902F55
Relationship 9902F56
Service Code 9902F57
Member Category Code 9902F58
Organization Part – II 9902F59
Organization Part - I 9902F5A
22
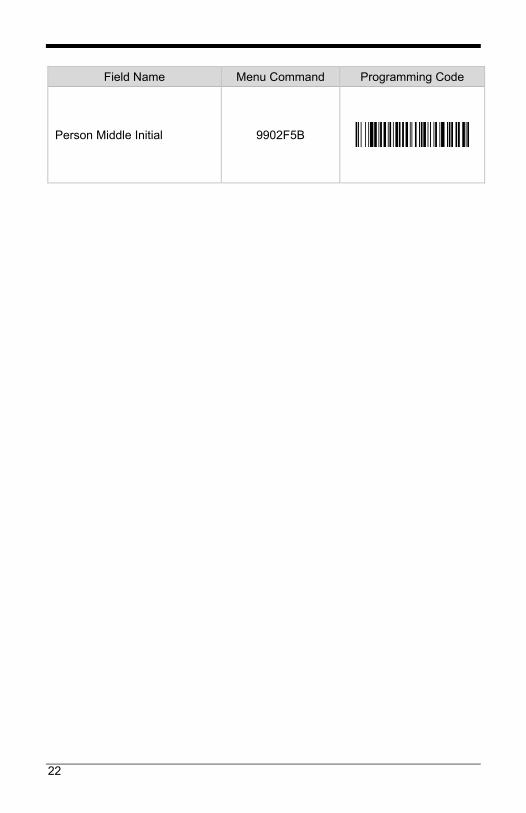
Field Name Menu Command Programming Code
Person Middle Initial 9902F5B

23
Header Options Field Name Menu Command Programming Code
File Type 9902H00
Issuer Identification Number (IIN) 9902H01
AAMVA Version Number 9902H02
Jurisdiction Version Number 9902H03
Header 9902H04
Header + SubFile Type 9902H05

24
Field Name Menu Command Programming Code
Military Bar Code Version 9902H06
Military Identification Code 9902H07
25
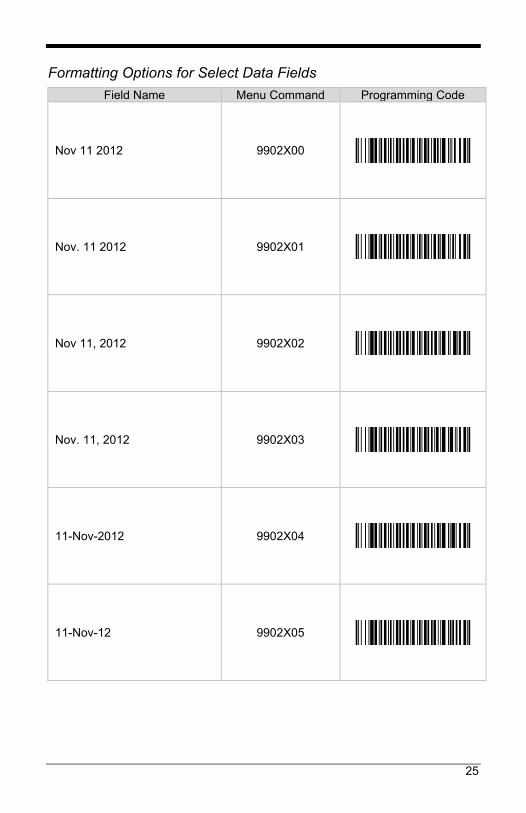
Formatting Options for Select Data Fields Field Name Menu Command Programming Code
Nov 11 2012 9902X00
Nov. 11 2012 9902X01
Nov 11, 2012 9902X02
Nov. 11, 2012 9902X03
11-Nov-2012 9902X04
11-Nov-12 9902X05
26
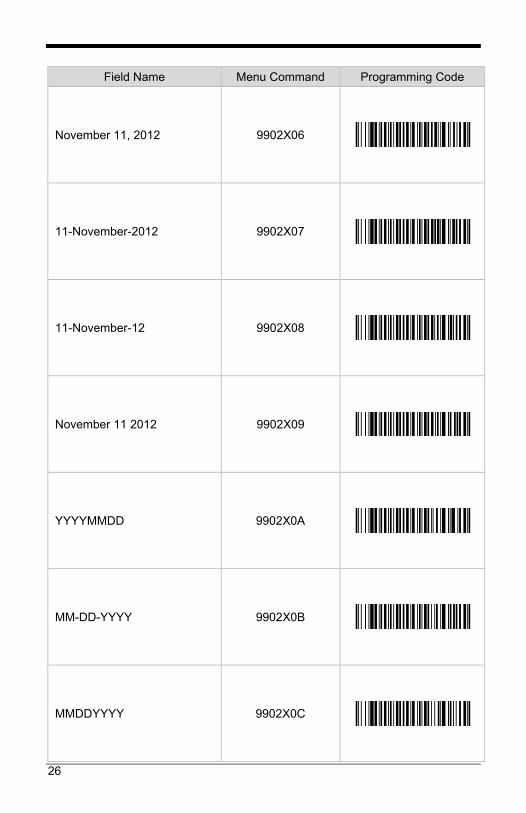
Field Name Menu Command Programming Code
November 11, 2012 9902X06
11-November-2012 9902X07
11-November-12 9902X08
November 11 2012 9902X09
YYYYMMDD 9902X0A
MM-DD-YYYY 9902X0B
MMDDYYYY 9902X0C

27
Field Name Menu Command Programming Code
MM/DD/YYYY 9902X1D
MM/YYYY/DD 9902X1E
YYYY/MM/DD 9902X1F
YYYY/DD/MM 9902X20
DD/MM/YYYY 9902X21
DD/YYYY/MM 9902X22
28
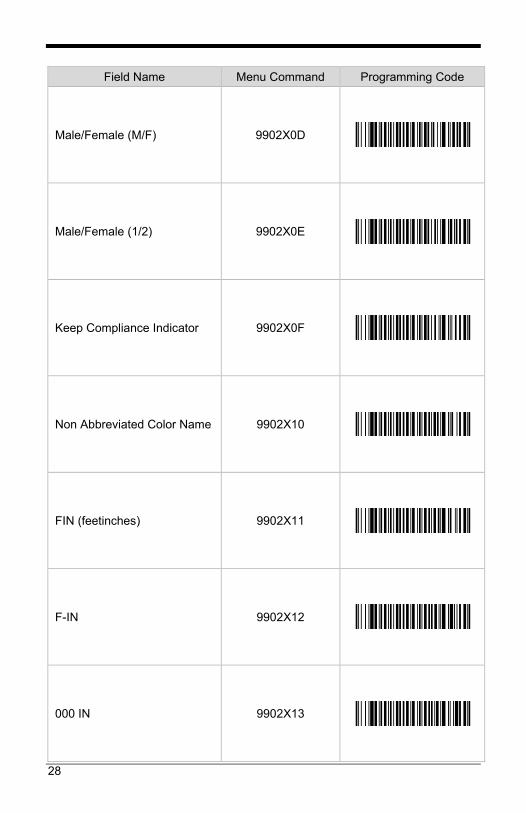
Field Name Menu Command Programming Code
Male/Female (M/F) 9902X0D
Male/Female (1/2) 9902X0E
Keep Compliance Indicator 9902X0F
Non Abbreviated Color Name 9902X10
FIN (feetinches) 9902X11
F-IN 9902X12
000 IN 9902X13

29
Field Name Menu Command Programming Code
IN 9902X14
## IN 9902X15
US Regular Format ZIP+4 (#####-####) 9902X16
US Only Zone Code (####) 9902X17
US Complete String (#########) 9902X18
US Only ZIP and No Zone (#####) 9902X19
Canada: ANA NAN 9902X1A

30
Field Name Menu Command Programming Code
Non-Abbreviated Hair Color Name 9902X23
Non-Abbreviated Blood Color Name 9902X24
Abbreviated 9902X1B
Non-Abbreviated 9902X1C
Yes/No (1/0) 9902X27
Yes/No (Y/N) 9902X28
Yes/No (1/2) 9902X29
31
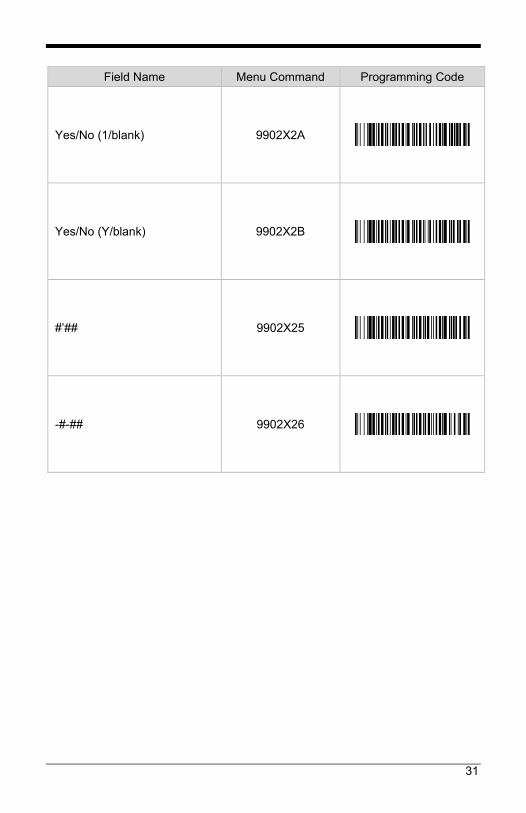
Field Name Menu Command Programming Code
Yes/No (1/blank) 9902X2A
Yes/No (Y/blank) 9902X2B
#’## 9902X25
-#-## 9902X26

32
Separators for Programming Mode Field Name Menu Command Programming Code
Line Feed 9902S0A
Vertical Tab 9092S0B
Horizontal Tab 9902S09
Carriage Return 9902S0D
Space “ “ 9902S20
Comma “,” 9902S2C
33
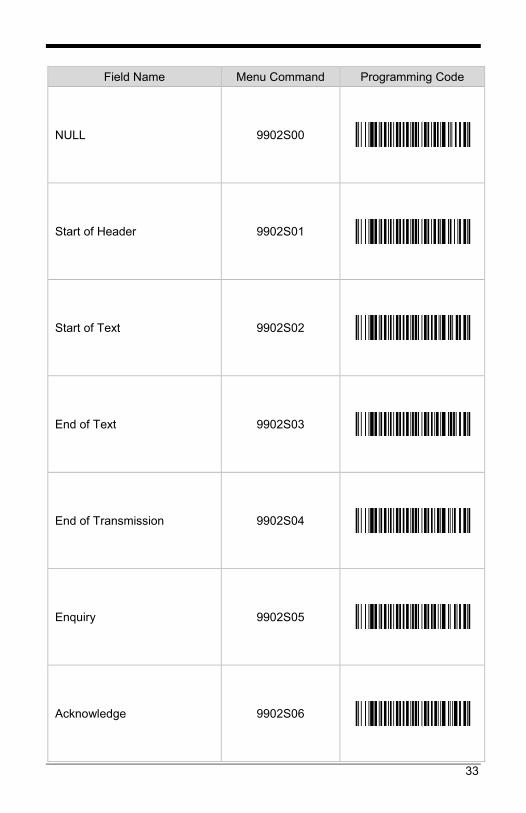
Field Name Menu Command Programming Code
NULL 9902S00
Start of Header 9902S01
Start of Text 9902S02
End of Text 9902S03
End of Transmission 9902S04
Enquiry 9902S05
Acknowledge 9902S06

34
Field Name Menu Command Programming Code
Bell 9902S07
Backspace 9902S08
Form Feed 9902S0C
Shift Out 9902S0E
Shift In 9902S0F
Data Link Escape 9902S10
Device Control 1 9902S11
35
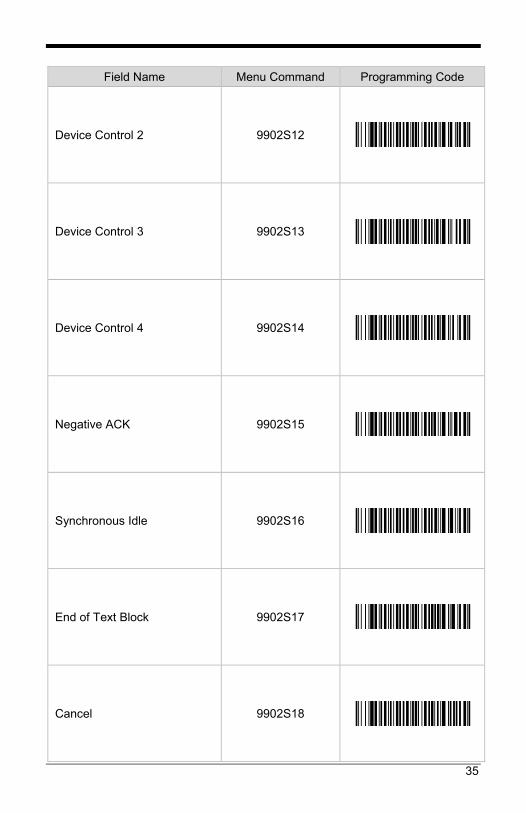
Field Name Menu Command Programming Code
Device Control 2 9902S12
Device Control 3 9902S13
Device Control 4 9902S14
Negative ACK 9902S15
Synchronous Idle 9902S16
End of Text Block 9902S17
Cancel 9902S18

36
Field Name Menu Command Programming Code
End of Medium 9902S19
Substitute 9902S1A
Escape 9902S1B
File Separator 9902S1C
Group Separator 9902S1D
Record Separator 9902S1E
Unit Separator 9902S1F

37
Field Name Menu Command Programming Code
Exclamation Point “!” 9902S21
Quotation Mark “” 9902S22
Cross Hatch “#” 9902S23
Dollar Sign “$” 9902S24
Percent Sign “%” 9902S25
Ampersand “&” 9902S26
Closing Single Quote “’” 9902S27

38
Field Name Menu Command Programming Code
Opening Parentheses “(“ 9902S28
Closing Parentheses “)” 9902S29
Asterisk “*” 9902S2A
Plus “+” 9902S2B
Hypen “-“ 9902S2D
Period “.” 9902S2E
Forward Slant “/” 9902S2F
39
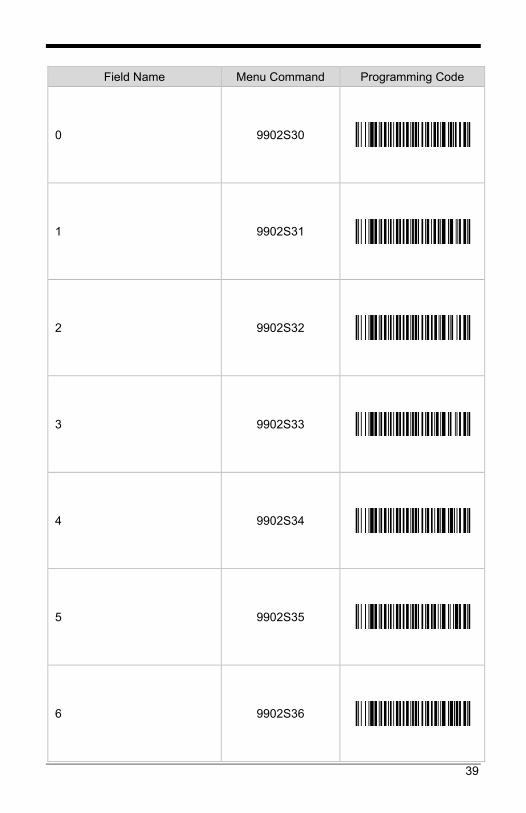
Field Name Menu Command Programming Code
0 9902S30
1 9902S31
2 9902S32
3 9902S33
4 9902S34
5 9902S35
6 9902S36

40
Field Name Menu Command Programming Code
7 9902S37
8 9902S38
9 9902S39
Colon “:” 9902S3A
Semi-Colon “;” 9902S3B
Less Than Sign “<” 9902S3C
Equals Sign “=” 9902S3D

41
Field Name Menu Command Programming Code
Greater Than Sign “>” 9902S3E
Question Mark “?” 9902S3F
At Sign “@” 9902S40
A 9902S41
B 9902S42
C 9902S43
D 9902S44

42
Field Name Menu Command Programming Code
E 9902S45
F 9902S46
G 9902S47
H 9902S48
I 9902S49
J 9902S4A
K 9902S4B

43
Field Name Menu Command Programming Code
L 9902S4C
M 9902S4D
N 9902S4E
O 9902S4F
P 9902S50
Q 9902S51
R 9902S52
44
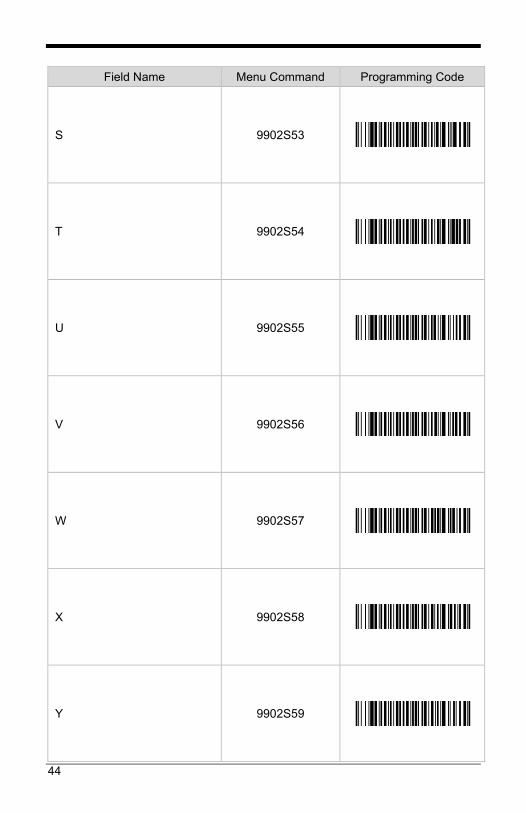
Field Name Menu Command Programming Code
S 9902S53
T 9902S54
U 9902S55
V 9902S56
W 9902S57
X 9902S58
Y 9902S59
45
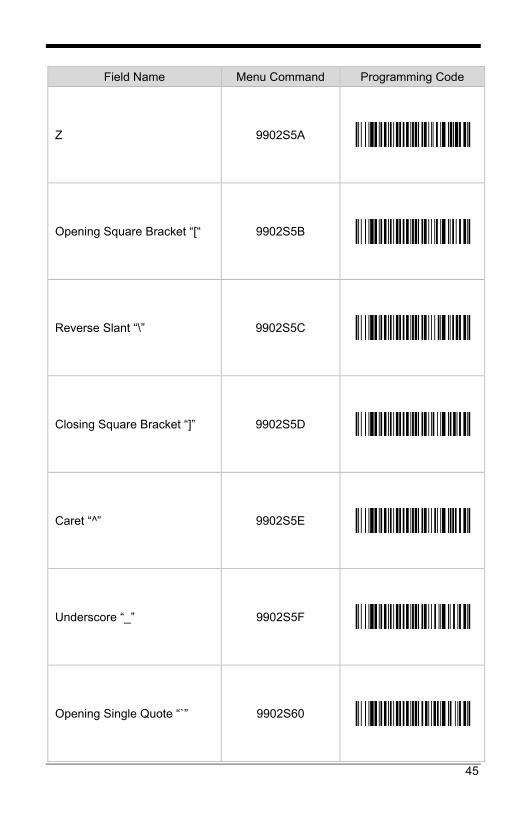
Field Name Menu Command Programming Code
Z 9902S5A
Opening Square Bracket “[“ 9902S5B
Reverse Slant “\” 9902S5C
Closing Square Bracket “]” 9902S5D
Caret “^” 9902S5E
Underscore “_” 9902S5F
Opening Single Quote “`” 9902S60

46
Field Name Menu Command Programming Code
a 9902S61
b 9902S62
c 9902S63
d 9902S64
e 9902S65
f 9902S66
g 9902S67
47
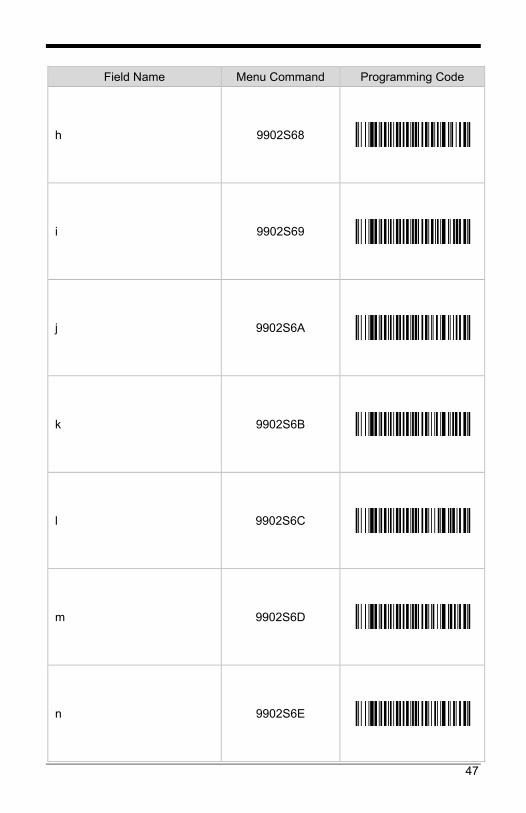
Field Name Menu Command Programming Code
h 9902S68
i 9902S69
j 9902S6A
k 9902S6B
l 9902S6C
m 9902S6D
n 9902S6E

48
Field Name Menu Command Programming Code
o 9902S6F
p 9902S70
q 9902S71
r 9902S72
s 9902S73
t 9902S74
u 9902S75
49
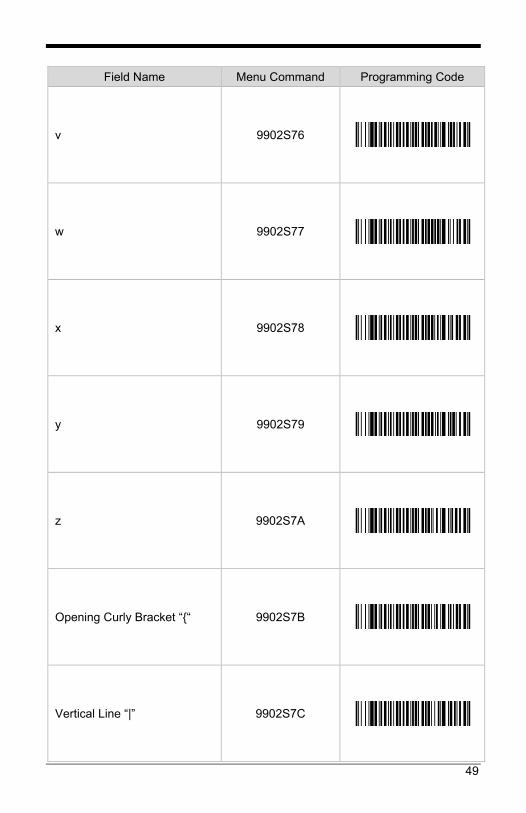
Field Name Menu Command Programming Code
v 9902S76
w 9902S77
x 9902S78
y 9902S79
z 9902S7A
Opening Curly Bracket “{“ 9902S7B
Vertical Line “|” 9902S7C

50
Field Name Menu Command Programming Code
Closing Curly Bracket “}” 9902S7D
Tilde “~” 9902S7E
DEL 9902S7F

51
Global Settings
Error Beep Programming Bar Codes The beeper may be configured Error Beep On or Error Beep Off in response to a non-Driver’s License or Identification bar code. Default = Error Beep Off.
Error Beep On 9902G05
* Error Beep Off 9902G04
Prefix of ID for Data Elements By default the Data Field prefix is not shown in the Data Field. To show the Data Field prefix, scan the Enable Prefix bar code. Default = Disable Prefix. EXAMPLE: When prefix is enabled, Data Field Postal Code will be displayed as
DAK123456789. When Prefix is disabled, Data Field Postal Code will be displayed as 123456789.
Enable Prefix 9902G03
* Disable Prefix 9902G02
For AAMVA prefixes and standards, please refer to the American Association of Motor Vehicle Administrators: Personal Identification – AAMVA International Specification – DL/ID Card Design Standard. (www.aamva.org)
* Factory Default.

52
Non-Standard Data
If Enable Non-Standard Data is scanned, non-standard data will be displayed with the prefix. Default = Disable Non-Standard Data.
Enable Non-Standard Data 9902G01
* Disable Non-Standard Data 9902G00
Appending NONE for No Data Found If you want “NONE” to appear in the Data Field where there is no data found, scan the Enable Appending NONE bar code. Default = Disable Appending NONE for No Data Found.
Enable Appending NONE 9902G09
* Disable Appending NONE 9902G08
For AAMVA prefixes and standards please refer to the American Association
of Motor Vehicle Administrators: Personal Identification – AAMVA International Specification – DL/ID Card Design Standard. (www.aamva.org)
* Factory Default.

53
Data Validation If you want “?????” to appear in the Data Field where the data is not standard, scan the Enable Data Validation bar code. Default = Disable Data Validation.
Enable Data Validation 9902G07
* Disable Data Validation 9902G06
For AAMVA prefixes and standards please refer to the American Association
of Motor Vehicle Administrators: Personal Identification – AAMVA International Specification – DL/ID Card Design Standard. (www.aamva.org)
* Factory Default.

54
55
Configuration Utility EasyDL 2.0 can also be configured using Honeywell’s EasyDL 2.0 Configuration Utility. This utility can generate bar codes to configure the plug-in alone, delays alone, and both plug-in and delays in a single bar code.
To configure using the EasyDL 2.0 Configuration Utility:
1. Start the EasyDL 2.0 Configuration Utility. Select the required document from the list of available documents shown in the drop down box to populate available fields. By default, Header fields are shown.
2. Select the desired Data Field or Separator from the list boxes. Click on the Insert button (>>) or double click on the item to add it to the Data Output Format list box.
Note: The Separator Fields list box can be extended to show all supported ASCII characters by checking the Show All Separators box.
3. Formatting options are available for different data fields within different documents. Select one of these fields and the options are displayed in the Data Format/Separator Delays list box.
4. Select the desired Data Field followed by required Data Format option. Click on the Insert button (>>) or double click on the item to add it to the Data Output Format list box.
5. To select a Data Format, click on the desired option. To deselect, double click the option.
6. To move a selected field within the Data Output Format list box, click on the Move Up or Move Down buttons until the field has been moved to the desired location.
7. To remove a selected field in the Data Output Format list box, click on the Remove button (<<.)
8. To configure a delay after a separator, in the Configure Delays section, select the Separator from the Separator dropdown list. Enter the delay amount in milliseconds.
Note: The delay must be in multiples of 5, starting from 5ms up to and including 5000ms.
9. To Enable Global Settings, check the Global Setting to be enabled.
10. The Data Output Format list box, the Configure Delays section, and Global Settings can be cleared by clicking on the Clear All button.

56
11. To create a bar code from the Data Output Format list box, Configure Delays, and/or Global Settings click on the Generate Barcode button. A second window will appear with the bar code. To save the bar code, click on the Save button. The bar code will be saved as an html file. To print the bar code, click on the Print button.
12. The selected configuration that includes the Data Output Format list box, Configure Delays, and Global Settings can be saved into a file. Click on Save to File button and select the location to save then click on the Save button. The configuration will be saved as an xml file.
13. To generate a bar code from a Saved to File configuration, select Load from File button. Select the xml file and then click on the Open button. The saved configuration will populate in the Data Output Format list box, Configure Delays section, and Global Settings. To generate a bar code, follow step number 11.
14. To complete the configuration, scan the generated bar code.
57
Inserting Delays between Fields Delays can be introduced in the data transmission using Data Formatter. The Data Formatting string can be sent as a serial command, built in a menu code, or created in EZConfig-Scanning. Follow input format needed as outlined in the imager’s User’s Guide available at www.honeywellaidc.com.
The EF command in the system data formatter will insert a delay between fields in the output.
To test the delay, follow these steps:
1. Setup EasyDL 2.0 to output data as Last/Family Name [Horizontal Tab]First Name.
2. For a delay after Last/Family Name, send the following data formatstring to the scanner:
DLYCRX200;DLY_XX09.
The breakdown of the command line is shown below:
DLYCRX informs the scanner the following string is the delay inmultiples of 5ms
200 inserts a delay of 1000ms (200 x 5ms) DLY_XX informs the scanner the following string is the separator
ASCII value 09 ASCII value for the Horizontal Tab . informs scanner to save data to non-volatile flash.
3. The output will be Last/Family Name, a delay of 1000ms, horizontal tab,then First Name.
Note: The system data formatter is based on the position of the virtual pointer in the data buffer.

58

59
Version Identification Scan the bar code below to transmit the version of EasyDL 2.0 software that the imager is running.
EasyDL 2.0 Version Check
Note: If the characters @#$EasyParseDL_2_0Version$#@. are transmitted when the bar code is scanned, the unit is not equipped with the EasyDL 2.0 software plug-in. If no characters are transmitted when the bar code is scanned, the unit may be equipped with the free trial version.

60

61
Customer Support
Technical Assistance If you need assistance installing or troubleshooting your device, please contact us by using one of the methods below:
Knowledge Base: www.hsmknowledgebase.com
Our Knowledge Base provides thousands of immediate solutions. If the Knowledge Base cannot help, our Technical Support Portal (see below) provides an easy way to report your problem or ask your question.
Technical Support Portal: www.hsmsupportportal.com
The Technical Support Portal not only allows you to report your problem, but it also provides immediate solutions to your technical issues by searching our Knowledge Base. With the Portal, you can submit and track your questions online and send and receive attachments.
Web form: www.hsmcontactsupport.com
You can contact our technical support team directly by filling out our online support form. Enter your contact details and the description of the question/problem.
Telephone: www.honeywellaidc.com/locations
For our latest contact information, please check our website at the link above.


Honeywell Scanning & Mobility 9680 Old Bailes Road For Mill, SC 29707 www.honeywellaidc.com
EASYDL-IG Rev C 2/19