ec114 baking baking 44 - ndsu - north dakota state … · ec114 baking baking 44 north dakota state...
TRANSCRIPT

EC114
BAKING 4Baking 4
North Dakota State University, Fargo, North Dakota
OCTOBER 2005
Revised September 2016

2
Cakes, Pies and PastriesBy Louise Garrett, Extension nutrition specialistRevised by Martha Anderson, Extension specialist, 4-HNew Mexico State University
Adapted in North Dakota by the 4-H Healthy Livestyles Programming Commitee:Marcia Hellendsaas, McKenzie and Dunn County Extension Agent - Nutrition, Food Safety and Health Gail Slinde, Ward County Extension Agent - 4-H Youth Development Kaylyn Anderson, LaMoure County Extension Agent - 4-H Youth Development/Nutrition Education Macine Lukach, Cavalier County Extension Agent - Nutrition, Food Safety and Health Heather Hagen, Former Cass County 4-H Member Deb Hagen, Cass County 4-H Volunteer Leader Jane Edwards, Extension Nutrition Specialist, NDSU Department of Health, Nutrition and Exercise Sciences Julie Garden-Robinson, Extension Food and Nutrition Specialist, NDSU Department of Health, Nutrition and Exercise Sciences Carrie Stark, 4-H Youth Development Specialist, NDSU Extension Service, Center for 4-H Youth Development
Revised June 2016 by Julie Garden-Robinson, Extension Food and Nutrition Specialist
ReferencesBetter Homes and Gardens New Baking Book (1999). Des Moines, Iowa: Meredith Books.Betty Crocker’s Picture Cook Book (1956). New York: McGraw-Hill.Cocinas de New Mexico (1976). Albuquerque, N.M.: Public Service Company of New Mexico.Dickson, Darlene (April 5, 1992). “A Tasty Recipe for Meringue Pie,” Clovis News Journal, p. 4D.Favorite Brand Name Pie Collection (1993). Lincolnwood, Ill.: Publications International Limited.Foodworks (1993). West Lafayette, Ind.: Purdue University Cooperative Extension Service.How to Master the Art of Pastry Making. (No date available.) General Mills booklet.Nusom, Lynn (1991). Christmas In New Mexico. Phoenix, Ariz.: Golden West Publications.Nusom, Lynn (March 7, 2000). “Round Out Your Pie-Making Skills,” Las Cruces–Sun News, p. A10.

3
ContentsIntroduction ................................................................................ 4
Eating Well ................................................................................... 5
Cake Science ................................................................................11
Let’s Bake a Cake ....................................................................... 12 Yellow Cake ............................................................................ 12 Sponge Cake .............................................................................13
Cake Finishes ...............................................................................15 Uncooked Butter Frosting ...........................................................15 Seven-minute Frosting ...............................................................15 Fudge Frosting ..........................................................................16 Busy Day Oatmeal Cake ............................................................17
Mixes ............................................................................................ 18
Other Important Things to Do ................................................19
Let’s Make Pastry ....................................................................... 20 Basic Recipe for Pastry (from solid shortening) ........................... 21 Great Ideas With Pastry ........................................................... 29 Pie Fillings ...............................................................................31 Thickening Agents .................................................................... 35 Cream Pies .............................................................................. 38 Custard Pies ............................................................................ 44 Fruit Pies ................................................................................. 47 Meat Pies, Cheese Pies, Little Pies and More ...............................51 Freezing Pies and Pastry Products .......................................... 55 Troubleshooting Pastry .......................................................... 56 Homemade or Ready-Made? ...................................................57
Baking Record Form ................................................................. 59

4
IntroductionPastry and Pies“As American as apple pie” — that’s an expression we’ve often heard. Americans like pie whether it’s apple, lemon, cherry, chocolate, pumpkin, pe-can or mince. Pie is America’s favorite dessert; a homemade pie is the crowning touch to a won-derful meal.
We use the word “pie” in many common expres-sions in our everyday speech, such as “sweet as pie,” “pie in the sky,” “eating humble pie” and “easy as pie.” A flaky pastry filled with flavor-ful fruit; a delicious, cream filling; or meat and cheese is a delight! No wonder some people say they like only two kinds of pie — hot and cold!
In this project, you will learn to make:• Tender,flakypastrythathasgoodflavor•Flavorfulcream,custardandfruitfillings•Attractivemeringue•Pastriessuchasturnovers,empanadasand
quiche
You will do the following to complete the project:•Makepastryusingseveraldifferentmixing
methods•Experimentwithvariousfatsusedinmaking
pastry•Performviscosityexperiments•Preparecreamfillingsthickenedwithvarious
products•Prepareattractivemeringueforcreampies•Preparecustardfillings•Preparefruitfillingsusingfreshand
canned fruits•Experimentwithpastry/pievariations
Suggested Exhibits: 1. One 8-inch or 9-inch fruit pie with
double crust 2. Two fruit-filled turnovers or empanadas 3. A viscosity display including experiment
result sheets and line spread viscometer, lami-nated or enclosed in plastic cover
4. Sponge Cake 5. Butter Cake
About CakesCakes are sweetened breads. Because of the extra amount of sugar and fat, you can mix cake batter until it is smooth and the cake will not be tough. Sugar and fat condition the gluten in the flour to make a tender product. (Overhandling bread dough causes toughness.)
Baking powder and eggs make cakes light. When you beat eggs separately and fold them into the cake batter, the air you beat into the eggs, plus the carbon dioxide gas from baking powder, can result in a cake that has a delicate, fine grain and is tender and moist.
To make a good cake, you must measure carefully and follow the directions for mixing and baking exactly.
Two types of cakesCakes come in two types — butter and sponge. Butter cakes are made with fat; sponge cakes are made without fat.
As the name tells you, butter was used most often as the fat in cakes at one time. You also can use any vegetable shortening in these cakes. Many people prefer butter for the delicacy of flavor, but the cost may be too high for the average family.
True sponge and angel cakes are made without fat or baking powder. Air and steam are the leaven-ing agents. You beat the egg whites so they hold as much air as possible, and then fold them carefully into the cake batter. As the cake bakes, the heat makes imprisoned air expand, and this causes the cake to rise. As the liquid in the batter heats, steam forms. This steam expands like the trapped air and also helps leaven the cake.
Angel or white sponge cakes are made with egg whites only. Yellow sponge cake is made with the whole egg.

5
Eating Well“MyPyramid” has been rebuilt and it’s now a plate! Here’s what the colors stand for:
orange - grains green - vegetables red - fruits blue - dairy foods purple - protein foods
The U.S. Department of Agriculture (USDA) wanted an easier way to remind people to eat healthfully. MyPlate shows the five food groups using a familiar picture: a place setting with a plate, cup and fork.
MyPlate SpeaksLet’s look at some of the other messages this new symbol is trying to send:
Balancing Calories •Enjoy your food, but eat less.
•Avoid oversized portions.
Foods to Increase •Make half your plate fruits and vegetables.
•Make at least half your grains whole grains.
•Switch to fat-free or low-fat (1%) milk.
Foods to Reduce •Compare sodium in foods such as soup, bread
and frozen meals. Choose foods with lower numbers.
•Drink water instead of sugary drinks.
Make it personal. Through the USDA’s MyPlate website (www.choosemyplate.gov), you can get personalized recommendations about the mix of foods you need to eat and how much you should be eating.

6
How Much Do I Need to Eat?Everyone wants to know how much he or she should eat to stay healthy. That’s a tricky question, though. It depends on your age, whether you’re a girl or boy, and how active you are. Kids who are more active burn more calories, so they need more calories. But we can give you some estimates for how much you need of each food group.
GrainsGrains are measured in ounce equivalents. What are they? Ounce equivalents are just another way of showing a serving size.
Here are ounce equivalents for common grain foods. An ounce equivalent equals:
1 piece of bread ½ cup of cooked cereal, such as oatmeal ½ cup of rice or pasta 1 cup of cold cereal
• 4-to8-year-oldsneed4to5ounce equivalents each day.
• 9-to13-year-oldgirlsneed5ounce equivalents each day.
• 9-to13-year-oldboysneed6ounce equivalents each day.
And one last thing about grains: Make at least half your grain food choices whole grains, such as 100 percent wheat bread, brown rice and oatmeal.
VegetablesOf course, you need your vegetables, especially those dark green and orange ones. But how much is enough? Vegetable servings are measured in cups.
• 4-to8-year-oldsneed1½cupsofveggieseachday.
• 9-to13-year-oldgirlsneed2cupsofveggieseach day.
• 9-to13-year-oldboysneed2½cupsofveggieseach day.
FruitsSweet, juicy fruit definitely is part of a healthy diet. Here’s how much you need: • 4-to8-year-oldsneed1cupto1½cupsoffruit
each day.• 9-to13-year-oldgirlsneed1½cupsoffruiteach
day.• 9-to13-year-oldboysneed1½cupsoffruiteach
day.
Dairy FoodsDairy foods are rich in calcium to build strong bones to last a lifetime.
• 4-to8-year-oldsneed1to2cupsofmilk(orothercalcium-rich food) each day.
• 9-to13-year-oldgirlsneed3cupsofmilk (or other calcium-rich foods) each day.
• 9-to13-year-oldboysneed3cupsofmilk (or other calcium-rich foods) each day.
If you want something other than milk, you can substitute yogurt, cheese or calcium-fortified orange juice — just to name a few.
Protein FoodsThese foods contain iron and lots of other important nutrients. Like grains, these foods are measured in ounce equivalents.
An ounce equivalent of this group would be:
1 ounce of meat, poultry or fish ¼ cup cooked dry beans 1 egg 1 tablespoon of peanut butter a small handful of nuts or seeds
• 4-to8-year-oldsneed3to4ounce equivalents each day.
• 9-to13-year-oldgirlsneed5ounce equivalents each day.
• 9-to13-year-oldboysneed5ounce equivalents each day.
Whoa! That’s a lot to swallow. The good news is that your mom, dad and the other grownups in your life will help you eat what you need to stay healthy. Here’s more good news: You don’t have to become a perfect eater overnight.
Adapted with permission from http://kidshealth.org/kid/stay_healthy/food/pyramid.html

7
FAT FREE
enjoy your food, but eat less
10 tips to enjoying your meal
You can enjoy your meals while making small adjustments to the amounts of food on your plate. Healthy meals start with more fruits, vegetables, grains, protein foods, and dairy. Drink and eat less sodium, saturated fat, and added sugars.
10 tips
Nutrition Education Series
Go to www.ChooseMyPlate.gov for more information.
DG TipSheet No. 18
Revised January 2016
1 get to know the foods you eat Use the SuperTracker to find out what kinds of foods and how much to eat and to get tips and support for
making better food choices.
2 take your time Be mindful to eat slowly, enjoy the taste and textures, and pay attention to how you feel. Use
hunger and fullness cues to recognize when to eat and when you’ve had enough.
3 use a smaller plate Use a smaller plate at meals to help with portion control. That way you can finish your entire plate and
feel satisfied without overeating.
4 if you eat out, choose healthier options
Check and compare nutrition information about the foods you are eating. Preparing food at home
makes it easier to control what is in your meals.
5 satisfy your sweet tooth in a healthy way Indulge in a naturally sweet dessert dish—fruit! Serve a fresh fruit cocktail or a fruit
parfait made with yogurt. For a hot dessert, bake apples and top with cinnamon.
6 choose to eat some foods more or less often Choose more vegetables, fruits, whole grains, and
fat-free or 1% milk and dairy products. Cut back on foods high in solid fats, added sugars, and salt.
7 find out what you need Get your personalized plan by using the SuperTracker to identify your food group targets. Compare the foods
you eat to the foods you need to eat.
8 sip smarter Drink water or other calorie-free beverages, 100% juice, or fat-free
milk when you are thirsty. Soda and other sugar-sweetened beverages contain added sugar and are high in calories.
9 compare foods Check out the Food-A-Pedia to look up and compare nutrition information for more than 8,000 foods.
10 make treats “treats,” not everyday foods Treats are great once in a while. Just don’t make
treat foods an everyday choice. Limit sweet treats to special occasions.
Center for Nutrition Policy and PromotionUSDA is an equal opportunity provider and employer.
United States Department of Agriculture

8
choosing whole-grain foods
10 tips for purchasing and storing whole-grain foodsWhole grains are important sources of nutrients such as zinc, magnesium, B vitamins, and fiber. There are many choices available to make half your grains whole grains. But whole-grain foods should be handled with care. Over time and if not properly stored, oils in whole grains can cause spoilage. Consider these tips to select whole-grain products and keep them fresh and safe to eat.
10 tips
Nutrition Education Series
DG TipSheet No. 22Revised January 2016
Go to www.ChooseMyPlate.gov for more information.
6 check for freshness Buy whole-grain products that are tightly packaged and well sealed. Grains should always look and smell
fresh. Also, check the expiration date and storage guidelines on the package.
7 keep a lid on it When storing whole grains from bulk bins, use containers with tight-fitting lids and keep in a cool,
dry location. A sealed container is important for maintaining freshness and reducing bug infestations.
8 buy what you need Purchase smaller quantities of whole-grain products to
reduce spoilage. Most grains in sealed packaging can be kept in the freezer.
9 wrap it up Whole-grain bread is best stored at room temperature in its original packaging, tightly closed with a quick-
lock or twist tie. The refrigerator will cause bread to lose moisture quickly and become stale. Properly wrapped bread will store well in the freezer.
10 what’s the shelf life? Since the oil in various whole-grain flours differs, the shelf life varies too. Most whole-grain
flours keep well in the refrigerator for 2 to 3 months and in the freezer for 6 to 8 months. Cooked brown rice can be refrigerated 3 to 5 days and can be frozen up to 6 months.
1 search the label Whole grains can be an easy choice when preparing meals. Choose
whole-grain breads, breakfast cereals, and pastas. Look at the Nutrition Facts labels and ingredients lists to find choices lower in sodium, saturated (solid) fat, and added sugars.
2 look for the word “whole” at the beginning of the ingredients list Some whole-grain ingredients include whole oats,
whole-wheat flour, whole-grain corn, whole-grain brown rice, and whole rye. Foods that say “multi-grain,” “100% wheat,” “high fiber,” or are brown in color may not be a whole-grain product.
3 kids can choose whole grains Your kids can choose whole grains at school. Encourage healthier choices at home by adding
whole grains into their favorite recipes, meals, and snacks.
4 find the fiber on label If the product provides at least 3 grams of fiber per serving, it is a good source of fiber. If it contains 5 or
more grams of fiber per serving, it is an excellent source of fiber.
5 is gluten in whole grains? People who can’t eat wheat gluten can eat whole grains if they choose carefully.
There are many whole-grain products, such as buckwheat, certified gluten-free oats or oatmeal, popcorn, brown rice, wild rice, and quinoa that fit gluten-free diet needs.
Center for Nutrition Policy and PromotionUSDA is an equal opportunity provider and employer.
United States Department of Agriculture

9
Why Do We Eat? We know everyone needs food to live. But why?
Food gives you two things:
• Energytomoveandtodothings
• Stufftohelpyougrowandstayhealthy
Just like a car needs fuel to run, your body needs food for energy. Without energy, you couldn’t run or play.
Besides giving you energy, food helps you grow and heal. When you skin a knee or an elbow, your body needs to fix or replace the skin you scraped off. If you get sick, your body needs to fight the infection, rebuild weak body parts and get well. Your body also keeps you from getting too hot or cold. Nutrients are the things in food that help your body perform all these functions. So your body doesn’t need just the food, it needs the nu-trients in the food.
Nutrients — Who Needs Them?Nutrients are chemical substances that your body gets from the food you eat. Each nutrient has a different job to do. They all are necessary in specific amounts, but your body knows how to handle it all! You’re an amazing machine!
• VitaminAhelpsyouseeinthedark.
• Waterregulatesbodytemperature.
• Calciumbuildsstrongbonesandteeth.
• Fatgivesyouenergyandcarriessomevitaminsto where the body needs them.
• Ironhelpsyourbloodcarryoxygentoallpartsof your body — even your toes!
• Proteinbuildsandrepairsmusclesandotherparts of your body.
• VitaminChelpshealcuts.
• Carbohydratesgiveyouenergytogrow,moveand do things.

10
Cake Science
Let’s Experiment! Does the pan make a difference in baking food?
Cakes and cookies are similar in that they are delicate in flavor and texture. (You can do this experiment with cookies and note the results for both kinds of baked products.)
Materials Needed1 roll of sugar-cookie dough bought at store1 sharp slicing knife1 shiny baking sheet (pie pans can be used)1 dark-dull baking sheet
Procedure 1. Place oven rack in the center position of the oven.
2. Preheat oven to the temperature stated on the cookie package.
3. Open cookie dough and slice eight cookies off the roll. Try to make slices as much alike as possible.
4. Place four cookies on the shiny pan and four cookies on the dark-dull pan.
5. Bake only one pan of cookies at a time. Start with the shiny pan. Check the time. Place the cookies near the center of the oven. Bake until light brown and done. Write down the exact number of minutes they bake. Remove cookies from pan to cool. Bake cookies on the dark-dull pan. Bake them in the same spot in the oven and for exactly the same number of minutes as you used for the cookies on the shiny pan. Remove cookies from pan to cool.
ObservationAfter cookies cool, compare the color and texture.
QuestionsWhat difference can you see in color, especially on the bottom of the cookies?
Break cookies in half. What is the difference in the texture of the cookies?
Which pan absorbed more heat?
What kind of pan should be used for a delicate white cake?

11
Let’s Experiment! What are some differences between all-purpose flour and cake flour?
Materials NeededAll-purpose flourCake flourSheet of blue or white paperWaxed paperFlour sifter1/2 cup measuring cup2 small bowls, same size and shapeLiquid measuring cupTwo metal mixing spoons, both alike
Procedure and ObservationsPlace 1 Tbsp. all-purpose flour and 1 Tbsp. cake flour side by side on a piece of blue or white paper. Describe any difference you observe. Rub a pinch of each flour between your thumb and finger. (Be sure your fingers are dry.) If you feel any difference, describe it.
In this part of the experiment, you will mix two simple flour and water pastes, one with all-purpose flour and the other with cake flour. Follow these steps:
1. Place two small bowls side by side on the table. Sift and measure 1/2 cup all-purpose flour. Put in one bowl. Sift and measure 1/2 cup cake flour. Put in other bowl. Label bowls.
2. Measure 1/4 cup cold water and pour into the all-purpose flour. Stir until all flour is dampened.
3. Measure another 1/4 cup cold water and pour into the cake flour. Stir until all flour is dampened.
4. Stir the mixture in each bowl 50 strokes.
QuestionsWhich flour absorbed more liquid?
What difference did you notice between the two flour-water mixtures?
If a recipe calls for 1 cup of cake flour, but you use 1 cup of all-purpose flour instead, what might be the result with the baked cake?
Why do directions sometimes tell you to use 7/8 cup of all-purpose flour in place of 1 cup cake flour?
Why is following the directions given in a recipe for mixing so important?

12
Let’s Bake a CakeYellow CakeEveryday and Sunday, too, it’s that kind of cake. If you can keep hands off, it will stay moist for several days. Frost and fill it with yummy fudge frosting.
Preheat oven to 375 F.
Use three 8-by-1½-inch round layer pans. Cut waxed papers to fit bottoms of pans. Be sure these papers lie flat and do not wrinkle at sides. Grease tops of papers and place in pans. Do not grease sides of pans.
Ingredients3 cups sifted cake flour 1½ cups sugar2¼ tsp. double-acting baking powder 2 tsp. vanilla (at elevations of 7,000 feet or more, 4 egg yolks use only 1¾ tsp. baking powder) 1¾ cups milk1 cup butter* 4 egg whites
* You can use hydrogenated vegetable shortening in place of butter if you add 1/2 tsp. salt, sifted with flour and baking powder.
1. Sift flour, then measure. Add baking powder to flour and sift together three times. Set aside.
2. Stir butter to soften. Add sugar gradually and cream together thoroughly.
3. Blend in vanilla.
4. Add egg yolks, one at a time, blending thoroughly after each.
5. Add flour and milk alternately, beginning and ending with flour. Add flour in four portions, milk in three. Mix after each addition at lowest speed until just blended. Beat one minute at a medium speed after last addition of flour. (If mix-ing by hand, stir each addition until just blended. Beat 35 strokes after first three additions of flour. After last addition of flour, beat 70 strokes.)
6. Beat egg whites until they begin to hold a peak that stands straight up when you gently lift the beater. With a mixing spoon, fold egg whites into mixture; use 30 to 40 strokes.
7. Pour batter into pans lined with waxed paper. Spread from center so batter is slightly higher at edges.
8. Bake in 375 F oven about 30 minutes, or until cake springs back when lightly pressed.
9. Remove from oven. Immediately loosen layers from pans by running a thin spatula around the edges. Turn layers onto wire racks to cool and immediately lift off waxed pa-per.
10. Cover tightly or wrap the cooled cake to prevent drying.
13
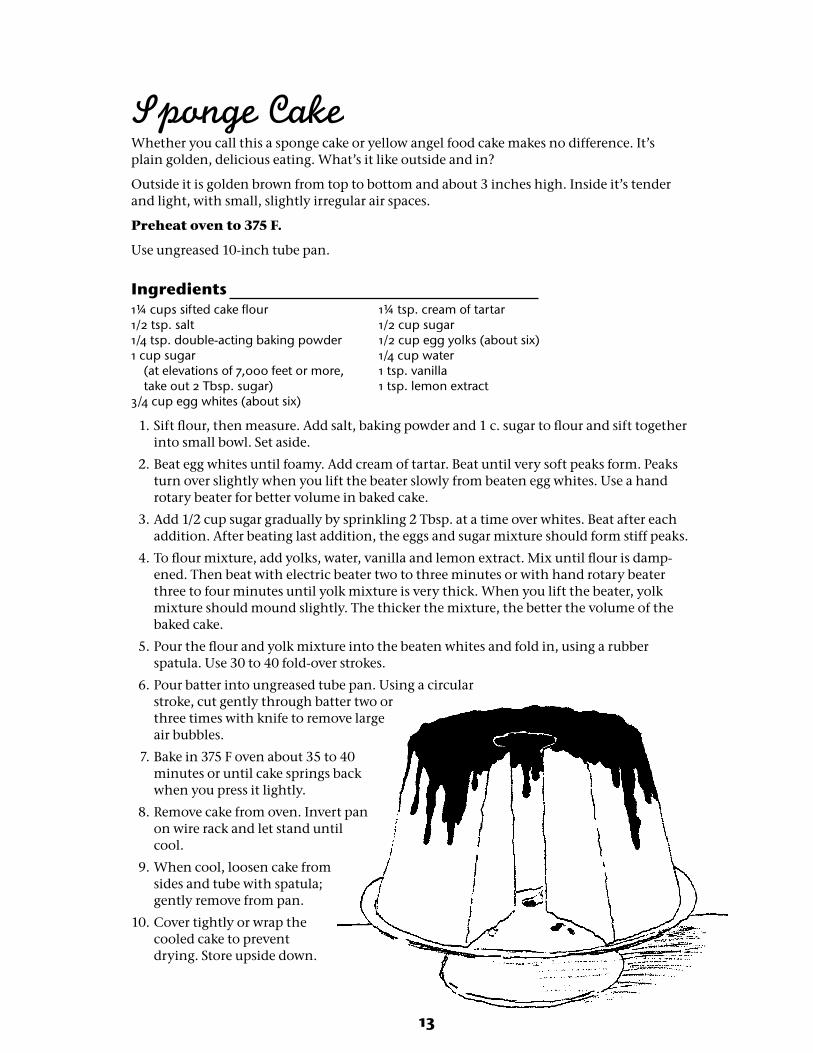
Sponge CakeWhether you call this a sponge cake or yellow angel food cake makes no difference. It’s plain golden, delicious eating. What’s it like outside and in?
Outside it is golden brown from top to bottom and about 3 inches high. Inside it’s tender and light, with small, slightly irregular air spaces.
Preheat oven to 375 F.
Use ungreased 10-inch tube pan.
Ingredients1¼ cups sifted cake flour 1¼ tsp. cream of tartar1/2 tsp. salt 1/2 cup sugar1/4 tsp. double-acting baking powder 1/2 cup egg yolks (about six)1 cup sugar 1/4 cup water (at elevations of 7,000 feet or more, 1 tsp. vanilla take out 2 Tbsp. sugar) 1 tsp. lemon extract3/4 cup egg whites (about six)
1. Sift flour, then measure. Add salt, baking powder and 1 c. sugar to flour and sift together into small bowl. Set aside.
2. Beat egg whites until foamy. Add cream of tartar. Beat until very soft peaks form. Peaks turn over slightly when you lift the beater slowly from beaten egg whites. Use a hand rotary beater for better volume in baked cake.
3. Add 1/2 cup sugar gradually by sprinkling 2 Tbsp. at a time over whites. Beat after each addition. After beating last addition, the eggs and sugar mixture should form stiff peaks.
4. To flour mixture, add yolks, water, vanilla and lemon extract. Mix until flour is damp-ened. Then beat with electric beater two to three minutes or with hand rotary beater three to four minutes until yolk mixture is very thick. When you lift the beater, yolk mixture should mound slightly. The thicker the mixture, the better the volume of the baked cake.
5. Pour the flour and yolk mixture into the beaten whites and fold in, using a rubber spatula. Use 30 to 40 fold-over strokes.
6. Pour batter into ungreased tube pan. Using a circular stroke, cut gently through batter two or three times with knife to remove large air bubbles.
7. Bake in 375 F oven about 35 to 40 minutes or until cake springs back when you press it lightly.
8. Remove cake from oven. Invert pan on wire rack and let stand until cool.
9. When cool, loosen cake from sides and tube with spatula; gently remove from pan.
10. Cover tightly or wrap the cooled cake to prevent drying. Store upside down.

14
How does your cake rate?Reasons for Butter Cake Failures
UndersizedToo little leavening agentToo large a panOven too hotOvermixing
Tough CrustsToo much flourToo little sugar or shorteningOven too hotCake baked too long
Fallen CakeToo much sugarToo much shorteningInsufficient baking
Soggy or Heavy BottomUndermixingToo little leaveningLower part of oven too coolToo much liquid
Course-grainedInsufficient creamingToo much leaveningAll-purpose rather than cake flourOven too slow
Reasons for Sponge Cake Failures
Tough CakeOven too hotNot enough sugarOvermixing
Coarse TextureUnderbeaten egg whitesToo slow an ovenIngredients not blended well enough
Heavy Sticky Layer at BottomEgg yolks not beaten enoughInsufficient mixing of yolks with other ingredients
Cracks in CrustOverbeating egg whitesToo much sugarToo hot an oven
Sticky CrustToo much sugarUnderbaking
Undersized CakeUnderbeaten or overbeaten egg whitesOvermixingToo large a panToo hot an ovenRemoved from pan too soon

15
Cake FinishesFrosting adds beauty and appetite appeal, and complements the flavor of the cake. Frostings fall into two general categories — creamy and fluffy.
Creamy frosting has a soft, lustrous, smooth surface. Uncooked butter frosting is popular. Other creamy frostings, such as fudge and penuche, are cooked, cooled and beaten to a creamy consistency.
Fluffy frostings have a glossy surface and are light and fluffy. You make the most familiar of these, seven-minute frosting, in a double broiler. A fluffy frosting will set on the surface, but remain soft underneath.
Be sure cakes are cool before frosting. Brush off all loose crumbs so they will not cause frosting to look bumpy.
Uncooked Butter Frosting1/3 cup soft butter or margarine3 cups confectioners’ sugar3 Tbsp. (approximately) cream or rich milk 1 tsp. vanilla
1. Cream butter or margarine and gradually add the sugar. Mix until blended.
2. Add vanilla and enough cream or milk so frosting will spread easily, but not run.
3. If desired, add coloring to all or part of this frosting. Be careful to use only a small amount of the food coloring so the frosting will have a very delicate tint.
Variations• Add3ounces(threesquares)unsweetenedchocolate,melted.
• Use1Tbsp.gratedrindand3Tbsp.orangeorlemonjuiceinsteadofvanilla and cream.
Seven-minute Frosting3/4 cup sugar1 egg white1/2 tsp. vanilla1/8 tsp. cream of tartar3 Tbsp. water1/4 tsp. almond extract (if desired)
1. Mix all ingredients, except extracts, in top of double broiler. Beat until blended.
2. Place over boiling water and beat rapidly until frosting holds a peak.
3. Add extracts. Spread on cooled cake.

16
Fudge Frosting2 squares unsweetened chocolate2 cups sugar2 Tbsp. light corn syrup1 tsp. vanilla1 cup milk1/8 tsp. salt2 tsp. butter or margarine
1. Combine chocolate and milk in medium-sized saucepan. Place over low heat and cook until mixture is smooth and well-blended, stirring constantly.
2. Add sugar, salt and corn syrup. Stir until sugar is dis-solved and mixture boils. Continue boiling, without stirring, until a small amount of mixture forms a very soft ball in cold water.
3. Remove from heat. Add butter or margarine and va-nilla. Cool until lukewarm.
4. Beat until of creamy consistency that you can spread on the cake. If necessary, place over hot water to keep soft while spreading.
Good cakes taste great with fresh fruit, gentle glazes or whipped cream as a spectacular finish, too. Fruit has more nutrition, less fat, and is better for your teeth as well!

17
Busy Day Oatmeal Cake Ingredients 1 cup oatmeal, quick 1¼ cups boiling water
Pour water over oats and let stand while mixing the following: 1 cup sugar ½ cup shortening 2 eggs 1½ cups plain flour 1 tsp. vanilla 1 tsp. cinnamon 1 tsp. nutmeg 1 tsp. allspice 1 tsp. soda
Directions 1. Preheat oven to 350 F.
2. Cream sugar and shortening. Add eggs; beat.
3. Add flour, oatmeal, vanilla and spices.
4. Pour into floured 9-inch by 13-inch pan.
5. Bake at 350 degrees for 30 to 35 minutes or until done.
6. Cool cake before icing.
Icing for Oatmeal Cake (optional)
Ingredients1 cup brown sugar½ stick butter4 to 5 Tbsp. evaporated milk
Directions 1. Boil one minute and add 1 cup coconut and 1/2 cup nuts
(optional). Spread on top of cake.
2. Broil a few minutes until lightly browned.
Makes 12 servings
Per serving: 210 calories, 30 g carbohydrates, 10 g fat, 2 g fiber and 120 mg sodium
(With icing: 380 calories, 50 g carbohydrates, 20 g fat, 2 g fiber and 170 mg sodium)

18
MixesCheck your grocery store and see how many packaged mixes you find for:
yellow butter cakesponge cakefluffy white frostingchocolate frosting
Select a package mix of your choice from the above group. Prepare it at home. How did it compare with “scratch” products you made in:
costflavortime of preparationkeeping qualitynumber of servings
When would you use the “scratch” method for family meals? The mix?

19
Other Important Things to DoDemonstrations• Giveademonstrationonhowtomakeacakeorfoodscience.
Citizenship• Helpwithafooddrive
• Visitanursinghome.Callfirsttoseeifyoucanbring home-baked treats.
• Helpwithasoupkitchen.
• Bakeforfamily,friends,shut-ins,neighbors.
Leadership• Serveasajuniorleaderfora4-Hfoodprojectgroup.
• Chairaclubpicnic,partyorspecialevent.
• Inspireother4-Hmemberstoexcel.
Career Exploration• Learnaboutcareersinfoodpreparation,microbiology
or food science.
• Interviewsomeoneinthefieldthatinterestsyou.
• Askthepersonwhatheorsheenjoysmost.
• Askthepersonwhyheorshechosethatcareer.
• Askthepersonhowheorshegotstarted.
• Askthepersonwhattrainingheorshehadtosucceed.
Keep a record of your 4-H activities.• Usetheforminthisproject,oraformyoudesignedon
the computer program.

20
Let’s Make PastryAnother word for pie crust is pastry. Pastry is stiff dough made of flour, salt, some form of fat and a small amount of liquid. Pastry can hold many wonderful fillings that serve as snacks, appetizers, main dishes or desserts.
Making good pastry requires 4-H members to learn and practice a few basic rules. These are called principles of cookery. One of the first and most important prin-ciples is: “Keep cool.” All the ingredients and utensils, even your hands, should be cool when making pastry. One professional chef says, “I have hot hands, so I dip my hands in a bowl of ice cold water before and during handling the pie crust to make sure the dough does not get overly heated, as that makes it hard to roll out.”
Another rule: Choose a standard recipe that fits the size of pan you will use and the type of pie you are making. Most fruit pies require a double, unbaked pie crust. Use a baked, single crust for cream pies. Use a raw, single crust pastry for custard pies, such as pecan and pumpkin.

21
Basic Recipe for Pastry (from solid shortening)
Be sure to measure accurately, using the correct measuring tools and techniques.
1. Lightly spoon flour into dry measuring cups, forming a slight mound above the cup rim. Do not tap on the cup or pack more flour into the cup. Level off with a spatula or straight-edged knife. Place in medium mixing bowl.
2. Measure salt (not over the mixing bowl!); add to flour and stir to blend the two ingredi-ents.
3. Measure shortening accurately and add to flour and salt.
a. Measure shortening by packing it into a dry measuring cup, leveling the top with a spatula, then using a rubber scraper to remove all the shortening from the cup.
b. Pre-measured shortening sticks are available. This is a neat, timesaving method, but is more expensive than measuring your own bulk shortening.
4. Using two knives or a pastry blender, cut the shortening into the flour mixture until the texture is the size of small peas (Figure 1).
5. Add ice cold water, sprinkling water on flour, one tablespoon at a time. Mix lightly with a fork until the flour is moistened. Each time you add a tablespoon, be sure to add it to a dry portion (Figure 2). The dough should form a ball, but not be sticky. Sticky dough results in tough pastry.
Single Crust Double Crust 8- or 9-inch 8-inch 9-inch
Flour 1 cup 1½ cups 2 cups
Salt 1/2 tsp. 3/4 tsp. 1 tsp.
Shortening 1/3 cup 1/2 cup 2/3 cup
Water 2 Tbsp. 3 Tbsp. 4 Tbsp.
Figure 2Figure 1

22
6. Lightly flour a dough board or pastry cloth, which you can purchase or make from a lightweight canvas fabric. (Some people prefer waxed paper underneath and on top of the dough — see Stir and Roll Pastry for directions). Place the dough ball (divide in half if you are making a double-crust pie) on the board or cloth.
Flatten and press the dough into a circle to provide a starting point for rolling out the pastry. Using a lightly floured rolling pin,* roll the pastry from the center to the outer edge (Figure 3 and Figure 4). As you reach the edge, lift the rolling pin to achieve an even thickness throughout the crust. Set the rolling pin back in the center, rolling in a different direction to the edge. By rolling out in different directions from the center, the pastry will be round in shape (Figure 5).
7. Measure the crust by holding an inverted pie pan over the pastry to see if it is large enough (Figure 6). Remember to allow 1 inch extra diameter for the crust edge and sides of the pie pan.
Figure 4Figure 3
Figure 6Figure 5
*A stockinette rolling pin cover prevents sticking; it may be purchased at specialty kitchen shops.

23
8. Fold the pie crust into fourths, transferring quickly to the pie pan (Figure 7). Unfold, being careful to center the pastry in the pie pan (Figure 8). Do not stretch the crust since it will shrink when baked.
9. If you have an uneven amount of crust hanging over the edge, trim it away with kitchen shears or a knife (Figure 9). A 1-inch overhang is adequate. Save the scraps for special treats! For a single-crust pastry used in making cream pies, such as chocolate or lemon, turn the edge under and form an attractive border with the tines of a fork or with a pinch and a twist of the dough between the thumb and forefinger (Figure 10 and Figure 11). This process is known as “fluting.”
Figure 7 Figure 8
Figure 9 Figure 10
Figure 11

24
10. Prick the unbaked shell liberally with a fork to prevent “bubbling” during the baking process (Figure 12 and Figure 13). Bake the crust on a rack in the center of an oven preheated to 425 F until lightly browned on the edges, approximately 10 minutes. Cool.
For a custard pie — pecan, pumpkin, etc. — follow the same steps, but leave the crust unbaked. It will be filled with raw custard, then baked.
For a double-crust pie, roll the remaining ball of dough as you did the lower crust. Before transferring this top crust to the pie, cut some vent holes using a sharp knife, cookie cutter or other tool. This cut-out design allows the steam to escape during baking, keeping the juices and fruit inside the crusts. Fill the lower crust with the prepared pie filling. Trim the bottom crust flush with the edge of the pie pan. Place the top crust over the rolling pin and gently lay it on the filled pie, centering as well as possible. Cut away long, overhanging pieces of dough as before. Lap the top crust edge over the bottom crust edge and press together. Form an attractive edge as described in step 9. Bake as directed in the recipe.
Figure 12 Figure 13

25
Let’s PracticeNow it’s time for you to try your hand at preparing pastry. Make a one-crust, baked pie crust and rate it with the following score sheet.
Rating Your Pastry Score SheetAppearance Score - Golden brown color; blistery surface; uniform, attractive edges; fits pan well
❏ Perfect - 5 points ❏ Fair - 1 point ❏ Good - 3 points ❏ Poor - 0 points
Poor Characteristics Here’s WhyBurned .............................................. OverbakingPale, dull color .................................. Underbaking, overhandlingSmooth, not blistery surface ............. Overhandling, too much flour when rollingUneven edge ..................................... Crust not rolled in even circle, not careful enough in shaping crust in panShrunken .......................................... Stretched crust when easing into panLarge air bubbles ............................... Not pricked well enough
Tenderness Score - Cuts easily with table knife or fork but holds shape when served
❏ Perfect - 5 points ❏ Fair - 1 point ❏ Good - 3 points ❏ Poor - 0 points
Poor Characteristic Here’s WhyTough, rubbery ................................ Too much water and overhandlingToo tender, falls apart ....................... Undermixing, not enough liquid, too much shortening
Texture Score - Flakes layered throughout crust; crisp eating
❏ Perfect - 5 points ❏ Fair - 1 point ❏ Good - 3 points ❏ Poor - 0 points
Poor Characteristics Here’s WhyCompact, doughy ............................. Underbaked, too much liquidDry, mealy ........................................ Shortening cut in too finely, not enough liquid
Flavor Score - Pleasant, bland flavor to enhance the filling
❏ Perfect - 5 points ❏ Fair - 1 point ❏ Good - 3 points ❏ Poor - 0 points
Poor Characteristics Here’s WhyBurned .............................................. OverbakedRancid .............................................. Poor-quality shortening, overbakedRaw ................................................... Underbaked
Now Add Up Your ScoreAppearance ___________Tenderness ___________Texture ___________Flavor ___________Total ___________
This evaluation has a possible score of 20.How well did your pastry score?

26
Let’s ExperimentHigh-quality pie crust should be flaky and tender. Flakiness is due to open spaces that form between layers during baking. The layers result because the fat trapped between the lay-ers of flour melts and is absorbed into the dough. This leaves air spaces needed for a flaky crust. Tenderness is the result of minimal formation of gluten, the protein structure found in flour. The less handling involved in making pastry, the more tender the pastry will be. Pastry also is tender due to the high fat-to-flour ratio.
In the following food science experiment, you will prepare three single pie crusts using three different types of fat.
Equipment Needed IngredientsThree 8-inch aluminum pie plates 3 cups all purpose flourPastry blender 1/3 cup vegetable shorteningMeasuring spoons 1/3 cup softened* margarineMedium mixing bowl (not diet)Rolling pin 1/3 cup vegetable oilFork 2 Tbsp. milkDry measuring cups waterSharp knife/kitchen shears waxed paperPie server/pancake turner salt
1 . Prepare the pie crust using 1 cup flour, 1 tsp. salt, 1/3 cup shortening and 2 Tbsp. water. Using the tines of a fork, prick the crust generously and bake at 425 F for 10 minutes or until lightly browned. Set aside to cool.
2. Prepare the second pie crust following the same procedure as the shortening crust, but use 1/3 cup margarine instead of shortening.
3. Prepare the third pie crust using the following procedure for “stir and roll” pastry, using oil as the fat.
a. Measure 1 c. of flour, place in medium size bowl. Add 1/2 tsp. of salt; mix well. Measure 1/3 cup vegetable oil into liquid measuring cup. Add 2 Tbsp. milk to the oil; do not mix the two liquids together.
b. Make a “well” in the center of the flour; add milk-oil mixture all at once in the well. Using a fork, mix the two substances together until the dough follows the fork and no dry flour is on the sides of the bowl.
c. Place the ball of dough on a lightly floured sheet of waxed paper. Cover the ball with a second sheet of waxed paper. Press the ball to flatten; then roll from the center until you reach the correct size of crust. Peel away the top piece of waxed paper. Invert the pie pan over the crust and turn the pan right side up. Peel away the waxed paper.
d. Form crust gently into the pan and complete a fluted edge as in previous crusts. Prick generously on bottom and sides.
e. Bake at 425 F until lightly browned, about 10 to 12 minutes. Cool.
*Soften margarine by laying it out on the counter for two hours before use or place it in a microwave for 10 to 15 seconds on “defrost.”

27
4. When all of the pie crusts are complete, set them side by side on a flat surface. Examine each crust, recording your observations on Chart A.
a. Observe the appearance of the crusts. How does the surface look? Is it flat and smooth? Bumpy? Does it have “blisters” or air bubbles? Describe the color of each crust. Record your observations.
b. Use a sharp knife to cut each crust in half across the pie pan. Turn the pie pan 90 degrees and cut each crust in half the opposite direction. Use a pie server to lift one of the wedges from the pan. Put the wedge on a small plate that you have labeled with the type of fat you used.
c. Compare the flakiness of each crust. Look closely at the cut edge of each wedge of crust. Can you see layers of dough separated by layers of air? Record your observa-tions on the worksheet.
d. Compare the tenderness of each crust. To do this, use a fork to cut a piece of crust from the wedge. Evaluate the ease of cutting each crust. Record your observation.
e. Take a bite of each crust. Describe the flavor and the “mouth feel” of each. Record your observations.
Now answer these questions on the basis of your experiment and observations.
1. Which crust(s) were: most attractive? ________________________________
least attractive? ________________________________________
2. Which crust was: flakiest? _______________________________________________
least flaky? _____________________________________________
3. Which crust was: most tender? __________________________________________
toughest? ______________________________________________
4. Which crust(s): tasted best? ____________________________________________
had the poorest flavor? __________________________________
5. Which crust(s): felt smooth in your mouth? _____________________________
did not “melt” in your mouth? __________________________
6. Which crust: stayed together best? ___________________________________
fell apart easily? ________________________________________
7. Which crust was: simplest and quickest to make? __________________________
the most difficult to make? ______________________________

28
Chart A: Characteristics of Pie Crusts Made With Different Fats
Appearance of Mouth feel Uncut Crust (melts in the (golden brown, Flavor mouth, smooth, uniform, Tenderness (pleasant, bland pleasant to blistery surface, (cuts easily flavor, not salty tongue and attractive edge, Flakiness with table or with rancid skin of the Type of Fat fits pan well) (layered, crisp) knife or fork) fat taste) mouth)
Shortening
Margarine
Vegetable Oil

29
Great Ideas With PastryFreezing PastryMake several recipes of your favorite pie crust. On a lightly floured surface, roll the pastry into rounds. Stack them with two sheets of waxed paper between layers or place them in aluminum foil pie pans. Place the pastry in freezer bags; then seal, label and freeze. Plan to use the frozen pastry within six to eight weeks.
To use the frozen pastry, thaw the flat rounds, covered, at room temperature while making the filling. Gently place in pan; form edge. Bake or fill according to pie type. Frozen pastry shells can be baked without thawing first; just add five to 10 minutes to the baking time.
Best PansFor well-baked, brown undercrust, choose pie pans of heat-resistant glass, ceramic ware or enamelware. Dark metal pans or aluminum pans with a dull, satiny finish give good results. Shiny metal does not bake the undercrust as well because it deflects the heat.
Tart ShellsMake standard pastry for a two-crust pie. Divide into eight equal parts. Roll each part into a 4-inch circle or square. Fit shells inside or over backs of individual pie pans, fluted tart pans, custard cups or muffin cups. Prick well with a fork to prevent puffing. Place cups on a cookie sheet and bake in an oven preheated to 425 F for eight to 10 minutes. When cool, remove from cups or pans. Fill with any desired pie filling, jam or fresh fruit.
Pretty PastryPastry cutouts make pies look festive. Using regular-sized or miniature cookie cut-ters, cut rolled pastry into holiday shapes, such as pumpkins for Halloween or bells for Christmas. Brush the cut-out shapes with water and sugar and place on the filling to bake. You also may place them on unbaked crust or bake on a cookie sheet, then place on top of a baked pie.
To achieve a shiny top, brush the top crust with milk before baking. For a golden brown, glazed top, brush the top crust with water; sprinkle evenly with granulated sugar before baking. For a glazed top, brush the top crust lightly before baking with beaten whole egg or egg yolk mixed with a little water.
30
Scrap Dough ProjectsRemember those scraps you trimmed from the pastry? Make a quick snack by placing them on a cookie sheet and sprinkling them lightly with salt. Bake, and you have homemade crackers! You may brush scraps lightly with margarine, sprinkle with a cinnamon and sugar mixture, and bake for a sweet treat! An-other idea — bake the scraps, then sprinkle them with grated cheese for a tasty snack.
Hidden Treasure Pastries - Heat oven to 425 F. Pat 1 tsp. dough into a thin circle. Wrap around one of the following fillings:
•Amaraschinocherry(drainedwell)
•Mint-flavoredchocolatepieces(sixtoeight)
•Pineapplechunk(drainedwell)
•Pecanfilling(Mix1/4cupchoppedpecans,2Tbsp.packedbrownsugar, 1 Tbsp. margarine and 1/2 tsp. vanilla. Form into tiny balls.)
Be sure dough is wrapped around filling and sealed well. Bake 10 to 15 minutes or until light brown. Roll immediately in confectioners’ sugar. If desired, roll again before serving.

31
Pie FillingsWhether you are making a fruit, custard or cream pie, the filling must be thick enough to hold its shape when served and it does not cause the bottom crust to be soggy.
Food manufacturers need information about how thick or thin a food will be. Food technologists test various recipes to see what type of mixing equipment, food pumps and packaging materials the manufacturers need. The technologists use a device called a viscometer, pronounced viz-com-uh-tur. The device is a cup with a hole in the bottom. It is centered on a line spread chart, filled with a thickened substance, then lifted straight up. The substance then spreads for a predetermined time, and the technologists take a measurement.
Let’s Experiment!You will need SamplesA copy of the line spread viscometer (page 33) JamClear laminating film and laminator or Ketchup plastic sleeve ApplesauceRing biscuit/cookie cutter, small paper/ Pudding plastic cup with bottom removed, or a Yogurt small cross section of plastic pipe close in size to the center of a bull’s-eye (about 1 inch high)Stopwatch or kitchen timer
Procedure 1. Make a copy of the bull’s-eye (line spread viscometer). Laminate or insert it into
the plastic sleeve available in a school supply department.
2. Find a sample holder. It must be round with the top and bottom open (Figure 14). Center the sample holder on the center of the bull’s-eye. Fill it to the top with one of the samples (Figure 15). As you lift the sample holder straight up, start the stopwatch or kitchen timer (Figure 16). Allow the sample to spread for two minutes.
3. At the end of the two minutes, measure how far the sample has spread at the top, bottom and both sides of the bull’s-eye. Use the numbers on the lines of the bull’s-eye to help determine how far the sample has spread (Figure 17). Place the measurements on Chart B. Add the four measurements together, divide by four for the average number. Place the average in the chart.
4. Wash the sample holder and dry. Clean the bull’s-eye with a damp cloth and dry well. Repeat the procedure with the other four samples, noting the results.
5. Answer the questions at the bottom of Chart B, based on your observations and data.

32
Figure 15Figure 14
Figure 17Figure 16

33
Line Spread Viscometer
34
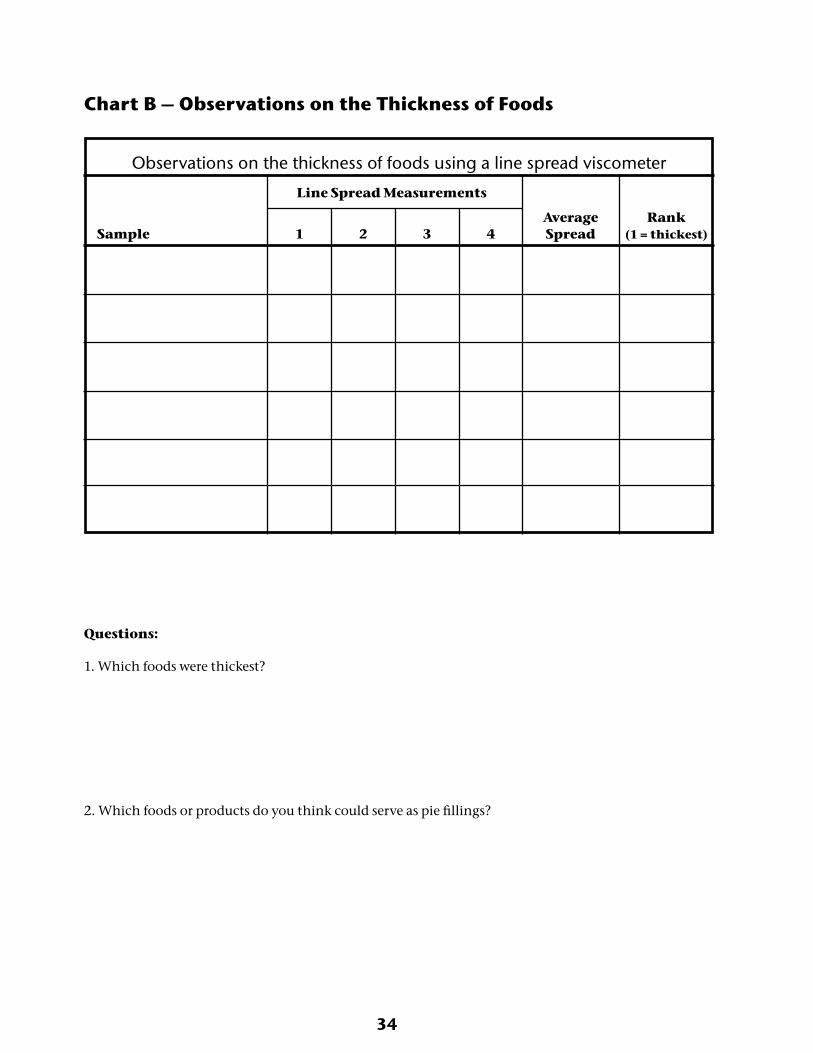
Chart B – Observations on the Thickness of Foods
Observations on the thickness of foods using a line spread viscometer
Line Spread Measurements
Average Rank Sample 1 2 3 4 Spread (1 = thickest)
Questions:
1. Which foods were thickest?
2. Which foods or products do you think could serve as pie fillings?

35
Thickening AgentsCanned fruit with juice or thin, watery pudding does not make a good pie filling. Various thickening agents are used to thicken the foods. All-purpose flour is made from ground wheat starch and often is used to thicken gravy. Cornstarch is made from ground starch found in corn kernels and is used in foods such as pie fillings. Tapioca is made from a root vegetable called cassava and is used to make tapioca pudding. Food manufacturers also use ingredients called modified food starches, which are starches that food scientists have changed to make them work better in foods.
Let’s Experiment!Each of the thickeners mentioned above has a different thickening ability, gives a different appearance to the thickened foods and has a different texture. In this experiment, you will thicken water with different starches, use the viscometer to measure the thickness and observe the results.
Equipment SuppliesQuart saucepan All-purpose flourLarge spoon CornstarchMeasuring spoons Tapioca3 medium bowls WaterViscometer equipment
Directions 1. Flour plus water
•Combine1Tbsp.flourwith1cupcoldwater.Stiruntilthemixtureissmooth.
•Placethe1-quartsaucepanonaburneratmediumheat.Bringthestarchmixture to a boil, continuously stirring. Once the mixture is bubbling, boil for one minute.
•Removethepanfromtheheatandturntheburneroff.Carefullypourthestarch mixture into a bowl. Set the bowl aside to cool while you prepare the other treatments.
2. Cornstarch plus water
•Combine1Tbsp.cornstarchand1cupcoldwaterina 1-quart saucepan. Stir until the mixture is smooth.
•Placethesaucepanonaburneratmediumheat.Bringthe starch mixture to a boil, continuously stirring. Once the mixture is bubbling, continue boiling for one minute.
•Removethepanfromtheheatandturnthe burner off. Carefully pour the starch mixture into a bowl. Set the bowl aside to cool while you prepare the final mixture.

36
3. Tapioca plus water
•Place1½Tbsp.ofquicktapiocaand1cupcoldwaterina1-quartsaucepan. Stir the mixture until combined. Let the mixture stand for 15 minutes. Place the saucepan on a burner and cook on medium heat.
•Bringthestarchmixturetoaboil,continuouslystirring.Oncethemixtureisbubbling, let it boil for one minute. Remove the pan from the heat and turn the burner off. Carefully pour the starch mixture into a bowl. Let the mixture cool to room temperature before evaluating the starch pastes.
When all of the starch mixtures are cool, set the bowls side by side. Label each mix-ture with the name of the starch used. Fill in Chart C with your observations.
1. First, compare the appearance of the three pastes. What is the color of each paste? Are the pastes clear or cloudy? Do they look smooth or lumpy?
2. Next, use your line spread viscometer to compare the thickness of the starch pastes as you did in the previous experiment.
3. Finally, compare the texture of each starch paste. Rub some of each paste be-tween your thumb and finger. Does it feel gritty or sandy? Does it feel smooth? Is it lumpy? Is the paste sticky?
Based on your observations, think about which starch will result in the smoothest cream pie or the most attractive fruit pie. Consider which starch or starches will result in a firm filling that will not run when cut. Remember these thoughts and observations and put them into practice when preparing fruit or cream pies.

37
Chart C: Observations of Pastes Made With Different Starches
Viscosity (line spread) Average
Paste Type Appearance 1 2 3 4 Spread Texture
Flour Plus Water
Cornstarch Plus Water
Tapioca Plus Water

38
Cream PiesSeveral principles of cookery apply to making and serving cream pies.
•Creampiesaremadeinasingle,bakedbottomcrust.
•Besuretousethecorrectsizeofcrust/panasindicatedintherecipe.
•Besuretheovenisaccurate.Ifyouarenotsure,checktheovenwith an oven thermometer.
•Youmuststirfillingsconstantlyandwatchthemcarefullysothey do not scorch on the bottom.
•Placemeringueonahotcreamfilling,whichcookstheunderside of the meringue.
•Creampiesmustberefrigeratedwithintwohoursbecauseoftheeggand milk content. Protein foods are highly susceptible to organisms that cause foodborne illness if not handled properly. Do not allow cream pies to sit out for more than two hours.
•An8-inchpiemakessixservings;a9-inchpieserveseightpeople.
39
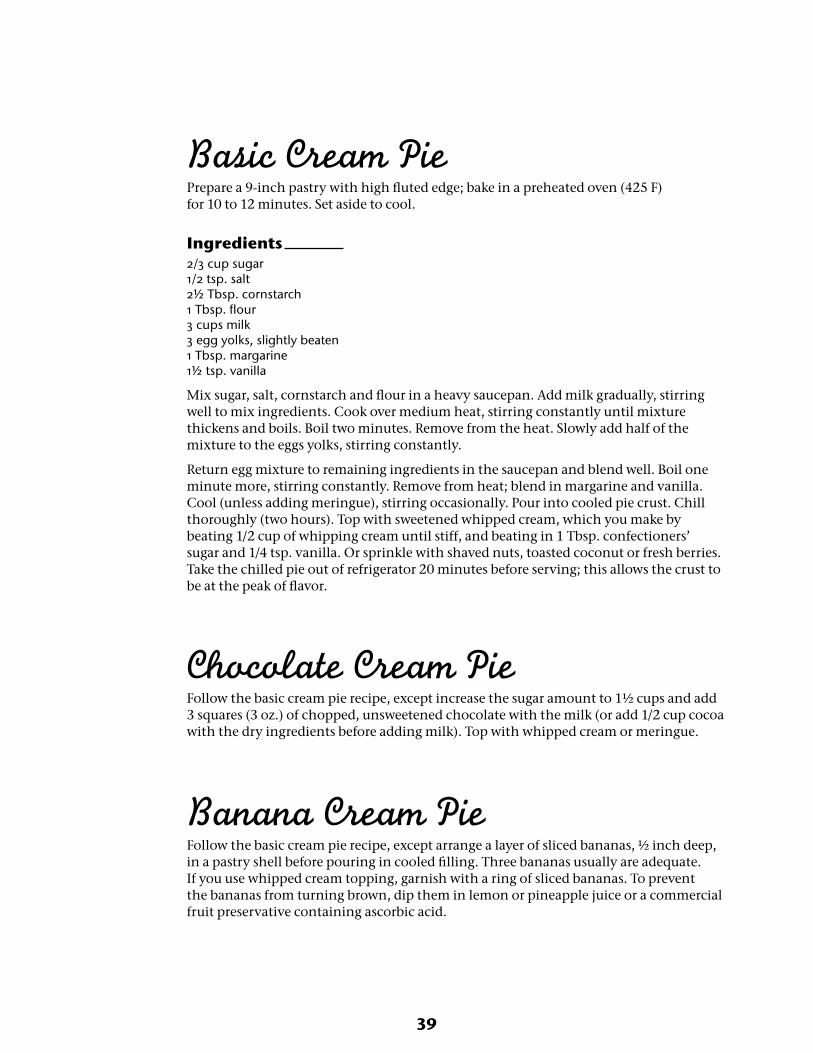
Basic Cream PiePrepare a 9-inch pastry with high fluted edge; bake in a preheated oven (425 F) for 10 to 12 minutes. Set aside to cool.
Ingredients2/3 cup sugar1/2 tsp. salt2½ Tbsp. cornstarch1 Tbsp. flour3 cups milk3 egg yolks, slightly beaten1 Tbsp. margarine1½ tsp. vanilla
Mix sugar, salt, cornstarch and flour in a heavy saucepan. Add milk gradually, stirring well to mix ingredients. Cook over medium heat, stirring constantly until mixture thickens and boils. Boil two minutes. Remove from the heat. Slowly add half of the mixture to the eggs yolks, stirring constantly.
Return egg mixture to remaining ingredients in the saucepan and blend well. Boil one minute more, stirring constantly. Remove from heat; blend in margarine and vanilla. Cool (unless adding meringue), stirring occasionally. Pour into cooled pie crust. Chill thoroughly (two hours). Top with sweetened whipped cream, which you make by beating 1/2 cup of whipping cream until stiff, and beating in 1 Tbsp. confectioners’ sugar and 1/4 tsp. vanilla. Or sprinkle with shaved nuts, toasted coconut or fresh berries. Take the chilled pie out of refrigerator 20 minutes before serving; this allows the crust to be at the peak of flavor.
Chocolate Cream PieFollow the basic cream pie recipe, except increase the sugar amount to 1½ cups and add 3 squares (3 oz.) of chopped, unsweetened chocolate with the milk (or add 1/2 cup cocoa with the dry ingredients before adding milk). Top with whipped cream or meringue.
Banana Cream PieFollow the basic cream pie recipe, except arrange a layer of sliced bananas, ½ inch deep, in a pastry shell before pouring in cooled filling. Three bananas usually are adequate. If you use whipped cream topping, garnish with a ring of sliced bananas. To prevent the bananas from turning brown, dip them in lemon or pineapple juice or a commercial fruit preservative containing ascorbic acid.

40
Coconut Cream PieFollow the basic cream pie recipe, except fold in 3/4 cup moist, shredded coconut just before filling pastry shell. Sprinkle an additional 1/4 cup of shredded coconut on whipped cream or meringue topping (before meringue is baked so coconut will toast in the final baking).
Lemon Meringue PieMake a single 9-inch pie crust; bake in 425 F oven for 10 to 12 minutes.
Ingredients1½ cups sugar1/3 cup cornstarch1½ cups water3 egg yolks, slightly beaten3 Tbsp. margarine1/4 cup lemon juice1 1/3 Tbsp. lemon rind or orange rind
Mix sugar and cornstarch in a medium-sized, heavy saucepan. Stir in water gradually. Cook over medium heat, stirring constantly, until mixture thickens and boils. Boil for one minute. Slowly stir half the hot mixture into the beaten egg yolks, then return to hot mixture in the saucepan. Boil one minute longer, stirring constantly. Remove from heat. Continue stirring until smooth. Blend in margarine, lemon juice and lemon rind. Pour into baked pie shell; cover with meringue. Bake until a delicate brown in a 400 F oven (about eight to 10 minutes). Serve as soon as pie has cooled.
Perfect Meringue (for 9-inch pie)3 egg whites1/4 tsp. cream of tartar6 Tbsp. sugar (1/4 cup + 2 Tbsp. is a quick way to measure!)1/2 tsp. vanilla
Special NoteEggs separate best when cold; use an egg separator if one is available. The alternative is: Separate white from yolk by tapping the egg with a table knife in the center of the egg shell. Pull the two halves apart and pour the egg back and forth, draining the white into a clean glass or metal container, carefully keeping the yolk intact in the shell. Use caution or the yolk will break; yolk in white prevents the whites from whipping to a nice volume. After separating each egg, move that white and yolk to new containers, being sure to place the whites in clean metal or glass bowls. Plastic bowls often retain grease even when washed; grease prevents egg whites from whipping. The leftover egg yolks should be used within 24 hours in pie fillings, puddings, quick breads, French toast or other egg dishes. Be sure they are stored in the refrigerator until you are ready to use them.
Tip: Fresh lemon juice is desirable, but bottled is quick and easy to keep on hand!
Tip: When grating lemon or orange rind, grate just the thin, colored rind with a fine grater.

41
Beat room-temperature egg whites with cream of tartar until frothy, using an electric mixer or egg beater. Gradually add sugar, a small amount at a time, beating between additions (Figure 18). Continue beating until egg whites are stiff and glossy. Test the stiffness by lifting the whites to a peak. If they stand firm, the meringue is stiff enough (Figure 19). If overbeaten, the egg whites “clump” and will not spread smoothly on the pie.
Pile the meringue, a spoonful at a time, on top of the hot filling. Be sure to seal the meringue to the edge of the crust to prevent shrinkage when baked (Figure 20). Cover the pie completely. Swirl or pull up points for a decorative look (Figure 21). Bake until delicately browned in a 400 F oven, about eight to 10 minutes. Cool gradually in a slightly warm place away from drafts. Chilling the meringue before it cools usually will make the meringue “fall.”
Figure 18 Figure 19
Figure 20 Figure 21

42
Never-fail MeringueIf you admire the “mile-high” meringue that professional pastry chefs add to their pies, try this recipe!
Ingredients1 Tbsp. cornstarch1/2 cup water2 Tbsp. sugar3 egg whites, at room temperature1/2 tsp. salt1/2 tsp. vanilla6 Tbsp. sugar
Preheat oven to 350 F. In a 1-quart saucepan, combine cornstarch, 2 Tbsp. sugar and water. Cook until clear; set aside to cool. Beat egg whites, salt and vanilla until stiff, then add 6 Tbsp. sugar, 1 Tbsp. at a time. Fold cornstarch mixture into egg whites. Spoon on hot pie filling, being sure to attach meringue to crust. Bake approximately 20 minutes or until meringue is golden brown. Makes enough meringue for one 9-inch pie.
Tip: Incomplete blending of sugar or overbaking cause meringue to “weep.”

43
Cream Pie With Meringue Score Sheet
1. Filling - Thick consistency, no separation of filling, smooth with no lumps
❏ Excellent ............. 5 points❏ Good ................... 3 points❏ Fair ...................... 1 point❏ Poor..................... 0 points
2. Crust - Crisp, tender, well-browned but not burned on edges
❏ Excellent ............. 5 points❏ Good ................... 3 points❏ Fair ...................... 1 point❏ Poor..................... 0 points
3. Meringue - Attractive, well-browned, no “weeping,” attached to crust, tender, nice volume
❏ Excellent ............. 5 points❏ Good ................... 3 points❏ Fair ...................... 1 point❏ Poor..................... 0 points
4. Flavor - Tasty, flavors blend well, no unwanted flavors
❏ Excellent ............. 5 points❏ Good ................... 3 points❏ Fair ...................... 1 point❏ Poor..................... 0 points
Add up your scores
Filling: ______________
Crust: _______________
Meringue: _______________
Flavor: _______________
Total (20 possible):
_______________

44
Custard PiesCustard pies are made in an unbaked pie crust. The filling is cold when you place it in the raw crust. The filling and crust bake at the same time.
Traditional Pumpkin PieMake a 9-inch unbaked pie shell. Do not prick or bake.
Ingredients2 eggs, slightly beaten1 16-oz. can of solid-pack pumpkin3/4 cup sugar1/2 tsp. salt1 tsp. cinnamon1/2 tsp. ginger1/4 tsp. ground cloves1½ cups (12-oz. can) evaporated milk
Preheat oven and cookie sheet to 375 F. Combine filling ingredients in order listed, using a whisk or mixing spoon. Place pie crust on preheated cookie sheet near center of oven.
Pull oven rack out enough to pour filling into pie crust. Bake for 70 minutes or until knife inserted in the center comes out clean. Cool on a wire rack. Garnish with whipped cream or pumpkin cut-outs. Custard pies should be refrigerated within two hours because they contain eggs and/or milk. Leftover custard pie also should be refrigerated.
Tip: If the crust edges are browning too quickly, place strips of aluminum foil over the edge.

45
Pecan PieA Favorite Southwestern Pie Great for Holidays!
Ingredients for8-inch pie 9-inch pie2 eggs 3 eggs1/2 cup sugar 2/3 cup sugar1/4 tsp. salt 1/2 tsp. salt1½ Tbsp. flour 2 Tbsp. flour3/4 cup dark corn syrup l cup dark corn syrup2 Tbsp. melted margarine 3 Tbsp. melted margarine3/4 tsp. vanilla 1 tsp. vanilla1 cup pecan halves 1¼ cups pecan halves
Prepare unbaked pastry shell. Beat the eggs, sugar, salt, flour, melted margarine and syrup together with rotary beater or whisk. Mix in pecans and pour into pastry-lined pan. Bake until set (40 to 50 minutes) in a 375 F oven. Cool. Serve cold or slightly warm. Remember to refrigerate within two hours after baking or serving!

46
Custard Pie Score Sheet
1. Crust - Tender, well-browned, not soggy on the bottom, cuts easily, attractive edge
❏ Excellent ............. 5 points❏ Good ................... 3 points❏ Fair ...................... 1 point❏ Poor..................... 0 points
2. Filling - Smooth, no separation, thick enough to hold shape, pleasing flavor, well-done
❏ Excellent ............. 5 points❏ Good ................... 3 points❏ Fair ...................... 1 point❏ Poor..................... 0 points
3. Overall appearance - Garnished attractively, fits pan well, appealing color, crust not overly brown
❏ Excellent ............. 5 points❏ Good ................... 3 points❏ Fair ...................... 1 point❏ Poor..................... 0 points
Add up your scores
Crust: ______________
Filling: _______________
Appearance: _______________
Total: _______________
Possible score of 15.
How well did your pie score?

47
Fruit Pies Capture the flavor of fresh, frozen or canned fruits in a tender, double crust for a special treat!
Apple Pie America’s Favorite Dessert!Know your apples. Select tart, firm, juicy apples, such as Granny Smith, Jonathan or Winesap, for pies. One pound of apples will yield about 3 cups of sliced apples. Apples should be peeled and quartered, with the cores removed, and sliced to ¼-inch thickness. If the apples seem dry, sprinkle with a little water. For more tartness, add a little lemon juice.
Make pastry for two-crust 9-inch pie. Line pie pan with one crust.
Ingredients3/4 to 1 cup sugar1 tsp. cinnamon6 to 7 cups sliced apples1½ tsp. margarine
Tip: Place a cookie sheet on the rack under the pie to catch spills; it may save you from getting a smelly mess and having to clean the oven!
Combine sugar and cinnamon and mix lightly through apples. Heap apple slices in pastry-lined pie pan. Dot with margarine. Cover with top crust, which has steam vents and a 1-inch overlap. Fold overlap over bottom crust and seal. Flute edges. Bake 50 to 60 minutes in hot oven (425 F) until crust is nicely browned and apples are cooked through (test by prick-ing with a fork). Serve warm or cold with cream, whipped cream or ice cream.

48
Canned Cherry Pie“Can she bake a cherry pie, Billy Boy, Billy Boy? Can she bake a cherry pie, charming Billy?”
“She can bake a cherry pie; she’s the apple of my eye. She’s a young thing and cannot leave her mother!”
In an old song, one test of cooking skill was the ability to make a great cherry pie! Your family and friends will enjoy your cherry pie made from scratch!
Ingredients1 c. sugar1/4 cup flour2½ cups canned pitted, sour cherries with juice1/4 tsp. almond flavoring1 Tbsp. + 1 tsp. margarinered food coloring
Tip: Fruit pies do not need refrigeration for the first 24 hours after baking. Refrigerate after that time — if any pie is left over!
Prepare a double-crust, 9-inch unbaked pie crust. Fill bottom crust and trim flush with pie pan. In a saucepan, mix together sugar and flour, then add cherry juice and stir well. Cook over moderate heat, stirring constantly, until mixture thickens and boils. Remove from heat. Add cherries, margarine, almond flavoring and two to three drops of red food coloring. Stir well; pour into pastry-lined pan. Quickly cover with top crust, which has steam vents and a 1-inch overlap. Fold overlap over bottom crust and seal. Create pretty edge. Bake in 425 F oven until nicely browned and juice begins to bubble through slits in crust (about 30 to 40 minutes). Serve warm, not hot.
Fresh or Frozen Cherry PieFollow the directions for Canned Cherry Pie except use 4 cups fresh or frozen pitted sour cherries, 1/3 cup additional sugar and no added food coloring. Makes a wonderful pie!

49
Canned Berry, Peach or Apricot PieFollow recipe for Canned Cherry Pie, substituting 2½ cups sliced peaches, berries or apricots for cherries, and 1/2 tsp. cinnamon for the almond flavoring. Delete food coloring.
Fresh Strawberry PieWhen strawberries are in season, nothing is more delicious than this wonderful pie!
Ingredients1 Tbsp. strawberry-flavored gelatin3 Tbsp. cornstarch3/4 to 1 cup sugar1 cup water1 quart fresh strawberries, washed and hulled1 baked, cooled 9-inch pie shell
Combine gelatin, cornstarch, sugar and water. Bring to a boil, stirring constantly. Set aside to cool. Place small, whole berries or larger berry halves in pie shell. Pour cooled gelatin mixture over berries; refrigerate about three hours. Garnish with a spoonful of whipped cream on each serving.
Innovative Fruit FillingsA 9-inch fruit pie needs approximately 4 c. of fresh fruit or 2½ to 3 cups cooked or canned fruit, approximately 2 Tbsp. cornstarch and 2/3 to 1 cup sugar. Experiment with different fruits; try one of these combinations:
•Halfappleandhalfpear
•Halfcherryandhalfstrawberry
•Halfrhubarbandhalfstrawberry
•One-thirdcranberryandtwo-thirdsapple
•Two-thirdsraspberryandone-thirdcranberry

50
Double Crust Pie Score Sheet
1. Attractiveness - Evenly browned, fits plate well, adequate filling, attractive edge
❏ Excellent ............. 5 points❏ Good ................... 3 points❏ Fair ...................... 1 point❏ Poor..................... 0 points
2. Filling - Flavorful, appealing color; thick enough to hold shape when cut
❏ Excellent ............. 5 points❏ Good ................... 3 points❏ Fair ...................... 1 point❏ Poor..................... 0 points
3. Crust - Tender, bland taste that does not detract from filling; crisp, bottom crust not soggy
❏ Excellent ............. 5 points❏ Good ................... 3 points❏ Fair ...................... 1 point❏ Poor..................... 0 points
Add up your scores
Attractiveness: ______________
Filling: _______________
Crust: _______________
Total: _______________
Possible score of 15.
How well did your pie score?

51
Meat Pies, Cheese Pies, Little Pies and More
Traditional Quiche1 unbaked 9-inch pie shell, pricked9 slices bacon, cooked and crumbled or 8 oz. diced ham1½ cups (6 oz.) shredded Swiss cheese1 egg2 cups half and half dairy product1/4 tsp. salt1/8 tsp. ground nutmegdash ground red pepper
Preheat oven to 425 F. Bake pie shell eight minutes; remove from oven. Sprinkle bacon/ham and cheese on bottom of pie shell. In medium bowl, beat eggs; add remaining ingredients. Pour into prepared pie shell. Bake 15 minutes; reduce oven temperature to 350 F and bake 25 minutes longer or until center is set. If pie crust edges become too brown, shield them with aluminum foil strips. Cool slightly. Serve warm; refrigerate leftovers.
Reduced-cholesterol Spinach QuicheThink low-fat, reduced-cholesterol dishes can’t be tasty? This quiche will change your mind.
Ingredients9-inch single-crust pastry made with vegetable oil 1 Tbsp. vegetable oil2 cups sliced mushrooms1/2 cup finely chopped onion1 clove garlic, minced3 egg whites2 tsp. Dijon-style mustard1/4 tsp. salt1/4 tsp. pepper8 oz. low-fat cottage cheese1 10-oz. package frozen, chopped spinach, thawed and squeezed dry of liquid
In medium skillet, heat oil over medium heat. Add mushrooms, onion and garlic; cook and stir five minutes or until tender. In medium bowl, slightly beat egg whites, mustard, salt and pepper until blended. Stir in cottage cheese, onion mixture and spinach. Place in raw pie crust; bake in a preheated 350 F oven for 45 minutes or until knife inserted in center comes out clean.

52
Apple TurnoversMake a recipe of 9-inch double-crust pastry dough. Roll out in a square shape, 1/8 inch thick. Cut into 5-inch squares. Place drained, cooked apple slices in center of each square. Sprinkle with sugar, cinnamon and lemon juice. Dot with margarine. Moisten outer edges with cold water, fold into triangle and seal well with tines of fork. Cut slit in top. Brush with milk, sprinkle with sugar. Bake at 475 F until delicately browned, about 10 to12 minutes.
EmpanadasEmpanadas are a New Mexico version of turnovers or “little pies.” Traditionally, they are filled with spicy mincemeat or fruit filling. Pumpkin, prune, peach and apricot are some of the favorites!
Apricot or Peach Empanadas1 recipe of pastry for 9-inch double-crust pie1/2 pound dried peaches or apricots1/8 tsp. ground coriander, optional1¼ cups sugar1/4 tsp. salt1 tsp. cinnamon1/2 tsp. nutmeg1/2 cup raisins, soaked in warm water
1. Soak peaches or apricots in enough hot water to cover fruit until soft, about 20 to 30 minutes. Meanwhile, prepare pastry.
2. Simmer peaches in small quantity of water using medium high heat. Cook until very soft, almost mushy. Drain fruit if water has not been absorbed.
3. Mash fruit with potato masher. Add remaining ingredients and mix well.
4. Divide dough into 24 parts; roll into balls.
5. Using rolling pin, roll balls into circles about 4 inches in diameter.
6. Place 1 Tbsp. of filling on center of each circle, fold over in half and seal. Prick top.
7. Bake on an ungreased cookie sheet in a 450 F oven for 10 to 12 minutes or until golden.

53
Pumpkin Empanadas16 oz. cooked, mashed or canned pumpkin1 cup light brown sugar1 Tbsp. melted margarine1/4 tsp. ground cloves1/4 tsp. ground nutmeg1/2 tsp. ground allspice1 egg, beatengranulated sugarpie crust dough – enough for 9-inch double-crust pie
Mix pumpkin with brown sugar, margarine and spices. Divide pastry into 12 portions. Roll each portion into a 6-inch circle. Spoon 2 Tbsp. of pumpkin filling on each circle; fold to form a turnover and seal edges with the tines of a fork.
Cut a vent in the top to allow steam to escape while baking. Brush turnovers with beaten egg and sprinkle with sugar. Bake on greased baking sheets in a 400 F oven for 30 minutes or until nicely browned. Cool on wire racks. Makes 12 large empanadas.
54
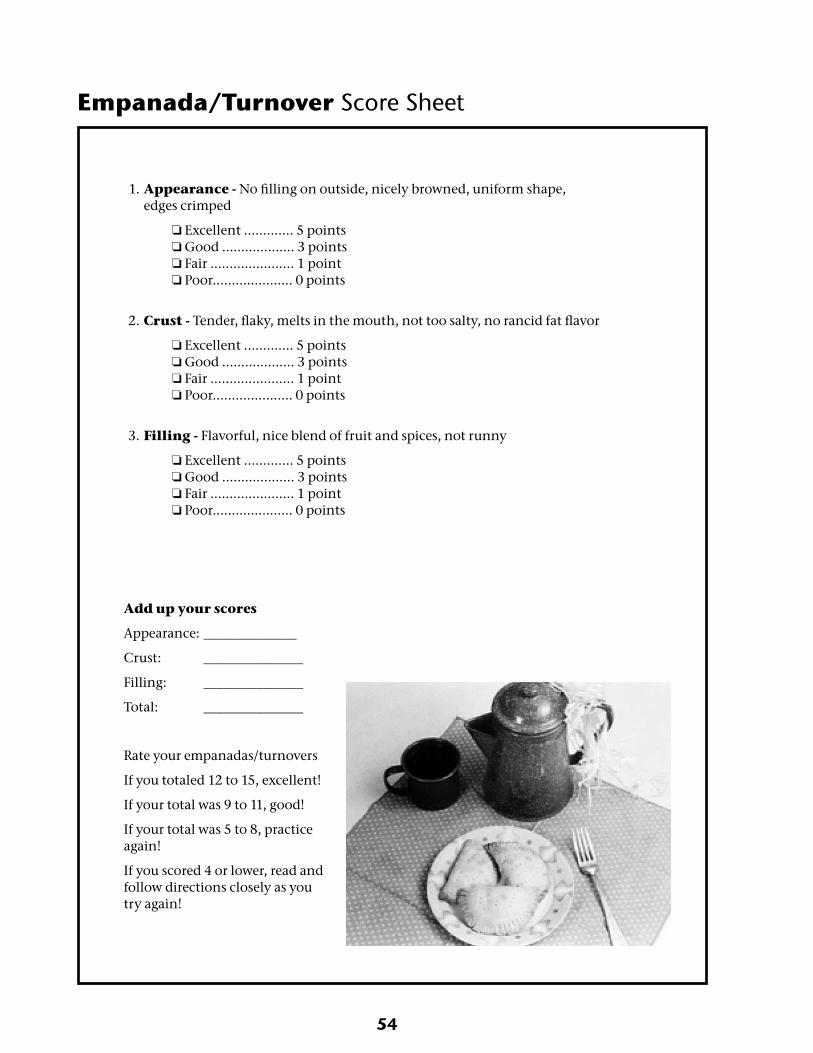
Empanada/Turnover Score Sheet
1. Appearance - No filling on outside, nicely browned, uniform shape, edges crimped
❏ Excellent ............. 5 points❏ Good ................... 3 points❏ Fair ...................... 1 point❏ Poor..................... 0 points
2. Crust - Tender, flaky, melts in the mouth, not too salty, no rancid fat flavor
❏ Excellent ............. 5 points❏ Good ................... 3 points❏ Fair ...................... 1 point❏ Poor..................... 0 points
3. Filling - Flavorful, nice blend of fruit and spices, not runny
❏ Excellent ............. 5 points❏ Good ................... 3 points❏ Fair ...................... 1 point❏ Poor..................... 0 points
Add up your scores
Appearance: ______________
Crust: _______________
Filling: _______________
Total: _______________
Rate your empanadas/turnovers
If you totaled 12 to 15, excellent!
If your total was 9 to 11, good!
If your total was 5 to 8, practice again!
If you scored 4 or lower, read and follow directions closely as you try again!

55
Freezing Pies and Pastry Products
One timesaving strategy is to make several pies at the same time and freeze some for later use. Fruit pies, both baked and unbaked, freeze well. Some custard pies, such as pumpkin and pecan, freeze well. They freeze more successfully after baking.
Do not add meringue or whipped cream to pies you plan to freeze. Cream pies do not freeze well, but you can freeze pastry shells ahead of time, cutting cream pie preparation time in half.
To freeze unbaked fruit pies:
•Treatlight-coloredfruit,suchasapplesandpeaches,withanascorbicacidfruit preservative.
•Usemetal,freezer-to-ovenordisposablepiepans.
•Sealpieinafreezerbag,beingsureitissealedwell,orinheavyaluminum foil that completely surrounds the pie with the edges brought together, rolled and sealed.
•Labelwithkindofpieanddateitwasfrozen.Besuretousefrozenpies within two to four months.
•Tobakeafrozenpie,unwrapitandcoverwithfoil.Bakeina450Foven for 15 minutes; reduce the temperature to 375 F and continue baking for 15 minutes. Uncover and continue baking for 55 to 60 minutes until crust is golden and filling is bubbly.
To freeze baked fruit/custard pies:
•Bakeandcoolthepiecompletely.Placeinafreezerbagorheavyfoil,seal,label and freeze for up to eight months.
•Touse,thawthepie,covered,intherefrigerator.Ifdesired,reheatthepie by baking it, covered, in a 325 F oven until warm.

56
Troubleshooting Pastry
If the pastry in your pie or pastry product did not turn out perfectly, look for the reason and make adjustments the next time you make a pie or pastry product.
1. If the pastry was crumbly and hard to roll:
•Addmorewater,1tsp.atatime.
•Mixthewaterandflourtogetherjustalittlemoreuntilevenly moistened.
2. If the pastry was tough:
•Useapastryblendertocutintheshorteninguntilwellmixedand all of the mixture resembles small peas.
•Uselesswatertomoistentheflourmixture.
•Donotovermixtheflourmixtureandwater.
•Uselessflourwhenrollingoutthepastry.
3. If the crust shrinks excessively:
•Mixinthewateronlyuntilevenlymoistened.
•Letpastryrestforfiveminutesifit’shardtoroll.
•Don’tstretchpastrywhentransferringit.
4. If the bottom crust is soggy:
•Useadullmetalorglasspieplateratherthanashinymetalpan.
•Patchanycracksinthebottompastrybeforeaddingthefilling.
•Makesuretheoventemperatureisaccurate.
• Besureyoupreheattheovenbeforebakingthepie.

57
Homemade or Ready-made?
You have learned how to make pastry, pies and meringue “from scratch” in your kitchen. Many people believe that making homemade baked goods is worth the extra time and effort. Others do not feel they have the time to bake at home. Complete a time-taste-cost-wholesomeness survey and determine your values.
A. Purchase a frozen, ready-to-bake pie. Be sure to note the cost and the amount of time baking the pie took. Save the carton or label to determine the ingredients.
B. Prepare from scratch a pie of the same size and flavor (apple, cherry, pumpkin, pecan, etc.) Keep track of the time you took to prepare the pie. Add the cost of the ingredients to determine the total cost of the pie.
C. Serve each person in your “test group” a small piece of each pie, preferably without mentioning which one you made. Note their comments about the flavor, tenderness of the crust, amount of filling and attractiveness of each pie.
D. Complete Chart D, comparing the cost, time, quality and wholesomeness of each pie.

58
Chart D – Comparison of Homemade and Purchased Pies
A. Homemade Pie: ___________________________________ Name and size of pie
Cost of pie _____________
Preparation time _____________ minutes
Quality _____________ (1-5)
Rank from 1 (the lowest) to 5 (the highest) the overall quality of the pie considering:•Flavor•Tendernessofcrust•Attractiveness
Wholesomeness/food safety _____________ (1-5)Rate 1 to 5 on the basis of the freshness of the ingredients, how the food was handled and stored, cleanliness of kitchen, and whether preservatives and artificial colors/flavors were used.
B. Purchased Pie: ___________________________________ Name and size of pie
Cost of pie _____________
Preparation time _____________ minutes
Quality _____________ (1-5)
Rank from 1 to 5 the overall quality of the pie considering:•Flavor•Tendernessofcrust•Attractiveness
Wholesomeness/food safety _____________ (1-5)Rate 1 to 5 on the basis of the freshness of the ingredients, how the food was handled and stored, cleanliness of kitchen, and whether preservatives and artificial colors/flavors were used.
Comparison of PiesWhich pie cost more? _____________________________________________
Which pie required more time to complete? ___________________________
Which pie was more attractive? _______________________________________
Which pie had the better flavor? _____________________________________
Which pie had the more tender crust? _________________________________
Which pie seemed to be more wholesome and safe? ____________________
Your OpinionDo you think baking from scratch is worthwhile? Why or why not?
Why do you think many people purchase frozen or ready-baked pies?

59
Baking Record FormName _________________________________ Age________ Number of years in 4-H________
Years in baking projects___________________
Project meetings held__________ Number attended__________
Products prepared Date Comments (Excellent, Good, Fair)
_____________________________ __________ ______________________________________
_____________________________ __________ ______________________________________
_____________________________ __________ ______________________________________
_____________________________ __________ ______________________________________
_____________________________ __________ ______________________________________
_____________________________ __________ ______________________________________
(Add pages if needed.)
What new skills did you learn? Which skills were improved?
_________________________________________________________________________________
_________________________________________________________________________________
_________________________________________________________________________________
_________________________________________________________________________________
Activities
Tours taken related to this project: ____________________________________________________
_________________________________________________________________________________
Judging experience(s): _____________________________________________________________
_________________________________________________________________________________
Demonstration: ___________________________________________________________________
_________________________________________________________________________________

This publication is adapted with permission from New Mexico State University’s Cooperative Extension Service.
County commissions, North Dakota State University and U.S. Department of Agriculture cooperating. North Dakota State University does not discriminate on the basis of age, color, gender expression/identity, genetic information, marital status, national origin, physical and mental disability, pregnancy, public assistance status, race, religion, sex, sexual orientation, or status as a U.S. veteran. Direct inquiries to: Vice Provost for Faculty and Equity and Title IX/ADA Coordinator, Old Main 201, 701-231-7708. This publication will be made available in alternative formats for people with disabilities upon request, 701-231-7881. 500-01-06, 100-9-16
Citizenship: _______________________________________________________________________
_________________________________________________________________________________
Leadership: _______________________________________________________________________
_________________________________________________________________________________
ExhibitsProduct Where exhibited Placing
_________________________________________________________________________________
_________________________________________________________________________________
_________________________________________________________________________________
_________________________________________________________________________________
_________________________________________________________________________________
_________________________________________________________________________________
_________________________________________________________________________________
_________________________________________________________________________________
Leader, helper, or parents’ comments: ________________________________________________
_________________________________________________________________________________
_________________________________________________________________________________
Member signature Parent signature
Project leader signature
(Add pages as needed.)