ecinteractiveplus®: customizing site text and...
TRANSCRIPT

Updated January 2020
ECinteractivePLUS®: Customizing Site Text and Messages

© 2020 ECI and the ECI logo are registered trademarks of ECI Software Solutions, Inc. All rights reserved.
ContentsCustomizing Site Text and Messages ...............................................................................3Using the Text Editor ......................................................................................................3Site Text Assignment ......................................................................................................4
Site Pages .......................................................................................................................................... 4Conversion Text ................................................................................................................................. 5Checkout Text .................................................................................................................................... 6
Default Checkout Text .........................................................................................................................6Default Exceeded Order Limit Message for Single Orders ..................................................................7Default Exceeded Order Limit Messages for Multi-Department Orders .............................................7Default Message When Paying Invoices with Credit Card ..................................................................7
Emails ................................................................................................................................................ 8Default Email Format for Individual Shoppers ....................................................................................8Default Email Format for New Shoppers ............................................................................................9Default Email Format in Parameter Maintenance ..............................................................................9Default HTML Email ..........................................................................................................................10Order Submitted for Approval ..........................................................................................................10Order Submitted for Fulfillment .......................................................................................................10Request for Order Approval .............................................................................................................10Order Approved ...............................................................................................................................10Order Denied ....................................................................................................................................10Payment Approved ...........................................................................................................................11Payment Declined .............................................................................................................................11Sample Plain Text Email ....................................................................................................................12
Custom Zones .................................................................................................................................. 13Home Page Display Order .............................................................................................................. 13New User Registration .................................................................................................................... 14Account Admin News ..................................................................................................................... 14User Order Limits ............................................................................................................................ 15
Expand Category Display on Home and Browse Catalog Pages ......................................15Account News ..............................................................................................................16Error Text .....................................................................................................................16

3 continue to next page
ECinteractivePLUS®: Customizing Site Text and Messages
Customizing Site Text and MessagesYou can customize text in ECinteractivePLUS®, including order limit messages for orders over a credit limit/monthly budget, credit card authorization messages for processing/approved/declined orders, automated email messages, and more.
For several pages, the WYSIWYG (What You See Is What You Get) Text Editor gives you a user-friendly way to use HTML formatting on your Home, About, Contact Us, Privacy Policy, Account News pages, and more. You can format the messages with fonts, color, bold, italic, images, and links to flyers, specific pages, external sites, or email addresses.
Using the Text EditorYou can use the HTML-capable WYSIWYG Text Editor to create blocks of text. Some custom text could be fairly permanent, like your Home, About, Contact Us, Privacy Policy, Login, and Order Errors pages.
You may also create other text blocks to be used and updated more frequently. In Account News, you might highlight seasonal sales, discounts, or information about the account or sales representative.
Note: To insert images, you must first upload the files (GIF, JPG, JPEG, PNG, BMP, etc.) in Image Management. For detailed instructions, see your online help.
1. On the Admin site, click the Site Config training toolbar and select Text Editor.
2. Click the Select Text drop-down menu to select any existing text you’ve created.
3. Click the Text Description box and enter a name for the text. This name displays in the drop-down menu when you assign this text block to a specific page or message in Site Text Assignment.
4 continue to next page
ECinteractivePLUS®: Customizing Site Text and Messages
4. Click the text box area and enter the text. You can format the text using the formatting buttons. For more information, click .
5. (Optional) Click the Plain Text tab to view what a message may look like to a reader who receives it in an email client that does not allow HTML.
6. (Optional) Click to view the HTML code and make changes, as needed. You can return to the
text box by clicking .
7. (Optional) Click Delete to delete the entire text block.
8. (Optional) Click Copy to create a copy of the text block to use for a new text block with a different Text Description. This could be useful for creating Account News for several customers with slightly different information.
9. Click Save.
Site Text AssignmentAfter you create site text using the Text Editor, you can assign it to different areas of your front-end site using the Site Text Assignment page.
Site PagesYou can assign text blocks to your shopping site’s default pages, including About Us, Contact Us, Home, Inactive Account Dept, Login, and Privacy Policy.
Note: To customize Site Pages, you must first create text using the Text Editor.
1. Click the Site Config training toolbar and select Site Text Assignment.
2. Click the Site Pages tab.
3. To view what is currently assigned, click .
4. To change the assigned text:
4.1 Click .
4.2 Click the Text Description drop-down menu and select a different text block.
4.3 Click .
4.4 To cancel your changes, click .

5 continue to next page
ECinteractivePLUS®: Customizing Site Text and Messages
Conversion TextYou can customize the message that displays when you first migrate a customer from a previous system that accepted a shorter password than ECinteractivePLUS.
Note: To customize Conversion Text, you must first create text using the Text Editor.
1. Click the Site Config training toolbar and select Site Text Assignment.
2. Click the Conversion Text tab.
3. To view what is currently assigned, click .
4. To change the assigned text:
4.1 Click .
4.2 Click the Text Description drop-down menu and select a different text block.
4.3 Click .
4.4 To cancel your changes, click .
6 continue to next page
ECinteractivePLUS®: Customizing Site Text and Messages
Checkout TextYou can customize several messages that display during checkout or credit card processing.
Note: To customize Checkout Text, you must first create text using the Text Editor. HTML formatting is not used for Checkout messages.
1. Click the Site Config training toolbar and select Site Text Assignment.
2. Click the Checkout Text tab.
3. To view what is currently assigned, click .
4. To change the assigned text:
4.1 Click .
4.2 Click the Text Description drop-down menu and select a different text block.
4.3 Click .
4.4 To cancel your changes, click .
Default Checkout TextUntil you assign new text to these fields, the default messages are as follows:
• CC Approved: Your credit card payment has been approved.
• CC Declined: We are sorry, but your credit card payment was declined. Please contact our customer service department to arrange another payment method for this order.
• CC Other Error: We are sorry, but there appears to have been an error processing your credit card payment. Please contact our customer service department for assistance.
• CC Pending Approval: We are currently processing your credit card payment.
• CC Processing: We are currently processing your credit card payment.
• Exceeded monthly dollar limit: The order has exceeded your order limit and has been placed on hold. An email has been sent to #FullName# (#Email#) for order approval.
• Exceeded order limit: The order has exceeded your order limit and has been placed on hold. An email has been sent to #FullName# (#Email#) for order approval.
Note: The previous two bullets are used when an order requires approval. The #FullName# and #Email# variables are replaced with the approver’s full name and email address at the time the order is placed.
• Order held, due to over credit limit: We are sorry, but you have exceeded your credit limit. Your order has been placed on hold. Please contact our customer service department for assistance.
• Order held, due to over monthly budget: We are sorry, but you have exceeded your monthly budget. Your order has been placed on hold. Please contact our customer service department for assistance.
• Order held, due to over past due: We are sorry, but your account is past due. Your order has been placed on hold. Please contact our customer service department for assistance.
7 continue to next page
ECinteractivePLUS®: Customizing Site Text and Messages
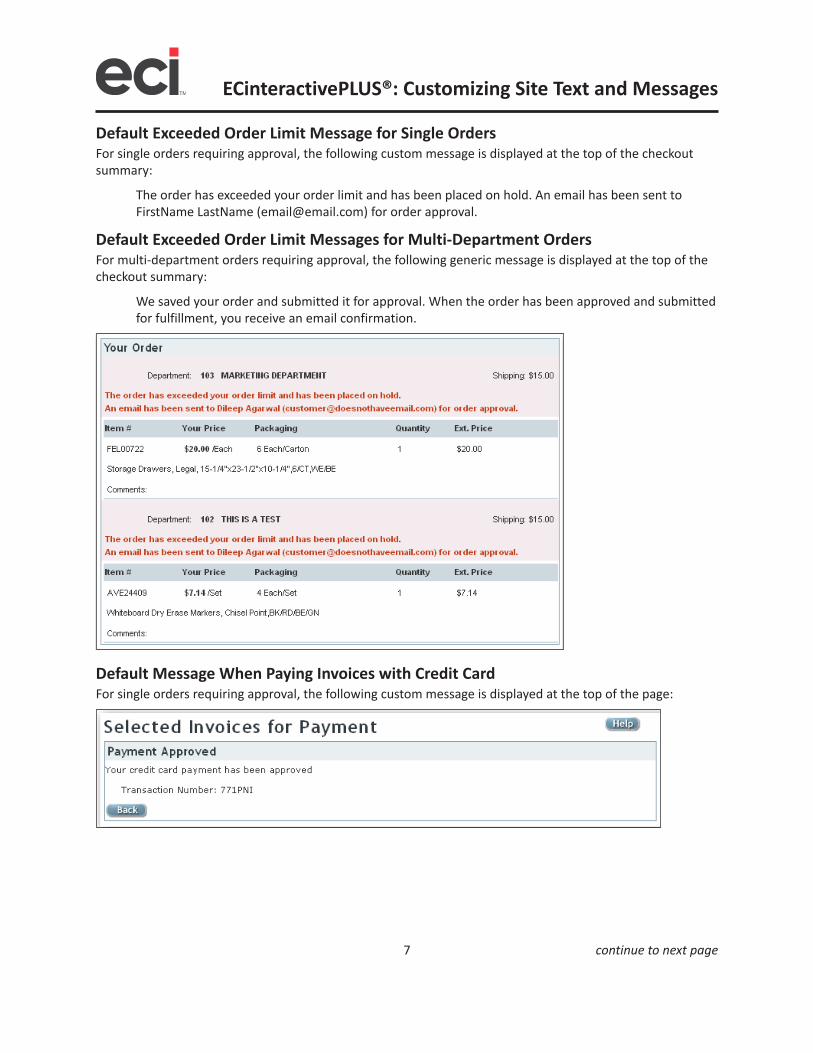
Default Exceeded Order Limit Message for Single OrdersFor single orders requiring approval, the following custom message is displayed at the top of the checkout summary:
The order has exceeded your order limit and has been placed on hold. An email has been sent to FirstName LastName ([email protected]) for order approval.
Default Exceeded Order Limit Messages for Multi-Department OrdersFor multi-department orders requiring approval, the following generic message is displayed at the top of the checkout summary:
We saved your order and submitted it for approval. When the order has been approved and submitted for fulfillment, you receive an email confirmation.
Default Message When Paying Invoices with Credit CardFor single orders requiring approval, the following custom message is displayed at the top of the page:

8 continue to next page
ECinteractivePLUS®: Customizing Site Text and Messages
EmailsYou can add an HTML-capable header and footer to the confirmation email messages your customers receive. By default, these headers and footers are not displayed until you assign specific text created with the Text Editor.
Note: To customize Emails, you must first create text using the Text Editor. HTML may not be displayed correctly in the recipient’s email client. We recommend that you test your own HTML messages using test accounts in various email clients.
1. Click the Site Config training toolbar and select Site Text Assignment.
2. Click the Emails tab.
3. To view what is currently assigned, click .
4. To change the assigned text:
4.1 Click .
4.2 Click the Plain-Text Description drop-down menu and select a different text block.
4.3 Click the HTML Description drop-down menu and select a different text block.
4.4 Click .
4.5 To cancel your changes, click .
Default Email Format for Individual ShoppersYou can set up specific shoppers to receive either plain text or HTML emails by default.
1. On the Admin site, click the Consumer Admin training toolbar and select Customer Maintenance.
2. Select a customer.
3. Click in the Customer Information section.
4. Click the Email Format drop-down menu and select HTML Capable (default setting) or Plain Text.
5. Click Save.

9 continue to next page
ECinteractivePLUS®: Customizing Site Text and Messages
Default Email Format for New ShoppersWhen your shoppers create a new account, they can set their default email format. Shoppers can update their default email format by clicking the My Accounts drop-down menu and selecting Edit Profile.
Default Email Format in Parameter MaintenanceYou can set up groups of shoppers to receive either plain text or HTML emails by default.
1. On the Admin site, click the Consumer Admin training toolbar and select Parameter Maintenance.
2. Click the Choose a Parameter drop-down menu and select Email Format.
3. Click the Choose a Value drop-down menu and select the current format. For example, if your customers are set to receive plain text by default, select Plain Text.
4. Click Search. The search results display. You can filter to a specific account number, department, name, or email address.
5. Click the Apply New Parameter Value drop-down menu and select the new email format.
6. Click Save.

10 continue to next page
ECinteractivePLUS®: Customizing Site Text and Messages
Default HTML EmailMessages use the same HTML format as the HTML Order Confirmation, but messages have different text, as shown in the following figures.
Order Submitted for Approval
Order Submitted for Fulfillment
Request for Order Approval
Order Approved
Order Denied

11 continue to next page
ECinteractivePLUS®: Customizing Site Text and Messages
Payment Approved
Payment Declined
12 continue to next page
ECinteractivePLUS®: Customizing Site Text and Messages
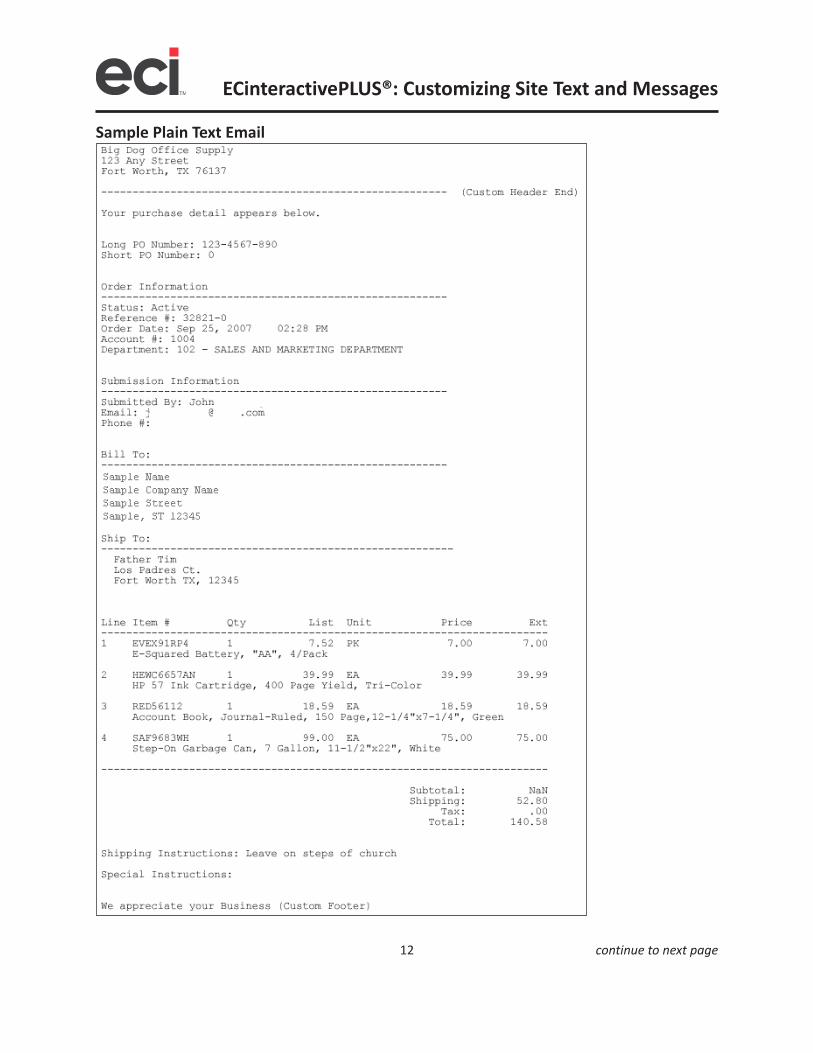
Sample Plain Text Email

13 continue to next page
ECinteractivePLUS®: Customizing Site Text and Messages
Custom ZonesWe added four Dealer Custom Areas on the shopper’s site: Footer, Header, Sidebar 1, and Sidebar 2.
Note: To edit Custom Zones, you must first create text using the Text Editor.
1. Click the Site Config training toolbar and select Site Text Assignment.
2. Click the Custom Zones tab.
3. To view what is currently assigned, click .
4. To change the assigned text:
4.1 Click .
4.2 Click the Text Description drop-down menu and select a different text block.
4.3 Click .
4.4 To cancel your changes, click .
Home Page Display OrderWe designed the Home page to be friendly, easy-to-use, and intuitive. To help you achieve even better results, you control the information shown on the Home page and the order in which it displays.
In addition to your shopping site’s navigation menus, the Home page displays four main pieces of information in the following default order: Default News, Home Page Text, Browse Category Display, and Account Specific News. You can change the order in which these elements display.
Note: To customize Home Page Display Order, you must first create text using the Text Editor.
1. Click the Site Config training toolbar and select Site Text Assignment.
2. Click the Home Page Display Order tab.

14 continue to next page
ECinteractivePLUS®: Customizing Site Text and Messages
3. To remove an element from your Home page, click the box in the Hide column.
4. To change the order in which the elements display, change the numbers in the Display Order column.
5. To require that your visitors select their account to view their Account Specific News, click the drop-down menu and select the account from the list.
6. To see a mock-up of your Home page, click View Home Page Content. You can also click the Current Site link at the top of the page.
7. Click Save.
New User RegistrationYou can customize messages that display when a user registers for an account.
Note: To customize New User Registration, you must first create text using the Text Editor.
1. Click the Site Config training toolbar and select Site Text Assignment.
2. Click the New User Registration tab.
3. To view what is currently assigned, click .
4. To change the assigned text:
4.1 Click .
4.2 Click the Text Description drop-down menu and select a different text block.
4.3 Click .
4.4 To cancel your changes, click .
Account Admin NewsWhen your account administrators log in to their Account Management dashboard, it does not display the Account Admin News box by default. You can customize the message that displays.
Note: To customize Account Admin News, you must first create text using the Text Editor.
1. Click the Site Config training toolbar and select Site Text Assignment.
2. Click the Account Admin News tab.
3. To view what is currently assigned, click .
4. To change the assigned text:
4.1 Click .
4.2 Click the Text Description drop-down menu and select a different text block.
4.3 Click .
4.4 To cancel your changes, click .

15 continue to next page
ECinteractivePLUS®: Customizing Site Text and Messages
User Order LimitsYou can customize messages that display when a user exceeds their maximum order amount or does not meet the minimum order amount.
Note: To customize User Order Limits, you must first create text using the Text Editor.
1. Click the Site Config training toolbar and select Site Text Assignment.
2. Click the User Order Limits tab.
3. To view what is currently assigned, click .
4. To change the assigned text:
4.1 Click .
4.2 Click the Text Description drop-down menu and select a different text block.
4.3 Click .
4.4 To cancel your changes, click .
Expand Category Display on Home and Browse Catalog PagesYou can expand the category display on the shopper’s Home and Browse Catalog pages. You can have first-level categories display in a specified order using either standard eContent or enhanced content from a provider such as S.P. Richards™ or Essendant™.
1. On the Admin site, click the Site Config training toolbar and select Site Preferences.
2. Click in the Category Display Order section.
3. Click the Expand Category Display on Home and Browse Catalog Pages box. If you check this box, the complete list of second-level categories displays as long as there are no more than six first-level categories.
4. Click the box next to each content provider to display its categories.
5. Click Get Categories to see all the first-level categories from your selected providers.
6. To change the order in which the categories display, change the numbers in the Rank column.
7. Click Save.
8. Click the Enhanced Categories tab. This tab allows you to set the display order for the top-level enhanced content provider categories.
9. Click Save.

16 continue to next page
ECinteractivePLUS®: Customizing Site Text and Messages
Account NewsYou can communicate news to your customers.
Note: To customize Account News, you must first create text using the Text Editor.
1. On the Admin site, click the Consumer Admin training toolbar and select Account News.
2. Click the Available Pages drop-down menu and select Account News.
3. To view what is currently assigned, click .
4. In the Available Accounts section, select an account.
5. Click Add.
6. To remove an account, click . You can also click Remove All to remove all accounts.
Error TextYou can customize error messages that display to shoppers.
• Exception Occurred: This message displays if the server had trouble loading the page or if the back-office system or third-party system (such as enhanced content or microsite) does not respond within a normal timeframe.
• Item Not Available: This message displays for items that are not available for purchase.
• Items Not Allowed: If you limit a customer to a list of items or catalogs, this message displays if the customer attempts to purchase an item outside of the allowed items.
• No Search Results: This message displays on Enhanced Search, Enhanced Product Detail, Advanced Search, and Standard Product Detail when no items are found matching the search term in the back-office or third-party system (such as enhanced content or microsite).

17
ECinteractivePLUS®: Customizing Site Text and Messages
To customize error messages:
1. On the Admin site, click the Site Config training toolbar, Text Editor, and select Error Text.
2. Click the Select an Error drop-down menu and select the message to customize.
3. Customize the text using the text editor.
4. Click Save.