ecx ethernet control - digidesignakmedia.digidesign.com/support/docs/ecx_ethernet_control...all of...
TRANSCRIPT
ECx Ethernet Control
for Avid Live SystemsPN 9329-65307-00 REV A 8/13

Legal Notices© 2013 Avid Technology, Inc., (“Avid”), all rights reserved. This guide may not be duplicated in whole or in part without the written consent of Avid.
003, 192 Digital I/O, 192 I/O, 96 I/O, 96i I/O, Adrenaline, AirSpeed, ALEX, Alienbrain, AME, AniMatte, Archive, Archive II, Assistant Station, AudioPages, AudioStation, AutoLoop, AutoSync, Avid, Avid Active, Avid Advanced Response, Avid DNA, Avid DNxcel, Avid DNxHD, Avid DS Assist Station, Avid Ignite, Avid Liquid, Avid Media Engine, Avid Media Processor, Avid MEDIArray, Avid Mojo, Avid Remote Response, Avid Unity, Avid Unity ISIS, Avid VideoRAID, AvidRAID, AvidShare, AVIDstripe, AVX, Beat Detective, Beauty Without The Bandwidth, Beyond Reality, BF Essentials, Bomb Factory, Bruno, C|24, CaptureManager, ChromaCurve, ChromaWheel, Cineractive Engine, Cineractive Player, Cineractive Viewer, Color Conductor, Command|8, Control|24, Cosmonaut Voice, CountDown, d2, d3, DAE, D-Command, D-Control, Deko, DekoCast, D-Fi, D-fx, Digi 002, Digi 003, DigiBase, Digidesign, Digidesign Audio Engine, Digidesign Development Partners, Digidesign Intelligent Noise Reduction, Digidesign TDM Bus, DigiLink, DigiMeter, DigiPanner, DigiProNet, DigiRack, DigiSerial, DigiSnake, DigiSystem, Digital Choreography, Digital Nonlinear Accelerator, DigiTest, DigiTranslator, DigiWear, DINR, DNxchange, Do More, DPP-1, D-Show, DSP Manager, DS-StorageCalc, DV Toolkit, DVD Complete, D-Verb, Eleven, EM, Euphonix, EUCON, EveryPhase, Expander, ExpertRender, Fairchild, FastBreak, Fast Track, Film Cutter, FilmScribe, FlexEvent, FluidMotion, Frame Chase, FXDeko, HD Core, HD Process, HDpack, Home-to-Hollywood, HyperSPACE, HyperSPACE HDCAM, iKnowledge, Impact, Improv, iNEWS, iNEWS Assign, iNEWS ControlAir, InGame, Instantwrite, Instinct, Intelligent Content Management, Intelligent Digital Actor Technology, IntelliRender, Intelli-Sat, Intelli-Sat Broadcasting Recording Manager, InterFX, Interplay, inTONE, Intraframe, iS Expander, iS9, iS18, iS23, iS36, ISIS, IsoSync, LaunchPad, LeaderPlus, LFX, Lightning, Link & Sync, ListSync, LKT-200, Lo-Fi, MachineControl, Magic Mask, Make Anything Hollywood, make manage move|media, Marquee, MassivePack, MassivePack Pro, Maxim, Mbox, Media Composer, MediaFlow, MediaLog, MediaMix, Media Reader, Media Recorder, MEDIArray, MediaServer, MediaShare, MetaFuze, MetaSync, MIDI I/O, Mix Rack, Moviestar, MultiShell, NaturalMatch, NewsCutter, NewsView, NewsVision, Nitris, NL3D, NLP, NSDOS, NSWIN, OMF, OMF Interchange, OMM, OnDVD, Open Media Framework, Open Media Management, Painterly Effects, Palladium, Personal Q, PET, Podcast Factory, PowerSwap, PRE, ProControl, ProEncode, Profiler, Pro Tools, Pro Tools|HD, Pro Tools LE, Pro Tools M-Powered, Pro Transfer, QuickPunch, QuietDrive, Realtime Motion Synthesis, Recti-Fi, Reel Tape Delay, Reel Tape Flanger, Reel Tape Saturation, Reprise, Res Rocket Surfer, Reso, RetroLoop, Reverb One, ReVibe, Revolution, rS9, rS18, RTAS, Salesview, Sci-Fi, Scorch, ScriptSync, SecureProductionEnvironment, Shape-to-Shape, ShuttleCase, Sibelius, SimulPlay, SimulRecord, Slightly Rude Compressor, Smack!, Soft SampleCell, Soft-Clip Limiter, SoundReplacer, SPACE, SPACEShift, SpectraGraph, SpectraMatte, SteadyGlide, Streamfactory, Streamgenie, StreamRAID, SubCap, Sundance, Sundance Digital, SurroundScope, Symphony, SYNC HD, SYNC I/O, Synchronic, SynchroScope, Syntax, TDM FlexCable, TechFlix, Tel-Ray, Thunder, TimeLiner, Titansync, Titan, TL Aggro, TL AutoPan, TL Drum Rehab, TL Everyphase, TL Fauxlder, TL In Tune, TL MasterMeter, TL Metro, TL Space, TL Utilities, tools for storytellers, Transit, TransJammer, Trillium Lane Labs, TruTouch, UnityRAID, Vari-Fi, Video the Web Way, VideoRAID, VideoSPACE, VTEM, Work-N-Play, Xdeck, X-Form, and XMON are either registered trademarks or trademarks of Avid Technology, Inc. in the United States and/or other countries.
Bonjour, the Bonjour logo, and the Bonjour symbol are trademarks of Apple Computer, Inc.
Thunderbolt and the Thunderbolt logo are trademarks of Intel Corporation in the U.S. and/or other countries.
This product may be protected by one or more U.S. and non-U.S. patents. Details are available at www.avid.com/patents.
Product features, specifications, system requirements, and availability are subject to change without notice.
Guide Part Number 9329-65307-00 REVA 8/13

Chapter 1. Overview. . . . . . . . . . . . . . . . . . . . . . . . . . . . . . . . . . . . . . . . . . . . . . . . . . . . . . . . . . . . . . . . . . . . . . . . . . . . . . . . . 1
ECx Capabilities and Features . . . . . . . . . . . . . . . . . . . . . . . . . . . . . . . . . . . . . . . . . . . . . . . . . . . . . . . . . . . . . . . . . . . . 1
Required Components for ECx . . . . . . . . . . . . . . . . . . . . . . . . . . . . . . . . . . . . . . . . . . . . . . . . . . . . . . . . . . . . . . . . . . . . 1
System Requirements and Compatibility . . . . . . . . . . . . . . . . . . . . . . . . . . . . . . . . . . . . . . . . . . . . . . . . . . . . . . . . . . . . . 1
About www.avid.com . . . . . . . . . . . . . . . . . . . . . . . . . . . . . . . . . . . . . . . . . . . . . . . . . . . . . . . . . . . . . . . . . . . . . . . . . . . 2
Registration . . . . . . . . . . . . . . . . . . . . . . . . . . . . . . . . . . . . . . . . . . . . . . . . . . . . . . . . . . . . . . . . . . . . . . . . . . . . . . . . . . 2
Conventions Used in This Guide. . . . . . . . . . . . . . . . . . . . . . . . . . . . . . . . . . . . . . . . . . . . . . . . . . . . . . . . . . . . . . . . . . . 2
How to Use this PDF Guide. . . . . . . . . . . . . . . . . . . . . . . . . . . . . . . . . . . . . . . . . . . . . . . . . . . . . . . . . . . . . . . . . . . 2
Chapter 2. Installing and Using ECx. . . . . . . . . . . . . . . . . . . . . . . . . . . . . . . . . . . . . . . . . . . . . . . . . . . . . . . . . . . . . . . . . . . . 3
Installing ECx Host Software . . . . . . . . . . . . . . . . . . . . . . . . . . . . . . . . . . . . . . . . . . . . . . . . . . . . . . . . . . . . . . . . . . . . . 3
Installing the ECx Client Software . . . . . . . . . . . . . . . . . . . . . . . . . . . . . . . . . . . . . . . . . . . . . . . . . . . . . . . . . . . . . . . . . . 4
Uninstalling ECx Host Software . . . . . . . . . . . . . . . . . . . . . . . . . . . . . . . . . . . . . . . . . . . . . . . . . . . . . . . . . . . . . . . . 5
Reinstalling ECx Host Software . . . . . . . . . . . . . . . . . . . . . . . . . . . . . . . . . . . . . . . . . . . . . . . . . . . . . . . . . . . . . . . . 5
Overview of ECx Setup and Configuration. . . . . . . . . . . . . . . . . . . . . . . . . . . . . . . . . . . . . . . . . . . . . . . . . . . . . . . . . . . . 5
Connecting a Computer Directly to VENUE . . . . . . . . . . . . . . . . . . . . . . . . . . . . . . . . . . . . . . . . . . . . . . . . . . . . . . . . . . . 5
Connecting a Wireless Router or WAP . . . . . . . . . . . . . . . . . . . . . . . . . . . . . . . . . . . . . . . . . . . . . . . . . . . . . . . . . . . . . . 6
Setting IP Addresses . . . . . . . . . . . . . . . . . . . . . . . . . . . . . . . . . . . . . . . . . . . . . . . . . . . . . . . . . . . . . . . . . . . . . . . . . . . 6
Setting VENUE and Client IP Addresses Manually . . . . . . . . . . . . . . . . . . . . . . . . . . . . . . . . . . . . . . . . . . . . . . . . . . 7
Setting IP Addresses Automatically . . . . . . . . . . . . . . . . . . . . . . . . . . . . . . . . . . . . . . . . . . . . . . . . . . . . . . . . . . . . . 9
Establishing a Wireless Connection . . . . . . . . . . . . . . . . . . . . . . . . . . . . . . . . . . . . . . . . . . . . . . . . . . . . . . . . . . . . . . . 11
Establishing a Wireless Connection on a Mac Client. . . . . . . . . . . . . . . . . . . . . . . . . . . . . . . . . . . . . . . . . . . . . . . . 11
Establishing a Wireleless Connection on a Windows Client . . . . . . . . . . . . . . . . . . . . . . . . . . . . . . . . . . . . . . . . . . . 11
Enabling Remote Operation . . . . . . . . . . . . . . . . . . . . . . . . . . . . . . . . . . . . . . . . . . . . . . . . . . . . . . . . . . . . . . . . . . . . . 12
Enabling Remote Operation on a Mac Client . . . . . . . . . . . . . . . . . . . . . . . . . . . . . . . . . . . . . . . . . . . . . . . . . . . . . 12
Enabling Remote Operation on a Windows Client. . . . . . . . . . . . . . . . . . . . . . . . . . . . . . . . . . . . . . . . . . . . . . . . . . 13
Disconnecting ECx. . . . . . . . . . . . . . . . . . . . . . . . . . . . . . . . . . . . . . . . . . . . . . . . . . . . . . . . . . . . . . . . . . . . . . . . . . . . 13
Changing the Ethernet Control Password . . . . . . . . . . . . . . . . . . . . . . . . . . . . . . . . . . . . . . . . . . . . . . . . . . . . . . . . . . . 13
Contents
Contents iii
Chapter 1: Overview
Your system includes ECx Ethernet Control remote control host and client software. ECx lets you control your system remotely over an Ethernet network from a client computer or other mobile device using compatible wired or wireless network equipment.
ECx Capabilities and FeaturesECx provides the following:
• Remote control of your system from a client computer, in-cluding laptops, tablets, smart phones, and other mobile de-vices that support VNC (Virtual Network Computing) client software
• Exact duplication of VENUE software on the remote client computer or device
Required Components for ECxThe following components are required to use ECx with your sys-tem:
• ECx Ethernet Control host and client software
• A Mac or Windows client computer with an Ethernet (RJ-45) port, and/or with wireless networking capability (purchased separately)
• A tablet or other mobile device with VNC client software (purchased separately)
• For wireless communication with ECx, a router or wireless access point (WAP) (purchased separately)
• Ethernet cable for connecting to your client computer, wire-less router, or wireless access point device (purchased sep-arately)
For wireless communications, 802.11g capable devices are recommended.
System Requirements and CompatibilityAvid can only assure compatibility and provide support for hard-ware and software it has tested and approved. For complete sys-tem requirements and a list of qualified computers, operating sys-tems, hard drives, and third-party devices, visit:
www.avid.com/compatibility
Chapter 1: Overview 1

About www.avid.comThe Avid website (www.avid.com) is your best online source for information to help you get the most out of your system. The fol-lowing are just a few of the services and features available.
Product Registration Register your purchase online.
Support and Downloads Contact Customer Success (technical support); download software updates and the latest online manu-als; browse the Compatibility documents for system require-ments or search the online Knowledgebase.
Training and Education Study on your own using courses avail-able online or find out how you can learn in a classroom setting at a certified Avid training center.
Products and Developers Learn about Avid products; download demo software or learn about our Develop-ment Partners and their plug-ins, applications, and hardware.
News and Events Get the latest news from Avid or sign up for a product demo.
Pro Tools Accelerated Videos Watch the series of free tutorial videos. Accelerated Videos are designed to help you get up and running with Pro Tools and its plug-ins quickly.
Live Sound Webinars Watch free tutorial videos and live sys-tem-specific webinars to learn from the experts.
To learn more about these and other resources available from Avid, visit our website (www.avid.com).
RegistrationReview the enclosed Registration Information Card and follow the printed instructions to quickly register your purchase online. By registering, you become eligible to receive the following:
• Technical support information
• Software update and upgrade notices
• Hardware warranty information
ECx Ethernet Control2
Conventions Used in This GuideAll of our guides use the following conventions to indicate menu choices and key commands::
The names of Commands, Options, and Settings that appear on-screen are in a different font.
The following symbols are used to highlight important informa-tion:
How to Use this PDF GuideThese are some useful features of this PDF:
• The Bookmarks on the left serve as a continuously visible table of contents. Click on a subject heading to jump to that page.
• Click a + symbol to expand that heading to show subhead-ings. Click the – symbol to collapse a subheading.
• The Table of Contents provides active links to their pages. Select the hand cursor, allow it to hover over the heading until it turns into a finger. Then click to locate to that subject and page.
• All cross references and Index entries are active links. Al-low the hand cursor to hover over the reference until it turns into a finger and click to follow the reference.
• Select Find from the Edit menu to search for a subject.
Convention Action
Options > System In the VENUE software, click Options to display the Options tab, then click the System tab.
File > Save Choose Save from the File menu
Control+NHold down the Control key and press the N key
Control-clickHold down the Control key and click the mouse button
Right-click Click with the right mouse button
User Tips are helpful hints for getting the most from your sys-tem.
Important Notices include information that could affect your data or the performance of your system.
Shortcuts show you useful keyboard or mouse shortcuts.
Cross References point to related sections in this guide and other VENUE guides.

Chapter 2: Installing and Using ECx
To use ECx Ethernet Control, you must do the following:
• Install the ECx host software on your FOH Rack, Mix Rack, SC48, or E3 engine.
• Install ECx client software on your remote computer or mo-bile device.
ECx Ethernet Control host and client software installers are avail-able from our website at www.avid.com.
If you need to uninstall the ECx host software from your Avid live system, see “Uninstalling ECx Host Software” on page 5.If you need to re-install the ECx host software, (after a System Re-store or an Update), see “Reinstalling ECx Host Software” on page 5.
After you install the host and client software, see “Overview of ECx Setup and Configuration” on page 5 for information on set-ting up your Avid live system and client computer for remote op-eration.
ECx host and client software installers are also available in the Avid account of the user who activated the S3L sys-tem software and plug-ins.
Installing ECx Host SoftwareECx Ethernet Control host software is installed on your FOH Rack, Mix Rack, SC48, or E3 engine, enabling your Avid live system to communicate with a computer running the remote cli-ent software.
You can use either a USB drive or a CD-R to install the ECx host software on the FOH Rack, Mix Rack and SC48. The E3 engine supports USB installation only.
Installing from a USB Drive
1 Ensure 80MB of free space is available on the USB drive.
2 Do either of the following depending on where you are obtain-ing the software:
• Download the ECx Ethernet Control Software from your Avid account and extract the file to your desktop.
– or –
• Locate and download the latest VENUE_ECx_x.x_USB.zip file from the support pages at www.avid.com, and extract the file to your desktop.
3 Locate the ECx Ethernet Control Software folder and copy the entire folder to the top (root) level of your USB drive.
4 Insert the USB drive into an available USB port on your FOH Rack, Mix Rack, SC48, or E3 Engine.
5 Place the system into Config Mode.
6 In VENUE, go to the Options > System page.
7 Click Update.
8 Do one of the following:
• Click Install.
– or –
• If more than one VENUE software installer is located on the USB drive, click Next to select the ECx Ethernet Con-trol Software installer and click Install.
9 Click Update and follow the on-screen instructions. VENUE software restarts, and ECx is ready for use.
When your perform an Update or a System Restore of your VENUE software, you must reinstall the ECx host software. See “Reinstalling ECx Host Software” on page 5.
Chapter 2: Installing and Using ECx 3
Installing from a CD-R:
1 Make sure a blank CD-R is inserted in your computer.
2 Download the VENUE_ECx_x.x_ISO file. from the support pages at www.avid.com.
3 Extract the file to your desktop.
4 Locate the extracted ISO file.
5 To create a CD, do the following depending on your com-puter’s operating system:
Mac OSX Launch Disk Utility, drag the VENUE_ECx_x.x.iso file into the left pane of Disk Utility, select the file, and click Burn.
Windows 7 Right-Click the file VENUE_ECx_x.x.iso and choose Burn disc image from the pop-up menu. If necessary, choose the correct disc burner from the Disc burner drop down menu in the dialog, and click Burn.
Windows XP Use a CD burning application such as Nero or Easy CD Creator to create a CD from the ISO file.
6 Insert the CD into the CD-ROM drive of the FOH Rack, Mix Rack, or SC48.
7 Place the system into Config Mode.
8 In VENUE, go to the Options > System page.
9 Click Update.
10 Do one of the following:
• Click Install.
– or –
• If more than one VENUE software installer is located on the CD, click Next to select the ECx Ethernet Control Soft-ware installer and click Install.
11 Click Update and follow the on-screen instructions. VENUE software restarts, and ECx is ready for use.
ECx Ethernet Control4
Installing the ECx Client SoftwareAfter installing the host software on your system, install the ECx client software on the computer you want to use to control your system remotely. You can install the client software on your com-puter directly after downloading the client software, or from the CD you created from the VENUE_ECx_x.x.iso file.
Installing from the download file:
1 Do either of the following depending on where you are obtain-ing the software:
• Download the ECx Ethernet Control Software from your Avid account and extract the file to your desktop.
– or –
• Locate and download the latest VENUE_ECx_Clients file from the support pages at www.avid.com, and extract the file to your desktop.
2 If necessary, transfer the ECx software to the computer you want to use for remote control of your system.
3 To install the client software on a Mac, do the following:
• Locate and open the Mac OSX Client folder.
• Double-click the cotvnc-20b4.dmg file to mount the file.
• Drag the Chicken of the VNC file to your Applications folder.
4 To install the client software on Windows, do the following:
• Open the Windows Client folder.
• Double-click the UltraVNC-Viewer.exe file.
• Follow the on-screen installation instructions.
Installing from a CD-R:
1 Insert the CD containing the ECx software into the disc drive of the computer you want to use to remotely control your sys-tem.
2 To install the client software on a Mac, do the following:
• Locate and open the Mac OSX Client folder.
• Double-click the cotvnc-20b4.dmg file to mount the file.
• Drag the Chicken of the VNC file to your Applications folder.
3 To install the client software on Windows, do the following:
• Open the Windows Client folder.
• Double-click the UltraVNC-Viewer.exe file.
• Follow the on-screen installation instructions.
For instructions on installing and configuring VNC client software for mobile devices, refer to the software’s in-structions. For iPad, the iTeleport app is recommended (www.itleleportmobile.com).
Uninstalling ECx Host SoftwareECx host software can be uninstalled from VENUE.
To uninstall ECx host software from VENUE:
1 Insert the USB drive containing the ECx host software into an available USB port on your FOH Rack, Mix Rack, SC48 or E3 engine.
2 Put your system into Config Mode.
3 Go to Options > System page and click Update.
4 Do one of the following:
• Click Install.
– or –
• If more than one installer is located on the USB drive, click Next to select the ECx Ethernet Control Software installer and click Install.
5 Select the ECx Ethernet Control software and click Install.
6 Click Uninstall.
The ECx host software is uninstalled, and the software automati-cally restarts.
Reinstalling ECx Host SoftwareECx Ethernet Control host software must be reinstalled on your system after restoring or updating your system software. How ECx is reinstalled depends on whether you update or restore your system, and the version of VENUE software you updated from.
After Updating Your System
If you have previously installed ECx software on your system, and you are updating from VENUE software 3.x or higher, ECx software can be reinstalled immediately after you update your system.
To update ECx:
1 Put your system into Config Mode.
2 Go to the Options > System page and click Update.
3 Follow the instructions on-screen to complete the Update.
After Restoring Your System
If you perform a complete System Restore (or if you are updating from VENUE software 3.x or higher), the ECx host software must be reinstalled from the USB drive containing the ECx host software installer. See “Installing ECx Host Software” on page 3.
The ECx folder will remain on your Avid live system hard drive after uninstalling,
Overview of ECx Setup and ConfigurationYou can control your Avid live system (the “host”) with a remote computer (the “client”) using standard VNC (Virtual Network Computing) protocol over TCP/IP, allowing remote access to your system via a wired or wireless Ethernet-based network. This chapter covers the steps for configuring and using ECx.
For a wired network, the steps include:
Connecting the remote client computer directly to your Avid live system using an Ethernet cable.
Setting the IP addresses of your Avid live system and your cli-ent computer manually.
Enabling remote operation of your Avid live system.
For a wireless network, the steps include:
Connecting a wireless router or a wireless access point (WAP) device to your Avid live system.
Setting the IP addresses of your Avid live system and your cli-ent computer manually or automatically.
Establishing a connection between your wireless router and the client computer.
Enabling remote operation of your Avid live system.
Connecting a Computer Directly to VENUEIf you are establishing a fixed remote control station and do not need a mobile connection, you can connect the remote computer directly to the ECx port on your Avid live system device using an Ethernet cable.
To connect a computer directly to your Avid live system:
1 Connect one end of a standard Ethernet cable to the ECx port on your FOH Rack, Mix Rack, SC48, or E3 engine, and the other end to the Ethernet port on the router or WAP.
2 Configure the VENUE software and the client computer IP ad-dresses manually. See “Setting VENUE and Client IP Ad-dresses Manually” on page 7.
For S3L systems, only use the port labeled ECx on the E3 engine for ECx connections. Do not use the Network ports for ECx connections.
Chapter 2: Installing and Using ECx 5

Connecting a Wireless Router or WAP Standard wireless routers or WAP devices can be connected to the ECx port on your Avid live system for wireless remote control of your system.
Before connecting a wireless router or WAP, you should config-ure the SSID (network name) of the networking equipment so that its wireless network can be easily identified on the client computer. You can specify any unique network name for the de-vice, such as “Avid Network.”
To configure the SSID and any network security features of your wireless router or WAP, refer to the manufacturer’s instructions.
To connect a wireless router or WAP device to your Avid live system:
1 Connect one end of a standard Ethernet cable to the ECx port on your FOH Rack, Mix Rack, SC48, or E3 engine.
2 Connect he other end of the cable to the Ethernet port on the router or WAP.
3 Do one of the following:
• If you are using a wireless router or WAP device that does not include a DHCP server function (such as the Cisco Ai-ronet 1230AG), you must configure the IP addresses in VENUE and on the client computer manually. See “Setting VENUE and Client IP Addresses Manually” on page 7.
– or –
• If you are using a wireless router that includes a DHCP server function (such as the Belkin Pre-N series routers), you can use DHCP to set the IP addresses automatically. See “Setting IP Addresses Automatically” on page 9.
For security reasons, you may be able to configure your wireless router or WAP device to not broadcast its SSID (creating a “hidden” network). Instructions for connecting to such networks are contained in this chapter. But for in-structions on how to configure a hidden network, refer to the router or WAP device manufacturer’s instructions.
For S3L systems, only use the port labeled ECx on the E3 engine for ECx connections. Do not use the Network ports for ECx connections.
ECx Ethernet Control6
Setting IP AddressesDo one of the following to set the IP addresses in VENUE and on your client computer, depending on the configuration of your net-work:
If you are connecting a computer directly to your Avid live system, or you are using a wireless router or WAP device that does not include a DHCP server function, see “Setting VENUE and Client IP Addresses Manually” on page 7.
– or –
If you are using a wireless router that includes a DHCP server function, see “Setting IP Addresses Automatically” on page 9.
IP configuration changes can take up to 2 minutes to become effective. After making changes, be sure to allow sufficient time for the system to assign IP addresses and establish com-munication between all the components.
If network communication is not established after allowing sufficient time for IP addressing, verify that you are using the correct cable types, have correctly connected the system, and have working cables.
Setting VENUE and Client IP Addresses ManuallySet the IP addresses in VENUE and the client computer manually if you are connecting a computer directly to your Avid live sys-tem, or if you are using a wireless router or WAP device that does not include a DHCP server function.
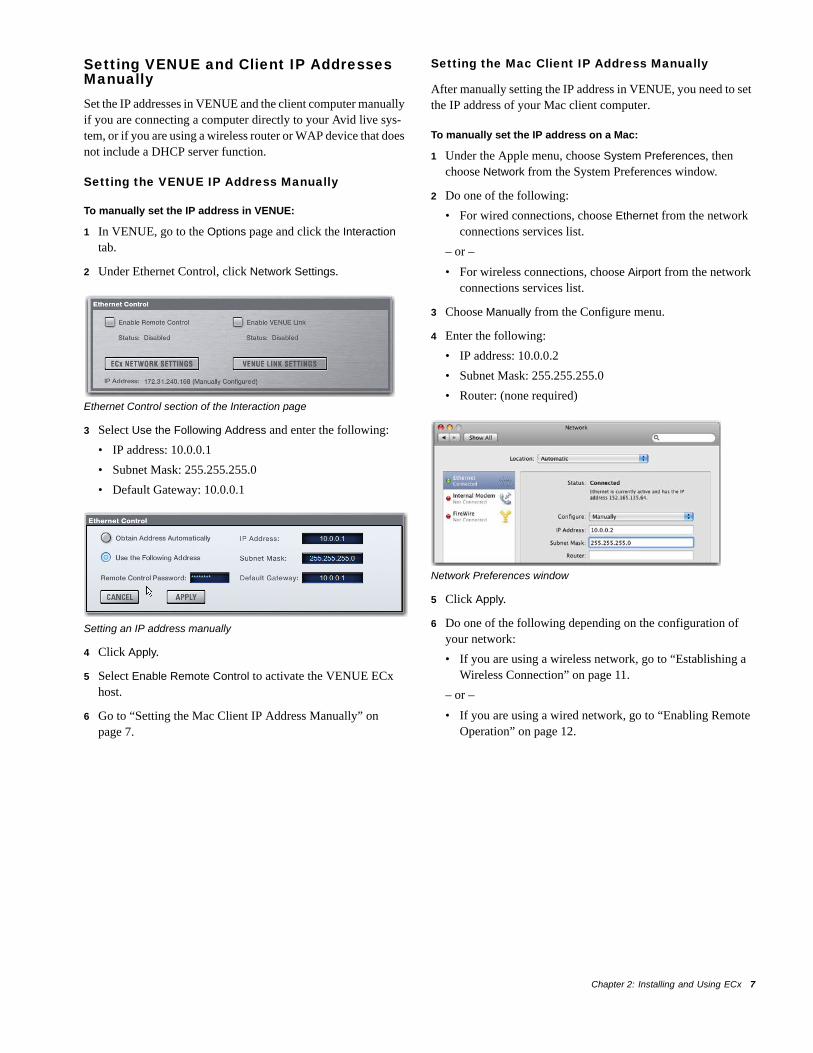
Setting the VENUE IP Address Manually
To manually set the IP address in VENUE:
1 In VENUE, go to the Options page and click the Interaction tab.
2 Under Ethernet Control, click Network Settings.
3 Select Use the Following Address and enter the following:
• IP address: 10.0.0.1
• Subnet Mask: 255.255.255.0
• Default Gateway: 10.0.0.1
4 Click Apply.
5 Select Enable Remote Control to activate the VENUE ECx host.
6 Go to “Setting the Mac Client IP Address Manually” on page 7.
Ethernet Control section of the Interaction page
Setting an IP address manually
Setting the Mac Client IP Address Manually
After manually setting the IP address in VENUE, you need to set the IP address of your Mac client computer.
To manually set the IP address on a Mac:
1 Under the Apple menu, choose System Preferences, then choose Network from the System Preferences window.
2 Do one of the following:
• For wired connections, choose Ethernet from the network connections services list.
– or –
• For wireless connections, choose Airport from the network connections services list.
3 Choose Manually from the Configure menu.
4 Enter the following:
• IP address: 10.0.0.2
• Subnet Mask: 255.255.255.0
• Router: (none required)
5 Click Apply.
6 Do one of the following depending on the configuration of your network:
• If you are using a wireless network, go to “Establishing a Wireless Connection” on page 11.
– or –
• If you are using a wired network, go to “Enabling Remote Operation” on page 12.
Network Preferences window
Chapter 2: Installing and Using ECx 7
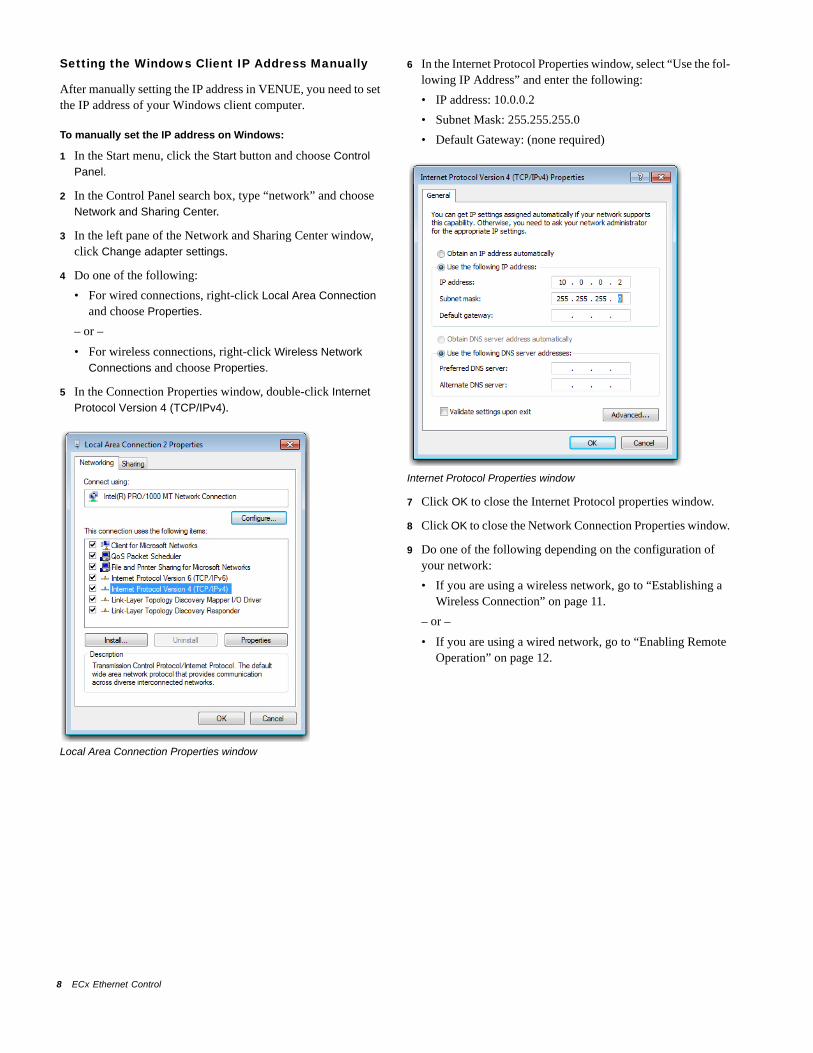
Setting the Windows Client IP Address Manually
After manually setting the IP address in VENUE, you need to set the IP address of your Windows client computer.
To manually set the IP address on Windows:
1 In the Start menu, click the Start button and choose Control
Panel.
2 In the Control Panel search box, type “network” and choose Network and Sharing Center.
3 In the left pane of the Network and Sharing Center window, click Change adapter settings.
4 Do one of the following:
• For wired connections, right-click Local Area Connection
and choose Properties.
– or –
• For wireless connections, right-click Wireless Network
Connections and choose Properties.
5 In the Connection Properties window, double-click Internet
Protocol Version 4 (TCP/IPv4).
Local Area Connection Properties window
ECx Ethernet Control8
6 In the Internet Protocol Properties window, select “Use the fol-lowing IP Address” and enter the following:
• IP address: 10.0.0.2
• Subnet Mask: 255.255.255.0
• Default Gateway: (none required)
7 Click OK to close the Internet Protocol properties window.
8 Click OK to close the Network Connection Properties window.
9 Do one of the following depending on the configuration of your network:
• If you are using a wireless network, go to “Establishing a Wireless Connection” on page 11.
– or –
• If you are using a wired network, go to “Enabling Remote Operation” on page 12.
Internet Protocol Properties window
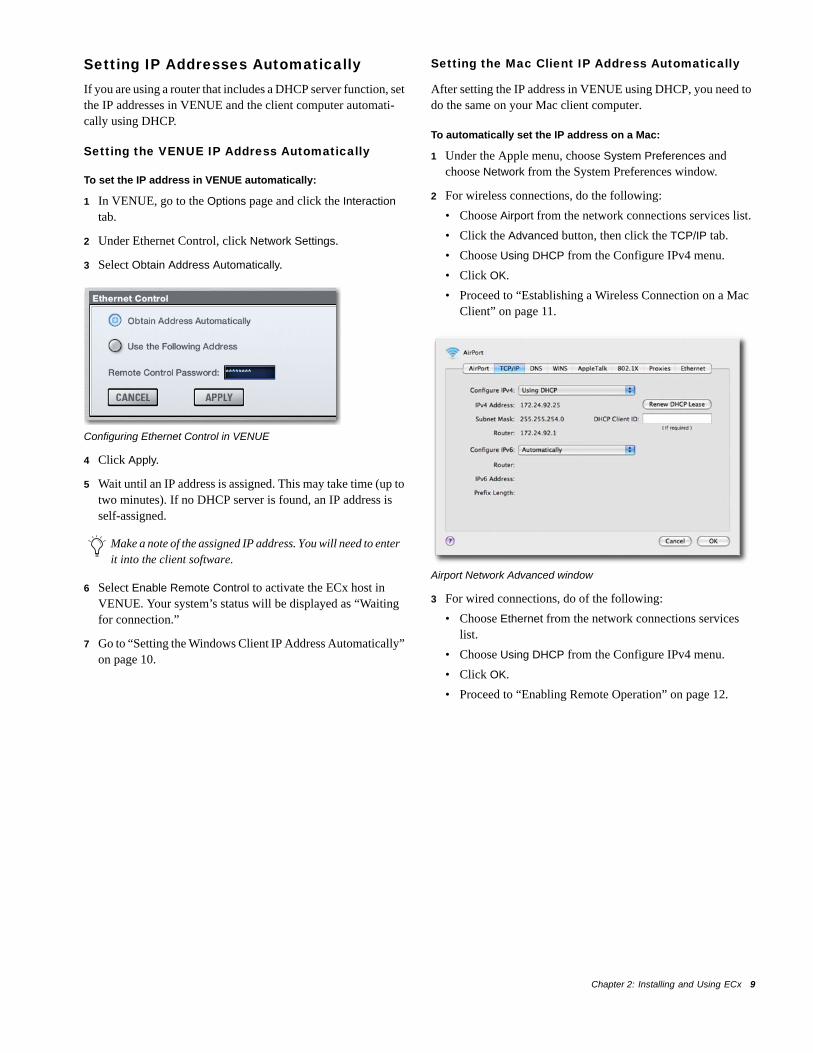
Setting IP Addresses AutomaticallyIf you are using a router that includes a DHCP server function, set the IP addresses in VENUE and the client computer automati-cally using DHCP.
Setting the VENUE IP Address Automatically
To set the IP address in VENUE automatically:
1 In VENUE, go to the Options page and click the Interaction tab.
2 Under Ethernet Control, click Network Settings.
3 Select Obtain Address Automatically.
4 Click Apply.
5 Wait until an IP address is assigned. This may take time (up to two minutes). If no DHCP server is found, an IP address is self-assigned.
6 Select Enable Remote Control to activate the ECx host in VENUE. Your system’s status will be displayed as “Waiting for connection.”
7 Go to “Setting the Windows Client IP Address Automatically” on page 10.
Configuring Ethernet Control in VENUE
Make a note of the assigned IP address. You will need to enter it into the client software.
Setting the Mac Client IP Address Automatically
After setting the IP address in VENUE using DHCP, you need to do the same on your Mac client computer.
To automatically set the IP address on a Mac:
1 Under the Apple menu, choose System Preferences and choose Network from the System Preferences window.
2 For wireless connections, do the following:
• Choose Airport from the network connections services list.
• Click the Advanced button, then click the TCP/IP tab.
• Choose Using DHCP from the Configure IPv4 menu.
• Click OK.
• Proceed to “Establishing a Wireless Connection on a Mac Client” on page 11.
3 For wired connections, do of the following:
• Choose Ethernet from the network connections services list.
• Choose Using DHCP from the Configure IPv4 menu.
• Click OK.
• Proceed to “Enabling Remote Operation” on page 12.
Airport Network Advanced window
Chapter 2: Installing and Using ECx 9
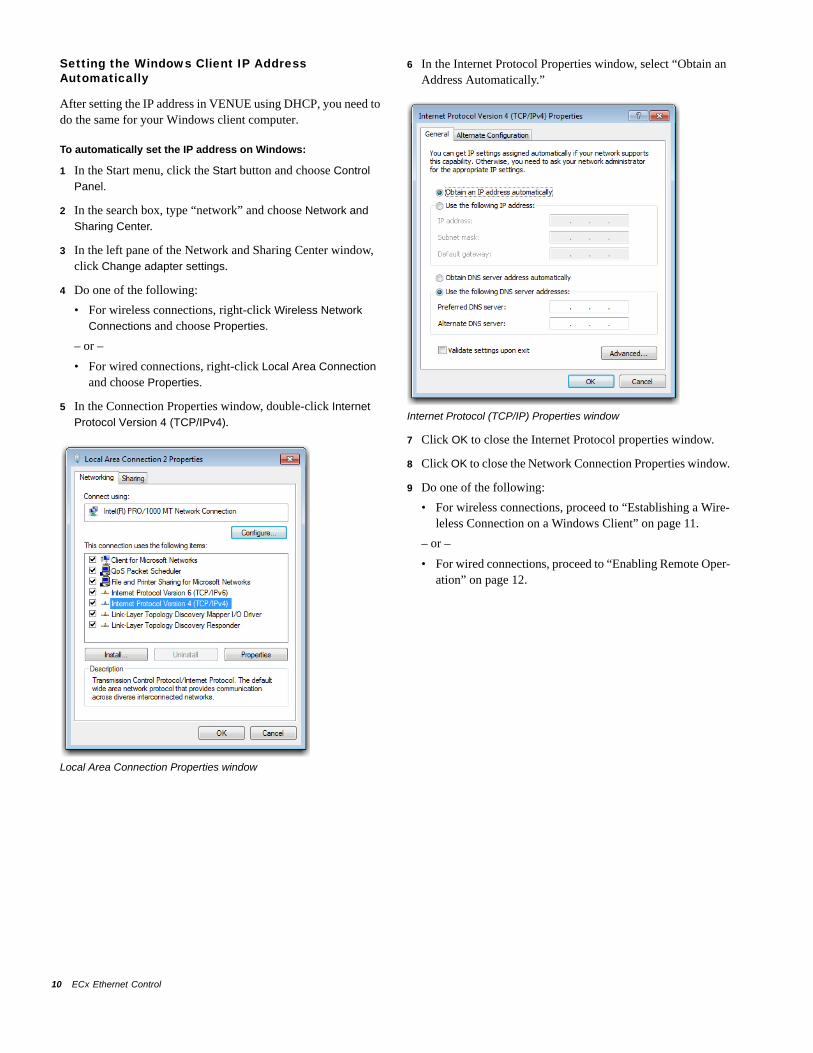
Setting the Windows Client IP Address Automatically
After setting the IP address in VENUE using DHCP, you need to do the same for your Windows client computer.
To automatically set the IP address on Windows:
1 In the Start menu, click the Start button and choose Control
Panel.
2 In the search box, type “network” and choose Network and
Sharing Center.
3 In the left pane of the Network and Sharing Center window, click Change adapter settings.
4 Do one of the following:
• For wireless connections, right-click Wireless Network
Connections and choose Properties.
– or –
• For wired connections, right-click Local Area Connection
and choose Properties.
5 In the Connection Properties window, double-click Internet
Protocol Version 4 (TCP/IPv4).
Local Area Connection Properties window
ECx Ethernet Control10
6 In the Internet Protocol Properties window, select “Obtain an Address Automatically.”
7 Click OK to close the Internet Protocol properties window.
8 Click OK to close the Network Connection Properties window.
9 Do one of the following:
• For wireless connections, proceed to “Establishing a Wire-leless Connection on a Windows Client” on page 11.
– or –
• For wired connections, proceed to “Enabling Remote Oper-ation” on page 12.
Internet Protocol (TCP/IP) Properties window
Establishing a Wireless ConnectionOnce IP addresses are set, you can establish a connection from the client computer to the wireless network. These instructions show how to establish wireless connections to routers or WAPs that may or may not be broadcasting their SSIDs.
Establishing a Wireless Connection on a Mac Client
To establish a wireless connection on a Mac:
1 Under the Apple menu, choose System Preferences and choose Network from the System Preferences window.
2 Choose Airport from the network connections services list.
3 If you have chosen to broadcast the SSID of your router or WAP, do the following:
• From the Network Name pop-up menu, choose your net-work.
• Enter a valid password when prompted and click OK.
4 If you have chosen to not broadcast the SSID of your router or WAP, do the following:
• In the Network Name pop-up menu, choose Join Other Net-
work.
• In the Network Name field, type in the SSID of your net-work,
• Choose the network security type used by the router or WAP from the Security pop-up menu.
• Enter the network password, and click Join.
5 Go to “Enabling Remote Operation” on page 12.
Configuring a wireless connection on the Mac
To configure the security features on your wireless router or WAP device, see your device’s documentation.
Establishing a Wireleless Connection on a Windows Client
To connect to a network that is broadcasting its SSID on Windows:
1 Open the Connect to a Network window by clicking the net-work icon in the notification area.
2 In the list of available networks, choose your network and click Connect.
3 Go to “Enabling Remote Operation” on page 12.
To connect to a network that is not broadcasting its SSID on Windows:
1 In the Start menu, click the Start button and choose Control
Panel.
2 In the search box, type “network” and choose Network and
Sharing Center.
3 Click Set up a new connection or network.
4 Choose Manually connect to a wireless network and click Next.
Choose “Set up a new connection or network”
Choose “Manually connect to a wireless network”
Chapter 2: Installing and Using ECx 11
5 In the Network name field, enter the SSID of the wireless router or WAP device connected to VENUE ECx.
6 Choose the Security type and the Encryption type from the pop-up menus for the router or WAP device, and enter the Se-curity key (password).
7 Click Next.The SSID for the router connected to VENUE ECx should appear in the list of available wireless networks.
8 In the list of available wireless networks in the notification area, choose your network and click Connect.
9 Go to “Enabling Remote Operation” on page 12.
Manual wireless connection options
To configure the security features on your wireless router or WAP device, see your device’s documentation.
ECx Ethernet Control12
Enabling Remote OperationIn order to enable remote operation of your Avid live system, you need to have obtained valid IP addresses in VENUE and on your client computer. If you are using a wireless network, you also need to have established a network connections between the wire-less router or WAP device that is connected to your Avid live sys-tem and your client computer or mobile device.
Enabling Remote Operation on a Mac Client
To enable remote operation on Mac:
1 Double-click the “Chicken of the VNC” icon to launch the ap-plication.
2 In the Host field, enter the IP address of the your Avid live sys-tem as it appears in the Ethernet Control section of the Options
> Interaction page.
3 Enter the password (the default password for VENUE is “pass-word”) and click Connect.
The client launches and displays the VENUE software screen. You can then view and operate all on-screen controls from the cli-ent computer.
If you have a trouble connecting using a router, try con-necting the computer directly to the Engine. If you can con-nect, reset your router to its default settings and reconnect using the router.
Chicken of the VNC window
Enabling Remote Operation on a Windows Client
To enable remote operation on Windows:
1 Double-click the “ECx Ethernet Control (UltraVNC Viewer)” icon on your desktop (or go to Start Menu > Programs > Ul-traVNC > Run UltraVNC Viewer) to launch the UltraVNC Viewer application.
2 In the VNC Server field, enter the IP address of the your Avid live system as it appears in the Ethernet Control section of the Options > Interaction page.
3 Click Connect.
4 Enter the password when prompted (the default password in VENUE is “password”) and click Connect.
The client launches and displays the VENUE software screen. You can then view and operate all on-screen controls from the cli-ent computer.
UltraVNC Viewer window
Disconnecting ECxTo disconnect ECx:
1 Close the ECx client application by doing one of the follow-ing:
• On Mac, press Command+Q to quit.
– or –
• In Windows, move the pointer to the top of the screen until the control strip appears, and click the close box.
2 In VENUE, deselect Enable in the Ethernet Control section of the Options > Interaction page.
Changing the Ethernet Control PasswordYou can change the password that users need to enter to control your system remotely.
To change the Ethernet Control password:
1 In the Ethernet Control section of the Options > Interaction page, double-click the Password field.
2 Enter a new password and press Enter.
By default, the VENUE Ethernet Control password is “password” (all lowercase).
Make a note of the new password and your system’s IP ad-dress, as you will need to enter it into the client software.
Chapter 2: Installing and Using ECx 13

Avid2001 Junipero Serra Boulevard Daly City, CA 94014-3886 USA
Technical Support (USA)Visit the Online Support Center at www.avid.com/support
Product InformationFor company and product information, visit us on the web at www.avid.com