edi express enrollment eft · september 2018 wps edi electronic funds transfer user manual 2 wps...
TRANSCRIPT

WPS EDI Express Enrollment Electronic Funds Transfer Manual
TABLE OF CONTENTS
WPS EDI EXPRESS ENROLLMENT – EFT OVERVIEW & CHECKLIST WPS EDI Express Enrollment – EFT Overview………………………………………………………. 2
User Checklist…………………………………….……………………………………………………….2
DOWNLOADING/ACCESSING GOOGLE AUTHENTICATION APPLICATION Desktop Chrome Extension Authenticaor……………………………………………………….…….. 2
Google Play………………………………………………………………………………………………..5 App Store…………………………………………………………………………………………………..8 USER RESPONSIBILITIES, ACCESS, & MANAGEMENT
USER RESPONSIBILITIES
Sharing User Login IDs………………………………………………………………………………….. 9
NEW USER ACCESS TO EFT REGISTRATION
Authentication Criteria…………………………………………………………………………………… 9
Register a User……………………………………………………………………………………………9
Mulit-Factor Authentication…………………………………………………………………………......15
ELECTRONIC FUNDS TRANSFER (EFT) REGISTRATION
Mock Agreement………………………………………………………………………………………...17
Bank Account Information……………………………………………………………………………....18
Signature Pages….…………………………………………………………………………………...…18 EXISTING USER ACCESS TO EFT REGISTRATION
Authentication Criteria…………………………………………………………………………………..20
Logging In………………………………………………………………………………………………...21
Registering Additional Tax ID orTax ID/NPI…………..………………………………………………22
Adding Contract/insruance Type...………...…………..………………………………………………25
USERNAME/PASSWORD MANAGEMENT
Password Requirements………………………………………………………………………………. 26
TROUBLESHOOTING Google Authenticator – Time Sync…………………………………………………………………… 27

September 2018 WPS EDI Electronic Funds Transfer User Manual
2
WPS EDI Express Enrollment – EFT Overview WPS EDI Express Enrollment WPS EDI Express Enrollment WPS EDI Express Enrollment WPS EDI Express Enrollment –––– EFT OverviewEFT OverviewEFT OverviewEFT Overview
The WPS EDI Express Enrollment is a comprehensive and secure website for providers to enroll in Electronic Funds Transfers. The Multi Factor Authentication is an additional form of security to safe guard your information.
User ChecklistUser ChecklistUser ChecklistUser Checklist
Be prepared with the following information before proceeding with the enrollment process. 1. Information about two claims previously paid by WPS within the last 90 days. 2. The two claims must have a positive paid amount and have been paid on separate payments
• Claim Number • Claim Paid Amount • Claim Payment Date • Check/EFT Number of the Paid Claim
3. Download the Google Authentication Application on your smartphone using either the App Store or Google Play. Follow the steps on the app to download to your phone.
DOWNLOADING/ACCESSING GOOGLE AUTHENTICATION APPLICATION Disclaimer - WPS is not responsible for the support or availability of the Google Authenticator app.
Desktop Chrome Extension AuthenticatorDesktop Chrome Extension AuthenticatorDesktop Chrome Extension AuthenticatorDesktop Chrome Extension Authenticator
There may be some differences downloading the application other than what is provided below, please follow the prompts.
1. Enter URL https://chrome.google.com/webstore/detail/gauth-
authenticator/ilgcnhelpchnceeipipijaljkblbcobl?hl=en into your Chrome browser. 2. Select ‘Add to Chrome’.

September 2018 WPS EDI Electronic Funds Transfer User Manual
3
3. An ‘Add GAuth Authenticator?’ box displays, select ‘Add extension’.
4. Once downloaded you will receive a message stating it has been added to Chrome.
September 2018 WPS EDI Electronic Funds Transfer User Manual
4
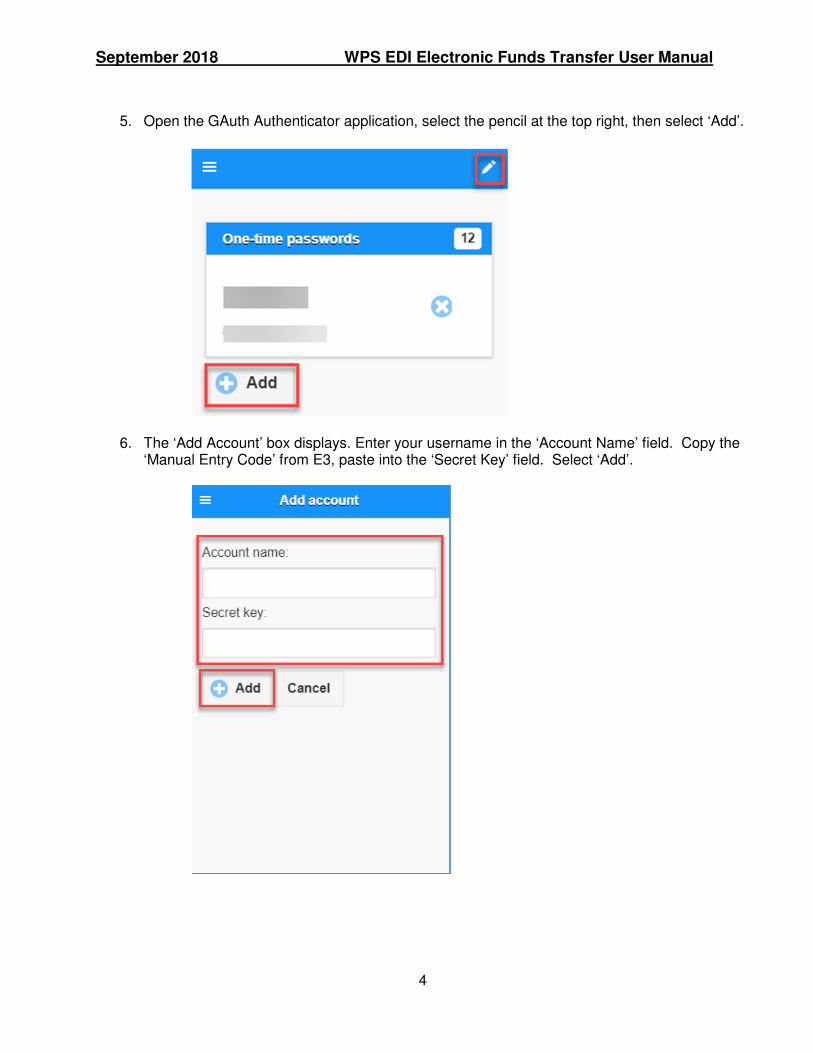
5. Open the GAuth Authenticator application, select the pencil at the top right, then select ‘Add’.
6. The ‘Add Account’ box displays. Enter your username in the ‘Account Name’ field. Copy the ‘Manual Entry Code’ from E3, paste into the ‘Secret Key’ field. Select ‘Add’.

September 2018 WPS EDI Electronic Funds Transfer User Manual
5
7. Enter the 6-digit One-time password in the ‘Enter Google Authenticator Token’ field in E3.
Google PlayGoogle PlayGoogle PlayGoogle Play
There may be some differences downloading the application other than what is provided below, please follow the prompts. 1. Key in ‘Google Authentication’ in the search field of Google Play. 2. Select ‘Install’.
3. Once downloaded, select the icon on your phone to open the application.

September 2018 WPS EDI Electronic Funds Transfer User Manual
6
4. It is not necessary to sign in to Google to continue. Select, ‘Skip’.
I
5. Select ‘Begin’.

September 2018 WPS EDI Electronic Funds Transfer User Manual
7
6. You may select one of the following options to continue.
7. When selecting the ‘Scan a barcode’ option, scan the QR Code when prompted during the enrollment process. You will be provided a code to enter for Token Authentication.
8. When selecting the ‘Enter a provided key’ option, enter the Manual Entry Code and username
when prompted during the registration process. You will be provided a code to enter for Token Authentication.

September 2018 WPS EDI Electronic Funds Transfer User Manual
8
The App StoreThe App StoreThe App StoreThe App Store
There may be some differences downloading the application other than what is provided below, please follow the prompts. 1. Key in ‘Google Authentication’ in the search field of the App Store. 2. Select ‘Get.
3. Once downloaded, select the icon on your phone to open the application.
4. Select ‘Begin Setup’. You may select one of the following options to continue.

September 2018 WPS EDI Electronic Funds Transfer User Manual
9
5. When selecting the ‘Scan barcode’ option, scan the QR Code when prompted during the
enrollment process. You will be provided a code to enter for Token Authentication.
6. When selecting the ‘Enter a provided key’ option, enter the Manual Entry Code and username when prompted during the registration process. You will be provided a code to enter for Token Authentication.
User Responsibilities, Access, and Management
USER RESPONSIBILITIES
SHARING USER LOGIN IDsSHARING USER LOGIN IDsSHARING USER LOGIN IDsSHARING USER LOGIN IDs Every user must have their own User Login ID to adhere to privacy laws. Users cannot share their User Login ID. This means employers may not create a ‘Master’ login and have all employees share that account. Each user must have their own Login credentials.
NEW USER ACCESS TO EFT REGISTRATION
AAAAUTHENTICATION CRITERIAUTHENTICATION CRITERIAUTHENTICATION CRITERIAUTHENTICATION CRITERIA Be prepared with the following authentication criteria required through the registration process. 1. Information about two claims previously paid by WPS, to the healthcare provider being
enrolled for EFT within the last 90 days. 2. The two claims must have a positive paid amount and have been paid on separate payments
• Claim Number • Claim Paid Amount • Claim Payment Date • Check/EFT Number of the Paid Claim
REGISTER REGISTER REGISTER REGISTER AS A USER AS A USER AS A USER AS A USER
1. Access the website at: https://edi.wpsic.com/edir/home
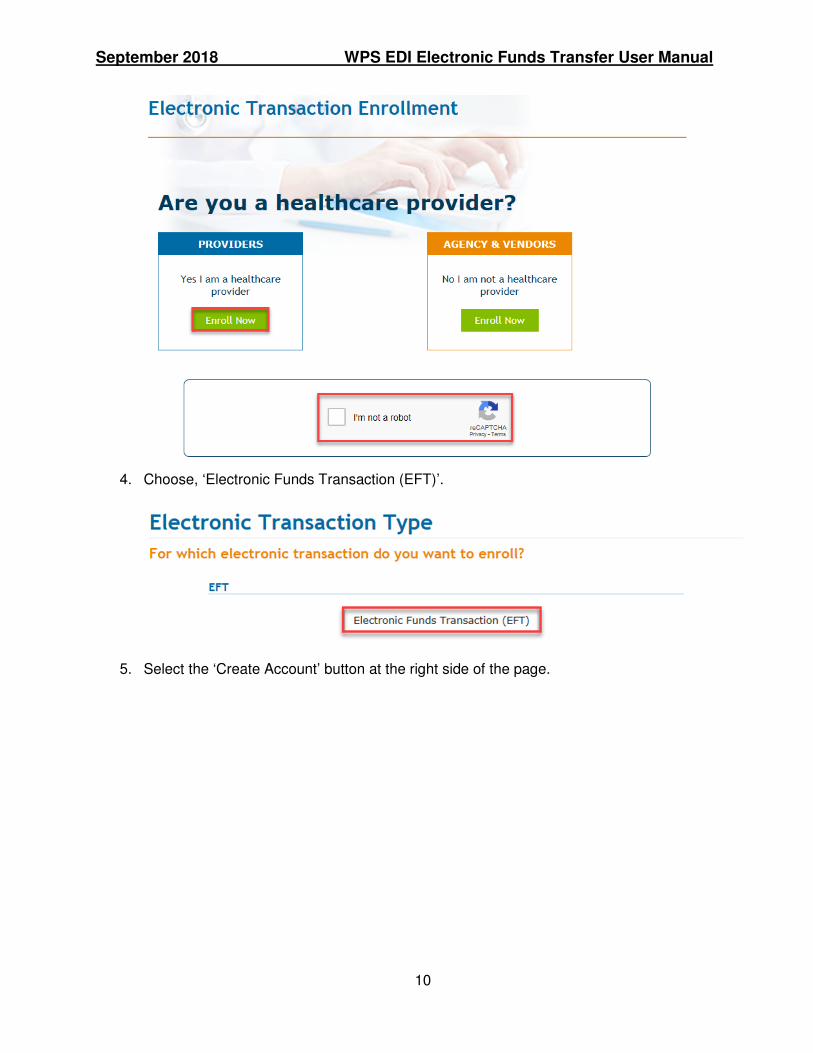
2. Check the reCAPTCHA check box – follow the prompts. 3. Choose, ‘Enroll Now’ under ‘Yes I am a healthcare provider.’
September 2018 WPS EDI Electronic Funds Transfer User Manual
10
4. Choose, ‘Electronic Funds Transaction (EFT)’.
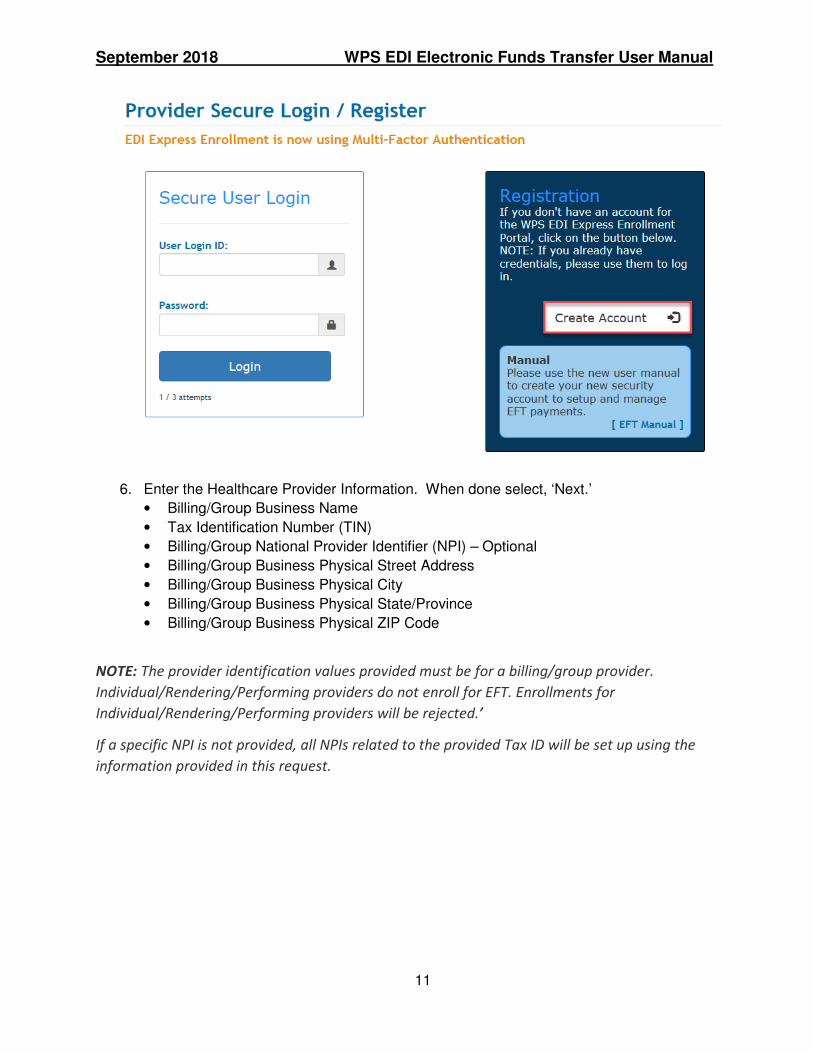
5. Select the ‘Create Account’ button at the right side of the page.
September 2018 WPS EDI Electronic Funds Transfer User Manual
11
6. Enter the Healthcare Provider Information. When done select, ‘Next.’
• Billing/Group Business Name
• Tax Identification Number (TIN)
• Billing/Group National Provider Identifier (NPI) – Optional
• Billing/Group Business Physical Street Address
• Billing/Group Business Physical City
• Billing/Group Business Physical State/Province
• Billing/Group Business Physical ZIP Code
NOTE: The provider identification values provided must be for a billing/group provider.
Individual/Rendering/Performing providers do not enroll for EFT. Enrollments for
Individual/Rendering/Performing providers will be rejected.’
If a specific NPI is not provided, all NPIs related to the provided Tax ID will be set up using the
information provided in this request.

September 2018 WPS EDI Electronic Funds Transfer User Manual
12
7. Choose the appropriate line(s) of business for the previously entered Healthcare Provider.
More than one line of business may be selected, if applicable. When done select, ‘Next.’
8. Provide the following information about two claims previously paid by WPS, to the healthcare
provider being enrolled for EFT within the last 90 days. The two claims must have a positive paid amount and have been paid on separate payments. Select ‘Submit Claims for Validation’ when done.
• Claim Number • Claim Paid Amount • Claim Payment Date • Check/EFT Number of the Paid Claim

September 2018 WPS EDI Electronic Funds Transfer User Manual
13
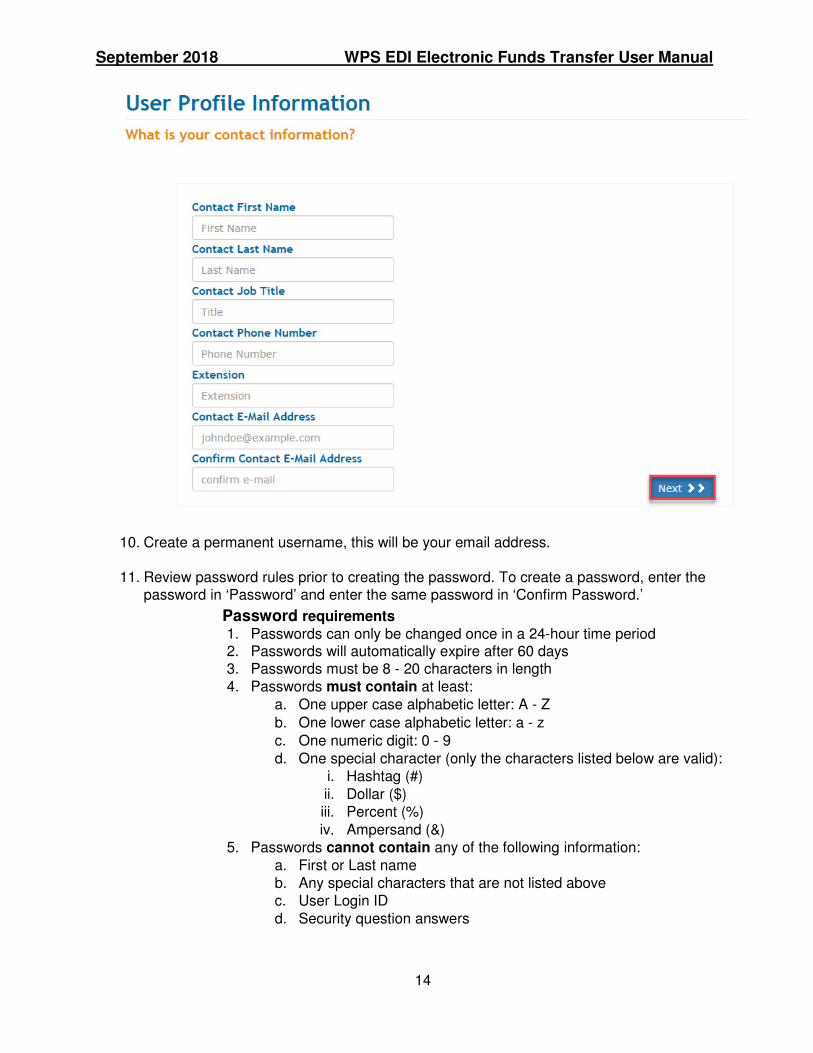
9. Provide your contact information. Select ‘Next; when done.
• Contact First Name
• Contact Last Name
• Contact Job Title
• Contact Phone Number/Extension
• Contact Email Address
September 2018 WPS EDI Electronic Funds Transfer User Manual
14
10. Create a permanent username, this will be your email address.
11. Review password rules prior to creating the password. To create a password, enter the password in ‘Password’ and enter the same password in ‘Confirm Password.’
Password requirements
1. Passwords can only be changed once in a 24-hour time period 2. Passwords will automatically expire after 60 days 3. Passwords must be 8 - 20 characters in length 4. Passwords must contain at least:
a. One upper case alphabetic letter: A - Z
b. One lower case alphabetic letter: a - z c. One numeric digit: 0 - 9 d. One special character (only the characters listed below are valid):
i. Hashtag (#) ii. Dollar ($) iii. Percent (%) iv. Ampersand (&)
5. Passwords cannot contain any of the following information: a. First or Last name b. Any special characters that are not listed above c. User Login ID d. Security question answers

September 2018 WPS EDI Electronic Funds Transfer User Manual
15
e. Words (words consisting of four or more letters) Please note: This is the requirement most often overlooked and causes the most difficulty for users. To successfully create a password, please avoid ‘dictionary’ words. (EXAMPLES: Book, Tree, Water, etc.).
12. Set up Security Challenge Questions.
MULTIMULTIMULTIMULTI----FACTOR AUTHENTICATIONFACTOR AUTHENTICATIONFACTOR AUTHENTICATIONFACTOR AUTHENTICATION
Multi-Factor Authentication (MFA): a requirement that provides an additional form of security to safe guard your information. When logging, you will be requested and enter a MFA Verification code that you will obtain using Google Authenticator.
MFA Verification code is use of Google Authenticator. Google Authenticator is an application that implements two-step verification and is an app typically installed on a smart phone or PC. To use Google Authenticator, first download the app via Google Play or the App Store on your smart phone or download the Chrome Extension on your PC. Follow the steps on the app to download to your phone or PC.
Once you have installed Google Authenticator to your phone or PC, use the application to scan the Bar Code or key in the Manual Entry Code (shown below). You will receive a Verification Code on your phone or PC. Enter that code in the Verification Code box and click ‘Verify Token’. Please note: the code must be entered within 30 seconds from the time it is displayed in the Authenticator app.
The next time that you log into the portal, you will enter your User Login ID, Password. Obtain and enter a new authentication code using your Google Authenticator Application.

September 2018 WPS EDI Electronic Funds Transfer User Manual
16
Once you have set up your Multi-Factor Authentication you will be able to continue to the EFT Enrollment process. Select ‘Continue to EFT Enrollment’.

September 2018 WPS EDI Electronic Funds Transfer User Manual
17
A message displays stating ‘Multi-Factor Authentication Successful’. To enroll the Tax ID or Tax ID/NPI select ‘Enroll This Tax ID in EFT’.
ELECTRONIC FUNDS TRANSFER (EFT) REGISTRATIONELECTRONIC FUNDS TRANSFER (EFT) REGISTRATIONELECTRONIC FUNDS TRANSFER (EFT) REGISTRATIONELECTRONIC FUNDS TRANSFER (EFT) REGISTRATION
MOCK AGREEMENTMOCK AGREEMENTMOCK AGREEMENTMOCK AGREEMENT
The Mock Agreement page displays a sample agreement that will be completed as you progress in your registration. You may review and print the sample agreement depending on your business needs. Select the ‘Continue to Registration’ button.

September 2018 WPS EDI Electronic Funds Transfer User Manual
18
BANK ACCOUNT BANK ACCOUNT BANK ACCOUNT BANK ACCOUNT INFORMATIONINFORMATIONINFORMATIONINFORMATION
Complete the requested Banking information on the following screens.
• Bank Routing Number
• Account Type
• Account Number
SIGNATURE PAGESSIGNATURE PAGESSIGNATURE PAGESSIGNATURE PAGES
Completing the information requested on the previous screens takes you to the Final Agreements screen. Review Final Agreements and select ‘Complete & Submit’.

September 2018 WPS EDI Electronic Funds Transfer User Manual
19
If you agree to all the terms of the agreement, type your name in the Signature field and select ‘Submit Agreements’. Once the agreement has been submitted and process a confirmation email will be sent to the email provided on the agreement.

September 2018 WPS EDI Electronic Funds Transfer User Manual
20
‘Thank you – Enrollment Complete’ message displays, and you will be redirected back to the WPS EDI website.
EXISTING USER ACCESS TO EFT REGISTRATIONEXISTING USER ACCESS TO EFT REGISTRATIONEXISTING USER ACCESS TO EFT REGISTRATIONEXISTING USER ACCESS TO EFT REGISTRATION
AAAAUTHENTICATION CRITERIAUTHENTICATION CRITERIAUTHENTICATION CRITERIAUTHENTICATION CRITERIA Be prepared with the following authentication criteria required through the registration process. 3. Information about two claims previously paid by WPS, to the healthcare provider being
enrolled for EFT within the last 90 days. 4. The two claims must have a positive paid amount and have been paid on separate payments
• Claim Number • Claim Paid Amount • Claim Payment Date • Check/EFT Number of the Paid Claim

September 2018 WPS EDI Electronic Funds Transfer User Manual
21
LOGGING INLOGGING INLOGGING INLOGGING IN
1. Access the website at: https://edi.wpsic.com/edir/home 2. Check the reCAPTCHA check box – follow the prompts. 3. Choose, ‘Enroll Now’ under ‘Yes I am a healthcare provider.’
4. Choose, ‘Electronic Funds Transaction (EFT).’
5. Enter your ‘User Login ID and Password.
6. Select ‘Login’.

September 2018 WPS EDI Electronic Funds Transfer User Manual
22
7. Obtain the new authentication code from your Google Authenticator Application on your
phone. You should have downloaded this application during your initial registration. Enter the code, select ‘Verify Token’.
Existing users may delete or register additional Tax IDs, Tax ID/NPI for their organization.
REGISTERING ADDITONAL TAX ID OR TAX ID/NPIREGISTERING ADDITONAL TAX ID OR TAX ID/NPIREGISTERING ADDITONAL TAX ID OR TAX ID/NPIREGISTERING ADDITONAL TAX ID OR TAX ID/NPI
Existing users may register additional Tax IDs, Tax ID/NPI for their organization.
1. To register an additional Tax ID or Tax ID/NPI select the ‘New Tax ID? Add Another Tax ID to your account’ option.

September 2018 WPS EDI Electronic Funds Transfer User Manual
23
2. Enter the appropriate Tax ID and NPI (NPI optional), select ‘Next (claim verification)’.
NOTE: The provider identification values provided must be for a billing/group provider.
Individual/Rendering/Performing providers do not enroll for EFT. Enrollments for
Individual/Rendering/Performing providers will be rejected.’
If a specific NPI is not provided, all NPIs related to the provided Tax ID will be set up using the
information provided in this request.
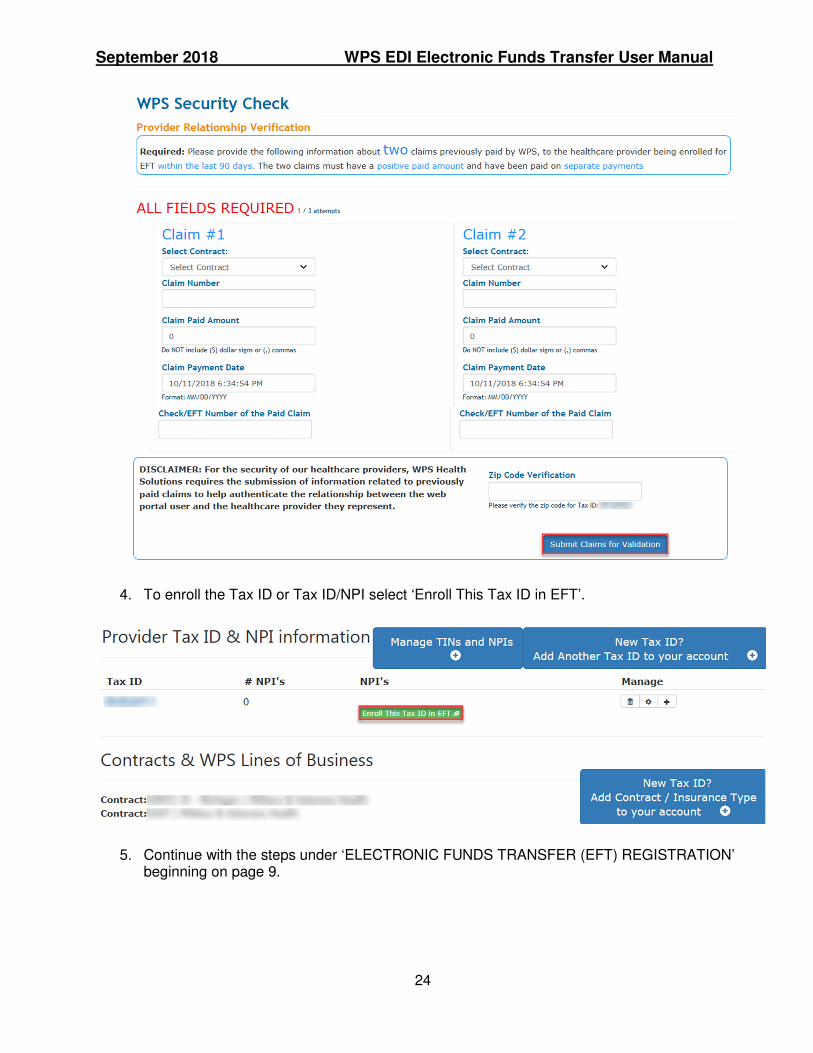
3. Provide the following information about two claims previously paid by WPS, to the healthcare provider being enrolled for EFT within the last 90 days. The two claims must have a positive paid amount and have been paid on separate payments. Select ‘Submit Claims for Validation’ when done.
• Claim Number • Claim Paid Amount • Claim Payment Date • Check/EFT Number of the Paid Claim • Business Address Zip Code
September 2018 WPS EDI Electronic Funds Transfer User Manual
24
4. To enroll the Tax ID or Tax ID/NPI select ‘Enroll This Tax ID in EFT’.
5. Continue with the steps under ‘ELECTRONIC FUNDS TRANSFER (EFT) REGISTRATION’ beginning on page 9.
September 2018 WPS EDI Electronic Funds Transfer User Manual
25
ADDING CONTRACT/INSURANCE TYPEADDING CONTRACT/INSURANCE TYPEADDING CONTRACT/INSURANCE TYPEADDING CONTRACT/INSURANCE TYPE
Existing users may add Contract/Insurance Types to enrolled Tax ID or Tax ID/NPI for their organization.
1. Follow the ‘EXISTING USER ACCESS TO EFT REGISTRATION - LOGGING IN section beginning on page 13.
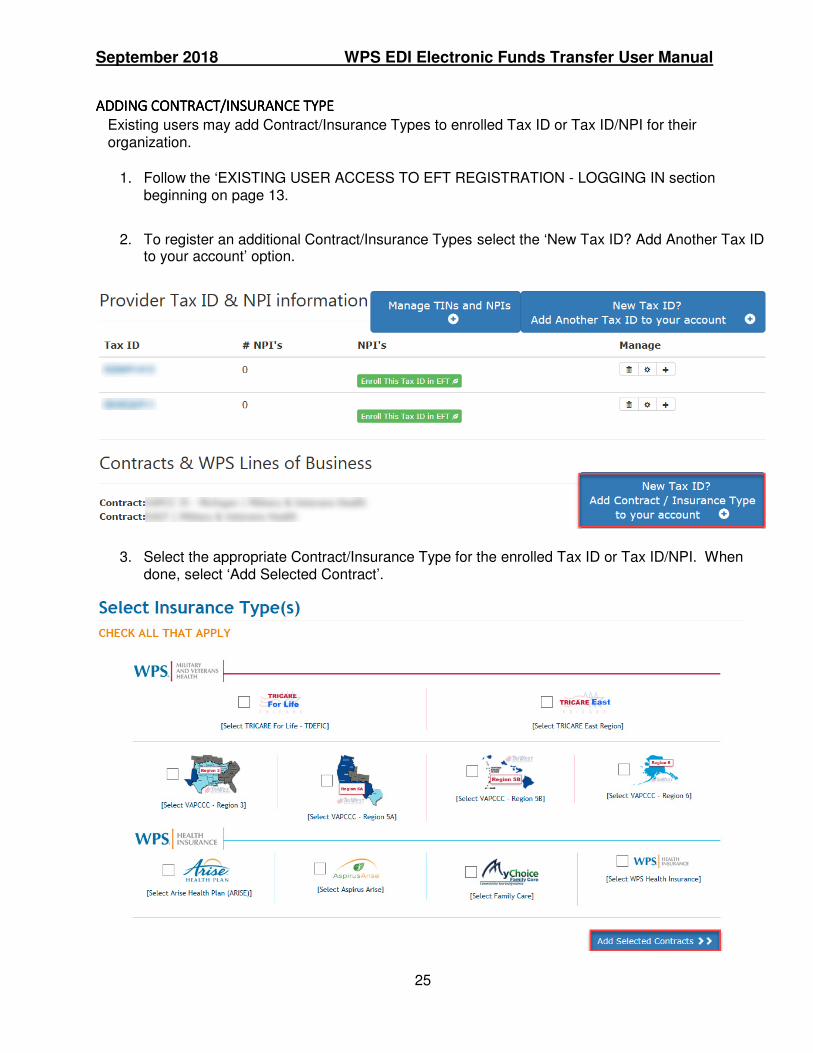
2. To register an additional Contract/Insurance Types select the ‘New Tax ID? Add Another Tax ID to your account’ option.
3. Select the appropriate Contract/Insurance Type for the enrolled Tax ID or Tax ID/NPI. When done, select ‘Add Selected Contract’.

September 2018 WPS EDI Electronic Funds Transfer User Manual
26
4. To add the Contract/Insurance Type, select the appropriate Tax ID or Tax ID/NPI. When done, select ‘Enroll This Tax ID in EFT’.
5. Continue with the steps under ‘ELECTRONIC FUNDS TRANSFER (EFT) REGISTRATION’ beginning on page 9.
USERNAME/PASSWORD MANAGEMENTUSERNAME/PASSWORD MANAGEMENTUSERNAME/PASSWORD MANAGEMENTUSERNAME/PASSWORD MANAGEMENT
PASSWORD REQUIREMENTSPASSWORD REQUIREMENTSPASSWORD REQUIREMENTSPASSWORD REQUIREMENTS
WPS Health Solutions is committed to protecting your information. To ensure this level of protection, WPS Health Solutions is dedicated to meeting the following security requirements.
1. Passwords can only be changed once in a 24-hour time period. 2. Passwords will automatically expire after 60 days 3. Passwords must be 8 - 20 characters in length 4. Passwords must contain at least:
a. One upper case alphabetic letter: A - Z b. One lower case alphabetic letter: a - z c. One numeric digit: 0 - 9 d. One special character (only the characters listed below are valid):
i. Hashtag (#) ii. Dollar ($) iii. Percent (%) iv. Ampersand (&)
5. Passwords cannot contain any of the following information: a. First or Last name b. Any special characters that are not listed above c. User Login ID d. Security question answers e. Words (words consisting of four or more letters) Please note: This is the
requirement most often overlooked and causes the most difficulty for users. To successfully create a password, please avoid ‘dictionary’ words. (EXAMPLES: Book, Tree, Water, etc.).
6. Newly created passwords must be different than the previous 24 passwords used. 7. Newly created passwords must differ from the previous password by at least four characters.

September 2018 WPS EDI Electronic Funds Transfer User Manual
27
Some helpful suggestions to assist you in the creation of your new password are listed below or see
next section about auto-creating a password. 1. Choose a smaller password and repeat it: Ab#1Ab#1 2. Use the $ sign instead of the letter ‘S’: Pa$$1Pa$$1 3. Use the number zero instead of the letter ‘O’: w0rd1w0rd1 4. Use the number one instead of the letter ‘I’: Wh1te$Wh1te$
TROUBLESHOOTINGTROUBLESHOOTINGTROUBLESHOOTINGTROUBLESHOOTING
GOOGLE GOOGLE GOOGLE GOOGLE AUTHENTICATORAUTHENTICATORAUTHENTICATORAUTHENTICATOR –––– TIME SYNCTIME SYNCTIME SYNCTIME SYNC
Google authenticator will throw an error, when the time sync is not aligned. Under the google auth app on user’s phone, you can click a “Time Sync” button to correct this error.